I always like to have on hand uplifting cards that I can send as a little surprise to anyone who is in need of a little encouragement (and who couldn’t use a little boost from time to time, right?).
 I’ve had this Inky Antics “Balloon Buddies” stamp set for several years and embarrassingly it was only after I did some craft room deep cleaning for my destash (please see prior post HERE forstamp destash info) that I re-discovered these cuties.
I was bound and determined to use them before putting them back into my stash hoard, but it took me a while to remember where I had stowed the accompanying honeycomb papers. When I finally found the specialty papers, I quickly realized, that these honeycombs could be used for any kind of image that was the same on the left and right sides to create a fun and easy pop up (I’ve got a couple of Christmas card idea so stay tuned – hehehe).
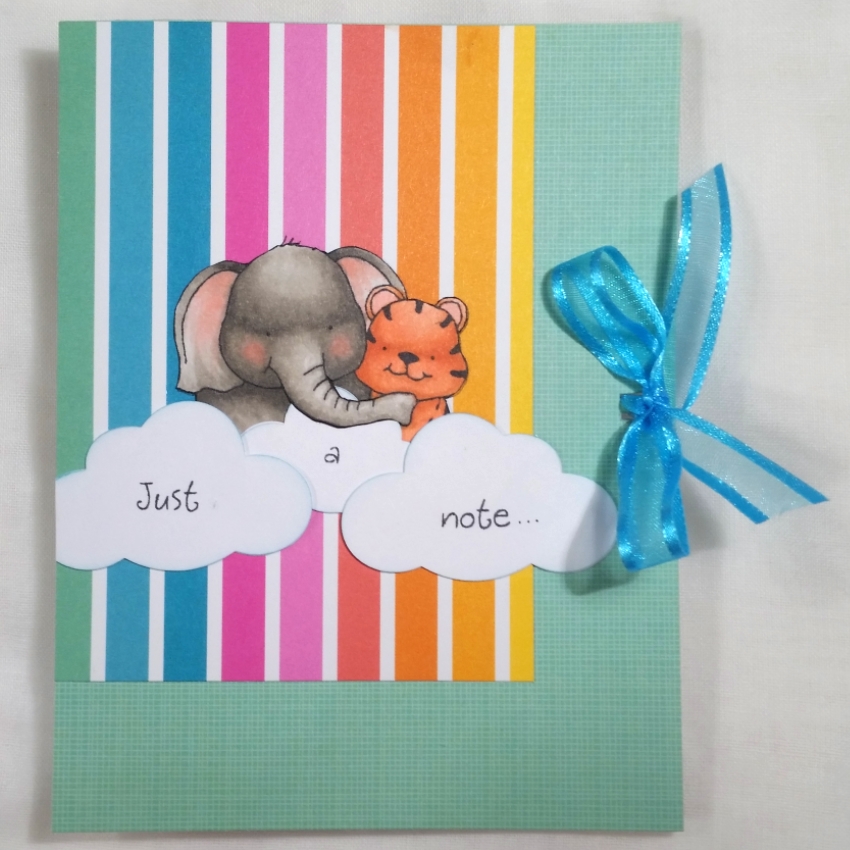
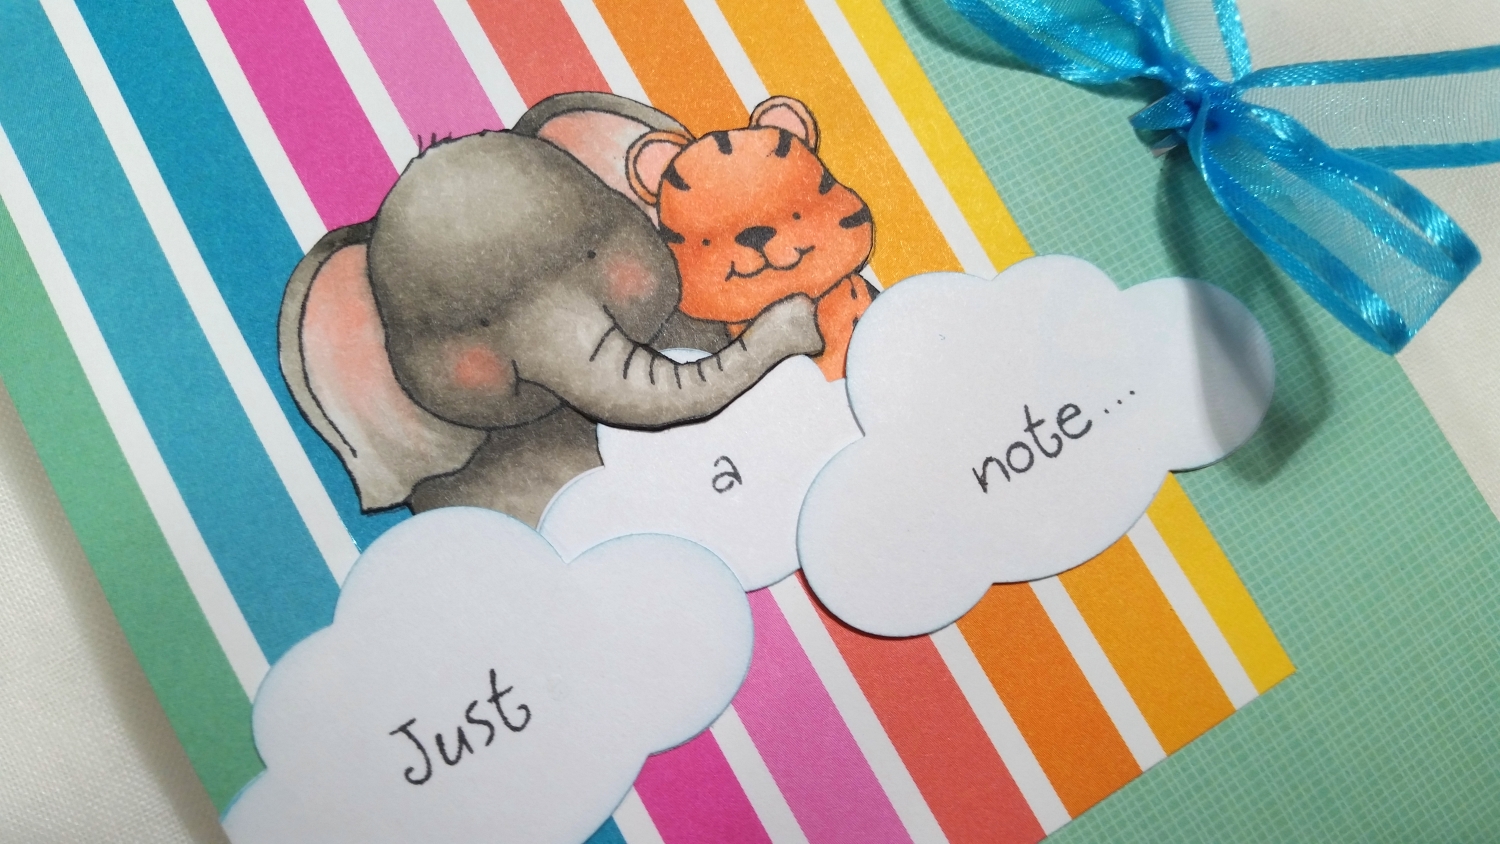
Anyway, for this card I decided to Copic color all of the images from the stamp set (except the hot air balloon). I used the following Copic markers to color up the wild but adorable elephants and tigers:
Elephant: W0, W1, W3, W5 and R20
Tiger: E93, E95, E97 and R20
Basket: E30, E31 and E33
Then I fussy cut out the images. I put the close up images of the elephant and tiger on the front, positioning them so that they looked like they were peeking up over a bank of clouds that I punched out with my Fiskars X-large and Large (looks like small) cloud punches. So that the clouds didn’t obstruct too much of the cute critters, I used an X-Acto blade to cut slits above and below the elephant’s trunk and tucked the top of one cloud through the openings. I really like how this made it look like the critters were hugging the clouds. I stamped out a partial sentiment (one word on each cloud), that read, “Just a note…”
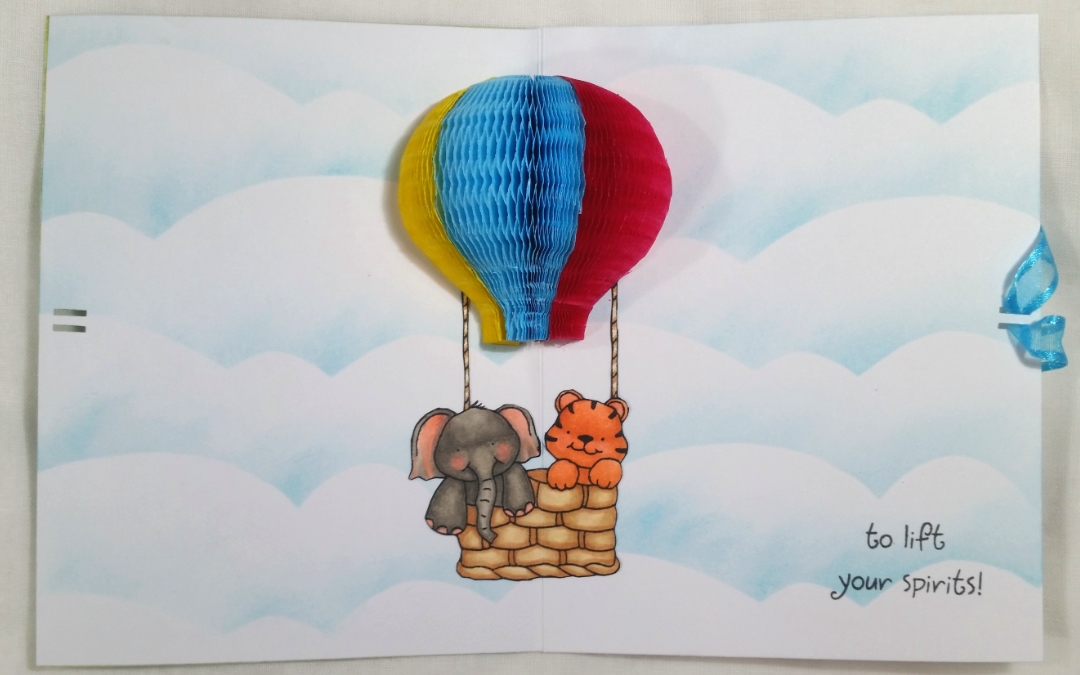
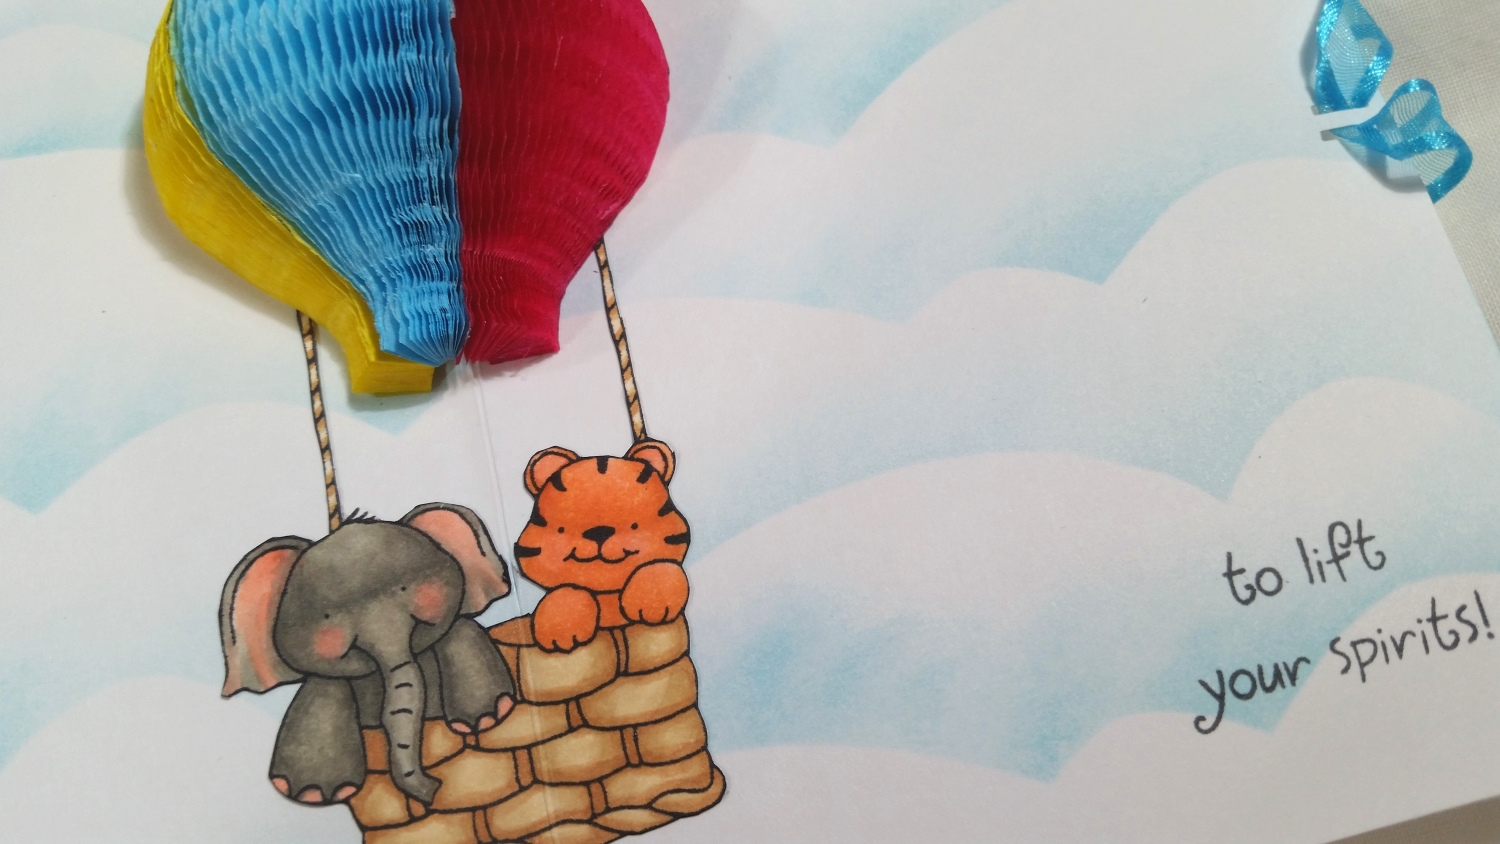
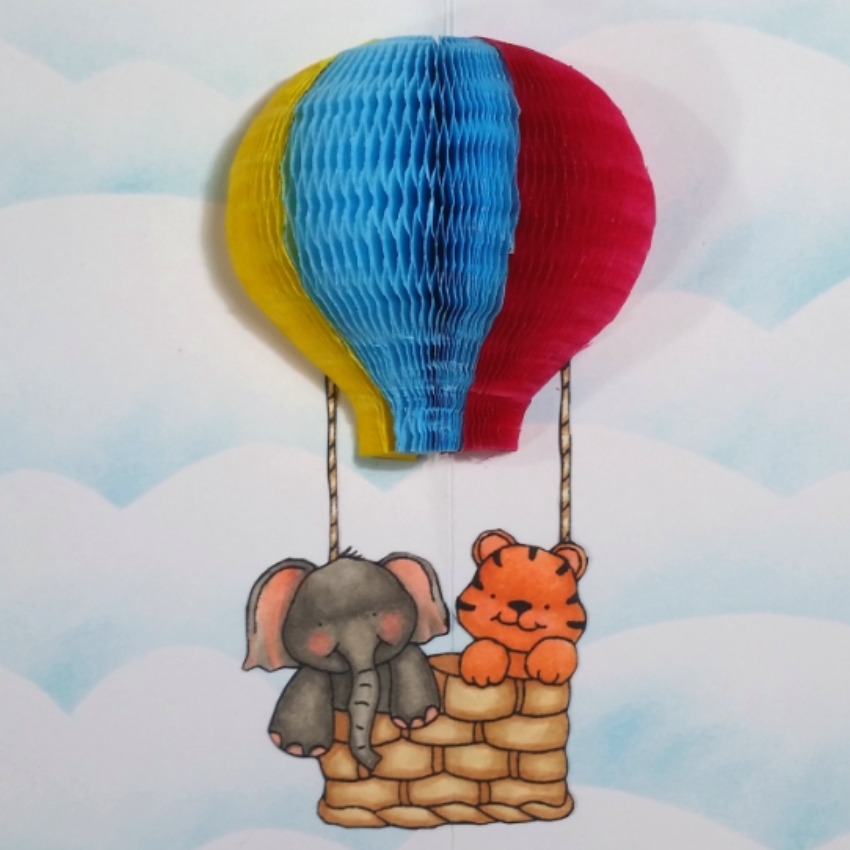 Then for the inside of the card, I hand cut out a temporary stencil and blended on Tim Holtz Distress Ink in Tumbled Glass to make the entire inside background look like a cloud-filled sky. Then I scored and folded the card base down the middle. I also took the elephant and tiger in the hot air balloon basket and scored that down the middle. Next it was a matter of tucking in and gluing down the critters in the basket along the inside center of the card base.
The stamp set came with a template stamp for half of the hot air balloon. So I stamped that onto some honeycomb papers in red, yellow and blue (this made it super thick, but I liked all the color variation; it’s also available in smaller packs like THIS). Then I hand fussy cut the half balloon shapes and glued them together as well as to the card base, positioning it above the critters in the basket. Lastly, in the lower right corner of the inside of the card, I stamped out the rest of the sentiment, “to lift your spirits!”
If I had simply used one honeycomb paper color, I probably could have stopped here, but, of course, I didn’t. Because I used three honeycomb sheets, it made the card very bulky. I wanted to make sure that the card would close properly, so I used a McGill Ribbon Stitch Punch to punch through the card front and the card base back and looped through some sheer teal ribbon, which I tied into a bow on the card front.
Disclosure: Many of the supplies I’ve used for today’s project are linked. Some may be affiliate links, which means if you make a purchase I receive a small commission at no extra cost to you. I truly appreciate your support toward the costs of running this blog!
Please click the following picture to watch the card making process video:
This card is being entered into the following challenges:
Lil Patch of Crafty Friends Anything Goes Challenge
Cute Card Thursday Anything Goes Challenge
613 Avenue Create Anything Goes with Optional Design Your Own Paper Challenge
Word Art Wednesday Anything Goes Challenge
Creatalicious Anything Goes with Optional Under the Sea or Fairytales Challenge
Cards Galore Encore Anything Goes Challenge
Through the Craft Room Door Anything Goes Challenge
Simon Says Stamp Monday Make Your Own Background Challenge
Simon Says Stamp Wednesday Wild Things Challenge
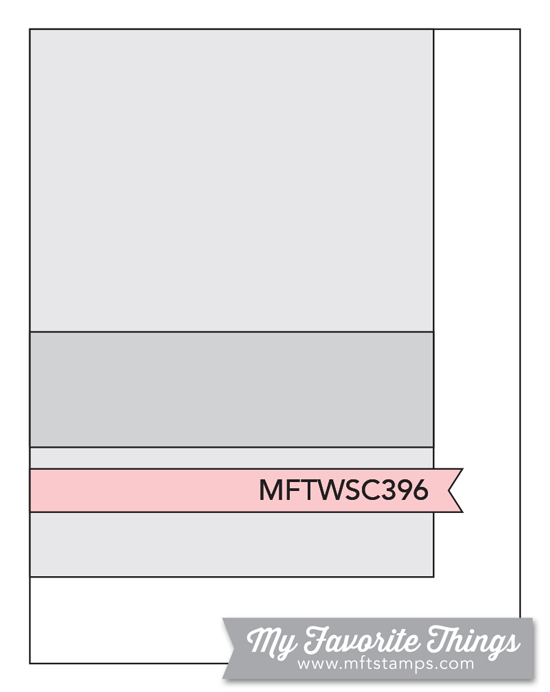
MFT Card Sketch Challenge #396


Oh wow this is gorgeous, such a great card and would lift anyone’s spirit.
Thanks for joining us over at Creatalicious.
Jean xx
Thanks so very much Jean!
Love this entry, thank you for sharing with Creatalicious. Good luck and we all hope to see you and your creations again! Jackie DT member.
Thank you so much Jackie! This was super fun to craft. 🙂
Oh wow this is just gorgeous. I love the colours and that 3d balloon!
So glad it dropped onto our front porch at 613 Avenue create.
Hugs Sheryl DT member xx
Awww thanks so much Sheryl!
This is such a sweet card! Love how the balloon pops open. Thanks for sharing your awesome make with us at Simon Says Stamp Monday Challenge! hugs, Maura
Thanks so much Maura! This was really fun to craft. 🙂
Wow! This is adorable! I am gonna have to get some of that paper to plaay with.
Thanks so much Victoria! Isn’t that honeycomb paper fun?!
This is just adorable. Love it. Thank you so much for entering our ATG challenge at Through The Craft Room Door this week. Looking forward to see you again next challenge.
Regards,
Ann-Marie
TTCRD DT
Annemi {My Blog}
Through The Craft Room Door
ttcrd.blogspot.com
Awww thanks so much Ann-Marie!
Oh how cute is this. I love the way you did the clouds and the hot air balloon is awesome! Thank you so much for joining us at Simon Says Stamp Wednesday Challenge — Good Luck!
♥ Mindy
Thank you so much Mindy!
What a darling card – I love the hot air balloon on the inside!! ♥Maranda
awww thanks so much Maranda!
Wonderful creation!
Thank-you for joining us at the Crafts Galore Encore Challenge August “ATG”.
Ileanaxx
Thanks so much Ileana!
A lovely card!
Thank you soo much for taking part in our “anything goes with optional under the sea or fairy tales” challenge over at Creatalicious & good luck in the draw.
Hope to see you again in our new challenge as well…
Hugs,
Melanie
(DT-Coordinator Creatalicious Challenges)
(DT Crafty Friends)
(DT The Sketchy Challenges)
PS: Sorry for the late comment, life had been very busy these past weeks…
Thanks so much Melanie!