I have totally fallen in love with shaker cards. Not only is there fun movement, but after having made a few, I think I have figured out some tips and tricks to help fix the few frustrating issues folks often have with them.
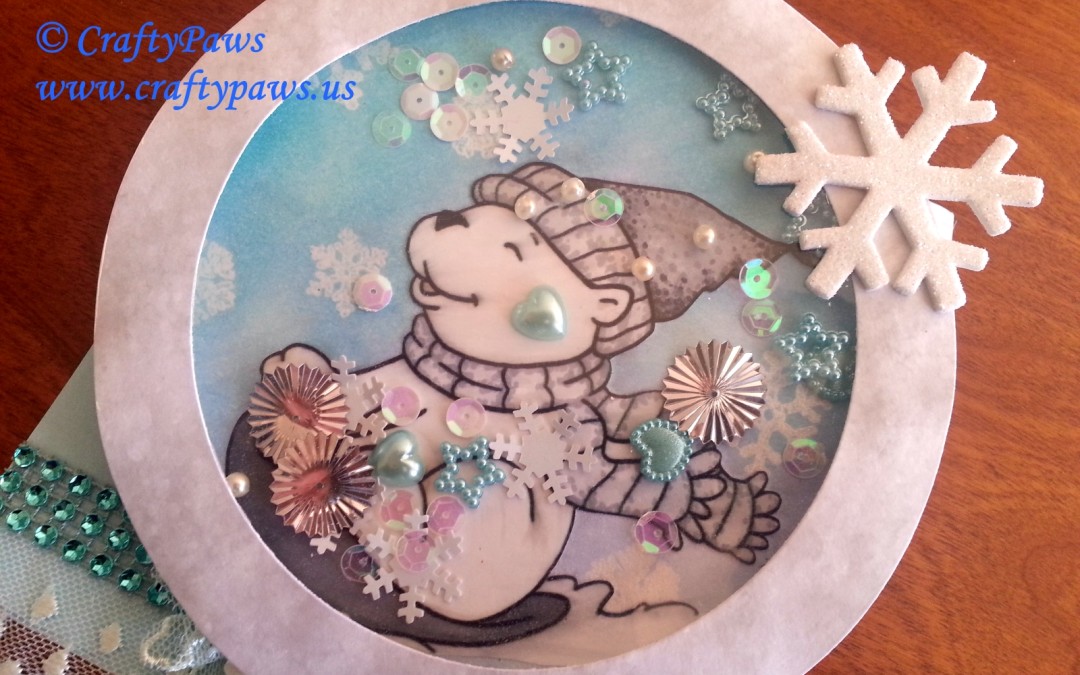
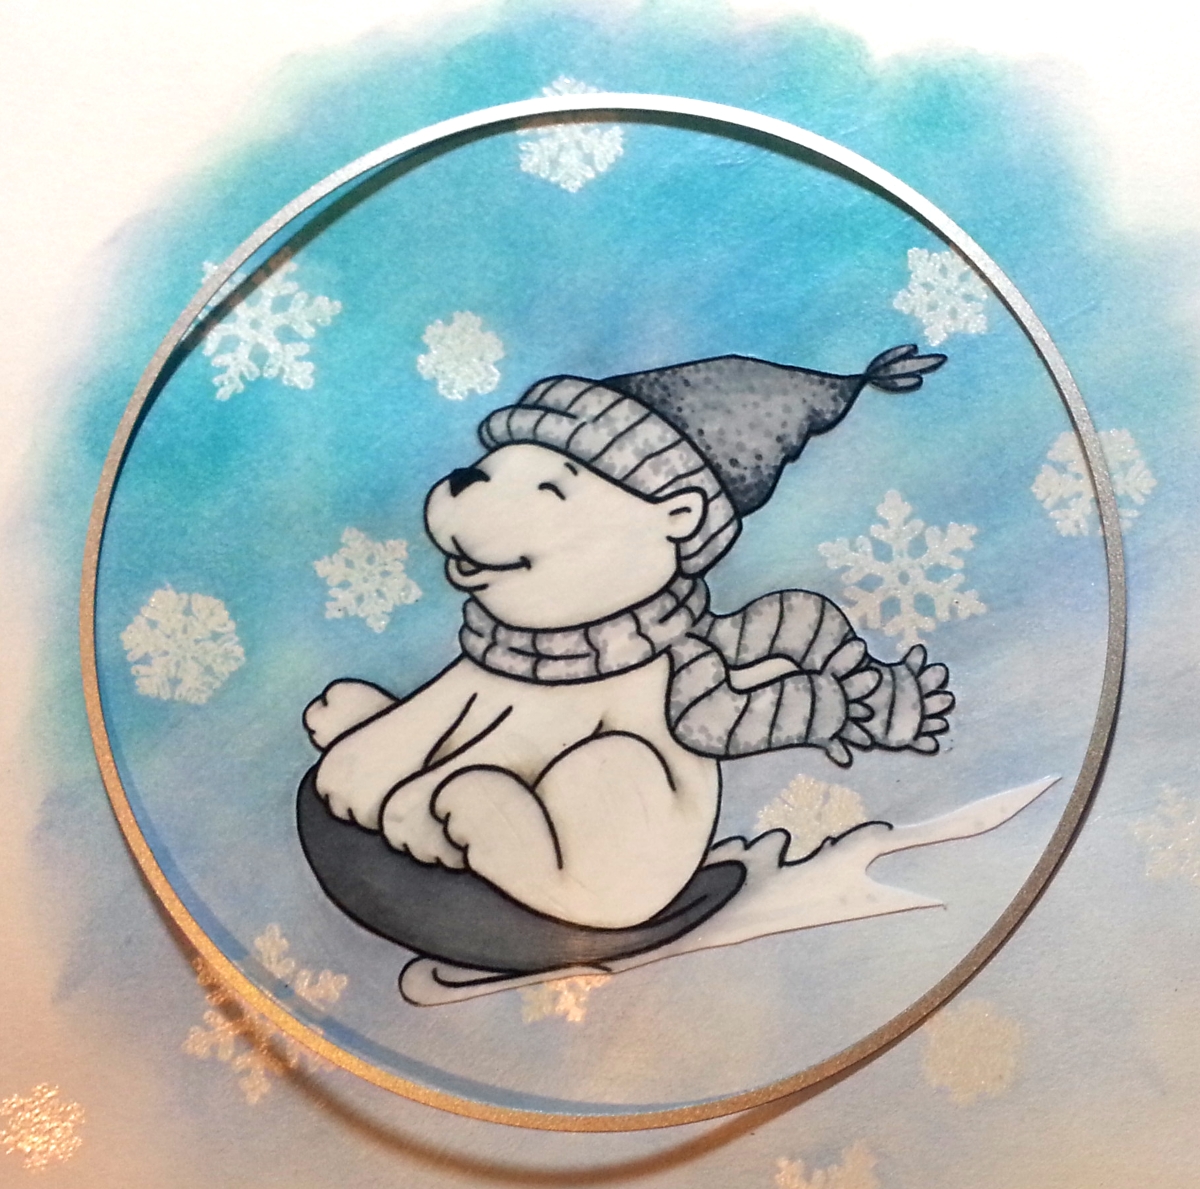 I made this card using the same FREE adorable coloring page image I used yesterday from Elizabeth O. Dulemba, called “Sledding Bear!” I colored it up using only Copics W1 and 3 for the bear and C1, 3, 5, and 7 for his hat, scarf and sled. SIDE NOTE: Using warm greys for living creatures seems to work better than cold greys. The background was made using the same technique as I shared in yesterday’s post. I stamped snowflakes with VersaMark ink and heat embossed them and then I used Distress Ink which resisted the embossed areas.
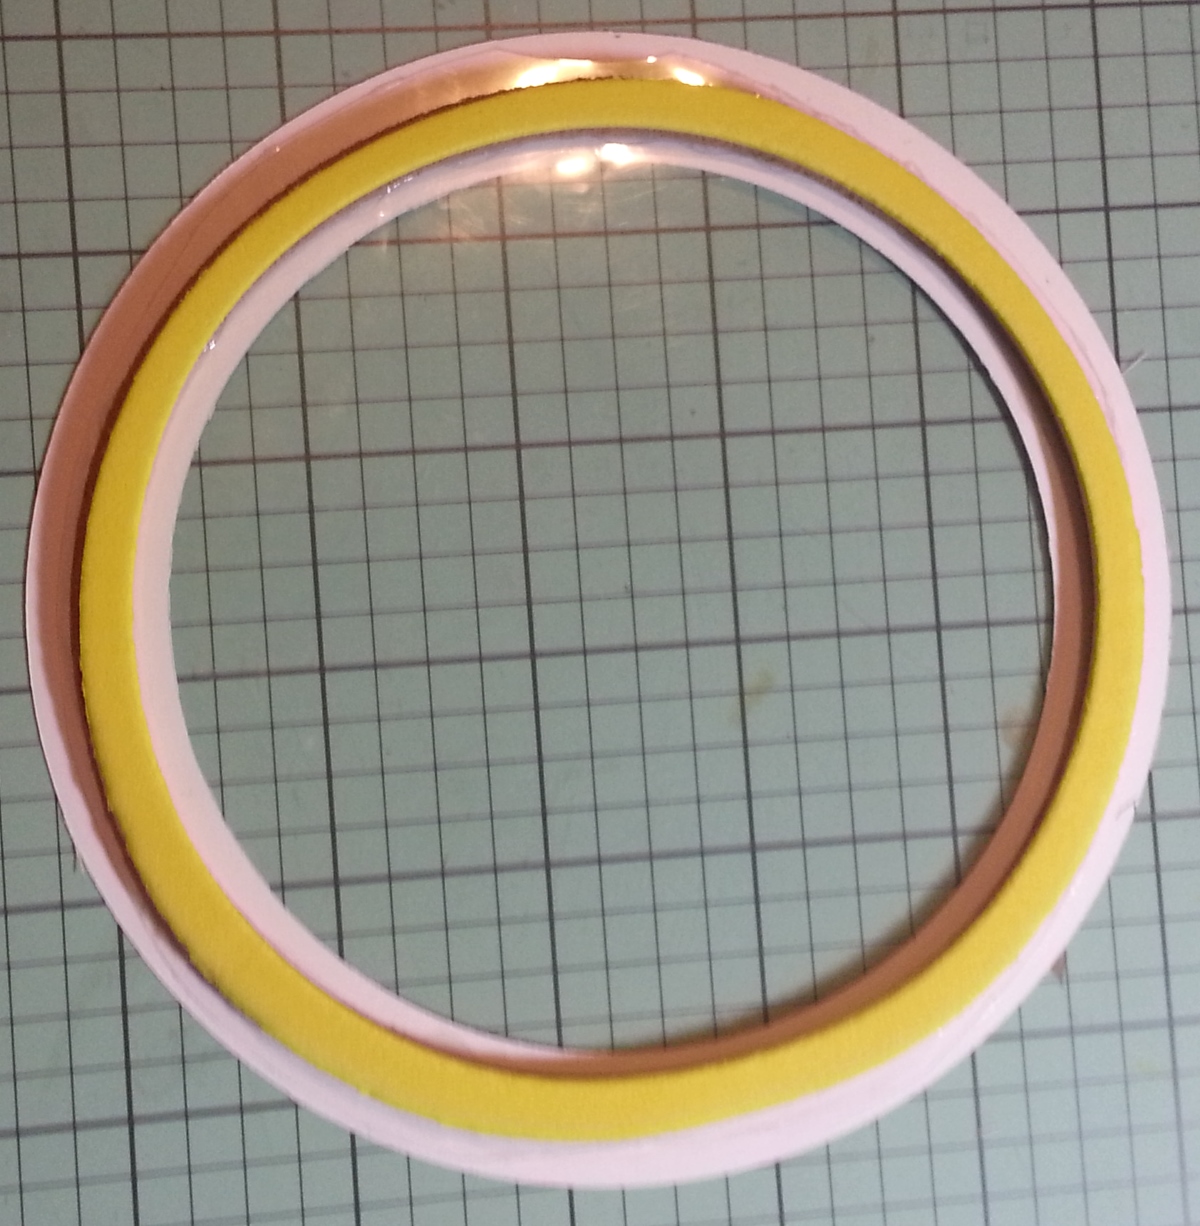 I then used a little acetate and 4 circle dies from the Diemond Dies Nesting Circle Die Set to create the shaker (I wanted the whole card to allude to the fun of round snowballs). I positioned the largest circle on the background image (pictured left) to cut out the background. To create the shaker topper frame, I used the same largest circle and the smallest of the four circle dies to die cut out a frame. To make the spacer rings, I cut 2 fun foam sheets using 2 middle sized circle dies. HINT: Skipping the circle dies immediately larger and immediately smaller than the 2 middle circle dies gives a nice forgiving buffer so that the spacer rings are not visible from the front or sides of the card. To assemble the shaker, I used E6000 to adhere everything together in the following order (from bottom to the top): (1) background base, (2) 2 spacer fun foam rings, (3) shaker pieces (no adhesive here–LOL), (4) acetate cover, and (5) shaker topper frame.
My readers can get 10% off at Diemond Dies by using the coupon code: thankskristina. If your purchase is $35 or more, you also get FREE worldwide shipping!
 Five tips and tricks for making shaker cards:
1. When selecting shaker pieces, try to use dimensional things like most of the ones I used here: flat-back turquoise pearl hearts (I wanted the card recipient to think of love being in the air everywhere when shaking this card 🙂 ), plastic teal stars, and wavy silver sequins, and small white pearls. Thicker or round pieces stick less to the inside edges of the shaker.
2. If you can’t help but use sequins (like the snowflakes I used), try to bend them a bit so that they are less flat. If they don’t have flat edges, they are less likely to get caught along the sides of the shaker.
3. To create enough space for dimensional shaker pieces, use at least 2 layers of fun foam when making the spacer rings
4. When adhering acetate, use E6000. Glossy Accents may work too, but I find that it is less durable.
5. Before closing up the shaker compartment with all the shaker pieces inside, brush some powder (baby, baking, etc.) along the edges of the spacer rings. This should help eliminate any residual stickiness from gluing the ring layers together, which could sabotage free shaker movement.
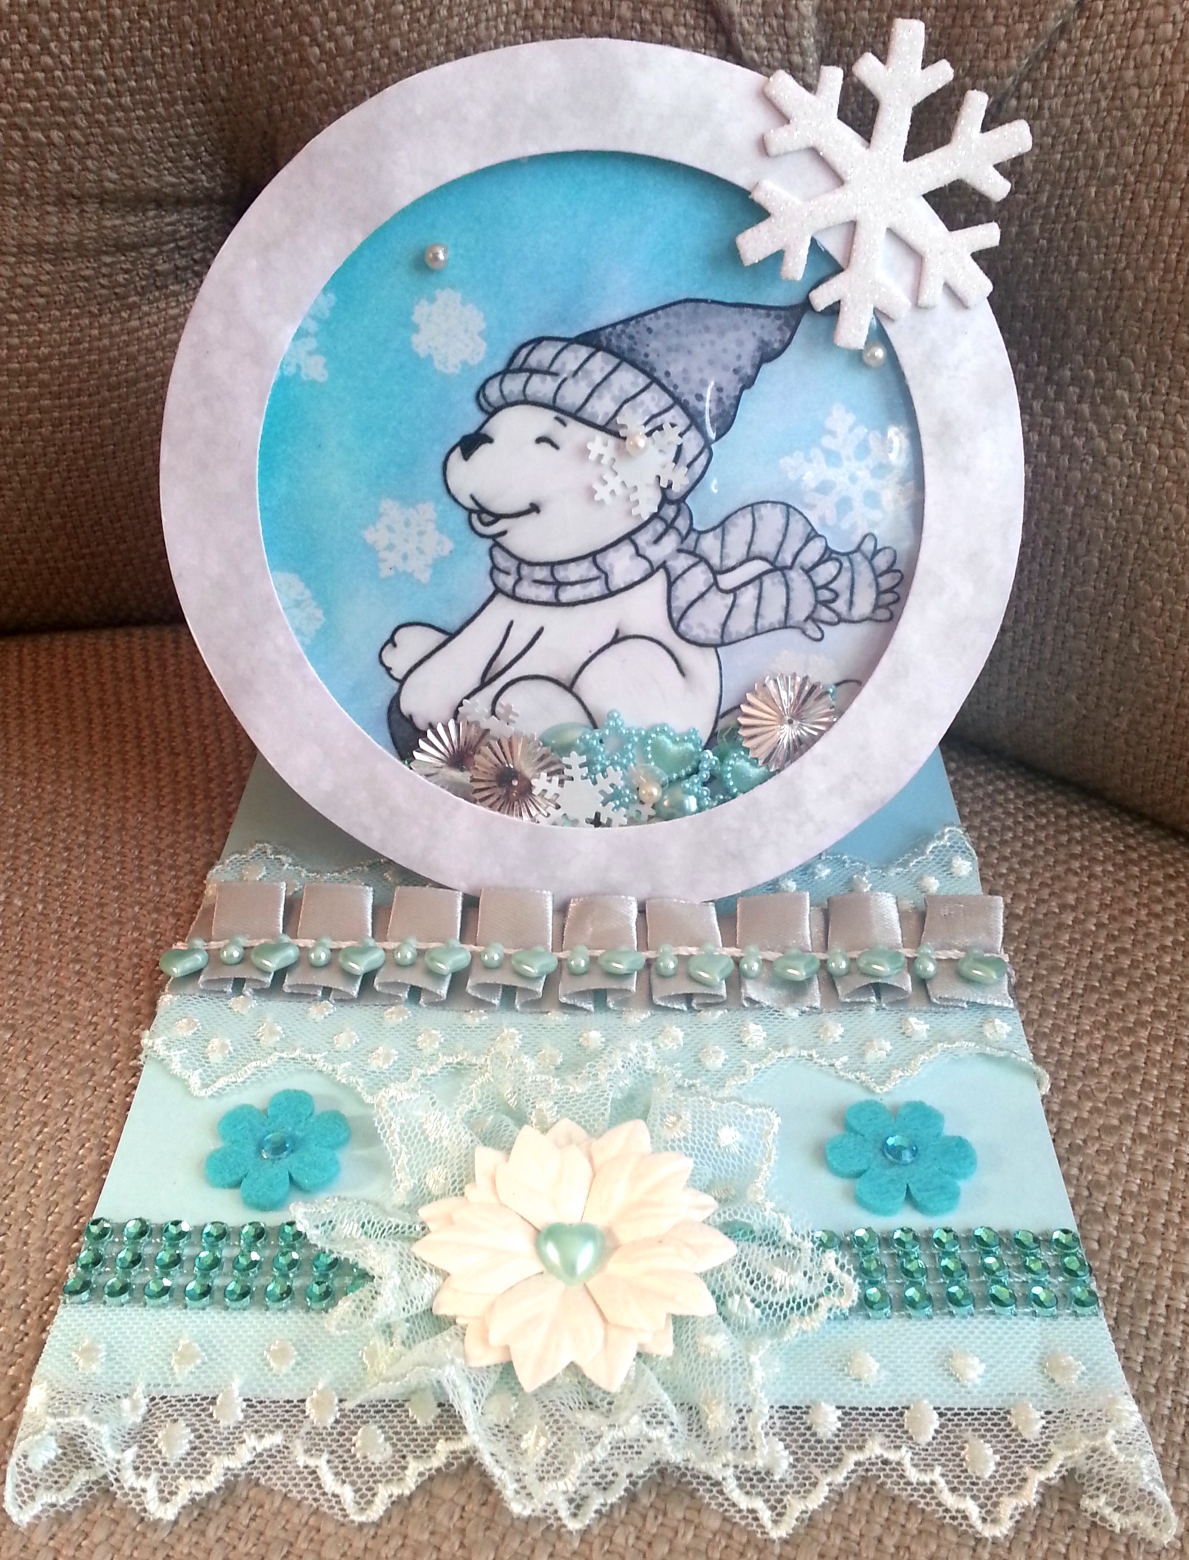
I am making this card for a brave little girl named Mariah who soon is going to have her third open heart surgery so I wanted to make this an easel card so she could stand it up on her side table in her hospital room. Plus that gave me a bonus surface to decorate! I had lots of fun decorating it in her favorite “Frozen” colors, using lace and box pleat trim from Webster’s Pages, making a paper and lace flower, using up some felt and bling flowers, adding sparkle with 3 rows of teal bling, and using some adorable pale blue puffy heart and ball trim (which seemed to be the perfect match for the Frozen theme, right?!).
The following is a video share of this card:
This card is being entered into the following challenges:
The Pink Elephant Love Challenge
Raisin Boat Love is in the Air Challenge
IBSIC #90 Heart Challenge
CARDZ TV Any Occasion Challenge
Simon Says Stamp Monday Winter Stamping Challenge
Thanks for stopping by and have a great day! WOOF


Another great shaker card!!! Thanks for joining us at Cardz TV!
Gerda
http://cardscreations.blogspot.com
Oh my this is absolutely gorgeous. Thanks for playing with us at Cardz TV.
~DT Barbara
SNOW cute! 😉 LOVE the image, the fun fillers, and the beautiful easel/shaker combo! Thank you for joining us at Inspired By Stamping! Hope you join us again soon! HUGS! 🙂 Mynn xx
Lovely card,Mariah will just adore this! Thanks for sharing 🙂
Kristina, thank you for the wonderful shaker card tips! I truly appreciate the video since I learn better by seeing and doing than reading. Your blog and pictures are superb, so clear and fun! Thanks for putting effort into making your blog and sending out the digests!
xoxo
Jen
Oh, Your card is beautiful! Thanks so much for sharing your tips! Awesome card! 🙂
Thanks so much for stopping by. I hope you have fun trying shaker cards. 🙂 Hugs, Kristina
Thanks for the tips Kristina. You have inspired me to have a go!
Oh I’m so glad. I hope my tips help to make your next shaker fun for you to create. 🙂 tf stopping by! Hugs, Kristina
I love your shaker card! Thanks for joining us at Cardz TV for our challenge!
Hugs,
Georgia
Cardz TV DT
Stunning work!!! Thanks so much for sharing it with us at the Simon Says Stamp Monday Challenge Blog!!! 🙂 – Ashli
This card is so cute, Kristina! And thank you for the tips, I love the idea of using the powder. I’ve always had a problem with the shakers, and these tips should solve them all.
Debbie 🙂
Oh I’m so glad I could be helpful. Hope you enjoy your next shaker card! TF stopping by. Hugs, Kristina
Wow, what a fun card! Soo nice!:)