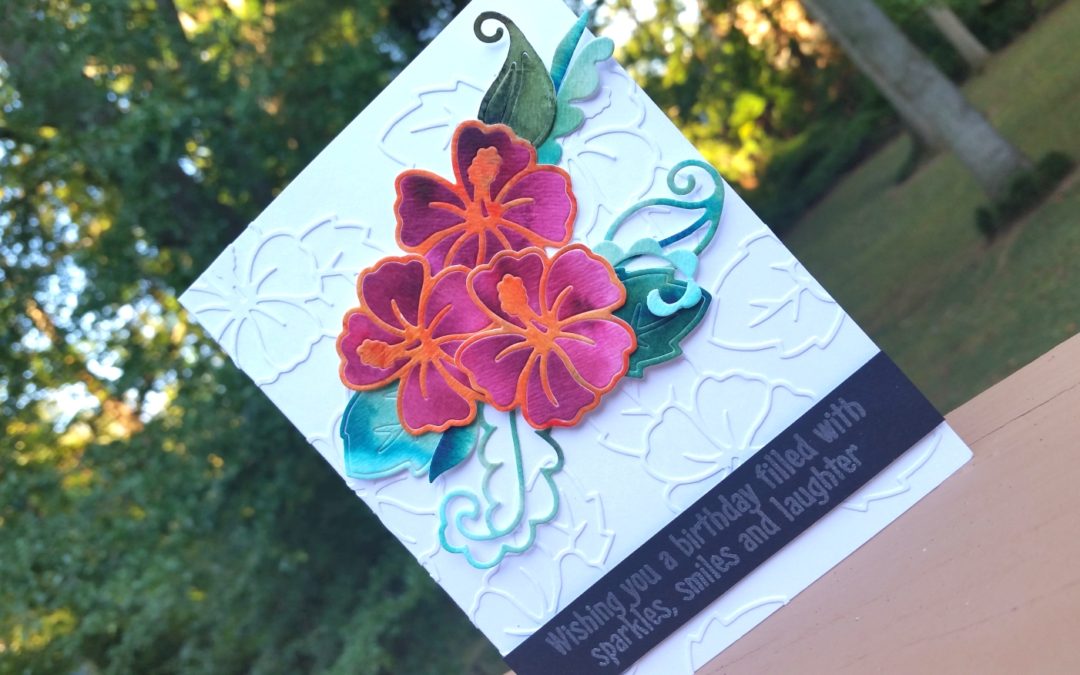
I fell in love with the Hibiscus Die and Paisleys Die Set from Paper Smooches the minute I saw them. I knew they would be great for unisex cards (and could be great for scrapbooking my recent vacation to Hawaii–that’s still on my to-do list), and I got to run them through their paces with this last minute birthday card that I made for my brother-in-law’s birthday today.
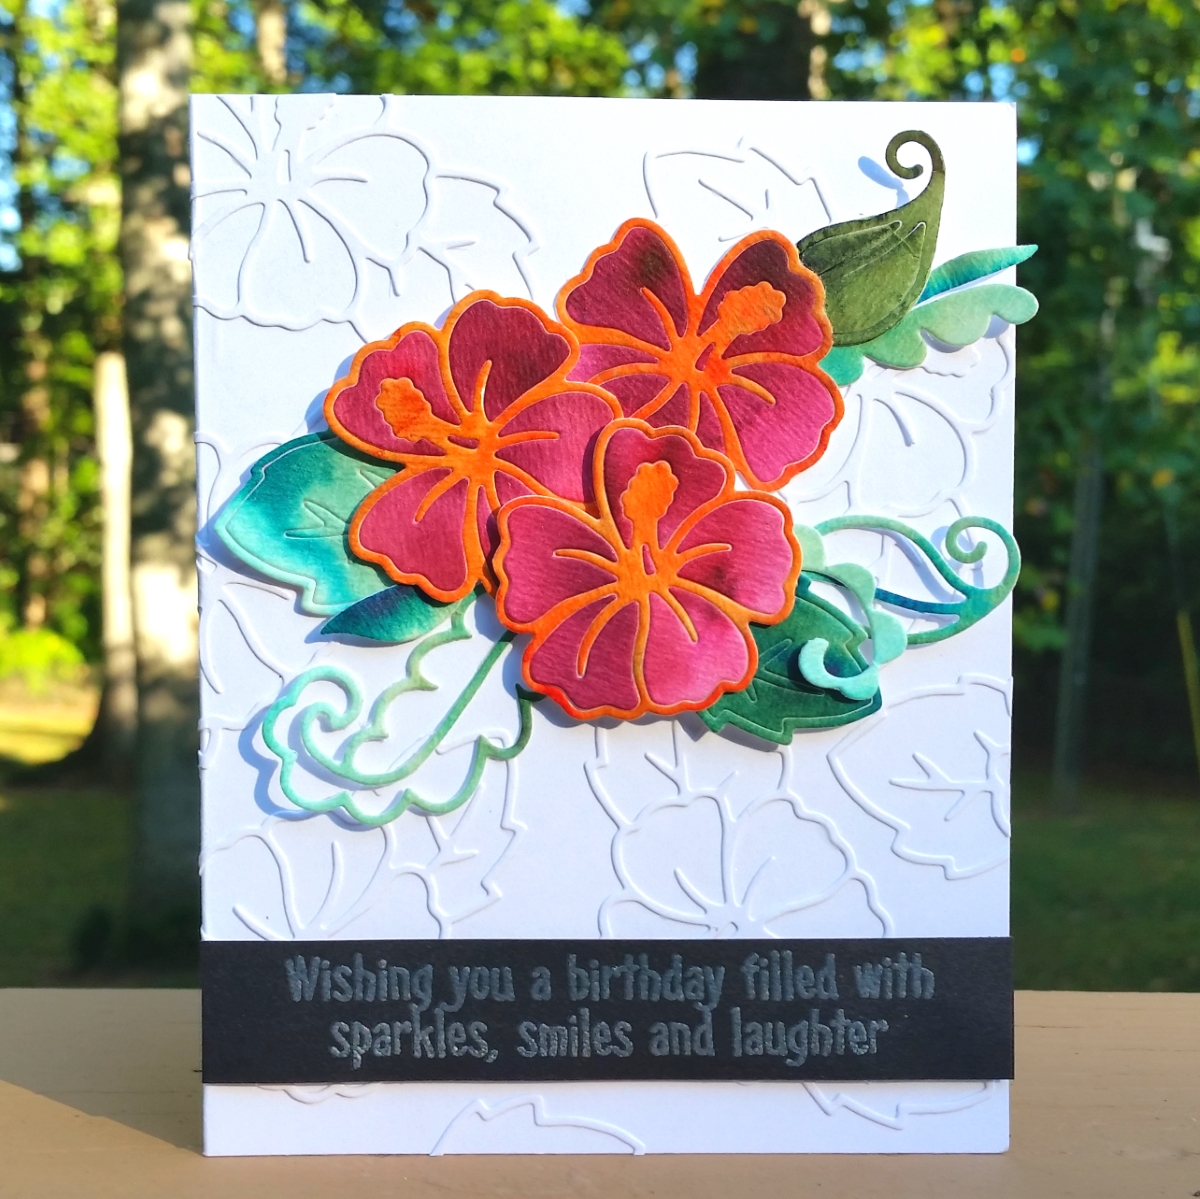 First I wanted to just use the outline portion of the Hibiscus Die to create a faux embossed look for the card background. I die cut it out 10 times from white card stock and glued them down onto a white card base using Art Glitter Glue with a fine tip nozzle in a random pattern, making sure to have some of these flower outlines run off the edges of the card base and wrapping them even to the back of the card. I love this all-white, subtle yet interesting textured background.
Then for the focal flower cluster, I used 140 lb Strathmore watercolor paper, a paint brush, a water-filled spray bottle, and Ken Oliver Color Bursts in Merlot, Burnt Orange, Yellow Ochre and Terre Verte to create watercolored scraps with lots of variations in color tones. I then used the Hibiscus Die to cut three flowers from the merlot red paper, three flowers from the yellow ochre/burnt orange paper, a couple of the Hibiscus Die leaves and two of the Paisley Die Set flourishes from the terre verte paper. I used just the outlines of the flowers (cutting off the leaf portions) from the yellow ochre/burnt orange paper and inset the merlot red flower petals. For the leaves and paisley flourishes, I popped some of the inner sections out and used them as additional foliage. To add to the dimensional look, I used 1/16″ and 1/8″ foam dots behind the hibiscus flowers and glued down only the base of each leaf behind the flowers so the leaf ends were free to hang off the card front.
Lastly, for the sentiment, I used a retired Hero Arts Clear Princess stamp set (sorry there is no official name on the packaging). I heat embossed some Recollections Snow embossing powder onto a black card stock scrap with the sentiment that says, “Wishing you a birthday filled with sparkles, smiles and laughter.”
The following is a process video sharing how I made this card:
This card is being entered into the following challenges:
Winnie & Walter Background Building with Shay Challenge
Word Art Wednesday Anything Goes Challenge
Addicted to CAS Watercolor Challenge
Simon Says Stamp Work It Wednesday Red, Orange and Yellow Challenge
Ceafts Galore Encore Anything Goes Challenge
Through the Craft Room Door Anything Goes Challenge
Crafty Gals Corner Punches/Die Cuts Challenge
Addicted to Stamps and More CAS Challenge
MarkerPOP Color Challenge

Paper Smooches Fall Color Story Challenge


Great project Thank-you for joining us at Crafts Galore Encore
Good luck in the challenge x
Thanks so much Isobel!
How absolutely stunning and clever! Thanks for sharing your technique and your beautiful card..appreciate the video! So glad you shared your art at WAW. May God bless you in a special way this week.
Christine
Guest Designer
Thank you so much Christine! I was most definitely blessed with a lovely visit with my brother and his family and my sister’s kids up on NYC this week. Thank you for your kind words. Big hugs, Kristina
WOW! I never would have come up with any of that 🙁
You’ve created a phenomenal masterpiece!!
AMAZING ❤️ It!
Oh my goodness, you are so kind, Michelle! Thank you so much for stopping by and for your incredibly sweet and encouraging comment! Big hugs, Kristina
lovely card. great idea the faux embossing. thank you for sharing it with us at TTCRD and good luck, Theresa DT xx
Thanks so much Theresa! I had fun trying some different coloring and die cutting techniques. 🙂 TFStopping by! Hugs, Kristina
This is so beautiful!!! I love how you used the die for the background as well!! Really really makes your project cohesive!!
Thanks for playing with us at Crafty Gals Corner this week!!
Thanks so much Sara! For this OCD crafter, your comment about the card being cohesive is the highest praise! 😀 lol Thanks so much for stopping by and taking the time to leave a sweet and encouraging comment! Big hugs, Kristina
What a beautiful card—- I absolutely love the background and coloring! You nailed this design! Thanks so much for joining in the fun and playing along with the October PS challenge! <3 Hope you join in the fun again soon!
Thank you so much Savannah! I had fun with PS. 🙂