I know I saw this idea somewhere, but for the life of me I could not re-find it, so to whoever originally thought of this–thank you!
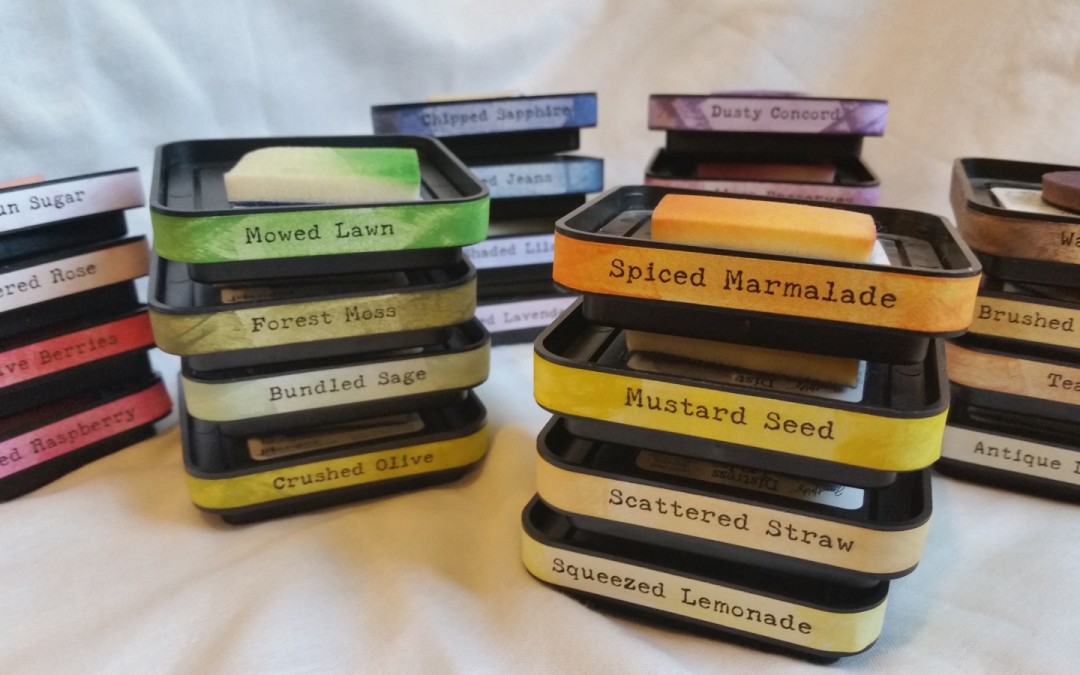
I was able to score all the original 48 Tim Holtz Distress Ink Pads in a destash on YouTube. Woot woot! Previously, I had only had a handful, and I could easily look through them when I wanted to use one to pick the color I wanted. Now, I knew I needed a better organizational system.
I first hunted for a free font that I really liked and thought coordinated nicely with the type on the Distress Ink Pads: SBC Distress Typewriter Then I typed out all the colors I had into a word document in landscape format, centered and double spaced.
I cut out each label to 3/8″ width and shortened the 11″ length by 5/8″ on each side. Next I put on some good YT crafty videos and took my time just inking and blending the color onto each label. Finally I used Matte Mod Podge and glued each label onto each ink pad. If I had a Xyron, I think that would have been easier, less messy and perhaps more permanent, but alas I do not have one. 🙂
I’ll admit this took a long time, but I love the look of the final results, and I feel super organized! Now to construct an easily accessible storage holder for all these ink pads….
The following is a tutorial video of how to create these labels:
Thanks for stopping by! Hope you are having a wonderful crafty day! WOOF


Cooool – that is a fab idea and they look great 😀
Hugz
IKE in Greece xx
Thanks so much IKE! I feel so organized now! LOL tf stopping by! Hugs, Kristina
I used my label maker, but yours look lovely and you don’t need my wall chart. You can just look at the container to ascertain which is the “just right” color.
I use two eight section sock organizers from The Container store to stack all my Distress Inks. I now have 52. They fit perfectly and each section holds five ink pads. I also have basic embossing powders in a few openings. I do have a thumb print on the bottom of each pad so I can check the colors when I am in class. Thanks for sharing!
Thanks for the storage info! If what I’m planning to build doesn’t work, I’ll check out the Container Store! Thanks for stopping by and leaving a nice thoughtful comment too! Hugs, Kristina
What a great idea. Thank you for sharing it with us. I have to try it as it looks so much more efficient.
Hugs,
My pleasure! I hope you give it a try. It is a bit time consuming, but now I feel totally organized! 😀
Hello, Kristina. I really like how you did this. I have been wanting to organize my Distress Inks for awhile now. I’ve been googling it and I always come back to your method as my favorite. I’m wondering if you might share your typed labels – I’d like mine to be just like yours! fitkitty1@gmail.com Thank you!
Aww that’s so sweet. I’ll email my labels to you now. 🙂 Enjoy!
LOVE! Can’t wait to do this. I just finished watching a couple of your video’s and learning a little about you. Being an animal person myself I love what you had to say about your “loves of your life”. You/we are so blessed to be able to share our lives with our 4-legged friends. You also made me smile and I think it is one of the greatest gifts we can share with others – the gift to make someone smile and/or laugh. Thank you! Having just found your site, I look forward to the many hours of looking over all you do. Warm regard, Barbara Jo
Aww thanks so much Barbara Jo! I truly believe that our four-legged friends are one of our greatest blessings. 🙂 Thank you so much for taking the time to not only look over some of my blog posts, but also for leaving such a kind and thoughtful comment! That truly means so much. BTW, I sent you an email regarding your registration, etc. Hope you enjoy playing with the digis. Big hugs, Kristina
I too would like mine to look like yours. Could you e-mail me a copy as well?
bjg1704@yahoo.com
Just emailed you a copy of my document. You’ll likely have to edit it to list the ink colors you have, but hopefully it will retain the font style. If not, my blog post has a link to where you can download the font for free. Enjoy!
Paw-some <——- see what I did there? I absolutely love your diy storage ideas! I have seen some like yours, but I liked/loved yours best
Your ideas made me so happy, that I had to sign up for your next posting!!
I'm going to look around now. Oh, I'd like to thank you in advance for all of the other things that I'm going to find and love.
TFS
Michelle
Oh my goodness, you’ve totally made my day, Michelle! Thanks so much for your super kind and encouraging comments! I hope you find some fun crafty ideas to try on my blog. 🙂 Big hugs, Kristina
Your idea is amazing!! If you are willing to share, my email is SharliF@cox.net
Thanks!!
Awww thanks for your sweet words! I’ll email you my typed ink pad names as soon as I get to my computer (I’m on my phone). Hope they are helpful to you!
I love this idea, as well as the font you’ve used. I just found your page and am going out, today, to buy the foam core to create my storage for my distress inks. If you have time, could you please send me your file for the labels? I’m going to try printing them on a sticky sheet and hope that works so I don’t have to use the Xyron or Mod Podge. Hope it works. 🙂
Oh my gosh . brilliant. thanks for this video!! best one out there!
Can you email it to me toooooo please!!! Krazzykittykat (AT) Hotmail.com
thanks so much for this great video.
I’m so glad you liked this post. I’m sorry, but I no longer have the labels (I’ve switched computers since this post 2 years ago). If you want the look, just use the free distressed typewriter font.
This is awesome – I can appreciate why everyone is asking for your labels. You didn’t actually mention what size of the font you used. Perhaps you could add that to your blog and maybe a link to your file – that would probably be easier for you than emailing everyone who asks. I was tempted as well but don’t relish publishing my email. Thanks so much for sharing and the link to the font! 🙂
I love your ideas.