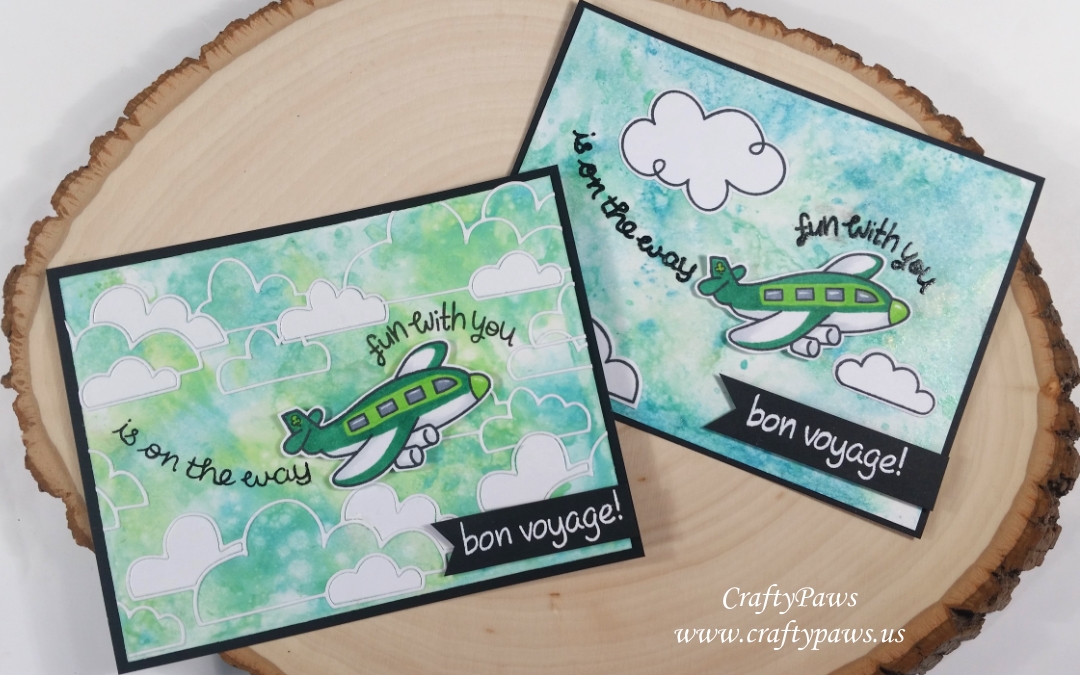
I created these two cards for multiple purposes. First, I wanted to play with my new Distress Oxide Inks and compare them with my Distress Inks. Second I wanted to ink up my new Lawn Fawn Bon Voyage stamp set. Third, I wanted to create a couple of cards customized for mini albums that I am working on for my sister and my niece to commemorate our beginning of summer vacation to Scotland, Ireland and Northern Ireland.
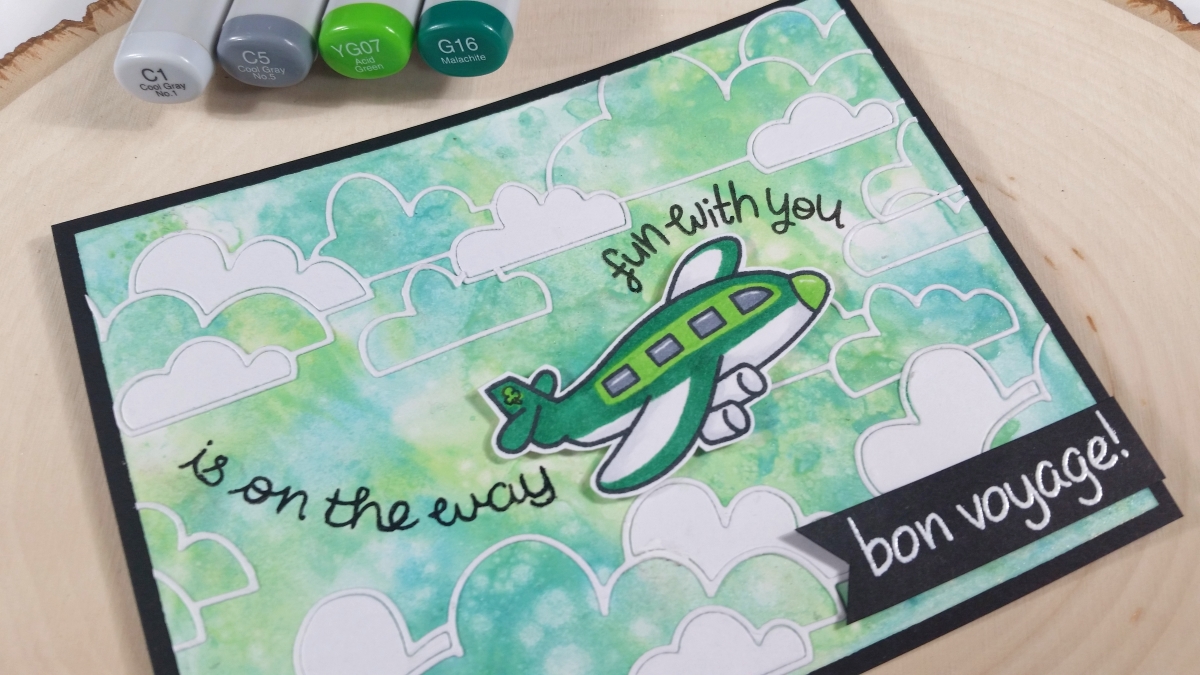 So for the first ink play part, I compared the Cracked Pistachio and Broken China original Distress Inks with the Distress Oxide Inks by using them on two Bristol card stock card fronts with a smooshing technique. I blotted the inks on a craft mat and then sprayed water and Heidi Swapp Sheer Shimmer Spray to activate the inks. Then I smooshed the paper into the ink puddles, dried the paper with a heat tool, and smooshed the paper into the ink puddles again, and so on and so forth.
Comparison: I did the same number of ink smooshing and drying for each card front, and tried to spray a similar amount of shimmer spray and water (although I didn’t measure out the liquid content). I was so surprised to see the differences. The original Distress Inks were more translucent, and layered nicely but more thinly. I don’t know if the colors make a difference, but my Cracked Pistachio ink seemed particularly light. The oxide inks were more opaque, and created a rich mottled color. The coverage was fantastic and came out soft and a bit chalky in appearance. The results were some fabulously fun-to-create splattered backgrounds with great sparkle and shimmer.
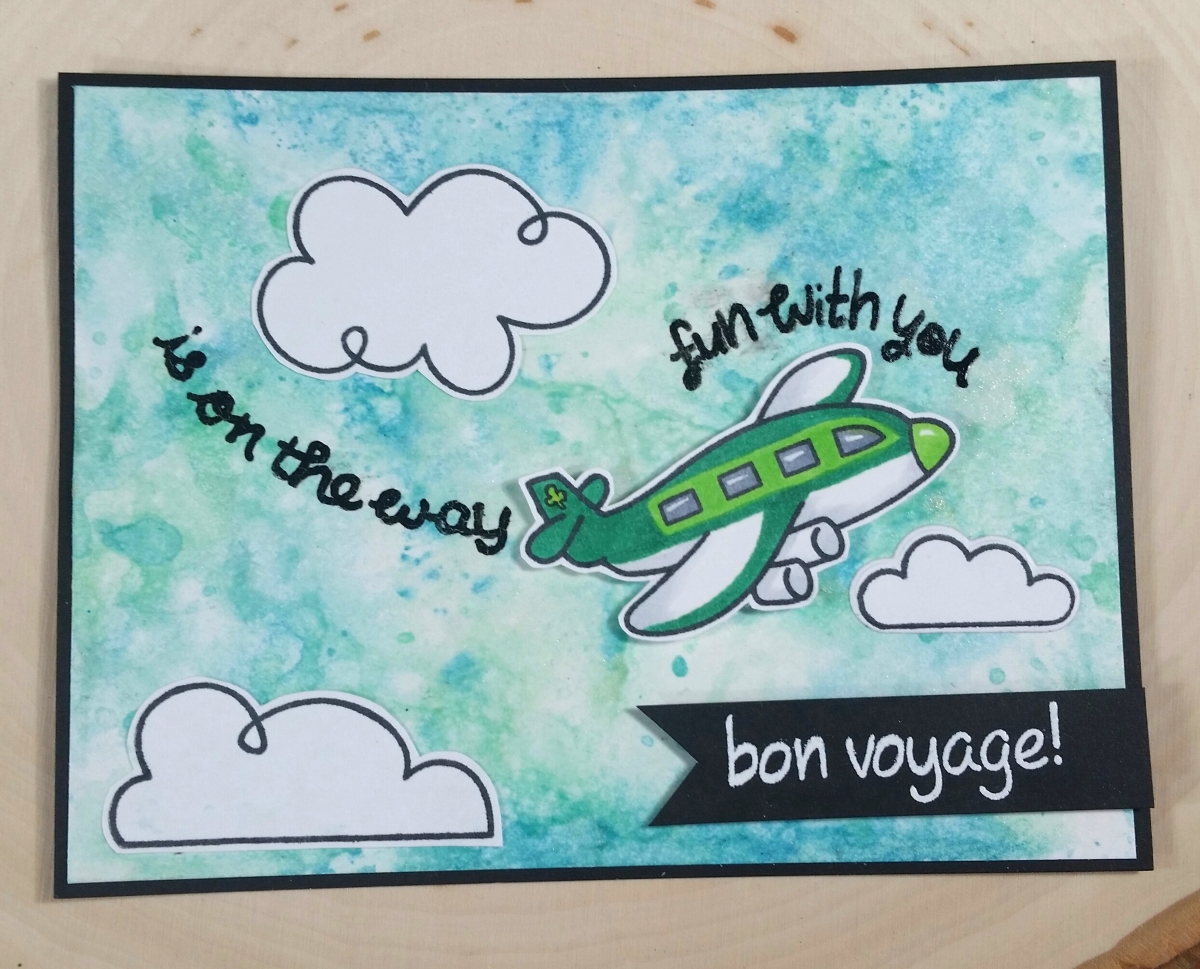 Then I stamped out the airplane and clouds from the Lawn Fawn “Bon Voyage” stamp set. I simply Copic colored the plane with the following colors to mimic the look of Aer Lingus planes (since that was the airline we flew most on our vacation): C1, YG07, G16 and C5. Then I fussy cut them out and positioned them, along with sentiment phrases from two other Lawn Fawn stamp sets: “Love You S’more” and “Hello Baby.” It was fun to look through my stash of Lawn Fawn yumminess and come up with a personalized sentiment that I thought was perfect for the time I spent with my niece and sister on our girls’ vacation.
I stamped out the phrase sentiments in a curved format by putting them on stamping blocks in a curve: one over and around the front of the plane and one swooping up from behind the plane like exhaust coming out. Together, they read, “fun with you is on the way.” I also used Ranger Super Fine Detail Embossing Powder in White on a scrap of black card stock to heat emboss, “Bon voyage!” It’s no accident that the sentiments form a kind of triangle in their positioning. 🙂
Then to create a sense that the plane was flying through the sky, I added stamped and fussy cut puffy clouds from the Bon Voyage stamp set and the Hello Baby stamp set for one of the the cards. For the other card, I decided to add a whole bunch of die cut clouds using the Simon Says Stamp Cloud Bank die. The delicate cloud outlines were great to add that ethereal feeling through which you could appreciate the background smooshing, and the occasional inset cloud added a nice pop of white.
The following is a process video of creating these cards:
These cards are being entered into the following challenges:
Lawn Fawnatics Custom Sentiments Challenge
Simon Says Stamp Work It Wednesday Add Sparkle Challenge
Lil Patch of Crafty Friends Anything Goes Challenge
Through the Craft Room Door Anything Goes Challenge
Word Art Wednesday Anything Goes Challenge
Creatalicious Anything Goes Challenge with Optional Stars
Not Just Cards Anything Goes Challenge
613 Avenue Create Anything Goes with Optional Shabby Chic


This has such an awesome sense of movement and is SO cute! What a perfect card.
Thanks so much Becca!
Love this technique and it is perfect for these cards. Wonderful job on them both.
Thanks so very much Teresa!
Great technique. I haven’t bought any Distress Oxide Inks but it looks like fun.
Thanks so much Julie! These are my first Oxide Inks and they are very different from the original Distress Inks. I think I’ll be enjoying both! 🙂
Wow! Super fun project! Thanks so much for sharing with us at Creatalicious,Jackie DT.
Thanks so much Jackie! These were fun to do!
These are both gorgeous, thanks for showing us this neat techniques with the distress oxide inks, I have two but haven’t tried them yet:-)
Thank so much Ann! Yes, i’ve now bought the first 12 and have only opened up a couple. Will definitely take some getting used to, but they’re fun to play with!
Wonderful cards, love the colors and design! Thank you for joining us at Creatalicious Challenges! We hope to see you again!
~DT Sherry x
Thank so much Sherry!
Absolutely love how these cards came out. The color combination is beautiful and I am so happy to see how to do this. Thank you so very much for sharing! Xoxo
Awww thanks so much Dorothy! xoxo
Those inky backgrounds are so awesome and the color combo is so fresh and fun! I love how you curved the sentiments, they work so well together! Thanks for sharing with us at Lawn Fawnatics!
the cards are so sweet. yes, you are right about oxides. they are chalky and give more coverage. thank you for sharing it with us at TTCRD and good luck in the challenge, Theresa DT xx
The inky backgrounds you created are so awesome! I am surprised at how different they look even though you used the same technique! They both look so amazing though.
Thank you for joining us at Li’l Patch of Crafty Friends for our challenge.
Thanks so much Rae Ann! Yep, they’re very different but both fun to play with
Oh my, these cards are super gorgeous. Thank you for sharing your watercoloring/distressing technique. So glad you linked with us this month at 613 Avenue Create. I hope you join us again in our upcoming September Challenge. Have a wonderful and blessed day!
JO ANN
http://jatterburycreations.blogspot.com
Thanks so very much Jo Ann!
A fun card!
Thank you soo much for taking part in our “anything goes with optional stars” challenge over at Creatalicious & good luck in the draw.
Hope to see you again in our new challenge as well…
Hugs,
Melanie
(DT-Coordinator Creatalicious Challenges)
(DT Crafty Friends)
(DT The Sketchy Challenges)
PS: Sorry for the late comment, life had been very busy during my 5-week-trip to Africa…