
We had an amazing time and were blown away by the unique visions the artist shared through various paper and ink, sculpture, and lighting immersive installations.
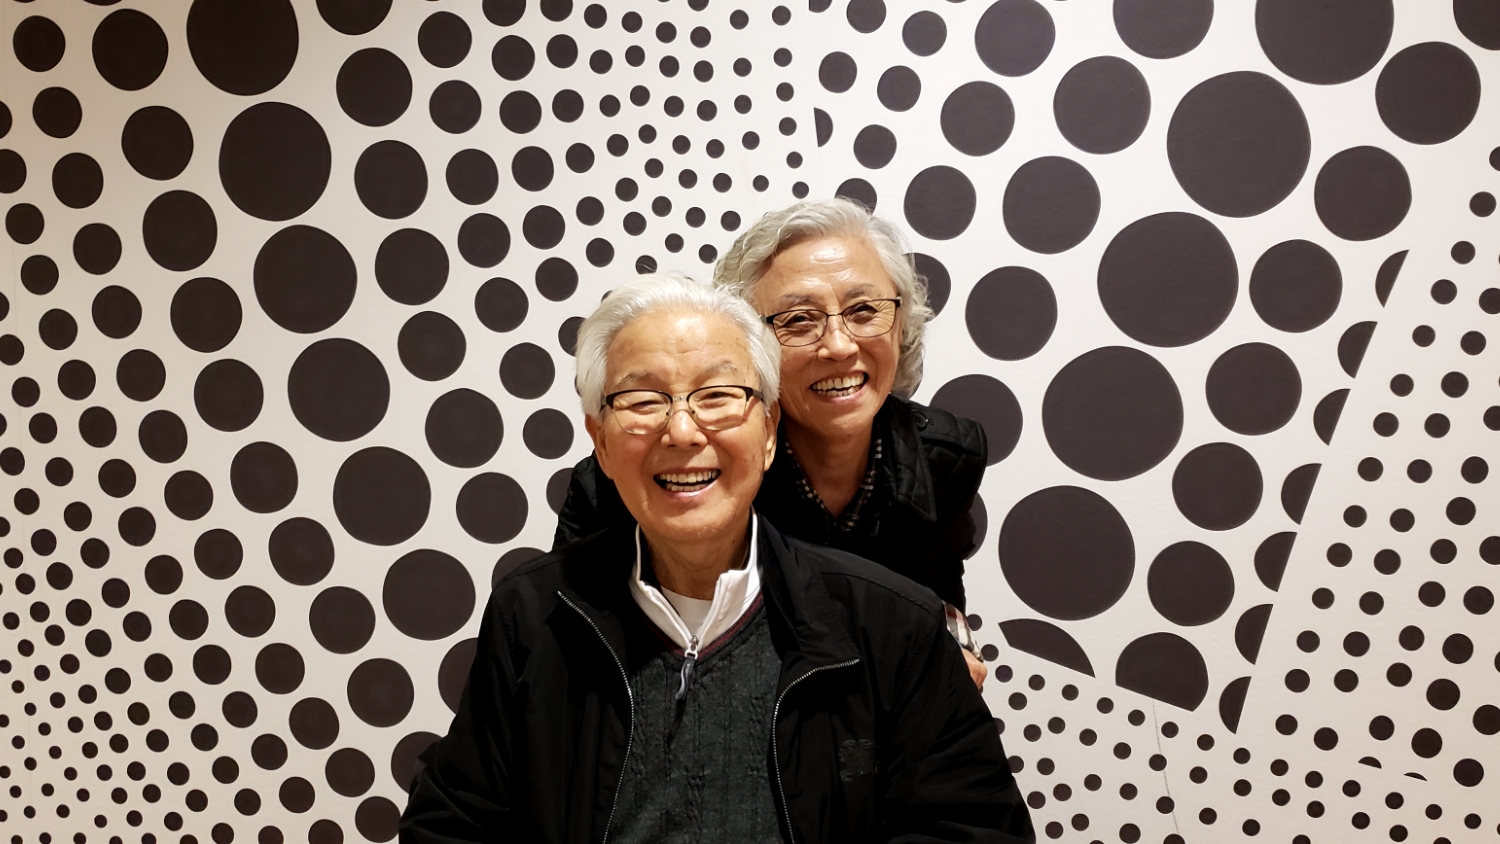
From the numerous pictures we took, one particularly spoke to me. It was an unassuming black and white polka dot wall at the end, and on a whim I asked my parents to pose in front of it. The resultant picture was wonderful and I knew immediately I wanted to frame it for them. I enlarged it to 16″ x 20″ (~$10 with a 40% off coupon at CVS) and then cut it down to about 13.5″ square. I scored and folded up the edges at 0.75″ from each side. Then I cut a triangle from each corner and secured each side together to form a shallow box (how-to the video posted HERE starting at 7:53).
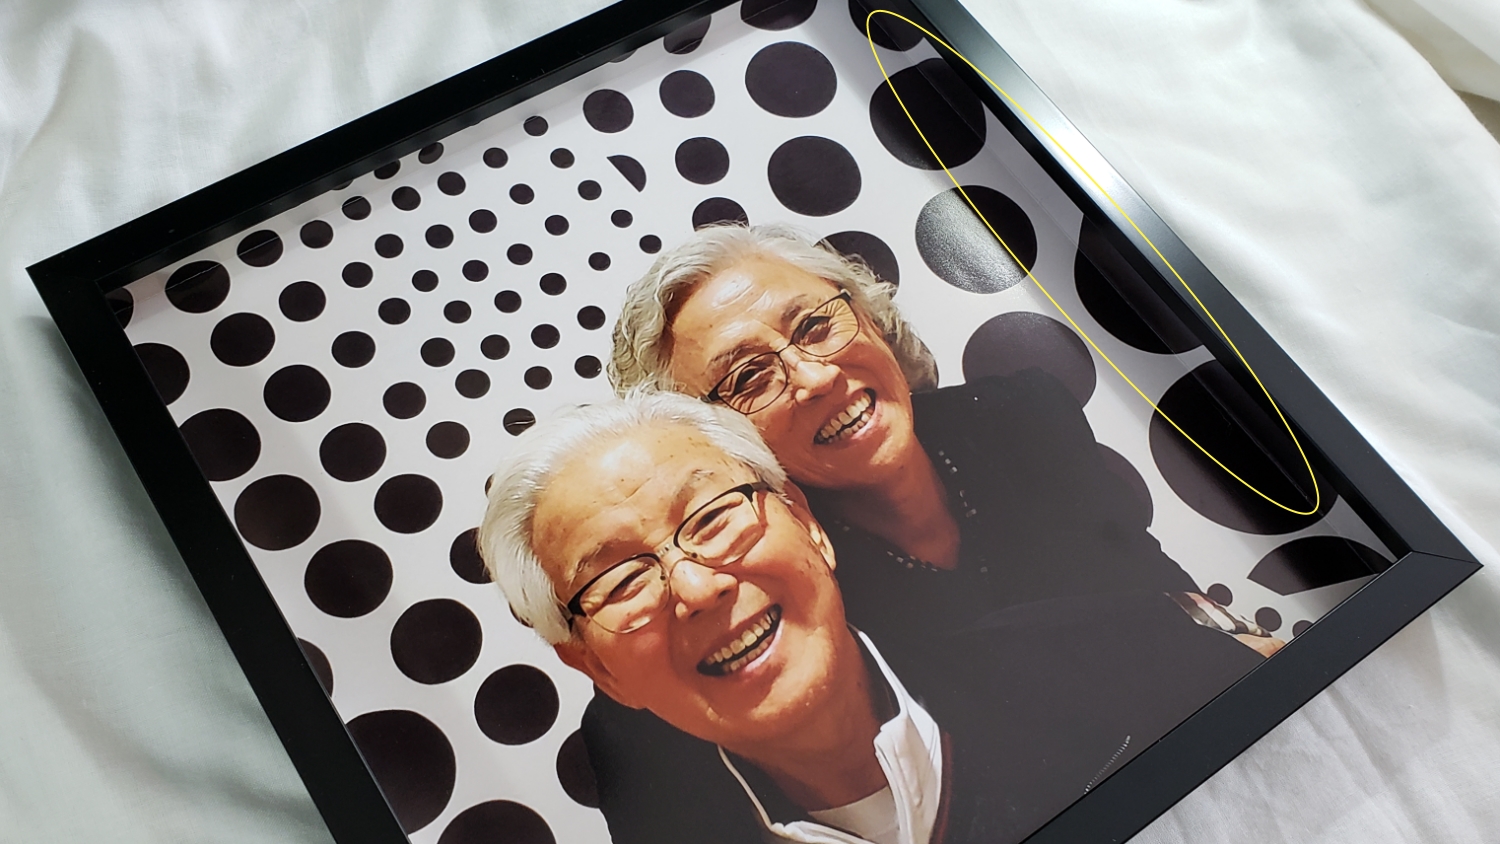
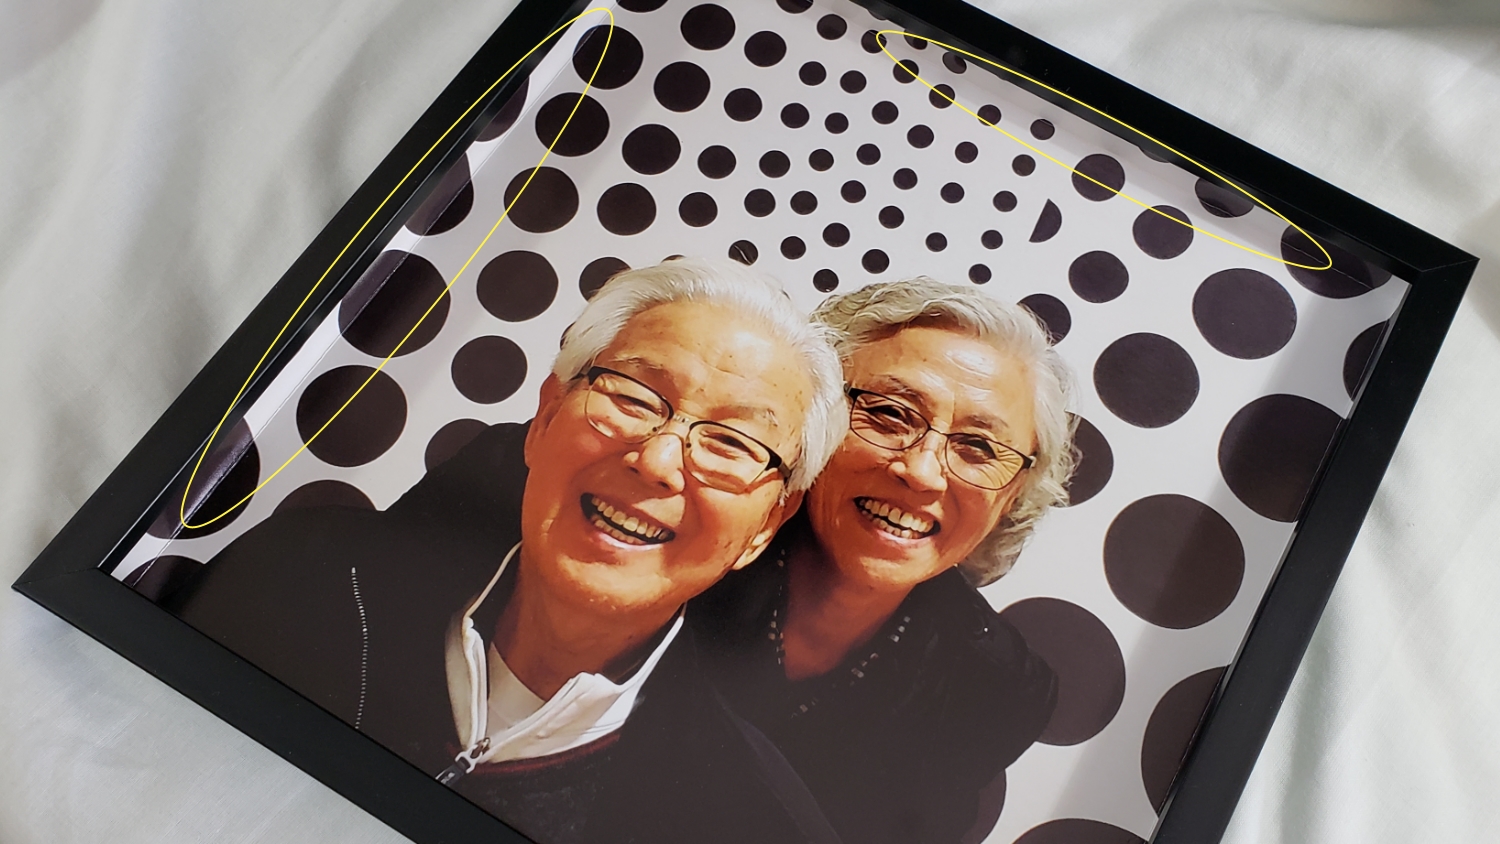
This fit perfectly in the 12″ x 12″ Studio Decor Shadow Box Frame I purchased at Michaels. I love the way this slight bit of paper crafting makes the picture fill the shadow box and makes it look like this project captures a kind of excerpt from the whole room (see images above with circle marking the turned up edges).
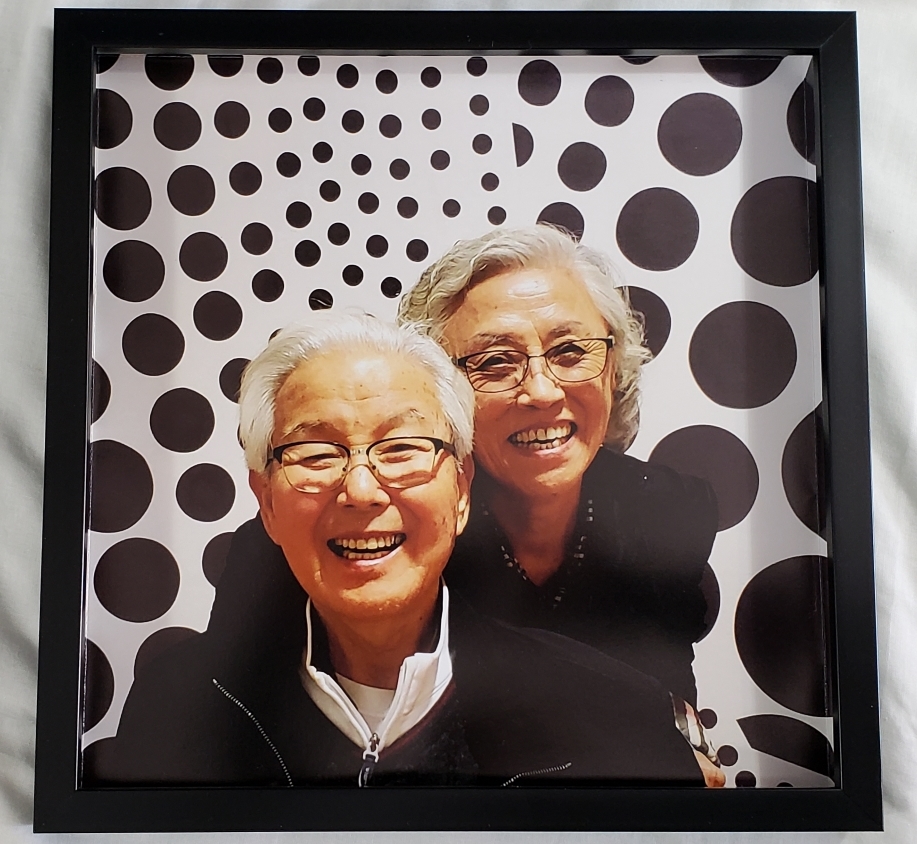
I’m having lunch and then doing a virtual reality gaming session with them tomorrow, and I can’t wait to gift this shadowbox picture project as well as the prior mixed media layouts (HERE) to my parents. I hope they love them as much as I loved creating them!
]]>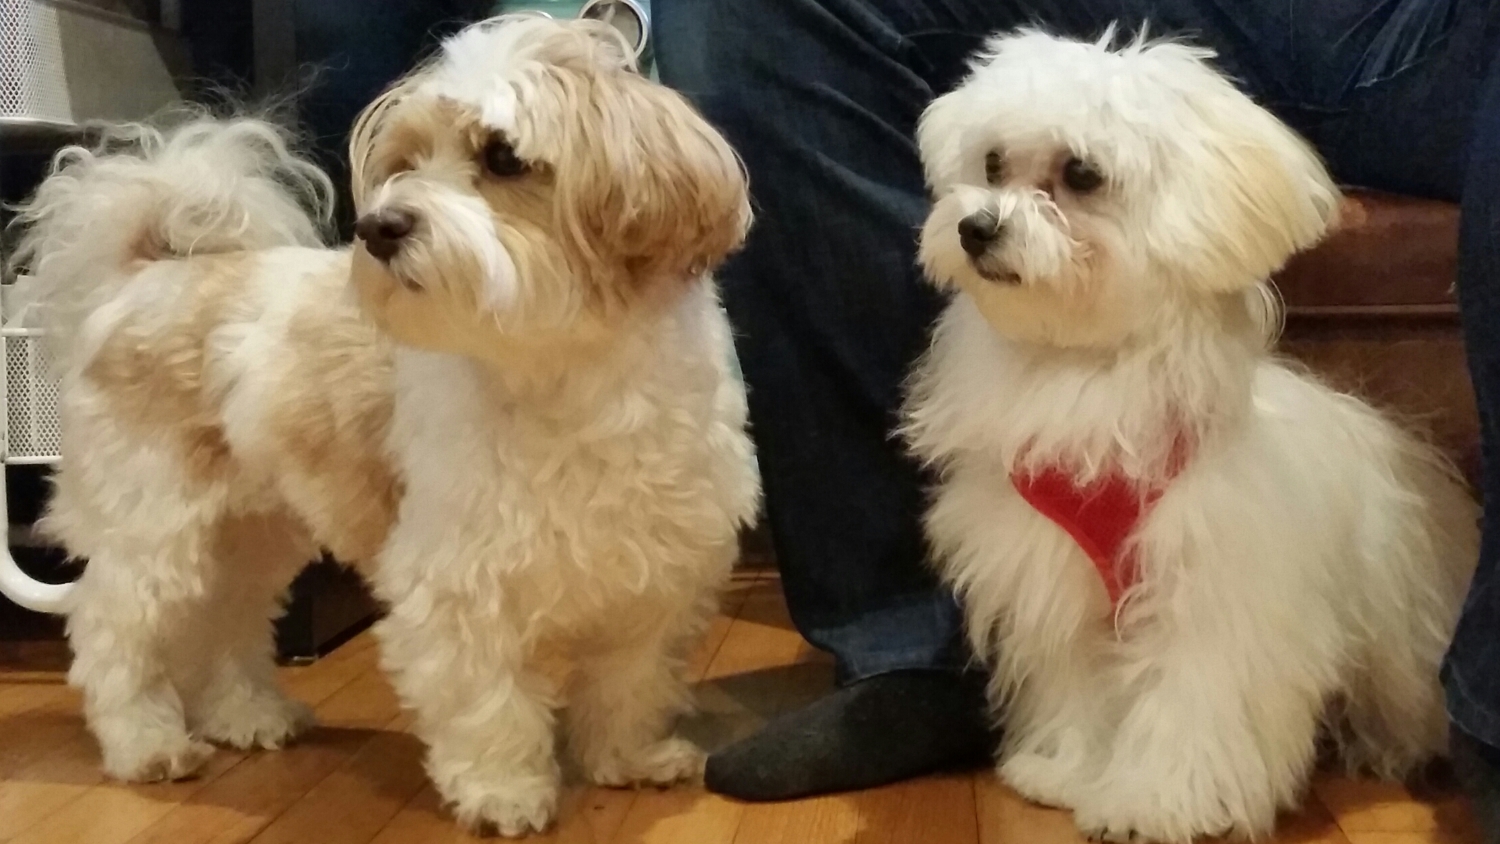
Bandito (left) with cousin Cookie (right)
This is all brand new to me so I thought I’d share some tips and tricks that made this totally enjoyable and pretty fast (I did the whole picture in 1 evening). First, I used blue painters tape to affix it to a portable wooden easel that I had from my drawing class days. Securing it this way, kept it stable while also allowing me to carry it to different spots around the house easily. Second, I used more painters tape to keep each package of drills (that’s what the little “diamond” pieces are called) closed after opening them. Some folks complain that these little plastic baggies are very fragile and can tear making a mess of drills, but I found these from NewFrog fairly strong (some folks transfer them to mini ziplock bags to avoid the possibility of drill spills). I also labeled each using a Sharpie marker on the blue tape to make each baggie easy to distinguish from the next.
As I also had 2 other diamond painting kits, I used the 2 additional green trays to lay out up to three colors of drills at the same time. Because the color variations on this picture were pretty well segmented to just a few colors in each area, this made working on each area before moving onto the next area easy. Following a tip I learned from Shirley (YT: shirlscraftyworld), I also put a little sticker on top of the release paper so I could tell the front and back of the release paper and keep my canvas free from lint or debris. Lastly, I found that having a little piece of a Swiffer duster sheet or an anti-static bag (used to prep surfaces for heat embossing), was helpful for avoiding drill-to-tray cling.
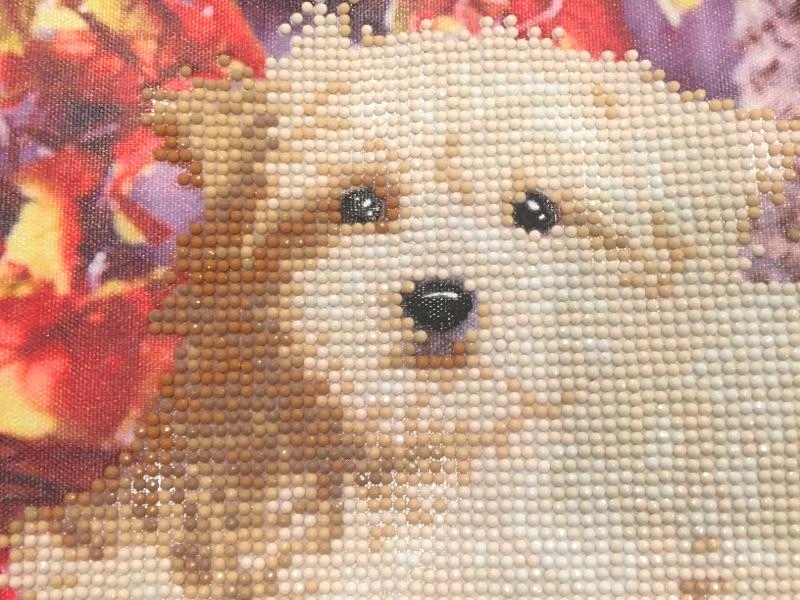
BTW, because this diamond painting was not an image that was designed to be entirely covered with drills, I found that the flat eyes and nose did not stand up to the drill-covered puppy. To remedy this, I added black glazing with a Sakura Black Glaze Pen and highlights with a Uniball Signo White Gel Pen, and it came out much better. Anyway, I hope you found these diamond painting tips helpful. I had so much fun with this, I can’t wait to start my next one!
Disclosure: Many of the supplies I’ve used for today’s project are linked. Some may be affiliate links, which means if you make a purchase I receive a small commission at no extra cost to you. I truly appreciate your support toward the costs of running this blog!
This diamond painting is being entered into the following challenges:
Simon Says Stamp Wednesday Anything Goes Challenge
Word Art Wednesday Anything Goes Challenge
Just Keep on Creating Anything Goes Challenge
Through the Craft Room Door Anything Goes Challenge
Crafts Galore Encore Anything Goes Challenge
Catch the Bug Anything Goes Challenge
Crafter’s Castle Anything Goes with Optaional The Holidays Challenge
]]>
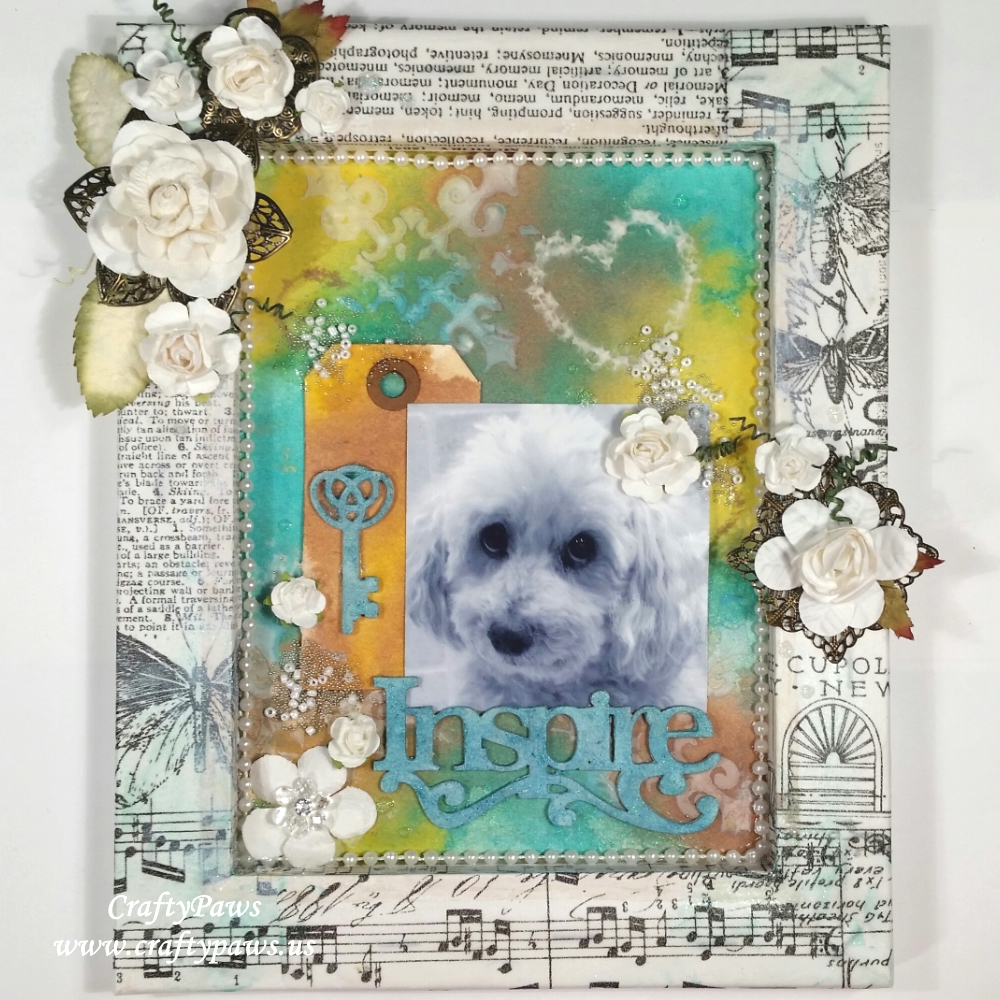 I started with a canvas that I reversed and applied Liquitex Gesso around the exposed wooden edges and over the staples. I next covered the edges with Tim Holtz Tissue Paper, using my new favorite glue, Beacon 3-in-1. I distressed the edges a bit and also smeared on some translucent Art Anthology dimensional medium in Mermaid Sorbet .
While that was drying, I started to work on my background insert, which is made from heavy-weight watercolor paper. I used some mud texture paste and an Art Anthology Gothic Stencil to create some texture and interest to the background. When that was dry to the touch, I used 3 different Art Anthology Colorations Sprays in Glorious (yellow), Sandcastle (tan), and Siesta Key (aqua) to spray the background as well as a little manila tag (I wanted to do a kind of vintage summer country fair color scheme — somehow that seemed fitting for my dear girl who is in her autumn (or winter), but about whom I am hoping and praying this is her summer. Plus I’m taking her in a stroller to a country fair next weekend!). To prep a couple of chipboard pieces (the key and word “Inspire”), I used more gesso to mute down the brown of the chipboard and then used some Art Anthology dimensional medium in Cayman Sorbet and Mermaid Sorbet (the sorbet dimensional mediums are translucent but add a great shimmer/sparkle and rich hint of color) to coordinate with the Siesta Key spray from the background.
Then to add some more interest and texture to the background, I used some Clear Coat Dimensional Medium and dropped in 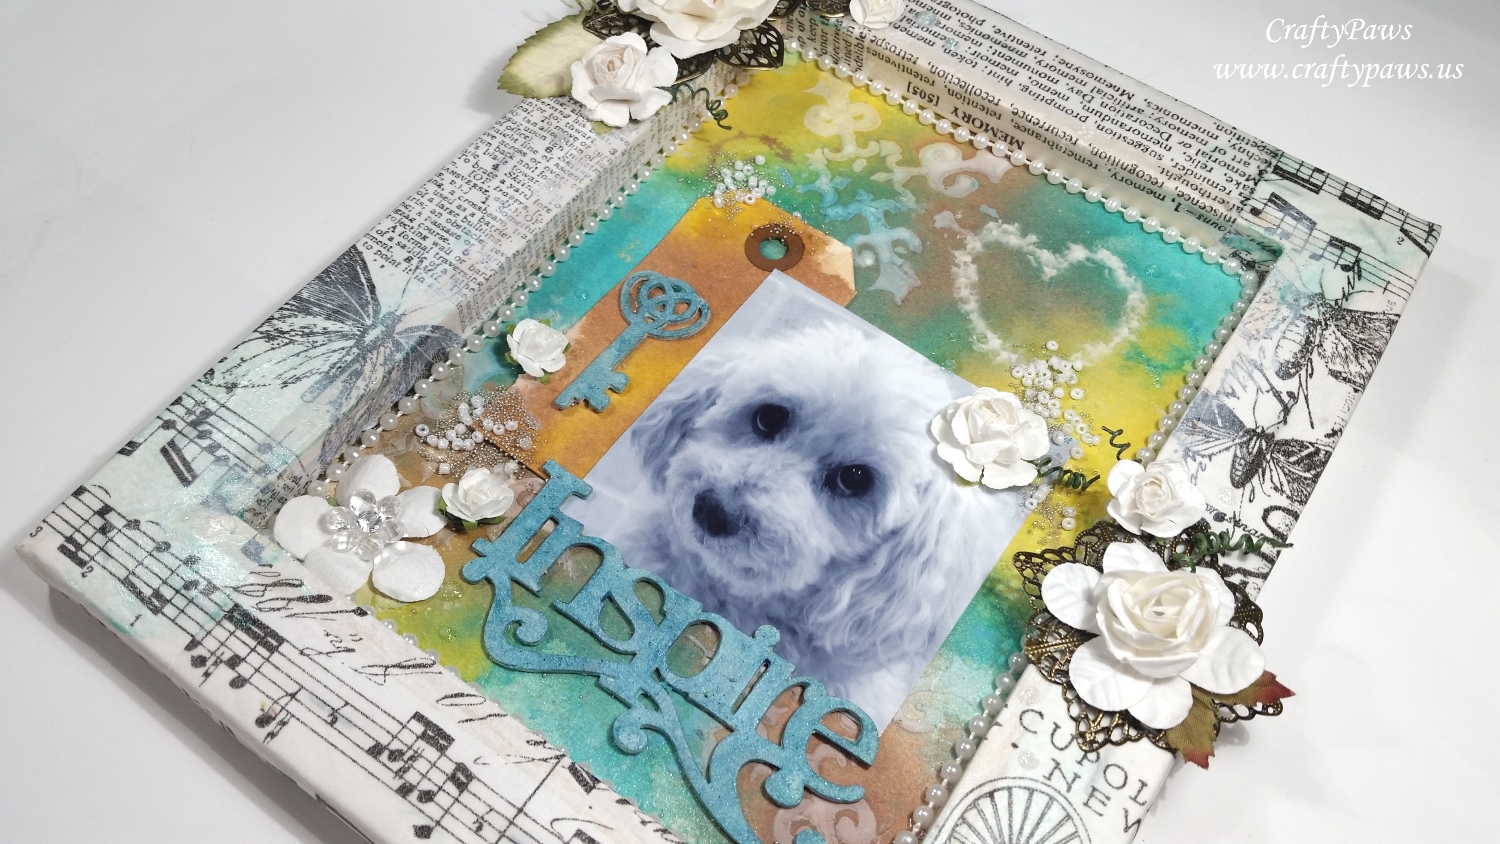 some small white seed beads and micro silver beads. I also used some plain Deco Art Modeling Paste and dabbed on with my finger a Primative little heart.
To cover up the seam where the background watercolor paper didn’t quite reach the edges of the shadowbox frame, I used a strand of pearls (the paper was cut correctly a little larger than the opening, but I was not careful about centering it after inserting and gluing it down – argh!). Lastly, I layered various antique bronze metal flowers/rosettes and white paper flowers and leaves from my stash. I tried to group them into 3 loose clusters in a triangular formation, to follow the rule of 3 and thirds. I especially like the flower on my angelic Biscuit’s hair — doesn’t she look like she’s got the flower tucked behind her ear? 🙂
The following is a process video sharing the 2nd half of creating this canvas shadow box (the first part was done in class so I didn’t video that part):
This altered canvas is being entered into the following challenges
Card Mania Summer Fun Challenge
Simon Says Stamp Monday Distress It Challenge
Not Just Cards Anything Goes Challenge
Word Art Wednesday Anything Goes Challenge
Through the Craft Room Door Anything Goes Challenge
Creatalicious Anything Goes with Optional Summer
Lil Patch of Crafty Friends Anything Goes Challenge
613 Avenue Create Anything Goes with Optional Monochrome
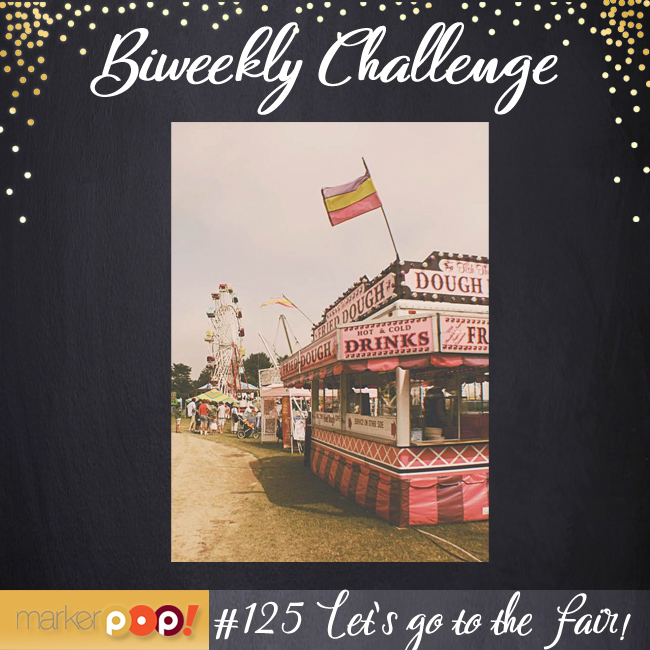
MarkerPOP Summer Fun – We’re Going to the Fair Challenge
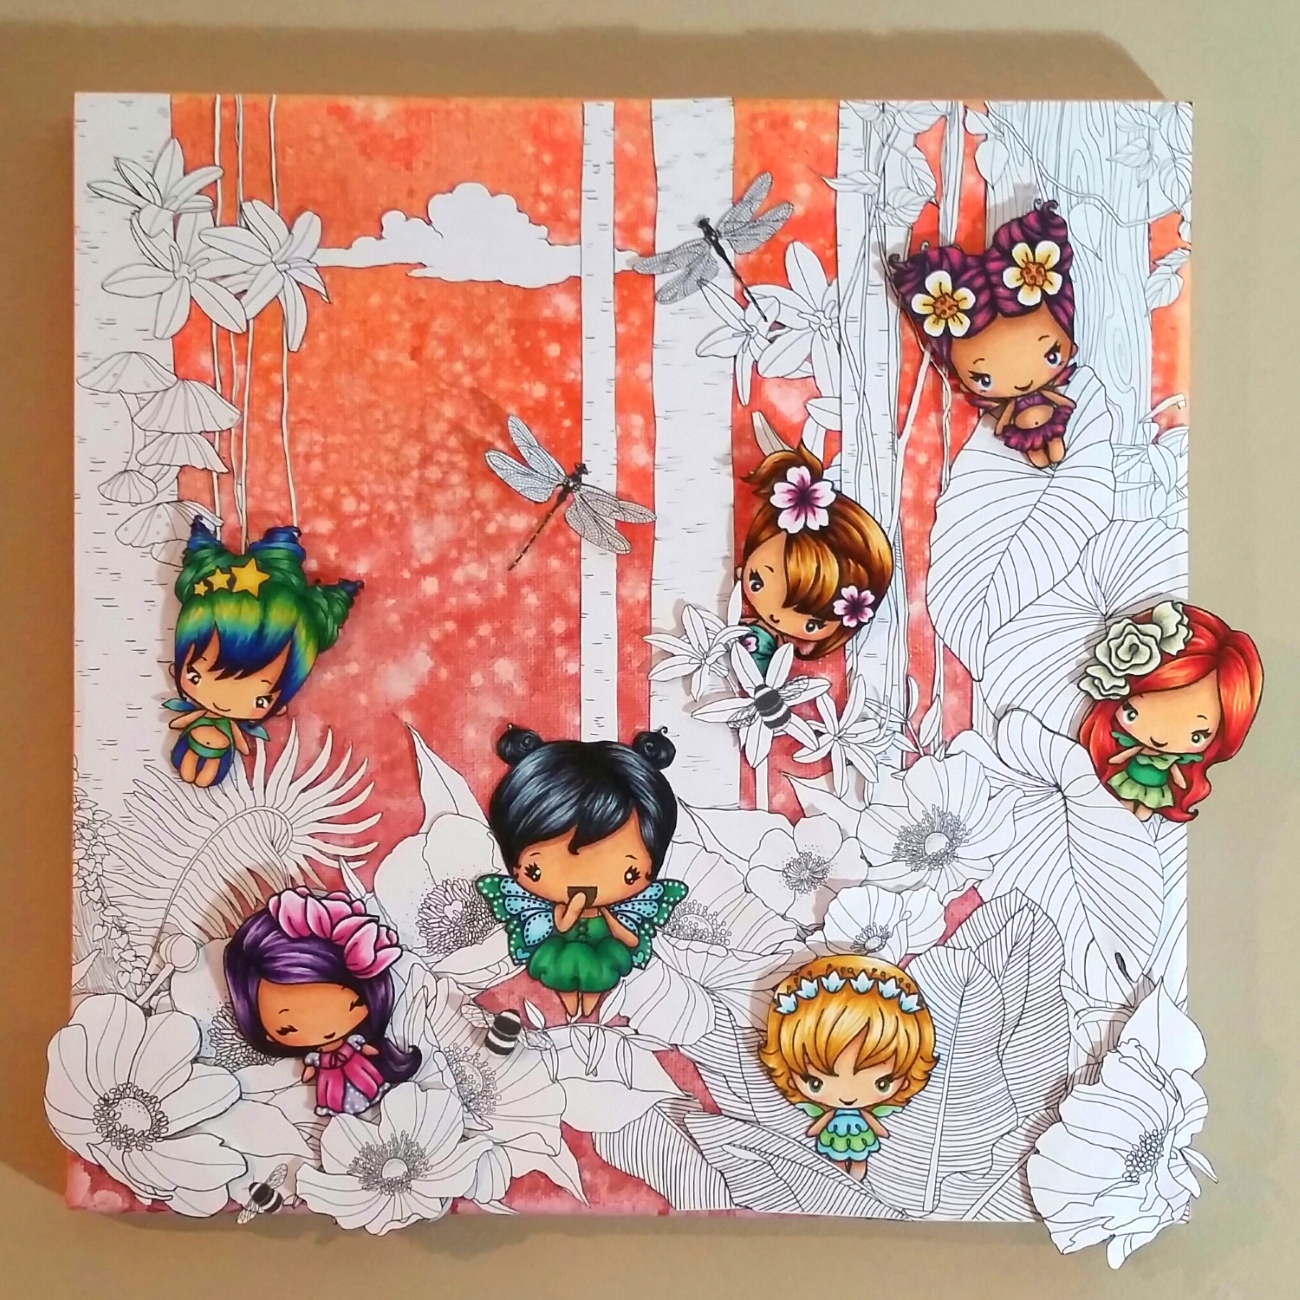
For the last three days, I colored up more of The Greeting Farm Bloom Kit girls with the following Copic colors:
Tracy (with green hair): Skin: E51, E21, E11, R20; Hair: YG01, YG25, G14, G17, G29, C7, C8 and C10; Dress and flowers: Y19, R32, R35, R37 and R39
Mae (with blue-green hair): Skin: E00, E21, E11, R20; Hair and dress: Y15, BG11, BG23, BG49 and BG78; Flowers: Y15, YR15, YG11, YG25 with Distress Marker in Hickory Smoke for details in white petals
Cindy (with purple hair): Skin: E00, E21, E11, R20; Hair: V12, V15, V17 and V09; Flowers and Dress: RV52 and RV55; Underskirt and puffy sleeves: V20, BV02 with white gel pen for dot details
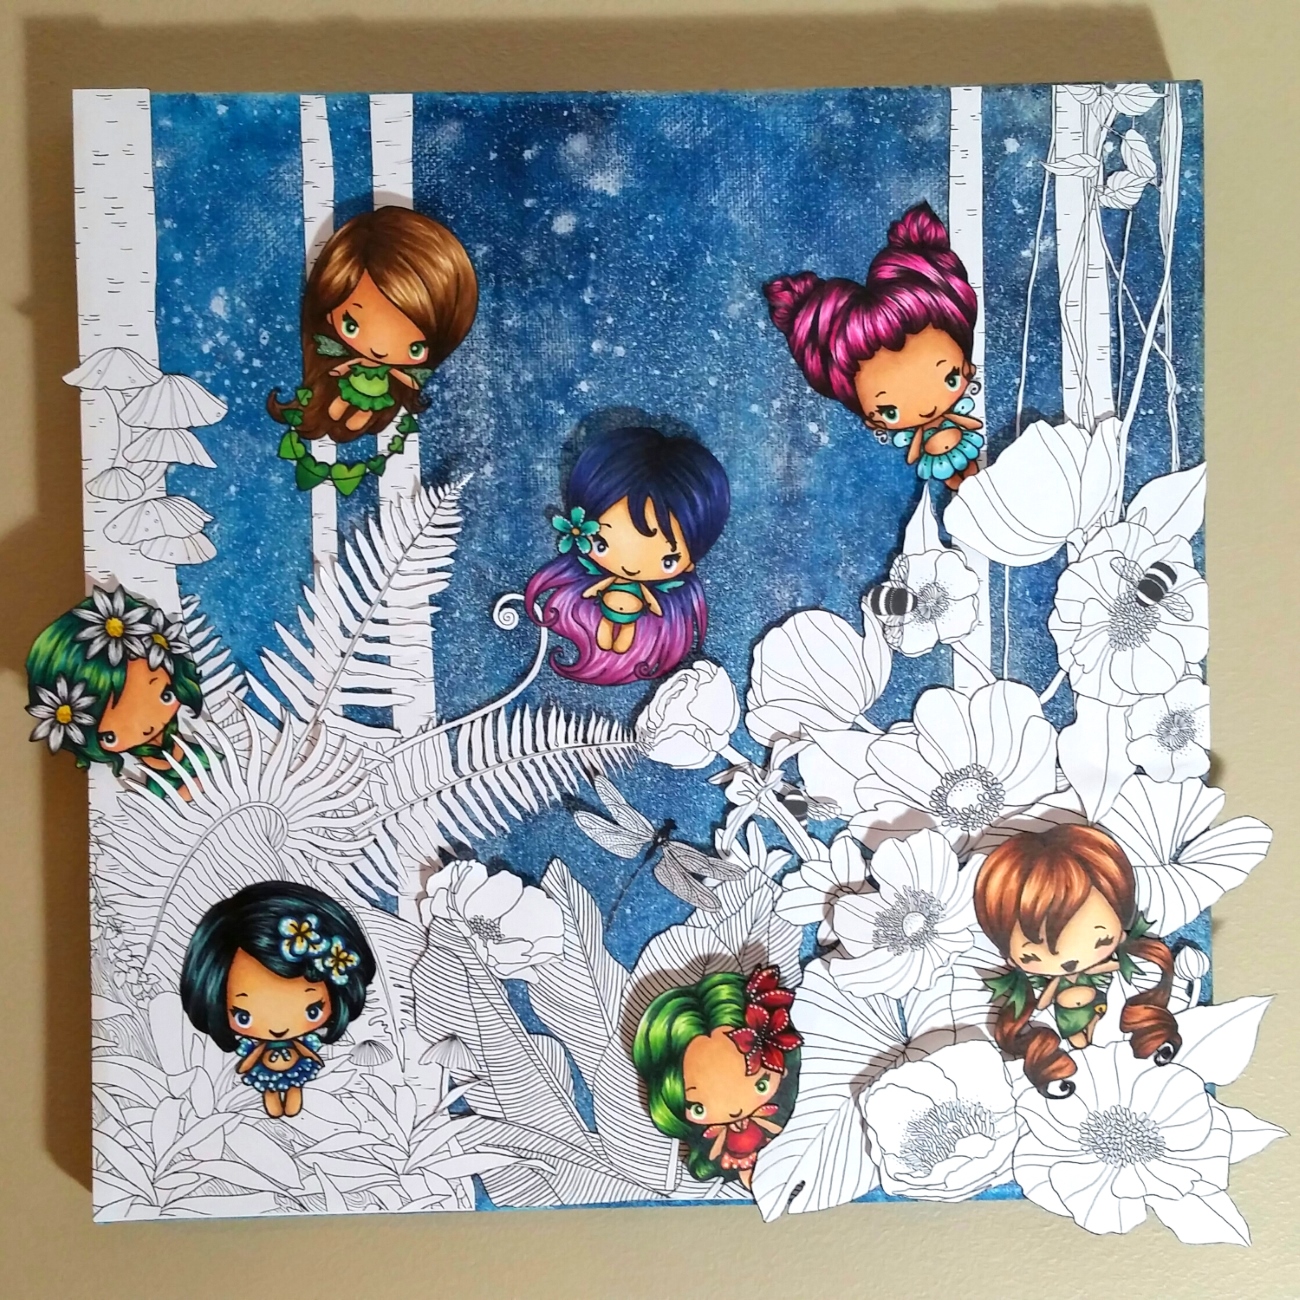
Along with fussy cutting and popping up additional foliage from the Stampin’ Up! “Inside the Lines” Designer Series Papers, I added these cuties to the canvases (sprayed with lots of Heidi Swapp, Recollections and DecoArt shimmer sprays) that I shared with you last week (HERE and HERE). I tucked them under and behind bits of leaves and fern fronds so that they looked like they were coming out from hiding in the forest, and now each canvas has a whopping 7 fairies!
These newly updated canvases are being entered into the following challenges:
Simon Says Stamp National Crafting Month Show Us What You’re Working On Challenge
CAS-ual Fridays No Dies Allowed Challenge
Simon Says Stamp Wednesday Anything Goes Challenge
]]>
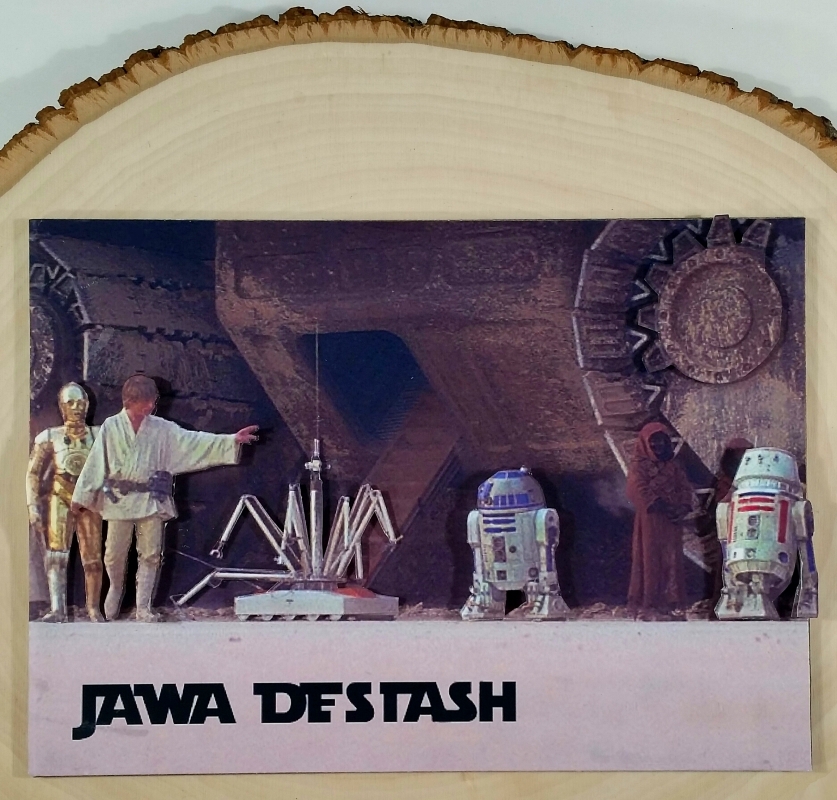
After much agonizing, I finally decided to create some mash ups with Star Wars and our crafting world on some 4″ x 7″ gesso boards. The first one I thought of was how in Episode IV, the Jawa’s sale of droids was similar to our crafty destashes. I found a picture online and printed it out three times on photo paper so I could fussy cut around the various robots, Luke, C3PO, and R2D2 to create a dimensional scene. There was a lot of detailed fussy cutting of the image as well as of fun foam to pop up each layer. I also found a free Star Wars font and typed in the caption: “Jawa Destash.”
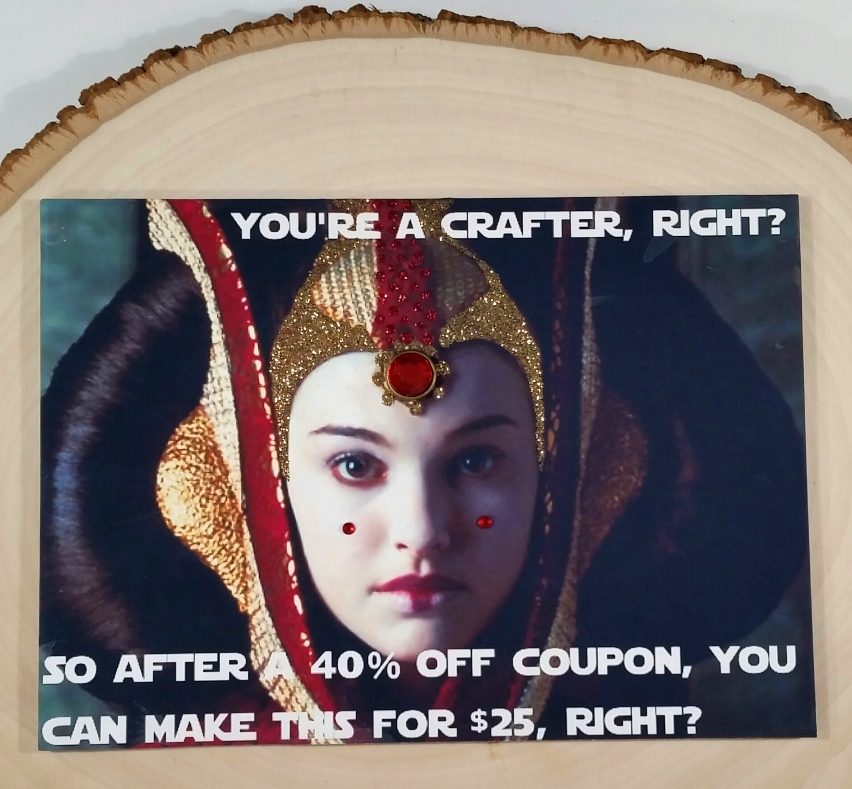
The second one I thought of was to highlight how non-crafters think we crafters can create anything on a shoe string and how we magically use coupons to find great deals. I found a fabulous picture of Queen Amidala in a spectacular costume and added the text, “You’re a crafter, right? So after a 40% coupon, you can make this for $25, right?” To “craft it up,” I added bling, rhinestone gems, and lots of Cranberry and Champagne gold Stickles to the image.
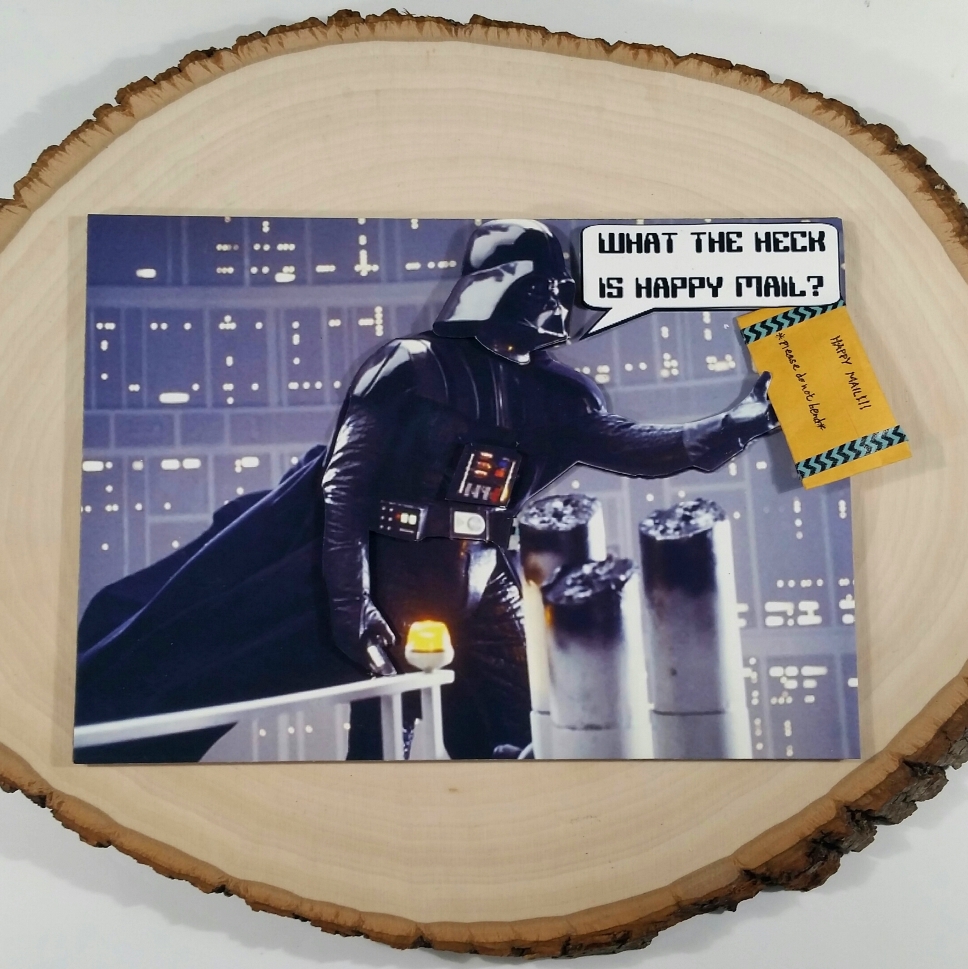
The third scene is one paying homage to our crafty community lingo and culture of gift giving. I found a picture of Darth Vader with his arm outstretched and printed that out three times as well. I wanted to add dimension to his upper body, and even more to his helmeted head and light up panel on his torso. Again, this was a little more fussy cutting and popping up on fun foam. I also added a speech bubble for Darth to say, “What the heck is happy mail?” in a free robotic font I found online. But the piece de resistance was the small padded envelope I created for Darth to hold. I wrote in teeny tiny handwriting, “Please do not bend” and “HAPPY MAIL!!!” on the package and even added some trimmed down washi tape to mimic fancy duct tape.
I had so much fun creating these mash up scenes/memes for my crafty friend’s husband, and I hope he enjoys them. The following is a video share of these projects:
These projects are being entered into the following challenges:
Simon Says Stamp National Craft Month Show Us What You’re Working On
Simon Says Stamp Wednesday Anything Goes Challenge
Word Art Wednesday Anything Goes Challenge
CAS-ual Fridays No Dies Allowed Challenge
Creatalicious Anything Goes Challenge with Optional Flowers
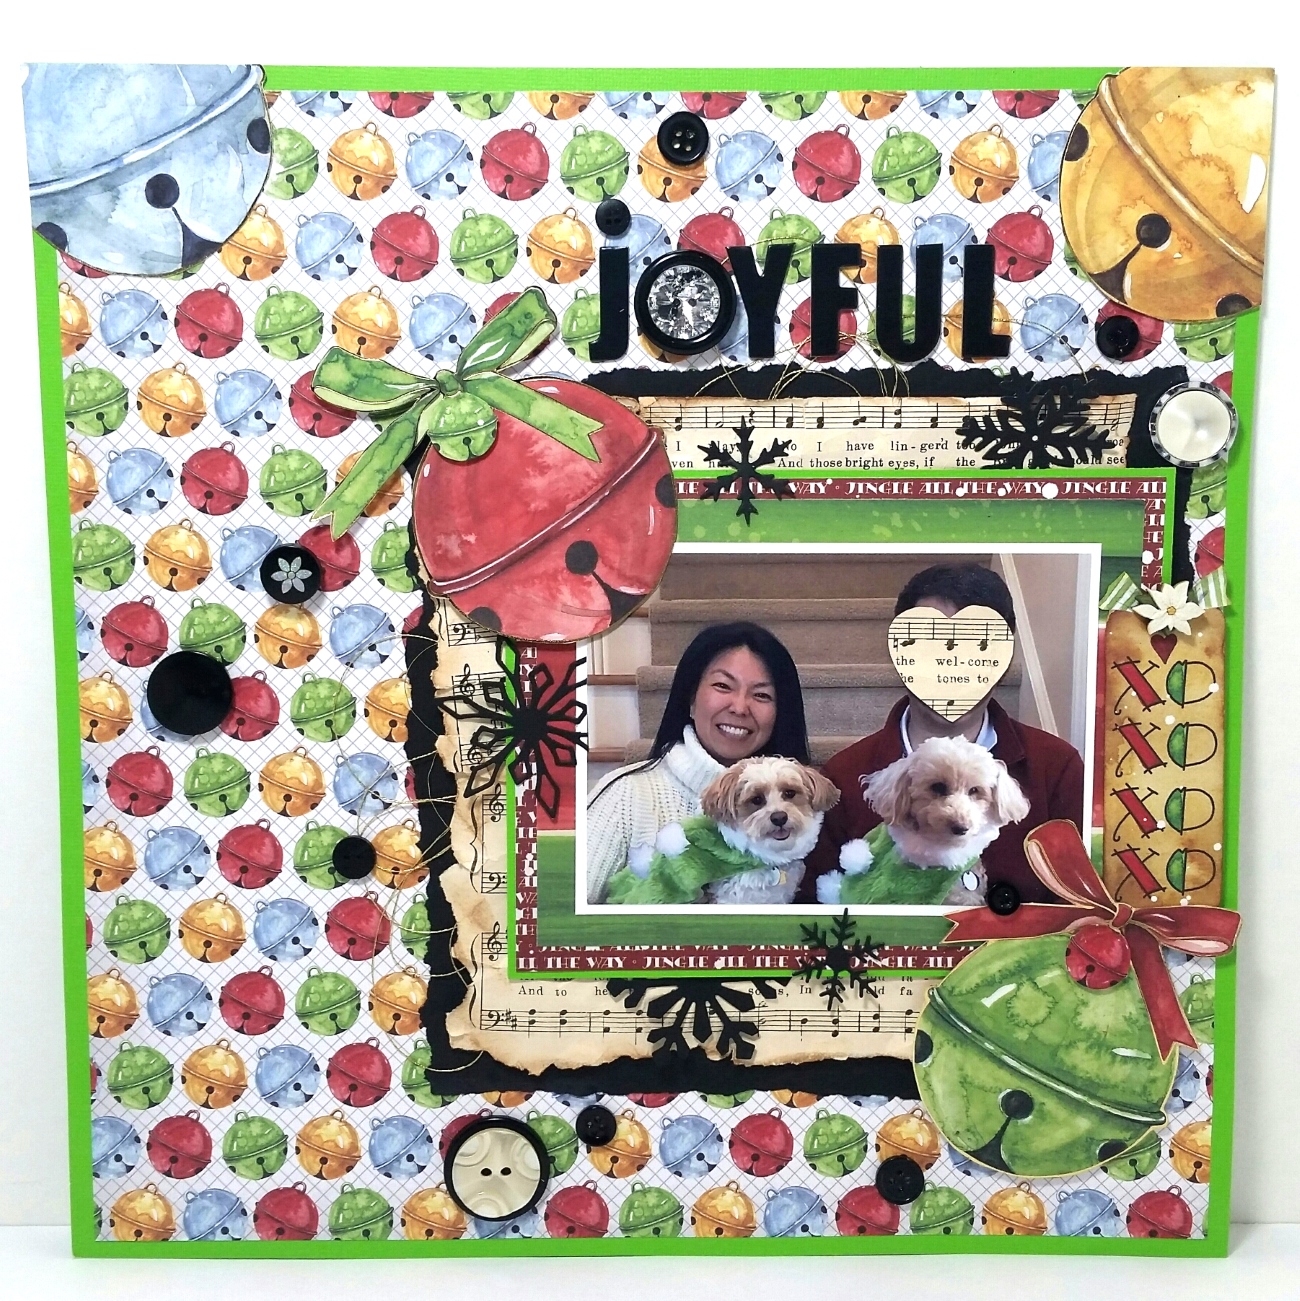 Given the color scheme of what we were wearing, I looked through my stash and found a 2013 Recollections Christmas paper pad called “Watercolors” that seemed a perfect match. To carry through the citron green color of the pups’ coats, I used a plain card stock (this might be 10+ years old!) to frame the whole layout as well as a 1/8th border on the 4th mat around the photo. For the main background, I used a fun jingle bell patterned paper from the paper pad. I also used a crimson text patterned paper that repeats, “jingle all the way” in white, a crimson, green and cream stripe patterned paper, giant jingle bell ornaments that I fussy cut from another paper, and a few of the images from the cut-a-parts page–all from this collection. It is hard to see in the pictures, but I also coated the small fussy cut bells and bows with Clear Wink of Stella to add shimmer and sparkle.
To add a contrasting vintage feel to the fairly modern and playful patterned papers, I also layered in some vintage music paper that I inked with Tim Holtz Distress Ink in Vintage Photo as well as some torn black card stock to help the photo with all its mats pop from the busy background pattern. For the “JOYFUL” title, I used Fancy Pants Designs Black Chipboard Alphas, which tied in well with the torn black card stock matting.
For finishing touches, I added DMC metallic gold embroidery thread that I bunched up and tucked behind the music paper in two places as well as some vintage black, cream, and rhinestone (for SPARKLE) detailed buttons (the black and cream were used to maintain a consistent color story). Lastly, I decided to add some snowflakes die cut with Diemond Dies Icy Snowflakes Die Set, Winter Snowflakes Die Set, and Snowflake #1 Die and punched out with the Martha Stewart Himalayan Snowflake Punch in unexpected black card stock to tie in with the black accents throughout. I’m still super rusty at layouts, but I’m trying to keep my new years resolution and really enjoying the process.
Diemond Dies Coupon: My readers can get 10% off and free worldwide shipping on all orders of $35 or more at Diemond Dies by using the coupon code “thankskristina” at checkout.
The following is a process video sharing how I created this layout:
This layout is being entered into the following challenges:
Simon Says Stamp Monday Pets Corner Challenge
Lil Patch of Crafty Friends Anything Goes Challenge
Word Art Wednesday Anything Goes Challenge
Through the Craft Room Door Anything Goes Challenge
Crafts Galore Encore Anything Goes Challenge
Not Just Cards New Beginnings Challenge
Crafty Gals Corner Add Some Sparkle Challenge
Creatalicious Anything Goes with Optional Hearts Challenge
Addicted to Stamps and More Make Your Mark Challenge
]]>
 This picture was taken at the Polynesian Cultural Center and it really captured the feeling of Hawaii with all of us donning leis. Oddly, the photographer framed the picture with yellow and white Plumeria flowers which did not match the purple-pink flowers of our leis so I knew I had to “fix” that. 🙂
 I picked up a Studio Decor 8″ x 10″ shadow box at Michaels using a 50% off coupon for $10. I lined the background with black card stock so that the original canvas color of the background wouldn’t distract from the photo and flowers. I also cut away the Plumeria flower photo frame for the same reason.
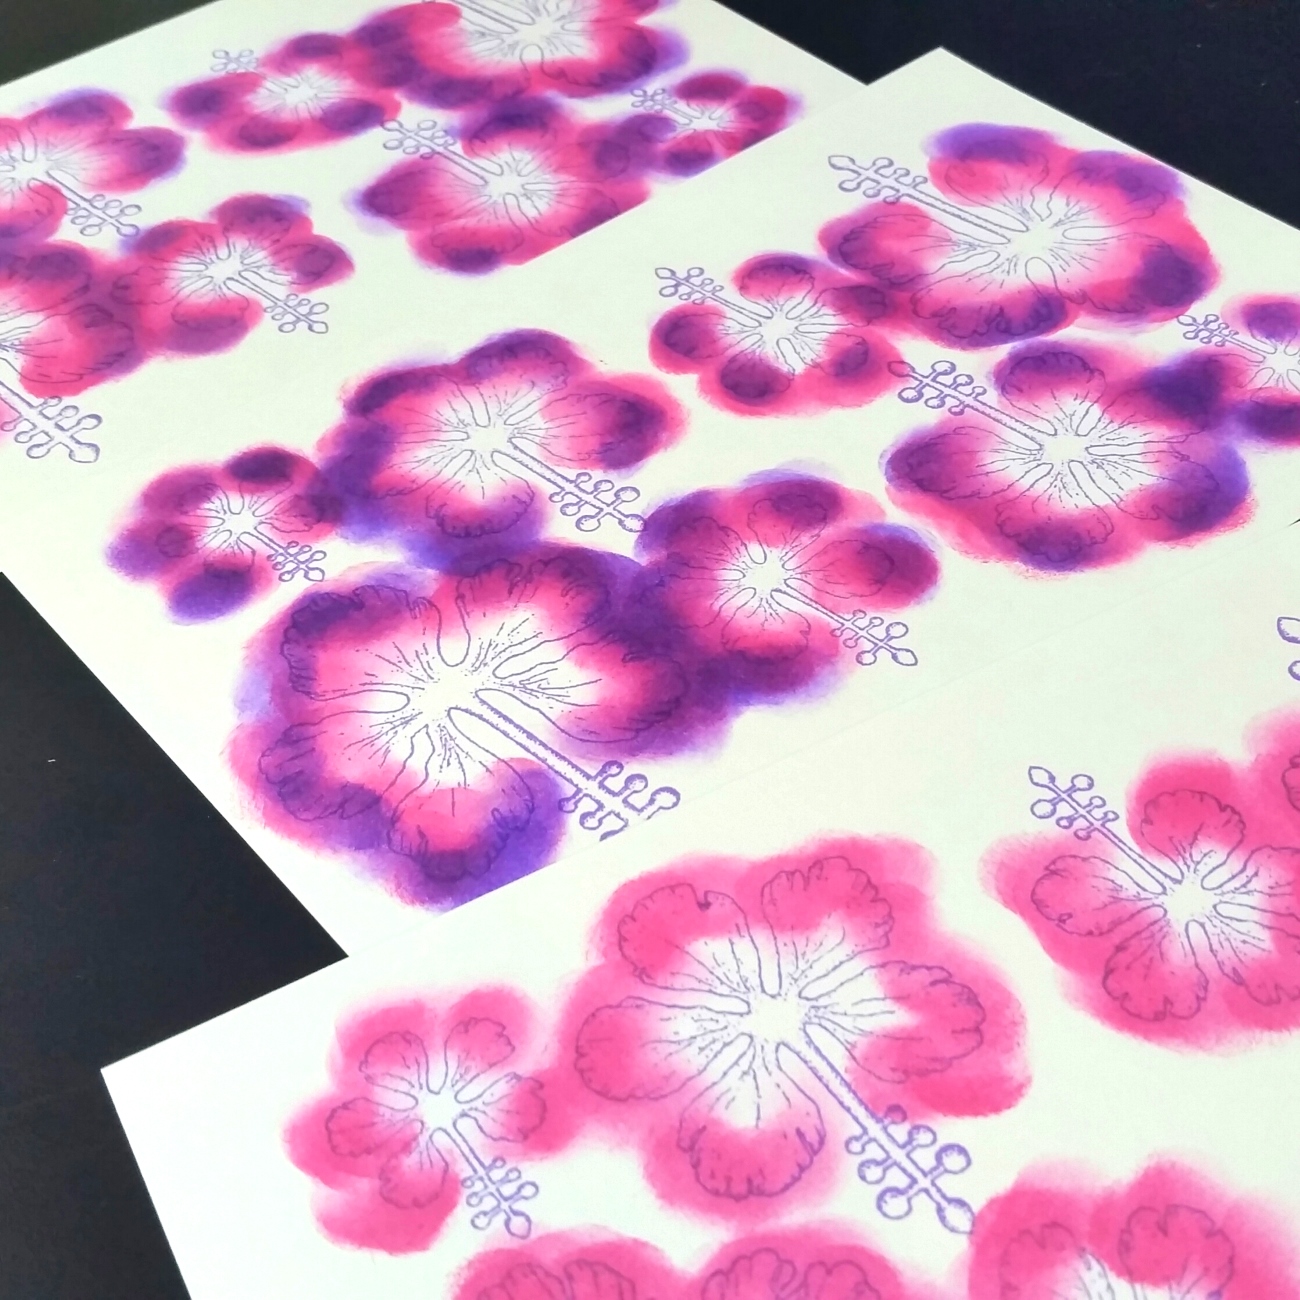
Then I used the Heartfelt Creations Tropical Hibiscus Stamps and Coordinating Dies to stamp, color and die cut over 30 paper flowers to surround the picture. I used Tim Holtz Distress Inks in Picked Raspberry and Wilted Violet with finger daubers to color them up. Then I shaped all the flowers with my Spellbinders Tool ‘n One with Embossing Stylus Tips–I use my mouse pad as the cushion to do this dry embossing and shaping.
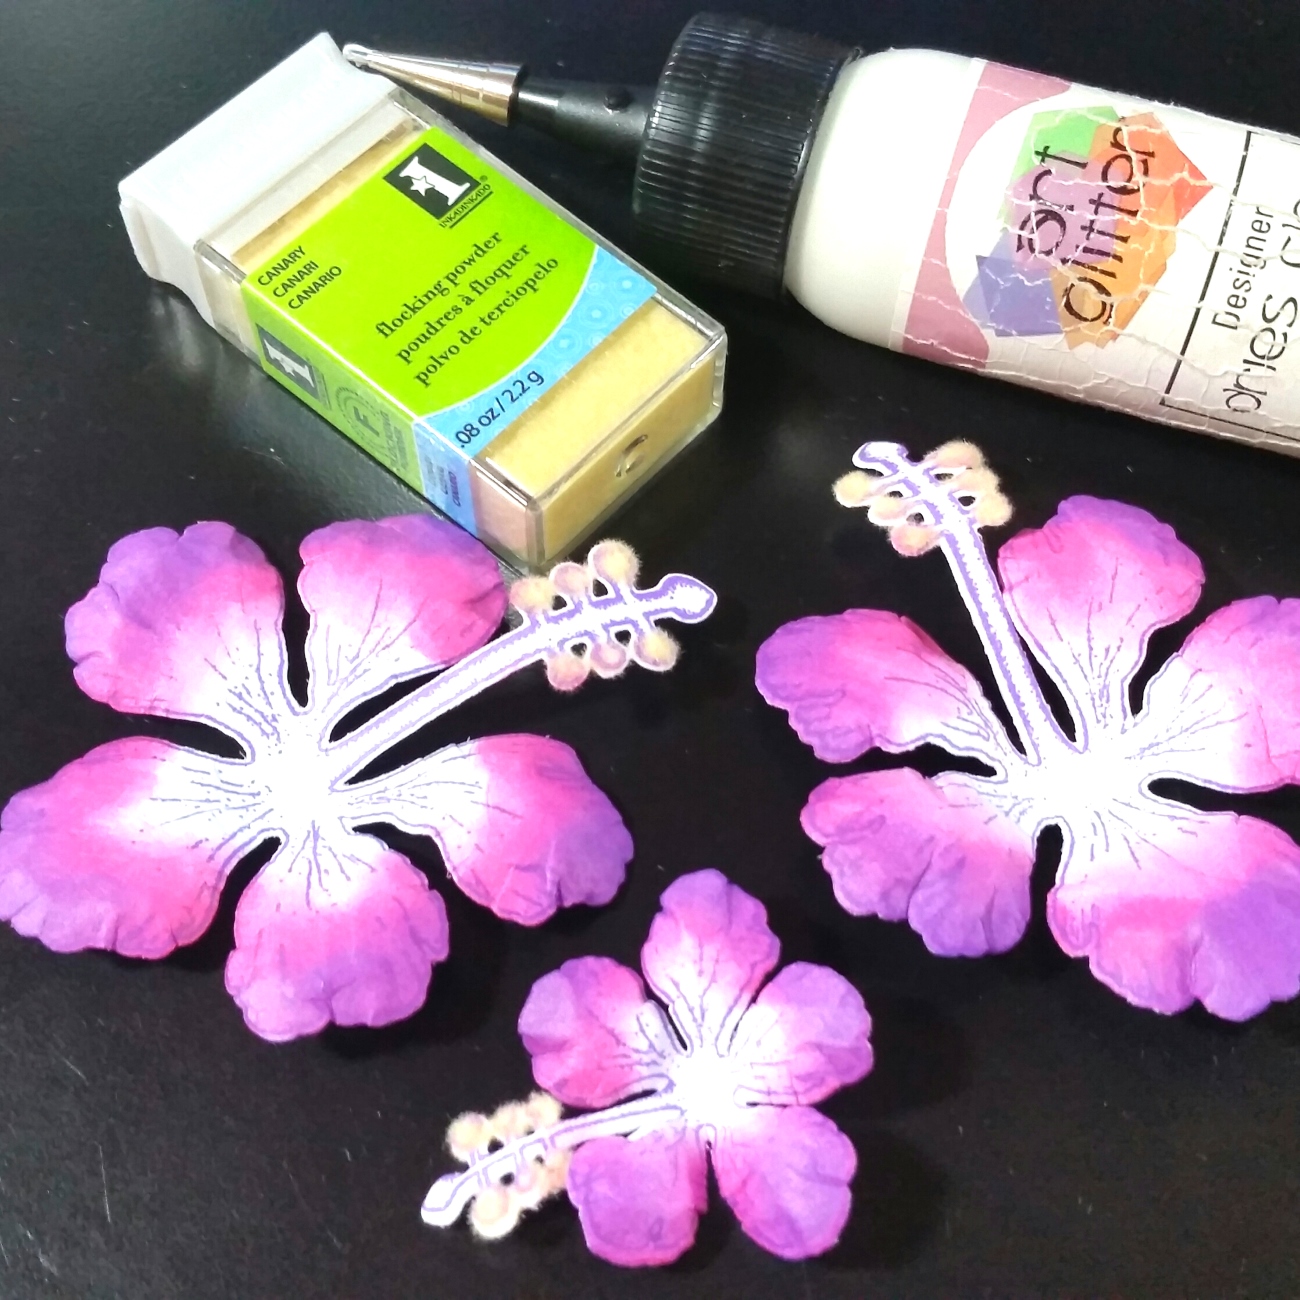
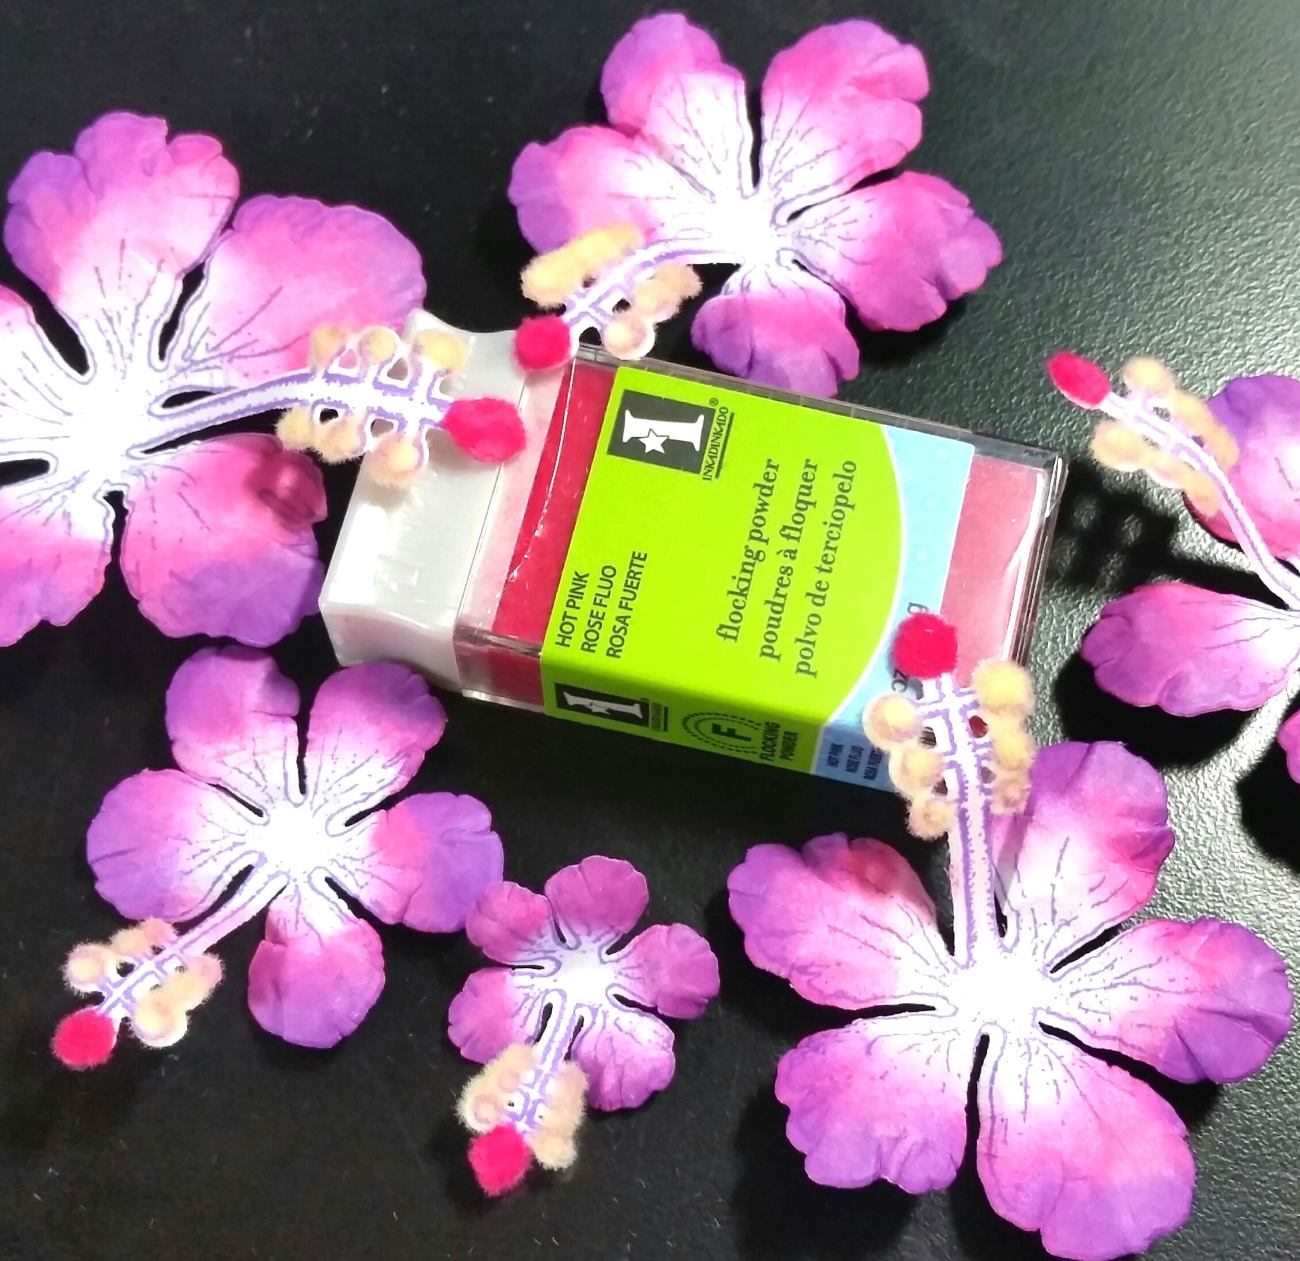 Then to add some interest (and realism?), I used my favorite wet glue, Art Glitter Glue by the Art Institute Glitter, Inc., with a Fine Tip Nozzle to apply glue to the stamen. I added a fuzzy pollen-like texture with Inkadinkado Flocking Powder. After looking at a lot of hibiscus flower images on Google for reference, I decided to use Canary Yellow for the side stamen ends and Hot Pink for the tips.
Lastly I added three kinds of bling: pins, charms and buttons from my stash to add some sparkle to the whole project. I filled in the nooks and crannies left by the flowers with these bling pieces, and I feel like there are little hidden gem surprises sprinkled throughout. All the flowers and even the blingy additions were adhered with permanent Glue Dots, which I think/hope are really strong and secure.
This shadow box Christmas gift is being entered into the following challenges:
Word Art Wednesday Anything Goes Challenge
Crafty Gals Corner 3 of a Kind Challenge – 3 kinds of bling
Simon Says Stamp Wednesday Christmas to Die For Challenge
Simon Says Stamp Monday Trio-Tastic Challenge – 3 kinds of bling
Addicted to Stamps and More Anything Goes Challenge
Just Keep on Creating Anything Goes Challenge
Creatalicious Anything Goes with Optional Use of Sentiment Challenge
613 Avenue Create Anything Goes Challenge
Not Just Cards Challenge
]]>
 This was my second try at no line coloring and I really like the softer look of the images with new favorite technique. I used Memento Desert Sand Ink
 to stamp the images and used the following Copic colors (skin for all 3 girls was with E50, 51 and 53 with R30 blush), white Sakura Gelly Roll pen for highlights and 0.03 pt Copic Multiliner pen for drawing in eyes:
The Owl Gorjuss Girl:
Hair: C5, C7, C9, B00
Feathers: BG13, BG18, B00, B01 and B04
Dress and boots: B00, B01 and B04 with
Pink hearts: R32
Owl: E53, 55, 57 and 59
 Sweet Tea Gorjuss Girl:
Hair: E97, 99 and 29
Dress and hair bow: R11, 30 and 20
Teacup and saucer: E000, G20, G24 and W1
Bunny and drink me tag: YR20, YR31 and YR24
Ladybird Gorjuss Girl:
Hair: E55, 57 and 59
Dress: RV52, 55, and 66
Top petticoat: W1, 3, 5, 7, and 9
Underskirt: W1, 3, and 5
Striped stockings: RV10, 52, 55 and 66
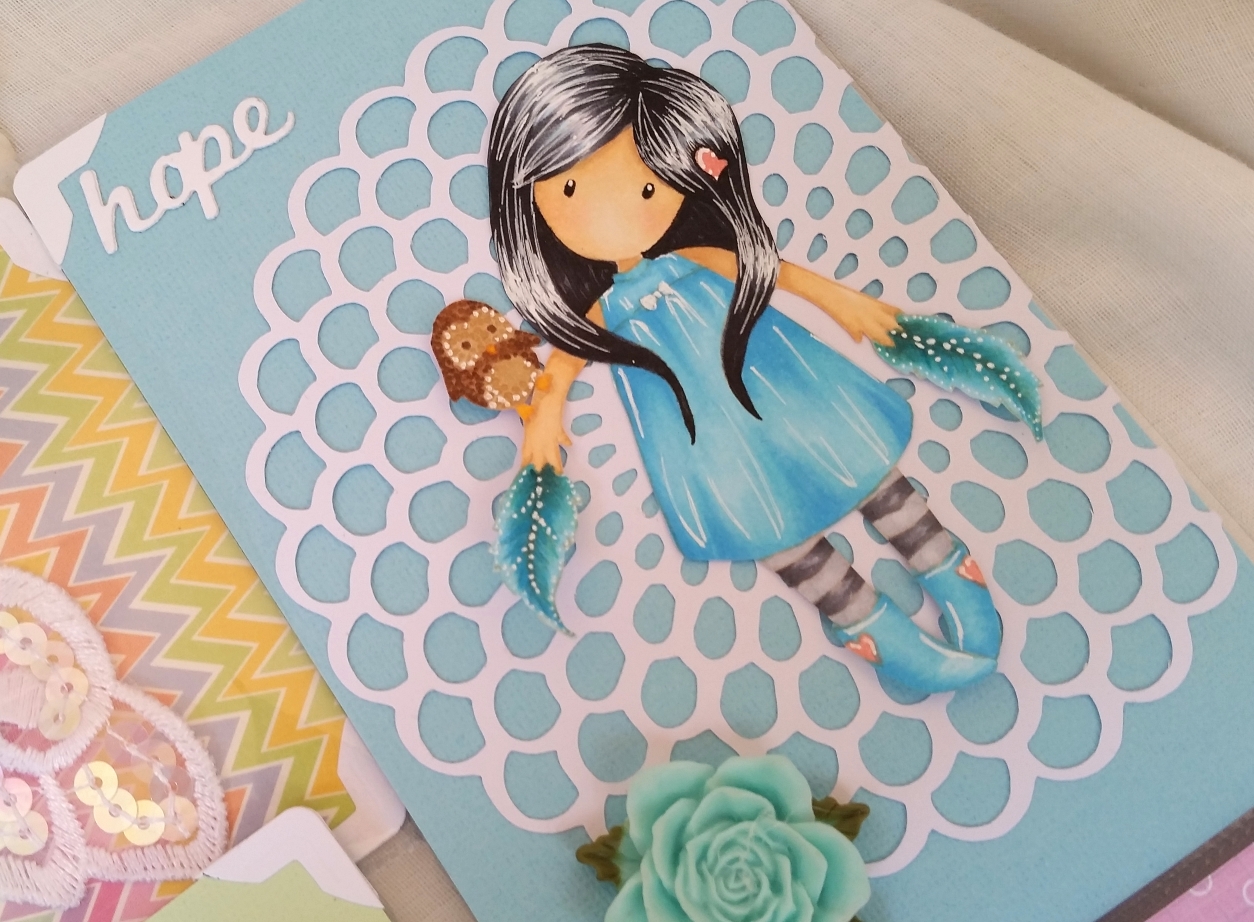
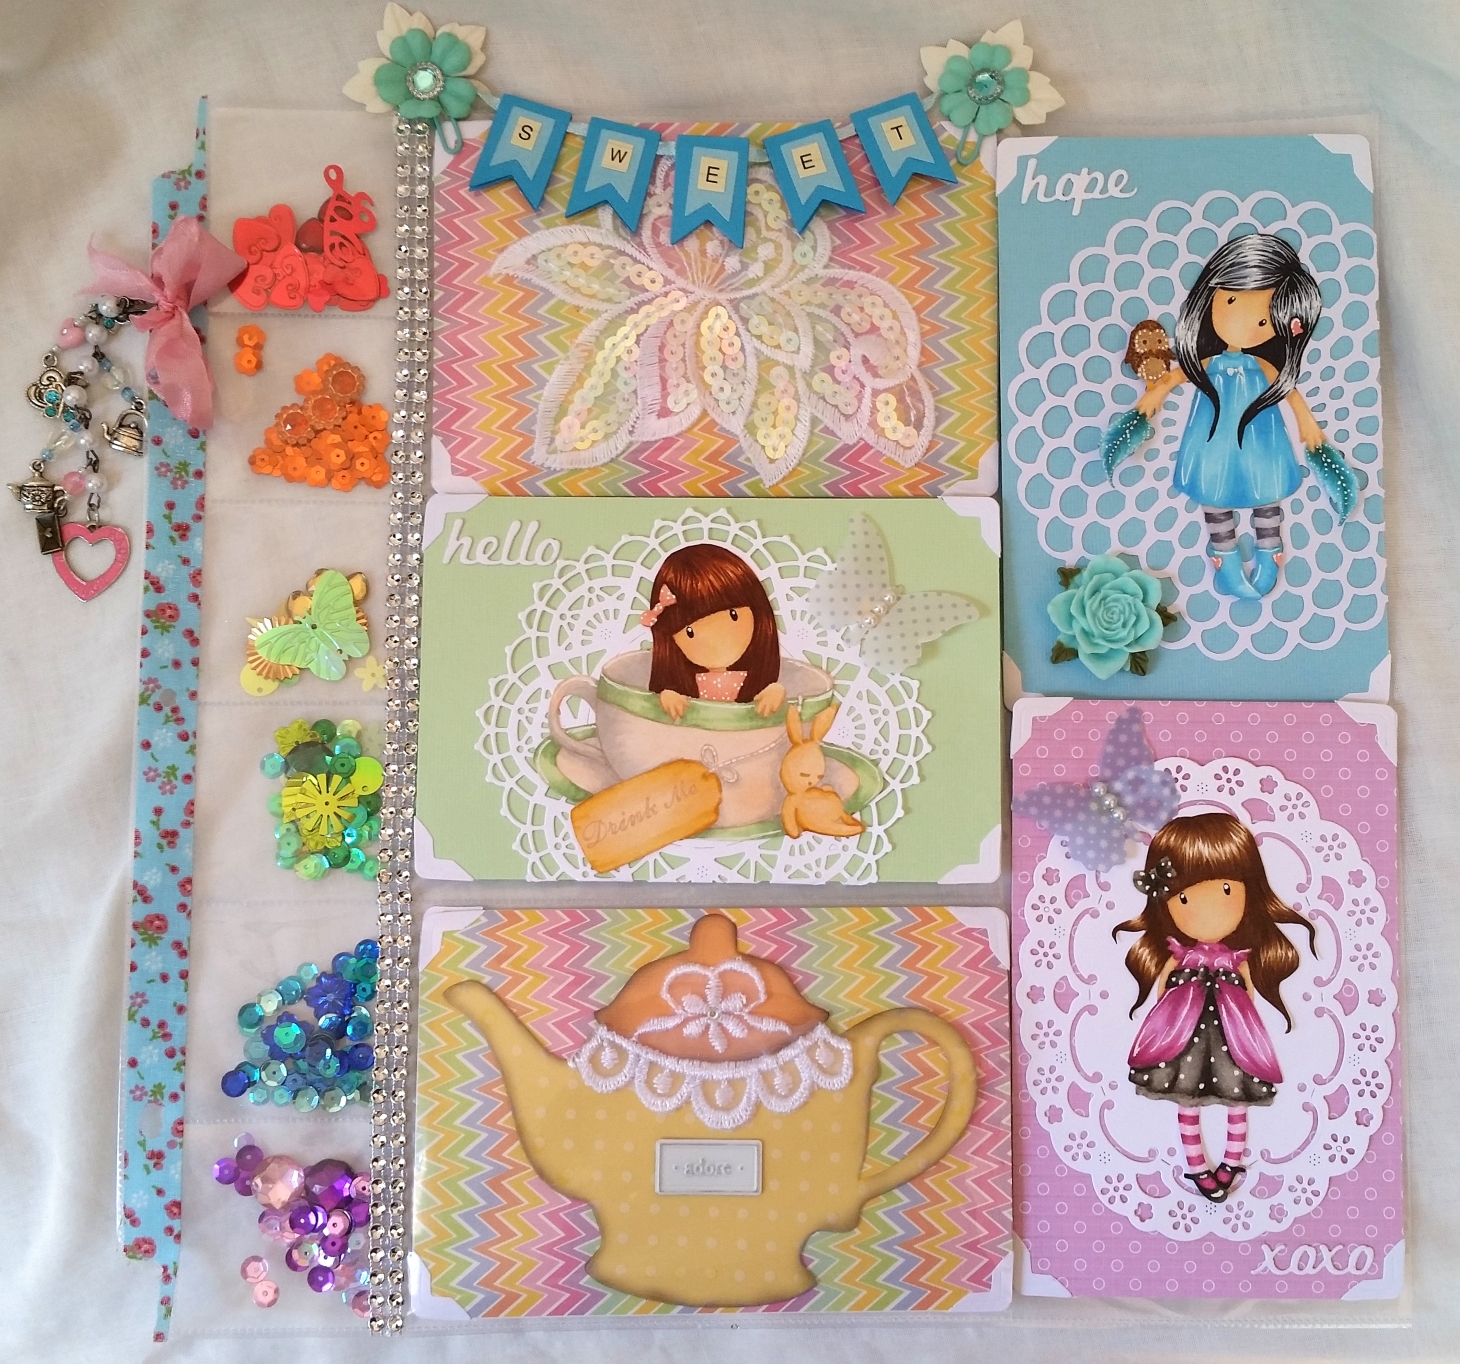
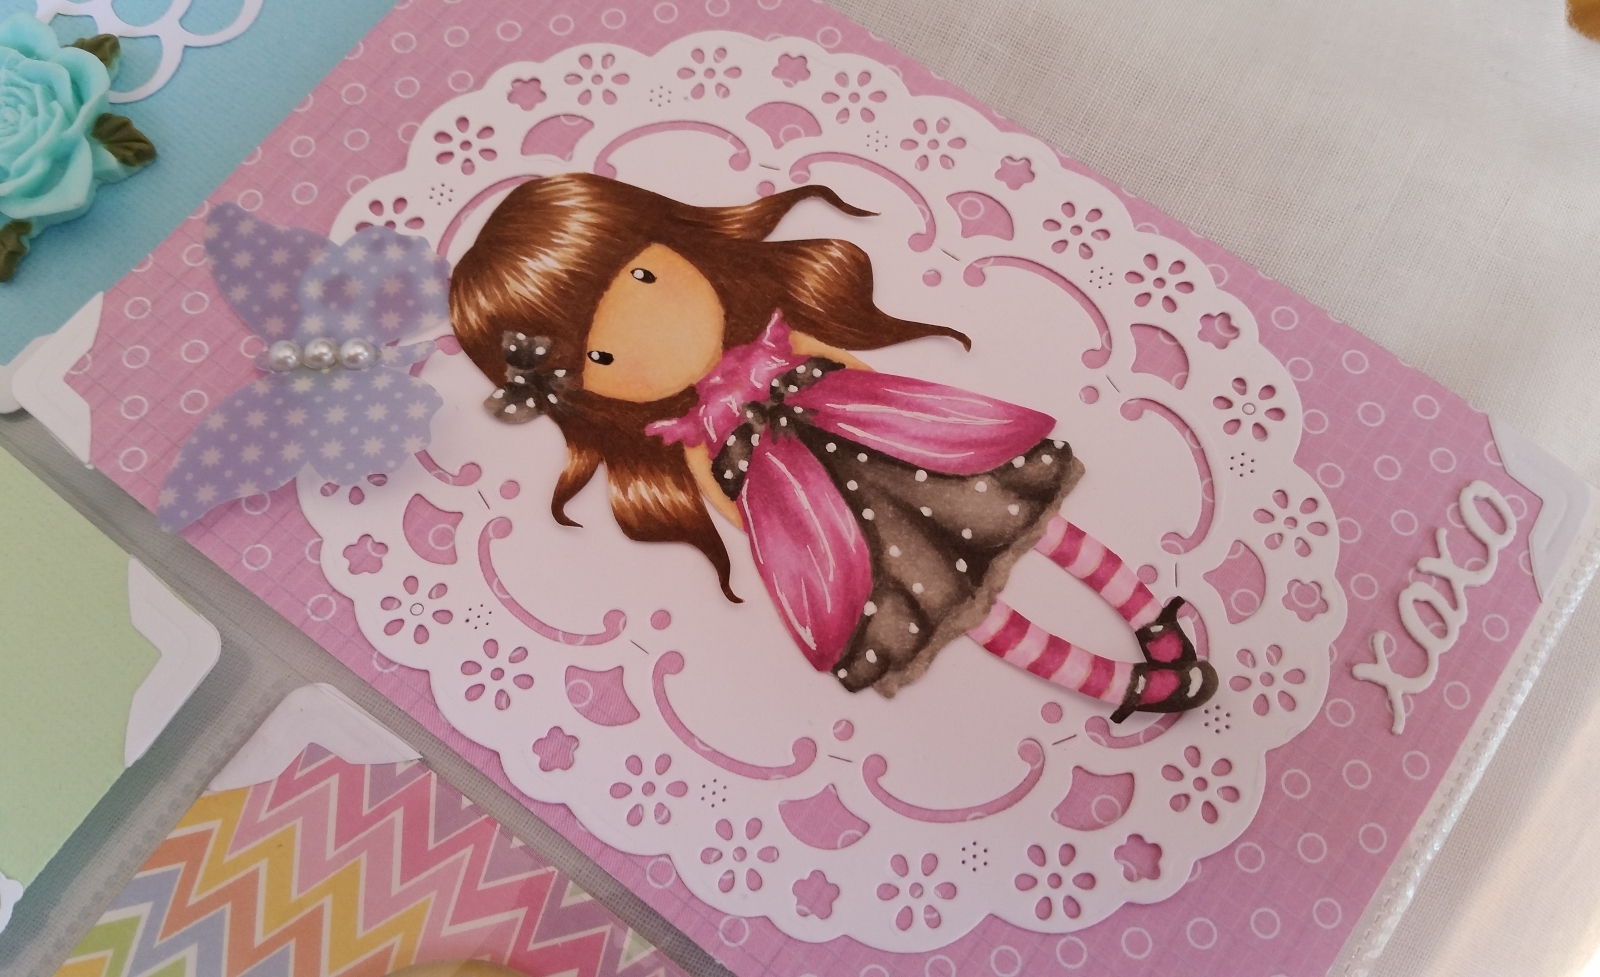
For each card with a Gorjuss Girl, I started with a pastel colored base, layered a white die cut doily and white photo corners that I die cut using my Tim Holtz Sizzix ATC and Photo Corners die. I also used the words “hope,” “hello,” and “xoxo” from the Diemond Dies Word Die Set #1 to add a kind of sentiment to each girl card. For small extra touches of embellishing without over stuffing the pockets, I added a couple of Jenni Bowlin Studio vellum butterflies and a resin aqua rose from my stash.
 For the other two large pockets, I used fun zig zag patterned paper from a DCWV Flowers & Butterflies mat stack. In the top pocket, I added a fancy lace sequin floral applique from my stash, and on top of the pocket altogether I added a banner that reads “SWEET” made using the Diemond Dies Mini Pennants Die Set, some thin aqua satin ribbon, some alpha stickers, and two handmade flower paper clips (to anchor the banner).
My readers can get 10% on orders of $35 or more at Diemond Dies by using the coupon code: “thankskristina”. Diemond Dies is having a 25% off SALE through June 24, 2015–on all orders of $99 or more, use the code “save25”. Only 1 coupon per order; cannot combine coupon codes.
In the bottom pocket, I die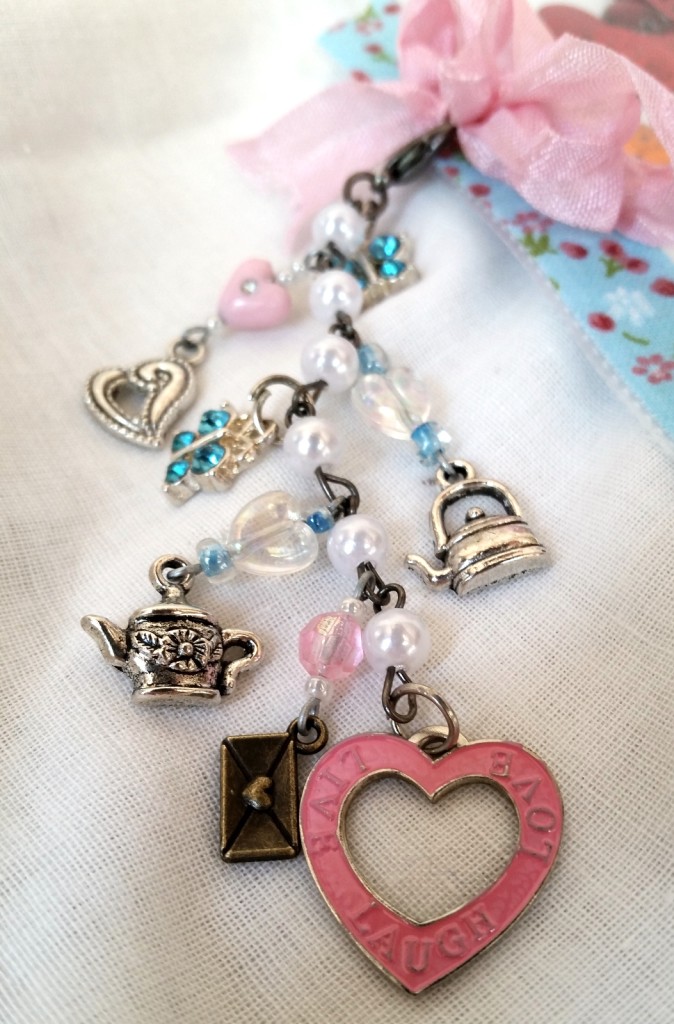 cut a tea pot using the Diemond Dies Mini Album Tea Pot Die. I separately cut out the top again with a different colored card stock to add interest and to cover up and shorten the neck of the tea pot so that it would fit into the horizontal pocket. To add a little interest to the tea pot, I added a polka dot vellum on top of the yellow card stock, a metal word embellishment that says “adore” and some scalloped lace to decorate the pot and lid. There are more fun crafty die cut and tea themed gifts in the back of each pocket , but I want to keep some of those a surprise for Marla so I won’t go into them here.
One of the fun things I got to do with this larger, non-standard sized pocket letter was to use the three skinny pockets on the left to make six shakers. I used the Becky Higgins Project Life Fuse Tool (which I LOVE) and gathered up sequins, confetti, bling pieces, and embellishments in all the rainbow colors and made a pocket shaker for each color. Then to finish off the edges, I added a couple rows of silver bling with hot glue over the right seam and floral fabric washi tape over the hole punched left side.
Lastly, for some added movement, I made a chunky dangle using tea pot charms, heart charms, blue crystal butterfly charms and various beads in clear, white, teal and pink. The dangle base is a beaded pearl chain with a lobster claw clasp by Spare Parts. I softened the hardness of the metal clasp and bit of chain at the top with a double loop pink seam binding bow.
The following is a video share of this Sweet Tea themed pocket letter:
This pocket letter is being entered into the following challenges:
Simon Says Stamp Work It Wednesday Rainbow Challenge
Simon Says Stamp Wednesday Favorite Technique Challenge
613 Avenue Anything Goes with an Optional Twist of Sights, Tastes, and Sounds Challenge (Winner)
One Sweet Challenge Die Cuts or Punches
Card Mania Metal Embellishments Challenge
Thanks for stopping by and have a wonderful crafty day! WOOF
]]>
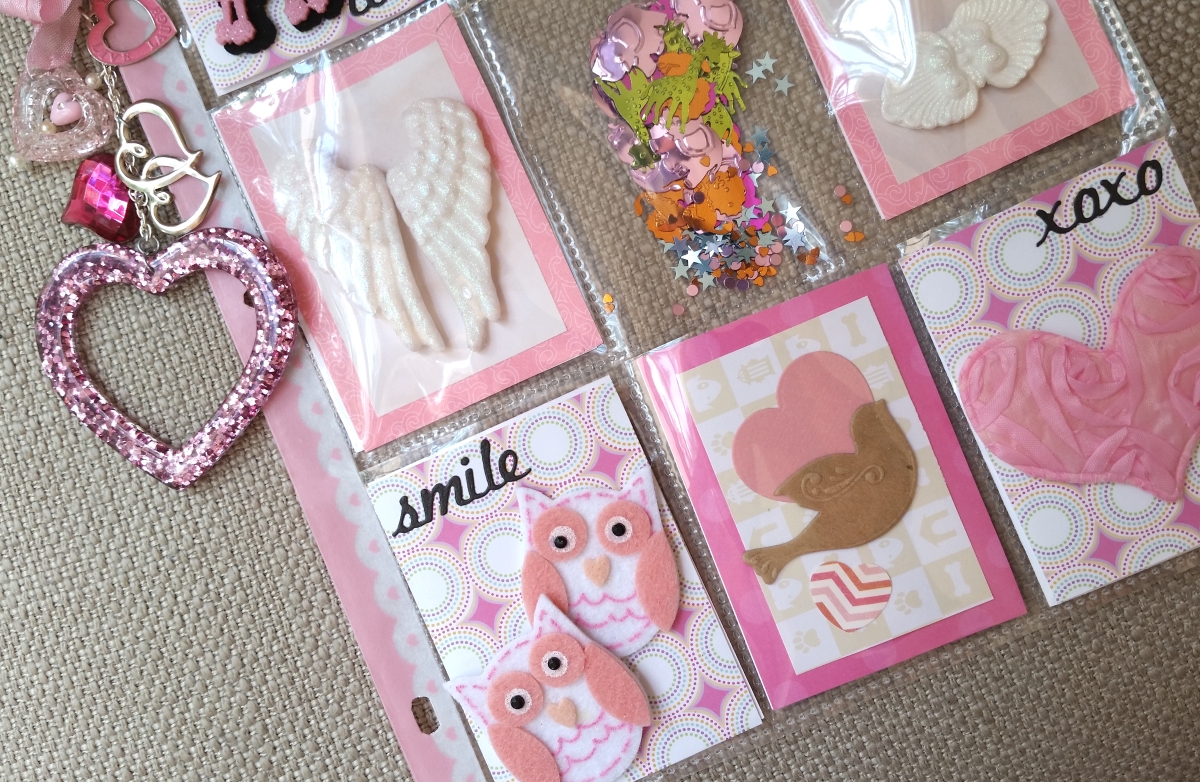
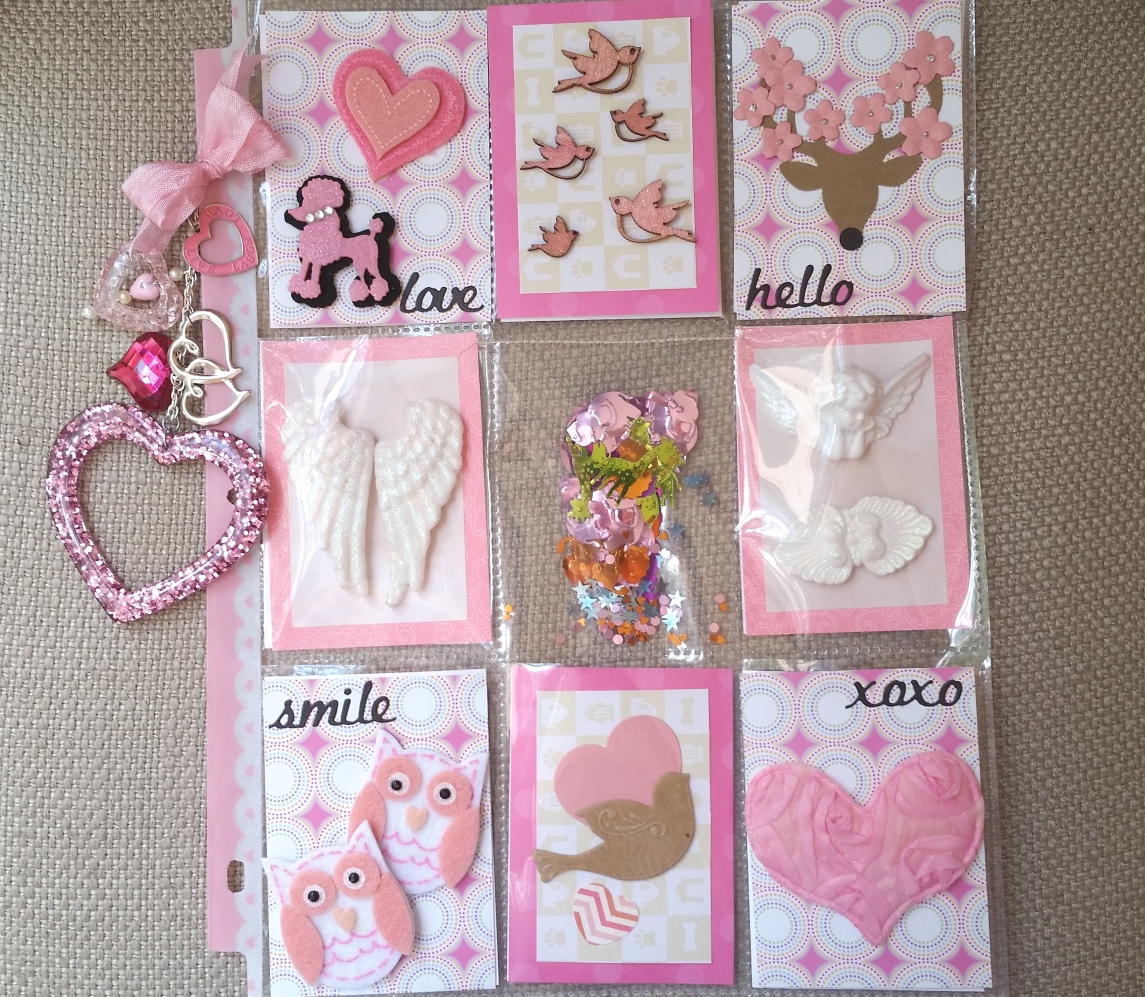 She loves animals (she even raises chickens!) and the color pink, so I figured this pocket letter should have those themes, more or less. I also think of Jonnie as being an angel here on Earth walking among us mere mortals (yes, she is that kind, thoughtful, and gentle), so I also included some angel themed items.
I used animal confetti from Michaels for the center shaker pocket, which I sewed up with my sewing machine. I used some cute pink felt pieces of a pink poodle (I have been hoarding this for a long time, but I wanted to use this for the the pocket that will include my letter to Jonnie), pink owls from Target, and a double pink heart also from Target. I created a smaller version of the spirit deer card (shared HERE) using the EK Tools Large Deer Head Punch and the Diemond Dies Cherry Blossom Branch and Flowers Die Set. I also used the Diemond Dies Word Die Set #1 to cut out some words that I thought would make nice little accents in the four corner pockets.
 My readers can get 10% off and free worldwide shipping on all orders of $35 or more at Diemond Dies by using the code “thankskristina” at check out.
The most difficult part of this pocket letter was the heart-themed dangle with a double loop pink seam binding bow. I poured through my acrylic, bead, and metal collections, pulling out all the hearts. From that small pile, I picked out these special pieces and used my jewelry making tools to make this dangle. The trickiest one was the pink acrylic, pearl and heart enamel bead charm that I made using an eye pin threaded through the various components. Do you think I love that charm the most because it was the most complicated to make or because it just turned out pretty? LOL XD
This project was more about thoughtfully assembling and decorating with things from my stash to fit Jonnie’s tastes, so if you’re interested in any additional details, please check out the video below:
This pocket letter is being entered into the following challenges:
Simon Says Stamp Anything Goes Wednesday Challenge
Craft-Dee BowZ Anything Goes with a Handmade Bow
Thanks for stopping by and have a wonderful crafty day! WOOF
]]>
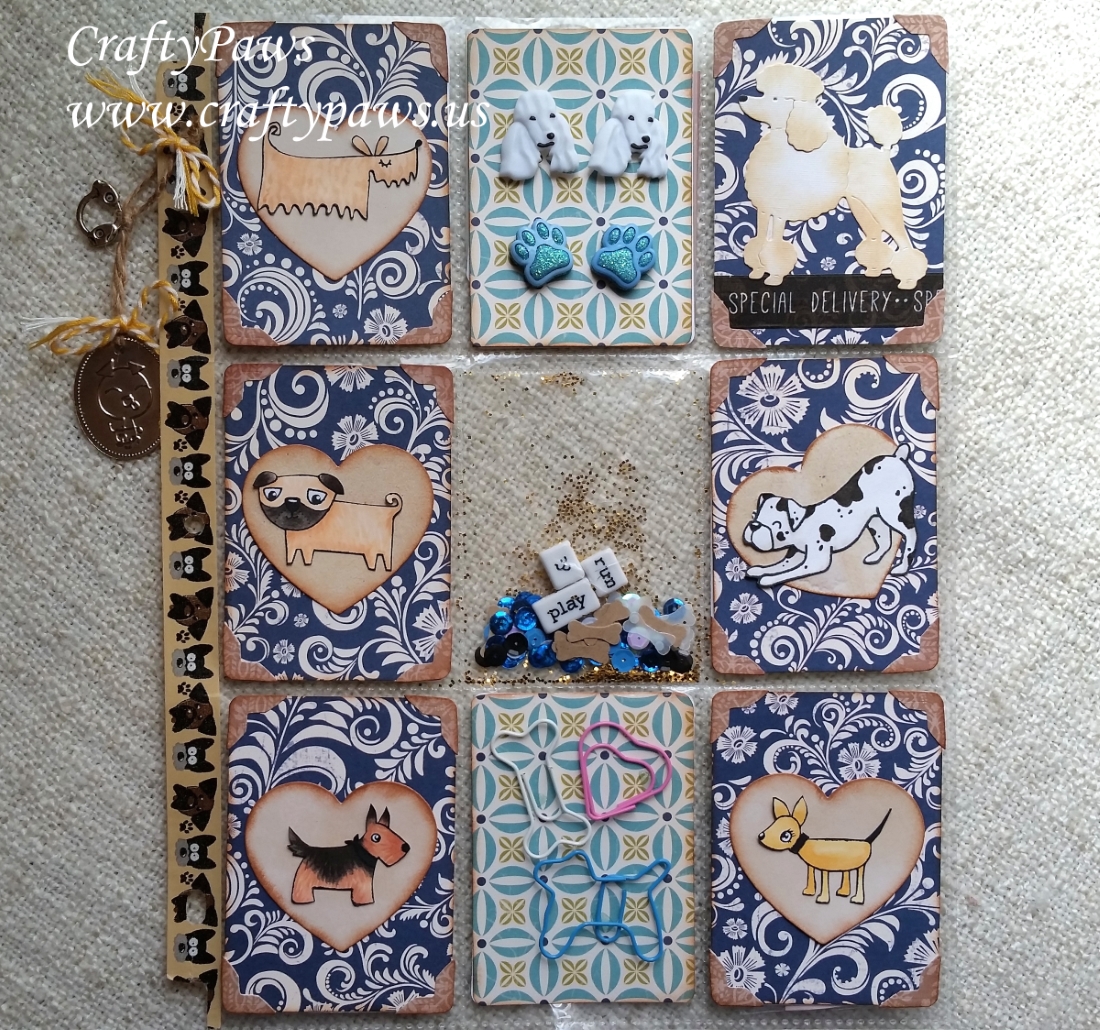 I used pups from three different stamp sets but tried to keep them all relatively similar in their simplicity and cartoon style. I used “Puppy Pals” from My Cute Stamps, “Paws and Claws” from The Paper Company, and “Critters in the Dog Park” from Lawn Fawn. I colored them with the following Copic colors (clockwise from upper left) and fussy cut each of them out, edging them completely with a black marker to eliminate the white paper edge, and adding glints of eyes and shines on noses with a white Gelly Roll pen.
Shaggy Dog: E51, 52 and 53
Harlequin Great Dane: W1 and W7
Chihuahua: E50, YR20 and YR31
Australian Terrier: E51, E11, E13, W5 and W7
Pug: E50, E51, E53, W5 and W7
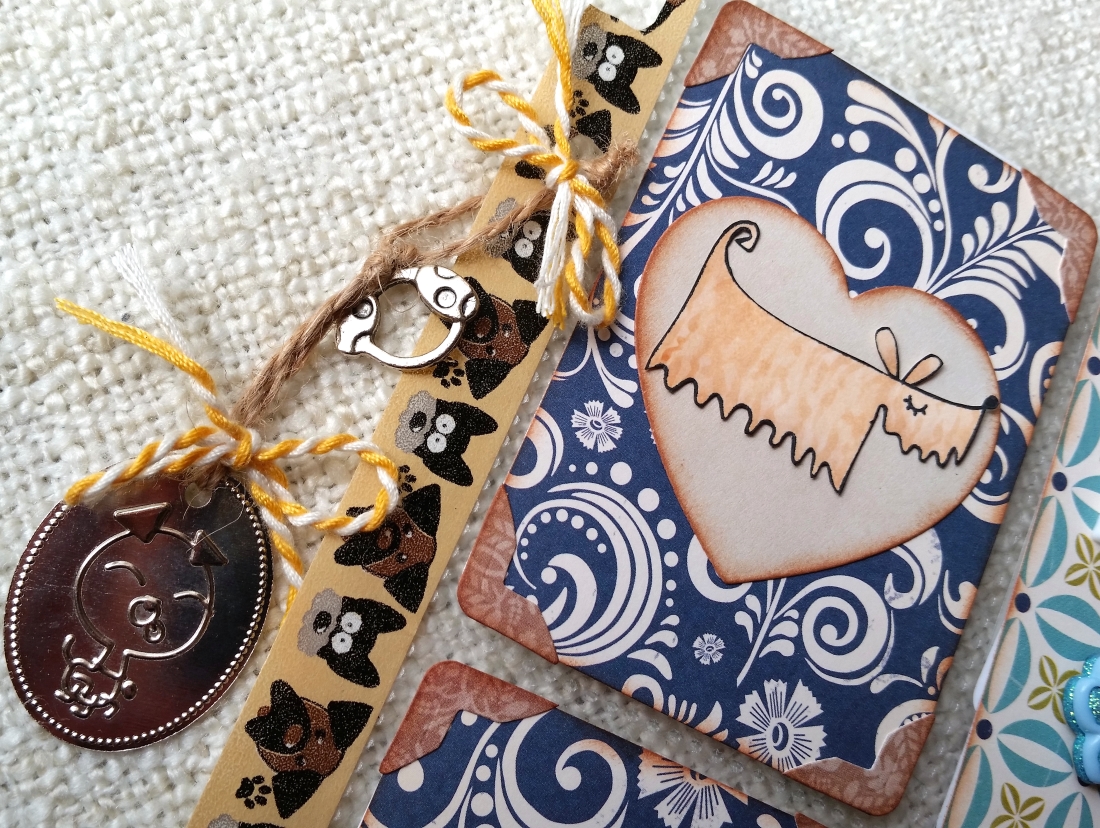 For each of the backgrounds, I used the Tim Holtz Alterations Movers and Shapers ATC and Corners Die Set and scrap papers I’ve been gifted (sorry I don’t know the names of the collections). Because the patterns were very busy, I die cut hearts from cream colored scrap papers using the third smallest heart from the Diemond Dies Nesting Hearts Die Set and framed each pup in a heart. To give a more finished vintage look, I inked the edges of the hearts and the cut out ATCs with Tim Holtz Distress Ink in Antique Photo.
I filled the center column top and bottom pockets, with poodle buttons, glittery dimensional paws, and fun shaped doggy love metal paper clips. For the center pocket, I used my new fuse tool to create a shaker, which I filled with sequins, gold glitter, dog bone punch outs from vellum and kraft card stock, and the word beads “play,” “&,” and “run” from Bead Landing. To add something with movement, I added metal dangles of an adorable little pup and a dog head charm with twine and yellow and white bakers twine bows.
The back of each pocket is filled with more fun doggy embellishments and crafty goodies, which you can peek at in the following share video:
This pocket letter is being entered into the following challenges:
MarkerPOP Anything Goes Challenge (Top 3 Winner)
Simon Says Stamp Anything Goes Wednesday Challenge
Lawn Fawn Calling All Critters Challenge
Card Mania Metal Embellishment Challenge
Thanks for stopping by and have a wonderful crafty day! WOOF
]]>