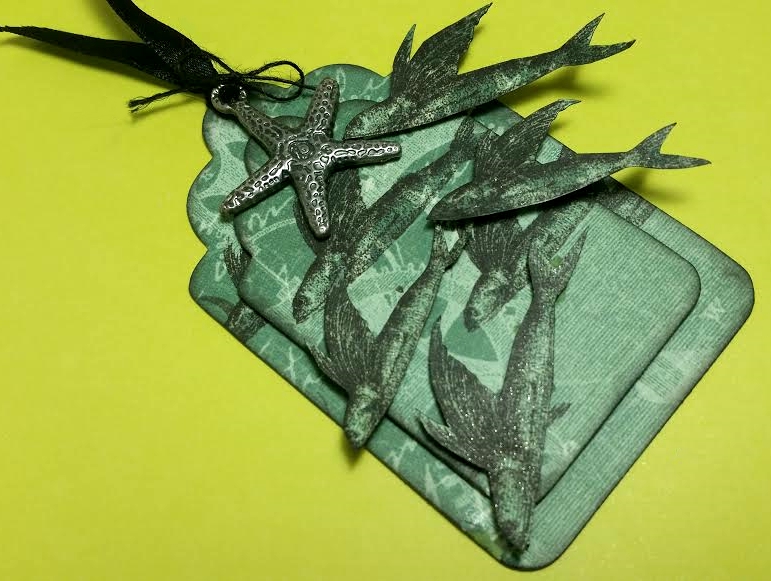
To make this little tag, I used the Diemond Dies Nesting Tag Die Set and cut into my one remaining sheet of this Steampunk Debutante Collection paper with the flying fish in the background (it has the flying man held up by a giant 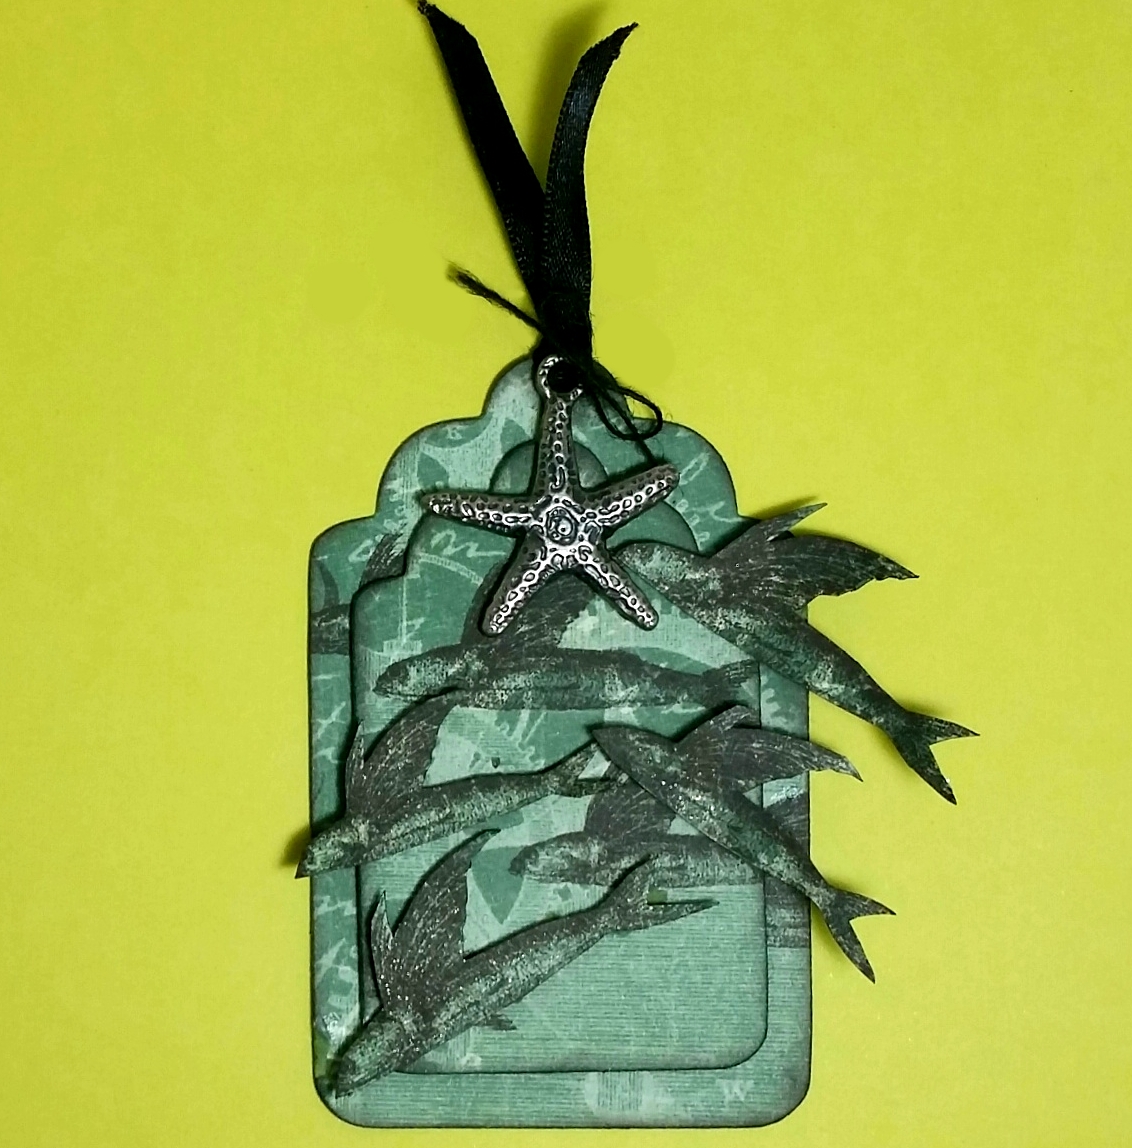 hand by a propeller). I layered two of the nesting tags with double sided foam adhesive, inking all the edges with Tim Holtz Distress Ink in Black Soot.
Then it was a matter of fussy cutting all the flying fish and inking the edges with a black marker. I then popped them up on one, two, or even three layers of more double sided foam adhesive, positioning them in directions to make them look like they were swimming in harmony in a big school. I think adding all the extra double sided foam adhesive gave some of them the look of jumping/flying in the air! I don’t know if you can see it in the photos, but I also added coats of Clear Wink of Stella to the flying fish so they have a great sparkle in the light.
To finish off the tag, I used a bit of black silk ribbon and looped it through a hole I had punched at the top. Lastly, I remembered I had an old metal starfish charm in my stash so I tied a bit of black twine into a bow and added the whole thing as a little topper.
This tag is being entered into the following challenges:
Simon Says Stamp Monday Nautical/By the Sea Challenge
Simon Says Stamp Wednesday Things With Wings Challenge
613 Avenue Create Anything Goes Challenge
SanDee & Ameile’s Anything Goes Steampunk/Industrial Challenge
Creatalicious Anything Goes Challenge
]]>
 I Copic colored the little super hero bunny very simply with : 0, C0, C1, C3, C6, C7 and C9. I fussy cut him out leaving a small white border around the whole image just so I could make him large enough to be mounted on a slider mechanism (even with the white border he was too small to be put on a normal penny slider).
For the scene on the card front, I die cut out the cityscape several times from black card stock to get a row of skyscrapers. I also used the negative left over part of card stock as a silhouette of a skyline further back. To add a pop of color, I inked some white card stock with Tim Holtz Distress Ink in 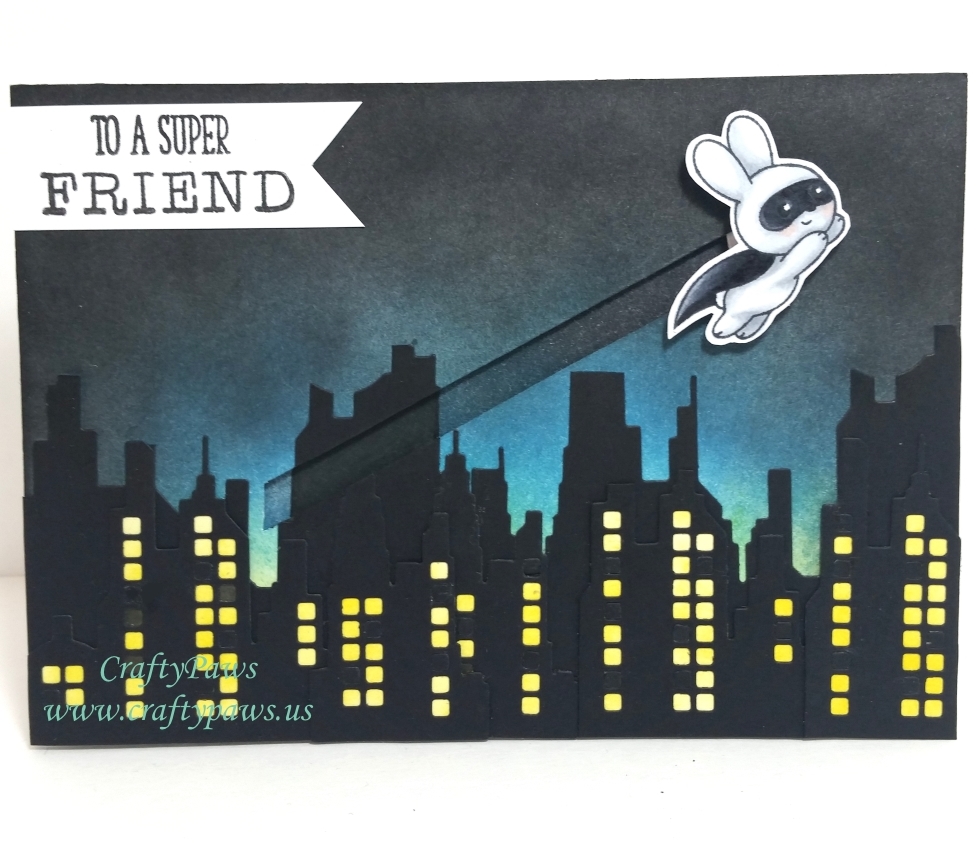 Mustard Seed and lined the back of the die cut buildings so that they would look like they were lit up from the inside. For the night sky, I didn’t want the black silhouetted buildings to fade into the sky so I inked up the card front with the following Tim Holtz Distress Inks: a hint of Mustard Seed on the lower third (most of which would be covered by the buildings and the silhouette; Salty Ocean for the middle third; and Black Soot for the top third. But I also mixed the Black Soot into the blue area more to create a feeling of dusk. To get a more intense black for the top of the card and along the edges, I also used an ink dauber and some Onyx Black Versafine Ink.
I used an X-Acto knife to cut a slit into the card front where the bunny could zoom up into the sky. Rather than using two pennies for the slider mechanism, I punched out eight 3/4″ circles from scrap card stock and trimmed them down so that they could be completely hidden behind the bunny. I glued them together to end up with two thick circles, four card stock layers thick. Then I cut a Tombow Power Adhesive Tab into quarters and stacked two quarters together to create a spacer between the circles. I used a powder tool to eliminate the sticky edges of the power tabs to help facilitate a smooth glide. Before putting the card front onto the card base with double sided foam adhesive, I also inked the area of the card base that would show through the slit to match the colors of the sky on the card front, and I used a black Faber Castell Pitt Pen to even draw in the silhouetted building that was cut out from the slit. I think those kind of details really helps create a cohesive scene look. 🙂
The following is a process video of how I made this slider card:
This slider card is being entered into the following challenges:
Paper Smooches Black and White with a Pop of Color Challenge
Word Art Wednesday Anything Goes Challenge
Crafty Girls Creations Anything Goes Challenge
Not Just Cards Anything Goes Challenge
Craft Your Passion Anything Goes Challenge
613 Avenue Create Anything Goes Challenge
Art Impressions Show Off Your Stamp Challenge
Through The Craft Room Door Anything Goes Challenge
Crafts Galore Encore Anything Goes Challenge
MFT Color Challenge 43
]]>
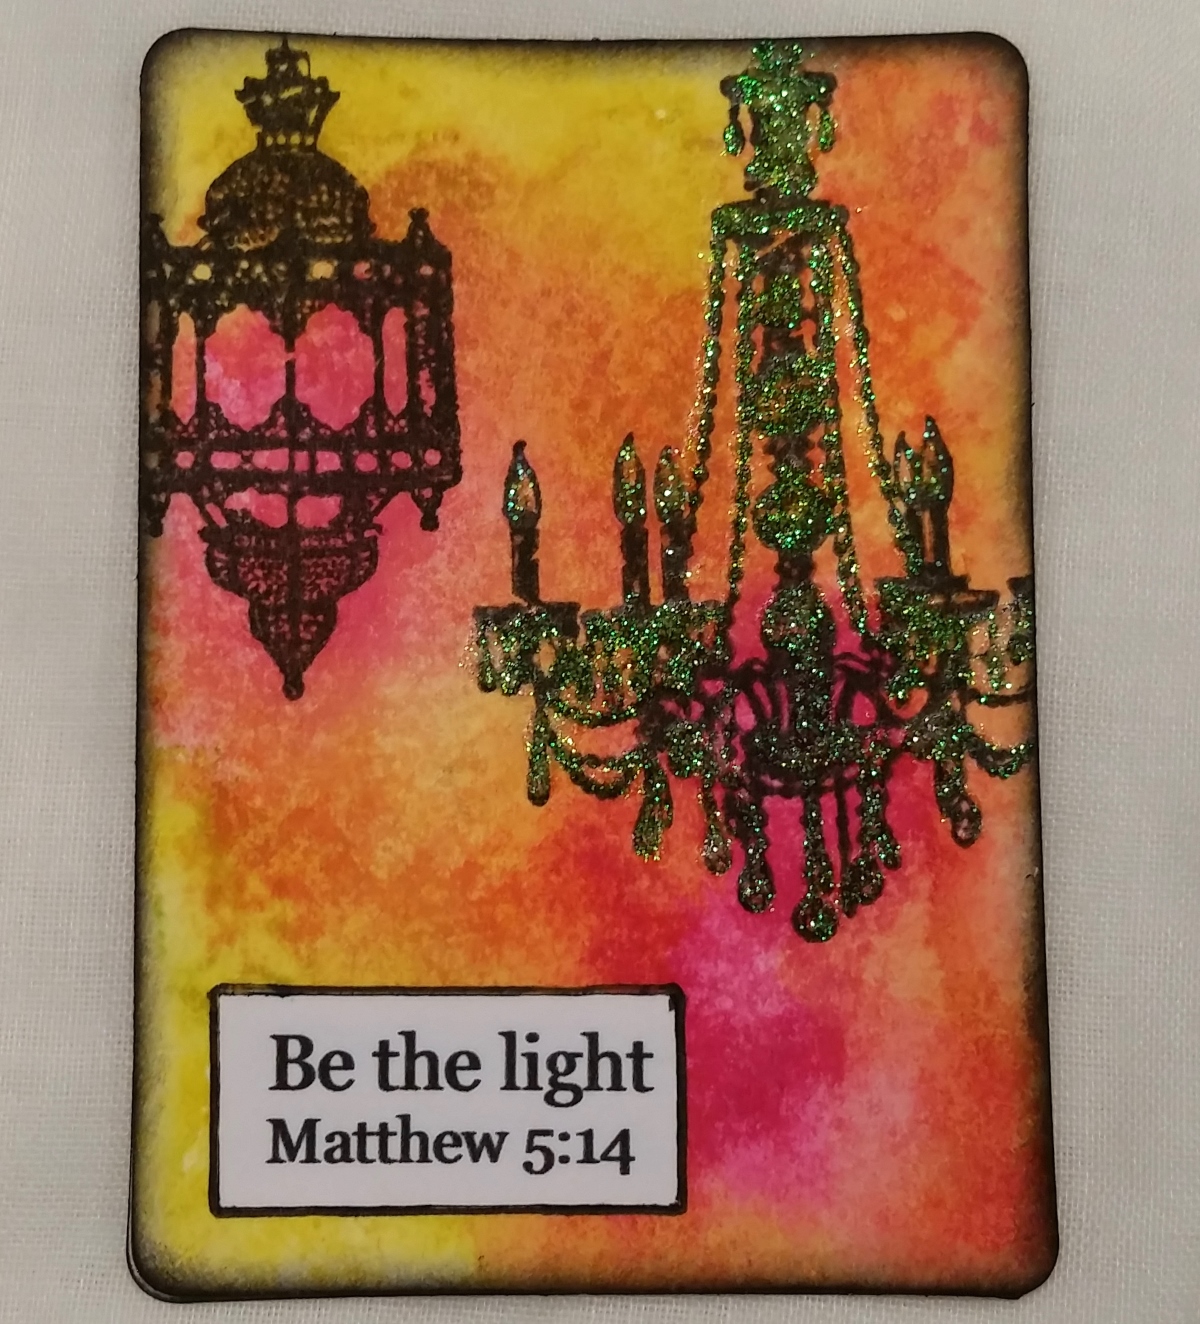
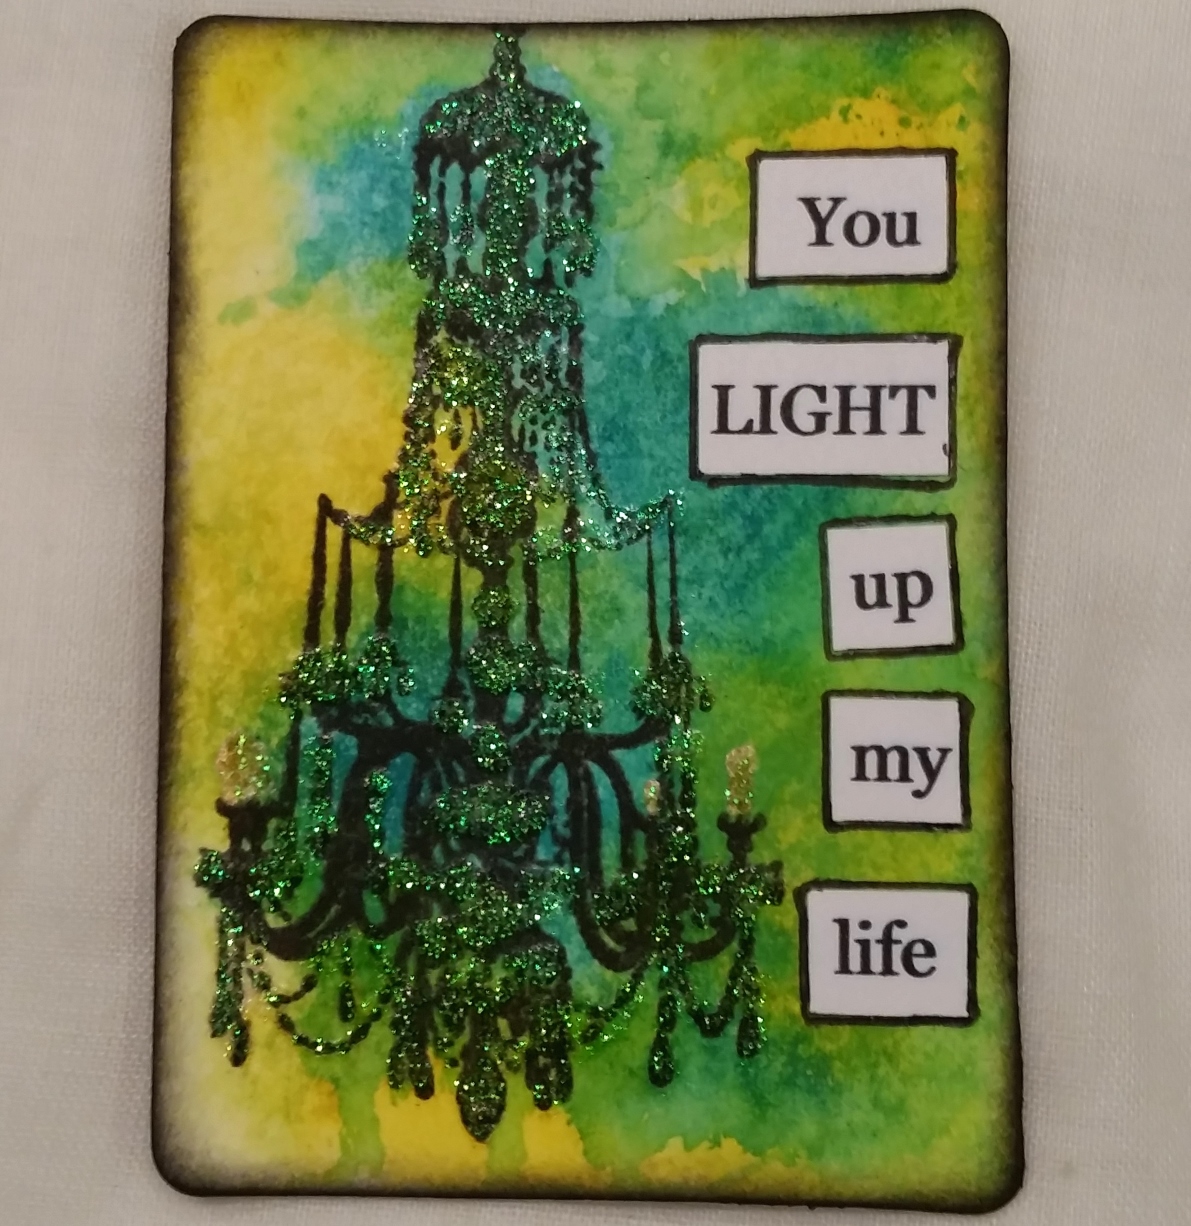 I used 140 lb Strathmore water color paper which I cut down with the Tim Holtz ATC and Corners Sizzix Die (I also cut down medium weight chip board to create a sturdier base). I misted water on the water color paper and used my non-stick craft mat to smoosh out (yes, that’s the technical term) the following colors for each ATC:
 ATC 1: You LIGHT Up My Life
Peacock Feathers
Squeezed Lemonade
ATC 2: Be the Light – Matthew 5:14
Picked Raspberry
Spiced Marmalade
Squeezed Lemonade
ATC 3: Let Your Light Shine
Seedless Preserves
Salty Ocean
Squeezed Lemonade
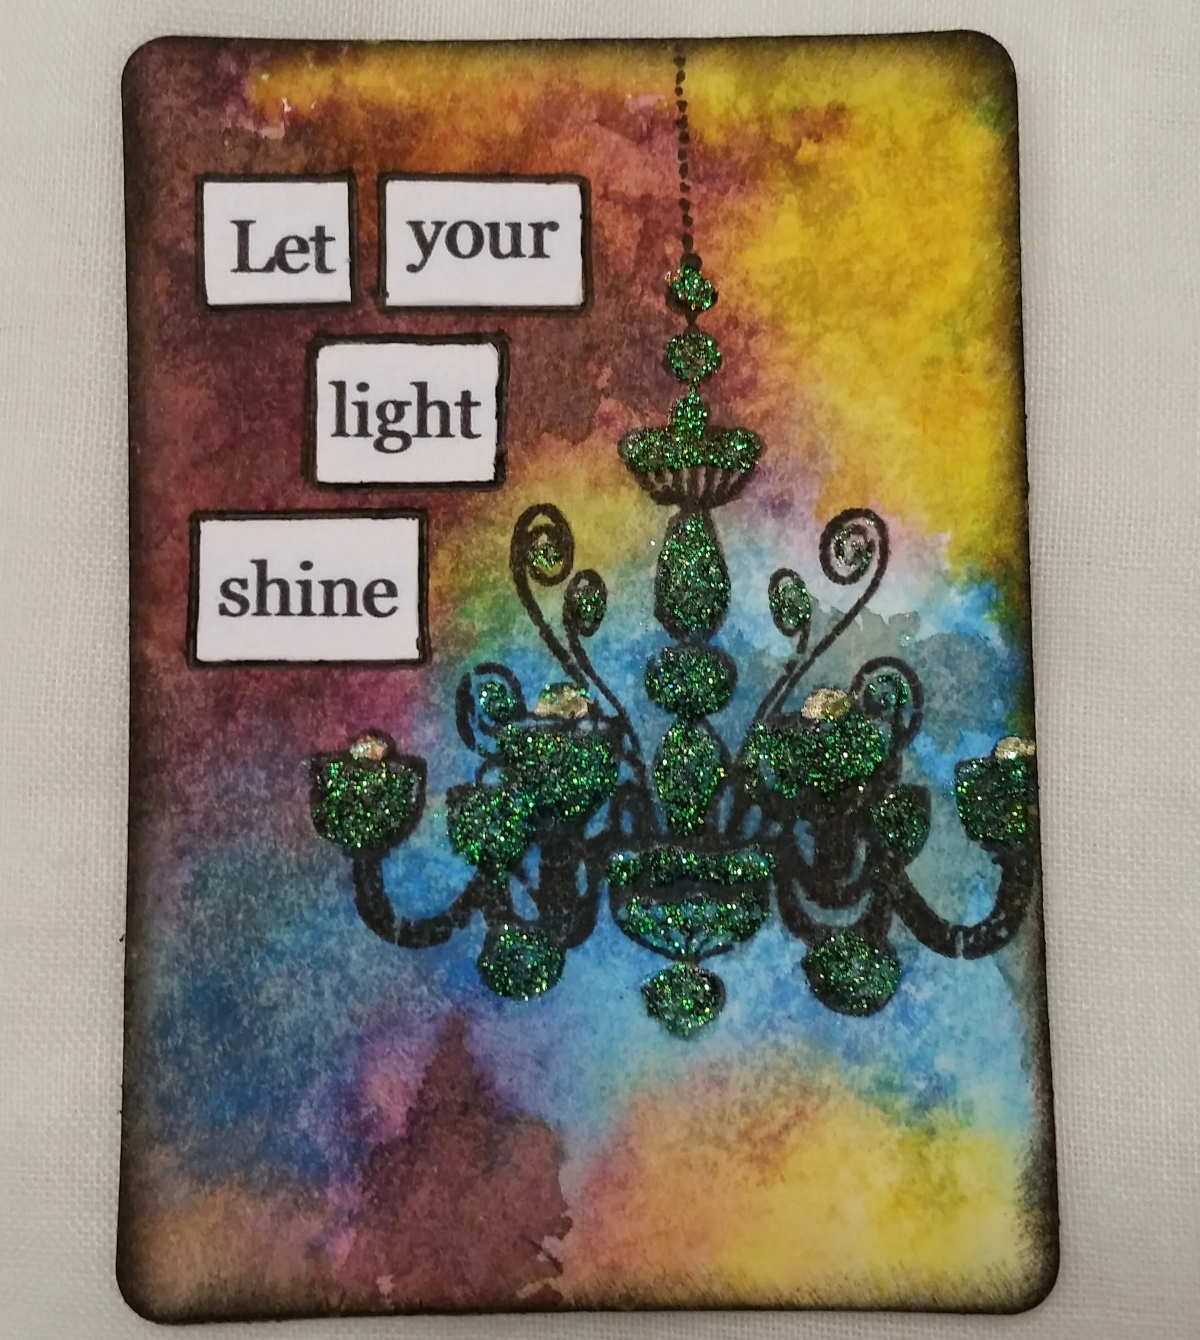 I helped along some of the ink movement with more water misting, and to get more intense colors, I dried the ATCs between adding layers of ink colors with a Pentel water brush. Finally to finish off the edges I inked with Black Soot.
Over top of the chandeliers I used Studio G glitter glue and over the flames and light bulbs I used a metallic gold Gelly Roll pen topped with Recollections Sunflower glitter glue. Lastly I found some quotes about light that appealed to me online and printed them out on white card stock. I cut up the sentiments, glued those in place, and outlined each segment with a black Uniball ink pen.
This ATC series is being entered into the following challenges:
Simon Says Stamp Monday Stamp + Mist Challenge (Top 3 Winner)
Simon Says Stamp Wednesday Anything Goes Challenge
Through the Craft Room Anything Goes Challenge
The following is a video share of this ATC series:
Thanks for stopping by and have a fabulous crafty day! WOOF
]]>
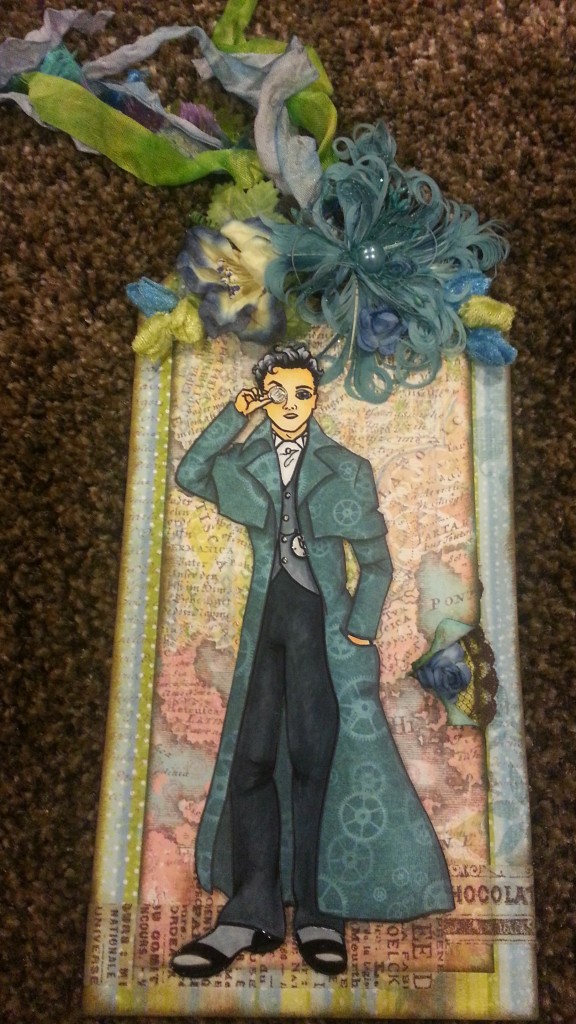 appeal. So naturally I turned to none other than Patrick Dempsey, who played Doctor McDreamy, for some inspiration. LOL Actually, I was never really a fan of Grey’s Anatomy, but when I released Steampunk Scarlett, crafty friend Amador (YT: Amadoreros), commented that she was “McSteamy.” Right then, I knew the direction this digi was headed. 😀
To create this Steampunk-lite tag (I didn’t add a lot of metal, gears, dark colors, etc.), I used some wonderful papers from K & Company as a base. There is a map pattern to the top paper, which alludes to the adventurer/explorer that I imagine McSteamy to be. LOL I added some Tim Holtz tissue tape which I darkened with Tim Holtz Walnut Stain Distress Ink (to give McSteamy something to stand on). I inked the edges of the papers with Tim Holtz Distress Ink in Peacock Feathers and Walnut Stain. Where I tore and rolled back a bit of the top paper, I inked both sides of the paper and tucked behind some brown lace and a blue rose to add some interest. Because I did not want to make the tag too feminine, I stayed with blue and green hues and used paper, rubber, velvet, and feather flowers (quite the mix eh?). The flowers were mostly Wild Orchid Craft or Prima.
To color up McSteamy, I paper pieced his fabulous coat using one of my all-time favorite Graphic 45 papers, “Steampunk Spells.” To add depth, I added shadows to this paper pieced portion using Copic colors: C3 and 5. Actually, I wanted that coat with that fabulous paper to be the main focus of the image so other than the skin tones in E000, 00, and 11; the only Copic colors I used were: C1, 3, 5, 7, and 9. I used different combinations for his pants, vest, and cravat. For a little sparkle to the “metal” parts of the digi, I used a clear star Sakura Gelly Roll pen on his monocle, vest buttons, cravat pin, and clock edge. To add a bit of shine, I also used Glossy Accents on his eye, monocle, pocket watch, and shoes.
The tassle on the tag is made from hand-dyed seam binding in blues and greens and some fun eyelash trim in blue, green, and purple. Overall I kept this tag more simple, but I like the final result with McSteamy taking center stage.
The following is a video share of this tag:
This tag is being entered into the Simon Says Stamp Monday Anything Goes Challenge
Thanks for stopping by. Please subscribe, and have a great day! WOOF
]]>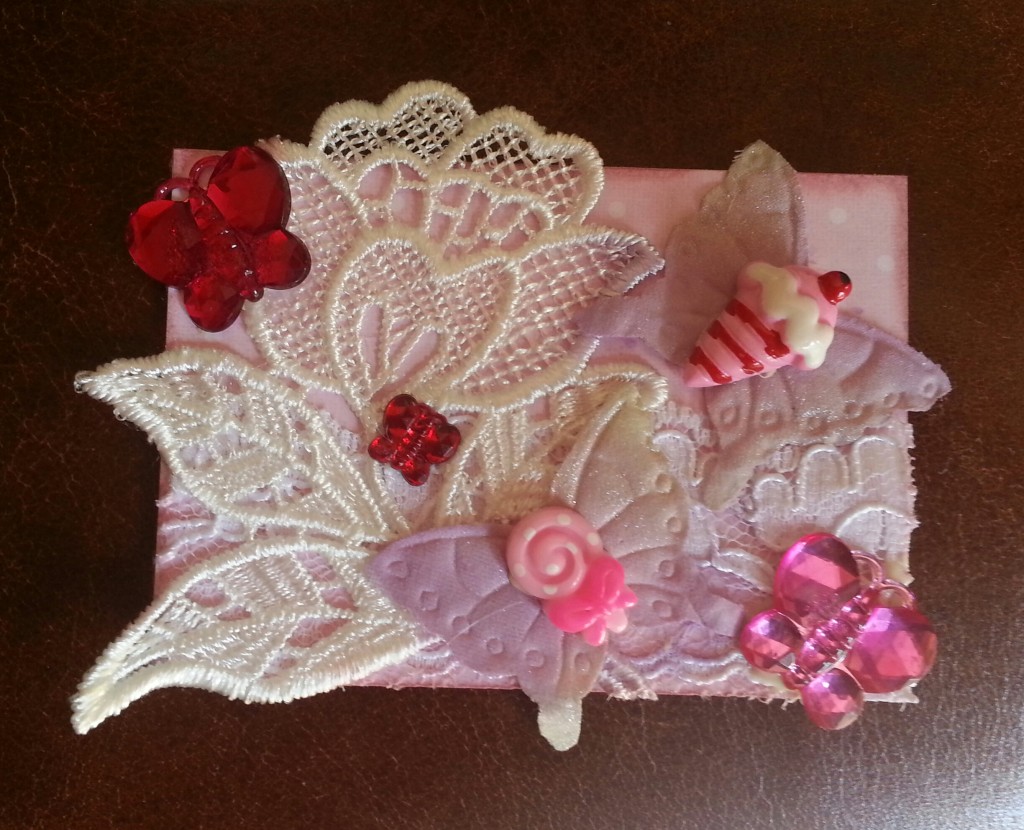 I decided to make the first one using more traditional elements like laces, appliques, and butterflies–all classic crafting items. Then I added a little twist. What if I added plastic sweets to the centers of the butterflies to add a little whimsy? Yes, that was the ticket. I added a little lolly and an ice cream cone and titled the ATC, “Butterfly Dreams.” 🙂
The second one was inspired by the sweet little wood veneer dogs by Studio Calico that I picked up at Tuesday Morning for only $1.99! I cut out a little row of houses from thick watercolor paper (I find the tooth on watercolor paper is great for getting vibrant color from Gelatos), using a Spellbinders in’spire die called “Row Houses.” Colored them up using a variety of Gelatos (as if the evening sun was reflecting the colors of the rainbow on them), and inked up a handful of wood veneer dogs with Tim Holtz Distress inks antique photo and walnut stain to “hang out” in front. I decided I would create a little scene from an imaginary “It’s a Dog’s World.” LOL
The following is a video share of the two fanciful ATCs:
The “It’s a Dog’s Life” ATC is also being entered into the Pretty Pink Posh Cutting Edge Blog Hop
Thanks for stopping by! Please subscribe if you wish, and have a great day! WOOF
]]>
I wanted to make a project with a Steampunk or grunge look, and I loved the results of painting, distressing and inking these letters. Plus, what is better than being able to personalize something with a name or words with special meanings?
The following is a list of supplies I used:
1. Tim Holtz grunge board kit
2. Adhesive, my preferred is gel medium to prevent shininess or surfaces that resist ink or paint
3. Black acrylic paint
4. 220 grit sand paper
5. Tim Holtz Distress Ink or Marker in medium shade; I used brushed corduroy
This is a video tutorial of how to use these Tim Holtz Grunge Board letters:
Thanks for stopping by! Please subscribe if you wish, and have a great day! WOOF
]]>