 I colored up the poodle with the following Copic colors: E51, E21, E11, and E93, and the fluffy spotted dog in: W1, W3, E33, E23 and E25
Then I scanned in both images into my computer and taped some tissue paper onto card stock to run through my printer. I printed out several images of each pup onto the tissue paper and then loosely cut them out.
I adhered the tissue paper images of the pups onto fragrant white candles from the Dollar Tree by covering them with wax paper to hold them in place as I slightly melted the wax of the candles with my heat tool. This light melting embeds the tissue paper into the surface of the candle wax, and voila! Custom candle!
Then I created sturdy chip board candle bases and had fun decorating the bases and the lower part of the candles with loads of paper flowers. I used hot glue to adhere all the roses and then added a finishing touch of small pearl heart stickers, also from the Dollar Tree. This was a new-to-me technique, and I’m so pleased with the results. I’m made a set of poodle ones for my sister (she has 2 poodles) so she can have them by her soaking tub. She and I are kindred spirits when it comes to our pups, and I know she’ll love the ones I made for her.
The following is a process video of making these custom candles:
These candles are being entered into the following challenges:
MarkerPOP Valentines Challenge
Simon Says Stamp Monday Something New Challenge
Simon Says Stamp Wednesday Something New Challenge
Penny Black and More One for the Girls
Not Just Cards Anything Goes Challenge
Crafts Galore Encore Anything Goes Challenge
Fab ‘n’ Funky Something New Challenge
Lil Patch of Crafty Friends Anything Goes Challenge
Thanks for stopping by, and have a fabulous crafty day! WOOF
]]>
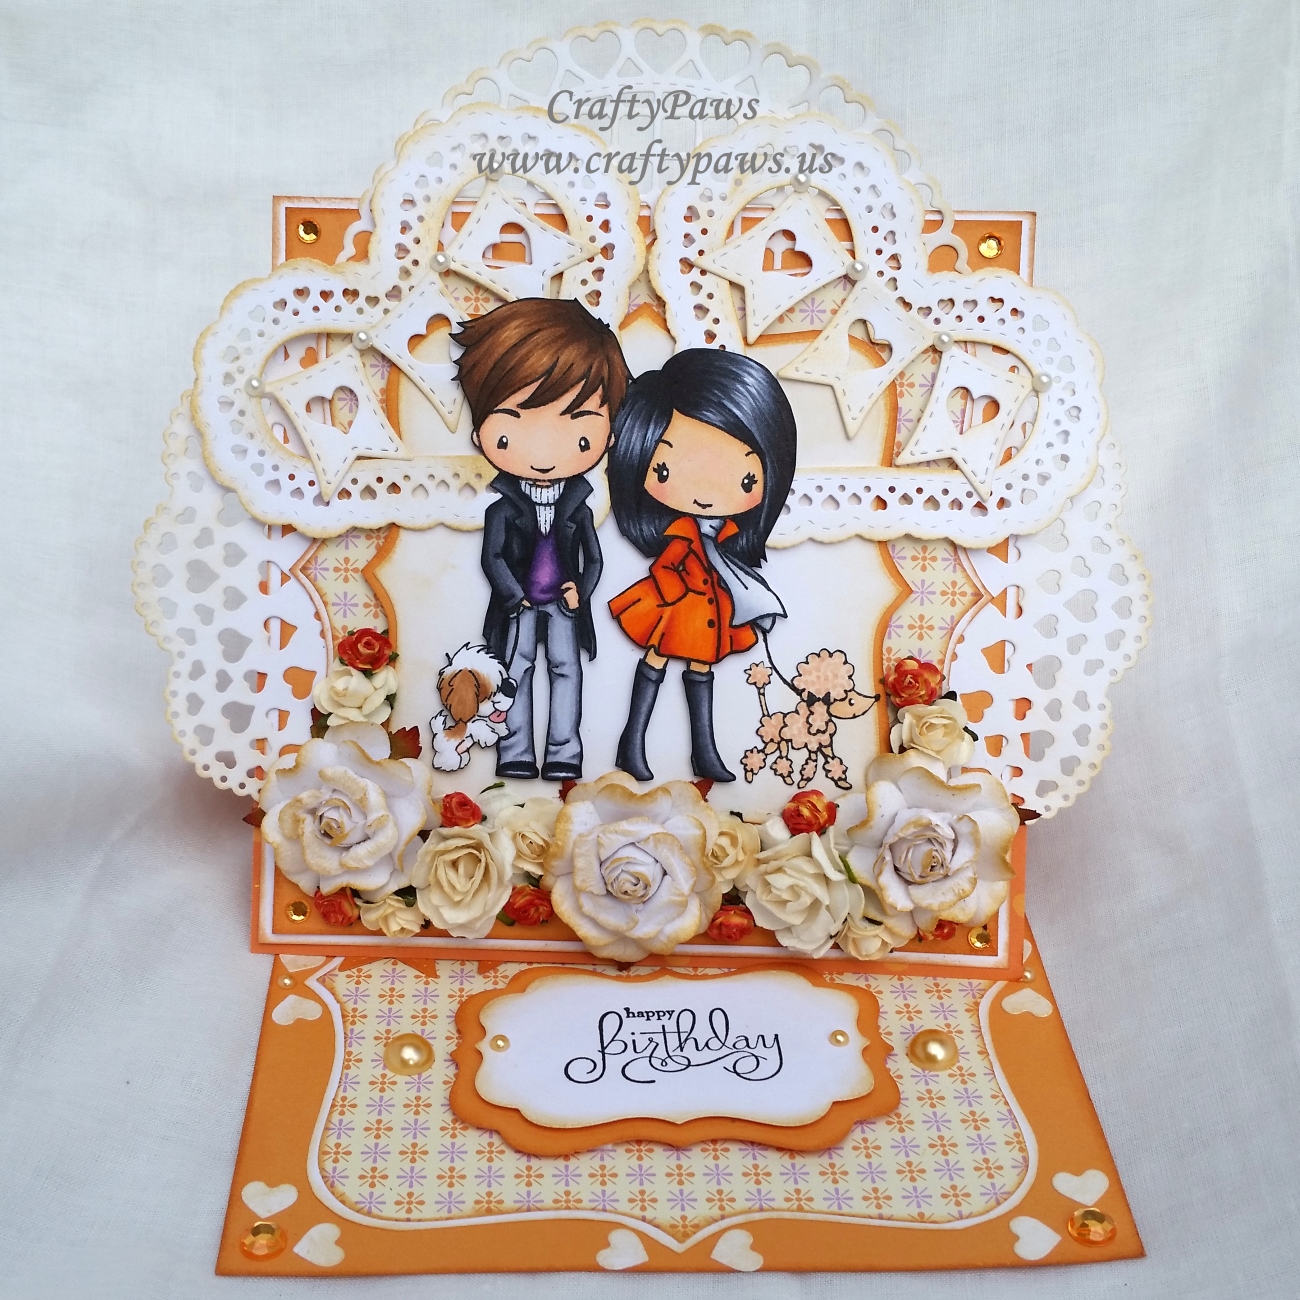 As my GIL loves to display the handmade cards I have sent to her, I decided this time I would make an easel card. To create the structure for that card base, I used the Diemond Dies Labels 2 Top Note Nesting Die Set and the Labels 1 Nesting Die Set for the Prop/Stopper. For the white card stock layers I inked the edges with Delicata Golden Glitz pigment ink and for the orange and purple patterned paper and orange card stock layers I inked the edges with Tim Holtz Distress Ink in Tea Dye.
Because she also likes very detailed things, I also thought I should try my hand at making my very first very layered and detailed card with lots of intricate dies. I used the La-La Land Open Hearts Doily, La-La Land Crafts Heart Banner Die, La-La Land Crafts Heart Doily Border Die
, and La-La Land Crafts Heart Doily Die
(yes, there are a lot of hearts to show how much we love her!). I inked all the edges of these white card stock die cuts with Delicata Golden Glitz pigment ink to highlight all the details.
Lastly, I poured through my stamp collection and came up with three stamp sets that I could use together to represent my hubby, our two dogs, and me. This would be like an animated family portrait card. LOL I used the boy and girl from “Together Anywhere” by The Greeting Farm to represent my hubby and me, coloring them up with these autumnal/Halloween (black, orange and purple) Copic colors:
 Hubby: Skin: E000, E00, E11, R30; Hair: E35, 37, 57, 59; Pants, C1, 3, 5; Sweater Vest: V12, 15, 17, 09; Jacket: C3, 5, 7, 9; Turtleneck sweater: C1 + Copic multiliner in 0.1 pt
Me: Skin: E000, E50, E51, E53, R20; Hair: C5, C7, C9, C10, B32; Boots: C3, 5, 7, 9 + 100; Coat: YR00, YR04, YR07, R08; Scarf: C1, 3, 5 + Blender
For Biscuit, I used the poodle from the Penny Black “Mimi in Paris” stamp set and colored her up with: E51, 21, 11, and 93
For Bandito, I used the little scruffy pup from “Wanderlust” by A Random Fan and colored him up as follows: Belly: E93; Tongue R83; Brown areas: E31, 33, 35; White areas: W1 + Blender; and Nose: C10
I also drew in leashes for the pups with a Copic Multiliner pen.
Then it was just a matter of putting all the layers and pieces together in a pleasing way, which to me is often achieved with symmetry. That’s my OCD coming out–LOL. The following video illustrates the process of assembling all these pieces with mulberry paper flowers, flat back pearls, and bling:
This card is being entered into the following challenges:
One Sweet Challenge Fall Colors
Farm Fresh Challenge: Black, Orange & Purple
Addicted to Stamps and More Make Your Mark Challenge
Crafts Galore Encore Make a Card Challenge
Through the Craft Room Door Anything Goes Challenge
The Daily Marker 30 Day Coloring Challenge
Simon Says Stamp Work It Wednesday STAMPtember Challenge
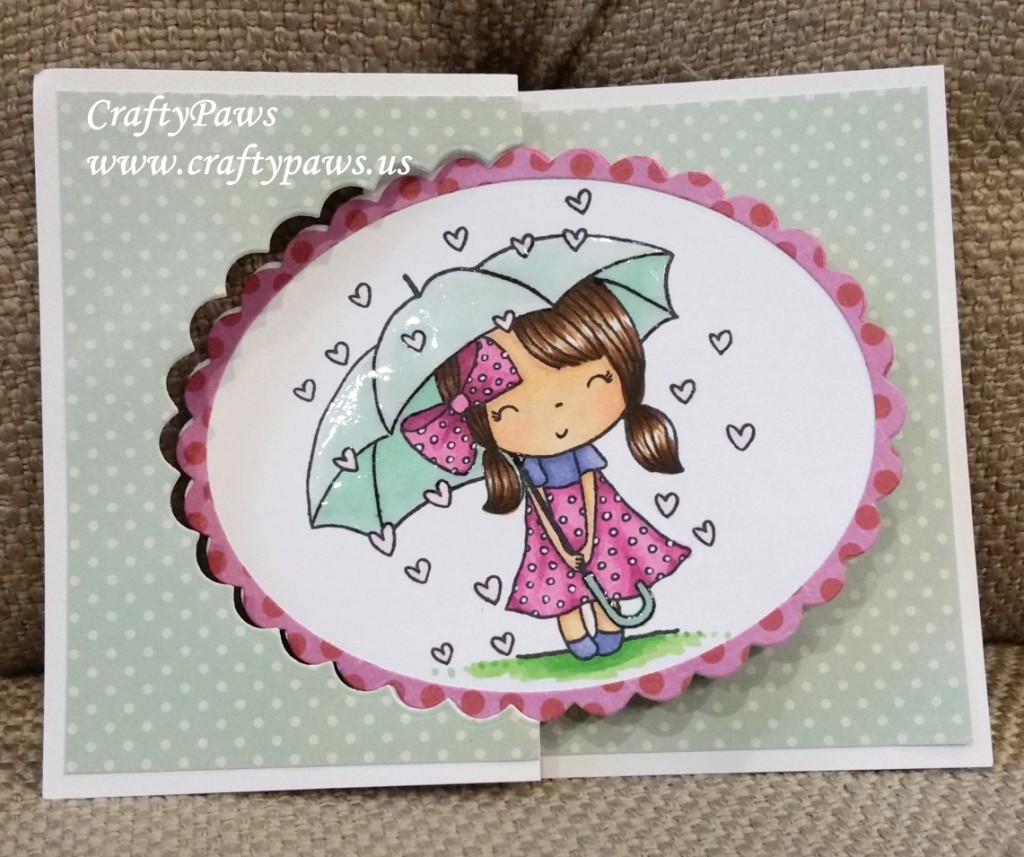 ack clear stamp set called “Mimi’s Love” which I picked up at the Not2ShabbyShop. I decided that I would create a flip it card with the adorable little Mimi walking in the rain being showered with love (literally it is raining hearts!) on one side and the cute fairy Mimi (from one of my other Penny Black favorites, “Mimi in Paris”) on the other side surrounded by heart flowers (which are from dollar stamps I was recently gifted by my friend Marla (YT: Marla H)).
I created the flip it card using the 4th largest oval from the Diemond Dies Oval Nesting Die Set and a slightly larger 4th largest scalloped oval from the Diemond Dies Scalloped Oval Nesting Die Set. Yes, that’s right, you don’t need a specialty die to create flip in cards. You can create them with any shaped die. The video below includes a tutorial (you can also find one HERE for a triple flip it card).
I colored in the images with the following Copic colors (the video also shows samples of coloring the skin and hair):
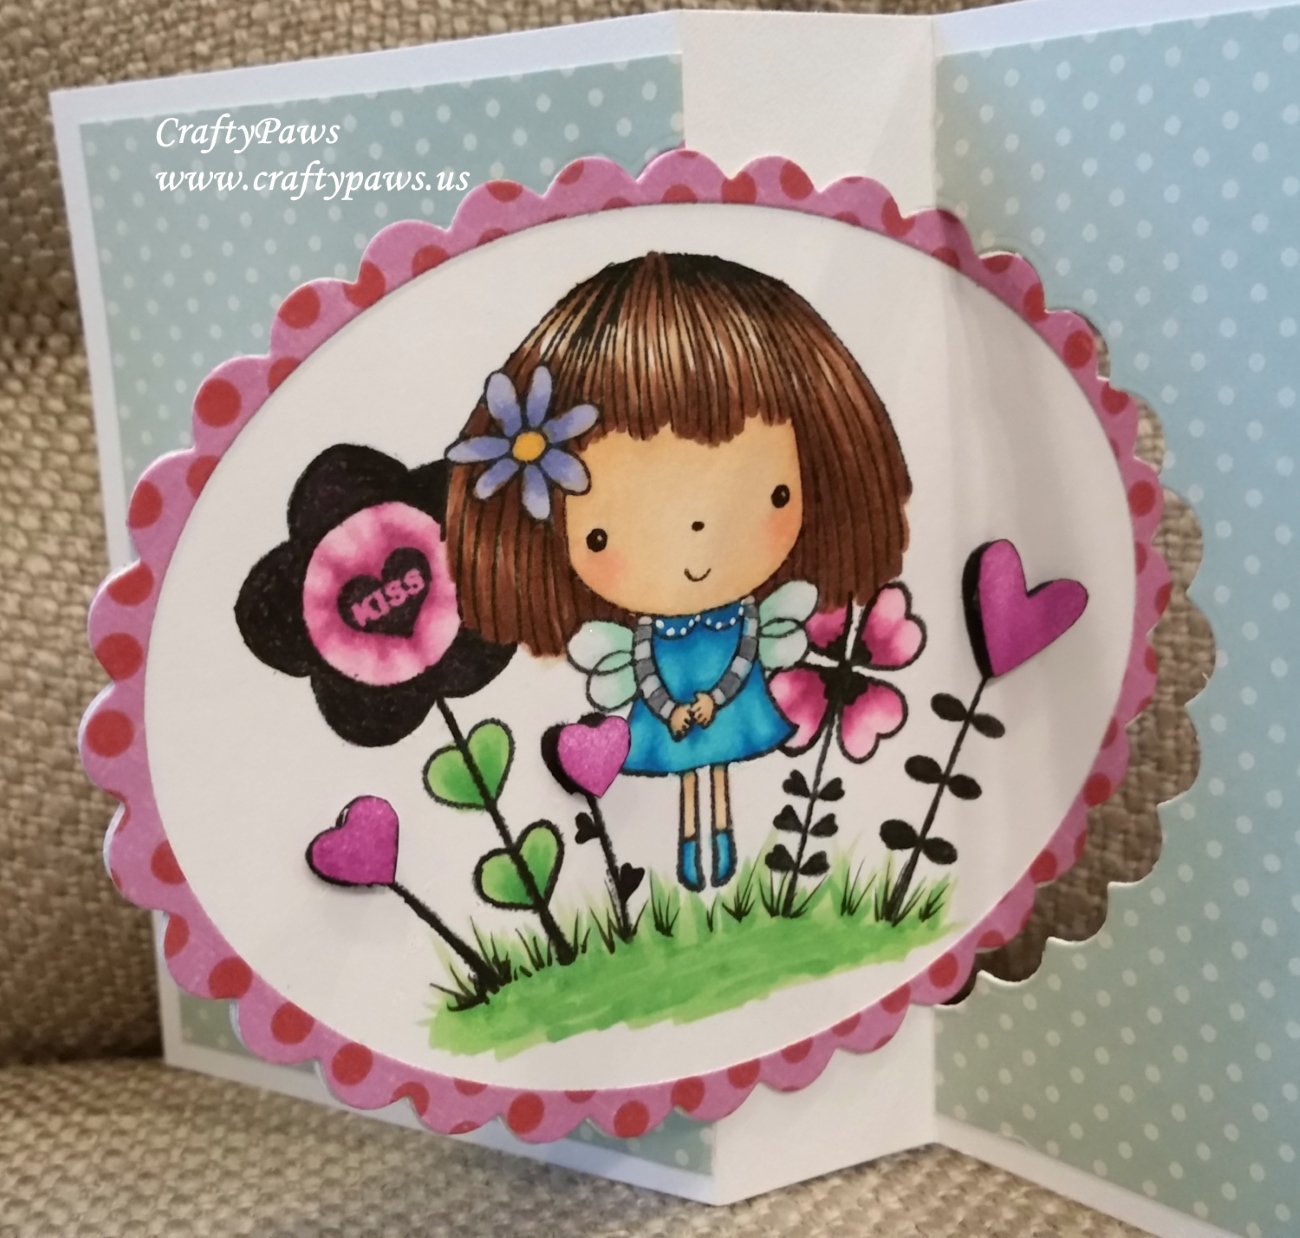 Skin: E50, 51 and 53 with R30 for blush
Hair: E55, 57 and 59
Purple and pink dress: BV01, 02 and 13 and RV55 and 66
Umbrella and wings of fairy: BG70, BG10 and G00, with clear Wink of Stella and Glossy Accent for shimmer and shine
Grass and leaves of flowers: YG06 and 09
Heart raindrops: RV000 and 00
Blue fairy dress and boots: B04 and 06
Purple and yellow flower in fairy’s hair: BV02, BG13 and Y35
Pink flowers: RV00, 55 and 66
I also used Wild Plum Ranger Adirondack Pigment Ink to stamp out the heart flowers, which I popped up on foam adhesive for some extra interest and dimension.
My readers can get 10% off at the Not2ShabbyShop by using the coupon code “CRAFTYPAWS” and 10% off at Diemond Dies by using the coupon code “thankskristina” ENJOY!
The following is a video tutorial and share of this flip it card:
https://www.youtube.com/watch?v=jEUZFnCvC6A
This April Showers Bring May Flowers Flip It Card is being entered into the following challenges:
Simon Says Stamp Monday A is for … Challenge
Simon Says Stamp April Showers or May Flowers Challenge
Naughty or Nice In Bloom Challenge
Card Mania Flowers Challenge
The Pink Elephant Pastel Challenge
Thanks for stopping by, and I hope you are having a wonderful crafty day! WOOF
]]>
For Day 18, I had fun using some stickers that were gifted to me from crafty friends, Jenn (YT: ScrapbenaCreations) and Jill (YT: luvmy2pugs1). It amazed me that everything seemed to coordinate together even though I had prepped this page weeks ago.
 For Day 19, I included a colored print out of the free digi I made that day, “Gift From Down Under“ and some pics I snapped of Biscuit and Bandito after the hair cuts I gave them that day. They weren’t thrilled with me that day, but I loved how sweet they looked.
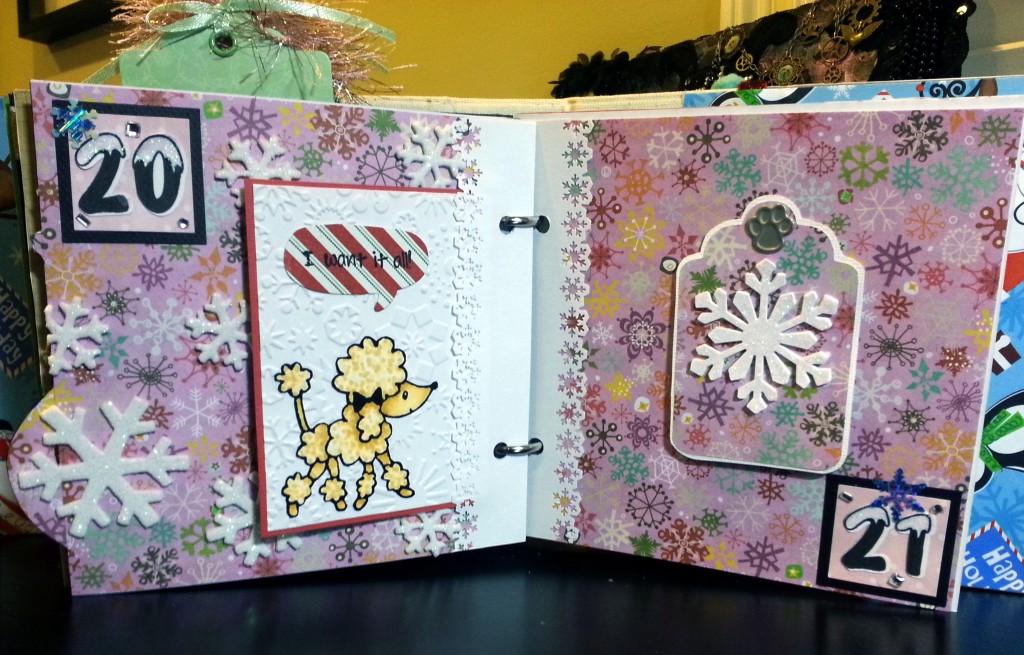
Day 20 was made just using some foam glitter snowflake stickers from the Dollar Tree for the page base and some paper from the Crate Paper “Snowy Day” collection. I made a little journaling card using a scrap piece of white card stock that I put through a Cuttlebug snowflake embossing folder and a poodle stamp from the Penny Black Penny Black “Mimi in Paris” stamp set, my current absolute favorite stamps! I colored it up to look like my Biscuit with the following Copic markers, using a dotting coloring technique to give the impression of curly fur: E50, 51, and 53.
Day 21 was super simple, which was a great way to reflect a quiet Sunday (plus, as my December Daily is getting pretty fat, it was helpful to create a flatter page-LOL). I just used a tag from the Diemond Dies Nesting Tag die set and a little silver paw shaped brad to create a swivel topper that hides that day’s journaling. The tag is decorated using 5 stacked punch outs from a Martha Stewart Crafts Himalayan Snowflake Large Punch. I glued them together to create a more substantial looking embellishment and then coated the top one with some glitter glue. I love how this simple tag came out and plan to make more for gift tags.
Diemond Dies is having a sale through December 31, 2014, so go check them out if you have a little extra shopping money left over or if you have someone just “dying” to get you something for the holidays. 🙂 Don’t forget to use the coupon code: thankskristina for an EXTRA 10% off your purchase, and if your order is $35 or more, you also get free worldwide shipping!
The following is a video share of these December Daily pages:
Page 20 is being entered into the Simon Says Stamp Wednesday Winter Inspiration Challenge (that dog licking the snow is so adorable)
Thanks for stopping by and have a wonderful day! WOOF
]]>
I started with a red card stock base and used some black card stock for the top film strip layer — just like Sandy 🙂 Then I wondered what little images I could pop into some of the frames. What better than stamped puppy images? Well, for me, nothing’s better. LOL I stamped out the little poodle from the Penny Black “Mimi in Paris” stamp set and the little dog from the Tiddly Inks “I Wuf You” stamp set. I colored them up with the following Copic Markers: Poodle: E02, 31, and 33; and Brown and white dog: W1, E23 adn E25.
I fussy cut out the pups and positioned them, just so, between the frames. I left room between the dogs so I could add little punched out red hearts, which I made shiny with Ranger Inkssentials Glossy Accents. Remember, you can’t use glitter on OWH cards so no sparkle allowed. LOL
For the sentiment, I hand wrote “i wuf you” with a White Sakura Gelly Roll Medium Point Gel Pen. The lower part of the black card stock layer was looking a little plain to me, so I searched through my washi tape collection and found a thin black and white one of a film strip (sorry I don’t know the brand) and a red, black and white terrier one made by Craft Essentials. I felt like this card was just meant to be. Don’t you love it when that happens?
With very little coloring and fussy cutting, this card was pretty quick to make. With the flexibility of adding all sorts of different images in the film strip frames (I’m going to do one with the cutie patootie kids from the Mama Elephant “In My Heart” stamp set next), different versions would be easy too. I see a lot of these cards in my future for my next OWH batch of cards!
This card is being entered into the Operation Write Home Red Friday Blog Hop Challenge

and the Tiddly Inks Gratitude and Joyfulness Challenge
Thanks for stopping by, and have a great day! WOOF
]]>
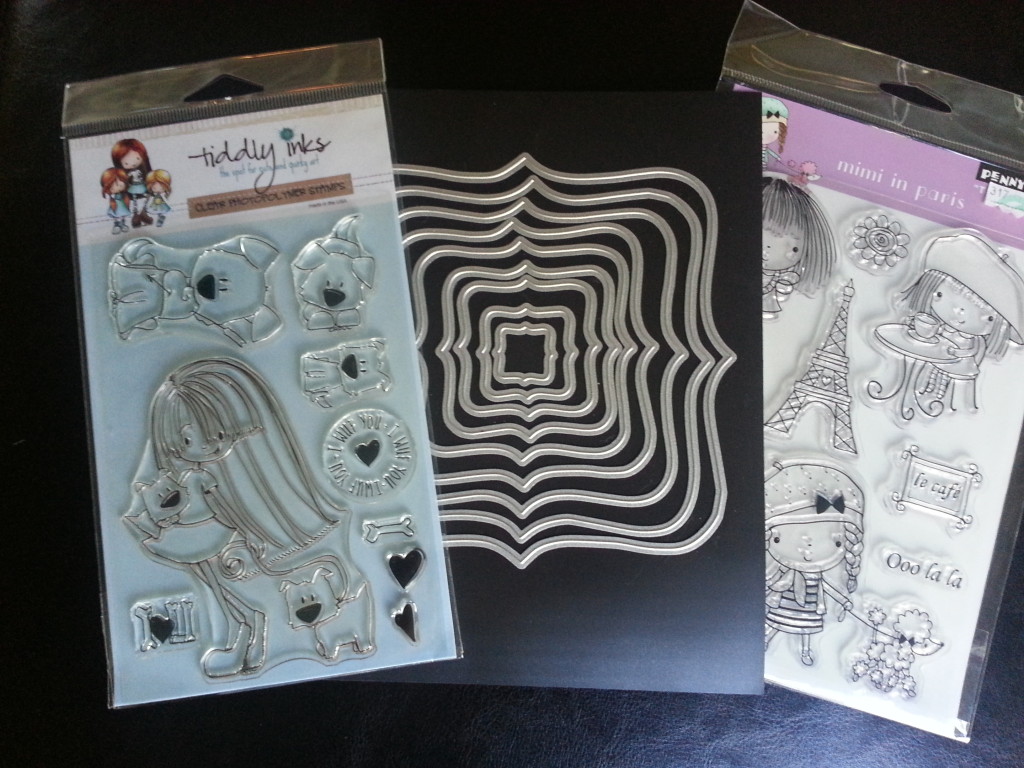 For the images representing me and Bandito, I could just use the Tidly Inks stamp, masking off the second dog part of the stamp with tape and removing the tape before stamping. Using a free program, called paint.net, I tweaked the adorable poodle from the Penny Black “Mimi in Paris” stamp set, which I stamped and scanned it into my computer. I cleaned up the rough stamped image, flipped it (so it faced the direction I wanted) and then printed it out a tad larger (because Biscuit is a bigger than Bandito).
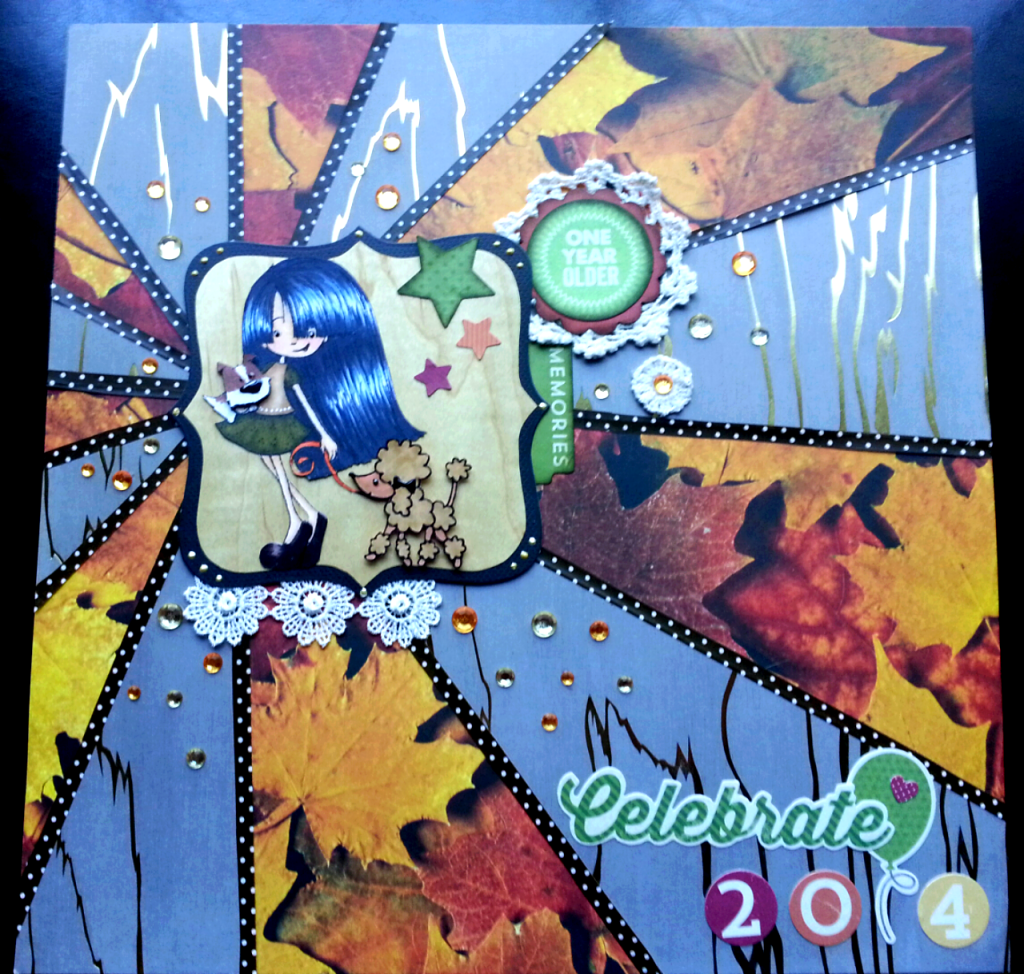 I colored up all the images with the following Copic markers and fussy cut everything out to assemble on a wood veneer paper background mat that I cut using the Diemond Dies Top Note die set (Use Coupon Code: “thankskristina” for 10% off your entire order and free worldwide shipping on orders of $35 or more! PLUS they are having a sale from now through October 5, 2014). Skin: E50, 51 and 53; Blush E30; Poodle: E55 and R30; Havanese: W1, E23 and E25; Hair: C7, C9 and B24; Shoes: E74 and 79; Top: E55 (and white Gelly Roll pen); Dress: YT95, 97 and 99 (and black with Uniball pen); Leash: YR02, 04 and 07. I loved using these autumnal colors, esp. because I’m not a real girly girl.
Because I wanted to use a special gold foil faux wood grain paper in a way to highlight this celebratory layout, I created a sunburst effect using a straight edge and scissors with that paper and a contrasting large photo print fall leaves patterned paper. To finish off the edges where the different patterned papers meet up, I used thin strips of washi in a dark chocolate polka dot. For embellishments, I used various die cuts and stickers from the Jellibean Soup “Birthday Bisque” collection, which had a lot of fantastic appropriate sayings in the perfect colors for this layout (esp. when inked around the edges with Tim Holtz Distress Inks in forest moss and walnut stain). I also added some crocheted doilies and laces to add softness as well as some champagne and tangerine bling pieces to add sparkle.
The following is a video share of this layout:
This layout is also being entered into the Simon Says Stamp Color Recipe Work it Wednesday Challenge and
the Kraftin’ Kimmie Stamps Wonderful Wednesday Anything Goes Challenge and
the Inspired by Stamping Monthly Challenge Inspired by Gold
]]>