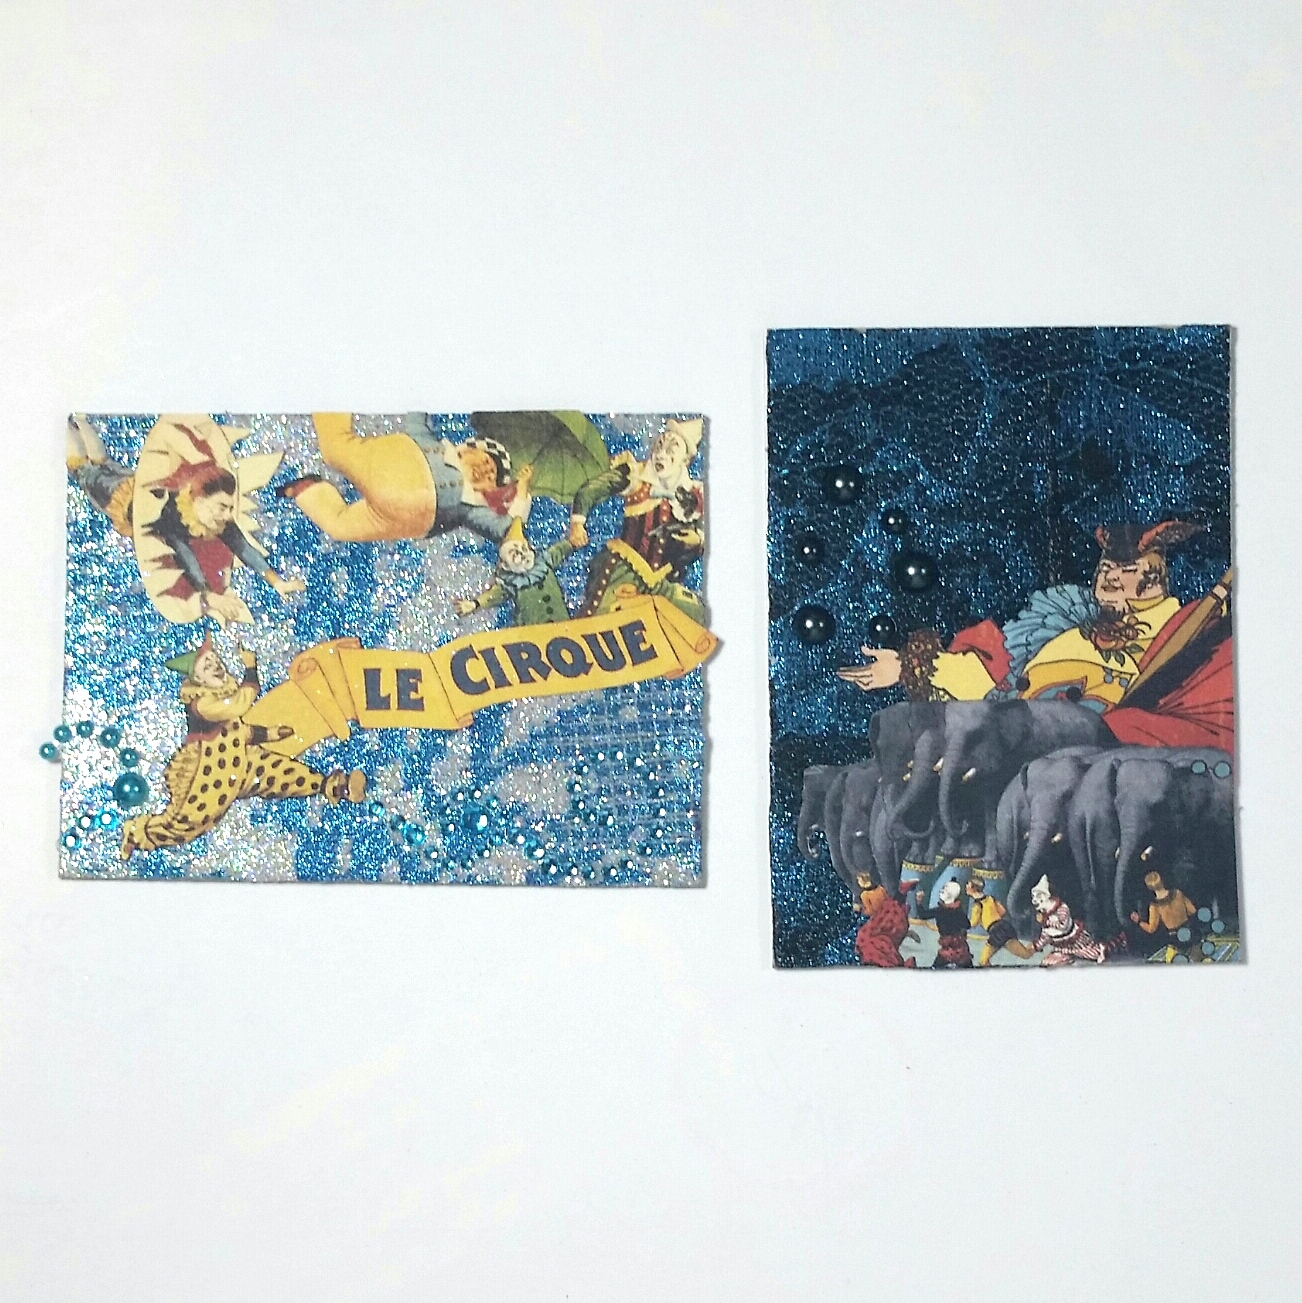
 I covered the chipboard (salvaged and upcycled from the backing of a watercolor paper pad) with double sided adhesive, and used snippets of wide but thin floral lace as a kind of stencil to create glittery lacy textured backgrounds.
For the one with the juggling circus master and elephants, I used Elizabeth Craft Designs Basic Black Microfine Glitter and Sparkle and Sprinkle Jasper Blue Extrafine Glitter. For the clown-filled Le Cirque one, I used the Sparkle and Sprinkle Jasper Blue Extrafine Glitter and some left over ultrafine glitter from my Heartfelt Creations card kit.
For all the Graphic 45 Le Cirque images, I used Fiskars spring loaded scissors (my favorite, especially since I developed arthritis in my hands) to do a lot of detailed fussy cutting and arranged the images around the ATCs to hopefully create a kind of dream-like quality. I added black and teal flat back pearls and rhinestone gems to indicate movement (like the clown running and the circus master juggling).
The following is a tutorial video on how I made the glittery lacy backgrounds:
These ATCs are being entered into the following challenges:
Simon Says Stamps Monday Texture Challenge
Card Mania Lace and/or Pearls Challenge
Through the Craft Room Door Anything Goes Challenge
613 Avenue Create Anything Goes Challenge
Word Art Wednesday Anything Goes Challenge
Creatalicious Anything Goes with an Option of Adding Flowers
]]>
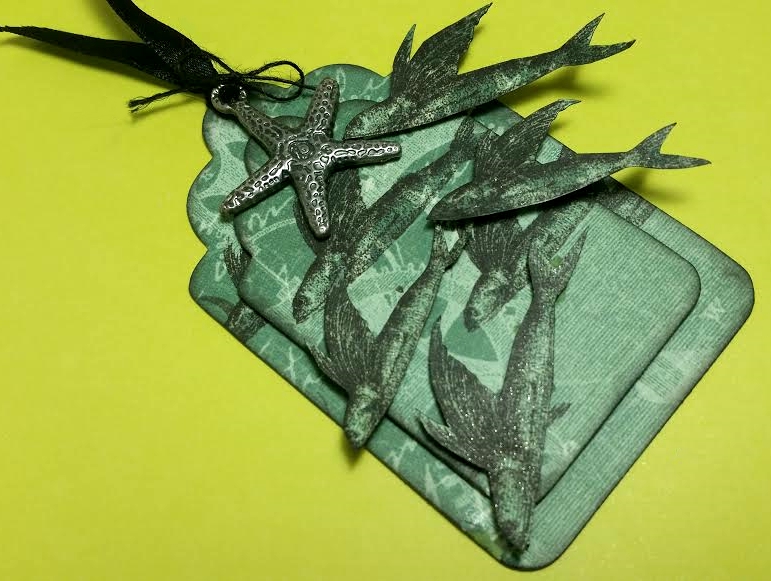
To make this little tag, I used the Diemond Dies Nesting Tag Die Set and cut into my one remaining sheet of this Steampunk Debutante Collection paper with the flying fish in the background (it has the flying man held up by a giant 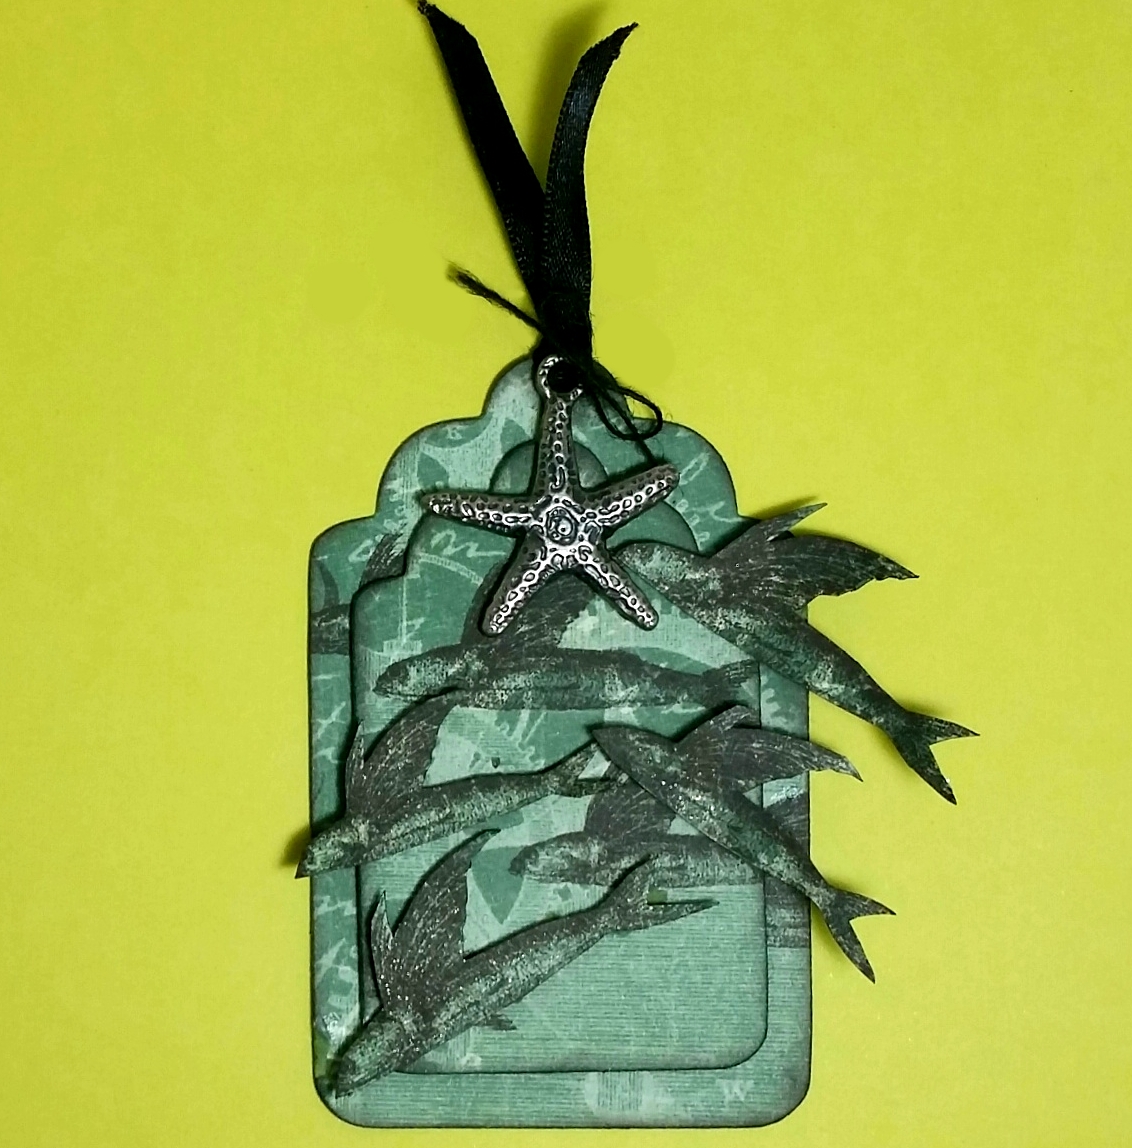 hand by a propeller). I layered two of the nesting tags with double sided foam adhesive, inking all the edges with Tim Holtz Distress Ink in Black Soot.
Then it was a matter of fussy cutting all the flying fish and inking the edges with a black marker. I then popped them up on one, two, or even three layers of more double sided foam adhesive, positioning them in directions to make them look like they were swimming in harmony in a big school. I think adding all the extra double sided foam adhesive gave some of them the look of jumping/flying in the air! I don’t know if you can see it in the photos, but I also added coats of Clear Wink of Stella to the flying fish so they have a great sparkle in the light.
To finish off the tag, I used a bit of black silk ribbon and looped it through a hole I had punched at the top. Lastly, I remembered I had an old metal starfish charm in my stash so I tied a bit of black twine into a bow and added the whole thing as a little topper.
This tag is being entered into the following challenges:
Simon Says Stamp Monday Nautical/By the Sea Challenge
Simon Says Stamp Wednesday Things With Wings Challenge
613 Avenue Create Anything Goes Challenge
SanDee & Ameile’s Anything Goes Steampunk/Industrial Challenge
Creatalicious Anything Goes Challenge
]]>
For the card base, I used favorite papers from my scrap box from the Graphic 45 “Steampunk Spells” and the “Bohemian Bazaar” collections. I also knew I wanted to add a little sparkle so I laid down some sparkly gold glitter tape for the floor where the girl and her pups are walking and also created a couple of paw prints by laying down two rows of the tape on thin copy paper and punching out a small paw print with a Marvy Uchida punch. I backed the paws with white card stock and then framed it with another layer of black card stock. I also used some letter stickers to spell out “crafty” and backed that on black card stock to create my name, “CraftyPaws”. Because I knew I was going to raise at least some of these on foam adhesive, I also edged the black card stock on all the pieces with a Faber-Castell SB width PITT artist pen (this eliminates the white edge and gives a more finished look).
For the images, I paper pieced the girl’s T-shirt and skirt with tiny scraps from my scrap box (in patterns I thought I would wear in shades of my favorite color, blue) and used the following Copic colors: Hair: C7, C9 and B02; Shoes: C7 and 9; Skin: E50, 51, and 53; Blush: R11; Dog in arms: W1, W3, E 23 and E25; Poodle: E11 and E21; Leash: B02. I also used a little Glossy Accents over everyone’s eyes, the dogs’ noses, and the girl’s shoes.
The following is a video tutorial on the Copic coloring, paper piecing, and card assembly:
https://www.youtube.com/watch?v=SUlcnv8Cxzw&feature=youtu.be
This card is being entered into the following challenges:
The Pink Elephant Anything Goes Challenge and
The Paper Nest Dolls Anything Goes Challenge
Thanks for stopping by and have a great day! WOOF
]]>
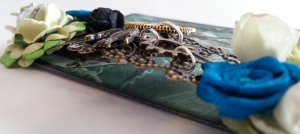
Side View Showing Filigree Arch
I started with the traditional 3.5″ x 2.5″ chipboard (upcycled embellishment packaging) base and covered both sides with a wonderful scrap of paper that I had in my scrap box from the Graphic 45 “Steampunk Debutante” collection. In moody green and black tones and a sophisticated French lady perched on a Chippendale chair, I thought this paper was perfect. I inked the edges with Tim Holtz Distress Ink in black soot, and then I was ready to build up the ATC!
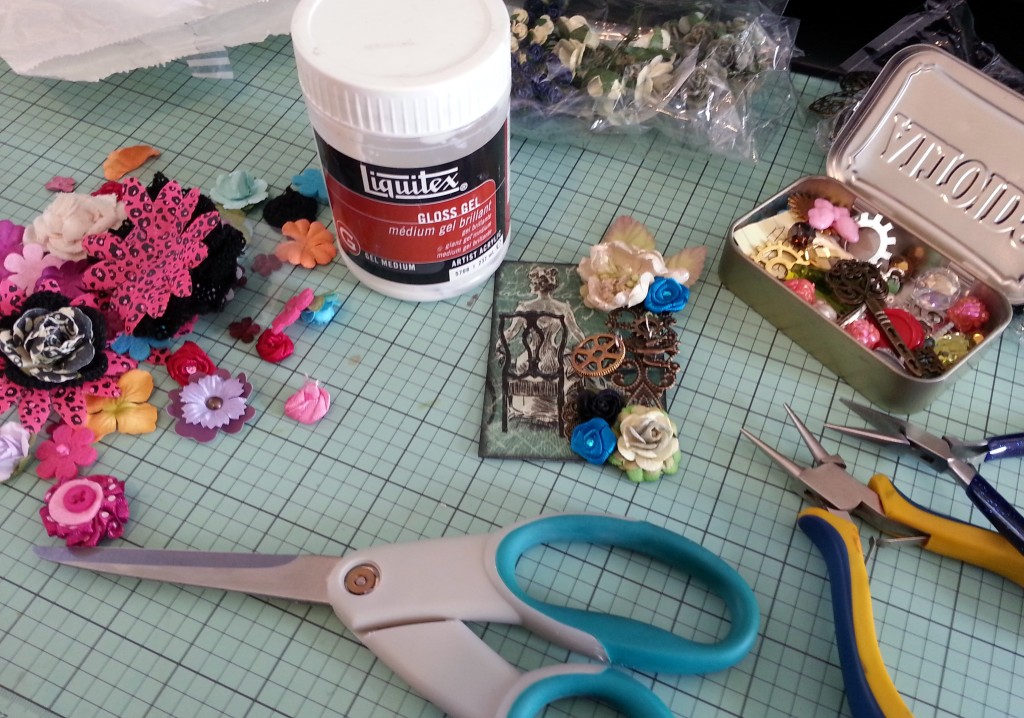
Craft Desk While Creating
I got out a bag of metal embellishments, a couple of doodad bags of different flowers that had been gifted to me from crafty friends, and an Altoid tin of mixed metal charms. I took a long metal filigree embellishment and bent the two ends to create a kind of arch. From that arch I decided I’d hang some metal charms. I used jump rings to attach a couple of gears, a bird and an Eiffel Tower (remember I had decided the elegant lady was French? LOL). With a little E6000 and some hot glue, I attached the arch to the ATC base and then covered the tops and bottoms with some layered crochet pieces, paper flowers, and paper flower petals that I thought complemented the Graphic 45 paper. While pretty in that monochromatic way, in the end I decided to add two turquoise rolled roses with rhinestone centers to the flower clusters to add a little pop of color and shift the green base paper toward blue a bit (isn’t it funny how putting different colors adjacent to one another can shift the perceived color of something?).
The following is a video share of this ATC:
https://www.youtube.com/watch?v=jDhlIM-xDLQ
This ATC is being entered into the SanDee & amelie’s Steampunk Destinations Challenge
The photo of my craft desk is being entered into the Moxie Fab World Throwdown Challenge
 Let me back up and share the process of how I prepared the canvas. I used Liquitex gesso to prime the 11″ x 14″ canvas. After drying for a few hours, I used three different stencils and some latex caulk (purchased at the hardware store) to create a fun textured background. I let that dry overnight and in the morning I started adding color.
First I used my Tim Holtz marker spritzer and Chromatix markers (I can’t bring myself to use up Copics or even Distress Markers for this) in Grape 3 and Marine 3 to create a fine misted bright color layer. Then I took my Tim Holtz Distress Ink in Forest Moss and Walnut Stain to add some darker shades to the tops of the caulked areas. I added even darker splatters with watered down black acrylic paint. Lastly to really deepen the canvas base and bring out all the textures, I dry brushed on black acrylic paint. Ohhh that last step really made the background complete because it brought to bear the power of using the full range of light to dark.
The lushness of the canvas comes from the gorgeous black organza and sequin appliques from MelsCraftBoutique. There is a larger flowers one and a medium rose one. Both are stunning. I cut them up to spread across the top and bottom of my canvas. I layered in one spray of vintage style black flowers that I also cut up to form two clusters. Around the whole canvas edge, I painted a purple mauve base to peek through the dainty black heart design lace. That combination of colors adds a romantic Steampunk feeling. To add a little movement, I topped the right flower applique with a black beaded applique (sorry there is only a similar white version in the shop now, but Mel is going to update the shop later this week).
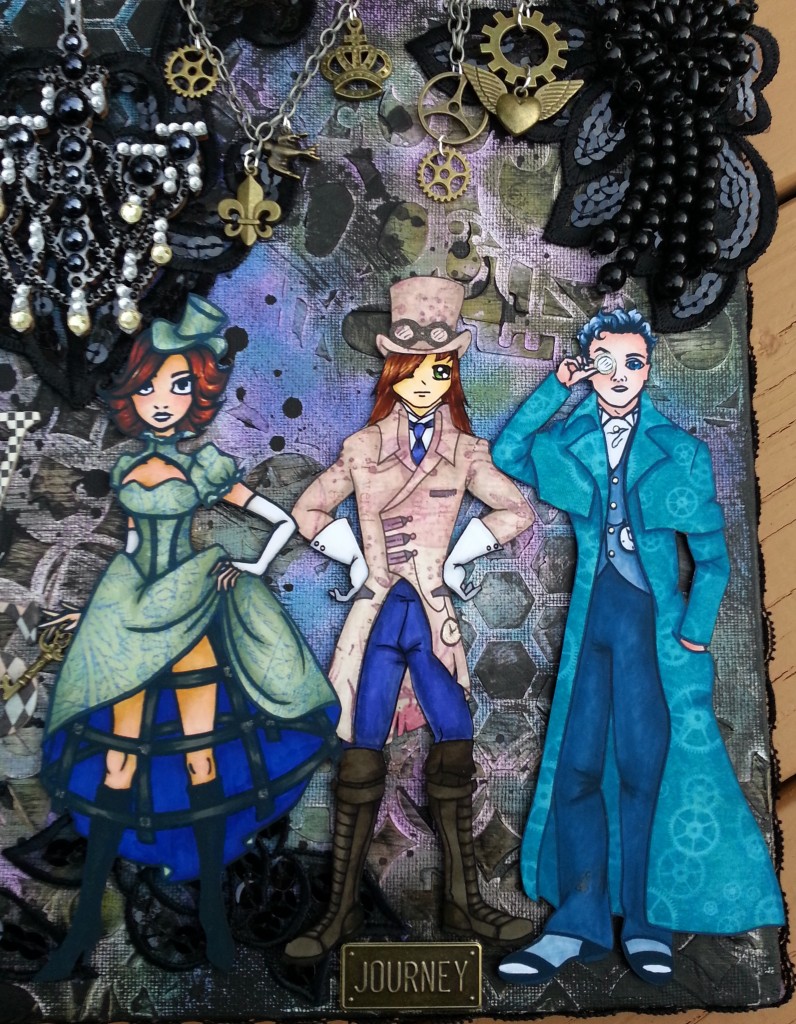
 The Copic coloring of the Steampunk characters was relatively simple. For their skin, I used E50, 51 and 53. Where I wanted blush, I added R20. The gloves, which I wanted to keep “white,” were colored with C1 and 3. Metal goggles were colored with C3, 5 and 7. Brown boots were E57 and 59. All paper pieced clothing was shaded with W1 and 3. Steampunk Barbies’s blonde hair was Y 32, YR24 and E23. Her blue green eyes were BG 72 and 78. Her ruffled skirt is BG70 and 72 with a top coating of clear Wink of Stella. Her jacket is paper pieced from a patterned paper from K & Company Designer Paper. Steampunk Willy’s tie and pants are BV13 adn 17 and his jacket and top hat are paper pieced from the DCWV “The Once Upon a Time” collection. The accents on his jacket are colored with V15 and 17. His brown hair is E55, 57 and 59. For Steampunk Scarlett and McSteamy, I followed the same coloring and paper piecing as I shared HERE and HERE.
I blinged out a wood veneer chandelier (which I first painted black and then made look metallic with silver Rub ‘n Buff) with black, clear, and champagne colored rhinestones. This was a tedious and time consuming job, but the wow factor definitely made it worthwhile. I hung it from a chain, which I swagged so I could add more movement to the project and additional interest with some small antique bronze charms.
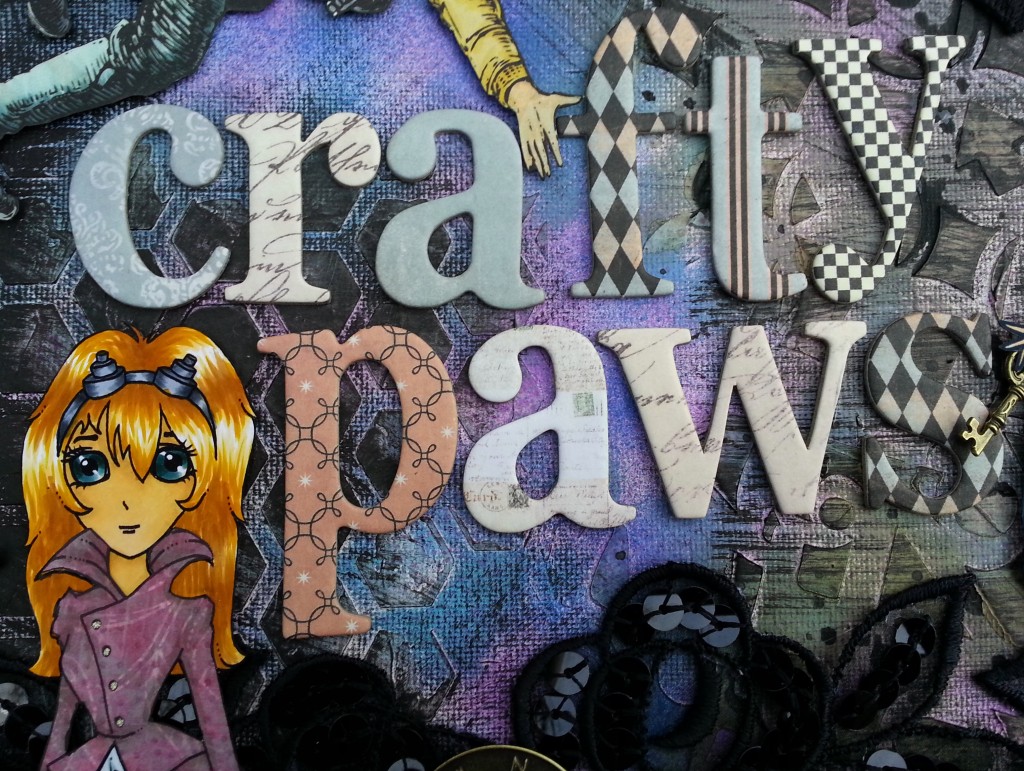
In addition to my own digis, I wanted my YT crafty name sign to include references to what I think and how I feel about crafting. My blog slogan is “remember to PAWS and enjoy the journey.” I wanted to reference that and found the perfect metal word sticker “journey” that Steampunk Willy could stand on. The flying man from the Steampunk Debutante paper is a great expression of taking risks and exploring the unfamiliar. The metal sticker with the arrow and the word, “explore,” that I could position by the flying man was perfect. Lastly, I wanted to include a metal compass to reference traveling in different directions and hopefully to reach new crafty destinations. Finally, I used some 7 Gypsies chipboard letters from their Venice collection, which I thought was whimsical and represented the fun that I have on my crafty adventures.
The following is a video share of this project.
This altered canvas is being entered into the following challenges:
SanDee & Amelia Steampunk November Destinations Challenge
Miriam’s Crafting Blog Steampunk Challenge
Challenge Up Your Life Anything Goes Challenge
Simon Says Stamp Wednesday Anything Goes Challenge
The Aviary Paper Wings Anything Goes Challenge
Thanks for stopping by. Please subscribe if you wish, and have a great day! WOOF
]]>
 appeal. So naturally I turned to none other than Patrick Dempsey, who played Doctor McDreamy, for some inspiration. LOL Actually, I was never really a fan of Grey’s Anatomy, but when I released Steampunk Scarlett, crafty friend Amador (YT: Amadoreros), commented that she was “McSteamy.” Right then, I knew the direction this digi was headed. 😀
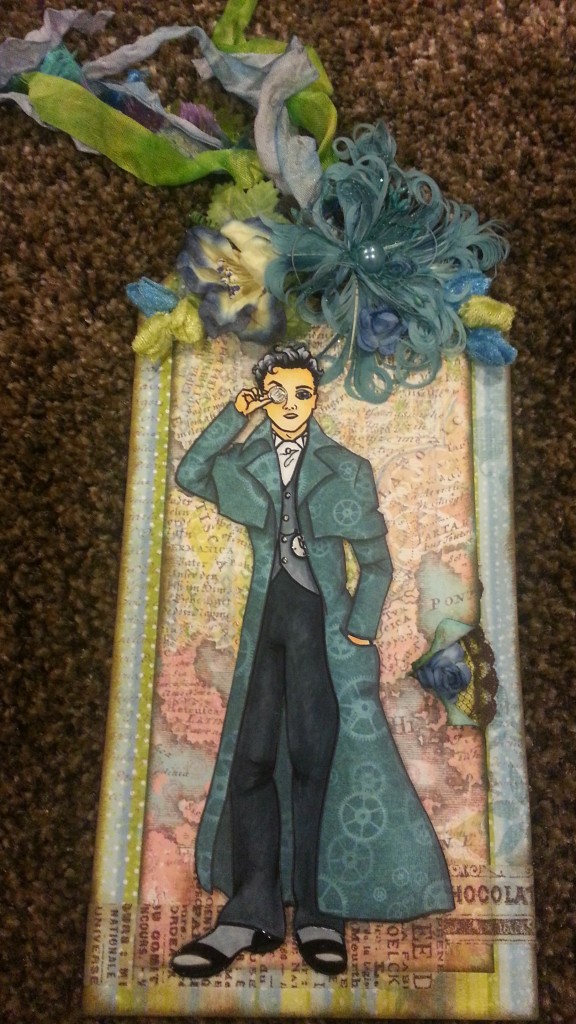
To create this Steampunk-lite tag (I didn’t add a lot of metal, gears, dark colors, etc.), I used some wonderful papers from K & Company as a base. There is a map pattern to the top paper, which alludes to the adventurer/explorer that I imagine McSteamy to be. LOL I added some Tim Holtz tissue tape which I darkened with Tim Holtz Walnut Stain Distress Ink (to give McSteamy something to stand on). I inked the edges of the papers with Tim Holtz Distress Ink in Peacock Feathers and Walnut Stain. Where I tore and rolled back a bit of the top paper, I inked both sides of the paper and tucked behind some brown lace and a blue rose to add some interest. Because I did not want to make the tag too feminine, I stayed with blue and green hues and used paper, rubber, velvet, and feather flowers (quite the mix eh?). The flowers were mostly Wild Orchid Craft or Prima.
To color up McSteamy, I paper pieced his fabulous coat using one of my all-time favorite Graphic 45 papers, “Steampunk Spells.” To add depth, I added shadows to this paper pieced portion using Copic colors: C3 and 5. Actually, I wanted that coat with that fabulous paper to be the main focus of the image so other than the skin tones in E000, 00, and 11; the only Copic colors I used were: C1, 3, 5, 7, and 9. I used different combinations for his pants, vest, and cravat. For a little sparkle to the “metal” parts of the digi, I used a clear star Sakura Gelly Roll pen on his monocle, vest buttons, cravat pin, and clock edge. To add a bit of shine, I also used Glossy Accents on his eye, monocle, pocket watch, and shoes.
The tassle on the tag is made from hand-dyed seam binding in blues and greens and some fun eyelash trim in blue, green, and purple. Overall I kept this tag more simple, but I like the final result with McSteamy taking center stage.
The following is a video share of this tag:
This tag is being entered into the Simon Says Stamp Monday Anything Goes Challenge
Thanks for stopping by. Please subscribe, and have a great day! WOOF
]]>In any case, “Practical Magic” which stars Sandra Bullock, Nicole Kidman, Diane Wiest, and Stockard Channing (what a fabulous cast!), has a decent plot including a little romance, a wild child, crazy aunts, sisterly love, and female bonding. Ok, it’s a chick flick, but a good one! 🙂
 On the front of my card, I hand wrote a quote spoken by Stockard Channing’s character, Aunt Francis Owen, that I love: “My darling girl, when are you going to realize that being normal is not necessarily a virtue? It rather denotes a lack of courage.” I think that many people let fear drive them to mediocrity and this quote encourages us to be ourselves and embrace our uniqueness. What’s not to love? I framed the quote with 12 dark brown and black brooms I cut out using the Die-Versions sweet petite line. I used 12 brooms because even though a coven is normally 13, in the movie, they called for 12 women to form the circle with their brooms to exorcise the evil spirit from Nicole Kidman’s character, Gilly Owen. I then filled in some of the spaces with small black hearts I punched out with my EK Success Heart Frame punch. Over the top of the brooms to the edge of the card, I painted in the rest of the “frame” with Folk Art Extreme Glitter acrylic paint in black. The paint comes out of the bottle milky and opague, but dries translucent, leaving a dark magical grey glitter over everything it coats.
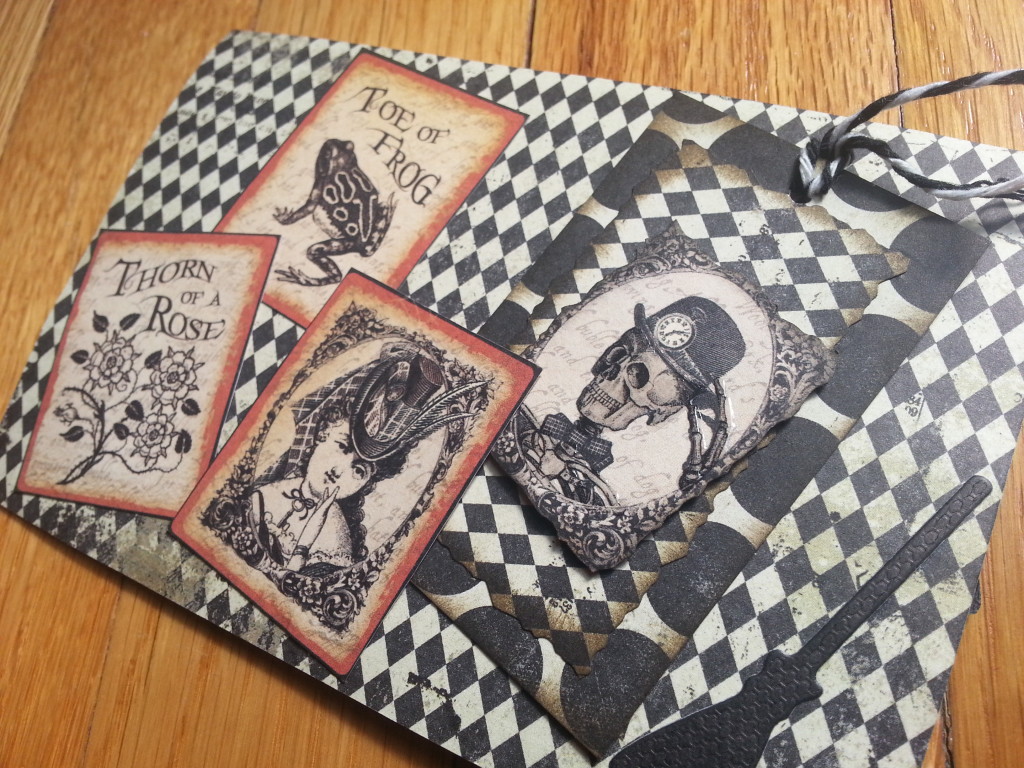
The back side of the card I added one more little broom (because I thought they were so cute), and I added three small tags that I cut from the Graphic 45 Steampunk Spells Nevermore collection. The frog tag is a reference to the frog that spat out the ring of the evil dead boyfriend. The Steampunk lady is a reference to the two wonderful aunts, Francis and Jet, and the thorny rose tag represents the wild rose bush that grew overnight over the area where the dead boyfriend was buried. What a happy coincidence that these tags from the collection fit this story so well! Lastly, I added a little removable tag with my info on the back and layered a few Halloween papers including a Glossy Accented Steampunk skeleton, which is popped up on foam adhesive to add a little dimension.
The following is a video share of this card:
This card is being entered into the CARDZ TV To Die For Challenge and
The Simon Says Stamp Monday Anything Goes Challenge and
The PunkyouGirl October Halloween Challenge
Thanks for stopping by and have a great day! WOOF
]]>
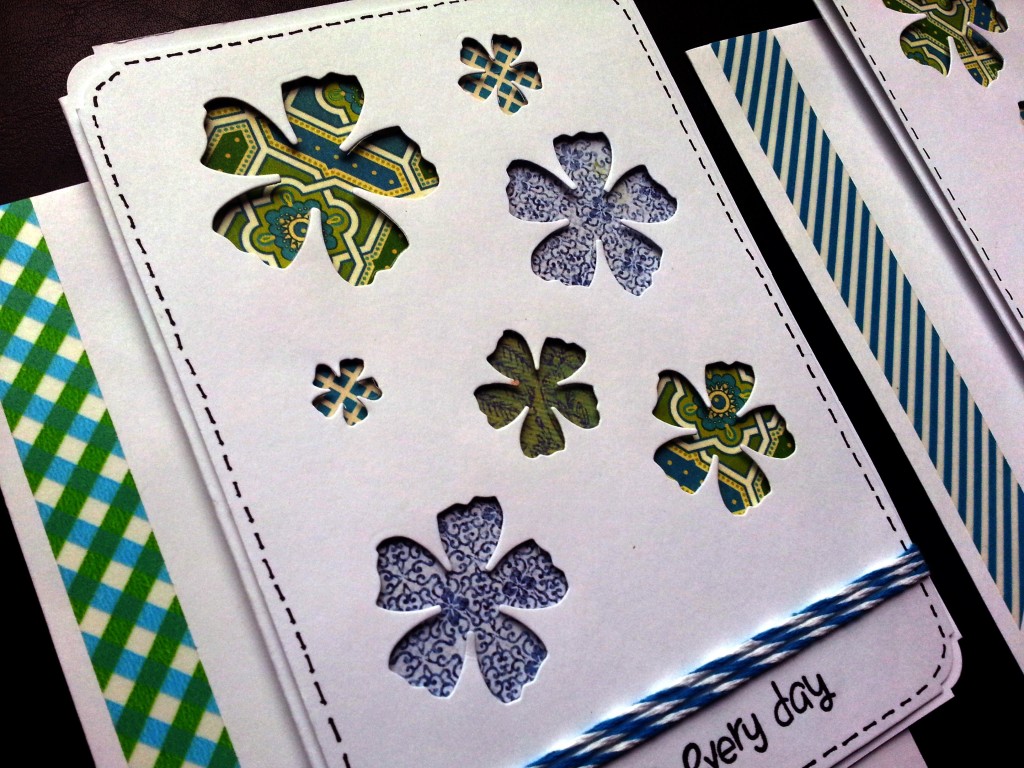 These cards take advantage of the negative space created by small dies. I used the whole 7 piece set of the Diemond Dies sugarplum flower die set. [DIEMOND DIES COUPON CODE: thankskristina is still active for 10% off your entire Diemond Dies purchase and free shipping on orders of $35 or more!] Then I “back-filled” each cut out with some small scraps of patterned paper (If you recognize some of these, it could be because they are the bits left over from the Steampunk Scarlett tag I made last week), using strips of foam tape to add a little depth and shadow interest. The papers I used were from My Mind’s Eye “Everyday Tango” and Graphic 45 “Bohemian Bazaar”.
For the sentiments, I used the Lawn Fawn’s “Critters at the Dog Park” and “Love You S’more” stamp sets. For the “love everyday”, I had to do a little masking, as it was two different stamps, but it was quick and easy (the tutorial video below shows how easy!).
To add a little more interest, I used a Faber-Castell M size PITT artist pen to draw in some faux stitch lines. On one of the cards I also added some teal and white bakers twine. Finally, just to make the gift set a little more special, I took some washi in a similar color family to the patterned papers I used and put a little banner all around the envelopes.
The following is a video share of these cards including a step-by-step tutorial:
This card is being entered into the Lawnscaping Patterned Paper Challenge and
The Paper Nest Dolls Anything Goes Challenge
Thanks for stopping by and have a great day. WOOF!
]]>
Closed Card Front
Oh my gosh I LOVE this style of card! The card-in-a-box is not as difficult as it appears (tutorial video is at the bottom of this post), and it has so much room for decorating and really creating a whole environment.
Back and Message Area
The following are the measurements of the papers I used for the card structure:
1 sheet of card stock – 12″ x 8.5″ – for the base.
Patterned paper A for lower sides of box – 3 rectangles – 2.5″ x 3.5″.
Patterned paper B for upper sides of box (inside and out) – 7 squares – 2.5″ x 2.5″.
1 sheet of pale colored card stock to write the message – 2.5″ x 6.25″.
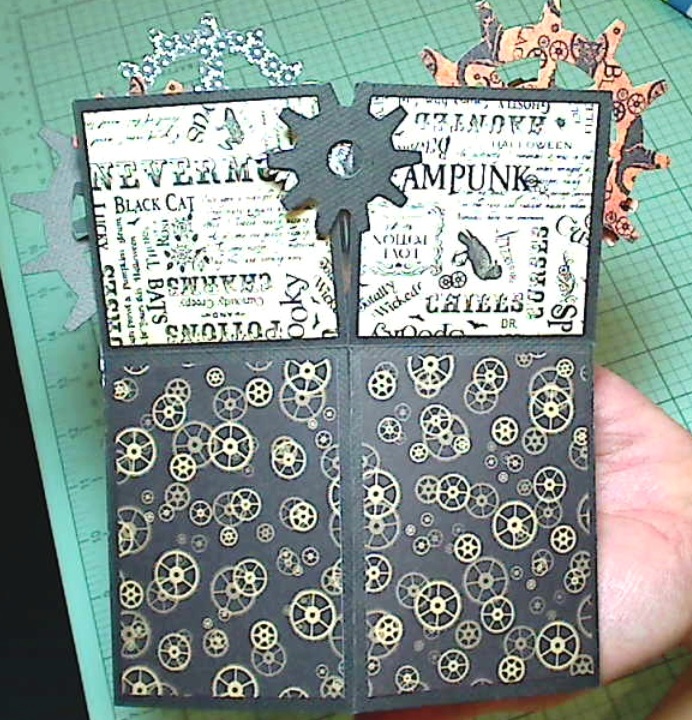
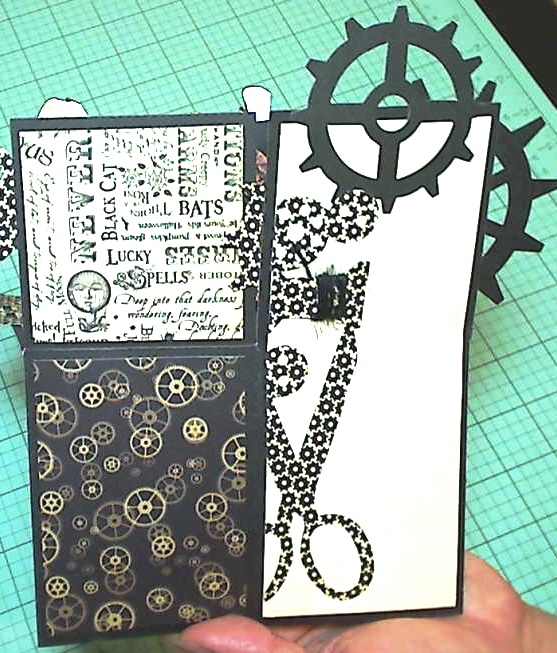
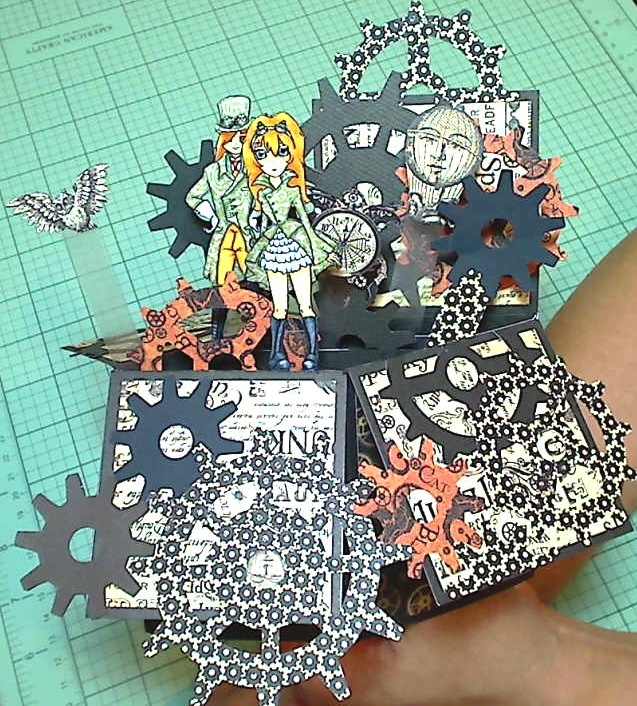
After creating the structure of the card-in-a-box, I used three 6″ x 6″ sheets of Steampunk Spells Graphic 45 paper (that is all you need for patterned paper A and B noted above) and lots of gears cut from different scrap papers using my Tim Holtz Alterations “Gadget Gears” die. To add more interest, I chose some images from the cut apart page of the Steampunk Spells collection. I picked those images of things that fly (i.e., clock with wings, hot air balloon, owl) to fussy cut and adhere to strips of acetate (upcycled from some sticker packaging) to attach to the various layers of the card-in-a-box. For good measure (and to fill in a little gap) I also fussy cut and added the black cat from that cut apart page (since the friend who will receive this card loves cats (and dogs)). 🙂
I decorated the back of the card (where the longer pale card stock is adhered for writing a message to the card recipient) using another Tim Holtz Alterations die called “Sewing Edge”. I added a little extra fun by wrapping the spool part of the die cut with some black twine.
Opened Card
The focal points of this card-in-a-box were two of my free digis (available HERE), Steampunk Willy and Steampunk Barbie. I printed them out in a small format (what you get when you print 9 images on an 8.5″ x 11″ sheet of paper), colored them with Copic markers (skin: E50, 51, 53; cheeks: R30; hair: YR20, 31, 24, and E13; boots: C3, 5, 7) and paper pieced their coats with a beautiful small print tapestry patterned paper from the MME “Traveler” collection. To add a little depth to the tapestry coats, the “white” gloves of Willy, and the “white” lace skirt of Barbie, I added some shadows with Copic C3. Finally I added a little shimmer to Willy’s goggles with my clear star color Gelly Roll pen and put Glossy Accents on the boots, eyes, and goggles of both images.
 Ok, I confess that this card (with lots of breaks since I had my mother-in-law over for an impromptu visit this weekend) took me 2 days to create. I am a slow crafter so if you do a more simple version with less detailed fussy cutting I’m sure you could make similar cards much faster. While the card construction is not hard, the decorating can take some time. If you have the time, it is a card that you’ll enjoy making with results that can be spectacular!
This card is being entered for the Simon Says Stamp Wednesday Challenge
This is my video tutorial for this card:
Thanks for stopping by. Please subscribe if you wish, and have a great day! WOOF
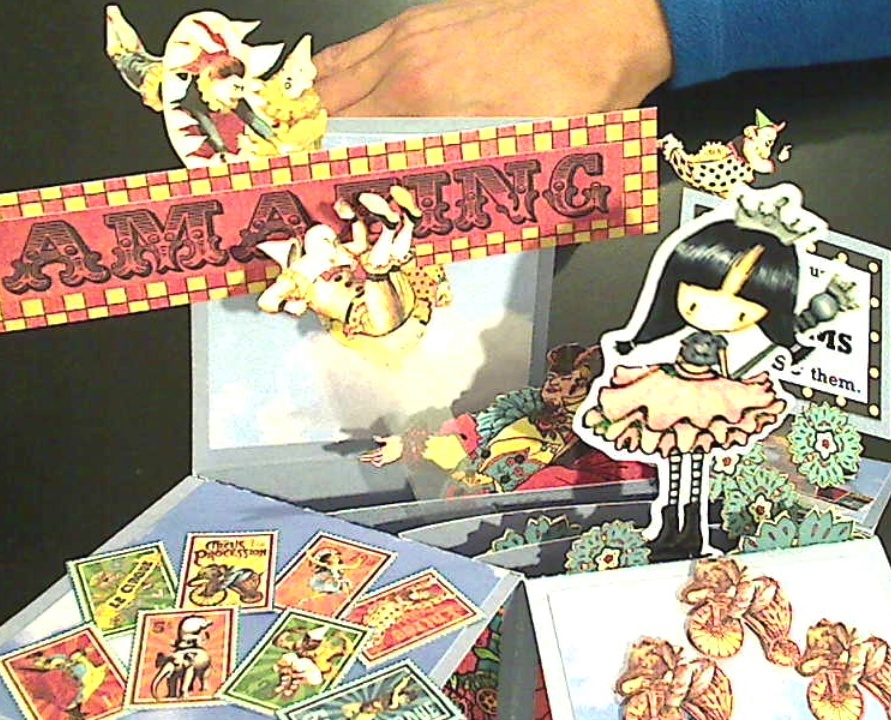
]]>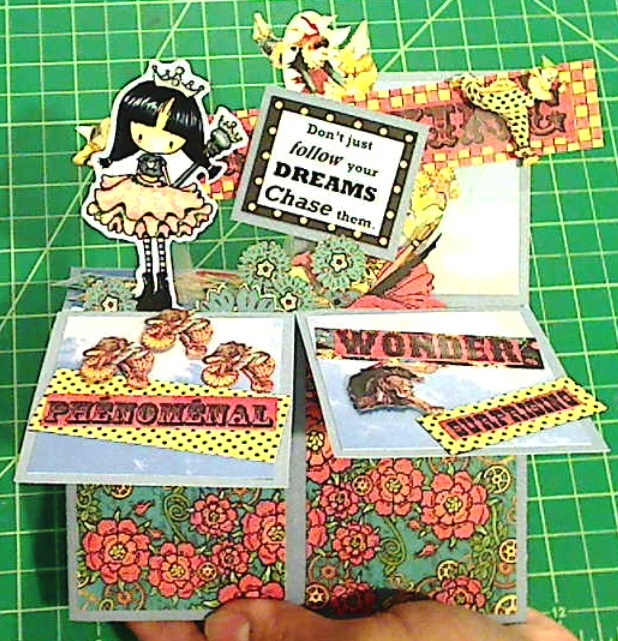 Lately I’ve been thinking a lot about the idea of pursuing dreams. I’ve never really been a dreamer (too much of a worrier and effects of being an immigrant perhaps), but I admire it in others. As my nephew is graduating college soon, I’ve been hoping for him that he can continue to chase his dreams. I mean really, not just follow them, but CHASE them. I think he is doing that, and I am so proud of him.
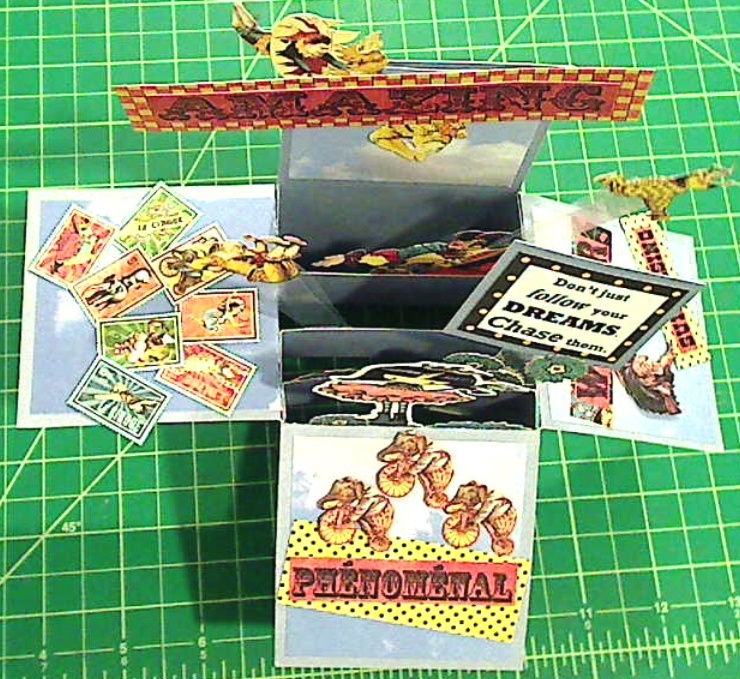 I made this little card in a box style card with that theme in mind. I used a really cute Tiddly Inks image as the focal point of the card called “Everyday Princess,” and imagined that this little punky princess is daydreaming about running a circus. I used mostly Graphic 45 paper, 1 sheet from Steampunk Spells and another borders sheet from Le Cirque. To decorate the top part of the box that flips down, I used cloud paper from my stash. I did a lot of fussy cutting and popped up some images on foam adhesives and even used a bit of acetate to make it look like a couple of the clowns/tumblers were flying in the air! I love how it came out.
The following is a video share of the card:
This card is being entered into the Tiddly Inks Challenge
and the Sugar and Spice Crafty Challenge
Thanks for stopping by! Please subscribe if you wish, and have a great day! WOOF
]]>