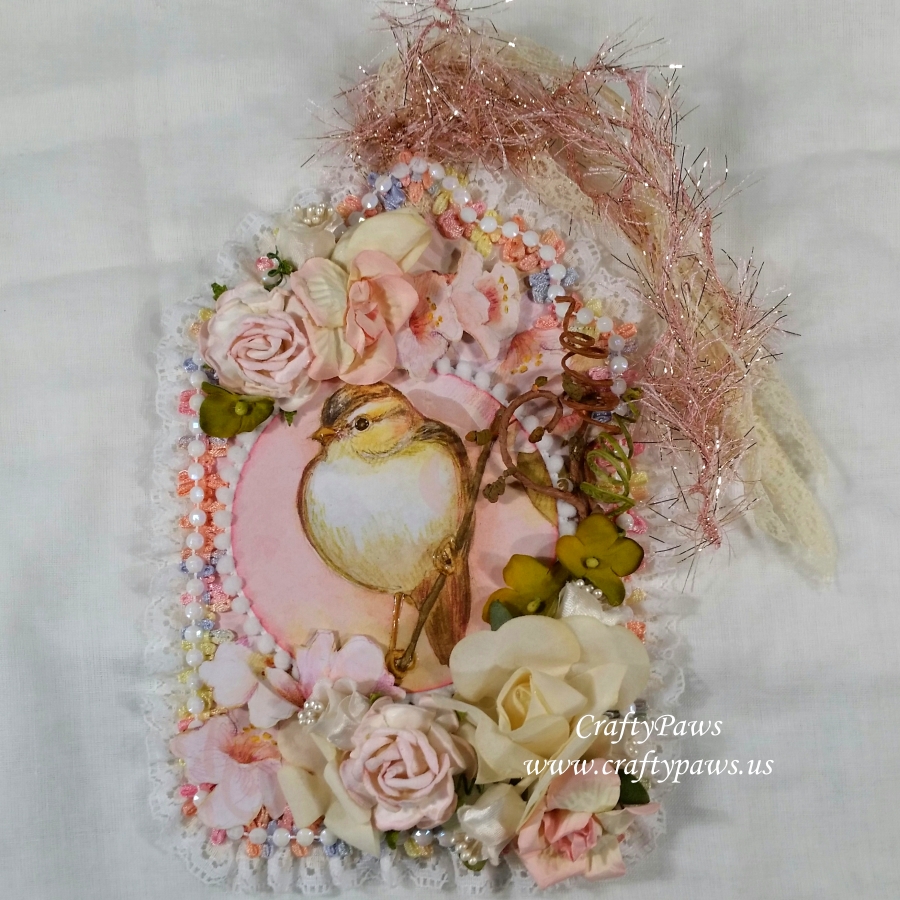
 BASE: For the base of the tag, I used the largest of the Diemond Dies Tags Nesting Die Set with thin chipboard, and paper from some retired K & Company Floral Collection paper called “Bird on Pink”. I framed the tag from the back with gathered lace that I shirred a bit more as I hot glued it into place for extra luxe fluff. Then I used a mixed pastel colored braided trim all around the edges of the tag. While I liked the Easter colors of that braided trim, I thought it looked a bit unfinished so I added a strand of faceted white beaded trim all along the center-line, which I think gave the border of the tag a whimsical candy-covered look.
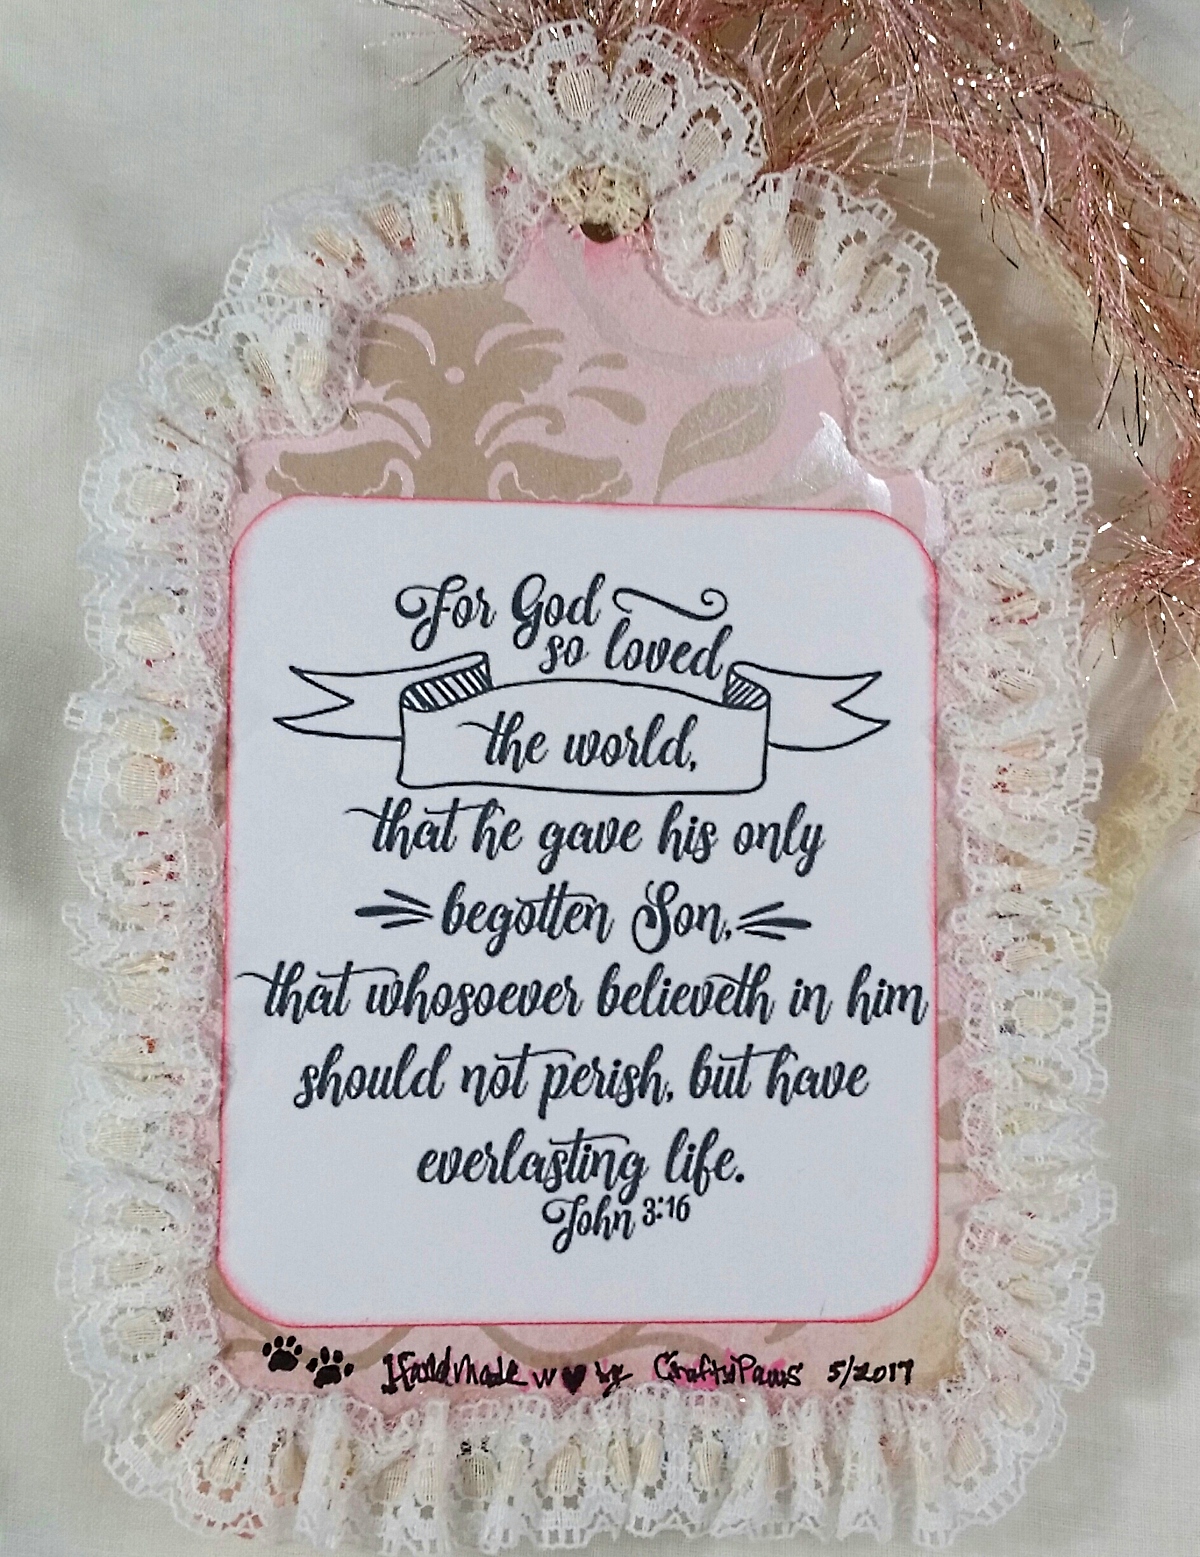
For the backside of the tag base, I printed out a beautiful quote from the Bible from the Word Art Wednesday Challenge Blog back in early December 2016. I know it is not the word art that is for the current challenge, but it seemed perfectly suited for my friend at this time in her life after her mother’s passing. I cut out the quote with a paper trimmer, then I rounded the corners with a We R Memory Keepers Crop-A-Dile Corner Chomper to match the rounded corners of the tag. Then I inked the edges with Tim Holtz Distress Ink in Worn Lipstick to give the word art a finished look.
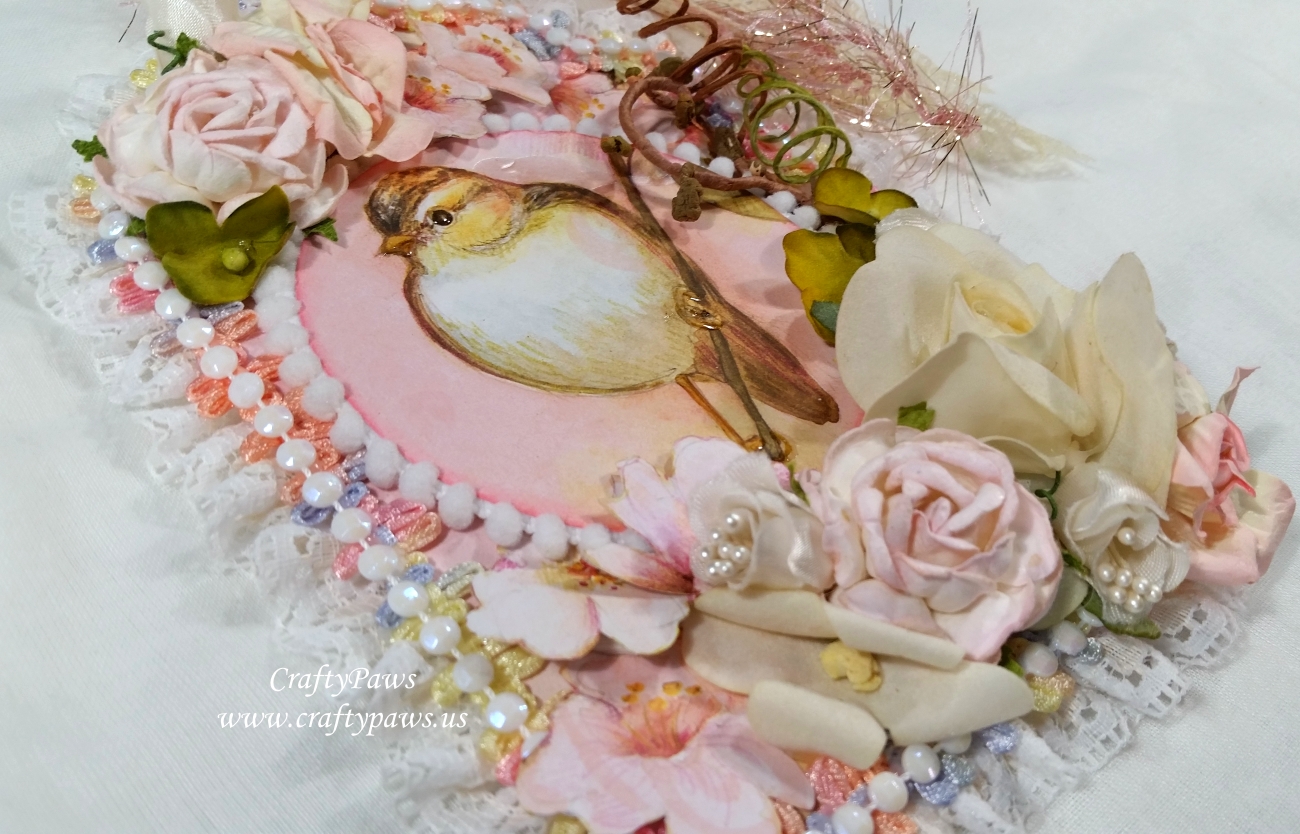
 FOCAL POINT: For the centerpiece, I die cut a sweet bird from the K & Company Floral Collection “Bird on Pink” (adding Glossy Accents to the eyes, beak and legs for some lifelike shine) with the 8th largest of the 20 piece Diemond Dies Die-Normous Stack-Ems Circle Nesting Die Set. I inked the edges of this die cut circle with more Tim Holtz Distress Ink in Worn Lipstick, which I think helped highlight the pale pink background. Then for some added whimsy, I added pom pom trim around the whole circle, which was intended to echo the faceted beaded trim around the tag while adding a different, soft texture. This pom pom trim also framed the focal point image nicely. Before adhering the image to the tag, I backed it with fun foam to add a bit of dimension to the focal point and bring it forward on this super dimensional tag.
Note: My readers can get 10% off and free worldwide shipping on all orders of $35 or more at Diemond Dies by using the coupon code: thankskristina
LAYERING/TOPPINGS: I added four 1/2″ lace strands and 4 pink and silver eyelash trim strands to create a fulsome tassel for the top of the tag, tying an eyelash trim bow to cinch it all together. Then for the tag itself, I knew I wanted to add two flower clusters — a larger one on the lower right to add some visual weight for the base and a smaller one in the upper left for balance. I used a variety of paper, foam and fabric flowers that I had been gifted (and hoarded for just that perfect special project) from crafty friends (YT: mynashka, Crafty Bean, NewCrafterBev, MyDivineGrace, and Crafty Creations by Dezy). I added twig-like curlicues from a Prima floral embellishment package to the right of the image emanating from the lower right flower cluster to add some height and to be a 3D reference to the twig on which the bird is standing. I also hand fussy cut some of the pale pink flowers from the K & Company Floral Collection “Bird on Pink” paper and popped those up on fun foam to add some dimension and interest while still matching in style with the focal bird image.
This jumbo spring tag is being entered into the following challenges:
Simon Says Stamp Monday The Great Outdoors Challenge
Creatalicious Anything Goes Challenge with an Option of For the Girls or Mothers Day
Simon Says Stamp Wednesday A Hint of Pink Challenge
Fab ‘n’ Funky Lovely Ladies Challenge
Word Art Wednesday Anything Goes Challenge
Through the Craft Room Door Anything Goes Challenge
Crafts Galore Encore Anything Goes Challenge
Not Just Cards Easter Challenge
Simon Says Stamp Work it Wednesday April Showers Bring May Flowers Challenge
613 Avenue Create Anything Goes with Optional Spring Challenge
 I figured I was so late that I should just start with a stamp and papers that I have had in my stash for a while and never got around to using. I got to use a super cute freebie digi from Pure Innocence, called “Merry Kissmas” that I have had in my stash for about a year (unfortunately I couldn’t find the link to this freebie anymore) and some pretty green gingham patterned paper that I’ve had in my stash for over 10 years! I had fun using up some scrap patterned papers, bits of seam binding and twine, and lacy ribbons too.
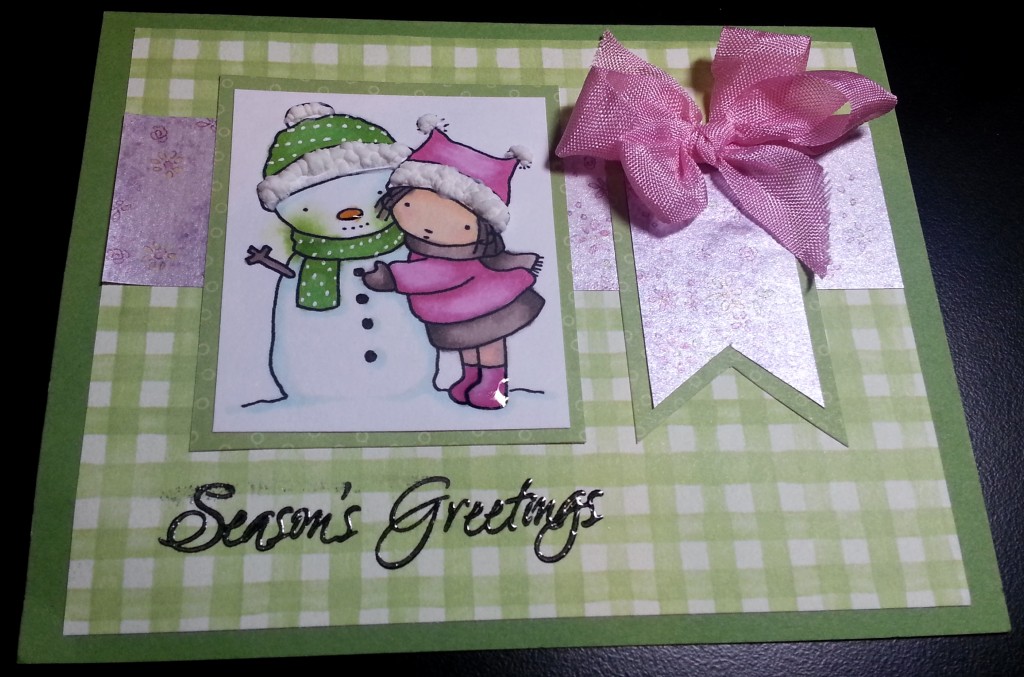 I colored up the image 3 times with the following Copic markers: Skin: E000, 00, 11, 21 and R30 (blush); Red clothes: RV25 and 29; Pink clothes: RV52 and 55; Grey clothes: C3, 5, and 7; Green clothes: YG13 and 25; Snowman: BG10 and 0; Hair and snowman arms: E74; Snowman nose: Y38; and Black coal buttons: 100 To add a little interest I used a White Sakura Gelly Roll Pen
 to add dots to some of the clothes, Mini Glossy Accents
to add shine to the carrot nose and little girl’s boots, and White Uchida Liquid Applique
to puff up the faux fur on the hats.
Lastly, I used Tuxedo Black Momento Luxe ink to stamp out a simple “Season’s Greetings” from My Sentiments Exactly and used clear embossing powder to emboss the sentiment. This last bit I rushed so the stamping is not as clear as it should be, but it will have to do. I just can’t be even later with these cards!
The card in the top picture is being entered into the following challenges:
Simon Says Stamp Wednesday Anything Goes Challenge
Inspired by Stamping #89 Gingham Challenge
The Pink Elephant Inspiration Challenge
The pink bow and enamel hearts card is entered into the Simon Says Stamp Work it Wednesday Challenge
Remember I am taking a short break from drawing digis but I’ll be back in the new year with more freebies. Thanks for stopping by, and I hope you are having a wonderful holiday season! WOOF
]]>DIEMOND DIES SALE: Diemond Dies is having a sale through Dec 31, 2014! The Holly Leaves Die set is 25% off and the Nesting Tag Die Set is 10% off. PLUS, if you use the coupon code “thankskristina” you’ll get an additional 10% off of sale prices and FREE worldwide shipping on orders of $35 or more. Happy Holidays!
Day 23 was two pages. The first is just a card that I made using my free digi, Happy HOWLidays. This was the card that I made a lot of to finally get some cards out so I thought I should document that in my December Daily. I hadn’t really thought of it before, but the inside of the card makes a perfect journaling spot. The next page was a fun one. I used some left over wrapping paper. This kraft paw print paper made me gasp with delight when I first saw it wrapped around a gift sent to me a month or so ago so I salvaged as much as I could and had been hoarding it for a special project. I used the Tim Holtz Sizzix Movers & Shapers L Die called “In the Bag” to create a little faux shopping bag, adding a twine handle and a hand made double twine bow. This was a great way to represent all the Christmas shopping I’ve been doing as well as the doggy bag that I got at a holiday dinner I attended at Maggiano’s (part of the menu has a two-fer; order one dish for dinner and they make a second one for you to take and eat at home the next day for free!). The little decorative tag I made using a dimensional sticker and one of the smaller tag dies from the Diemond Dies Nesting Tag Die Set. I used one of the larger tag dies to create a journaling tag that slides in and out of the doggy bag. As I’ve said before, I think this tag nesting die set is one of the most useful dies I own–it has been indispensable for my December Daily album.
Day 24 was a simple one. I simply used another one of the tag dies, some left over glitter paper and bit of gross grain ribbon, and the last scrap I had of one of my favorite papers from the Graphic 45 “Bohemian Bazaar” collection. The tag is finished off with the Lawn Fawn scripty joy die. I die cut it out twice and offset the words to create a kind of shadow effect that helps the word pop off the busy background. A little journaling on the back of this tag was all the page required.
The following is a video share of these pages:
The Day 24 page is being entered into the Simon Says Stamp Wednesday Anything Goes Challenge
Thanks for stopping by! If you celebrate Christmas, Merry Christmas! May your 2015 bring you happiness, good health, and wonderful crafty adventures! WOOF
]]>
 This digi is dedicated to a sweet princess who’s gone through some very trying times but has come out the other side as strong and beautiful as ever. My friend, Jamie (YT: ScrappinStampers and the owner of the Not2ShabbyShop on Zibbet) has an adorable Shar Pei who went through serious cancer surgery. With my Biscuit’s recent cancer scare, this hit very close to home. Happily, she is doing great after the surgery, and I wanted to draw this digi for all those dog lovers out there who love their fur babies like family members, and especially Jamie. 🙂
I know it is the holiday season and some folks might be wondering why I didn’t add a Santa cap or jingle bells or something, but I wanted to make this digi more versatile and usable year round.
For the card I made, I created a background using a stamped and stenciled background patterned paper created and gifted to me by my friend Rosa (YT: ColorXplosion by Rosa). I thought the primarily turquoise color matched well with the card base and helped the light browns of the Shar Pei pop nicely. I then hand cut a little snow ground (which I shimmered up using Clear Wink of Stella) around which I scattered bits of a snowman (LOL) from the Diemond Dies Build a Snowman Die Set.
Coupon code for Diemond Dies: “thankskristina” gets you 10% off your entire purchase, and if your order is $35 or more, you also get free worldwide shipping. PLUS Diemond Dies is having a fantastic Christmas Giveaway. Check it out HERE on their Facebook page!
I colored up the digi with the following Copic colors: Muzzle and paw pads: W5 and 7; Shar Pei: E50, 51, 53, 23; and Shadow in snow: C1. To add a little more realism, I also used Glossy Accents on the nose, eyes, claws, and paw pads of the Shar Pei and the discarded carrot. 🙂
Lastly I used a stamp from the C.C. Designs “Snarky Christmas” stamp set that says, “Dear Santa, define naughty…” I thought this was perfect for the expression and stance of the Shar Pei surrounded by the bits of the snowman.
The following is a video share of this card:
This card is being entered into the Naughty or Nice Winter Holiday Challenge
The winner of the Christmas Blog Candy Winner is: Barbara Alexander! YAAAAY!
Barbara Alexander commented: Congrats on all the subbies…love this cute little kitty..hugs barb
Thanks for stopping by and have a great day! WOOF
]]> For the sentiment, I printed it out on my Canon PIXMA MX922 Wireless Color Photo Printer with Scanner, Copier and Fax
 in the perfect shade of green to match the papers I wanted to use. For the card base, the patterned papers, the cut-a-parts, and even the twisted blue raffia are all from the Jillibean Soup card kit called, “Birthday Bisque”. The vintagey feel seemed well-suited for this card.
I colored Simon on Bike with the following Copic colors: Skin: E50, 51, and 53; Hair: E 55, 74 and 59; Jeans: B93, 95, and 97; Tires: C9; Jacket: C7; White T-shirt: C1; Chrome of bike: C1 and 3; Red of motorcycle: R39 and 89. I also made some glare lines on his glasses with a White Sakura Gelly Roll Pen and I added Glossy Accents
over the glasses as well as the metal parts of the bike.
The trickiest part of this card was fussy cutting the image. The narrow and inside sections were difficult to cut, but I managed with a sharp X-ACTO #2 Knife. 🙂 After the detailed cutting, I popped up the whole image using foam adhesive, with the front wheel straddling the raffia ribbon to make it look like it was even further forward.
The following is a share of this card:
This card is being entered into the Simon Says Stamp Monday Transportation Challenge and
Seize the Birthday Anything Goes Challenge
Thanks for stopping by! Please subscribe if you wish, and have a great day! WOOF
]]>
I started with a red card stock base and used some black card stock for the top film strip layer — just like Sandy 🙂 Then I wondered what little images I could pop into some of the frames. What better than stamped puppy images? Well, for me, nothing’s better. LOL I stamped out the little poodle from the Penny Black “Mimi in Paris” stamp set and the little dog from the Tiddly Inks “I Wuf You” stamp set. I colored them up with the following Copic Markers: Poodle: E02, 31, and 33; and Brown and white dog: W1, E23 adn E25.
I fussy cut out the pups and positioned them, just so, between the frames. I left room between the dogs so I could add little punched out red hearts, which I made shiny with Ranger Inkssentials Glossy Accents. Remember, you can’t use glitter on OWH cards so no sparkle allowed. LOL
For the sentiment, I hand wrote “i wuf you” with a White Sakura Gelly Roll Medium Point Gel Pen. The lower part of the black card stock layer was looking a little plain to me, so I searched through my washi tape collection and found a thin black and white one of a film strip (sorry I don’t know the brand) and a red, black and white terrier one made by Craft Essentials. I felt like this card was just meant to be. Don’t you love it when that happens?
With very little coloring and fussy cutting, this card was pretty quick to make. With the flexibility of adding all sorts of different images in the film strip frames (I’m going to do one with the cutie patootie kids from the Mama Elephant “In My Heart” stamp set next), different versions would be easy too. I see a lot of these cards in my future for my next OWH batch of cards!
This card is being entered into the Operation Write Home Red Friday Blog Hop Challenge
and the Tiddly Inks Gratitude and Joyfulness Challenge
Thanks for stopping by, and have a great day! WOOF
]]>
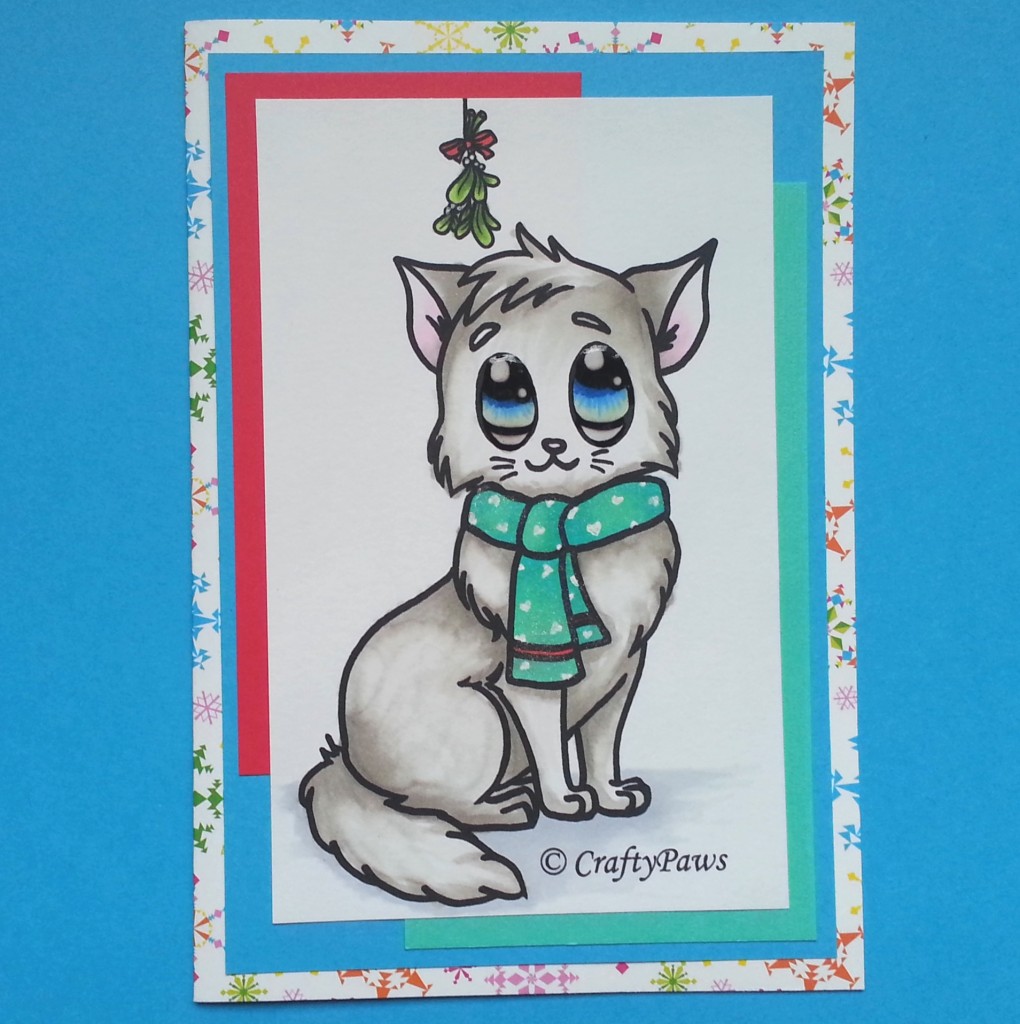 I colored her up with the following Copic markers: Fur: W1 and 3; Ears: RV00; Eyes: B21, 24, 18 and G40; Scarf stripe: R08; Scarf: BG23 and 45; Mistletoe: YG13 and 17; Red bow: R08. The colors are totally influenced by the beautiful card created by Kristie Marcotte in her OWH Red Friday Blog Hop card. I just loved it and was thinking of it when I created this loving kitty card. 🙂
I also used a White Sakura Gelly Roll Medium Point Gel Pen, to clean up the white berries on the mistletoe as well as draw in the little hearts on the kitty’s scarf. This is by far my favorite white pen, and I’ve linked to where I’ve found it for the best price (Amazon). To give a shimmery look to the scarf, I also coated it with Clear Wink of Stella
. There is a special Christmas 3 pack of Silver, Gold and Clear Wink of Stella at a great price HERE
. Lastly, I added a nice shine to even further accentuate the big sweet eyes of the kitty with Ranger Inkssentials Glossy Accents.
Hope you like “PURRker Up” as much as I enjoyed drawing her up to share with you.
This card is being entered into the following challenges:
Simon Says Stamp Monday Holiday Cards Challenge
Simon Says Stamp Wednesday Christmas/Holidays Challenge
Naughty or Nice Winter Holiday Card Challenge
The Aviary Holiday Challenge
OWH Red Friday Blog Hop

Thanks for stopping by and have a great day! WOOF
]]> I started with the same star burst background and picked another stamped image that looked like me and Bandito. This stamp is by A Random Fan and is called “Wanderlust,” and I think it is absolutely adorable! I paper pieced the Vespa, the girl’s goggles, and the girl’s skirt and scarf using small scraps from my scrap box. HINT: The key to creating a realistic look with paper piecing is to first color all the areas of the image that you are not going to paper piece. Then make sure you add shadows to those tiny paper pieces. Fussy cut them out and then edge each piece with black marker (I use a Faber-Castell PITT artist pen in SB size to do the edging). Finally adhere the paper piecing to the underlying image. The order of this process is important to create a finished look and not create any muddy areas; if you shade after edging the black marker may leach into the shaded areas.
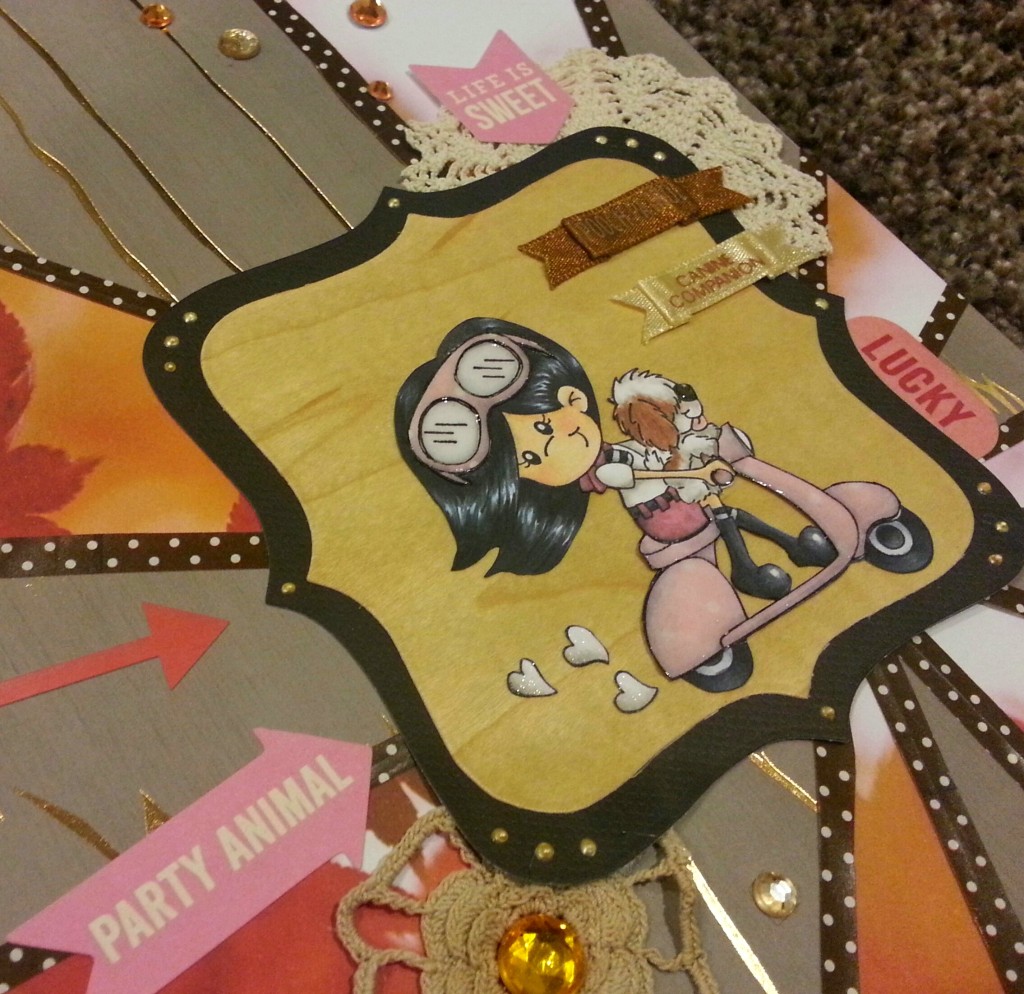 Because there wasn’t a poodle I could add readily to the stamped image that would make sense, I used a white poodle sticker that I had from Sandylion Essentials, colored it up to look like my Biscuit, and added it to the layout as the main part of the the secondary cluster. The Copic colors I used are: Skin: E50, 51, and 53 with R20 for blush; Vespa and goggle shading: C1 and 3; White shirt shading W1 and 3; Hair: C7, C9 and B32; Boots and Vespa tires: C5, 7, and 9; Brown and white dog fur: E23, E25, W1 and W3 with R20 for blush and tongue; and Poodle fur: E31 and 33. I put a coating of Glossy Accents on the Vespa and the girl’s goggles and a lot of clear Wink of Stella on the heart puffs of exhaust to add some shine and shimmer.
The stamped image was relatively small for the layout and I wanted it to stand out from the busy background so I created a framed area using the Diemond Dies Labels 2 Nesting Die Set with some black card stock and wood veneer paper. I love the way the wood veneer contrasts but reflects the faux bois patterned paper with the foiled gold in the background. To carry the golden elements throughout the layout, I also added little drops of gold Liquid Pearl around the black frame and added orange and champagne gold rhinestones in clusters around the layout. Check out the SALE at Diemond Dies (through November 2014)!!! Currently everything in the store (except the latest release) is 10% off or more. The Labels 1 Nesting Die Set and the Fishtail Banners Nesting Die Set are 20% off. Plus if you use the coupon code: “thankskristina” you get and EXTRA 10% off of the sale prices and free worldwide shipping on orders of $35 or more!
I wanted to add some softness to the layout so I picked out three crocheted doily flowers in cream, which I layered with stickers, rhinestones, and/or tucked behind the main framed image. I also had fun picking out some dimensional stickers from the My Mind’s Eye’s Lost & Found “Record It” collection and the Jillibean Soup’s “Birthday Bisque” collection. Lastly I had some satin ribbon salutation banner doggy stickers by Offray that seemed perfect for this layout. One says “Pooch Patrol” and the other says “Canine Companion.” How cute is that?
The following is a video share of this layout:
This layout is being entered into The Pink Elephant Anything But a Card Challenge
Thanks for stopping by. Please subscribe if you wish, and have a great day! WOOF
]]>
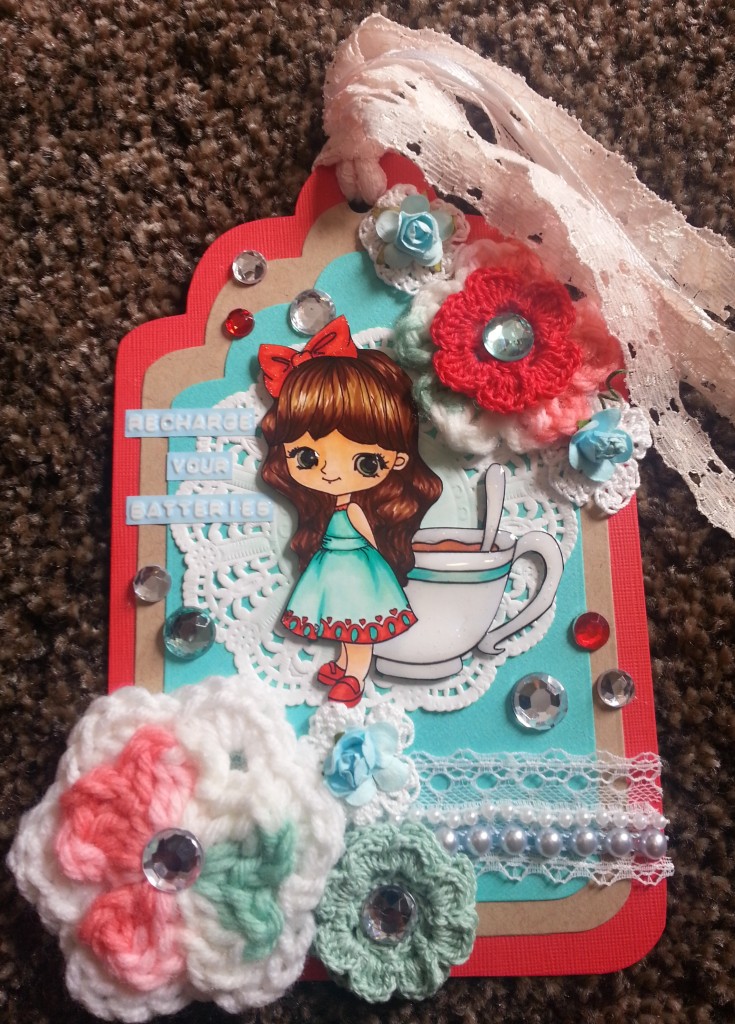 stock in those colors and make a sweet tag for a crafty friend, Elena (YT: Eleval Labat). She has been going through a lot, and I hoped that this tag with the “recharge your batteries” sentiment by Sticko might bring a smile to her face. DIEMOND DIES COUPON CODE: thankskristina gets you 10% off your entire purchase and free shipping on orders of $35 or more!
I used the three largest nesting tag dies to make the three tag base layers. Then I added a white paper doily, which I softly colored with my BG10 Copic marker to highlight the main focal image. The stamped girl is a Little Blue Button Stamps image called “Miss Lilly Tea.” What a cutie patootie, right?! I colored Miss Lilly up with the following Copic colors: Hair: E55, 57, and 59; Skin, E000, 00, and 11; Eyes: G94 and 99; Tea: E25 and 21; Cup and spoon: C1; Teal color on cup and dress: BG10 and 13; Red of bow, dress and shoes: R22 and 08.
I then rummaged through all of my crochet flowers and found some fabulous ones that coordinated perfectly with this color palette. They were all made for me by my crafty friends Brenda and Cheryl (YT: Brendahdp77 and delygirl1961, respectively). I added some small teal mulberry paper flowers on top of the smallest white crochet flowers and hot glued clear, aqua and red bling for some fun sparkle. To add a little more softness, I also added a bit of lace and small and medium pearl trims. The tassle at the top was made with delicate satin ribbon and flower lace. Lastly, I added Glossy Accents over Miss Lilly’s eyes, and over the tea cup and spoon. This is a special addition on this tag for Elena because she was the first person who told me about Glossy Accents! 🙂
The following is a video share of this tag:
This tag is also being entered into the following challenges:
Inspired by Stamping IBSIC #87 Color Challenge
Challenge Up Your Life Anything Goes Challenge
The Aviary: Paper Wings Productions Anything Goes Challenge
I colored up these two foxes from C.C. Designs called, “Sir Rupert with Tea” and “Sir Rupert with Cane” using the following Copic colors and pens: Hat and bow tie: B95 and 97; Dark brown ears and paws: C74 and 79; White tail, chest and snout: W1 and 3; Eyes: BG75 and 78; Brown of body: E97 and 99. Chair for the tea sipping fox: YR31 and 24; Staff for the walking fox: Clear Star Gelly Roll pen. White shine spot on eyes: White Gelly Roll pen. Darkening edges of fussy cut images: Faber Castell PITT artist pen in SB size. Lastly, to add some dimension, I added Glossy Accents to the eyes, glasses, walking staff, and tea cup and saucer.
The following is a process video showing how I colored the walking fox:
Thanks for stopping by. Please subscribe if you wish, and have a great day! WOOF
]]>