The 4″ x 6″ card I made is for a challenge hosted by a wonderful crafty friend, Anny (YT: StargrlAnny) who is celebrating 2 years on YouTube. Woot woot! She was very open to whatever we wanted to make in terms of style but wanted us to put our YT name on the front so that she could at-a-glance know who made which card, as she is going to use it as a kind of Roladex system/mini album. Because I didn’t want my YT name to take center stage, I used a pale wood grained Amy Tangerine textured Thickers from American Crafts called “Muse.”
I used some spring green colored gingham print paper that I have had in my stash for over a decade for the base. Then I used some scraps that I had left over from a paper from the Dear Lizzy Neopolitan collection for the background. To add a little fun and a tiny bit of dimension (Anny didn’t want a lot since she is planning to put these into plastic sleeves), I fussy cut out a lot of flowers from that patterned paper and popped them up on foam adhesive. For a little sparkle, I also used different colored Stickles and glitter glue around some of the flowers.
For the little lamb, I used the following Copic colors and used a dotting technique to give a sense of wooly texture: E000, E31, W1 (for the shadow), and RV000 (for the inner ear area). I used some Glossy Accents on the lamb’s eyes, nose and hooves to add a little visual shine.
The following is a video share of this card:
This card is being entered into the Simon Says Stamp Monday A Piece of Paradise Challenge
and the Raisin Boat Celebrate Challenge
Thanks for stopping by and have a great day! WOOF
]]>
I was making two 3″ x 5″ (index card size) love-themed cards for my crafty friend Pam’s (YT: theoneandonlygrand), challenge celebrating 1000+ subbies on YT. Woot woot! These are a clean and simple (CAS) styel, and I thought these digis would be perfect for this project.
I shared the colors I used on the “Believe” digi in yesterday’s post, and the following are the markers I used for this digi: Elephant: W1 and W3; Blush and water/hearts: R30 and R20. I also added a little Clear Wink of Stella on the hearts to add a little shimmer.
 I used paper from the new-to-me My Mind’s Eye Lost & Found Record It! Double-Sided Cardstock 12″X12″- Heirloom Glamorous
, the matching Layered Stickers
, and Adhesive Enamel Dots
. I love the sparkle from the red glitter in combination with the vintage feel of the more muted colors. The main thing that took more time (other than drawing and cleaning up the digis) was the fussy cutting of that intricate lacy heart behind the elephant (I added clear Wink of Stella on the lacy part of this heart too).
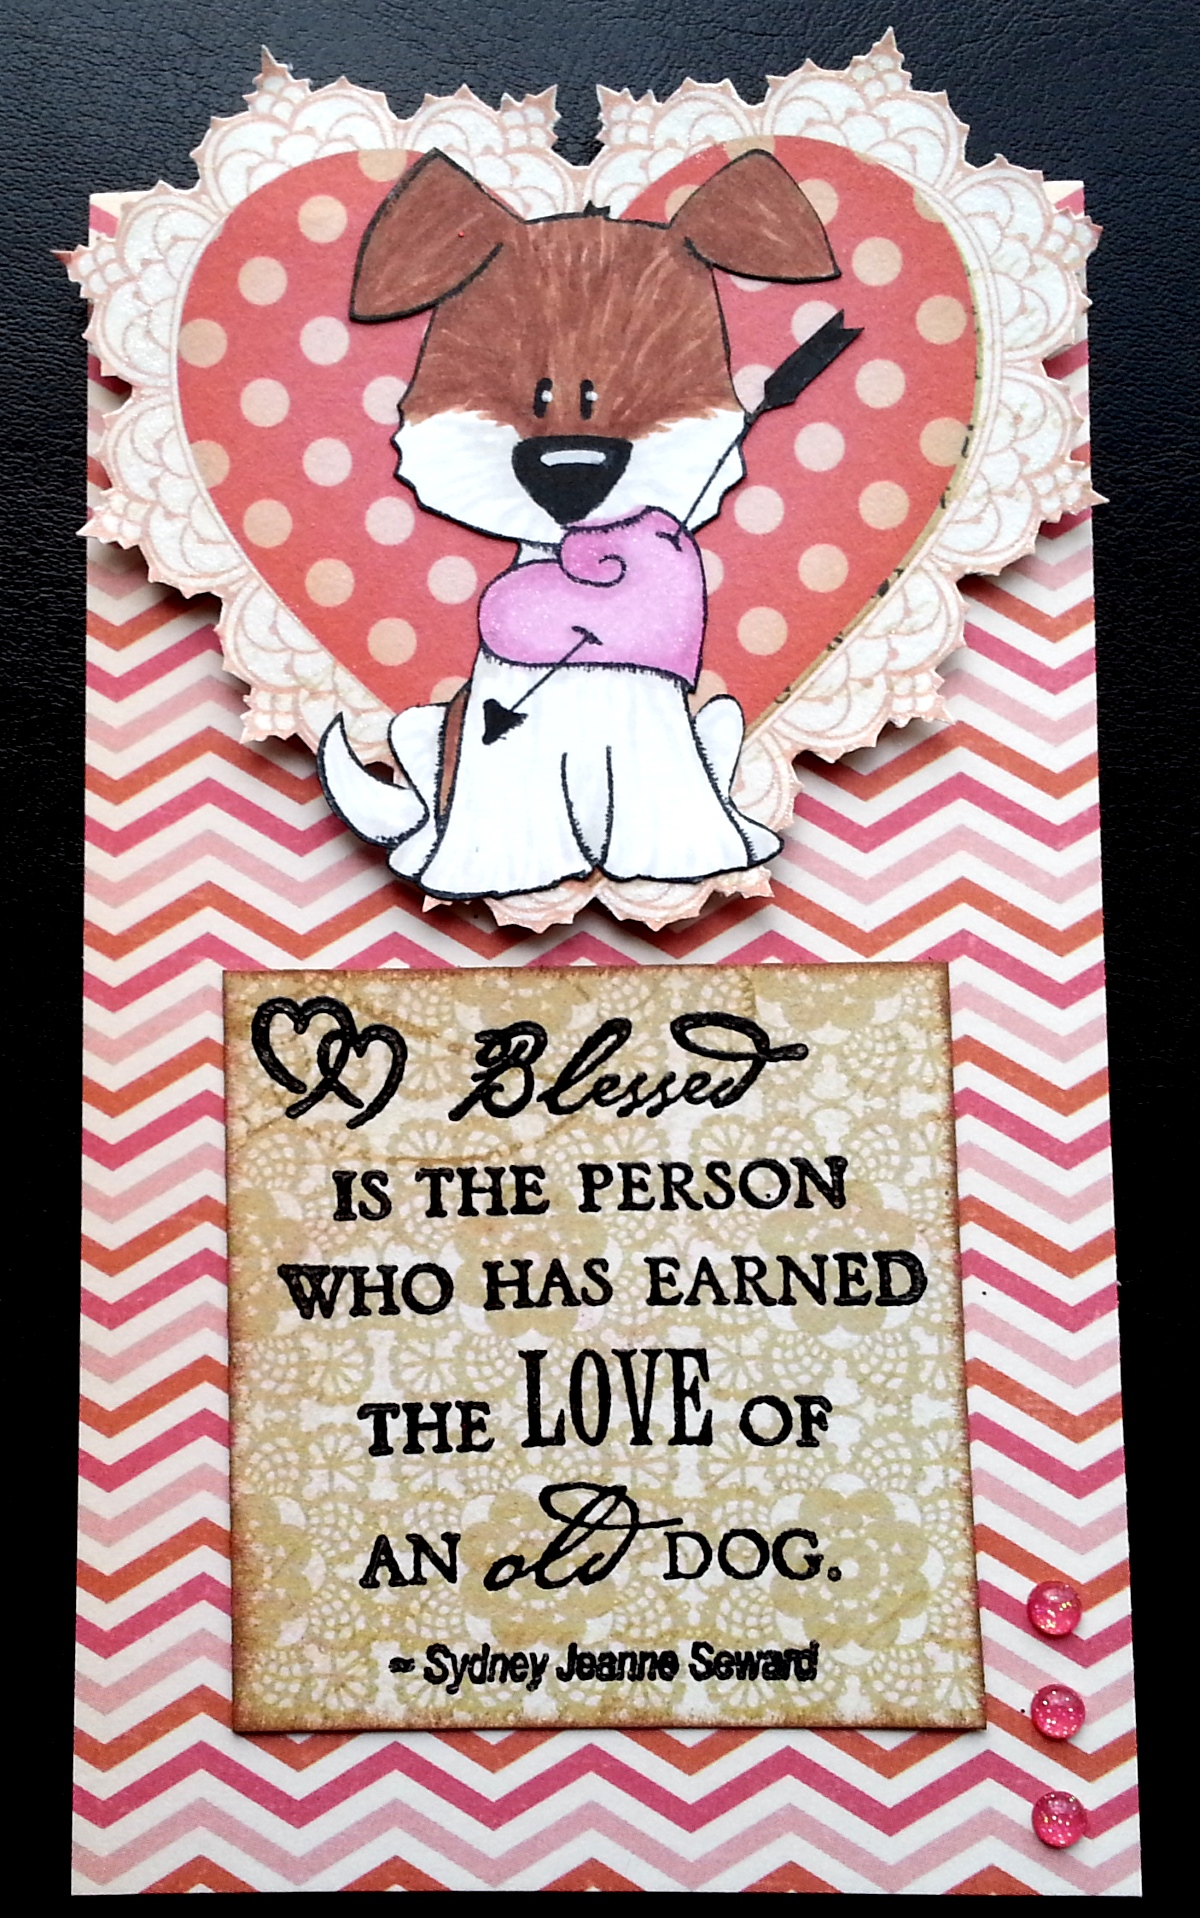
Because I couldn’t leave it at two non-doggy cards, I made an extra card with this adorable Tiddly Inks pup from the “I Wuf You” stamp set. I colored it up with Copic markers: E23, E25, and W1. The Sentiment is from one of my all time favorite sentiment stamp sets from Fiskars Cloud 9 Designs called “Simple Thoughts – Dog,” which was gifted to me by my crafty friend, Laura (YT: littleluluscraps). I used Memento Luxe Tuxedo Black Ink and clear Recollections embossing powder to lend a little elegance and shine to the sentiment, which reads: “Blessed is the person who has earned the love of an old dog. – Sydney Jeanne Seward” Again, to add a little extra shimmer, I used clear Wink of Stella on the heart in the dog’s mouth as well as on the lacy parts of the fussy cut heart behind the dog (yep, I cut out another one–LOL).
These cards are being entered into the following challenges:
CARDZ TV Any Occasion Challenge and
CASology NBUS Challenge
The dog card is being entered into the Tiddly Inks New Beginnings Challenge
Thanks for stopping by, and have a great day! WOOF
]]>
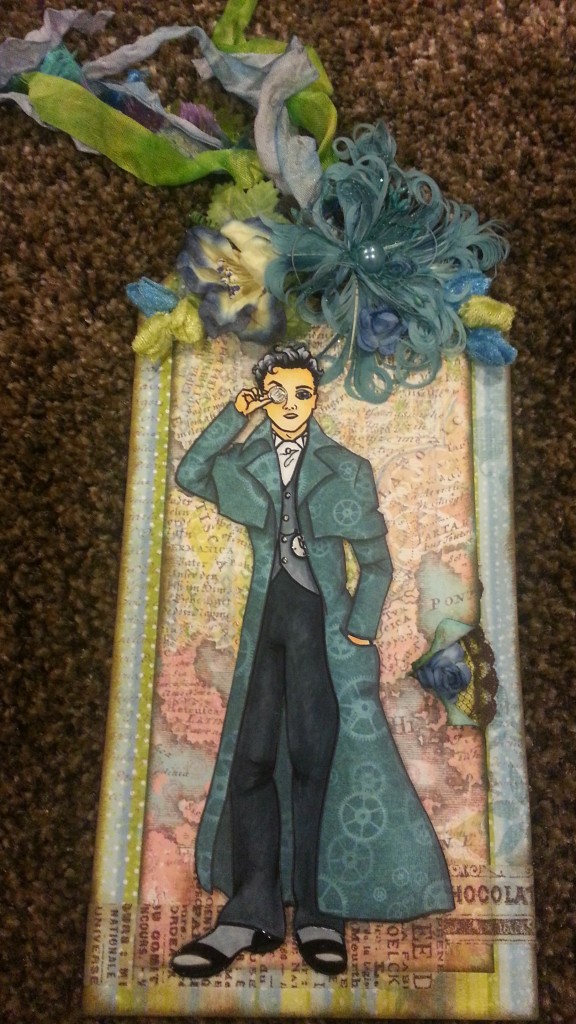 appeal. So naturally I turned to none other than Patrick Dempsey, who played Doctor McDreamy, for some inspiration. LOL Actually, I was never really a fan of Grey’s Anatomy, but when I released Steampunk Scarlett, crafty friend Amador (YT: Amadoreros), commented that she was “McSteamy.” Right then, I knew the direction this digi was headed. 😀
To create this Steampunk-lite tag (I didn’t add a lot of metal, gears, dark colors, etc.), I used some wonderful papers from K & Company as a base. There is a map pattern to the top paper, which alludes to the adventurer/explorer that I imagine McSteamy to be. LOL I added some Tim Holtz tissue tape which I darkened with Tim Holtz Walnut Stain Distress Ink (to give McSteamy something to stand on). I inked the edges of the papers with Tim Holtz Distress Ink in Peacock Feathers and Walnut Stain. Where I tore and rolled back a bit of the top paper, I inked both sides of the paper and tucked behind some brown lace and a blue rose to add some interest. Because I did not want to make the tag too feminine, I stayed with blue and green hues and used paper, rubber, velvet, and feather flowers (quite the mix eh?). The flowers were mostly Wild Orchid Craft or Prima.
To color up McSteamy, I paper pieced his fabulous coat using one of my all-time favorite Graphic 45 papers, “Steampunk Spells.” To add depth, I added shadows to this paper pieced portion using Copic colors: C3 and 5. Actually, I wanted that coat with that fabulous paper to be the main focus of the image so other than the skin tones in E000, 00, and 11; the only Copic colors I used were: C1, 3, 5, 7, and 9. I used different combinations for his pants, vest, and cravat. For a little sparkle to the “metal” parts of the digi, I used a clear star Sakura Gelly Roll pen on his monocle, vest buttons, cravat pin, and clock edge. To add a bit of shine, I also used Glossy Accents on his eye, monocle, pocket watch, and shoes.
The tassle on the tag is made from hand-dyed seam binding in blues and greens and some fun eyelash trim in blue, green, and purple. Overall I kept this tag more simple, but I like the final result with McSteamy taking center stage.
The following is a video share of this tag:
This tag is being entered into the Simon Says Stamp Monday Anything Goes Challenge
Thanks for stopping by. Please subscribe, and have a great day! WOOF
]]>If you’d like to check out the Second Annual Crafty Academy Awards and vote, please watch this YT video by Betty (YT: Scrappassion01), who is hosting this, getting so many incredibly generous sponsors, and is doing so much untold work to make this huge event a spectacular success (like it was last year), please watch this HOW TO VOTE VIDEO.
The following is a video share of this digi and some of my thought process as I was drawing and prepping Steampunk Scarlett:
The paper that I used to paper piece her dress and hat is a beautiful soft patterned paper from the My Mind’s Eye “Everyday Tango” collection. The forest green with the bluish purple has a rich autumn feel to it–with a hint of Halloween dress up. 🙂 To create shadows for the folds and the 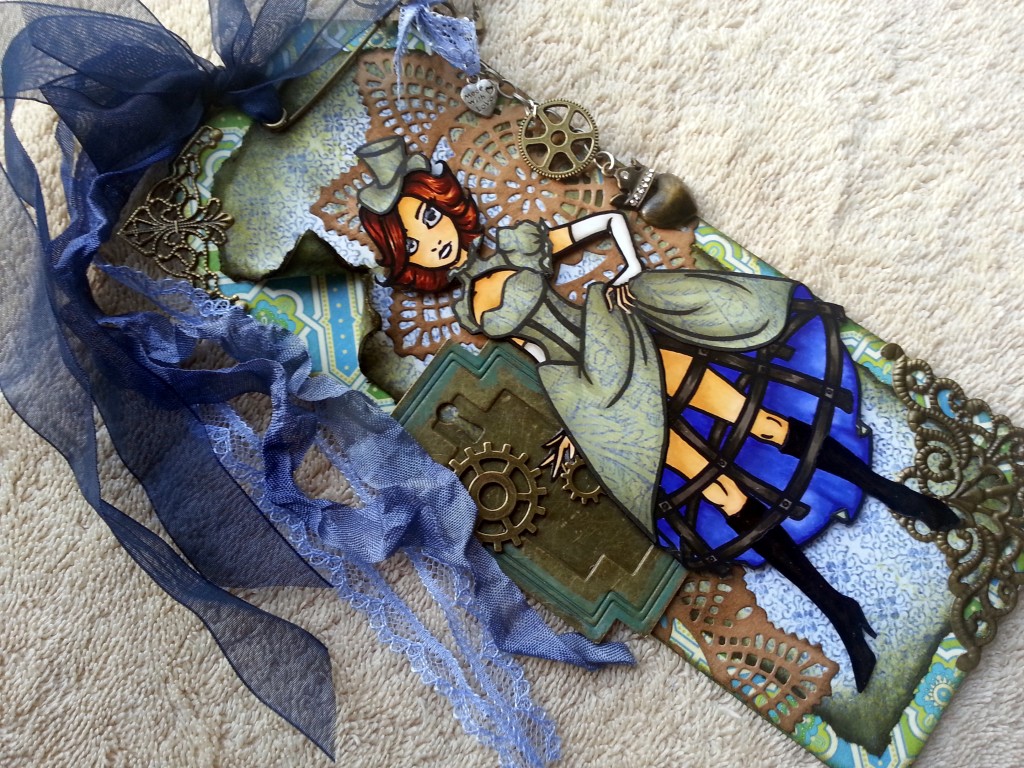 edges of the dress and hat, I used W1, 3 and 5. For the under part of the dress, I picked up the blue from the patterned paper and used B63, 66 and 69. I am super excited about the new color combination I tried to create an auburn hair color: E97, 99 and 29. For her boots, I used W9 and 100. Her fingerless gloves I wanted to keep looking white, but with “realistic” shading so I used W1 and 3. Lastly, for her skin, I used E50, 51, 53 and R11. I also used Glossy Accents for her eyes and her boots and some clear Wink of Stella for her hat and dress; a girl can never have too much shimmer! LOL
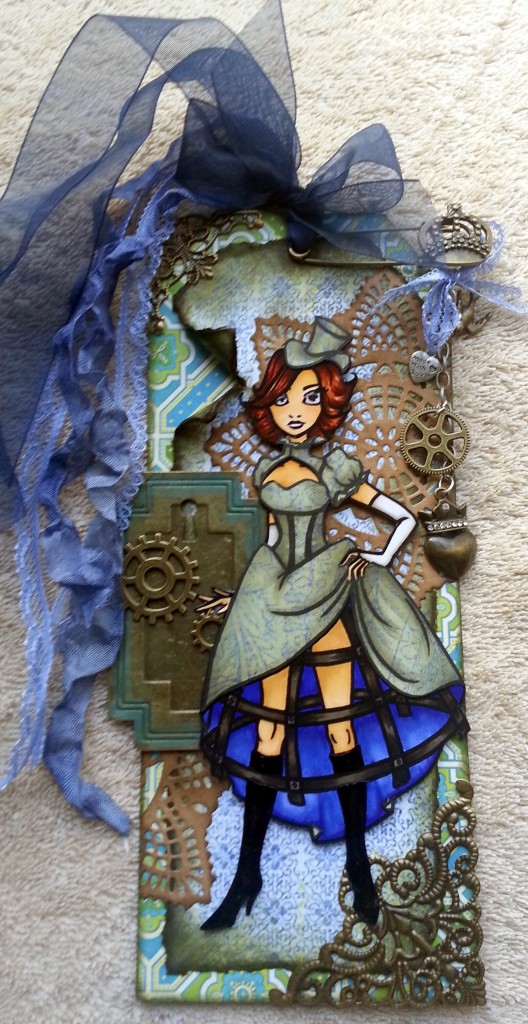 I made a Steampunk tag for a dear crafty friend using Steampunk Scarlett. I started with a light weight chipboard that I covered using a glue stick with Graphic 45 Bohemian Bazaar paper and another patterned paper from the My Mind’s Eye Everyday Tango collection. I distressed the edges and inked them up with Tim Holtz Distress Ink in forest moss. I even tore a little of the top paper and rolled it back to reveal more of that gorgeous G45 print. Then I took a kraft doily , inked the edges of that with Tim Holtz Distress Ink in walnut stain, cut it two and used it to “finish off” the background.
I wanted to keep the materials more limited to stay closer to the Steampunk style so I added only metal and some ribbons and lace. I used a metal lock plate called “stamped geometric metal tags” from Graphic 45, a metal safety pin from which to add a chain and various small metal charms, small Tim Holtz gears, and two ornate metal flourish corners. All the metal pieces were in the antique brass finish and were adhered using E6000. To counter balance all the hard metal, I added pretty ribbons and laces in various hues of blue (to coordinate with the inside lining of Scarlett’s dress) as a tassel for the top of the tag and a little bow at the top of the dangle. I think the colors, the distressing, and the antique brass metals lend a luxe autumnal feel to the tag. Finally, I fussy cut Steampunk Scarlett out (very carefully with all those tiny curls in her hair!) and popped her up on foam adhesive to match her height up with some of the metal embellishments I added to the tag background.
The video in which I share the final tag project I made with Steampunk Scarlett is below:
This tag is being entered into the Kraftin’ Kimmie Wonderful Wednesday Anything Goes Challenge and
the Craft-Dee Bowz October Anything Goes with a Handmade Bow Challenge and
the Simon Says Stamp Monday Fall Challenge and
the PunkyouGirl Anything Goes Steampunk October Challenge (Winner)
A Step In The Dark Anything Goes On the Darker Side Challenge
Thanks for stopping. Please subscribe if you wish, and I hope you enjoy my free digis. WOOF!
]]>
 I used a little paper doily, some pink satin ribbon and a little crinkled pink seam binding to add some softness to the front. At the bottom, to add a little more interest, I punched out a little border using my Martha Stewart iron gate border punch. This is one of my favorites because of all the detail to it, but I think it is retired.
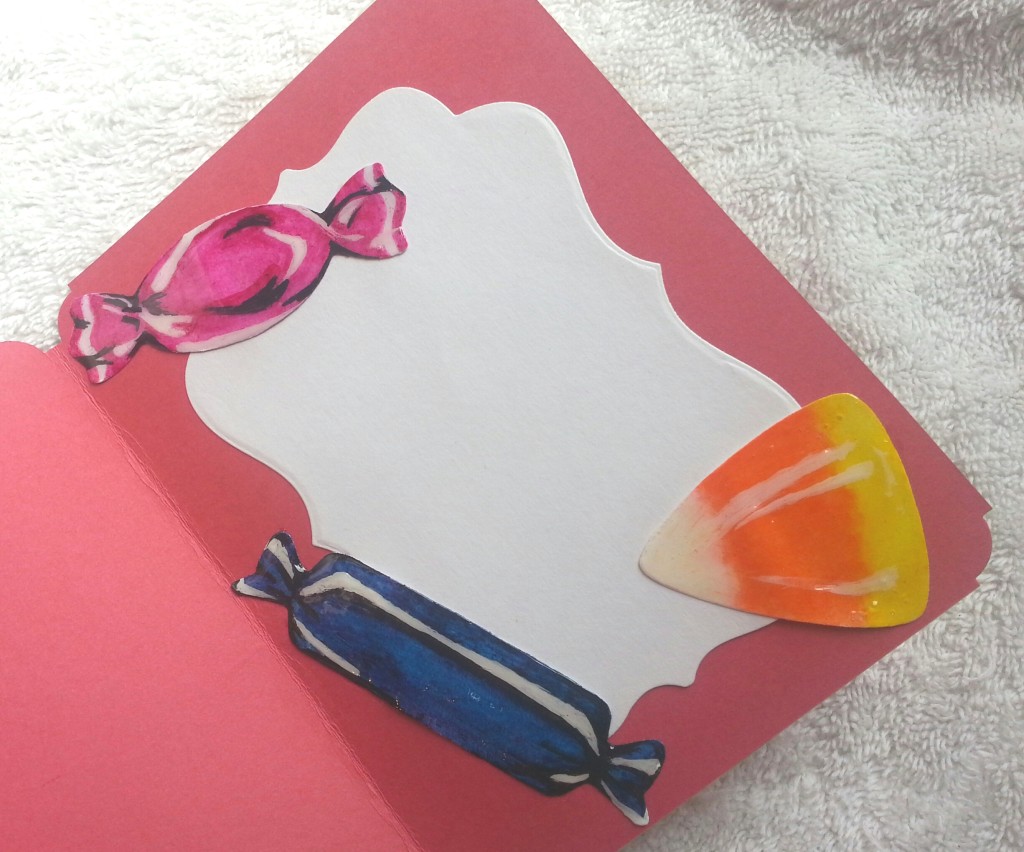
On the inside I used the largest of the Diemond Dies Labels 1 Nesting die set (I find that I use this die all the time to make cards since it is the perfect size for standard A2 card message areas) to set up a place where I could write my note and then had some fun making some candy embellishments using the Diemond Dies candy die set. Remember, use Diemond Dies coupon code: thankskristina for 10% off your entire purchase and free worldwide shipping on orders of $35 or more!
The coloring of these candies was really fun to figure out. I used my Derwent Inktense watercolor pencils to color in the bases (but you could probably just cut colored card stock). Then I took my white gesso with a thin paint brush to add in highlights. The final touch came from using my M size Faber Castell black PITT pen to put in low lights or shadows. That is the trick; to create a 3-D look with 2-D images or die cuts you have to include highlights and low lights.
The following is a video share of this card:
This card is being entered into the Simon Says Stamps Wednesday Watercolor Challenge and
The Kraftin’ Kimmie Anything Goes Wonderful Wednesday Challenge and
The Paper Nest Dolls Anything Goes with a Bow Challenge and
The Aviary: Paper Wings Halloween Challenge and
Craft-Dee BowZ Anything Goes with a Handmade Bow Challenge
Thanks for stopping by and have a great day! WOOF
]]>
I colored up this little digi, I named “Bad 2 the Bone,” to look like my little Bandito, but you could color him up completely differently for a totally different look. I kept all the stripes without color so you can use whatever color combinations you might like (e.g., pinks, orange and black, etc.).
 I colored up the digi with the following Copic colors: Dark stripes: C5, 7 and 9; White stripes: C1 and 3; White parts of dog: W1 and 3; Brown parts of dog: E11, 13 and 15; Eyes E74 and 79; and Tongue R08 and W3.
I had little sparkly devil horns from an old Halloween costume of mine when I was “deviled eggs” (don’t ask–LOL). I put those on my dog along with a little red jacket to take a few pics for this LO. Actually, my little pup is anything but a bad dog or a little devil. He is as sweet as they come, but I think that’s what makes this “bad dog” layout funny. I used papers and cut outs from the American Crafts “Night Fall” collection, which was from last Halloween, for all the papers and embellishments. To add a little dimension I cut some of the cut outs a couple of times and used foam adhesive behind the top layer.
I also used my Diemond Dies spider web set to kind of “frame” the layout with these incredibly detailed and delicate spider web and spider. I love the interest and balance that they add to the layout. Remember, all the new Halloween dies have recently been released and there is a sale going on right now; everything is 10% off through October 5, 2014. Also, if you use my coupon code: thankskristina, you’ll receive an additional 10% off and free worldwide shipping on orders of $35 or more. Now’s the time to stock up!
Lastly, to add a little softness, I added a triple loop bow that I made with sheer black wire edged ribbon. I cinched the center with black and white twine, and tucked it under the popped up embellishment that is supposed to represent what the little digi dog is saying. 🙂
The following is a video share of this layout:
This layout is being entered into the Aviary Halloween October Challenge and
the Kraftin’ Kimmie Stamps Wonderful Wednesday Anything Goes Challenge and
The Paper Nest Dolls Anything Goes plus a Bow Challenge and
Craft-Dee BowZ Anything Goes plus a Bow Challenge
Thanks for stopping by and have a great day! WOOF
]]>I drew this “Christmas Tree Kitty” for all you cat lovers, but especially for the extremely talented Linda Lapotka (YT: Linda Lapotka), who starts and ends her YT videos with adorable pictures of her kitties and my crafty friend, Cindy (YT: cindy4kiddos), who has a cat who stays in her tree from the moment she puts it up in November. I colored up the digi with the following Copic markers: Kitty: E11, E 15, and C1; Oval bulb: RV00, 02 and 04; Round bulb: B60, 63 and 66; Pine branches: YG 63, YG67 and G29; Strand of gold balls: Y35, and 38. The dark shadows I laid in with my Derwent Inktense water color pencil in ink black and a Pentel waterbrush. To add sparkle to the bulbs, I added Wink of Stella, and to add glitter to the gold ball strand, I used a clear star Gelly Roll pen.
This Christmas card is one that I made using non-traditional colors and an adorable paper from imaginisce called, “Gingerbread Village”. The front of the paper has those super cute elves/gnomes and the back is pale green with small circles. I have been wanting to use this sweet paper and make a “gnomey-homey” holiday card (LOL) for a while, and I thought this was the perfect opportunity. Just to add a little decorative flourish, I tied a triple bow using green and white bakers twine and “dangled” a little gingerbread house that I fussy cut out of the paper and popped up on a double layer of foam adhesive.
This card is being entered into The Aviary Ribbon or Twine Challenge and
the Taylored Expressions Sketch Selfie Share Challenge and
the Catherine Pooler Housewarming Party Challenge

Thanks for stopping by and have a great day! WOOF
]]>
Anyway, just wanted to share this CAS card that I made using my latest free digi, “Friends Forever”. I love the disproportionate little boy with the big dog–isn’t that cute? I drew them simply, so they should be easy to paper piece and/or color.
I colored them up using Copic markers. Skin E00; Shirt: RV25 and RV29; Jeans: B93, 95 and 97; Hair: C1, 3, 5, 7, 9, and B00; Dog: E31 and 33; Cement ground: W1 and 3. I fussy cut them out, popped them up using foam adhesive, and used a sky patterned background paper.
The quote is one of my favorites: “Love does not consist in gazing at each other, but in looking together in the same direction.” I printed it out on my color printer using dark blue (to coordinate with the boy’s jeans and the sky). Then I free hand fussy cut around it to form a cloud. After adhering it to the card, I used Liquid Applique in white to go around the cloud shape, zapped it with my heat tool, and like magic, it puffed up!
I thought this would be a very versatile, “any time” card.
The following is a video share of the card:
Thanks for stopping by! Please subscribe if you wish, and have a great day! WOOF
]]>Just to add a fun extra little twist, I also added an action wobble on the puppy’s head. I had printed out two of the digis and fussy cut out one completely and just the head of the other one. Then I added a homemade action wobble (Tutorial HERE) so that the puppy can look like he is shaking his head while carrying the letter! How fun is that?!
It is a really easy card, even though it looks complicated. I have re-released my free digi “Happy Mail” for the next week so if you’re interested in downloading him, CLICK HERE. I colored him up simply with only 3 Copic markers: W1, W7 and W9.
The following is a video sharing the details of this card:
Thanks for stopping by and have a great day! WOOF
]]>
In the meantime, I hope you all enjoy playing with “Steampunk Fairy”!
Thanks for stopping by, and have a great day! WOOF
]]>