 In any event, I thought I would share a more detailed look at how to achieve that deeper look and share a Copic hair coloring video of coloring caramel blonde (or “bronde”) hair with more dark tones than in THIS champagne blonde hair.
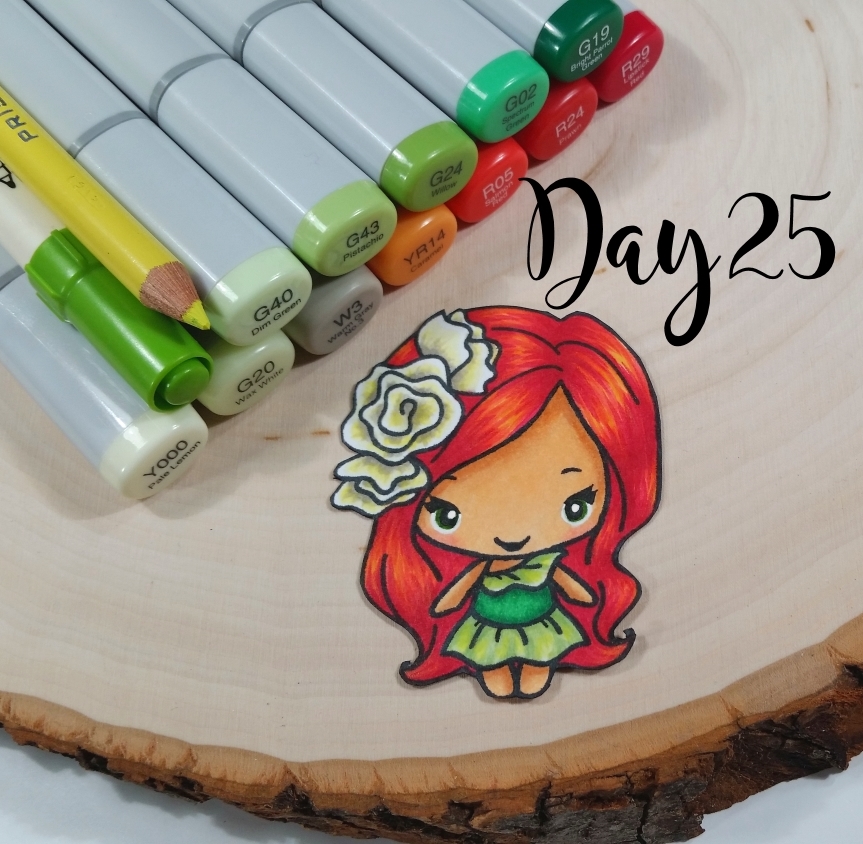
As a comparison, I colored up this image of Rose from The Greeting Farm’s Bloom Kit with the following Copic colors for Day 25 of the 30 day coloring challenge: Skin: E51, E53, E21, R20 and BV000; Roses in her hair: Y000, G20, W3 with Prismacolor color pencil yellow highlights with Yellow Chartreuse; Dress: G40, G43, G24, G02 and G19 with Prismacolor color pencil yellow highlights with Yellow Chartreuse; Hair: YR14, R05, R24, and R29. Now I know I generally have a heavy hand with coloring anyway, but I was not totally satisfied with the level of highlights left in her hair at the end. She would be great for a graphic pop on a project, but I was hoping for a little more subtle detail.
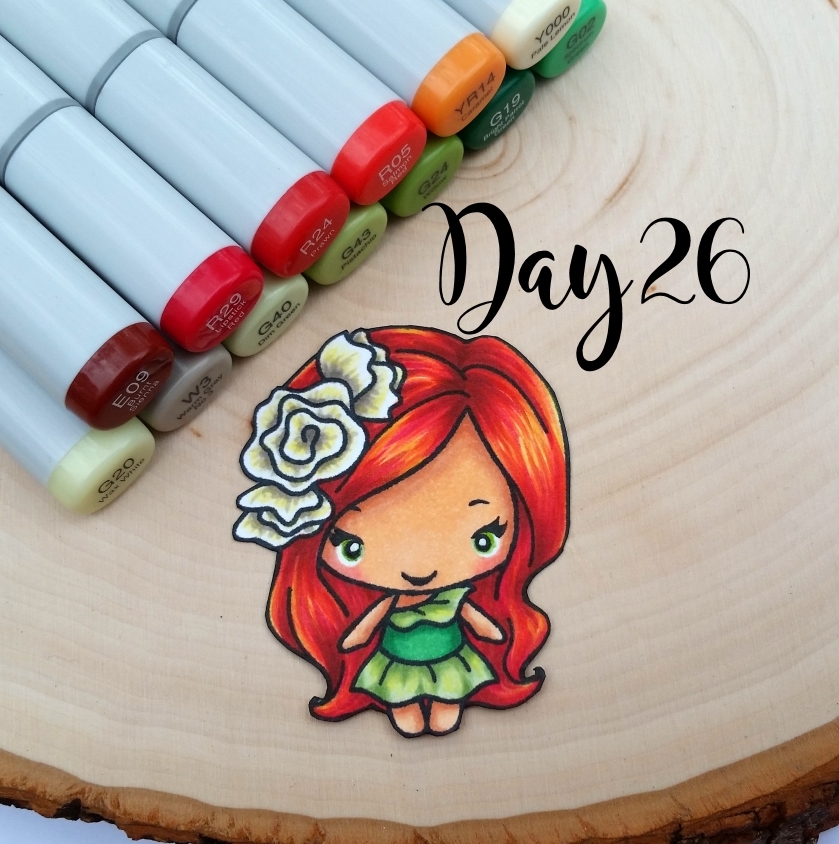 So on the next day, I colored up the same Rose with all the same colors, except that I added a couple of additional Copic colors to her hair coloring (a light highlight and a deeper shadow). This time, I used the following Copic colors for her hair: Y000, YR14, R05, R24, R29 and E09. I was channeling Disney’s Ariel for the color scheme. 🙂
Lastly, I thought I would share how to get a full depth and range of color for a blonde so I used the following Copic colors for Jolene from The Greeting Farm’s Bloom Kit (top image): Skin: E51, E53, E21, R20 and BV000; Hibiscus flowers: RV52, RV17 and C6; Dress: BG11 and BG13; and Hair: Y21, YR26, YR24, E25 and E29. Jolene was really fun to color up, and surprisingly, I thought the partial coloring of her hibiscus flowers really made her pop!
The following is a process video sharing this hair coloring:
]]>
This image from my Copic coloring tutorial series this week, episode 7 was actually adding some grays to an image I colored up last week. I think adding the W7 and W9 really added a lot of visual pop to her hair:
The next image for episode 8 I started out coloring aqua or teal hair but then changed my mind after a blob of ink came out. I actually think this brunette with teal highlights came out cuter, and I believe mistakes can sometimes help us get to better than planned results! Basically I think this video reinforces the idea that we should be enjoying the process of coloring and go with the flow:
I used the following Copic colors to color up the above cutie: E50, E51, E21, E11, BV00, R20, B18, BG11, BG13, Y15 and Y17. Her hair is colored with BG11, BG13, BG15, C8 and C9. I used a Distress Ink Marker (the fine tip side) in Salty Ocean for the pupils of her eyes.
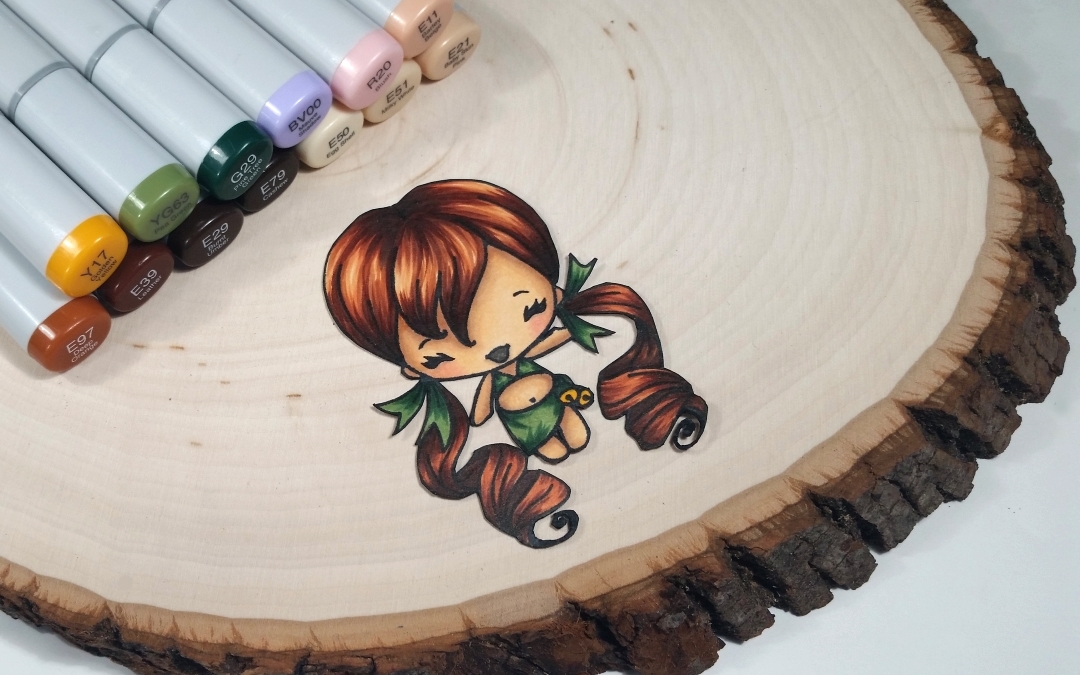
The above auburn haired cutie I colored up with the following Copic colors, but there sorry to say there is no video for this one (suffering from a flu, I just couldn’t get to videotaping and editing): Skin: E50, E51, E21, E11, R20, BV00; Clothes: YG63, G29 and Y17; and Hair: E97, E39, E29 and E79.
For the latest coloring video in the series, I veered from hair coloring to focus on the much-requested skin and eyes. I used the following Copic colors for the skin – E51, E53, E21, E11, R20, BV00 – and then used a Tim Holtz Distress Marker in Salty Ocean again for the pupils of her eyes.
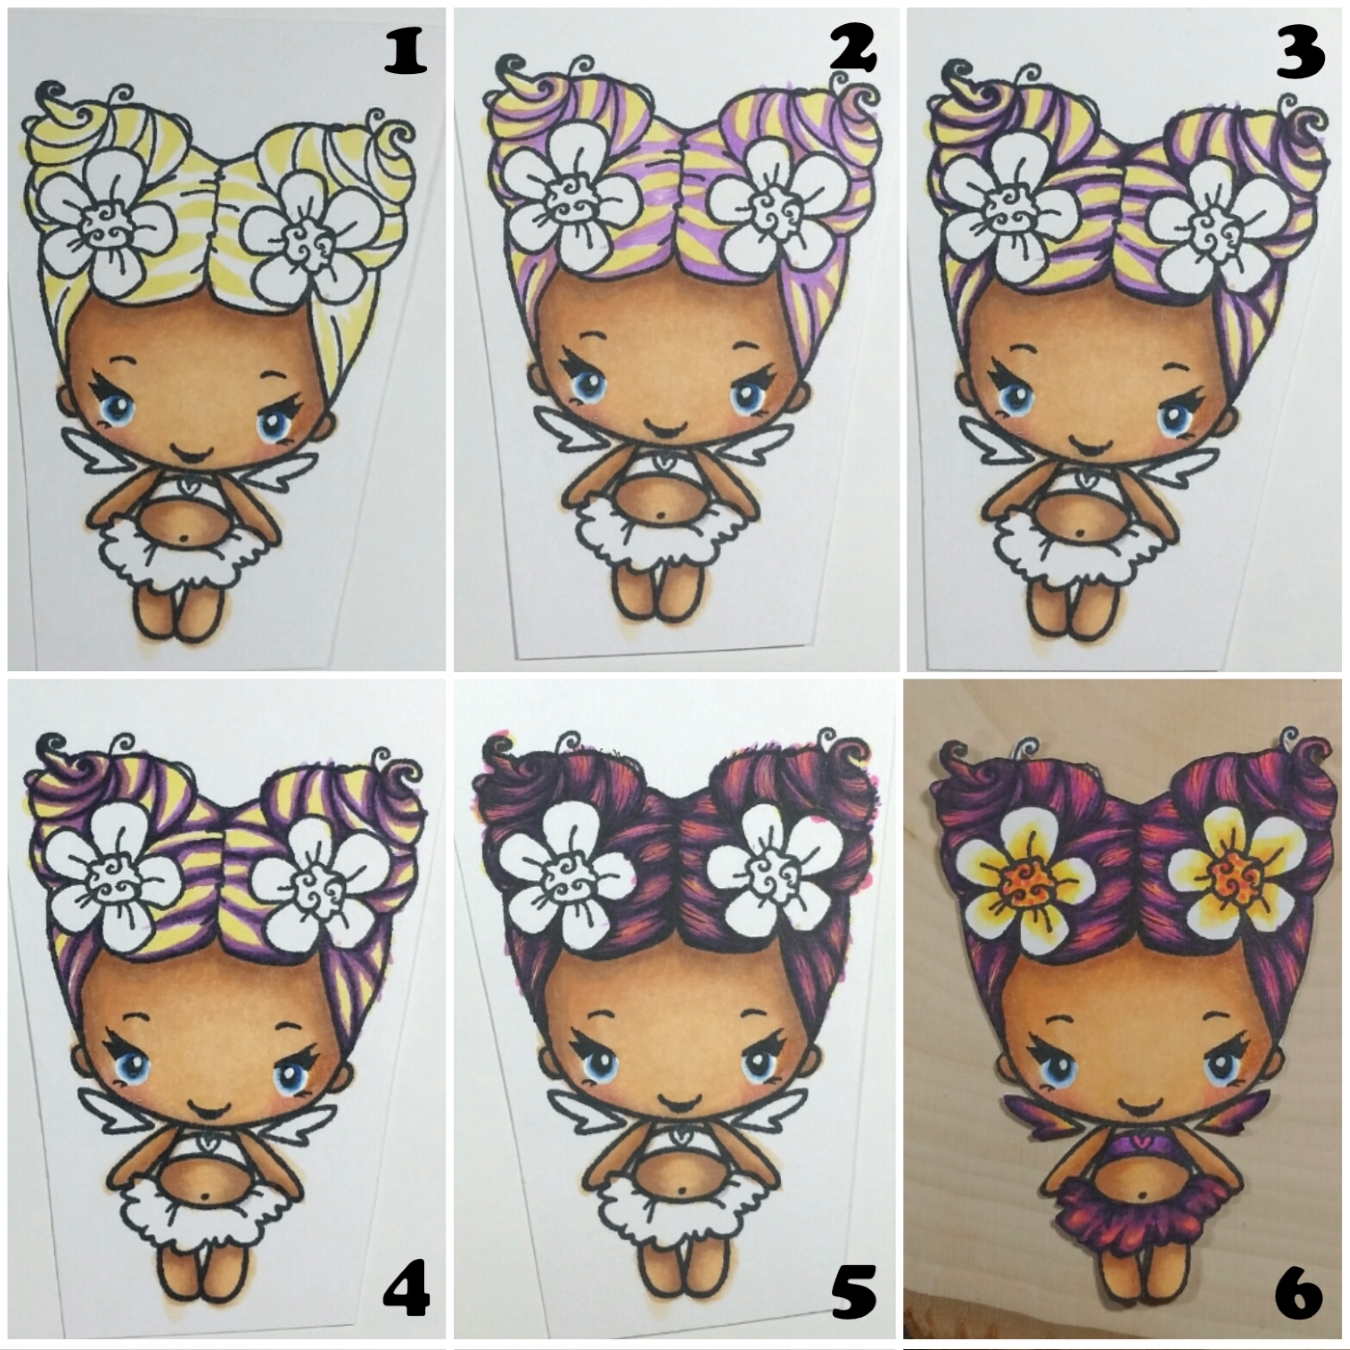
The finished fairy image from the above video has wild colored hair and outfit (it was my reaction to a very gray and gloomy day) using the following Copic colors: V04, V06, V09, RV04, Y11, Y13, YR04
I hope you are enjoying these Copic coloring series. Next week, I’ll be trying to share how I color fur!
]]>
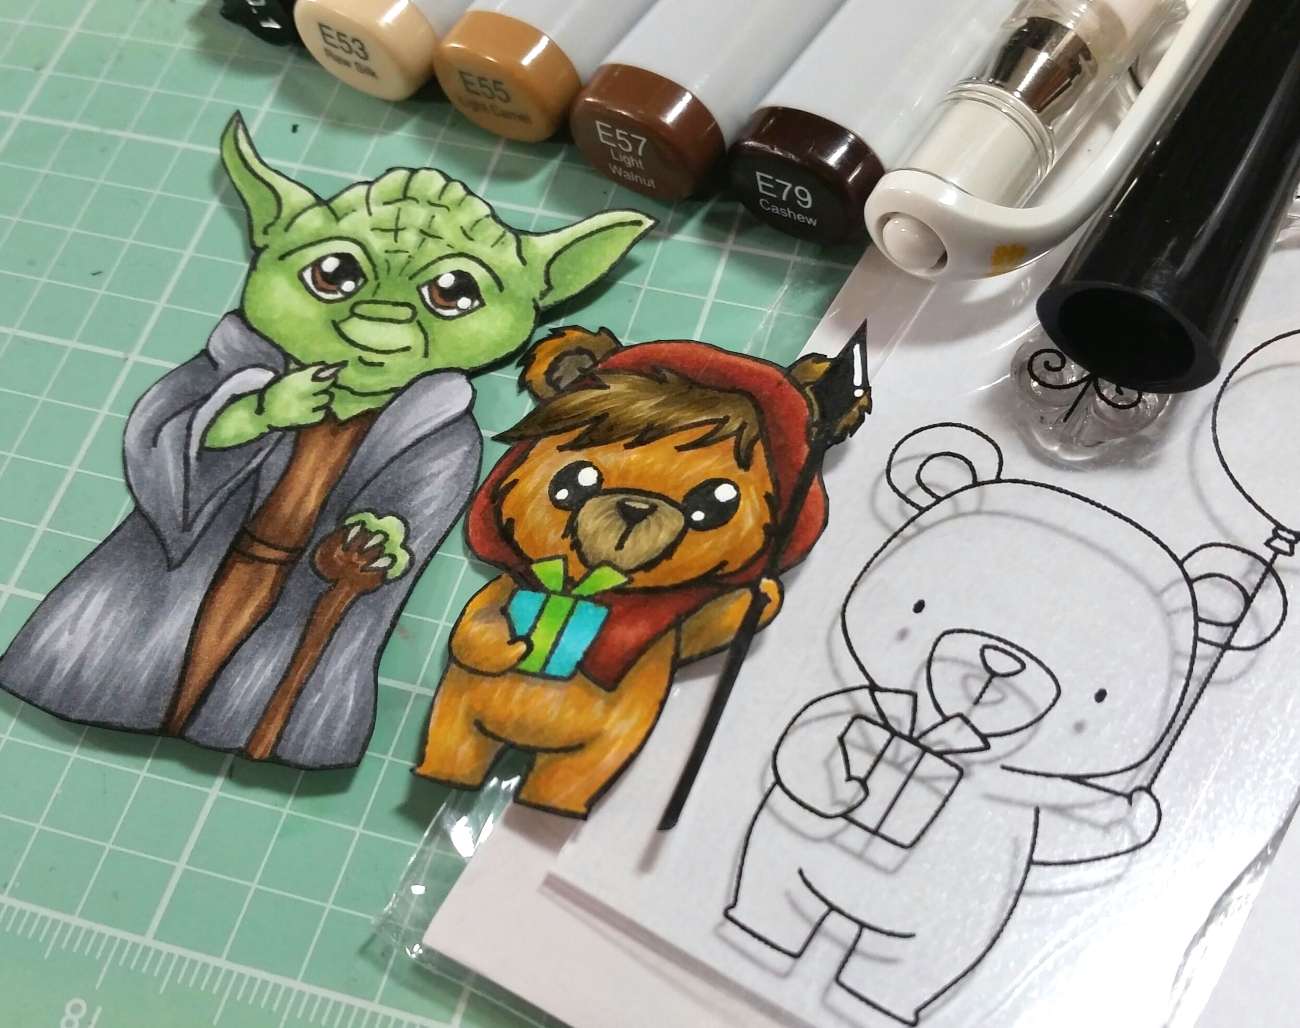 One of my new year’s resolutions was to get back to drawing a bit again, so I decided to draw a cartoony Chewbacca (who’s great for furry Copic coloring) and Yoda (because he has the best quotes). The second half of the video below is a speed drawing of both characters. I used the following Copic colors for them:
Chewbacca: E53, E55, E57, E59, E79 and C1
Yoda: G40, G43 and G24; Claws: W3; Tunic and cane: E55, E57 and E59; and Robe: N1, N3 and N5
Then when I re-looked at the new-to-me My Favorite Things “Beary Special Birthday” stamp set, I started seeing how these bears could be turned into Ewoks (our favorite characters because they look so much like our little Havanese, Bandito). The video below shows in detail how I altered one of these bears to become an Ewok. I used the following Copic colors for this cutie:
Bangs and muzzle: E81, E84, E87, E57, E29 and W5; Hood: E15, E19 and E29; Body: E31, E33, E55, Y28 and YR24; and Present: BG15, BG45, YG25 and G14
The following is a step-by-step video on how to alter stamps with a bonus bit of doodling:
]]> You don’t have to play along each day, but it’s great to get encouraging words from fellow crafters and to spread some crafty love to others as they participate too. You can use color pencils, water colors, inks, Copics, well anything!
 I’ve been sharing my coloring on my Instagram: kristina_craftypaws
But you can share it by linking up on Kathy’s first post about this round of the 30 days of coloring HERE
Hope you get a chance to play along too!
]]>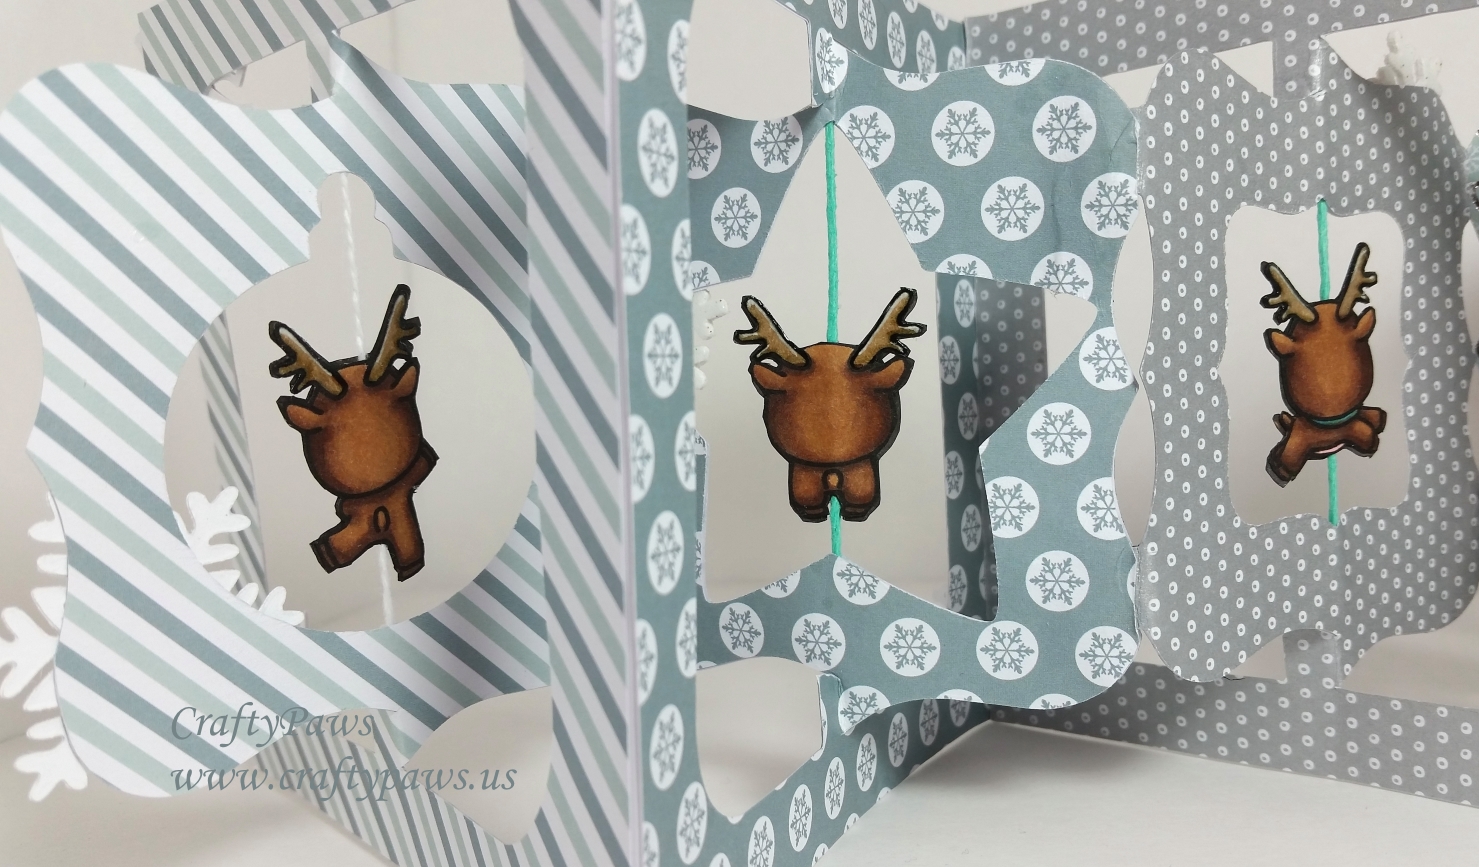
Reindeer Backs Drawn to Match Mama Elephant Reindeer Games Fronts
First off, I needed to draw the backs of each of the Mama Elephant reindeer. I know a lot of folks have made spinners using the mirrored stamps, but I just didn’t want the deer to have 2 heads. LOL Anyway, I drew the backs on my computer, Copic colored all the reindeer, and fussy cut each of them out. That’s a LOT of fussy cutting, inking the backs and edges, and gluing, but they are soooo stinkin cute, they were worth every minute.
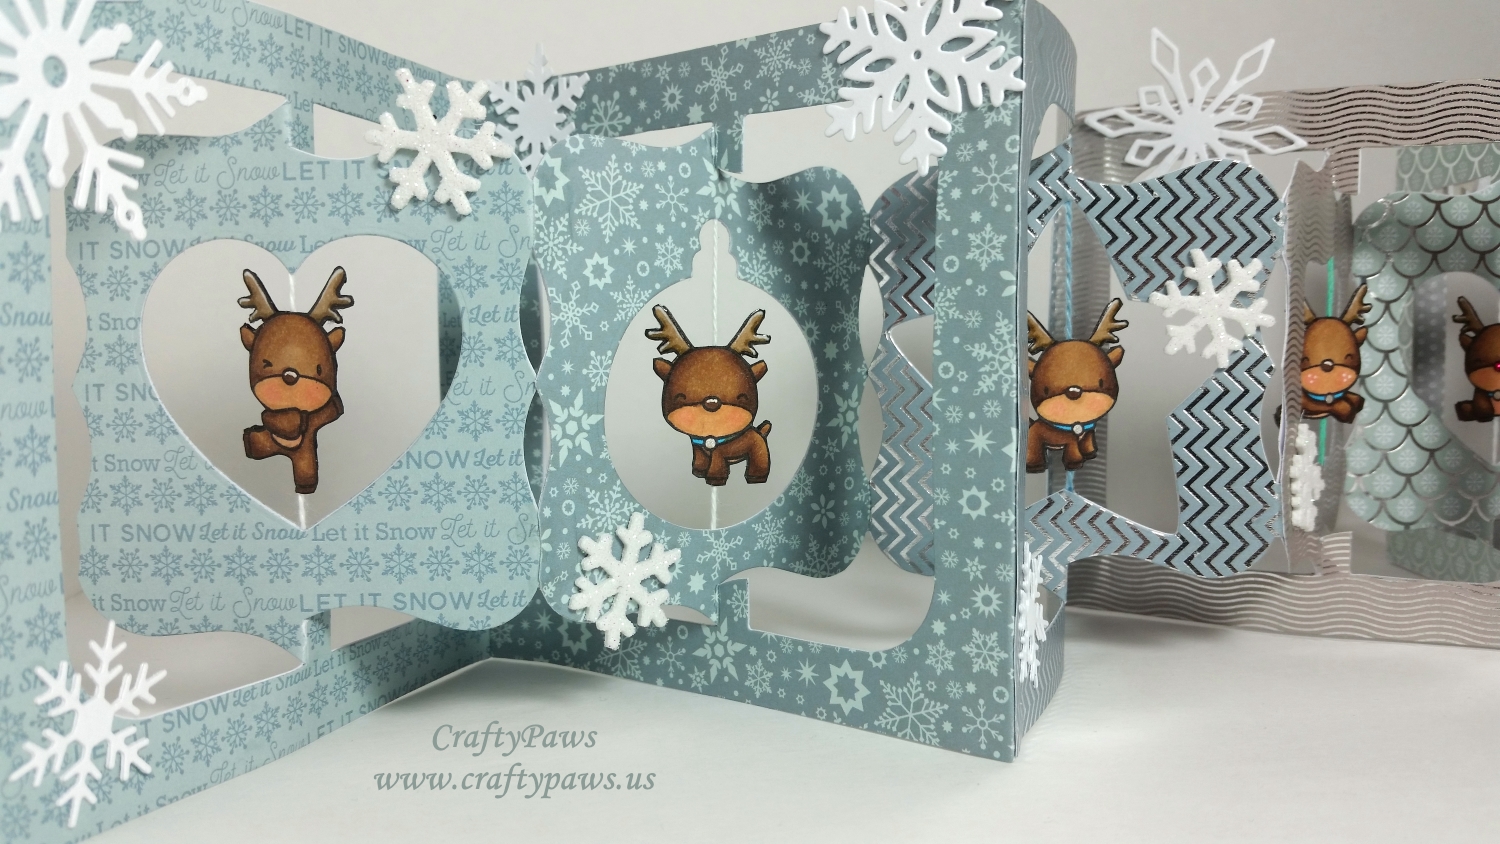
Left Side of Accordion: View of 4+ of the 8 Panels
Copic colors used: Bodies and hooves: E55, 57, and 59; Muzzles: E53, E55 and R20; Antlers: E43 and E87 with white Sakura Gelly Roll pen highlights and topped with Glossy Accents for shine; Collars: B05 with Clear Star Sakura Gelly Roll pen for the tags; and Rudolph’s Nose: R29 covered with Cranberry Stickles for sparkle.
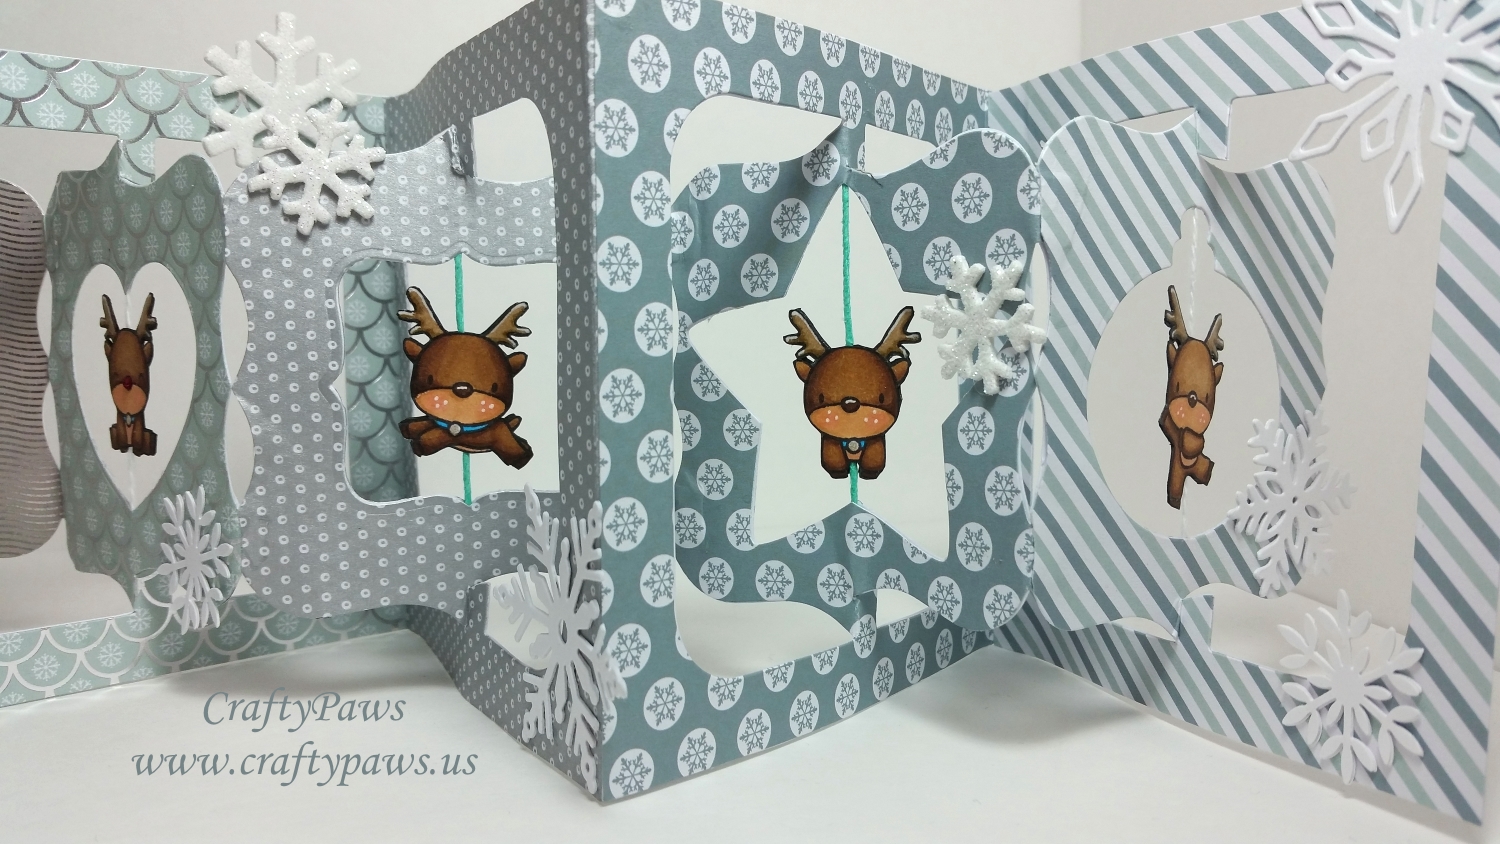
Right Side of Accordion: View of 3+ of 8 Panels
I next cut out each of the panels of the accordion using the Recollections Winter Frost collection paper pad. Then I chose some fun shapes to die cut windows in which each of the reindeer could spin (and keep an eye out in every direction). I chose the Diemond Dies Christmas Ornament Die, the third smallest heart from the Diemond Dies Nesting Heart Die Set, the third smallest of the Diemond Dies Labels 2 Top Note Nesting Die Set, and the third smallest star from the Lawn Fawn Puffy Star Stackables die set. Then it was a matter of figuring out how to assemble each of the panels I cut out and insert the spinning reindeer. The following video includes a tutorial on the assembly (hopefully this will save you from all the mistakes I made and had to re-do):
Lastly I added left over glitter foam snowflake stickers from the Dollar Tree, dusting the backs with baby powder after adhering them to the project so the exposed parts wouldn’t stay sticky. I also punched out snowflakes using the Martha Stewart Glacial Snowflake Punch and Martha Stewart Alpine Snowflake Punch and die cut the Diemond Dies Winter Snowflake Die Set and the Diemond Dies Snowflake #1 Die, gluing 2 of each snowflake together to give them added sturdiness. I want to be able to use this accordion project as table-top home decor to celebrate the winter in the new year even after the Christmas tree is taken down. Cuz, really, rather than reindeer guards, don’t they look like they are dancing reindeer celebrating the new year?! 🙂
My readers can get 10% off and free worldwide shipping on all orders of $35 or more at Diemond Dies by using the coupon code “thankskristina” at checkout.
This accordion folder is being entered into the following challenges:
Simon Says Stamp Monday Winter Wonderland Challenge
Simon Says Stamp Wednesday Party! Challenge
Through the Craft Room Door Anything Goes Challenge
Raisin Boat Christmas and New Year’s Challenge – WINNER
613 Avenue Create Anything Goes Challenge – WINNER
The Shabby Tea Room Winter Wonderland Challenge

Thanks for stopping by, and I hope you and yours have a safe and wonderful 2016!
]]>
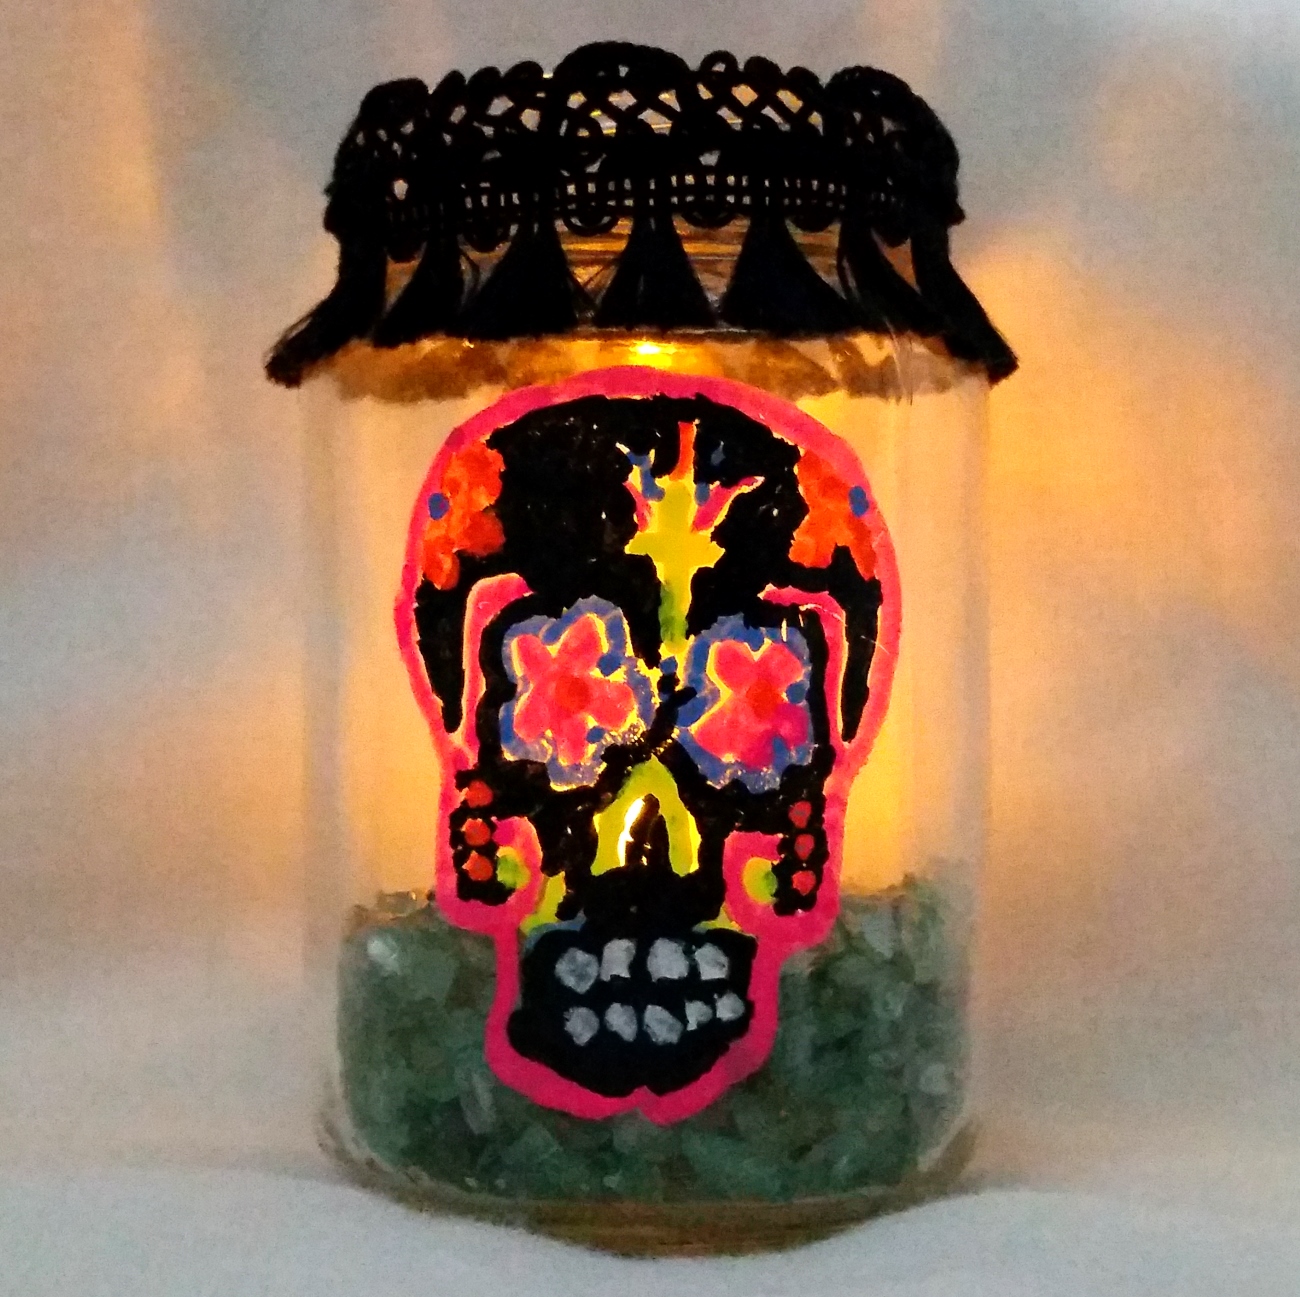 I tried them on ready made American Crafts chalk board stickers, home made chalk board stickers I made with American Crafts chalkboard paint on name tags, a mirror, a ceramic mug, and on an upcycled baby food jar that I made into a Dia De Los Muertos votive holder! How great would a whole row of these votive holders look at a Halloween dinner?! I had so much fun playing with these markers.
They work on hard, non-porous surfaces like glass, whiteboards, mirrors, plastics, chalkboards, and ceramics. Clean up is easy with water or Windex on a paper towel or a baby wipe. They are child safe, water-based, non-toxic, low odor, acid free, and does not stain clothing.
ChalkOla Markers are available here:
Amazon in the US: ChalkOla Markers
Amazon in the UK: ChalkOla Markers
The following video is a product review and my sharing some fun craft projects/play using ChalkOla Markers:
The Dia De Los Muertos votive holder is being entered into the following challenges:
The Daily Marker 30 Day Coloring Challenge
The Shabby Tea Room Swirls and Twirls Challenge
Simon Says Stamp Anything Goes Wednesday Challenge
Virginia’s View All Things Colored Challenge
Thanks for stopping by and I hope you are having a wonderful crafty day! WOOF
]]>
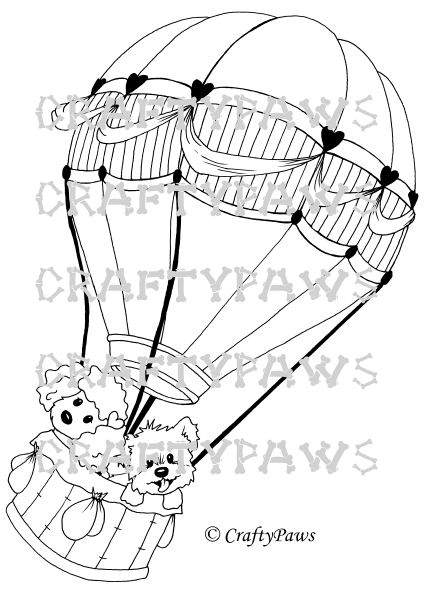 I love the limitless possibilities and the spirit of fun and adventure that hot air balloons symbolize, and, of course, I love my dogs, so why not combine them together? 😀 I hope you like “Oh, The Places You’ll Go!” (inspired by the Dr. Seuss book of the same title)
I drew and colored this digi for my niece, who is graduating from high school in a couple of weeks. I wrote her a note on the back congratulating her, and this will go into a copy of the Dr. Seuss book I bought for her along with a gift check. 🙂 I thought the image nicely represented the encouraging sentiment: “The sky’s the limit!”
I used the following Copics to color up this digi:
Hot air balloon: C1, 3, 5, and 7
Blue accents: B00, 01 and 02
Poodle (Biscuit): E51, 21, and 33
Havanese (Bandito): W1, E33 and E23
Golden yellow basket and base of hot air balloon: YR20 and 31
Sandbags: W1 and 3
The following is a short video share:
This colored drawing is being entered into the following challenges:
The Pink Elephant Graduation Challenge
Simon Says Stamp Work It Wednesday Yellow Challenge
Thanks for stopping by and have a wonderful crafty day! WOOF
]]>
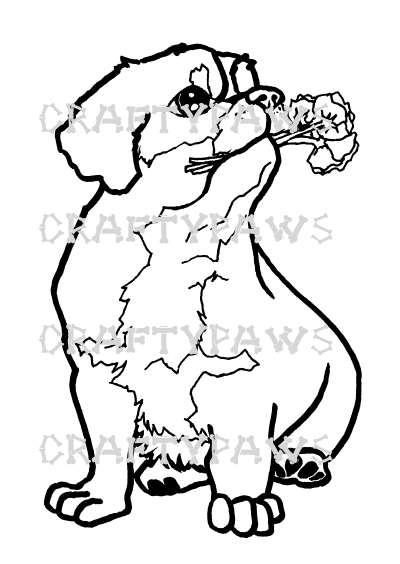 It’s been a while since I shared a free digi so I thought I would draw one up that I thought could be used for upcoming mother’s day or father’s day cards. However, as we’ve had some out of town house guests, time got away from me.
I haven’t had a chance to color this up, but hopefully I’ll get a chance to do that this weekend. In the meantime, I hope you enjoy “St. Bernard Puppy With Flowers For You”.
Hope you are having a wonderful crafty day! Thanks for stopping by and please subscribe if you wish. WOOF
]]>
 I downloaded a speech bubble from the Internet and stamped the sentiment inside. I fussy cut it out, inked the edges with a black ink pen (to hide the white edge of the paper), and it was ready to go.
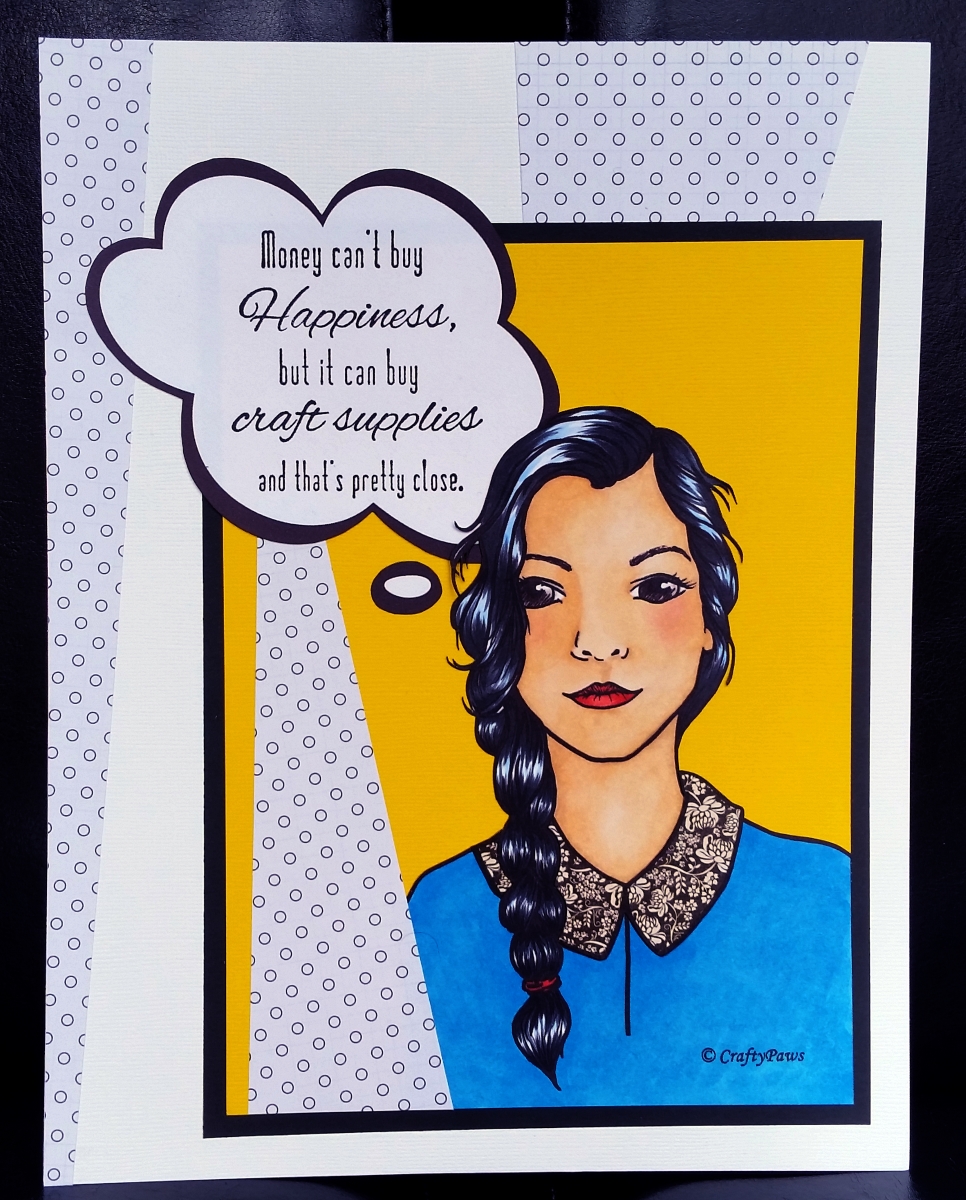 I colored up the digi with these Copic colors:
Eyes: E74 and 79
Hair: C7, C9 and B32
Lips and ponytail tie: R22 and 24
Shirt: B02 and 04 and paper pieced collar from scrap G45
Skin: E50, 51, and 53
Blush R30
Once I had colored the girl’s shirt so brightly and had the speech bubble, I was reminded of the fun pop art pieces by Roy Lichtenstein. I decided the image would look best on a bright yellow card stock, framed with a thin black border. I fussy cut out the image, partly to hide some of my coloring outside the lines and partly so that the hair (which was very hard to fussy cut) could lift off the page to add subtle dimension. I then rummaged through my patterned papers and found a fun graphic circle print from an old Recollections Bright and Basic stack (this is a very thin paper and I generally wouldn’t recommend it, but it was perfect for this layering application). I cut some strips of this patterned paper at angles and decided on the placement of three strips to create some rhythm and interest.
The following video is a share of this project:
This project is being entered into the MarkerPOP Bright Colors Challenge
Thanks for stopping by. Please subscribe if you wish, and have a great day. WOOF
]]>
The 4″ x 6″ card I made is for a challenge hosted by a wonderful crafty friend, Anny (YT: StargrlAnny) who is celebrating 2 years on YouTube. Woot woot! She was very open to whatever we wanted to make in terms of style but wanted us to put our YT name on the front so that she could at-a-glance know who made which card, as she is going to use it as a kind of Roladex system/mini album. Because I didn’t want my YT name to take center stage, I used a pale wood grained Amy Tangerine textured Thickers from American Crafts called “Muse.”
I used some spring green colored gingham print paper that I have had in my stash for over a decade for the base. Then I used some scraps that I had left over from a paper from the Dear Lizzy Neopolitan collection for the background. To add a little fun and a tiny bit of dimension (Anny didn’t want a lot since she is planning to put these into plastic sleeves), I fussy cut out a lot of flowers from that patterned paper and popped them up on foam adhesive. For a little sparkle, I also used different colored Stickles and glitter glue around some of the flowers.
For the little lamb, I used the following Copic colors and used a dotting technique to give a sense of wooly texture: E000, E31, W1 (for the shadow), and RV000 (for the inner ear area). I used some Glossy Accents on the lamb’s eyes, nose and hooves to add a little visual shine.
The following is a video share of this card:
This card is being entered into the Simon Says Stamp Monday A Piece of Paradise Challenge
and the Raisin Boat Celebrate Challenge
Thanks for stopping by and have a great day! WOOF
]]>