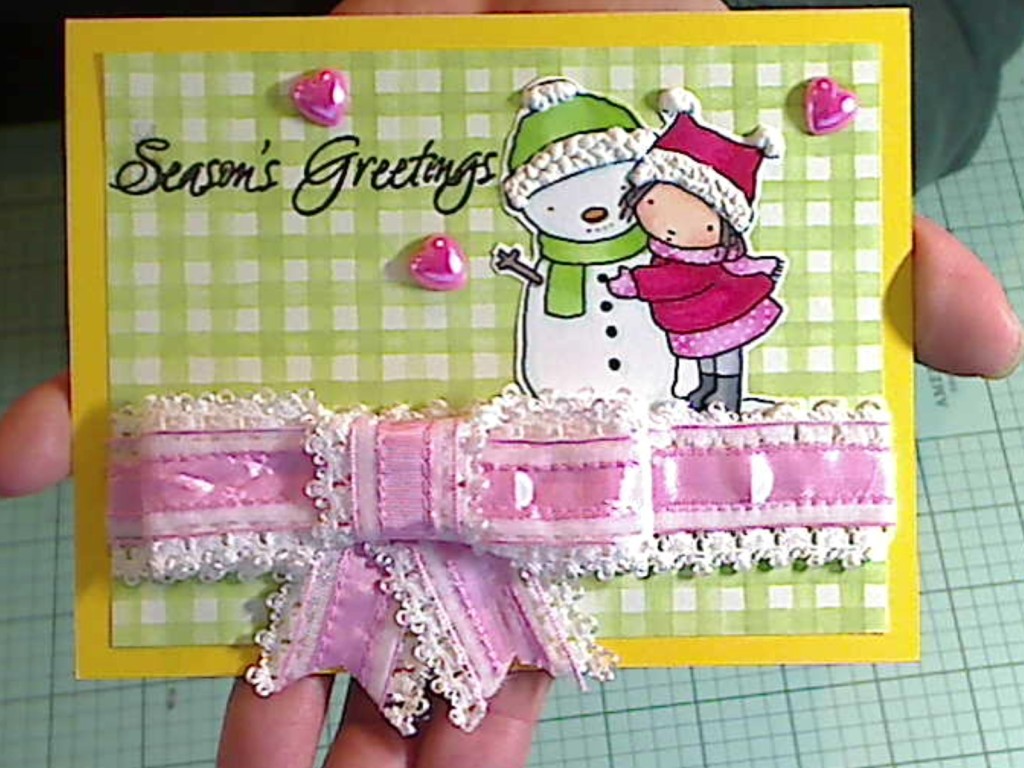
 I figured I was so late that I should just start with a stamp and papers that I have had in my stash for a while and never got around to using. I got to use a super cute freebie digi from Pure Innocence, called “Merry Kissmas” that I have had in my stash for about a year (unfortunately I couldn’t find the link to this freebie anymore) and some pretty green gingham patterned paper that I’ve had in my stash for over 10 years! I had fun using up some scrap patterned papers, bits of seam binding and twine, and lacy ribbons too.
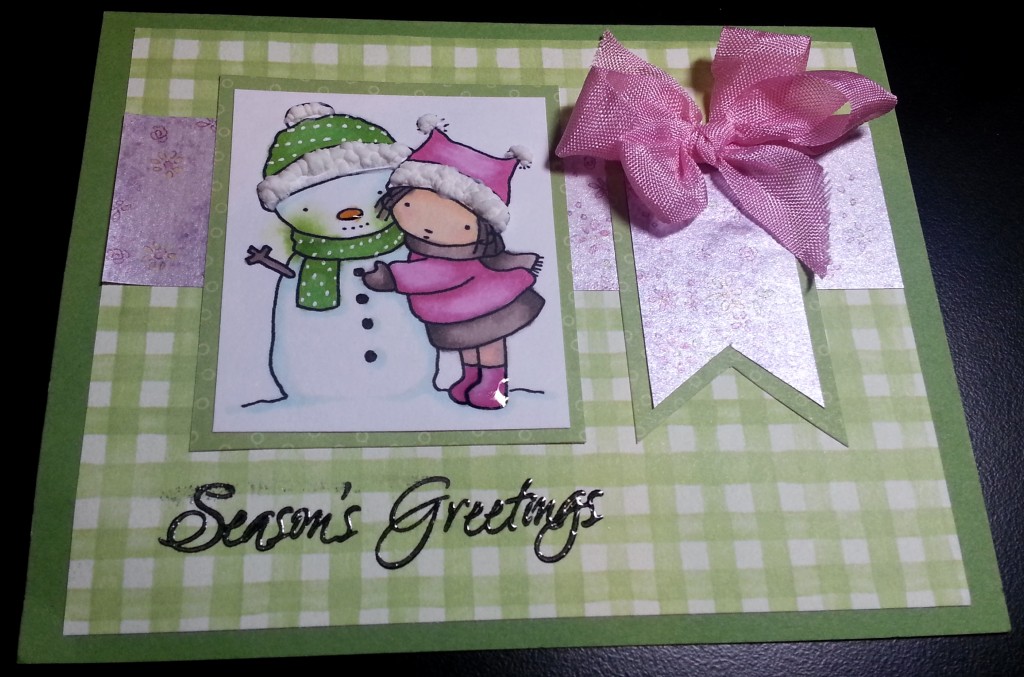 I colored up the image 3 times with the following Copic markers: Skin: E000, 00, 11, 21 and R30 (blush); Red clothes: RV25 and 29; Pink clothes: RV52 and 55; Grey clothes: C3, 5, and 7; Green clothes: YG13 and 25; Snowman: BG10 and 0; Hair and snowman arms: E74; Snowman nose: Y38; and Black coal buttons: 100 To add a little interest I used a White Sakura Gelly Roll Pen
 to add dots to some of the clothes, Mini Glossy Accents
to add shine to the carrot nose and little girl’s boots, and White Uchida Liquid Applique
to puff up the faux fur on the hats.
Lastly, I used Tuxedo Black Momento Luxe ink to stamp out a simple “Season’s Greetings” from My Sentiments Exactly and used clear embossing powder to emboss the sentiment. This last bit I rushed so the stamping is not as clear as it should be, but it will have to do. I just can’t be even later with these cards!
The card in the top picture is being entered into the following challenges:
Simon Says Stamp Wednesday Anything Goes Challenge
Inspired by Stamping #89 Gingham Challenge
The Pink Elephant Inspiration Challenge
The pink bow and enamel hearts card is entered into the Simon Says Stamp Work it Wednesday Challenge
Remember I am taking a short break from drawing digis but I’ll be back in the new year with more freebies. Thanks for stopping by, and I hope you are having a wonderful holiday season! WOOF
]]> I did a few different versions, but the one that I made the most of was using my digi called, “Happy Howlidays.” I colored up a couple of different versions and settled on this one with teals, pink, red and of course the pups are colored like my Biscuit and Bandito. I used the following Copic colors: Santa outfit and Deer’s bow: R22 and 24; Deer Poodle: E50, 51 and 53; Santi-Paws Dog: E23, E25 and W1; Sled: BG10, 23 and 45; Bag of toys: RV21 and 13; Antlers: W1; Straps of harness: E74. To add a little interest, I used a Sakura White Gelly Roll Pen
 to add some dots to the bag of toys, and a Sakura Metallic Gold Gelly Roll Pen
to add some shimmer to the bell around the Deer Poodle. I added some shine to the antlers, noses and eyes with Glossy Accents. Lastly to add some fun to the cards, I used White Uchida Liquid Applique
around the Santi-Paws outfit and puffed up the faux fur areas. This is so easy and fun to watch (like heat embossing on steroids). I LOVE this effect!
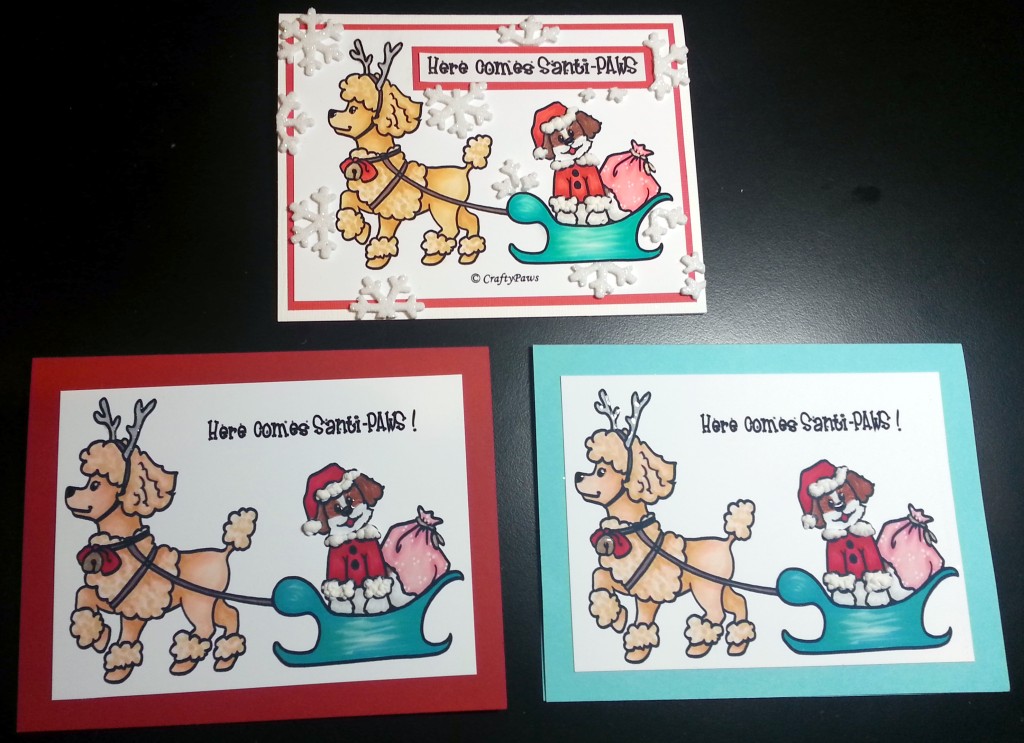 Each of the cards are a little different in terms of card base colors, added stickers, patterned papers, and the addition of lace, but overall they were made in more or less assembly line fashion (a first for me, as I normally don’t make more than 1 or 2 of any one thing). I scanned in the colored digi, added the new sentiment, “Here Comes Santi-Paws” (either by banner or directly above the digi), and printed them out. For some cards, I just printed out the whole colored digi and used that as the top layer of the card. For other cards, I used my Silhouette Cameo
 to cut out the scanned in digi so that I could put them on snowflake embossed backgrounds. SIDE NOTE: I got my Silhouette Cameo recently (an early Christmas present), and I have to say this may be the best crafty purchase I’ve ever made. It can fussy cut out detailed images in seconds! Seriously, this is my new favorite craft tool.
The top card is being entered into the Simon Says Stamp Wednesday Anything Goes Challenge and
The Naughty or Nice Winter Holidays Challenge
I hope you are all having a wonderful holiday season and that 2015 brings you happiness, prosperity and wonderful crafty adventures! Thanks for stopping by! WOOF
]]> For the sentiment, I printed it out on my Canon PIXMA MX922 Wireless Color Photo Printer with Scanner, Copier and Fax
 in the perfect shade of green to match the papers I wanted to use. For the card base, the patterned papers, the cut-a-parts, and even the twisted blue raffia are all from the Jillibean Soup card kit called, “Birthday Bisque”. The vintagey feel seemed well-suited for this card.
I colored Simon on Bike with the following Copic colors: Skin: E50, 51, and 53; Hair: E 55, 74 and 59; Jeans: B93, 95, and 97; Tires: C9; Jacket: C7; White T-shirt: C1; Chrome of bike: C1 and 3; Red of motorcycle: R39 and 89. I also made some glare lines on his glasses with a White Sakura Gelly Roll Pen and I added Glossy Accents
over the glasses as well as the metal parts of the bike.
The trickiest part of this card was fussy cutting the image. The narrow and inside sections were difficult to cut, but I managed with a sharp X-ACTO #2 Knife. 🙂 After the detailed cutting, I popped up the whole image using foam adhesive, with the front wheel straddling the raffia ribbon to make it look like it was even further forward.
The following is a share of this card:
This card is being entered into the Simon Says Stamp Monday Transportation Challenge and
Seize the Birthday Anything Goes Challenge
Thanks for stopping by! Please subscribe if you wish, and have a great day! WOOF
]]>
I started with a red card stock base and used some black card stock for the top film strip layer — just like Sandy 🙂 Then I wondered what little images I could pop into some of the frames. What better than stamped puppy images? Well, for me, nothing’s better. LOL I stamped out the little poodle from the Penny Black “Mimi in Paris” stamp set and the little dog from the Tiddly Inks “I Wuf You” stamp set. I colored them up with the following Copic Markers: Poodle: E02, 31, and 33; and Brown and white dog: W1, E23 adn E25.
I fussy cut out the pups and positioned them, just so, between the frames. I left room between the dogs so I could add little punched out red hearts, which I made shiny with Ranger Inkssentials Glossy Accents. Remember, you can’t use glitter on OWH cards so no sparkle allowed. LOL
For the sentiment, I hand wrote “i wuf you” with a White Sakura Gelly Roll Medium Point Gel Pen. The lower part of the black card stock layer was looking a little plain to me, so I searched through my washi tape collection and found a thin black and white one of a film strip (sorry I don’t know the brand) and a red, black and white terrier one made by Craft Essentials. I felt like this card was just meant to be. Don’t you love it when that happens?
With very little coloring and fussy cutting, this card was pretty quick to make. With the flexibility of adding all sorts of different images in the film strip frames (I’m going to do one with the cutie patootie kids from the Mama Elephant “In My Heart” stamp set next), different versions would be easy too. I see a lot of these cards in my future for my next OWH batch of cards!
This card is being entered into the Operation Write Home Red Friday Blog Hop Challenge
and the Tiddly Inks Gratitude and Joyfulness Challenge
Thanks for stopping by, and have a great day! WOOF
]]>
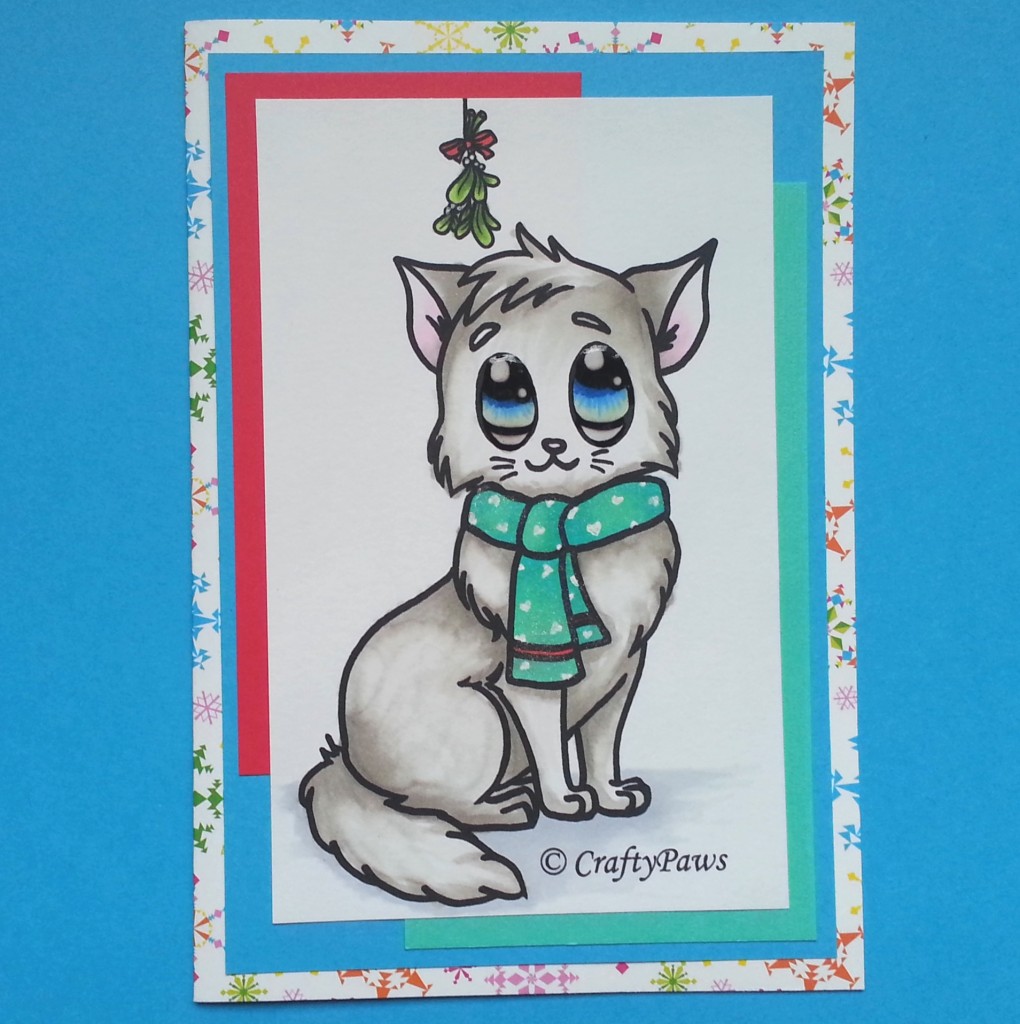 I colored her up with the following Copic markers: Fur: W1 and 3; Ears: RV00; Eyes: B21, 24, 18 and G40; Scarf stripe: R08; Scarf: BG23 and 45; Mistletoe: YG13 and 17; Red bow: R08. The colors are totally influenced by the beautiful card created by Kristie Marcotte in her OWH Red Friday Blog Hop card. I just loved it and was thinking of it when I created this loving kitty card. 🙂
I also used a White Sakura Gelly Roll Medium Point Gel Pen, to clean up the white berries on the mistletoe as well as draw in the little hearts on the kitty’s scarf. This is by far my favorite white pen, and I’ve linked to where I’ve found it for the best price (Amazon). To give a shimmery look to the scarf, I also coated it with Clear Wink of Stella
. There is a special Christmas 3 pack of Silver, Gold and Clear Wink of Stella at a great price HERE
. Lastly, I added a nice shine to even further accentuate the big sweet eyes of the kitty with Ranger Inkssentials Glossy Accents.
Hope you like “PURRker Up” as much as I enjoyed drawing her up to share with you.
This card is being entered into the following challenges:
Simon Says Stamp Monday Holiday Cards Challenge
Simon Says Stamp Wednesday Christmas/Holidays Challenge
Naughty or Nice Winter Holiday Card Challenge
The Aviary Holiday Challenge
OWH Red Friday Blog Hop

Thanks for stopping by and have a great day! WOOF
]]>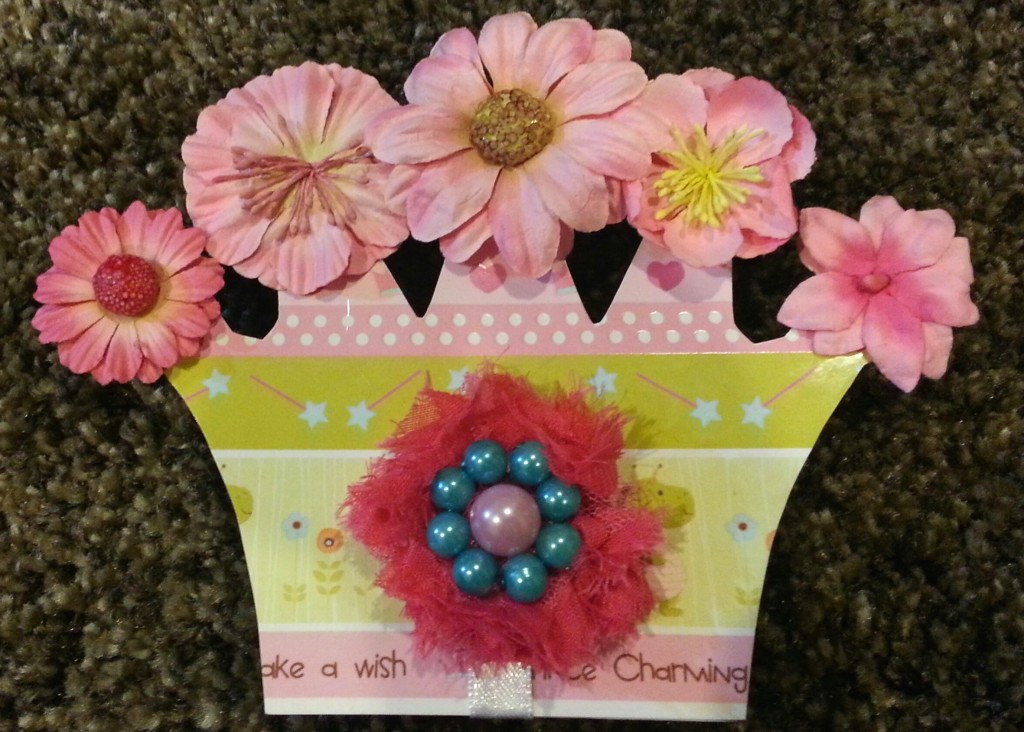 I started with a wonderful card base by Petaloo, from their Plain & Simple collection. The base is chipboard covered with white paper in the shape of a crown. Brilliant, right?! All the decorating is the crafter’s choice. I covered the front of the card with some fun imaginesce paper called, “Princess Promenage.” Then I hot glued different pink Recollections paper flowers on the tops of each of the crown points. For the magnetized closure, I used a little scrap of glittered floral paper from K & Company for the side with the magnet and a handmade pink, lavender and teal flower for the front. To create a finished look, I covered the backs of each accordian fold with more of that scrap glittered floral paper and on the fronts I used pink damask foiled paper (also from K & Company) to create a soft background for the images I planned to color and add.
The images I used were from one of my favorite stamp lines, Gorjuss Girls. The first is a girl nestled in the crook of her magical pet fox and is called, “Stole.” The second is a girl taking flight on the back of a giant dove and is called, “Flying Above It All.” The following are the Copic colors I used for the first image: Fox: N0 and N2 (top coated with clear Wink of Stella); Skin: E000, 00 and 11 and blush: R11; Hair: E31, 37 and 29; Dress and Boots: BG23 and 45; and Striped socks: C1, 3, 5, and 7. I also added some white dots with a white Sakura Gelly Roll pen to soften the solid span of the dress. To add some fun and continue the princess theme I added a blue-green bling crown and teal and pale blue bling hearts to denote the love that the little girl and fox feel for one another.
The following are the Copic colors I used for the second image: Dove: W1 and 3 (top coated with clear Wink of Stella) and beak: Y32; Hair: E31, 37 and 39; Skin: E000, 00 and 11 and blush: R11; Stocking/boots: C1, 3, 5, and 7. Again to denote the love that the little girl and dove feel for one another I added pink and purple bling hearts and topped the little girl’s head with a pink sparkly bling crown.
I fussy cut both of the images out with my Tonic spring loaded scissors (which are great for folks who struggle with hand pain or arthritis). For the couple of places where I had to cut into the image without an edge starting place, I used an Exacto knife (HINT: replace the blades regularly to get sharp, easier cuts). I also edged each image carefully with my Faber-Castell SB size Pitt Pen to hide the white edge of the fussy cut images. Lastly, I wanted to add a little bit more dimension to these focal images so I also popped them up on foam adhesive.
The following is a video share of this card:
This card is also being entered into the Simon Says Stamp Monday Anything Goes Challenge and
Seize the Birthday Anything Goes Challenge
Thanks for stopping by! Please subscribe if you wish, and have a great day. WOOF!
]]>Candace sent me a few pictures of Meow, and I chose one to work from primarily. The others were used more for reference, as colors (esp. on fur) can change in different light.
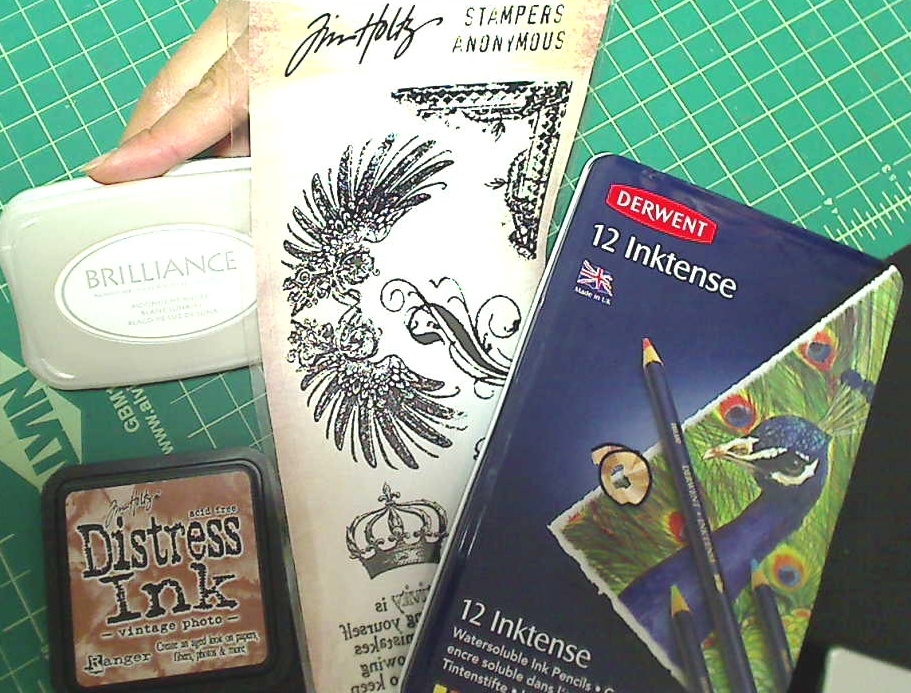
Supplies Used
I first drew a sketch of Meow in pencil, just blocking off her general structure. Then I used my Uniball ink pen to draw out a detailed portrait. I then made a digital scan of the image that I was able to clean up (similar to the way I work on my digis), erasing stray lines, ink smudges, making minor edits, etc. I was then able to print off two prints, one to color and one to use as a mask.
I used matte photo paper for the version I intended to color. I used my Derwent Inktense pencils, my Pentel water brush, and my white gelly roll pen to color in Meow. This coloring was a bit stylized; after all, a photo would be more accurate, and I wanted to create something special in memory of this gorgeous and much beloved cat. I created shadows on Meow with a light wash of watered down water color.
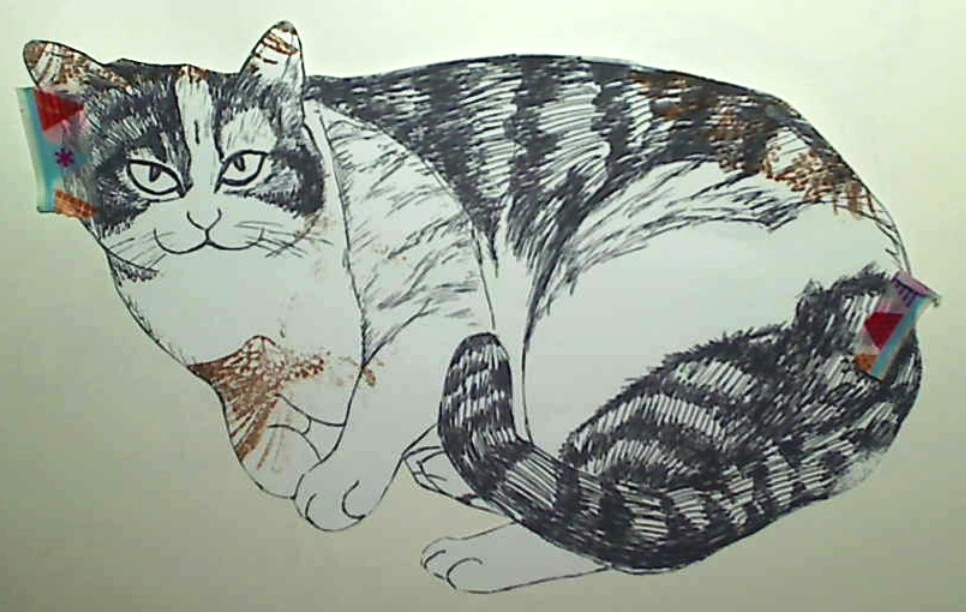
Meow Mask
Lastly, I used the wings from a Tom Holtz Stampers Anonymous stamp set with my Antique Photo Distress Ink and my Moonlight White Tsukineko Brilliance pigment ink. I wanted to add the angel wing patterns to the background so I fussy cut out my second print of Meow (which I printed on plain copy paper) to make a mask and used a little washi tape to lightly adhere it over the colored print of Meow. The white is not so visible in pictures but in person, I like the added shimmer and dimension it adds to the background.
The finished portrait, along with the ink sketch and the digital image are all going to be sent to Candace along with the rest of her prize. I hope she enjoys them.
The colored portrait is also being entered into the Simon Says Stamp Monday Challenge
as well as The Pink Elephant Anything Goes Challenge
The following is a video share of these portrait drawings:
Thanks for stopping by. Please subscribe if you wish, and have a great day. WOOF
]]>