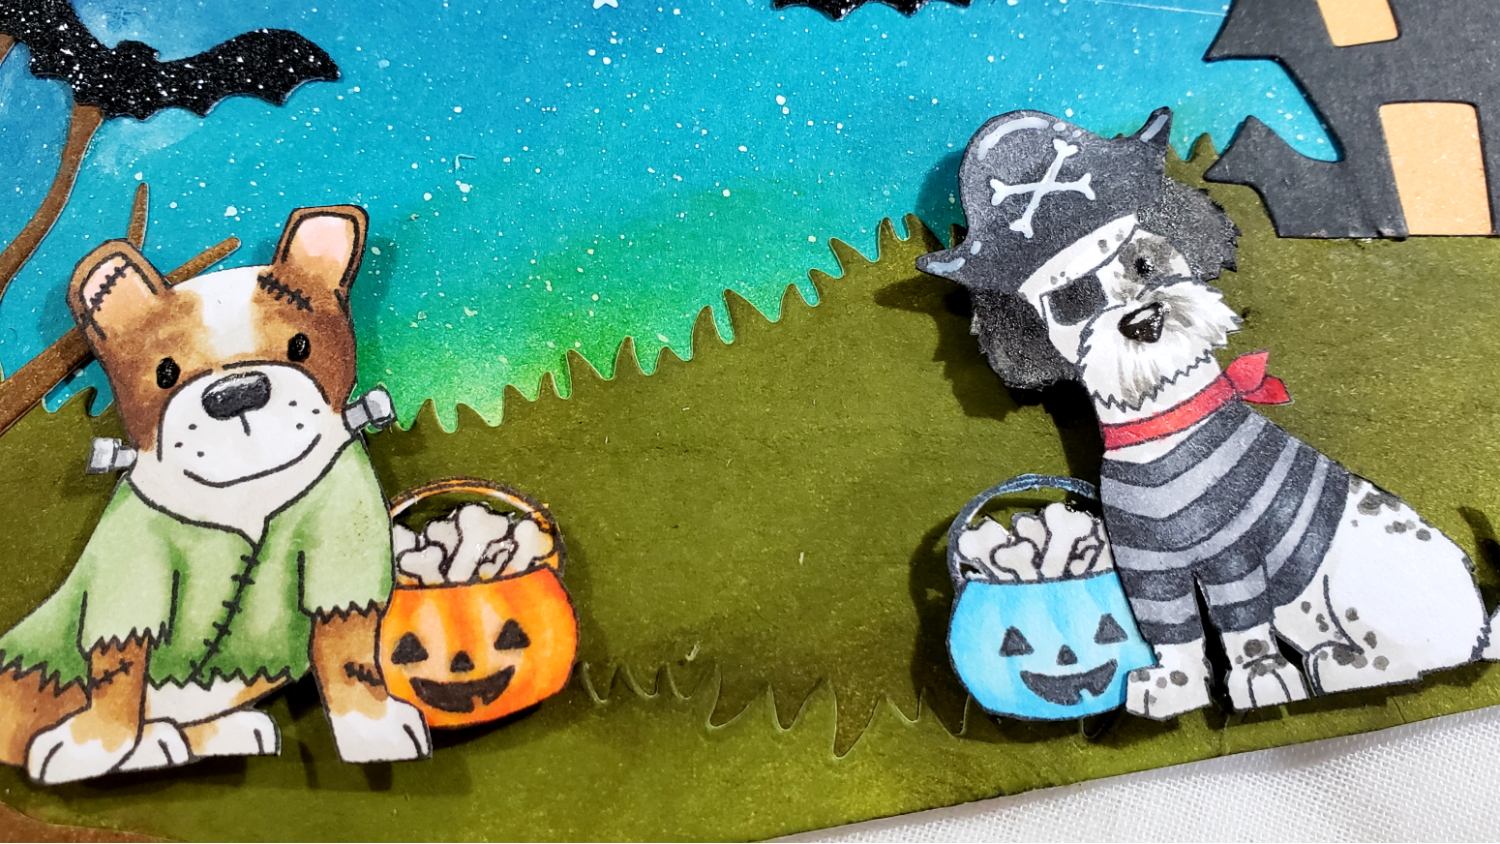
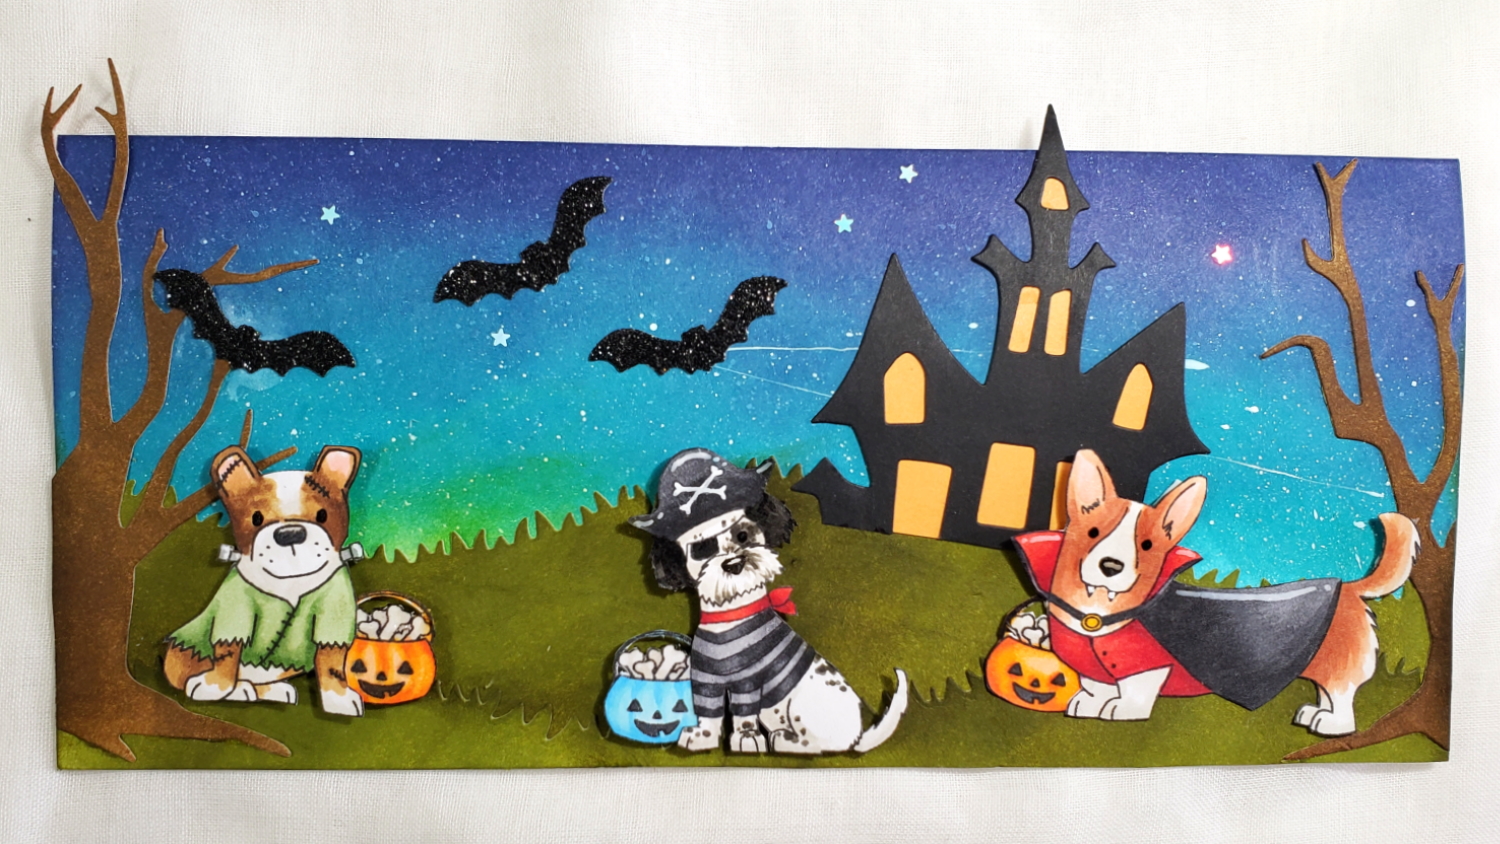
I don’t normally keep a lot of colored card stock, and I like the softer, more natural look of inked card stock for die cutting, so I made this slim line scene card largely with inked papers. The background sky was blended on with Tim Holtz Distress Ink in Chipped Sapphire and Peacock Feathers with a hint of sunset yellow added with Mustard Seed. The MFT Grassy Hillsides were colored with Tim Holtz Distress Ink in Peeled Paint and Forest Moss. And the Diemond Dies Spooky Tree (sold out but this is a similar spooky tree) was inked up with Tim Holtz Distress Ink in Gathered Twigs and Walnut Stain. The only part that I die cut from colored papers was the Diemond Dies Spooky House, which I made with black and tangerine orange card stock scraps.
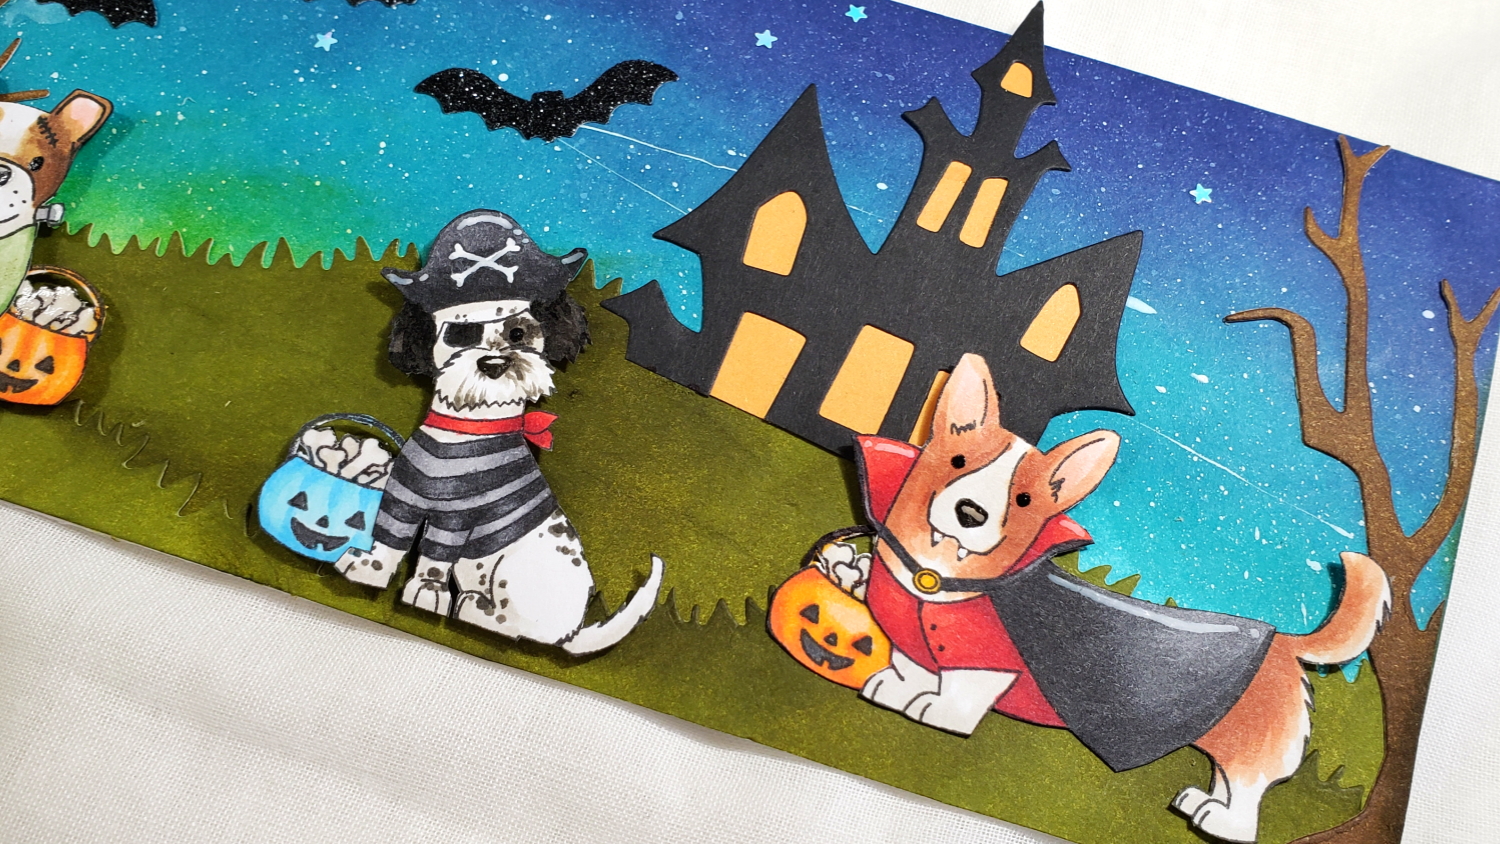
For the Fun Stampers Journey Costumed Cuties, I Copic colored and fussy cut out all the puppies and the Jack-O-Lantern treat bags filled with bones as follows:
Corgi Dracula:
Ears: R20; Brown fur: E11, E13 and E15; White fur: W0 and W1; Cape: N4, N5, and N9; R24, R27, R29 and R39; Cape closure: Y38
Pirate Pup (colored up like my Babaloo):
Black fur: W7, and W9; White fur: W0 and W1; Red scarf: R24, R27 and R29; Black hat and black and grey striped shirt: N2, N3, N4, N5, N7 and N9
Bulldog Frankenstein’s Monster:
Brown fur: E55, E57 and E59; Ears: R20; Green shirt: YG61, YG63, and YG67; White and grey side screws: W0 and N2
Jack-O-Lantern Treat Bags:
Blue: B00, B01 and B02; Orange: YR01, YR04 and YR09
I added highlight lines with Signo Uniball White Gel Pen, darkened the eyes and noses with Sakura Black Glaze Pen and added shine on the bones and noses with Ranger Glossy Accents.
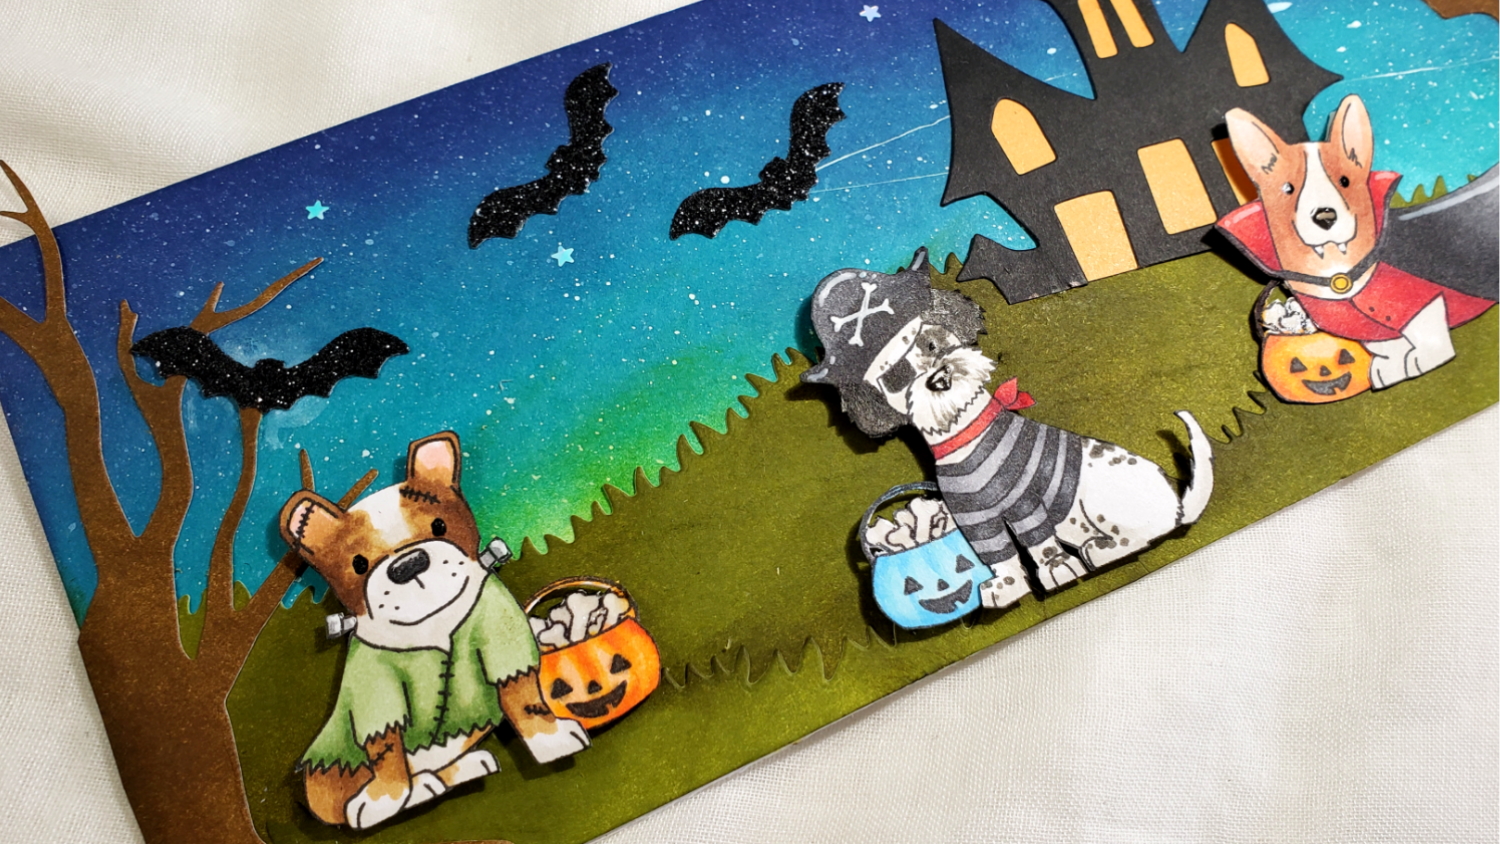
To add some extra little finishing touches, I splattered on some white acrylic paint to create the sense of a starry night. To cover up some of my over-splatter and smudges, I added 3 glittered card stock bats (they were included in my collab package). As a finishing touch a also used Art Glitter Glue with a Fine Tip Nozzle to glue on a handful of tiny metallic stars that were part of the sequin mix.
CLICK on the picture below to watch the card making process video:
Disclosure: Many of the supplies I’ve used for today’s project are linked. Some may be affiliate links, which means if you make a purchase I receive a small commission at no extra cost to you. I truly appreciate your support toward the costs of running this blog!
This card is being entered into the following challenges:
Simon Says Stamp Wednesday Make It Sparkle Challenge – glitter star sequins
Creatalicious Anything Goes with Optional Shaped Card Challenge
Lil Patch of Crafty Friends Anything Goes Challenge
Art Impressions Scenic Route Challenge
Crafts Galore Encore Anything Goes Challenge
Through the Craft Room Door Anything Goes Challenge
]]>
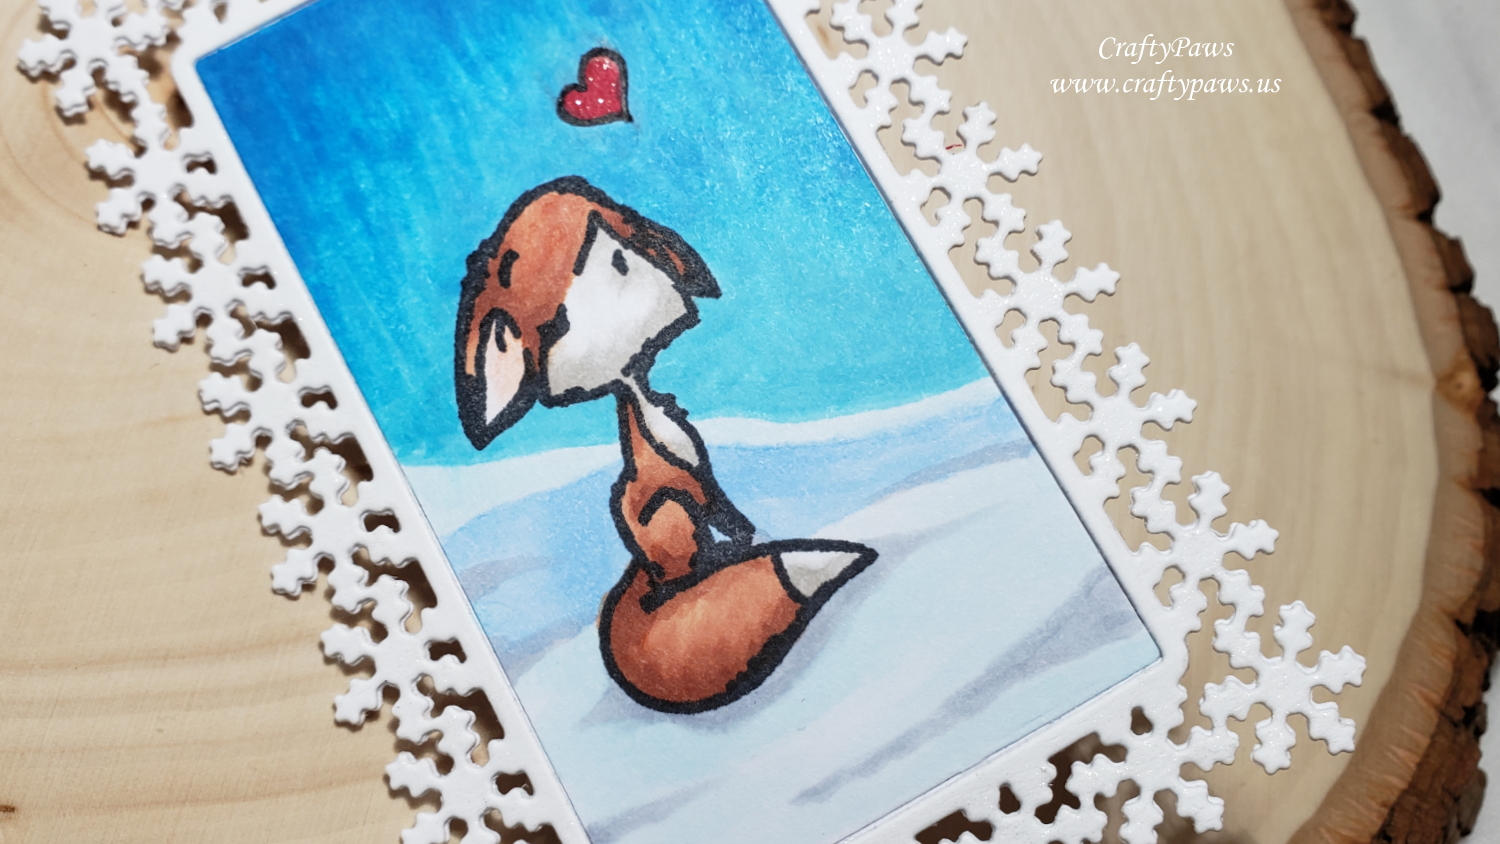
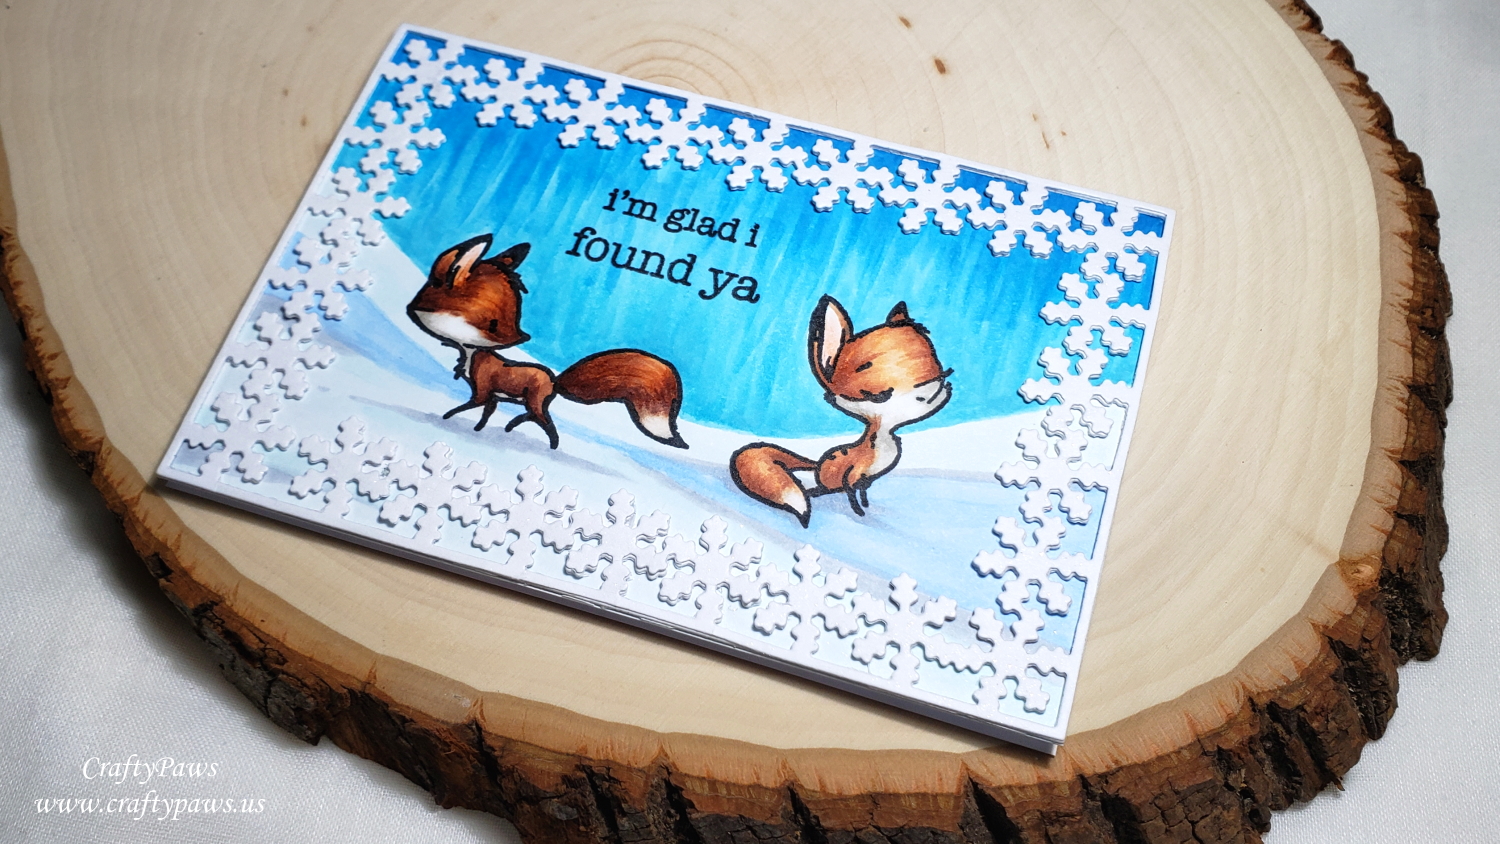
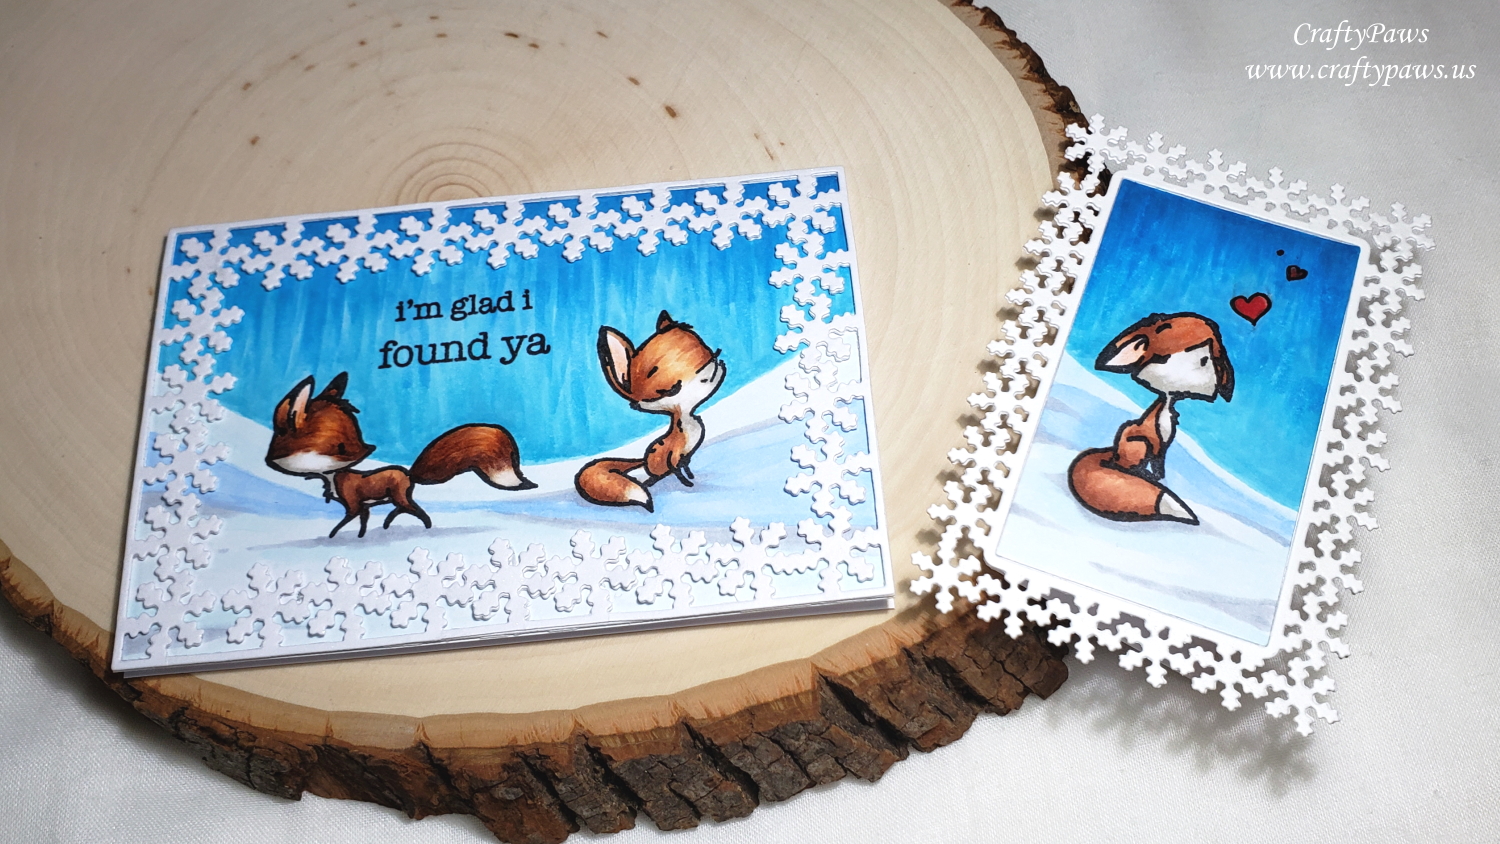
The Snowflake Frame Dies at first glance seem like they might be best for Christmas or New Years, but as I didn’t get to use them this past holiday season, I decided they would make the perfect festive and wintery frames for Valentines scene cards. Obviously Valentines Day occurs when it is the full height of winter, and creating simple foxy winter scenes with the Picket Fence Studios “Like a Crafty Fox” stamp set (one of my new favorites) seemed like a natural fit.
I used the following Copic colors to color up the foxes and the snowing scenes:
Fox Howling: Ears: R30; White fur: W2 and W3; Brown fur: E11, E13 and E15
Hearts (drawn in with a 0.1 pt Copic Multiliner Pen): E32 and R29 and a bit of Clear Wink of Stella for shimmer
Feminine Fox: Ears: R30; White fur: W2 and W3; Brown fur: E21, E13 and E15
Fox Looking Back: Ears: R30; White fur: W2 and W3; Brown fur: E11, E23 and E18
Snowy Ground: B32, B000 and C2
Crisp Sky: B01, B02 or BG01 and B04
I stacked two to three layers of the Snowflake Frames to build up card structure strength and dimension. To add a little sparkle, I topped the last layer with Clear Wink of Stella.
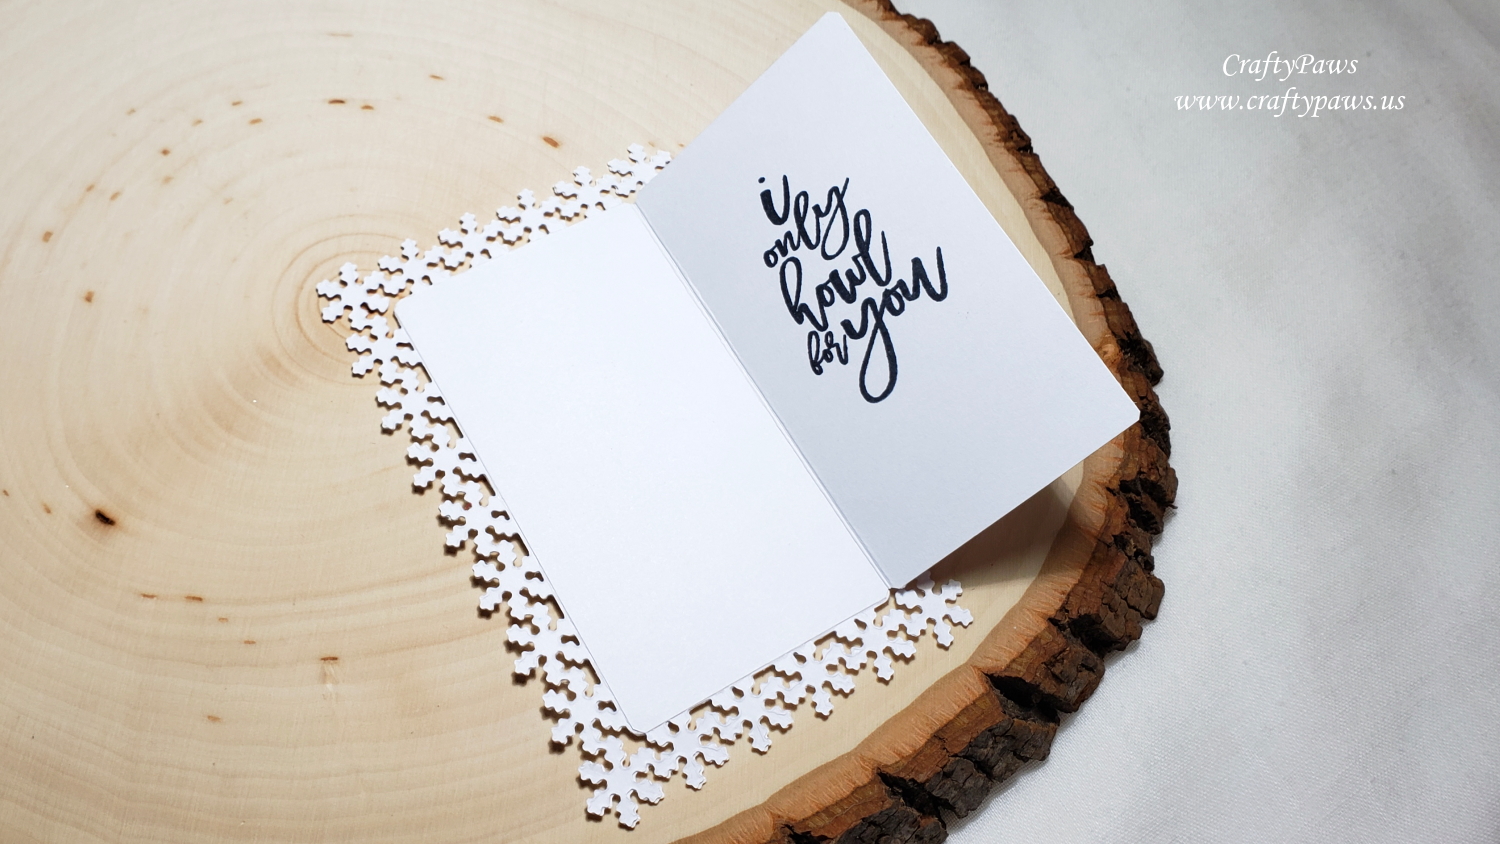
For the little card (that I thought would be a fun note to include with a packed snack for Mr. CraftyPaws), I used the sentiment, “i only howl for you” on the inside. There is just enough room to add a short handwritten. For the main Valentines Day card, I used the first three words of one sentiment, “i’m glad i caught you” (masking off the unwanted words with a strip of washi tape before inking and removing the mask before stamping) and the “found ya” sentiment, both from the Picket Fence Studios “Like a Crafty Fox” stamp set. I thought that sentiment could express the sentiment of the boy fox doing a double-take of the feminine foxy girl. 🙂
CLICK on the following picture to watch the process video:
These cards are being entered into the following challenges:
Crafts Galore Encore Anything Goes Challenge
Penny Black and More Make it Feminine Challenge
Crafty Gals Corner Winter Fun Challenge
Stamping Sensations Favorite Stamp Challenge
Creatalicious Anything Goes with Optional Add a Snowflake Challenge
Word Art Wednesday Anything Goes Challenge
Simon Says Stamp Work it Wednesday Snowflakes Challenge
]]>
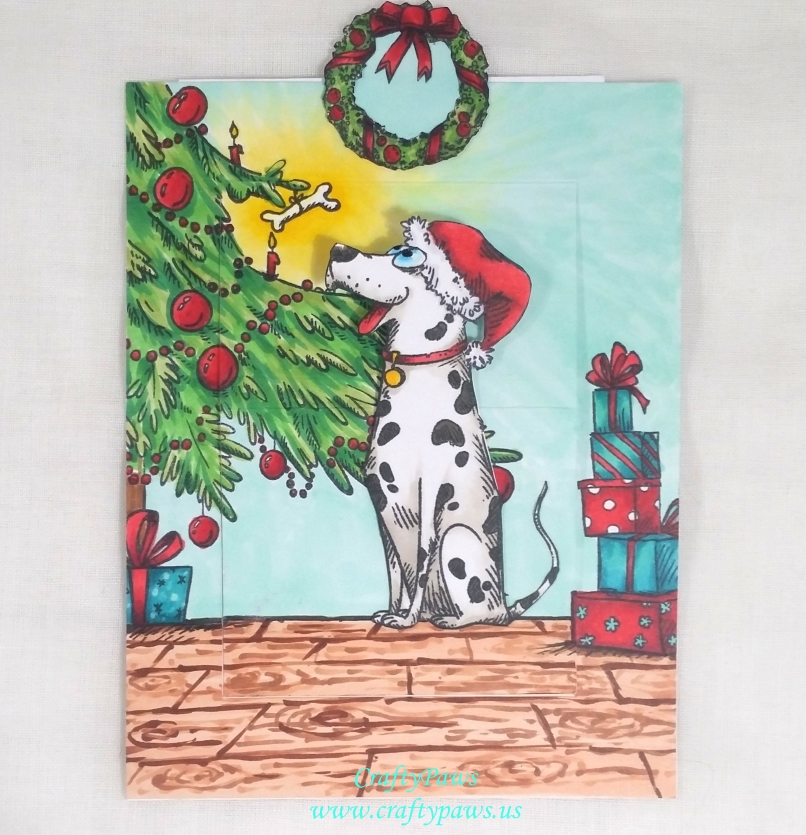
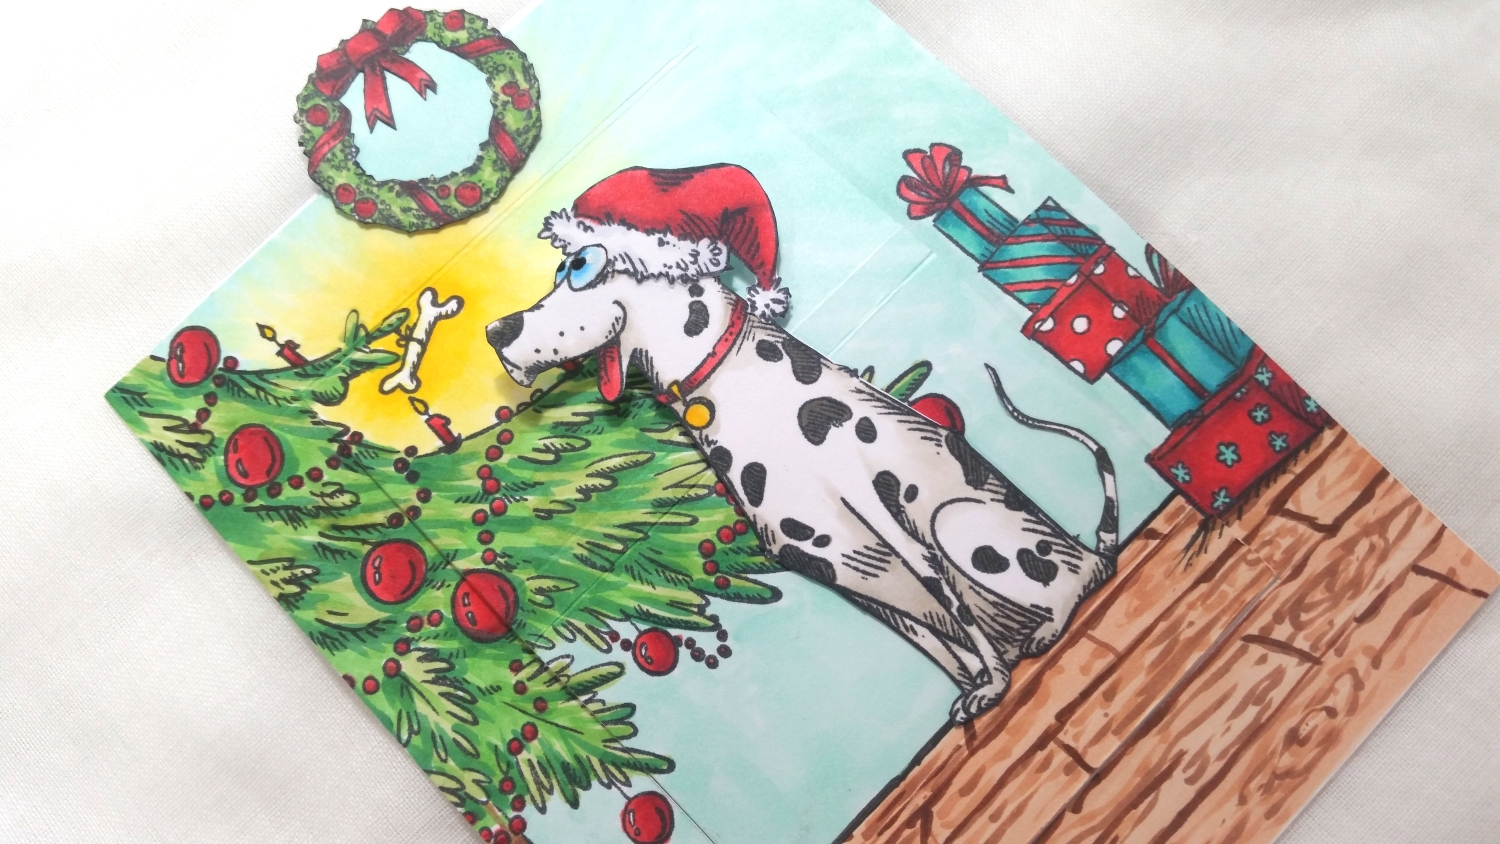
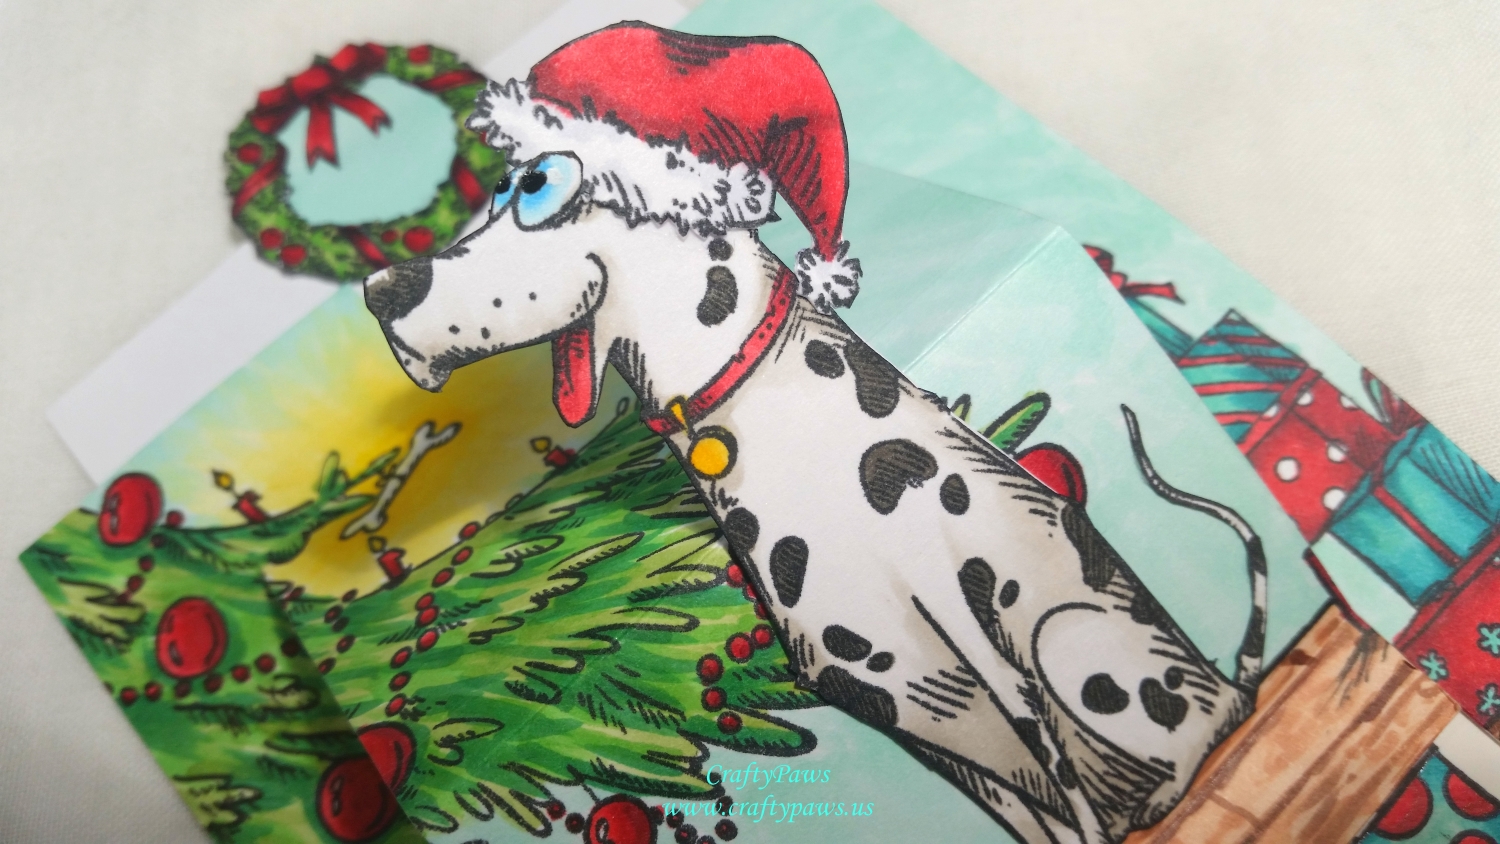
I chose the Dalmatian from the Dogs Stamp Set as the focal point of my card. I Copic colored him using the following colors:
White: W0 and W1; Black: W5;
Eyes: B000 and B02 with Signo Uniball White Gel Pen and Black Glaze Pen;
Tongue and Collar: R35 and 37;
Tag: Y15 and Y19
Then I fussy cut him out, taking care to also cut around his eyes about halfway down so that I could position the Santa hat from the Funny Accessories Stamp Set fully onto his head.
For the card front background, I used the Christmas tree base from the Sleigh Stamp Set and using a 0.1 pt Copic Mulit-liner Pen I doodled a bit more of the decorated Christmas tree in order to extend the height of the tree. I also doodled a dog bone hanging from a tree branch as a special doggy-themed Christmas decoration. To fill out a little more of the background scene I added a stack of presents to the right side of the panel from the Funny Accessories Stamp Set, and then Copic colored/drew in a wood floor and the rest of the scene using the following colors:
Santa Hat: R35, R37 and R39 and C1 Yellow aura around bone: Y00, Y11, Y13, Y08
Tree: G43, G14, G17 Red accents: R35, R37 and R39 Teal accents: BG32, BG23, BG45 and BG49
Wall: BG11 Wood Floor: E11, E13, E25, E29
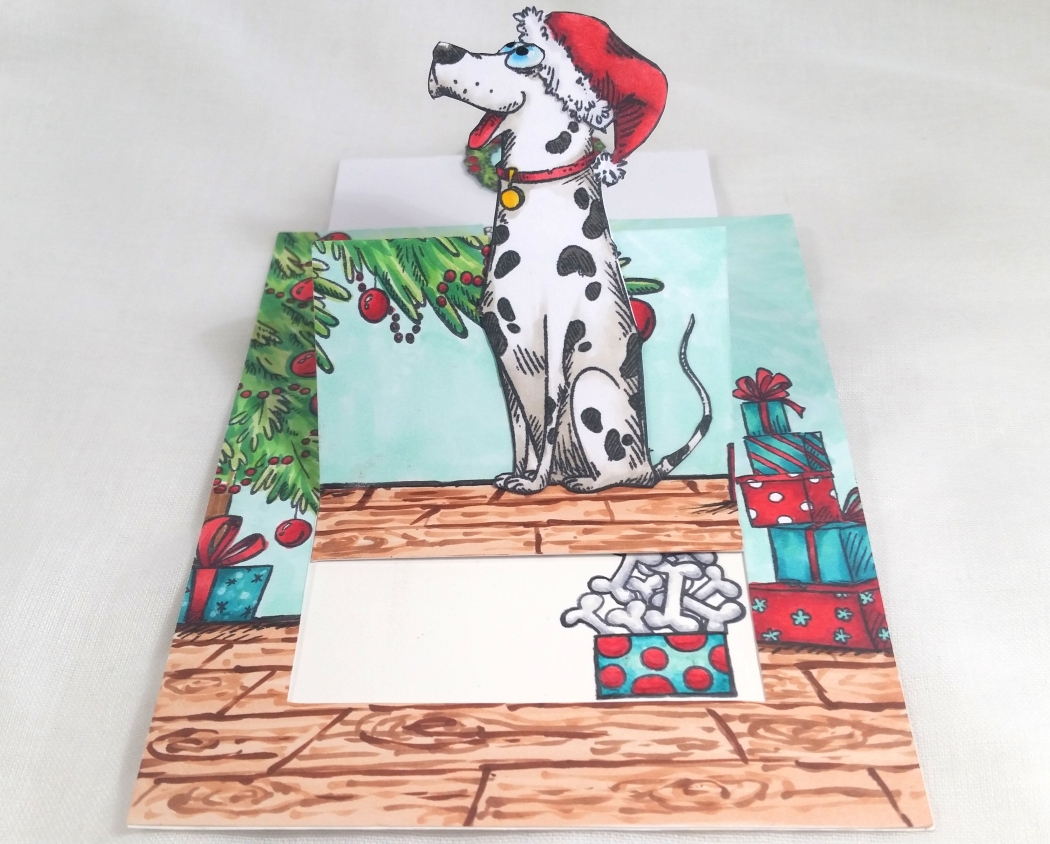
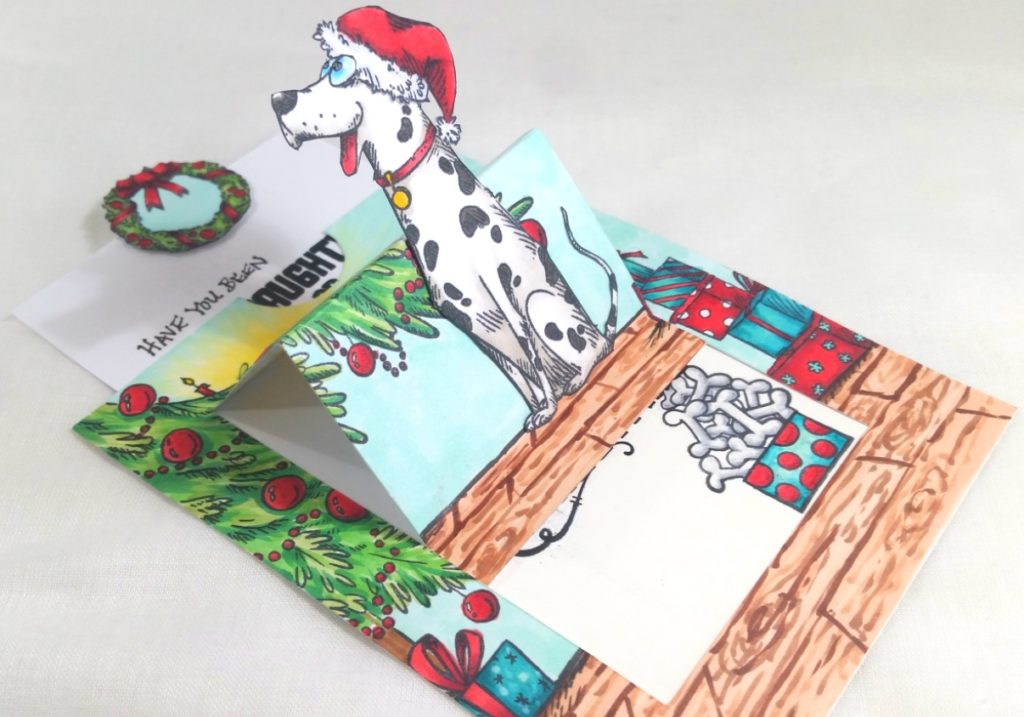
The following are the instructions to create the pop-up mechanism:
* Use the decorated card front measuring 4.25″ x 5.5″ (A2 size)
* Use an X-Acto blade and cut 0.75″ from the left, bottom and right sides of the card; take care to leave the top 0.75″ at the top side uncut.
* Turn the card 90° so the top of the card front is now on the left and use a score board to score at: 0.75″, 2.5″ and 4.25″ between the cut lines.
* Burnish the scored lines so that you form a valley at the 4.25″ line, a hill at the 2.5″ line and a valley at the 0.75″ line.
The following are the directions to create the slider mechanism:
* Cut a smaller slider piece of cardstock to 3.25″ 4.75″
* Use Scor-Tape (glue works too) on the back of the bottom smallest section of the pop-Up mechanism you made above.
* Attach the smaller slider piece of cardstock, centered and lined up to the edge of the bottom smallest section of the pop-Up mechanism.
* Now use Scor-Tape (glue works too) on the back of the card front around the left, bottom and right sides, beyond the center-cut pop-up mechanism area and attach this to an A2 sized card base.
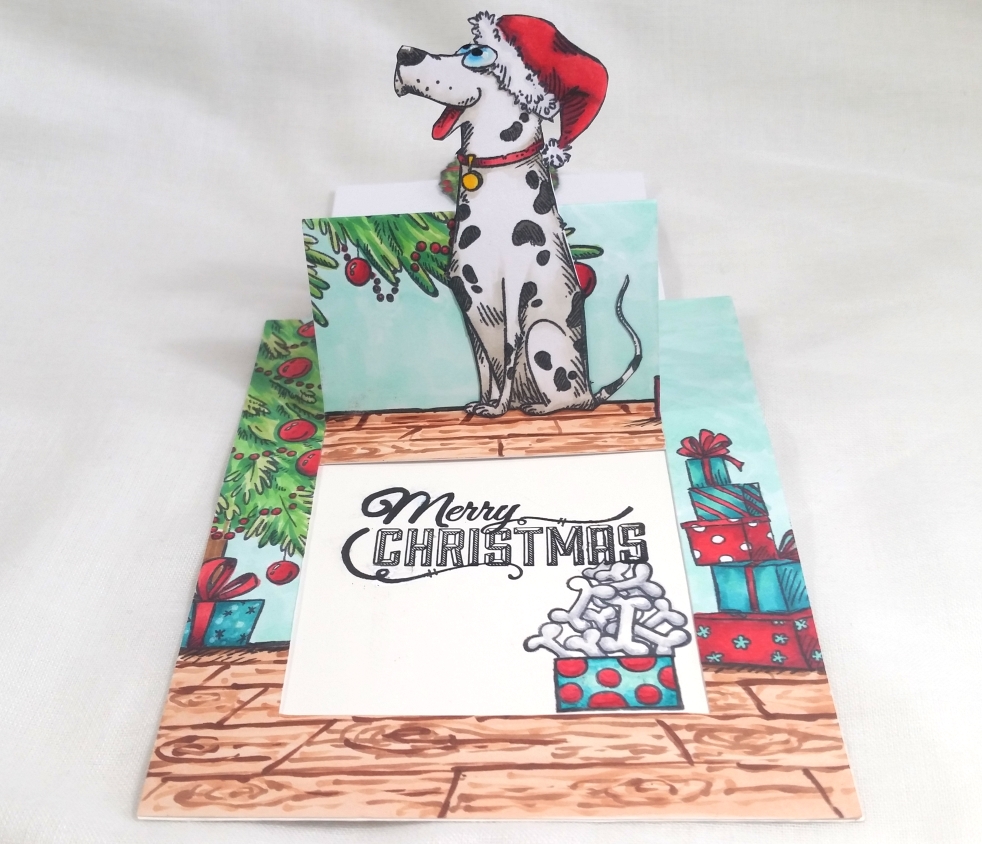
* Optional: You can cut out a thumb window at the top of the cardfront and/or add a pull tab to the top of the smaller slider piece of cardstock. I did both and took the opportunity to create a pull tab using the Christmas wreath from the Katzelkraft Sleigh Stamp Set.
 I hand wrote and used a couple of stamps from a Prima “Merry Nice” Stamp Set to add a sentiment on the top half of the slider piece that says: “Have you been naughty or nice?” and a stamp on the bottom half of the slider piece that says: “Merry Christmas”. For a bit more embellishment inside the card, I also stamped a box full of bones from an old Hampton Art Furry Christmas Stamp Set, and I colored it up to match the stack of presents on the right side of the card.
CLICK THE FOLLOWING PICTURE to watch the process tutorial video of crafting this slider pop up card:
Disclosure: Many of the supplies I’ve used for today’s project are linked. Some may be affiliate links, which means if you make a purchase I receive a small commission at no extra cost to you. I truly appreciate your support toward the costs of running this blog!
This card is being entered into the following challenges:
The Corrosive Challenge Anything Goes
Simon Says Stamp Work it Wednesday Celebrate it Challenge
Creatalicious Anything Goes with Optional Circles Challenge
Word Art Wednesday Anything Goes Challenge
Lil Patch of Crafty Friends Anything Goes Challenge
Fab ‘n’ Funky Christmas Challenge
613 Avenue Create Anything Goes with Optional Clean and Simple Challenge
Through the Craft Room Door Anything Goes Challenge
Crafty Gals Corner 3+ Layers Challenge
Stamp Sensations I Spy Something with a B Challenge – Baubles, Boxes, Bows, Bones
]]>
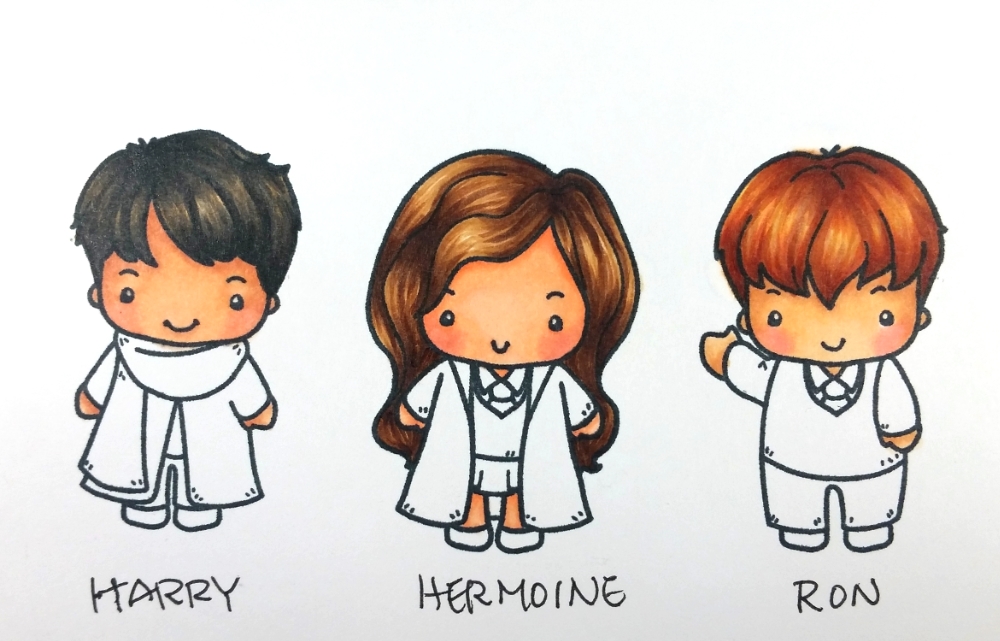

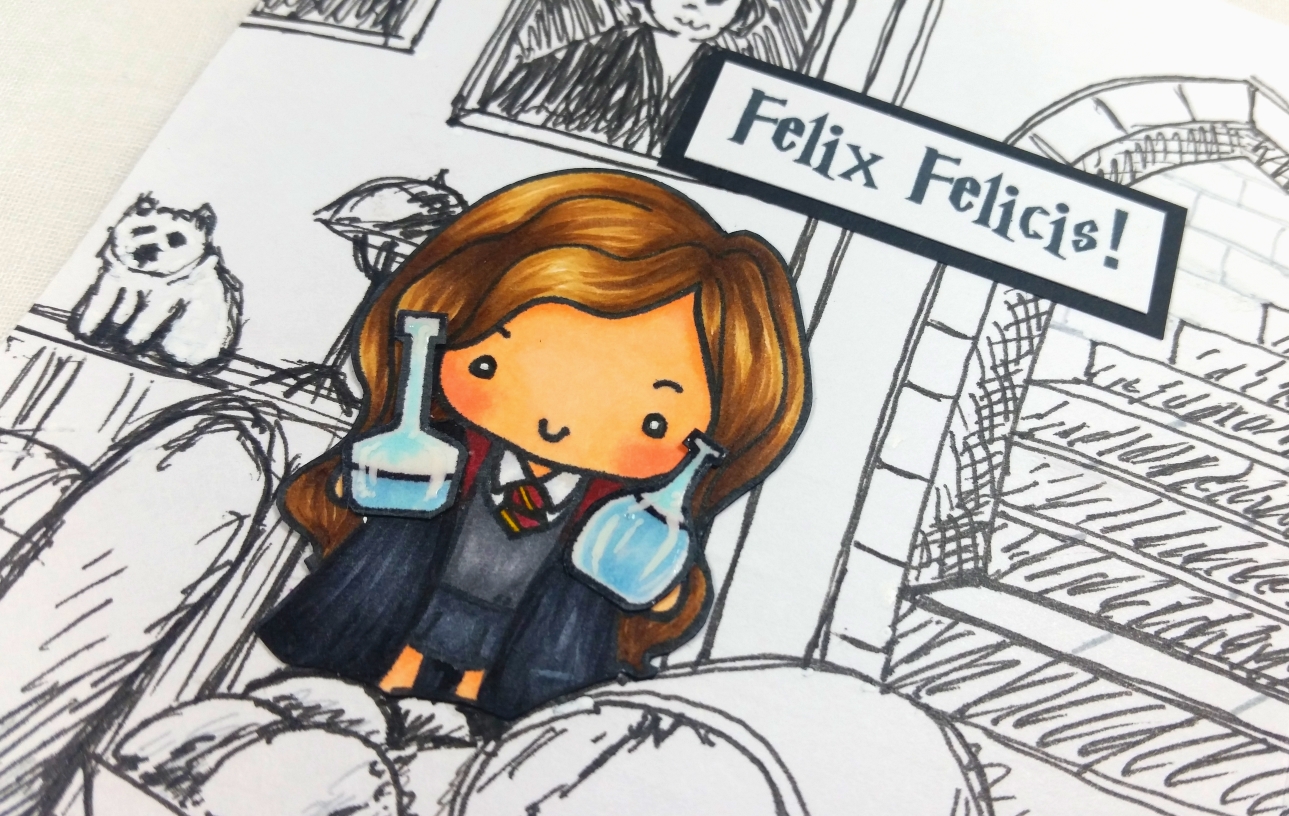
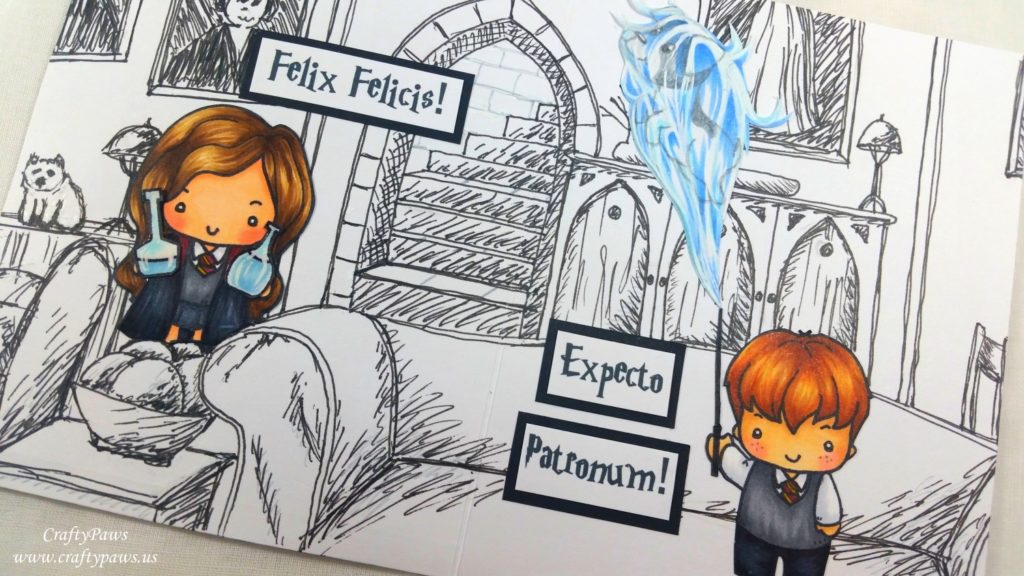
I stamped and Copic colored the three main characters: Harry, Hermoine and Ron. I gave Harry his signature round glasses (coated with Ranger Glossy Accents for shine), a flying broom, and doodled in his lightning bolt scar. Hermoine is holding potions bottles that are topped with Ranger Glossy Accents for a glass-like shine. Ron is holding his wand and is summoning his patronis, which is a Jack Russell Terrier (you knew I’d try to squeeze in a dog if I could, right?! LOL ). I doodled in the Jack Russell patronis using a Cool Gray Copic Multiliner Pen, a Uniball Signo White Gel Pen, and Copic Markers in B00 and B24. I also coated it with Clear Wink of Stella to add a magical shimmer. I fussy cut out all three characters as well as the patronis with my trusty Fiskars spring loaded scissors, and I inked the edges with a Momento Tuxedo Black Marker for a finished look.
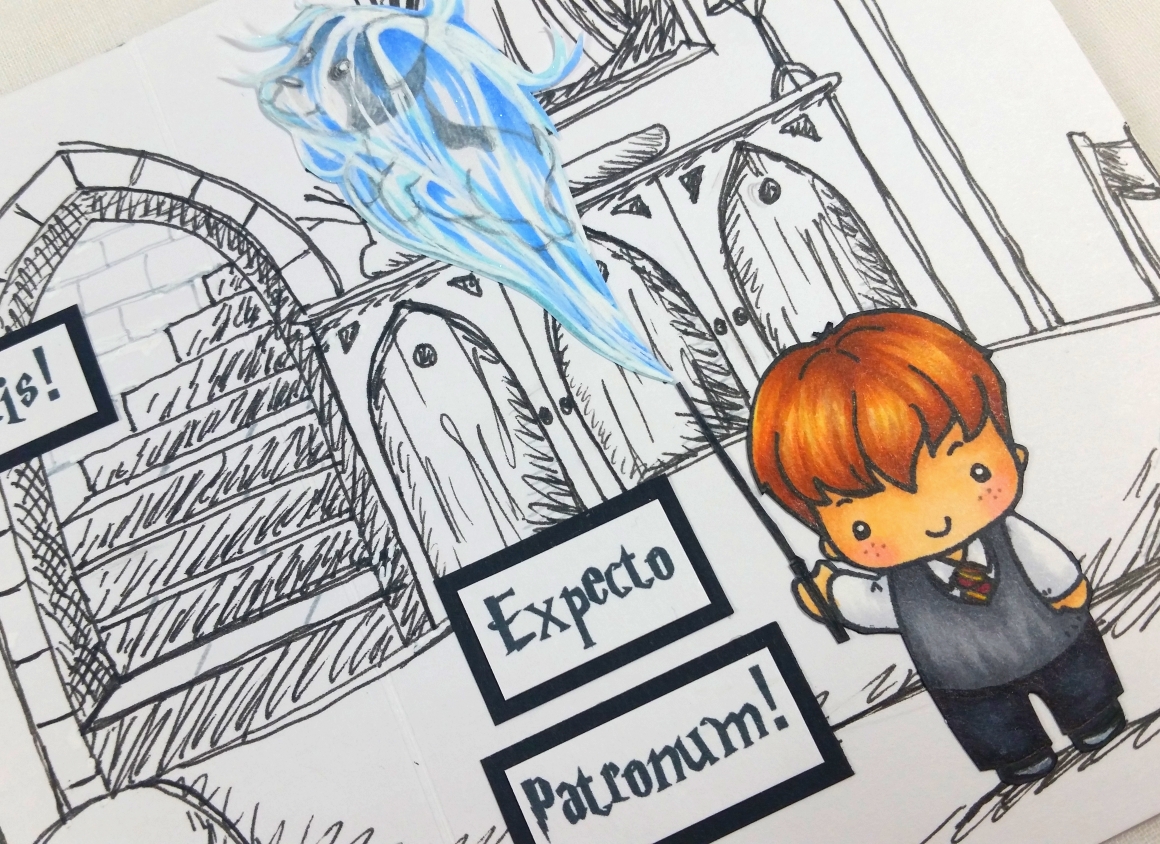
Now to make this extra special … hmmm. I didn’t have all the stamps I would need to replicate the Gryffindor common room so I decided to take a shot at drawing all the scenes with a Black Uniball Ink Roller Pen. I looked at lots of pictures on the Internet and just went for it. I drew the big couch they often sat in first. Then I drew in the staircase that led up to the boys’ quarters in the background. I also drew in a side club chair, portrait paintings, a cabinet, tabletop accessories, etc. I kept the drawing style loose and sketchy, which I think helped me get down the general look and feel without getting too caught up in the details.
Then for the card front, I thought about creating a scene of the Fat Lady painting who guarded the entrance to the Gryffindor common room. After a lot of Googling, I found a great picture of Dawn French as the Fat Lady, that I thought I could download from the Internet and manipulate to look like a sketch. I used the free paint.net software program to take the color image, make it black and white, alter it to look like a pen drawing, and have it fit into a frame that I stamped out from the Santoro Gorgeous Girl Toadstools Stamp Set (which I sized down to fit on an A2 card (5.5″ x 4.25″)).
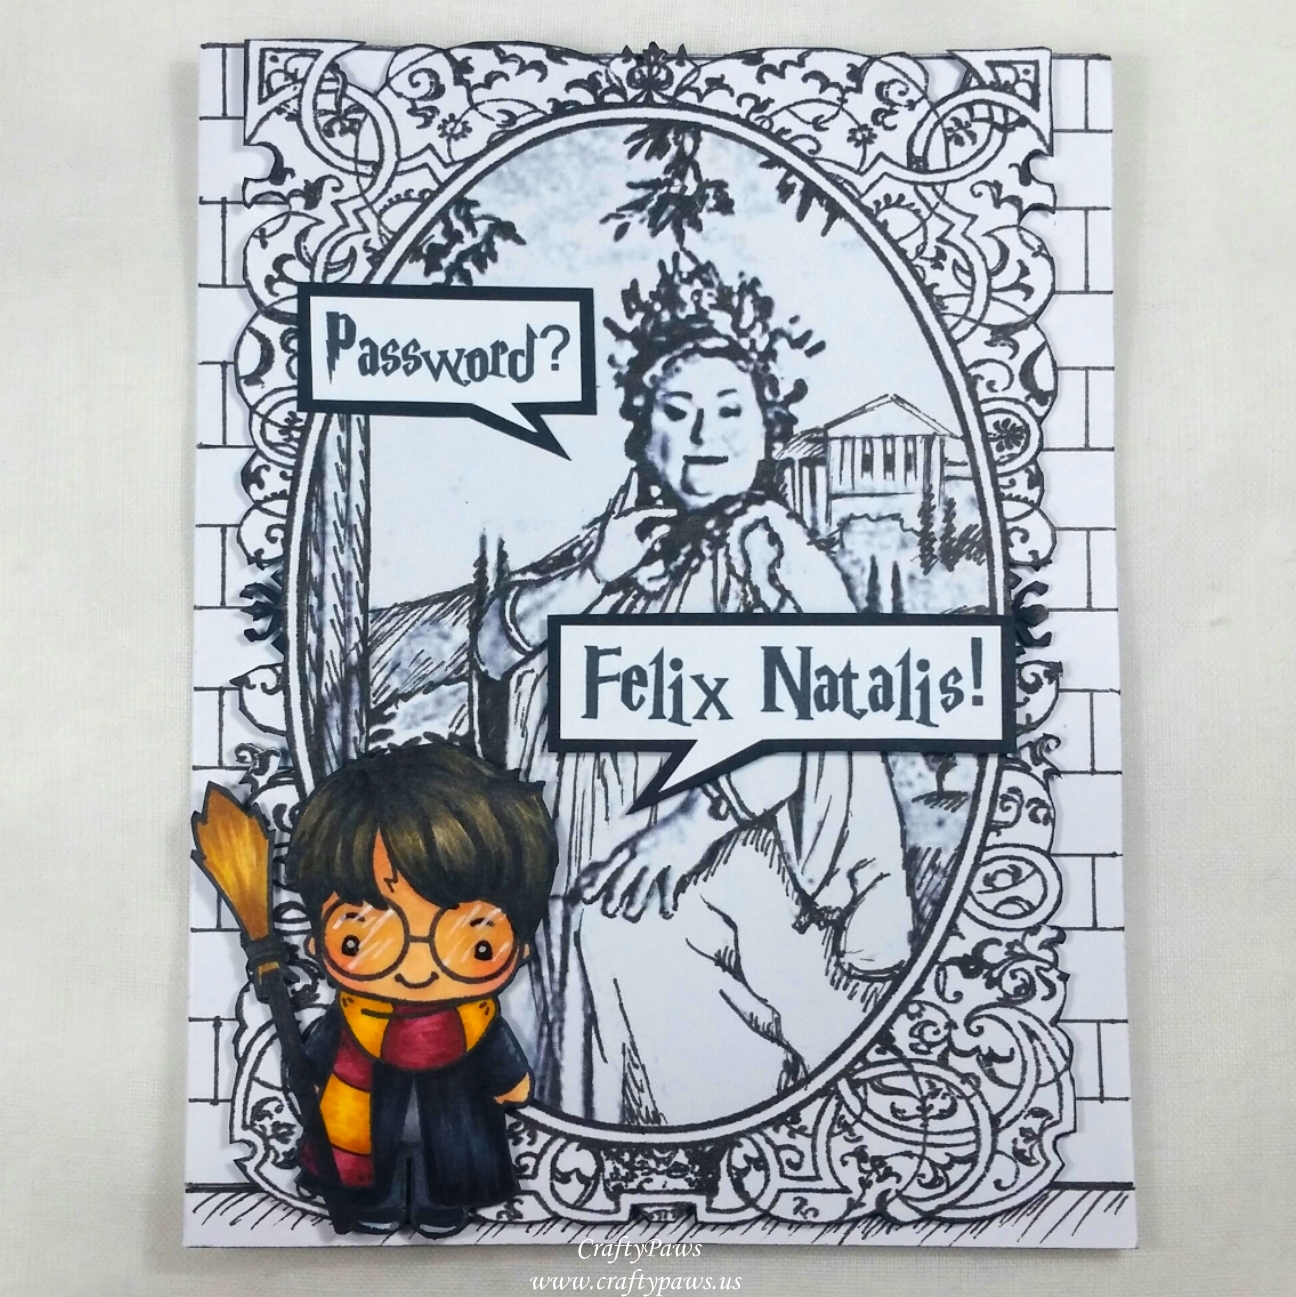
I printed out the Fat Lady portrait, doodled over top to make the image look more sketchy to better match the interior scene sketching I did, and fussy cut out the intricate frame. I popped up the portrait on double sided foam adhesive to give her a little dimension from the background stone wall that I doodled in along the edges of the card front base.
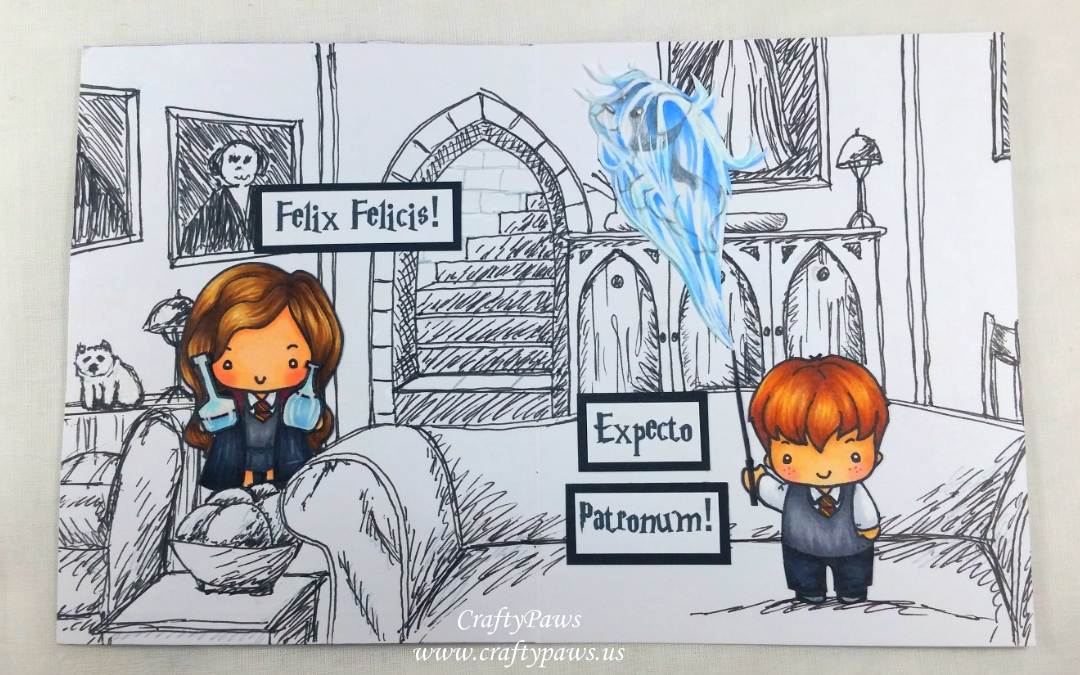
As I positioned Harry, Hermoine and Ron on each panel of the card, I made sure I left room to add sentiments that I printed from my computer using a free Harry Potter font. I printed out “Password?” for the Fat Lady; “Felix Natalis!” (happy birthday in Latin) for Harry; “Felix Felicis!” (the liquid luck potion from “Harry Potter and the Half-Blood Prince”) for Hermoine; and “Expecto Patronum” for Ron and his Jack Russell Terrier patronis. As all the sentiments say, I want to wish my friend, Sue, a happy birthday, a day filled with all good luck, and protection from bad things.
The following is a video share of this card:
Disclosure: Many of the supplies I’ve used for today’s project are linked. Some may be affiliate links, which means if you make a purchase I receive a small commission at no extra cost to you. I truly appreciate your support toward the costs of running this blog!
This card is being entered into the following challenges:
Crafter’s Castle Anything Goes with Optional Dimensional Challenge
Simon Says Stamp Monday A Trio of Something Challenge
Simon Says Stamp Wednesday Happy Birthday Challenge
Word Art Wednesday Anything Goes Challenge
Creatalicious Anything Goes Challenge with Optional Friends/Friendship Challenge
Lil Patch of Crafty Friends Anything Goes Challenge
Through the Craft Room Door Anything Goes Challenge
Crafts Galore Encore Anything Goes Challenge
613 Avenue Create Anything Goes with Optional Use Vellum Challenge
Crafty Gals Corner Anything Goes Challenge
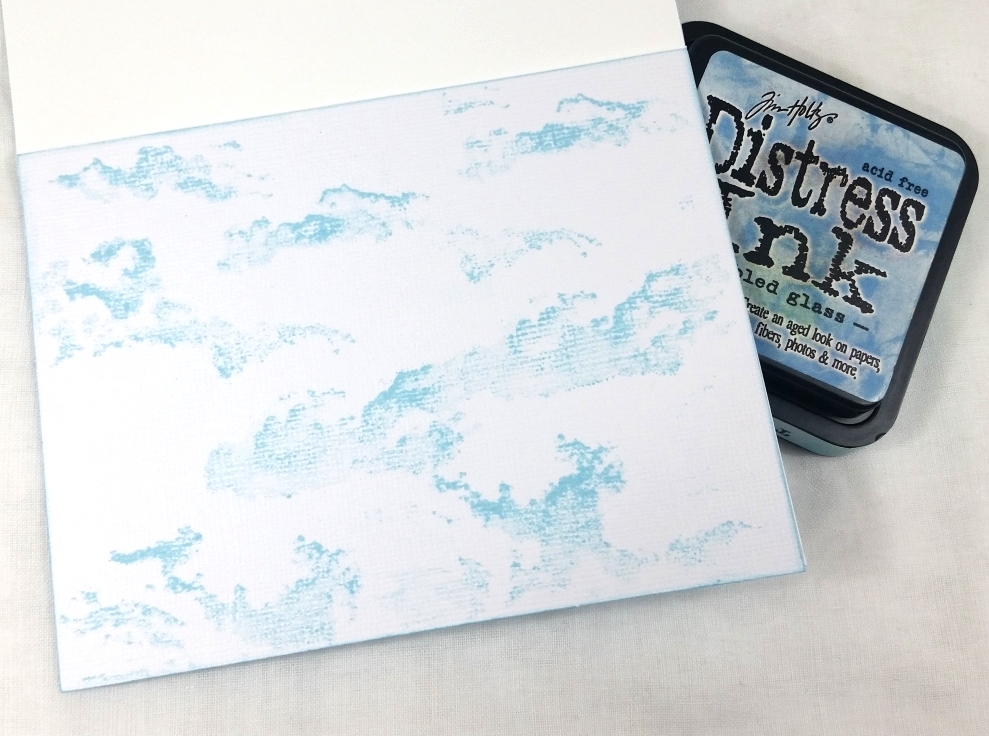
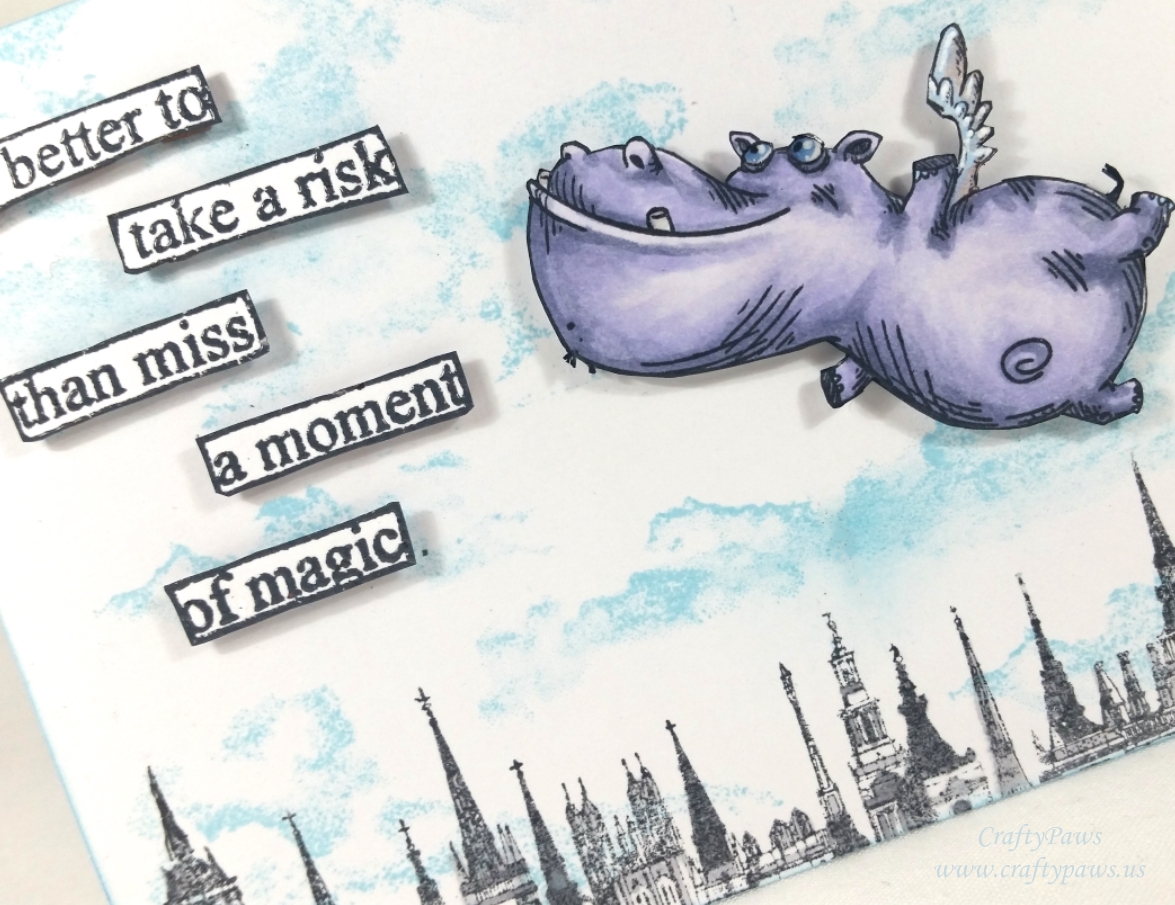 I stamped the background using the Katzelkraft Clouds Stamp with Tim Holtz Distress Ink in Tumbled Glass. Because I wanted a horizontal card and the stamp has a vertical orientation, I stamped portions of the stamp across the card front, trying to make sure that the edges of the unmounted stamped were wiped clean of ink before taking each impression (I failed once at this, but I was able to cover up the mistake with the hippo – whew!). Since the cloud image was so loose, it really wasn’t that difficult to create a seamless look. Then in the lower third, I wanted rooftops over which the hippo could be soaring so I stamped a portion of the Crafty Individuals Townhouse Rows Stamp (this is currently not available at Topflight Stamps but the Crafty Individuals Jingle Bells Rooftops has the same buildings) with Momento Tuxedo Black Ink. To cover up some of my spotty stamping, I added some shadows to the buildings with Copic N1 and N3 markers.
 I next colored up the flying hippo from the Katzelkraft Jungle Animals Stamp Set with the following Copic markers, adding Signo Uniball White Gel Pen highlights to the wings:
Body: V20, BV01, BV23, BV25 with B32 toenails
Teeth: C0; Eyes: B34; and Wings: B32 and B91
I then fussy cut it out and inked the edges with a Momento Tuxedo Black Marker for a finished look. For added shimmer and shine, I also coated the eyes and teeth with Ranger Glossy Accents and the wings with Clear Wink of Stella. Popping him up on foam dots helped him stand out even more and add a bit of dimension to the card. The sentiment, which is from the Dylusions Quote Medley Stamp Set (this link is for a different set but has the same quote), and says, “It’s better to take a risk than miss a moment of magic” is heat embossed with charcoal embossing powder, fussy cut and popped up on foam dots as well.
Lastly, I stamped out the clouds again on another piece of card stock and inked the edges to create a card liner. I love coordinating the insides of cards with the card fronts this way. It adds a finished completeness, and it’s so easy!
The following is a process video of crafting this card:

Disclosure: Many of the supplies I’ve used for today’s project are linked. Some may be affiliate links, which means if you make a purchase I receive a small commission at no extra cost to you. I truly appreciate your support toward the costs of running this blog!
This card is being entered into the following challenges:
Simon Says Stamp Wednesday Anything Goes Challenge
Word Art Wednesday Anything Goes Challenge
Creatalicious Anything Goes with Optional Birthday Challenge – WINNER
Card Mania Embossing Challenge
Lil Patch of Crafty Friends Anything Goes Challenge
613 Avenue Create Anything Goes with Optional Reuse/Upcycle Challenge
Crafty Gals Corner Anything Goes Challenge
]]>
 I’ve linked up a video tutorial for how to stamp out a single layer scene like this below, but basically, you stamp the most forward images first, create masks for them, and stamp the images behind them next. You repeat that process: stamping, masking, and stamping the next layer back; until you’re done creating the whole scene.
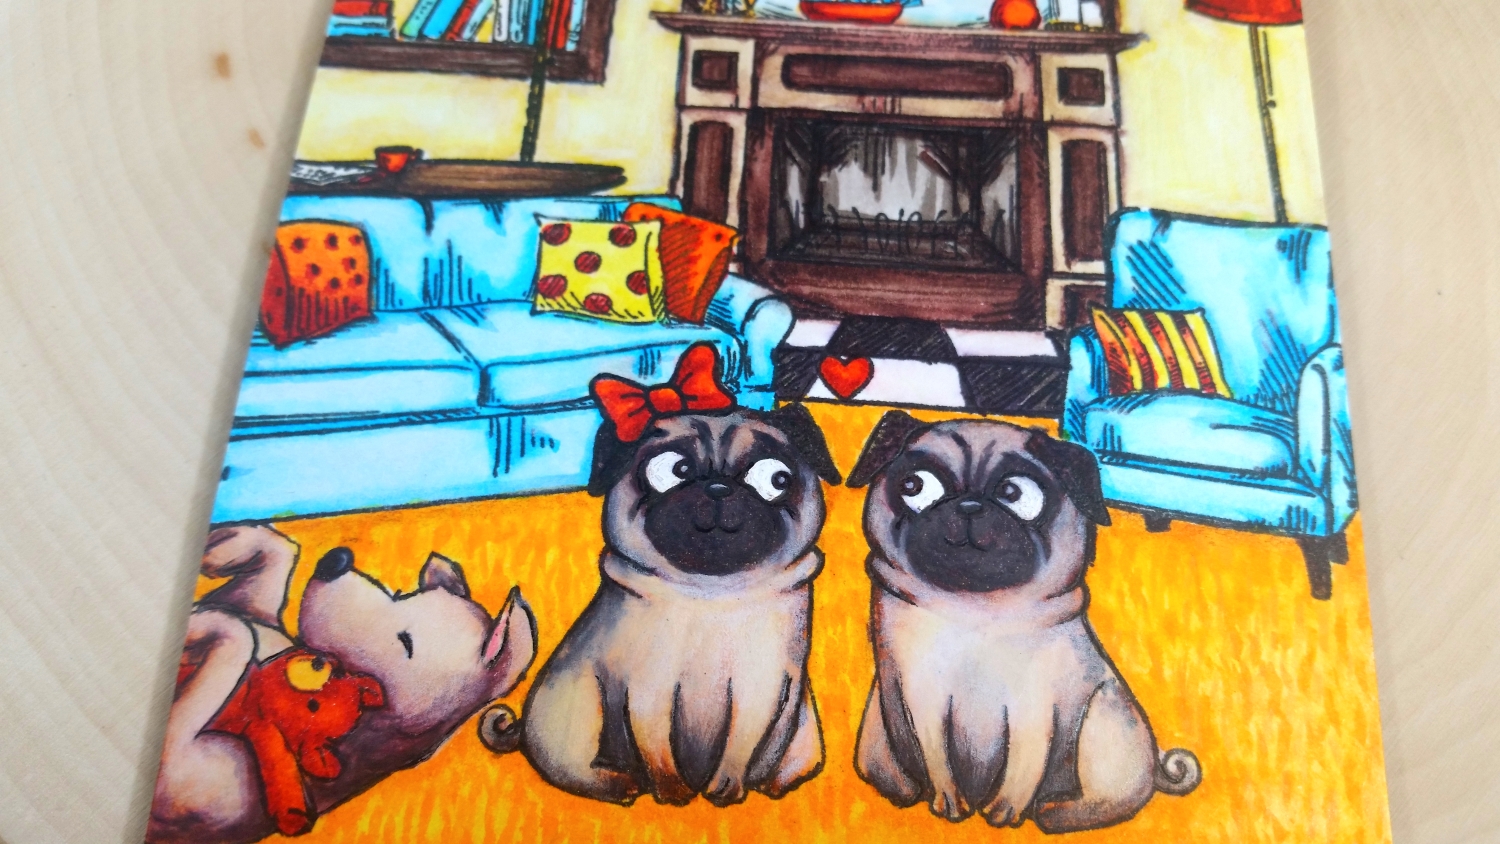
To color up the scene, I used the following Zig Clean Color Real Brush Markers:
Dogs: Lemon Yellow (051), Flesh (071), Oatmeal (064), Brown (060), Mid Gray (096) and Dark Brown (062)
Fireplace, sofa table and book shelf: Oatmeal (064), Mid Gray (096), Dark Brown (062) and Black (010)
Mirror, sofa and arm chair: Light Blue(036) and Cobalt Blue (031)
Books: Bright Yellow (052), Geranium (029), Light Blue(036) and Cobalt Blue (031)
Lamp shades, teddy bear, and other orange-red accent decor pieces: Bright Yellow (052) and Geranium (029)
 Yellow walls and yellow parts of pillows: Lemon Yellow (051)
Carpeting: Lemon Yellow (051) and Bright Yellow (052)
Plant on bookshelf: Pale Green (045)
Then I layered onto some of the images the following Prismacolor Premier Colored Pencils to add details and lighten some of the watercoloring that had gotten a little too dark in some areas (think dark Pug faces):
Dogs: Beige Peche (1085), Cream (914), Framboise Noire (1095), Gris Chaud (1058), and Blanc (938)
Walls, sofa and arm chair: Blanc (938)
Rug: Cream (914) and Yellowed Orange (1002)
Fireplace: Framboise Noire (1095)
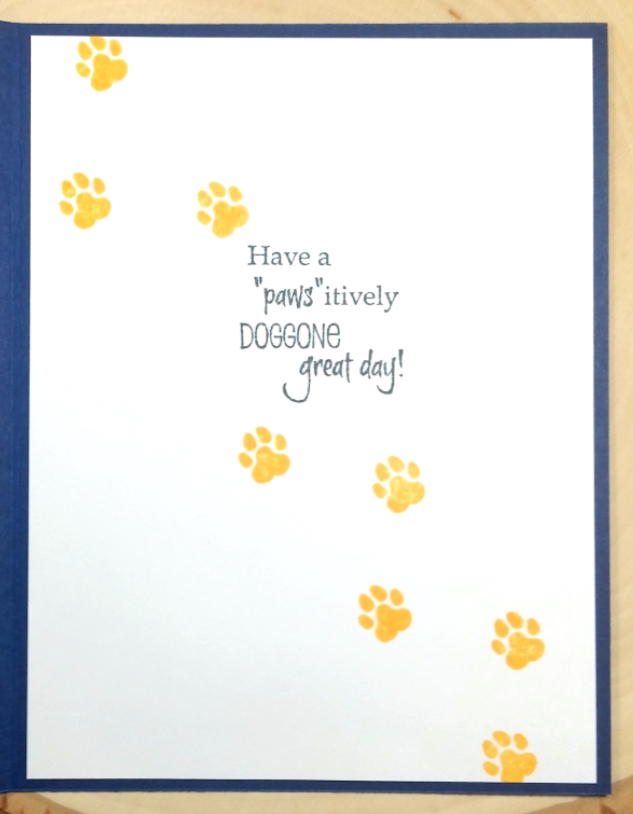
Lastly for the inside liner sheet, I used a couple of stamps that my friend, who’s receiving this card, has gifted me over the years. The sentiment, which I love because it is great for any time, is a Rubbernecker red rubber cling stamp called, “Pawsitively.” The row of paw prints was stamped using Simon Says Stamp Clementine Premium Ink and a handmade rubber paw stamp on a wooden dowel. Obviously my friend and I share our love of dogs and crafts! LOL
The following is the scene building tutorial video HERE
Disclosure: Many of the supplies I’ve used for today’s project are linked. Some may be affiliate links, which means if you make a purchase I receive a small commission at no extra cost to you. I truly appreciate your support toward the costs of running this blog!
This card is being entered into the following challenges:
Word Art Wednesday Anything Goes Challenge
Simon Says Stamp Wednesday Add a Sentiment Challenge
Lil Patch of Crafty Friends Anything Goes Challenge
Through the Craft Room Door Anything Goes Challenge
Creatalicious Anything Goes with Optional Cute Challenge
Crafty Gals Corner Anything Goes Challenge
613 Avenue Create Anything Goes with Optional Something New Challenge
MFT Color Challenge #85
]]>
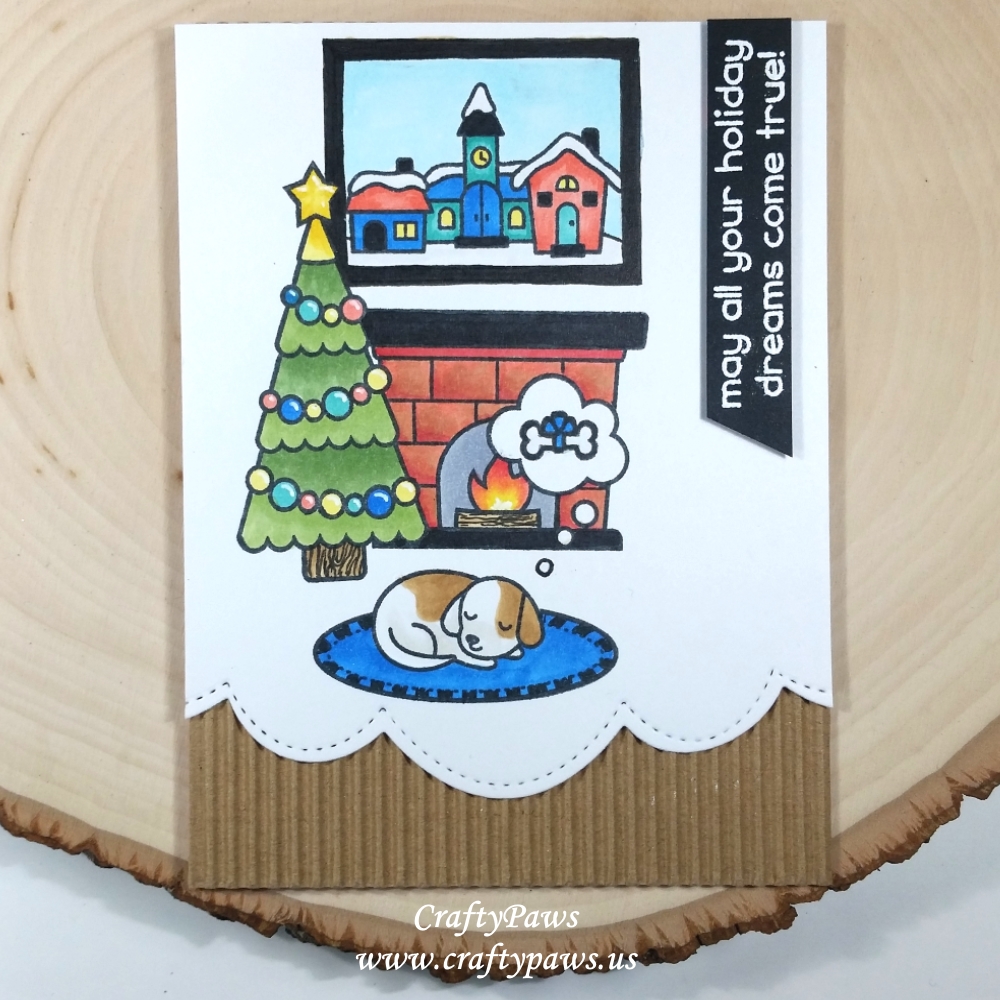 I decided to create a little scene using the pup, rug, fireplace, Christmas tree and thought bubble stamps. With a little simple masking I was able to get a layered scene. However, to fill in the space above the fireplace in the scene, I needed a little something more. I pulled out the snowy/icy village stamp from the Lawn Fawn “Ready, Set Snow” stamp set from 2015 and doodled a frame around it with a Copic Multiliner Pen in 0.1 pt. I thought the icy scene in the painting contrasted nicely with the main warm scene of the card.
Then with some simple Copic coloring (all the images are so small there is very little blending needed), I brought the little scene to life.
Puppy, fire log and tree trunk: W0 and E31 (which is basically like a kraft color) with wood grain doodled in with a Copic Multiliner Pen in 0.1 pt.
Fire place: E31, R22 and R35
Tree decorations and holiday village: Y13, R22, B000, B16 and BG13 with Uniball Signo White Gel Pen highlights on baubles
Fire: Y13, R22 and R35 with Uniball Signo White Gel Pen at fire core
Rug: B16; Tree: G43 and G24; Frame, mantle, hearth and rug trim: 100
All the baubles, the fire and the snow in the village scene got a healthy coating of Clear Wink of Stella shimmer too.
For a decorative lower edge for the card front, I used a Pretty Pink Posh Stitched Borders 2 die that I thought echoed the curves of the thought bubble, and then I backed the whole card front with some kraft corrugated card stock for some added dimension and texture.
The sentiment also came from the “Christmas Dreams” stamp set. I prepped a scrap of black card stock with my EK Success Powder tool and then used VersaMark Ink to stamp out the sentiment. I used Super Fine Detail Ranger Embossing Powder in White to heat emboss it, and then trimmed down the scrap to fit on the upper right side of the card (I had thought of putting it to the right just above the sleeping pup but the sentiment was too big and covered too much of the scene for my liking so I went with this vertical positioning).
The following is a process video of creating this Christmas scene card:
This card is being entered into the following challenges:
Card Mania Christmas Challenge
Lil Patch of Crafty Friends Anything Goes Challenge
Creatalicious Anything Goes with Optional Flourishes Challenge
Word Art Wednesday Anything Goes Challenge
Fab ‘n’ Funky Christmas Challenge
Crafty Gals Anything Goes Challenge
Simon Says Stamp Monday Icy Inspiration Challenge
Simon Says Stamp Wednesday Anything Goes Challenge
MFT Sketch Challenge 361
![]()
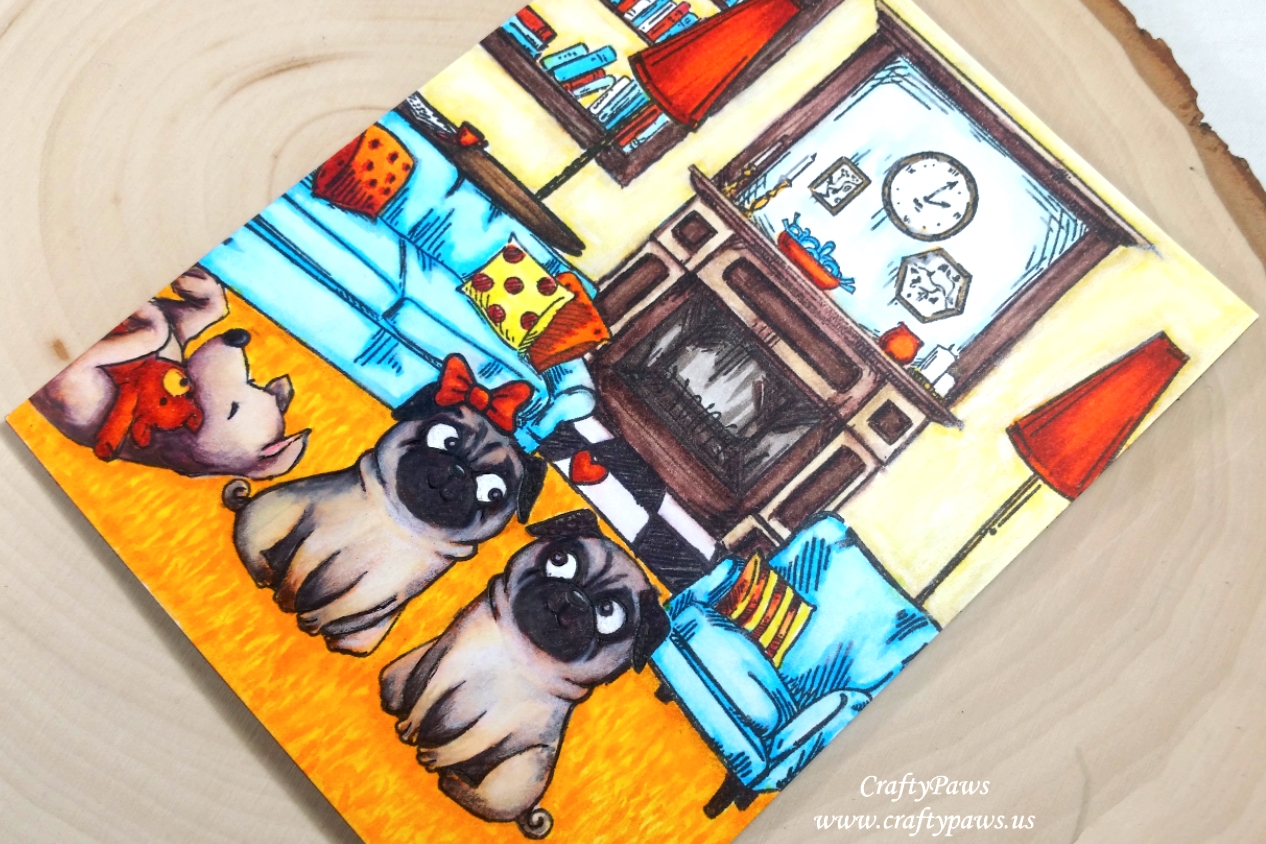
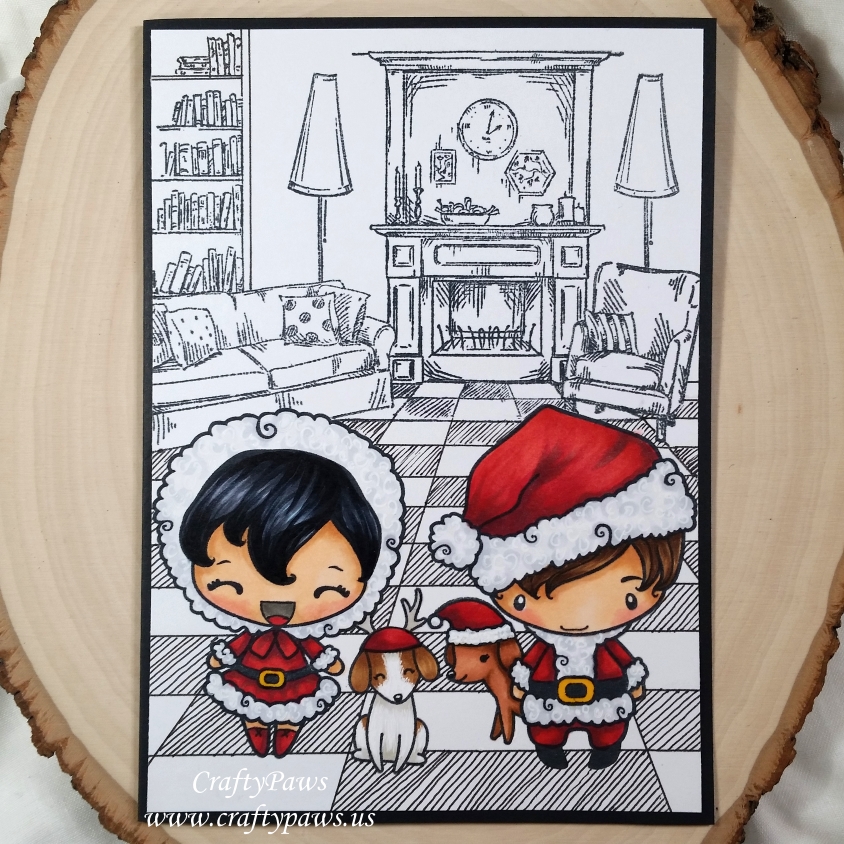 I first stamped out The Greeting Farm girl and boy as well as the Lawn Fawn “Happy Howlidays” (retired) pups using Momento Tuxedo Black Ink (my go-to for alcohol ink coloring since it never bleeds) and created masks for the kids and the puppy hats with post-it note paper so that I could build up the scenes to look 3D. TIP: Masking stamped scenes is easy if you first start with the images that you want forward, mask them off, and lastly stamp the images that go behind the first images.
I used the following Copic colors to color up just the boy, girl and puppies for some spotlight coloring (the rest of the scene will stay black and white):
Skin: E000, E00, E21, R20 with W5 for inside girl’s mouth
Red costumes: R24, R27, R29 and N4
Faux fur on costumes: C00 and C1 with Uniball Signo white gel pen squiggles
Belt buckles: Y17 with Glossy Accent shiny coating
Deer antlers: W1 with Glossy Accent shiny coating
Dog with Santa hat: E11, E13 and E37
Dog with deer antlers: E55, E57, W1 with Uniball Signo white gel pen fur texture
Black hair: B01, C5, C7 and C9
Brown hair: E55, E57 and E59
I created the living room scene with two stamp sets from Joy Crafts, both called “Home Sweet Home.” I doodled some extra book shelves and continued the checker board floor from the fireplace hearth to ground the entire scene using a Copic Multiliner Pen in 0.1 pt.
The following is a process video of creating this single layer scene card:
Disclosure: Many of the supplies I’ve used for today’s project are linked. Some may be affiliate links, which means if you make a purchase I receive a small commission at no extra cost to you. I truly appreciate your support toward the costs of running this blog!
This card is being entered into the following challenges:
Stamping Sensations One Layer Christmas Card Challenge
The Greeting Farm Farm Fresh 1 Layer Card Challenge
Lil Patch of Crafty Friends Anything Goes Challenge
Word Art Wednesday Anything Goes Challenge
Through the Craft Room Door Anything Goes Challenge
Creatalicious Anything Goes with Optional Thanks Challenge
613 Avenue Create Anything Goes with Optional 3D Challenge
Not Just Cards Anything Goes Challenge
]]>
STAMPING: I started with a card front that was 8.5″ x 5.5″ (yes, that’s half of a standard sheet of card stock!). Following the rule of thirds, I stamped out the cuties from The Greeting Farm Xmas Sweeties in the left and bottom 2/3 of the card front. Then to the right and bottom 1/3 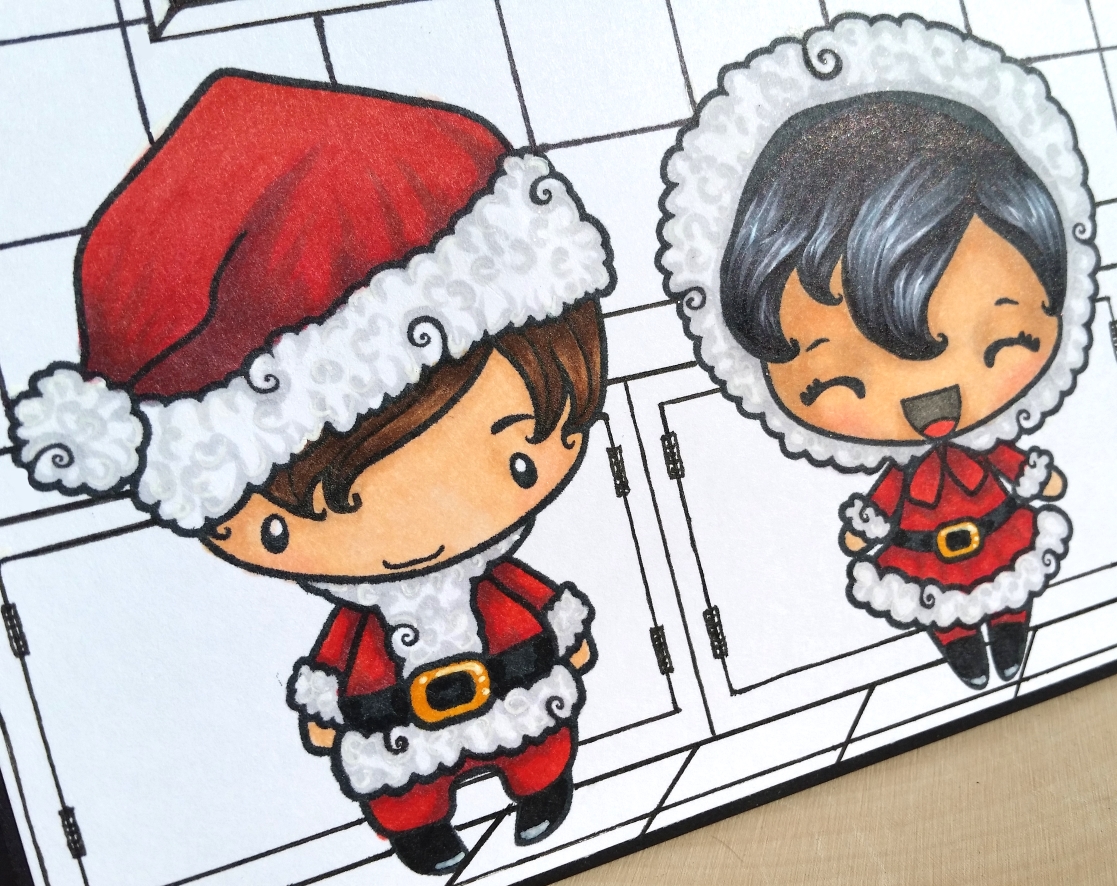 of the card front I used several of the stamps from the Lawn Fawn Sprinkled with Joy stamp set. I stamped in the stove/oven combination and filled the oven window with a cookie tray and some sugar cookies. The sentiment is a combination of two stamps also from this stamp set.
COLORING: To spotlight the two kids, I only colored them. I used the following Copic colors:
Fur on hats and trims: N2, Uni-ball Signo White Gel Pen and Clear Wink of Stella
Red holiday clothes: R24, R27, R29 and N4
Belt buckles: YR24 and Y17 with Uni-ball Signo White Gel Pen and Clear Wink of Stella
Skin: E00, E21, V20, R30 and R20
Black hair: B01, C5, C7 and C9
Brown hair: E55, E57 and E59
DOODLING: Directly above the stove/oven, I doodled in a simple range hood. To build up the rest of the kitchen scene, I doodled in wall tiles, a counter top, cabinets, and floor tiles. For the sentiment above the kiddos dressed in their furry holiday costumes, I tried to create a modern twist on the idea of an embroidered sampler. I doodled a frame and faux stitching around the sentiment that reads, “May your holidays be sprinkled with joy”. For most of the doodling, I used a Copic Multiliner Pen in 0.1 pt, except for the faux stitching, which I wanted to appear more fine and drew in with a Copic Multiliner Pen in 0.03 pt.
Disclosure: Many of the supplies I’ve used for today’s project are linked. Some may be affiliate links, which means if you make a purchase I receive a small commission at no extra cost to you. I truly appreciate your support toward the costs of running this blog!
The following is a video share of this card:
This card is being entered into the following challenges:
Stamping Sensations One Layer Christmas Card Challenge
Farm Fresh Challenge Single Layer Card
Simon Says Stamp Furry Friends Challenge
Card Mania Anything Goes Challenge
Creatalicious Anything Goes with Optional Thanks Challenge
Lil Patch of Crafty Friends Anything Goes Challenge
Word Art Wednesday Anything Goes Challenge
613 Avenue Create Anything Goes with Optional 3D Challenge
Crafts Galore Encore Anything Goes Challenge
Through the Craft Room Door Anything Goes Challenge
]]>
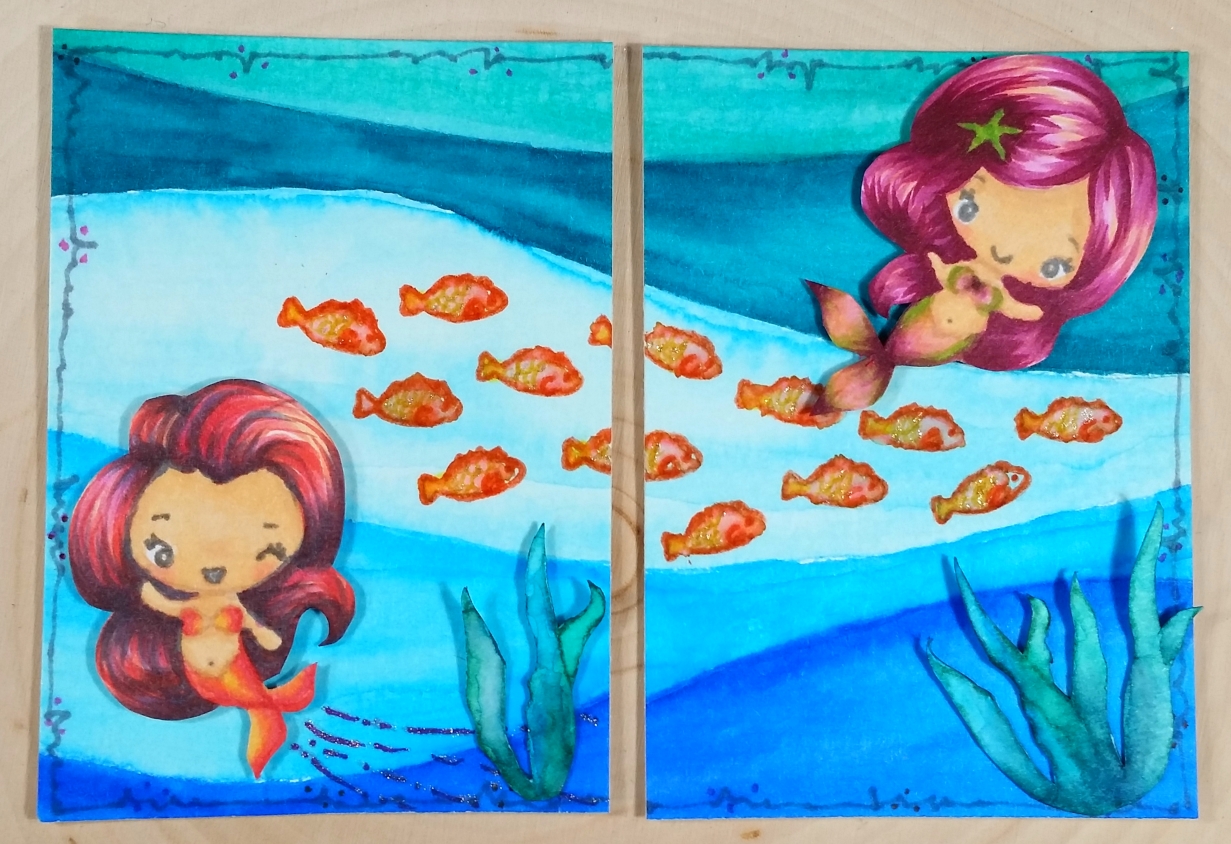
For the watery wavy background I used various blues and aquas from the 60 piece set of Zig Clean Color Real Brush Markers and free hand colored up the segments. I used a Pentel waterbrush to blend out each section, making sure to color 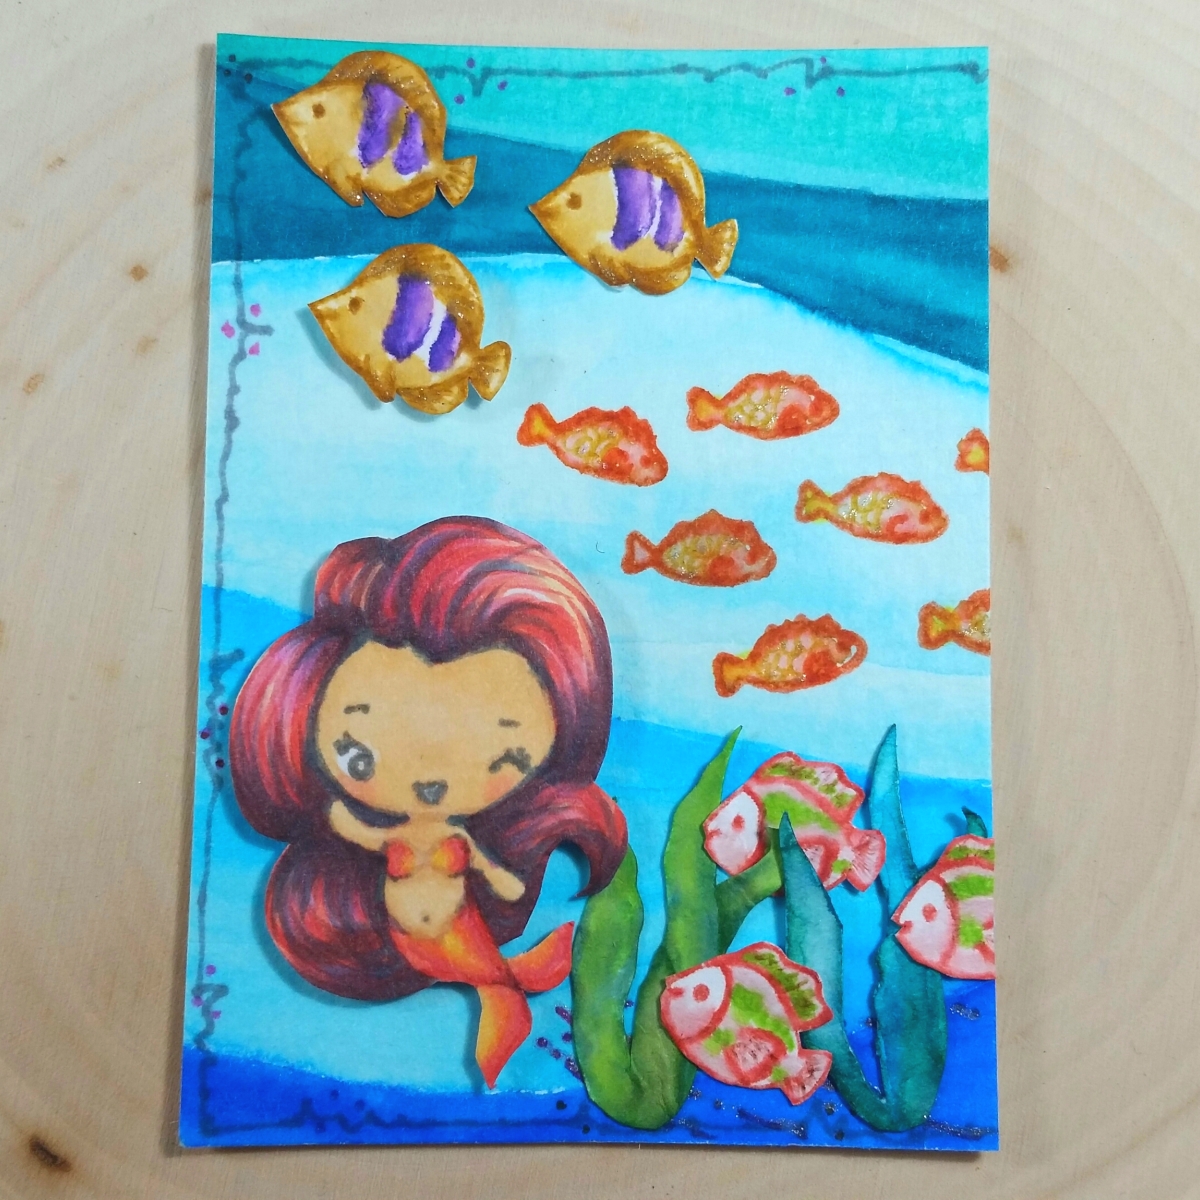 up the segments in alternating order so each segment could dry before the adjacent segment was watercolored so they would not bleed into each other. I also doodled out some zig-zaggy framing around both ATCs using Ultra Fine Point Sharpie Markers in Red, Hot Pink, Medium Pink, Purple and Gray.
For the school of orange fish, I inked up a simple fish stamp with a Ripe Persimmon Tim Holtz Distress Marker and colored the bodies with Wild Honey. For a little shimmer, I also added scales with a Clear Star Gelly Roll Pen. For the purple and yellow striped fish, I stamped out the fish with more Wild Honey and used Tim Holtz Distress Markers in Wilted Violet and more Wild Honey to watercolor them up. For the pink and green fish, I stamped the fish in Abandoned Coral and watercolored using Tim Holtz Distress Markers in Spun Sugar and Twisted Citron. The seaweed are colored up with Twisted Citron, Mowed Lawn, Peacock Feathers and Pine Needles, and the starfish are colored up with Squeezed Lemonade and Spiced Marmalade. I added more shimmer with the Gelly Roll Pen over the fins of the fish and the star fish as well. Except for the big school of orange fish, each of these little scene builders were painstakingly fussy cut out and glued on or popped up with double sided foam tape.
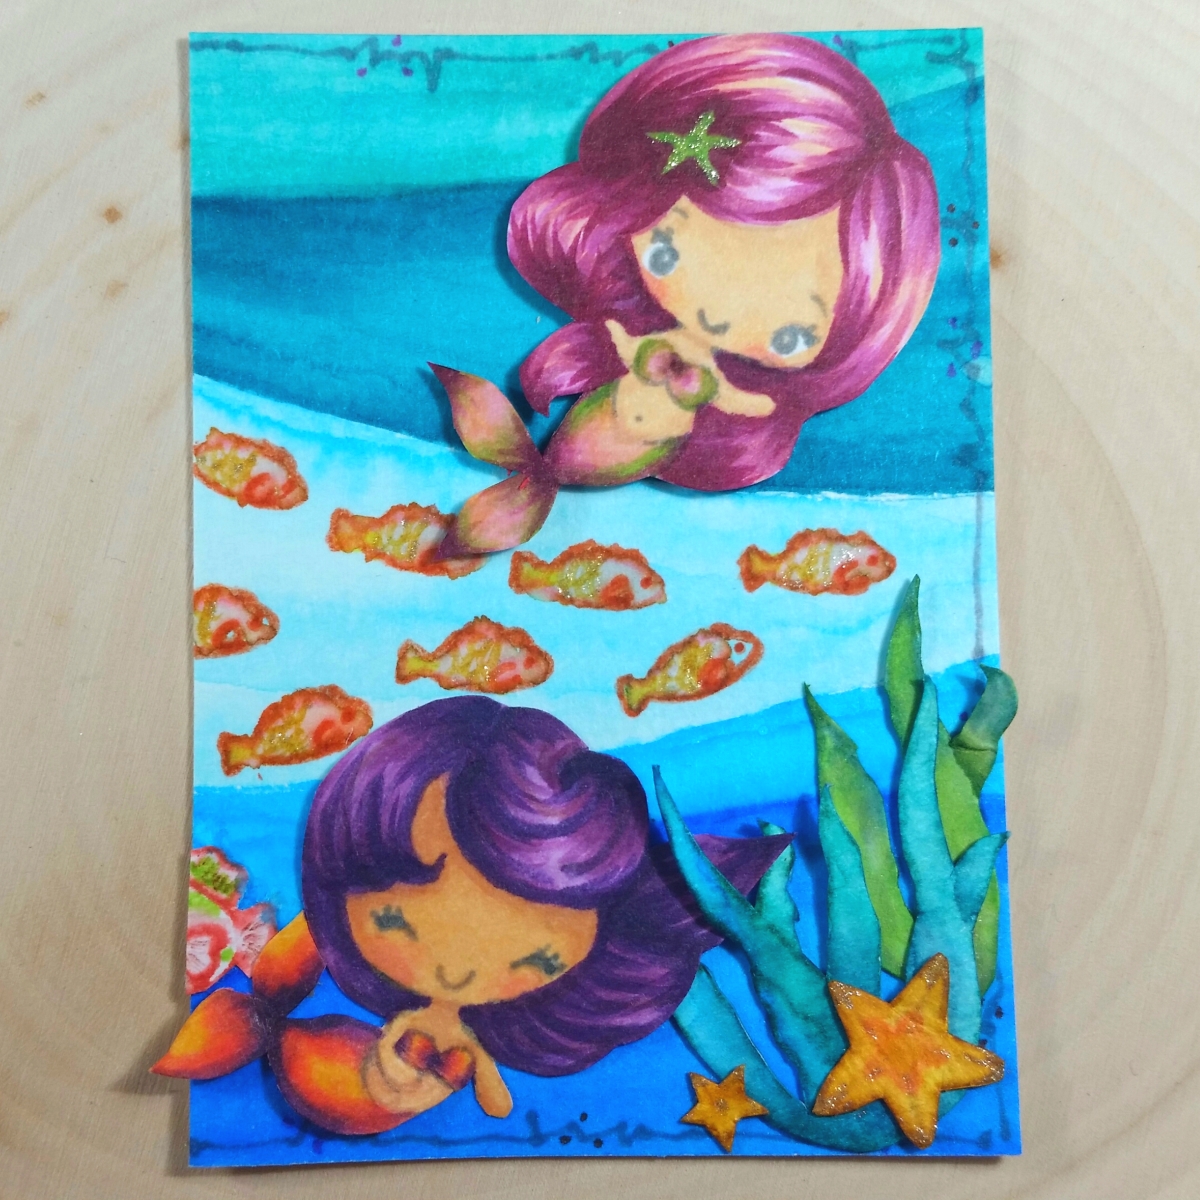 For the mermaids, I wanted a soft look, so I stamped out each with Momento Desert Sand Ink to do some no line coloring. I re-defined the facial features with a 0.3 pt Copic Multi-liner Pen in Cool Gray. Then I used the following Copic colors:
Mermaid with green starfish hair pin:
Skin: E51, E21, R20
Hair: YR21, RV52, RV66, RV69
Bikini top, mermaid tail, and starfish hair pin: YG25, YG17, RV52, RV55, RV66, RV69
Mermaid with purple hair:
Skin: E51, E21, E11, R20
Hair: V12, V15, V06, V09
Bikini top and mermaid tail: YR21, R22, V06 and V09
Mermaid winking:
Skin: E51, E21, R20
Hair: YR20, YR21, RV55 R24, C5
Bikini top and mermaid tail: YR20, YR21, R22, R24
The following is a video share of these ATCs that includes the no line coloring of the purple-haired mermaid:
These ATCs are being entered into the following challenges:
The Greeting Farm Farm Fresh Make a Scene Challenge
Lil Patch of Crafty Friends Anything Goes Challenge
Word Art Wednesday Anything Goes Challenge
Creatalicious Anything Goes with Optional Glitter/Bling Challenge
Not Just Cards Anything Goes Challenge
613 Avenue Create Anything Goes with Optional Shabby Chic Challenge
Penny Black and More All Creatures Great and Small Challenge
]]>