
I was so happy to be able to easily create this over-sized card using the Inloveartshop Stackables Spiral Pattern Decor Dies to create a background that highlights two focal point images. I cut out 4 sizes of the stackable spiral circles in various shades of purple — lavender, periwinkle, and deep purple. I stacked them progressively smaller and then spaced them out on a white card front on a periwinkle card base. To keep a cohesive look, I connected the stacked spirals with a strip of lavender card stock through the middle of the card. I also used a simple circle die (from the versatile Diemond Dies Die-Normous Stack-Ems Circle Nesting Die Set) to create a light background from which the puppy images could pop. NOTE: My readers can get 20% off by using the DISCOUNT CODE: G-36967 at the Inloveartshop checkout.
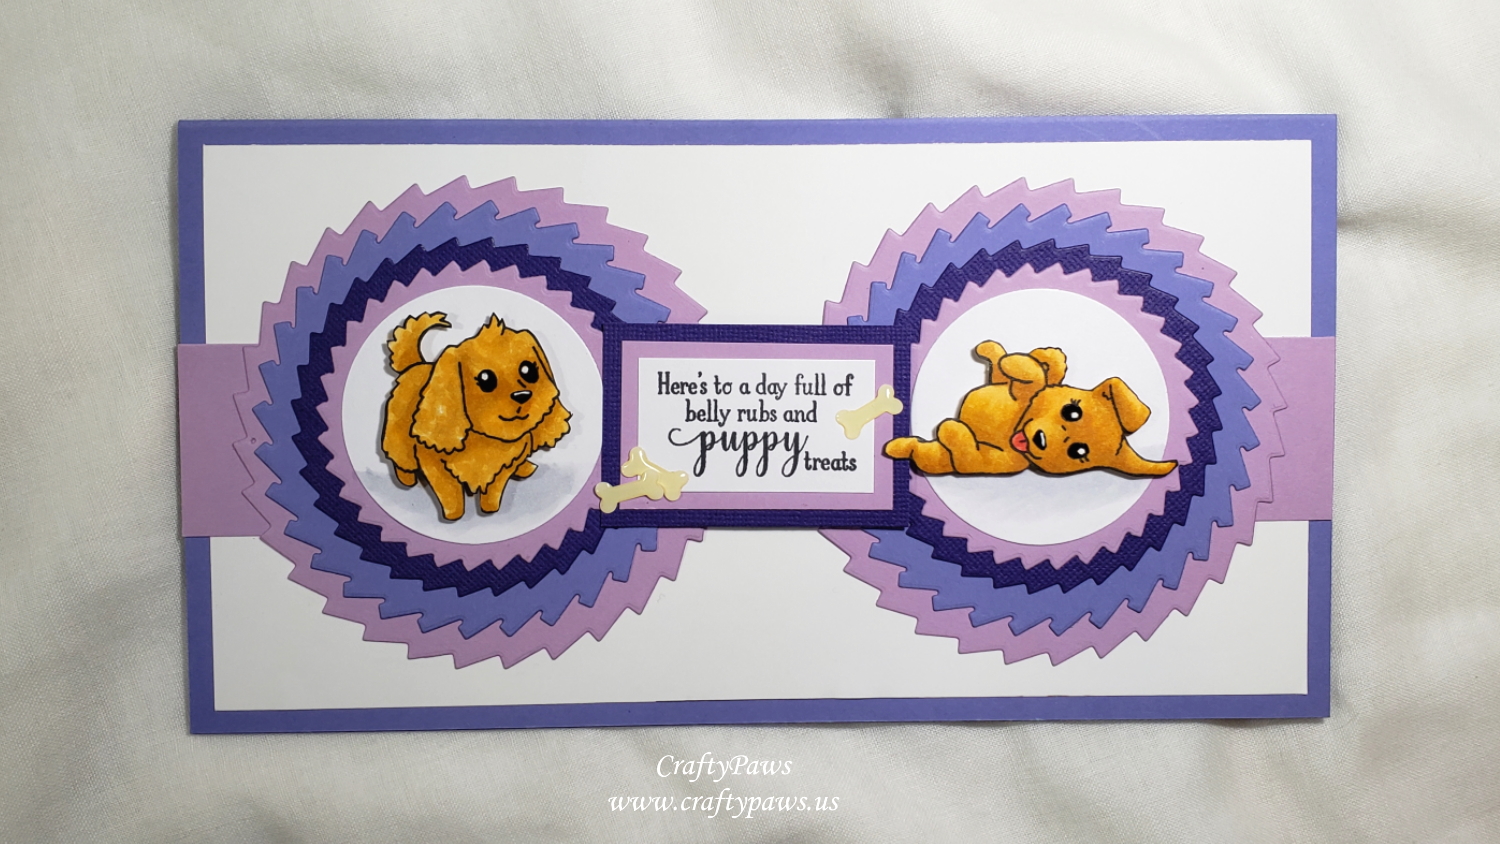
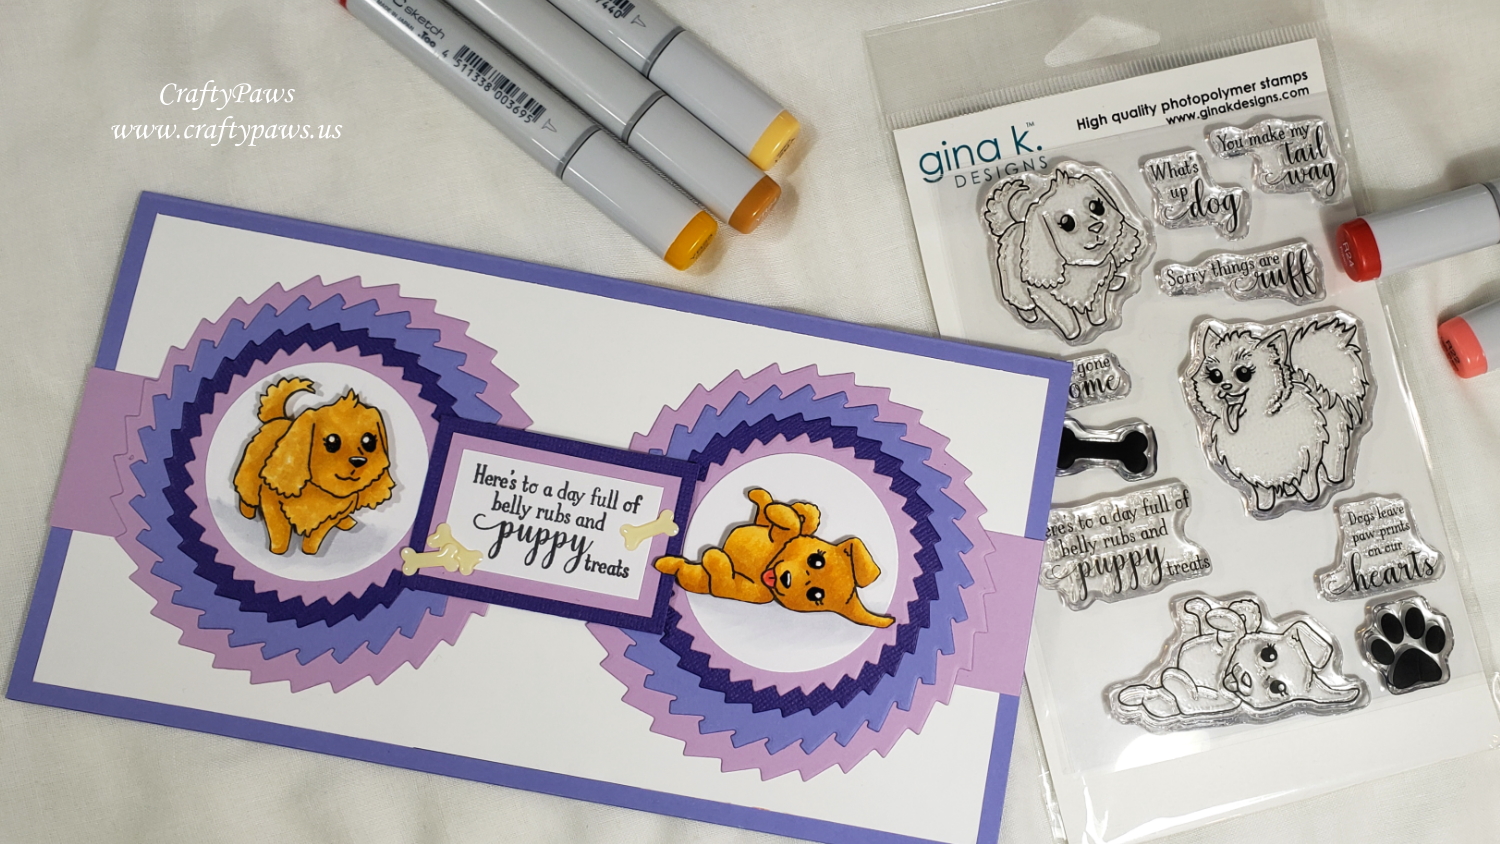
For the focal images, I finally got to color up the poodle and the paws-up puppy from the Gina K Designs “Playful Pups” stamp set (retired). As my niece’s new puppy is an apricot mini poodle (like my sweet Biscuit was), I colored up the dogs with the following Copic colors:
Fur: YR21, YR23, YR24
Nose: W7
Tongue: R22 and R24
Ground for background white circles: C1
After fussy cutting them with my Fiskars Spring Loaded Reverse Scissors, I inked the edges of the cut images with a Memento Tuxedo Black Marker for a clean finished look. I also popped up the puppies on double sided foam adhesive to add even more dimension.
For the sentiment, I used the “Here’s to a day full of belly rubs and puppy treats” from the same stamp set. To help the sentiment stand out, I matted them with more scraps of the lavender and deep purple card stock that I had used for the background, and I also back the sentiment with more double sided foam adhesive. I had a few enamel bones from a Doodlebug Designs sticker set from the Puppy Play Collection (retired), so I added 3 to the sentiment for embellishments.
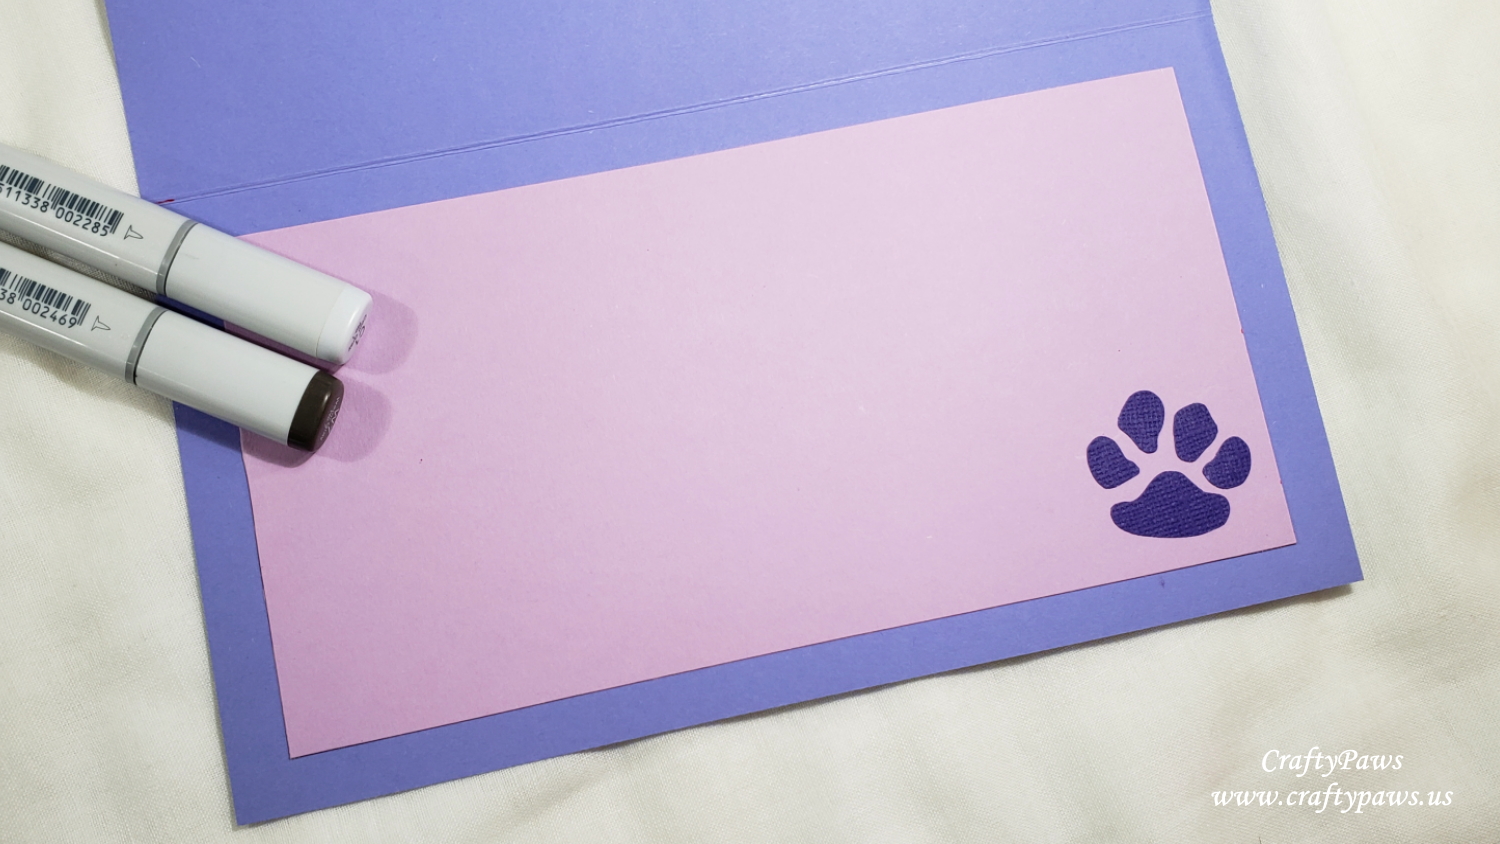 For the inside card liner, I used the remainder of the lavender card stock sheet. And for a little interest, I also used an old Fiskars Furry Friends Paw Squeeze Punch with a bit of the deep purple card stock for an accent paw print inside the card.
CLICK on the picture below to watch the card making video:

Disclosure: Many of the supplies I’ve used for today’s project are linked. Some may be affiliate links, which means if you make a purchase I receive a small commission at no extra cost to you. I truly appreciate your support toward the costs of running this blog!
This card is being entered into the following challenges:
Creatalicious Anything Goes with Optional Use Green Challenge
Word Art Wednesday Anything Goes Challenge
Through the Craft Room Door Anything Goes Challenge
Crafts Galore Encore Anything Goes Challenge
Stamping Sensations Monochromatic Challenge – purples
]]>
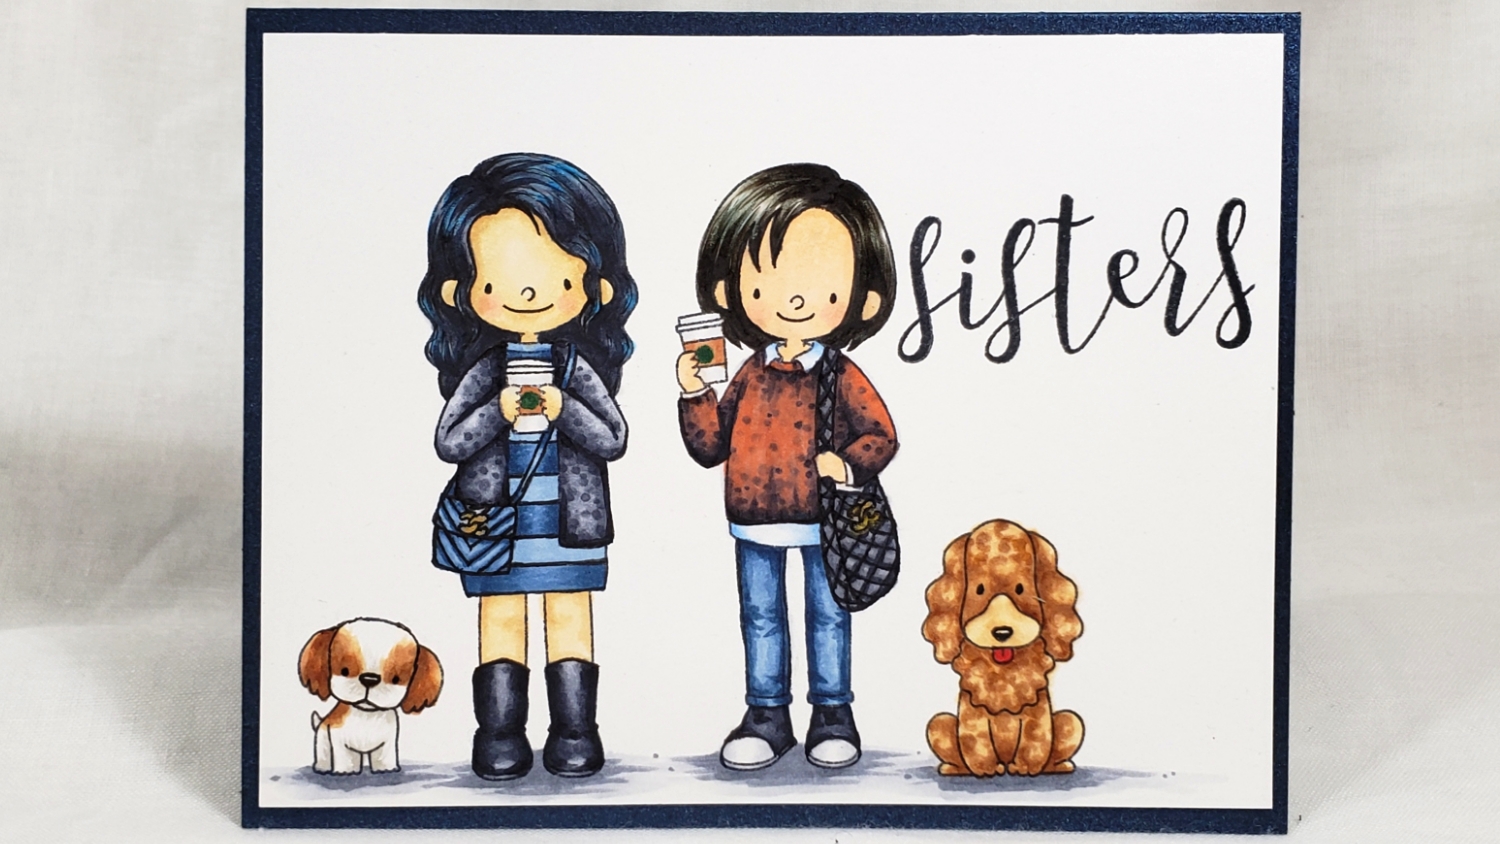
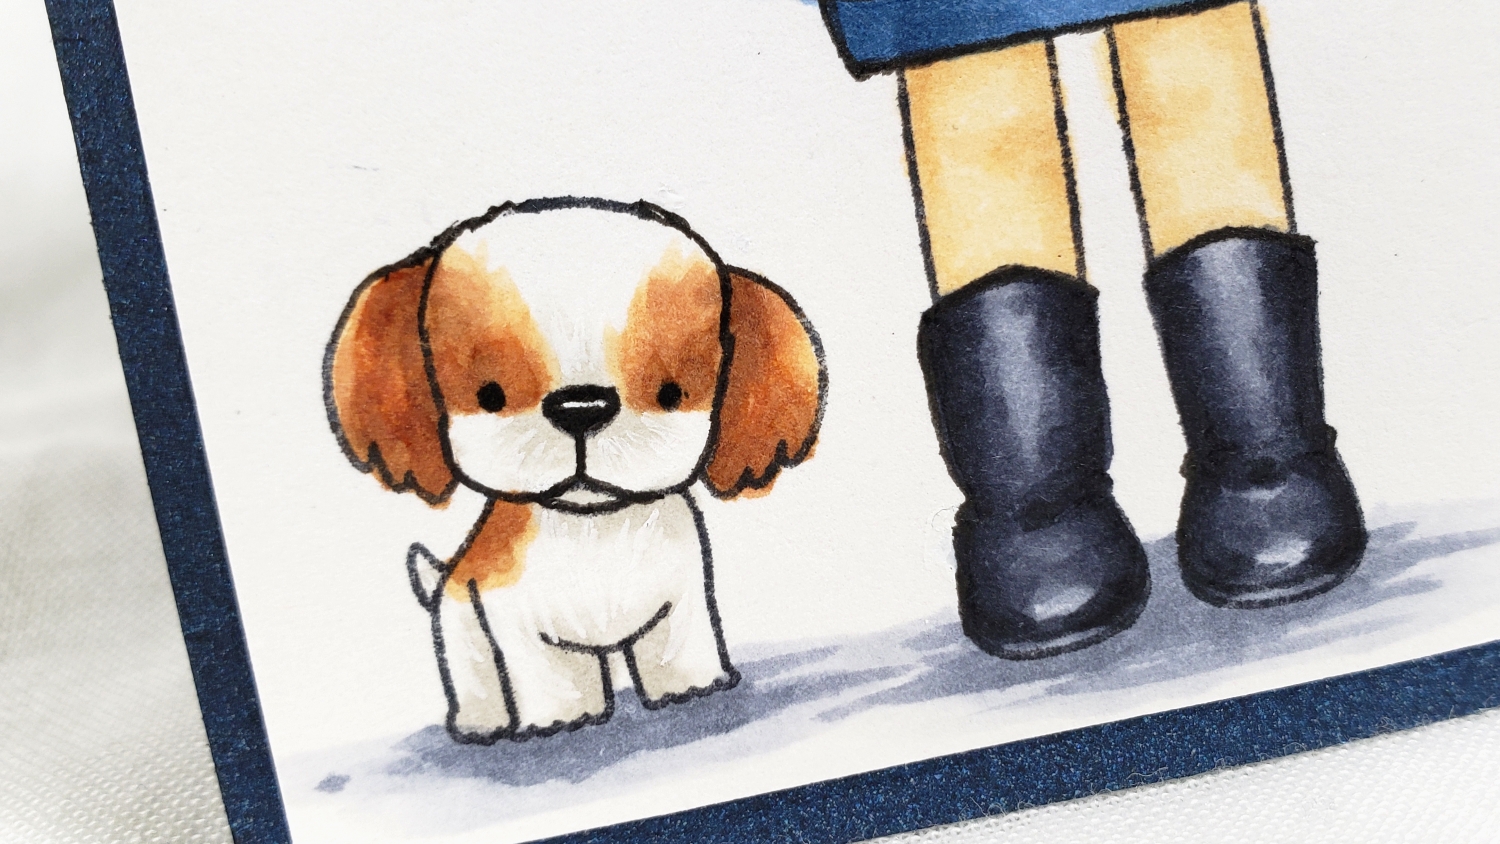
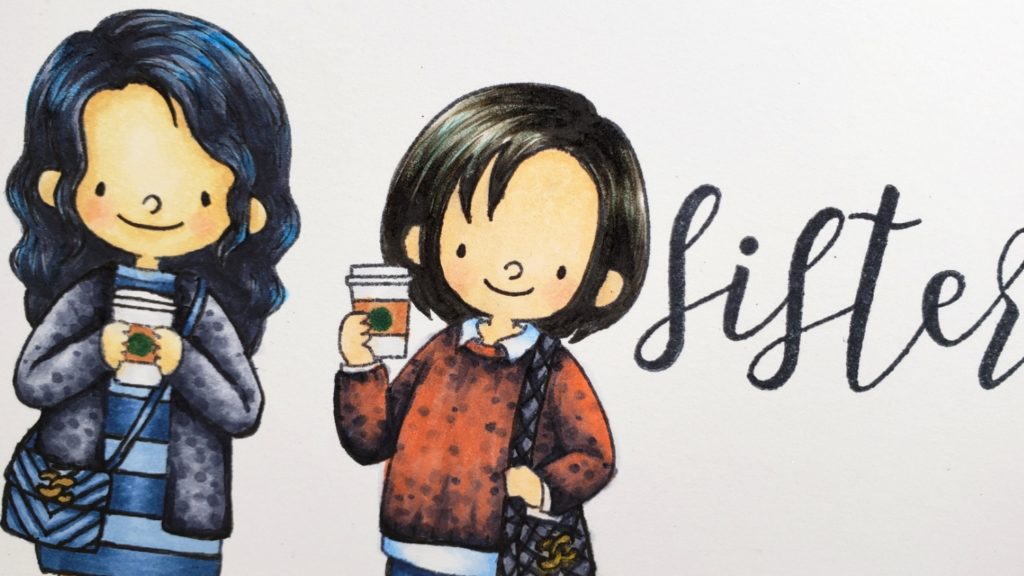
I used the following Copics to color this little scene of me and my sister and our fur babies:
Bandito (my spotted Havanese): W0, E50, E53, E13 with Sakura White Gelly Roll Pen fluffy fur details
Boomer (my sister’s fluffy mini apricot poodle): E21, E33, E23 with R27 tongue
Coffee cups: C0, C1, E13 and G29
Ground shadows: C2 and C4
Short haired girl (my sister): Skin: E000, E00, R20; Hair: B01, W3, W5, W7; Jeans: B91, B93, B95, B99; Shirt: B32, 0; Sweater: C2, C4, C6, C8, R05; Purse (with quilting and CC doodled in with a Copic Multiliner 0.03 pt Pen): C2, C4, C6, C8 and the CC logo with a Sakura Metallic Glittery Gold Gelly Roll Pen
Long haired girl (me): Skin: E50, E53, R20, Hair: B02, C4, C6, C8; Cardigan sweater and boots: C1, C2, C4, C6, C8; Purse (with chevron and CC doodled in with a Copic Multiliner 0.03 pt Pen) and striped dress: B91, B93, B95, B97, B99 and the CC logo with a Sakura Metallic Glittery Gold Gelly Roll Pen
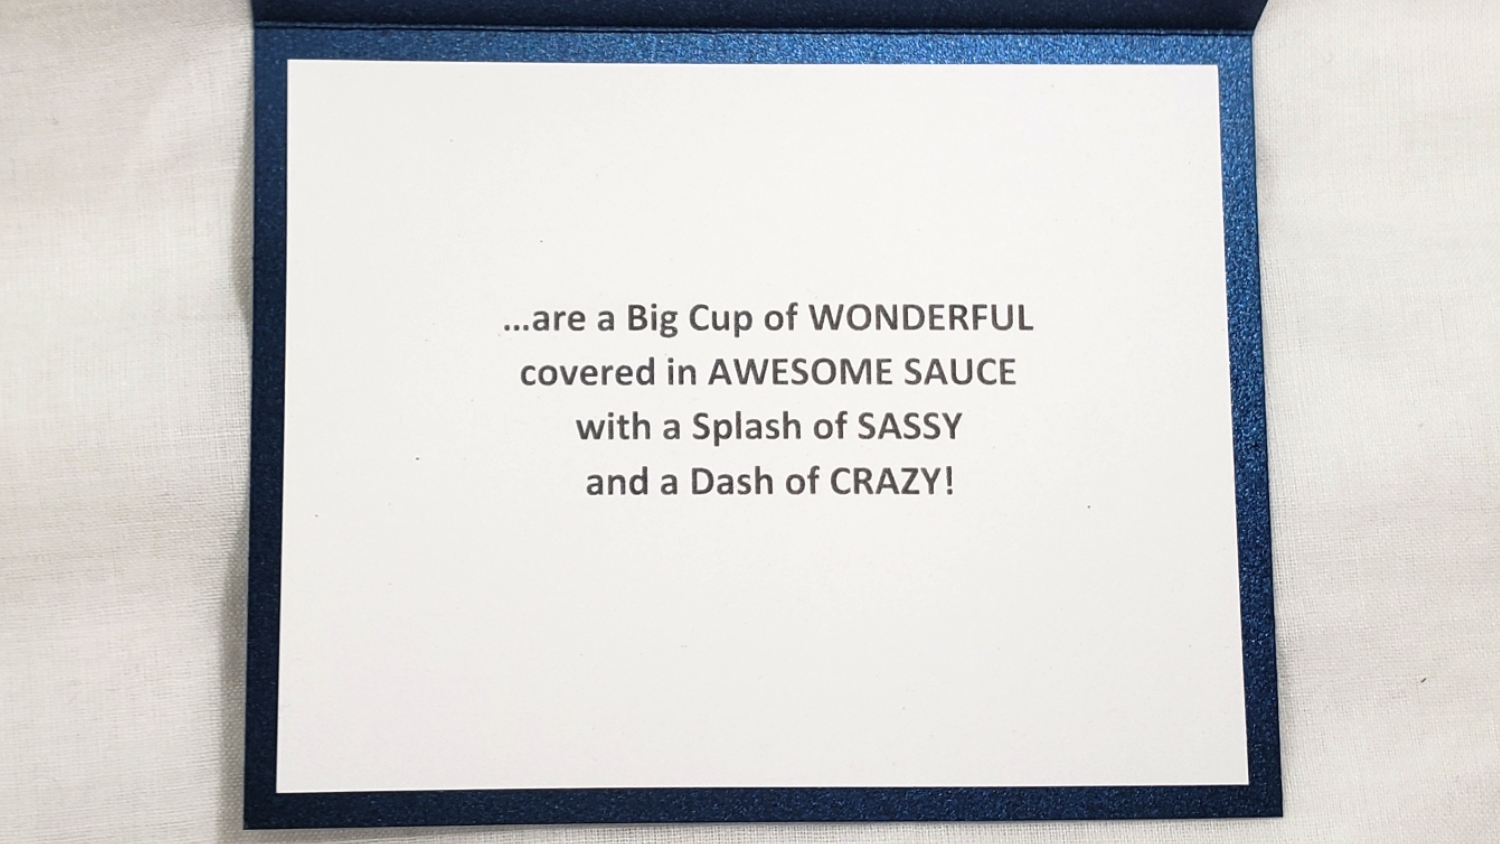
Then I used the Concord & 9th “Sophisticated Script Stamp Set” to stamp out the word “sisters” (using a stamping tool is critical for this step so that repeated stamping and exact positioning is possible). For the inside liner, I printed from my computer, the following: “…are a Big Cup of WONDERFUL covered in AWESOME SAUCE with a Splash of SASSY and a Dash of CRAZY!”
CLICK on the following picture to watch the stamping, doodling (stamp altering), and Copic coloring of the hair and fur:
Disclosure: Many of the supplies I’ve used for today’s project are linked. Some may be affiliate links, which means if you make a purchase I receive a small commission at no extra cost to you. I truly appreciate your support toward the costs of running this blog!
This card is being entered into the following challenges:
Crafting By Design Anything Goes Challenge
Through the Craft Room Door Anything Goes Challenge
Crafts Galore Encore Anything Goes Challenge
Crafter’s Castle Anything Goes with Optional Use Glitter Challenge
Simon Says Stamp Wednesday Scene Challenge
Word Art Wednesday Anything Goes Challenge
Creatalicious Anything Goes with Optional CAS Challenge
Addicted to CAS Fluffy Challenge
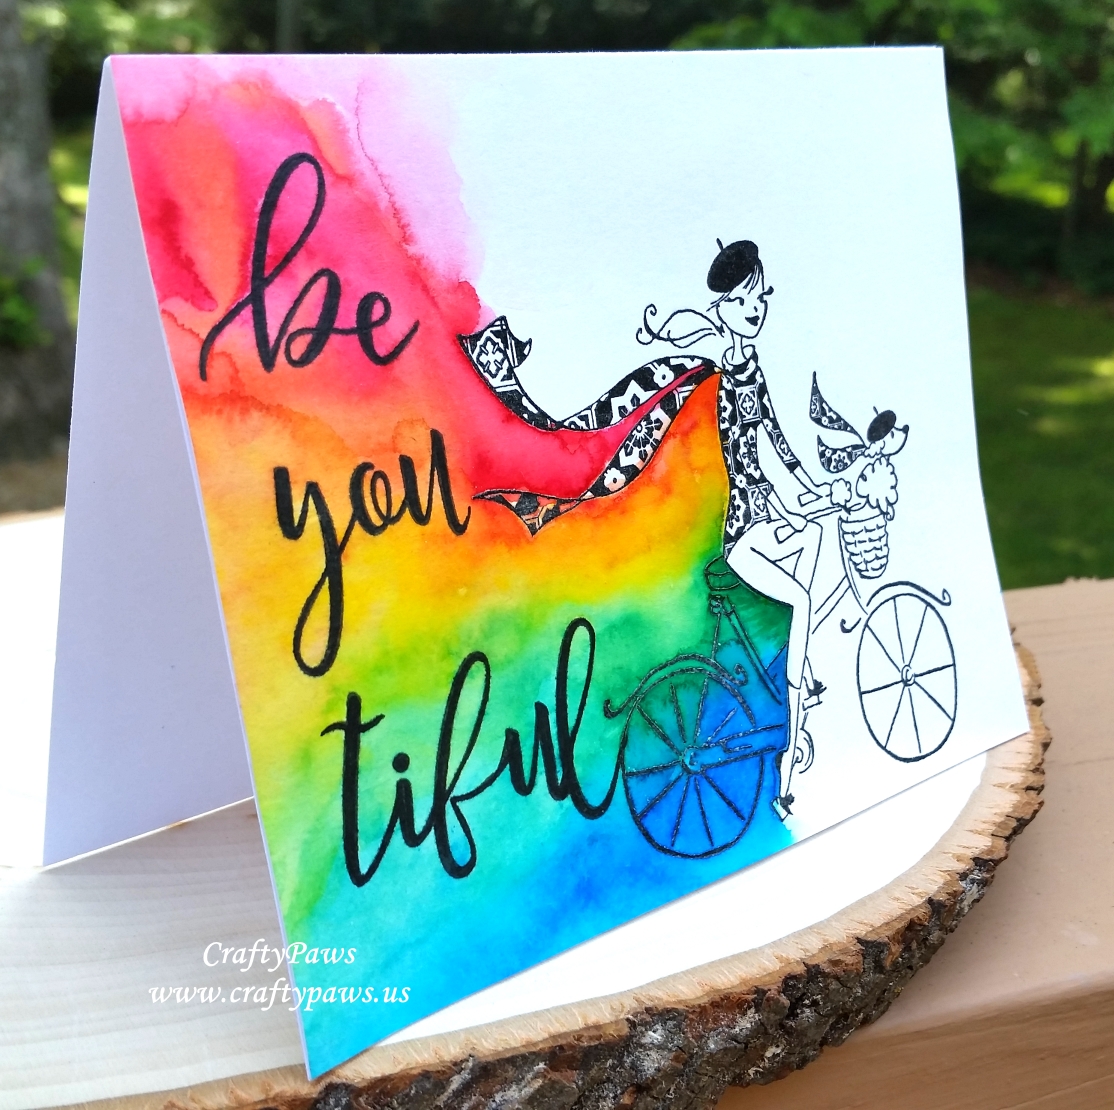 I stamped the Penny Black Fluffy Passenger Stamp with Momento Tuxedo Black Luxe Ink on Strathmore Bristol Paper and heat embossed it with clear embossing powder, positioning it about 2/3 of the way toward the right side of the A2 (5.5″ x 4.25″) top folding horizontal card. I wanted this positioning not only to follow the rule of thirds, but also to give me room to stamp out the focal point sentiment behind the girl and her poodle.
I used the Concord & 9th Sophisticated Script Stamp Set to stamp out the sentiment: “be you tiful” with VersaFine Black Onyx Ink, and I let that gorgeous script be the highlight of the card by watercoloring a rainbow around it with Ken Oliver Brights Color Bursts: Alizarin Crimson, Orange, Lemon Yellow, Pthalo Green and Ultramarine Blue. It took 3 applications of color to get the intensity that I wanted. To get into the nooks and crannies especially right up against the back side of the embossed girl image (the raised embossing seemed to repel some of the watercolored pigments), I also went in with some Copic colors in R35, YR04, G09 and B06. Lastly, to intensify the black of the script sentiment, I also traced over it with a black Momento Tuxedo Black Marker. I love the crisp, graphic look.
It’s a really simple card, but one that I spent a lot of time stamping and designing to make it “just right.” LOL The following is a process video of stamping out the script sentiment and watercoloring the rainbow (The DIY stamp shammy that I used in the video is available HERE):
This card is being entered into the following challenges:
Simon Says Stamp Wednesday Anything Goes Challenge
Word Art Wednesday Anything Goes Challenge
Addicted to CAS Rainbow Challenge
Where Creativity Meets C9 One Layer Challenge – WINNER
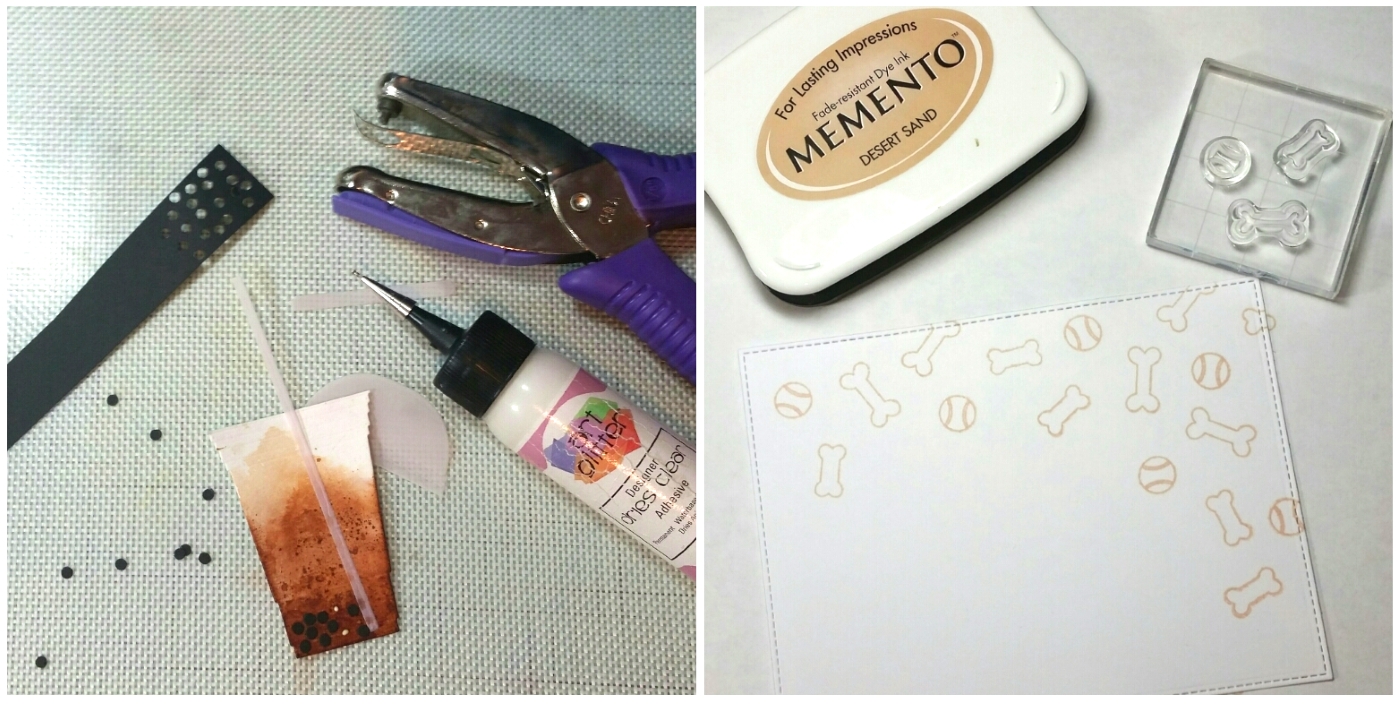
Two of her favorite things are mocha bubble tea (an ice tea with tapioca pearls) and her miniature apricot poodle, Boomer, so I thought I would combine the two in a totally personalized card. I started with a kraft card stock card base. Then for the first background layer, I created my own patterned paper using the small bone and tennis ball stamps from the MFT “You Make My Tail Wag” and “Lucky Dog” stamp sets with Momento Desert Sand ink. I cut that layer out with the large stitched rectangle die from the Die-namics Blueprints 15 Die Set.
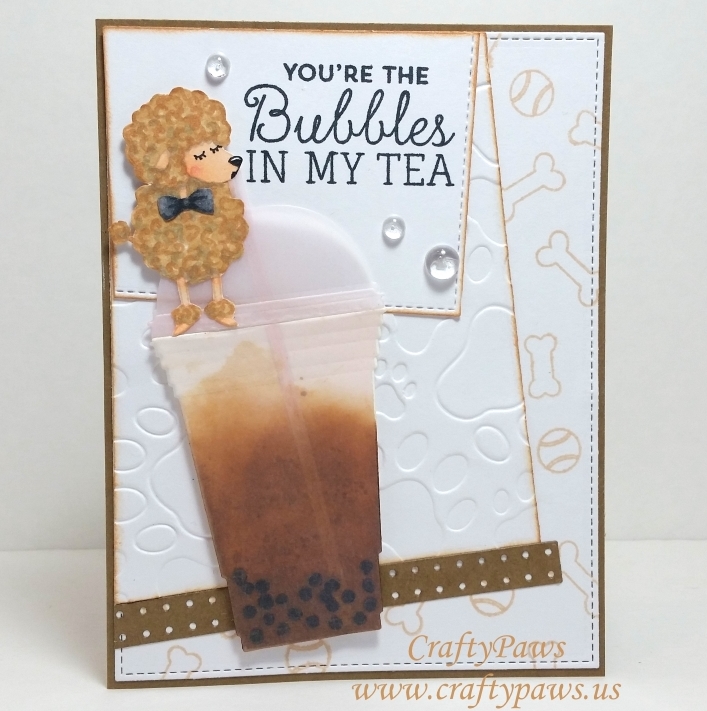 For the next layer, I ran a piece of white card stock through my Big Shot with a Darice paw print embossing folder then cut it down with the largest wonky rectangle die also from Die-Namics Blueprints 15 Die Set. I inked the edges with Tim Holtz Distress Ink in Tea Dye to add a finished look to the edges while maintaining the monochromatic color scheme. For the top layer with the sentiment, I couldn’t use the smaller wonky rectangle from Die-namics Blueprints 15 Die Set because I needed more room to fit the sentiment I wanted to use so I came up with a “work around.” I used the third largest die from the Die-namics Stitched Rectangle STAX Die Set and trimmed off two of the sides to create my own wonky rectangle! YAY for MacGyver crafty moments! The sentiment, which is from the MFT Stay Cool Stamp Set is stamped with Versafine Onyx Black ink.
For the focal point of the card, I die cut the cup from the Die-namics Cool Cup Die Set using 140 lb Strathmore watercolor paper and watercolored several layers of Tim Holtz Distress Ink in Tea Dye and Vintage Photo to create the look of a frosty cold mocha ice tea. With a little patience (to wait for layers of the watercoloring to dry between coats) and a little spraying with water to allow the ink to move naturally, the bubble tea came out looking quite realistic. I also cut out four of the dies from Cool Cup Die Set with vellum so that I could mimic the translucent look of disposable ice tea cups. Then to create the tapioca pearl bubbles I used a 1/8″ McGill hole punch to punch out a bunch of tiny black card stock circles. When I sandwiched them between the watercolored cup and the vellum cup and glued them into place with liquid glue, they looked very much like tapioca bubble tea pearls.
Lastly, I knew I had to add the poodle from the MFT “Lucky Dog” stamp set to represent my niece’s dog, Boomer. Because the stamp image has a pearl necklace, I decided to use no line coloring (rather than masked stamping) to hide the pearls with Copic coloring. I used Momento Desert Sand ink and then the following Copic colors to color up the poodle along with the bow tie from the same stamp set: E00, 01, 31, 33, 53 (skin and curly fur); R20 (blush); W3 and 5 (shadows); and N4, 5 and 7 (bow tie). Then I carefully fussy cut him out and layered him on top of the ice tea cup, snipping off and moving his tail to the other side of his body (so that it wouldn’t conflict with the straw) and tucking the vellum straw over the top part of his torso and back down behind his mouth so that it would look like he was drinking the bubble tea. I also doodled a little mouth with a Copic multiliner pen and hid the stamp image’s mouth with a little blush coloring. Both the bubble tea and the poodle are popped up on double sided foam adhesive to add extra dimension. The final finishing touches were three Pretty Pink Posh clear droplets in 4 mm and 6 mm sizes that I adhered with Glossy Accents to add a little blingy sparkle (I also think they coordinate nicely with the sentiment about bubbles).
I know it’s a crazy scene card, but I also know my niece will love it because it was made 100% just for her. I love that as crafters we can create anything we can dream up. We are only limited by our own imaginations. 🙂
The following is a video share of this card:
This card is being entered into the following challenges:
MFT Superstar Card Design Contest
Simon Says Stamp Wednesday Clean And Simple Challenge
MarkerPOP Watercolors Challenge
Word Art Wednesday Anything Goes Challenge
CAS-ual Fridays Dimension and Bling Challenge
Card Mania Earth Tones Challenge
Addicted to Stamps Anything Goes Challenge
Creatalicious Anything Goes Challenge
Craft Your Passion Anything Goes Challenge
Crafts Galore Encore Anything Goes Challenge
]]>
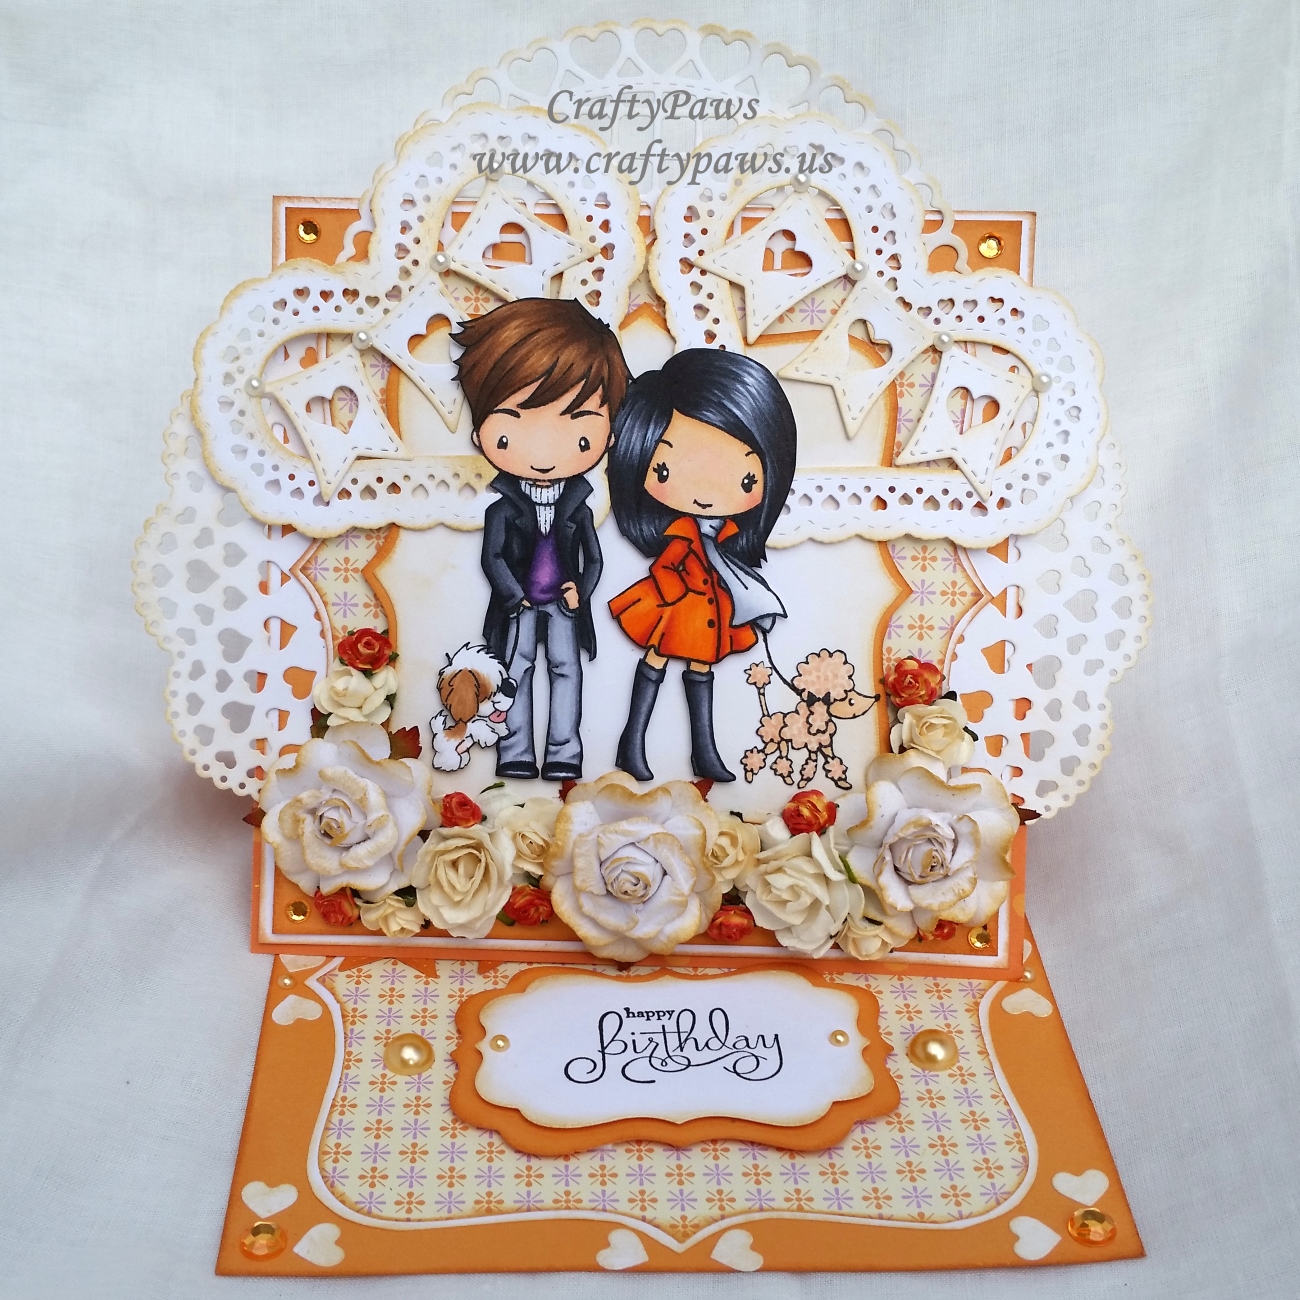 As my GIL loves to display the handmade cards I have sent to her, I decided this time I would make an easel card. To create the structure for that card base, I used the Diemond Dies Labels 2 Top Note Nesting Die Set and the Labels 1 Nesting Die Set for the Prop/Stopper. For the white card stock layers I inked the edges with Delicata Golden Glitz pigment ink and for the orange and purple patterned paper and orange card stock layers I inked the edges with Tim Holtz Distress Ink in Tea Dye.
Because she also likes very detailed things, I also thought I should try my hand at making my very first very layered and detailed card with lots of intricate dies. I used the La-La Land Open Hearts Doily, La-La Land Crafts Heart Banner Die, La-La Land Crafts Heart Doily Border Die
, and La-La Land Crafts Heart Doily Die
(yes, there are a lot of hearts to show how much we love her!). I inked all the edges of these white card stock die cuts with Delicata Golden Glitz pigment ink to highlight all the details.
Lastly, I poured through my stamp collection and came up with three stamp sets that I could use together to represent my hubby, our two dogs, and me. This would be like an animated family portrait card. LOL I used the boy and girl from “Together Anywhere” by The Greeting Farm to represent my hubby and me, coloring them up with these autumnal/Halloween (black, orange and purple) Copic colors:
 Hubby: Skin: E000, E00, E11, R30; Hair: E35, 37, 57, 59; Pants, C1, 3, 5; Sweater Vest: V12, 15, 17, 09; Jacket: C3, 5, 7, 9; Turtleneck sweater: C1 + Copic multiliner in 0.1 pt
Me: Skin: E000, E50, E51, E53, R20; Hair: C5, C7, C9, C10, B32; Boots: C3, 5, 7, 9 + 100; Coat: YR00, YR04, YR07, R08; Scarf: C1, 3, 5 + Blender
For Biscuit, I used the poodle from the Penny Black “Mimi in Paris” stamp set and colored her up with: E51, 21, 11, and 93
For Bandito, I used the little scruffy pup from “Wanderlust” by A Random Fan and colored him up as follows: Belly: E93; Tongue R83; Brown areas: E31, 33, 35; White areas: W1 + Blender; and Nose: C10
I also drew in leashes for the pups with a Copic Multiliner pen.
Then it was just a matter of putting all the layers and pieces together in a pleasing way, which to me is often achieved with symmetry. That’s my OCD coming out–LOL. The following video illustrates the process of assembling all these pieces with mulberry paper flowers, flat back pearls, and bling:
This card is being entered into the following challenges:
One Sweet Challenge Fall Colors
Farm Fresh Challenge: Black, Orange & Purple
Addicted to Stamps and More Make Your Mark Challenge
Crafts Galore Encore Make a Card Challenge
Through the Craft Room Door Anything Goes Challenge
The Daily Marker 30 Day Coloring Challenge
Simon Says Stamp Work It Wednesday STAMPtember Challenge
I created the background by running some white card stock through a Darice paw print embossing folder and then had some fun blending out a little rainbow with the following Tim Holtz Distress Ink colors: Barn Door, Mustard Seed, Mowed Lawn, Salty Ocean, and Seedless Preserves. Blending in those ink colors really brought out the embossed paw prints beautifully. I also inked the edges of the ATC with Black Soot, which I think finishes off the base and also helps the other colors pop.
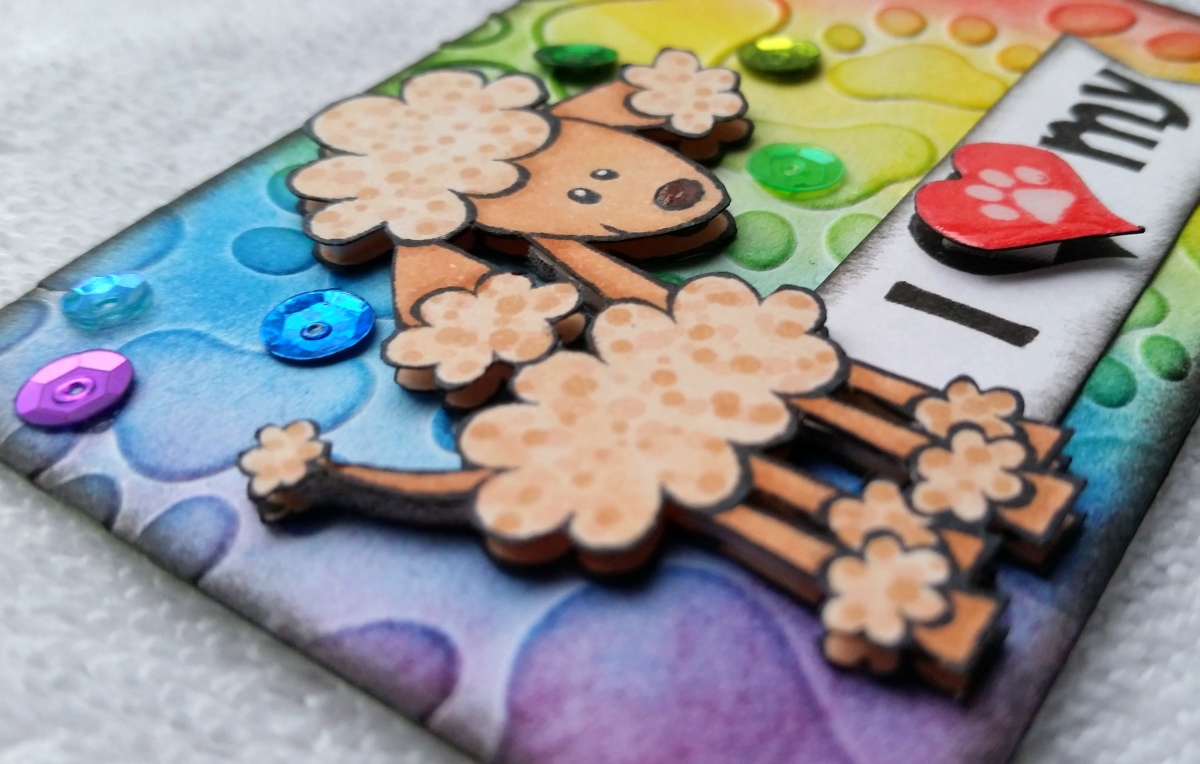 Then I took the poodle from the Recollections “Woof Woof” stamp set and stamped it out twice with Momento Tuxedo Black Ink. The acrylic stamps did not take the ink as well as I’d like, but I didn’t take the time to prep the surface (sanding the stamp with fine grit sand paper or an emery board) so I ended up cleaning up the image with a Copic Multiliner pen in 0.3 pt.
I colored up the poodle with Copic colors in E21, 11 and 33 with a little 29 for the nose. On the shaved parts of the poodle I blended the colors and on the fluffy parts of the poodle I used a dot coloring technique to give the illusion of cartoony curly hair.
I fussy cut out both poodles and stacked them on top of one another using foam adhesive. I used craft scissors to cut down the foam tape into very thin strips so that I could fully support those skinny legs and tail. I stamped out the “I {heart} my” sentiment from the same stamp set using VersaFine black ink (which I think helps with the clarity of sentiments better than Momento Ink) and also stamped out the heart with Ranger Adirondack Pigment Ink in Watermelon. I cut the sentiment out into a banner and inked the edges with more Black Soot. I fussy cut out the red heart and popped that up on foam adhesive over the black sentiment heart. To add a little shine and sparkle, I added Glossy Accents to the red heart and some rainbow colored sequins to the background.
The video share of this ATC is combined with the video in yesterday’s post of the Cheshire Bean card.
This ATC is being entered into the following challenges:
Simon Says Stamp We’re Going Dotty Wednesday Challenge
The Pink Elephant Anything Goes Challenge
Through The Craft Room Door Anything Goes Challenge
MarkerPOP Anything Goes Challenge
Challenge Up Your Life Sequins Challenge
Card Mania Anything Goes Challenge
Thanks for stopping by and I hope you’re having a wonderful crafty day! WOOF
]]>
I started with a red card stock base and used some black card stock for the top film strip layer — just like Sandy 🙂 Then I wondered what little images I could pop into some of the frames. What better than stamped puppy images? Well, for me, nothing’s better. LOL I stamped out the little poodle from the Penny Black “Mimi in Paris” stamp set and the little dog from the Tiddly Inks “I Wuf You” stamp set. I colored them up with the following Copic Markers: Poodle: E02, 31, and 33; and Brown and white dog: W1, E23 adn E25.
I fussy cut out the pups and positioned them, just so, between the frames. I left room between the dogs so I could add little punched out red hearts, which I made shiny with Ranger Inkssentials Glossy Accents. Remember, you can’t use glitter on OWH cards so no sparkle allowed. LOL
For the sentiment, I hand wrote “i wuf you” with a White Sakura Gelly Roll Medium Point Gel Pen. The lower part of the black card stock layer was looking a little plain to me, so I searched through my washi tape collection and found a thin black and white one of a film strip (sorry I don’t know the brand) and a red, black and white terrier one made by Craft Essentials. I felt like this card was just meant to be. Don’t you love it when that happens?
With very little coloring and fussy cutting, this card was pretty quick to make. With the flexibility of adding all sorts of different images in the film strip frames (I’m going to do one with the cutie patootie kids from the Mama Elephant “In My Heart” stamp set next), different versions would be easy too. I see a lot of these cards in my future for my next OWH batch of cards!
This card is being entered into the Operation Write Home Red Friday Blog Hop Challenge

and the Tiddly Inks Gratitude and Joyfulness Challenge
Thanks for stopping by, and have a great day! WOOF
]]>
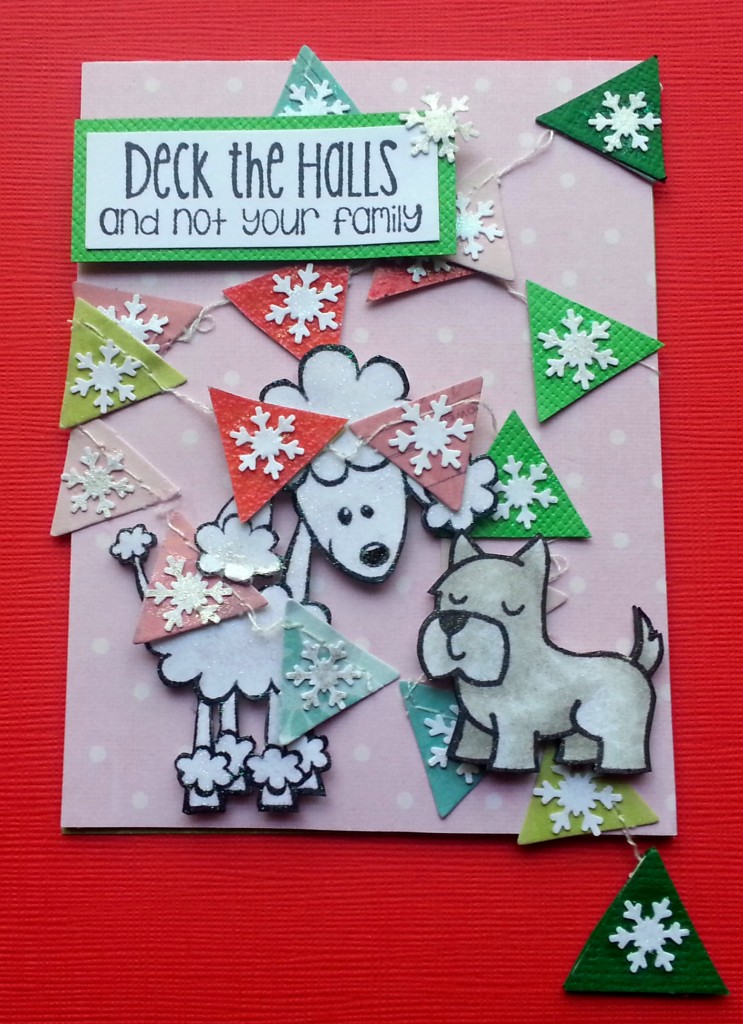 This led me to think about making a card with this sentiment using some doggy stamps (since I consider my dogs family members). 🙂 As the person who is receiving this card loves Lawn Fawn, I knew I had to include a dog from their “Critters in the Dog Park” set. However, when I added him to the card, he seemed too small. So I decided to add a larger poodle from the Recollections “Woof Woof” set. In my mind, the Scottie has been a little mischievous and decked out his big sister with this holiday banner. *wink*
Now these dogs are not supposed to represent my dogs (although if the terrier had drop ears, I could have colored him like Bandito). In fact, because I wanted to keep the color story very tight on this card (I only used shades of pink, green, red and white), these dogs stayed white (one a little dirtier with a little Copic W1–LOL). I fussy cut each of the dogs out twice and layered them up with some foam adhesive to add some interest and dimension. HINT: When doing this kind of layering, I think it is important to take the time to edge the fussy cut images out with black marker so the white edges of the paper don’t show. This gives a much more finished look. I use an SB width Faber-Castell PITT artist pen, but I know some folks even use a black Sharpie.
To create the Christmas banner decor, I used the Dear Lizzy 5th and Frolic Flutterbys. However, because these ready made pennants were in the typical sorbet colors of that collection, I had to hand cut small triangles in red and green to maintain the Christmas-y feel of the card and the tight color palette. I also used my Martha Stewart snowflake border punch to punch out some snowflakes that I could adhere to each pennant. All this took a lot of detail work but the final results seem worth it. I coated each of the snowflakes, the Poodle, and the Scottie dog, with Folk Art Extreme Glitter acrylic paint in hologram to get a very sparkly look (this is much more sparkly than Wink of Stella). I left the last pennant (which I decorated on both sides) dangling off the bottom edge of the card for a little added whimsy and some movement.
The following is a video share of this card:
This card is also being entered into the following challenge:
Raisin Boat Christmas and Holiday Challenge
Naughty or Nice Festive Furballs Challenge in the naughty category
CARDZ TV Color My Christmas Challenge
The Paper Nest Dolls Anything Goes Challenge