I have posted 2 videos about my experiences with the Stamp and Scrapbook Expo. In part 1, I share how I prepare and get organized to attend the Expo (get a sense of the booths map, pick my classes (3 classes gets you a free gift, which this year was a 12″ x 12″ paper pad, and you get free admission any day you have a class; my total this year was $122), go through all the special coupons (especially the early bird (time sensitive) specials), and figure out my schedule/plan for each day. The following is Part I of my experience at the Expo:
The following is Part II of my experience at the Expo, and it details the three classes I took (watercoloring hosted by Art Impressions, flower shaping by Heartfelt Creations, and mixed media by Art Anthology) and the great crafty hauls I got for $121.83:
]]>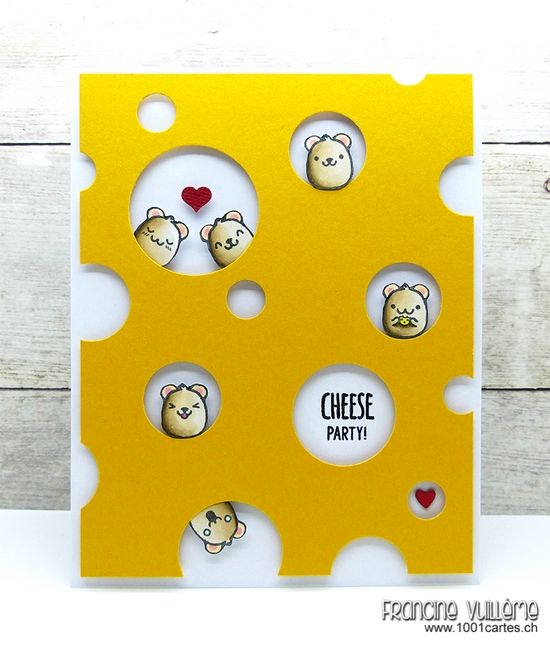 and vets). Ever since I saw this card (photo at right) at Francine Vuilleme’s 1001 Cartes blog HERE, I have been wanting to try my CAS version of it, so I thought this would be the perfect chance to get my holiday crafting on!
I used three of circle dies from the Diemond Dies Die-Normous Stack-Ems Circle Nesting Die Set and randomly cut out three circles from yellow card stock. I inked the edges of the card front as well as the die cut holes with Tim Holtz Distress Ink in Wild Honey. Note: my readers can get 10% off and free worldwide shipping at Diemond Dies on all orders of $35 or more by using the coupon code: thankskristina at check out.
Then I got out the adorable Lawn Fawn Merry Christmouse for Simon Says Stamp exclusive holiday stamp set from last year (I LOVE this set!) and picked out three of the mice and the swiss cheese Christmas tree and colored them up with the following Copic colors:
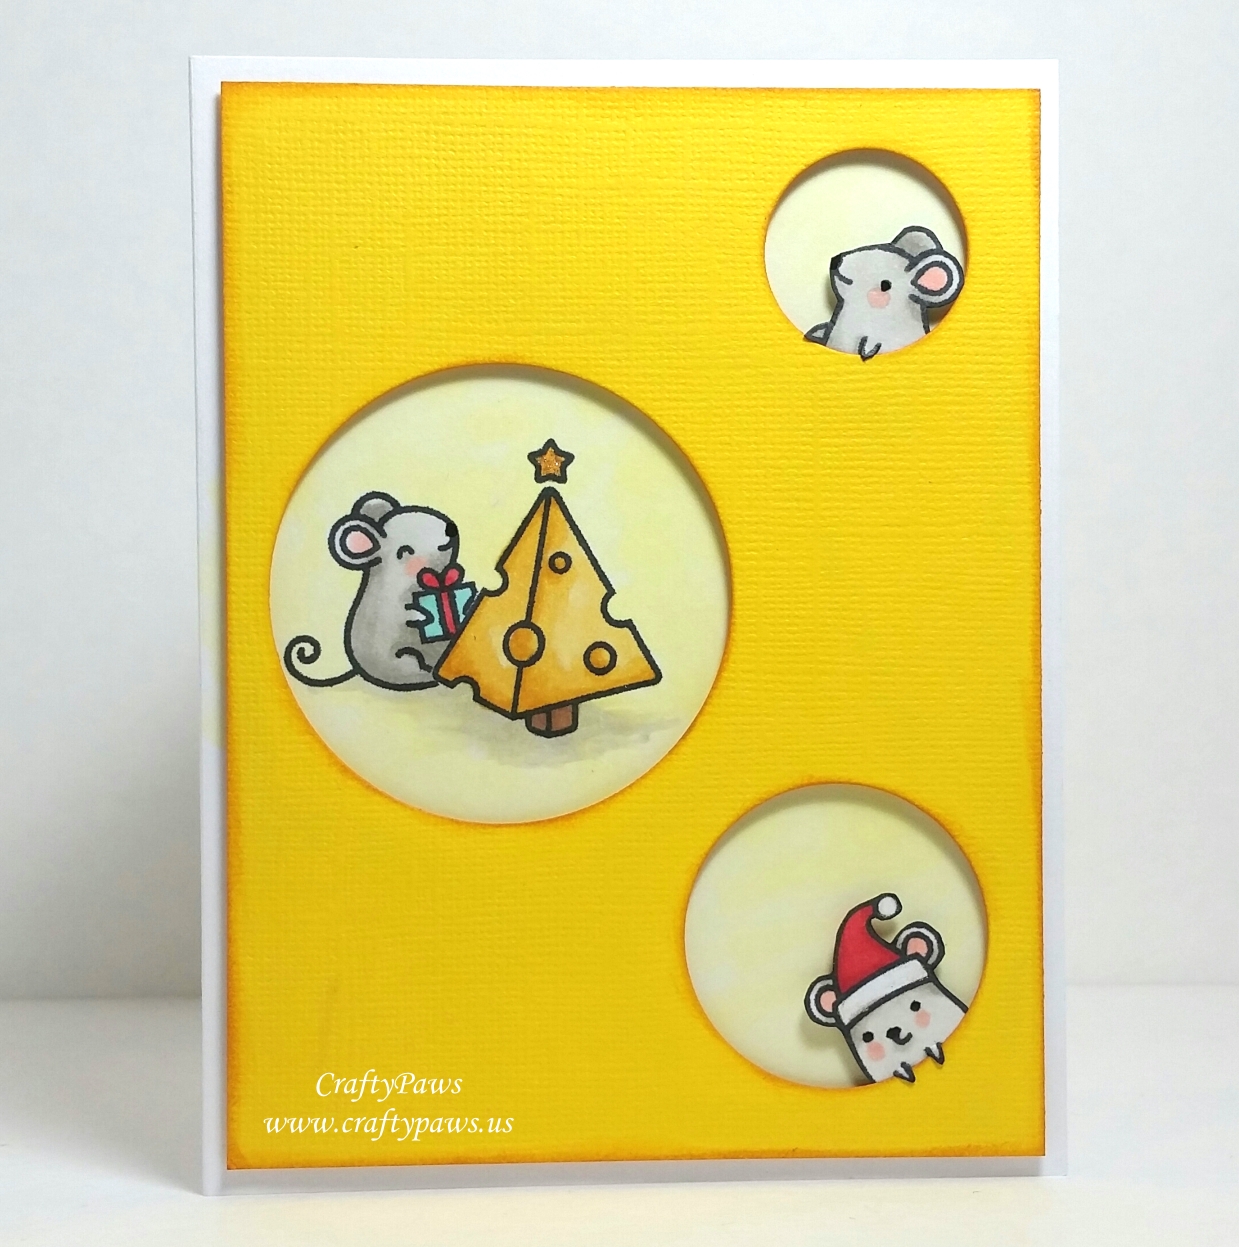 Mice: W0, 1, 3 and R20 for inside ears and blush
Hat and present ribbon: R35 and 37 with clear Wink of Stella for the white trim of the hat
Present: BG32 (red and this aqua is my favorite holiday color combo)
Cheesy Christmas tree: Y21, YR24, E24, E25, and Y38
I stamped the tree and the mouse with the present in the area where the larges hole would be directly onto the card base. I stamped and fussy cut out the other two mice so that they could pop up out of the other two holes, with their little front paws cut with an X-Acto blade so that the paws could hand over the die cut hole edges. I also colored the backgrounds of the card base areas that would show through the die cut holes of the card front with Y00.
For the inside of the card, I stamped out the “Merry Christmouse” sentiment from the stamp set, and stamped out and colored up another little mouse with Santa hat. The Copic ink had bled through the card front onto the inside of the card, so I covered that up with a sunny colored paper scrap from my scrap box. Then to use up the circle die cuts from the card front and to add a little visual interest and energy to the inside of the card, I adhered those randomly to the inside of the card as well (an extra circle went on the back of the card to cover up the ink bleeding of the little inside mouse to the back of the card base).
The following is a process video sharing how I made this card:
This card is being entered into the following challenges:
Crafty Gals Corner CASE-It Challenge
Word Art Wednesday Anything Goes Challenge
Craft Your Passion Anything Goes Challenge
Just Keep On Creating Anything Goes Challenge
Not Just Cards Anything Goes Challenge
Addicted to Stamping Photo Inspiration Challenge – inspired by the orange and yellow and large round moon

613 Avenue Create Anything Goes Challenge
]]>
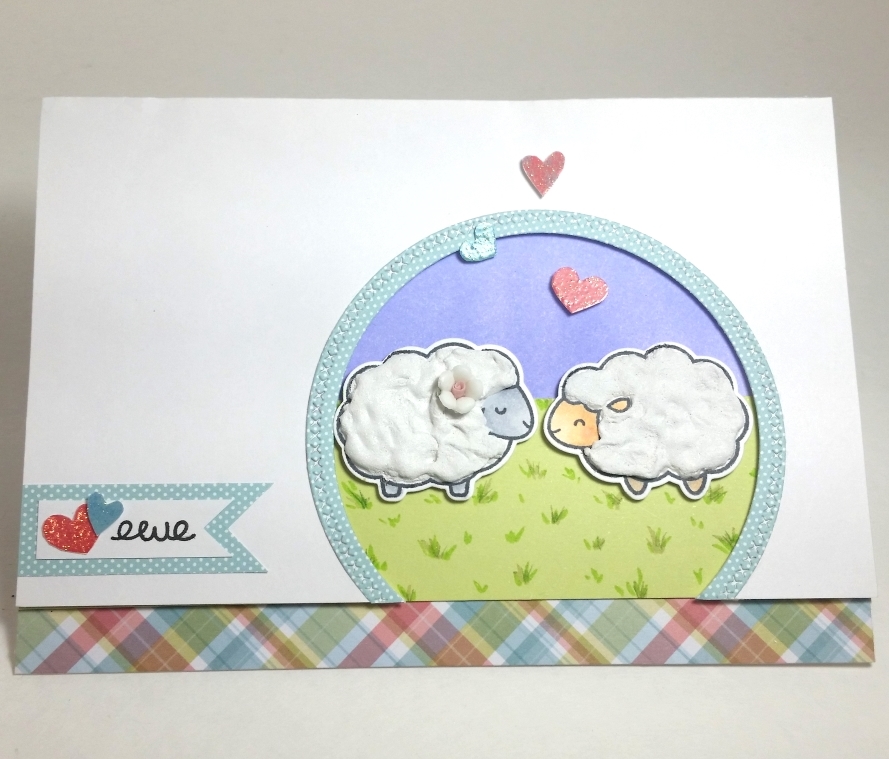 I stamped out the sheep with MFT black licorice hybrid ink because I wasn’t sure what coloring medium I would use and I have had the best luck with this ink working with everything from alcohol markers to water colors. Ultimately I Copic colored the ram and the ewe to make one look dark (C0, 1, and 2) and the other look fair (E50, 51 and 53 with R20 blush). I used the coordinating dies to cut them out (I don’t often buy coordinating dies but I splurged on this set because there are so many small stamps in the set, and I must say I love it!). Somehow, I smeared red marker on the ram’s horn so I covered it up with a small porcelain flower and flipped the genders of the sheep (LOL). Then for some fun woolly texture, I used DecoArt Snow Writer applied thickly with a palette knife all over the bodies of both sheep.
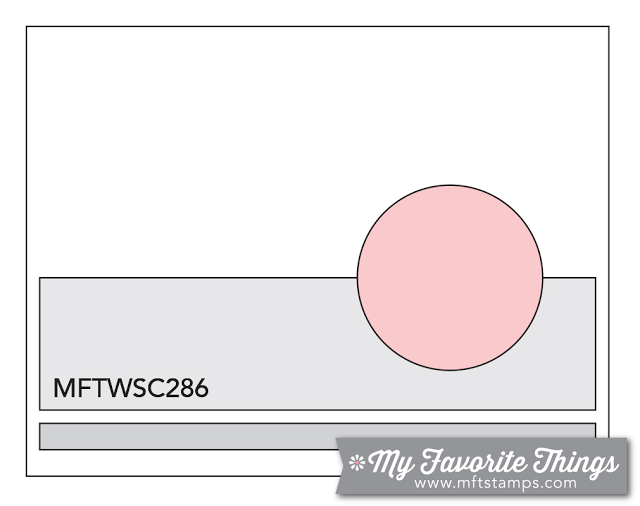
For the design of the card, I followed MFT Card Sketch 286, although I put a little twist on it by not cutting out a circle to layer under the sheep, but, rather, cut out circles to create a kind of frame around them and popped up that framed layer with double sided foam adhesive for some dimension. I also had fun mixing up some different patterned scraps from my scrap box. I used a pale aqua polka dot and created a frame around the circle opening using the second largest die from the 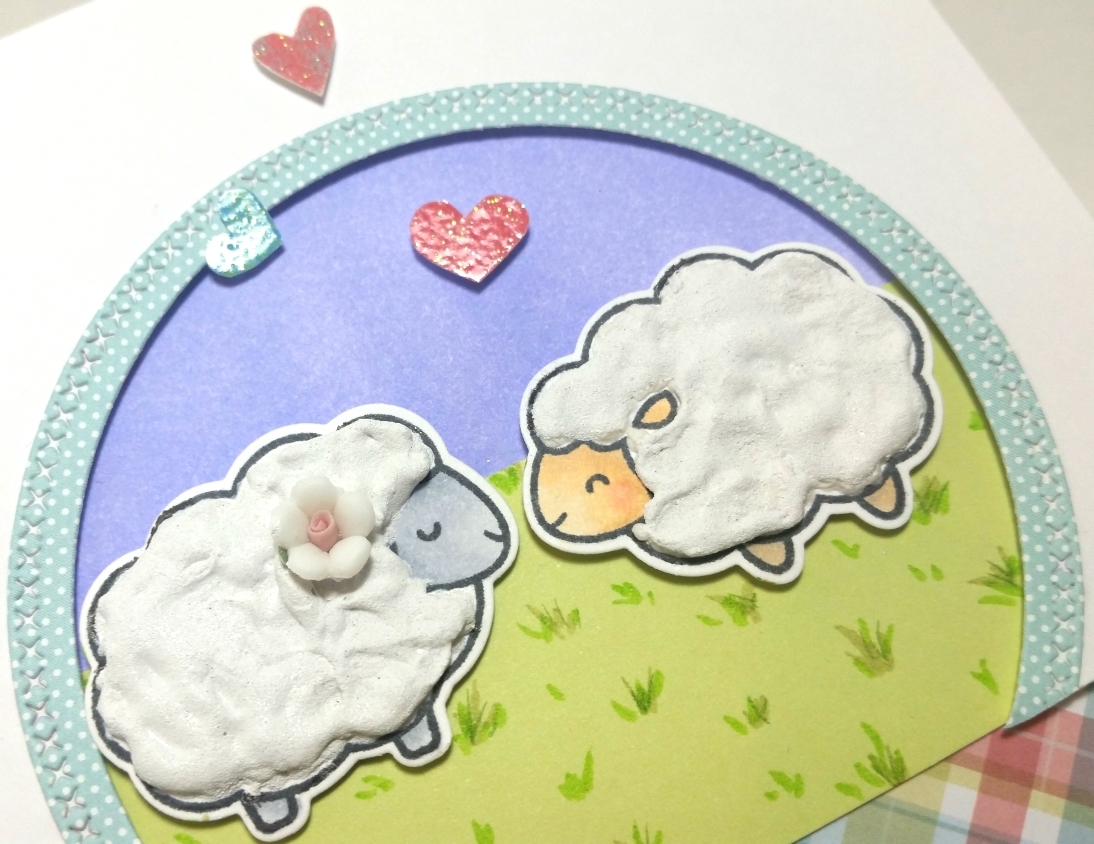 Diemond Dies nesting cross stitched circles die set and the 13th largest circle die from the Diemond Dies Die-Normous Stack-Ems Nesting Circle Die Set. I also used a scrap of a pastel plaid that I thought was a nice grounding for the little meadow scene in the window. The grass is just some pale green card stock with little blades of grass drawn on with Tim Holtz Distress Markers in Shabby Shutters, Twisted Citron, and Mowed Lawn; and the sky is Tim Holtz Distress Ink in Shaded Lilac blended onto the card front.
The “love [heart] ewe” sentiment was created by masking off with washi tape everything except the “ewe” from the “christmas is ewe” sentiment before inking up the “ewe”, removing the washi, and then stamping out the “ewe” onto card stock. I hand cut the banner, leaving enough room to add a couple of fussy cut shimmery hearts. To create a little continuity, I used the remaining scrap of the same polka dot pattered paper to mat the sentiment banner. All the shimmery embossed hearts are hand cut from a scrap of patterned paper from the DCWV Pet Stack that was about 2″ x 3″ that I had hoarded in my scrap box for years.
This card is being entered into the following challenges:
Creatalicious Anything Goes with an Optional Focus on Animals Challenge
Addicted to Stamps and More CAS Challenge
Simon Says Stamp Monday Use Patterned Papers Challenge
Simon Says Stamp Wednesday Add Some Shimmer Challenge
Lil Patch of Crafty Friends Anything Goes Challenge
Word Art Wednesday Anything Goes Challenge
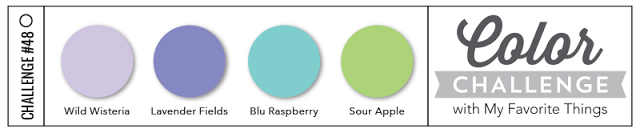
MFT Color Challenge #48
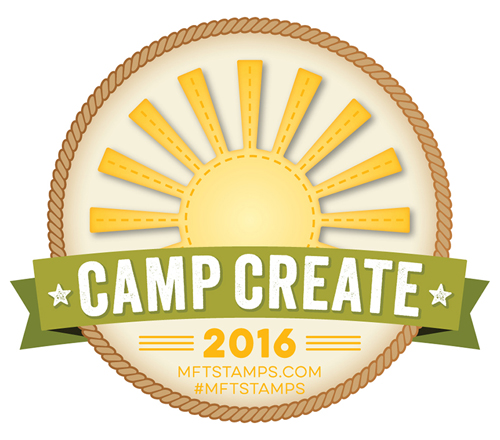
MFT Camp Create – Delightful Die Cutting
I Copic colored (E30, E31, E35 and R20 for blush and inside ears) a couple of the sweet bunnies from the Lawn Fawn “Hello Baby” stamp set. I also used the simple sentiment, “I look up to you,” from the Lawn Fawn “Mom + Me” stamp set. And what really helped get me going was the phenomenally inspiring and versatile My Favorite Things Blueprints 15 die set that I used with a bunch of spring colored paper scraps from my scrap box. I also used a white shimmery heart that I had previously cut out with the La La Land Doily Heart die set as a backdrop to set off the bunnies from the busy patterned papers.
As some finishing touches, I added irridescent clear sequins, dotted them with silver Stickles, and sprinkled some Recollections blue shimmer spray ink on the background.
The following is a video share of this card:
This card is being entered into the following challenges:
Virginia’s View Hello!!! Linky Party

Card Mania Spring Challenge
Word Art Wednesday Anything Goes Challenge
Simon Says Stamp Wednesday Let’s Do the Polka Challenge
MarkerPOP Anything Goes Challenge
Lil Patch of Crafty Friends Anything Goes Challenge
613 Avenue Create Anything Goes Challenge
Craft Your Passion Anything Goes Challenge
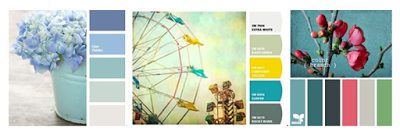
Seven Hills Craft Blog April Color Challenge (middle)
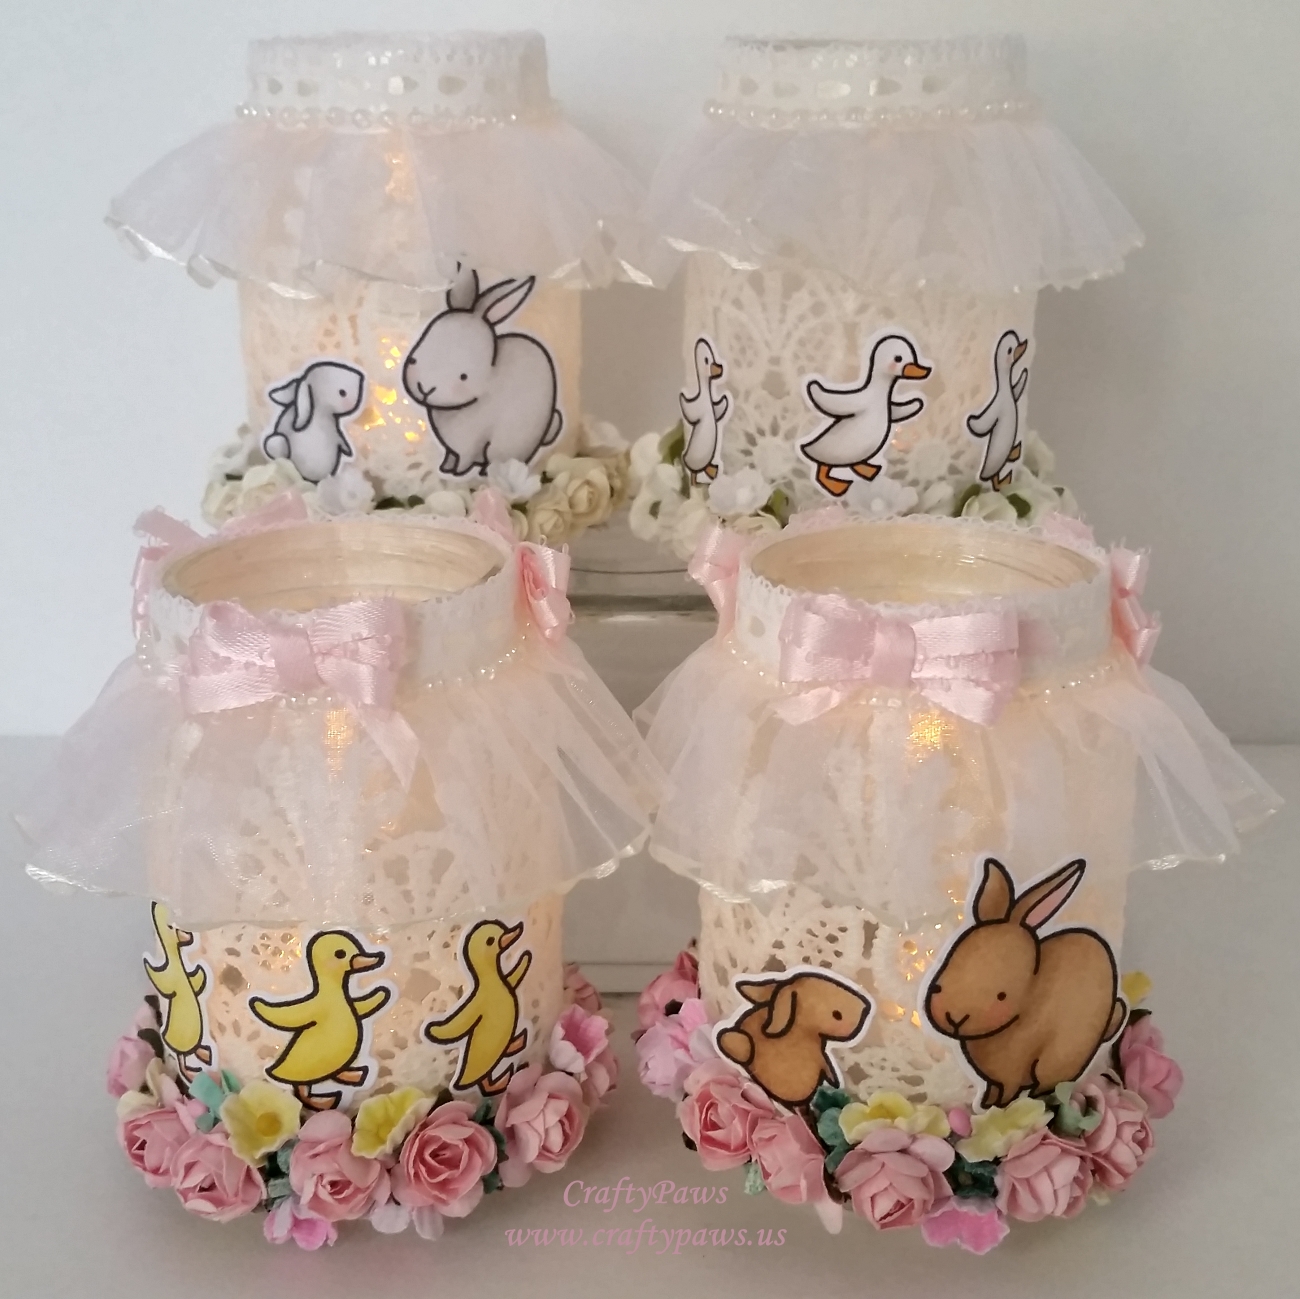 For these upcycled tea light holders, I saturated gorgeous 3″ wide Venice lace in Mod Podge and formed it around the base of each jar. These had to be left overnight but by the next morning, they were stiff and perfectly adhered. For the neck of each jar I used E6000 (for permanence) and hot glue (for quick adhesion) to glue on some satin ribbon with a chiffon box pleat ruffle. To add a little more sparkle, I also added a small pearlescent pearl trim at the base of each neck over the ribbon.
 Then for the cute and cuddly critters, I used the Lawn Fawn “Hello Baby” stamp set and colored up a natural set of bunnies and duckies with the following Copic colors. Bunnies: E30, 31, 35; Duckies: Y11, 13, 15 and YR12 and YR65; R20 (for blush). I also colored up a “white” set of critters with the following Copic colors: W0, 1, 3 with YR 12 (for duck feet) and R30 (for blush). Then I used the coordinating dies to die cut all the critters.
For the “ground” on which all the critters could stand and walk, I hot glued on each jar a bunch of mulberry paper roses and small tulip filler flowers in pinks, yellows and greens for the natural colored set of critters and whites for the white critters. Then to create a balanced look on the jars with the pink flowers, I tied 6 triple loop bows and adhered 3 spaced out around the neck of the 2 jars.
A video share of these tea light holders is below:
These baby food jar upcycled tea light holders are being entered into the following challenges:
Simon Says Stamp Monday Food and/or Drink Challenge
MarkerPOP Critters Challenge
Simon Says Stamp Work It Wednesday Floral Challenge
Simon Says Stamp Wednesday Cute and Cuddly Challenge
Whimsy Stamps Spring Colors or Easter Challenge
Word Art Wednesday Anything Goes Challenge
Penny Black Feature a Creature Challenge
Lil Patch of Crafty Friends Anything Goes Challenge
Through the Craft Room Door Anything Goes Challenge
Crafty Girls Creations Anything Goes Challenge
 The version of the song that I printed out on my computer and added to the back is:
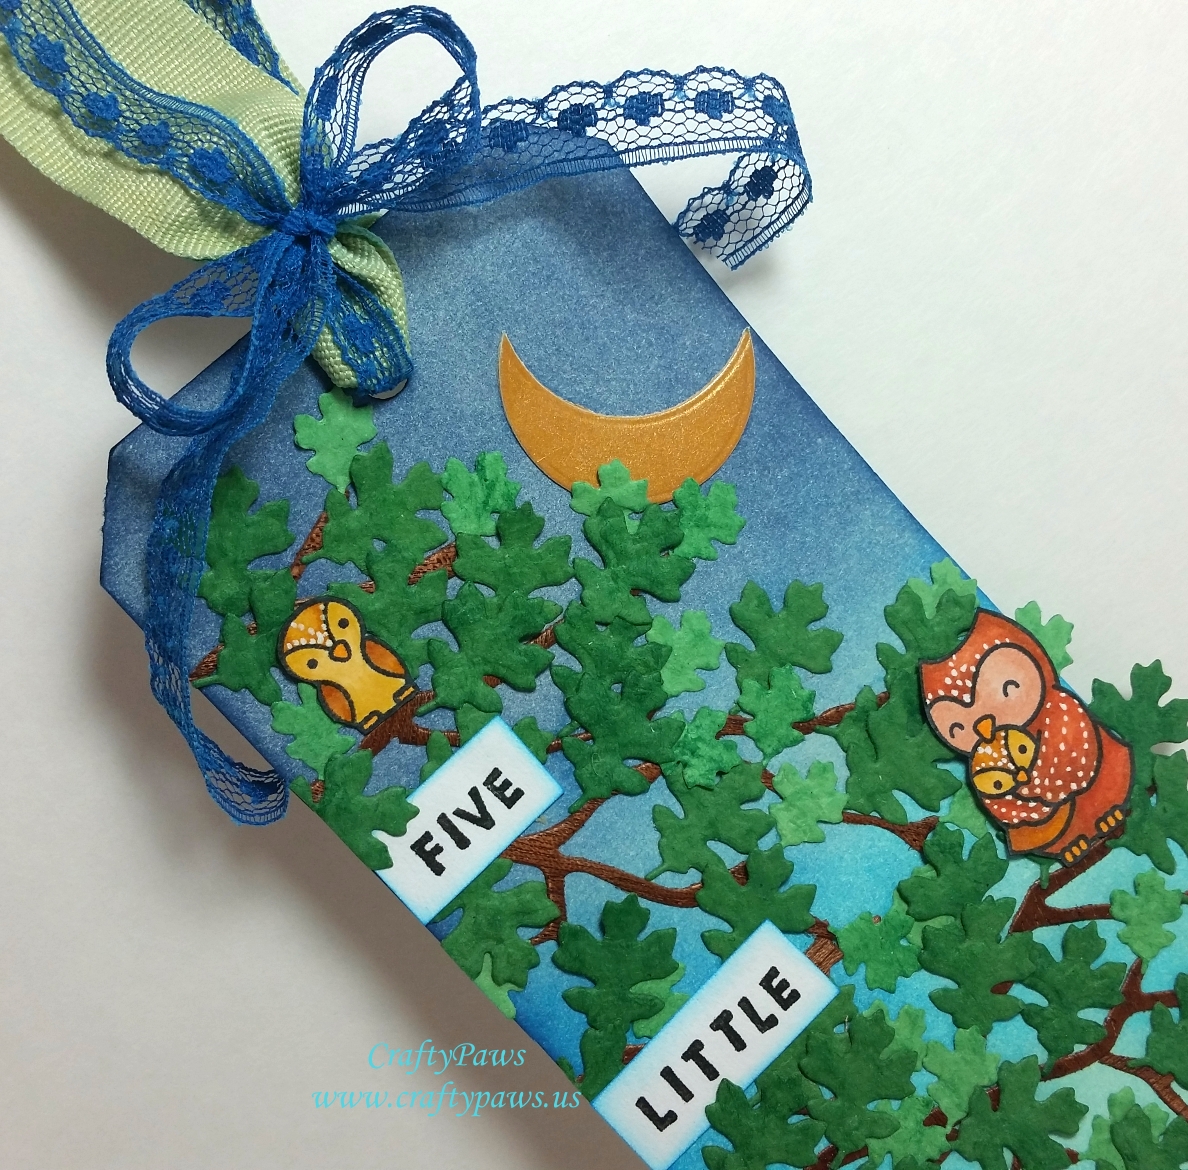
5 little owls, on a branch by the shore, one fell off, then there were 4.
4 little owls, high in a tree, the wind blew hard, then there were 3.
3 little owls, none of them knew, a raven took one, then there were 2.
2 little owls, sitting in the sun, a raccoon came along, then there was 1.
1 little owl, in the setting sun, flew off to the forest, then there was none.
I pulled out an old manila tag and used blending tools to ink from light to dark with Tim Holtz Distress Ink in Tumbled Glass, Salty Ocean and Chipped Sapphire to create the look of a sky at dusk.
 Then I die cut delicate branches from wood veneer paper (that has been in my stash for about 2 years!) using the branch from the Diemond Dies Cherry Blossom Branch and Flowers Die Set. I love the texture of the wood veneer and the look of real wood that using it gives the tree branches. PS: I find cutting delicate dies like this is much easier (esp. with thicker paper like this wood grain paper) with a metal shim die cutting plate, like this one: CottageCutz Universal Shim Plate Die Cuts
.
I then die cut –oh I don’t know a– a bazillion little oak leaves in the small and medium sizes from the Diemond Dies Mini Leaves Die Set from hand made paper that I inked up in advance with Tim Holtz Distress Ink in Evergreen Bough and Pine Needles. Individually die cutting and gluing in these little leaves was a bit tedious, but the end results were so lush and totally worth it.
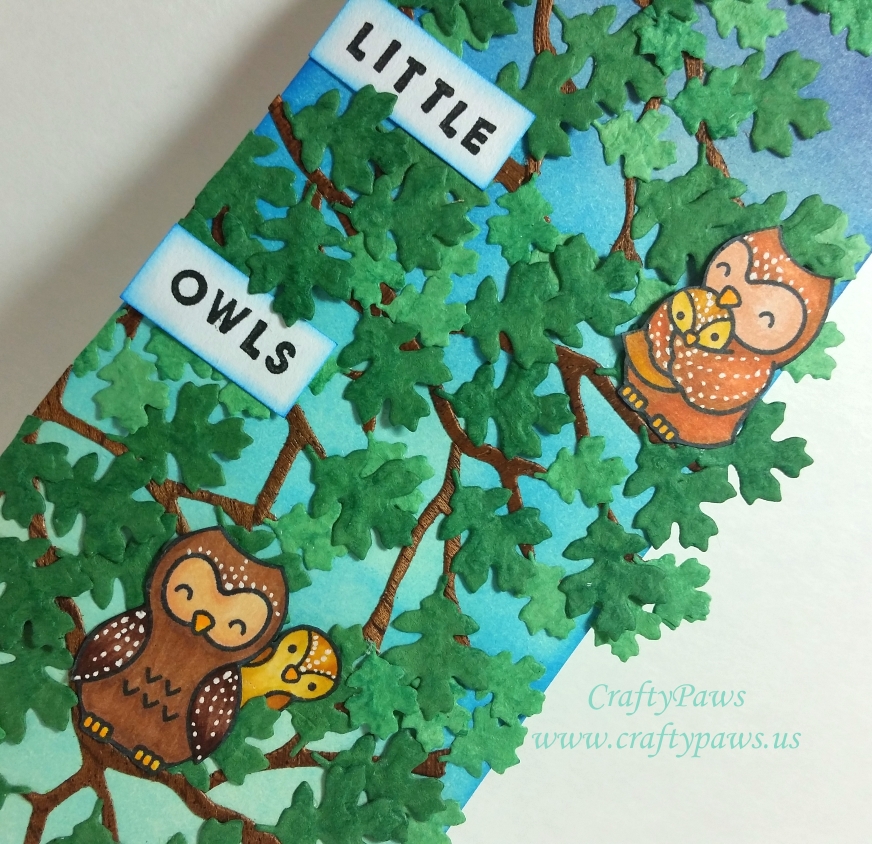
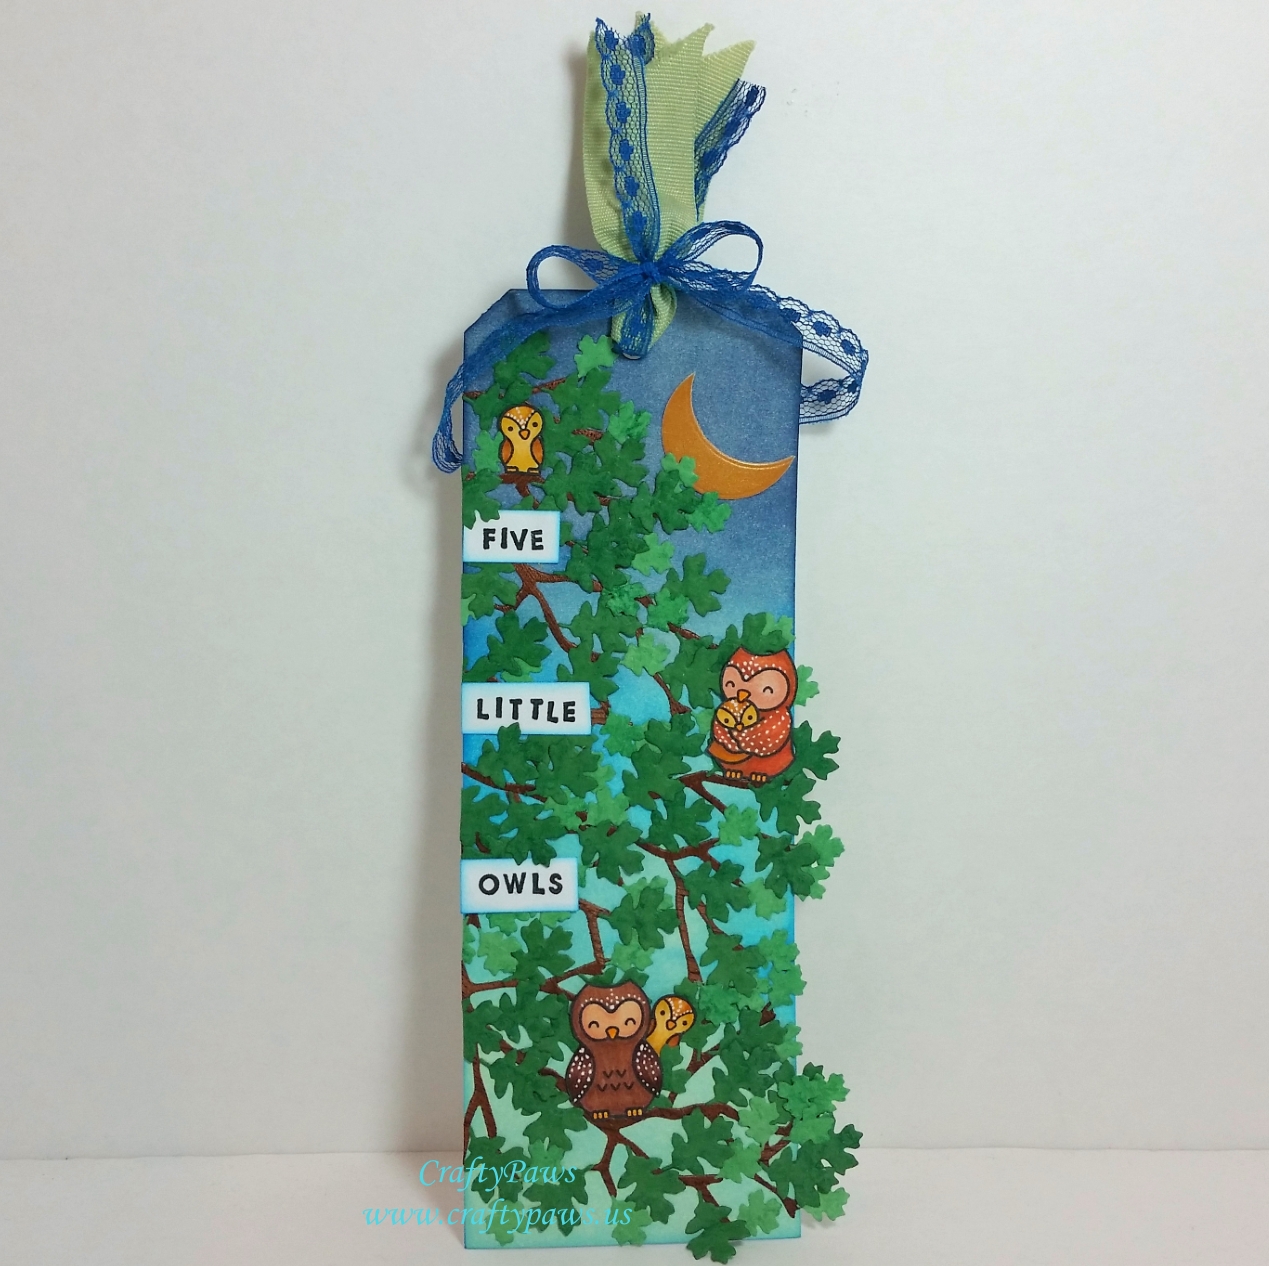 The focal point owls I colored up with the following Copic colors: Dad: E11, 21, 23, 25, 29; Mom: E21, 11, 97, 99; Kids: Y11, Y23, YR24 and E33 All the beaks and feet were colored with Y15 and Y38. What I think totally made these owls pop were the little white dots I added to their foreheads and wings with a white Gelly Roll pen. I had just watched “The Best Exotic Marigold Hotel” and “The Second Best Exotic Marigold Hotel” this past month, and I think I was channeling the beautiful henna body art. 🙂
I hand fussy cut (for scene projects I don’t like the white border that is left when you use the coordinating dies with most stamps) and inked the edges of the five little owls. I tucked in the owls nestled in the leaves of the oak tree, leaving the left side of the tag blank because I wanted to be able to add the title of the song that inspired the whole project.
I stamped out the title using a Michael’s $1.50 bin Studio G wooden alpha set and then just inked the edges of each word with more Tim Holtz Distress Ink in Salty Ocean. Lastly, I decided to add a crescent moon to the scene using the third smallest circle from the Diemond Dies Circle Nesting Die Set to cut out a shimmery golden moon from a scrap from my paper scrap box. Lastly, I added a tag topping bow with some ribbon and lace scraps from my trim scrap bag.
Remember, my readers can get 10% off and free worldwide shipping on any orders of $35 at Diemond Dies by using the coupon code “thankskristina” at checkout.
The following is a process video of creating this tag:
This tag is being entered into the following challenges:
Simon Says Stamp Monday Inspired by a Song Challenge
Simon Says Stamp Wednesday Anything Goes Challenge
Lil Patch of Crafty Friends Anything Goes Challenge
Through the Craft Room Door Anything Goes Challenge
613 Avenue Create Anything Goes Challenge
Penny Black Anything Goes With Stamps and Dies Challenge
Whimsy Stamps Anything Goes Challenge
Not Just Cards Anything Goes Challenge
Crafty Girls Creations Anything Goes Challenge
Word Art Wednesday Anything Goes Challenge – WINNER
]]>
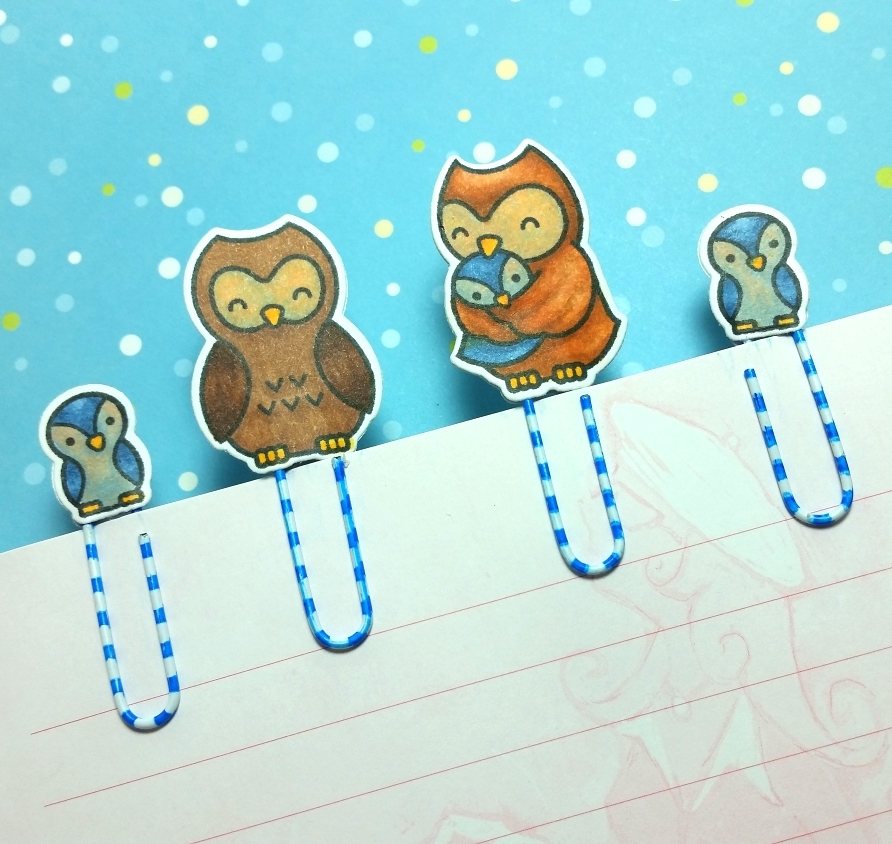
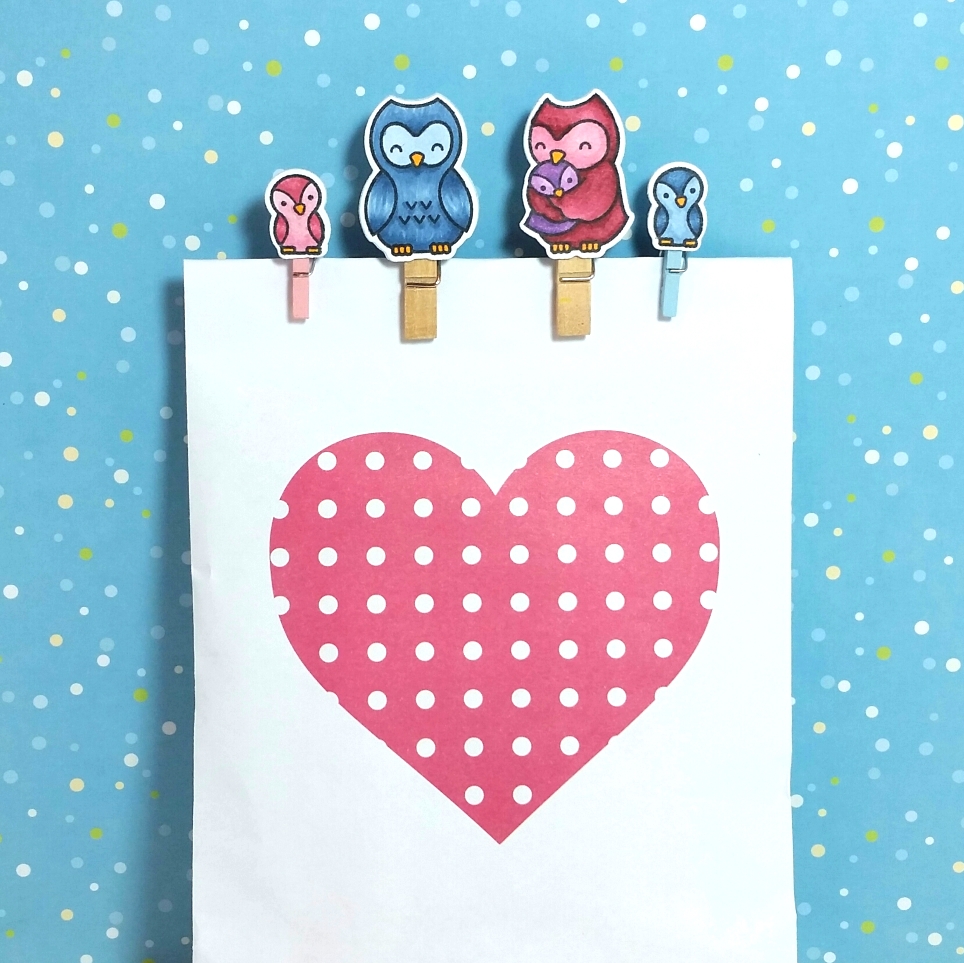 I decided to stamp and color up the owls first (the foxes will have to wait for a later project). I colored up three sets of owl families with the following Copic colors:
Pink and Blue make Purple Family – R81, 83, 85, 89; B91, 93, 95, 97; V12, 15, 17
Brown and Blue Family – Dad: E11, 21, 23, 25, 29 with hint of B91 in face; Mom: E21, 11, 97, 99 with hint of B91 in face; Kids: B91, 93, 95, 97 with hint of E21 in faces and bellies
Traditional Colored Family – Dad and Mom are colored the same as in Brown and Blue Family except without the hints of B91 in the faces; Kids: Y11, Y23, YR24 and E33
All the beaks and feet were colored with Y15 and Y38.
Then with the magic of the coordinating dies, I was able to quickly cut out each set and back them with more die cut card stock scraps to make them thicker and more sturdy. I made a couple families into altered paper clips (great for planners, packaging up little treat bags, etc.), using E 6000 glue and art glitter glue to sandwich the paper clips with the colored owls on one side and the extra die cut backings on the other.
 For the fun pink and blue make purple owl family, I attached them to small clothes pins. The larger clothes pins were the perfect size for the mom and dad and the tiny pink and blue ones (from a Recollections set of mini clothes pins that I picked up using a 50% off coupon a couple years ago when they were all the rage) made cute little bases for the pink and blue kiddie owls.
I have to say that I don’t often buy the coordinating die sets for stamps because I don’t mind fussy cutting and dies can be so expensive. However, these projects really showed me how they can be a huge time saver. Plus, when trying to make altered item projects like these that require finished pieces to be thicker and stronger, they seem absolutely essential for layering and gluing exact cut outs together. I know these projects would have taken much longer and not been as precise without the matching dies.
The following is a video share of these altered paper clips and clothes pins:
These altered paper clips and clothes pins are being entered into the following challenges:
MarkerPOP Anything Goes Challenge
Simon Says Stamp Wednesday Anything Goes Challenge
Simon Says Stamp Work It Wednesday Something New Challenge
Through the Craft Room Door Anything Goes Challenge
Not Just Cards Anything Goes Challenge
Crafty Gals Corner Anything Goes Challenge
Crafty Girls Creations Anything Goes Challenge
613 Avenue Create Anything Goes Challenge
]]>
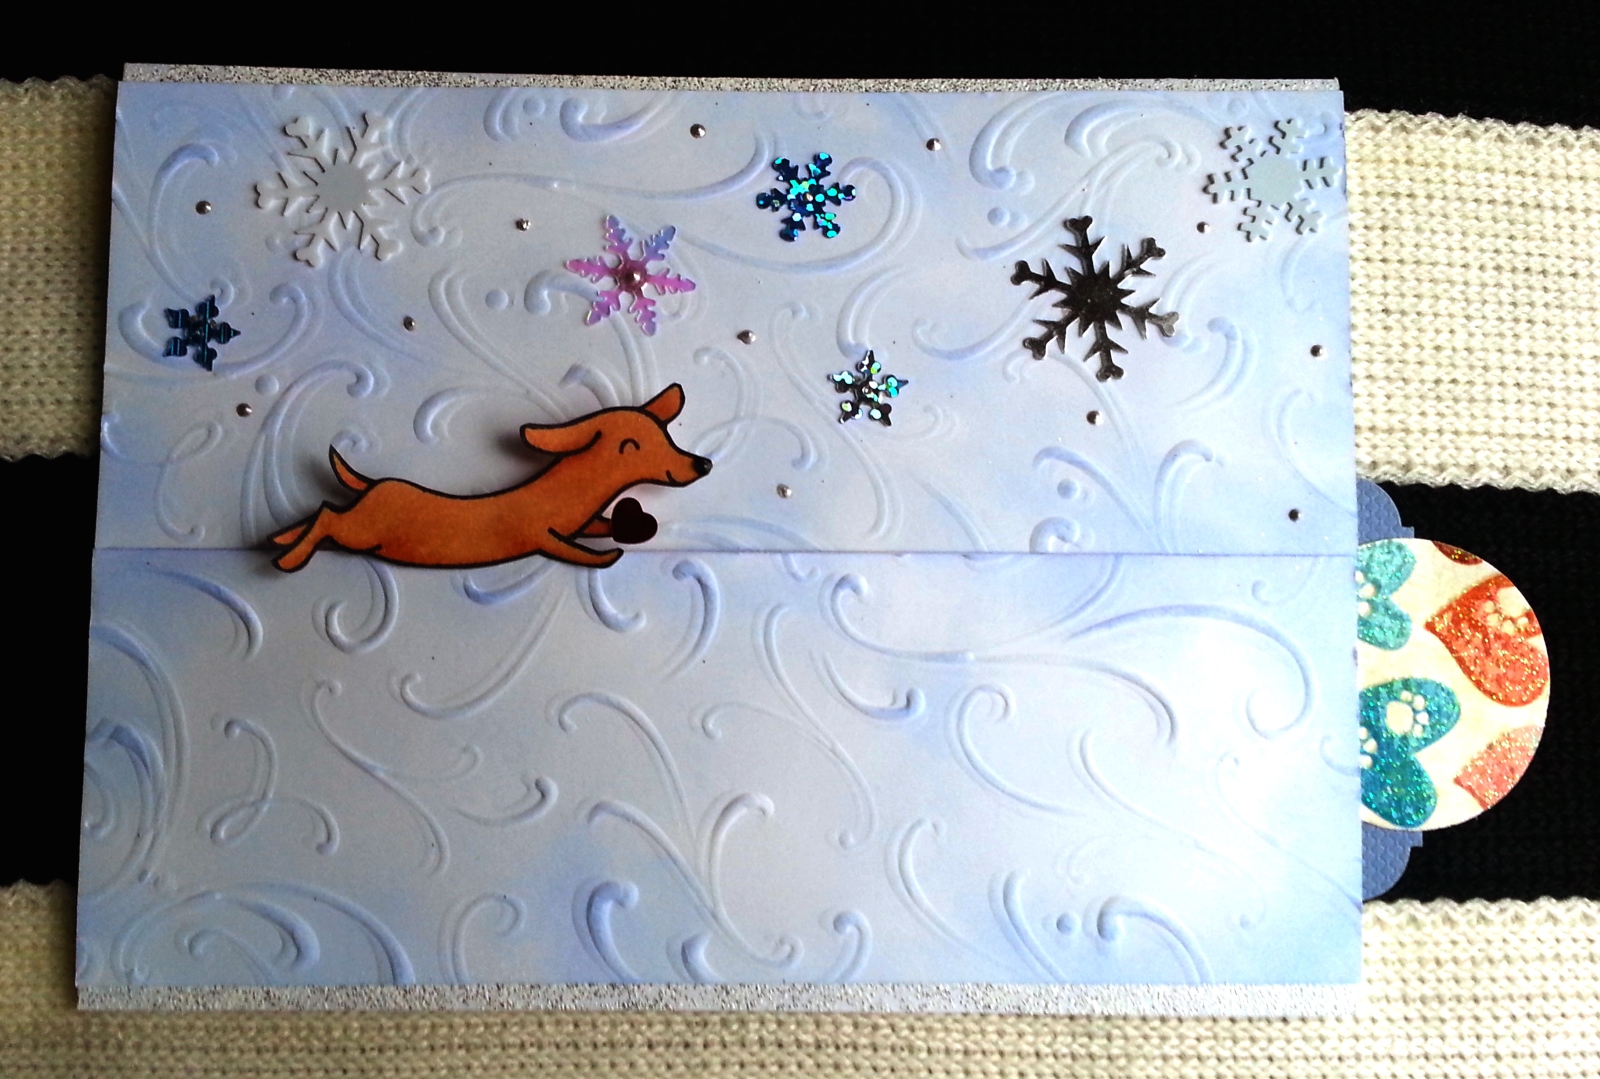 I colored up the little dog in two shades of brown (E21 and 23; E50 and 53) and just used a little touch of Glossy Accents to add a shine to their noses. To add a little reference to Valentines Day but keep this a wintery card, I added a small confetti heart in the dog’s paws.
The hidden slider card was really fun and easy to make. I followed a tutorial by my friend Jen (YT: Jen Evers) and I was able to make each card in about an hour. That is lightening fast for a slow crafter like me. 🙂 Some foam adhesive, dry embossed and inked papers (I used Tsukineko Brilliance Moonlight White for the white ink on blue card stock and Tsukineko Artnic Baby Blue for the blue ink on the white card stock) to give a little texture to the background, and some whimsical sequin snowflakes was all it really required. To add a little sparkle, I also heat embossed the top and bottom edges of the second card with a VersaMarker and Recollections Sparkling Embossing powder in “Opaque Bling” and used silver Liquid Pearls to add little snow dots on both cards.
The following is a video share of these two cards:
The card in the second picture is being entered into the following challenges:
The Lawnscaping Winter Themed Mood Board Challenge
The CASology NBUS Challenge
Simon Says Stamp Work it Wednesday Love Challenge and
Simon Says Stamp Monday Inky Background Challenge
Thanks for stopping by and have a great day! WOOF
]]>
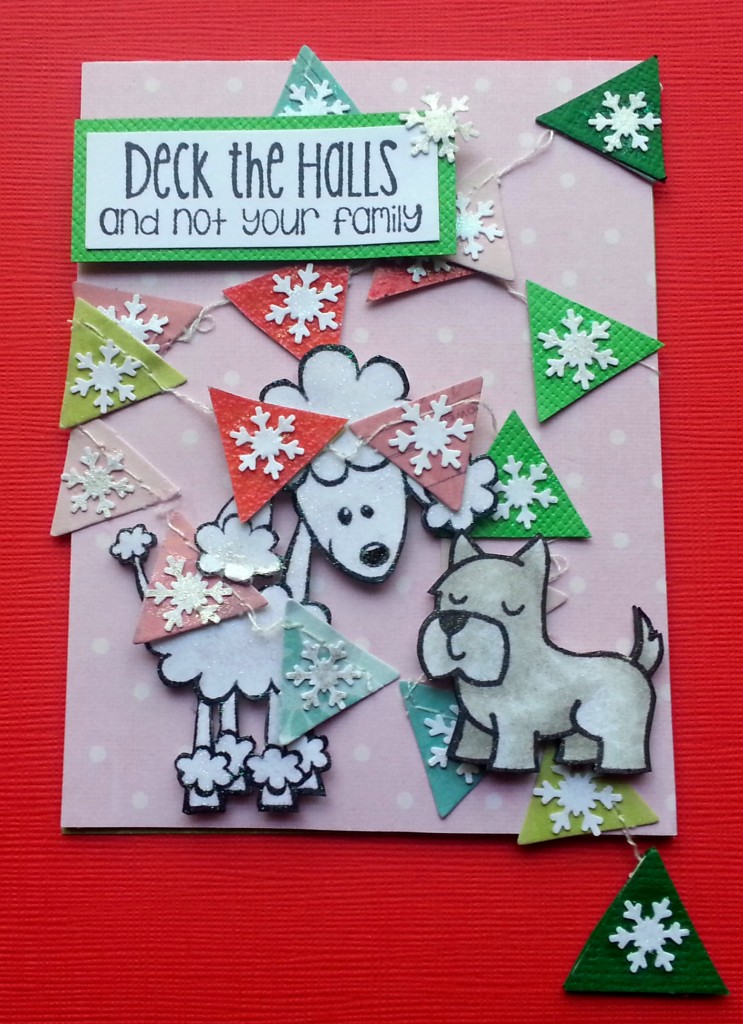 This led me to think about making a card with this sentiment using some doggy stamps (since I consider my dogs family members). 🙂 As the person who is receiving this card loves Lawn Fawn, I knew I had to include a dog from their “Critters in the Dog Park” set. However, when I added him to the card, he seemed too small. So I decided to add a larger poodle from the Recollections “Woof Woof” set. In my mind, the Scottie has been a little mischievous and decked out his big sister with this holiday banner. *wink*
Now these dogs are not supposed to represent my dogs (although if the terrier had drop ears, I could have colored him like Bandito). In fact, because I wanted to keep the color story very tight on this card (I only used shades of pink, green, red and white), these dogs stayed white (one a little dirtier with a little Copic W1–LOL). I fussy cut each of the dogs out twice and layered them up with some foam adhesive to add some interest and dimension. HINT: When doing this kind of layering, I think it is important to take the time to edge the fussy cut images out with black marker so the white edges of the paper don’t show. This gives a much more finished look. I use an SB width Faber-Castell PITT artist pen, but I know some folks even use a black Sharpie.
To create the Christmas banner decor, I used the Dear Lizzy 5th and Frolic Flutterbys. However, because these ready made pennants were in the typical sorbet colors of that collection, I had to hand cut small triangles in red and green to maintain the Christmas-y feel of the card and the tight color palette. I also used my Martha Stewart snowflake border punch to punch out some snowflakes that I could adhere to each pennant. All this took a lot of detail work but the final results seem worth it. I coated each of the snowflakes, the Poodle, and the Scottie dog, with Folk Art Extreme Glitter acrylic paint in hologram to get a very sparkly look (this is much more sparkly than Wink of Stella). I left the last pennant (which I decorated on both sides) dangling off the bottom edge of the card for a little added whimsy and some movement.
The following is a video share of this card:
This card is also being entered into the following challenge:
Raisin Boat Christmas and Holiday Challenge
Naughty or Nice Festive Furballs Challenge in the naughty category
CARDZ TV Color My Christmas Challenge
The Paper Nest Dolls Anything Goes Challenge
I used the hippopotamus and the word “hippo” from a little Lawn Fawn stamp set. The whole sentiment actually reads “Hippo Birdie to You” and is meant to be used for birthday cards, but I just masked off the rest of the sentiment with scotch tape when inking up the image and word then took the tape off before stamping. The coloring was simple with just Copic C3, C5 and R20. I hand wrote the “hooray!” in my best efforts at a similar font style, and I think it came out pretty close. LOL
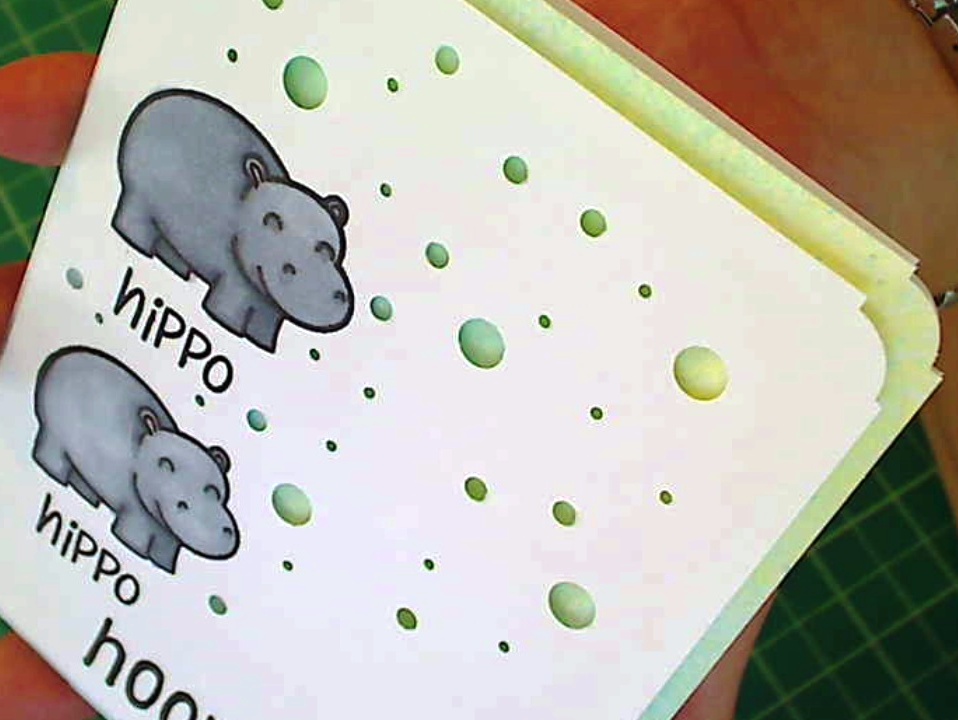 I rounded the corners of the white card stock card base as well as the stamped top piece with my We R Memory Keepers Crop-A-Dile Corner Chomper. Then used my old school McGill hand held hole punches in 3 sizes to make little holes all over the top piece. I think it created a kind of flying confetti look (yipee!). I could have left the base card white for a more sophisticated look, but I decided to use my Recollections spray ink in yellow, blue and green shimmer to add some color onto my card base. The color and sparkle peaking through the holes of the top piece are light and bright.
I did add a little dimension to this card by just adhering the top piece with foam adhesive (I couldn’t help myself! I wanted that little shadow and interest!) to the card base. It didn’t add any weight to the card, but it added a lot of interest IMHO. 🙂 In any event, this card (with a congratulatory check) can be mailed with 1 stamp. YAY!
The following is a video share of the card:
This card is also being entered into:
Case Study Challenge #194
Raisin Boat Graduation/Congratulations Challenge
Simon Says Stamp Masculine Challenge
Naughty or Nice Challenge
Thanks for stopping by. Please subscribe if you wish, and have a great day! WOOF!
]]>