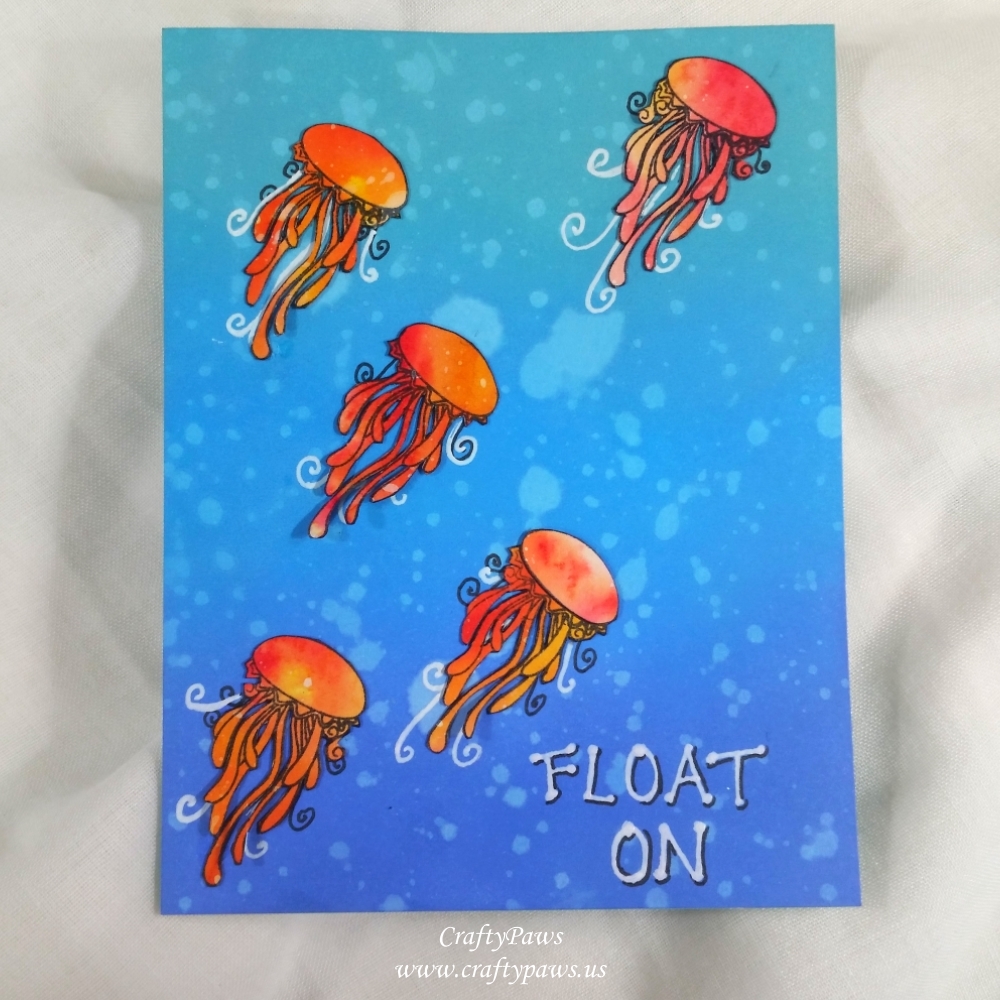
 I used Tim Holtz Distress Oxide Inks in Broken China, Salty Ocean and Blueprint Sketch to create a deep ocean ombre background. I also splattered water on them
to create a splotchy, more watery effect.
Then I used a scrap of Bristol Paper that I had inked and sprayed with Ken Oliver Color Bursts in Lemon Yellow, Orange and Merlot to stamp out and fussy cut 5 jellyfish from the stamp set. The fussy cutting was a bit intricate, but with my trusty Fiskars Spring Loaded Scissors and a little patience, it was well worth the effort to achieve the dimension and detail. I also inked the edges with a Momento Tuxedo Black Marker to hide the white edges of the cut paper.
To give each jellyfish a unique look (there is only 1 jellyfish in the stamp set) I doodled some black and white tentacle squiggles and swirls with a Black Uniball Pen and a White Signo Gel Pen. I also like the way the white actually helped the jellyfish pop from the background.
Lastly, I hand wrote the sentiment “FLOAT ON” with a White Signo Gel Pen in the lower right corner. To give the letters a little more weight, I also added a slight shadow with a Black Uniball Pen.
Disclosure: Many of the supplies I’ve used for today’s project are linked. Some may be affiliate links, which means if you make a purchase I receive a small commission at no extra cost to you. I truly appreciate your support toward the costs of running this blog!
This card is being entered into the following challenges:
Simon Says Stamp Monday Masculine Challenge – WINNER
Simon Says Stamp Wednesday Anything Goes Challenge
Word Art Wednesday Anything Goes Challenge
Creatalicious Anything Goes with Optional Photo Inspiration Challenge
Addicted to CAS SEA Challenge
CASology Squiggle Challenge
Simon Says Stamp Work it Wednesday Summer Challenge
Lil Patch of Crafty Friends Anything Goes Challenge
Through the Craft Room Door Anything Goes Challenge
613 Avenue Create Mostly Blue Challenge
]]>
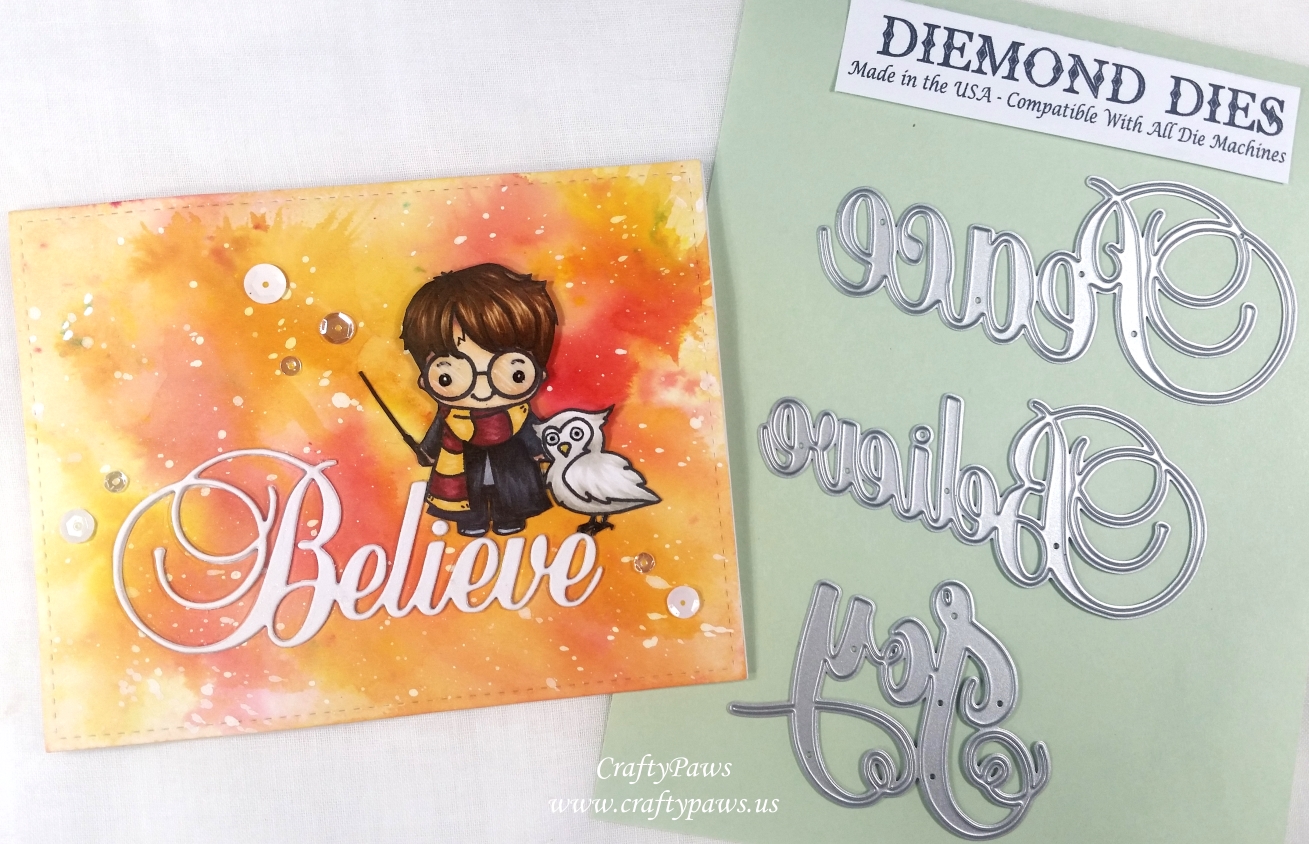
To make a colorful, mystical background, I die cut some Strathmore Bristol Paper with the large stitched rectangle die from the Mama Elephant Peek A Frame Die Set and played with some Ken Oliver Color Bursts in Lemon Yellow, Yellow Ochre, Alizarin Crimson and Merlot. I sprinkled (the powders), spritzed (with the mister), dabbed (with a tissue) until I was happy with the mix of saturated and lighter pigments. When dried, I diluted some Copic Opaque White with some water on an acrylic block and sprayed it all over the background to get a bright splattered effect.
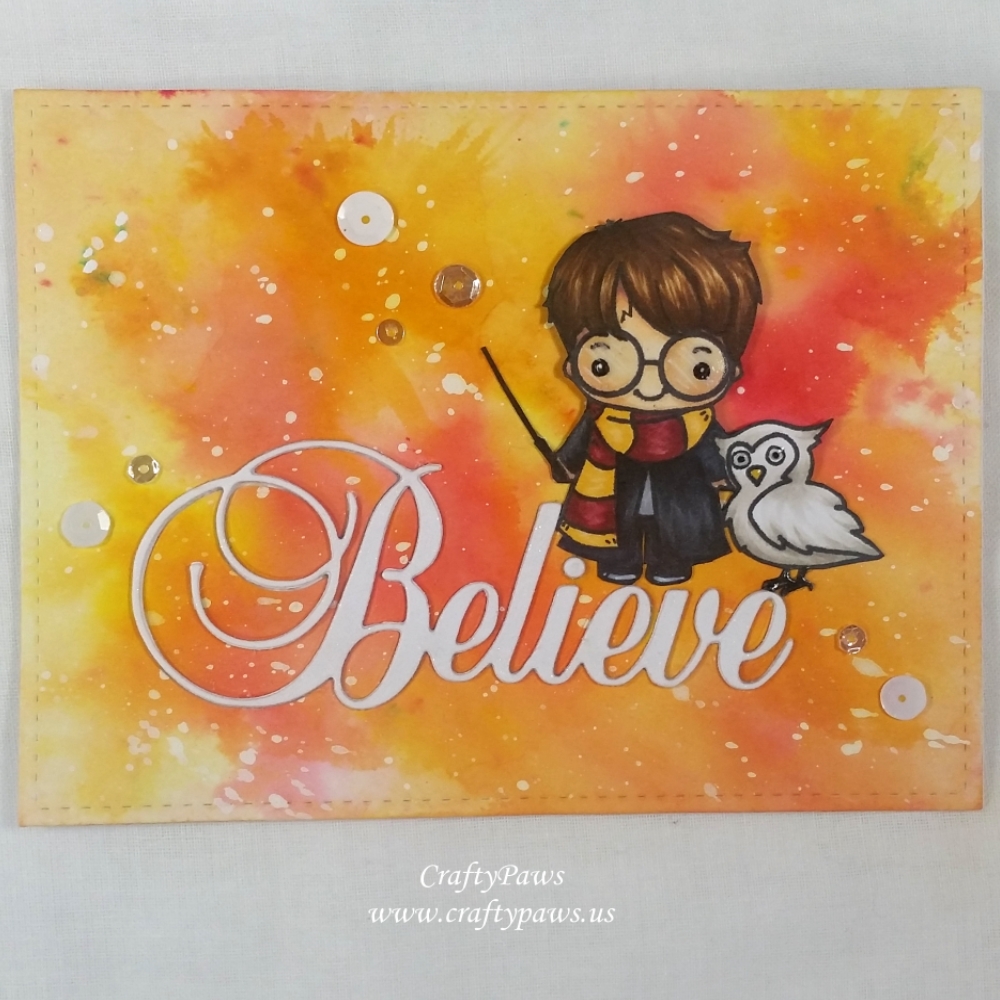 When the card front background was fully dried, I die cut the “Believe” word die from it, about 2/3 of the way down. I also die cut the word from white card stock 4 times, stacked and glued the words together to create a thicker die cut word that I could inset into the card front. This created a kind of “ground” on which my little Harry and Hedwig could stand.
I stamped out the owl, masked him, and then stamped out the boy I planned to color up like Harry Potter. I also stamped on eye glasses and doodled on a little scar. I used the following Copic colors to color up this little Harry Potter themed image:
Skin: E50, E51, E21, E04 and R30 with a doodled lightning bolt scar with a Copic Multiliner Pen in 0.03 pt
Hair: E55, E57 and E59
Robe, sweater, pants and shoes: C2, C3, C6, C8, C10
Owl: W0. W1 and W3
Scarf: Y32, Y35, R85 and R89
I also used a Uniball Signo White Gel Pen for highlights on the shoes and eye glasses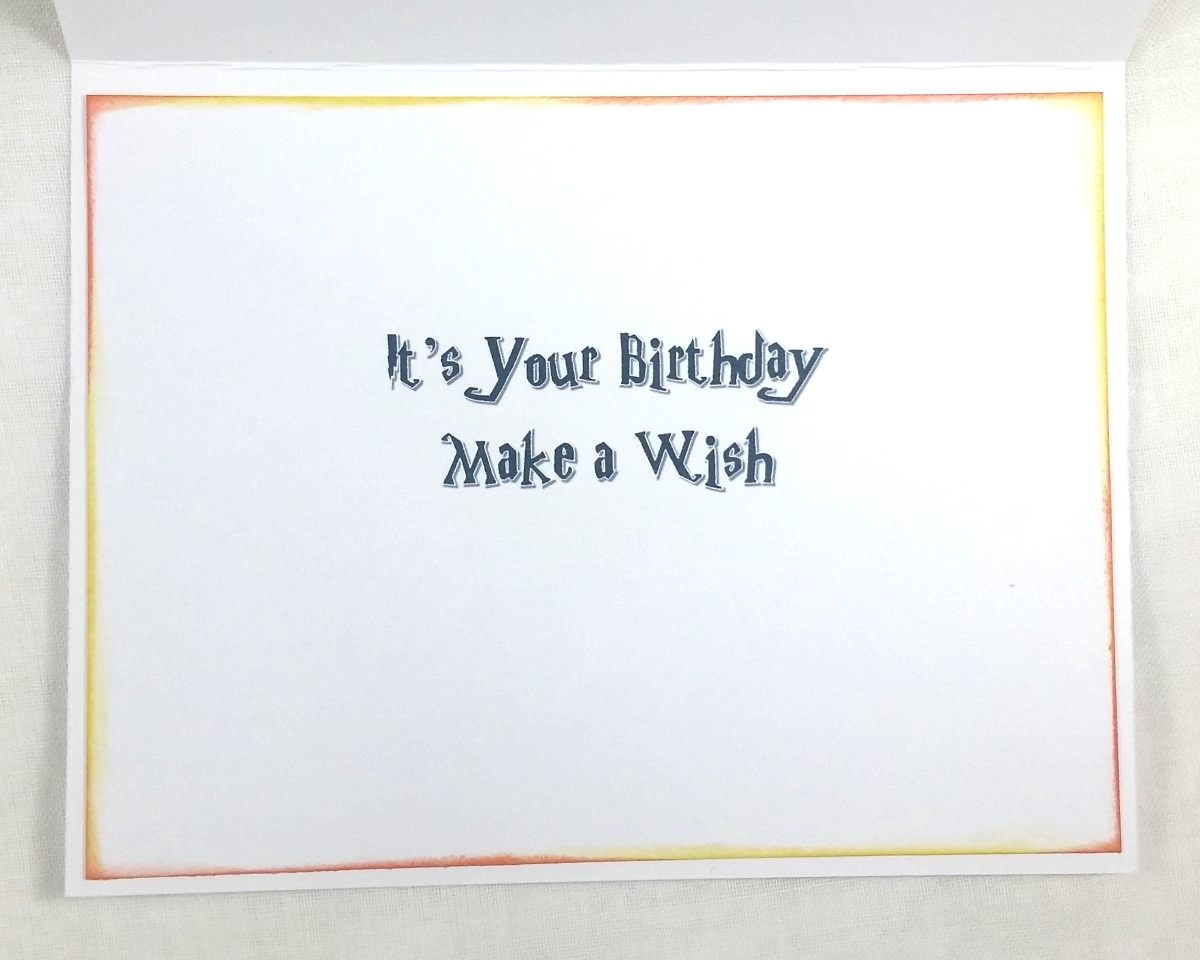
For finishing touches, I added Glossy Accents to Harry’s glasses and to Hedwig’s eyes and beak. I also coated the “Believe” with Clear Wink of Stella for some subtle glitter. To add even more sparkle and a little dimension, I added 7 white and clear sequins in 3 clusters (I try to keep things in odd numbers).
For the inside liner, I printed out the sentiment: “It’s Your Birthday. Make a Wish” in a free Harry Potter font. I also inked the edges of the card liner with Tim Holtz Distress Ink in Ripe Persimmon and Mustard Seed to echo the colors of the card front inside.
Use Diemond Dies coupon code: “thankskristina for 10% off and free worldwide shipping on all orders of $35 or more.
Disclosure: Many of the supplies I’ve used for today’s project are linked. Some may be affiliate links, which means if you make a purchase I receive a small commission at no extra cost to you. I truly appreciate your support toward the costs of running this blog!
The following is a process video of creating this card:
This card is being entered into the following challenges:
Penny Black and More Something New Challenge
Creatalicious Anything Goes with Optional Wishes Challenge
Art Impressions Anything Goes Challenge
CAS-ual Friday All that Glitters Challenge
Lil Patch of Crafty Friends Anything Goes Challenge
Crafts Galore Encore Anything Goes Challenge
Word Art Wednesday Anything Goes Challenge
Crafty Gals Corner Anything Goes Challenge
Through the Craft Room Door Anything Goes Challenge
Simon Says Stamp Monday Something Something New Challenge
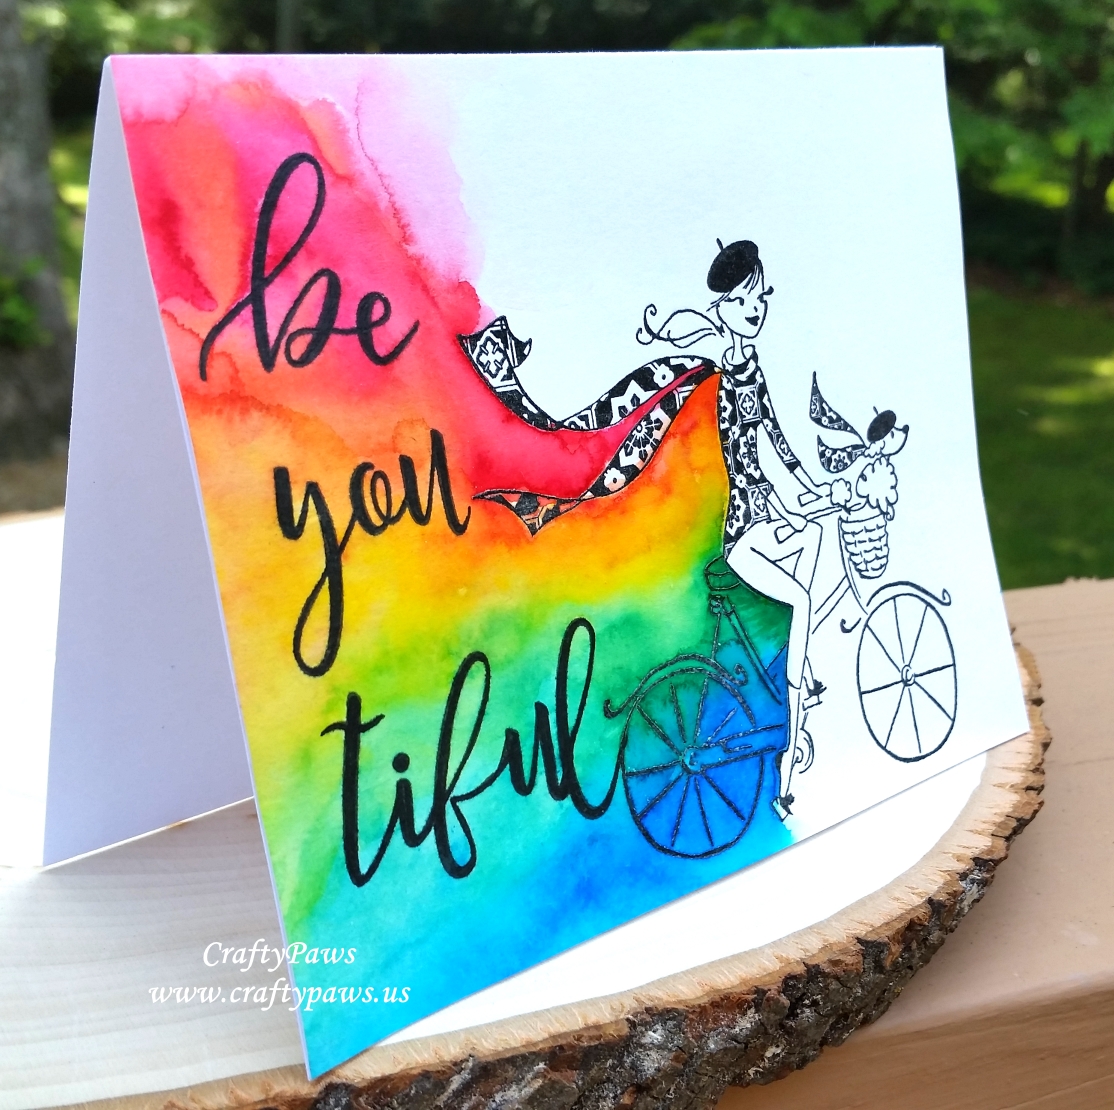 I stamped the Penny Black Fluffy Passenger Stamp with Momento Tuxedo Black Luxe Ink on Strathmore Bristol Paper and heat embossed it with clear embossing powder, positioning it about 2/3 of the way toward the right side of the A2 (5.5″ x 4.25″) top folding horizontal card. I wanted this positioning not only to follow the rule of thirds, but also to give me room to stamp out the focal point sentiment behind the girl and her poodle.
I used the Concord & 9th Sophisticated Script Stamp Set to stamp out the sentiment: “be you tiful” with VersaFine Black Onyx Ink, and I let that gorgeous script be the highlight of the card by watercoloring a rainbow around it with Ken Oliver Brights Color Bursts: Alizarin Crimson, Orange, Lemon Yellow, Pthalo Green and Ultramarine Blue. It took 3 applications of color to get the intensity that I wanted. To get into the nooks and crannies especially right up against the back side of the embossed girl image (the raised embossing seemed to repel some of the watercolored pigments), I also went in with some Copic colors in R35, YR04, G09 and B06. Lastly, to intensify the black of the script sentiment, I also traced over it with a black Momento Tuxedo Black Marker. I love the crisp, graphic look.
It’s a really simple card, but one that I spent a lot of time stamping and designing to make it “just right.” LOL The following is a process video of stamping out the script sentiment and watercoloring the rainbow (The DIY stamp shammy that I used in the video is available HERE):
This card is being entered into the following challenges:
Simon Says Stamp Wednesday Anything Goes Challenge
Word Art Wednesday Anything Goes Challenge
Addicted to CAS Rainbow Challenge
Where Creativity Meets C9 One Layer Challenge – WINNER
 I’m not a watercoloring expert by any means, but watercoloring with Ken Oliver Color Bursts can help anyone create projects like an artist! Each bottle has fine pigment granules, with the predominant color being the name on the label but mixed in with complementary colors. The color crystals are packed with such intensity that playing with these can make even a beginner like me look like a pro!
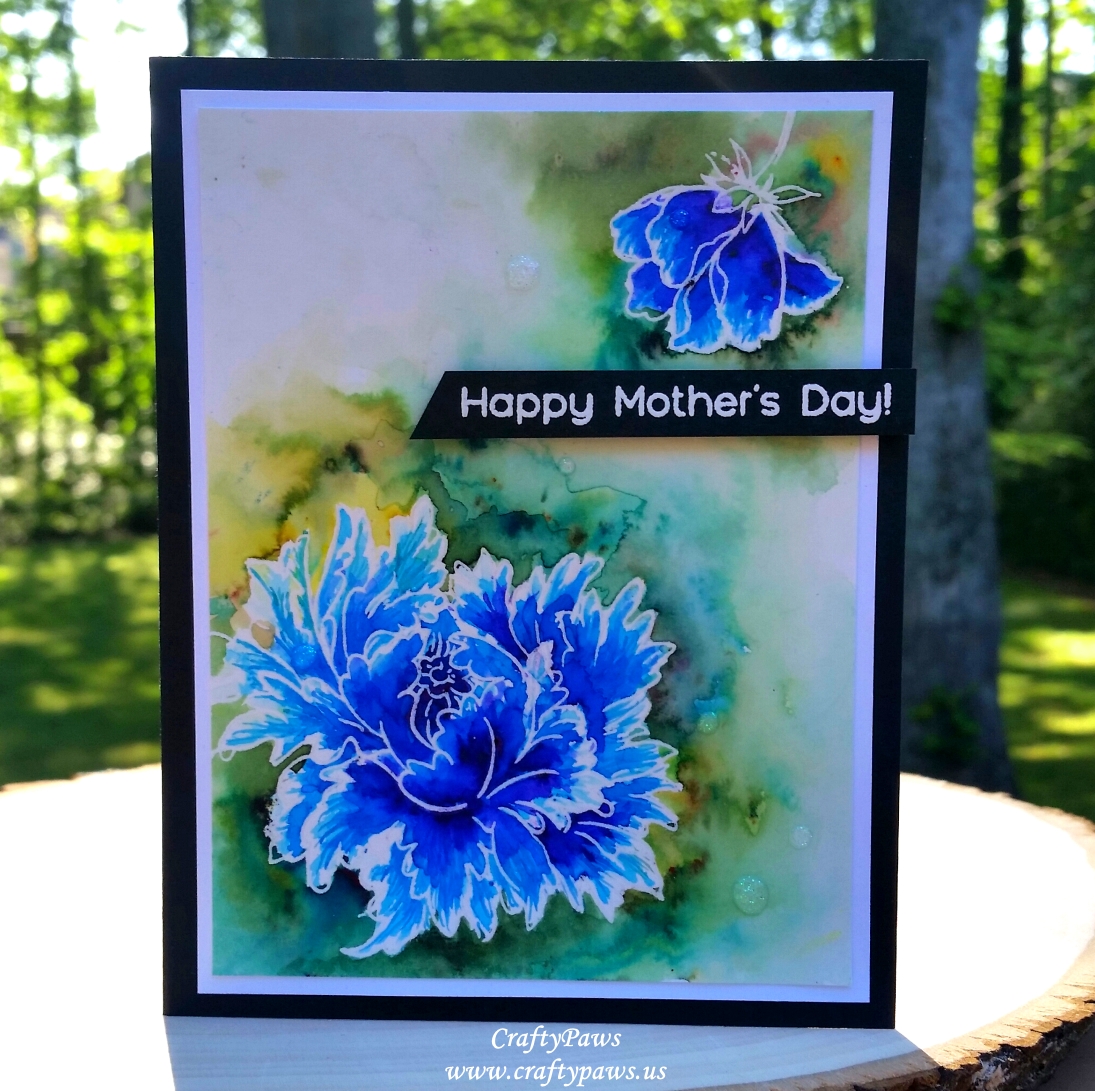
I thought I would get ahead of the game with Mothers’ Day and created a couple of cards for my mom and my mother-in-law using the Altenew “Majestic Bloom” and “Peony Bouquet” stamp sets. Both ladies’ favorite color is blue so I thought I would veer away from the normal whites or pinks and go bold with blues and purples. For both cards, I used the Ken Oliver Color Burst colors: Ultramarine Blue, Violet, Terre Verte and Yellow Ochre.
Using Strathmore Bristol Paper (I love how thick and absorbent this paper is for watercoloring and there is almost no perceptible bumpy texture unlike many watercolor papers) cut down to card front size, I stamped out flowers from both stamp sets using VersaMark Ink and clear embossing powder. Then I wet down the center of each flower and the base of each petal with plain water using a Silver Black Velvet #6 paint brush (this is the only brush I used throughout, and it’s perfect to get good coverage as well as detailed thin strokes). This wetness helps catch the color crystals (which could slide off of dry paper) where I want the most intense color.
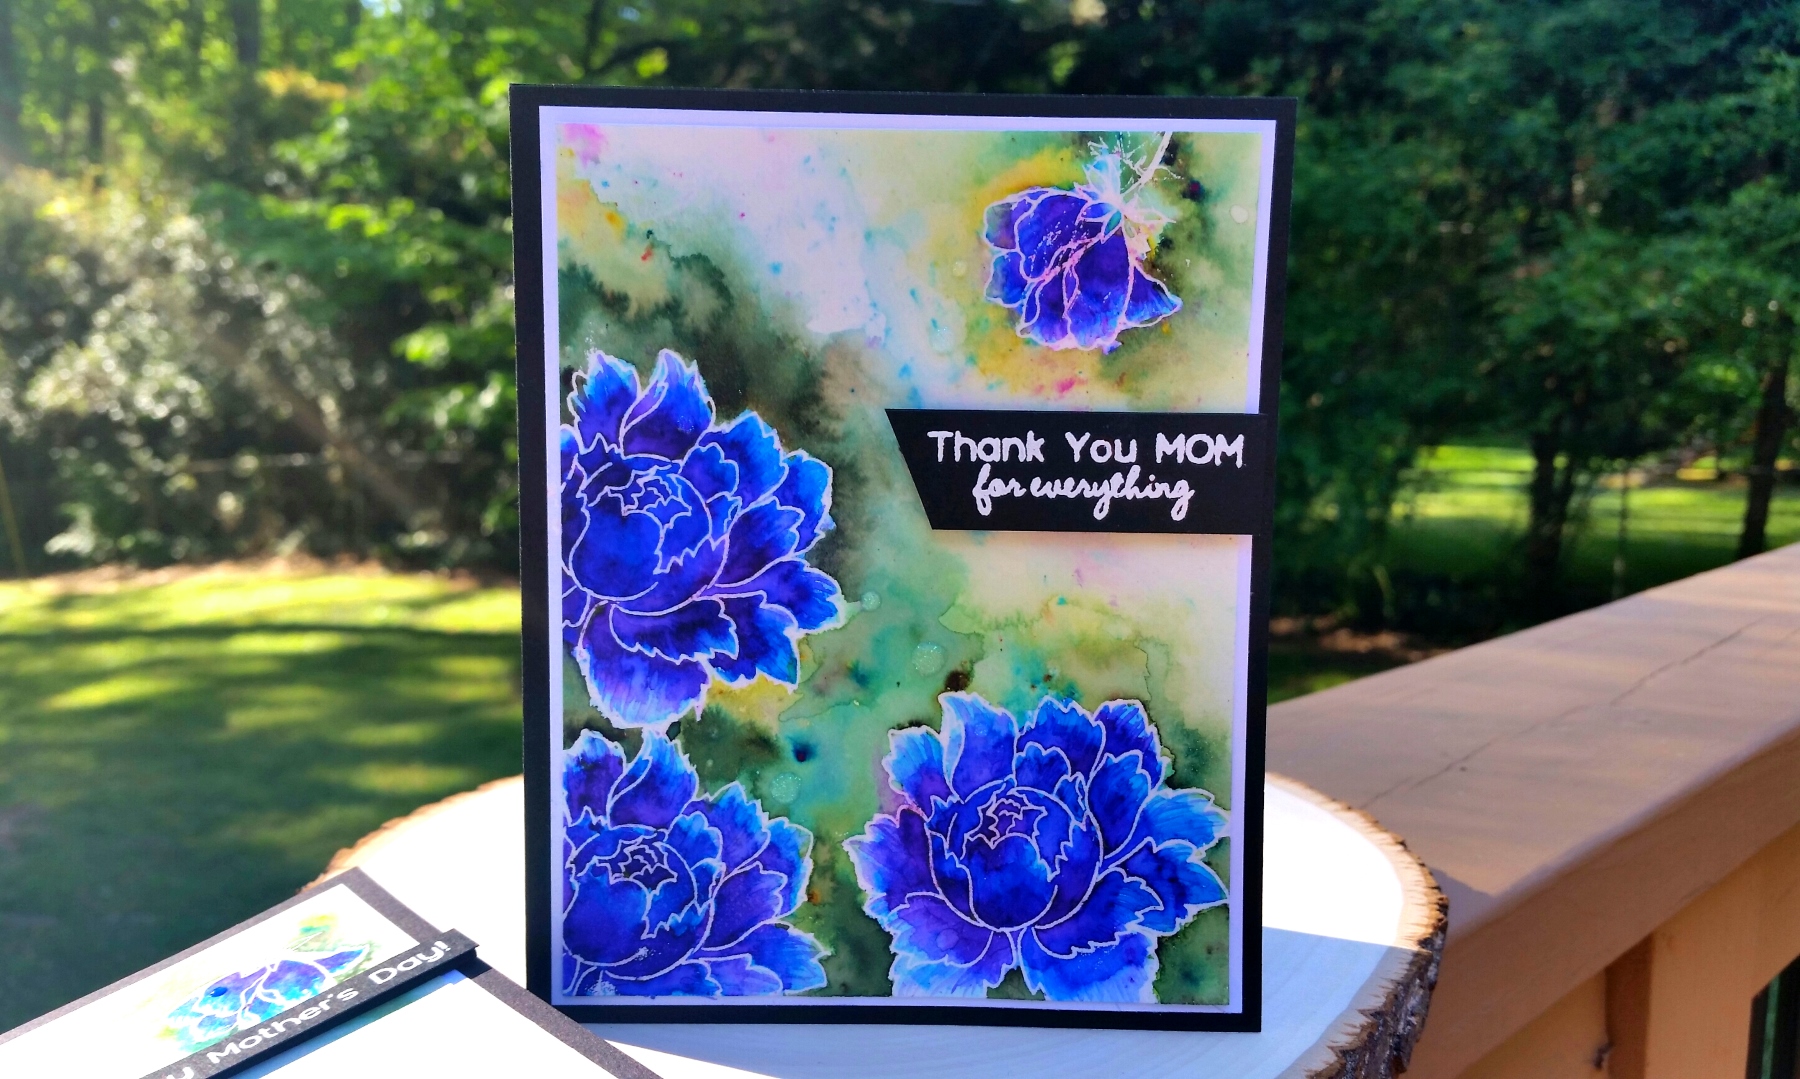
Then I blended out and directed the color crystals with more water on my brush. It’s important to dry the watercolors between each application of color so that the color crystals don’t all mix to create a muddy brown. I also like to occasionally hit the back side of the paper with the heat tool so that the drying doesn’t curl the paper in one direction too much.
 What’s fabulous about watercoloring with these Color Bursts is that the granules in each bottle have a combination of colors so there is a natural artistic blend that comes from just adding water and activating the crystals. Such an artistic look and so easy!
I layered each card front with white card stock for a thin border, and then mounted the whole card front onto a black card base. For the sentiment, I used more black card stock and Extra Fine Ranger White Embossing Powder to heat emboss some simple Mothers’ Day sentiments from The Greeting Farm “I Love Mom” stamp set. I hand cut those sentiments and popped them up for a little bit of dimension using fun foam. For a finishing touch, I added 7 varying sized dots of White Blizzard Nuvo Glitter Drops to give some shimmer and the look of water drop-like accents.
The following is a process video of watercoloring the card front with the outline of the main flower from the Majestic Bloom stamp set and the bud from the Peony Bouquet stamp set:
This card is being entered into the following challenges:
Simon Says Stamp Monday Splash It On Challenge
Simon Says Stamp Wednesday Showers and/or Flowers Challenge
Card Mania April Showers Bring May Flowers Challenge
Word Art Wednesday Anything Goes Challenge
Through the Craft Room Door Anything Goes Challenge – WINNER
Creatalicious Anything Goes with Optional Birthday Challenge
Lil Patch of Crafty Friends Anything Goes Challenge
613 Avenue Create Anything Goes with Optional Spring Challenge
Fab ‘n’ Funky In the Garden Challenge
]]>

I clear heat embossed a couple of the outline flowers from the Altenew Peony Bouquet stamp set (my favorite floral stamp set of all time!) onto 140 lb Strathmore watercolor ATC card bases (2.5″ x 3.5″). Then I went to town water coloring with Ken Oliver Color Bursts in Yellow Ochre, Burnt Orange, Merlot, and Terre Verte (this Earthtones color set is AWESOME and I have my eye on the Brights for my holiday wish list).
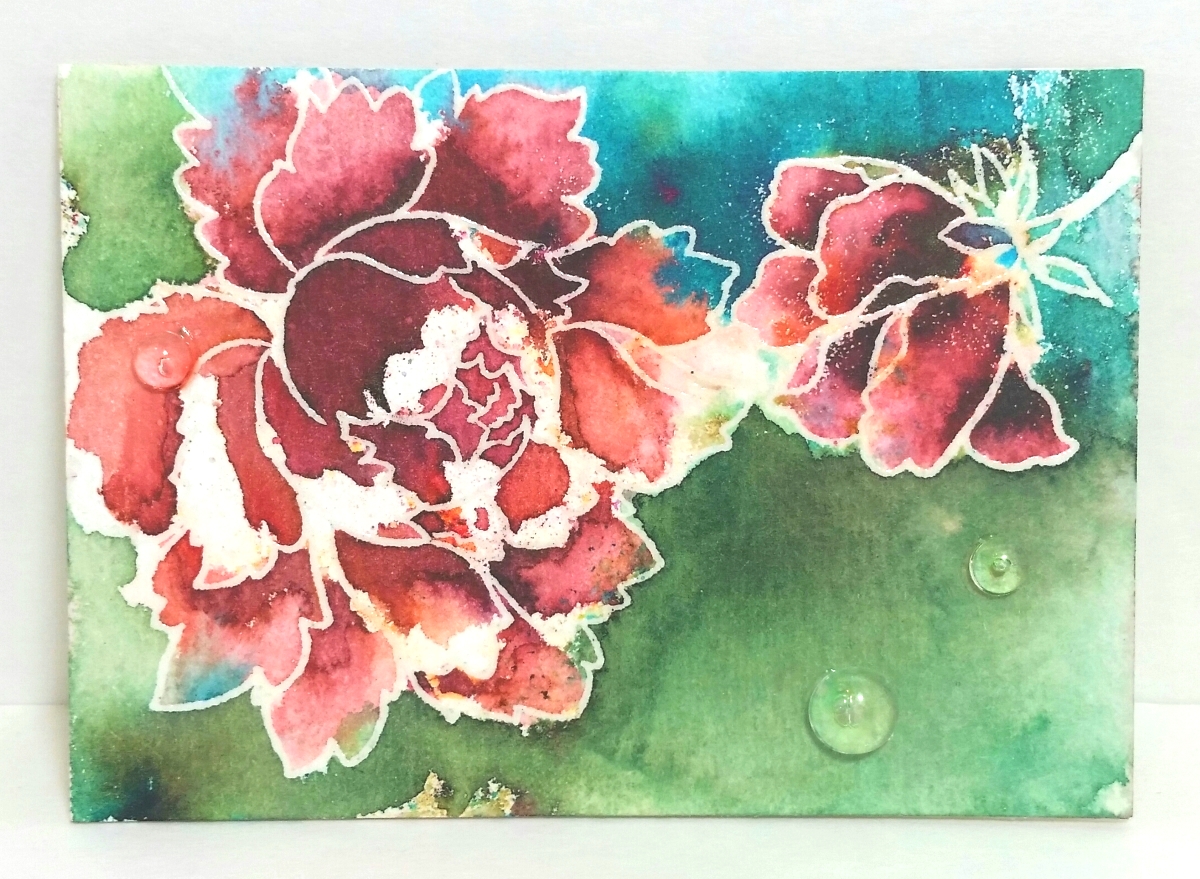
After I dried and mounted these little “pieces of art” onto heavy weight chipboard, I added a few well-placed 6mm and 4mm Pretty Pink Posh Clear Droplets. They add the perfect watery finishing touch. Don’t you think?
The following is a process video:
These ATCs are being entered into the following challenges:
Simon Says Stamp Work It Wednesday Red, Orange, Yellow and Brown Challenge
Word Art Wednesday Anything Goes Challenge
Lil Patch of Crafty Friends Anything Goes Challenge
Fab ‘n’ Funky Fabulous Flowers Challenge
Through the Craft Room Door Anything Goes Challenge
Just Keep on Creating Anything Goes Challenge
Addicted to Stamps and More Anything Goes Challenge
Not Just Cards Anything Goes Challenge
613 Avenue Create Anything Goes Challenge
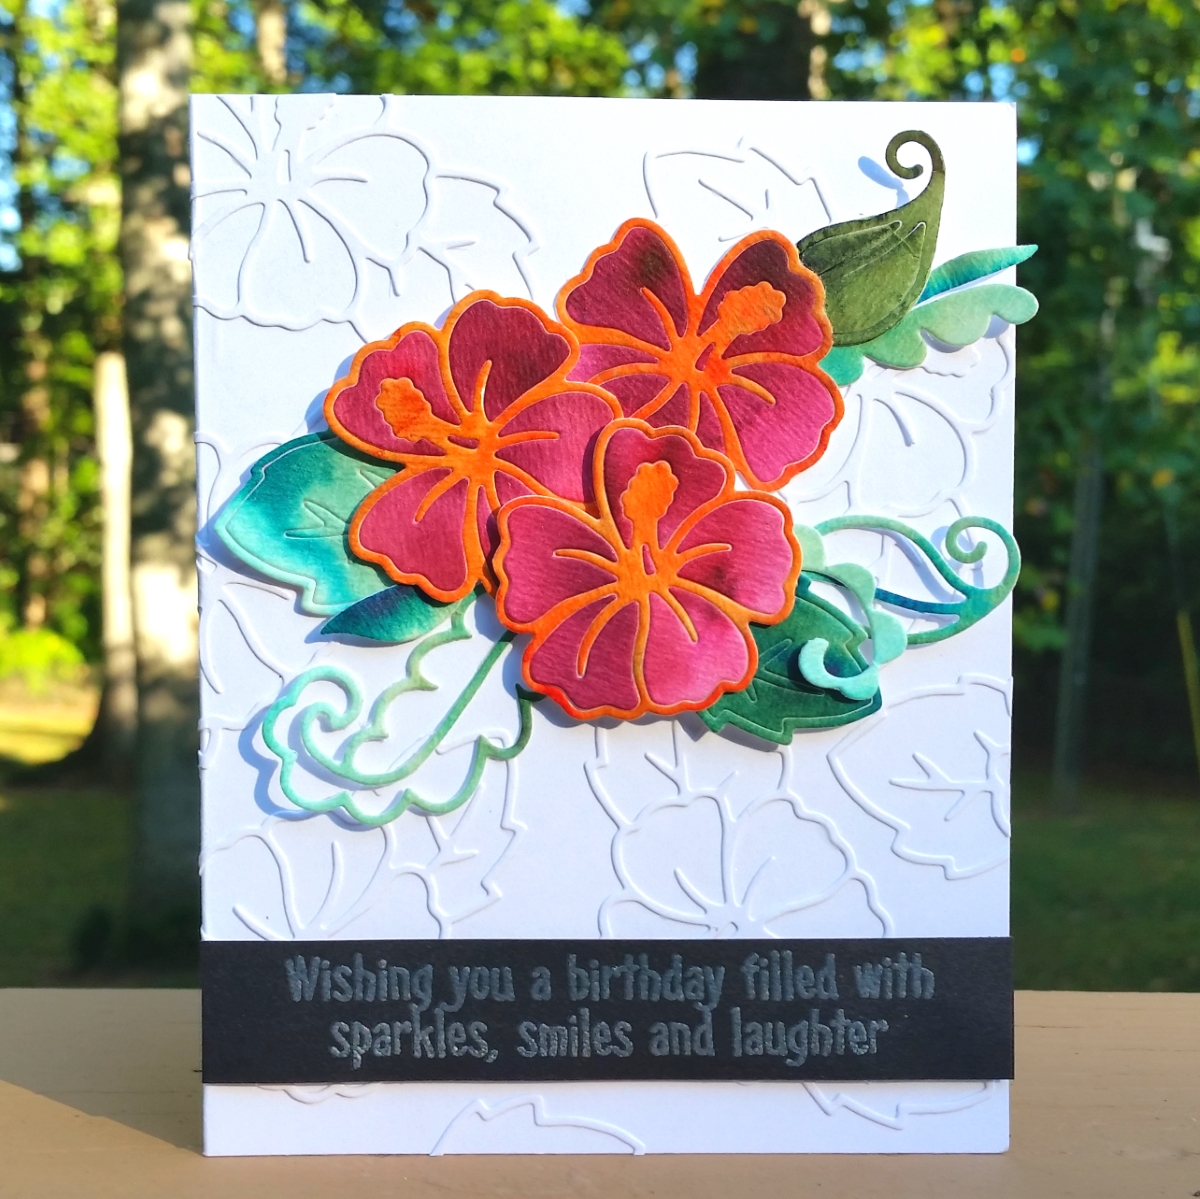 First I wanted to just use the outline portion of the Hibiscus Die to create a faux embossed look for the card background. I die cut it out 10 times from white card stock and glued them down onto a white card base using Art Glitter Glue with a fine tip nozzle in a random pattern, making sure to have some of these flower outlines run off the edges of the card base and wrapping them even to the back of the card. I love this all-white, subtle yet interesting textured background.
Then for the focal flower cluster, I used 140 lb Strathmore watercolor paper, a paint brush, a water-filled spray bottle, and Ken Oliver Color Bursts in Merlot, Burnt Orange, Yellow Ochre and Terre Verte to create watercolored scraps with lots of variations in color tones. I then used the Hibiscus Die to cut three flowers from the merlot red paper, three flowers from the yellow ochre/burnt orange paper, a couple of the Hibiscus Die leaves and two of the Paisley Die Set flourishes from the terre verte paper. I used just the outlines of the flowers (cutting off the leaf portions) from the yellow ochre/burnt orange paper and inset the merlot red flower petals. For the leaves and paisley flourishes, I popped some of the inner sections out and used them as additional foliage. To add to the dimensional look, I used 1/16″ and 1/8″ foam dots behind the hibiscus flowers and glued down only the base of each leaf behind the flowers so the leaf ends were free to hang off the card front.
Lastly, for the sentiment, I used a retired Hero Arts Clear Princess stamp set (sorry there is no official name on the packaging). I heat embossed some Recollections Snow embossing powder onto a black card stock scrap with the sentiment that says, “Wishing you a birthday filled with sparkles, smiles and laughter.”
The following is a process video sharing how I made this card:
This card is being entered into the following challenges:
Winnie & Walter Background Building with Shay Challenge
Word Art Wednesday Anything Goes Challenge
Addicted to CAS Watercolor Challenge
Simon Says Stamp Work It Wednesday Red, Orange and Yellow Challenge
Ceafts Galore Encore Anything Goes Challenge
Through the Craft Room Door Anything Goes Challenge
Crafty Gals Corner Punches/Die Cuts Challenge
Addicted to Stamps and More CAS Challenge
MarkerPOP Color Challenge

Paper Smooches Fall Color Story Challenge
]]>
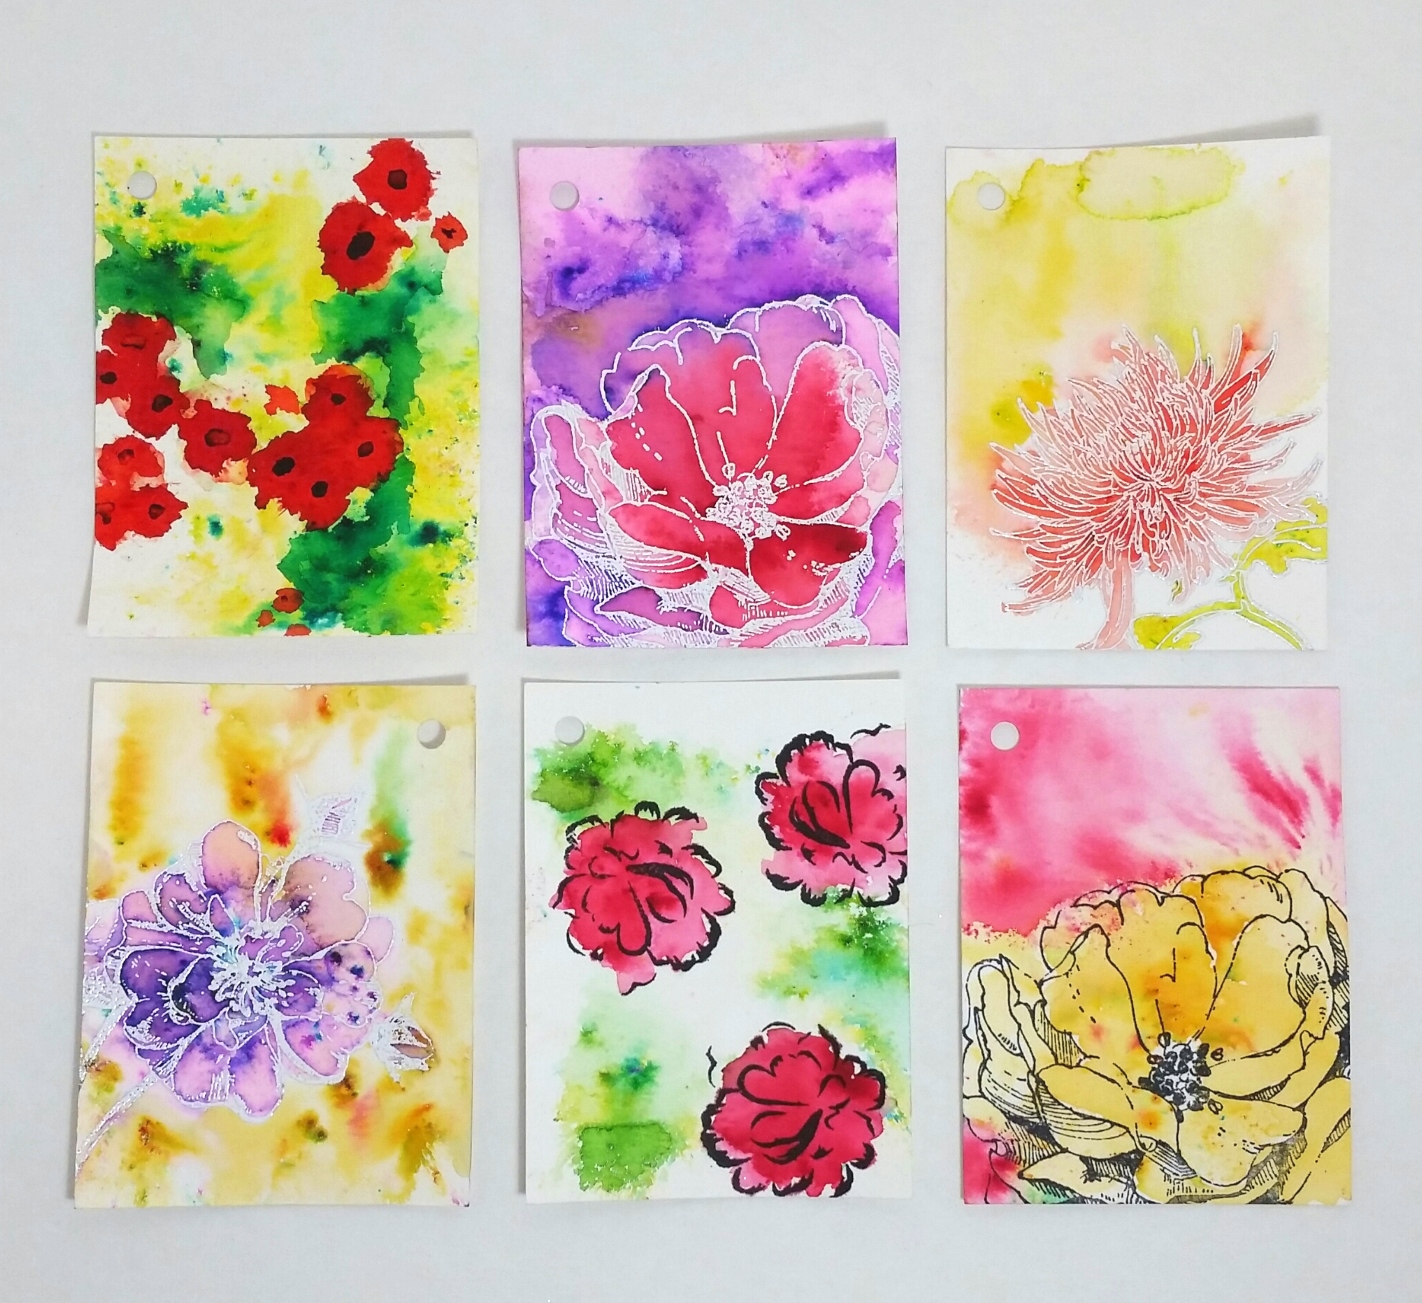 Anyway, after a lot of practice (see the photo at left of 6 of the 12 tags I colored up in class), I really fell in love with the magic and mystery that are in those tiny granules of pigment in the Ken Oliver Color Bursts.
My favorite technique was: (1) stamping an image with VersaMark ink, (2) heat embossing it with Hero Arts white embossing powder, (3) laying down water around the image (or in the image, but not both at once or you’ll get pigment everywhere), (4) lightly sprinkling on a bit of powder (never squeeze those bottles or you’ll end up with a hot dark mess), and then (5) moving the pigment crystals around with a paint brush or going WILD just spraying on water to move the pigment around in the ultimate crazy loose way (I can’t believe it since I’m usually all about control, but I did this a lot)!
We had the opportunity to try out one of our favorite techniques on a larger format. Sandy also provided a matte so that we could frame this “work of art,” but I had to finish up my piece when I got home to add the background soft greens. I wanted to try my hand at using some complementary colors (which if you’re not careful can turn very muddy) so I thought about vintage pansies and WILD roses as I painted this picture of a 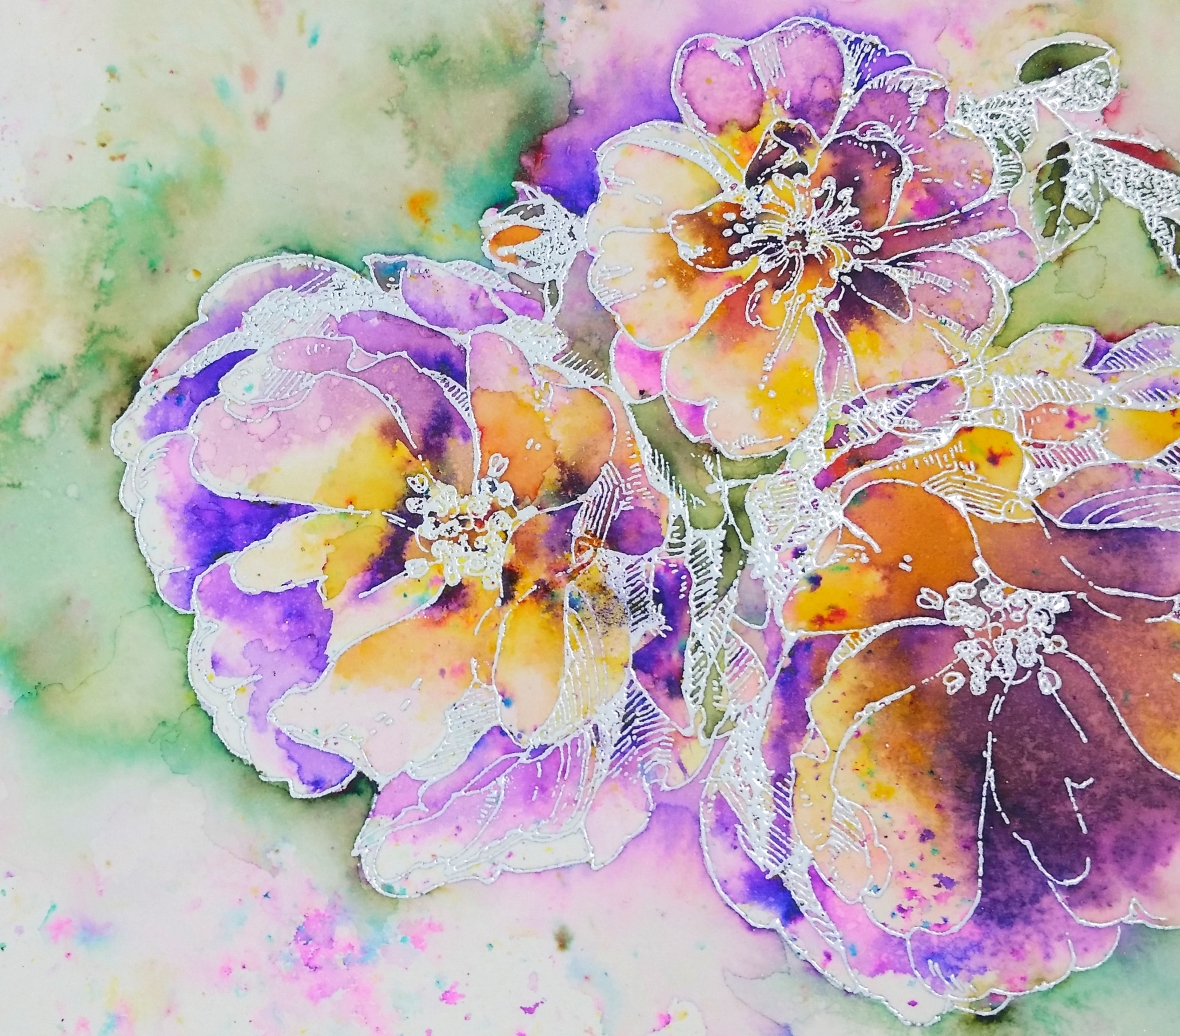 cluster of flowers (I did a bit of masking as I stamped the image to eliminate most of the stems and overlapping areas) that I stamped using the Hero Arts Antique Rose and the Hero Arts Antique Rose Stem stamps. The Ken Oliver Color Bursts I used were Violet, Lemon Yellow, Yellow Ochre, and Terre Verte. Even though this is a single layer treatment, there is so much visual movement and interest that comes from the Color Bursts. I’ll definitely be playing more with these!
By the way, the BIGGEST THRILL for me was that Sandy actually took a picture of my final floral project! She said she had never seen the purple and yellow worked together to achieve such a pretty natural color combo and she wanted to use my piece as a reference! I was humbled and absolutely floored!
The large floral watercolor is being entered into the following challenges:
Simon Says Stamp Monday Summer Fun Challenge
Simon Says Stamp Wednesday Let’s Go Wild Challenge
CAS-ual Fridays Time to Color Challenge
Word Art Wednesday Anything Goes Challenge
Through the Craft Room Door Anything Goes Challenge
613 Avenue Create Anything Goes Challenge
Penny Black and More Anything Goes with a Stamp Challenge
Craft Your Passion Anything Goes Challenge
Addicted to Stamps and More Anything Goes Challenge
MFT Camp Create Farewell Bonfire Single Layer Challenge
![]()

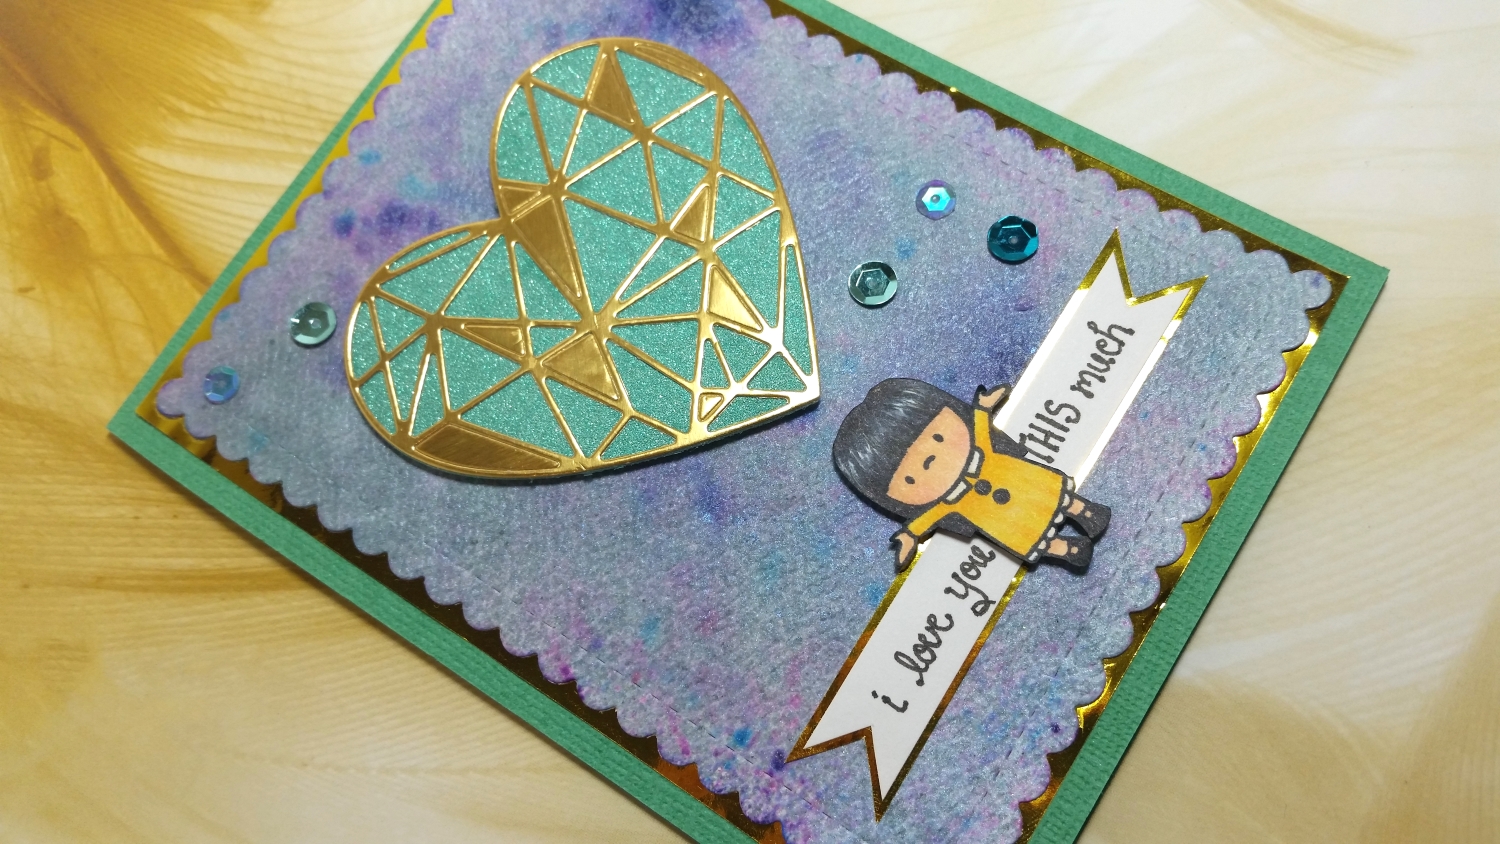
I sprayed an inexpensive piece of watercolor paper and overdosed it with Ken Oliver Color Bursts in Indigo. To soften the color I then went to town spraying it over top with Recollections Blue Shimmer spray and Heidi Swapp Navy spray. Oh yes! — the effect was a spotty almost bokeh look. I die cut the piece with one of my go-to card base dies from the WPlus9 Sunshine Layers die set and then layered that on top of a gold foil paper.
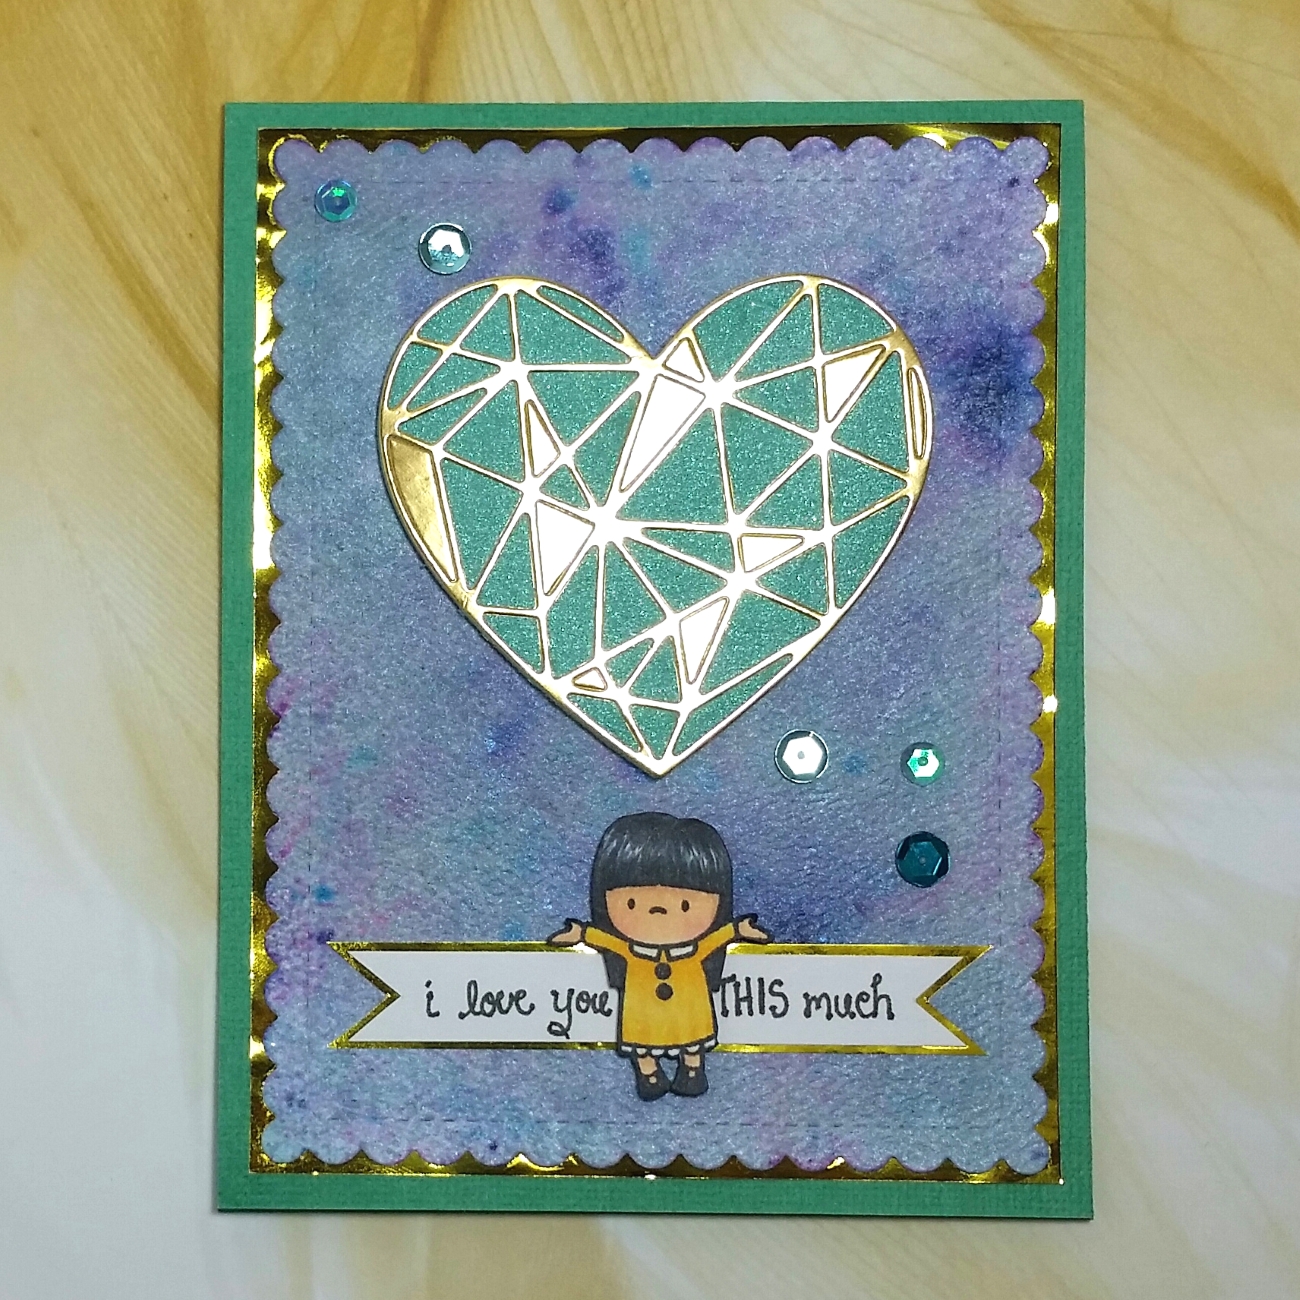 I layered a gold foil paper faceted heart from the Winnie and Walter True Multifaceted Heart Cutaways die (intentionally leaving some of the facets in to add visual weight to to the gold faceted part of the heart) over a shimmery blue-green fine glitter paper heart and popped the whole thing on double sided foam adhesive.
I really wanted to use the girl from the Mama Elephant In My Heart stamp set that had the outstretched arms for this card, but I wanted her to look more like me. So I stamped her out with MFT Black Licorice Hybrid Ink and then cut off the little pony tails and drew in longer straight hair with a Copic Multiliner Pen. I Copic colored her up simply with E51, E53, R20, C7, C9, B01, Y11, Y15. Then I fussy cut her out and put tiny strips of double-sided foam adhesive behind her to pop her up to the same level as the heart.
Then I practiced writing out the sentiment like a bazillion times until I finally got it to look straight and with all the letters basically the size I wanted them. I hand cut it into a banner and lined it with more gold foil paper. Uh oh, now I faced a dilemma. Where could I put this sentiment and not obstruct the beautiful faceted heart? After much angst, finally I figured out that I could cut the banner in half and tuck each half on either side of the little girl. YAY! Ultimately I think the card ended up with a good center-balanced design, and I just tweaked the big banner part of the MFT Wednesday Sketch Challenge (see below for link) into a smaller one with a sentiment. 🙂
Lastly for a little extra sparkle, I couldn’t resist adding some blue-green sequins. Voila! Now this is a first — I’m ready early for our anniversary! 🙂
This card is being entered into the following challenges:
Simon Says Stamp Monday Tic Tac Toe Challenge – sequins, blue, spray
Winnie & Walter Rerun No. 11 Challenge
Simon Says Stamp Wednesday Anything Goes Challenge
Word Art Wednesday Anything Goes Challenge
Through the Craft Room Door Anything Goes Challenge
Crafty Gals Corner Anything Goes Challenge
Craft Your Passion Anything Goes Challenge
Not Just Cards Anything Goes Challenge
MFT Wednesday Sketch Challenge #287

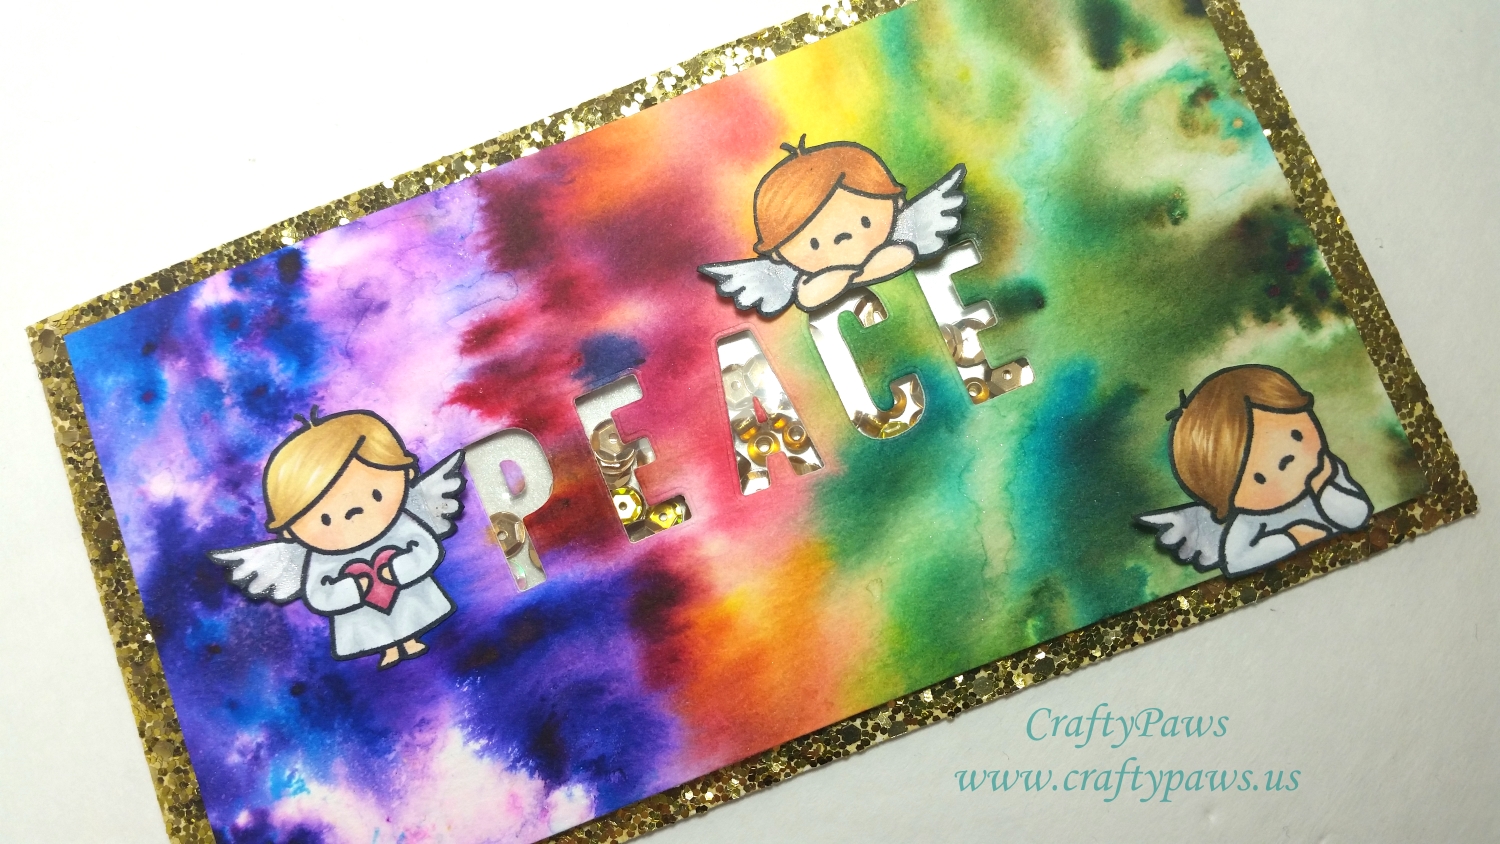 I first used Ken Oliver Color bursts in Indigo, Merlot, Terre Verde and Yellow Ochre on water color paper to create a kind of rainbow tie dye effect to represent the LGBT community’s philosophy of diversity and inclusion. I then die cut the word “PEACE” using the Lawn Fawn “Cole’s ABCs” die set. Using a fuse tool I sealed up part of a project life pocket page that I filled with gold sequins and seed beads to make a shaker element that I glued onto the back of the PEACE opening with Beacon Zip Dry glue (which is great for nonporous surfaces like plastic sleeves).
To represent the innocents I colored up three of the angels from the Mama Elephant “Love from Above” stamp set with the following Copic colors: Skin: E000, E00, R30; Blonde: E53, E55, Y21; Brown Hair: E53, E55, E57; Strawberry blonde: E53, E55, YR12; Heart: R81, 83, 85; Angel clothes and wings: C0, C2 with 2 coats of clear Wink of Stella on the wings for lots of shimmer. I fussy cut them out and inked the edges with black ink to eliminate the distraction of the white edge of the cut paper.
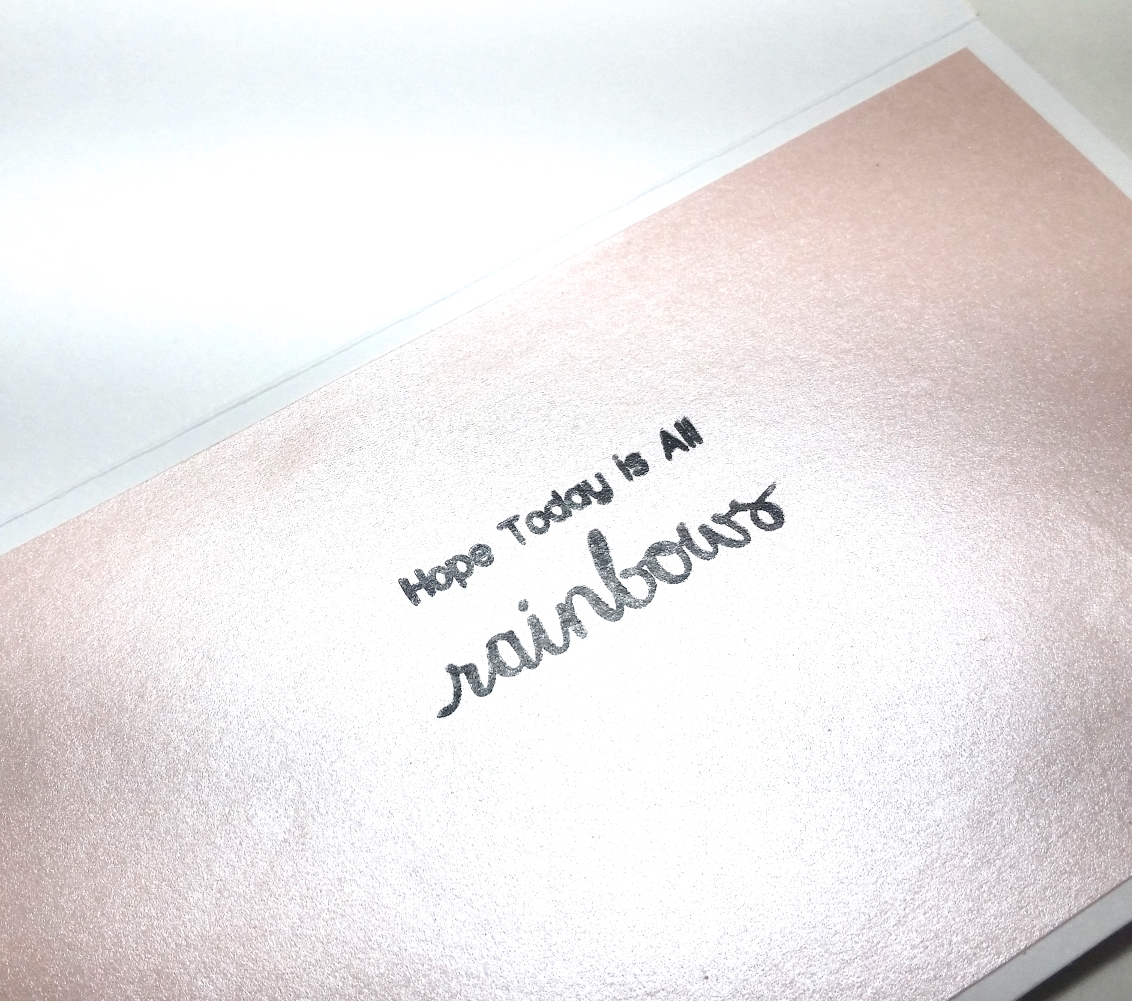 To help the gold sequins show up, I backed the opening with a scrap of shimmery white Shimmerz paper from DCWV. Then to help the gold sequins pop and still be cohesive on the card, I backed the watercolored card front onto chunky gold glitter card stock from Recollections. Lastly to add a little extra dimension and interest to the angel wings, I popped them up with a bits of Glue Dots. The inside of the card is simply lined with another scrap of pale pink Shimmerz paper and stamped with a sentiment from The Greeting Farm “Magical Friends” stamp set that reads, “Hope Today is All Rainbows.”
The following is a process video showing how I created this card start to finish:
This card is being entered into the following challenges:
Simon Says Stamp Wednesday Add Some Shimmer Challenge
Lil Patch of Crafty Friends Anything Goes Challenge
Word Art Wednesday Anything Goes Challenge
Craft Your Passion Anything Goes Challenge
613 Avenue Create Anything Goes Challenge
Through the Craft Room Door Anything Goes Challenge
Crafty Gals Corner Sparkle and Shine Challenge
Virginia’s View Make It Colorful Challenge
]]>