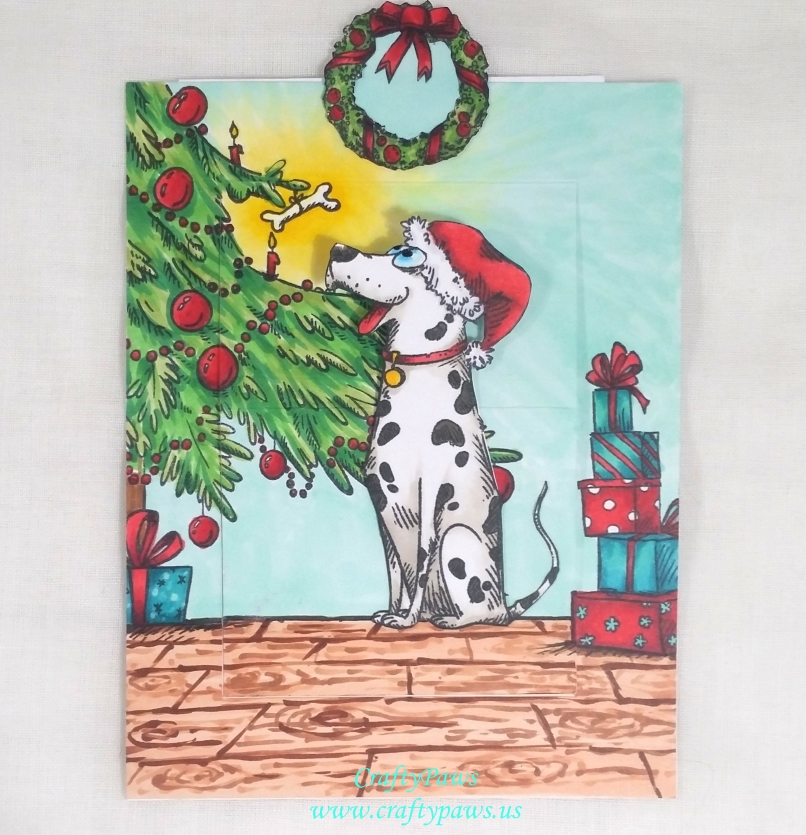
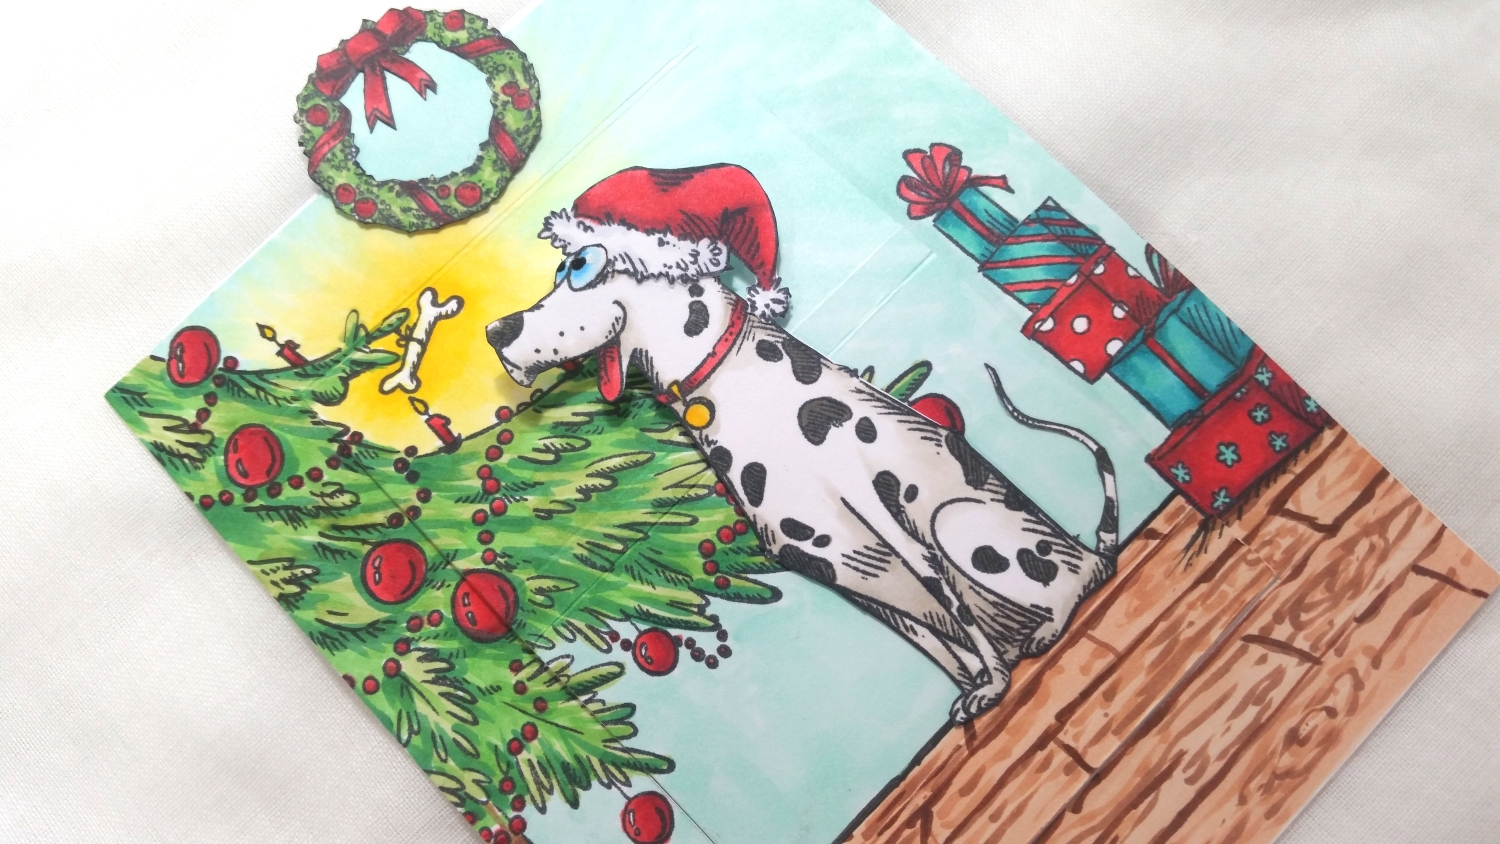
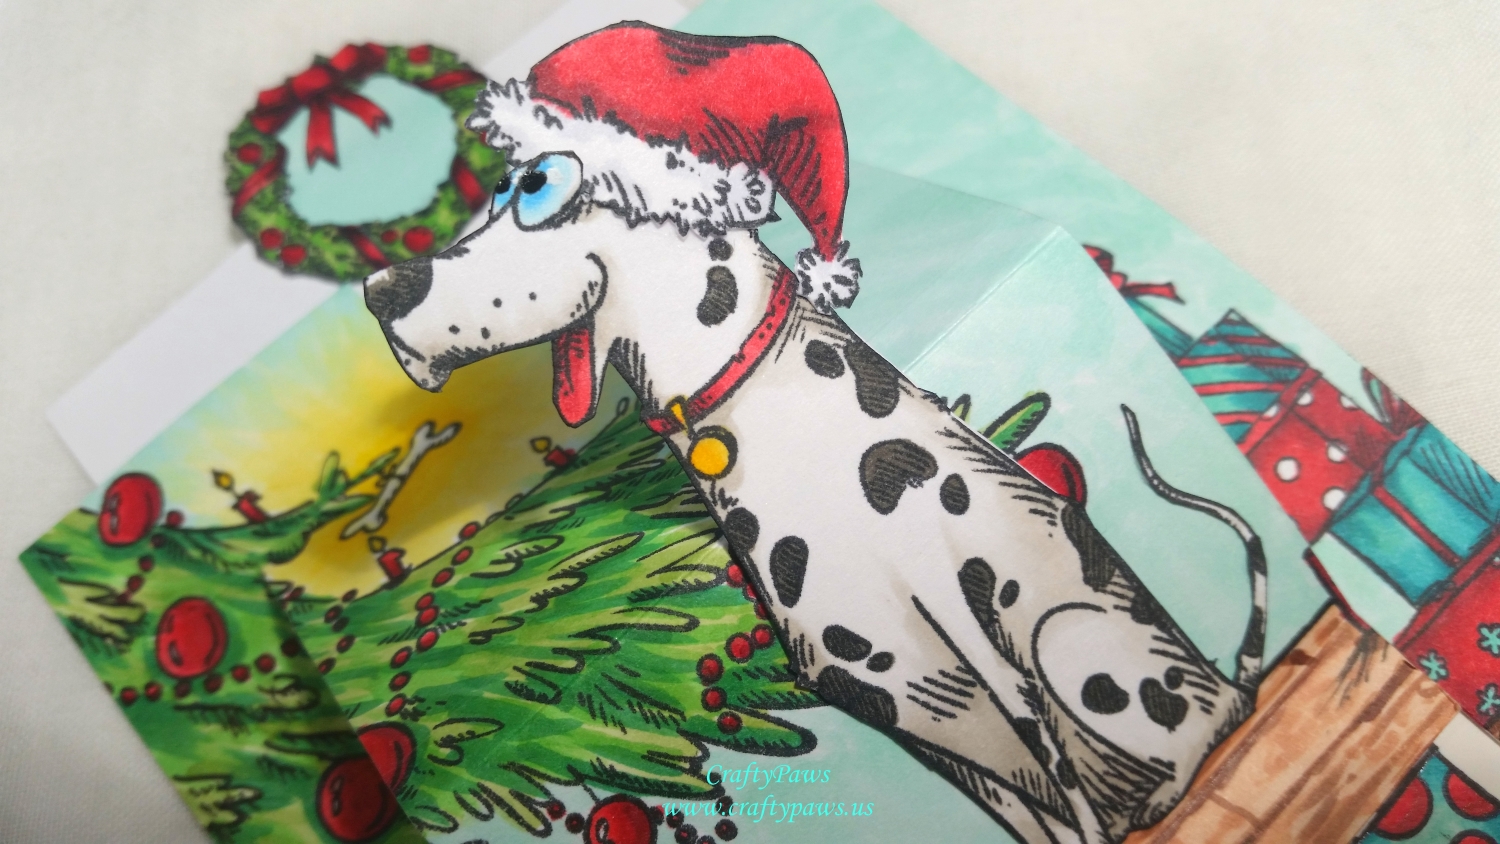
I chose the Dalmatian from the Dogs Stamp Set as the focal point of my card. I Copic colored him using the following colors:
White: W0 and W1; Black: W5;
Eyes: B000 and B02 with Signo Uniball White Gel Pen and Black Glaze Pen;
Tongue and Collar: R35 and 37;
Tag: Y15 and Y19
Then I fussy cut him out, taking care to also cut around his eyes about halfway down so that I could position the Santa hat from the Funny Accessories Stamp Set fully onto his head.
For the card front background, I used the Christmas tree base from the Sleigh Stamp Set and using a 0.1 pt Copic Mulit-liner Pen I doodled a bit more of the decorated Christmas tree in order to extend the height of the tree. I also doodled a dog bone hanging from a tree branch as a special doggy-themed Christmas decoration. To fill out a little more of the background scene I added a stack of presents to the right side of the panel from the Funny Accessories Stamp Set, and then Copic colored/drew in a wood floor and the rest of the scene using the following colors:
Santa Hat: R35, R37 and R39 and C1 Yellow aura around bone: Y00, Y11, Y13, Y08
Tree: G43, G14, G17 Red accents: R35, R37 and R39 Teal accents: BG32, BG23, BG45 and BG49
Wall: BG11 Wood Floor: E11, E13, E25, E29
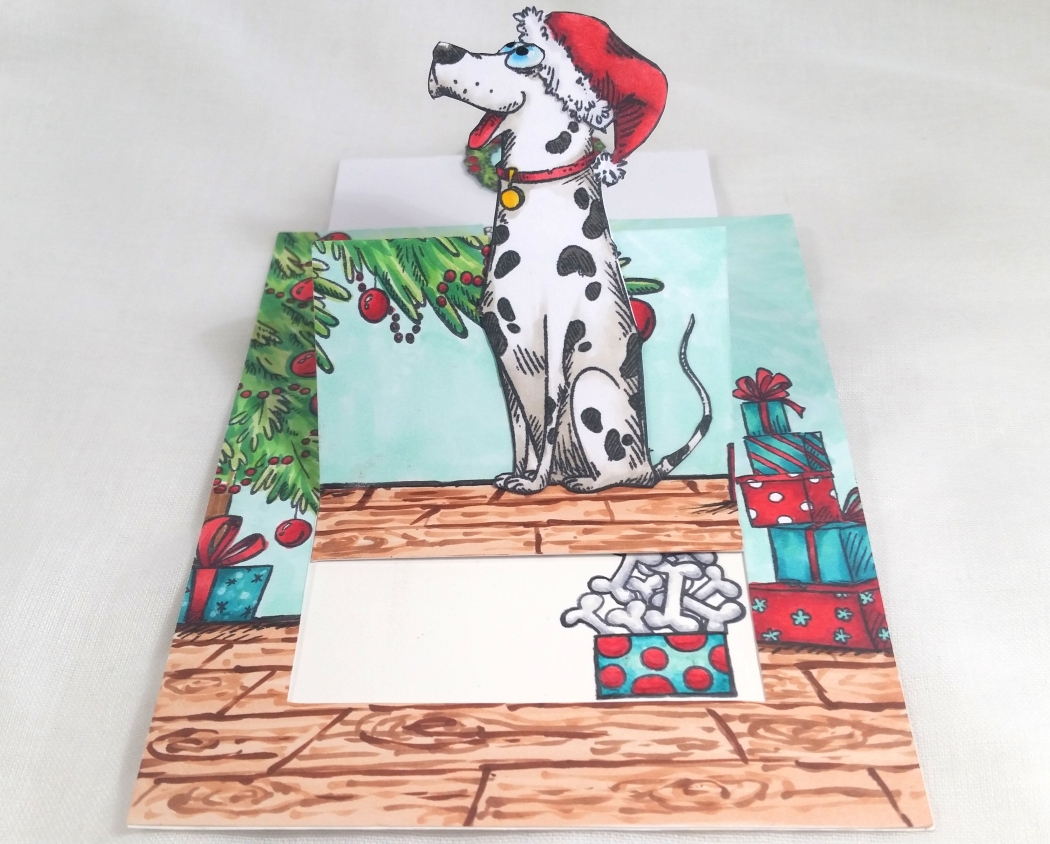
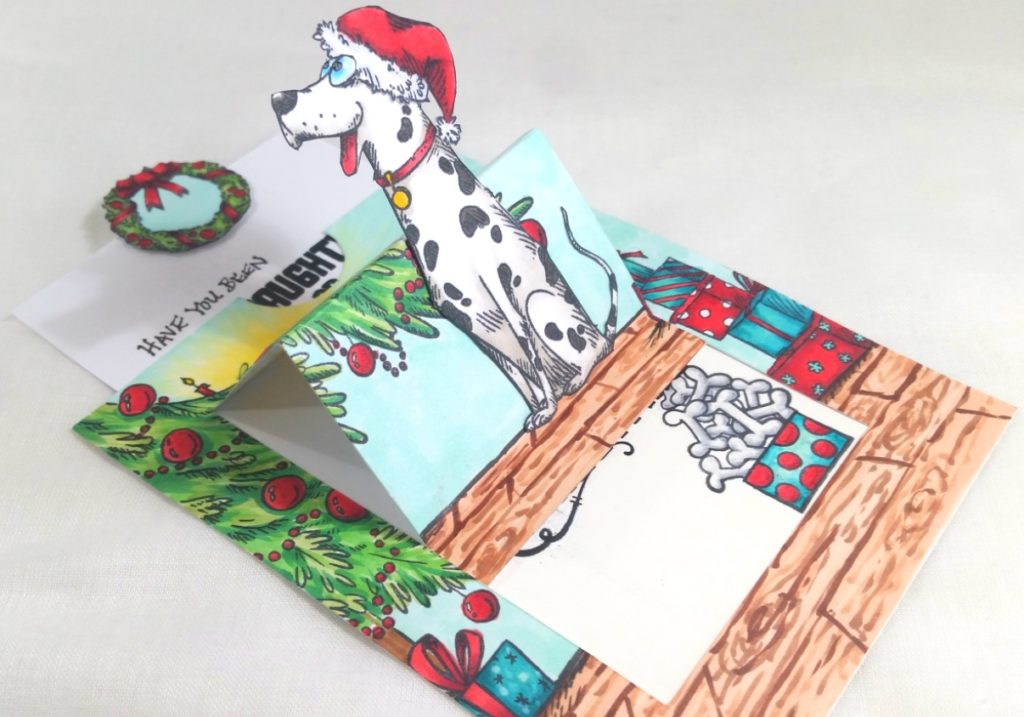
The following are the instructions to create the pop-up mechanism:
* Use the decorated card front measuring 4.25″ x 5.5″ (A2 size)
* Use an X-Acto blade and cut 0.75″ from the left, bottom and right sides of the card; take care to leave the top 0.75″ at the top side uncut.
* Turn the card 90° so the top of the card front is now on the left and use a score board to score at: 0.75″, 2.5″ and 4.25″ between the cut lines.
* Burnish the scored lines so that you form a valley at the 4.25″ line, a hill at the 2.5″ line and a valley at the 0.75″ line.
The following are the directions to create the slider mechanism:
* Cut a smaller slider piece of cardstock to 3.25″ 4.75″
* Use Scor-Tape (glue works too) on the back of the bottom smallest section of the pop-Up mechanism you made above.
* Attach the smaller slider piece of cardstock, centered and lined up to the edge of the bottom smallest section of the pop-Up mechanism.
* Now use Scor-Tape (glue works too) on the back of the card front around the left, bottom and right sides, beyond the center-cut pop-up mechanism area and attach this to an A2 sized card base.
* Optional: You can cut out a thumb window at the top of the cardfront and/or add a pull tab to the top of the smaller slider piece of cardstock. I did both and took the opportunity to create a pull tab using the Christmas wreath from the Katzelkraft Sleigh Stamp Set.
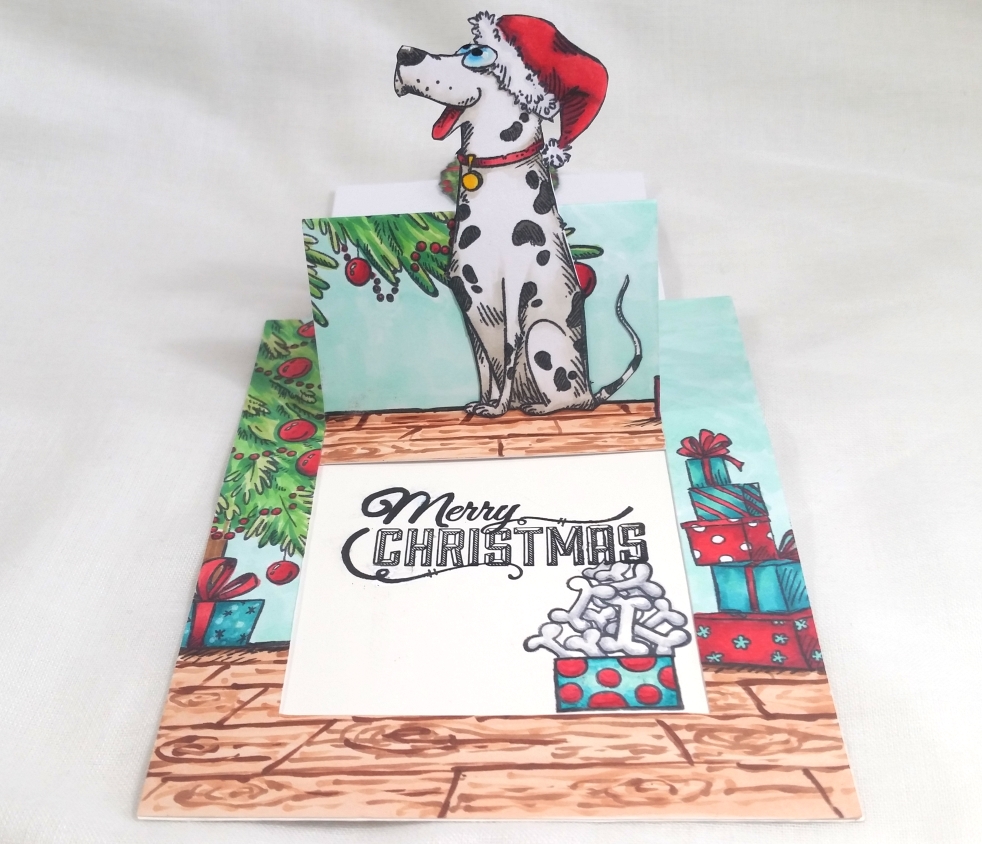
 I hand wrote and used a couple of stamps from a Prima “Merry Nice” Stamp Set to add a sentiment on the top half of the slider piece that says: “Have you been naughty or nice?” and a stamp on the bottom half of the slider piece that says: “Merry Christmas”. For a bit more embellishment inside the card, I also stamped a box full of bones from an old Hampton Art Furry Christmas Stamp Set, and I colored it up to match the stack of presents on the right side of the card.
CLICK THE FOLLOWING PICTURE to watch the process tutorial video of crafting this slider pop up card:
Disclosure: Many of the supplies I’ve used for today’s project are linked. Some may be affiliate links, which means if you make a purchase I receive a small commission at no extra cost to you. I truly appreciate your support toward the costs of running this blog!
This card is being entered into the following challenges:
The Corrosive Challenge Anything Goes
Simon Says Stamp Work it Wednesday Celebrate it Challenge
Creatalicious Anything Goes with Optional Circles Challenge
Word Art Wednesday Anything Goes Challenge
Lil Patch of Crafty Friends Anything Goes Challenge
Fab ‘n’ Funky Christmas Challenge
613 Avenue Create Anything Goes with Optional Clean and Simple Challenge
Through the Craft Room Door Anything Goes Challenge
Crafty Gals Corner 3+ Layers Challenge
Stamp Sensations I Spy Something with a B Challenge – Baubles, Boxes, Bows, Bones
]]>
I first stamped the little Santa hat from the Your Next Stamp “Hammie Holiday Fun” stamp set and then created a quick post-it note mask to cover it up. Next I stamped out the pup pulling the toy train set with another baby pup from the “Playful Pups” stamp set, positioning the duo so that the Santa 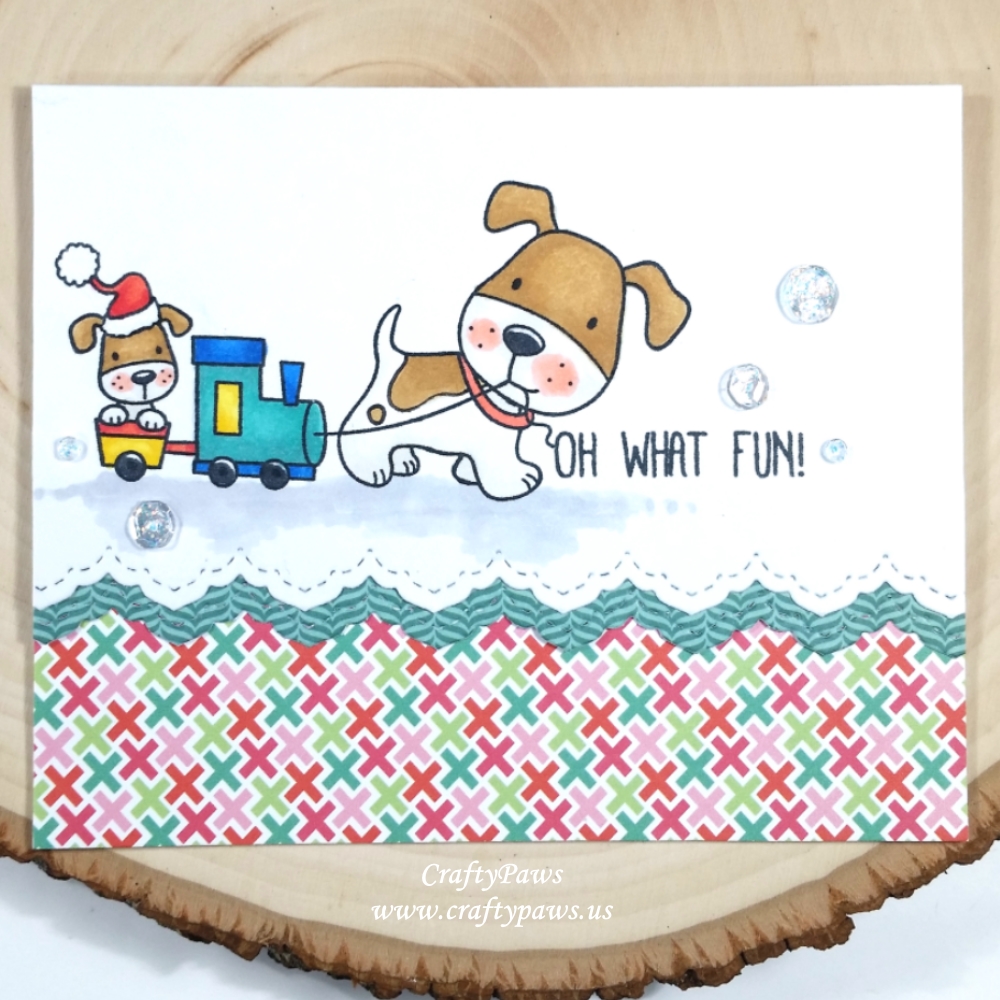 hat would look like it was being worn by the little pup. Lastly, I took a sentiment from the Avery Elle “Oh What Fun” stamp set and connected it with the string of the toy train just to the right of the pups. Using a Copic Multiliner Pen in 0.1 pt, I also doodled in a little stripe detail into the train car, a couple of spots on the bigger pup, and a hint of a smile on the big pup too. To add a little interest, I cut down this card front with a Pretty Pink Posh Stitched Borders 2 die, leaving a pretty decorative edge on the bottom.
I used the following Copic colors to color up this little scene:
Pups: W0, E30, E31 and R20
Coral Santa hat: R22 and R35
Train engine: B16, BG13, N2 and Y13
Train car: Y13, R22 and R35
Train tires and puppy noses: C7
Shadow to ground the scene: C1
For the patterned papers in the lower 1/3 of the card front, I used the Pretty Pink Posh Stitched Borders 2 die to cut out a scrap of blue-green small patterned paper for an additional decorative border. I paired that with a cross patterned paper with corals and blue-greens. Lastly, to add a little sparkle, I added 5 clear sequins in varying sizes and topped each with some Icicle Stickles.
The following is a process video:
Disclosure: Many of the supplies I’ve used for today’s project are linked. Some may be affiliate links, which means if you make a purchase I receive a small commission at no extra cost to you. I truly appreciate your support toward the costs of running this blog!
This card is being entered into the following challenges:
Card Mania Christmas Challenge
613 Avenue Create Anything Goes with Optional 3D Challenge
Creatalicious Anything Goes With Optional Flourishes Challenge
Crafty Gals Corner Anything Goes Challenge
Fab ‘n’ Funky Christmas Challenge
Lil Patch of Crafty Friends Anything Goes Challenge
Crafts Galore Encore Anything Goes Challenge
Simon Says Stamp Wednesday Anything Goes Challenge
MFT Sketch Challenge #361
 I colored it up with Copic colors, coated the white fuzzy areas of the Santa hat with Studio G glitter glue for sparkle, colored the eyes and nose with a Sakura black Glaze Pen for shine, and fussy cut it out. Then I popped it up on double sided foam adhesive and positioned it on a variety of layers of patterned and plain card stock from my scrap box in red, teal/mint, and pink. The red reverse scallop layer (that I think looks a little like the edges of a postage stamp) is actually the negative of the die cut from the Pretty Pink Posh Scallop Frames Dies that I used on the card I shared in the previous post! The whole card front is glued onto a mint card base and that’s really it!
This is going into a surprise RAK (random act of kindness) package of crafty goodies for a friend who is in need of a boost during these emotional and often difficult holiday season. I hope she enjoys it and all the crafty yumminess I’m sending her. 🙂
This card is being entered into the following challenges:
Simon Says Stamp Wednesday Gift It Challenge
Simon Says Stamp Work It Wednesday Die-Cember Challenge
Word Art Wednesday Anything Goes Challenge
Lil Patch of Crafty Friends Anything Goes Challenge
CAS-ual Friday Christmas and Hanukkah Challenge
Card Mania Anything Goes Challenge
Through the Craft Room Door Anything Goes Challenge
Not Just Cards Anything Goes Challenge
Creatalicious Anything Goes with Optional Christmas Challenge
Paper Sweeties December Inspiration Challenge
]]>
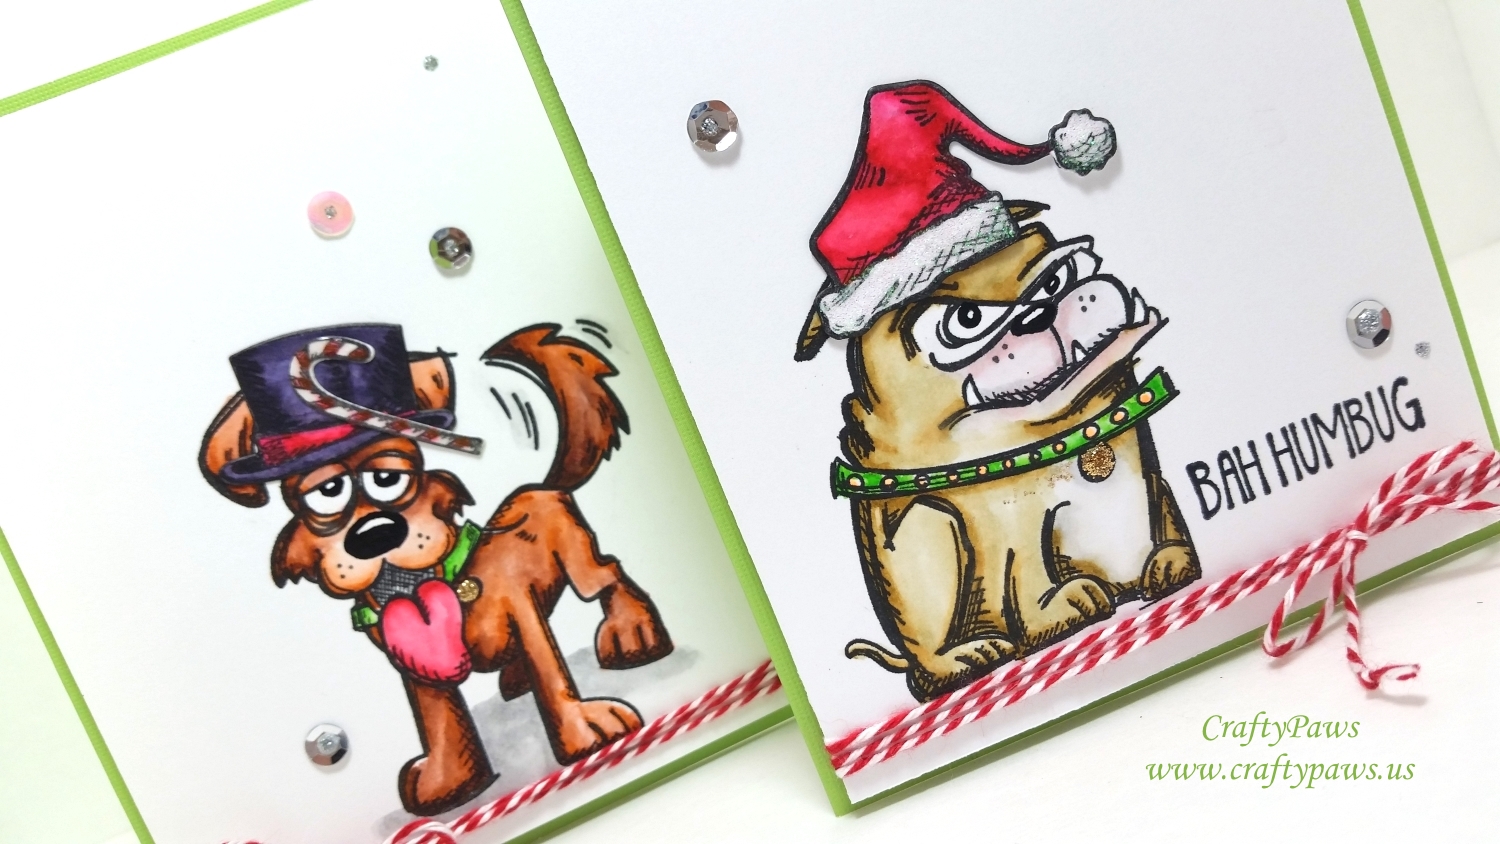
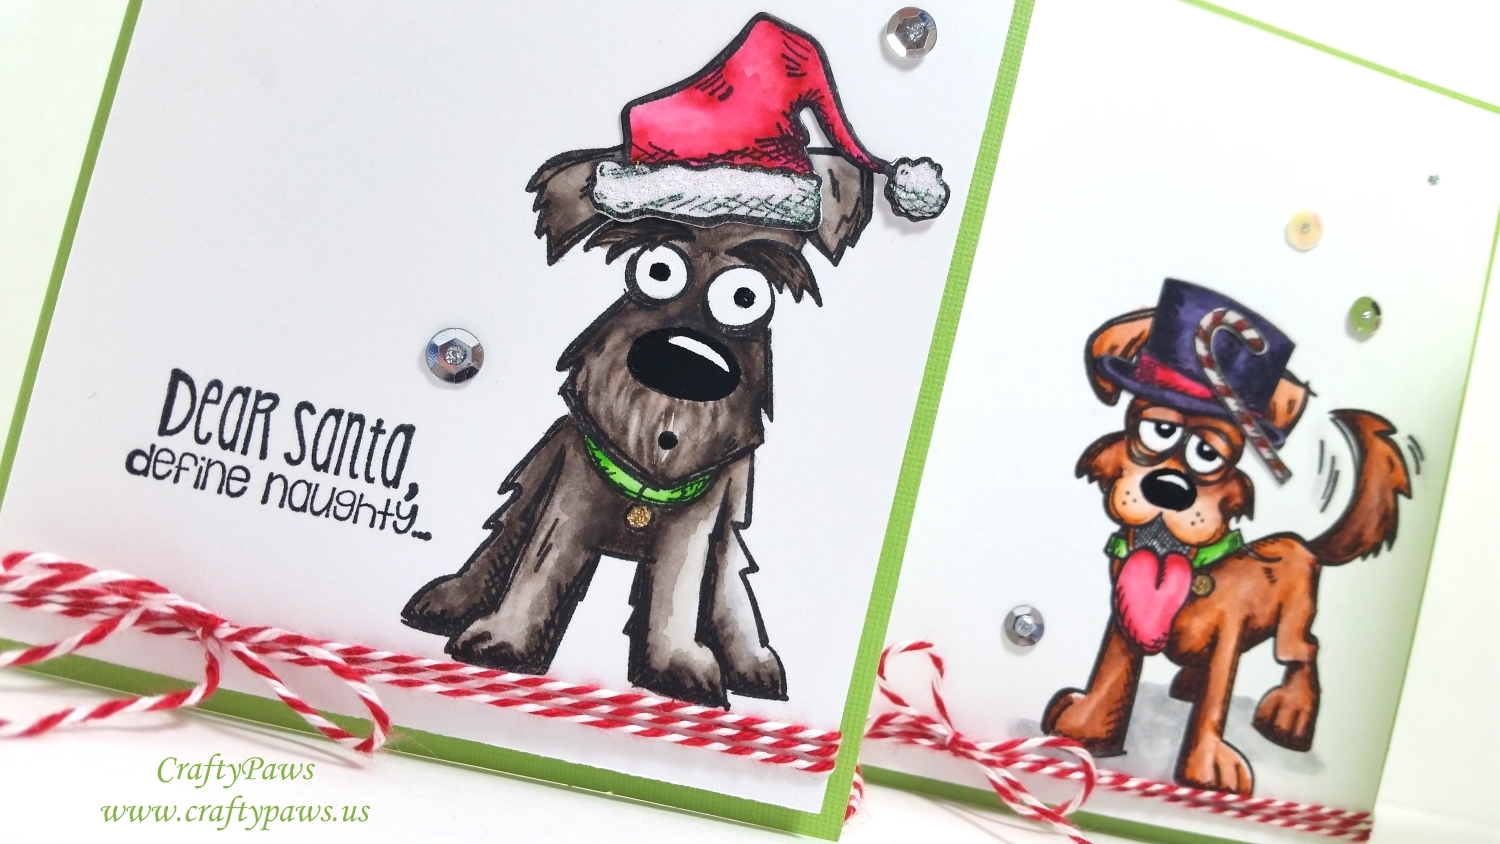
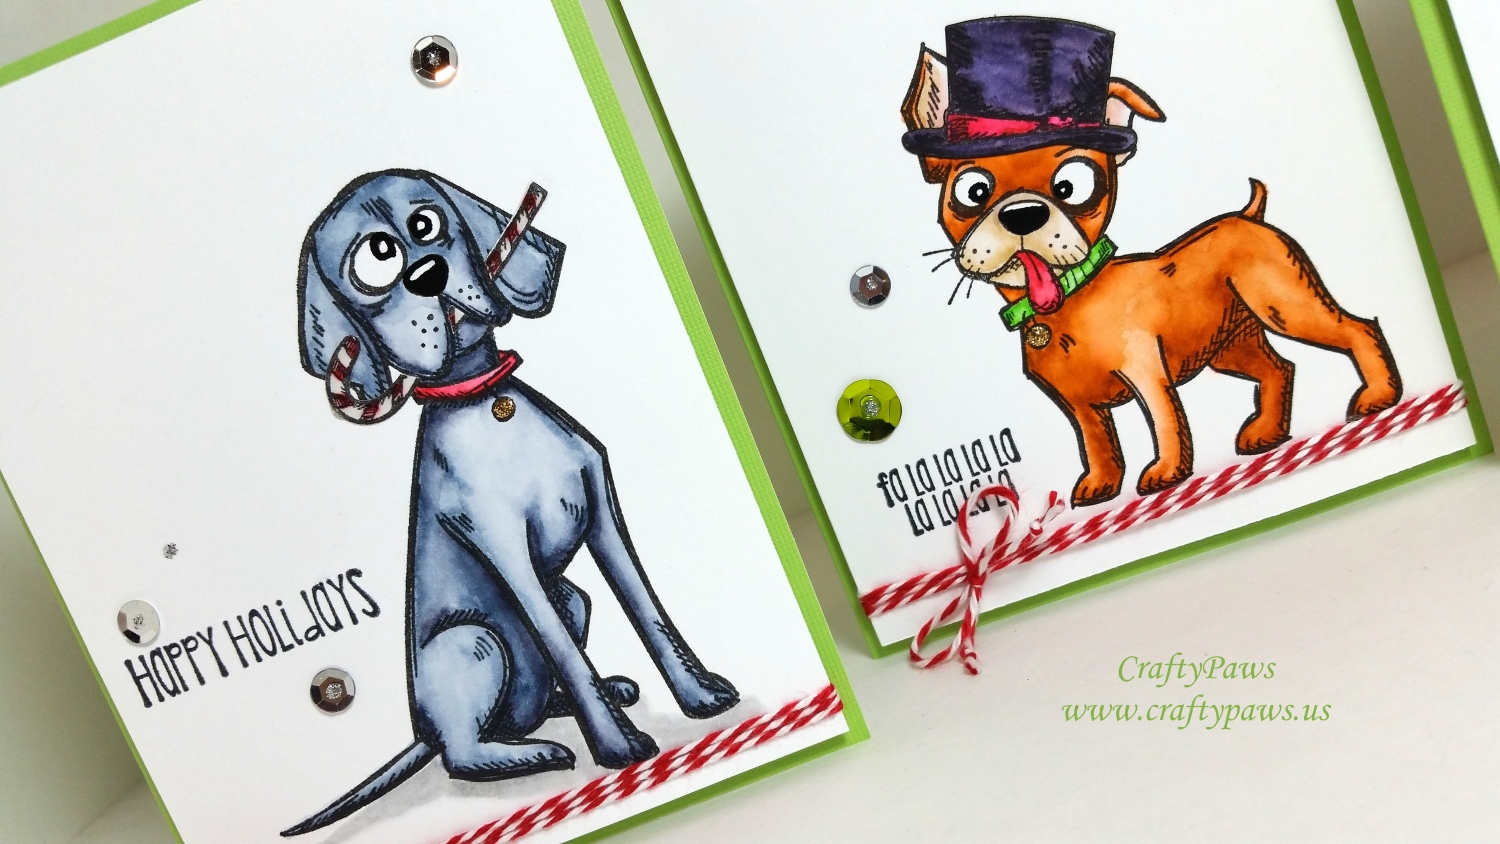
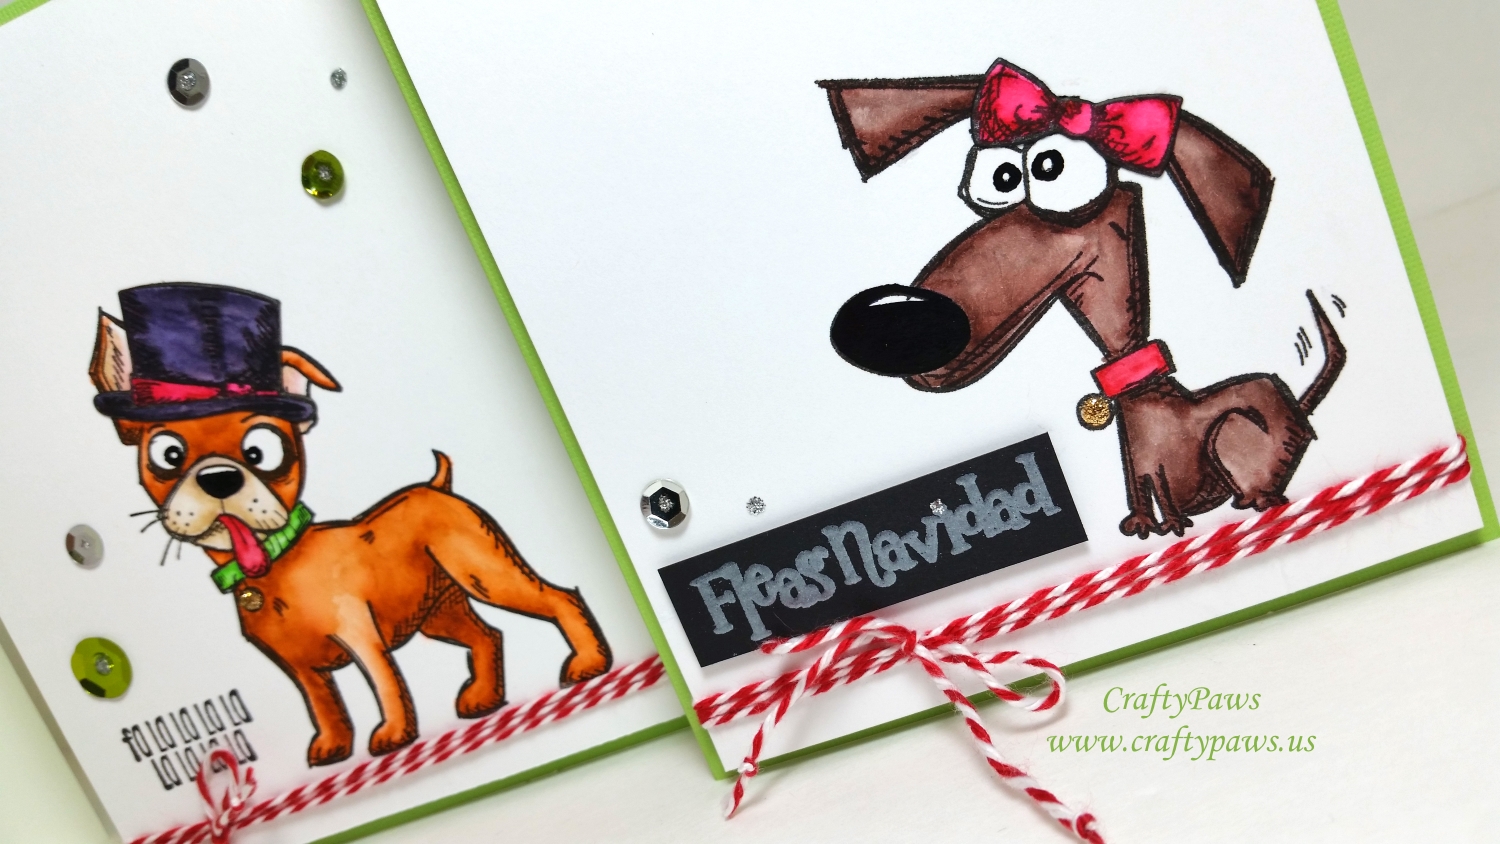
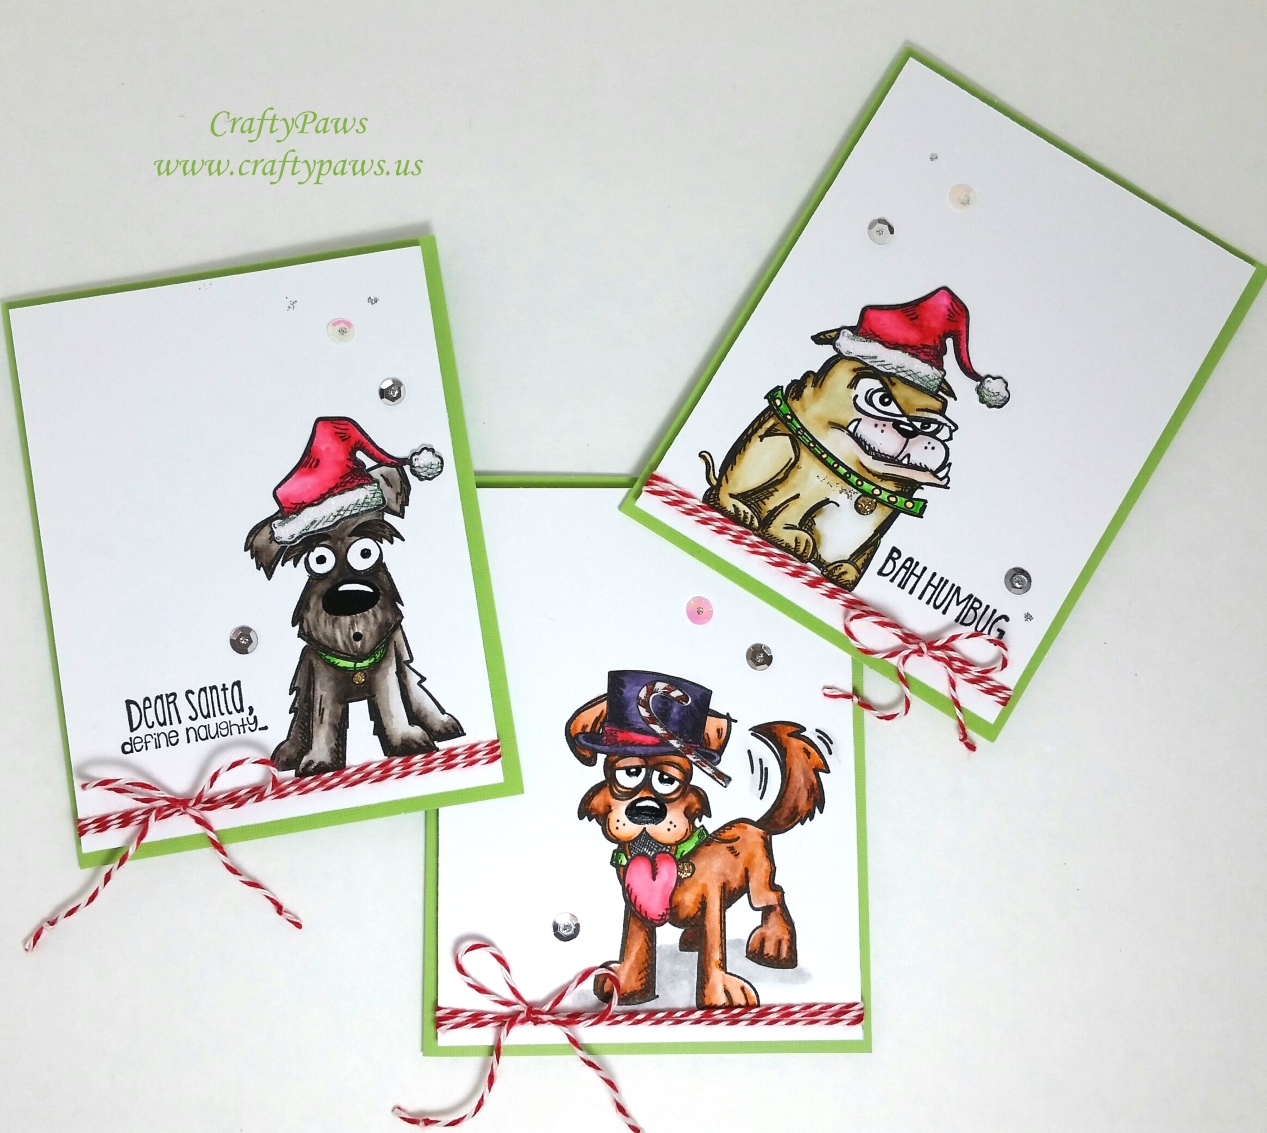 I stamped the dogs directly onto Strathmore Bristol Paper that I cut down to 4″ x 5.25″ and stamped out all the accessories onto scraps that I die cut out with the Crazy Things Coordinating Dies (I am a huge fan of these dies because they don’t leave any white border around the images so they don’t disrupt the look of any scene building) to mix and match with the dogs on the cards. The following are the colors I used (dogs listed clockwise from top left in main picture):
Weimeraner: Blue Gray (090) and Gray (092)
Dachshund: Dark Brown (062)
Boxer: Brown (060)
Scottish Terrier: Gray Brown (094) and Dark Brown (062)
Bulldog: Light Gray (091), Oatmeal (064), Dark Oatmeal (066) and Light Pink around muzzle
Shaggy Mutt: Brown (060) and Dark Brown (062)
I also colored in the accessories with Geranium Red (029), May Green (047) and Black (010) and added Glossy Accents over the candy canes, iridescent glitter glue on top of the white fluffy areas of the Santa hats, and gold Distress Stickles over the dog tags.
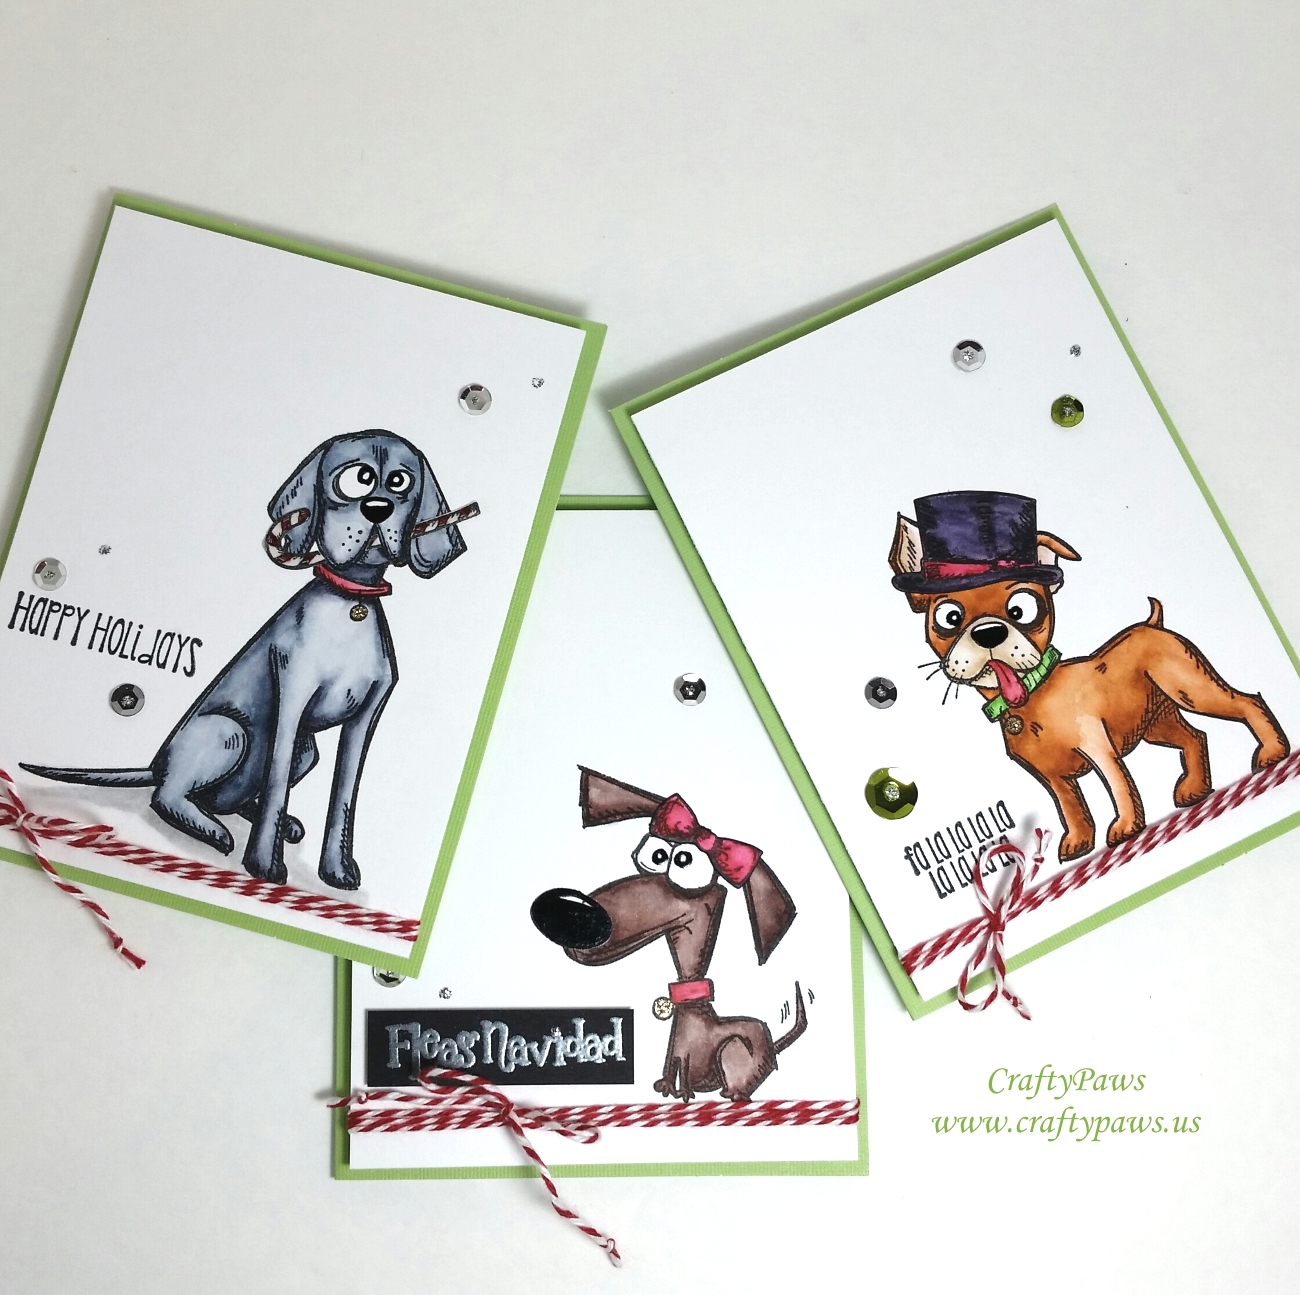 I had positioned each of the dogs in the lower left or lower right of each card front so that I would have the option of stamping out a sentiment just to the left or right of the dogs. Most of the sentiments are from the C.C. Designs “Snarky Christmas” stamp set (sorry, this is from 2014 and is retired), although I have one from My Creative Time “Christmas Doggy” (I smeared this one so I had to heat emboss this on black card stock to cover up the oops) and another from Prima “Merry Nice” (the “Naughty or Nice” inside the card with the Shaggy Mutt).
I also wrapped some red and white baker’s twine (from the Dollar Tree 3 pack!) 3 times around the card fronts and added a bow before popping up the whole card front with double sided foam adhesive onto green card bases from a Michael’s Hot Buy cards and envelopes set. Lastly, I added some well-positioned sequins onto each card with Glossy Accents and topped each sequin hole with silver Distress Stickles for a finished look.
The following is a short share and watercoloring tips video of a couple of the crazy dogs:
These cards are being entered into the following challenges:
Word Art Wednesday Anything Goes Challenge
Simon Says Stamp Monday Thinking of You Challenge
Simon Says Stamp Wednesday Thinking of You Challenge
Fab ‘n’ Funky Animals Challenge
Crafts Galore Encore Anything Goes Challenge
Creatalicious Anything Goes Challenge
Craft Your Passion Anything Goes Challenge
Addicted to Stamps and More Holiday Challenge – WINNER
MarkerPOP Sketch Challenge #107

]]>
For the first card, I used the Diemond Dies Pine Tree Die Set (these trees are a little more irregular and thinner than the Christmas tree dies by Diemond Dies) to make a kind of simplified outdoor forest scene. I inked the edges of the die cut trees with Tim Holtz Distress Ink in peacock feathers and decided to decorate the largest of them in the center with clear rhinestones and white and silver sequins of different sizes. I used Recollections glitz glitter glue in the centers of the sequins to cover up the holes and added a smattering of glitter glue dots on the trees for a little added sparkle. To add even more shimmer, I also colored in some of the circles on the patterned paper I used with a clear star Sakura Gelly Roll pen. To ground the trees and the dogs, I used a Copic C1 marker to add some shadow and a reference to a snowy ground.
Like my cards from yesterday, I also fussy cut the little dogs from my free digi, “Thanksgiving Boost,” and added them to one side of the largest tree. However, this time, I wanted to tell a different story. If you’ll notice, there are some rhinestones and sequins on the ground. These mischievous, naughty dogs are knocking off ornies from the tree! LOL The sentiment, which is from the C.C. Designs “Snarky Christmas” stamp set, says “Dear Santa, define naughty….”
Please consider using the code: thankskristina for 10% off your entire purchase at Diemond Dies and free worldwide shipping on orders of $35 or more.
For the second card, I used the same dogs but had them working together to peer through a cut out to gaze wistfully at a Christmas wreath made of doggy bones. I made the wreath using a Marvy Uchida dog bone punch and lots of little scraps from my scrap box. To give it a finished look, I covered all the bones with Glossy Accents and topped the wreath with a teeny tiny red satin bow (which I made using the Craft-Dee BowZ tool–oh my gosh this tool is amazing. I thought I was pretty good at making bows by hand, but this tool eliminates all the fussing and guess work!). I wrapped some green and white bakers twine around to give the Rottweiler something to “stand” on. I used another sentiment from the Snarky Christmas set, but this one sweetly just says what I image that Chihuahua is thinking, “It’s the most wonderful time of the year” as he peeks in and sees that amazing dog bone wreath. 🙂
The following is a video share of these two cards and the cards from yesterday’s post as well:
The first card is being entered into the Naughty or Nice Festive Furballs November Challenge in the naughty category and
the Tree-mendous Tree Challenge in the Moxie Fab World
The second card is being entered into the Craft-Dee BowZ Anything Goes with a Handmade Bow November Challenge and
The Paper Nest Dolls Anything Goes Challenge #23
Thanks for stopping by! Please subscribe if you wish, and have a great day! WOOF
]]>
I made these two cards using the large Christmas tree die and the mini album dog bone die from Diemond Dies. Remember, use the Diemond Dies coupon code “thankskristina” for 10% off of your entire order and free worldwide shipping on orders of $35 or more.
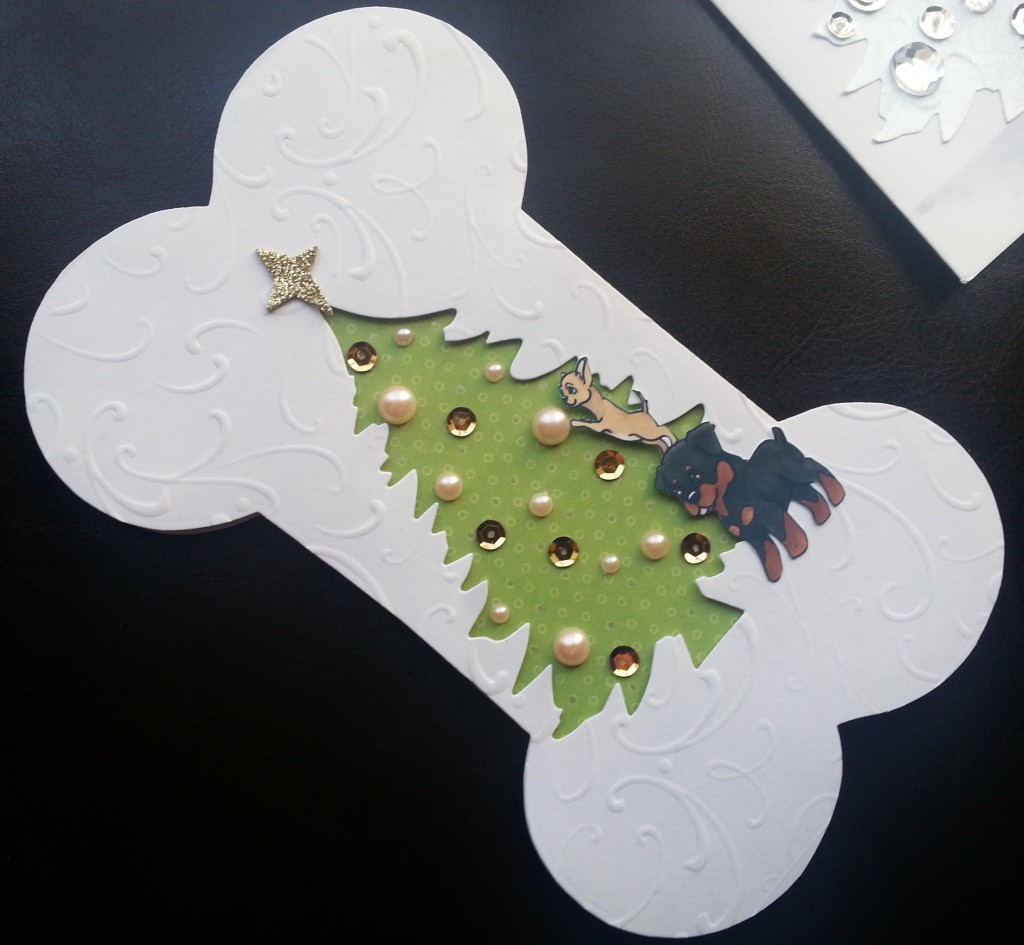 I made a dog bone hinge card using plain white card stock and embossed the top layer of the bone with some swirly designs (to give the illusion of swirling snow?). From the top layer, I die cut out a Christmas tree. Using some foam adhesive I backed the Christmas tree opening with a scrap of pale green patterned paper so that the tree would be recessed. I added just the dogs from the Thanksgiving Boost digi so that the dogs looked like they were working together to decorate the tree. 🙂 Then I had fun embellishing the tree with flat back pearls, gold sequins and a gold glittery hand cut star.
The second card I made with the Christmas tree that was die cut out of the first. I glittered it up using Folk Art Extreme Glitter paint in hologram and embellished it with clear rhinestones and silver sequins of different sizes. I added glitz Recollections glitter glue to the centers of all the sequins to cover up the little holes and add more sparkle! Again I used the dogs from the digi to add a little furry fun.
These cards are being entered into the following challenges:
Naughty or Nice Festive Furballs November Challenge – nice category
Tree-Mendous Tree Challenge in the Moxie Fab World
The Paper Nest Dolls Anything Goes Challenge
The Pink Elephant CAS Challenge
Thanks for stopping by and have a great day! WOOF
]]>