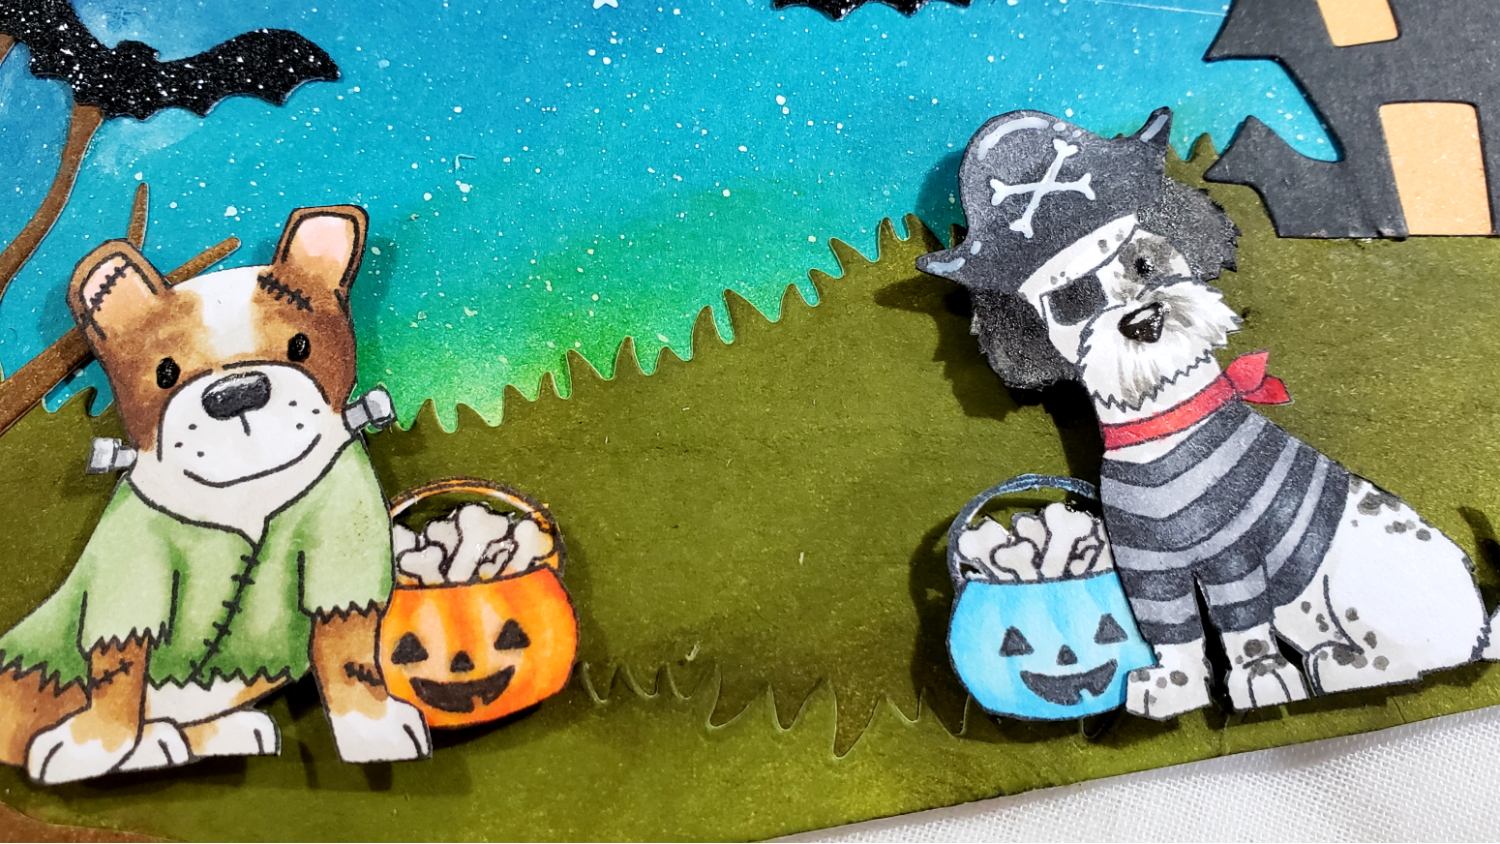
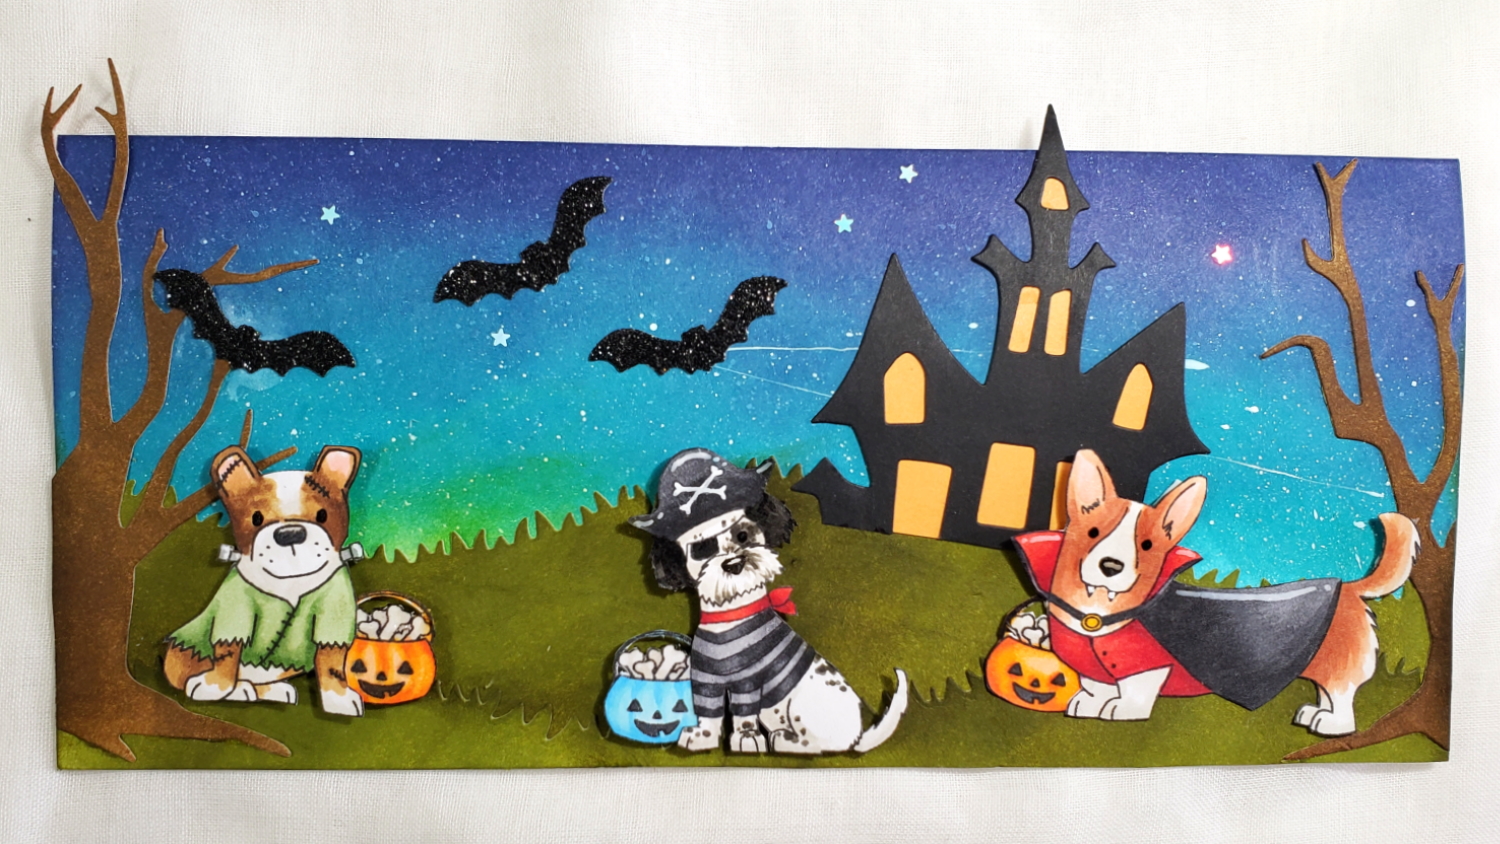
I don’t normally keep a lot of colored card stock, and I like the softer, more natural look of inked card stock for die cutting, so I made this slim line scene card largely with inked papers. The background sky was blended on with Tim Holtz Distress Ink in Chipped Sapphire and Peacock Feathers with a hint of sunset yellow added with Mustard Seed. The MFT Grassy Hillsides were colored with Tim Holtz Distress Ink in Peeled Paint and Forest Moss. And the Diemond Dies Spooky Tree (sold out but this is a similar spooky tree) was inked up with Tim Holtz Distress Ink in Gathered Twigs and Walnut Stain. The only part that I die cut from colored papers was the Diemond Dies Spooky House, which I made with black and tangerine orange card stock scraps.
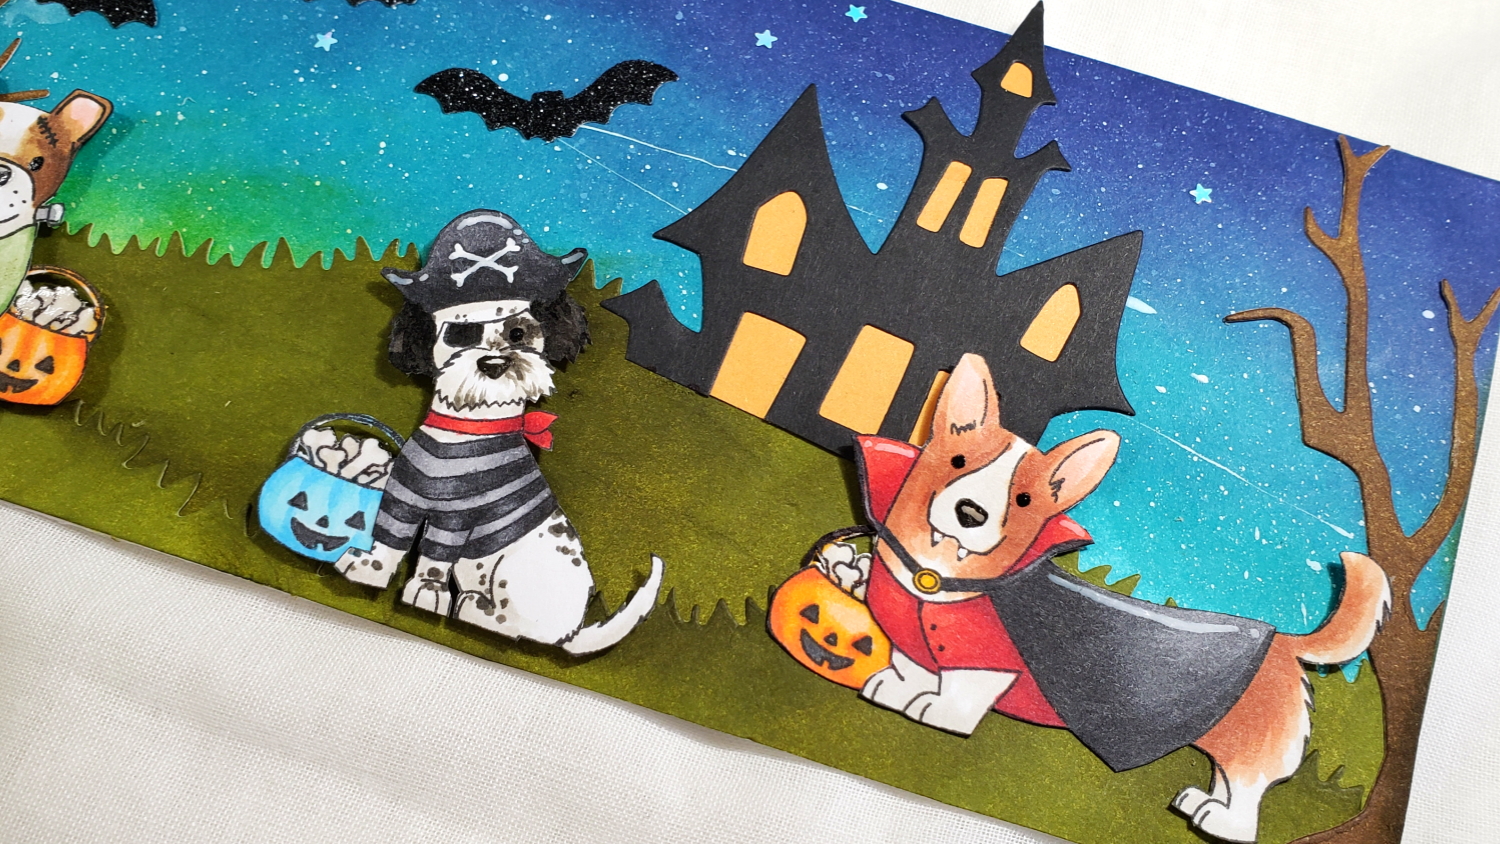
For the Fun Stampers Journey Costumed Cuties, I Copic colored and fussy cut out all the puppies and the Jack-O-Lantern treat bags filled with bones as follows:
Corgi Dracula:
Ears: R20; Brown fur: E11, E13 and E15; White fur: W0 and W1; Cape: N4, N5, and N9; R24, R27, R29 and R39; Cape closure: Y38
Pirate Pup (colored up like my Babaloo):
Black fur: W7, and W9; White fur: W0 and W1; Red scarf: R24, R27 and R29; Black hat and black and grey striped shirt: N2, N3, N4, N5, N7 and N9
Bulldog Frankenstein’s Monster:
Brown fur: E55, E57 and E59; Ears: R20; Green shirt: YG61, YG63, and YG67; White and grey side screws: W0 and N2
Jack-O-Lantern Treat Bags:
Blue: B00, B01 and B02; Orange: YR01, YR04 and YR09
I added highlight lines with Signo Uniball White Gel Pen, darkened the eyes and noses with Sakura Black Glaze Pen and added shine on the bones and noses with Ranger Glossy Accents.
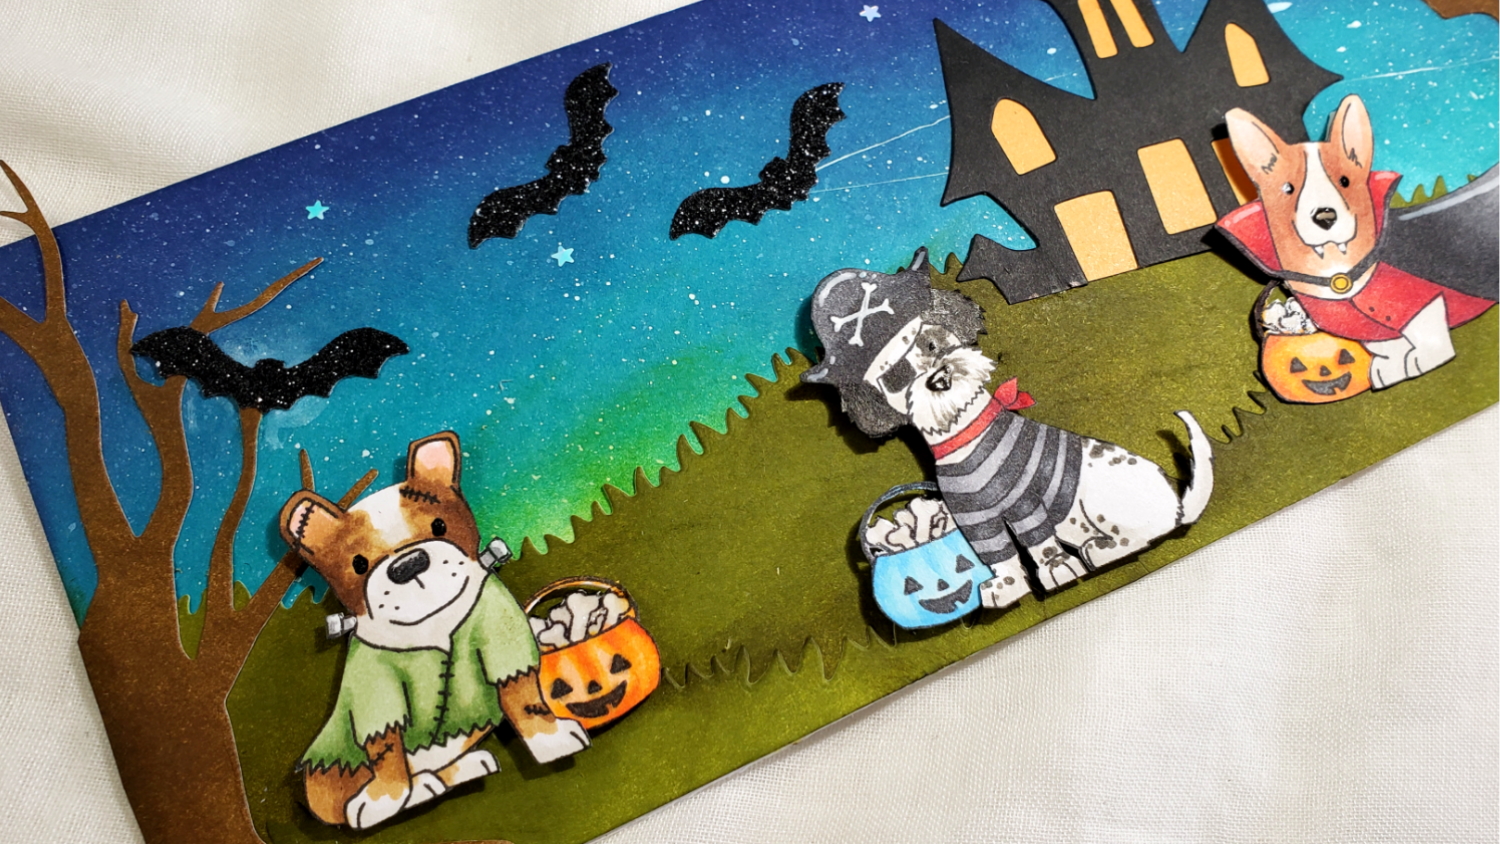
To add some extra little finishing touches, I splattered on some white acrylic paint to create the sense of a starry night. To cover up some of my over-splatter and smudges, I added 3 glittered card stock bats (they were included in my collab package). As a finishing touch a also used Art Glitter Glue with a Fine Tip Nozzle to glue on a handful of tiny metallic stars that were part of the sequin mix.
CLICK on the picture below to watch the card making process video:
Disclosure: Many of the supplies I’ve used for today’s project are linked. Some may be affiliate links, which means if you make a purchase I receive a small commission at no extra cost to you. I truly appreciate your support toward the costs of running this blog!
This card is being entered into the following challenges:
Simon Says Stamp Wednesday Make It Sparkle Challenge – glitter star sequins
Creatalicious Anything Goes with Optional Shaped Card Challenge
Lil Patch of Crafty Friends Anything Goes Challenge
Art Impressions Scenic Route Challenge
Crafts Galore Encore Anything Goes Challenge
Through the Craft Room Door Anything Goes Challenge
]]>
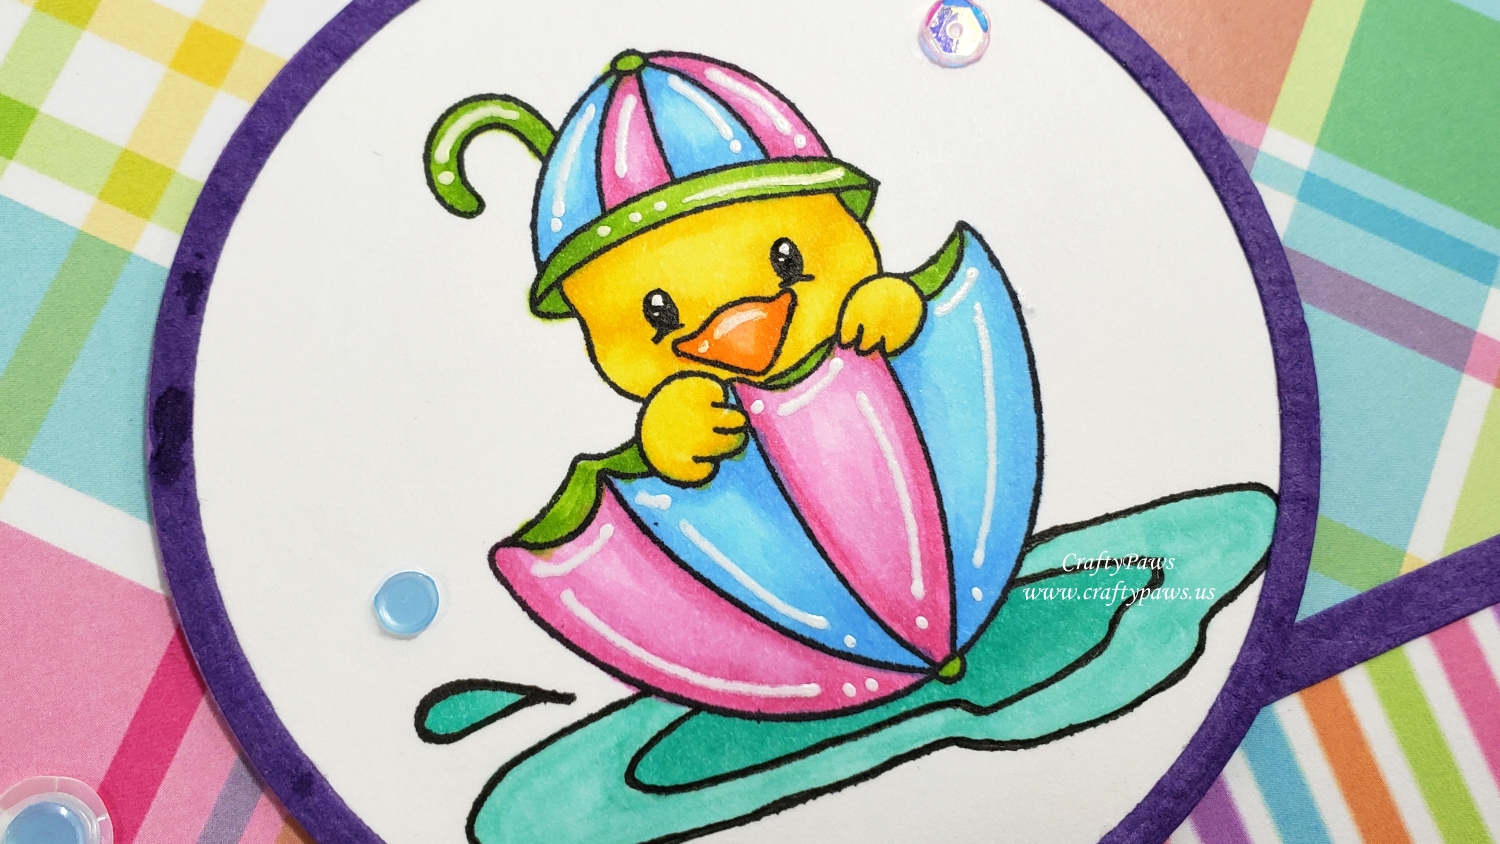
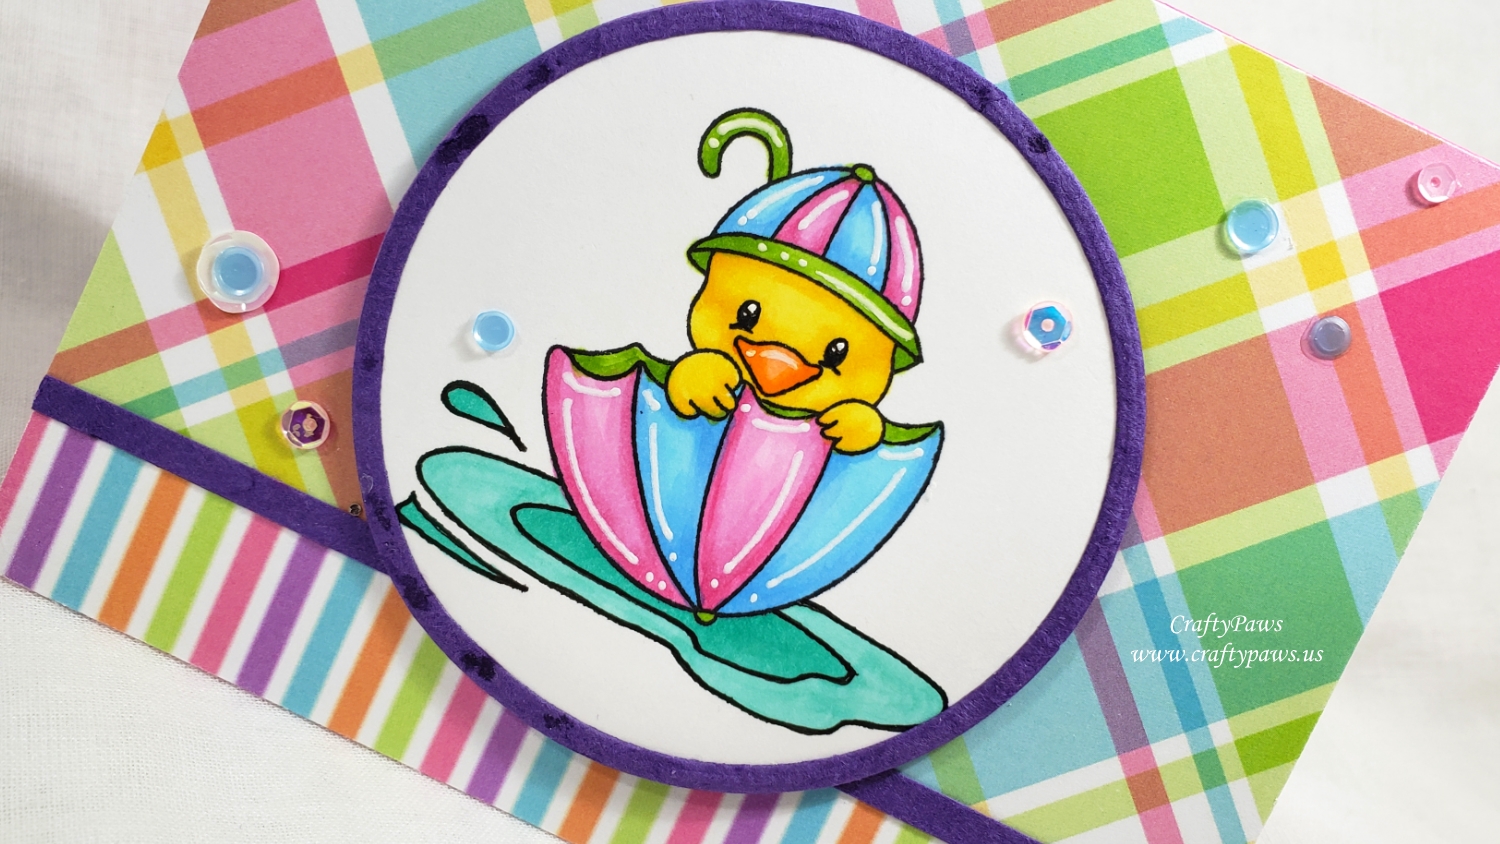
I colored up the duck tucked into the upturned umbrella with the following Copic colors to match the patterned plaid papers from the same Scrapping for Less collection:
Duck: Y13, Y15, YR00, YR16
Umbrella: B00, B12, YG03, YG25, RV52, RV55
Puddle that I doodled in with a Copic Multiliner Pen in 0.03 pt and re-outlined with a Faber-Castell XS point PITT Artist Pen: BG32 and BG23
I also added white highlight marks to the umbrella and the duck’s bill with a Uniball Signo White Gel Pen.
I used the Diemond Dies Die-Normous Stack-Ems Circle Nesting Die Set to cut out the image as well as die cut a frame for the image with purple handmade paper (for some added texture). I then used a plaid patterned paper and a striped pattern paper from this month’s Scrapping for Less Kit and covered the card front with these two patterned papers (about 2/3 and 1/3). I positioned a thin strip from more of the purple handmade paper between the two patterned papers to create a clean separation. Then I positioned the framed image centered on the card and overlapping the two patterned blocks.
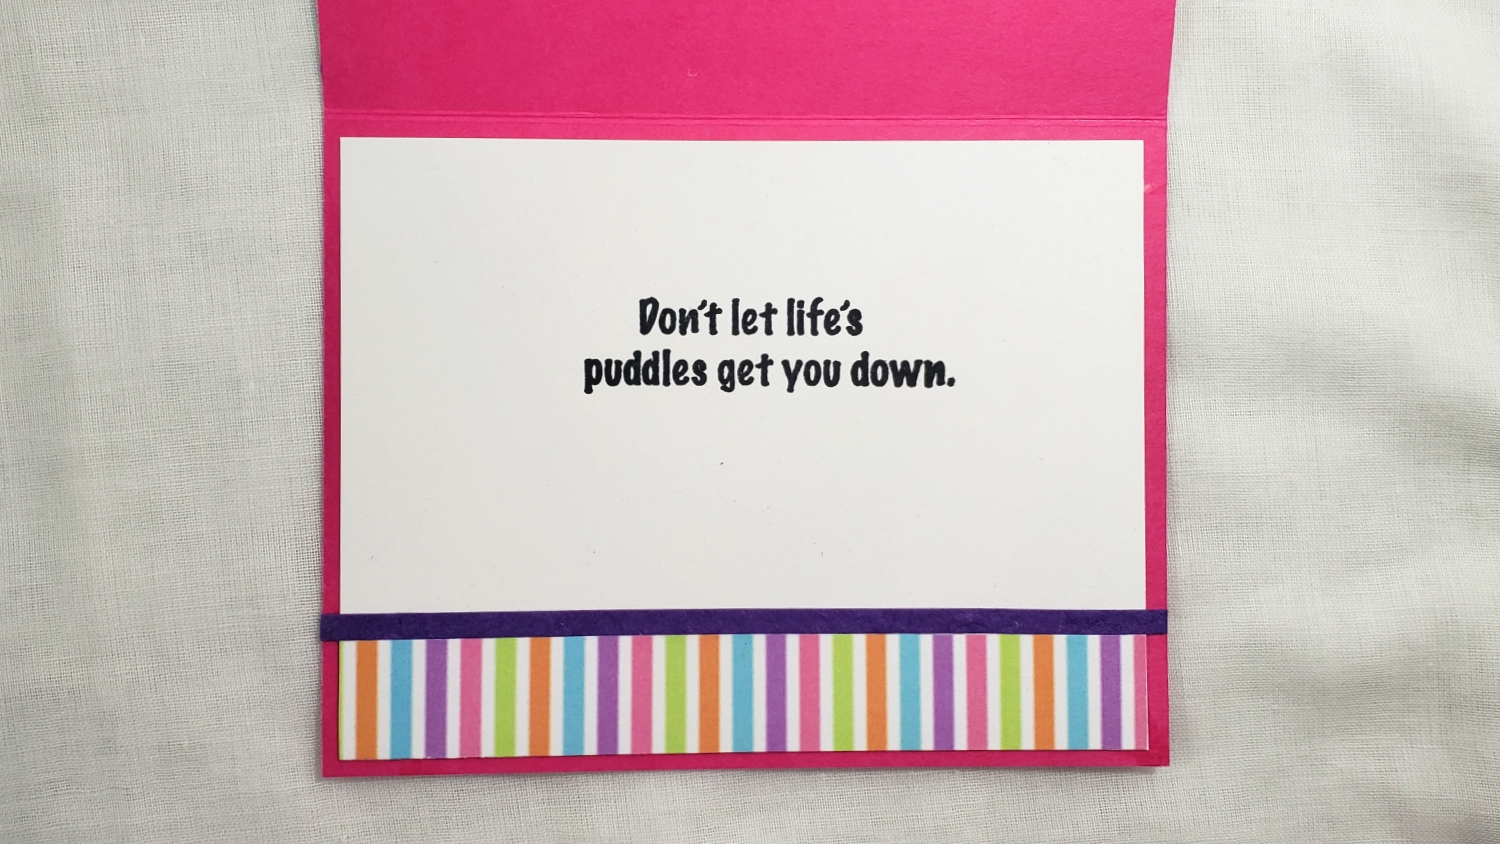
For the inside of the card, I used a sentiment from the Scrapping for Less add-on kit that says, “Don’t let life’s puddles get you down.” I used another scrap of the striped paper to coordinate the inside liner with the card front and added a similar purple strip to edge the striped paper from the white of the card liner. Lastly, as a finishing touch, I used Ranger Multi-Matte Medium to adhere 7 sequins on the card front to add a little sparkle and interest.
CLICK on the following picture to watch the start-to-finish card crafting video:
Disclosure: Many of the supplies I’ve used for today’s project are linked. Some may be affiliate links, which means if you make a purchase I receive a small commission at no extra cost to you. I truly appreciate your support toward the costs of running this blog!
This card is being entered into the following challenges:
Simon Says Stamp Monday Frame It Challenge
Word Art Wednesday Anything Goes Challenge
Creatalicious Anything Goes with Optional No Rectangles or Square Cards Challenge
Through the Craft Room Door Anything Goes Challenge
Cards Galore Encore Anything Goes Challenge
Penny Black and More Anything Goes Feminine Challenge
Simon Says Stamp Wednesday Bright Colors Mood Board Challenge

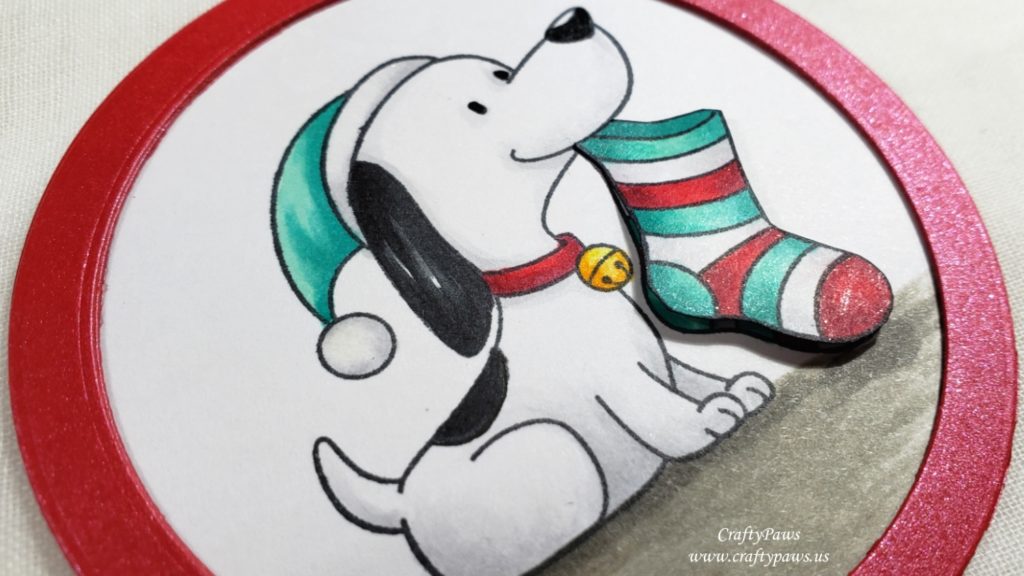
For the 3rd and 4th parts of the wreath, I used the other two adorable dogs from the MFT Happy Pawlidays stamp set (one of my all time favorite holiday stamp sets) and Copic colored them using the following colors (featuring my favorite Christmas color combination – red, white and aqua):
Snoopy-look-alike: N0, N1, N7 and N9
Yellow lab: Y13, Y15, Y26, Y28, E57
Floors: W3 and W5
Hat, stocking, bell, collar and lights: E11, Y17, BG11, BG13, BG15, R35, R37 and R39
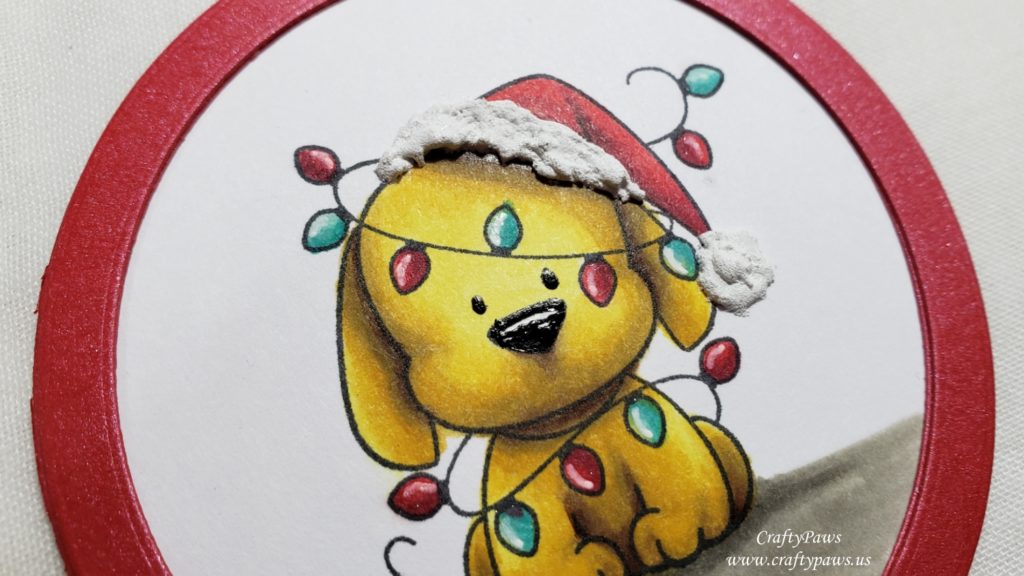
I added a high shine detail with a Uniball Signo White Gel Pen, a deep black shine for the puppies’ eyes and noses with aSakura Black Glaze Pen, and a shimmery sparkle on the stocking and holiday lights with a Clear Wink of Stella Pen. I also stamped out the stocking that the Snoopy-look-alike pup is holding again, colored it, and fussy cut it out to it pop up for a little added interest and dimension. For the yellow lab, I added DecoArt Snow Writer to add texture to the faux fur of the Santa hat.
I die cut the images using the 11th largest circle die from the Diemond Dies Die-Normous Stack-Ems Circle Nesting Die Set. Then to create frames for the pieces, I used beautiful sparkly shimmer red card stock and the 9th and 11th largest circles from the Diemond Dies Die-Normous Stack-Ems Circle Nesting Die Set — I cut each frame out twice and stacked them to add dimension and sturdiness.
CLICK on the image below to watch the process video:
Disclosure: Many of the supplies I’ve used for today’s project are linked. Some may be affiliate links, which means if you make a purchase I receive a small commission at no extra cost to you. I truly appreciate your support toward the costs of running this blog!
These tags are being entered into the following challenges:
Simon Says Stamp Monday Warm Winter Wishes Challenge
Word Art Wednesday Anything Goes Challenge
Simon Says Stamp Wednesday Christmas Challenge
Card Mania Christmas Challenge
ABC Christmas: Y – Fave things DOGS + Z – Zero Embellishments Challenge
Lil Patch of Crafty Friends Anything Goes Challenge
Fab ‘n’ Funky Cute Christmas Challenge
Crafty Gals Corner Anything Goes Christmas Challenge
Penny Black and More Traditional Christmas Colors Challenge
Stamping Sensations Winter Sparkle Challenge
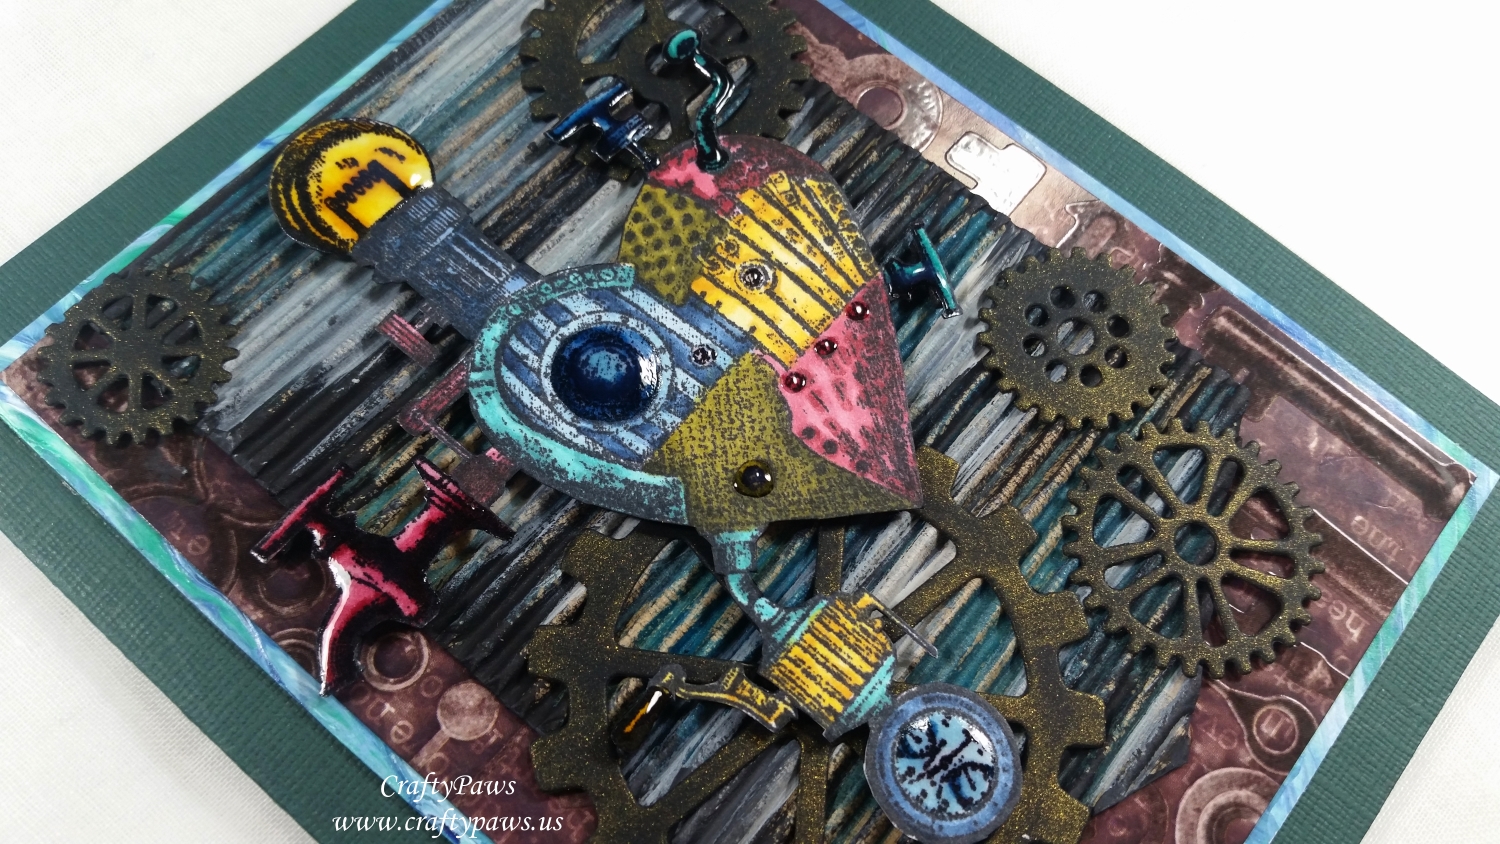
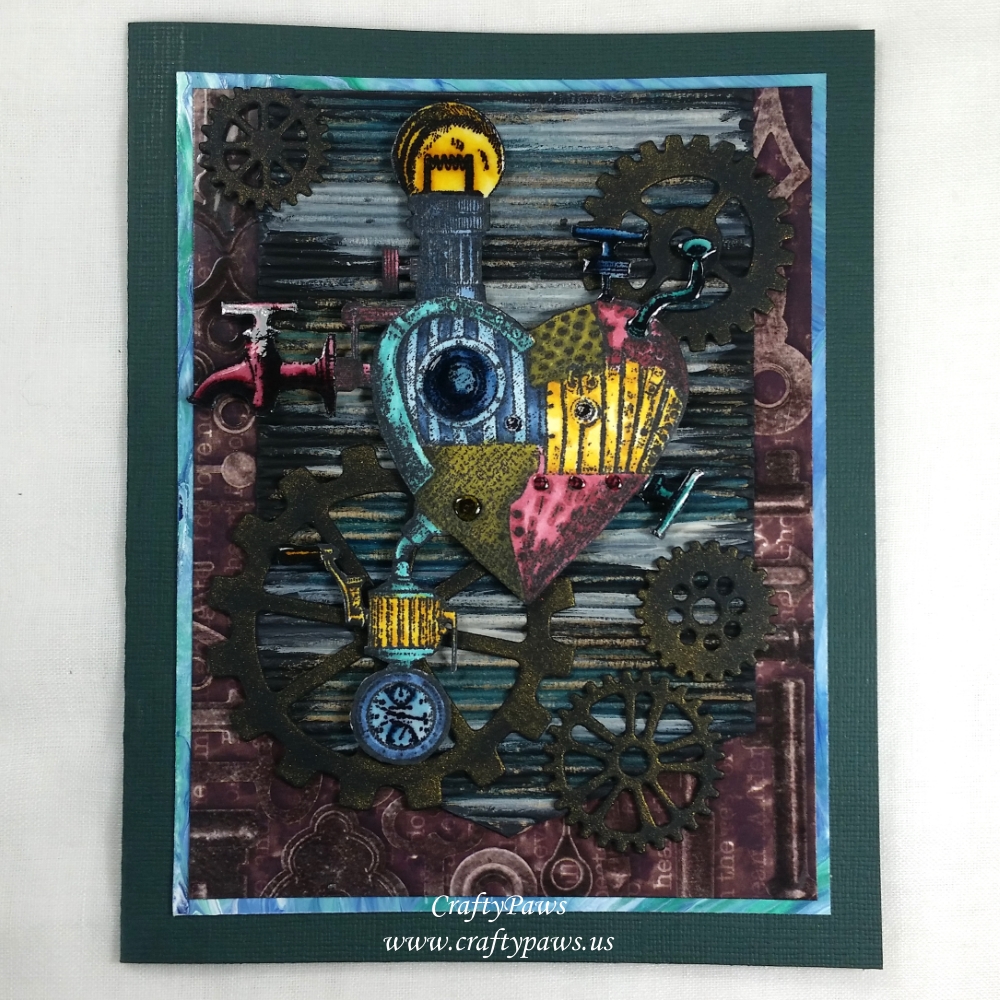 I created this Industrial Steampunk style card inspired by the striking Carabelle-Studio “The heart has its reasons” stamp set. I Copic colored it in the following rich secondary tones: Khaki: YG95, YT97, YG99; Golden Yellow: Y00, Y15, YR24; Teal: BG13, BG15, BG18; Burgundy: R83, R85, R89; Blues: B52, B93, B95, B97 and B99. Next I painstakingly fussy cut it out and carefully backed each part of the detailed image up on fun foam for added dimension. I also coated some parts of the image with Ranger Glossy Accents to give it some shine and interest.
For the card front, I really wanted to create a layered and textured grungy background. I rummaged through my paper scrap box and found some thick watercolor paper that I had long-ago painted with DecoArt fluid acrylics in Titanium White, Phthalo Blue, Cobalt Teal Blue, and Cerulean Blue. Just a bit of that peeks around the next layer up, which is a glossy and slightly textured patterned paper of keys and clock work hands that has been in my scrap box for years! I also found a bit of corrugated kraft card stock that I cut into a banner shape and then loosely painted with streaks using a DecoArt Media turquoise shimmer mister, dry brushed black acrylic paint and added light swaths of Martha Stewart Multi-Surface Satin Putty acrylic paint. I love the way the liquid mediums highlight the texture of the corrugated card stock and give this banner layer the look of something that has gotten painted numerous times over many years.

For some Steampunk accents, I die cut 5 gears from 100 lb black card stock using some Diemond Dies Steampunk Gears Dies. To give them a metallic shimmer, I blended on some Delicata Golden Glitz Pigment Ink to the die cut gears. I positioned them around and behind the top focal point image layer, which was the beautiful Steampunk heart image. The whole assembly was mounted on a dark forest green cardstock card base. My readers can get 10% off and free worldwide shipping on all orders of $35 or more at Diemond Dies by using the coupon code: thankskristina
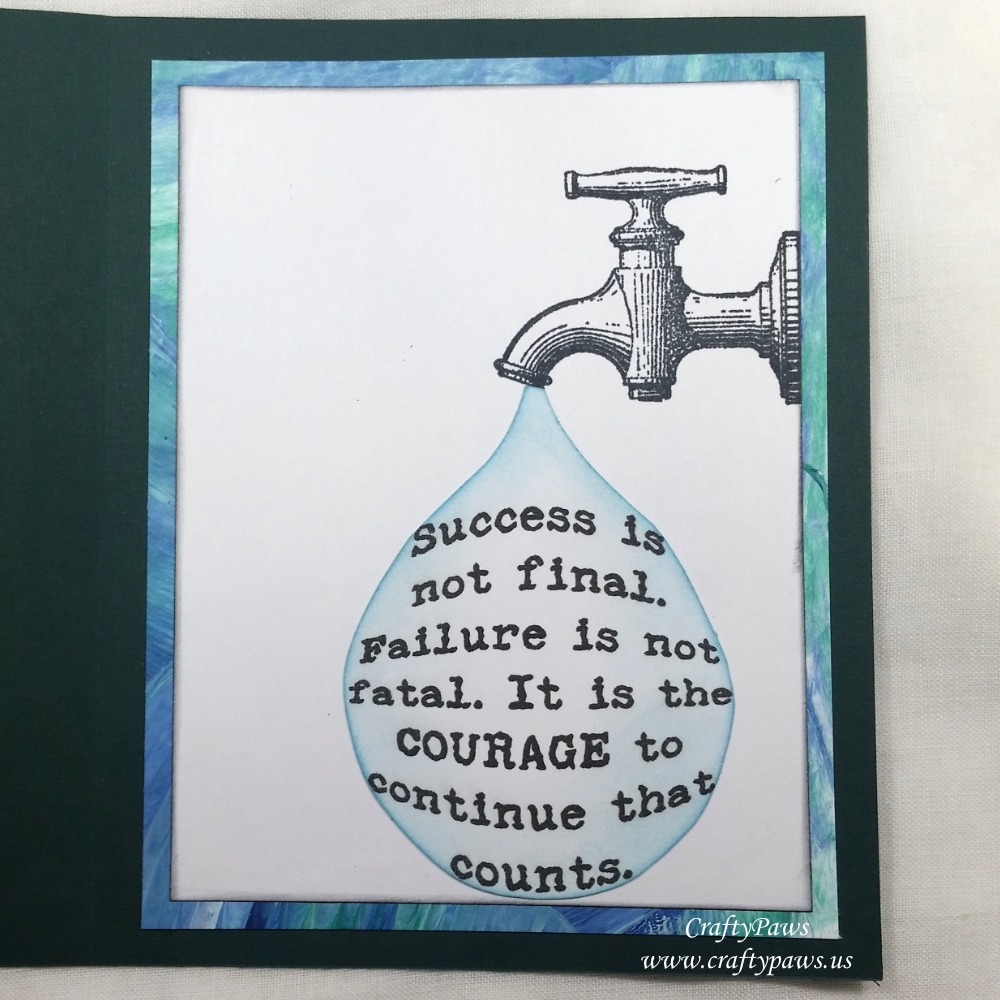 For the inside card liner, I simply stamped out the faucet from the Carabelle Studio “The heart has its reasons” stamp set on the upper right side. I matted it on more of the watercolor paper with the blue and green fluid acrylic paint to echo the matting on the card front.
Then I used Microsoft Word to shape the quote into a droplet shape. I inserted a circle shape that I made white with a white outline. Then I right clicked to insert text. I used a free distressed typewriter font to type in the quote in black. Then I used the “format” tab and clicked the “text effects” choice button which opened a drop down menu that had the “transform” choice as the last option. I clicked on the various options to shape the text into a rounded circle shape that I hoped I could cut into the form of a big drop of water. I printed out the quote and hand fussy cut it out into the droplet shape. Lastly, to add a bit of color and set the shaped sentiment apart from the white liner sheet, I blended on some Tim Holtz Distress Ink in Tumbled Glass.
Disclosure: Many of the supplies I’ve used for today’s project are linked. Some may be affiliate links, which means if you make a purchase I receive a small commission at no extra cost to you. I truly appreciate your support toward the costs of running this blog!
The following is a video share along with a Copic coloring process video:
This Steampunk Industrial card is being entered into the following challenges:
CropStop April Linky Party Challenge #38
Simon Says Stamp Wednesday Anything Goes Challenge
Word Art Wednesday Anything Goes Challenge
Creatalicious Anything Goes with Optional Dies or Punches Challenge
Lil Patch of Crafty Friends Anything Goes Challenge
Crafty Gals Corner Anything Goes Challenge
613 Avenue Create Anything Goes Challenge with Optional Use Vellum
Through the Craft Room Door Anything Goes Challenge
SanDee & Amelia’s Anything Goes Steampunk Industrial Challenge
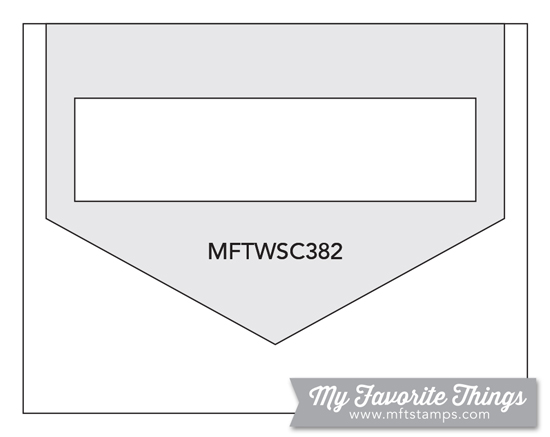
MFT Sketch Challenge #382
]]>
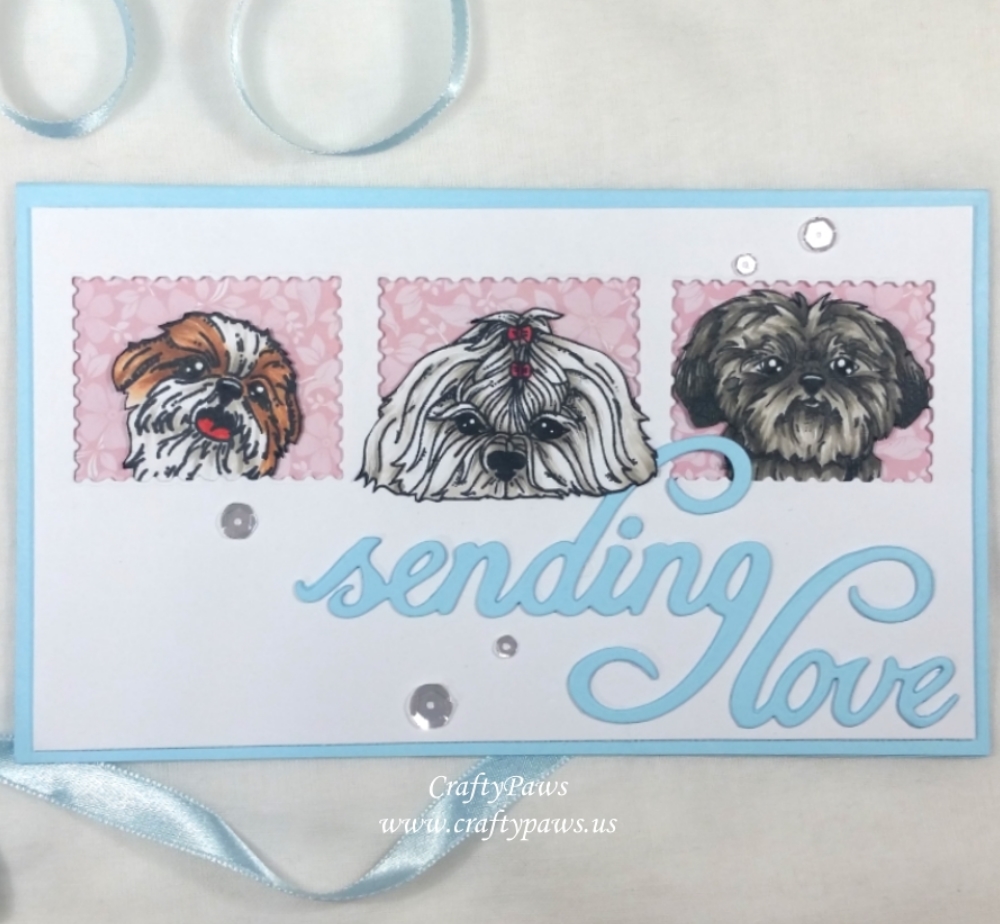 For this card, I decided to combine three of the images from the with the dies from the Diemond Dies Sending Love Die Set that I designed (FYI: a part of the proceeds of every die I designed is donated to no kill animal shelters). The three stamp dies from the die set were the perfect size to frame the three pups I Copic colored and fussy cut.
I used the following Copics to color up these pups like my Havanese, Bandito; my brother’s Havapoo, Cookie; and my aunt and uncle’s Affenpinscher, Naco:
Spotted Havanese: W0, W1, E11, E23, E25, R24 and R27
White Havapoo: W0, W1, W3 and R22 and R24
Black Affenpincher: W1, W3, W5 and W7
I also used my favorite Fiskars Spring Loaded Scissors to fussy cut all the pups so that just their heads would be popping out of the stamp frames and for the spotted Havanese and the Affenpinscher I shortened their ears from the original stamp images.
I used a pale blue card stock for the card base, and die cut the stamp frames from white card stock that I popped up with foam tape. I also lined the areas of the windows with some peach and coral patterned floral patterned paper from the 6 x 6 Crafts Sensations Pastels & Whites paper pack. For the sentiment, I die cut the “sending love” sentiment from the same card stock that I used for the card base three times. Stacking and gluing the die cut sentiments gave them a bit of dimension and made them feel substantial. I offset them in the lower, middle and right parts of the card front, lining up the “g” and “l” for what I thought was a nice, swooshy look (that’s a technical term – LOL). Lastly, I added a handful of clear silver sequins in three sizes for a bit of sparkle.
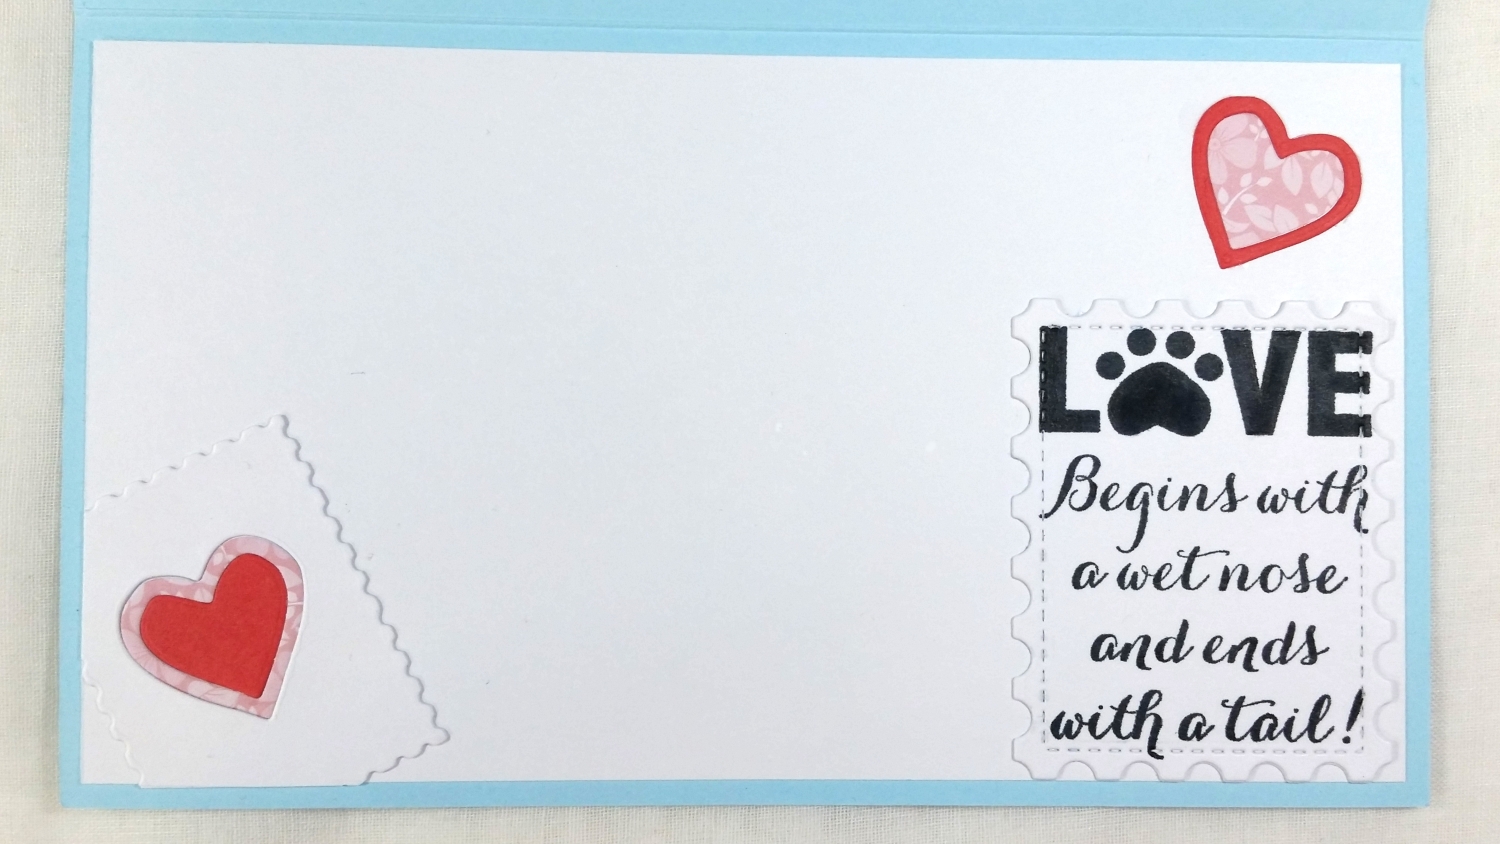
The inside of the card, I used one of the stamp dies to create a couple of heart embellishments with the same peach and coral floral patterned paper and some darker coral card stock. For one of the hearts, I also used the surrounding stamp die to create a stamp embellishment. The inside sentiment is a wooden stamp from My Sentiments Exactly that I picked up on clearance last week at Hobby Lobby. It says “Love begins with a wet nose and ends with a tail!” Unfortunately, since I moved my stamp when I was re-stamping for a darker impression, I had to cover the smear by re-stamping it on a separate piece of card stock and die cutting it out with a Kat Scrappiness Stitched Postage Stamp Edge Rectangles Die that more or less fit the sentiment. Whew – card salvaged!
The following is a process video of crafting this card:

My readers can get 10% off and free worldwide shipping from their order of $35 or more at Diemond Dies by using the coupon code: thankskristina at checkout.
Disclosure: Many of the supplies I’ve used for today’s project are linked. Some may be affiliate links, which means if you make a purchase I receive a small commission at no extra cost to you. I truly appreciate your support toward the costs of running this blog!
This card is being entered into the following challenges:
Simon Says Stamp Monday A Trio of Something Challenge
Word Art Wednesday Anything Goes Challenge
Creatalicious Anything Goes With Optional Friends/Friendship Challenge
Lil Patch of Crafty Friends Anything Goes Challenge
Through the Craft Room Door Anything Goes Challenge
Crafts Galore Encore Anything Goes Challenge
613 Avenue Create Anything Goes with Optional Use Vellum Challenge
Crafty Gals Corner Anything Goes Challenge
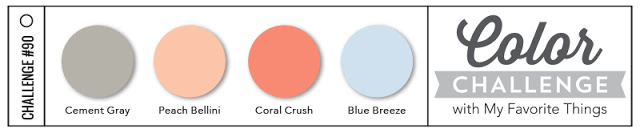
MFT Color Challenge #90
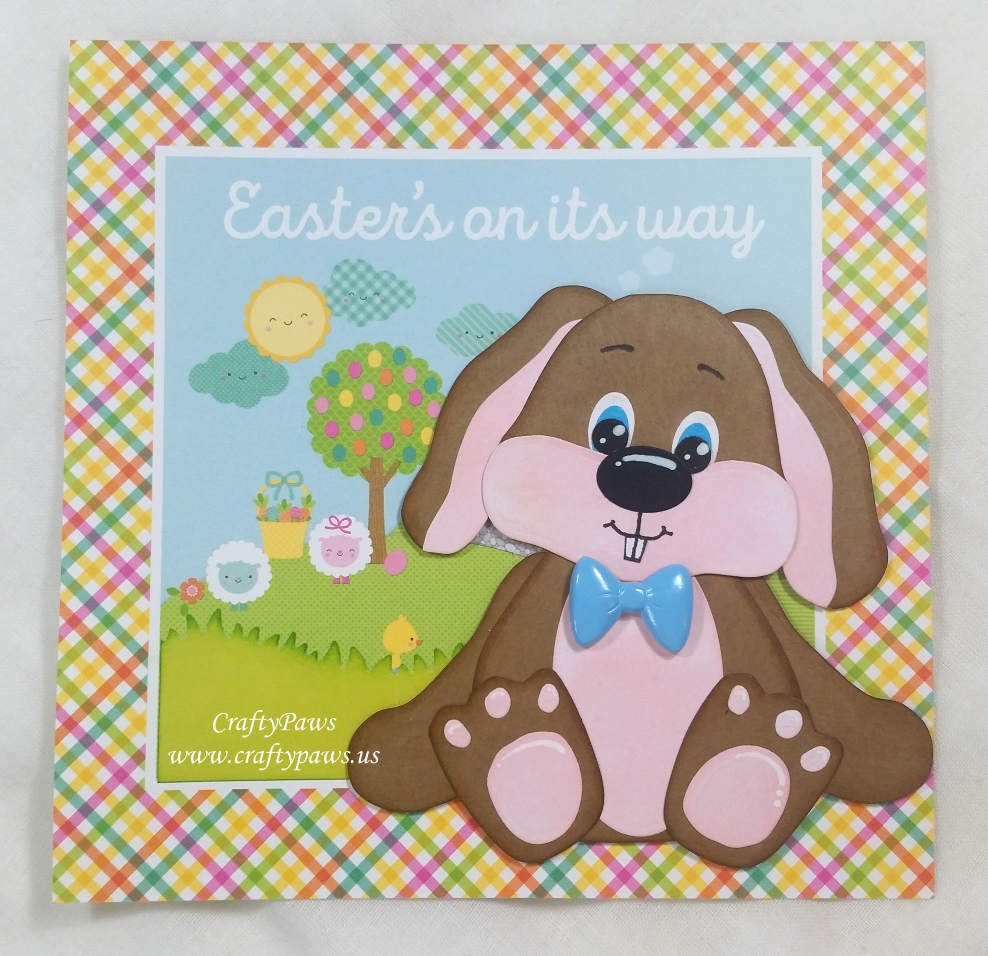 This time I die cut all the pieces of the Diemond Dies Teddy Bear Buildable Die Set from kraft and white (if I had a pale pink card stock, I could have used that but since I didn’t I used white and blended on Tim Holtz Distress Ink in Spun Sugar) card stock, except the nose, and ears. Also, I die cut the muzzle piece an extra 4 times, twice with kraft and twice with the pink card stock, to form the floppy ears. Obviously I offset the pink inside the kraft and hand fussy cut the ends and tucked behind the head the bases of the ears to create the look of full floppy rabbit ears. For the eyes, I used the medium and small eye die cut ovals from the set, but used an ordinary 1/4″ hole punch to make the pupils. For the nose, I actually used the largest eye die cut oval with a bit of black card stock. I also doodled in eye brows, a little critter mouth and buck teeth to complete the bunny’s face. As with all the die cut animals, I also used my go-to Uniball Signo White Gel Pen to add highlights to brighten up the eyes, nose and paw pads of the bunny.
In order for me to make the background image from the Doodlebug Easter Express 6 x 6 Paper Pad work as a background for this card, I had to cover up the small train filled with critters in the foreground of the image (or it would look like the train was running into the bunny’s bum – hohoho). To do that, I took a scrap of pale green card stock from my scrap box, die cut a little grass using one of the dies from the MFT Grassy Hills Die Set, and inked the edges with Tim Holtz Distress Ink in Mowed Lawn. For a bit of something special, I also used a dimensional bow from an old Jolee’s Boutique Bunny Ears Sticker Set and gave this Easter Bunny a bow tie. 🙂
The following is a process video of not only how I made this bunny, but also how I made the dog HERE and bear HERE in the immediately prior posts:
Disclosure: Many of the supplies I’ve used for today’s project are linked. Some may be affiliate links, which means if you make a purchase I receive a small commission at no extra cost to you. I truly appreciate your support toward the costs of running this blog!
Note: My readers can get 10% off and free worldwide shipping on all orders of $35 or more at Diemond Dies by using the coupon code: thankskristina
This card is being entered into the following challenges:
Simon Says Stamp Monday Whatever the Weather Challenge
Word Art Wednesday Anything Goes Challenge
Creatalicious Anything Goes with Optional Girly Challenge
Lil Patch of Crafty Friends Anything Goes Challenge
Crafts Galore Encore Anything Goes Challenge
613 Avenue Create Anything Goes with Optional Reuse/Recycle Challenge
Simon Says Stamp Wednesday Anything Goes Challenge
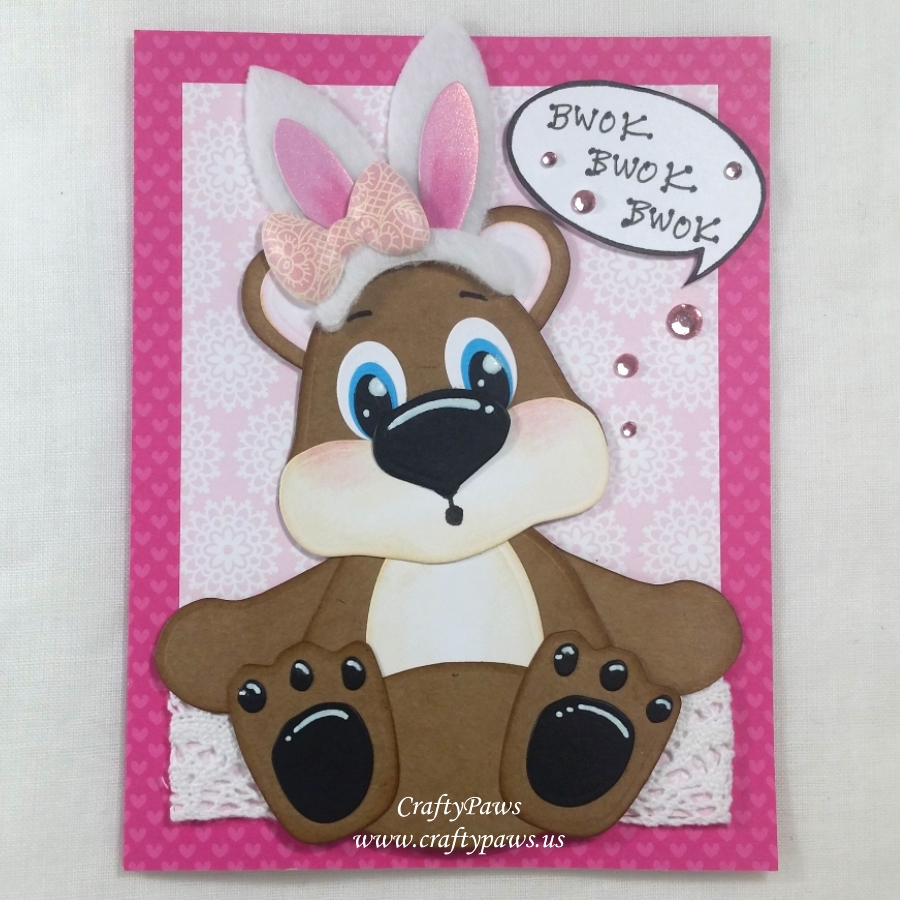 For this Easter card, I used the Diemond Dies Teddy Bear Buildable Die Set and built the bear from kraft, black (nose and paw pads) and white (ears, muzzle, belly and eyes) card stock. For all the kraft pieces, I inked the edges with Tim Holtz Distress Ink in Vintage Photo. For the white pieces that I wanted a hint of color on, I inked the edges with Tim Holtz Distress Ink in Antique Linen. Then for the inner ear white pieces that I blended on some Tim Holtz Distress Ink in Spun Sugar. Oh and I added a tiny bit of aqua card stock for the colored parts of the eyes.
For accents to the bear, I added white highlights with a Signo Uniball White Gel Pen, which I thought really brought the teddy to life. I also added slightly rosy cheeks with Pale Pink and Pink Prismacolor Colored Pencils. The piece de resistance are the fun bunny ears that are from a Jolee’s Boutique Bunny Ears sticker set I had in my stash from last spring.
The card front was made with scraps from the Doodlebug Lovebirds 6 x 6 paper pad (retired). I added a delicate crocheted ribbon for a “ground” for the bear to sit on. Then I added a speech bubble with “BWOK, BWOK BWOK” hand written on it for the faux chicken sounds that the bear would make at the try outs (LOL). Lastly I added pink gems to the speech bubble and flowing from the bears mouth to the speech bubble for extra sparkle.
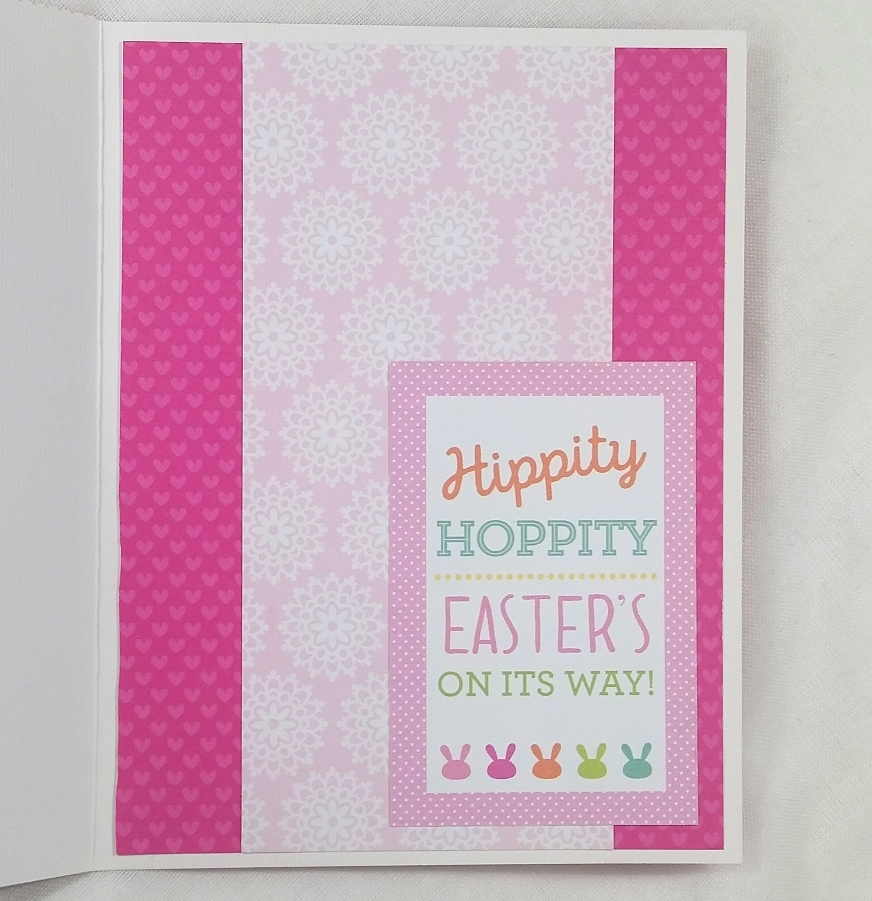 Continuing with my desire to decorate the inside of cards, for the card liner I used more Doodlebug Lovebirds scraps as well as a little sentiment cut apart that says “Hippity Hoppity Easter’s On Its Way!” from the Doodlebug Easter Express 6 x 6 paper pad.
Disclosure: Many of the supplies I’ve used for today’s project are linked. Some may be affiliate links, which means if you make a purchase I receive a small commission at no extra cost to you. I truly appreciate your support toward the costs of running this blog!
Note: My readers can get 10% off and free worldwide shipping on all orders of $35 or more at Diemond Dies by using the coupon code: thankskristina
This card is being entered into the following challenges:
Word Art Wednesday Anything Goes Challenge
Creatalicious Anything Goes with Optional Girly Challenge
Lil Patch of Crafty Friends Anything Goes Challenge
Through the Craft Room Door Anything Goes Challenge
Crafts Galore Encore Anything Goes Challenge
613 Avenue Create Anything Goes with Optional Reuse/Recycle Challenge
Crafty Gals Corner Anything Goes Challenge
Simon Says Stamp Wednesday Anything Goes Challenge
**************************************************
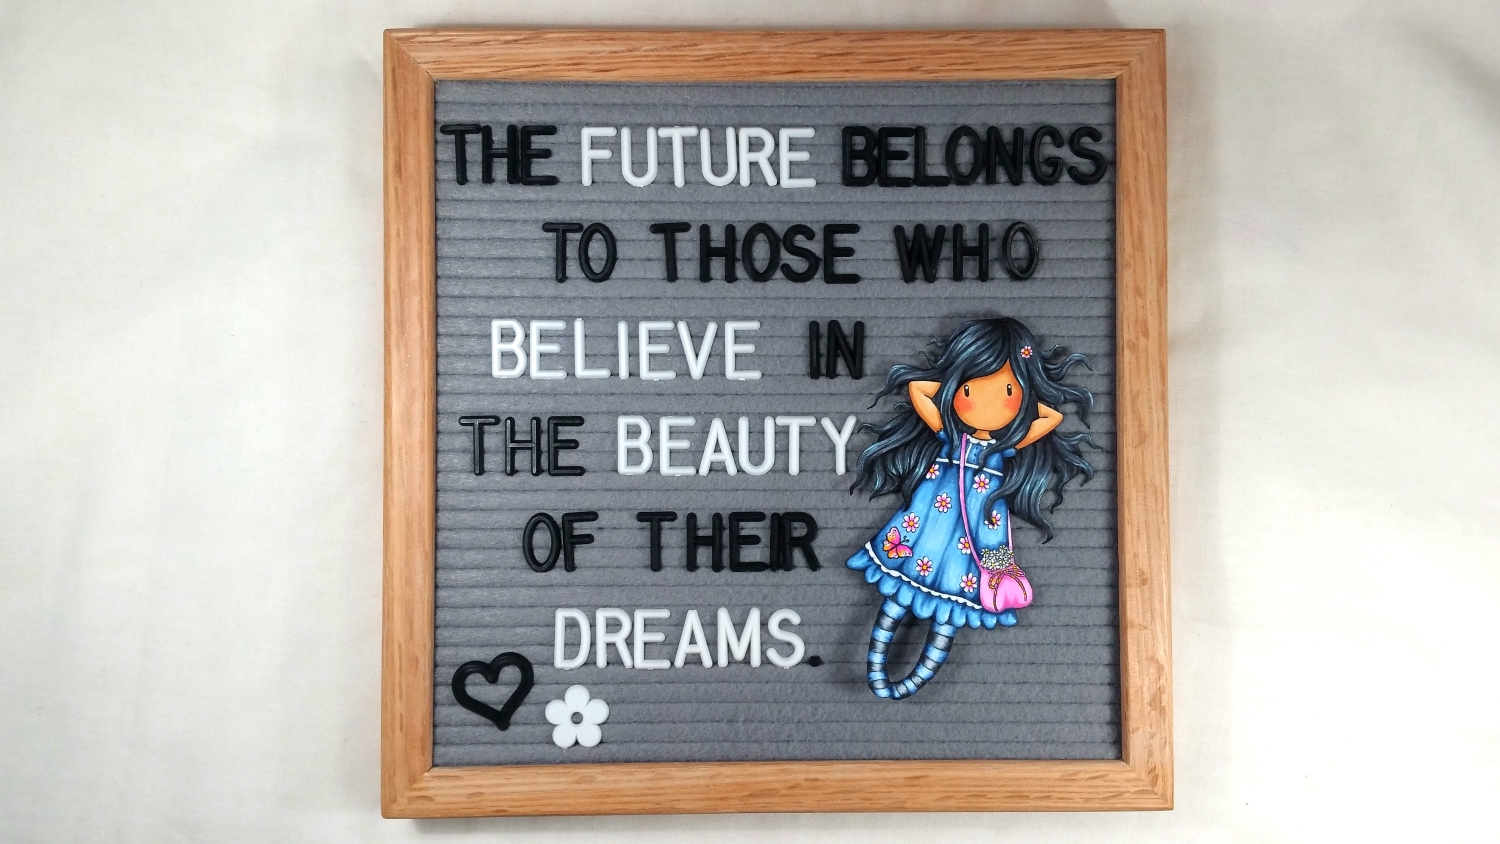
I am so excited to be doing a YouTube collaboration with my friend Sarah Elliott. She and I both recently passed 7,000 YouTube subscribers so we decided to do a collaboration/giveaway! We share many crafty loves, and one of them is the Santoro Gorjuss Girls so we made these cuties our shared theme (I can’t wait to see what she created). I had so many Gorjuss Girls in my stash that I had never inked up (so embarrassing) so I thought this also would be a perfect opportunity to combine this collaboration with my participation in the #thedailymarker30day coloring challenge hosted by Kathy Racoosin. I pulled out a bunch of Gorjuss Girl images and colored and fussy cutting them out to make embellishments for my new letter board (Sponsored Letter Board Unboxing and Giveaway ending 2/14/18). The following are the Copic colors I used:
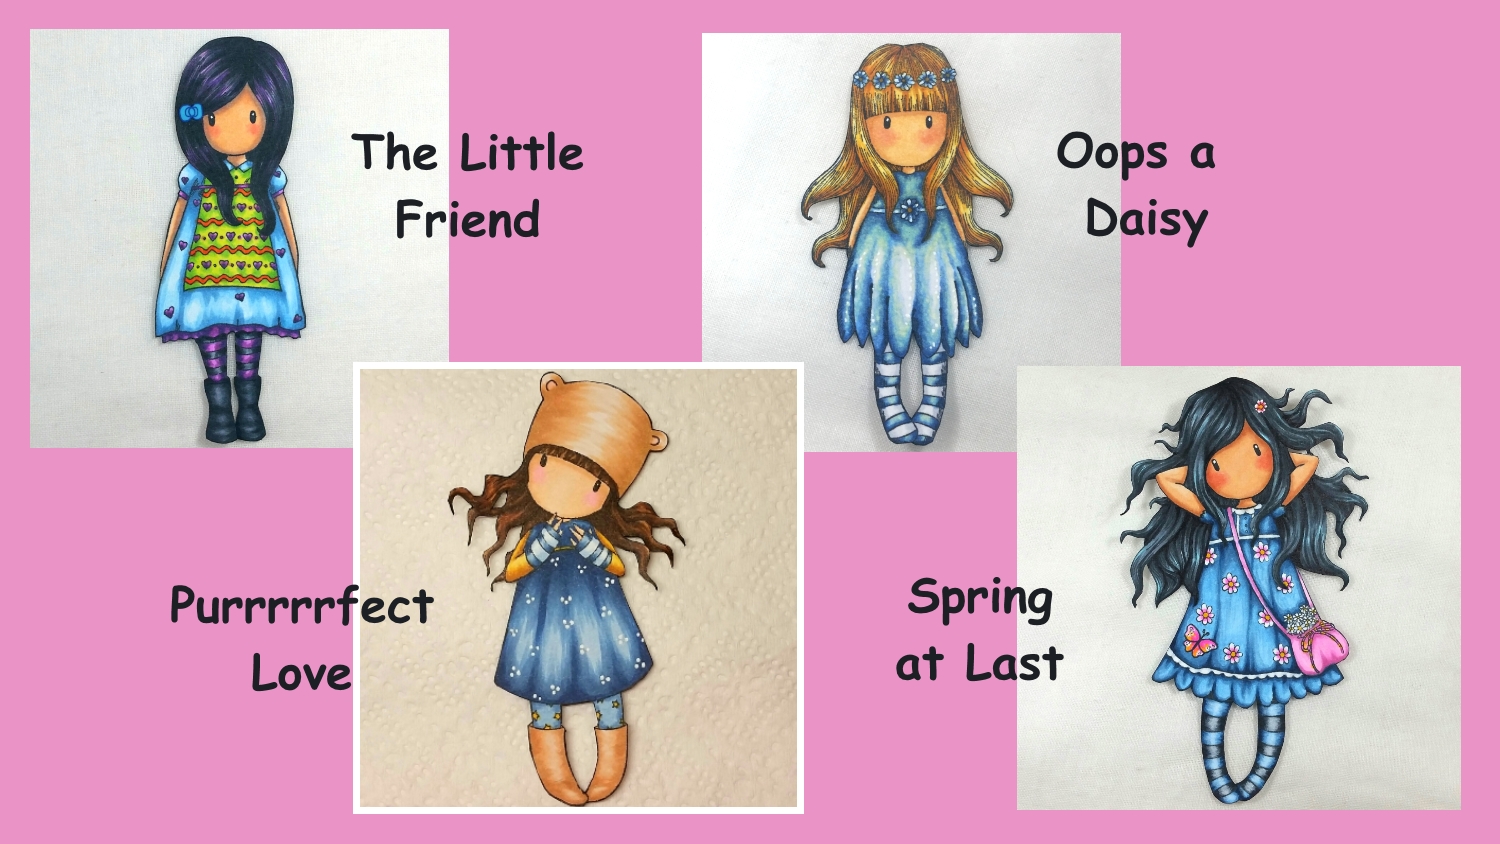
The Little Friend:
Blue dress: B41, B32 and B45
Green bib: YG01 and YG07
Orange squiggles: YR04 and YR07
Raspberry/purple in tights, underskirt and hair: V04, V06 and V09
Black in hair and tights: C3, C5, C7 and 100
Skin: E50, BV01, E51, E21 and R20
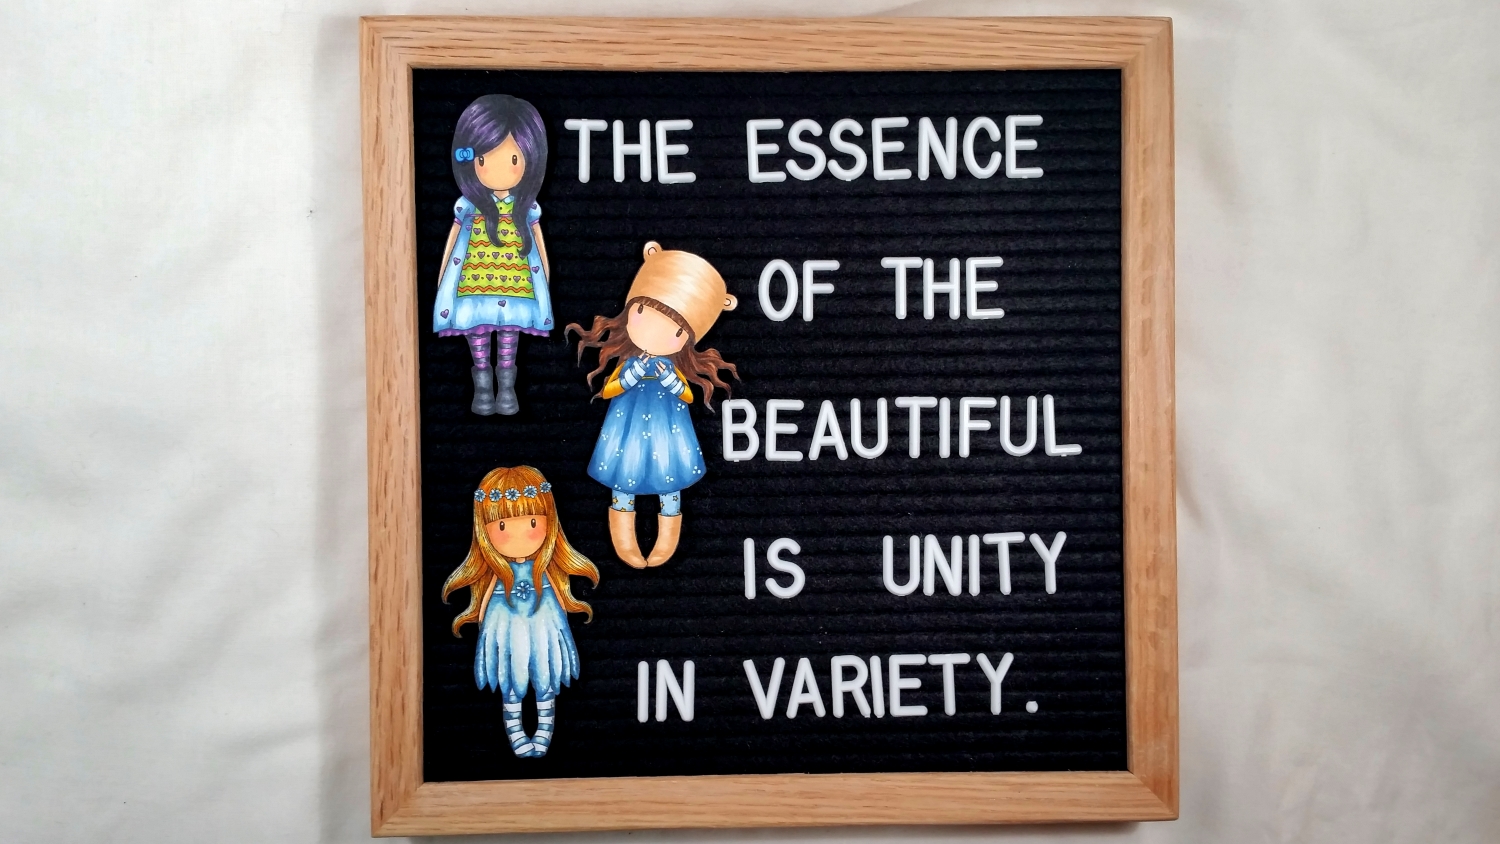
Quote by Felix Mendelssohn
Oops a Daisy:
Blue dress: Y000, B91, B32, B34 and B37
Tights: W1, Y000, C00 and C1
Hair: Y11, YR31, YR04 and YR24
Skin: E50, E51, E21 and R20
Purrrrrfect Love (I did not include the heart background and kitty, as I’m a dog person):
Hat and boots: E41, E53, E55 and R30 (inside ears)
Yellow shirt: Y13, Y19 and E55
Blues of dress and fingerless gloves: BG70, B91, B34 and B37
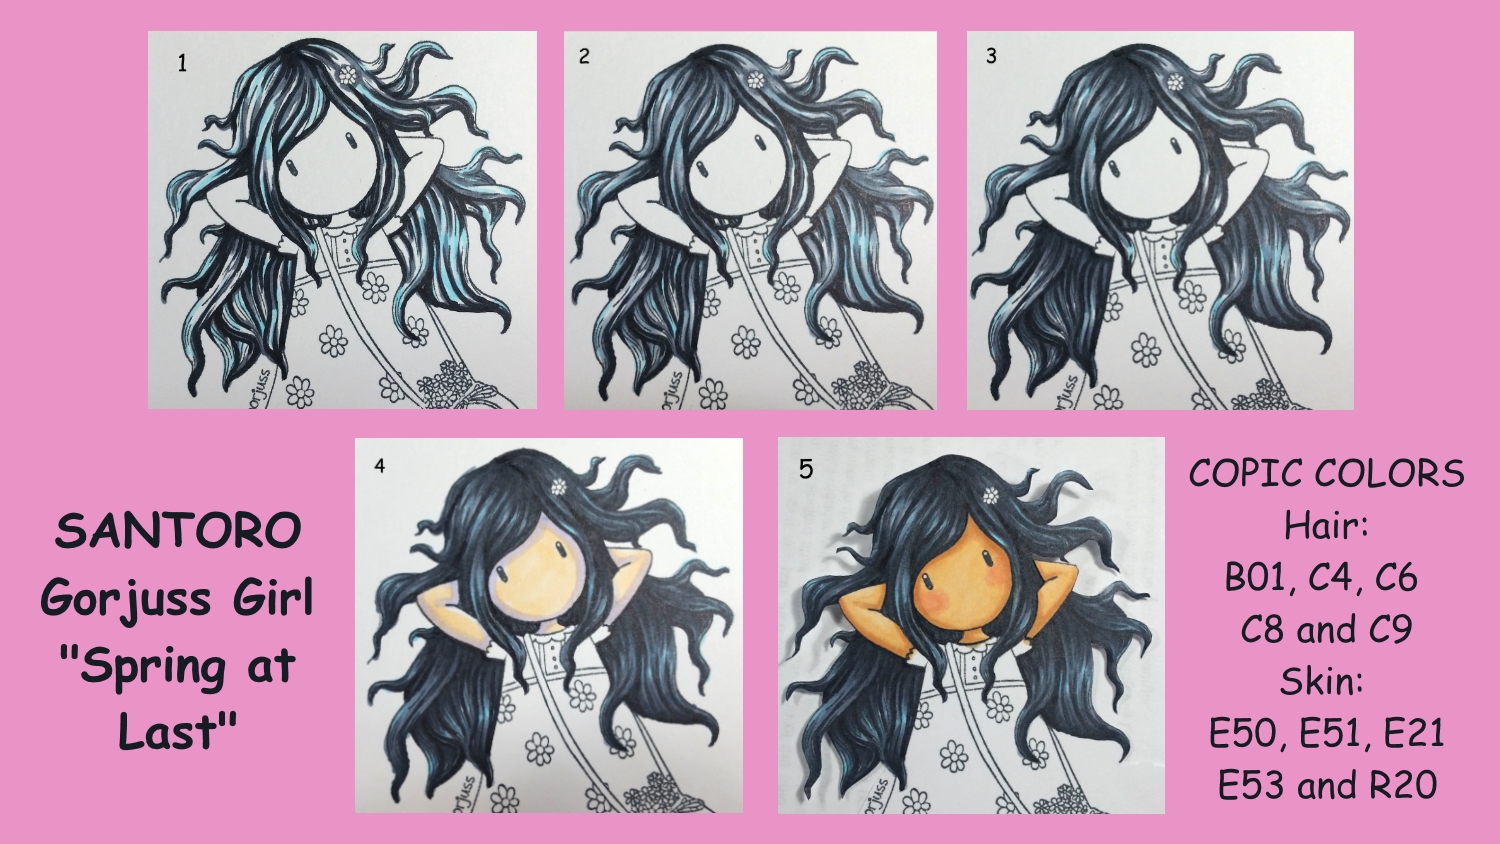
Spring At Last:
White parts of dresses: C1
Blue parts of dress and tights: B21, B32, B34 and B37
Flowers, purse and butterfly: Y08, RV02, RV04 and RV55
Hair and dark stripes on tights: B01, C4, C6, C8 and C9
Skin: E50, E51, E21, E53 and R20
Quote by Eleanor Roosevelt
Little Fishes:
Blue parts of dress: B32, B34, B37, B69 and B39
Red parts of dress, hair tie, and pantaloons: R14, R35, R37 and R39
White parts of dress: C1, C3, Uniball Signo White Gel Pen and
Prismacolor Pencils in white (PC938), 10% cool grey (PC1059) and 30% warm grey (PC1052)
Skin: E000, E00, E21, E11 and R20
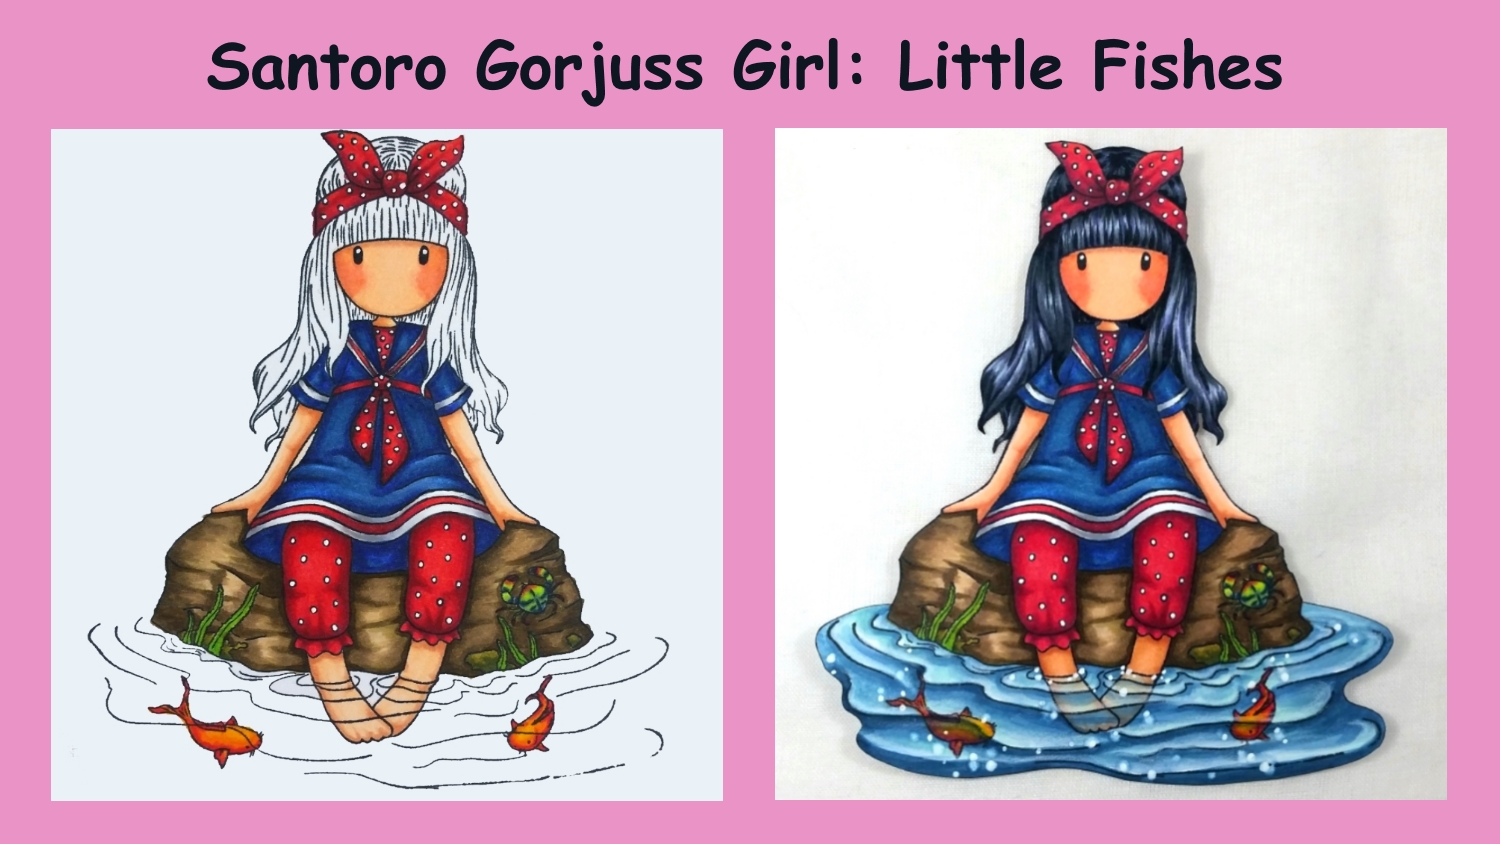
Hair: C5, C6, C9 and BV08
Seaweed: YG25, G14
Algae on rock: YG95, G99
Rock: E41, E43, E44, E84 and E87
Crab: B93, B95, B97, B99, YG01 and R35
Water: B91, B93, B95, B97, BG11, 0 blender marker and Uniball Signo White Gel Pen
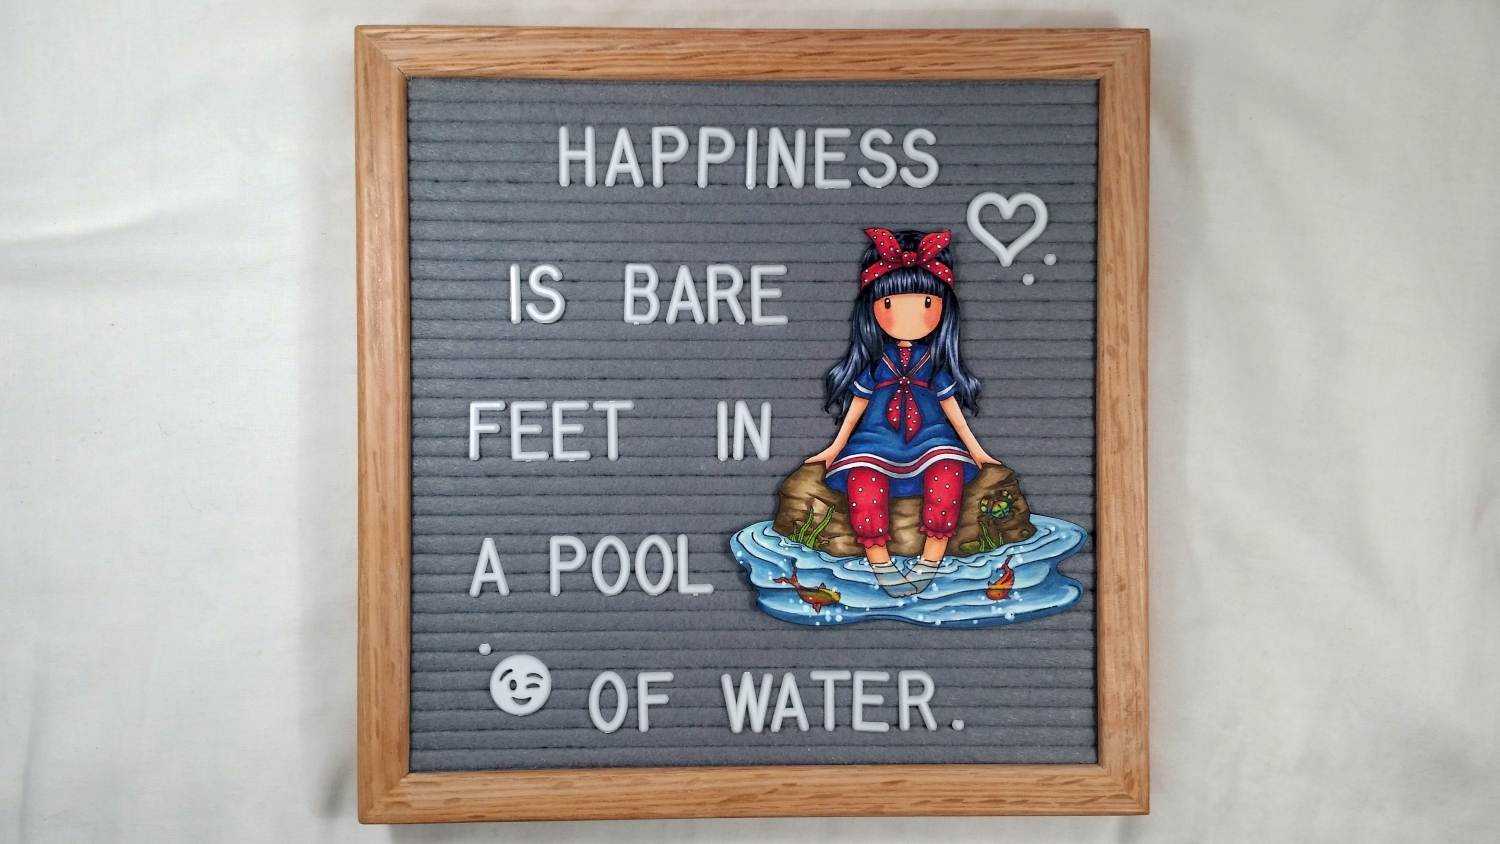
Quote by CraftyPaws — I’m a So Cal Girl and I Miss the Warmth of Summer
Sweet Tea (this stamps set is discontinued but I found some at Blitsy and Quick Creations as of 2/10/18):
Blues of dress and bow: B32, B41, B34, B37 and B39
Stuffed bunny: 0, W0, W1, B91, B32, B41, B34, R30 and R20
Pink of teacup and saucer: RV000, RV00 and RV52
Cream of teacup and saucer: E50, E31 and E55
Skin: E000, E00, YR00, R20
Hair: E97, YR07, E23, E19 and E18
I also added some dimensional detail to the teacup by using the Diemond Dies Natures Flourish and the flowers from the Diemond Dies Cherry Blossom Branch and Flowers Die Set, adding flat back pearl centers for the flowers.
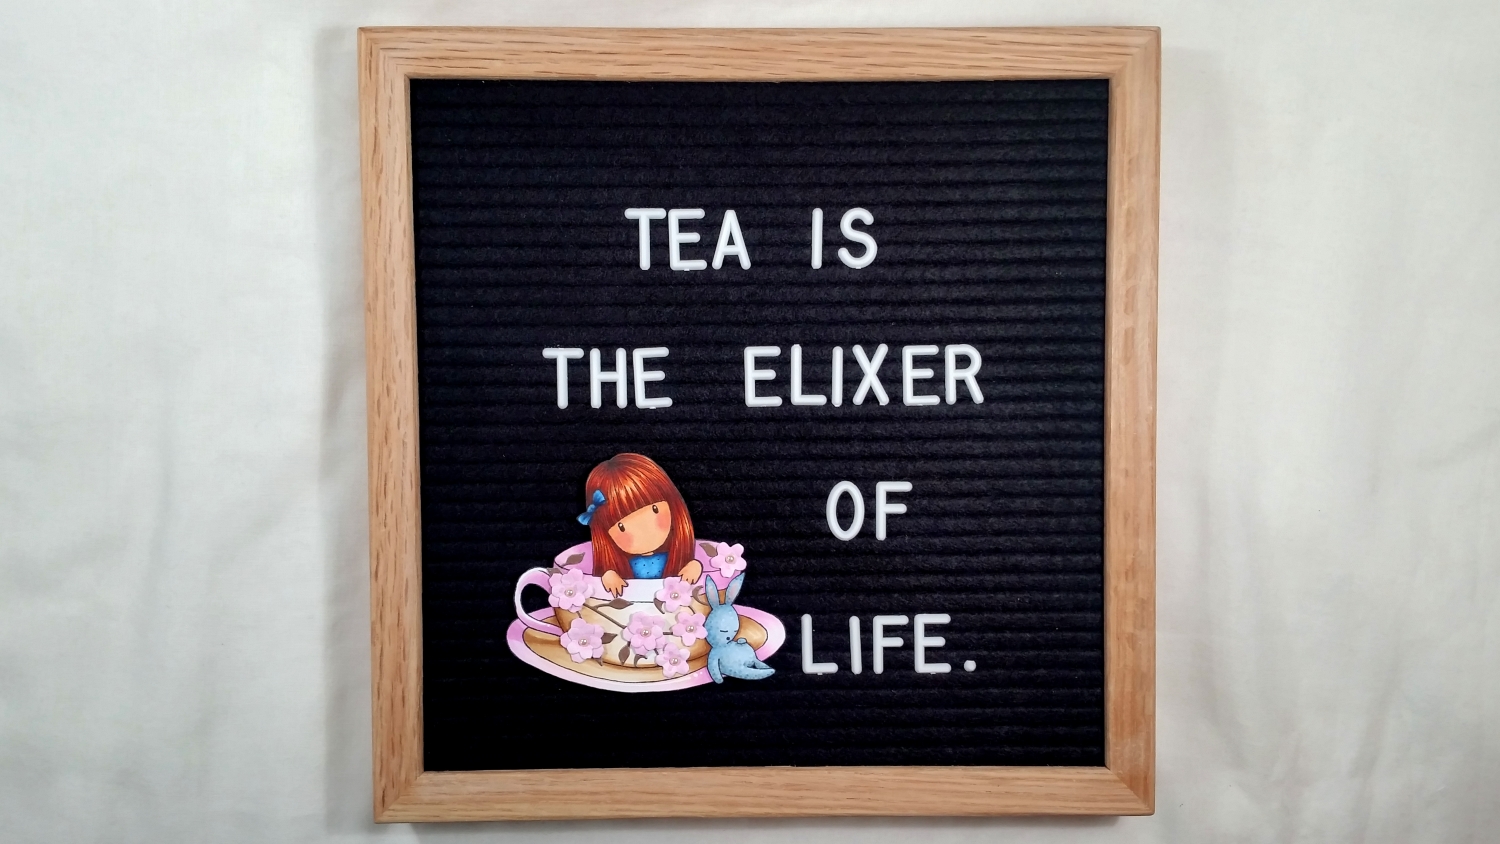
Quote by Lao Tzu
Diemond Dies is having a SALE on everything in the store through February 28, 2018! Use the coupon code “save14” for 14% off and free worldwide shipping on all orders of $35 or more. After that date, use the coupon code “thankskristina” for 10% off and free worldwide shipping on all orders of $35 or more.
Disclosure: Many of the supplies I’ve used for today’s project are linked. Some may be affiliate links, which means if you make a purchase I receive a small commission at no extra cost to you. I truly appreciate your support toward the costs of running this blog!
The following is a video sharing the giveaway details along with a little Copic coloring and assembly of the Sweet Tea embellishment:
These embellished letter boards are being entered into the following challenges:
Word Art Wednesday Anything Goes Challenge
Creatalicious Anything Goes Challenge with Optional Love/Anniversary/Thinking of You
Lil Patch of Crafty Friends Anything Goes Challenge
Through the Craft Room Door Anything Goes Challenge
Crafts Galore Encore Anything Goes Challenge
613 Avenue Create Anything Goes with Optional Love Challenge
Crafty Gals Corner Anything Goes Challenge
]]>
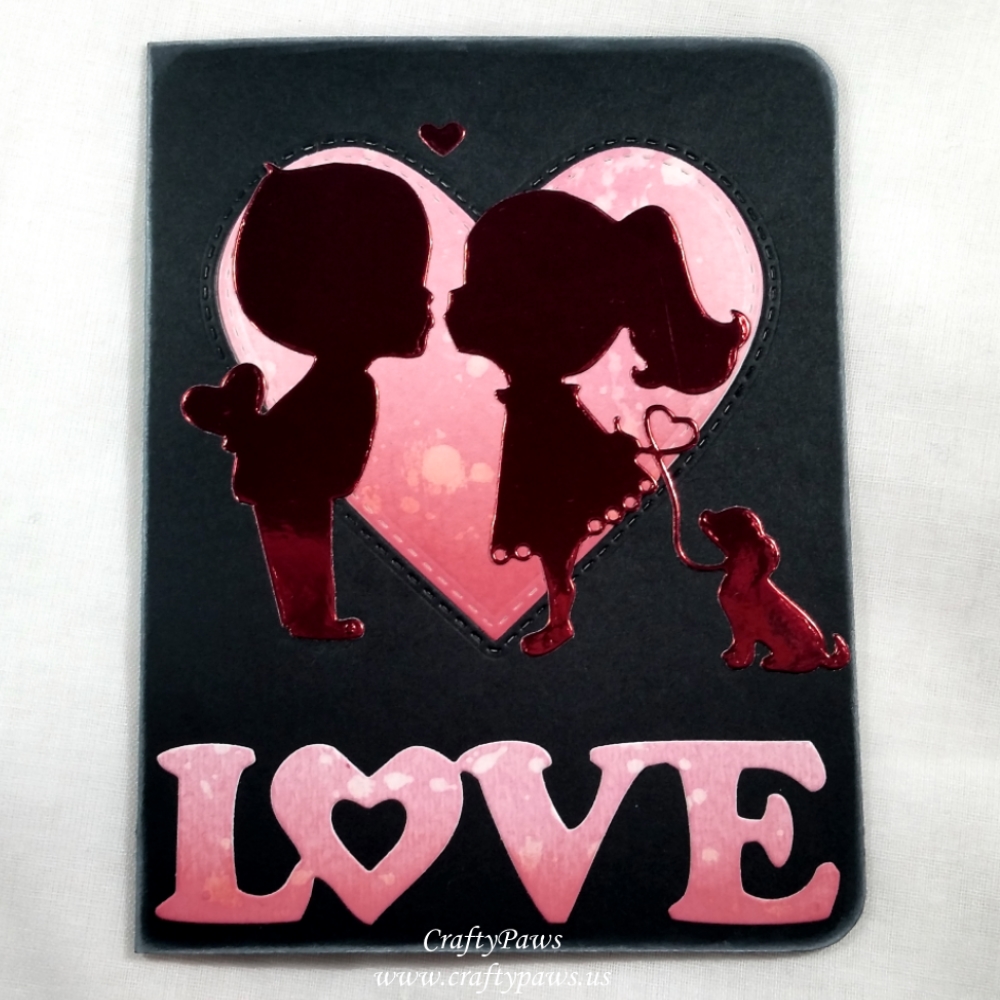 For this Valentines card, I used three of the four new die sets. First I used the middle sized heart from the Inside and Out Stitched Hearts Die Set to inlay a heart from the black card base. I love that with these hearts die set, the stitching is both on the inside and outside of the heart dies so if you just want to use the frame or area outside of the heart, you still get stitched details but you can get stitched hearts if you want to use the heart cut outs only.
In this sample, I first blended some Tim Holtz Distress Oxide Inks in Worn Lipstick and Candied Apple onto some watercolor paper to create an ombre look. Then sprinkled some water on the paper and lifted up some of the ink with a paper towel for a mottled look. I die cut the heart from the inked paper for the heart inset. Lastly, I die cut the same heart from the black card base and inset the ink-blended/splattered heart.
I repeated the same treatment to a bit more water color paper and used the Bold Love Word Die to kind of add a defining sentiment to the base of the card. Lastly I die cut the cute boy and girl (and dog) from the Sweet Kiss Die Set using red metallic card stock and positioned them in front of the heart. The metallic red adds festive shine and pops nicely from the black card base. The extra heart from the inside of the heart shaped leash I used as a finishing accent hovering above the boy and girl. To add a bit of softness, I also rounded to two right corners of the card with a We R Memory Keepers Crop-A-Dile Corner Chomper and inked the edges of the card with more Tim Holtz Distress Oxide Inks in Worn Lipstick.
The video below shows all the dies in this new release and also shares how I made this card:
My readers can get 10% off and FREE wordwide shipping at Diemond Dies by using the coupon code: thankskristina
Disclosure: Many of the supplies I’ve used for today’s project are linked. Some (not the Diemond Dies links) may be affiliate links, which means if you make a purchase I receive a small commission at no extra cost to you. I truly appreciate your support toward the costs of running this blog!
This card is being entered into the following challenges:
Simon Says Stamp Wednesday Layer it Up Challenge
Word Art Wednesday Anything Goes Challenge
Creatalicious Anything Goes with Optional Cute Challenge
Addicted to CAS Ombre Challenge
Card Mania Monochromatic Challenge
Lil Patch of Crafty Friends Anything Goes Challenge
Through the Craft Room Door Anything Goes Challenge
Crafty Gals Corner Anything Goes Challenge
]]>
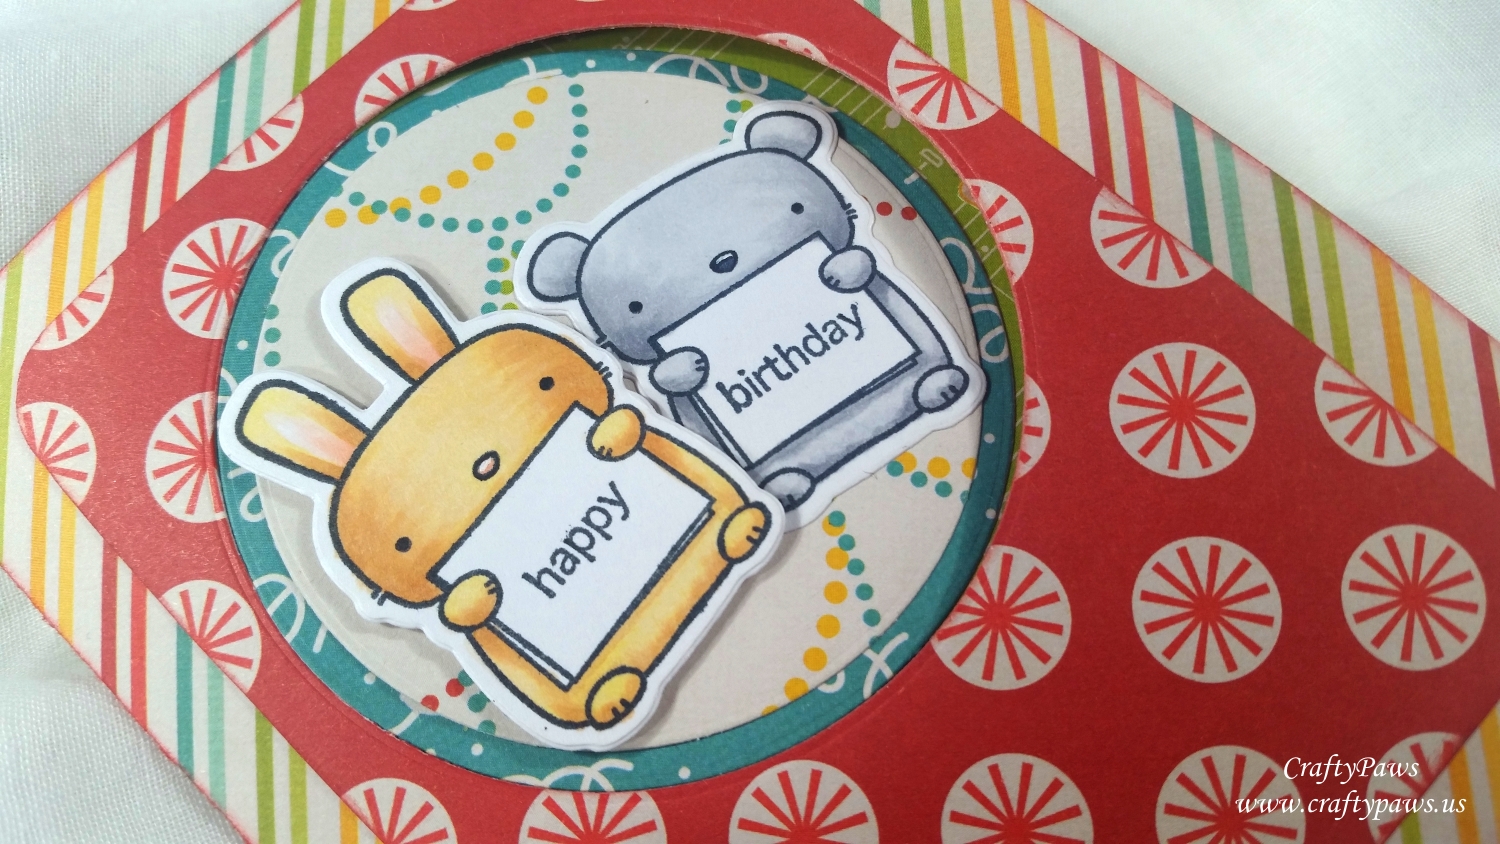
I first stamped out the bunny and the bear and then decided that I needed a third critter. So I stamped out the bear again, but wiped away the ink on the ears before stamping it. Then I used a 0.1 pt Copic Multiliner Pen to doodle in what I thought would transform this bear into a puppy! I Copic colored all three critters with the following colors:
Bear: N0, N2, N3 with C7 nose
Puppy: E50, E51, E53 with E15 nose
Bunny: Y11, E53 and E21 with R30 nose and inner ears
Using a MISTI Stamping Tool to help position the words exactly where I wanted them, I also stamped out the composite card sentiment. I stamped “happy” on the bunny’s sign, “birthday” on the bear’s sign, and “ditto” on the puppy’s sign inside the card. I used the accompanying dies to cut out the bunny and the bear, but I had to hand fussy cut the puppy with my favorite Fiskars Spring Loaded Scissors.
 Next I gathered some old birthday patterned paper from my stash (sorry, I don’t know the name of this collection). What drew me to this paper was that it was double sided, which I thought might help the card look finished even on the back sides of the flipping mechanism.
Pop Up Flip Mechanism Measurements:
1. To make a standard A2 size card, my card base measures: 5.5″h x 4.25″w
2. The inside pop up flip mechanism measures: 5.25″h x 6.5″w, scored along the width at 2″, 4″ and 6″
3. For the window on the card front, I used the 10th largest circle die from the Diemond Dies Die-Normous Stack-Ems Circle Nesting Die Set
4. To create the framed circle for the bunny and the bear to fit inside on the card front (this is the part that flips inside the window on the card front), I used the 9th and 10th largest circle dies from the Diemond Dies Die-Normous Stack-Ems Circle Nesting Die Set
5. To create the framed circle for the puppy to fit inside on the inside of the card, I used the 5th and 6th largest circle dies from the Diemond Dies Die-Normous Stack-Ems Circle Nesting Die Set
It’s difficult, if not impossible, to describe the assembly of the card, so the following is a tutorial video showing the step-by-step process:
Disclosure: Many of the supplies I’ve used for today’s project are linked. Some may be affiliate links, which means if you make a purchase I receive a small commission at no extra cost to you. I truly appreciate your support toward the costs of running this blog!
This card is being entered into the following challenges:
Creatalicious Anything Goes with Optional Cute Challenge
Word Art Wednesday Anything Goes Challenge
Through the Craft Room Door Anything Goes Challenge
613 Avenue Create Anything Goes with Optional Something New Challenge
Lil Patch of Crafty Friends Anything Goes Challenge
Crafty Gals Corner Anything Goes Challenge
MFT Birthday Project Celebrate Challenge
Simon Says Stamp Add a Sentiment Challenge
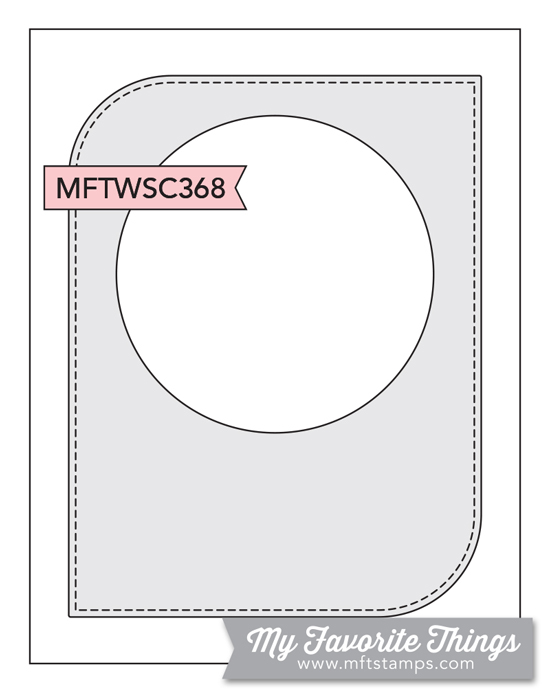
MFT Sketch Challenge #368
]]>