This image from my Copic coloring tutorial series this week, episode 7 was actually adding some grays to an image I colored up last week. I think adding the W7 and W9 really added a lot of visual pop to her hair:
The next image for episode 8 I started out coloring aqua or teal hair but then changed my mind after a blob of ink came out. I actually think this brunette with teal highlights came out cuter, and I believe mistakes can sometimes help us get to better than planned results! Basically I think this video reinforces the idea that we should be enjoying the process of coloring and go with the flow:
I used the following Copic colors to color up the above cutie: E50, E51, E21, E11, BV00, R20, B18, BG11, BG13, Y15 and Y17. Her hair is colored with BG11, BG13, BG15, C8 and C9. I used a Distress Ink Marker (the fine tip side) in Salty Ocean for the pupils of her eyes.
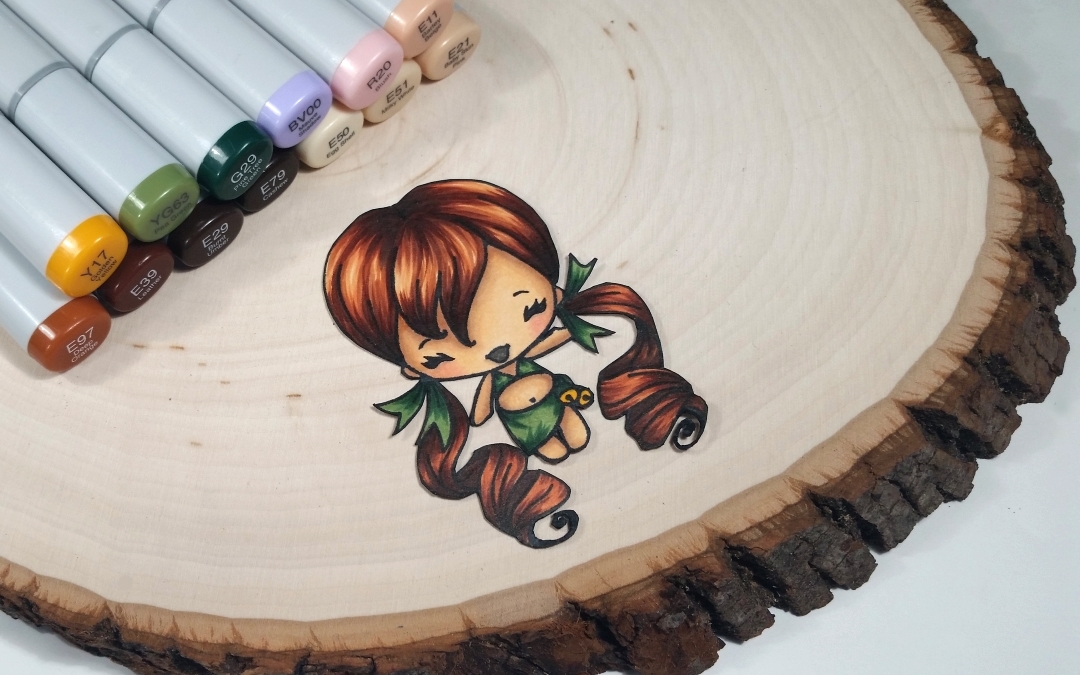
The above auburn haired cutie I colored up with the following Copic colors, but there sorry to say there is no video for this one (suffering from a flu, I just couldn’t get to videotaping and editing): Skin: E50, E51, E21, E11, R20, BV00; Clothes: YG63, G29 and Y17; and Hair: E97, E39, E29 and E79.
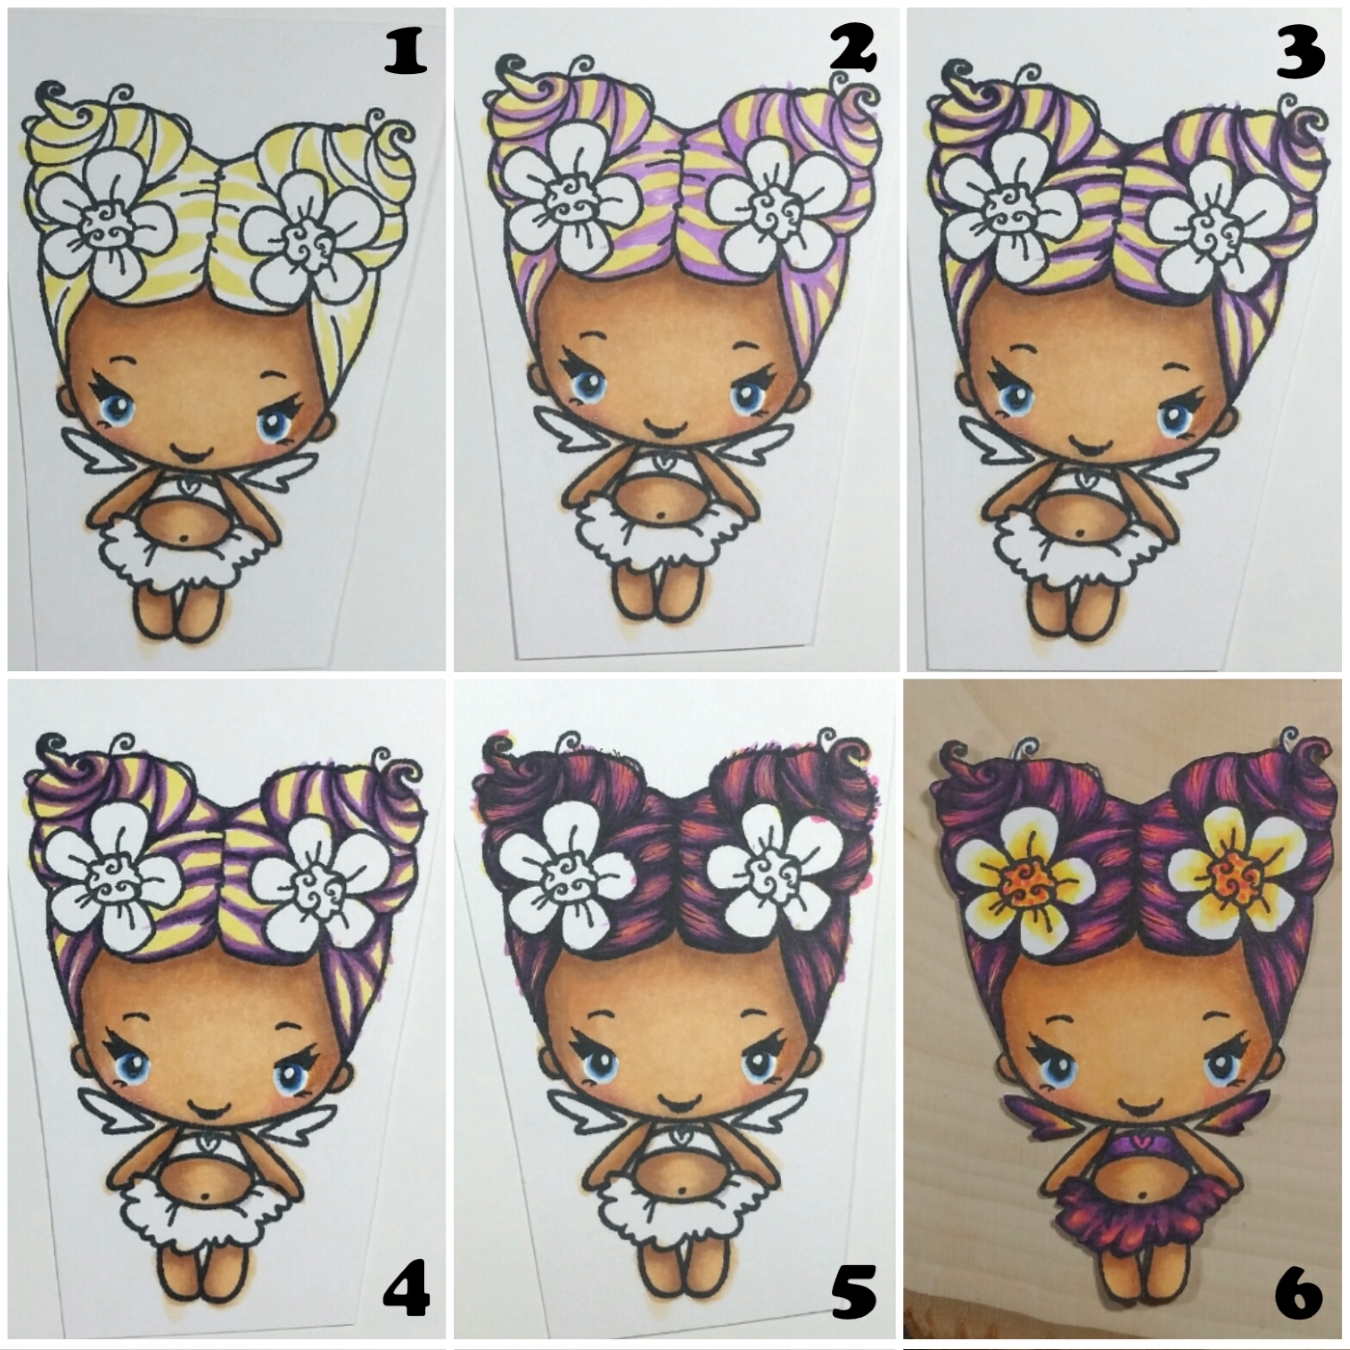
For the latest coloring video in the series, I veered from hair coloring to focus on the much-requested skin and eyes. I used the following Copic colors for the skin – E51, E53, E21, E11, R20, BV00 – and then used a Tim Holtz Distress Marker in Salty Ocean again for the pupils of her eyes.
The finished fairy image from the above video has wild colored hair and outfit (it was my reaction to a very gray and gloomy day) using the following Copic colors: V04, V06, V09, RV04, Y11, Y13, YR04
I hope you are enjoying these Copic coloring series. Next week, I’ll be trying to share how I color fur!
]]>
The first image I colored was a fairy from The Greeting Farm called Sweetie Bean. I colored her up with the following Copic colors to give her golden brown hair: YG01, YG03, YG07, G14, G17, E00, E21, E11 and R20. Her hair is E55, E57 and E59
For episode 2, I colored up The Greeting Farm image called Flutter Anya with the following Copic colors to give her black hair with shiny blue highlights: B000, G05, G16, BG78, E51, E21, E11, E13 and R20. Her hair is colored with B01, C4, C6 and C9
For the 3rd episode, I colored up The Greeting Farm image called Fairy Queen Anya with the following Copic colors, concentrating on how to shade braided hair: E51, E53, E21, BV00, R20, G02, G16, Y13 and Y19. Her hair is colored with Y21, YR24, E37 with fine details added in with a Warm Gray Copic Multi-liner Pen in 0.3 pt
I hope you enjoy the series, and if you have any suggestions on different hair color combinations you’d like to see me try, please let me know in the comments. I have planned peacock colored hair and bright henna hair next. Thanks!
]]> I hadn’t made a paper bag card in a long time, and I thought it would be fun to try this again with a gold paper bag that I received with some crafty goodies recently. I followed THIS tutorial by Jamie (the owner of the Not2ShabbyShop).
I used the following Copic colors as well as a Copic multiliner pen in 0.03 pt to clear up the eyes and add more eyelashes (a girl can never have too many long lashes, right?!):
Skin: E000, 00, 11, 13, and BV01
Blush: R20
Hair: E55, 57 and 59
Eyes: G24, 94 and 99
Lips: R85 and 89
Butterfly: YR20 and 24
Shading on paper pieced dress: W1 and 3
In the video, in which I describe all the parts of decorating this card (like the love die cut from green/gold glitter paper and the pretty crocheted flowers below and above the beautiful crocheted green bow), I also show a comparison with another image that I colored with a yellow undertone skin color combination (E50, 51, 53 and R30):
This card is also being entered into the following challenges:
Teresa Renken’s 300+ Subbie Challenge
Craft-Dee BowZ Anything Goes with a Handmade Bow Challenge
Suzy Bee’s Anything Goes with a Twist…Add Flowers Challenge
Scrappin Stampers Facebook Lunch Bag Card May Challenge
Thanks for stopping by and hope you are having a wonderful day! WOOF
]]>
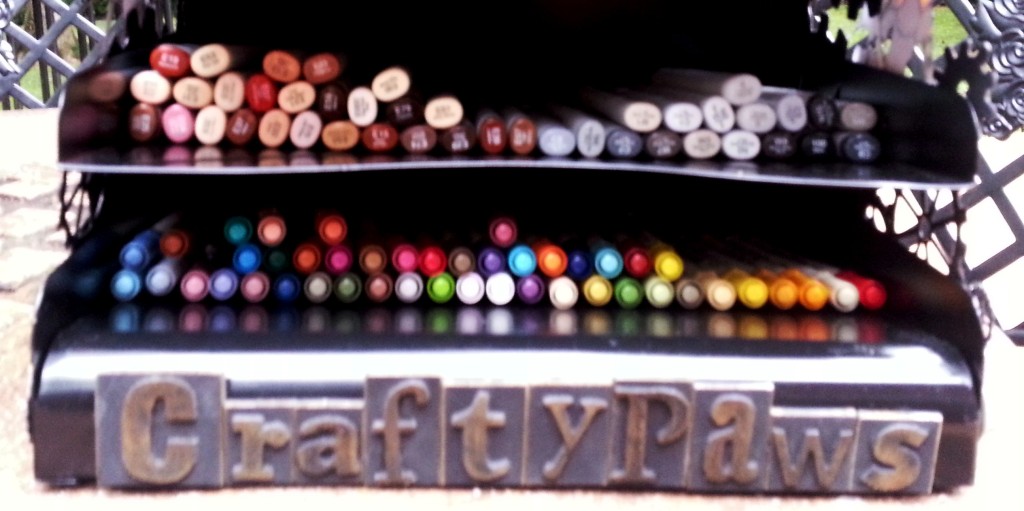
For the card base, I used favorite papers from my scrap box from the Graphic 45 “Steampunk Spells” and the “Bohemian Bazaar” collections. I also knew I wanted to add a little sparkle so I laid down some sparkly gold glitter tape for the floor where the girl and her pups are walking and also created a couple of paw prints by laying down two rows of the tape on thin copy paper and punching out a small paw print with a Marvy Uchida punch. I backed the paws with white card stock and then framed it with another layer of black card stock. I also used some letter stickers to spell out “crafty” and backed that on black card stock to create my name, “CraftyPaws”. Because I knew I was going to raise at least some of these on foam adhesive, I also edged the black card stock on all the pieces with a Faber-Castell SB width PITT artist pen (this eliminates the white edge and gives a more finished look).
For the images, I paper pieced the girl’s T-shirt and skirt with tiny scraps from my scrap box (in patterns I thought I would wear in shades of my favorite color, blue) and used the following Copic colors: Hair: C7, C9 and B02; Shoes: C7 and 9; Skin: E50, 51, and 53; Blush: R11; Dog in arms: W1, W3, E 23 and E25; Poodle: E11 and E21; Leash: B02. I also used a little Glossy Accents over everyone’s eyes, the dogs’ noses, and the girl’s shoes.
The following is a video tutorial on the Copic coloring, paper piecing, and card assembly:
https://www.youtube.com/watch?v=SUlcnv8Cxzw&feature=youtu.be
This card is being entered into the following challenges:
The Pink Elephant Anything Goes Challenge and
The Paper Nest Dolls Anything Goes Challenge
Thanks for stopping by and have a great day! WOOF
]]>
I think I may try some additional color combinations, but for this first card, I used more traditional, soft, almost vintage colors. I paper pieced and shaded the sled from a Recollections Christmas paper stack called “Watercolors.” I also added a small strip of that paper to the front bottom of the card, just to add some continuity.
The following, are the Copic colors used: Poodle/deer body: E31 and 33; Poodle/deer fur: E23, 25, and 29; Antlers: W1 and 3; Bell: Y35; Bow: R17; Harness: W9. I also used a Sakura White Gelly Roll Medium Point Pen to add highlights to the body, clear Wink of Stella to the bow and antler to add some shimmer; and Glossy Accents on the bell, eyes, nose and antlers to add some high shine. For the brown parts of SantiPaws: E23 and 25; white parts of SantiPaws: W1 and 3; Hat and jacket: R14, 17 and 08; Sack of toys: C1 and 3; Shading on sled: W1 and 3; and black of buttons and nose: W9. For the snow, I used C1 and 3 with a coating of clear Wink of Stella, which I also added to the hat and jacket. Lastly I added Uchida White Liquid Applique
, which I heated with my heat gun for the faux fur parts of the hat and jacket. What fun that added! It’s like heat embossing on steroids!
The following is a process video showing the coloring and paper piecing:
After all the coloring, I matted the image onto red card stock and then framed that with kraft card stock, which I punched out using a Martha Stewart eyelet lace punch around the page set. I put the whole thing on a white card stock base, and voila!
This card is being entered into the nice category of the Naughty or Nice Challenge Festive Furballs November Challenge and
The IBSIC #88 Color Challenge and
The Raisin Boat Christmas and Holiday Challenge
Thanks for stopping by and have a great day! WOOF
]]>
I colored up these two foxes from C.C. Designs called, “Sir Rupert with Tea” and “Sir Rupert with Cane” using the following Copic colors and pens: Hat and bow tie: B95 and 97; Dark brown ears and paws: C74 and 79; White tail, chest and snout: W1 and 3; Eyes: BG75 and 78; Brown of body: E97 and 99. Chair for the tea sipping fox: YR31 and 24; Staff for the walking fox: Clear Star Gelly Roll pen. White shine spot on eyes: White Gelly Roll pen. Darkening edges of fussy cut images: Faber Castell PITT artist pen in SB size. Lastly, to add some dimension, I added Glossy Accents to the eyes, glasses, walking staff, and tea cup and saucer.
The following is a process video showing how I colored the walking fox:
Thanks for stopping by. Please subscribe if you wish, and have a great day! WOOF
]]>
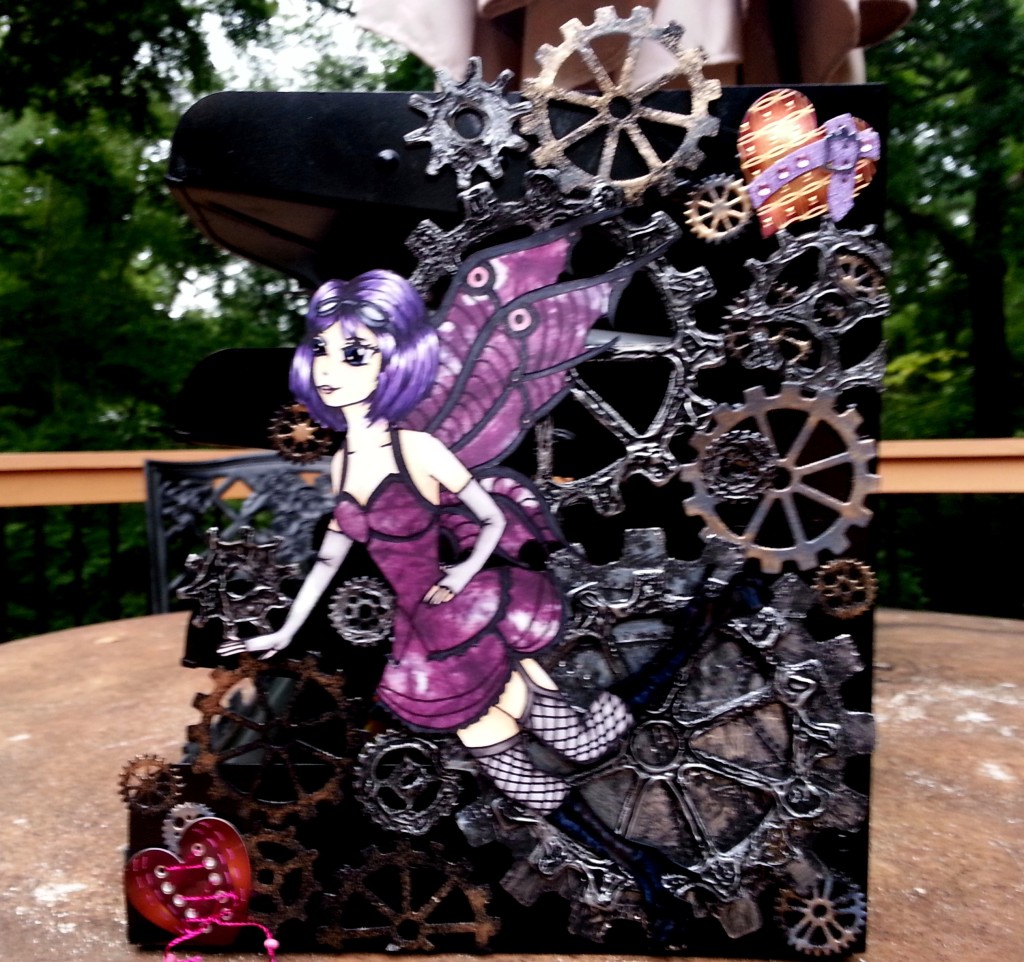 The colors I chose to color the two Steampunk Fairy images, which you can download for free on the Digi Page, came from a Jolees Boutique Steampunk hearts stickers pack. The hearts were fantastic, and helped carry the color scheme through the project without distracting from the focal point Steampunk Fairy images.
For the red violet haired Steampunk Fairy, I used a paper from the DCWV One Upon a Time paper stack to paper piece the dress and wings, shading with W1 and W3 directly on the patterned paper to add depth. I used the following Copic colors. Hair: YR00, RV10, RV34, RV66, RV69 and E79. Fishnet stockings and gloves: W1, 3, 5, and 7. Eyes: YG 95, 97. Boots and goggles: C1, 3, 5, 7, 9. Skin: E50, 51, and 53 with R30 for blush. The “skeleton” of her wings were colored with W9. I added a lot of shimmer to the full body of her wings with clear Wink of Stella.
For the purple haired Steampunk Fairy, I used paper from the DCWV Tie-Dyed Stack and used the following Copic colors. Hair: V15, V17, BV08 and 10o. Eyes B34 and B97. Fishnet stockings and gloves: W1, 3, 5, and 7. Boots and goggles: C3, 5, 7, 9. Skin: E 50, 51, and 53, with R30 for blush. I added shimmer to the “skeleton” of her wings and the straps and lace on her dress after I colored them with W9 with clear Wink of Stella.
 For both Steampunk Fairies, I added shine and gloss to the lenses of the goggles, the eyes and high boots with Glossy Accents.
I also added my name to the front of the storage unit with my Tim Holtz Grunge Board typeset style letters so that the unit can double as a name sign. You can find the tutorial for how to use those letters from the kit HERE.
The video share of the whole project follows:
DISCOUNT!: While I am a Diemond Dies Guest Design Team member, you can enjoy 10% off your entire order (including sale items) and free worldwide shipping on orders over $35 by using the code: thankskristina
Thanks for stopping by and have a great day! WOOF
]]>