CLICK the following picture to watch the video where I draw the winner:
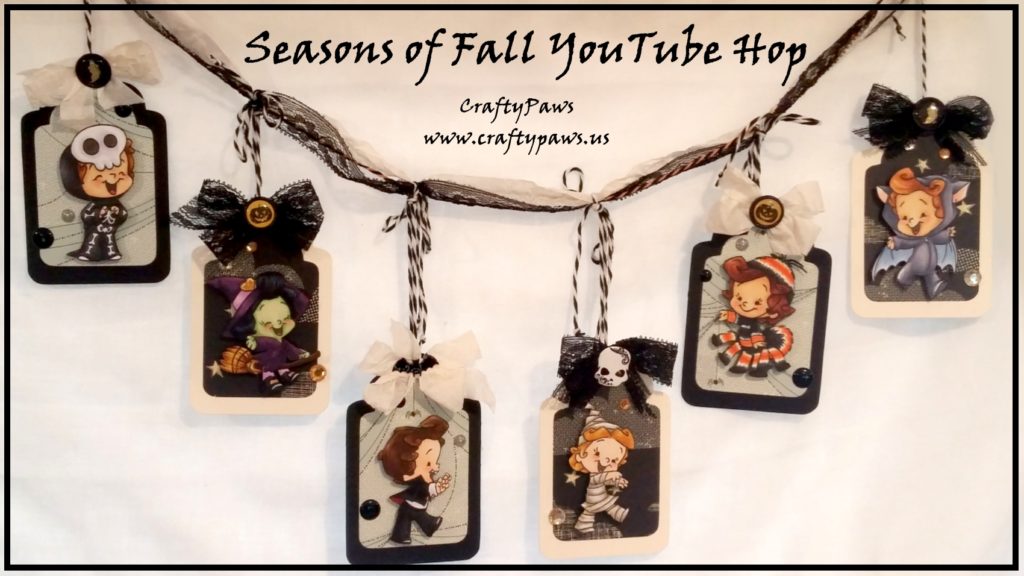
Thanks for all those of you who hopped along and left nice comments! We hope we were able to inspire you all with some fun fall craft projects.
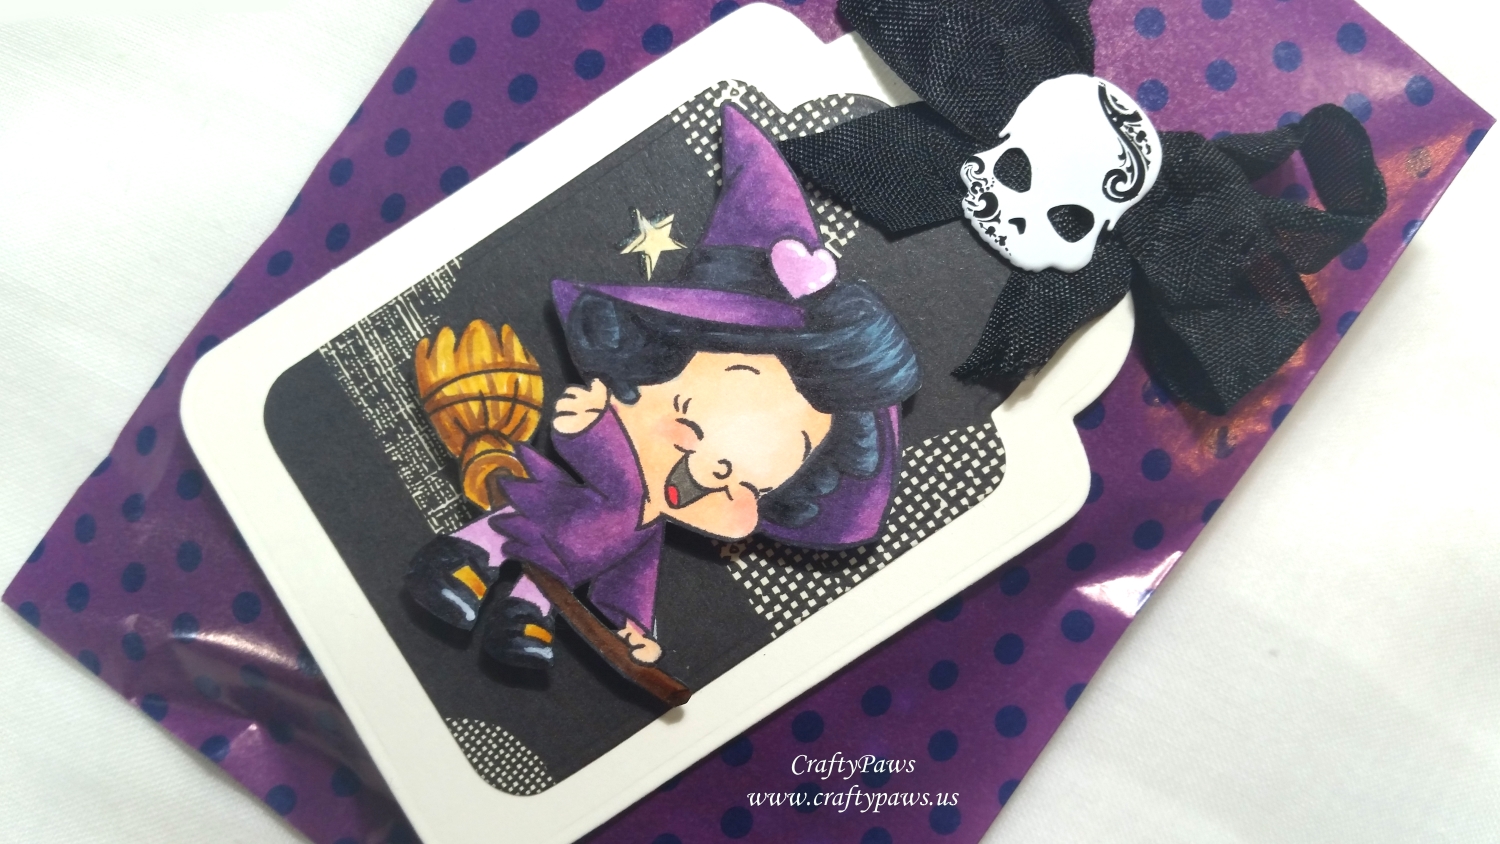
]]>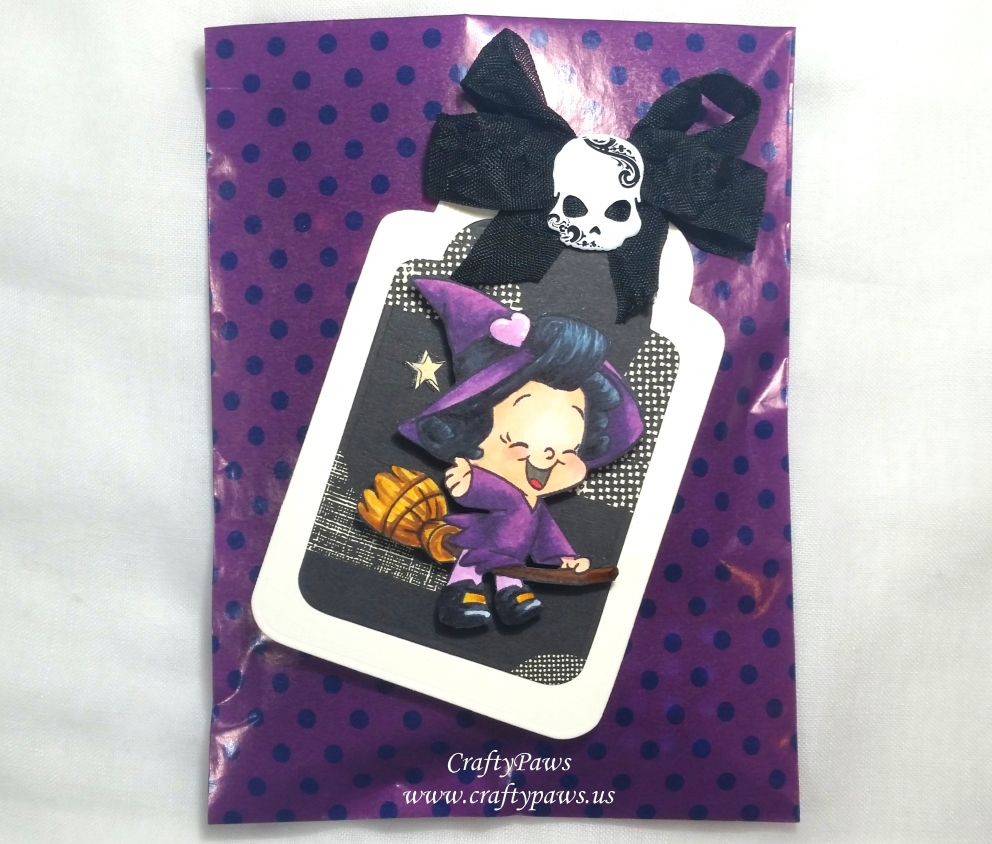 For this goody bag, I crafted an extra tag (like the tags I made in the prior post) using the C.C. Designs Monster Mash stamp set. I Copic colored the little flying witch as follows:
Skin: E000, E00, E01, R20 for blush, W5 for inside mouth, and R35 for tongue
Clothes: V12, V06, V15, V09
Boots and hat band: Y26, YR24, C7 and C9
Broom: Y26, YR24, E57 and E59
Hair: B01, C4, C6, C8 and C9 for hair
Then I fussy cut her out and inked the edges with a Momento Tuxedo Black Marker. Then I popped her up on double sided foam dots onto a tag I made.
I made the matted tag using two dies from the Diemond Dies Nesting Tags Die Set with cream cardstock and night sky patterned paper from an old American Crafts “Night Fall” paper stack. To create a reinforced hole at the top of all the tag, I used my We R Memory Keepers Crop-A-Dile Tool and a gold We R Memory Keepers Standard 3/16″ Eyelets. To embellish the tag, I used the Craft-Dee-BowZ Tool to make a black lace double loop bow and poked a metal Halloween skull brad from the Little Yellow Bicycle “Frightful Collection” Metal Variety Pack through the center. Lastly, the tag is positioned off-kilter on the front of a purple and blue polka dot treat bag (I love the way the purple and blue of the bag match the purple of the witch’s outfit and blue highlights in her jet black hair) filled with crafty yumminess.
Disclosure: Many of the supplies I’ve used for today’s project are linked. Some may be affiliate links, which means if you make a purchase I receive a small commission at no extra cost to you. I truly appreciate your support toward the costs of running this blog!
This treat bag tag is being entered into the following challenges:
Simon Says Stamp Monday Tag It Challenge
Creatalicious Anything Goes Challenge with Optional Texture
Lil Patch of Crafty Friends Anything Goes Challenge
Through the Craft Room Door Anything Goes Challenge
613 Avenue Create Anything Goes with Optional Use Something Wooden Challenge
Penny Black and More Autumn Splendor Challenge
Crafty Gals Corner Anything Fall Goes Challenge
Stamp Sensations Shades of Autumn Challenge
Cute Card Thursday Anything Goes Challenge
Catch the Bug Anything Goes Challenge
]]>
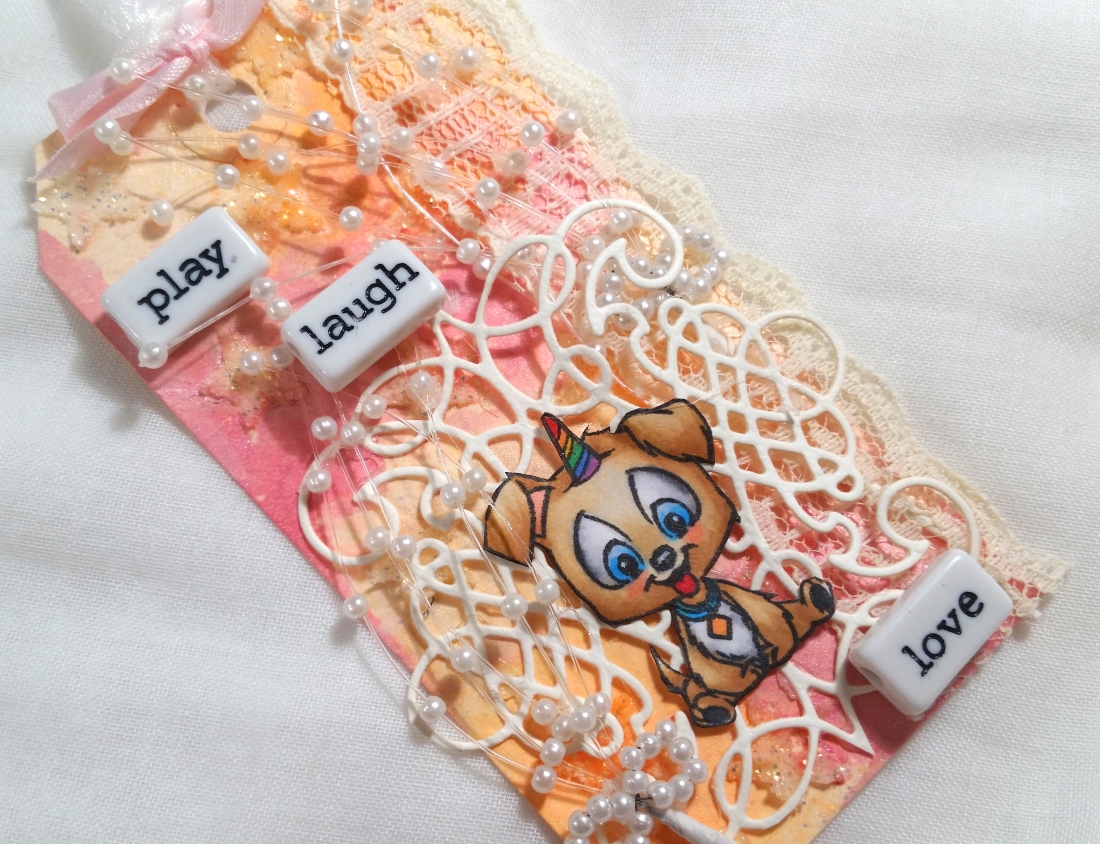
Before stamping out the puppies from the C.C. Designs “Puppy Power” stamp set (my current favorite stamp set), I wiped away a bit of the image at the top of each head so that I could draw in unicorn horns. I doodled in unicorn horns using Copic Multiliner Pens in 0.1 pt and 0.03 pt tips (the ink won’t bleed when you use Copic or other alcohol markers with these pens). Next I Copic colored the images with the following colors:
Rainbow unicorn horns: R27, YR65, Y15, G09, B04, B66 and V06 with Clear Wink of Stella for shimmer
Brown Unipup: E40, E30, E31 and E33; Gray Unipup: N0, N1 and N3
Blue eyes on unipup: B91 and B01; Blush and inside ears: R20; Paw pads: N7
Lastly I fussy cut out all the images with my favorite Fiskars spring loaded scissors and inked the edges with a Momento Tuxedo Black Marker to give them a nice finished look.
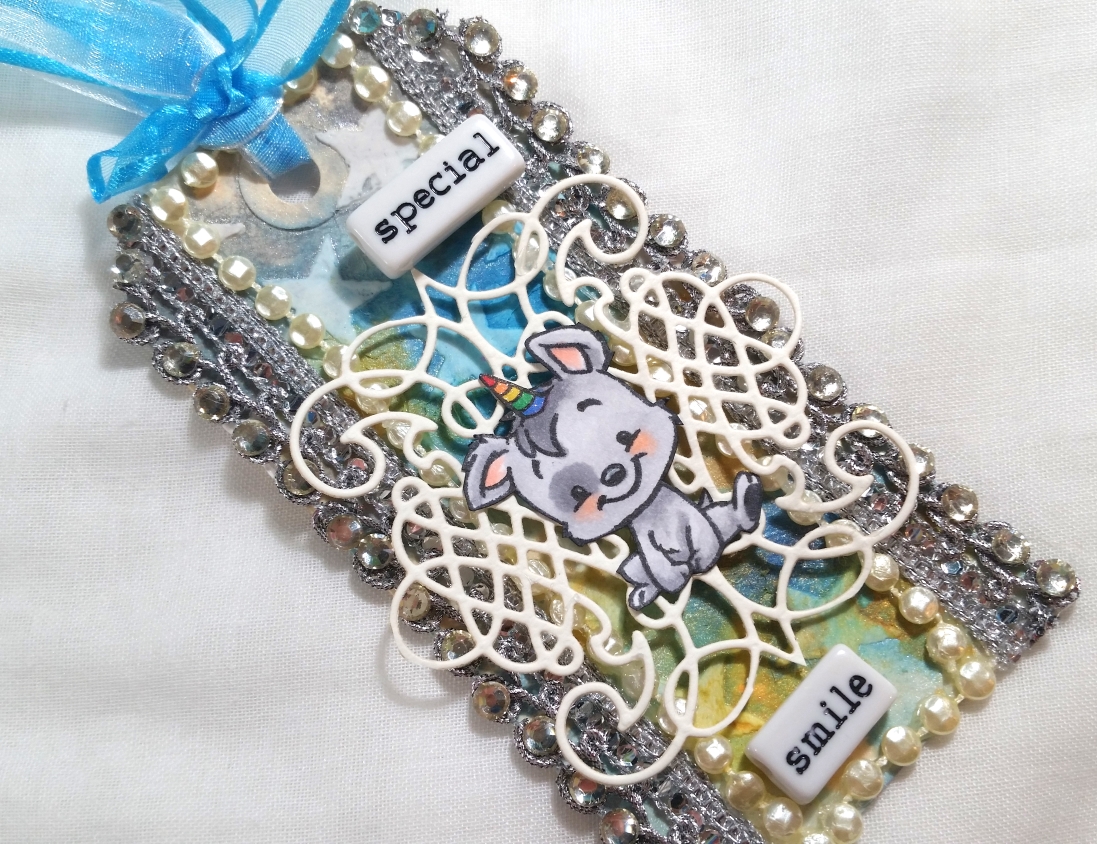
For the tag bases, I used Inkssentials Heavyweight #5 Craft Tags; stencils from Melissa Frances (Hearts Missing) and Visible Image (Stars and Stripes); and modeling pastes to create some textured backgrounds from Liquitex Professional Modeling Paste, and Martha Stewart Sparkle Texture Effect. Once dry, I had some fun with watercoloring, spraying and splattering shimmer sprays and inks from my stash: DecoArt Shimmer Mister in Turquoise; Recollections Simply Pastel in Blue Shimmer; Heidi Swapp Color Shine in Gold, Mustard, Sheer, and Primrose; and Tattered Angels in Blue Icing, Tin Can and Viva Pink. Once all the pastes and sprays were dry, I die cut some backgrounds from thick watercolor paper to add some visual separation between the tag bases and the images using a die from the Spellbinders Calligraphy Flourish Tiles Die Set from the Ooh La La Collection.

Then it was sprinkle in lots of remnant trims of laces, pearl strands, bling trim, satin ribbons, pearl sprays and organza ribbons. I hot glued embellishments in turquoise, pale pink, cream, cotton candy pink, turquoise, and silver. For finishing touches, I also used some Bead Landing Words Craft Beads to add the following phrases to each tag embellishment: “play, laugh, love;” and “special smile.”
Disclosure: Many of the supplies I’ve used for today’s project are linked. Some may be affiliate links, which means if you make a purchase I receive a small commission at no extra cost to you. I truly appreciate your support toward the costs of running this blog!
These tags are being entered into the following challenges:
Simon Says Stamp Sprinkle and Splatter Challenge
Word Art Wednesday Anything Goes Challenge
Creatalicious Anything Goes with Optional No Square or Rectangle Cards Challenge
Simon Says Stamp Work it Wednesday Watercolor Challenge
Lil Patch of Crafty Friends Anything Goes Challenge
613 Avenue Create Anything Goes with Optional Magic/Fantasy Challenge
Penny Black and More Add Something Beginning with B – beads, bling, blue, and bows
Crafty Gals Corner Add a Ribbon or a Bow Challenge
Stamping Sensations Favorite Stamp Challenge
I have posted 2 videos about my experiences with the Stamp and Scrapbook Expo. In part 1, I share how I prepare and get organized to attend the Expo (get a sense of the booths map, pick my classes (3 classes gets you a free gift, which this year was a 12″ x 12″ paper pad, and you get free admission any day you have a class; my total this year was $122), go through all the special coupons (especially the early bird (time sensitive) specials), and figure out my schedule/plan for each day. The following is Part I of my experience at the Expo:
The following is Part II of my experience at the Expo, and it details the three classes I took (watercoloring hosted by Art Impressions, flower shaping by Heartfelt Creations, and mixed media by Art Anthology) and the great crafty hauls I got for $121.83:
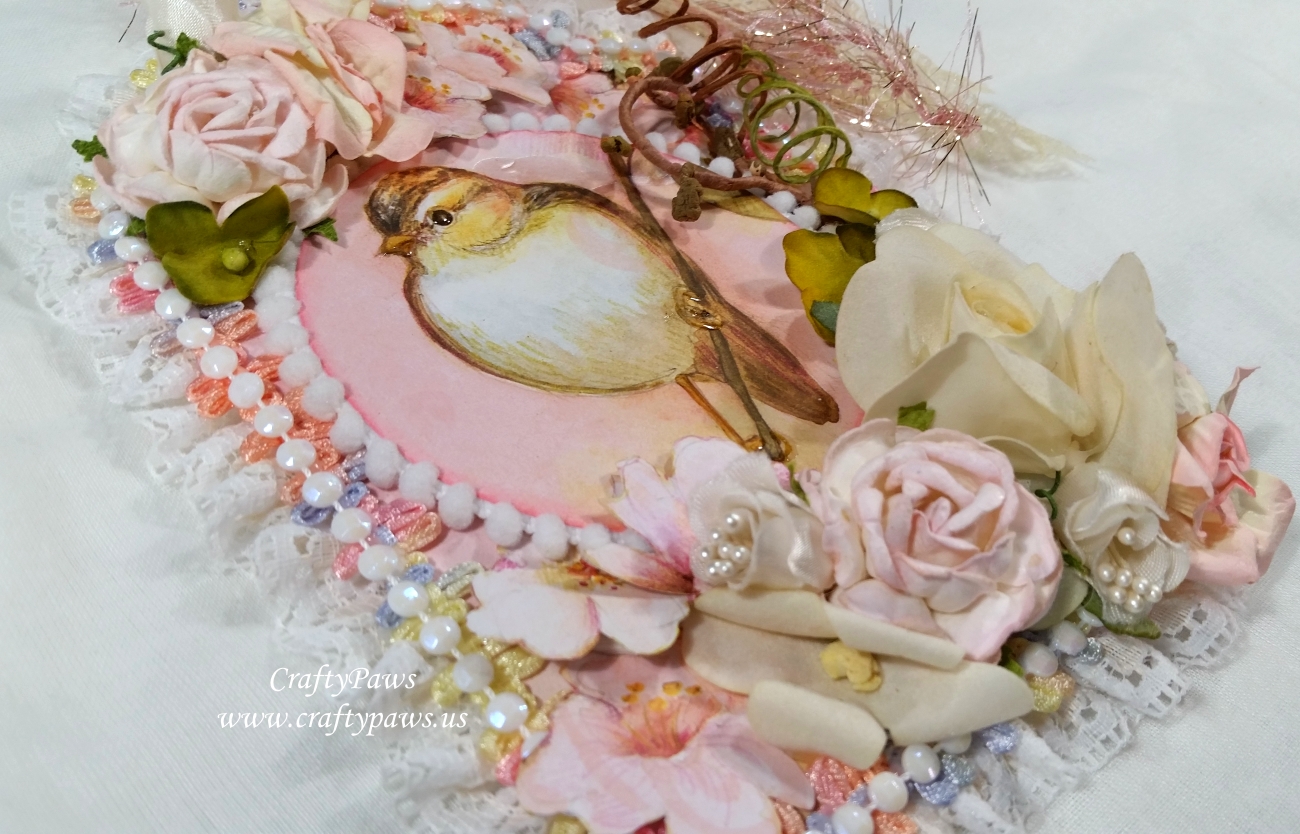
]]>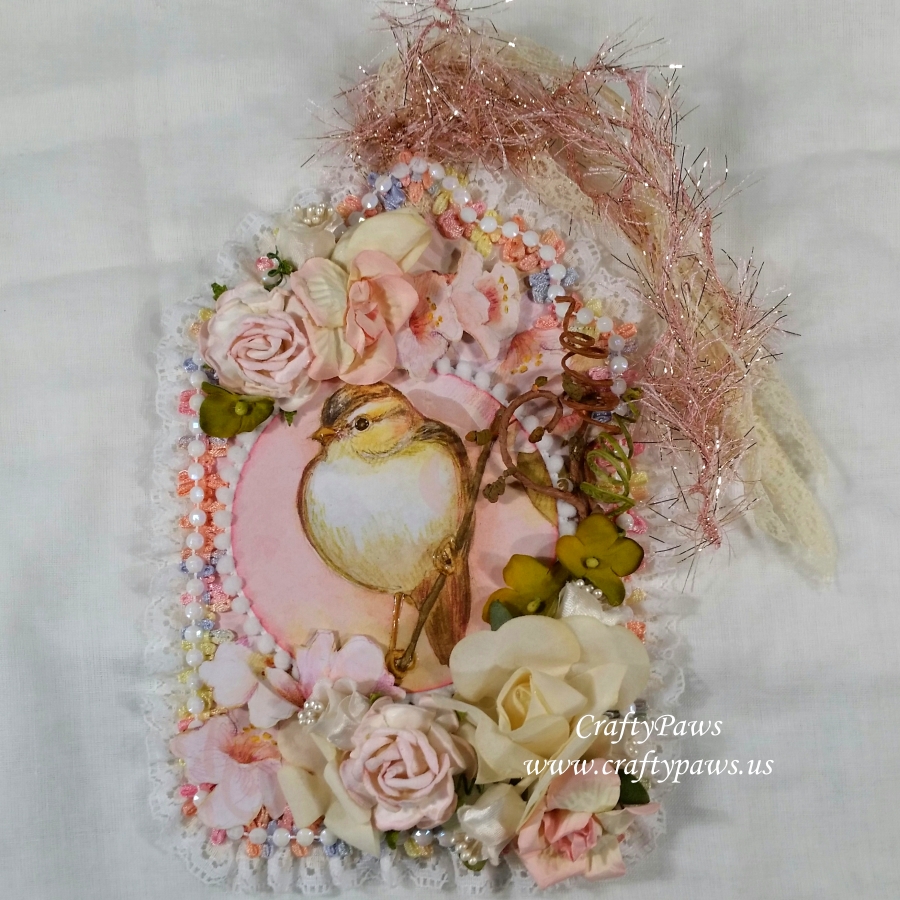 BASE: For the base of the tag, I used the largest of the Diemond Dies Tags Nesting Die Set with thin chipboard, and paper from some retired K & Company Floral Collection paper called “Bird on Pink”. I framed the tag from the back with gathered lace that I shirred a bit more as I hot glued it into place for extra luxe fluff. Then I used a mixed pastel colored braided trim all around the edges of the tag. While I liked the Easter colors of that braided trim, I thought it looked a bit unfinished so I added a strand of faceted white beaded trim all along the center-line, which I think gave the border of the tag a whimsical candy-covered look.
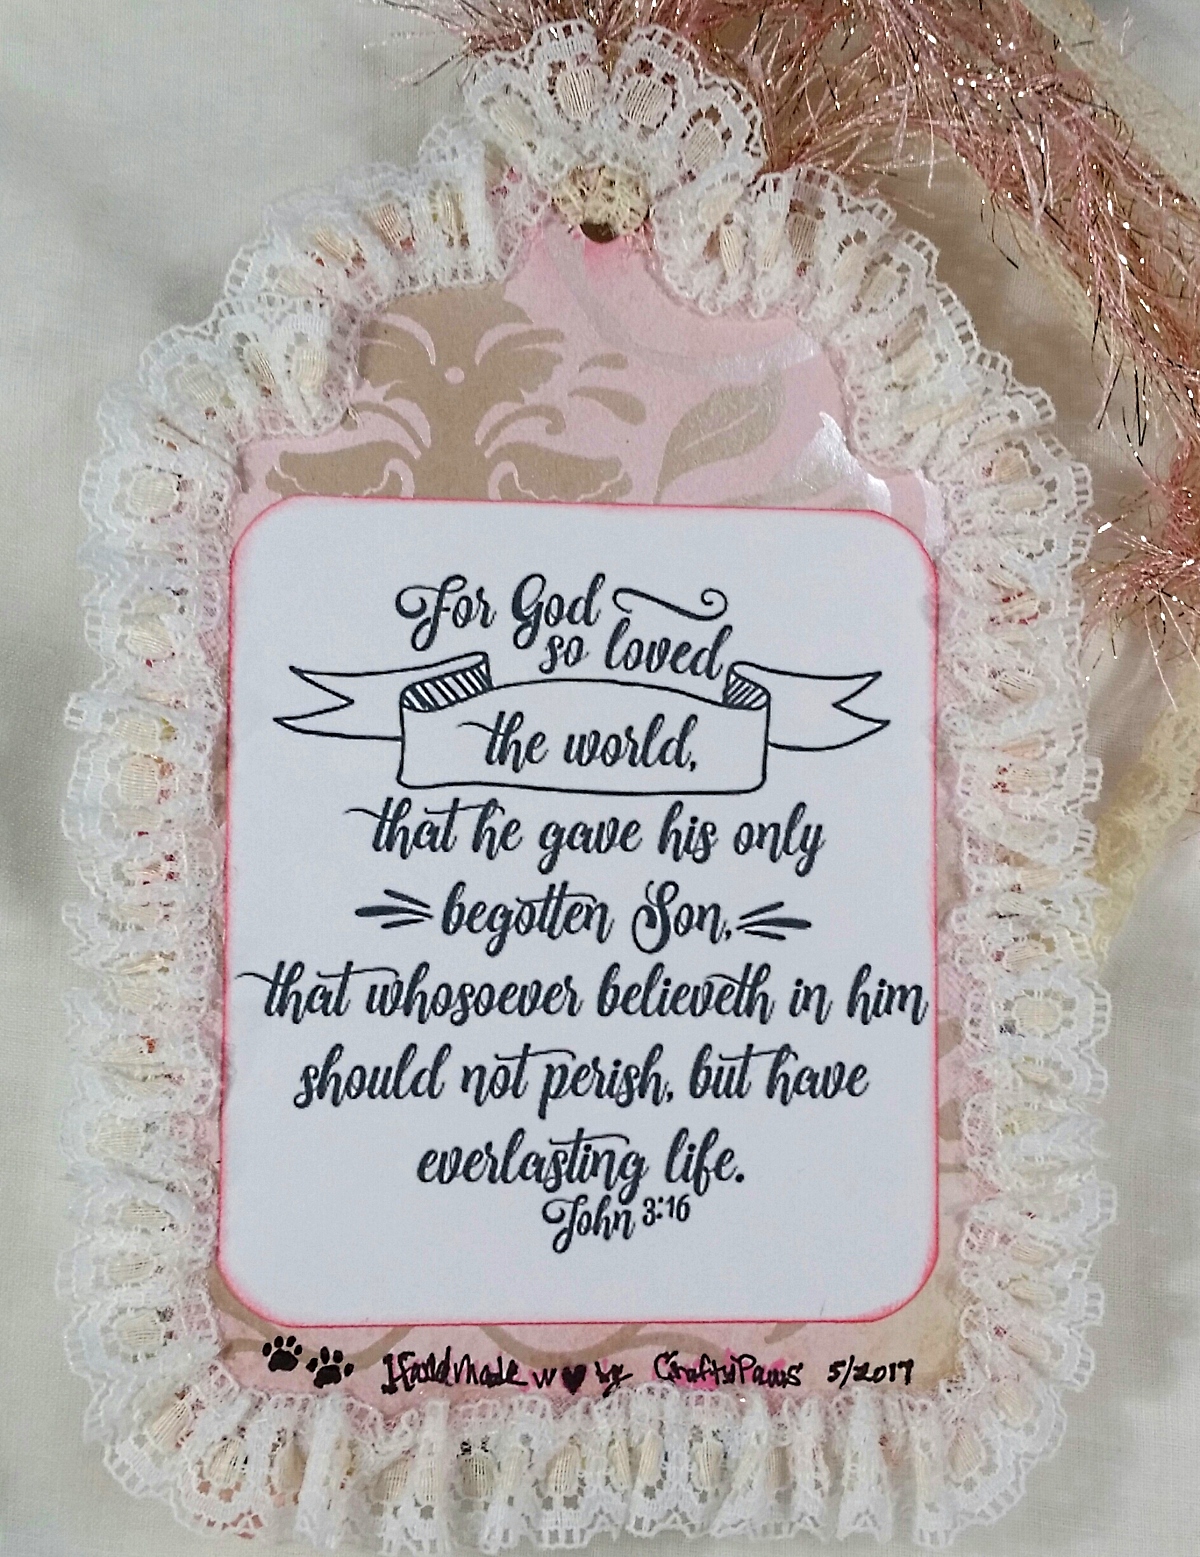
For the backside of the tag base, I printed out a beautiful quote from the Bible from the Word Art Wednesday Challenge Blog back in early December 2016. I know it is not the word art that is for the current challenge, but it seemed perfectly suited for my friend at this time in her life after her mother’s passing. I cut out the quote with a paper trimmer, then I rounded the corners with a We R Memory Keepers Crop-A-Dile Corner Chomper to match the rounded corners of the tag. Then I inked the edges with Tim Holtz Distress Ink in Worn Lipstick to give the word art a finished look.
 FOCAL POINT: For the centerpiece, I die cut a sweet bird from the K & Company Floral Collection “Bird on Pink” (adding Glossy Accents to the eyes, beak and legs for some lifelike shine) with the 8th largest of the 20 piece Diemond Dies Die-Normous Stack-Ems Circle Nesting Die Set. I inked the edges of this die cut circle with more Tim Holtz Distress Ink in Worn Lipstick, which I think helped highlight the pale pink background. Then for some added whimsy, I added pom pom trim around the whole circle, which was intended to echo the faceted beaded trim around the tag while adding a different, soft texture. This pom pom trim also framed the focal point image nicely. Before adhering the image to the tag, I backed it with fun foam to add a bit of dimension to the focal point and bring it forward on this super dimensional tag.
Note: My readers can get 10% off and free worldwide shipping on all orders of $35 or more at Diemond Dies by using the coupon code: thankskristina
LAYERING/TOPPINGS: I added four 1/2″ lace strands and 4 pink and silver eyelash trim strands to create a fulsome tassel for the top of the tag, tying an eyelash trim bow to cinch it all together. Then for the tag itself, I knew I wanted to add two flower clusters — a larger one on the lower right to add some visual weight for the base and a smaller one in the upper left for balance. I used a variety of paper, foam and fabric flowers that I had been gifted (and hoarded for just that perfect special project) from crafty friends (YT: mynashka, Crafty Bean, NewCrafterBev, MyDivineGrace, and Crafty Creations by Dezy). I added twig-like curlicues from a Prima floral embellishment package to the right of the image emanating from the lower right flower cluster to add some height and to be a 3D reference to the twig on which the bird is standing. I also hand fussy cut some of the pale pink flowers from the K & Company Floral Collection “Bird on Pink” paper and popped those up on fun foam to add some dimension and interest while still matching in style with the focal bird image.
This jumbo spring tag is being entered into the following challenges:
Simon Says Stamp Monday The Great Outdoors Challenge
Creatalicious Anything Goes Challenge with an Option of For the Girls or Mothers Day
Simon Says Stamp Wednesday A Hint of Pink Challenge
Fab ‘n’ Funky Lovely Ladies Challenge
Word Art Wednesday Anything Goes Challenge
Through the Craft Room Door Anything Goes Challenge
Crafts Galore Encore Anything Goes Challenge
Not Just Cards Easter Challenge
Simon Says Stamp Work it Wednesday April Showers Bring May Flowers Challenge
613 Avenue Create Anything Goes with Optional Spring Challenge
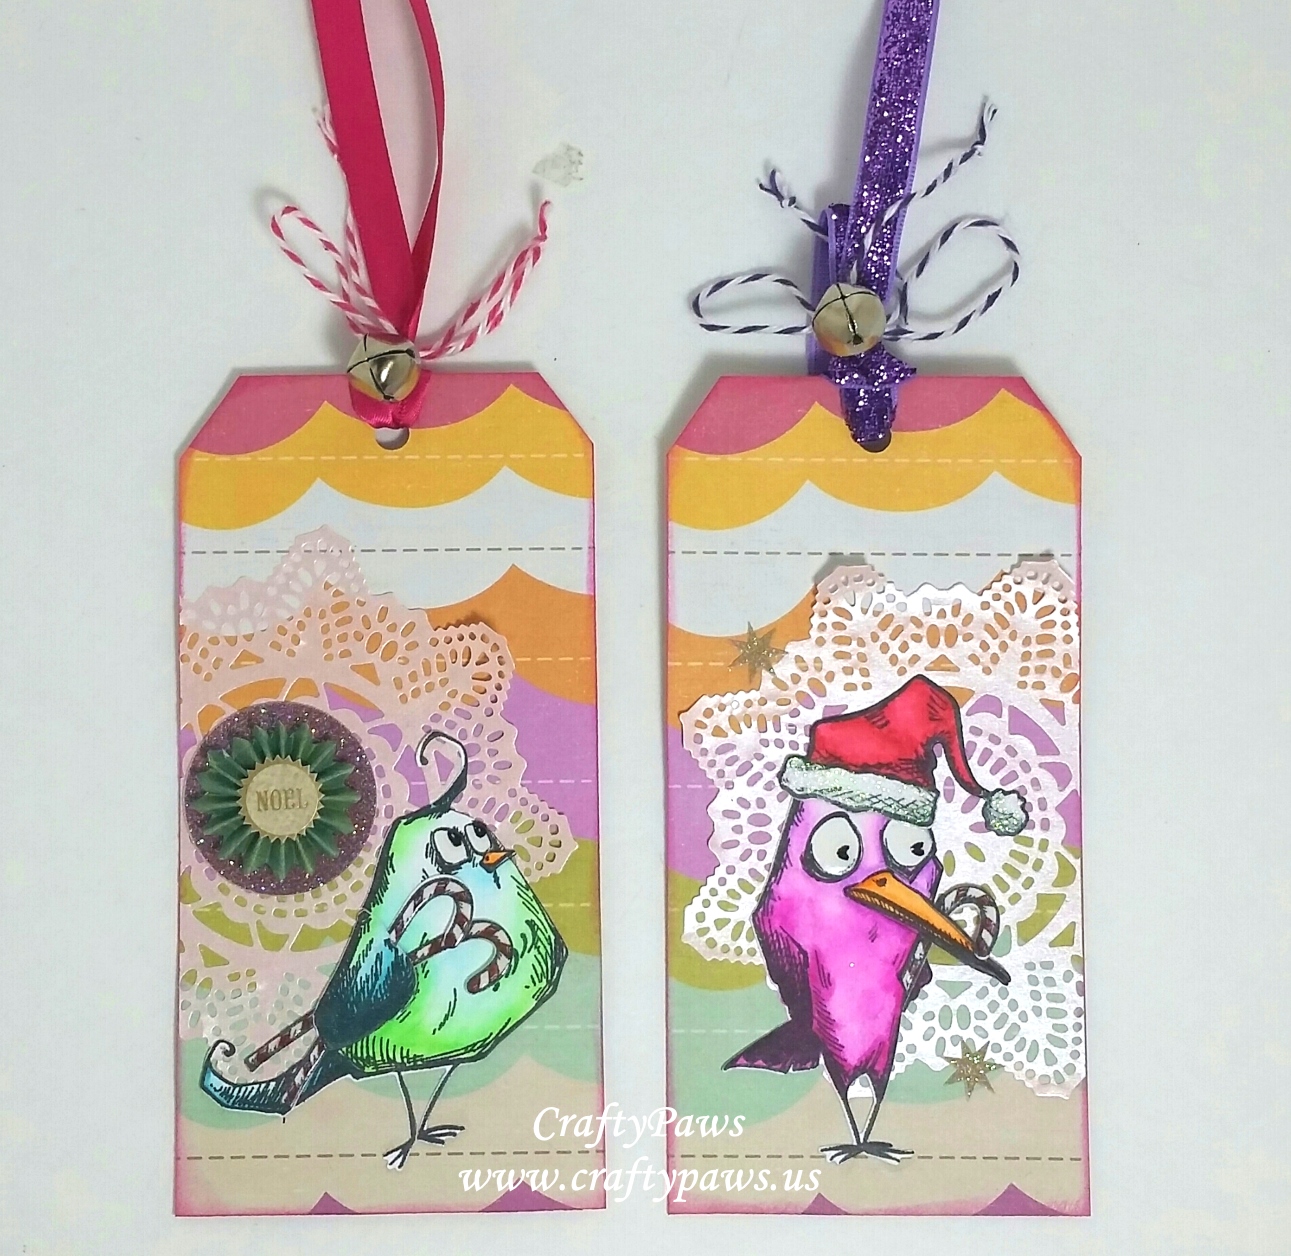
 I thought something whimsical and not gender specific could be useful to the shelter distributing the tags and gifts so my mind immediately turned to the Tim Holtz Crazy Birds and Crazy Things. I used the following Kuretake Zig Clean Color Real Brush Markers to color them up with wild and wacky colors: Persian Green (033), Cobalt Blue (031), Light Blue (036), Fluorescent Green (004), Yellow (050), Orange (070), Scarlett (023), Light Pink (026), Dark Pink (027) and Light Violet (081)
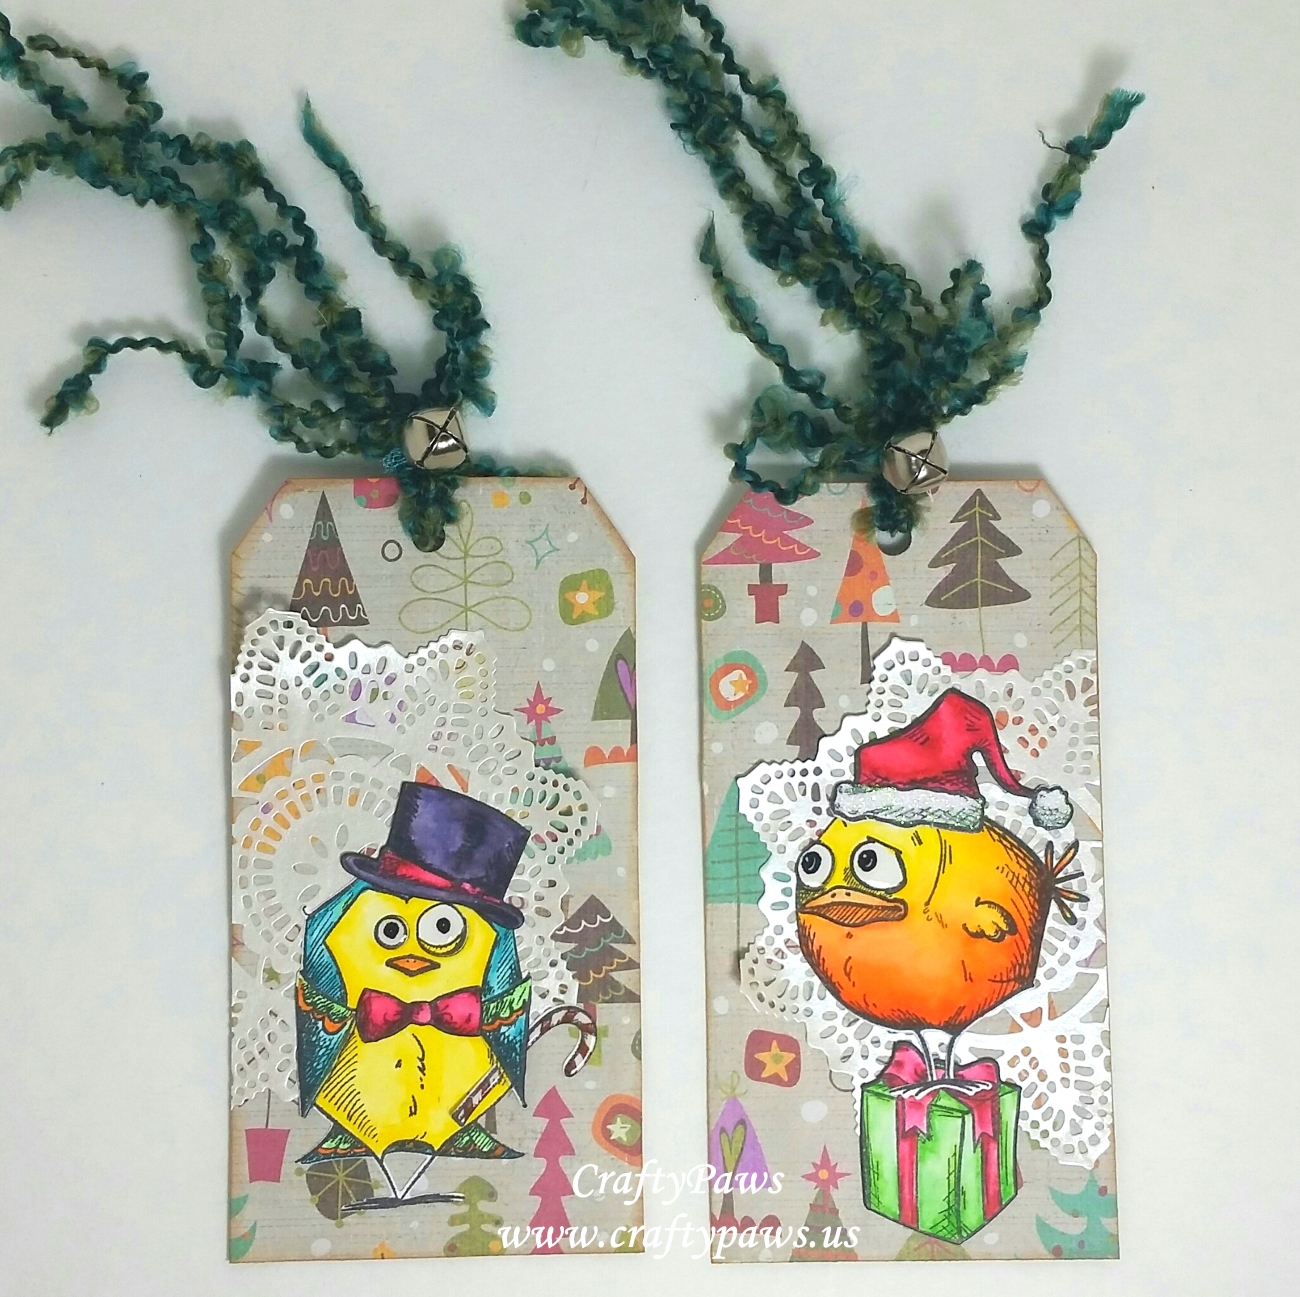 Because I had the coordinating Crazy Birds Dies and Crazy Things Dies, I die cut extra layers for all the eyes and wings of the birds (to add a bit of dimension), and I die cut lots of holiday accessories to mix and combine with the birds. I LOVE how the dies do not leave a big white area around the images to create a more integrated look. Then for a little shine and sparkle, I added Icicle Stickles over top of the white areas of the Santa hats, Glossy Accents on all the birds’ eyes and candy canes, and Wink of Stella on various parts of the birds.
Then I hand cut some tags from an old Crate Paper Snow Day paper pad that amazingly seemed to have the same crazy colors I had used to watercolor those birds! As the paper is not double sided, I cut enough of the paper to glue two pieces back to back, which was also good to make the tags feel more sturdy. I inked the edges of both sides with Tim Holtz Distress Ink in Tea Dye, Worn Lipstick or Picked Raspberry. I also used up some Shimmerz ivory and pale pink scraps with my Prima Pineapple Doily Die to create a little backdrop so that the birds would stand out from the busy patterned tag bases. Lastly I punched holes at the top of each tag and added ribbons, fibers, bakers twine bows, and jingle bells for a little fun.
 These tags are being entered into the following challenges:
Simon Says Stamp Monday Shine Bright Like a Diamond Challenge
Word Art Wednesday Anything Goes Challenge
Through the Craft Room Door Anything Goes Challenge
613 Avenue Create Anything Goes Challenge
Just Keep On Creating Anything Goes Challenge
Not Just Cards November Challenge
Card Mania Tag You’re It Challenge
Lil Patch of Crafty Friends Anything Goes Challenge
Creatalicious Anything Goes with an Optional Anything But a Card Challenge
Penny Black and More Anything Christmas Challenge
]]>
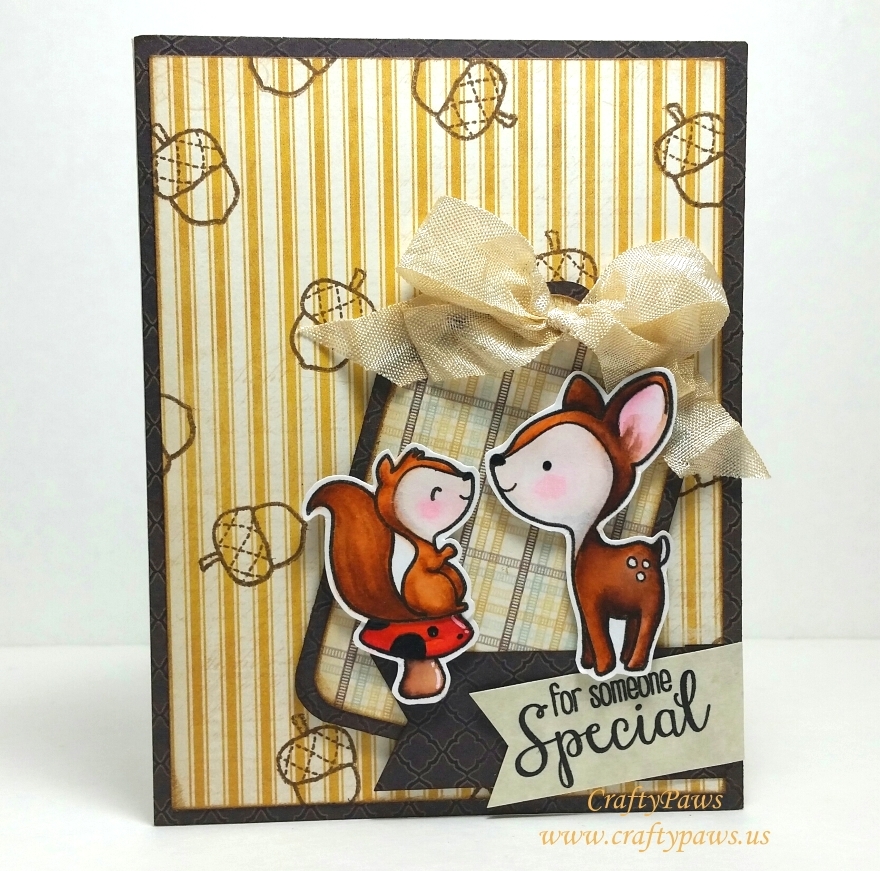 I started with some beautiful patterned papers from the My Mind’s Eye Lost & Found Sunshine collection. I picked a chocolate brown trellis pattern for all the matting. Then I chose a golden yellow stripe for the background that I stamped with sweet acorns from The Greeting Farm Wood Friends stamp set in Walnut Stain Tim Holtz Distress Ink. A soft plaid that I die cut into a tag with the Diemond Dies Nesting Tag Die Set seemed to create a nice backdrop for the main focal point of the card. Initially I thought it would be difficult to incorporate a stripe and a plaid together on one card, but keeping everything in the same family of fall colors made this easier than expected.
The main images for this card are the fawn and squirrel of The Greeting Farm Wood Friends. I also stamped out and colored a little bird from The Greeting Farm Your Wings stamp set that I had originally thought about adding to the duo on the card front, but I ended up adding it to the inside of the card instead (that tag was getting a little crowded). Because the squirrel was so much smaller than the fawn, I also put him on top of a mushroom from The Greeting Farm Little Fairies stamp set.
 I used the following Zig Clean Color Real Brush Markers with a water brush to watercolor all the images:
Fawn: Brown (060), Dark Brown (062), Pale Pink (028), Light Gray (091) and Light Pink (026)
Squirrel: Beige (072), Brown (060), Pale Pink (028), Light Gray (091) and Light Pink (026)
Bird: Light Blue (035)
Mushroom: Scarlett (023), Geranium Red (029), Beige (072), Dark Grown (062)
I also used a Sakura Black Glaze Pen to add a little shine to the eyes, noses, and spots on the mushroom as well as a Sakura White Gelly Roll Pen to add some highlights to the mushroom. The tag and the critters on the card front are all popped up on double sided foam adhesive for added dimension.
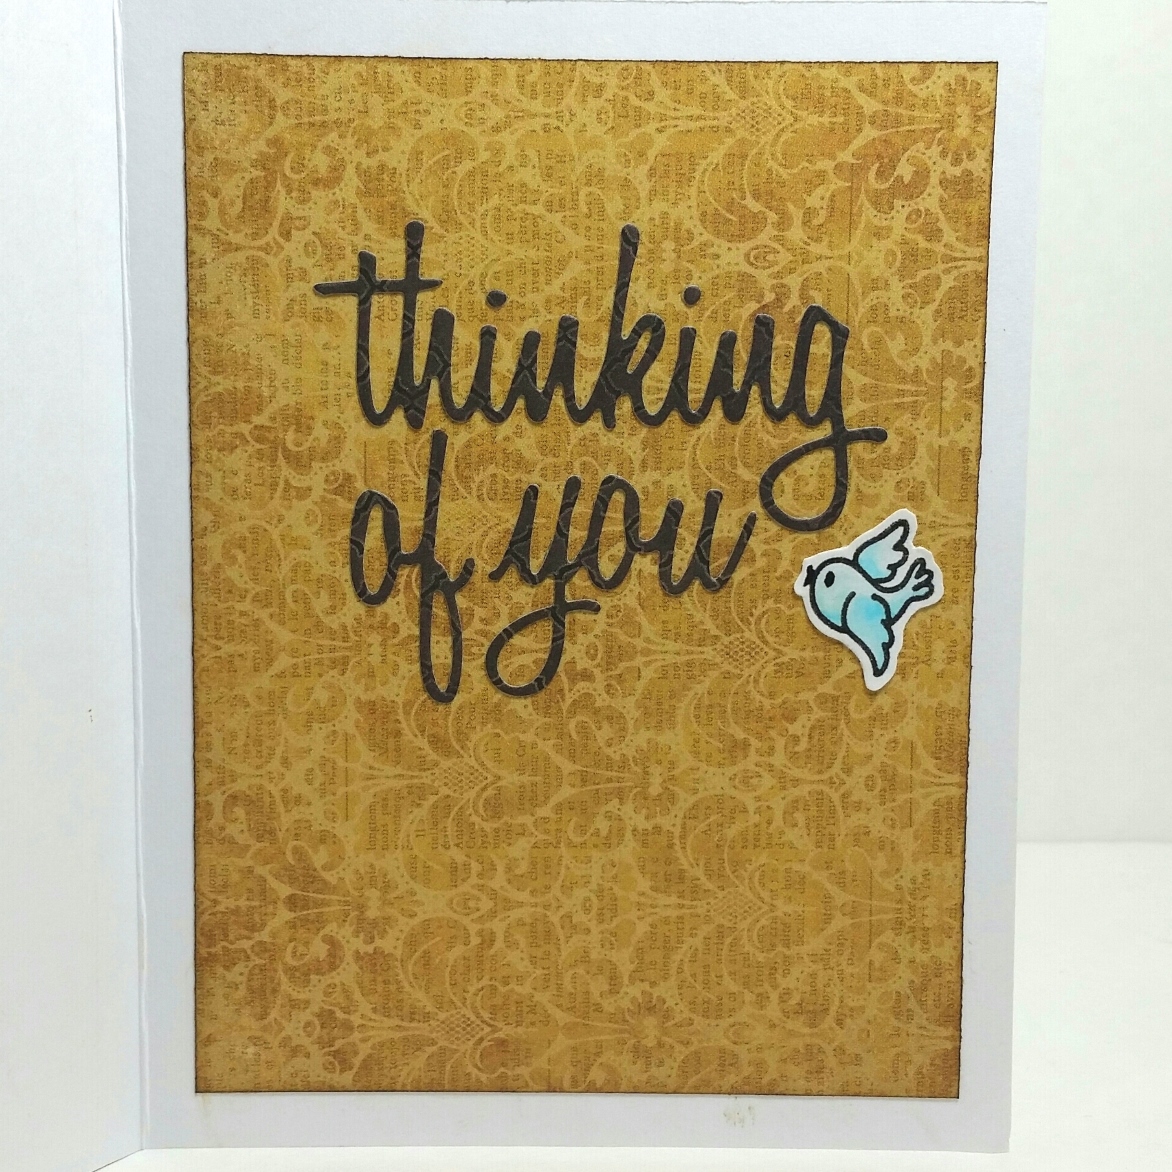
For the inside liner of the card, I used the reverse side of the plaid paper which was a beautiful golden damask. I used the “thinking of you” from the Sizzix Script Celebration Words die set with more of the chocolate brown trellis paper for the sentiment. I inked all the edges of each paper to finish off each edge (I like to camouflage the white edges of cut paper when I remember to do this step, which is about 50% of the time–LOL).
For finishing touches, I added a hand dyed seam binding bow to the top of the tag, and some hand cut fishtail banners from more of the chocolate trellis paper and a scrap of cream card stock from my scrap box. I stamped with Momento Luxe Tuxedo Black Ink the “for someone special” sentiment from the Wood Friends stamp set and heat embossed it with clear embossing powder for a subtle shine and dimension.
The following is a watercoloring process video of the critters on this card:
This card is being entered into the following challenges:
The Greeting Farm Farm Fresh Fall Colors Challenge
Card Mania Tag You’re It Challenge
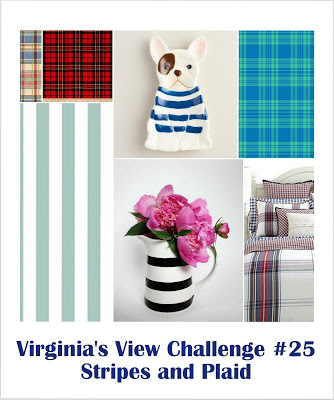
Virginia’s View Stripes and Plaid Challenge
MarkerPOP Sketch Challenge #107 – WINNER

]]>
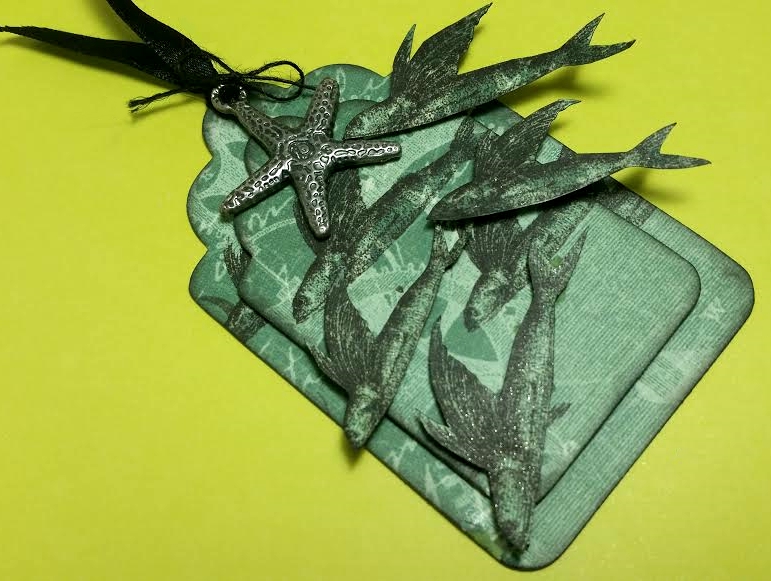
To make this little tag, I used the Diemond Dies Nesting Tag Die Set and cut into my one remaining sheet of this Steampunk Debutante Collection paper with the flying fish in the background (it has the flying man held up by a giant  hand by a propeller). I layered two of the nesting tags with double sided foam adhesive, inking all the edges with Tim Holtz Distress Ink in Black Soot.
Then it was a matter of fussy cutting all the flying fish and inking the edges with a black marker. I then popped them up on one, two, or even three layers of more double sided foam adhesive, positioning them in directions to make them look like they were swimming in harmony in a big school. I think adding all the extra double sided foam adhesive gave some of them the look of jumping/flying in the air! I don’t know if you can see it in the photos, but I also added coats of Clear Wink of Stella to the flying fish so they have a great sparkle in the light.
To finish off the tag, I used a bit of black silk ribbon and looped it through a hole I had punched at the top. Lastly, I remembered I had an old metal starfish charm in my stash so I tied a bit of black twine into a bow and added the whole thing as a little topper.
This tag is being entered into the following challenges:
Simon Says Stamp Monday Nautical/By the Sea Challenge
Simon Says Stamp Wednesday Things With Wings Challenge
613 Avenue Create Anything Goes Challenge
SanDee & Ameile’s Anything Goes Steampunk/Industrial Challenge
Creatalicious Anything Goes Challenge
]]>
 The version of the song that I printed out on my computer and added to the back is:
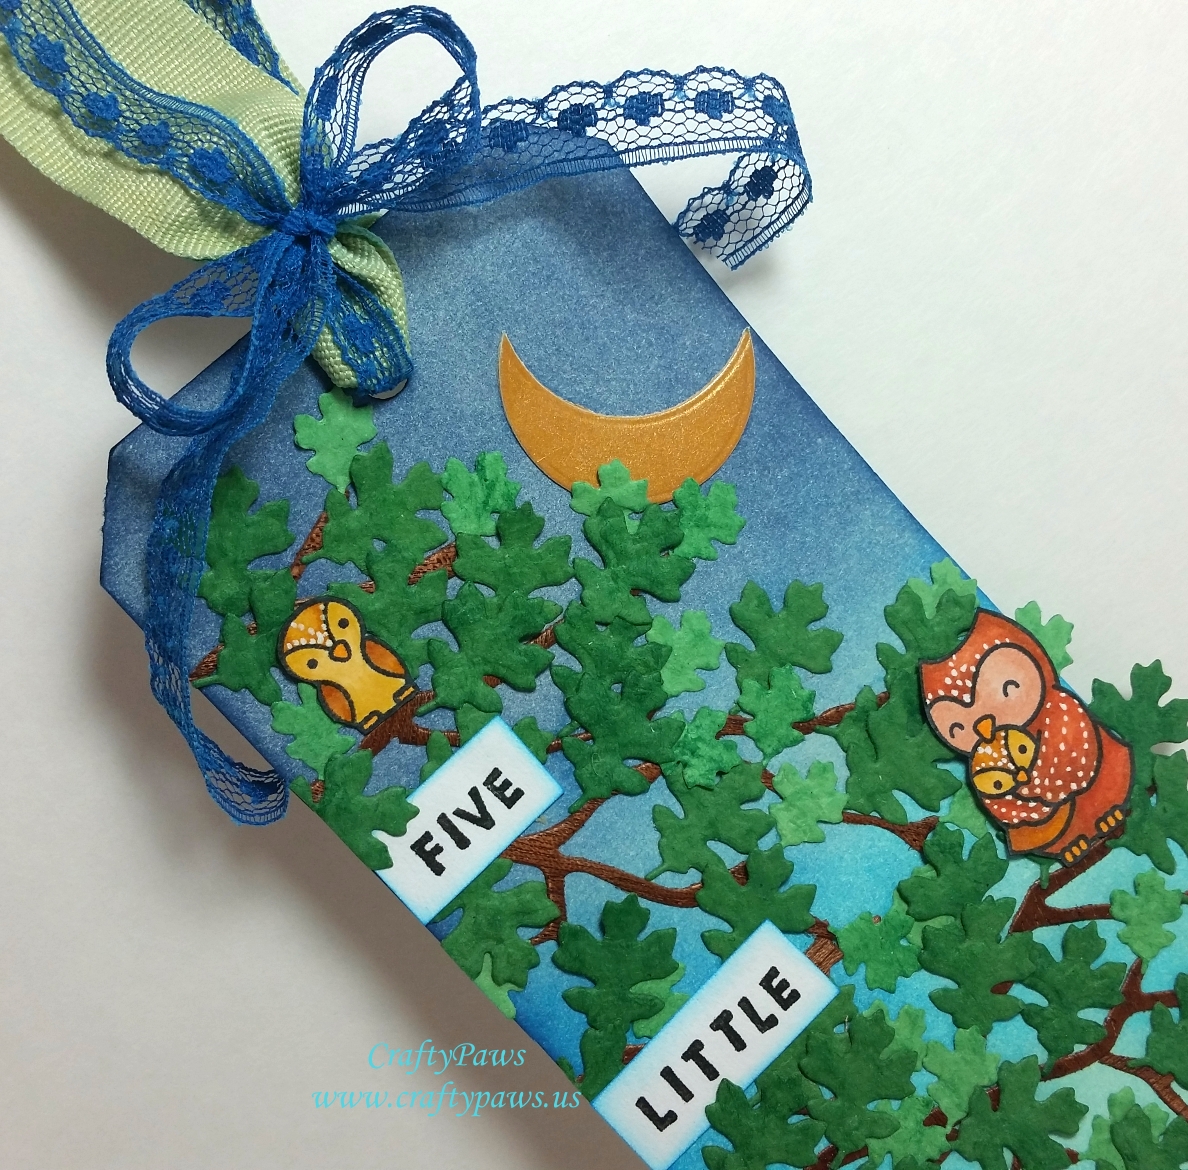
5 little owls, on a branch by the shore, one fell off, then there were 4.
4 little owls, high in a tree, the wind blew hard, then there were 3.
3 little owls, none of them knew, a raven took one, then there were 2.
2 little owls, sitting in the sun, a raccoon came along, then there was 1.
1 little owl, in the setting sun, flew off to the forest, then there was none.
I pulled out an old manila tag and used blending tools to ink from light to dark with Tim Holtz Distress Ink in Tumbled Glass, Salty Ocean and Chipped Sapphire to create the look of a sky at dusk.
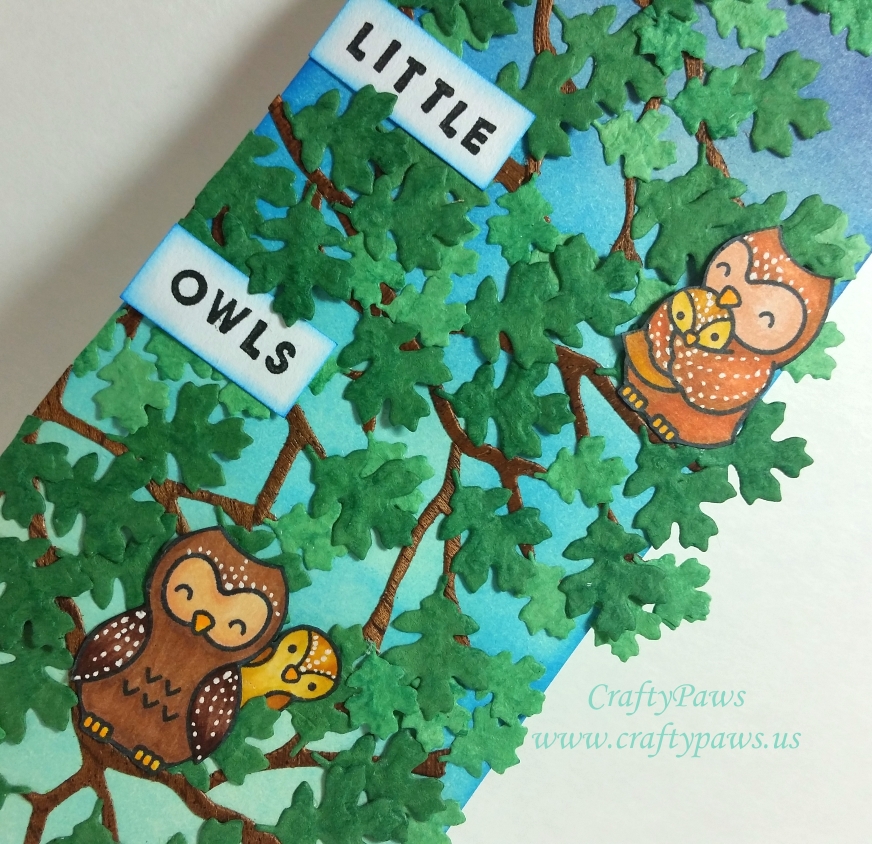 Then I die cut delicate branches from wood veneer paper (that has been in my stash for about 2 years!) using the branch from the Diemond Dies Cherry Blossom Branch and Flowers Die Set. I love the texture of the wood veneer and the look of real wood that using it gives the tree branches. PS: I find cutting delicate dies like this is much easier (esp. with thicker paper like this wood grain paper) with a metal shim die cutting plate, like this one: CottageCutz Universal Shim Plate Die Cuts
.
I then die cut –oh I don’t know a– a bazillion little oak leaves in the small and medium sizes from the Diemond Dies Mini Leaves Die Set from hand made paper that I inked up in advance with Tim Holtz Distress Ink in Evergreen Bough and Pine Needles. Individually die cutting and gluing in these little leaves was a bit tedious, but the end results were so lush and totally worth it.
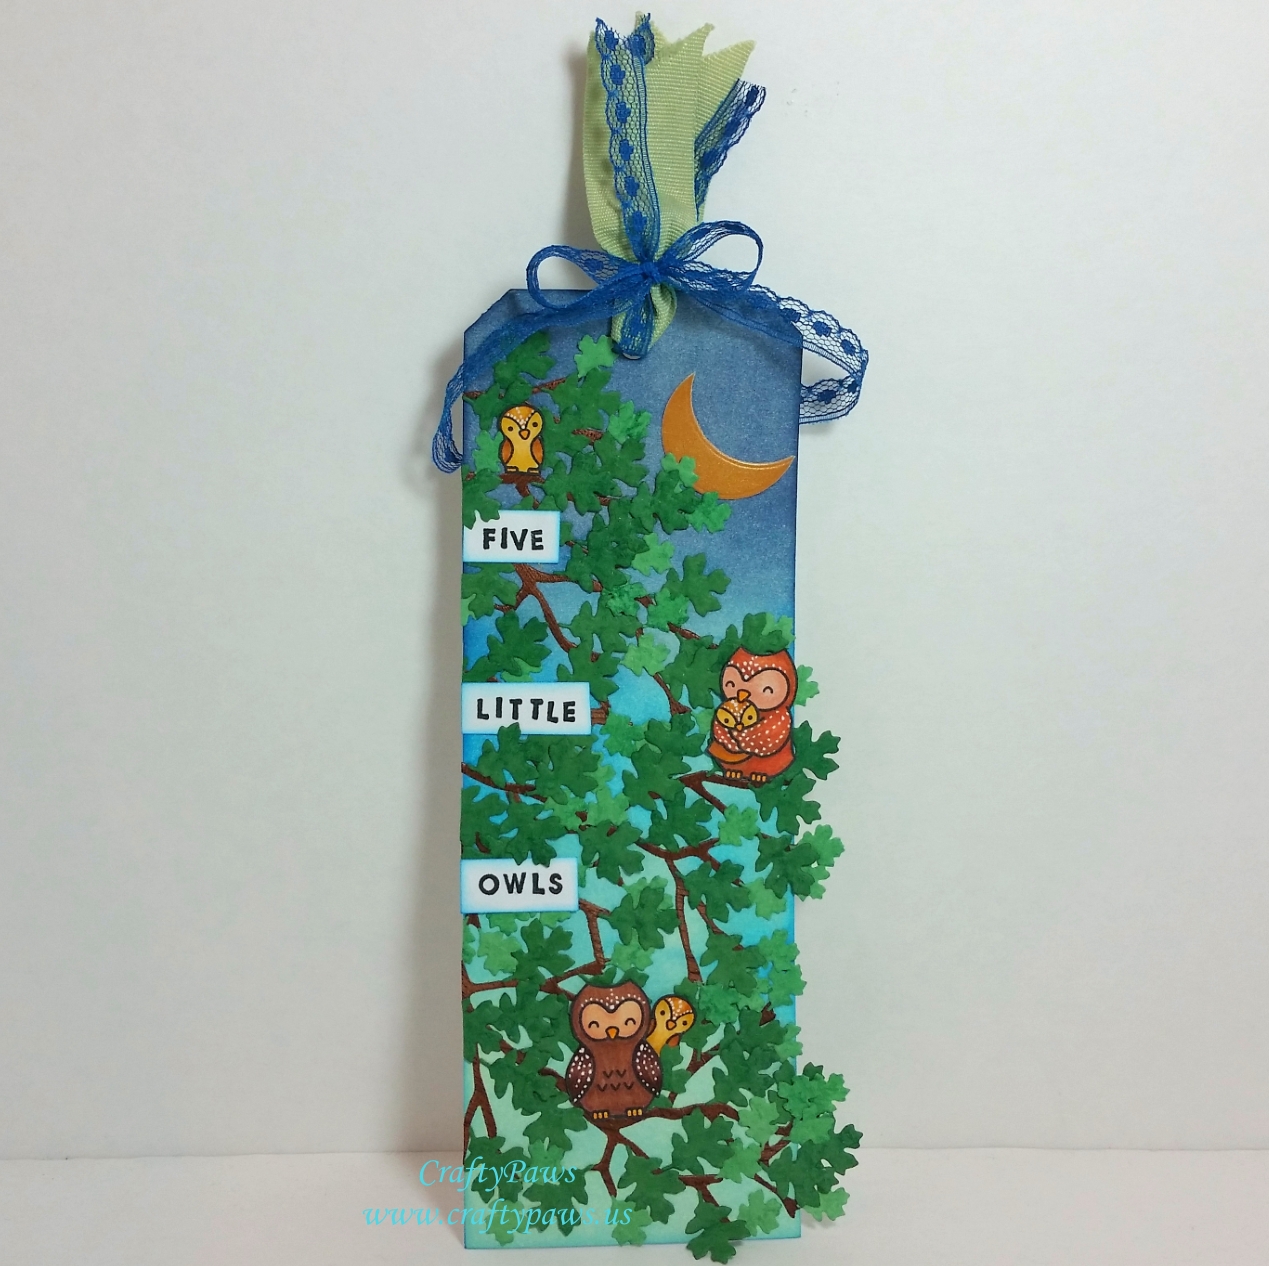 The focal point owls I colored up with the following Copic colors: Dad: E11, 21, 23, 25, 29; Mom: E21, 11, 97, 99; Kids: Y11, Y23, YR24 and E33 All the beaks and feet were colored with Y15 and Y38. What I think totally made these owls pop were the little white dots I added to their foreheads and wings with a white Gelly Roll pen. I had just watched “The Best Exotic Marigold Hotel” and “The Second Best Exotic Marigold Hotel” this past month, and I think I was channeling the beautiful henna body art. 🙂
I hand fussy cut (for scene projects I don’t like the white border that is left when you use the coordinating dies with most stamps) and inked the edges of the five little owls. I tucked in the owls nestled in the leaves of the oak tree, leaving the left side of the tag blank because I wanted to be able to add the title of the song that inspired the whole project.
I stamped out the title using a Michael’s $1.50 bin Studio G wooden alpha set and then just inked the edges of each word with more Tim Holtz Distress Ink in Salty Ocean. Lastly, I decided to add a crescent moon to the scene using the third smallest circle from the Diemond Dies Circle Nesting Die Set to cut out a shimmery golden moon from a scrap from my paper scrap box. Lastly, I added a tag topping bow with some ribbon and lace scraps from my trim scrap bag.
Remember, my readers can get 10% off and free worldwide shipping on any orders of $35 at Diemond Dies by using the coupon code “thankskristina” at checkout.
The following is a process video of creating this tag:
This tag is being entered into the following challenges:
Simon Says Stamp Monday Inspired by a Song Challenge
Simon Says Stamp Wednesday Anything Goes Challenge
Lil Patch of Crafty Friends Anything Goes Challenge
Through the Craft Room Door Anything Goes Challenge
613 Avenue Create Anything Goes Challenge
Penny Black Anything Goes With Stamps and Dies Challenge
Whimsy Stamps Anything Goes Challenge
Not Just Cards Anything Goes Challenge
Crafty Girls Creations Anything Goes Challenge
Word Art Wednesday Anything Goes Challenge – WINNER
]]>
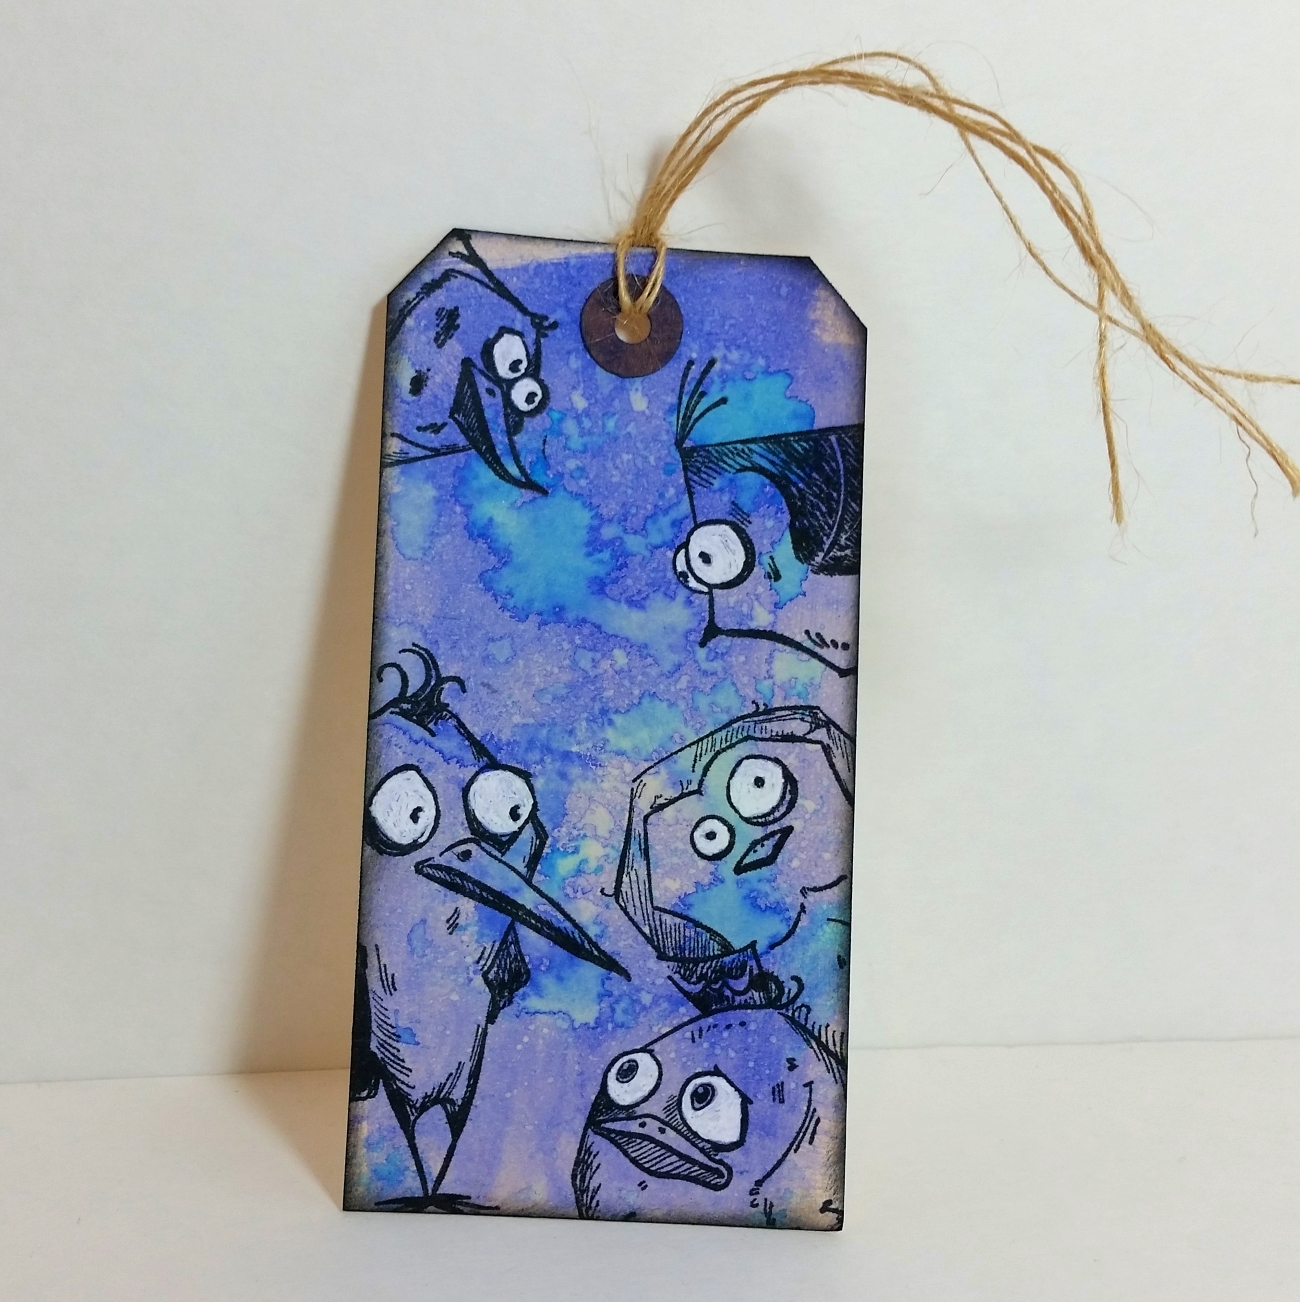 try new things so I wanted to make this tag for my friend Jami Lola (YT: Poetspice) so she can use it when she next makes a junk journal.
I first started with a manila tag base and did splotchy Distress Ink watercoloring on it in Jami Lola’s favorite color, blue. Then I simply stamped out five of the Stampers Anonymous Tim Holtz Bird Crazy Stamps. Even though they seem erratically placed, I took some time to try to position all of them so that they were looking at each other or looking out at the viewer (I had to mask the one in the lower right to stamp the one behind it so it would fit — love that little chubby guy!).
Then I took a white Sakura Gelly Roll pen and colored in all the eye balls. I think this step really made all the birds pop and emphasized their exaggerated, fun crazy look. Lastly to give a finished look I inked the edges with Tim Holtz Distress Ink in Black Soot and tied a few twine strings that I pulled from some burlap fabric to the top of the tag. I struggled with myself because I wanted to add more texture with embossing paste and stenciling. But as this was for my friend to use in a junk journal I restrained myself, and I think it turned out great for her. Sometimes less really is more! 🙂
This tag is being entered into the following challenges:
Simon Says Stamp Monday Something New Challenge
Simon Says Stamp Wednesday Something New Challenge