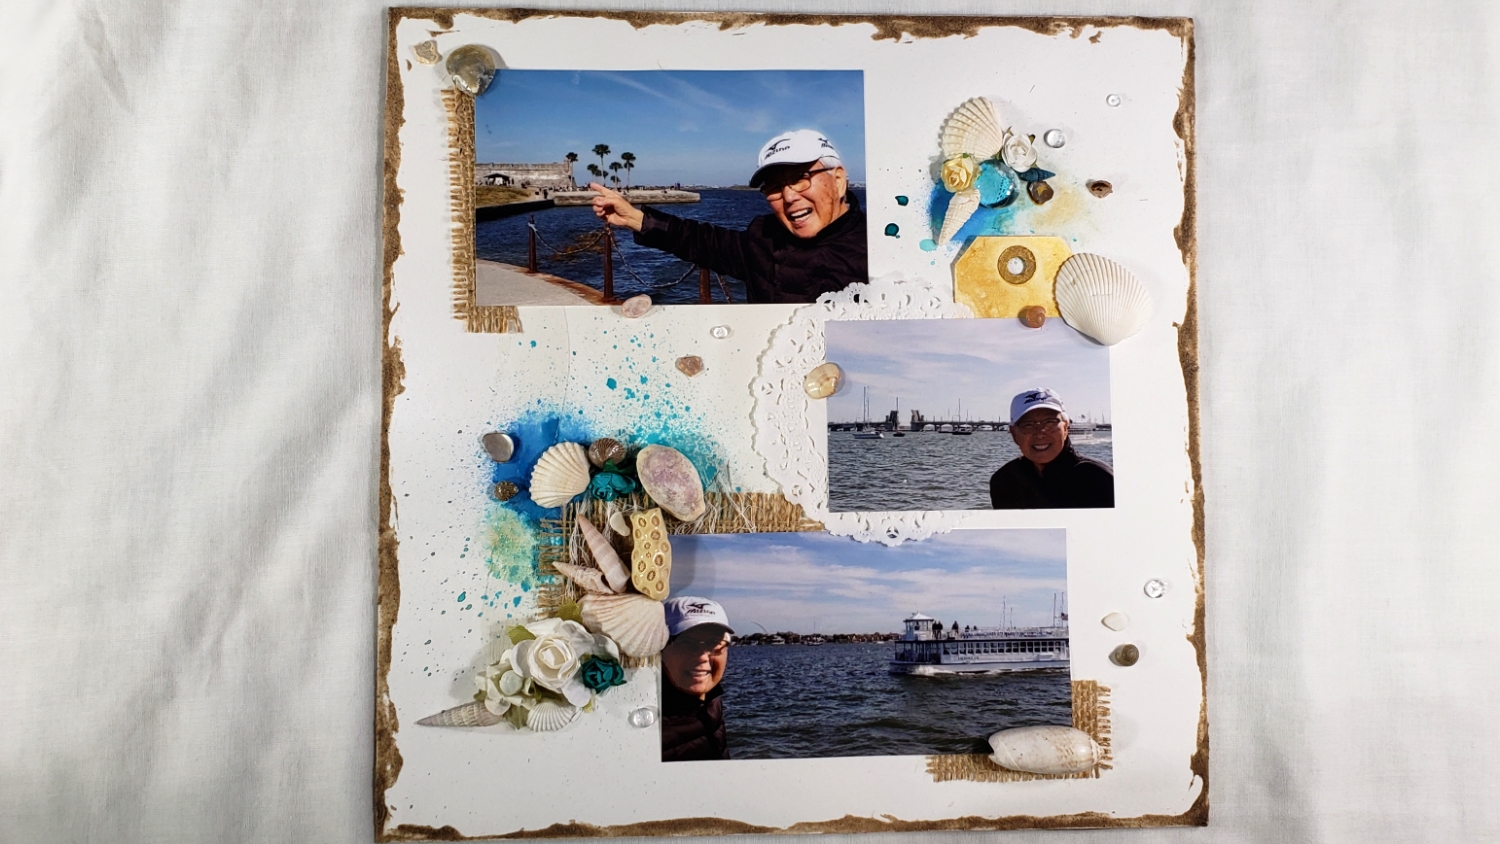
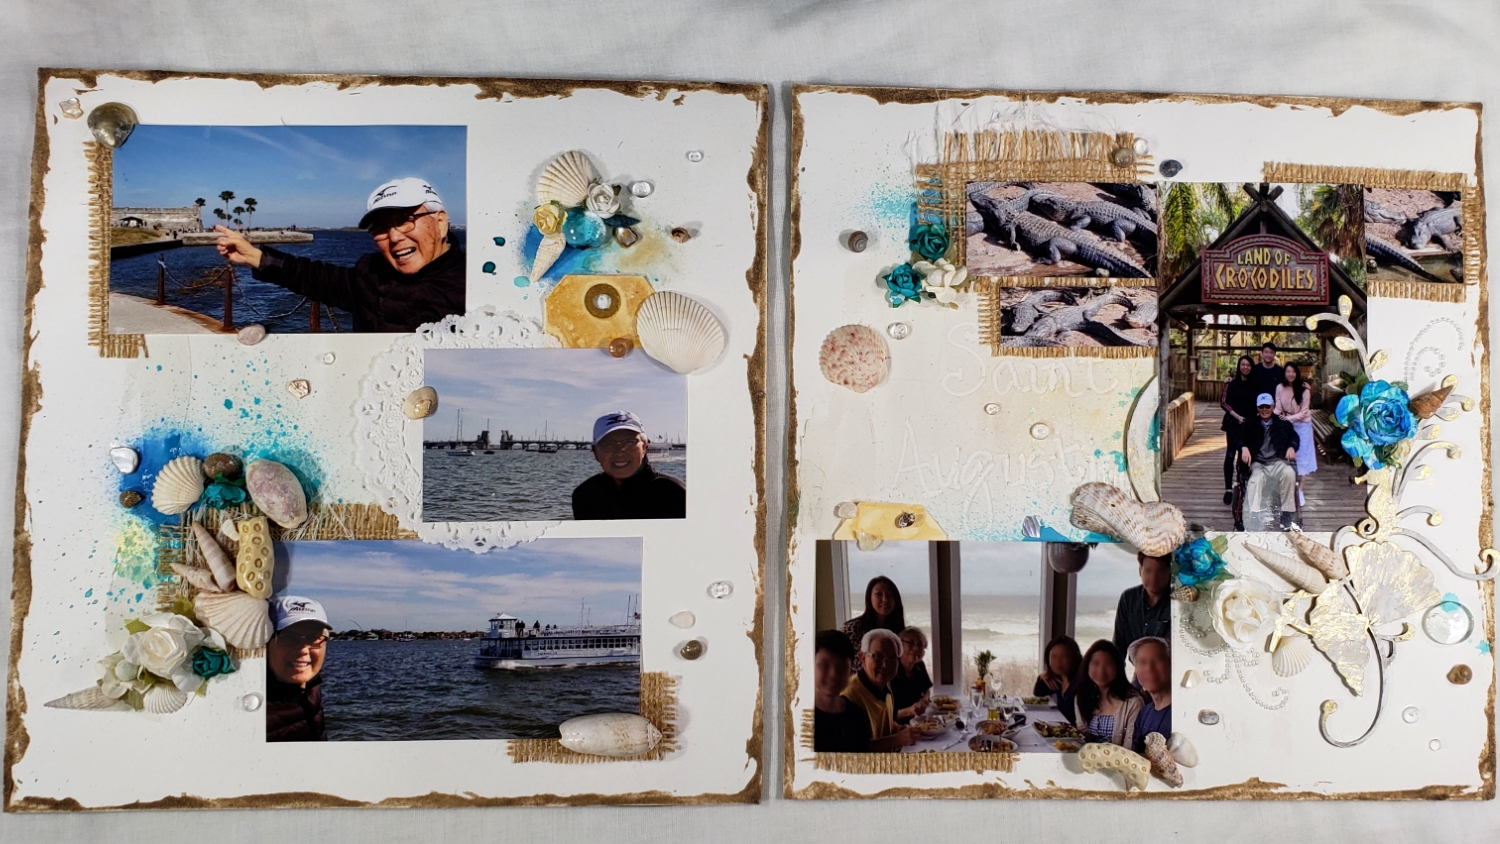
The bases are Canson XL Series Watercolor Textured Paper, which is incredibly robust and perfect for mixed media. The edges were distressed with new-to-me Art Anthology Mud Texture Paste. Then for the background texture, especially visible where I hand wrote “Saint Augustine” with the back end of a paintbrush, I used Art Anthology Sandstone Stone Effects. For the chip board pieces, I used Liquitex Gesso to soften the look and then rubbed on with my fingers some Art Anthology Gold Metal Effects to add a shimmer.
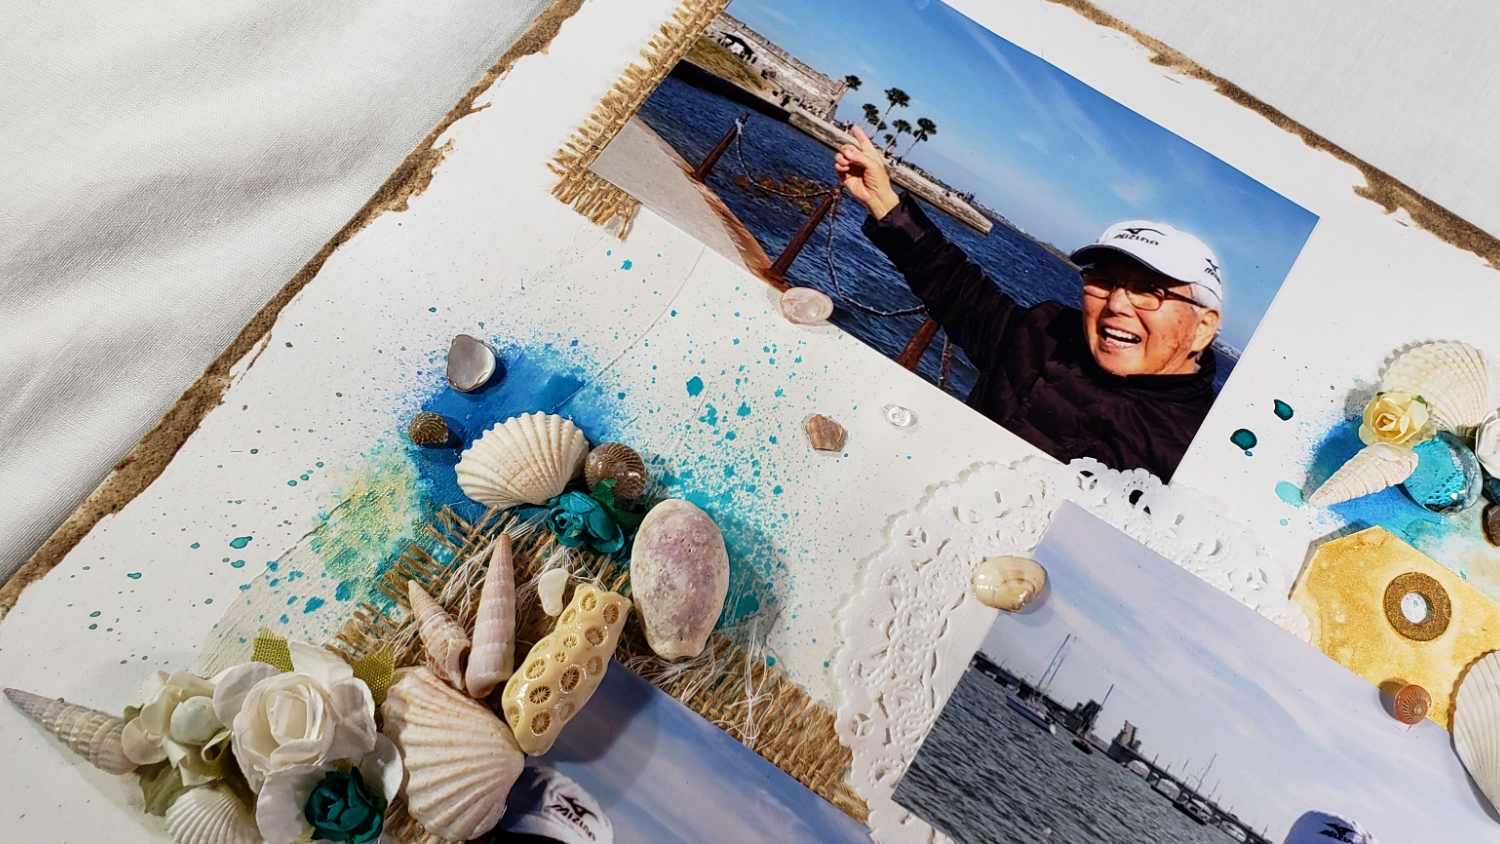
The other background elements to add texture, interest, warmth, and sea-worn look, I used gauze cheesecloth fibers, burlap (with the ends frayed), white flowers sprayed aqua with Art Anthology Siesta Key Spray, seashells, coral, paper doilies, pearl sticker gems, Heidi Swapp Gold Color Shine sprayed manila tags, and clear Pretty Pink Posh 4mm droplets and 6mm droplets.
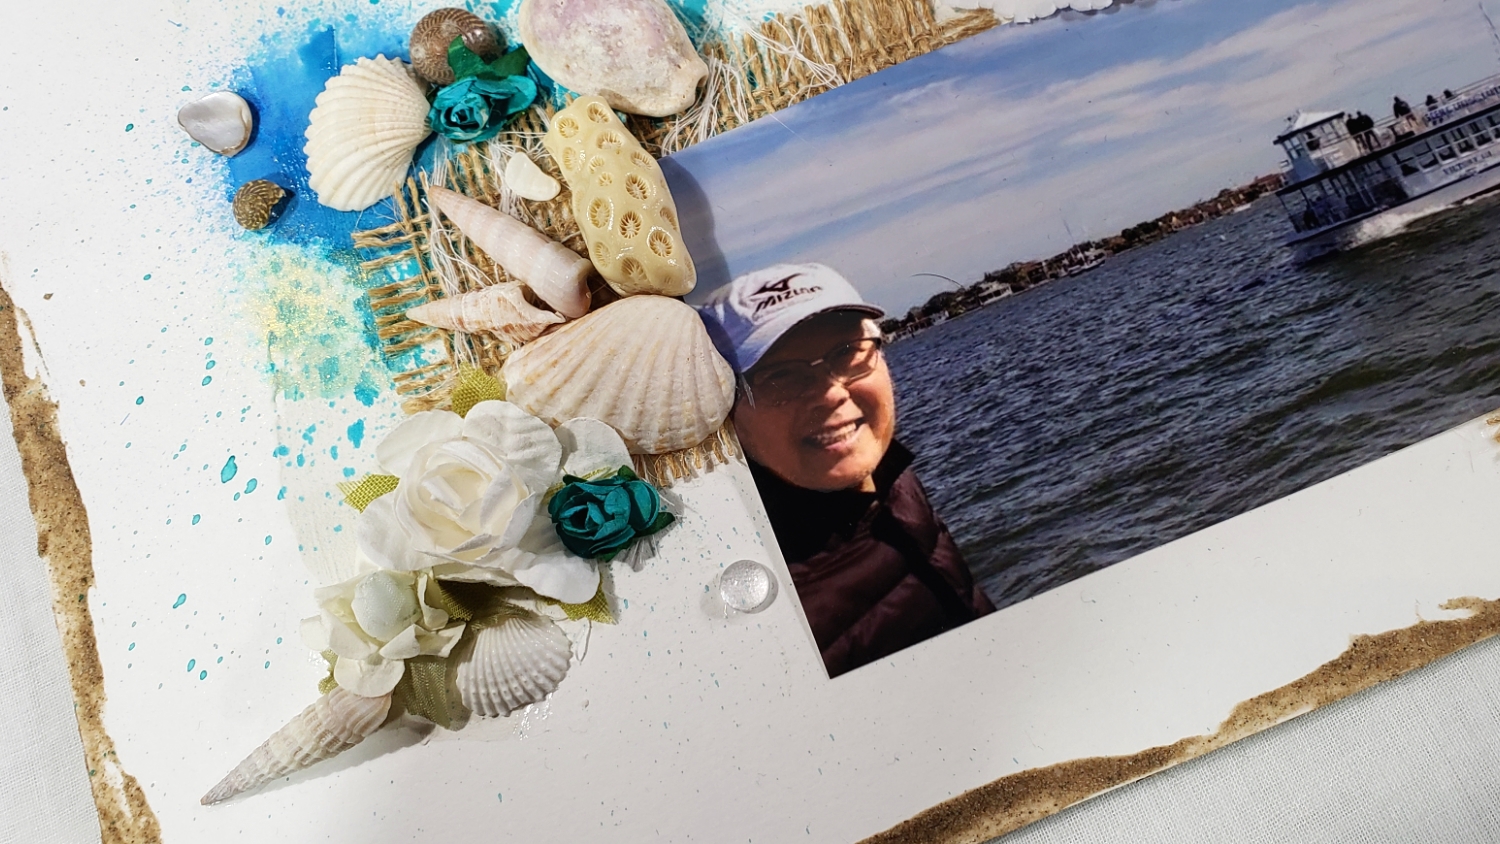
Then it was a matter of finding the pictures from our vacation that I thought would be fun to feature on the layouts. As these are going to be gifts for my dad I used 3 pictures of my dad at the St. Augustine down town area by the water, bridge and Castillo de San Marcos. For the second half of the spread, I used our family Christmas lunch picture (this was the only picture that had our whole family in it! – we were really bad about taking pictures), and a picture of my dad, me and my niece and nephew at the famous St. Augustine Alligator Farm.
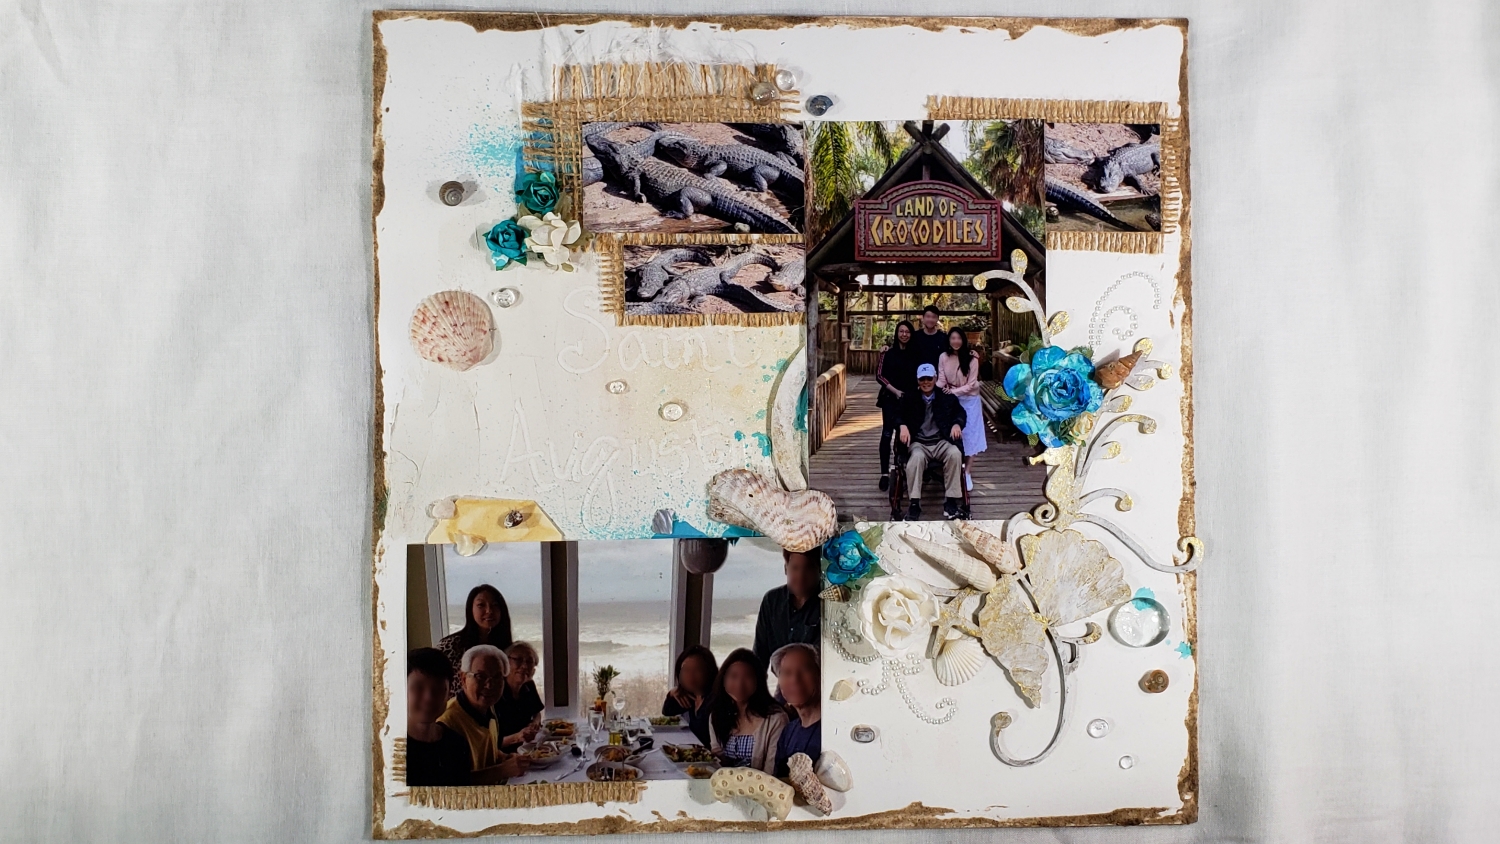
To secure everything in place I used E6000 Glue (for permanent hold) and my Adtech hot glue gun (for quick placement, while the E6000 cures). Due to the very textured nature of many of the embellishments, many other wet glues would be less secure and not suitable. To make the layouts into display pieces, I also backed them with scrap cardboard (watch video for details). All these mixed media techniques are something relatively new to me, but I love the final results, and I think my dad will love these layouts as a keepsake gift!
CLICK on the following picture to watch the quick share and how to make these layouts displayable pieces (there is also a quick share of a shadowbox gift idea that I’ll describe in more detail on my next post):
Disclosure: Many of the supplies I’ve used for today’s project are linked. Some may be affiliate links, which means if you make a purchase I receive a small commission at no extra cost to you. I truly appreciate your support toward the costs of running this blog!
These layouts are being entered into the following challenges:
Simon Says Stamp Wednesday Something New Challenge
Simon Says Stamp Monday Use Something New Challenge
Word Art Wednesday Anything Goes Challenge
Creatalicious Anything Goes with Optional Something New Challenge
Simon Says Stamp Work it Wednesday Try Something New Challenge
Crafter’s Castle Anything Goes with Optional Fun Technique Challenge
613 Avenue Create Anything Goes with Optional Watercoloring Challenge
Crafts Galore Encore Anything Goes Challenge
Through the Craft Room Door Anything Goes Challenge
Lil Patch of Crafty Friends Anything Goes Challenge
]]>
I have posted 2 videos about my experiences with the Stamp and Scrapbook Expo. In part 1, I share how I prepare and get organized to attend the Expo (get a sense of the booths map, pick my classes (3 classes gets you a free gift, which this year was a 12″ x 12″ paper pad, and you get free admission any day you have a class; my total this year was $122), go through all the special coupons (especially the early bird (time sensitive) specials), and figure out my schedule/plan for each day. The following is Part I of my experience at the Expo:
The following is Part II of my experience at the Expo, and it details the three classes I took (watercoloring hosted by Art Impressions, flower shaping by Heartfelt Creations, and mixed media by Art Anthology) and the great crafty hauls I got for $121.83:
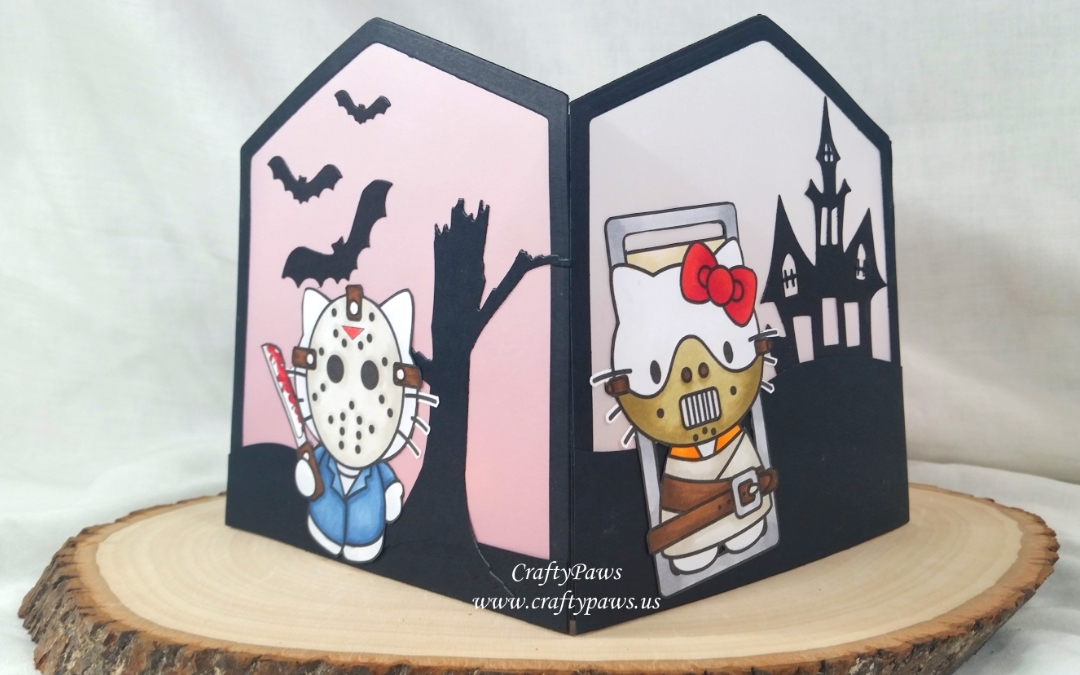
]]>I decided to feature each Killer Kitty in an eerie scene that would form one panel of a 4-sided luminary. For the construction of the luminary, I used premium extra-heavy (100 lb) black cardstock and the two largest of the Diemond Dies Nesting Pockets Die Set (which when flipped upside down creates a tombstone shaped frame!). I seemed each tombstone frame together with small strips of folded card stock, glued to each frame side. Then I lined the backs of each frame with vellum, also cut with the largest of the pocket dies. To ensure that the vellum did not show along the edges of the frame, I trimmed a tiny bit off of each side and the bottom before gluing them onto the frames. I also used the largest of the Diemond Dies Nesting Pockets Die Set to cut out the bases of some foregrounds for the scenes, hand fussy cutting the hillside tops with scissors.
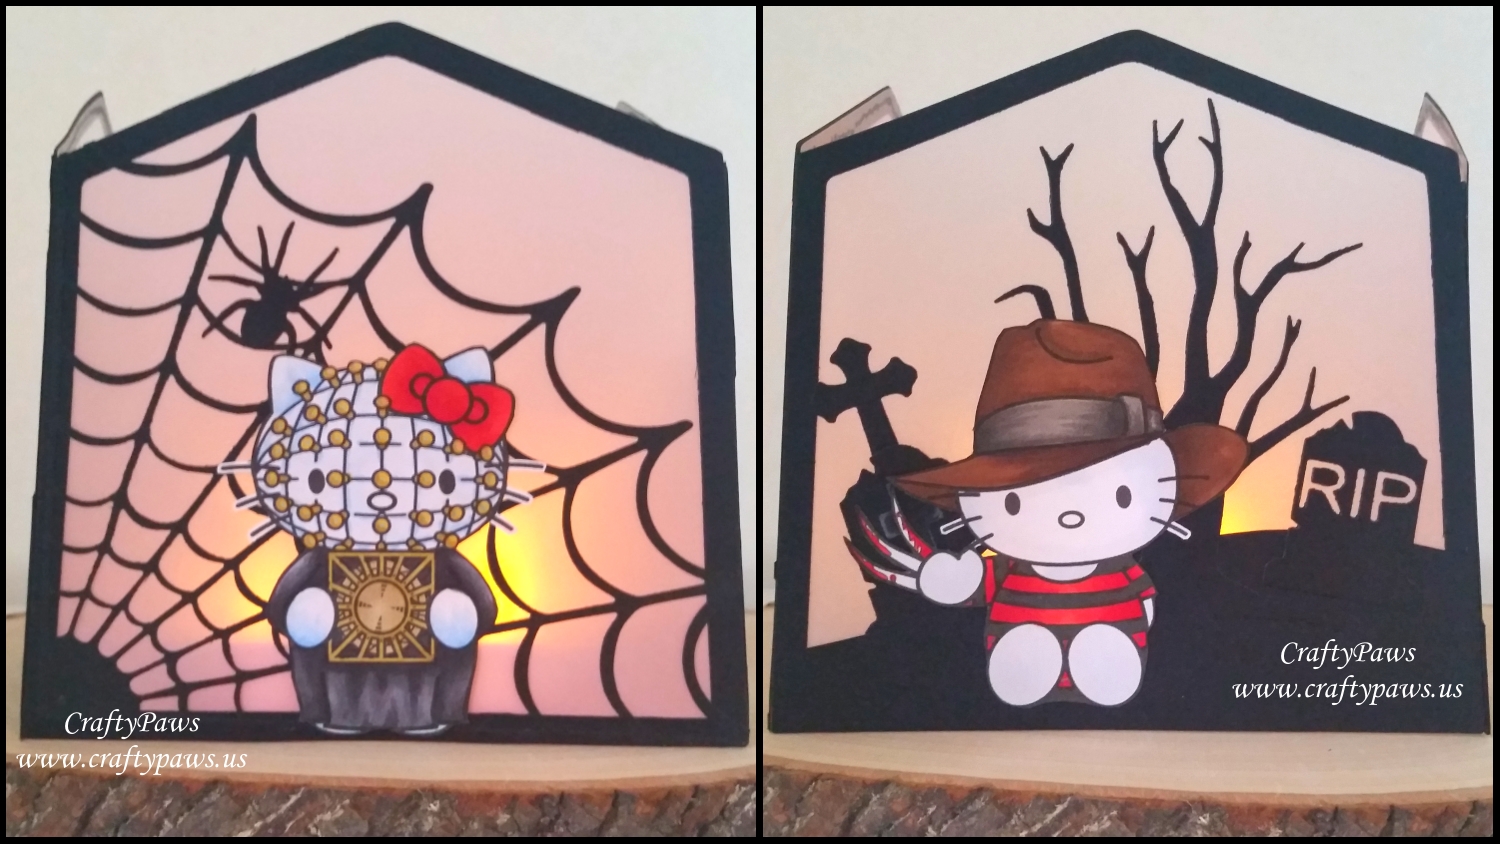
Then it was a matter of having fun decorating the silhouette scenes with lots of black die cuts of spooky images. I used the following Diemond Dies to create each panel scene:
Cemetery behind Hello Freddy: Tombstone Die Set, Cross from Coffin Die Set and Spooky Tree Die
Spiderweb behind Hello Pinhead: Spooky Spiderweb Mini Album Die Set and Spider from Spooky Spiderweb Die Set
Haunted house behind Hello Hannibal: Spooky House Die and Stitches from Frankenstein Die Set
Bats behind Hello Freddy: Flying Bats Die Set and C.C. Designs Spooky Tree (retired)

Next I Copic colored the Killer Kitties to bring them to life:
Hello Freddy (Nightmare on Elm Street): Kitty: C00; Hat: E57, E59, W5 and W7; Shirt and blood on blade/claws: R24, R27 and R29
Hello Pinhead (Hellraiser): Kitty: B32 and C00; Cloak: N3, N5 and N7; Bow: R24, R27 and R29; Pins and Puzzle Box: Y26 and Y28
Hello Hannibal (Silence of the Lambs): Kitty: C00 and C0; Bow: R24, R27 and R29; Straight jacket: W0 and W1; Orange shirt: YR61 and YR16; Pillow: E41 and E81; Mask: E81, E84; Leather straps: E57 and E59; Frame of restraint cart: N2
Hello Jason (Friday the 13th): Kitty: C00; Coat: B93, B95 and B97; Shirt: V20; Mask: W0 and W1; Leather straps on mask and knife handle: E57 and E59; Blood on knife: R24, R27 and R29; Blade of knife: N0
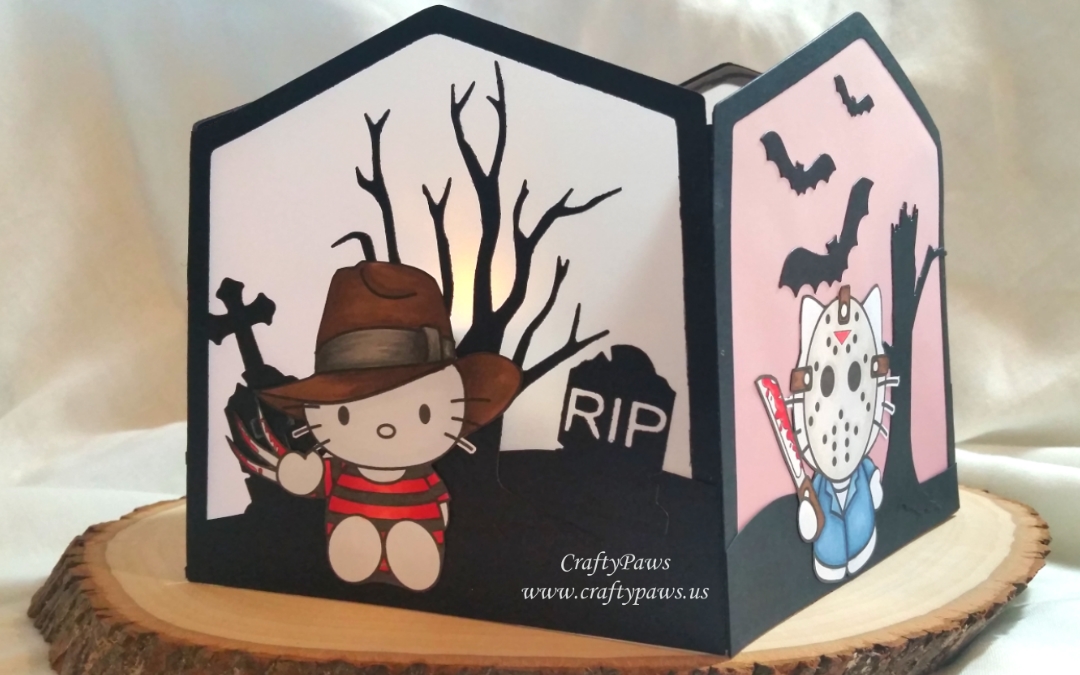
Although the images are relatively simple in the style of Hello Kitty, I took care when fussy cutting them with my Fiskars Spring Loaded Scissors to leave a little white edge around the whiskers so that the whiskers wouldn’t tear and would be visible even in front of the black die cut background pieces. I also took the extra step of inking around the images (except the whiskers) with a Tuxedo Black Momento Marker to finish off the edges and hide the white of the cardstock. This was so much fun to create, and I love how the luminary looks with the lights turned down and the flame-less candles lit (I use 4 flame-less tea lights to get a lot of illumination and there is plenty of room for more if you like) now I have a great centerpiece for my buffet table for our Halloween party!
Note: My readers can get 10% off and free worldwide shipping on all orders of $35 or more at Diemond Dies by using the coupon code: thankskristina.
Disclosure: Many of the supplies I’ve used for today’s project are linked. Some may be affiliate links, which means if you make a purchase I receive a small commission at no extra cost to you. I truly appreciate your support toward the costs of running this blog!
The following is a video tutorial for how to create the luminary and also includes the Copic coloring of a couple of the Killer Kitties:
This Halloween luminary is being entered into the following challenges:
Digi Chooseday Anything Goes Challenge
Art Impressions 3rd Dimension Challenge
Simon Says Stamp Monday All Creatures Great and Small Challenge – cutsie horror creatures
Simon Says Stamp Wednesday Anything Goes Challenge
613 Avenue Create Anything Goes with Optional Masculine Card Challenge
Lil Patch of Crafty Friends Anything Goes Challenge
Crafty Gals Corner Anything Goes Challenge
Not Just Cards Anything Goes Challenge
Oddball Art Cemeteries Challenge
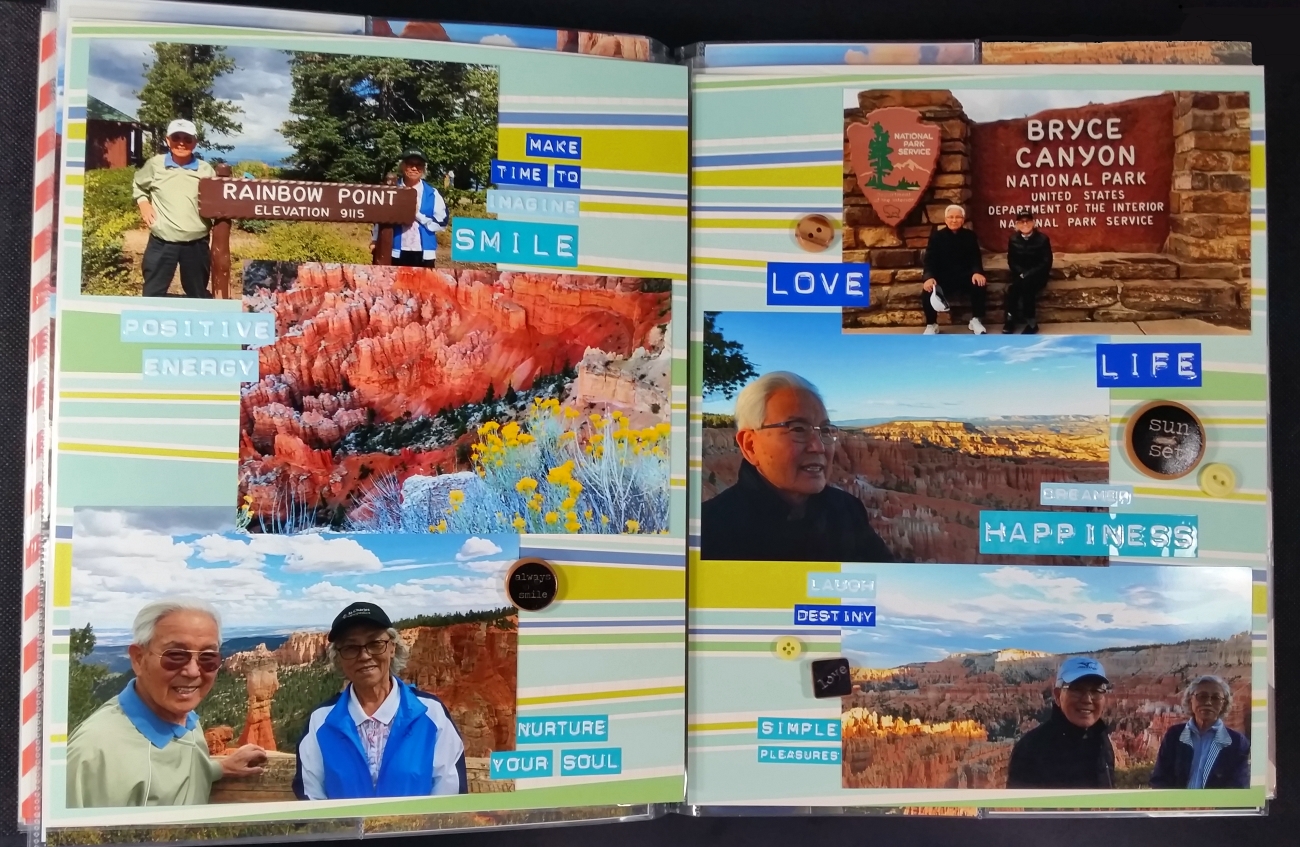
First I sorted through hundreds of pictures, and narrowed it down to about 130 to have printed out. I had to digitally edit about half of them to brighten the pictures and crop them to fit the standard 4″ x 6″ size for quantity printing. I was able to use a digital coupon at Walgreens and got them printed for about 10 cents a piece. That was day 1. 😀 LOL
Next I dug through my stash of stickers, embellishments, Thickers, and papers to come up with a collection of goodies that I thought coordinated nicely together. I used Me & My Big Ideas (MAMBI) Soft Spoken stickers, Heidi Swapp Memory Planner Puffy Stickers, Prima wood buttons from the Sunrise Sunset collection, My Mind’s Eye layered felt and paper stickers from the Cut & Paste Charm Sweet Bits & Pieces collection, Dollar Tree layered 3D sunflower stickers, American Crafts fabric stickers from the Everyday collection, My Mind’s Eye layered stickers from the Collectable Notable Memo collection, Recollections metal travel ticket, Heidi Swapp clear Word Stickers, various other stickers from old scrapbook kits and unbranded sticker sheets, and old buttons from my button hoard. All the papers were from the Travel the World Craft Smith 12″ x 12″ paper pad I had picked up on clearance at Michaels for $5. For added softness I also added some rough twine and metallic gold thread on some of the banners, buttons and tags.
Then it was a matter of putting together each page and double page spread layout for each part of their trip. I did a lot of cropping, more editing, matting, and color coordinating. As I worked through each part of their vacation pics, I also tried to note little things about their trip in some hand written or typed journaling. The cut-aparts from the paper pad were great to add little bits of info to a lot of the layouts.
The following is a video flip through share of the album:
Unless noted otherwise, the first pictured layout is being entered into the following challenges:
Simon Says Stamp Pop It Up Challenge – lots of layered 3D stickers and popped up embellishments using foam adhesive and fun foam
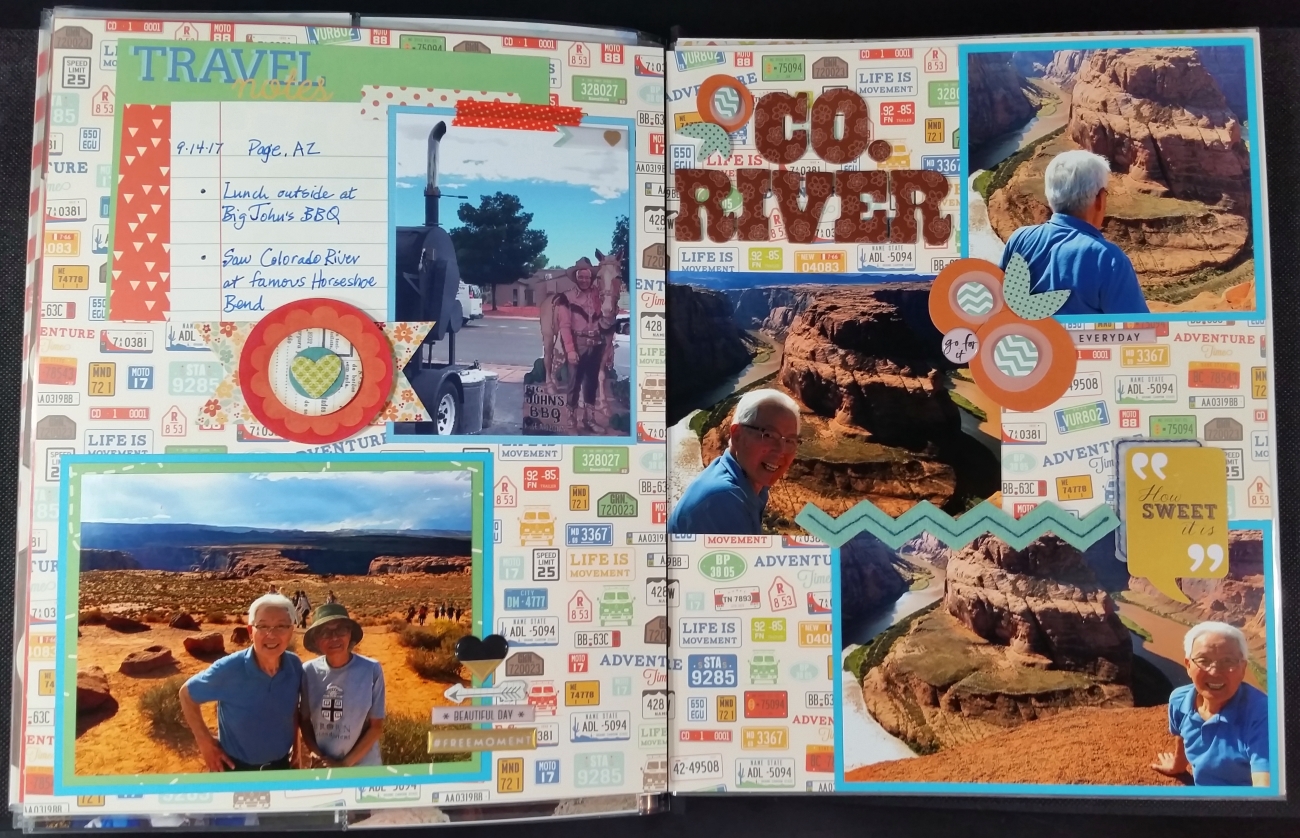
Card Mania Shabby Chic or Rustic Challenge – rustic western Colorado River layout (3rd picture)
Lil Patch of Crafty Friends Anything Goes Challenge
Word Art Wednesday Anything Goes Challenge
Through the Craft Room Door Anything Goes Challenge
Creatalicious Anything Goes with Optional Leaves – Colorado River layout with abstract flowers and leaves (3rd picture)
Crafts Galore Encore Anything Goes Challenge
613 Avenue Create Anything Goes with Optional Distress It Challenge
]]>
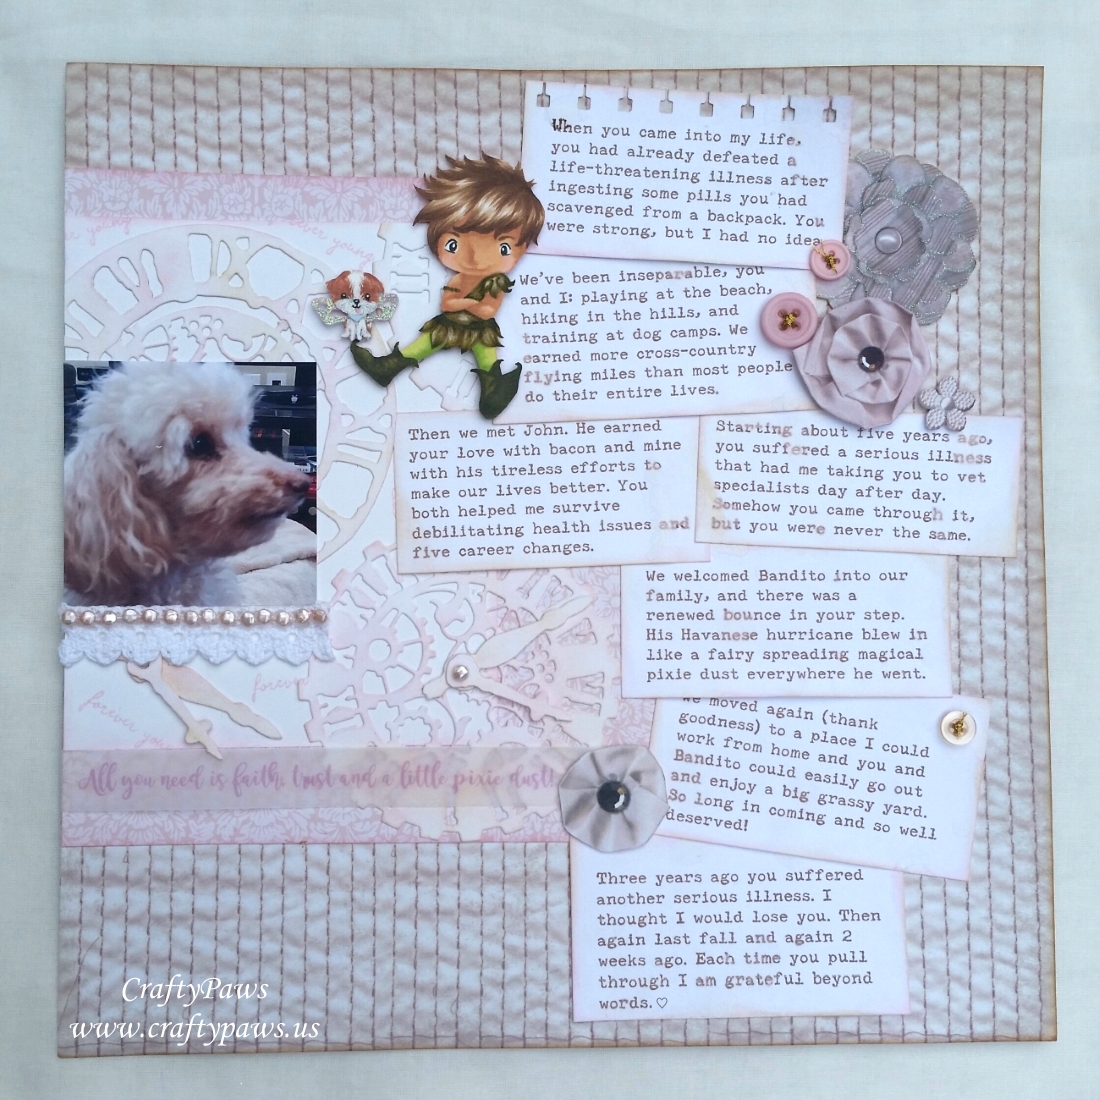
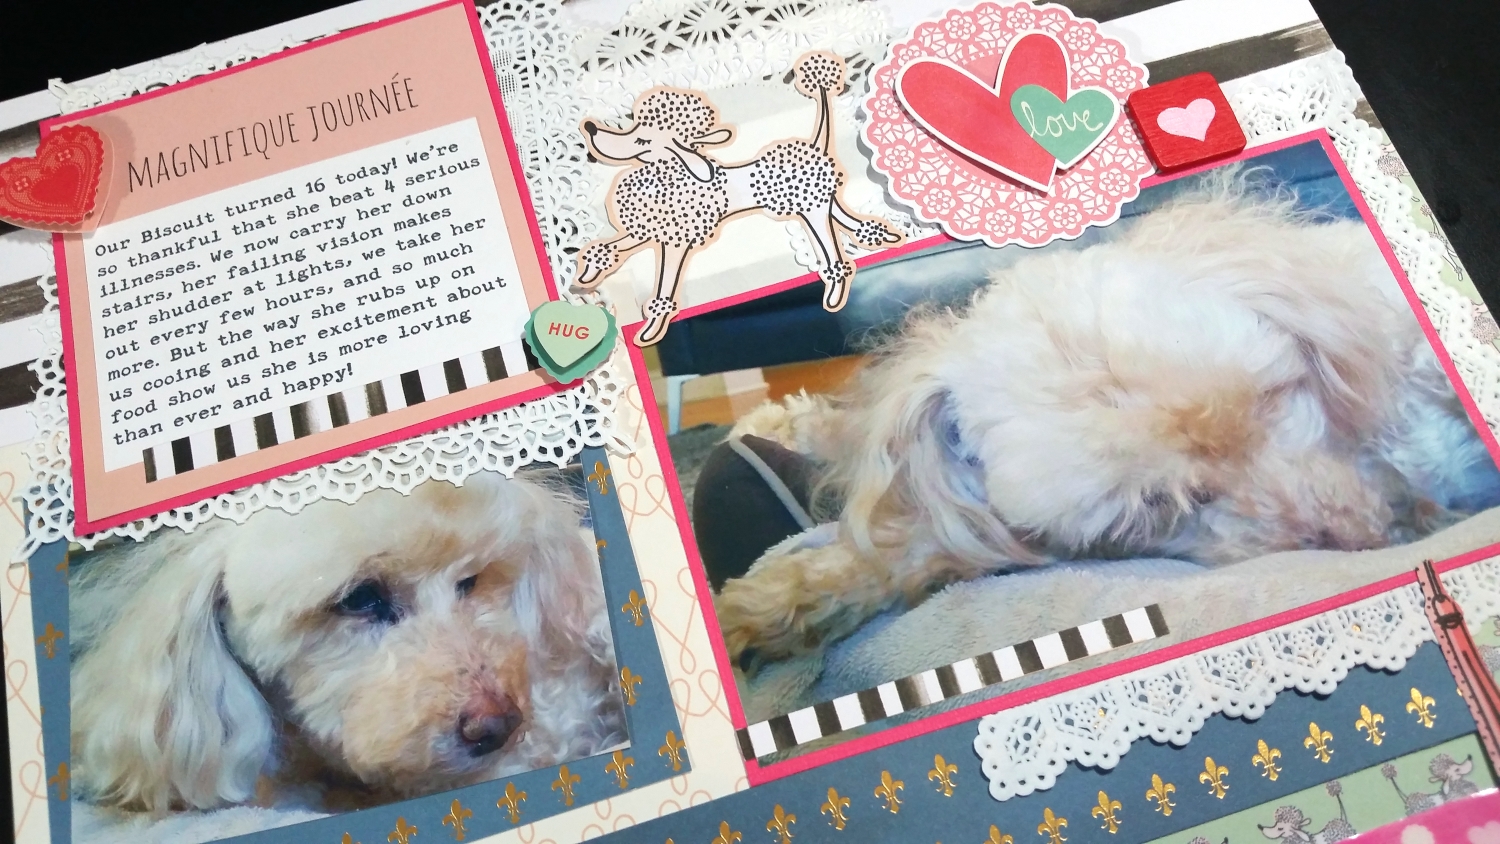
This is a double page shabby chic style layout featuring my sweet, Biscuit as a 1 year old (jumping picture with ears flying) and now at 16. Two weeks ago, we had a terrible health scare, and we agonized as we thought we would lose our sweet girl. Miraculously she pulled through. I wanted to create this special double page LO to memorialize our lives together as I pondered how amazing our lives have been with her and how blessed we are to have her still.
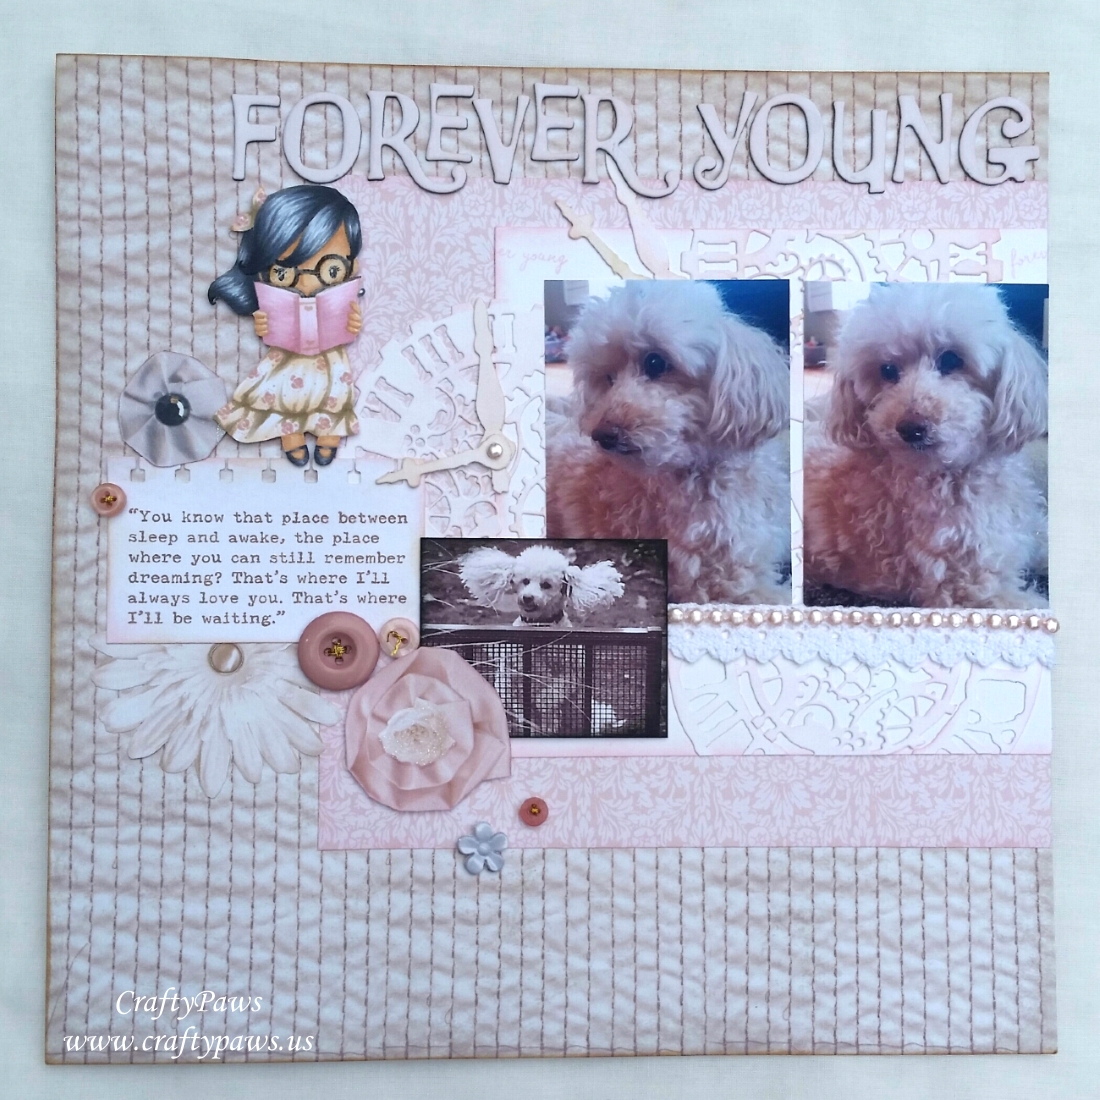 Journaling: The journaling spot on the left LO has a quote from Peter Pan that reads: “You know that place between sleep and awake, the place where you can still remember dreaming? That’s where I’ll always love you. That’s where I’ll be waiting.” The right LO includes a lot of journaling that memorializes snippets of our lives together–through 3 moves, 5 career changes, terrible health scares for me and her, how we met Mr. CraftyPaws, the addition of our 2nd fur baby, Bandito (who stole our hearts with his Havanese hurricanes spreading magical pixie dust like Tinkerbell), and how we got through everything together. I used the free Distress Typewriter Font in brown text for all the journaling, punched the top edge of the first journaling square on each LO with a Stampin’ Up Spiral Border Punch Notebook Trim Border, and inked all the edges with Tim Holtz Distress Ink in Spun Sugar and Antique Linen.
Stamped Images: I used the Wendy girl (representing me), Peter Pan boy (representing Mr. CraftyPaws) and “forever young” sentiment from The Greeting Farm’s Never Ever (retired) stamp set as well as the pup from The Greeting Farm “Mini Remix Happy” stamp set (representing Bandito as a doggy Tinkerbell). They were all stamped out with Momento Desert Sand ink and colored in the no line style with the following Copic colors:
 Skin: E51, E53, R21, E11, and R30
Girl’s hair: C00, C4, C6, C7
Boy’s hair: E55 and E57
Dog’s fur: C00, C2, E11, E13, E15 and white gelly roll gel pen
Girl’s Dress and book: RV000, RV00, RV11, E81, E43, E84
Boy’s Outfit: YG21, YG25, YG95, YG97, and G99 plus some detailing with Distress Markers in Peeled Paint and Crushed Olive
For extra details on the images, I added white gelly roll pen details on the girl’s glasses and coated them with Glossy Accents for shine. I also used the top parts of a punched Martha Stewart Butterfly Punch topped with glitter glue for sparkle as wings for Bandito as Tinkerbell. I hand fussy cut each image out and popped them up on fun foam or double sided foam adhesive for added dimension.
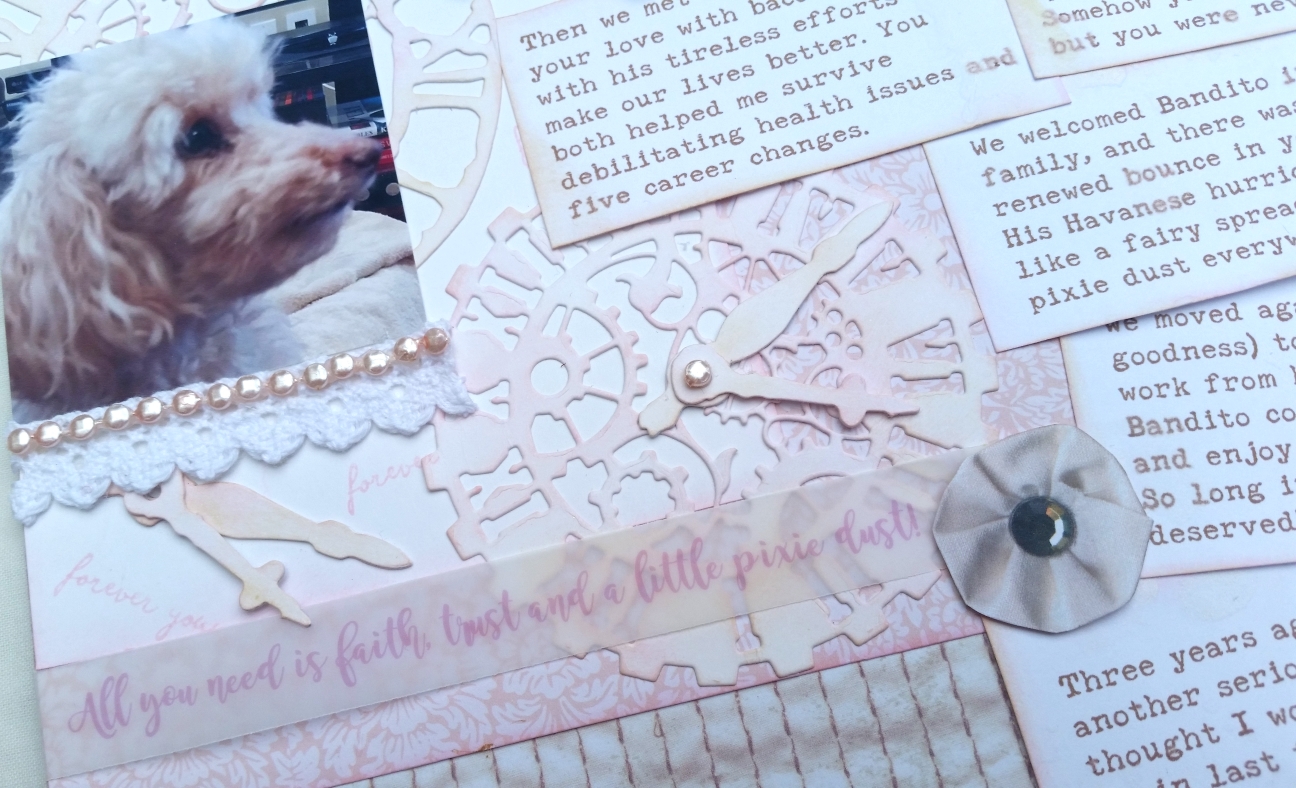
Backgrounds: I used 2 patterned papers from an old DCWV paper stack from my hoard vault called, “The Lace & Linen Stack.” I used a Tim Holtz Alterations Weathered Clock die and Prima Vintage Clock die to create the white/pink/vintage tonal background layer just beneath the pictures. I wanted a lot of texture and detail for this layer, without distracting from the pictures of Biscuit or the stamped and colored images so I layered all these dies and stamped the “forever young” sentiment simply with more Tim Holtz Distress Inks in Spun Sugar and Antique Linen.
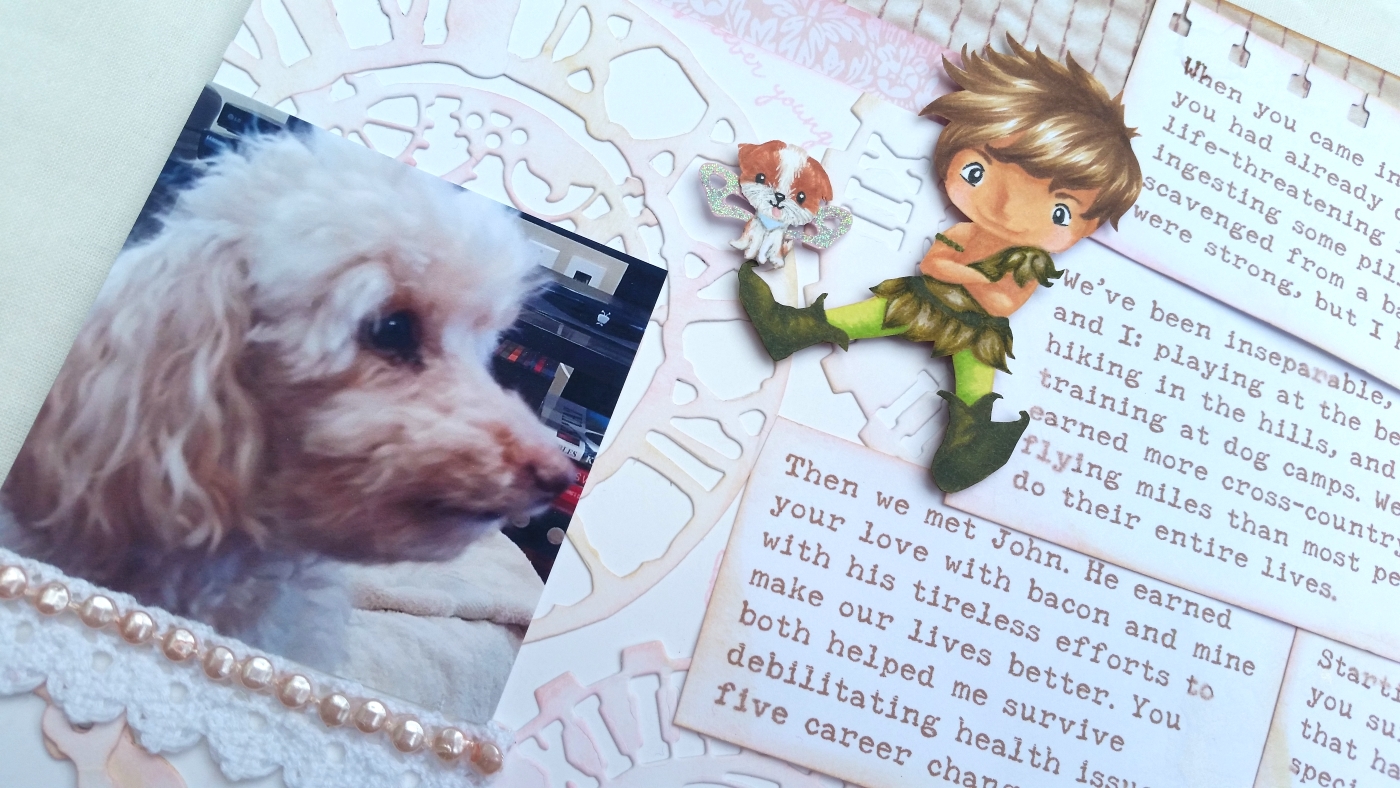
Embellishments/Bling: I used old crocheted lace trim, vintage buttons threaded with metallic gold thread (this isn’t as simple as it sounds – check out the video if you’re interested in the painstaking details), pale pink blingy pearl trim (which I also cut apart to add as clock hand centers), and hand fussy cut paper flower images that look like fabric flowers for embellishments. I also printed out in a free Magnolia Sky Script Font in pink onto vellum another quote from Peter Pan that reads, “All you need is faith, trust and a little pixie dust!”
The following is a video share of these layouts:
These layouts are being entered into the following challenges:
Work it Wednesday May Flowers Challenge
Word Art Wednesday Anything Goes Challenge
Lil Patch of Crafty Friends Anything Goes Challenge – WINNER
Crafty Purple Frog Fabulously Floral Challenge
Crafty Gals Corner Bling Challenge
Through the Craft Room Door Anything Goes Challenge
Crafts Galore Encore Anything Goes Challenge
613 Avenue Create Anything Goes Challenge
Creatalicious Anything Goes Challenge with Optional for the Girls/Mother’s Day
SCT Magazine NSD Sketch Challenge
This year I wanted to make a special layout with my Havanese baby looking like an Ewok. I fussy cut a picture of him in a pose that I thought would work for this “dress up.” Next I used the back side of some old textured paper to make a leathery looking hood by first tracing a general shape of the hood with the opening and hand cutting it out. I blended on Tim Holtz Distress Ink in Vintage Photo, Gathered Twigs and Fired Brick along with MFT Black Hybrid Licorice Ink (just along the edges) to give it an aged, weathered leathery look. To finish off the rustic hood, I tied four quadruple knots in a bit of twine to add to the top of the hood to look like the cinching or decorative wrapping around it.
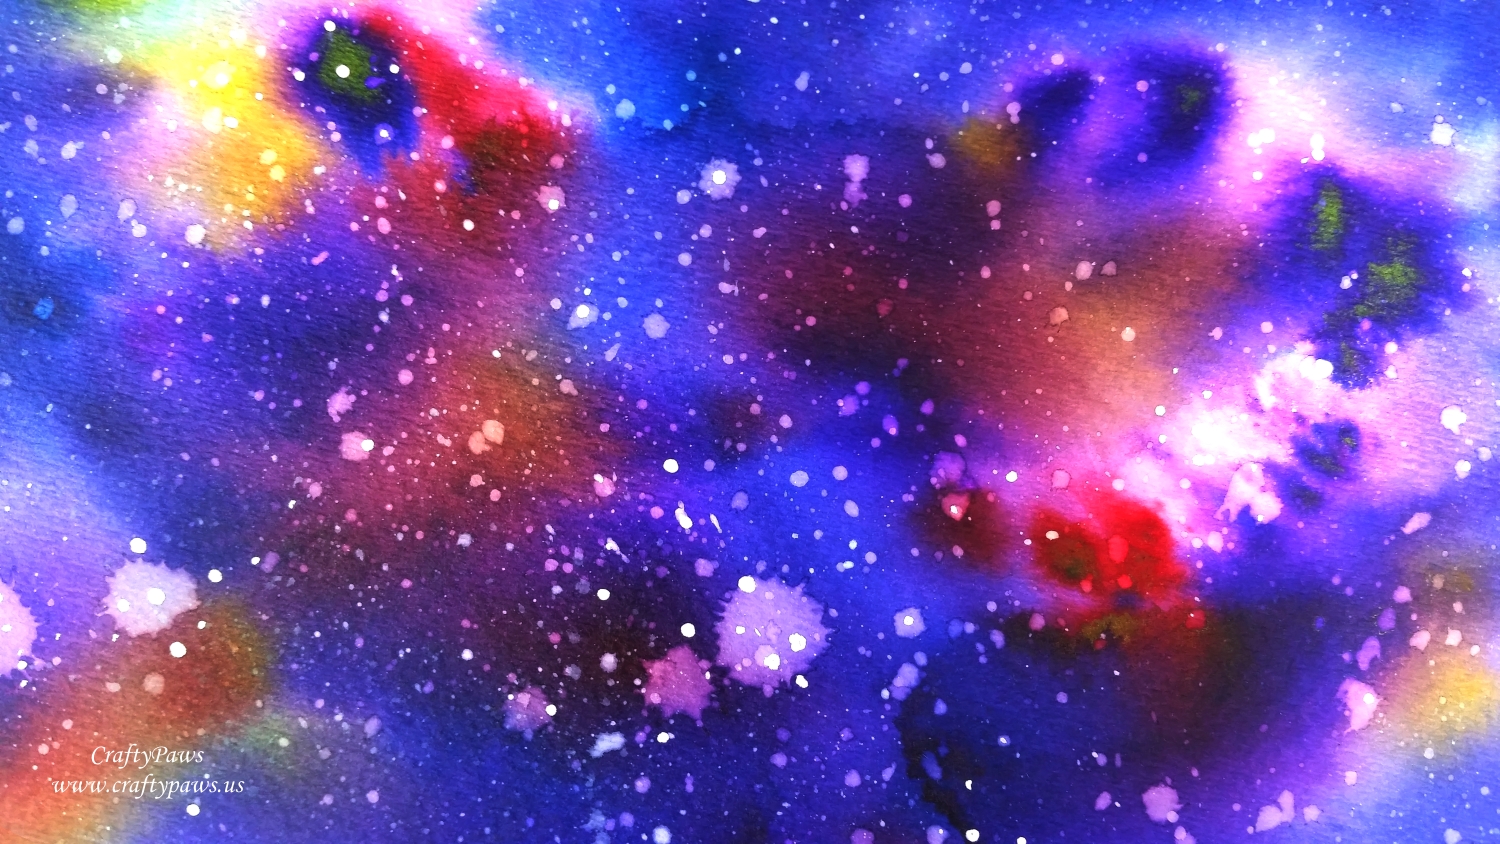 I knew I wanted to create a galaxy background, and I first started to blend on more Tim Holtz Distress Inks onto very textured watercolor paper, but this was not creating the vibrant look I wanted. So I switched to play with 6 Ken Oliver Color Bursts in Indigo, Ultramarine Blue, Violet, Alizarin Crimson, Yellow Ochre, and Lemon Yellow and water from a spray bottle. Oooh I love how the pigments FLOW, mix and move together (for instance, I don’t have a pink, but the Violet and Alizarin Crimson blend to create a beautiful hint of pink)! To create the negative splotchy look, I splattered and sprinkled water on the fully dried Color Burst background and after waiting 2+ minutes, I used a paper towel to blot up the released color. The final touch was adding white dots with Copic Opaque White to represent stars or planets. The vibrancy and look of real outer space depth was so fun to create.
For the sentiment, I played off the opening scrolling text that starts each Star Wars movie. I typed the title of this layout, “MAY THE FOURTH BE WITH YOU” in all caps. Then the rest of the sentiment reads: “Episode V [as in 5th birthday] A long time ago, in a galaxy far, far away… EL BANDITO was born.” (I did the all caps for his name because that is often done with important names in the Star Wars movies too). When I had the spacing just how I wanted it with a little word art magic using Microsoft Word, I printed it on vellum with yellow ink (again, just like in the movies); however, this proved to be hard to read over the dark background so I backed it with white card stock. Ultimately I decided to print out the text again with black font (much easier to read) and just layered it over top of the yellow so that the letters had a soft yellow glow (you can see the yellow if you look very closely).
I matted the whole layout with a thin border of white card stock and then matted that again onto a dark blue card stock base for a clean, crisp look. There are a lot of materials used on this layout but I think I was able to keep it in the CAS style. The following is a video share of this layout:
This layout is being entered into the following challenges:
Simon Says Stamp Monday The Great Outdoors Challenge
Simon Says Stamp Wednesday A Hint of Pink Challenge
CASology Flow Challenge
CAS-ual Friday Birthday Challenge – 6 Color Bursts
Card Mania Life is Colorful Challenge
Word Art Wednesday Anything Goes Challenge
Creatalicious Anything Goes Challenge with Optional For the Girls/Mother’s Day
Crafty Gals Corner Clean and Simple Challenge
Crafty Purple Frog Celebrate the Little People Challenge
MFT Sketch Challenge 331
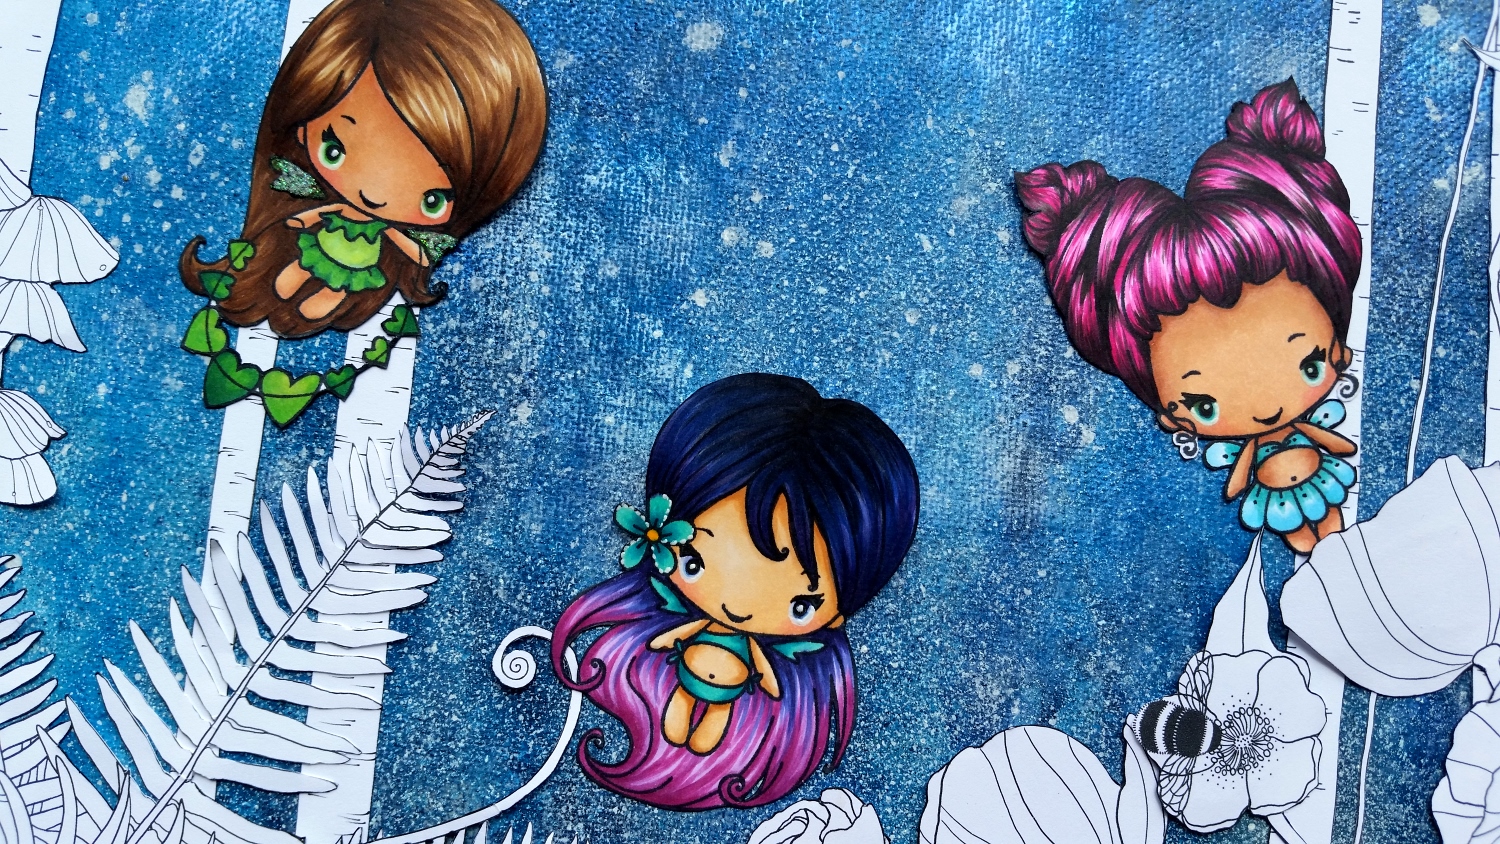
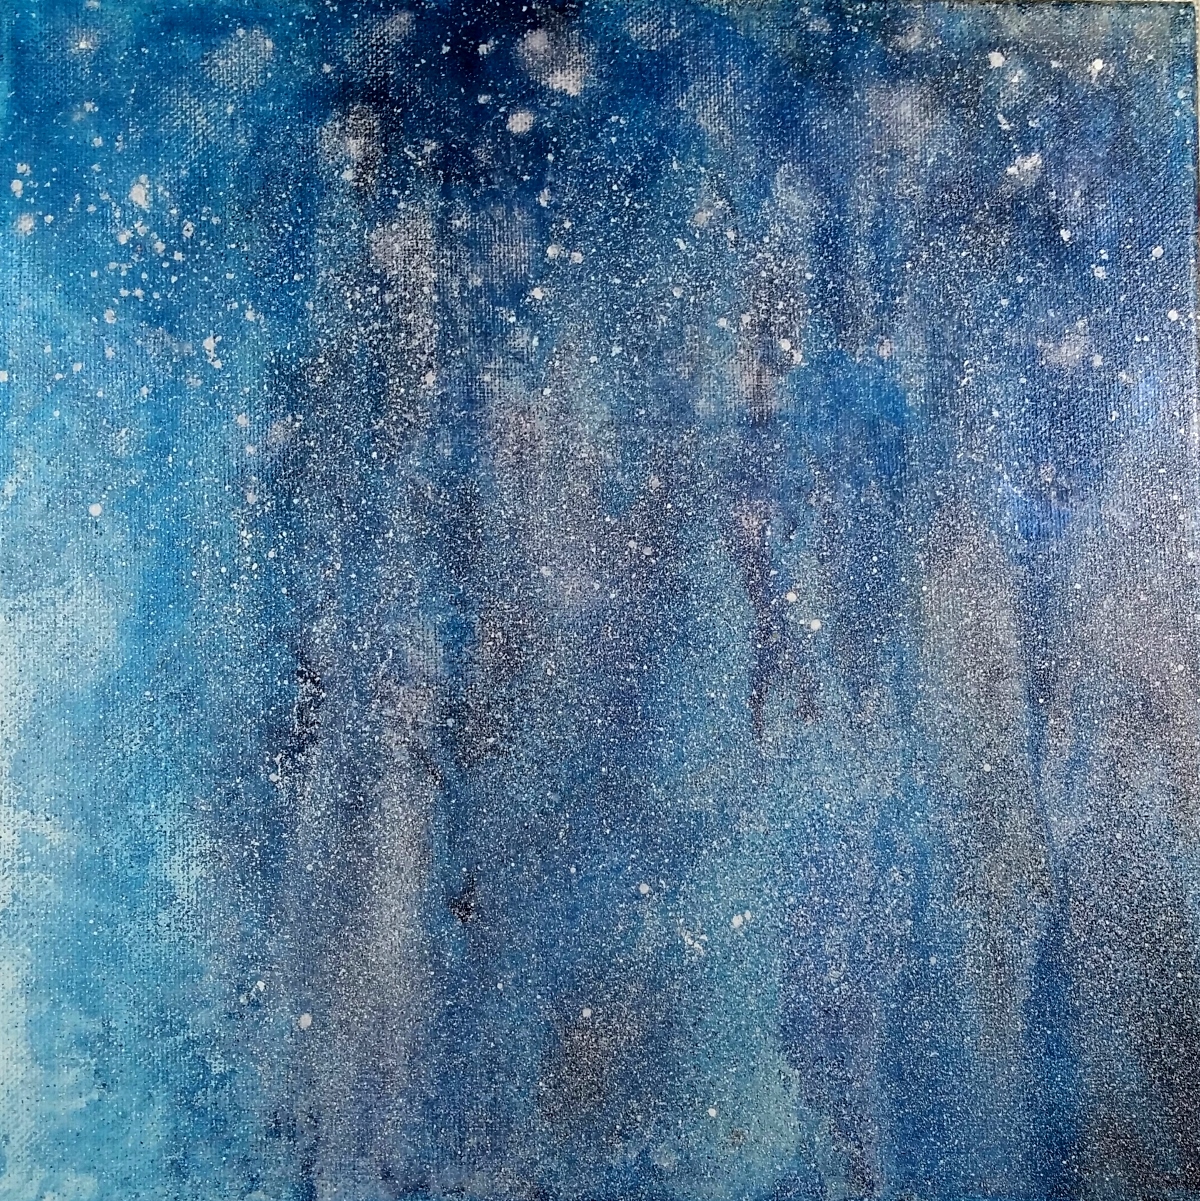 I didn’t want to detract from the adorable fairies (I added wings to the little ladies who didn’t have them), but I did want to create a magical scene with them so I first created a visually very textured but monochromatic bluish background with a lot of layers of sprays (letting each layer dry before spraying the next coating to get a deep rich look). I used a Heidi Swapp Color Shine Spray in Navy, DecoArt Media Shimmer Misters in White and Turquoise, a Recollections spray in Blue Shimmer and a Tattered Angels spray in Blue Icing. I love the shimmery white (sorry the shimmer was not captured in the photos) speckling/splotches that I imagine to be fairy dust or tiny fairies deeper in the forest.
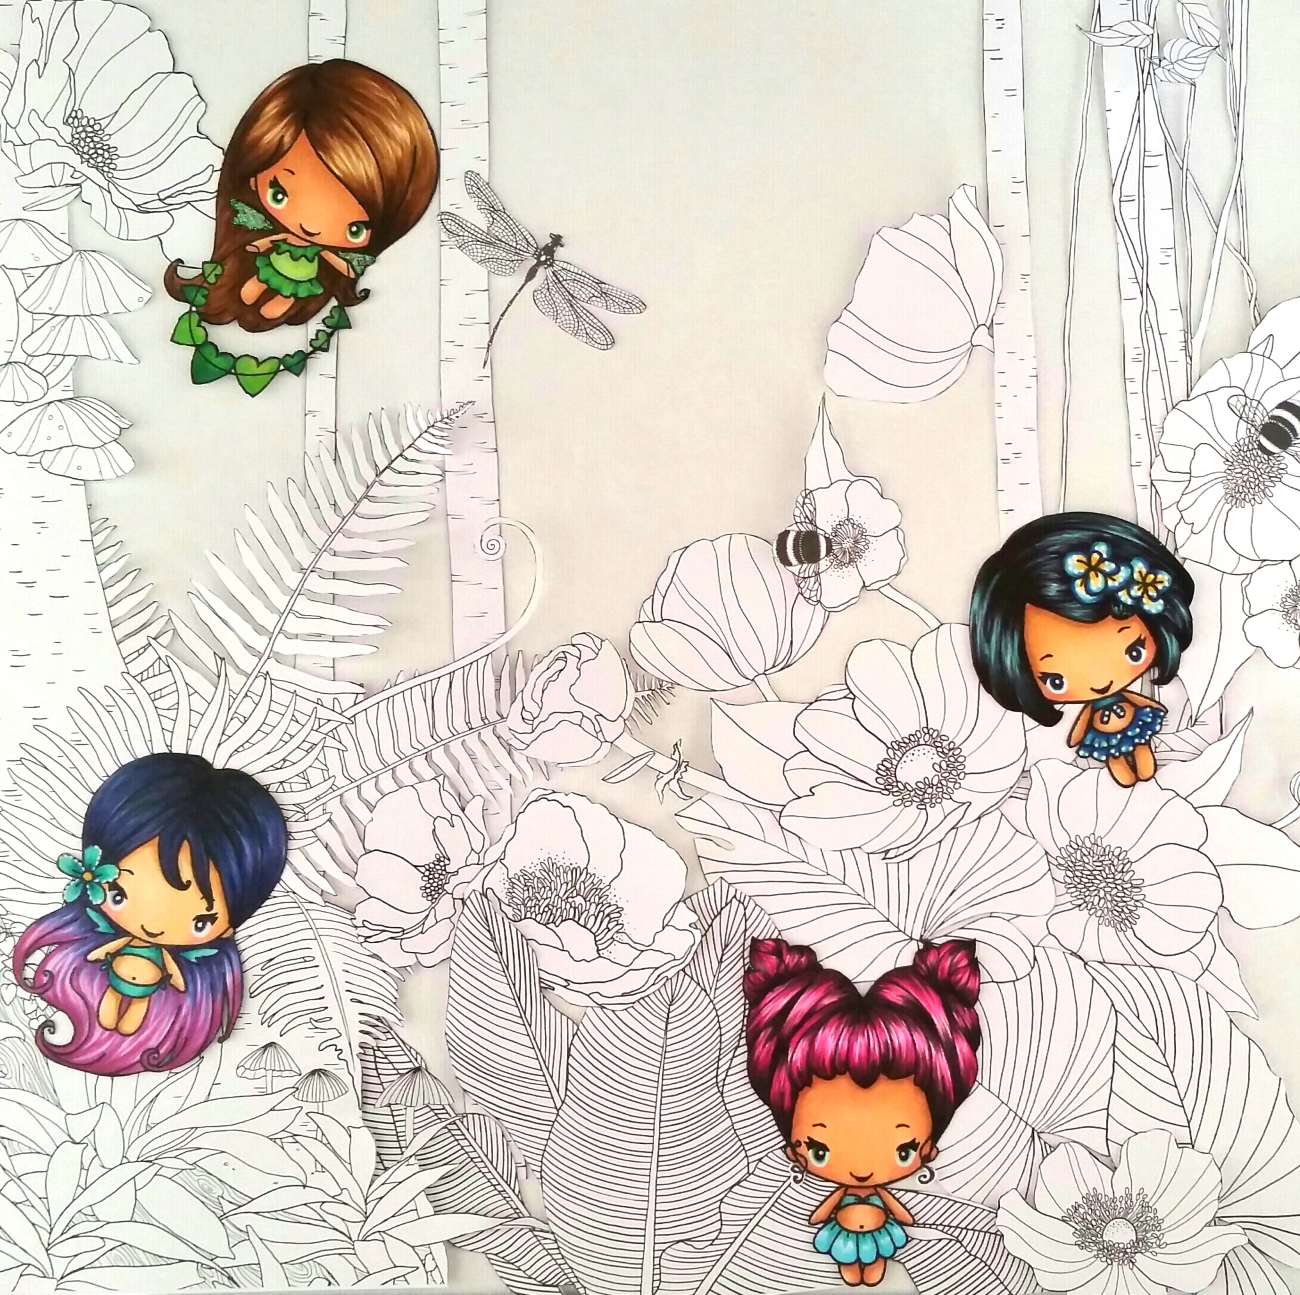 Then I did a LOT of fussy cutting. And when I say a LOT, I mean a LOT! I took several sheets of the Stampin’ Up! “Inside the Lines” Designer Series Papers and fussy cut out trees, leaves, ferns, flowers, bees, dragonflies, vines, and mushrooms. I even drew a few birch tree trunks with a black Copic multiliner 0.03 pt. pen to add to the background and fussy cut those out too. Then I mapped out where all the pieces would fit onto a 12″ x 12″ canvas (I had a spare to work on while the sprayed one was drying). Once I generally liked where everything was positioned, I used some GLAD Press’n Seal kitchen wrap paper to temporarily set them in place (this was a trick I learned from Jennifer McGuire for setting die cut pieces for layered cards). I decided not to color any of these fussy cut pieces so that they wouldn’t distract or detract from the colorful fairies.
Finally, I got to the assembly, and I had so much fun, putting this all together! I glued the initial background pieces down with wet glue, and then started to pop up parts and/or full floral pieces and fairies on double sided foam adhesive or fun foam. I’m hoping to finish a second canvas (more fussy cutting tonight!) and will come back and share that tomorrow. *wink*
This canvas is being entered into the following challenges:
The Greeting Farm Farm Fresh Mixed Media Madness Challenge
Simon Says Stamp Monday Layer It Up Challenge
Fab ‘n’ Funky Flowers Challenge
Word Art Wednesday Anything Goes Challenge
Crafty Gals Corner Anything But a Card Challenge
Creatalicious Anything Goes Challenge with Optional Gems or Pearls
Through the Craft Room Door Anything Goes Challenge
613 Avenue Create Anything Goes with Optional The Rubber Room-No Digis Challenge
Crafty Purple Frog Lovely Ladies Challenge
Not Just Cards Monochrome Challenge
]]>
I had printed at Walmart.com (the best prices and no crazy usage of my printer ink) all the best pictures from our anniversary/family vacation to San Francisco, Hawaii and Las Vegas and added flip outs, pockets, tags, and four additional pages (using 6×6 chip board pages I had in my stash and some coordinating patterned paper from Graphic 45’s Steampunk Spells Collection) to the mini album base from the class.
The following is a video share of the whole album:
]]>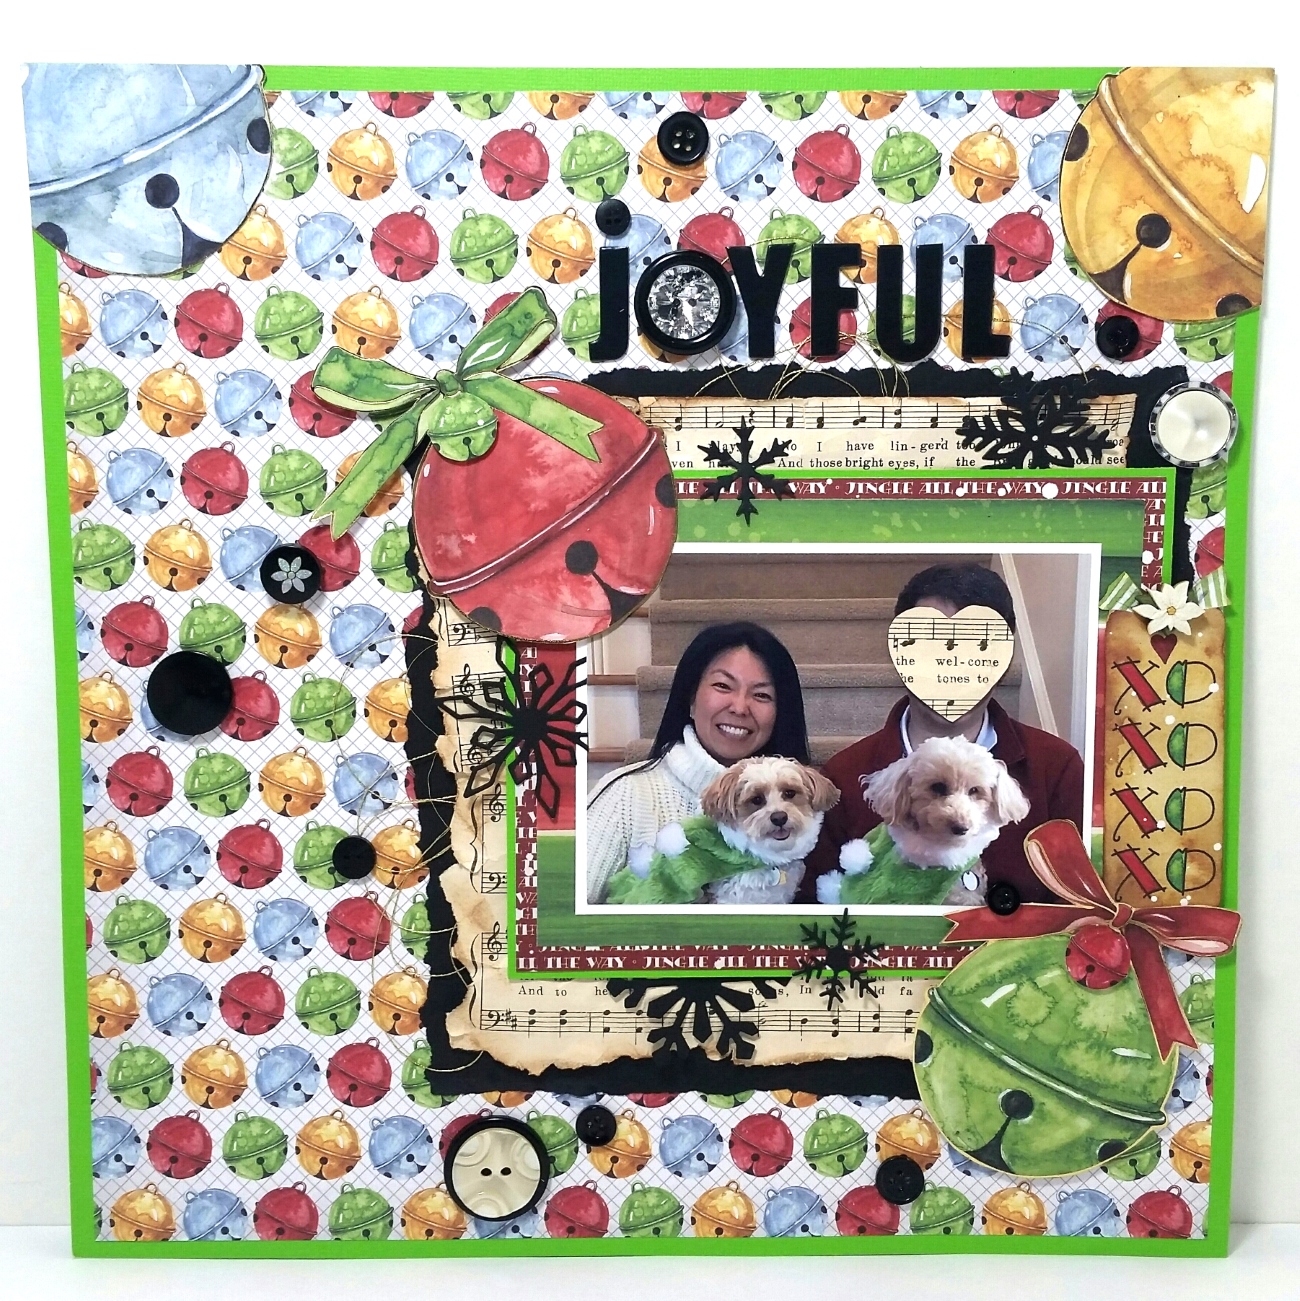 Given the color scheme of what we were wearing, I looked through my stash and found a 2013 Recollections Christmas paper pad called “Watercolors” that seemed a perfect match. To carry through the citron green color of the pups’ coats, I used a plain card stock (this might be 10+ years old!) to frame the whole layout as well as a 1/8th border on the 4th mat around the photo. For the main background, I used a fun jingle bell patterned paper from the paper pad. I also used a crimson text patterned paper that repeats, “jingle all the way” in white, a crimson, green and cream stripe patterned paper, giant jingle bell ornaments that I fussy cut from another paper, and a few of the images from the cut-a-parts page–all from this collection. It is hard to see in the pictures, but I also coated the small fussy cut bells and bows with Clear Wink of Stella to add shimmer and sparkle.
To add a contrasting vintage feel to the fairly modern and playful patterned papers, I also layered in some vintage music paper that I inked with Tim Holtz Distress Ink in Vintage Photo as well as some torn black card stock to help the photo with all its mats pop from the busy background pattern. For the “JOYFUL” title, I used Fancy Pants Designs Black Chipboard Alphas, which tied in well with the torn black card stock matting.
For finishing touches, I added DMC metallic gold embroidery thread that I bunched up and tucked behind the music paper in two places as well as some vintage black, cream, and rhinestone (for SPARKLE) detailed buttons (the black and cream were used to maintain a consistent color story). Lastly, I decided to add some snowflakes die cut with Diemond Dies Icy Snowflakes Die Set, Winter Snowflakes Die Set, and Snowflake #1 Die and punched out with the Martha Stewart Himalayan Snowflake Punch in unexpected black card stock to tie in with the black accents throughout. I’m still super rusty at layouts, but I’m trying to keep my new years resolution and really enjoying the process.
Diemond Dies Coupon: My readers can get 10% off and free worldwide shipping on all orders of $35 or more at Diemond Dies by using the coupon code “thankskristina” at checkout.
The following is a process video sharing how I created this layout:
This layout is being entered into the following challenges:
Simon Says Stamp Monday Pets Corner Challenge
Lil Patch of Crafty Friends Anything Goes Challenge
Word Art Wednesday Anything Goes Challenge
Through the Craft Room Door Anything Goes Challenge
Crafts Galore Encore Anything Goes Challenge
Not Just Cards New Beginnings Challenge
Crafty Gals Corner Add Some Sparkle Challenge
Creatalicious Anything Goes with Optional Hearts Challenge
Addicted to Stamps and More Make Your Mark Challenge
]]>
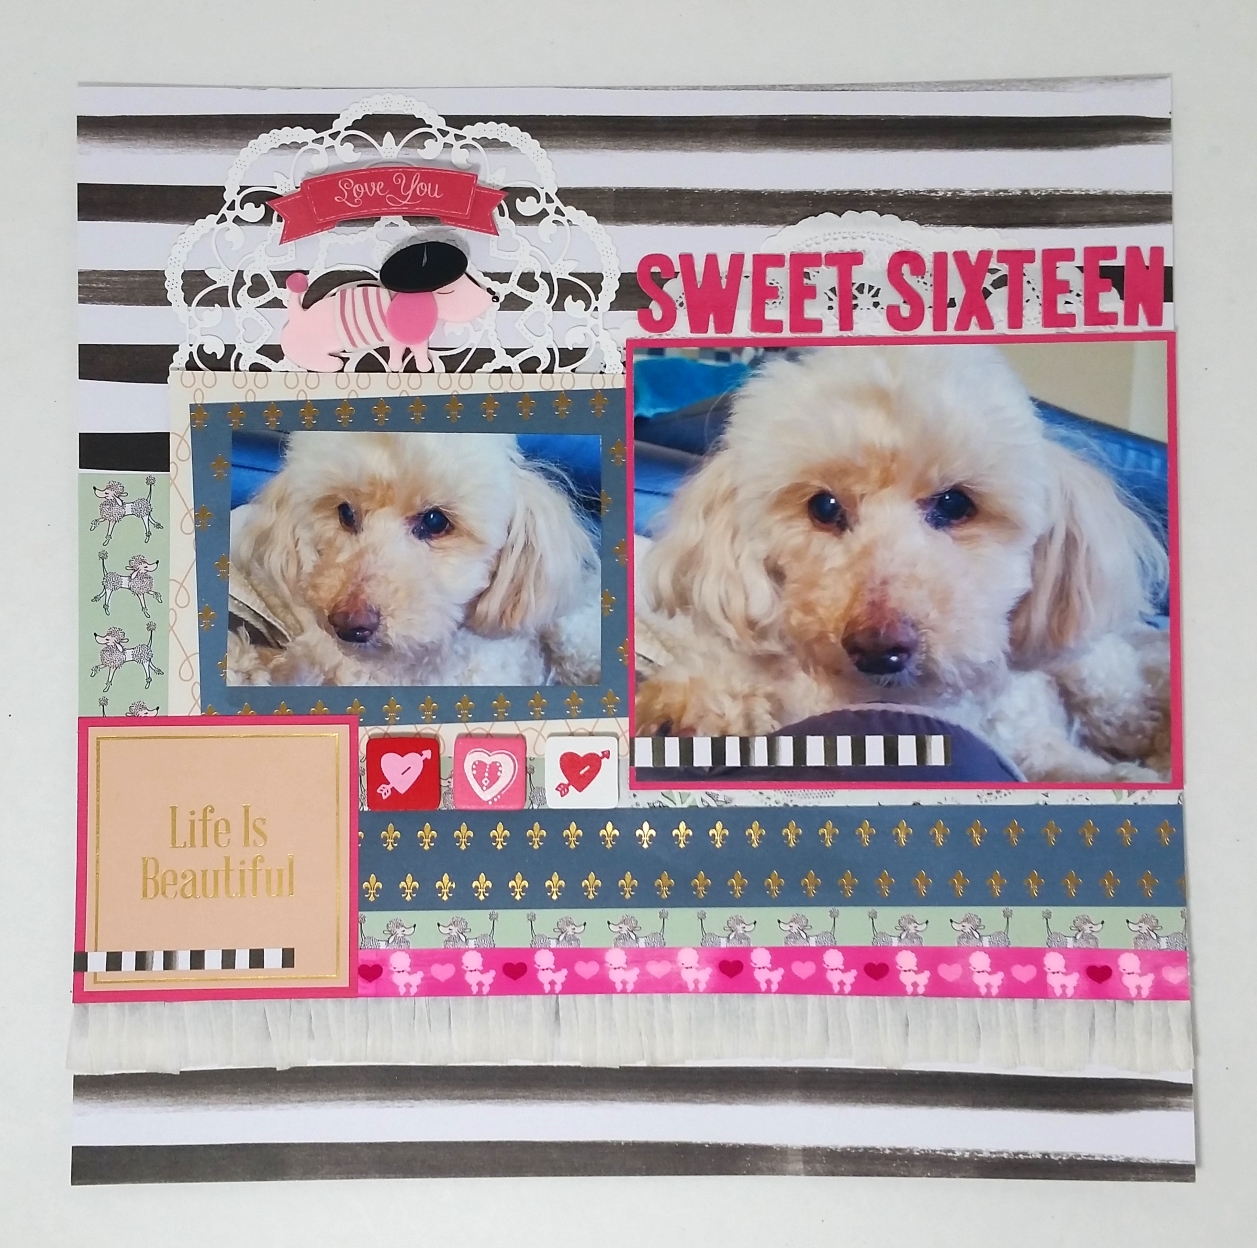 Besides the adorable pictures of Biscuit, I was inspired by the wonderful new Recollections “C’est La Vie” collection. I used a few of the cut-aparts, the painterly striped background, blue and gold foil fleur de lis, and the whimsical poodle patterned papers.
After creating a ruffled border from crepe paper streamers (I love this inexpensive but totally fabulous technique), I used a pink poodle washi that I have been hoarding for 3+ years to cover the seam where the ruffle meets the poodle patterned paper. I cut out the title, “SWEET SIXTEEN” with Lawn Fawn’s Cole’s Alphas Lawn Cut Dies and colored the pink card stock to better match the poodle washi with Copic RV04 and RV55.
To balance the softness of the ruffles below, I layered a variety of paper doilies toward the tops and underneath each photos and journaling spot. Lastly, I added color coordinating embellishments from my stash: a few old wooden heart stickers from the Dollar Tree, a super cute resin Parisian poodle from NatashaScrapbooKorner on Etsy, and layered St. Valentine stickers from American Crafts 2014 collection.
The following video shares the process of creating these layouts:
These layouts are being entered into the following challenges:
Simon Says Stamp Wednesday Anything Goes Challenge
Card Mania Layer It Challenge
Word Art Wednesday Anything Goes Challenge
Lil Patch of Crafty Friends Anything Goes Challenge
Through the Craft Room Door Anything Goes Challenge
613 Avenue Create Anything Goes with Optional Totally Technical Challenge
Not Just Cards New Beginnings Challenge
Crafty Purple Frogs New Beginnings Challenge
Addicted to Stamps and More Anything Goes Challenge
Crafty Gals Corner Anything Goes Challenge
]]>