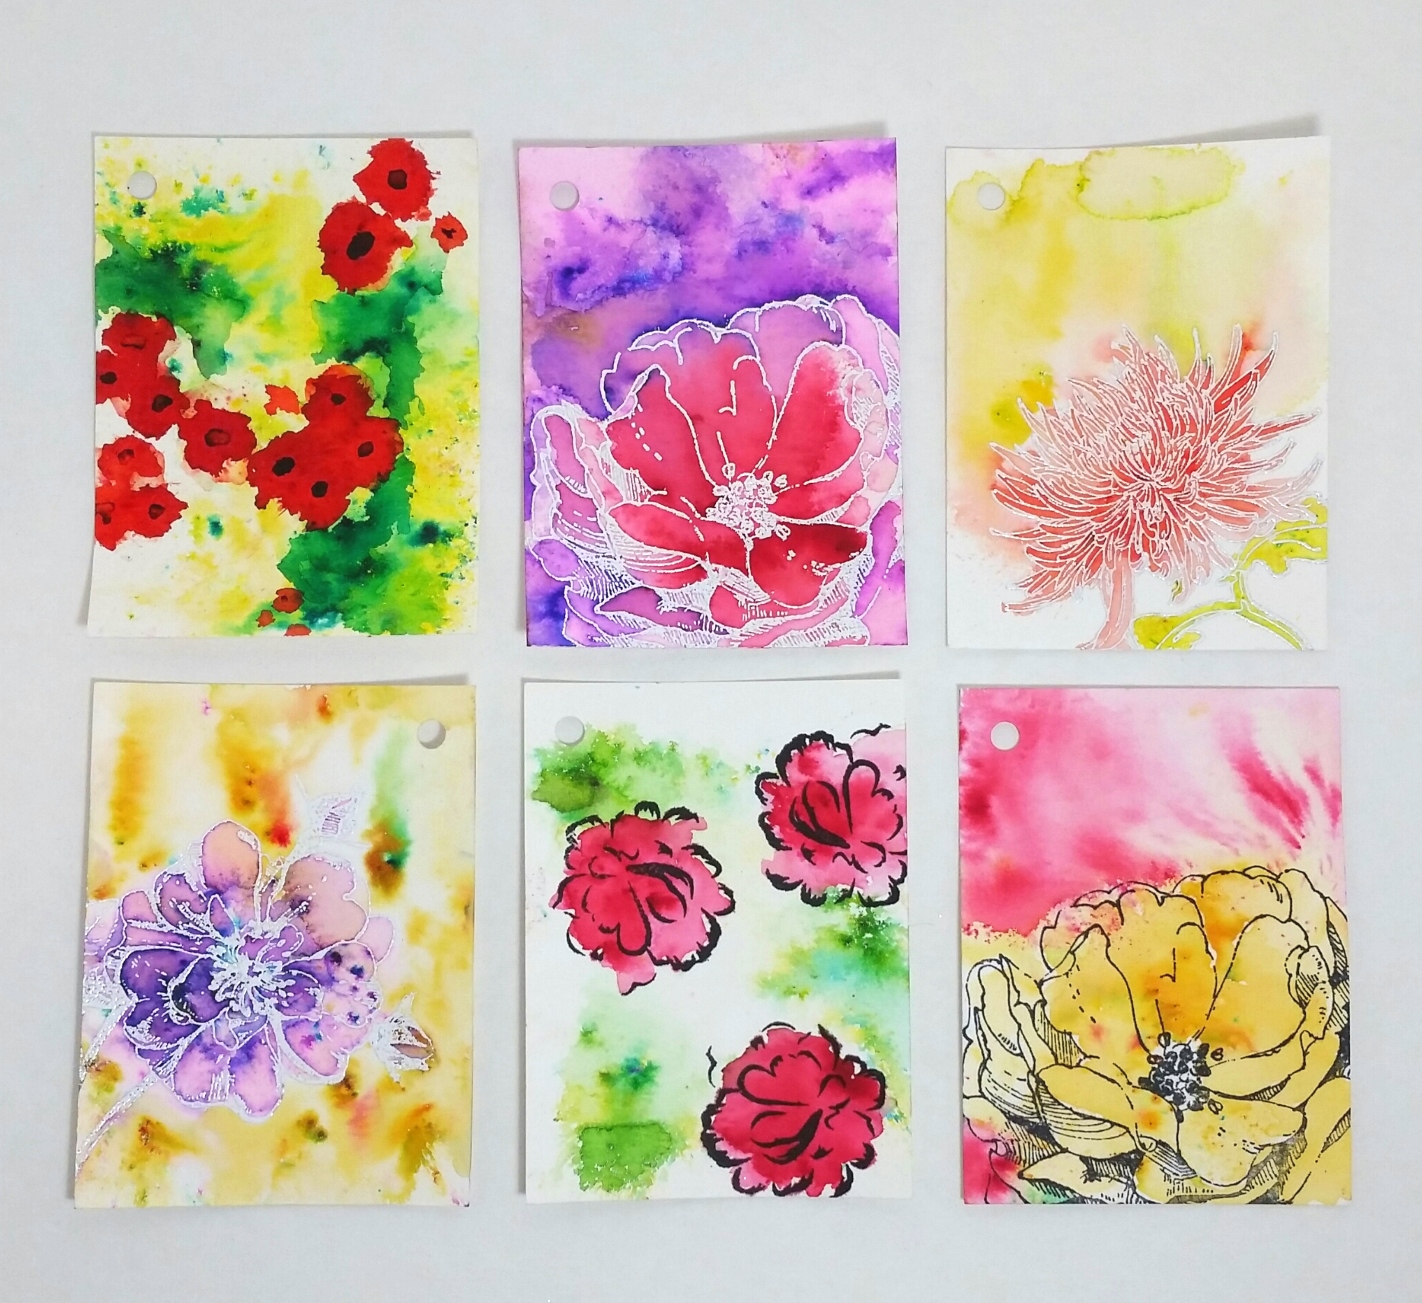
 Anyway, after a lot of practice (see the photo at left of 6 of the 12 tags I colored up in class), I really fell in love with the magic and mystery that are in those tiny granules of pigment in the Ken Oliver Color Bursts.
My favorite technique was: (1) stamping an image with VersaMark ink, (2) heat embossing it with Hero Arts white embossing powder, (3) laying down water around the image (or in the image, but not both at once or you’ll get pigment everywhere), (4) lightly sprinkling on a bit of powder (never squeeze those bottles or you’ll end up with a hot dark mess), and then (5) moving the pigment crystals around with a paint brush or going WILD just spraying on water to move the pigment around in the ultimate crazy loose way (I can’t believe it since I’m usually all about control, but I did this a lot)!
We had the opportunity to try out one of our favorite techniques on a larger format. Sandy also provided a matte so that we could frame this “work of art,” but I had to finish up my piece when I got home to add the background soft greens. I wanted to try my hand at using some complementary colors (which if you’re not careful can turn very muddy) so I thought about vintage pansies and WILD roses as I painted this picture of a 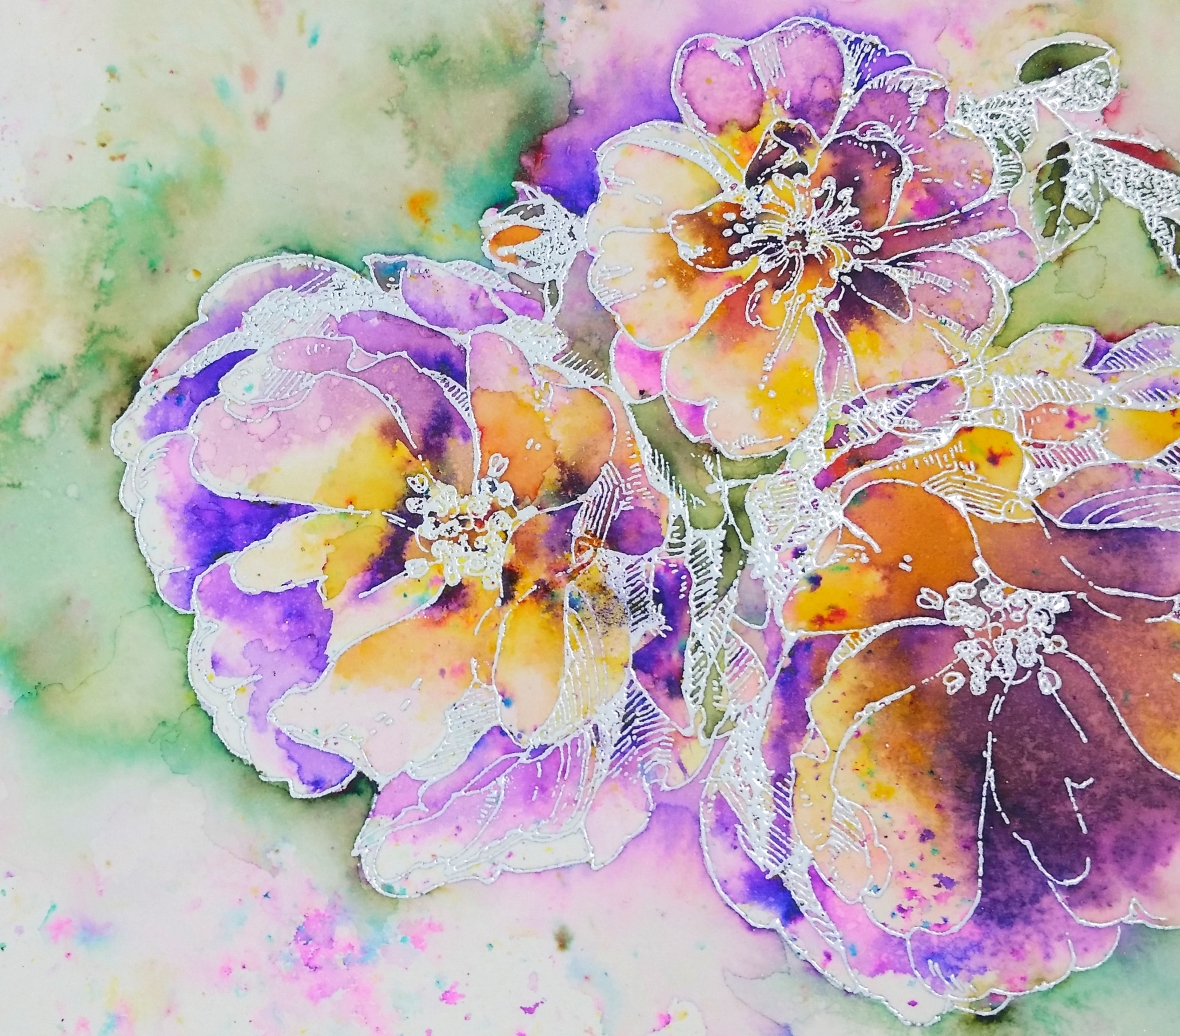 cluster of flowers (I did a bit of masking as I stamped the image to eliminate most of the stems and overlapping areas) that I stamped using the Hero Arts Antique Rose and the Hero Arts Antique Rose Stem stamps. The Ken Oliver Color Bursts I used were Violet, Lemon Yellow, Yellow Ochre, and Terre Verte. Even though this is a single layer treatment, there is so much visual movement and interest that comes from the Color Bursts. I’ll definitely be playing more with these!
By the way, the BIGGEST THRILL for me was that Sandy actually took a picture of my final floral project! She said she had never seen the purple and yellow worked together to achieve such a pretty natural color combo and she wanted to use my piece as a reference! I was humbled and absolutely floored!
The large floral watercolor is being entered into the following challenges:
Simon Says Stamp Monday Summer Fun Challenge
Simon Says Stamp Wednesday Let’s Go Wild Challenge
CAS-ual Fridays Time to Color Challenge
Word Art Wednesday Anything Goes Challenge
Through the Craft Room Door Anything Goes Challenge
613 Avenue Create Anything Goes Challenge
Penny Black and More Anything Goes with a Stamp Challenge
Craft Your Passion Anything Goes Challenge
Addicted to Stamps and More Anything Goes Challenge
MFT Camp Create Farewell Bonfire Single Layer Challenge
![]()
 I picked out these awesome building digis from The Stamping Boutique back in August and colored them up with a slew of Copic colors in shades that reminded me of 50’s small towns and malt shoppes (sorry I can’t remember the colors; it’s been so long since I colored them up).
I created the background base with some old papers from the Dear Lizzy Neopolitan collection, the Amy Tangerine Sketchbook collection, and the Heidi Grace Designs Daydream collection, using Mod Podge and DecoArt Americana Decoupage Matte glue sealer finisher as the adhesives (both worked well, but I found the DecoArt product was thinner and dried faster).
I used the DecoArt Dimensional Effects paintable texture paste with the Tim Holtz Bricked stencil to add texture to the sky background that reflected the brick of the buildings. The texture was really highlighted when I mixed up some DecoArt fluid acrylic paints in cobalt blue and titanium white, brushed it on and then wiped it off with a baby wipe.
To help pop out some book paper hearts that I had decoupaged on as well as the building digis that I had worked so hard to color, I used a black Faber-Castell PITT artist pen to outline the images and then softened the outline with a water-dampened Q-tip. I also used a white Faber-Castell PITT artist pen to further highlight the book paper hearts and the relief of the stenciled brick areas.
This art journal page was done in a dozen or more parts over several months, but I’ve edited it down to the following process video:
This art journal page is being entered into the following challenges:
Simon Says Stamp Monday Inspired By A Song Challenge – WINNER
Simon Says Stamp Work It Wednesday Something New Challenge
MarkerPOP Anything Goes Challenge
Lil Patch of Crafty Friends Anything Goes Challenge
Word Art Wednesday Anything Goes Challenge
Through The Craft Room Door Anything Goes Challenge
Craft Your Passion Anything Goes Challenge
Crafty Girls Creations Anything Goes Challenge
Not Just Cards Anything Goes Challenge
Paper Sweeties Inspiration #40 Color Challenge — pinks and purples of roof of house
 DISCLAIMERS: Neither Nutrisystem nor Costco is paying me, and I am not receiving any consideration for this blog post or YT video from either company. If you are interested in trying it, however, I would suggest checking out the twice-yearly sale on Nutrisystem gift certificates at Costco. As of today (August 17, 2015) you can purchase a $100 gift certificate for $60!
Also, if you’d like to receive a $30 Nutrisystem “Buddy Bucks” gift certificate, please email me at kristina@craftypaws.us with your email addie, and I will send you a link for $30 off your first order. If you use the Buddy Bucks, I will receive a $30 referral Buddy Bucks certificate too. YAY!
This planner journal is one that I picked from the MylkShoppe Etsy store owned by a fellow crafter, Lena (YT: mylkshoppe). It is Korean and has the cutest little rolly polly bunny images and sayings (written in Korean). I have found that writing down my struggles, successes, discoveries, etc. about my weight loss journey has helped keep me focused, motivated me, and added a creative element to this sometimes tedious endeavor.
 Besides, all of that, it has been a great way to use some of my favorite washi, doggy stickers and post it flags. I know that I will be keeping this journal planner for years to come and perhaps looking back on it in the future will help me stay on track. Fingers crossed!
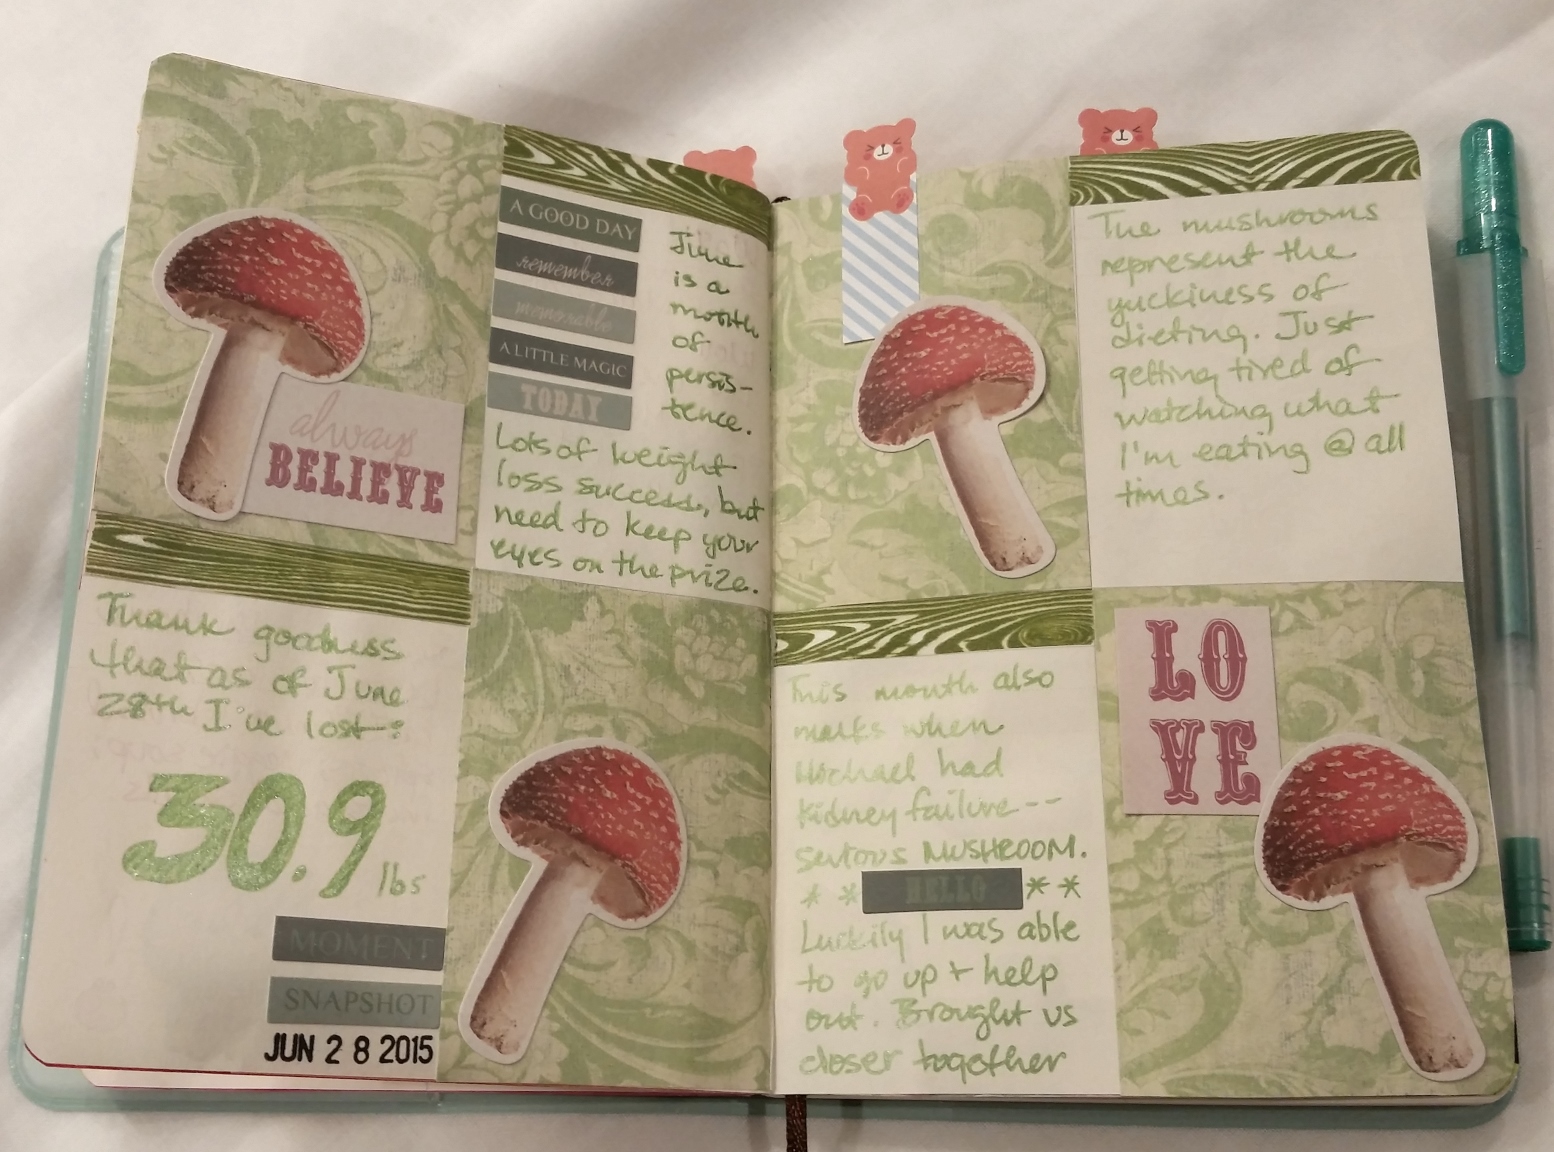
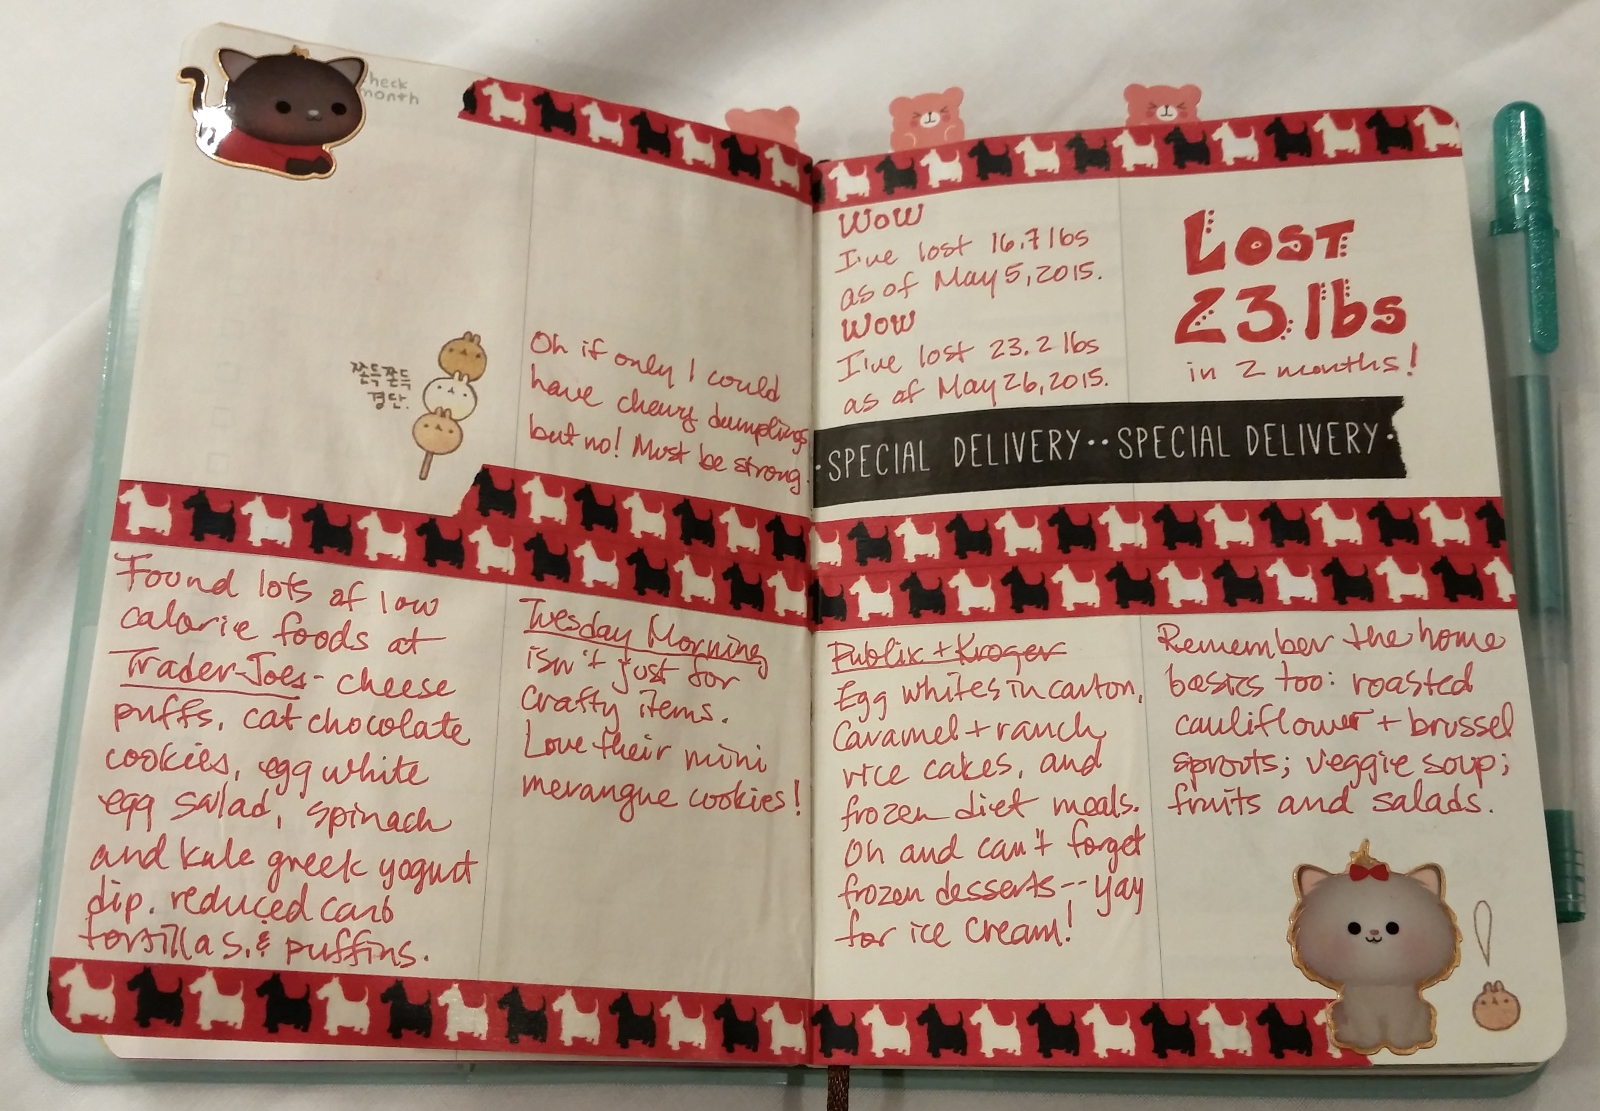
I’ve posted pictures of some of my favorite pages. The main picture is boldly colored in saturated colors and I think has the energy of the fun events from that period: I attended the Scrapbook Expo and got to meet a couple of crafty YT friends in person. I used bright, poppy paw print washi and silver and candy colored puffy doggy stickers to reflect the energy of the time.
The second picture is in more muted, in softer desaturated colors and reflects a rough period when I was helping my brother through some very serious health problems. I used forest green woodgrain washi, mushroom stickers (I detest mushrooms), and pale green damask patterned paper mod podged on alternating sections to give a cohesive look.
I won’t go through the rest here, but if you’re interested, please watch the following video share (and a bit of my story):
The first two planner pages pictured in this blog post are together being entered into the
MFT Summer School: Color Saturation Challenge
Thanks for stopping by! WOOF
]]>
1. Get more healthy, meaning exercise regularly at least 6 times a week. I am trying a consequences system in which I don’t get to craft after 2 pm (my most creative times seem to be in the evening) unless I have done some exercise earlier that day. The only exception to this would be if I’m not feeling well, but really, if I’m not feeling well I probably shouldn’t be crafting either. LOL
2. Continue to regularly create and share free digis. For the past 9 months, I have released a free digi every week. I may adjust this down to twice a month, but I haven’t decided yet. I have to assess my work and other commitments and will let you all know my intentions in the next week.
3. Keep a thankfulness journal (art and written). Even if it is just one sentence a day, I want to be thoughtful about and appreciate the good things (of which I have many) in my life. I have a notebook I am excited to decorate for this (post to come soon).
I am also excited to share the news that I am a guest designer for Little Blue Button Stamps for the month of January 2015. Woot woot! My first project will be shared on January 17 and my second will be on January 28. I will also be trying out for a spot on the Not2ShabbyShop design team in the near future, so please keep your fingers crossed for me!
Thanks for stopping by! I hope 2015 brings you and yours good health, much happiness, and wonderful crafty adventures! Big hugs, Kristina
]]>
 Then to be able to document this in my December Daily was crazy fun! LOL Seriously, I had a blast! I made a little stencil using a Fiskars paw print punch. Then I mixed some brown acrylic paint with some latex caulk to use with the stencil to make it appear as though there were doughy paw prints up the page. I snapped a picture of the doggy cookie cutters and taped them in using some silver and gold glitter washi tape. I hand wrote in some thoughts I had about making these faux gingerbread dog cookies, and finished off the page using the border punch from the Martha Stewart Crafts Punch Around The Page Aspen Set
 to decorate the hole reinforcement strips.
For the next page, I created my own background patterned paper by printing out a close up of the finished cookies (life size). Then I decided I wanted to add a traditional shaker (not a sewn acetate one like I’ve made recently). I printed out the cookies photo again, a bit smaller so it would fit better in the Polaroid frame from the Sizzix Jillibean Soup “I Heart This” Die Set, and used some scrap acetate (from some left over embellishment packaging), some thin strips of foam adhesive, and some pale pink and teal sequins to create a shaker. HINT: To avoid having the sequins accidentally stick to the sides of the shaker, brush on a thin coating of baby powder or baking soda along the edges before taking the backing off the foam adhesive and adding the back panel of the shaker.
I taped on some sheer teal ribbon to the sides of the page and tied a bow on the front. With the tails of the bow, I created a kind of net/pocket by taping those to the back of the page too. It’s a loose structure, but it works just fine to hold the shaker card in place.
The following is a video share of these pages:
Doggy Treat Recipe:
Preheat oven to 350 degrees
2 jars of organic baby food (a meaty flavor like beef with vegetables was a hit)
1 cup of wheat germ
Mix ingredients in a bowl and lay out on a lined cookie sheet in 1-2″ flattened balls OR use cookie cutters and use a small silicone spatula to lay in the wet dough into fun shapes like these dogs
Bake for 30 mins. Let cool. Treat your dogs to healthy doggy treats!
The caulked doggy paw print page is being entered into the following challenges:
Simon Says Stamp Anything Goes Challenge
The finished doggy cookies page with the shaker is being entered into the following challenges:
Simon Says Stamp Winter Inspiration Challenge (oh that doggy licking his chops is just adorable!)
Challenge Up Your Life Christmas Without Christmas Stamps Challenge #4
Day 11 was about the banner I created for Diemond Dies, which is having a wonderful Christmas giveaway on the Diemond Dies Facebook page. I also had made a funny masculine birthday card for a friend’s husband.
Day 12 was about the free digi I created, “Sweet Shar Pei”, and the card I made using the C.C. Designs “Snarky Christmas” stamp set and the Build A Snowman die set by Diemond Dies. The little pup is looking a bit sheepish I think, surrounded by the remnants of a snowman, and the speech bubble says “Dear Santa, define naughty…” I also journaled about picking the giveaway winner of my Christmas Blog Candy Giveaway. Lastly I slid in a sewed a mini acetate shaker for a little added fun.
 Days 13 and 14 were quiet weekend days. We ran errands, made doggy meat loaf for the coming week, and shared quality family time together. Family pics were snapped to help document the cozy good time.
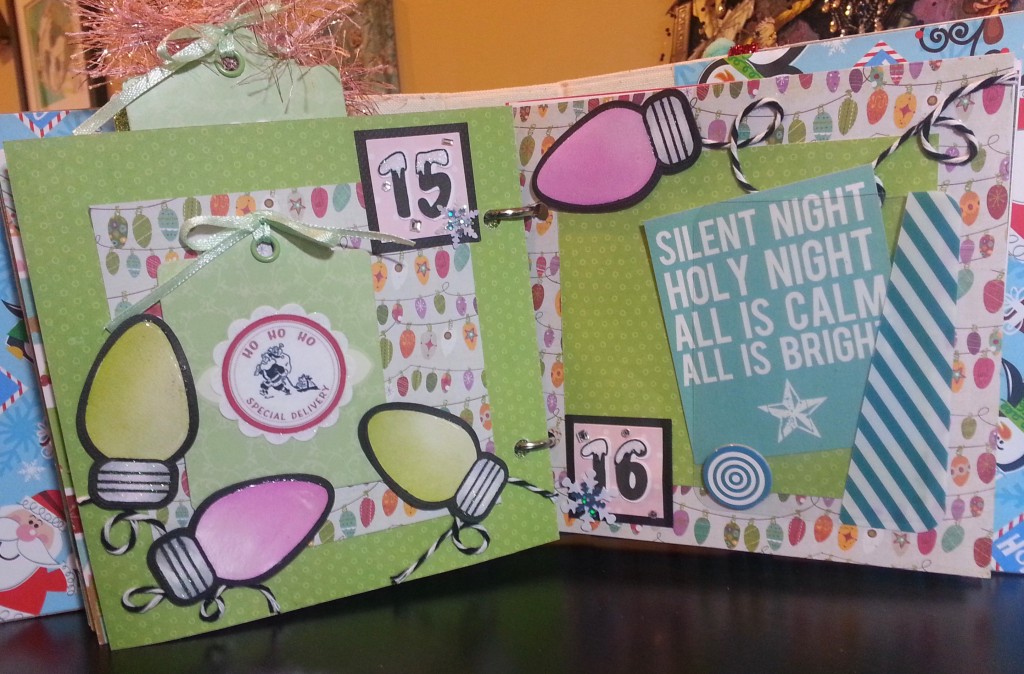
Day 15 was a rough one. We had a very stressful day fighting some terrible injustices related to my parents’ business. I thought adding the Christmas light patterned paper from the “Snowy Day” Crate Paper collection and some stamped and die cut Christmas lights from The Stamps of Life “Lights4Christmas” collection would be a great way to create a journaling tag holder while symbolizing the light at the end of the tunnel we hope to see. 🙂 I used black and white bakers twine and glued it down in a random swirly pattern to look like the cord of the Christmas lights.
Day 16–today, was a quiet one. After a night fighting insomnia after the stressful day yesterday (more on that in the video below), I was a bit of a zombie. I didn’t get much crafting done, other than just working on my December Daily. Hubby had to travel for work, so it was just me and the fur babies hanging out at home. It was a good catch up day with just a little journaling to represent the day. The free printable that I had with the lyrics from “Silent Night” seemed a good fit for the day.
The following is a video share of all the the last of these pages:
The December Daily Day 12 page is being entered into the Simon Says Stamp Work It Wednesday Anything Holiday Challenge and
the Simon Says Stamp Anything Goes Monday Challenge
Thanks for stopping by! Please subscribe if you wish and have a great day! WOOF
]]>
Anyway, when I found out that a YT crafty friend, Mataya (YT: minnescrapper) was hosting a challenge about using dies that we have not (or rarely) used, the Tim Holtz Fanciful Flight die that I purchased through an eBay auction came to mind. Why not make myself feel better about purchasing this die by using it on an art journal page? I wanted to try out all the permutations of wing combinations and really PLAY. The varying results were perfect for the sentiment I wanted to reflect: “You can SOAR with whatever wings you have.”
 I sprayed the paper initially with three Recollections shimmer mists in blue, purple and green. Then I used the die to cut out lots of wing segments from black cardstock and some fabulous background papers that were made and gifted to me by my friend Rosa (YT: ColorXplosion by Rosa). All the unique patterns on the papers really helped bring life to the butterflies, moths, and other flying insects.
I also used a Fiskars stamp set called “Butterfly Magic” to stamp small and medium sized dragonflies to add to the feeling of a flurry of wings that I wanted to create.
I printed out the sentiment on my computer, cut out the words and lined the edges using my Faber Castell Pitt Pens (sizes: SC and F). Lastly I sketched in “flight patterns” for each flying insect and then added some colorful sequins (just to add a little “magic”). 🙂
This art journal page is also being entered into the Raisinboat Summertime Challenge.
The following is a video share of the project:
Thanks for stopping by and have a great day. WOOF
]]>My first art journal page (top photo) is one that I did when I was suffering from one of my migraines. Normally I just curl up into a ball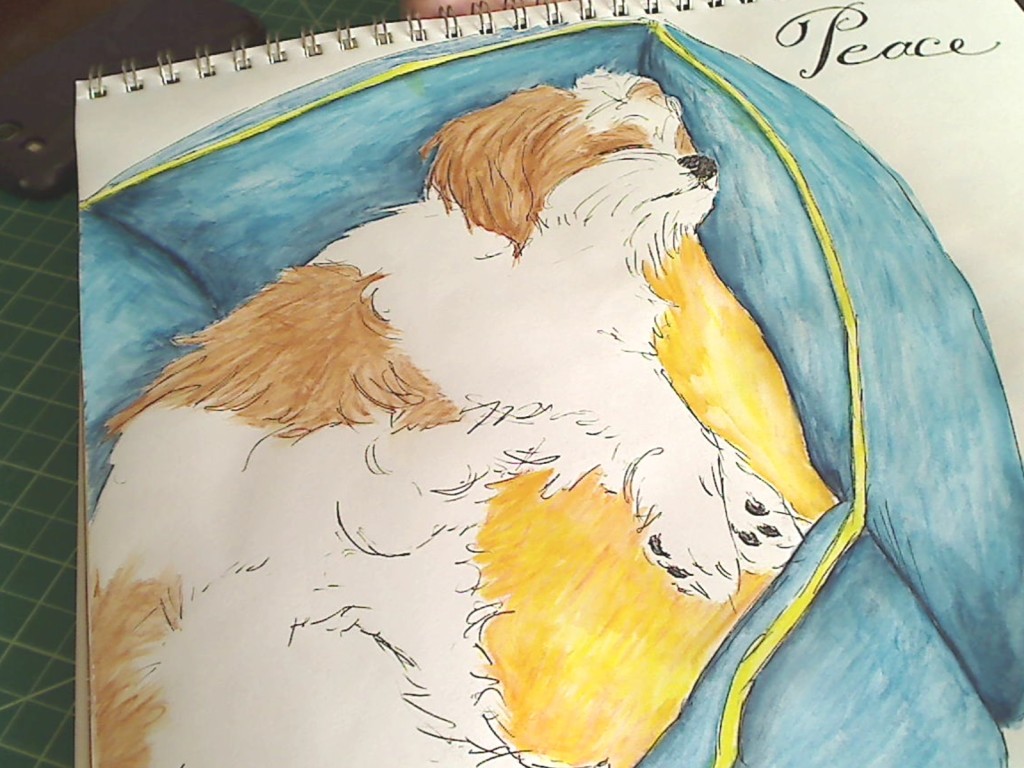 when I get one, but I had committed to starting an art journal this year so I really wanted to capture the essence of something that has so affected my life. I really like how it turned out, as I think it visually shows the feelings and hopes I have about my migraines.
I won’t share all of my art journal pages, but here is a sampling. A drawing of Bandito asleep in his dog bed next to my crafting desk. I used a plain Uniball pen and my Derwent Inktense water color pencils. Nothing says peace to me like a sleeping pup.
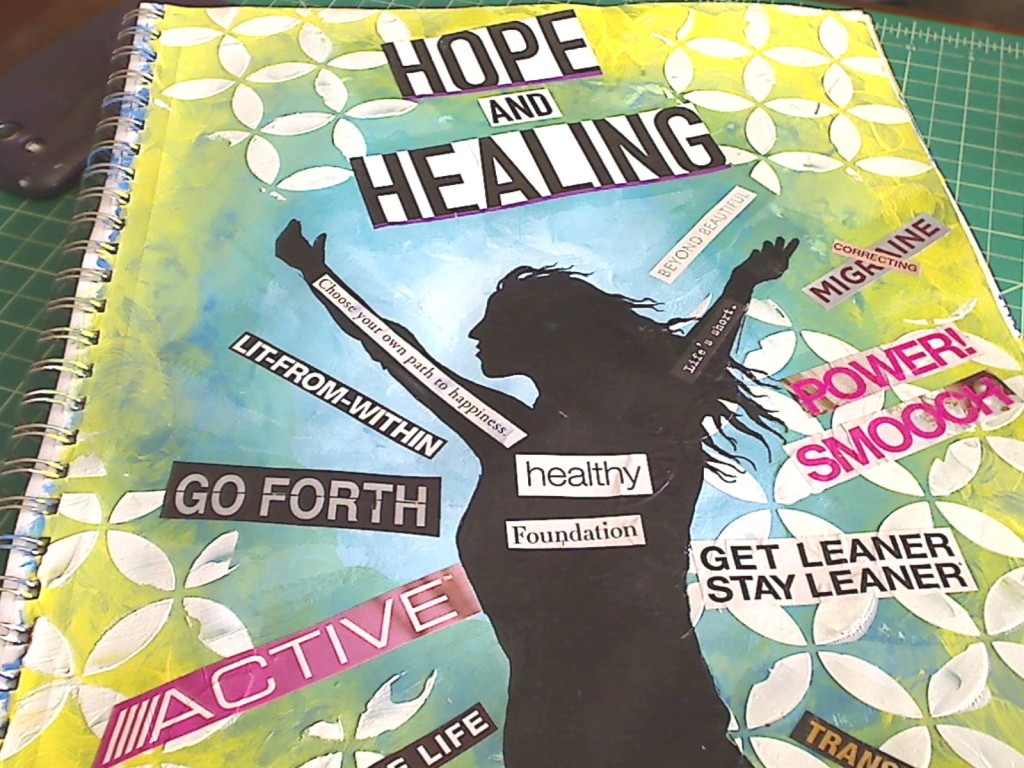 The next was a page that I hoped would keep me inspired and motivated this year to tackle my unhealthy demons. This was a bit of a collage and mixed media. I started my background with some plain acrylic paints, stenciled in some latex caulk and then drew in a silhouette of an uplifted woman. I then chose some phrases and words from a magazines and used my matte medium to clue them in. It has a bit of a retro 70s vibe, but I like how it turned out, and part of me thinks that the free-thinking 70s is a period from which I could learn a thing or two about letting go.
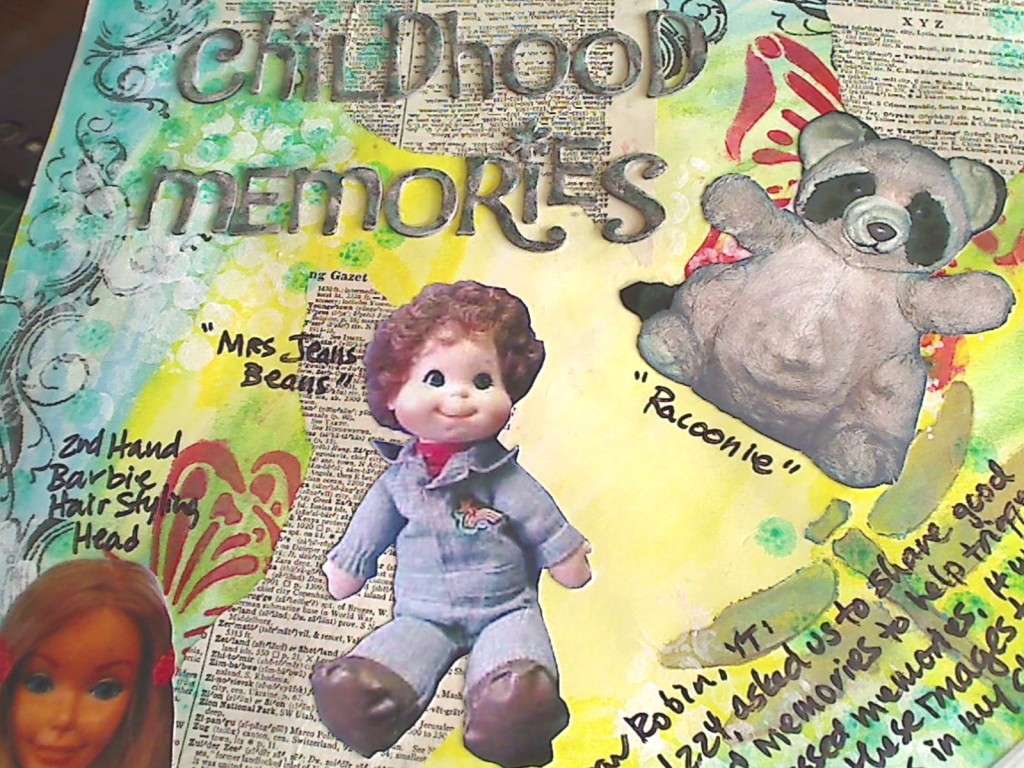 The next one I did for my friend, Robin (YT: tngirl224), who suffers from PTSD and asked folks to share good childhood memories. Now I had moved around a LOT as a child so I had nothing tangible with me from that part of my life, but thanks to the Internet I was able to find images of things that meant a great deal to me as a child that I shared in this art journal page. The memories came flooding back, and that can be a wonderful result of art journaling.
The following are the YT video posts of the last couple of these art journal pages along with one bonus one I did for another YT friend, Sharon (YT: Hope4ACure):
Thanks for stopping by! Subscribe if you wish, and have a great day! WOOF
]]>