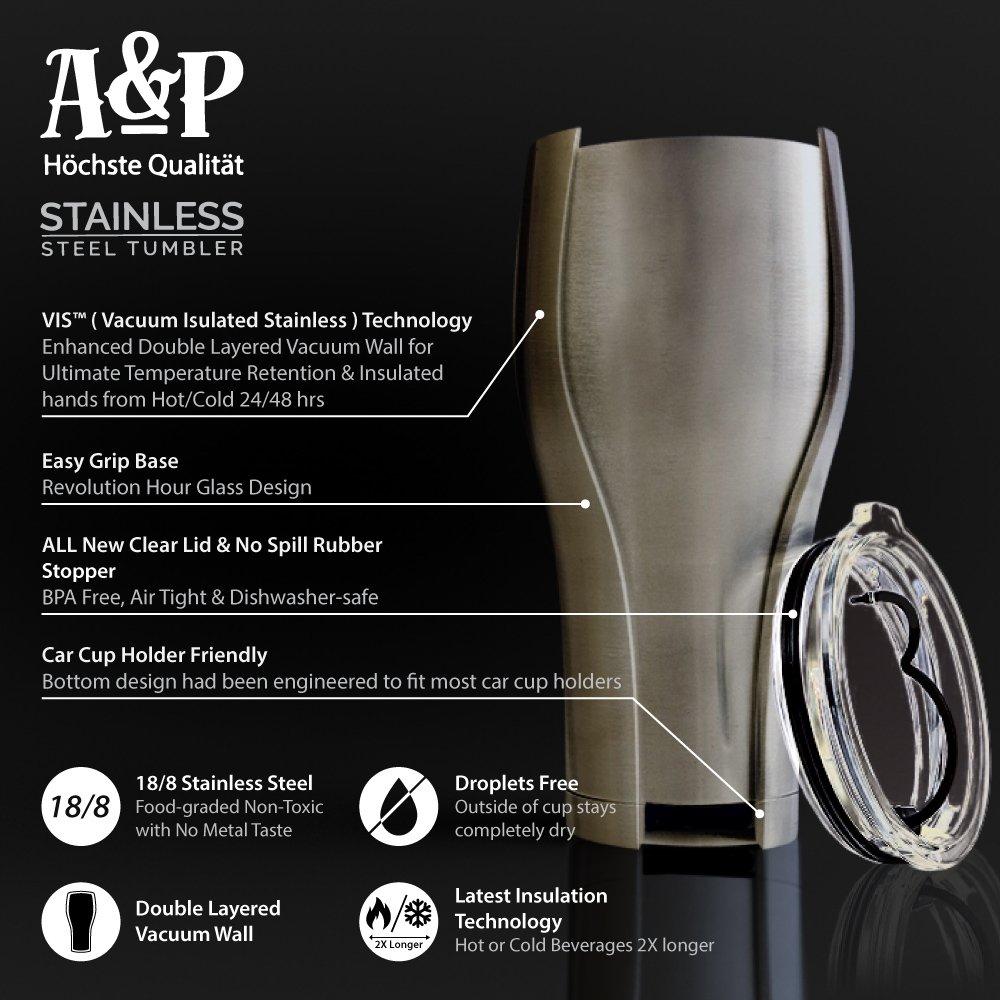
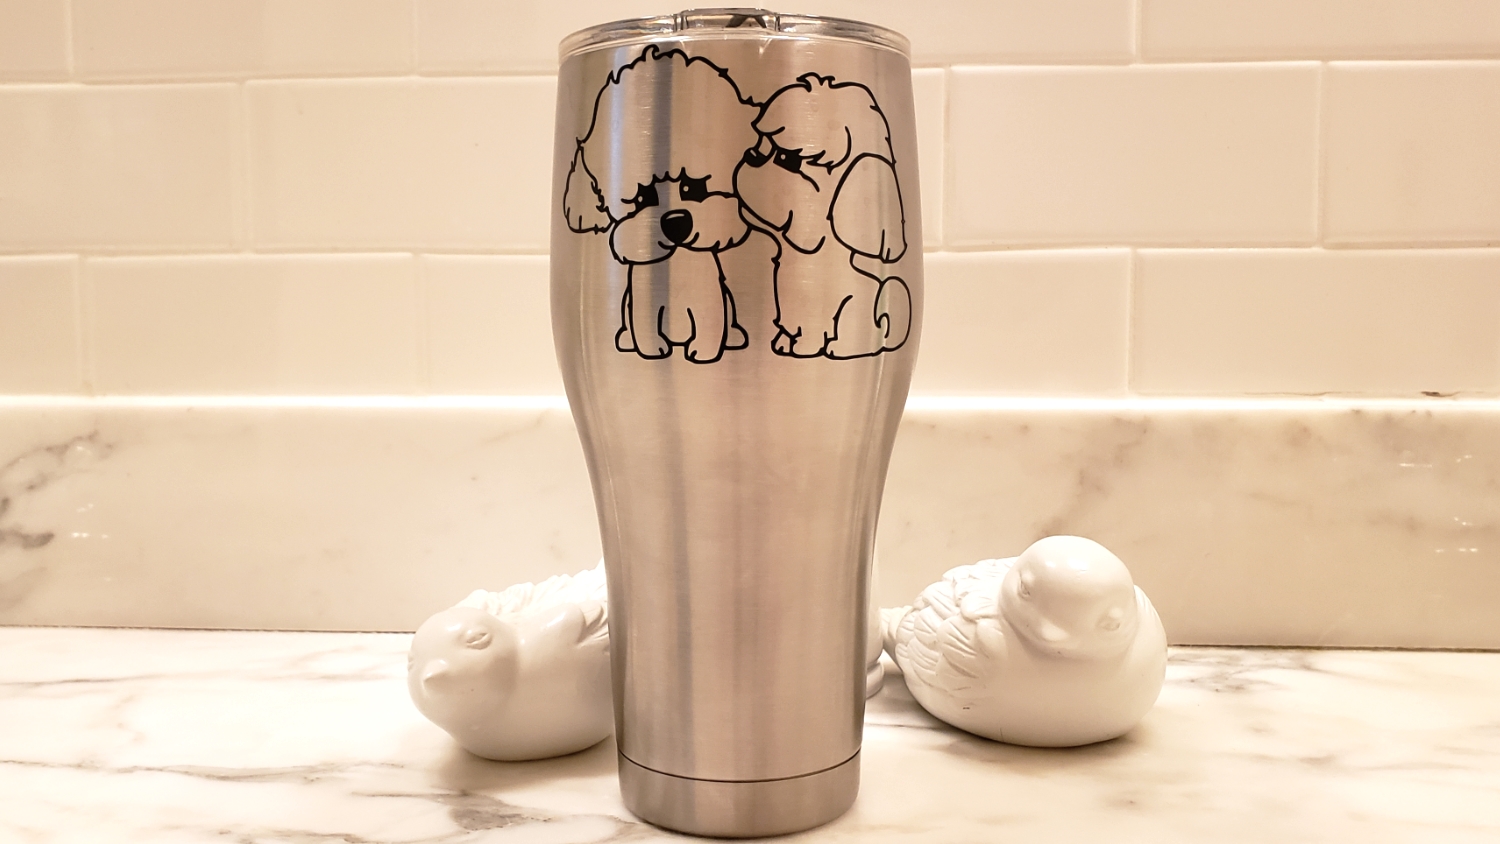
First off, Aric (the A of A&P) told me that their company was a small US based mom and pop company, so I knew I wanted to give their product a try and support them if I thought that they had a good product. Secondly, my hubby has a similar tumbler from a different company that he swears by but it is about $20 more (which I am unwilling to spend when the same funds could be used for crafting supplies – LOL). Third, I confirmed that I was free to provide whatever feedback and review; there were no strings attached to the free mug. Fourth (and lastly), I was able to personalize my tumbler with a vinyl decal of my sweet pups (this is also my CraftyPaws logo) using my Silhouette, and every time I see this I smile.
So long story short I agreed to do the trial and review, and I am so pleased to say that I love it! I use it for my daily morning vitamin drink and it has been wonderful to be able to keep this extra chilly all morning as I concentrate on my work or crafting. I have a couple of minor suggestions for improvement, and if you’re interested in the details of my experience and review please watch the video by CLICKING on the picture below:
Thanks for stopping by, and I hope you’re having a wonderful crafty day!
]]>
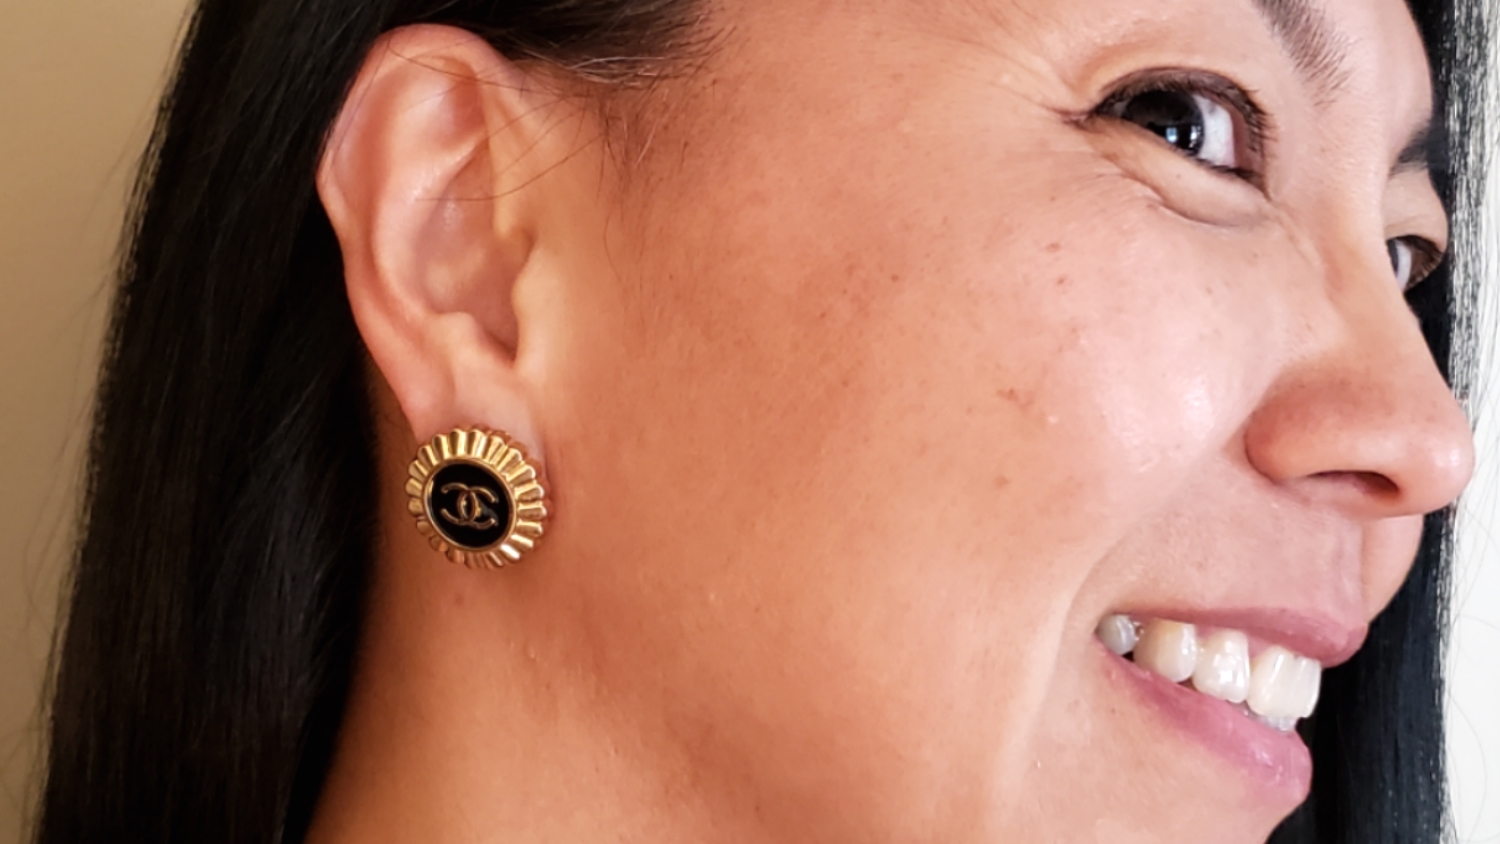
First I bought 2 black and gold sets of vintage buttons and a pair of silver bottle cap style buttons. I used wire cutters to cut off the shanks from the back of the buttons (please use gloves and protective eye wear in case small metal pieces fly), and where I couldn’t get low enough on the shank (the gold button shanks were very thick), I ground them down with a metal file.
Next I used some EnviroTex Jewelry Clay, completely mixing equal small amounts of A clay with B clay. Then I carefully inset the clay into the wells on the backs of the buttons. If your buttons are flat, you could skip this step completely, but mine had deep wells so I had to level the backs to the edges of the buttons. Have patience at this point: to fully cure, you need to leave this jewelry clay for 24 hours.
What I should have done next is paint the clay on the earring backs, but I jumped to attaching the Jewelry Shoppe 18K gold (nickel free) 8mm earring posts with E6000 glue. When that had fully dried after a couple of hours, I painted 2 coats of Artist’s Loft metallic acrylic paint — gold for the gold earrings and a mix of silver and white for the silver earrings.
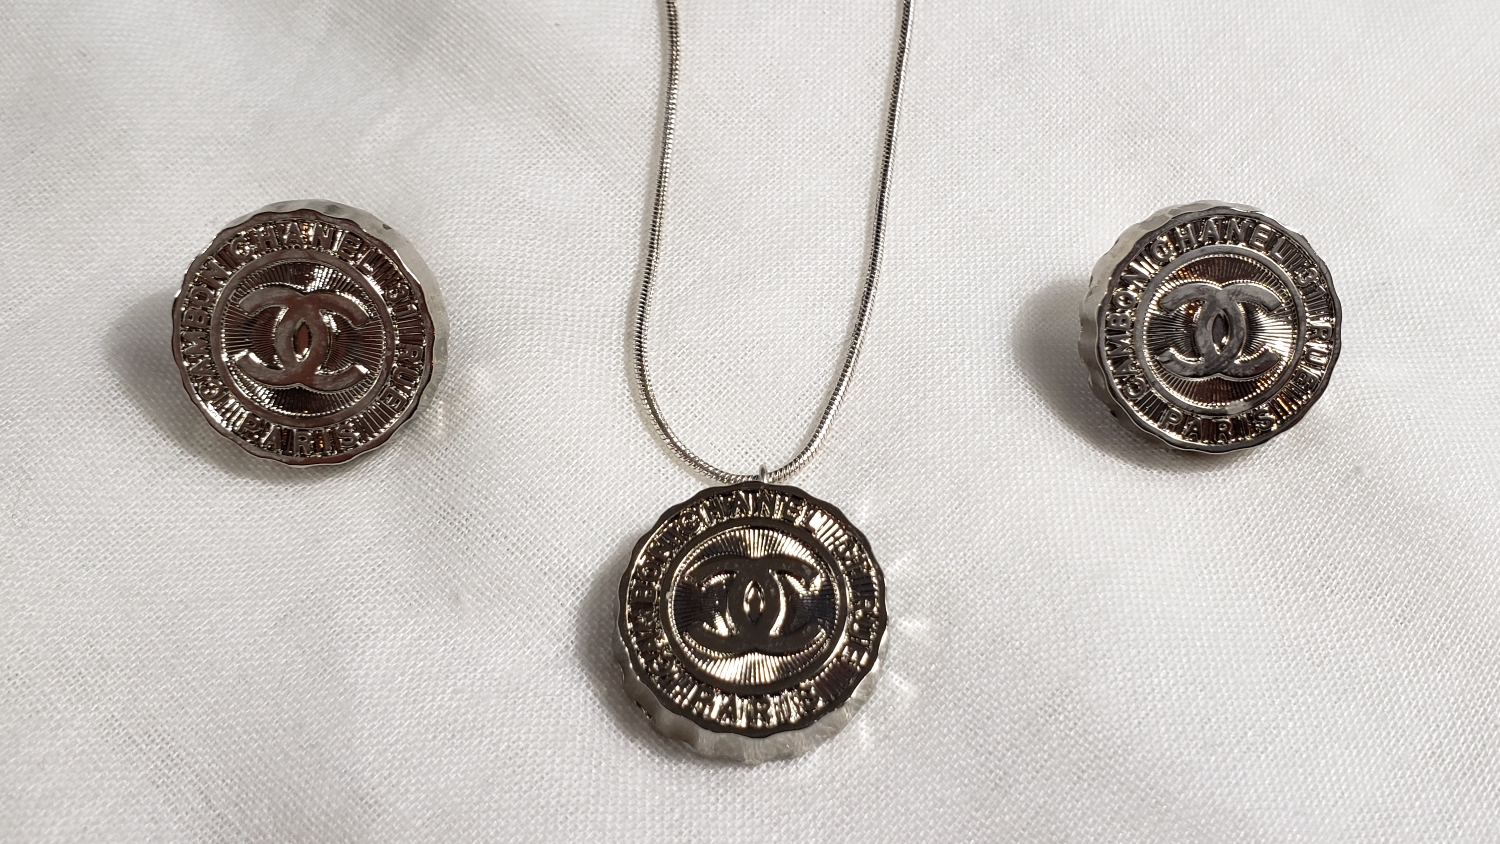
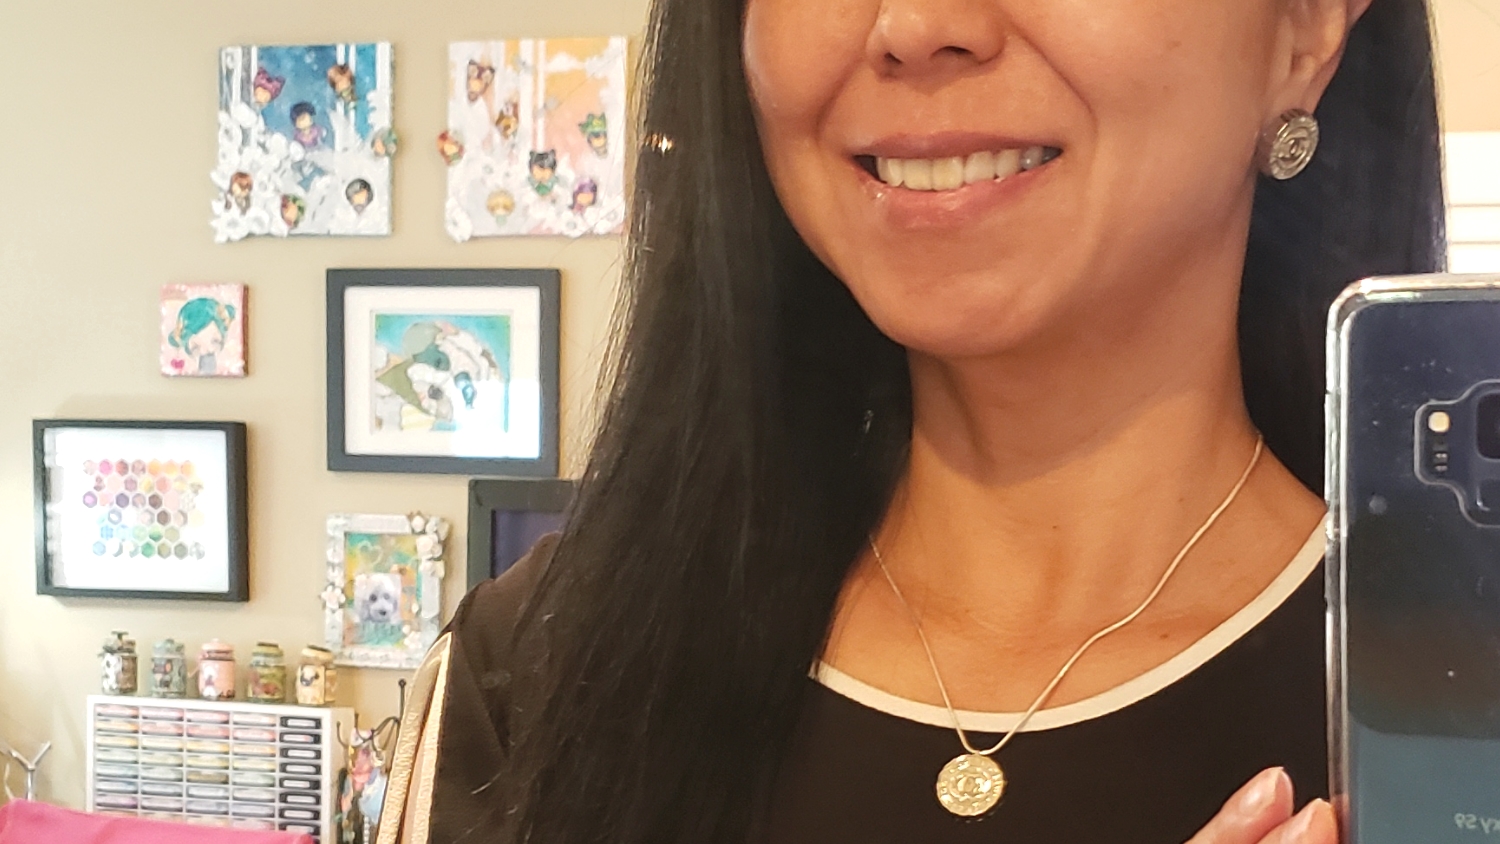
One of the eBay sellers actually sent me a bonus button so I also made a pendant necklace with that extra! To create this necklace pendant, I used flat and round pliers to create a eye loop pin from silver wire. Then, before the jewelry clay could fully dry, I inserted this eye loop pin into the soft clay, making sure it was centered at the top of the button design (the silver bottle cap designed buttons had a top and bottom). Again, after this clay fully cured, I painted the back with Artist’s Loft metallic silver and white acrylic paint and put a thin silver chain through the eye loop.
CLICK the picture below to watch the step by step process video of how I converted these Chanel buttons into authentic Chanel earrings:

Disclosure: Many of the supplies I’ve used for today’s project are linked. Some may be affiliate links, which means if you make a purchase I receive a small commission at no extra cost to you. I truly appreciate your support toward the costs of running this blog!
These Chanel earrings are being entered into the following challenges:
Simon Says Stamp Wednesday Anything Goes Challenge
Word Art Wednesday Anything Goes Challenge
Through the Craft Room Door Anything Goes Challenge
Crafts Galore Encore Anything Goes Challenge
Crafter’s Castle Anything Goes with Optional Use Glitter
]]>
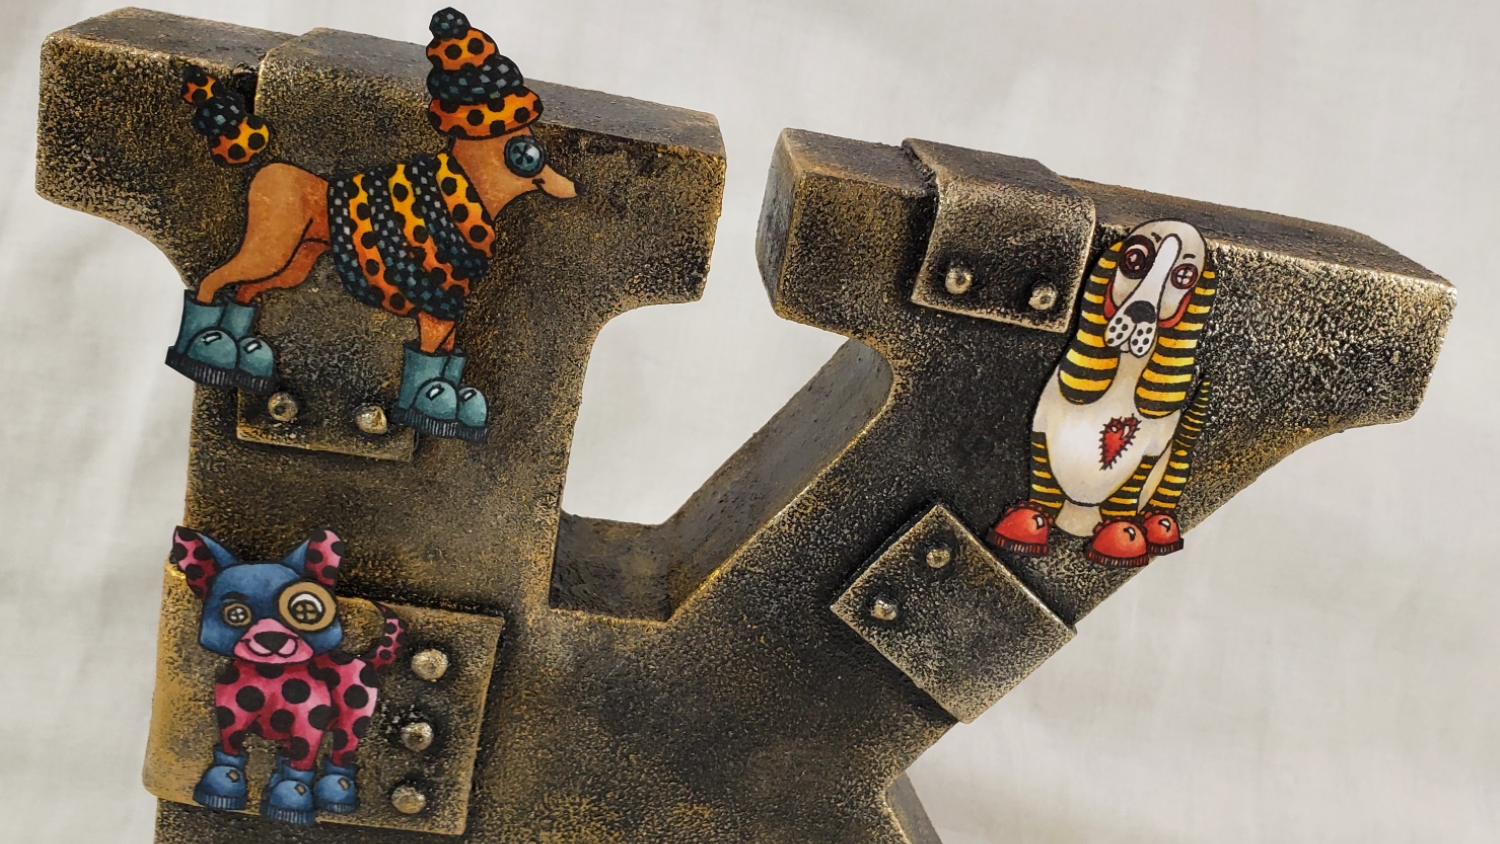
I had purchased a white wooden K in the clearance section of TJ Maxx about 4 years ago for $2. It was pretty beaten up, but I felt confident that I could revitalize it and make it my own. Then as other projects rose up on my crafting to-do/try list, the K got buried in my craft closet. So with small bursts of energy that seemed to work perfectly with needed drying times, I tackled this project — finally!
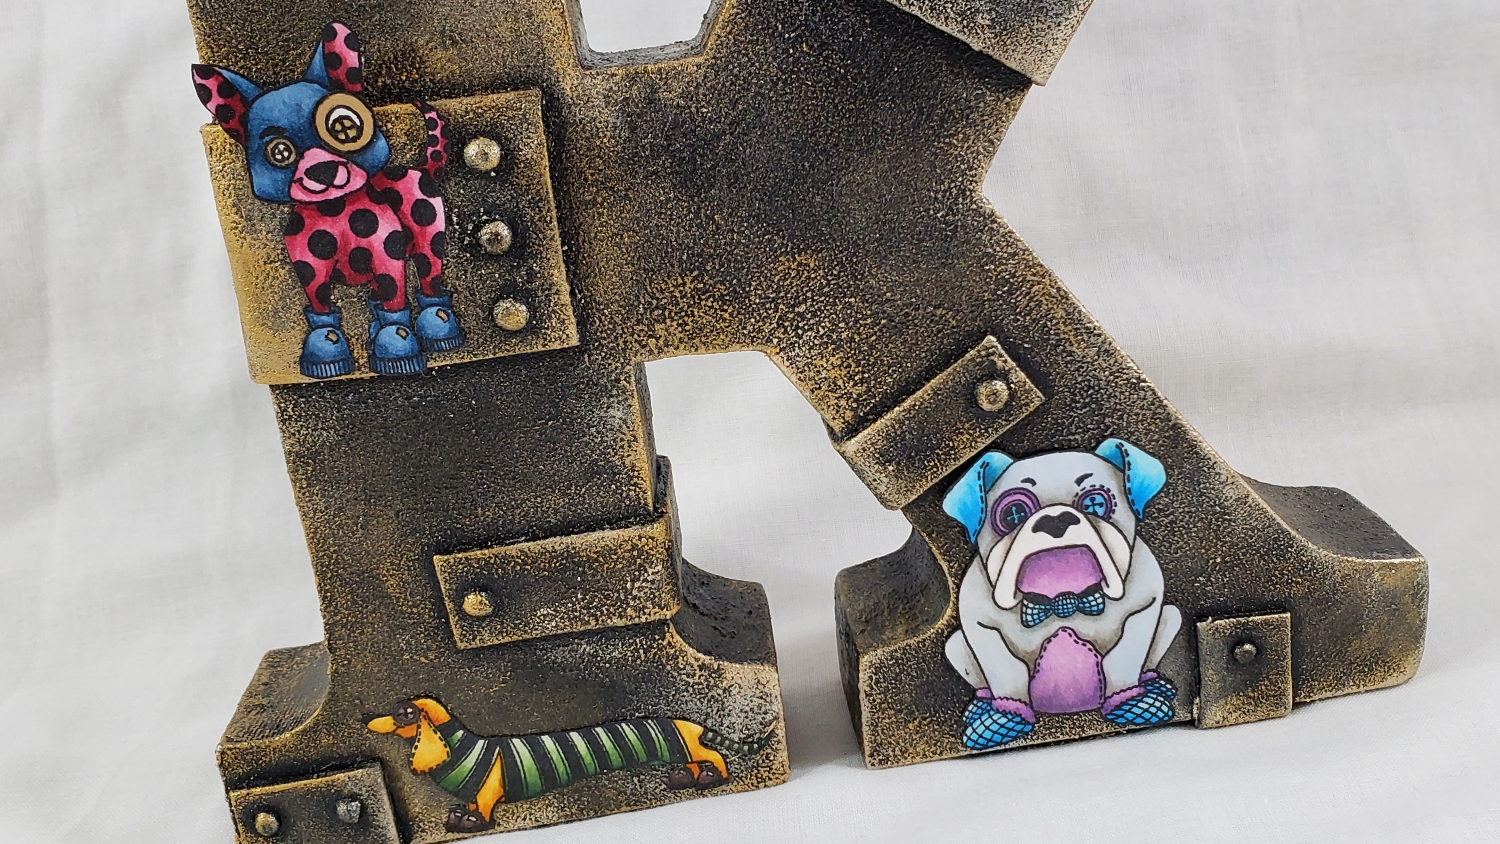
1. I cut strips of fun foam and hot glued them using my new Bojecher Glue Gun onto the K to form what I hoped would look like metal welded sheets.
2. I next used the hot glue gun to form little dots on the ends of the strips to form what I hoped would end up looking like rivets — to do both sides of the K I had to wait for the first side to dry to a full hardened cure.
3. I used a stiff stencil brush and DecoArt Media Modeling Paste in Black to not only seal the foam and wood, but also add some rough texture — again there was dry time of a couple of hours, especially where I had added thicker texture.
4. Because modeling paste did not fully cover the white of the wood, I next painted the whole thing with Artist’s Loft Metallic Black Acrylic Paint — more drying time, but pretty quick.
5. Lastly I had fun getting my fingers dirty with DecoArt Metallic Lustre in the colors Gold Rush and Champagne Ice. I first applied the Gold Rush to all the edges of the K, the rivets, and the strips, and it was like magic the way that shimmer made these odd materials look like metal. Then I did a light coating of the silvery Champagne Ice, over top of the gold and over more of the flat surfaces of the K, and this aged the K beautifully.
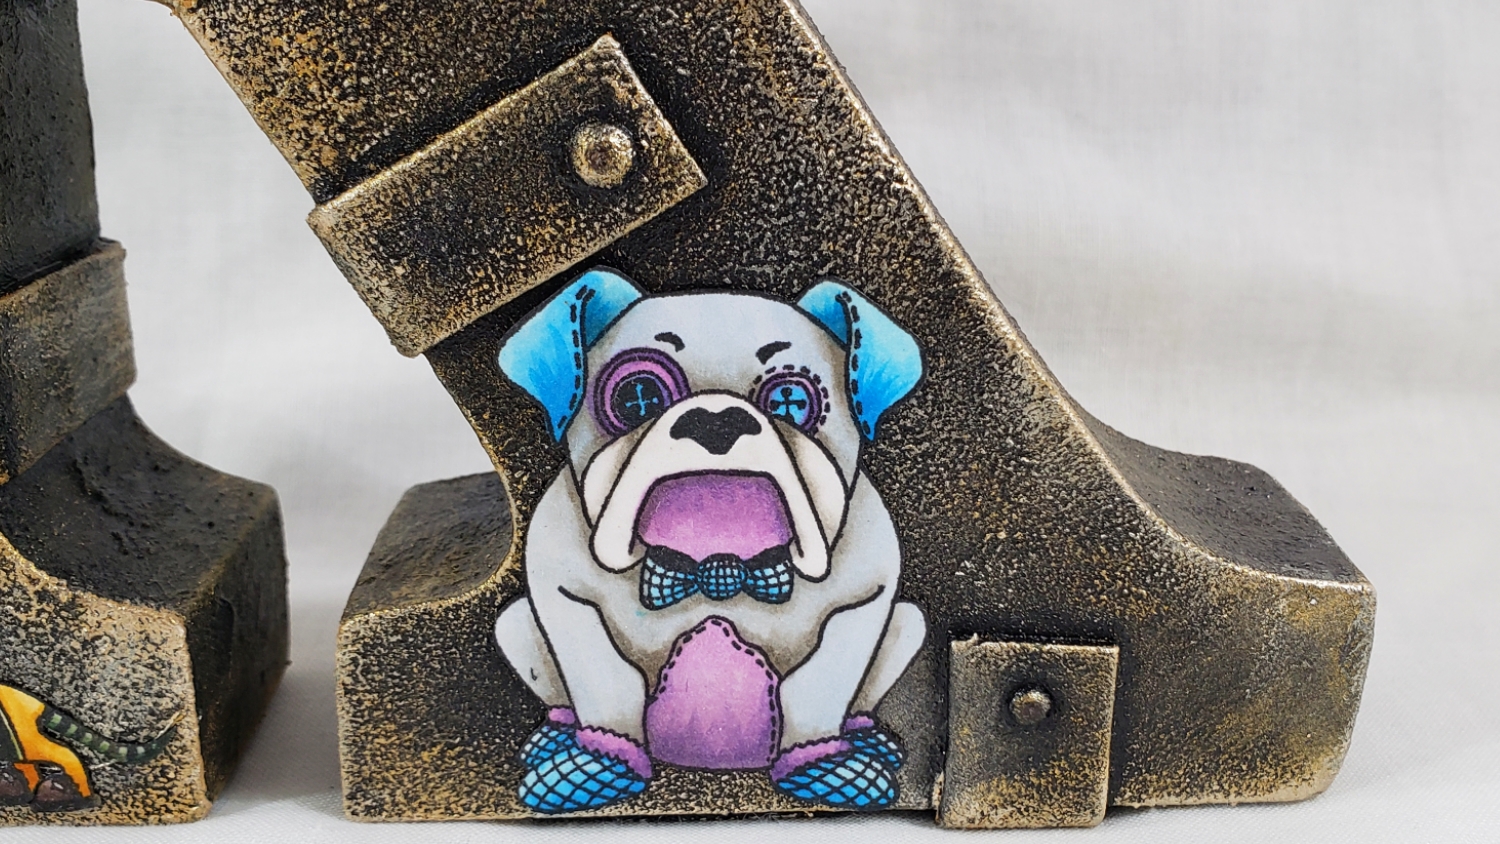
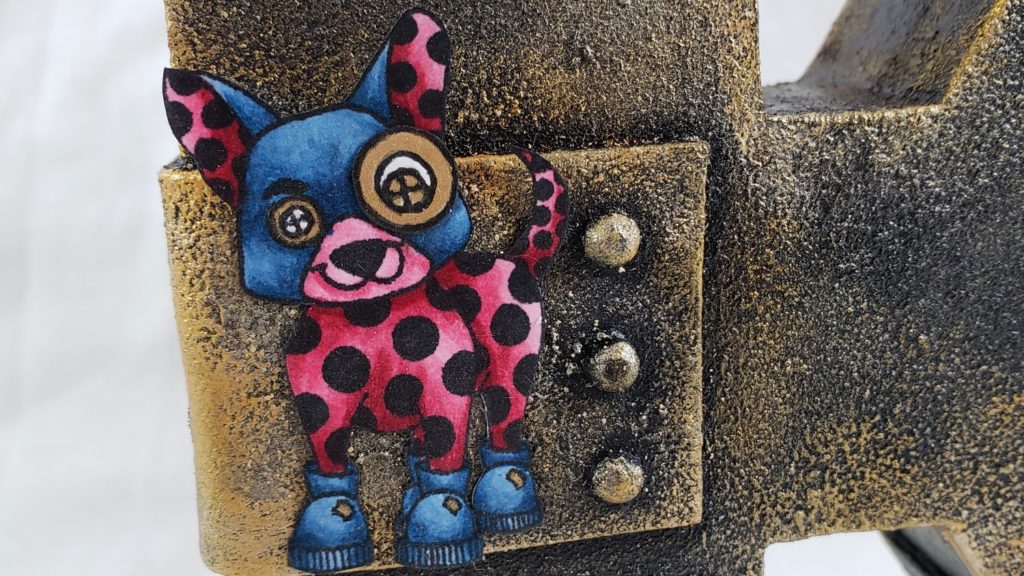
I could have stopped here, but I like Cutsie mixed with my Steampunk, so I pulled out those adorable TINY Dylusions Puppy Dog Tails images that I had Copic colored last month. I first coated them with a coat of Liquitex Matte Medium to protect the images and strengthen the paper. Then I futzed with them on the K until I found what I thought were the perfect placement of each pup. I really like this new addition to my craft room decor and I am sooooo happy to have that K finally transformed from trash to treasure!
The following is a video of the various steps to create this Cutsie Steampunk project:
Disclosure: Many of the supplies I’ve used for today’s project are linked. Some may be affiliate links, which means if you make a purchase I receive a small commission at no extra cost to you. I truly appreciate your support toward the costs of running this blog!
This altered letter is being entered into the following challenges:
SanDee and Amelia’s Anything Goes Steampunk/Industrial Challenge
Lil Patch of Crafty Friends Anything Goes Challenge
Through the Craft Room Door Anything Goes Challenge
Crafts Galore Encore Anything Goes Challenge
Word Art Wednesday Anything Goes Challenge
Simon Says Stamp Monday Tiny Things Challenge
Simon Says Stamp Wednesday Cute Challenge
Crafter’s Castle Anything Goes with Optional Add Glitter Challenge

We had an amazing time and were blown away by the unique visions the artist shared through various paper and ink, sculpture, and lighting immersive installations.

From the numerous pictures we took, one particularly spoke to me. It was an unassuming black and white polka dot wall at the end, and on a whim I asked my parents to pose in front of it. The resultant picture was wonderful and I knew immediately I wanted to frame it for them. I enlarged it to 16″ x 20″ (~$10 with a 40% off coupon at CVS) and then cut it down to about 13.5″ square. I scored and folded up the edges at 0.75″ from each side. Then I cut a triangle from each corner and secured each side together to form a shallow box (how-to the video posted HERE starting at 7:53).
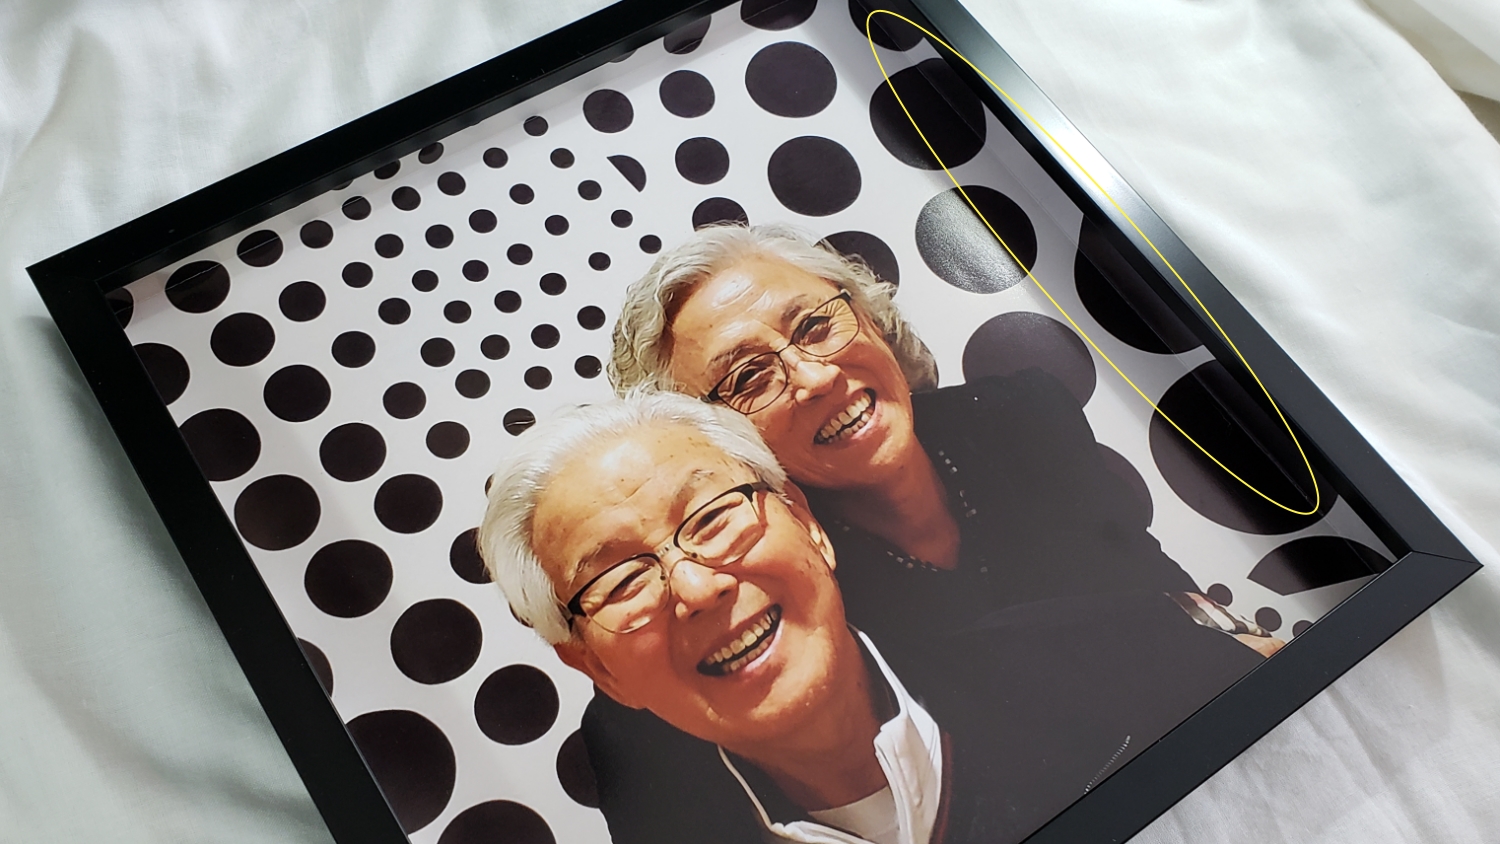
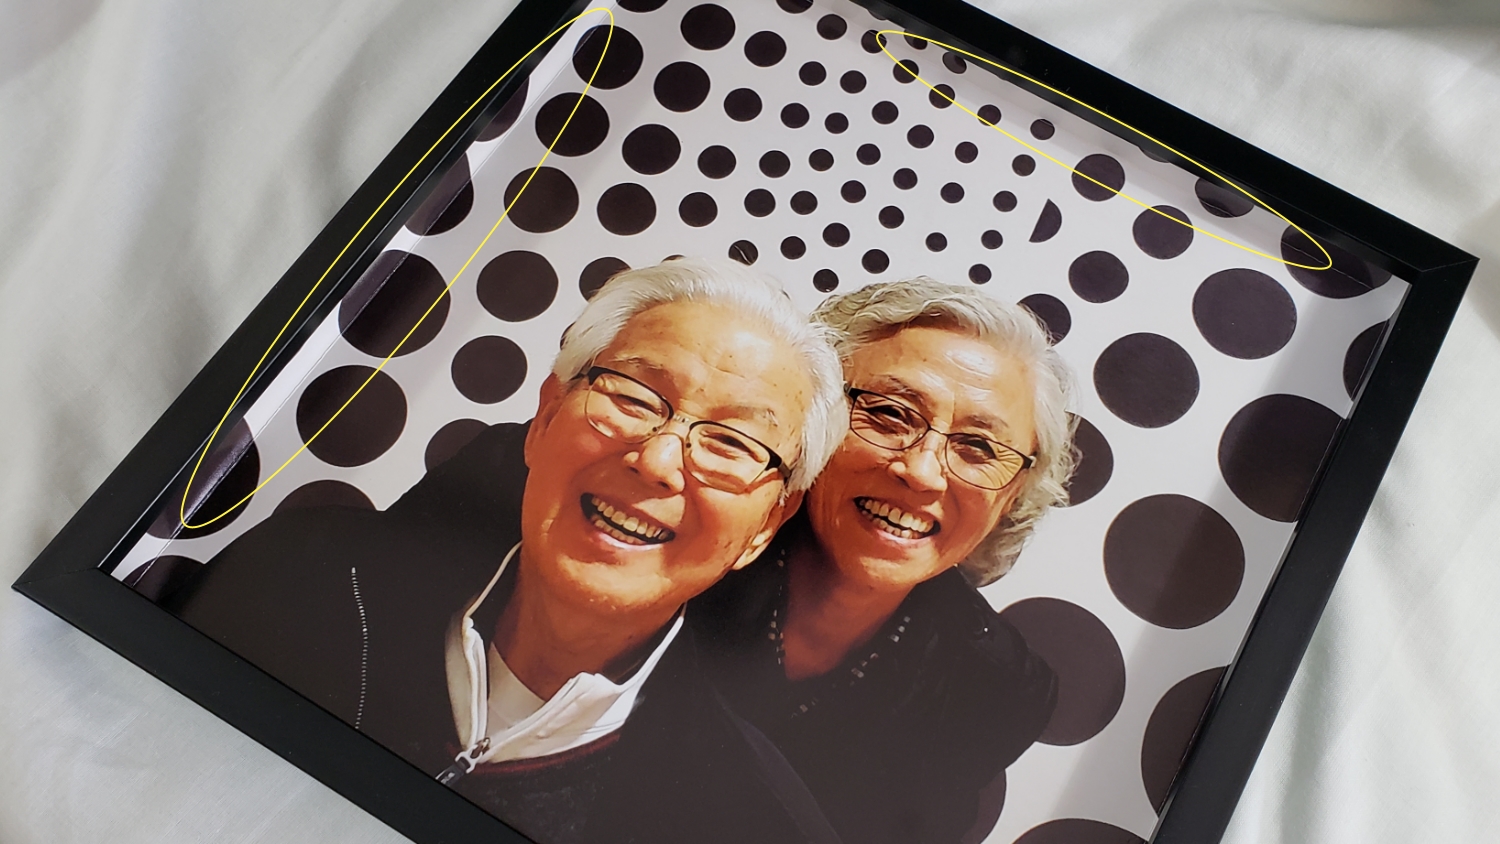
This fit perfectly in the 12″ x 12″ Studio Decor Shadow Box Frame I purchased at Michaels. I love the way this slight bit of paper crafting makes the picture fill the shadow box and makes it look like this project captures a kind of excerpt from the whole room (see images above with circle marking the turned up edges).

I’m having lunch and then doing a virtual reality gaming session with them tomorrow, and I can’t wait to gift this shadowbox picture project as well as the prior mixed media layouts (HERE) to my parents. I hope they love them as much as I loved creating them!
]]>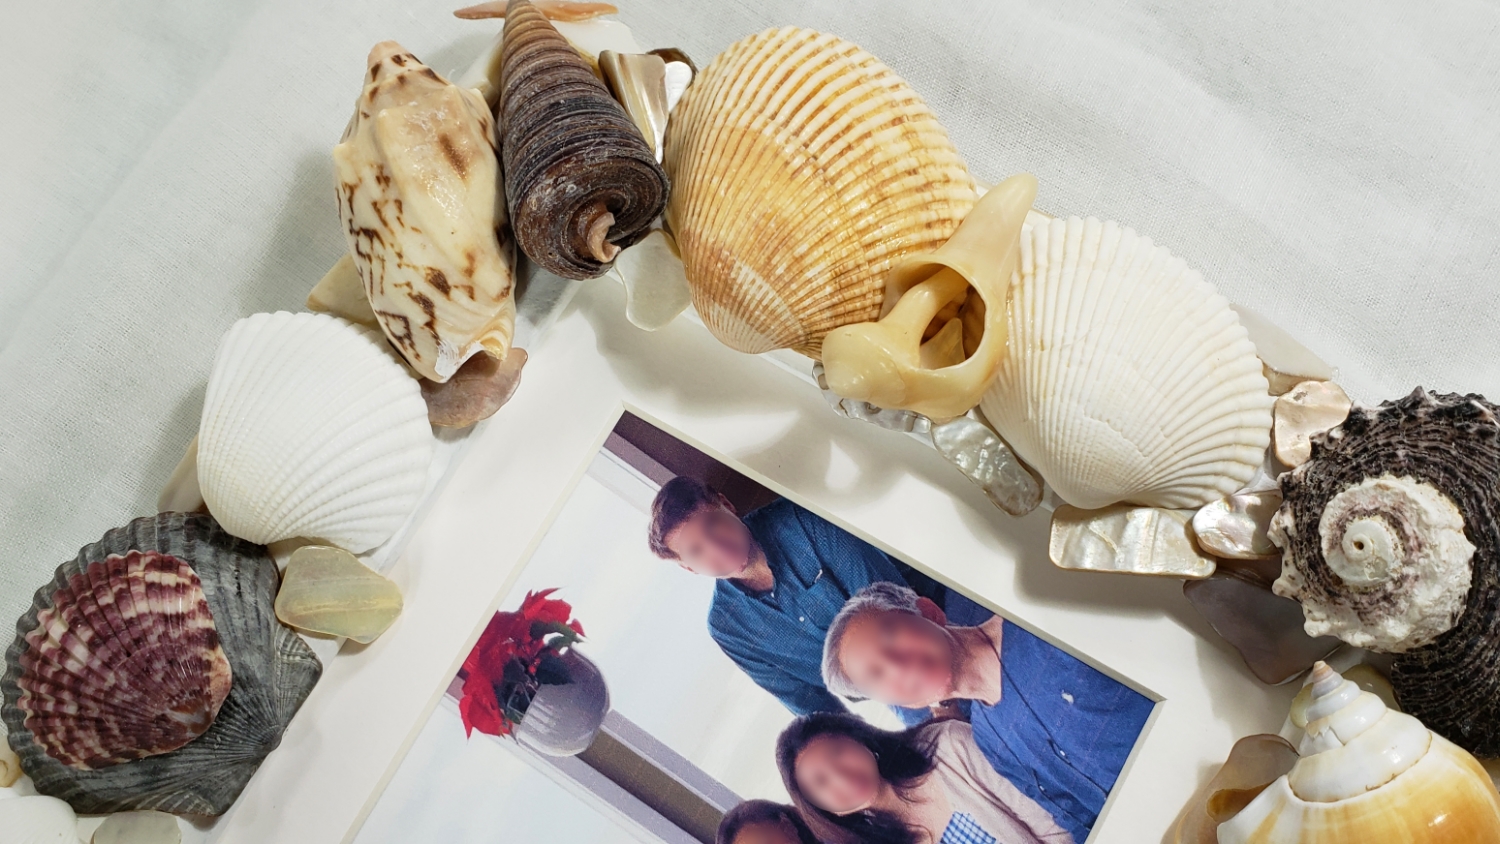
From our many walks along the beach, we picked up lots of beautiful seashells, and when I got home I knew I wanted to try something new and craft a special keepsake frame with them for my parents. Using a spare IKEA frame, I prepped the base with some Liquitex Gesso and white acrylic paint. Then after spending some ridiculously long futzing time with the collected shells (and some supplemental craft shells from the Dollar Tree), I designed what I think turned out to be a wonderful, meaningful gift.
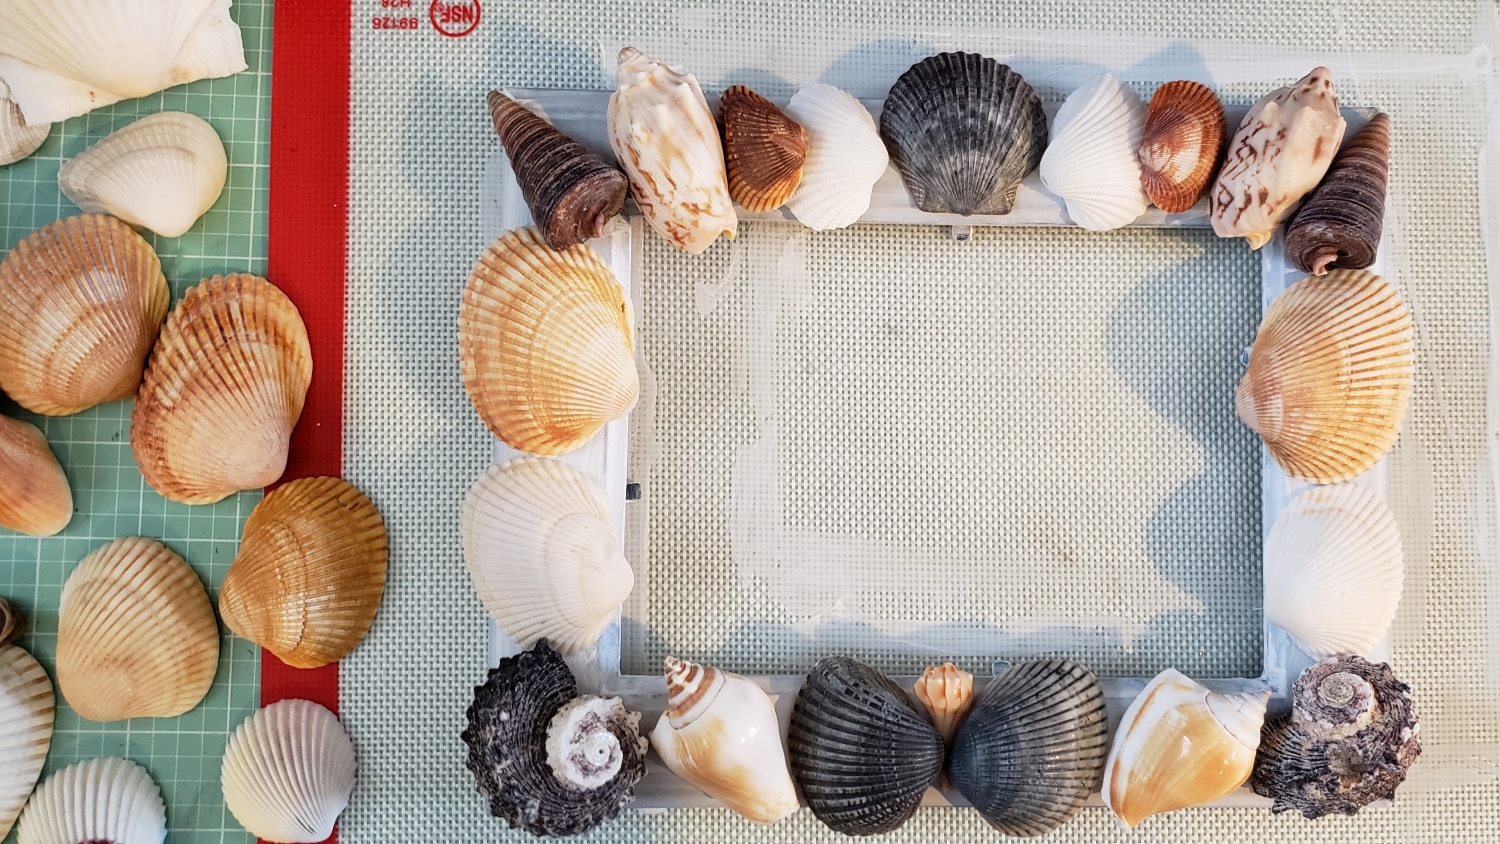
I tried various arrangements for the shells. Mostly I wanted the shells on the left and right sides of the frame to be mirror images of each other. I also wanted the biggest, roughest and dark shells in the four corners, largest on the bottom to visually weight the frame properly. Finally, I added a few unique shells from our beach combing adventures into prominent positions on the frame without regard for symmetry to highlight these special shells (each one has a little discovery story). When I was satisfied with the look, I used E6000 glue (this stuff is super strong but takes 24 hours to fully cure) to secure each piece in place.
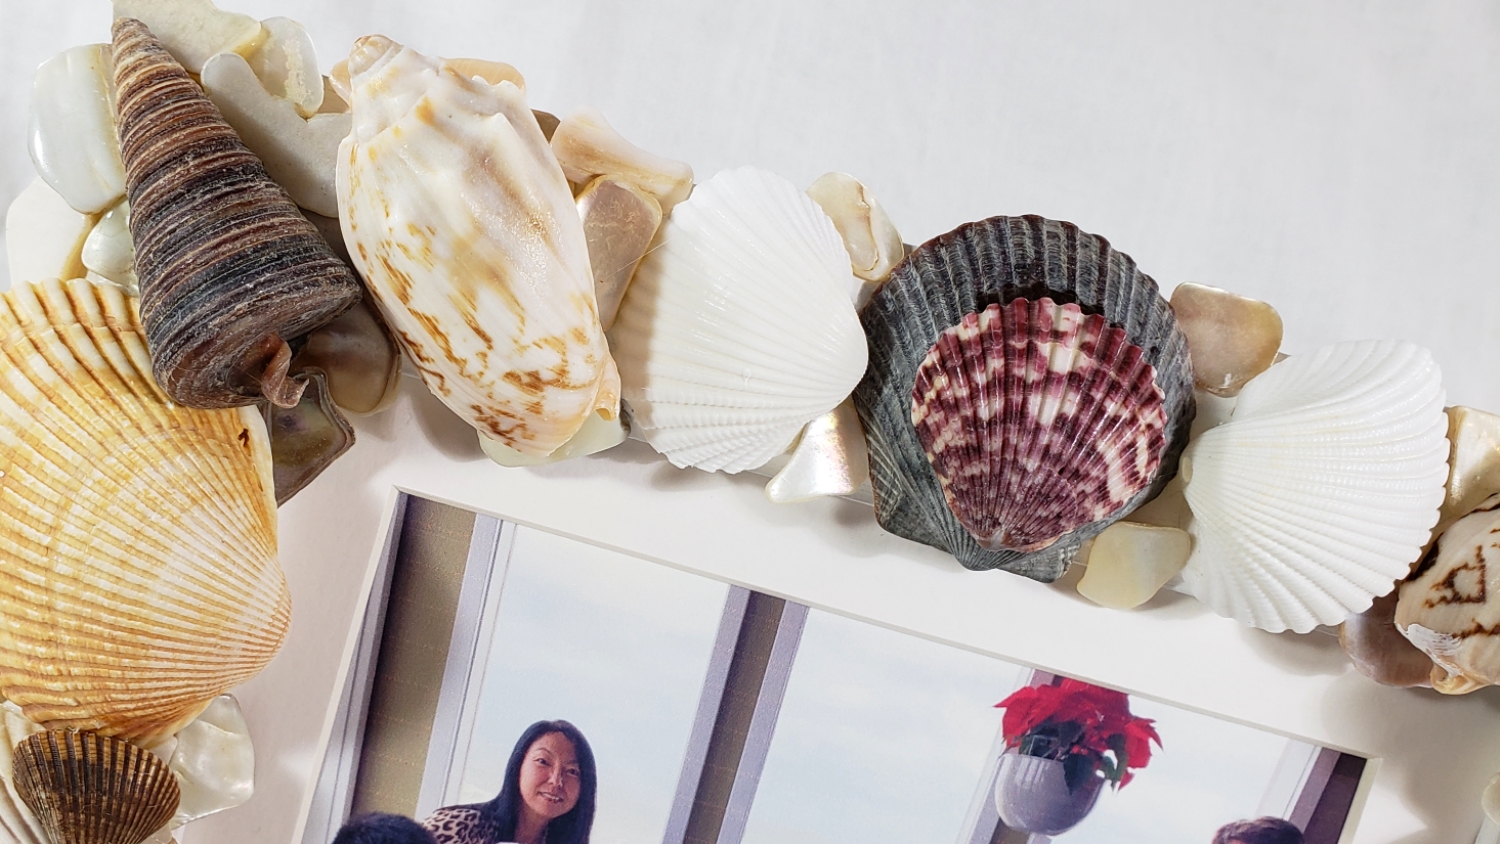
Then to fill in the gaps between the shells, I used crushed pearlized shell pieces that are sold as vase fillers. The resultant very heavy, luxe and naturally elegant frame went perfectly with the family picture we took at our Christmas lunch at The Reef Restaurant. I just gifted this to my parents (today is 3 days after our return home from this vacation), and they both got teary eyed and seemed to really be moved. While this is a small, inexpensive new year’s gift, it truly comes from the heart, and their reaction showed me that it was what they wanted more than any of the extravagant gifts we gave them for Christmas.
The following is a process video of crafting this seashell frame:
This keepsake frame is being entered into the following challenges:
Simon Says Stamp Wednesday Something New Challenge
Word Art Wednesday Anything Goes Challenge
Creatalicious Anything Goes with Optional Something New Challenge
Simon Says Stamp Work it Wednesday Try Something New Challenge
Lil Patch of Crafty Friends Anything Goes Challenge
ABC Christmas Challenge – A is for Anything Christmas Goes
Through the Craft Room Door Anything Goes Challenge
Crafts Galore Encore Anything Goes Challenge
The Corrosive Challenge Anything Goes
]]>
To create this wreath, I used a pot lid to trace a large circle on some foam core board and then used an X-Acto blade to cut it out. Then I found the center of the circle and used a ruler with a hole at one end to trace a smaller circle, using the ruler as a kind of jerry-rigged compass. I cut out this smaller concentric circle to create the wreath base.
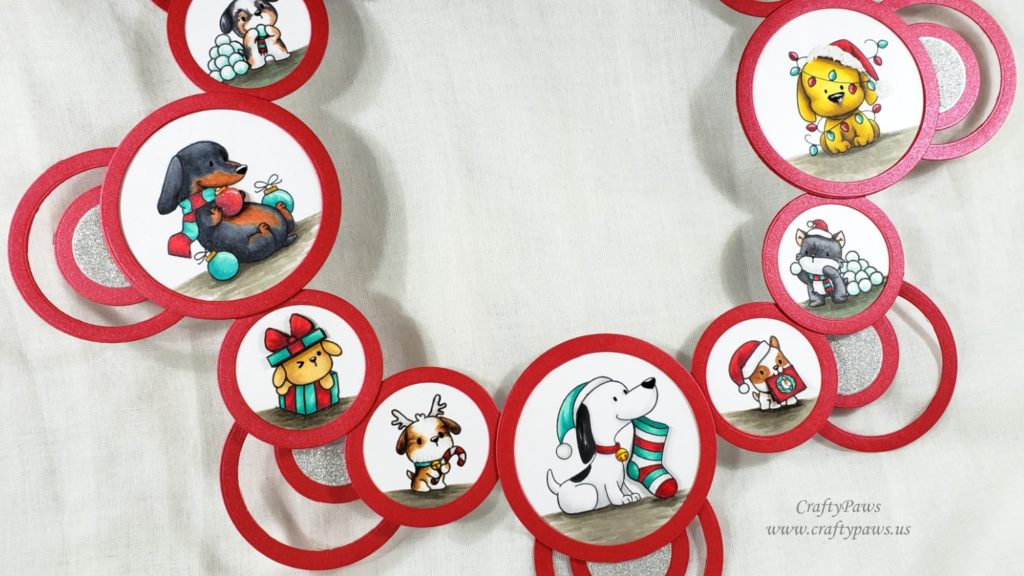
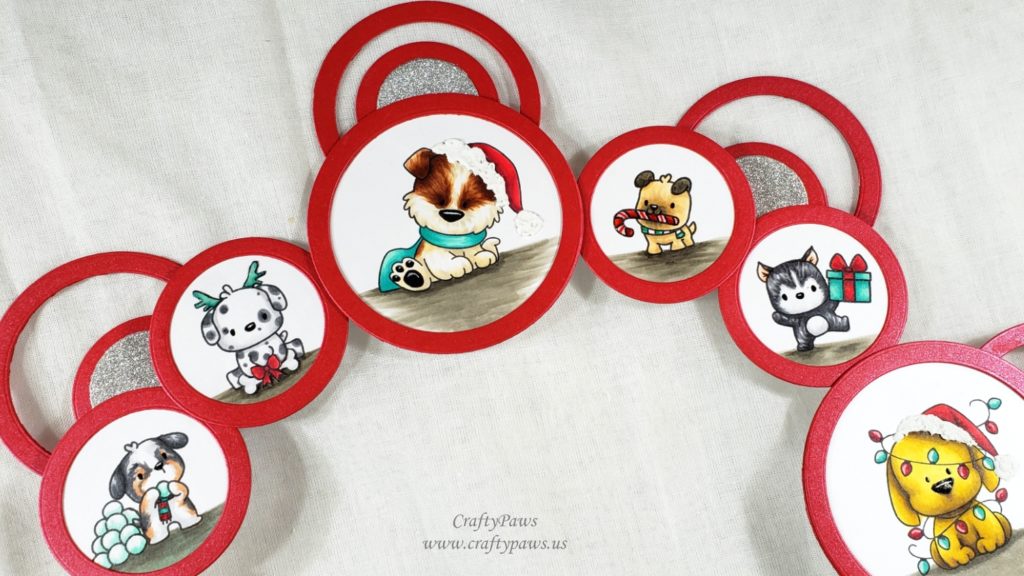
Then it was a matter of deciding where to position each Copic colored and framed puppy. When I had done a LOT of futzing, I glued all the puppies into place, the larger ones at the 12, 3, 6 and 9 o’clock positions and the smaller ones at the 1, 2, 4, 5, 7, 8, 10 and 11 o’clock positions. Spacing was a little tricky, but using my favorite Art Glitter Glue and Fine Tip Nozzle really helped with a little bit of wriggle room in the drying time.
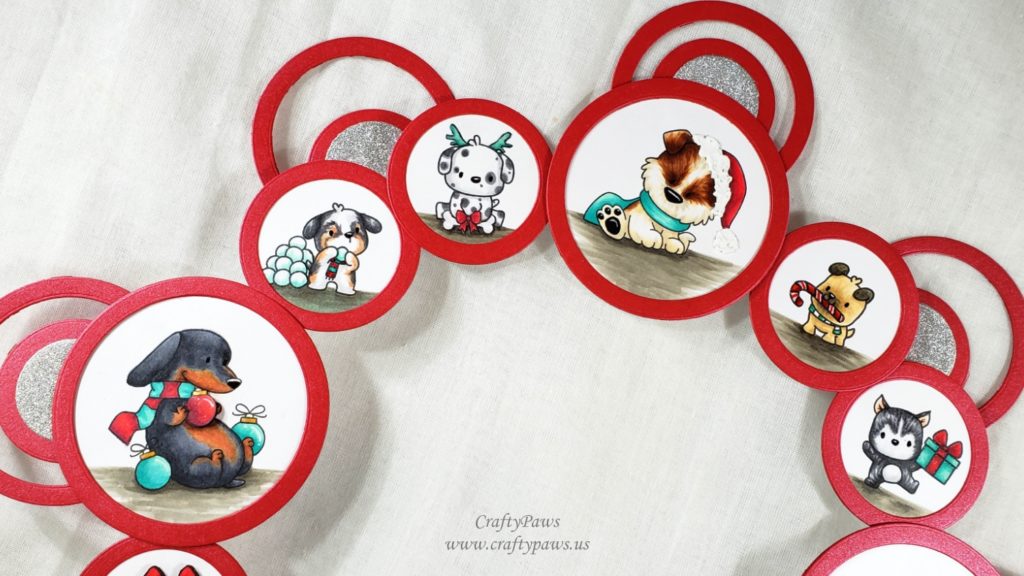
Lastly, I decided to add some extra embellishments with all the die cut red circles and rings that I had left over after cutting out all those frames for the puppy images. I had just enough to completely add an extra layer around the wreath of circles and circles with rings around the base wreath. To add a little sparkle, I used the 3rd largest circle from the Diemond Dies Die-Normous Stack-Ems Circle Nesting Die Set on some silver glitter card stock to add a sparkly center to all the red circles.
CLICK on the picture below link to watch the whole wreath making process tutorial:
Disclosure: Many of the supplies I’ve used for today’s project are linked. Some may be affiliate links, which means if you make a purchase I receive a small commission at no extra cost to you. I truly appreciate your support toward the costs of running this blog!
This Christmas puppy wreath is being entered into the following challenges:
Word Art Wednesday Anything Goes Challenge
Simon Says Stamp Monday Party Time Challenge
Simon Says Stamps Work it Wednesday Try Something New Challenge
Card Mania Christmas Challenge
Lil Patch of Crafty Friends Anything Goes Challenge
Fab ‘n’ Funky Cute Christmas Challenge – WINNER
ABC Christmas Y – favorite (dogs) and Z – zero embellishments Challenge – WINNER
Simon Says Stamp Wednesday Party Time Challenge
Stamping Sensations Winter Sparkle Challenge
Crafty Gals Corner Anything Goes Challenge – WINNER
And CLICK the photo below to watch the video of the drawing using YouTube random comment picker:
Congratulations to Yvette (YT: DaileyScrapper); Monique Gonzalez; and Rosa (YT: Sun-and-Moon Arts)!
]]> I just couldn’t face dealing with all those memories so rather than following the tradition of getting our tree after Thanksgiving, Mr. CraftyPaws and I decided that we would keep the holiday decor simple this year and perhaps just hang a couple of wreaths. So I picked up a simple live wreath for $8 at Walmart (this was even cheaper than the $10 live wreaths at Trader Joe’s, but I might go pick one of those up since I think they’re made of Boxwood).
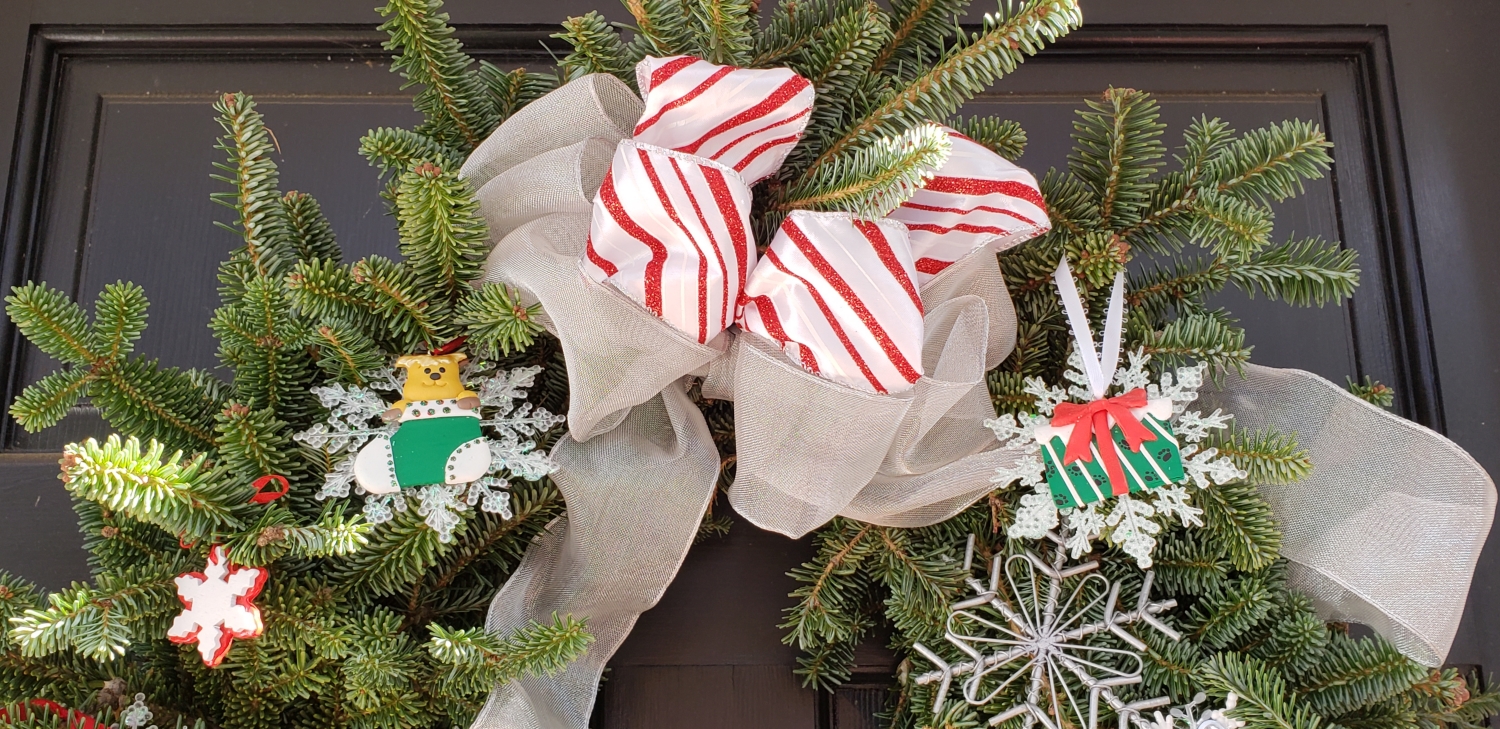
First I had to take off the cheap plastic/faux velvet bow, and made a triple loop bow from silver metal mesh wired ribbon and a double loop red and white sparkly satin wired ribbon that I secured to the top of the wreath with twist ties. Then I dragged out my Rubbermaid container where I had stashed post-holiday clearance buys from Michaels’ $2 grab bags (yes, these are from before they raised the prices to $3 and then $4) and the Dollar Tree years ago.
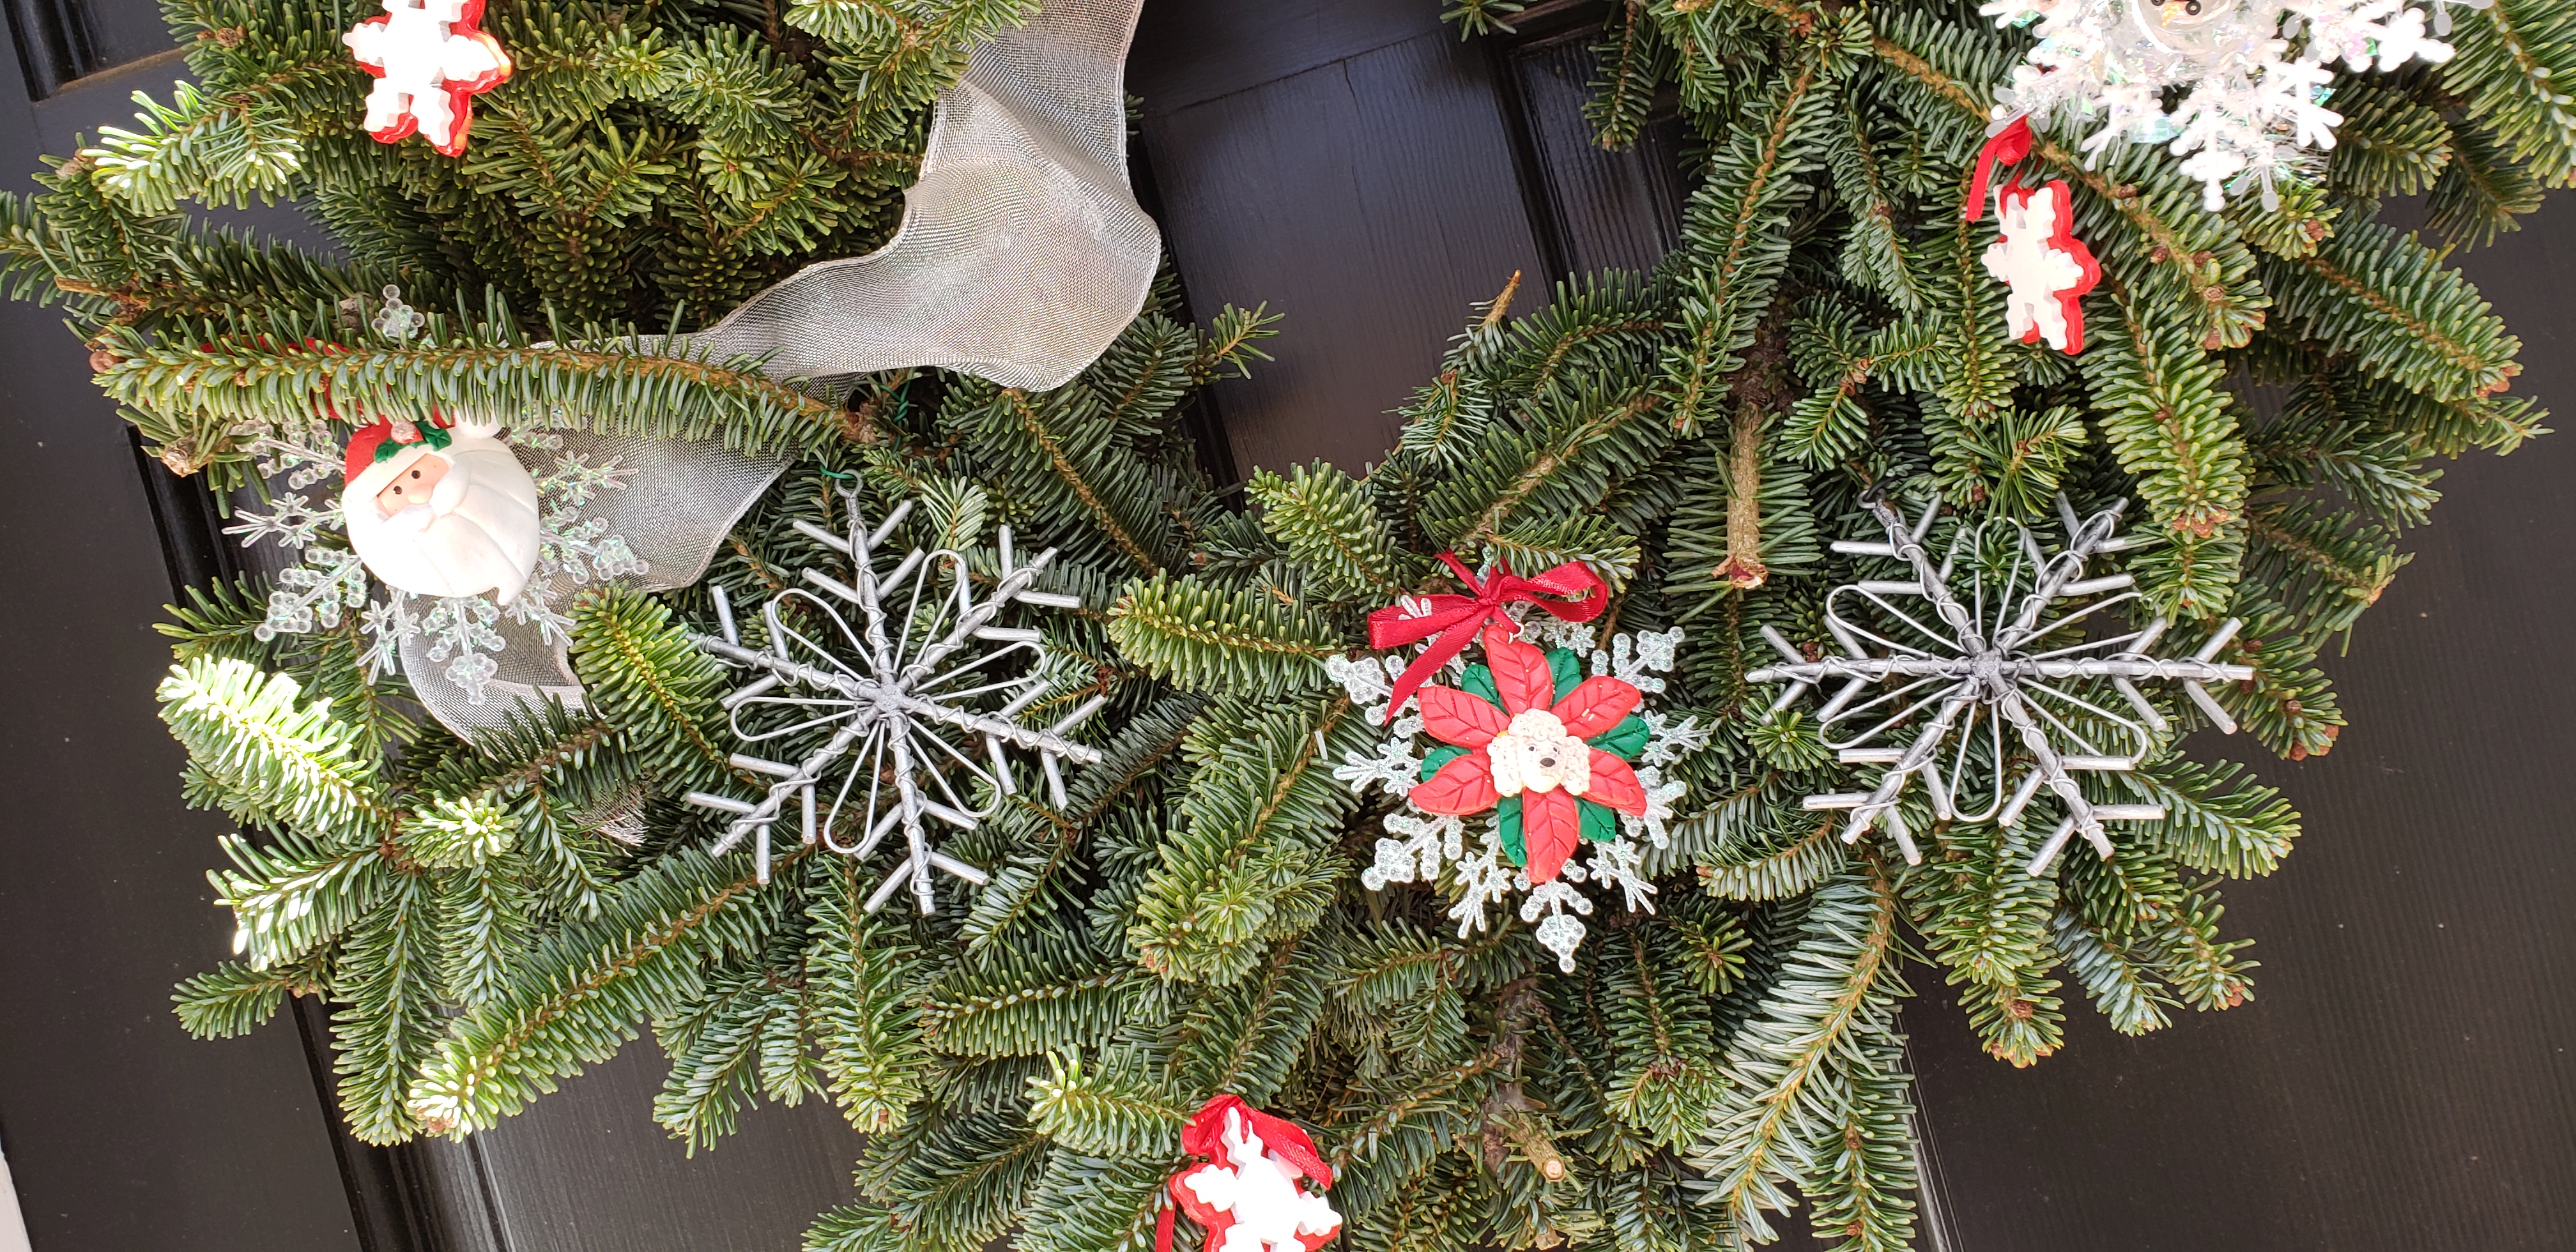
I tried to keep the same types of decorations in odd numbers for a pleasing look and started by tying on 3 small red and white wooden snowflake ornaments and 3 rough metal and wire snowflakes; these were the old Michaels pick-ups. Then I re-discovered some shimmery plastic snowflakes with clay embellishments layered on them that I had put together from the Dollar Tree. One of them had a little apricot poodle head at the center of a poinsettia flower, but somehow it seemed right to have this little reminder of Biscuit front and center on the wreath.
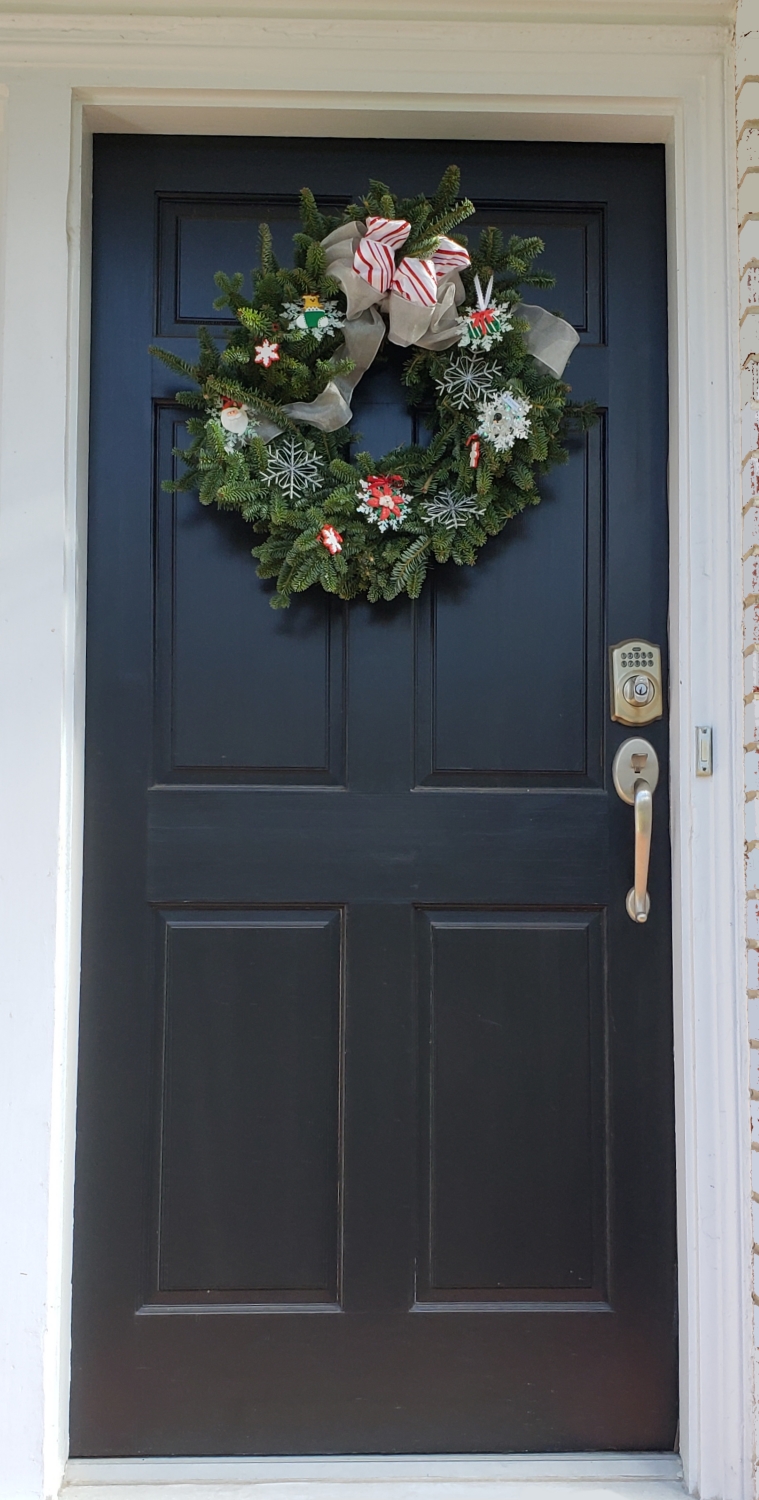
This last picture is how the wreath looks hanging on our front door. I am pleased with the simple, layered homespun look. It’s personal but it wasn’t emotionally taxing for me to craft. In fact, it was enjoyable enough that I am considering doing another one for our side kitchen door! I love how warm and welcoming it looks when folks approach our home from the cold outside.
This wreath is being entered into the following challenges:
Simon Says Stamp Wednesday Baby It’s Cold Outside Challenge
Word Art Wednesday Anything Goes Challenge
Creatalicious Anything Goes with Optional Layer It Up Challenge
Lil Patch of Crafty Friends Anything Goes Challenge
Fab ‘n’ Funky Christmas Challenge
Just Keep On Creating Anything Goes Challenge
613 Avenue Create Anything Goes with Optional Winter/Christmas Challenge
Crafts Galore Encore Anything Goes Challenge
The Corrosive Challenge Anything Goes
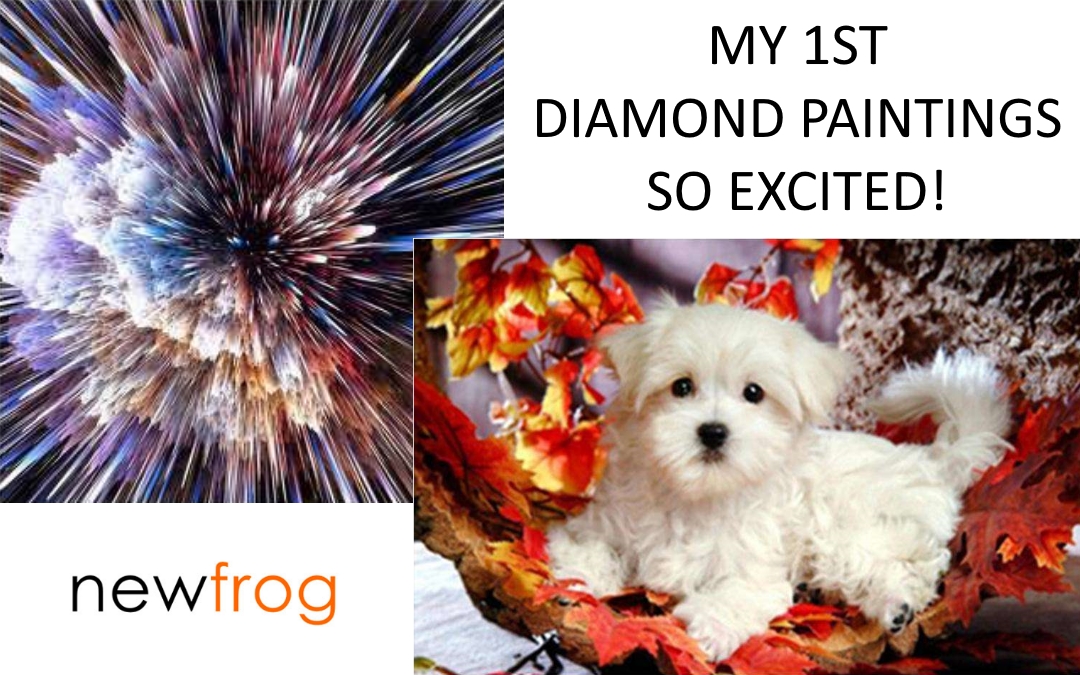
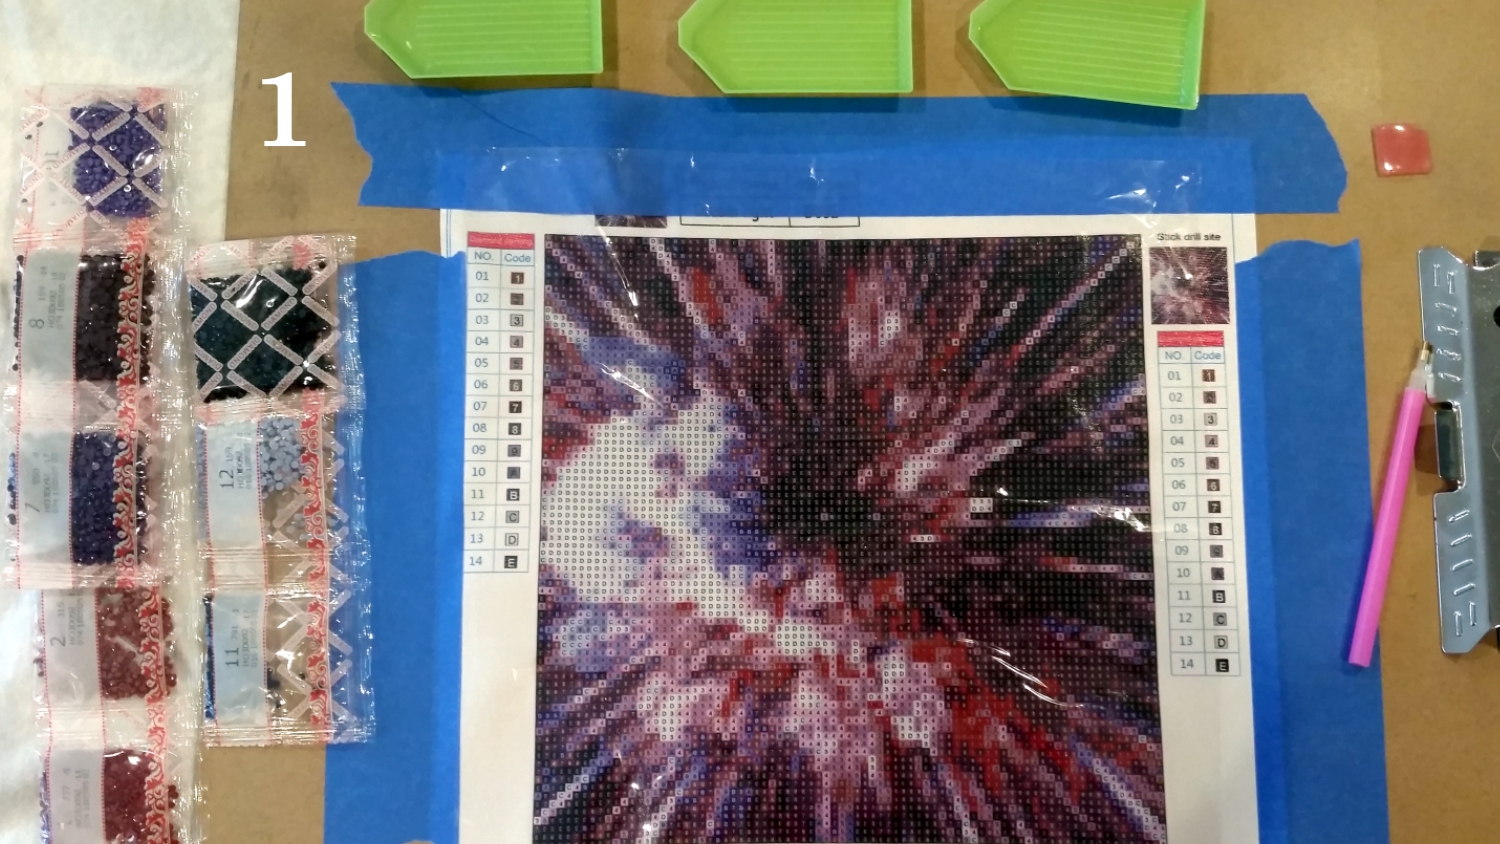
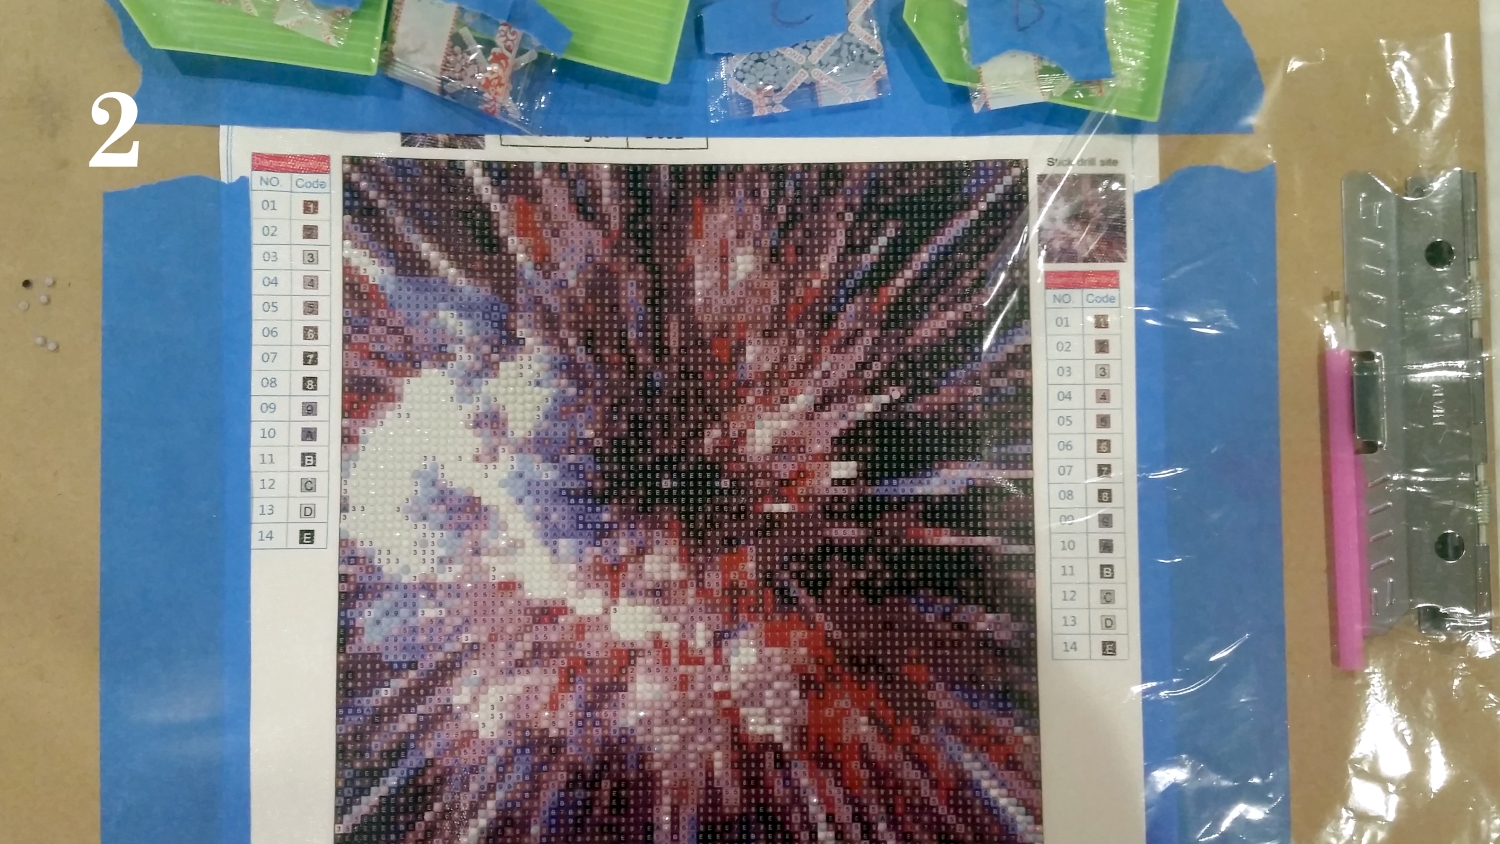
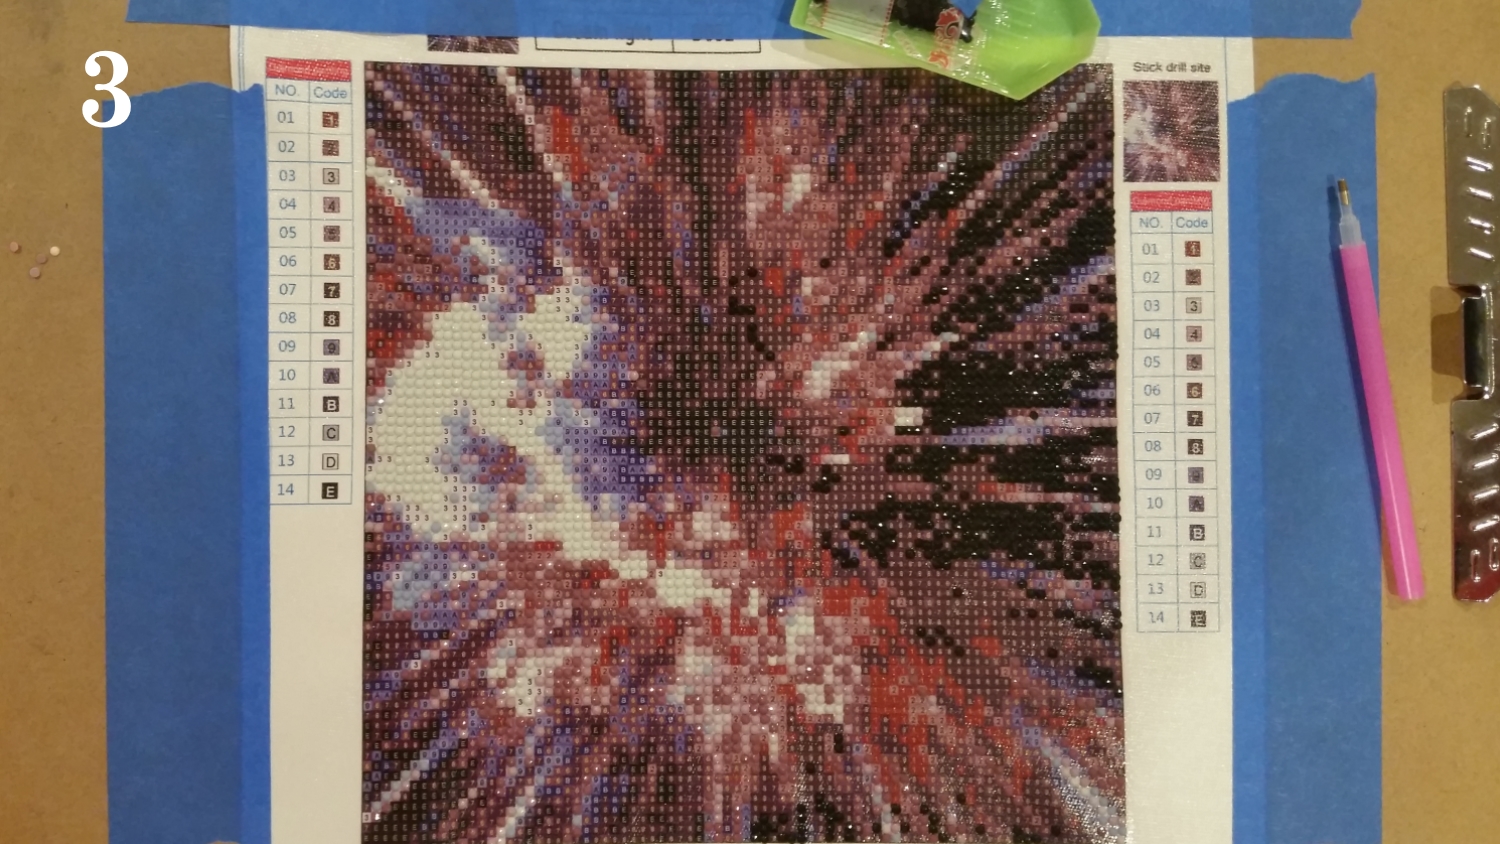
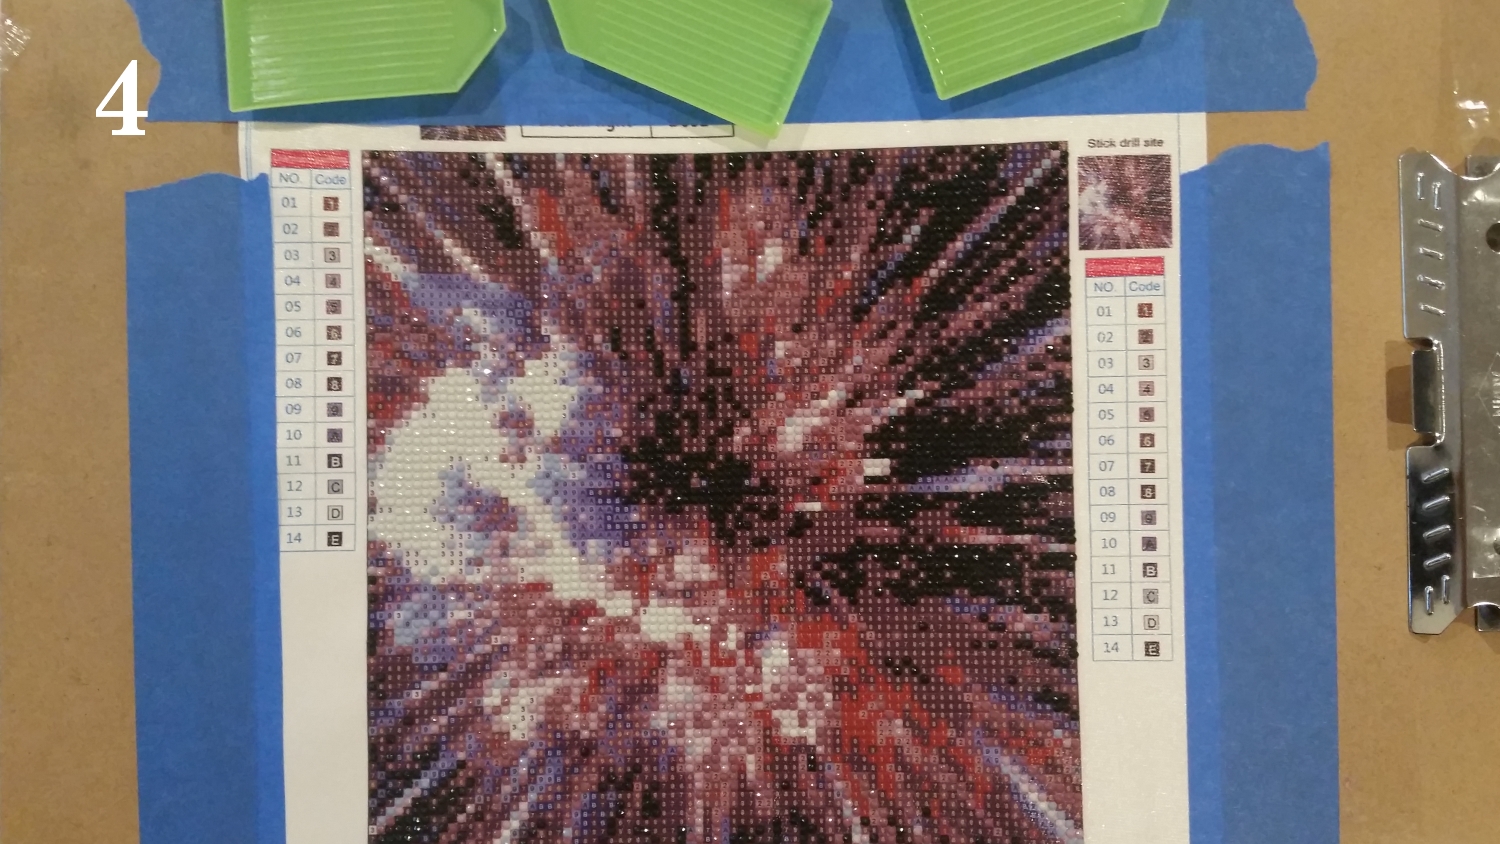
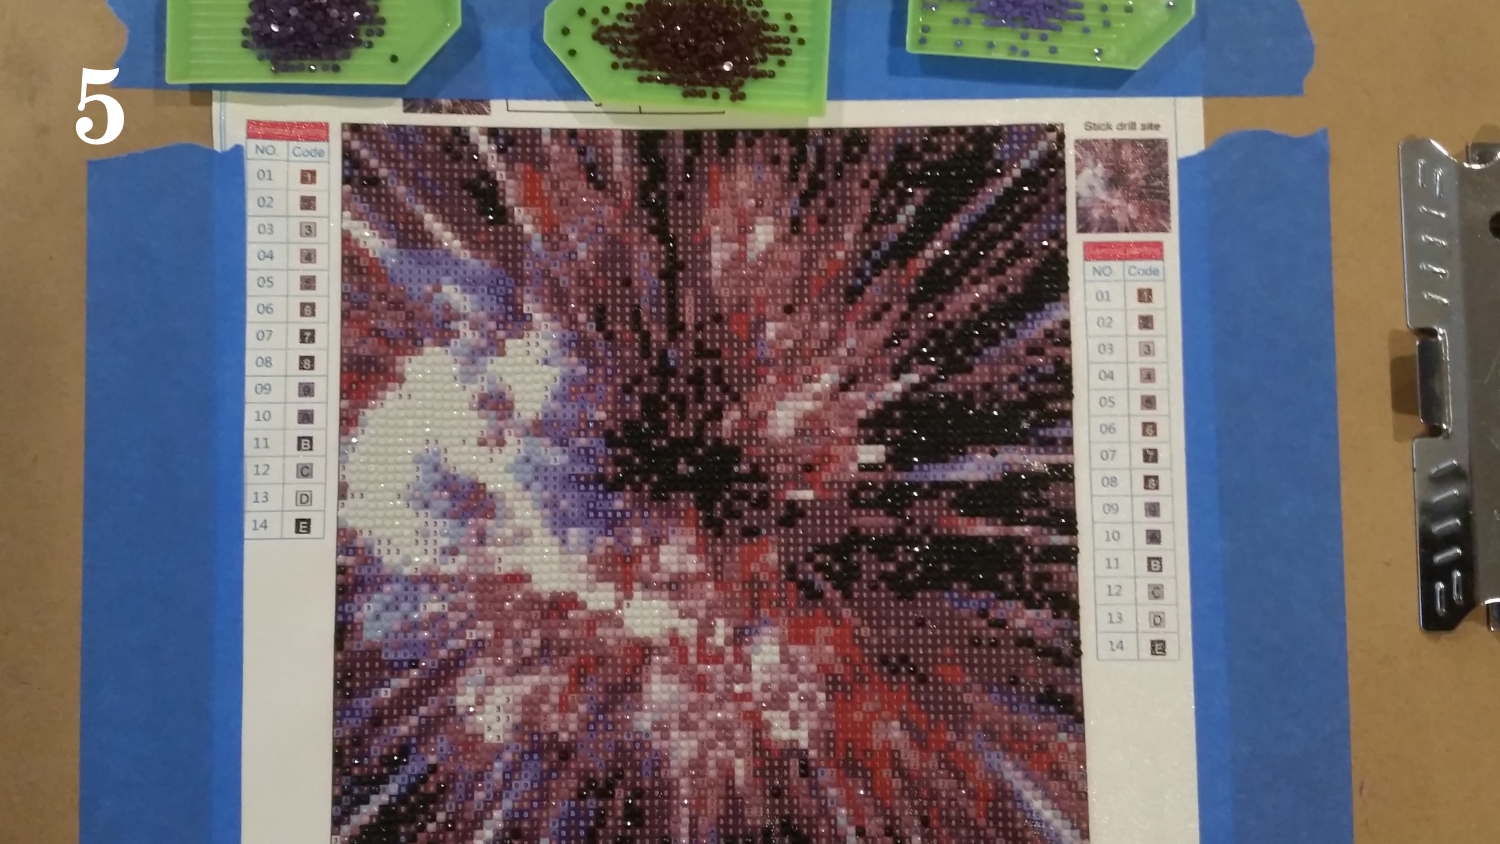
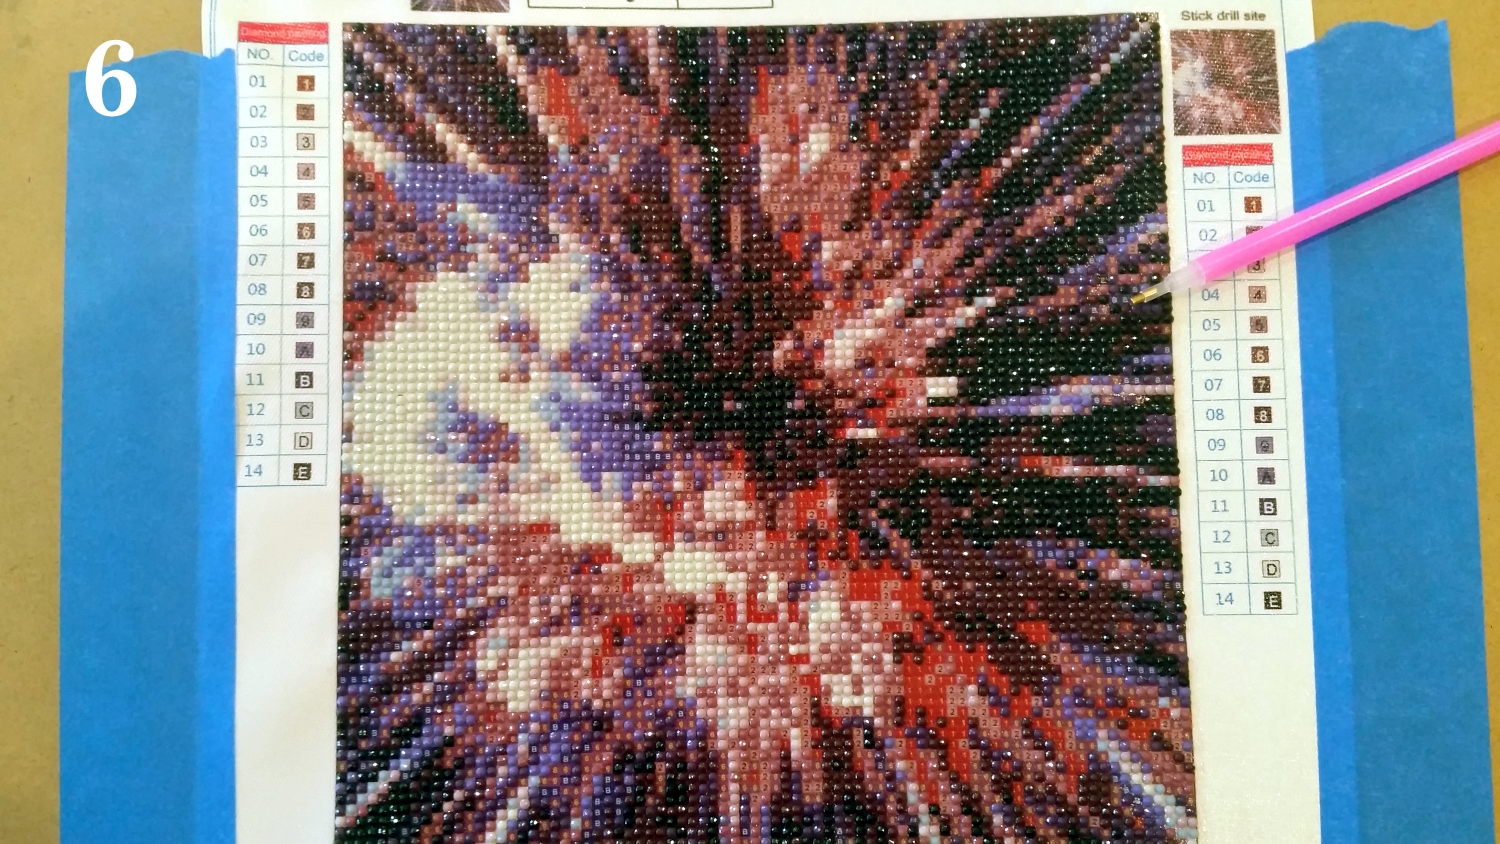
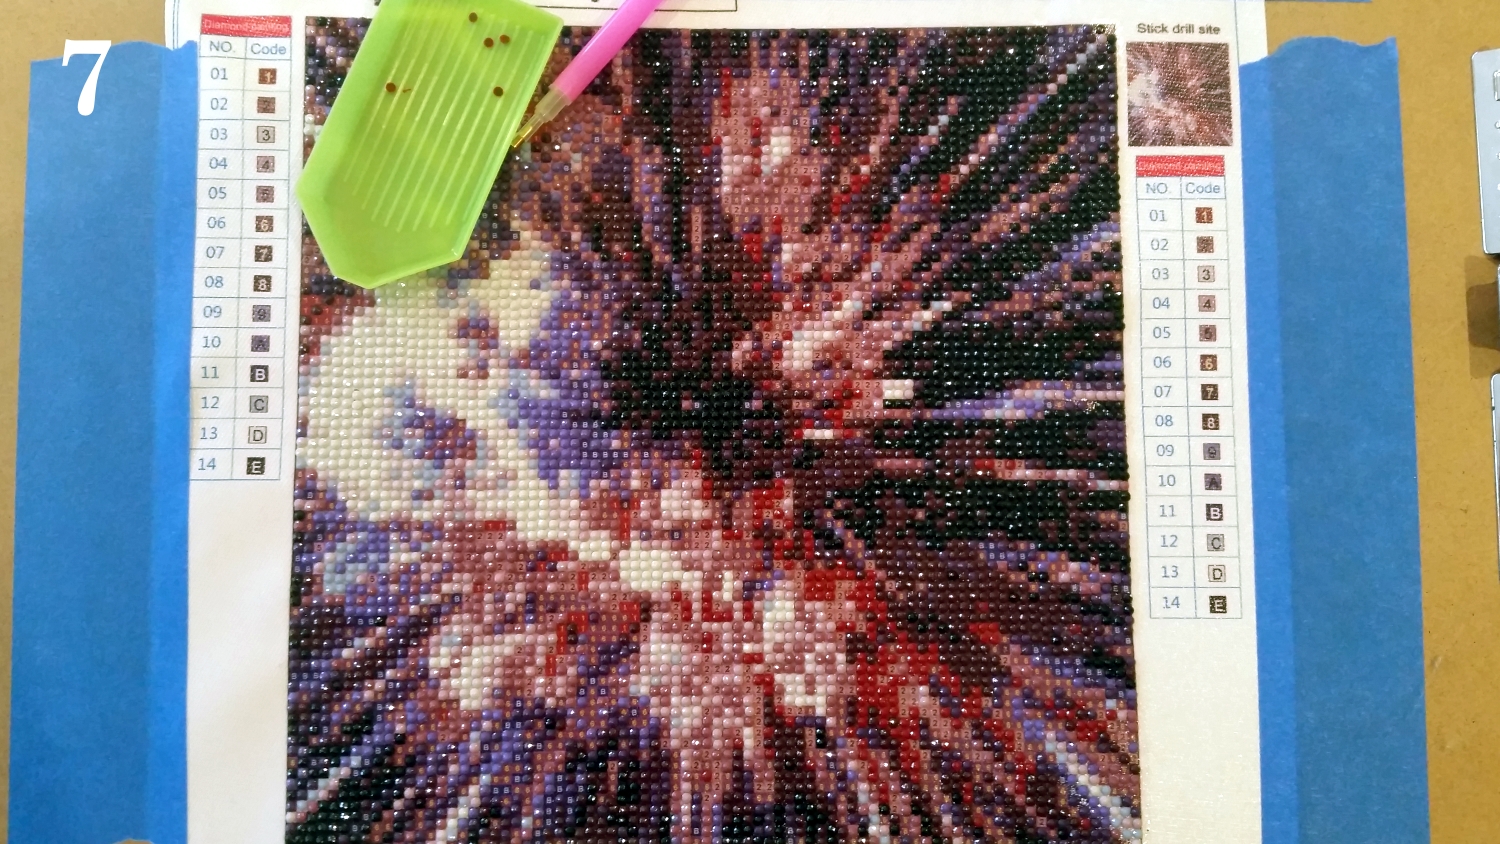
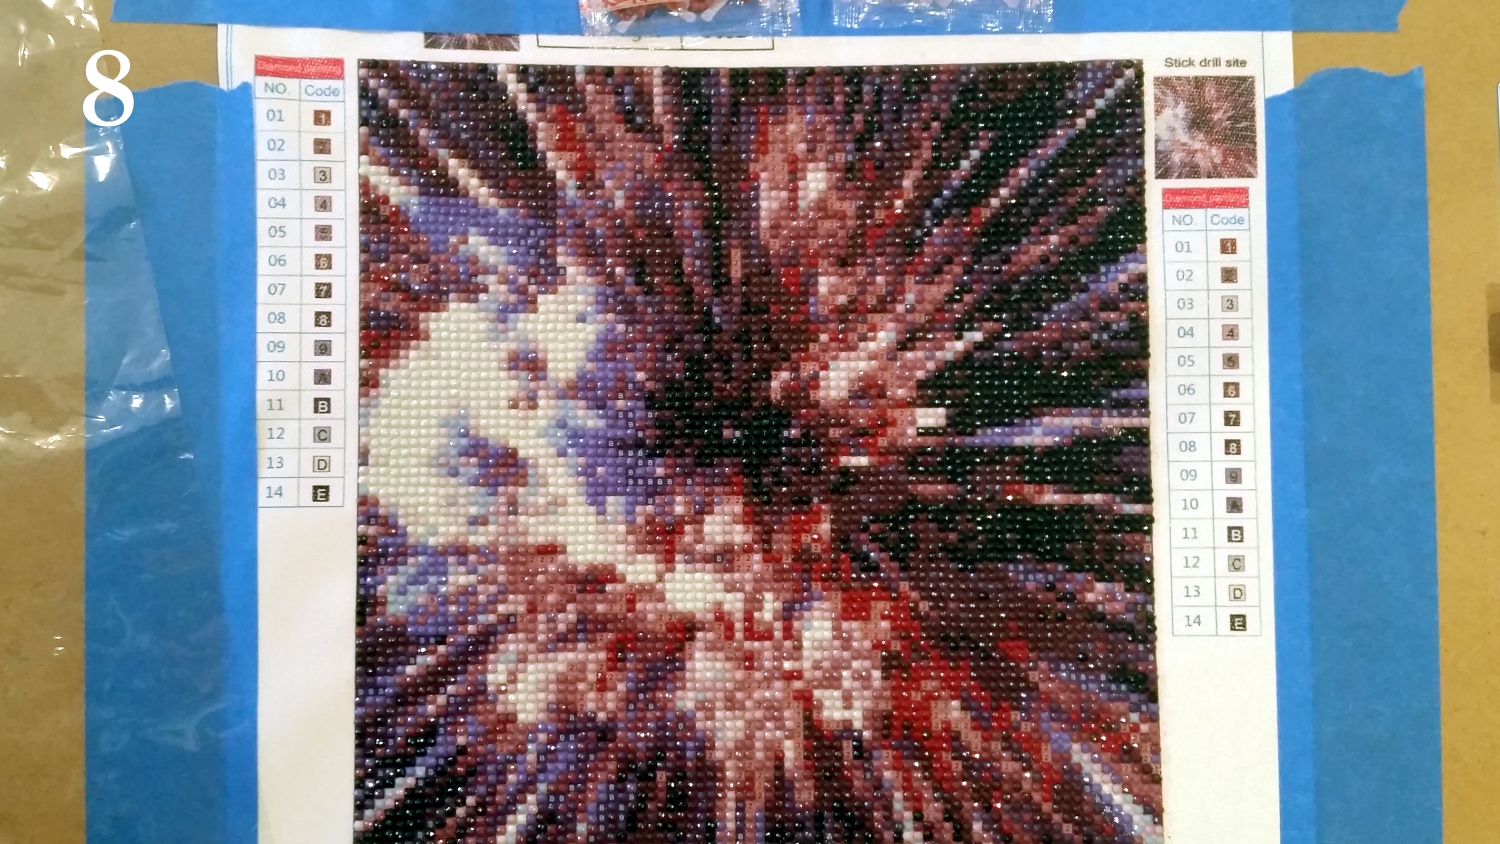
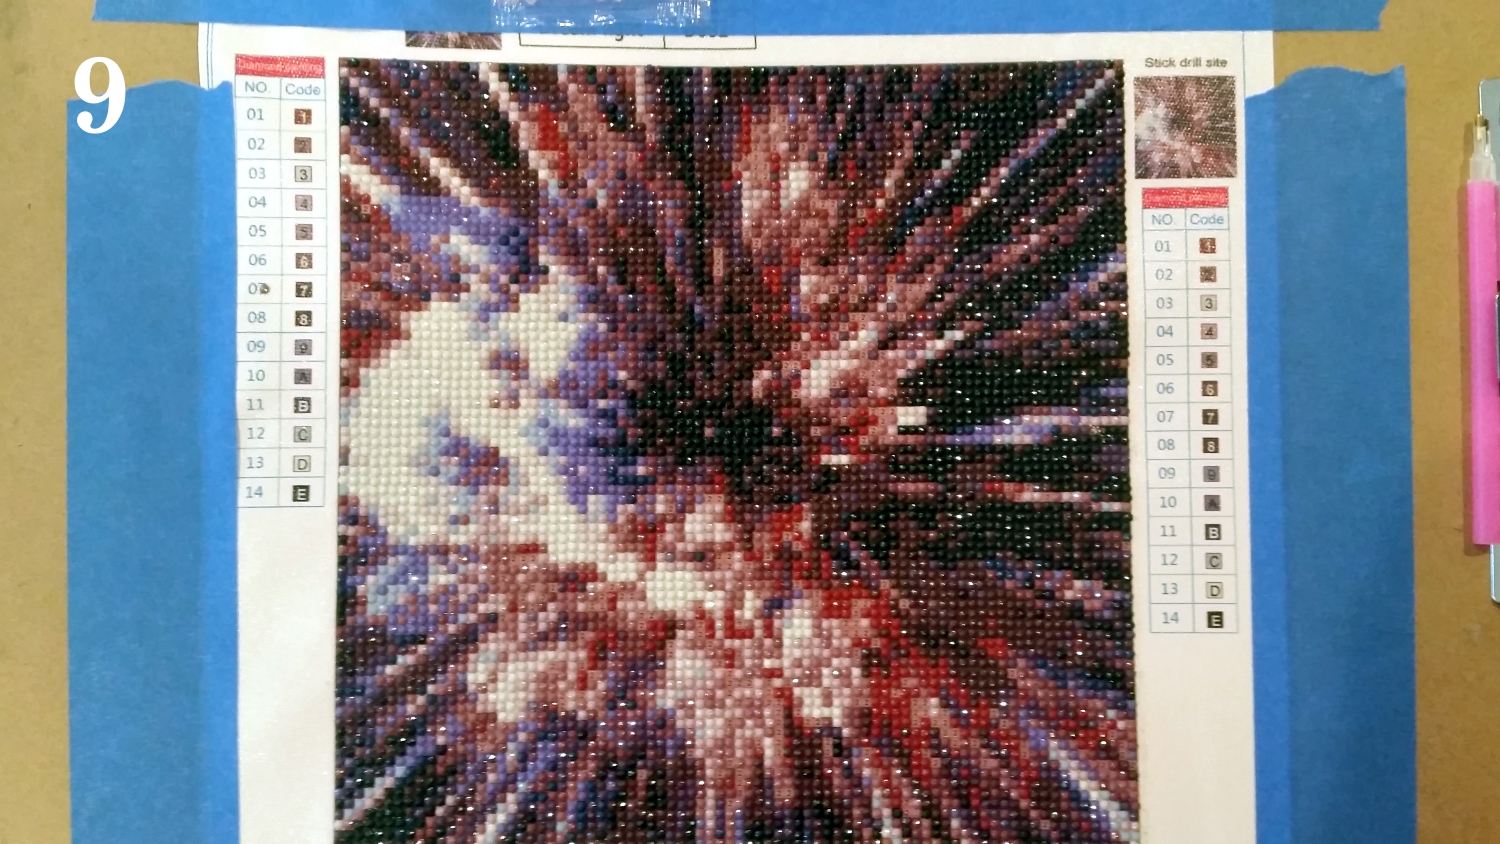
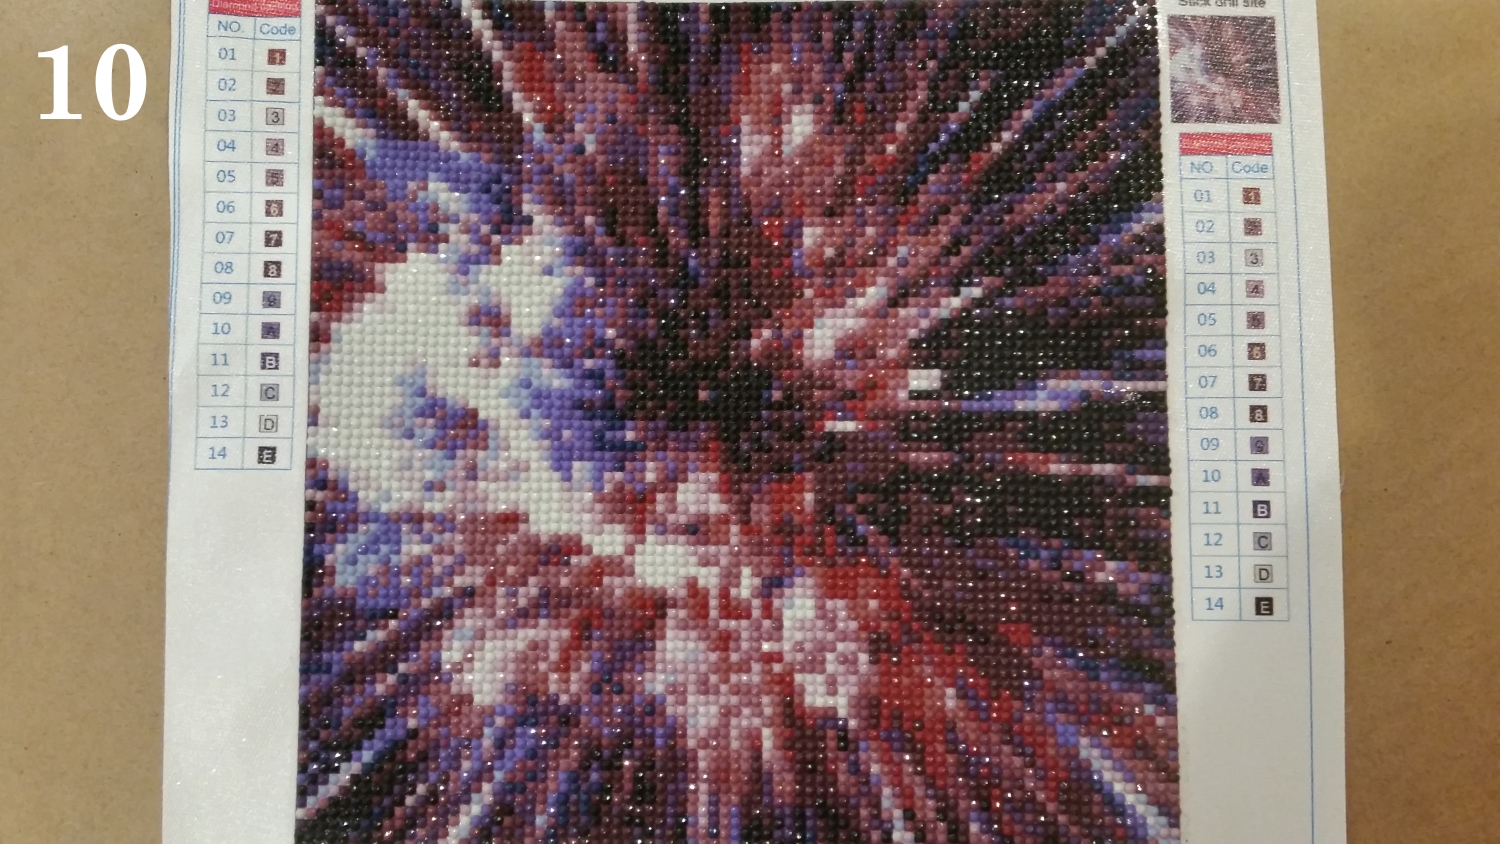
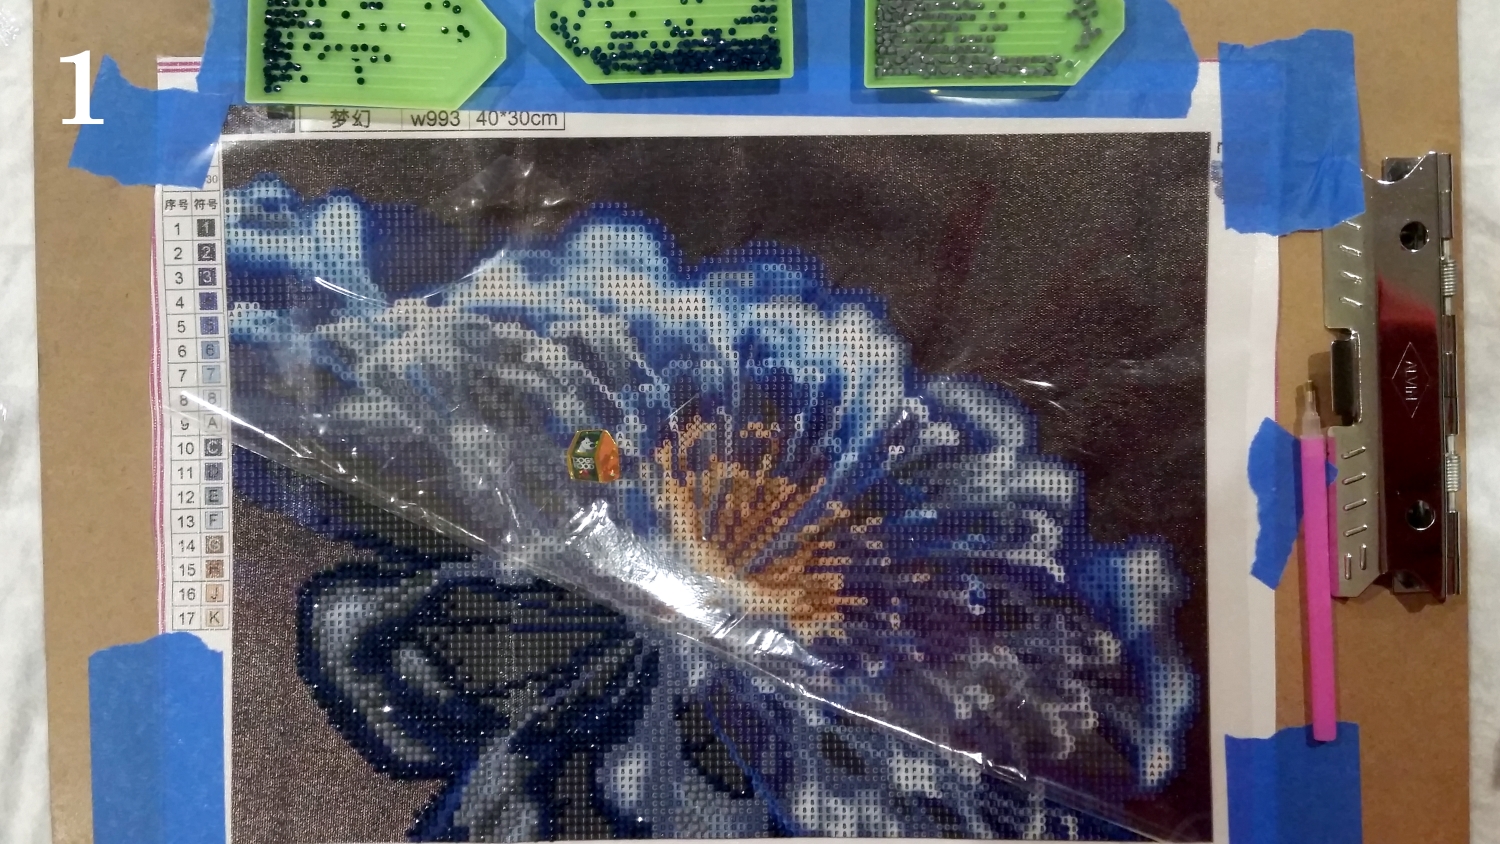
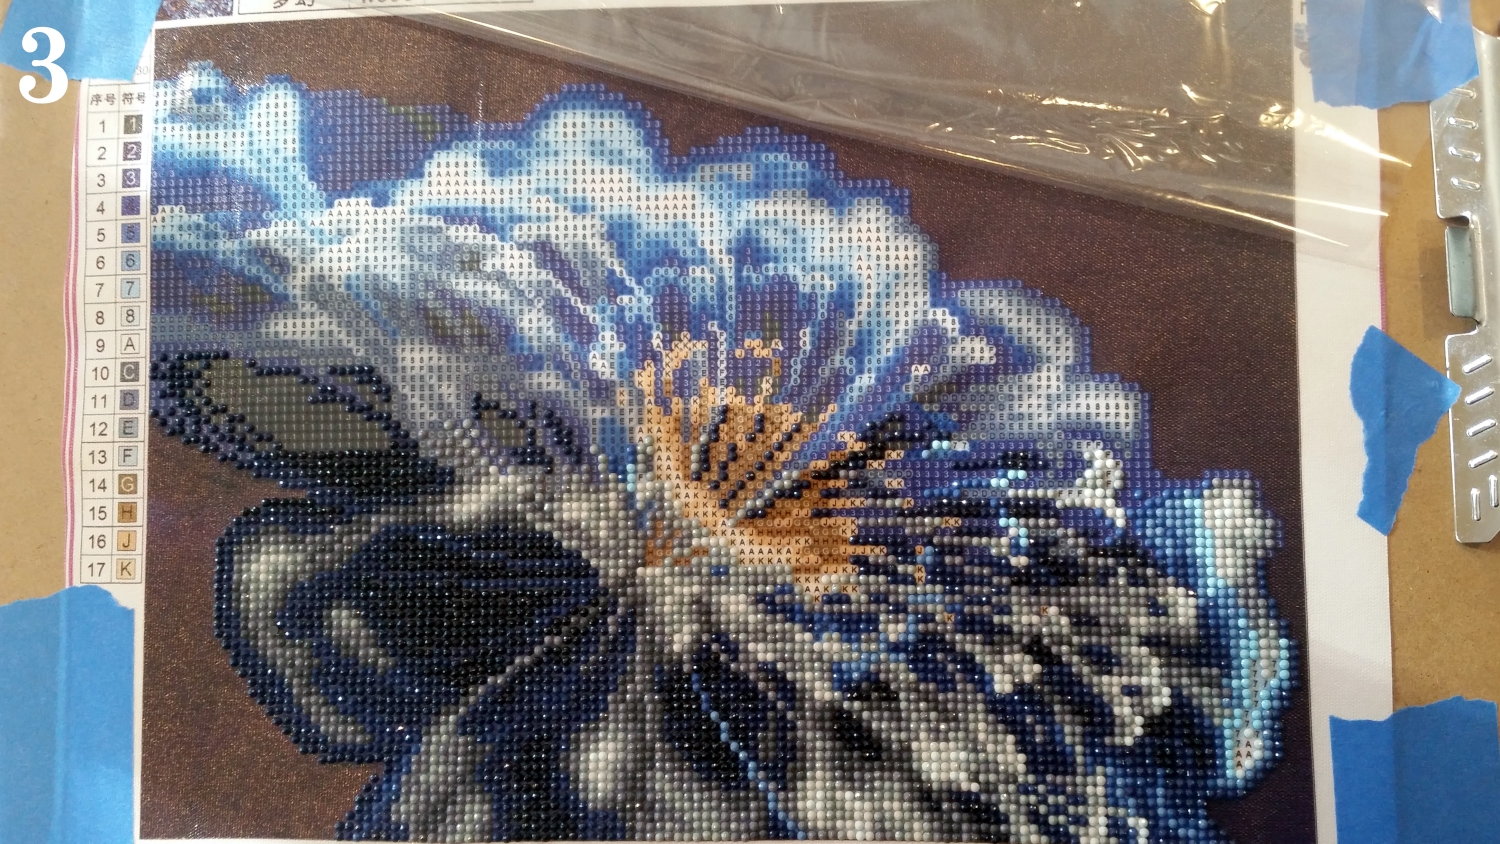
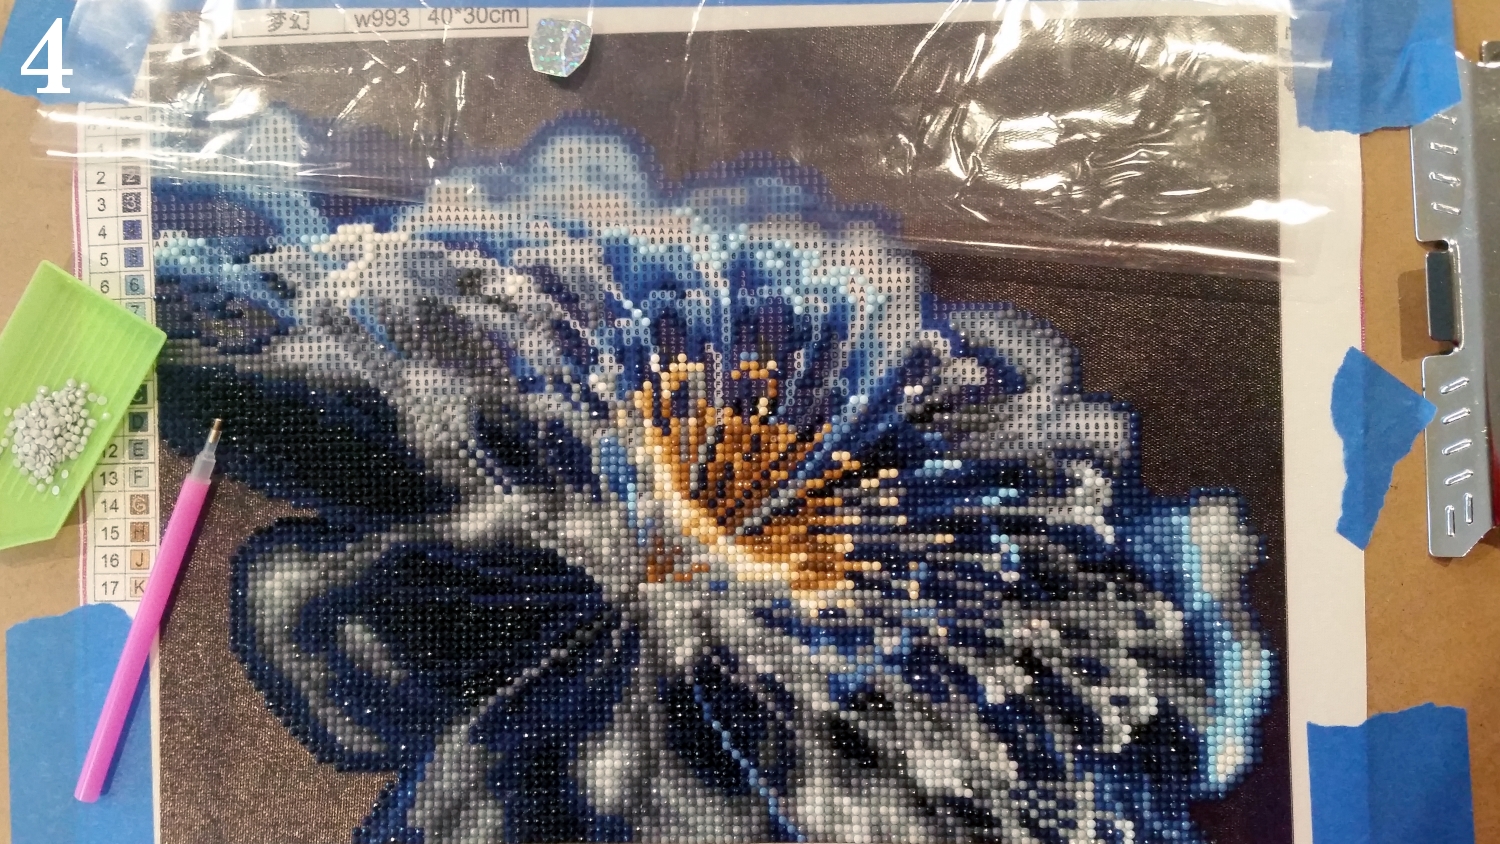
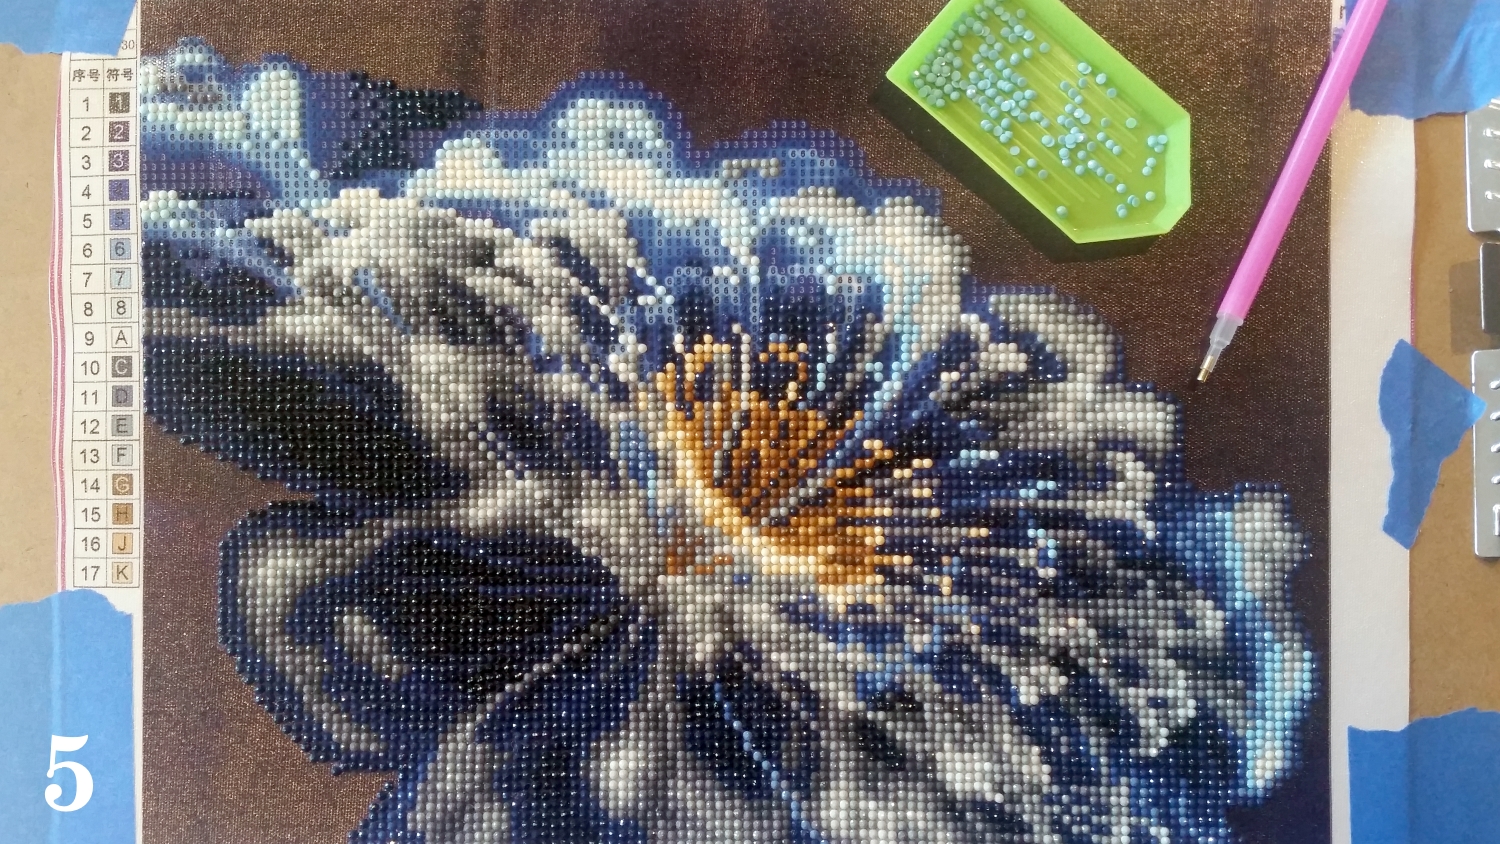
I was able to do this full drill painting in about 3 days (working on and off, of course). I didn’t approach it with any particular method. I just worked through each color more or less throughout the entire painting. Over long stretches of time, I would get bleary eyed and miss sections of a particular color and have to go back, but that was fine. I used the prep trays that came with all 3 diamond paintings that I received to review from Newfrog.com, and was able to keep all the colors organized as I worked through the project.
The following are a series of pictures of the project as I progressed:
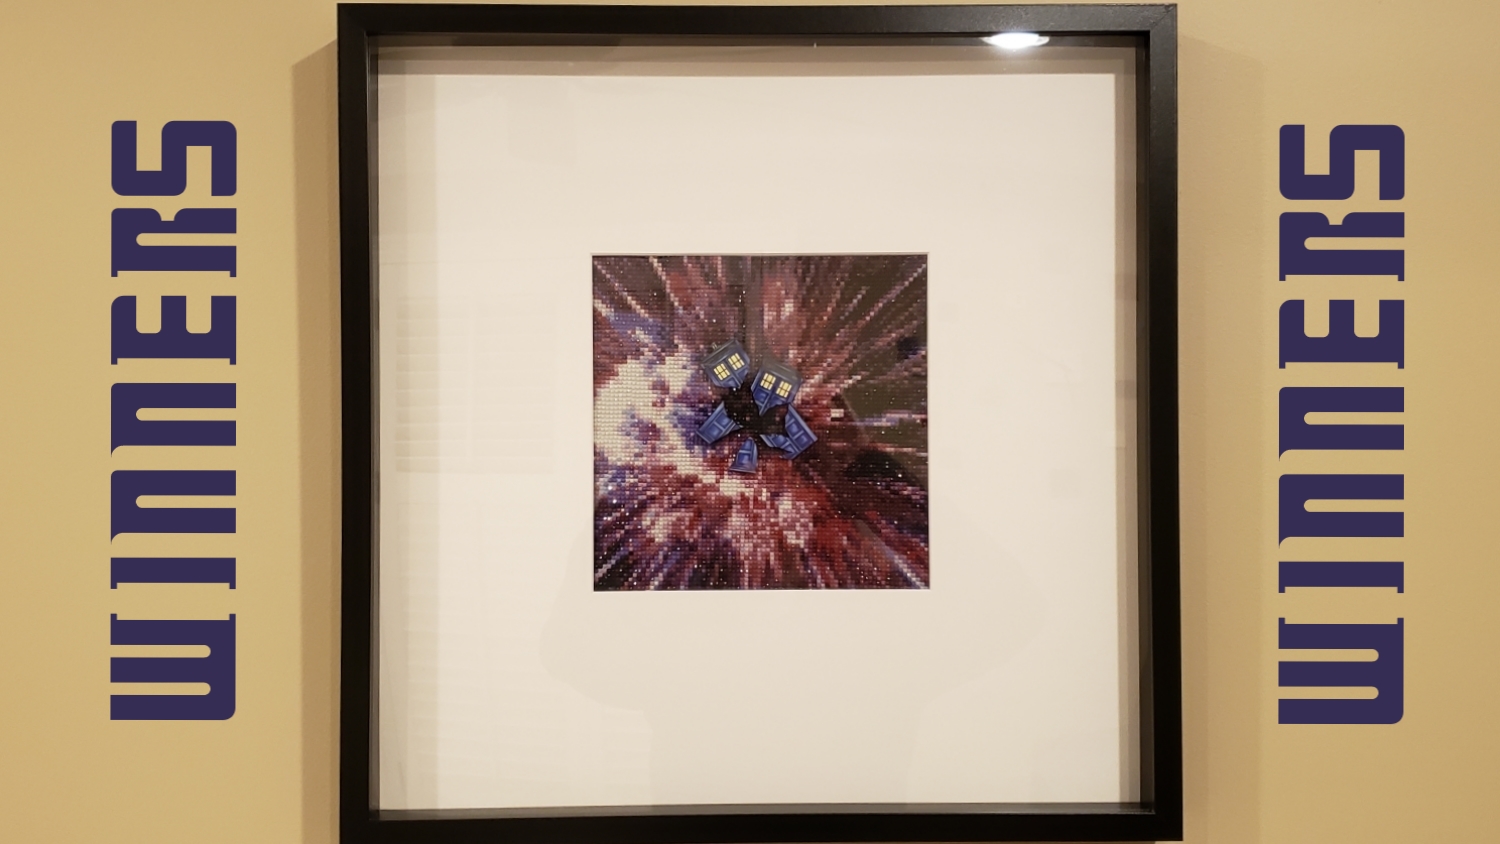
Next I stamped the Tardis image from the Kindred Stamps “Time Traveler” stamp set twice and used the following Copic colors to bring them to life: Y000, Y00, B41, B95, B66 and B69. Then I fussy cut out both images, cut off the top light of the telephone box/time travel machine from one and then haphazardly cut up the images so that it would look like the 4 sided Tardis was breaking apart.
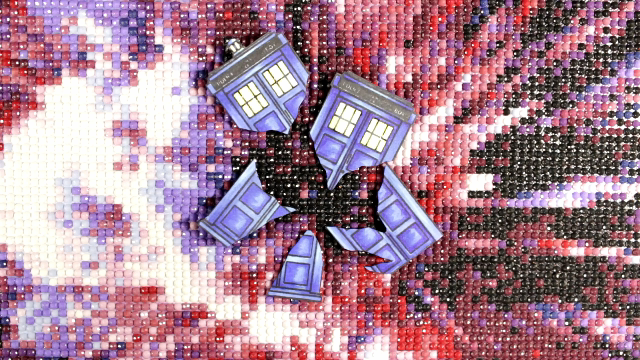
I layered in the cut up pieces of the Tardis using foam dots and Tombow adhesive tabs to give the pieces varying depth from the diamond painting background — less depth toward the center and more depth as the pieces emanated out to give the illusion as if it was exploding out from the center. Lastly, I bought an IKEA frame and had a custom mat cut at Hobby Lobby to fit the exact dimensions of the diamond painting. The final framed piece is the top picture of this blog post.
GIVEAWAYS:
Newfrog sent me three diamond paintings (duplicates of the white dog HERE, the blue flower close up HERE, and the fireworks canvas from this post) to give away to my subscribers. If you’re interested in entering this giveaway, CHECK OUT THE YOUTUBE VIDEO (below), be a YouTube subscriber to my channel, and leave a comment there on that YouTube video (CLOSES November 29, 2018 and winners will be announced on my YouTube channel):
This Exploding Tardis Diamond Painting is being entered into the following challenges:
Word Art Wednesday Anything Goes Challenge
Creatalicious Anything Goes with Optional Layer It Up Challenge
Lil Patch of Crafty Friends Anything Goes Challenge
Just Keep On Creating Anything Goes Challenge
Crafter’s Castle Anything Goes with Optional Holidays Challenge
The Corrosive Challenge Anything Goes Challenge
613 Avenue Create Anything Goes with Optional Twist Christmas/Winter Challenge
The following are a series of pictures of the project showing progress over the course of the 2 days it took to complete the project:

The finished piece is posted in the top picture. I haven’t yet decided if I’m going to frame it as-is, or perhaps add a little stamped image of a fairy or something. 🙂 If I change it significantly, I’ll be sure to post the picture on my Instagram: @kristina_craftypaws
This diamond painting is being entered into the following challenges:
Word Art Wednesday Anything Goes Challenge
Creatalicious Anything Goes with Optional Layer It Up Challenge
Lil Patch of Crafty Friends Anything Goes Challenge
Just Keep On Creating Anything Goes Challenge
Crafter’s Castle Anything Goes Challenge
The Corrosive Challenge Anything Goes Challenge
613 Avenue Create Anything Goes with Optional Twist Christmas/Winter Challenge
]]>