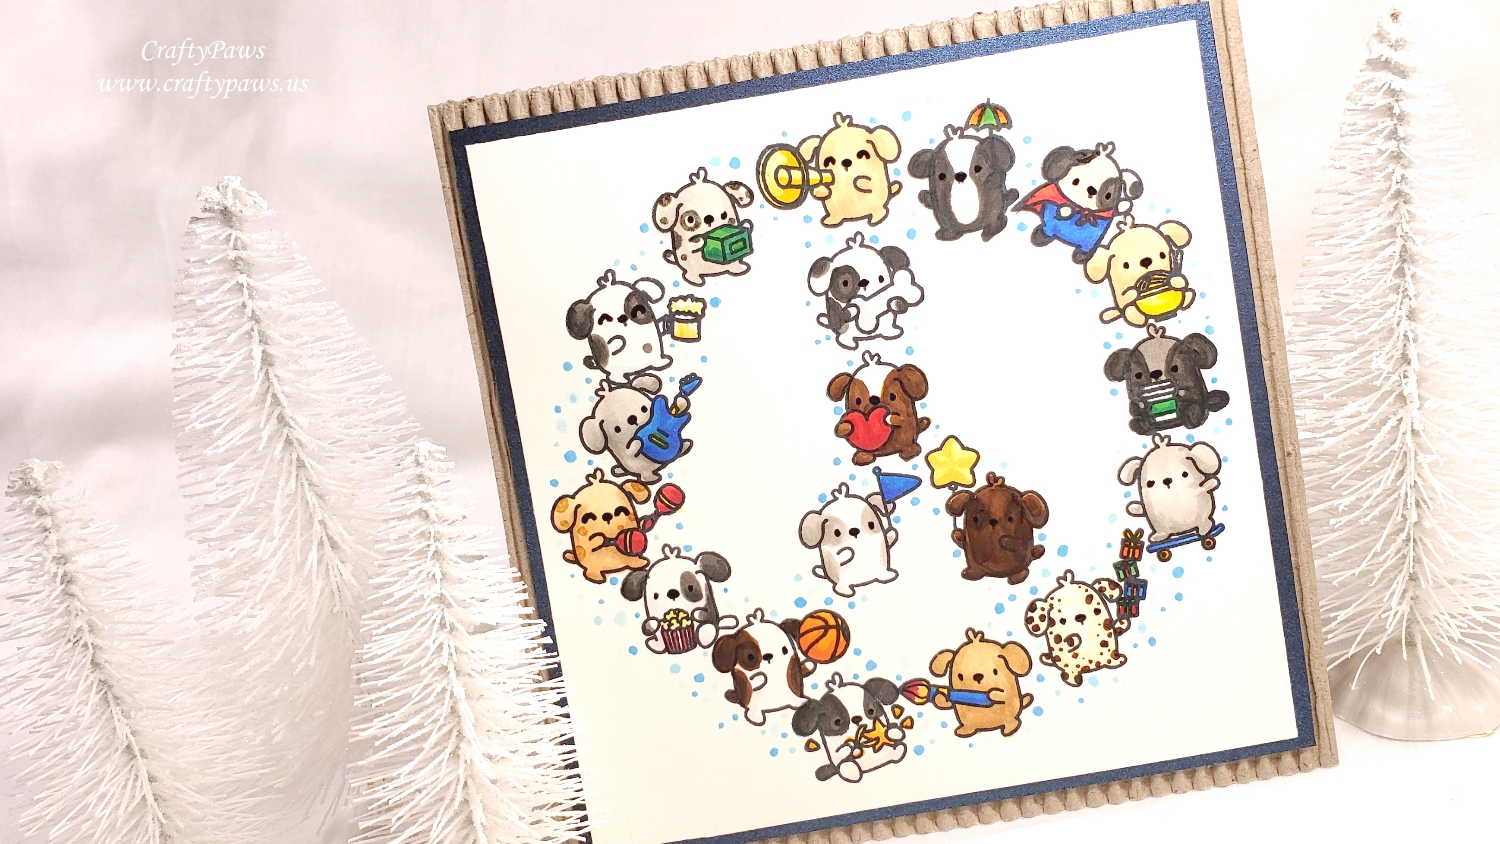
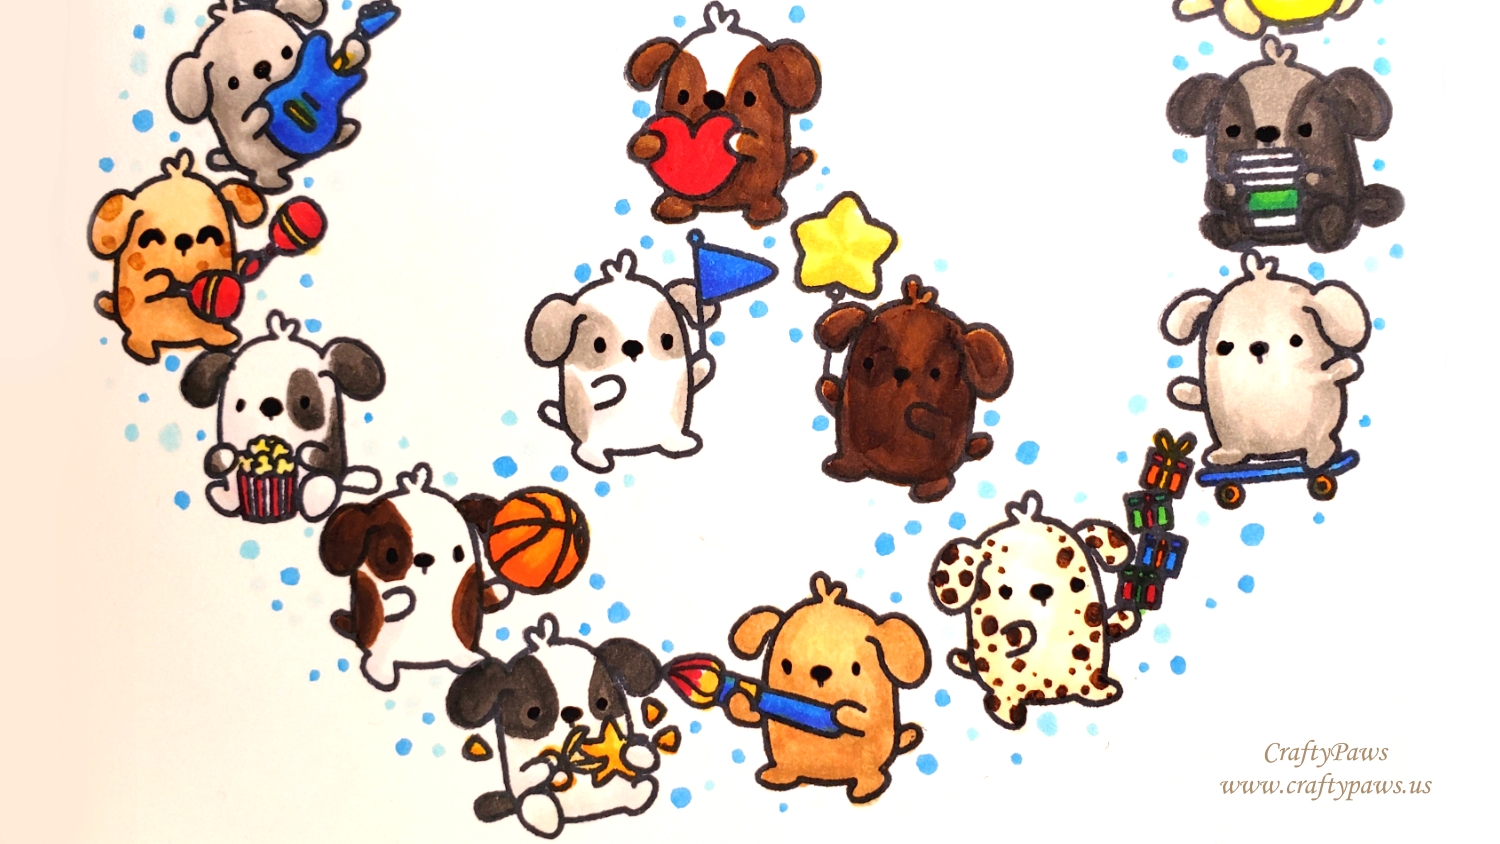
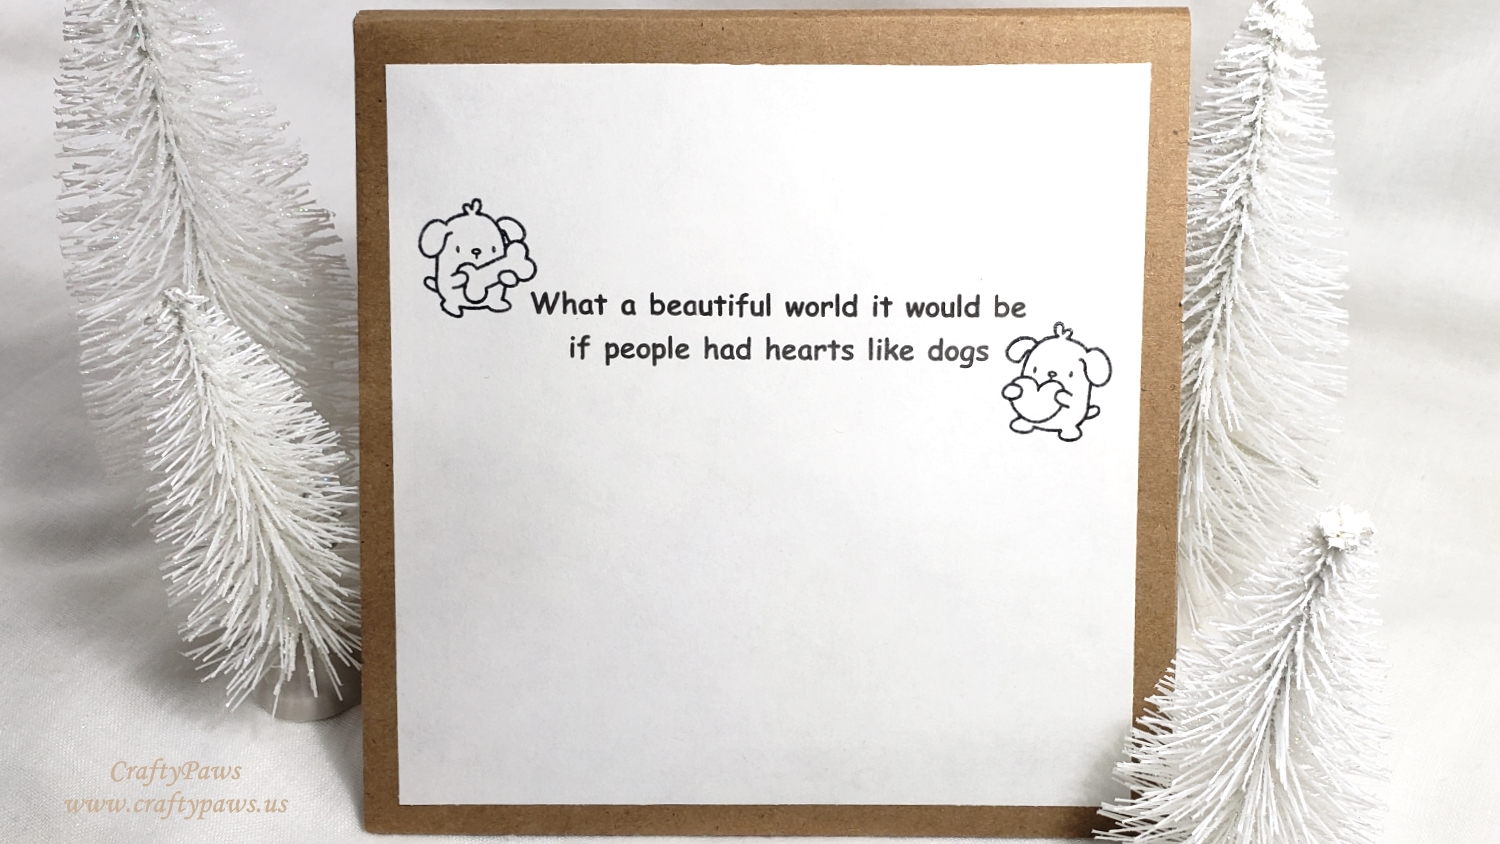
I sketched out a peace symbol using some circle dies to help get the general framework and doodling an upside-down Y down the middle. Then using an old school Stamp-a-ma-jig, a Fiskars acrylic block, and Momento Tuxedo Black Ink, I stamped out the adorable puppies from the Mama Elephant “Little Dog Agenda” stamp set in the shape of that peace sign to create this single layer card.
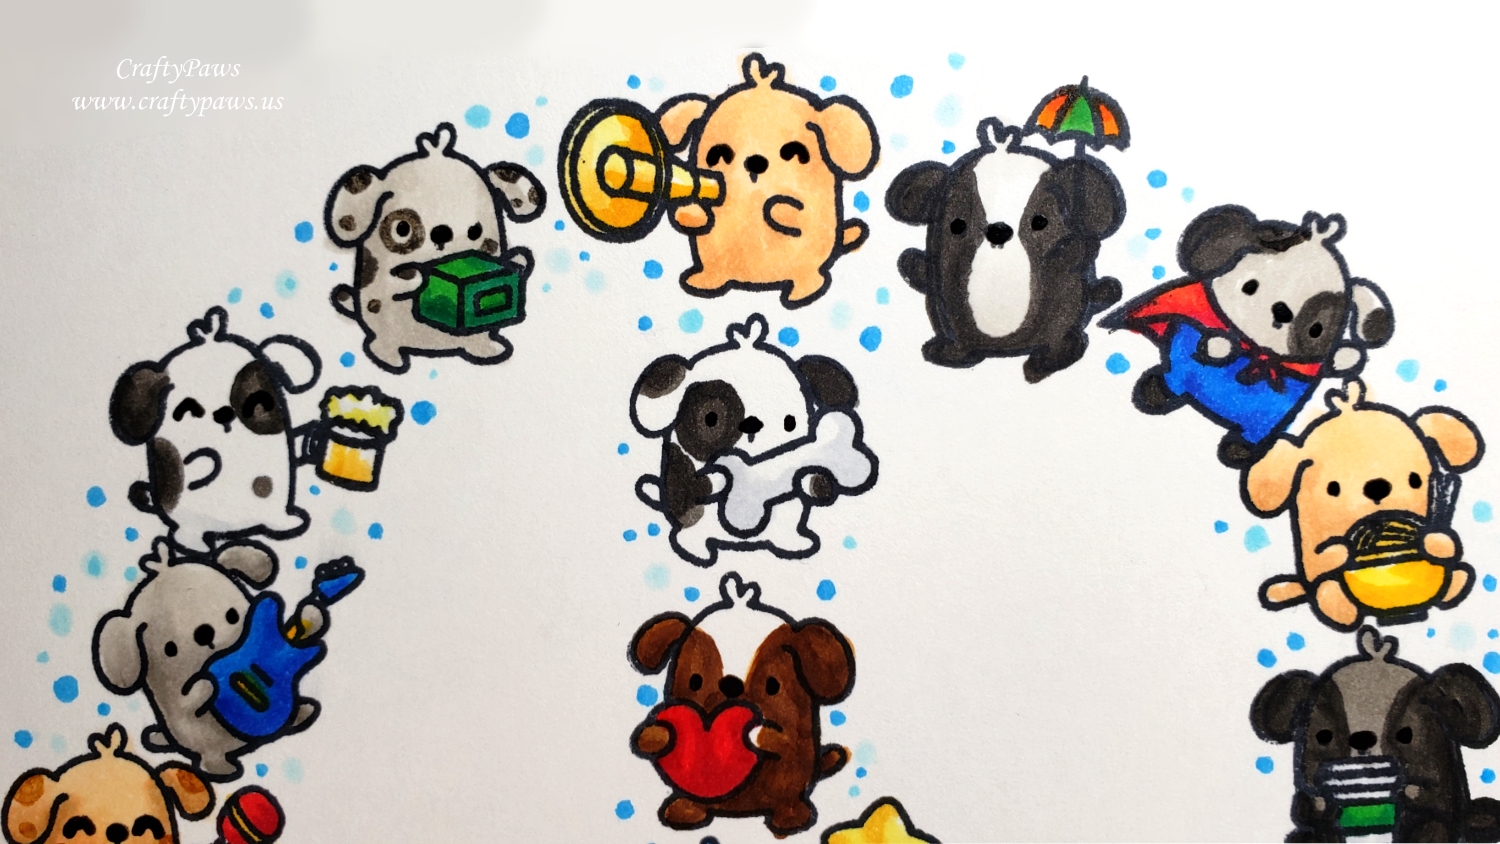
I used the following Copic colors to bring all the pups to life and create the puppy peace symbol:
Black and grey dogs: W0, W1, W3, W5 and W7
Brown and tan dogs: E50, E51, E53, E55, E57 and E59
Rainbow of colors for accessories: R35, R37, YR04, YR07, Y11, Y21, Y19, G14, G17, B16, B18, C0
Blue dots to fill in peace sign: B000, B01 and B02
I also re-emphasized the puppy eyes and noses with a Sakura Black Glaze Pen
For the card liner, I printed the sentiment from my computer and simply stamped a couple of my favorite Little Dog Agenda puppies (the one offerings the bone and the heart) to flank the sentiment. To mat the card front, I used a beautiful shimmery dark blue card stock and then adhered the whole thing to a square kraft corrugated card base. I love how this non-traditional holiday card for dog lovers came out. 🙂
Disclosure: Many of the supplies I’ve used for today’s project are linked. Some may be affiliate links, which means if you make a purchase I receive a small commission at no extra cost to you. I truly appreciate your support toward the costs of running this blog!
CLICK the following picture to watch the whole card crafting process video:
This card is being entered into the following challenges:
Crafter’s Castle Anything Goes with Optional Christmas Challenge
Simon Says Stamp Monday B is For (Blue, Brotherly love, Banner, Balloon, Basketball, Boxes, and Bone) Challenge
Word Art Wednesday Anything Goes Challenge
Simon Says Stamp Work It Wednesday Ho Ho Holiday Challenge
Card Mania Christmas Challenge
Crafts Galore Encore Anything Goes Challenge
Crafty Gals Corner Anything Goes Christmas Challenge
Lil Patch of Crafty Friends Anything Goes Challenge
Through the Craft Room Door Anything Goes Challenge
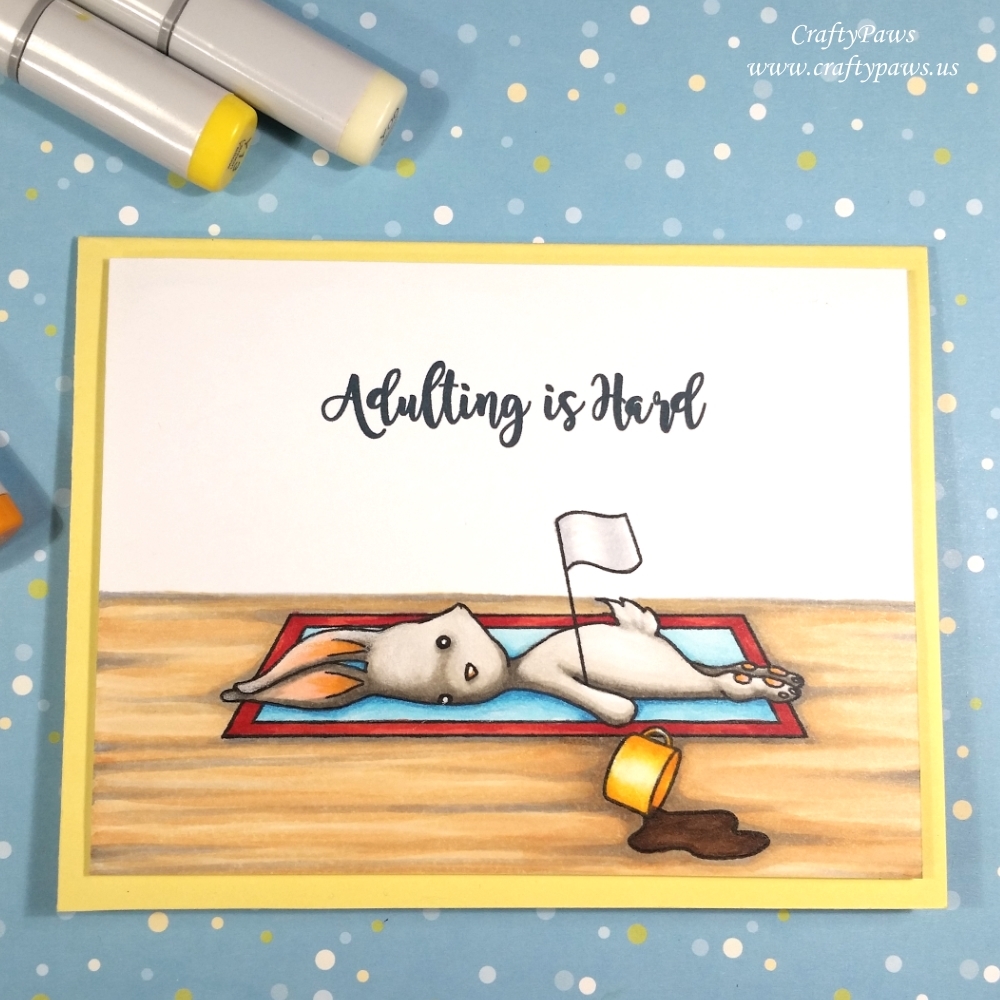 It’s a single layer CAS scene card that I stamped and masked in layers. I first stamped the bunny. Then I masked it to stamp the rug. I positioned the cup so it would look like it had just slipped from the bunny’s hand and doodled in some spilled coffee with a 0.1 pt Copic Multi-liner Pen. Then I partially masked off just below the bunny’s arm and stamped in the flag so it would look like it was tucked in the crook of her arm.
I used the following Copic colors for the scene:
Bunny: W0, W1, W3, W5 with R30, R20 and YR15 for the ears, nose and paw pads
Cup: Y00, Y13, YR15
Blue of rug: B000, B00, B01
Red of rug: R24, R27 and R29
White flag: C0, C1
Spilled coffee: E57 and E59
Wood grain floor: C1, C3, E53
I added white Uniball Signo Gel Pen dots in her eyes and a tiny highlight on her nose. And to add a bit of glimmer shimmer, I coated the cup with a Clear Wink of Stella.
For the sentiment, I printed from my computer the sentiment, “Adulting is Hard” using a free font called Magnolia Sky in 20 pt font. I really like the scripty look of this font and I thought the whimsical hand written look went well with this cute, exhausted bunny. LOL
This card is being entered into the following challenges:
Through the Craft Room Door Anything Goes Challenge
Simon Says Stamp Wednesday Add A Sentiment Challenge
CAS-ual Fridays More Coffee Please Challenge
Lil Patch of Crafty Friends Anything Goes Challenge
Word Art Wednesday Anything Goes Challenge
Crafty Gals Corner Anything Goes Challenge
Creatalicious Anything Goes with Optional Cute Challenge
613 Avenue Create Anything Goes with Optional Something New Challenge
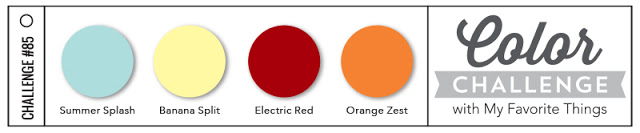
MFT Color Challenge #85
 I’ve linked up a video tutorial for how to stamp out a single layer scene like this below, but basically, you stamp the most forward images first, create masks for them, and stamp the images behind them next. You repeat that process: stamping, masking, and stamping the next layer back; until you’re done creating the whole scene.
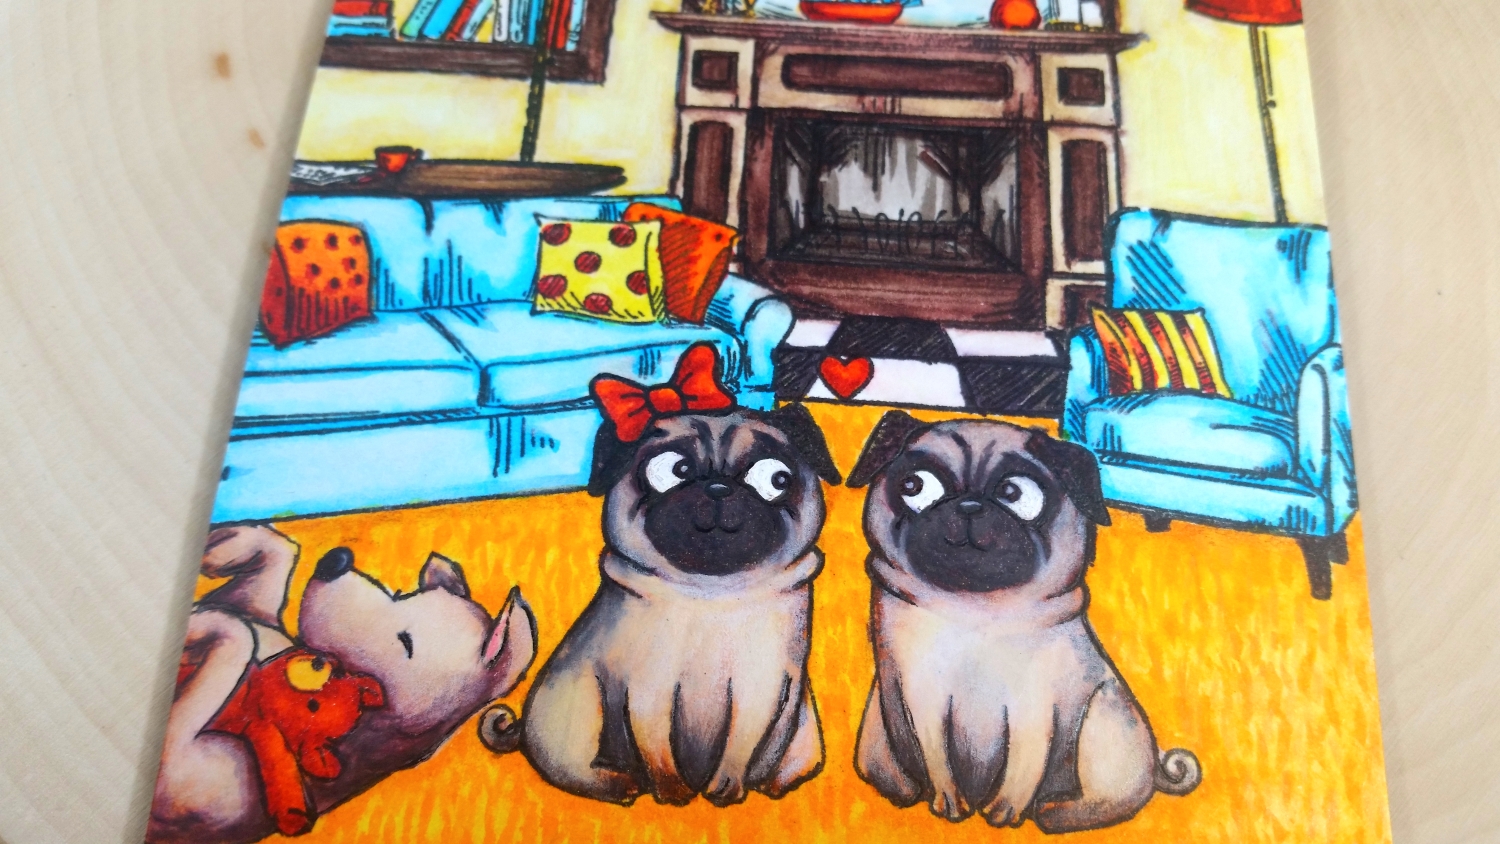
To color up the scene, I used the following Zig Clean Color Real Brush Markers:
Dogs: Lemon Yellow (051), Flesh (071), Oatmeal (064), Brown (060), Mid Gray (096) and Dark Brown (062)
Fireplace, sofa table and book shelf: Oatmeal (064), Mid Gray (096), Dark Brown (062) and Black (010)
Mirror, sofa and arm chair: Light Blue(036) and Cobalt Blue (031)
Books: Bright Yellow (052), Geranium (029), Light Blue(036) and Cobalt Blue (031)
Lamp shades, teddy bear, and other orange-red accent decor pieces: Bright Yellow (052) and Geranium (029)
 Yellow walls and yellow parts of pillows: Lemon Yellow (051)
Carpeting: Lemon Yellow (051) and Bright Yellow (052)
Plant on bookshelf: Pale Green (045)
Then I layered onto some of the images the following Prismacolor Premier Colored Pencils to add details and lighten some of the watercoloring that had gotten a little too dark in some areas (think dark Pug faces):
Dogs: Beige Peche (1085), Cream (914), Framboise Noire (1095), Gris Chaud (1058), and Blanc (938)
Walls, sofa and arm chair: Blanc (938)
Rug: Cream (914) and Yellowed Orange (1002)
Fireplace: Framboise Noire (1095)
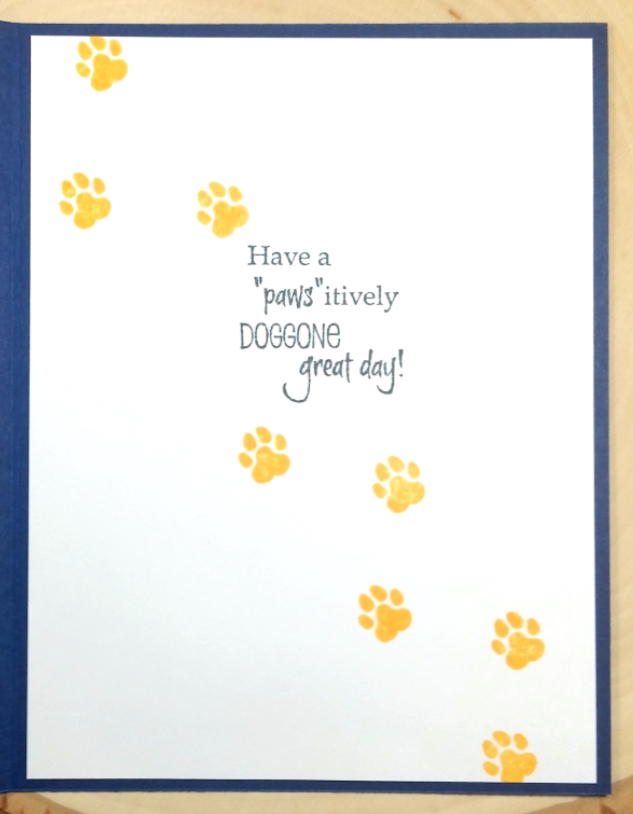
Lastly for the inside liner sheet, I used a couple of stamps that my friend, who’s receiving this card, has gifted me over the years. The sentiment, which I love because it is great for any time, is a Rubbernecker red rubber cling stamp called, “Pawsitively.” The row of paw prints was stamped using Simon Says Stamp Clementine Premium Ink and a handmade rubber paw stamp on a wooden dowel. Obviously my friend and I share our love of dogs and crafts! LOL
The following is the scene building tutorial video HERE
Disclosure: Many of the supplies I’ve used for today’s project are linked. Some may be affiliate links, which means if you make a purchase I receive a small commission at no extra cost to you. I truly appreciate your support toward the costs of running this blog!
This card is being entered into the following challenges:
Word Art Wednesday Anything Goes Challenge
Simon Says Stamp Wednesday Add a Sentiment Challenge
Lil Patch of Crafty Friends Anything Goes Challenge
Through the Craft Room Door Anything Goes Challenge
Creatalicious Anything Goes with Optional Cute Challenge
Crafty Gals Corner Anything Goes Challenge
613 Avenue Create Anything Goes with Optional Something New Challenge
MFT Color Challenge #85
]]>
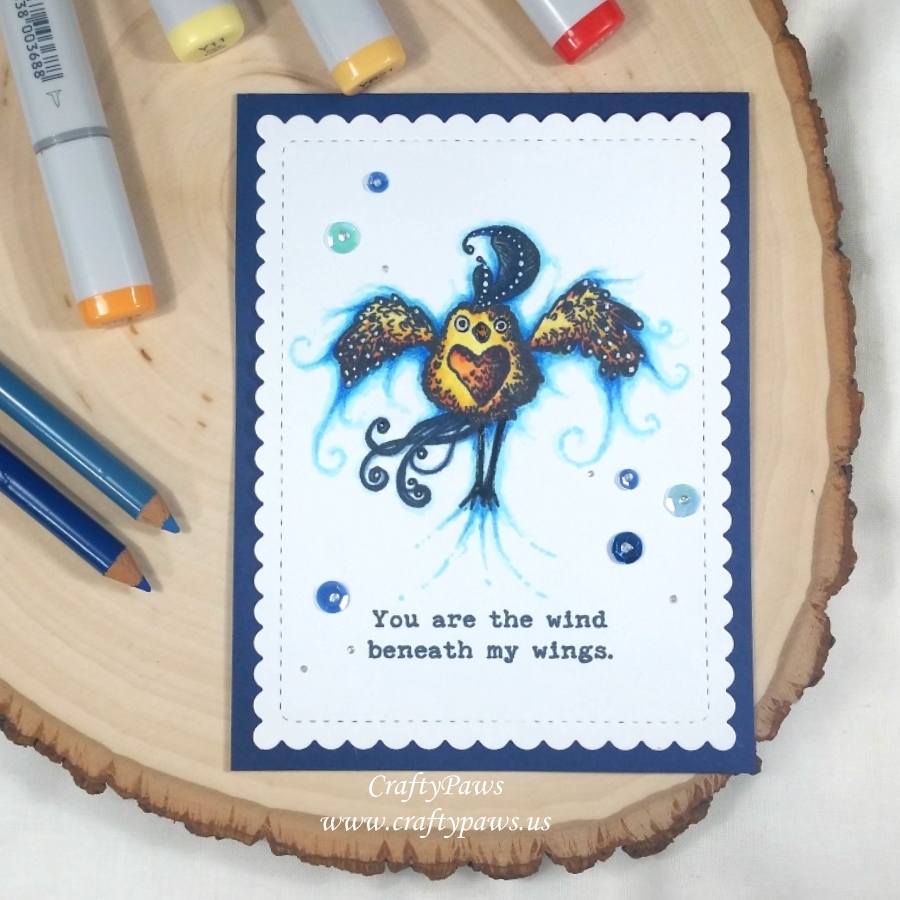 I printed out the sentiment: “You are the wind beneath my wings.” from my computer and then stamped out the whimsical flying bird with a heart shaped breast with Momento Tuxedo Black Ink. Then I Copic colored the bird and the surrounding swirly air/wind with the following Copic colors:
Bird: Y11, YR21, YR14, R14, B34, B37 and B39
Air: B000, B00, B01
To add a little deeper detailed coloring in the “nooks and crannies” of the air around the bird, I also used a couple of Prismacolor color pencils in Blue Mediterranee (PC1022) and Bleu Denim (PC1101). For a little magical shimmer on the bird, I added a coat of Clear Wink of Stella. To help the darker areas of the bird pop, I added some dotting details with a Uniball Signo White Gel Pen. Lastly I also added Ranger Glossy Accents to the bird’s eyes, beak and legs for some dimension and shine.
For a finishing touch on the CAS card, which I die cut using a WPlus9 Sunshine Layers die, I glued on a smattering of sequins topped with tiny dots of Platinum Liquid Pearls to cover the holes in the sequin centers. For added texture, shine and balance, I also added a handful of teeny tiny Platinum Liquid Pearl dots close to the sequin clusters.
The following is a process video of the coloring of this card:
Disclosure: Many of the supplies I’ve used for today’s project are linked. Some may be affiliate links, which means if you make a purchase I receive a small commission at no extra cost to you. I truly appreciate your support toward the costs of running this blog!
This card is being entered into the following challenges:
Simon Says Stamp Work It Wednesday New Challenge
Simon Says Stamp Monday Something New Challenge
Simon Says Stamp Wednesday Something New Challenge
CASology Encourage Challenge
Creatalicious Anything Goes Challenge
Word Art Wednesday Anything Goes Challenge
Crafty Gals Corner Anything Goes Challenge
Lil Patch of Crafty Friends Anything Goes Challenge
Cards Galore Encore Anything Goes Challenge
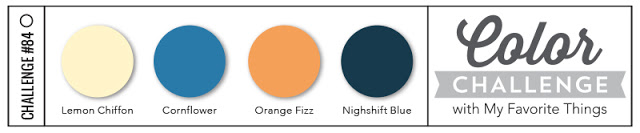
MFT Color Challenge #84
]]>
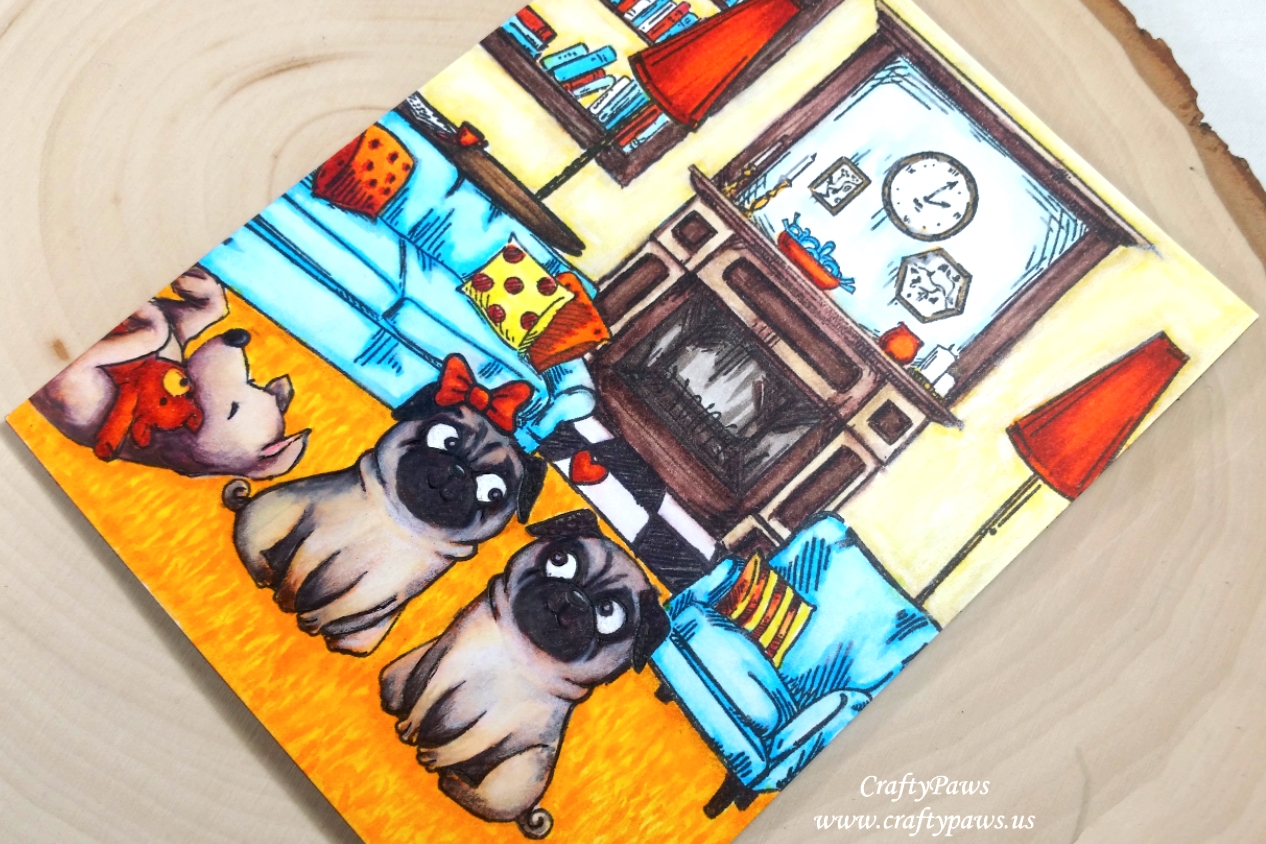
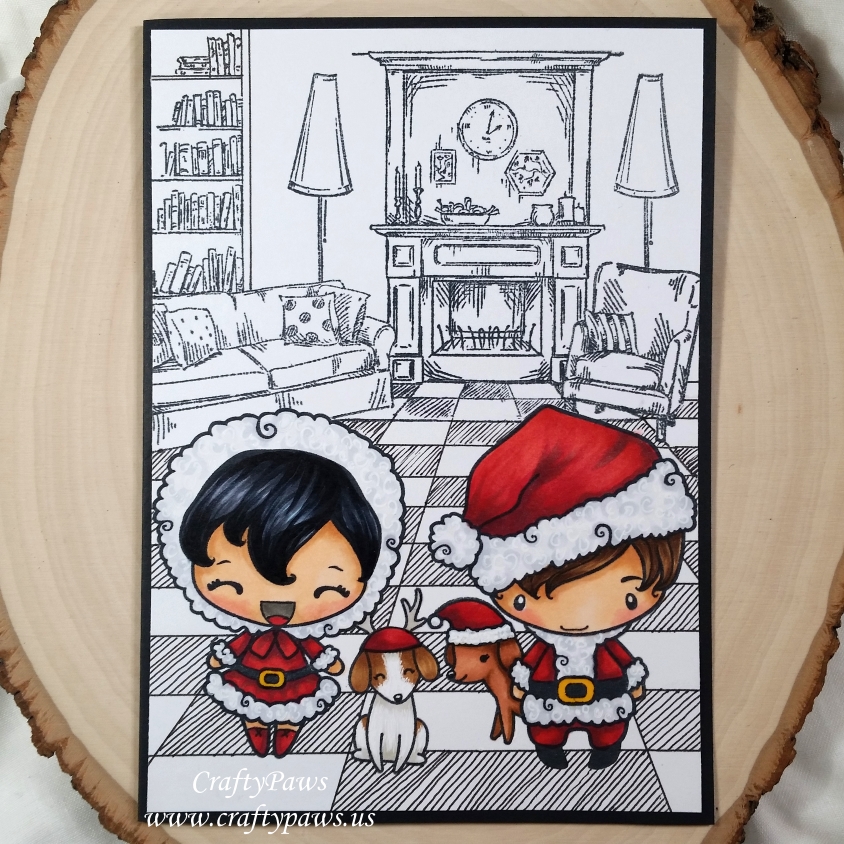 I first stamped out The Greeting Farm girl and boy as well as the Lawn Fawn “Happy Howlidays” (retired) pups using Momento Tuxedo Black Ink (my go-to for alcohol ink coloring since it never bleeds) and created masks for the kids and the puppy hats with post-it note paper so that I could build up the scenes to look 3D. TIP: Masking stamped scenes is easy if you first start with the images that you want forward, mask them off, and lastly stamp the images that go behind the first images.
I used the following Copic colors to color up just the boy, girl and puppies for some spotlight coloring (the rest of the scene will stay black and white):
Skin: E000, E00, E21, R20 with W5 for inside girl’s mouth
Red costumes: R24, R27, R29 and N4
Faux fur on costumes: C00 and C1 with Uniball Signo white gel pen squiggles
Belt buckles: Y17 with Glossy Accent shiny coating
Deer antlers: W1 with Glossy Accent shiny coating
Dog with Santa hat: E11, E13 and E37
Dog with deer antlers: E55, E57, W1 with Uniball Signo white gel pen fur texture
Black hair: B01, C5, C7 and C9
Brown hair: E55, E57 and E59
I created the living room scene with two stamp sets from Joy Crafts, both called “Home Sweet Home.” I doodled some extra book shelves and continued the checker board floor from the fireplace hearth to ground the entire scene using a Copic Multiliner Pen in 0.1 pt.
The following is a process video of creating this single layer scene card:
Disclosure: Many of the supplies I’ve used for today’s project are linked. Some may be affiliate links, which means if you make a purchase I receive a small commission at no extra cost to you. I truly appreciate your support toward the costs of running this blog!
This card is being entered into the following challenges:
Stamping Sensations One Layer Christmas Card Challenge
The Greeting Farm Farm Fresh 1 Layer Card Challenge
Lil Patch of Crafty Friends Anything Goes Challenge
Word Art Wednesday Anything Goes Challenge
Through the Craft Room Door Anything Goes Challenge
Creatalicious Anything Goes with Optional Thanks Challenge
613 Avenue Create Anything Goes with Optional 3D Challenge
Not Just Cards Anything Goes Challenge
]]>
STAMPING: I started with a card front that was 8.5″ x 5.5″ (yes, that’s half of a standard sheet of card stock!). Following the rule of thirds, I stamped out the cuties from The Greeting Farm Xmas Sweeties in the left and bottom 2/3 of the card front. Then to the right and bottom 1/3 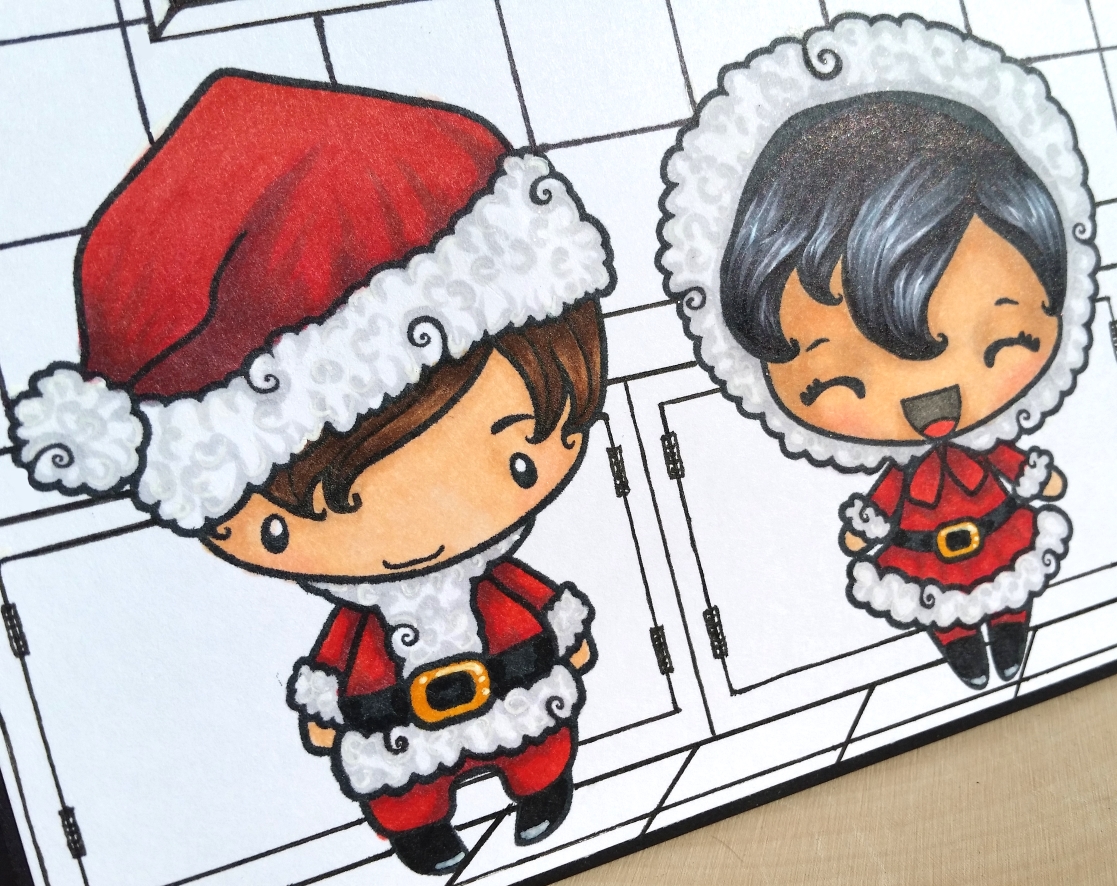 of the card front I used several of the stamps from the Lawn Fawn Sprinkled with Joy stamp set. I stamped in the stove/oven combination and filled the oven window with a cookie tray and some sugar cookies. The sentiment is a combination of two stamps also from this stamp set.
COLORING: To spotlight the two kids, I only colored them. I used the following Copic colors:
Fur on hats and trims: N2, Uni-ball Signo White Gel Pen and Clear Wink of Stella
Red holiday clothes: R24, R27, R29 and N4
Belt buckles: YR24 and Y17 with Uni-ball Signo White Gel Pen and Clear Wink of Stella
Skin: E00, E21, V20, R30 and R20
Black hair: B01, C5, C7 and C9
Brown hair: E55, E57 and E59
DOODLING: Directly above the stove/oven, I doodled in a simple range hood. To build up the rest of the kitchen scene, I doodled in wall tiles, a counter top, cabinets, and floor tiles. For the sentiment above the kiddos dressed in their furry holiday costumes, I tried to create a modern twist on the idea of an embroidered sampler. I doodled a frame and faux stitching around the sentiment that reads, “May your holidays be sprinkled with joy”. For most of the doodling, I used a Copic Multiliner Pen in 0.1 pt, except for the faux stitching, which I wanted to appear more fine and drew in with a Copic Multiliner Pen in 0.03 pt.
Disclosure: Many of the supplies I’ve used for today’s project are linked. Some may be affiliate links, which means if you make a purchase I receive a small commission at no extra cost to you. I truly appreciate your support toward the costs of running this blog!
The following is a video share of this card:
This card is being entered into the following challenges:
Stamping Sensations One Layer Christmas Card Challenge
Farm Fresh Challenge Single Layer Card
Simon Says Stamp Furry Friends Challenge
Card Mania Anything Goes Challenge
Creatalicious Anything Goes with Optional Thanks Challenge
Lil Patch of Crafty Friends Anything Goes Challenge
Word Art Wednesday Anything Goes Challenge
613 Avenue Create Anything Goes with Optional 3D Challenge
Crafts Galore Encore Anything Goes Challenge
Through the Craft Room Door Anything Goes Challenge
]]>
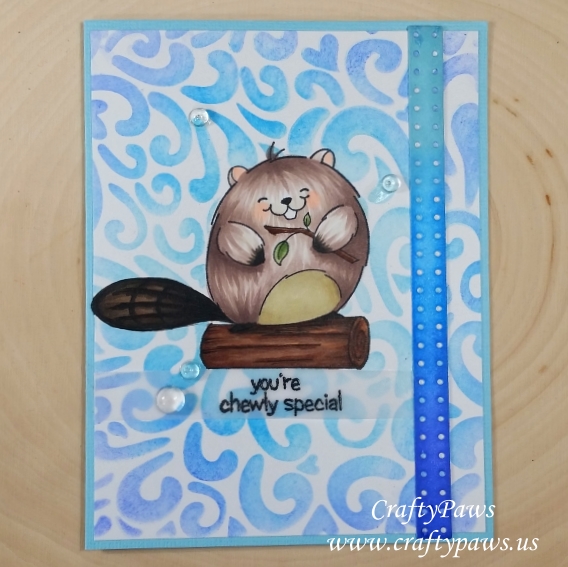 I made this mostly single layer card by stamping out the beaver from the Whimsy Stamp set “Furry Friendship.” I then created a mask to put over the stamped image so that I could use the Balzer Designs “Mini Heart Swirls” 6×6 stencil and blend on Tim Holtz Distress Inks in Tumbled Glass, Salty Ocean and Blueprint Sketch. I thought the hearts and swirls could kind of reference water on which the beaver could build a dam. LOL I created an ombre look, going from light to dark blues in an oval form around the cute little beaver.
For the beaver, I used the following Copic colors:
Beaver body: E70, E71, E74; Beaver belly: W1, E40, E81
Log and twig: E23, E25, E29 and E74
Leaves: YG61, YG64
Beaver tail, feet and hands: E23, E25, E29, W5, W7, W9
Cheeks and ears: R30
To add a little interest, I die cut a dotted strip from the MFT Die-Namics Blueprint 15 die set a couple of times and glued them stacked together to make it a little more sturdy. Then I blended on the same Tim Holtz Distress Inks in Tumbled Glass, Salty Ocean and Blueprint Sketch to create an ombre look on this strip. I added this to the right side of the card, and I think that balanced out nicely the visual weight of the dark beaver’s tail on the left side of the card.
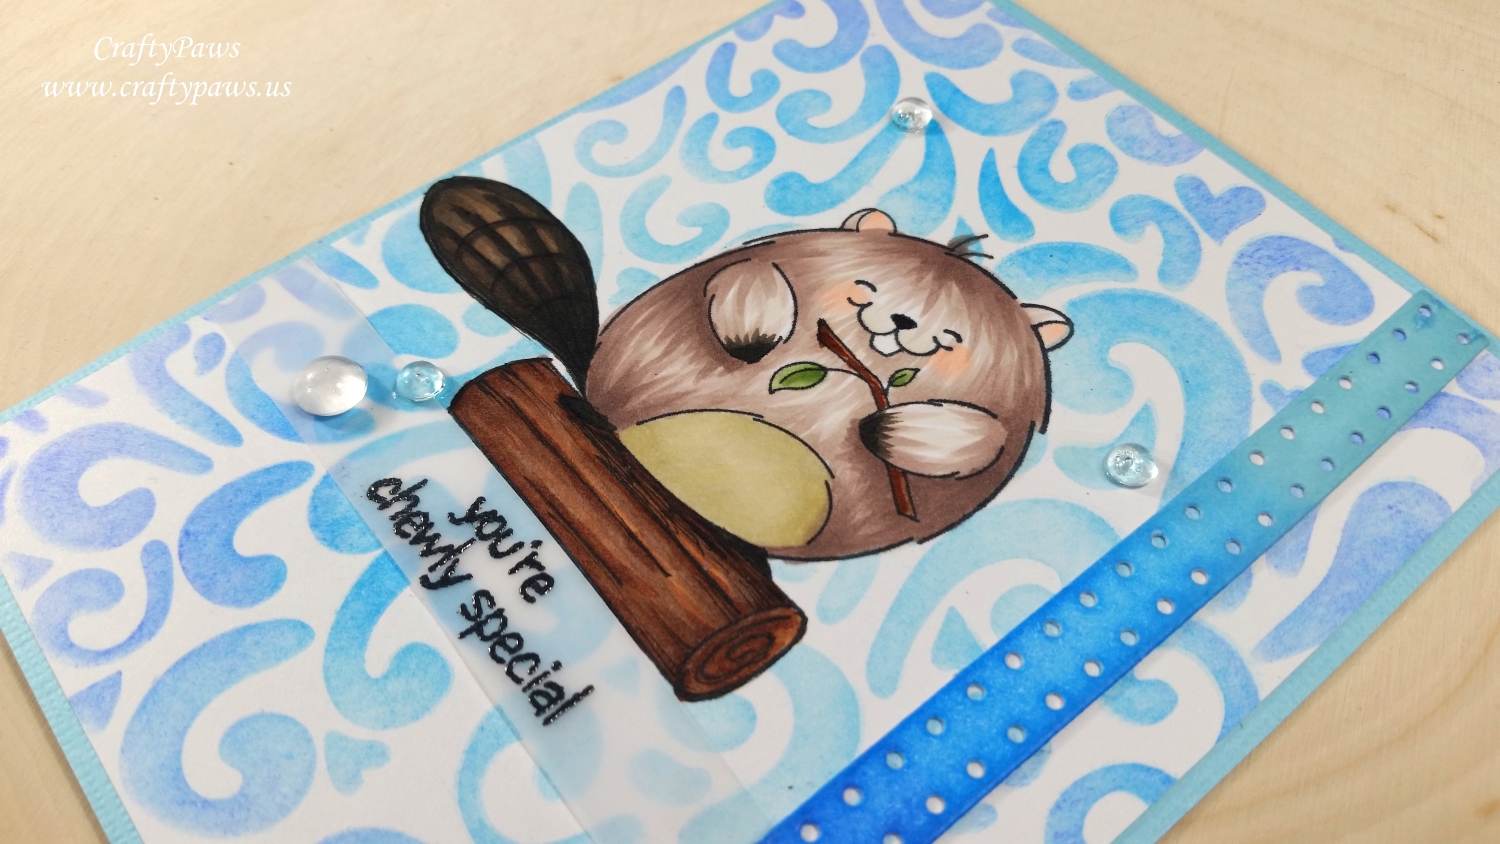
For the sentiment, I used VersaFine black onyx ink to stamp out “you’re chewly special” from the stamp set, and I used Charcoal Zing! Embossing Powder (it looks black in the pictures, but there is a slight softness to this charcoal that complements the softer look of the card design) to heat emboss the sentiment on a strip of vellum. I used Glossy Accents to glue the vellum into place in a couple of spots and then to camouflage the main glued down area, I used Pretty Pink Posh Clear Droplets in 4mm and 6mm to add some finishing touch sparkly embellishments. I thought these droplets also echoed the watery background nicely.
The following is a start-to-finish video of creating this card:
This card is being entered into the following challenges:
Whimsy Stamps Anything Goes Challenge 97
Penny Black and More For the Boys Challenge
Simon Says Stamp Wednesday Anything Goes Challenge
Simon Says Stamp Work It Wednesday Add Sparkle Challenge
Word Art Wednesday Anything Goes Challenge
613 Avenue Create Anything Goes with Optional Monochrome Challenge
Crafty Gals Corner Anything Goes Challenge
Creatalicious Anything Goes With Optional Stars Challenge
Lil Patch of Crafty Friends Anything Goes Challenge
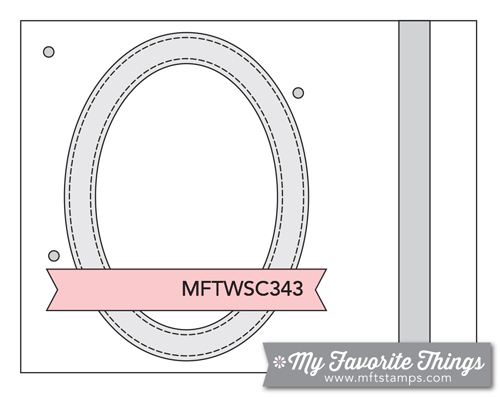
MFT Sketch Challenge #343
]]>
I wanted to keep the image soft and sweet so I stamped her with Momento Desert Storm Ink to try some no line (or faint line) coloring. I used some eyelet patterned paper to paper piece her bloomers, shading with Copic R20 and R30. For everything else I simply used the following Copic colors:
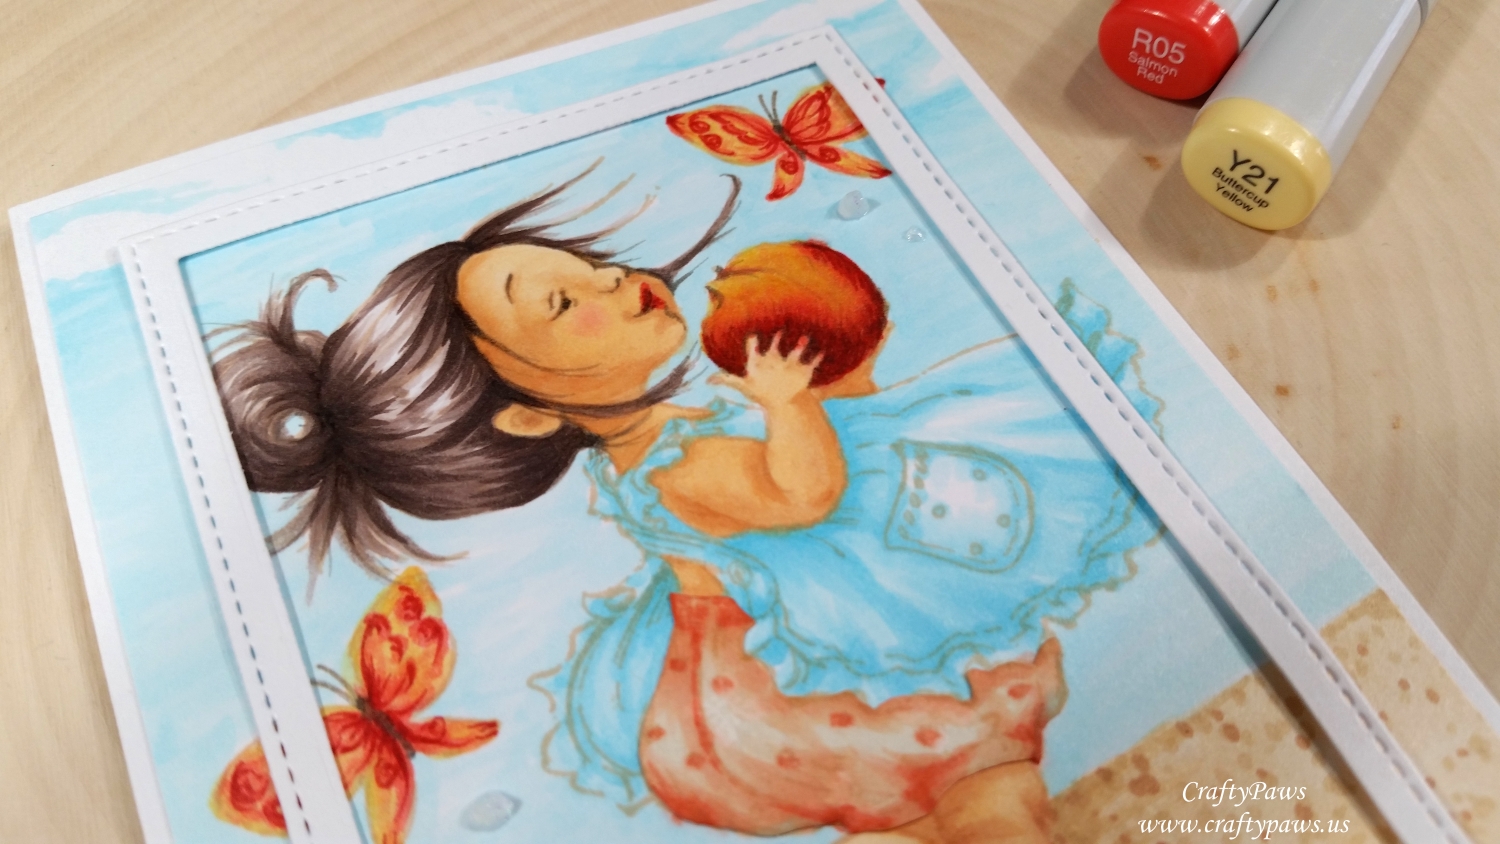 Hair: E70, 71, 74 and 79, with some detailed wisps added with a 0,03 warm gray Copic Multiliner Pen
Skin: E50, E51, E21, R20
Lips: R20, Distress Marker Festive Berries
Peach and butterflies: R5, R14, R17, Y21, E31, with details like the butterfly antennas and bodies added with a 0,03 warm gray Copic Multiliner Pen
Sand: E31, E33, E51
Apron/top: B000, B00, B01
Sky with clouds left white: B000, B00
Sandals: E70, E71, E74 with detailes added with a 0,03 warm gray Copic Multiliner Pen and shimmer added to buckles with a Metallic Gold Gelly Roll Pen
I used the largest and second largest of the My Favorite Things Die-Namics Stitched Rectangles die set and added some dimension to card front by adding a stitched frame. I mounted it onto the card front with rolled up 1/8″ double sided tape to add a bit of dimension, while keeping it relatively flat for mailing. I love how that small detail of breaking up the single layer card seems to add so much interest and emphasizes the dynamic movement in the image by contrasting it with the rectilinear framing. For final touches, I added 3 dots of Nuvo Glitter Drops in White Blizzard just under each butterfly. I think the sparkle adds a bit of magic and the placement adds to the feeling of movement from the butterflies. I made this card to represent and celebrate the start of summer, and I think this little cutie walking along the beach enjoying her giant peach does a good job of that!
This card is being entered into the following challenges:
Penny Black and More Anything Goes June Challenge
Word Art Wednesday Anything Goes Challenge
Not Just Cards Anything Goes Summer Challenge
Creatlicious Anything Goes Challenge with Optional Die Cuts or Punches
Lil Patch of Crafty Friends Anything Goes Challenge
Simon Says Stamp Wednesday Use Patterned Paper Challenge
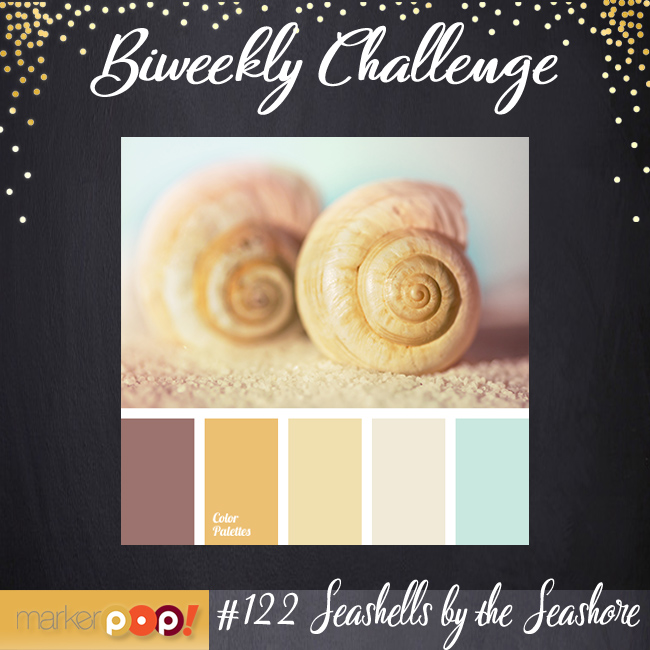
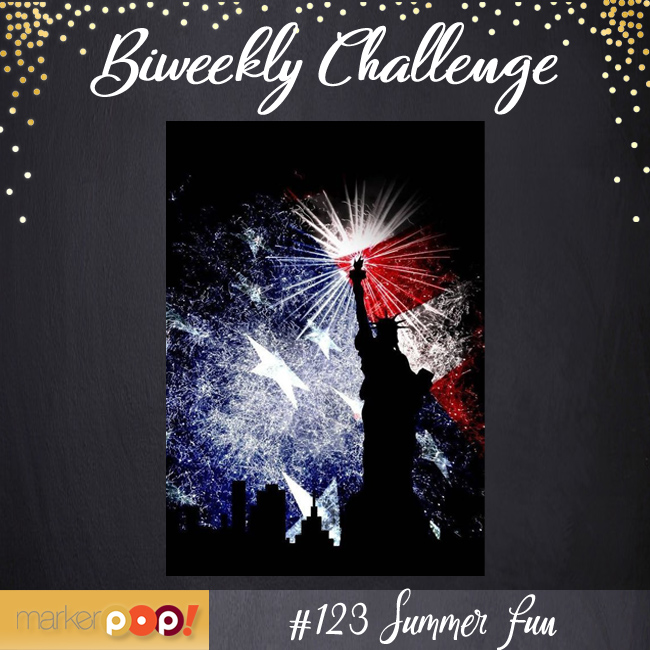
MarkerPOP Summer Fun Color and Theme Challenges #122 and 123
CAS-ual Fridays Color Challenge – WINNER
]]>
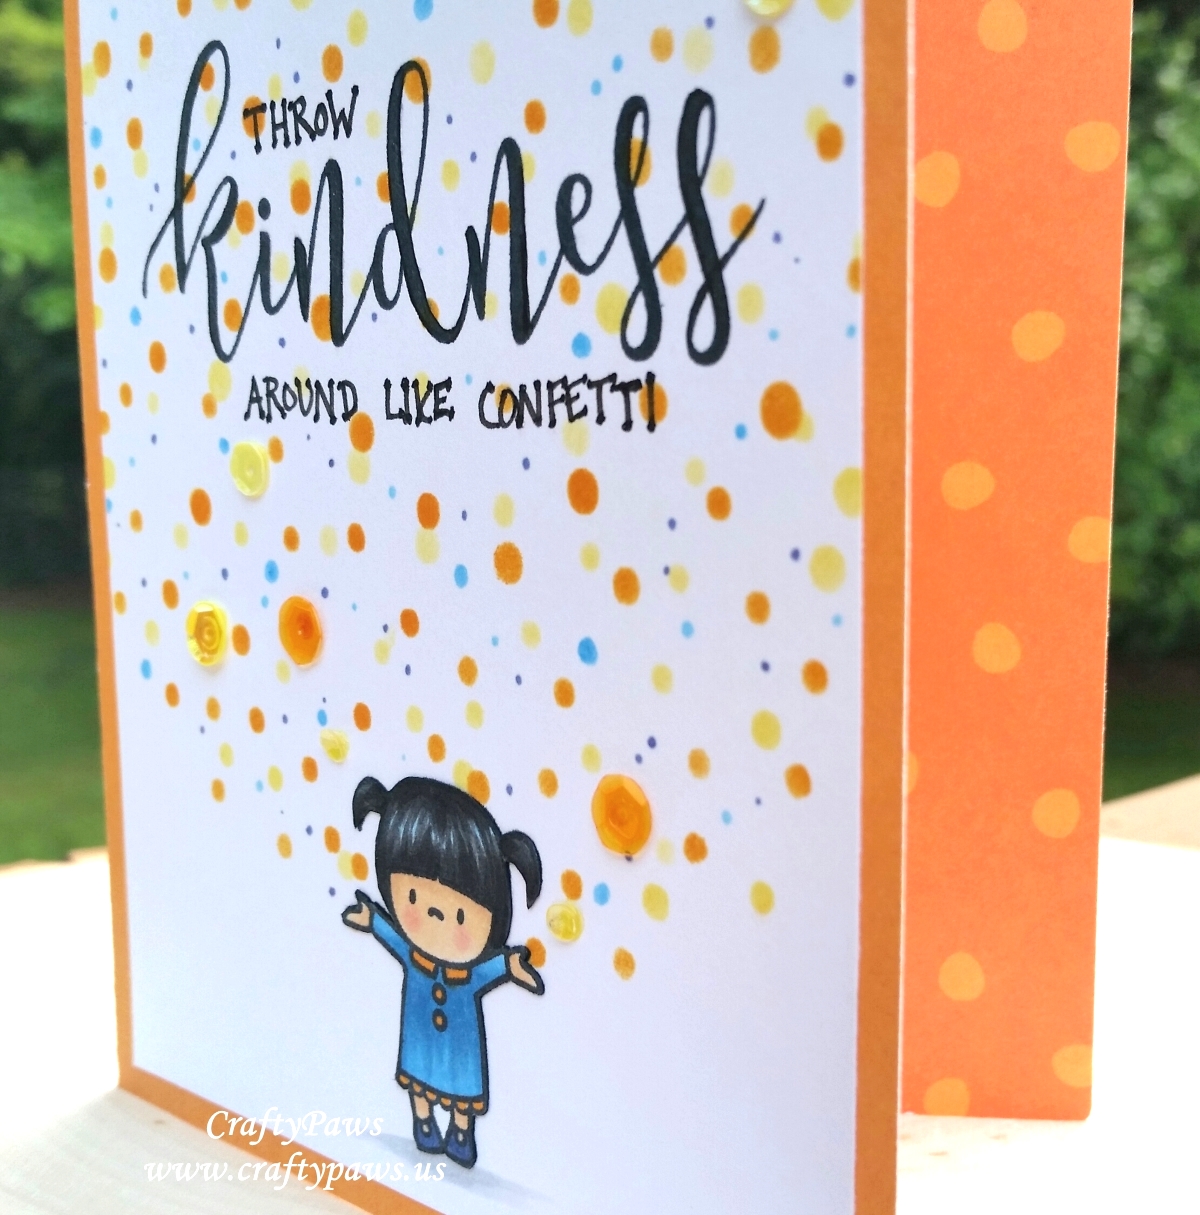 I created this card wanting the sentiment, “Throw Kindness Around Like Confetti,” to be the theme of the card design. I stamped out “kindness” with the Concord & 9th Sophisticated Script stamp set and hand wrote the other words with a 0.1 pt Copic Multiliner Pen in simple block letters. Following the rule of thirds, I positioned the “kindness” about 1/3 of the way down the A2 vertical card front.
Then at the center bottom of the card front, I stamped out the cute little girl with outstretched arms from the Mama Elephant “In My Heart” stamp set and colored her up with the following Copic markers:
Hair: B12, N7 and N9
Skin: E51, E21 and R20
Dress: B12, B14, YR16
Shoes: BV04
Grounding shadow: N1
I used the My Favorite Things MIX-ables Stencil called “Snowfall” and blended on Tim Holtz Distress Inks in Spiced Marmalade and Squeezed Lemonade with finger daubers to create the confetti background. I wanted to carry the light and dark blue tones from the little girl’s outfit into the confetti as well, so I used Copic markers B12 and BV04 to add some extra dot details in varying sizes. The stencil really helped me set the basis of the “random” look of the confetti being thrown into the air by the little girl and adding the extra smaller dots in the blues balanced the card design without interfering or distracting from the sentiment being the focal point.
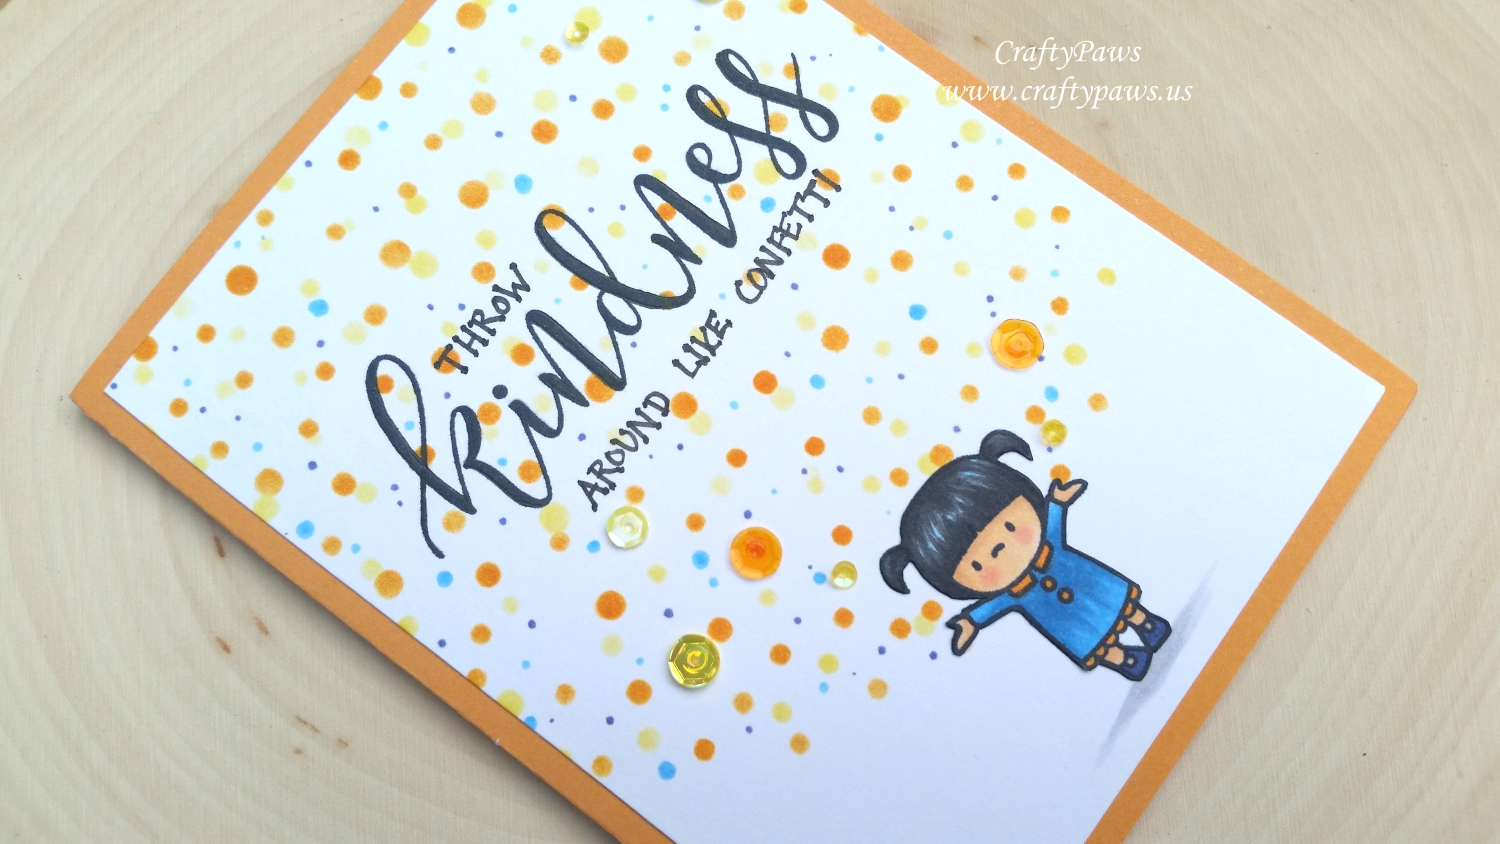
Although I wanted to keep the single layer card very CAS, I did add 9 (I have a thing about adding things in odd numbers) Dollar Tree sequins in sheer orange and Simon Says Stamp Sunshine Mix Sequins in lemon yellow to add just a little sparkle interest — and to hide a blob of the B12 that had gotten out of hand in the confetti dotting process! LOL I mounted this card front on a card base I made from some old orange card stock that has a fun random polka dot pattern on one side (that’s now an unexpected little detail on the inside of this card!).
This card is being entered into the following challenges:
Simon Says Stamp Wednesday Anything Goes Challenge
Word Art Wednesday Anything Goes Challenge
Where Creativity Meets C9 One Layer Challenge

]]>
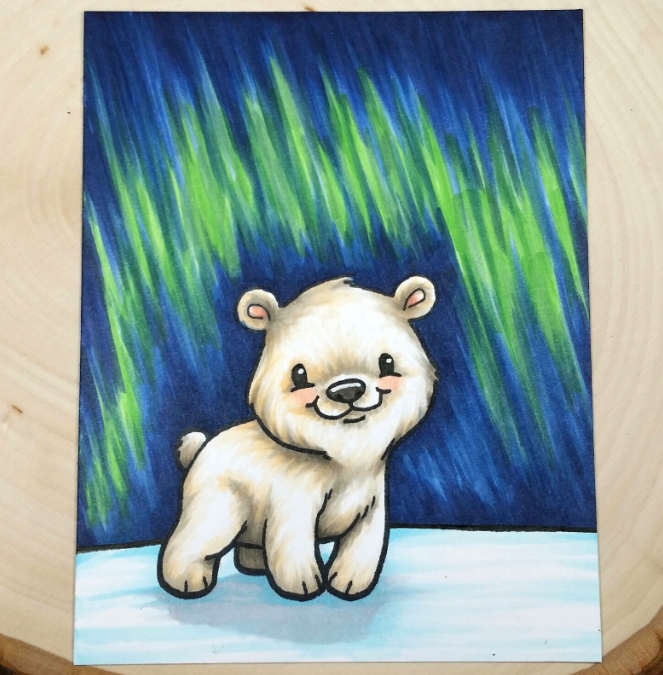 To add a bit of fun for me, I tried a new-to-me Copic coloring technique, taking a chance by trying to color an Aurora Borealis (aka Northern Lights) background sky. This was a total experiment, and I could have ruined the Copic colored bear, but I figured–nothing ventured, nothing gained. I was so excited as it started to come together. I felt lucky that it turned out — almost as lucky as I felt when I once saw the Northern Lights when I was on a family vacation cruise to Alaska 13 years ago.
I used the following Copic colors for the whole single layer card scene:
Polar bear with his “white” fur: E50, E51, W0, W1, W3, W5, W7, R30, and R20
Northern Lights sky background: G14 (yes, green!), B34, B37, B39
Snowy/icy foreground with the cast shadow: B000, B01, C1 and C2
While this is a clean and simple single layer card, I actually layered a LOT of Copic colors for what I think came out to be a rich layered and dimensional look. The following is a Copic coloring process video showing the coloring of the polar bear:
This card is being entered into the following challenges:
Simon Says Stamp Work It Wednesday Green Challenge
Simon Says Stamp Wednesday Bit O Green Challenge
Simon Says Stamp Layer it Up Challenge
CASology Melt Challenge
Word Art Wednesday Anything Goes Challenge
Creatalicious Challenge Anything Goes with Optional Pearls or Gems
Lil Patch of Crafty Friends Anything Goes Challenge
Addicted to Stamps and More Clean and Simple Challenge
Penny Black and More Anything Goes Challenge
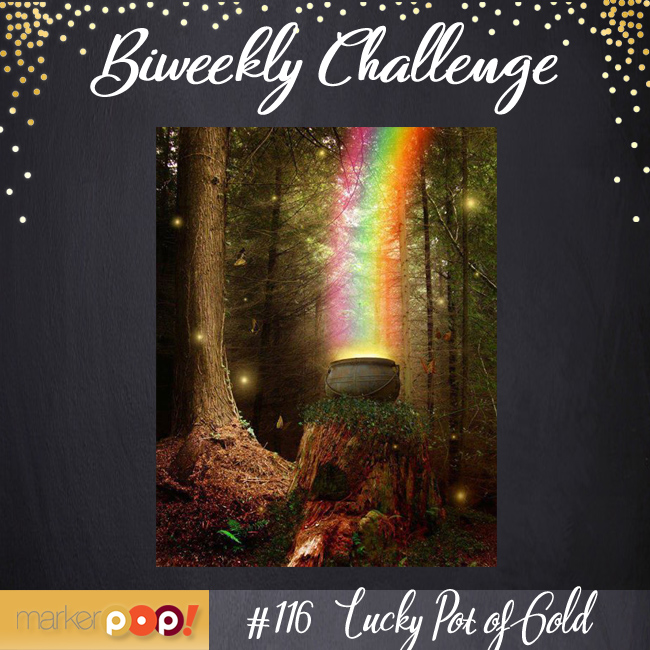
MarkerPOP Lucky Pot of Gold (Green) Challenge