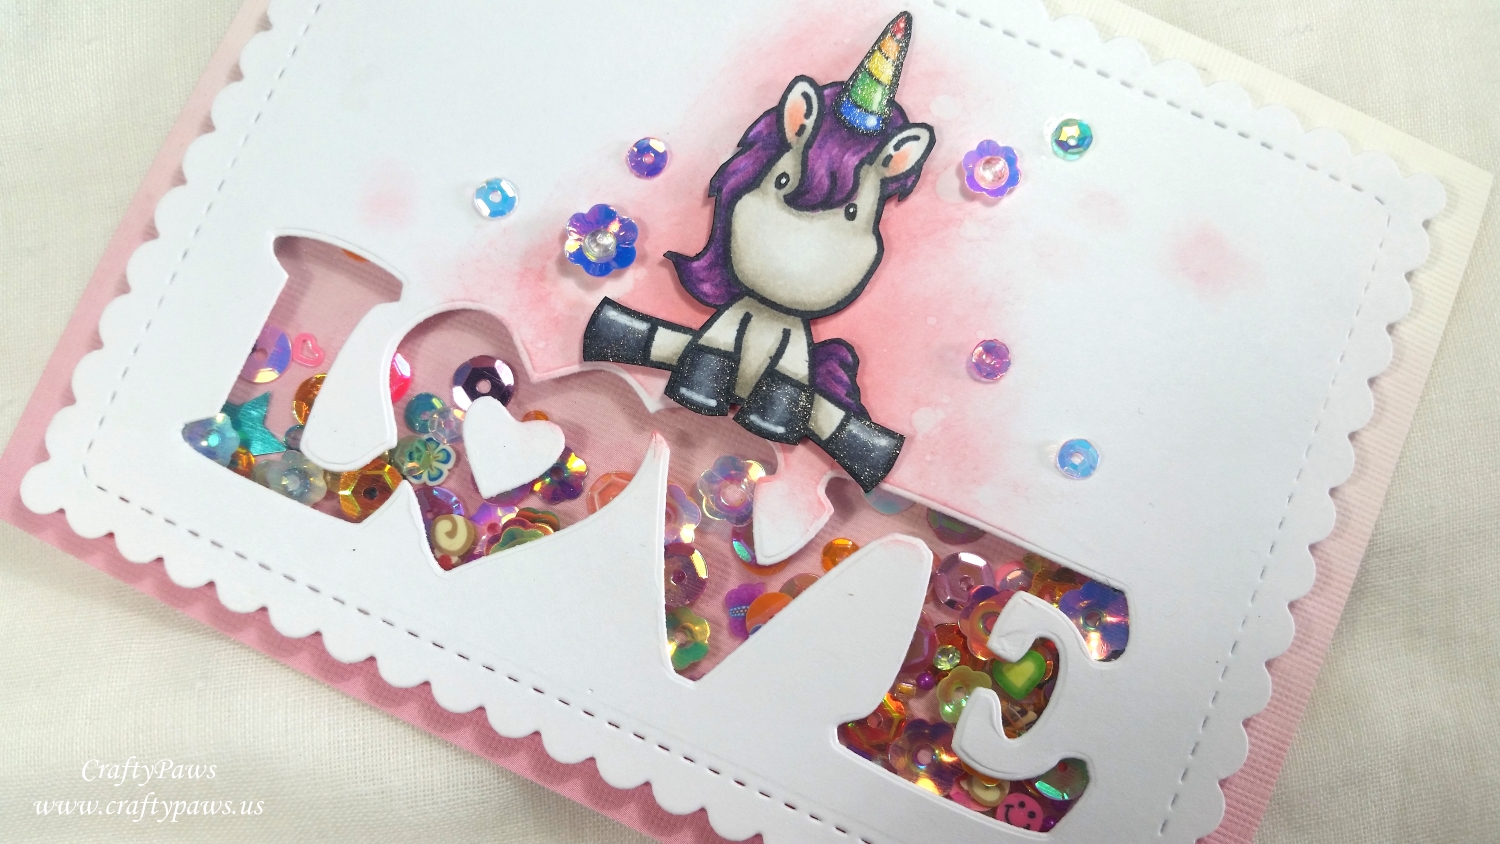
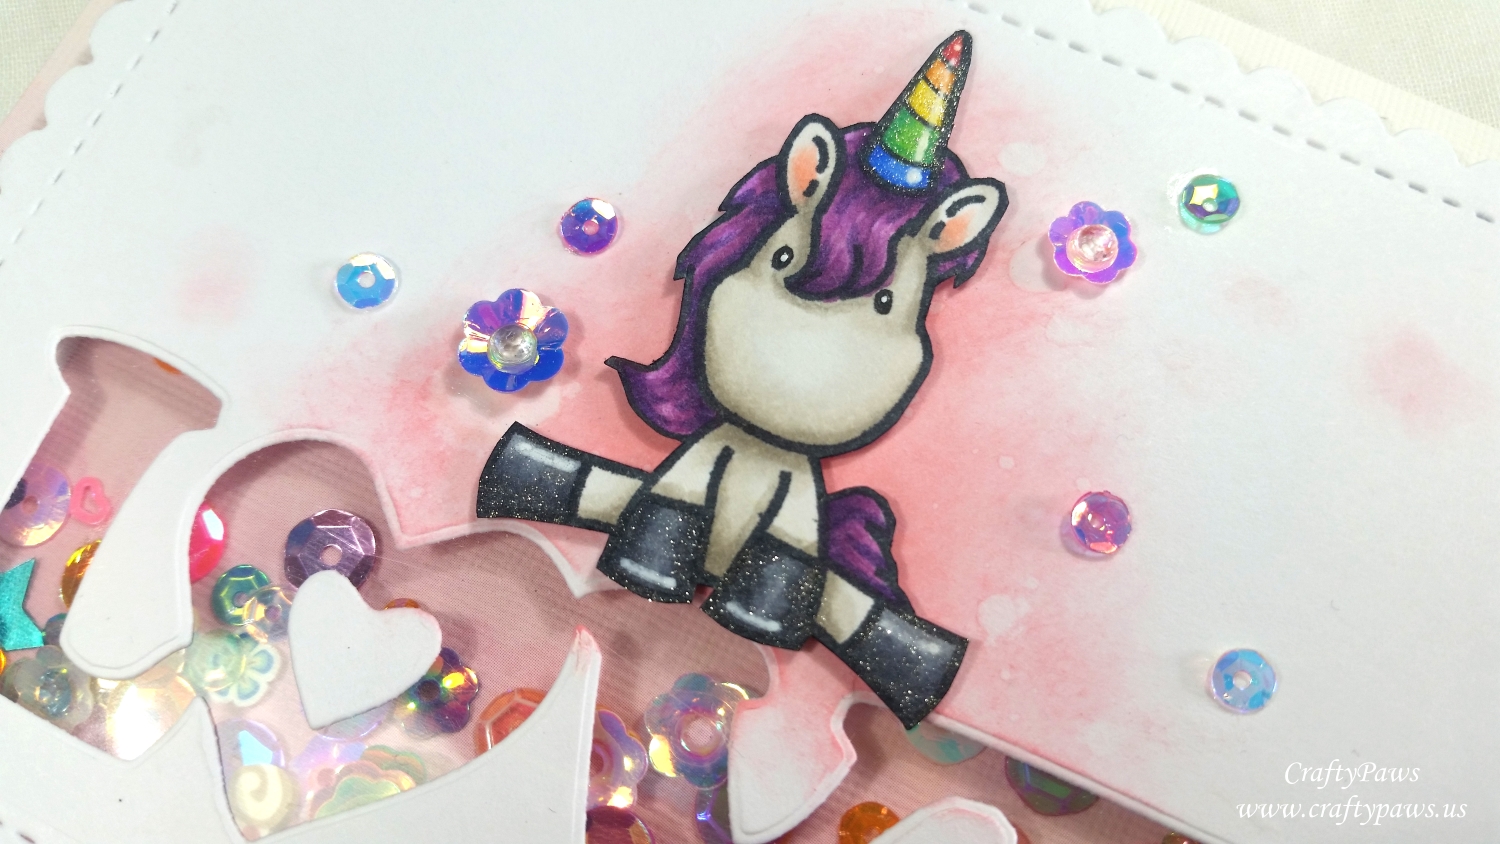
So I was excited to try out this idea with this unicorn love card. I first Copic colored up the cute unicorn from the C.C. Designs “Unicorn Dreams” stamp set:
Unicorn body and ears: W0, W1, W3 and R20
Unicorn hooves: C3, C5 and C7 with Uniball Signo White Gel Pen highlights
Main and tail: V01, V04, V06 and V09
Rainbow horn: B24 and B28; YG07 and G09; Y13 and Y08; YR00 and YR04; and R14 and R37 with Uniball Signo White Gel Pen highlights
I fussy cut that out with my favorite Fiskars Spring Loaded Scissors and inked the cut edges with a Momento Tuxedo Black Marker to give a nice finished look.
I die cut the card front with the scalloped stitched rectangle die from the WPlus9 “Sunshine Layers” die set. Then I die cut the love shaker window with the Diemond Dies Bold Love Word Die. With a scrap of plastic from some sticker packaging, I then framed in the shaker window using Beacon 3-in-1 Adhesive (which works great on non-porous substances like plastic). Then I created a double thickness double sided foam adhesive well all around the love word window. I also added double sided foam dots around the rest of the card front so that the card front would be level and fully supported. I next used my EK Tools Powder Tool to remove the stickiness around the edges of the double sided foam adhesive in the love word window area so that the Doodles Paper Playground Unicorn Sparkle Blend shaker pieces wouldn’t stick to the edges when I poured them in the well. I next removed all the release paper from the foam dots and foam adhesive strips and carefully aligned the ready-made pink ombre card base over top.
For the card front, I decided to blend on some Tim Holtz Distress Oxide Worn Lipstick behind where I was going to position the unicorn as well as a couple of smaller dots on the upper right and lower left hoof area of the unicorn. I sprinkled a bit of water on the ink and used a paper towel to get a nice splotchy look. Then after adding some thin double sided foam adhesive behind the unicorn, I placed him into place as if he was doing the splits on the love shaker window. For finishing touches I added seven additional shaker pieces around the unicorn for some sparkle and coated the unicorn’s horn and hooves with a coating of Clear Wink of Stella for some shine.
The following is a process video of creating this fun shaker card:
Disclosure: Many of the supplies I’ve used for today’s project are linked. Some may be affiliate links, which means if you make a purchase I receive a small commission at no extra cost to you. I truly appreciate your support toward the costs of running this blog!
This card is being entered into the following challenges:
Through the Craft Room Door Anything Goes Challenge
613 Avenue Create Something New Challenge
Crafty Gals Anything Goes Challenge
Simon Says Stamp Wednesday Anything Goes Challenge
Creatalicious Anything Goes With Optional Love/Anniversary/Thinking of You Challenge
Simon Says Stamp Work It Wednesday Love Challenge
Lil Patch of Crafty Friends Anything Goes Challenge
Art Impressions Feel the Love Challenge
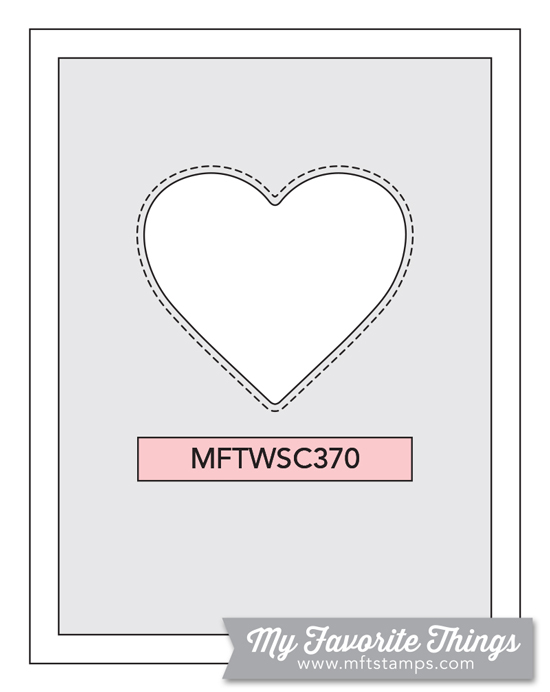
MFT Sketch Challenge #370
]]>
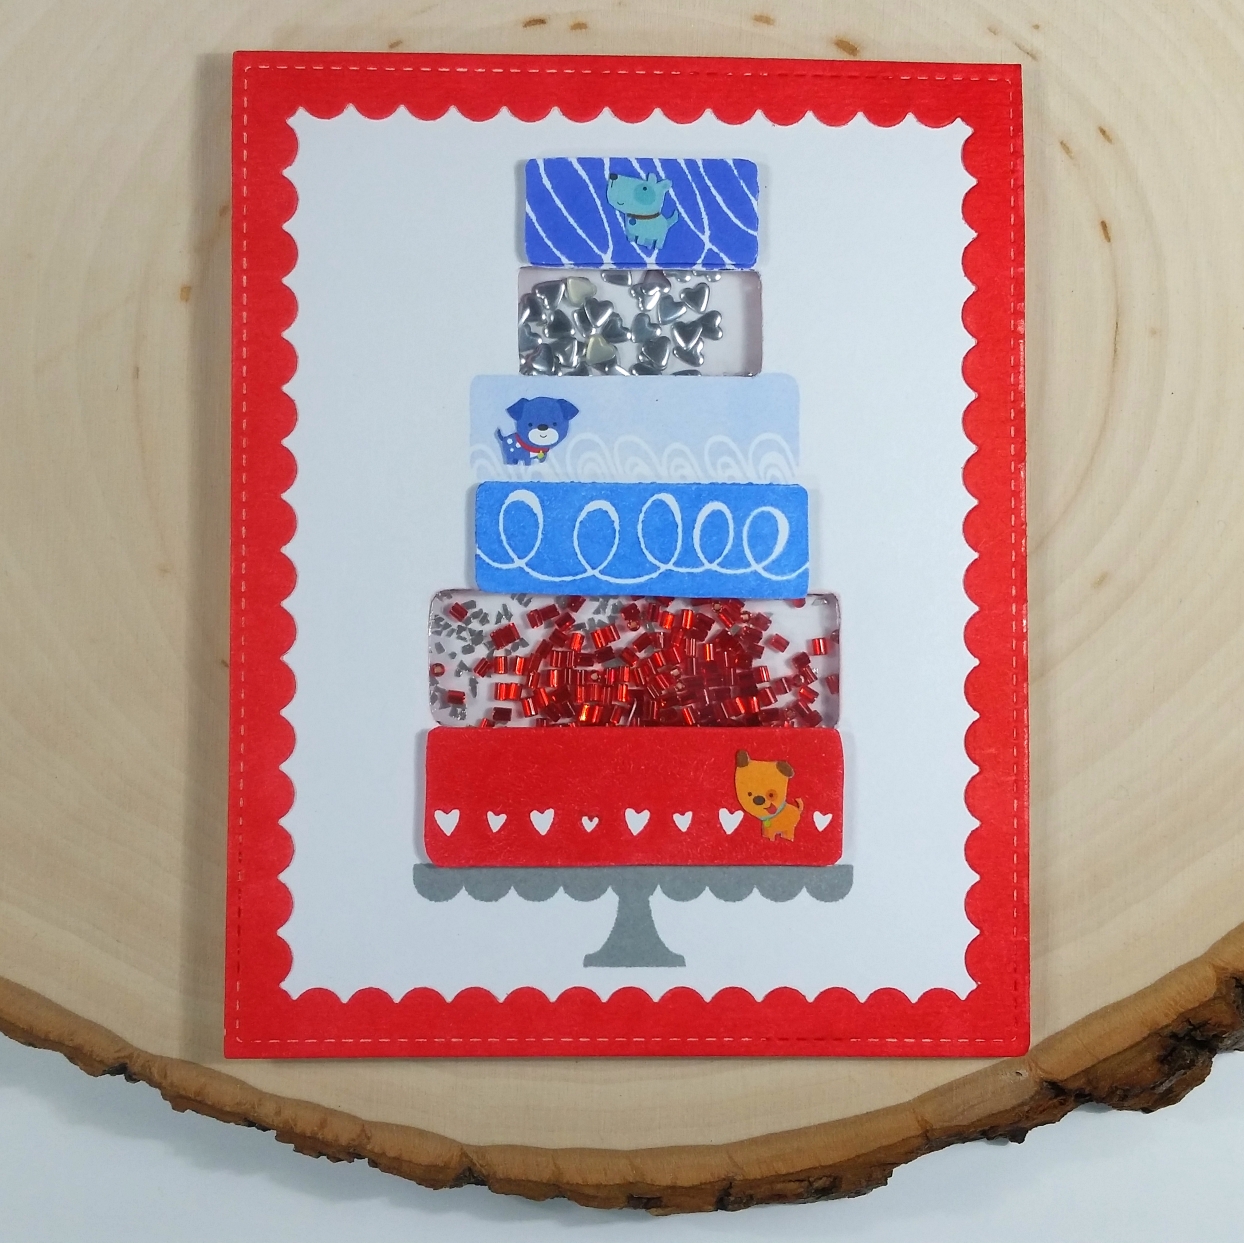 I stamped out six layer cake using The Greeting Farm Layer Cake stamp set with a variety of inks. I experimented with a variety of colors and inks in my stash and ultimately I ended up with a kind of patriotic color scheme that I thought made a hearty masculine cake (one my FIL would appreciate).
From the top down, I used Tim Holtz Distress Ink in Blueprint Sketch, then one layer I fussy cut out with an X-Acto knife to make a shaker window, next came a Tsukineko Artnic Baby Blue, followed by an Adirondack Brights pigment ink in Sale Boat Blue. Then I cut out another layer to create a larger shaker window and lastly I added an Adirondack Brights pigment ink in Watermelon. For the cake stand, I used a Lawn Fawn Premium Dye Ink in Hippo. For the two shaker windows, I filled the top one with tiny silver metal hearts and the bottom one with chunky silver glitter and red seed beads.
To frame out the card front, I used more of the Adirondack Brights pigment ink in Watermelon on a die 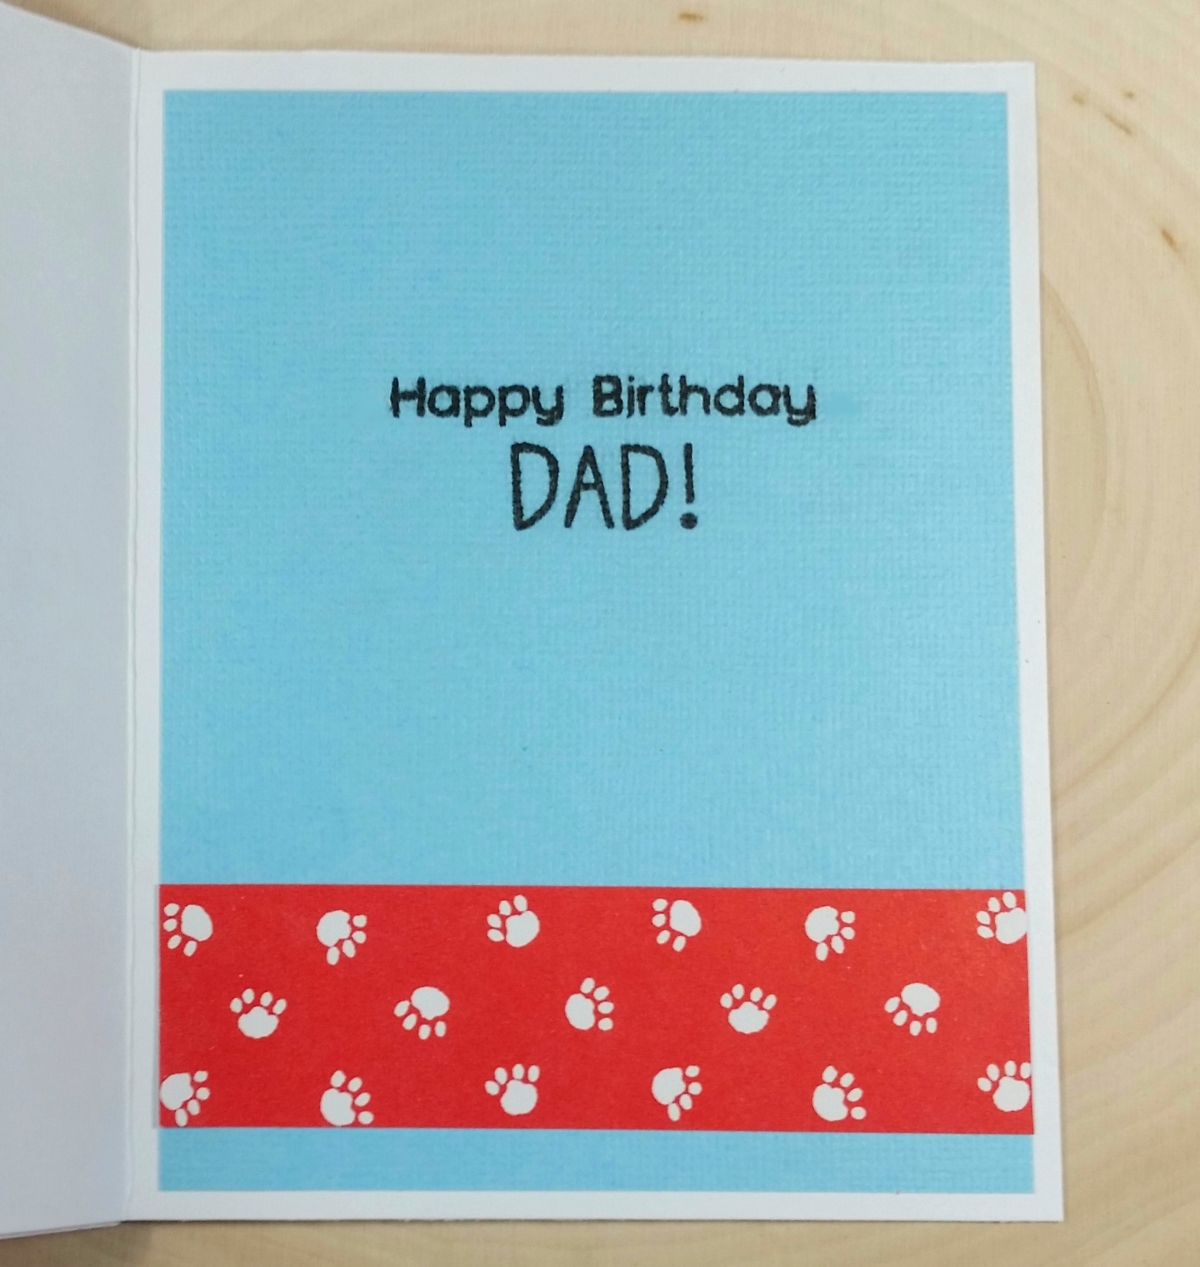 cut frame cut from the larger of the Pretty Pink Posh Scalloped Frame Die Set. I liked how repeating that red carried more of the red through the card to balance out all the blue cake layers.
To add a little more interest and dimension, I re-stamped the dark blue, medium blue and red cake layers and fussy cut them out to pop them up a bit with foam dots. Then to add a little whimsy, I painstakingly fussy cut out three tiny dogs from a Doodlebug Designs “Puppy Love” paper collection and added them to three of the cake layers.
For the inside card liner, I simply stamped out “Happy Birthday DAD!” from The Greeting Farm “I Love Dad” stamp set. I added a little scrap of puppy paw print paper from my scrap box to carry through the puppy love theme of the card and the red from the card front.
The following is a process video of making this card:
This card is being entered into the following challenges:
Lil Patch of Crafty Friends Anything Goes Challenge
The Greeting Farm Shaker Cards Challenge
Creatalicious Anything Goes with Optional Red White and Blue Challenge
Simon Says Stamp Monday Red White and Blue Challenge
Word Art Wednesday Anything Goes Challenge
Crafts Galore Encore Anything Goes Challenge
Penny Black and More For the Boys Challenge
613 Avenue Create Anything Goes with Optional Twist Monochrome
Not Just Cards Anything Goes Challenge
MFT Color Challenge #72

]]>
 I used one of the adorable heroes from The Greeting Farm’s “Little Hero” stamp set along with a mask, that I stamped first and masked before I stamped out the little guy. Then I colored him up with the following Copic colors:
Skin: E51, E21, E11
Hair: B01, C5, C7, C9, with details added with a 0.05 pt Copic Multiliner Pen
Red, Yellow and Blue superhero costume: B06, R27, R39, Y15 and C9
Then I fussy cut him out and inked the edges of the cut images with a Tuxedo Black Momento Marker (this inking detail really gives a clean finished look).
For the shaker window, I used the Pretty Pink Posh Peek A Boo Die and curled open the flaps and glued down just the tips to give a nice dimensional look. I backed the opening with a scrap of plastic sheeting from a Project Life pocket and glued that down with Glossy Accents (this is great for non-porous materials like plastic).
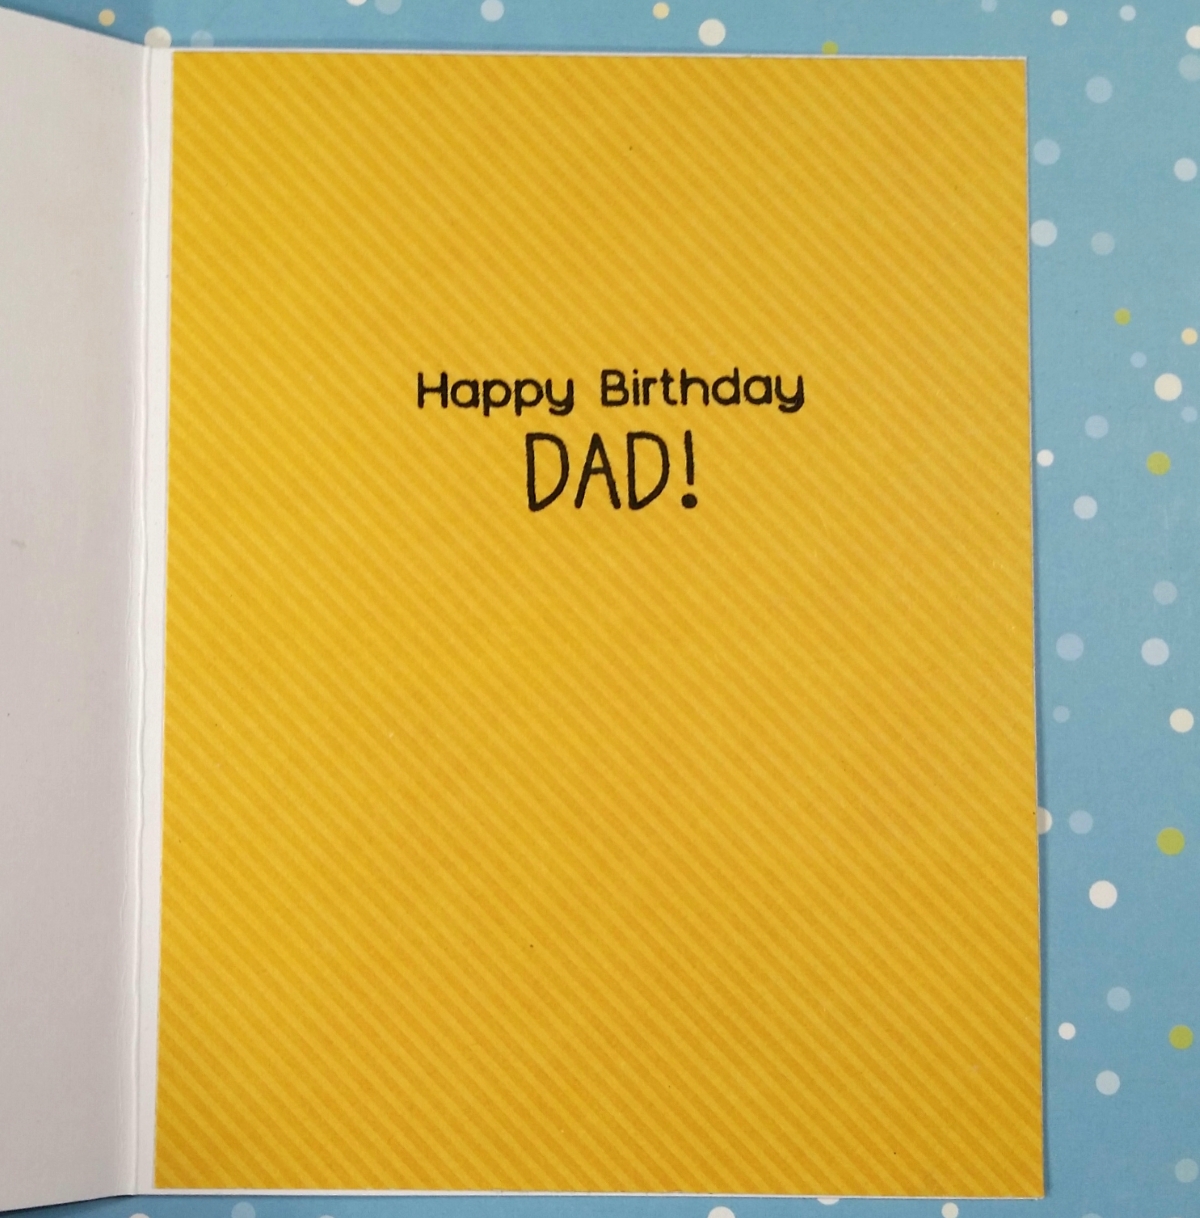
I probably should have stamped the sentiment before opening up the peek a boo die cut area, but using a MISTI tool, I was able to do it afterwards and just double stamp it to get a crisp stamping. I used the “You’re My Hero” sentiment from the Little Hero stamp set. I also took a piece of yellow striped scrap paper from my scrap box and used the “Happy Birthday DAD!” sentiment from The Greeting Farm “I Love Dad” stamp set for the inside liner.
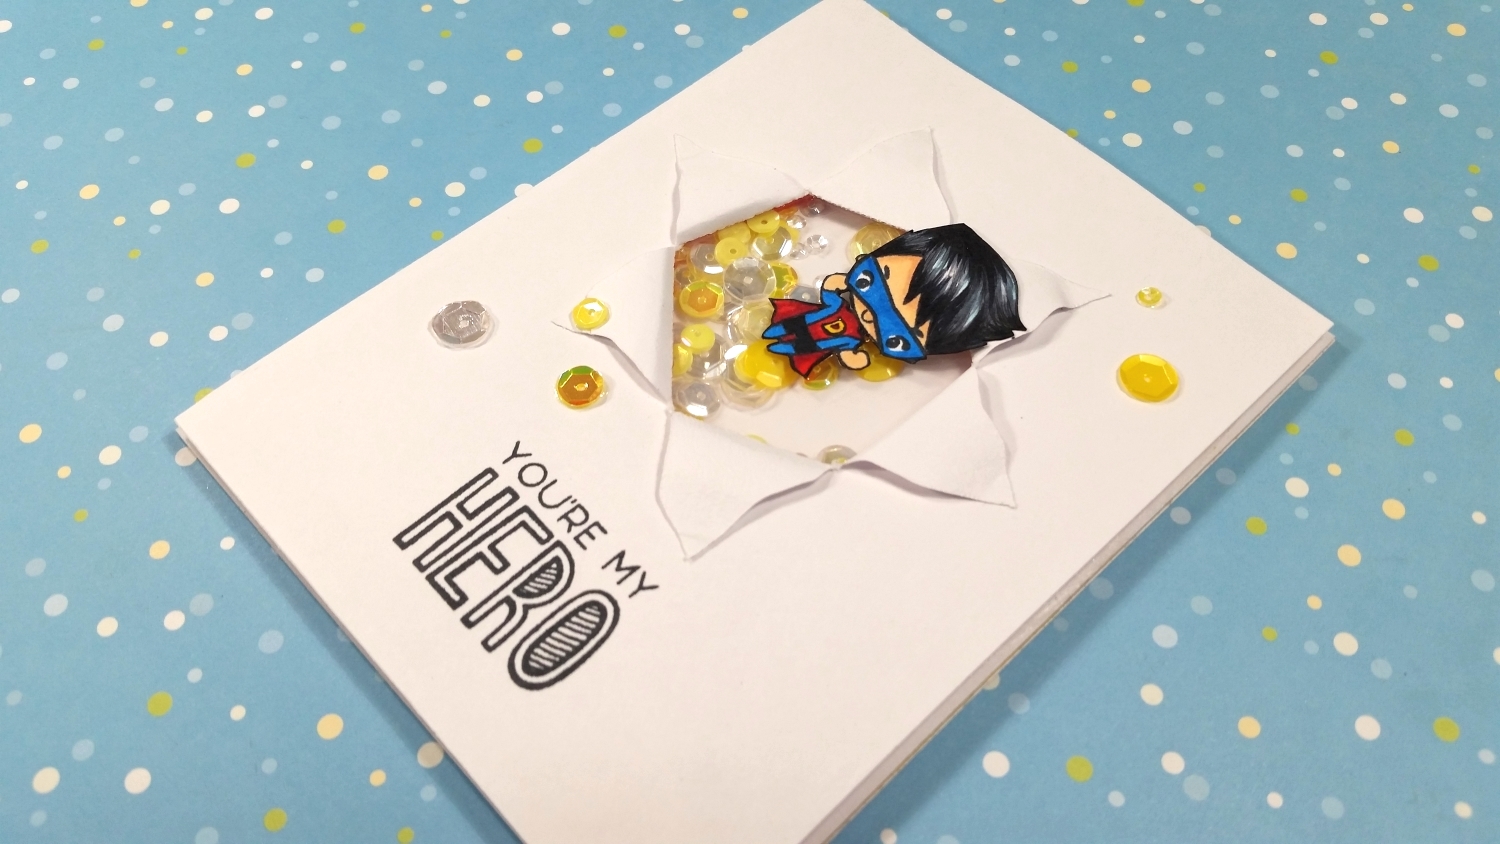
Now to complete the card front, I lined the back side of this card front with double sided foam adhesive (2 layers for added depth) and brushed the edges of the peek a boo die opening area with my embossing tool to eliminate the stickiness on the sides of the foam tape so the shaker sequins wouldn’t stick to the edges of the foam tape. Next I added sequins from the Simon Says Stamp Sunshine Mix (I love the variety of cheery shades and sizes in this mix — it’s like a burst of sunshine!) into the peek a boo well. Finally I placed the card base onto the card front, being careful not to knock the sequins out of the well.
Unfortunately, when I turned the card over, it looked like I had crushed the peek a boo flaps a bit, but I did my best to camouflage the damage with well placed extra sequins. LOL
The following is a start to finish video of how I created this card (mistakes and all):
This card is being entered into the following challenges:
The Greeting Farm Farm Fresh Shaker Cards Challenge
Simon Says Stamp Monday Red, White and/or Blue Challenge
Simon Says Stamp Wednesday Summer Sunshine Challenge
Word Art Wednesday Anything Goes Challenge
Creatalicious Anything Goes with Optional Red White and Blue
Crafts Galore Encore Anything Goes Challenge – WINNER
Not Just Cards Anything Goes Challenge
Penny Black and More For the Boys Challenge
Crafty Purple Frog Make It Manly Challenge
MFT Color Challenge #72
]]>
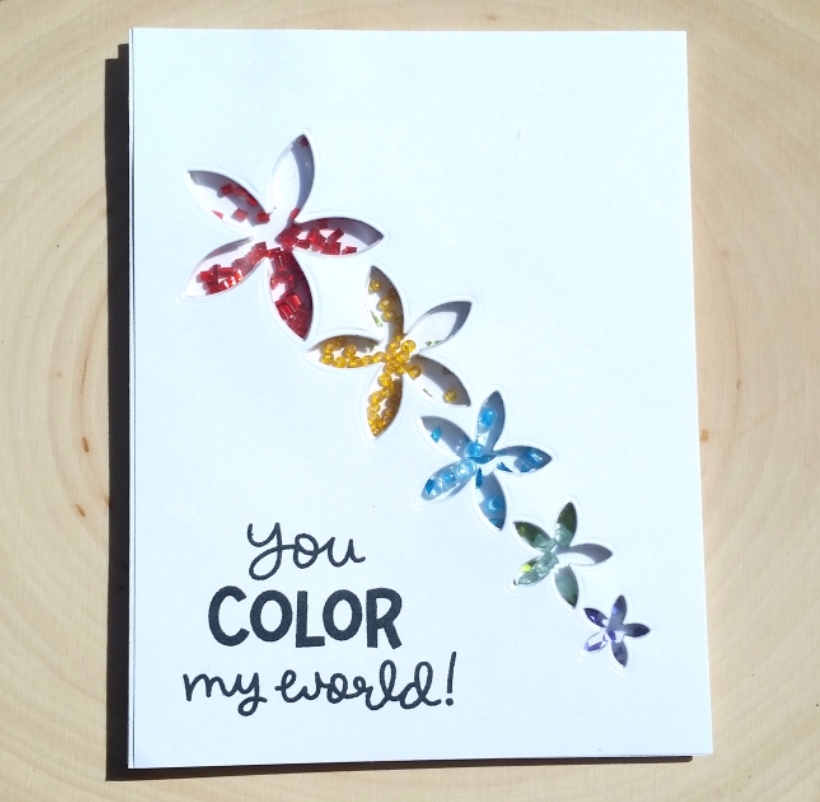 This is not a nesting die set, nor is it a die set with separate flowers in varied sizes. This was an actual single die that had the flowers all connected together. How cool, right?!
I made the first card into a shaker card by cutting out two card stock card fronts, layering in a piece of plastic to create a kind of sandwiched window. Then I cut two fun foam layering pieces to adhere to the back of the card front assemblage to add enough depth to create little floral wells for shaker pieces. To make a rainbow of flowers, I filled each flower well with different colored seed beads, confetti pieces, vase fillers, well, you get the idea–little bits and pieces of whatever I had on hand in the right colors. After all the flower wells were filled, I adhered a card stock card base, careful not to disturb all those shaker pieces from their positions. For the sentiment, I used a Lawn Fawn stamp from the “Color My World” mini stamp set, and used the MISTI to make sure that I got good, solid ink coverage.
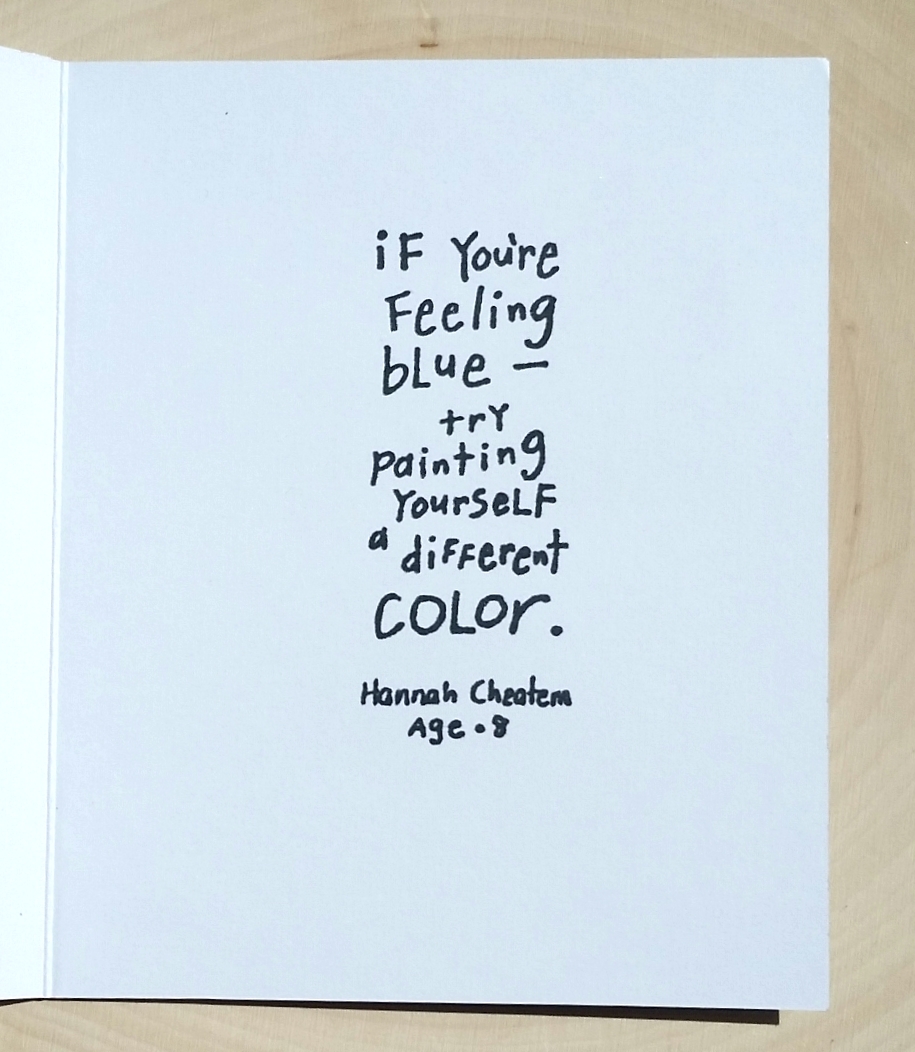
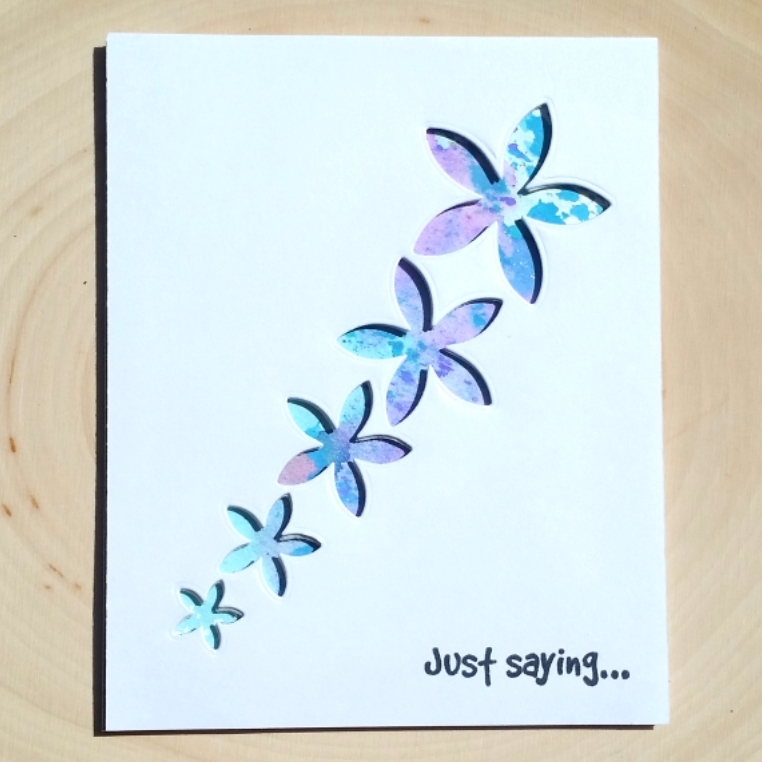 For the second card, I basically took advantage of the design of the die and cut out a card front and a single layer of fun foam to make floral windows in ascending size order. I thought about backing each flower window with a different colored patterned paper in rainbow order again, but then I came across a scrap of watercolor paper that I had in my scrap box that had some lovely mottled blues and blue-violets splatters. I backed all the flower windows with this one scrap, which just fit to cover all the openings. Then I adhered the whole front to a card base. For the sentiment, I stamped a simple phrase from the Cardz TV “Just Saying” stamp set that reads, “Just saying…” Then for the inside sentiment, I used an Inkadinkado “Kids Quotes” stamp set that reads, “If you’re feeling blue — try painting yourself a different color.”
Easy peasy, clean and simple floral cards and will be nice additions to my handmade card stash — ready to go when I want to send a little uplifting note to someone. 🙂
 Diemond Dies SALES: My readers can get 15% off and free worldwide shipping at Diemond Dies through June 19, 2017 by using the coupon code spring15 (no minimum purchase required). Additionally, if you are interested in buying the whole May 2017 Bundled New Release, there is a special bundled sale price of just $59 (which is lowered to $50 if you also use the spring15 code — that’s 44% off the individual die prices!), good through June 25, 2017. After June 19, 2017, you can use my coupon code thankskristina for 10% off and free worldwide shipping on all orders of $35 or more.
These cards are being entered into the following challenges:
Lil Patch of Crafty Friends Anything Goes Challenge
Simon Says Stamp Monday Touchy Feeling Challenge: shaker card
Creatalicious Anything Goes Challenge with Optional Die Cuts or Punches
Word Art Wednesday Anything Goes Challenge
Cards Galore Encore Anything Goes Challenge
Not Just Cards Anything Goes Challenge
613 Avenue Create Anything Goes Challenge
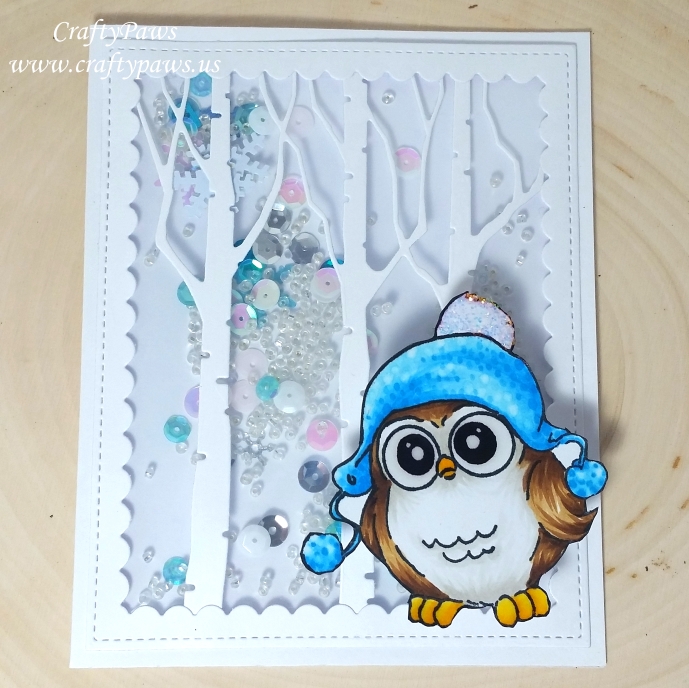 For the shaker, I used my Becky Higgins Project Life fuse tool and a plastic project life pocket. I filled it up with clear seed beads, white, teal and iridescent sequins, and snowflake confetti. For the card front, I used the larger die from the Pretty Pink Posh Scallop Frame Die Set and the Memory Box Birch Trio Die. To keep the attention on the owl and the action components of the card, I cut all these pieces from plain white card stock.
Then for the centerpiece, I used the following Copic colors for Beanie Whoot:
Owl: (brown parts) E55, 57 and 59; (white parts) W0 and W1; and (beak and claws) Y15, 17 and 38
Hat with dotting technique for texture: B00, 01, 02 and 05 with 0 for highlights
For sparkle and shine, I added Icicle Stickles on the hat pom pom, and Glossy Accents for the eyes, beak and claws.
 Then to add some fun, I fussy cut out Beanie Whoot and popped him up on a DIY action wobble, which I made with some card stock scraps and a thin wire that I wrapped around a marker to make into a spring.
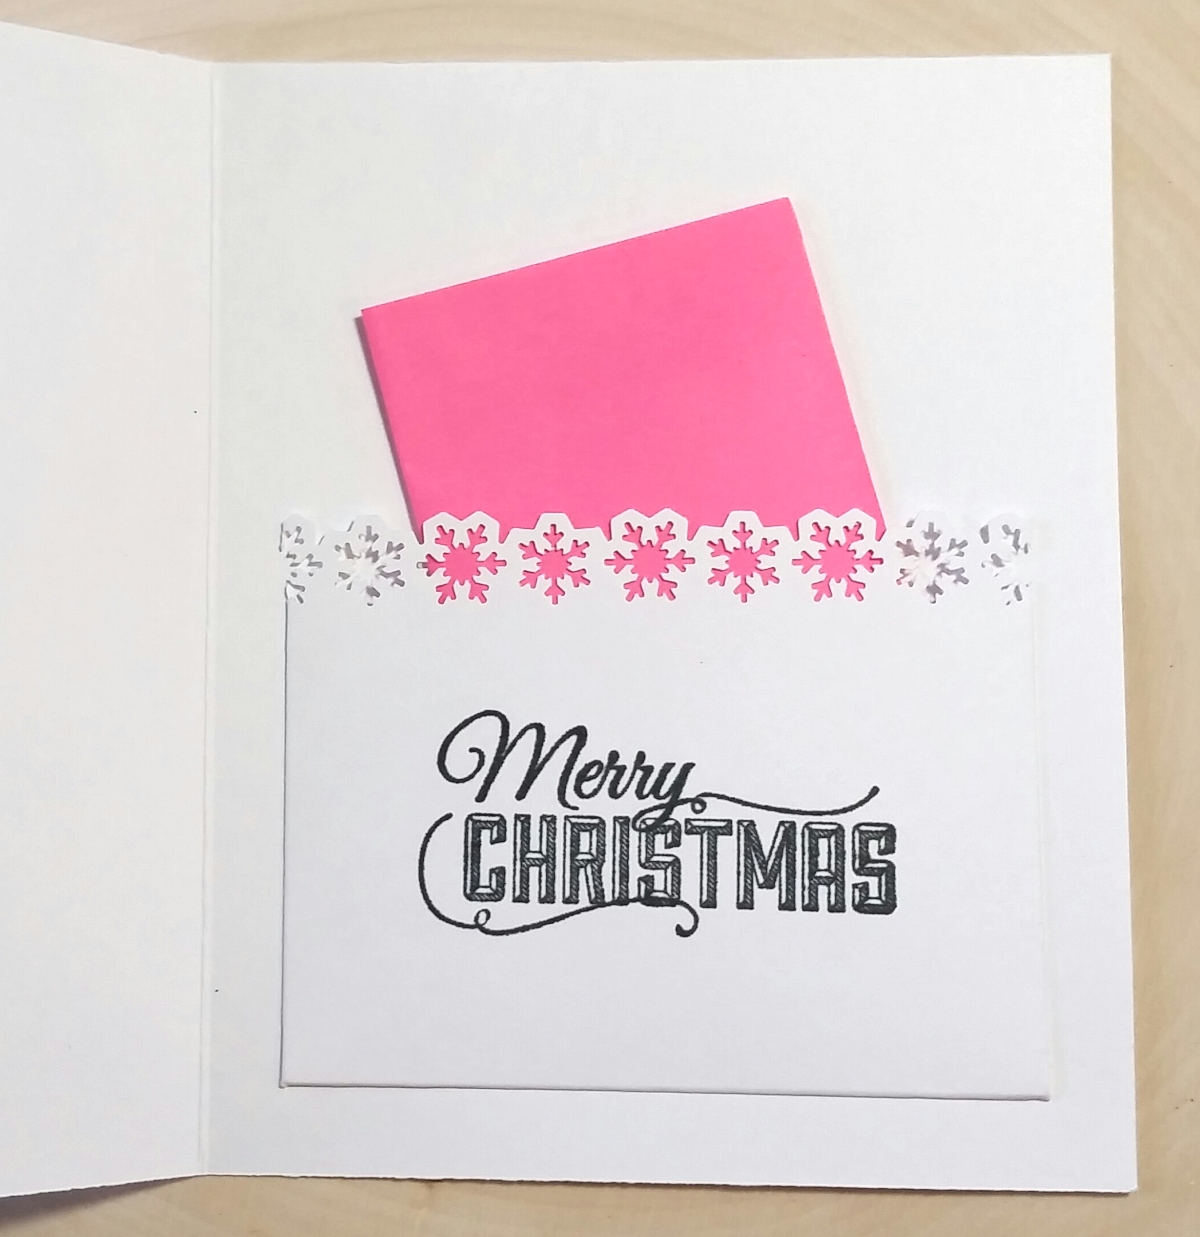
Lastly, to make this card a gift card holder (because a 21 year old really wants cash more than things an aunt would buy, right? – LOL), I made a little pocket inside the card. To make the pocket a little more decorative, I punched the top edge using the border punch from the Martha Stewart Aspen Punch Around the Page Punch Set. I stamped out the “Merry Christmas” (I love the fonts) from the Prima “Merry Nice” stamp set.
The following is a short shaker wobbler demo video:
This shaker, action wobble, gift card holder card is being entered into the following challenges:
Art Impressions Shake A Little Challenge
Simon Says Stamp Wednesday Gift It Challenge
Simon Says Stamp Let There Be Snow Challenge
Word Art Wednesday Anything Goes Challenge
Creatalicious Anything Goes with Optional Christmas Colors Challenge
613 Avenue Create Anything Goes with an Optional Holiday Happiness
Craft Your Passion Anything Goes Challenge
Crafty Purple Frog Winter Blues Challenge
Crafty Gals Corner Anything Goes Challenge
]]>
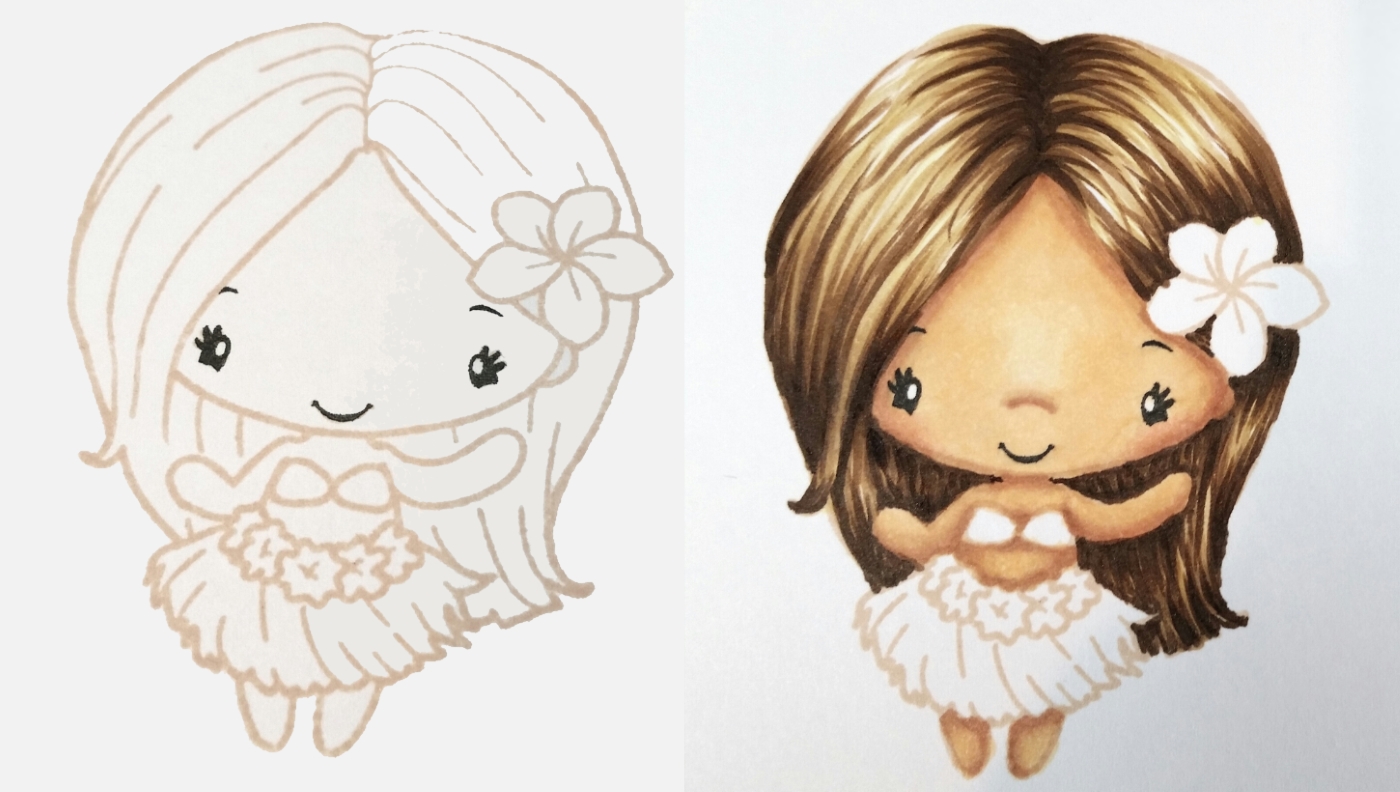
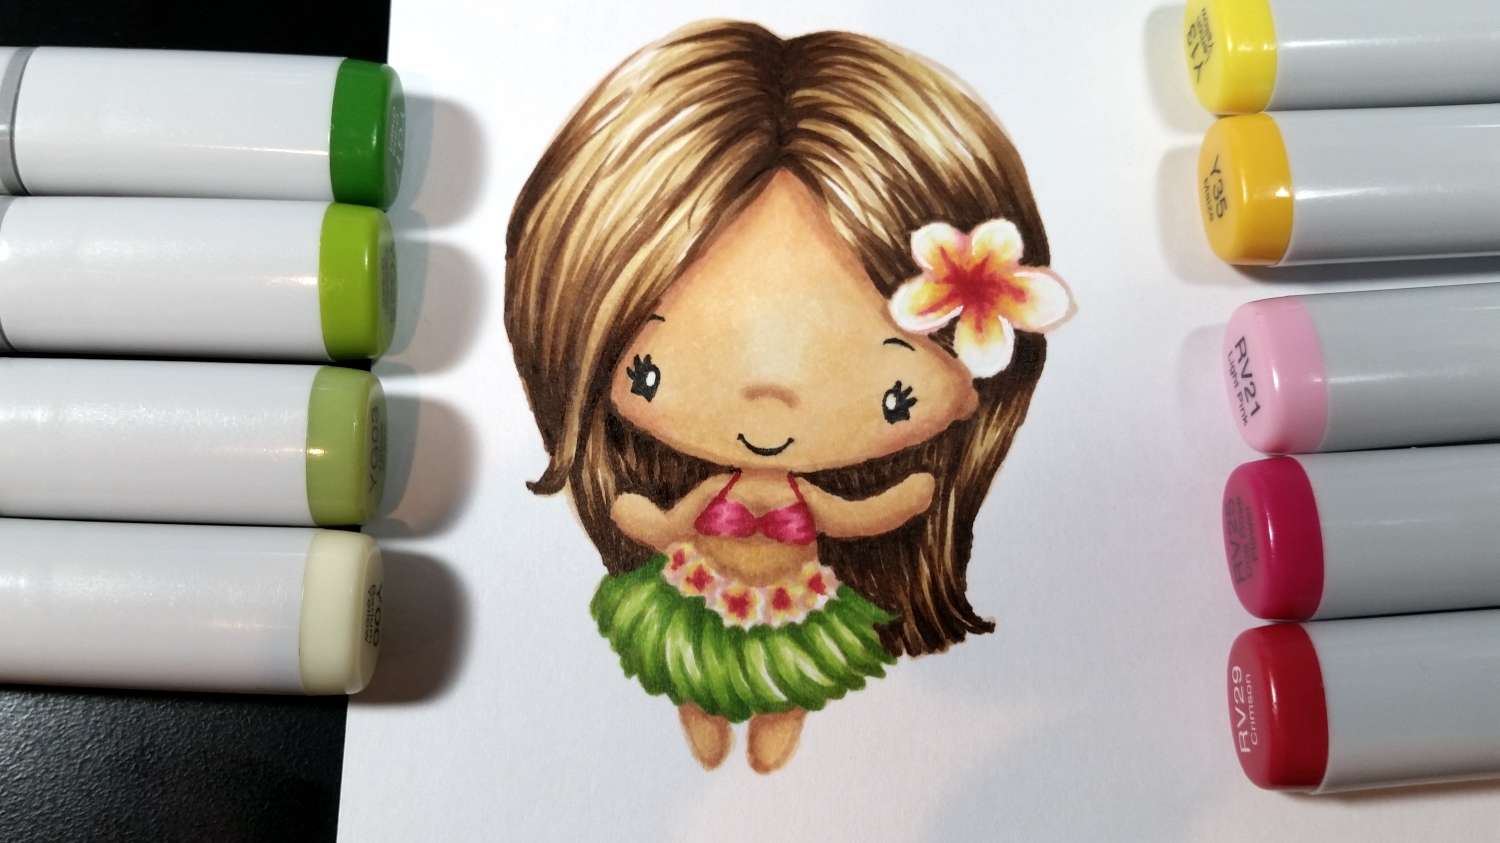
I colored up this cutie patootie with the following Copic colors, fussy cut her out, and popped her up on double sided foam adhesive:
Hair: Y11, E55, E57, E59
Skin: E50, 51, 11, 13 with R20 blush
Plumeria flowers: Y13, Y35, RV21, RV25, RV29
Bikini top: RV21, RV25, RV29
Hula skirt: Y00, YG03, YG25, YG17
Sand: E31
To make the shaker card front, I cut a window up and over to the right of the card front using the third smallest die from the Labels twenty-three Spellbinders Nestabilities die set. For the shaker background, I used another scrap of the stripey 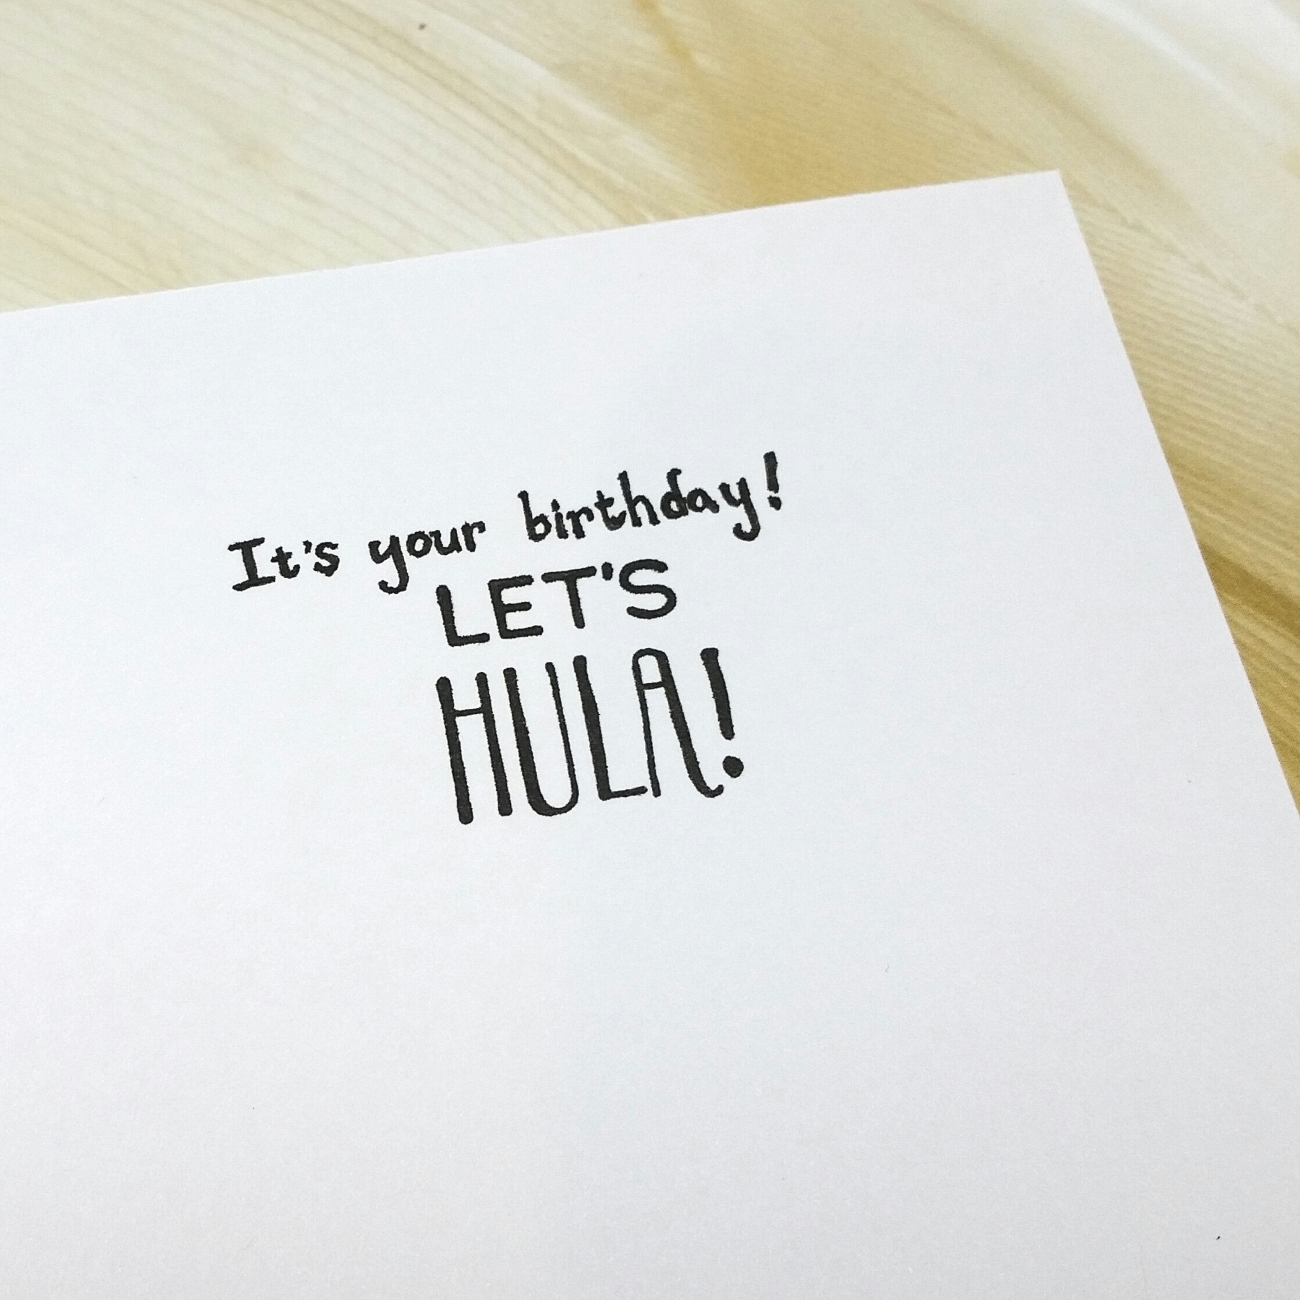 watery paper that I had made in THIS VIDEO (starting at 0:56) with Zig Clean Color Real Brush markers and watercolor paper. Then I used a little zip lock baggie and sprinkled in tiny iridescent glitter and chunky silver Stampin’ Up! glitter along with a half dozen tiny plastic dolphins that my friend Jackie had recently gifted me. I taped the baggie to the back of the card front opening, and then put double sided foam adhesive to level out the card front before attaching it to the card base.
I wanted to keep the front of the card very CAS (even with the shaker) so I opted to put the sentiment on the inside of the card. For the sentiment, I hand wrote: “It’s your birthday!” and used the sentiment stamp “Let’s Hula!” Between the “jumping and twirling” dolphins in the shaker and the little girl hula dancing on the front, I hope this card will bring a little interactive fun to the recipient. 🙂 It was a super easy peasy and fun shaker card to make.
This card is being entered into the following challenges:
The Greeting Farm Farm Fresh H20 Challenge
Simon Says Stamp Monday Flora and Fauna Challenge
Simon Says Stamp Work It Wednesday Wafer Thin Dies or Stencils Challenge
Addicted to CAS Stripes Challenge
Fab ‘n’ Funky Add A Sentiment Challenge
Through the Craft Room Door Anything Goes Challenge
613 Avenue Create Anything Goes Challenge
Word Art Wednesday Anything Goes Challenge
Creatalicious Anything Goes with an Option of CAS Challenge – WINNER
Addicted to Stamps and More Make Your Mark Challenge
]]>
I altered the adult robot to make a female version by masking off the thighs with tape, inking up the stamp, removing the tape, stamping, and then drawing in a simple trapezoid skirt. I also added a little bow to the antenna and eye lashes. LOL I altered the spunky little robot that seems to be jumping up for joy into a little dog (to resemble my Bandito) by adding ears, a nose with a split lip, and a tail. The little dog robot resembled my Biscuit sufficiently to just need a couple of eyelashes to illustrate she is a girl dog.
I used the following Copic colors in various greys for the metallic body parts: C1, C3, C5 for the girl robot; N0, N3 and N5 for the boy dog; and W1, W3 and W5 for the female dog. Then to add a little color to the entourage, I used the following colors to their “outfits”: RV52 and 55 for the girl’s pink “dress”; V06 and 17 for the purple boy dog; and R32 and 35 for the girl dog’s red top. I added Glossy Accents over all their eyes and on the tv screen to add a little shine and dimension.
I printed out on my computer the punny sentiment “Gear Up for a great Birthday!” using a free robot font I found online, and I anchored the sides and back of the sentiment with die cut gears. I used a plastic CD sleeve and used my fuse tool to make the see through shaker card. I inserted a die cut gear background into a plastic sleeve along with some silver star sequins and black and grey sequins, and I closed up the whole thing with my fuse tool (I also sealed the one open side of the sleeve with Zip Dry adhesive just to reinforce the closure).
The following is a video share of this card:
This card is being entered into the following challenges:
Simon Says Stamp Wednesday Shake It Up Challenge
Simon Says Stamp Work It Wednesday Something New Challenge
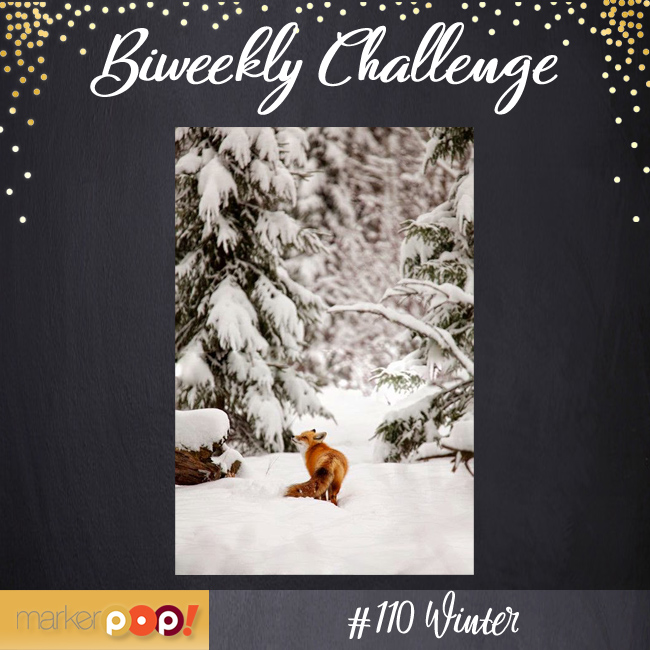
MarkerPOP Anything Goes Challenge
Card Mania Add Some Red Challenge
Lil Patch of Crafty Friends Anything Goes Challenge
Art Impressions Shake, Rattle and Roll Challenge
613 Avenue Create Anything Goes Challenge
Seize the Birthday Anything Goes Birthday Challenge
Word Art Wednesday Anything Goes Challenge
Fab and Funky Male Birthday Challenge
Thanks for stopping by and have a fabulous day!
]]>
I knew I wanted a large card to create a kind of “store front” look with a bright, welcoming awning and a large picture window. To add an interactive element, I made the front window a floating shaker through which you could see a room full of puppies from the Mama Elephant “Playful Pups” stamp set. Oh my gosh, aren’t those puppies the cutest?
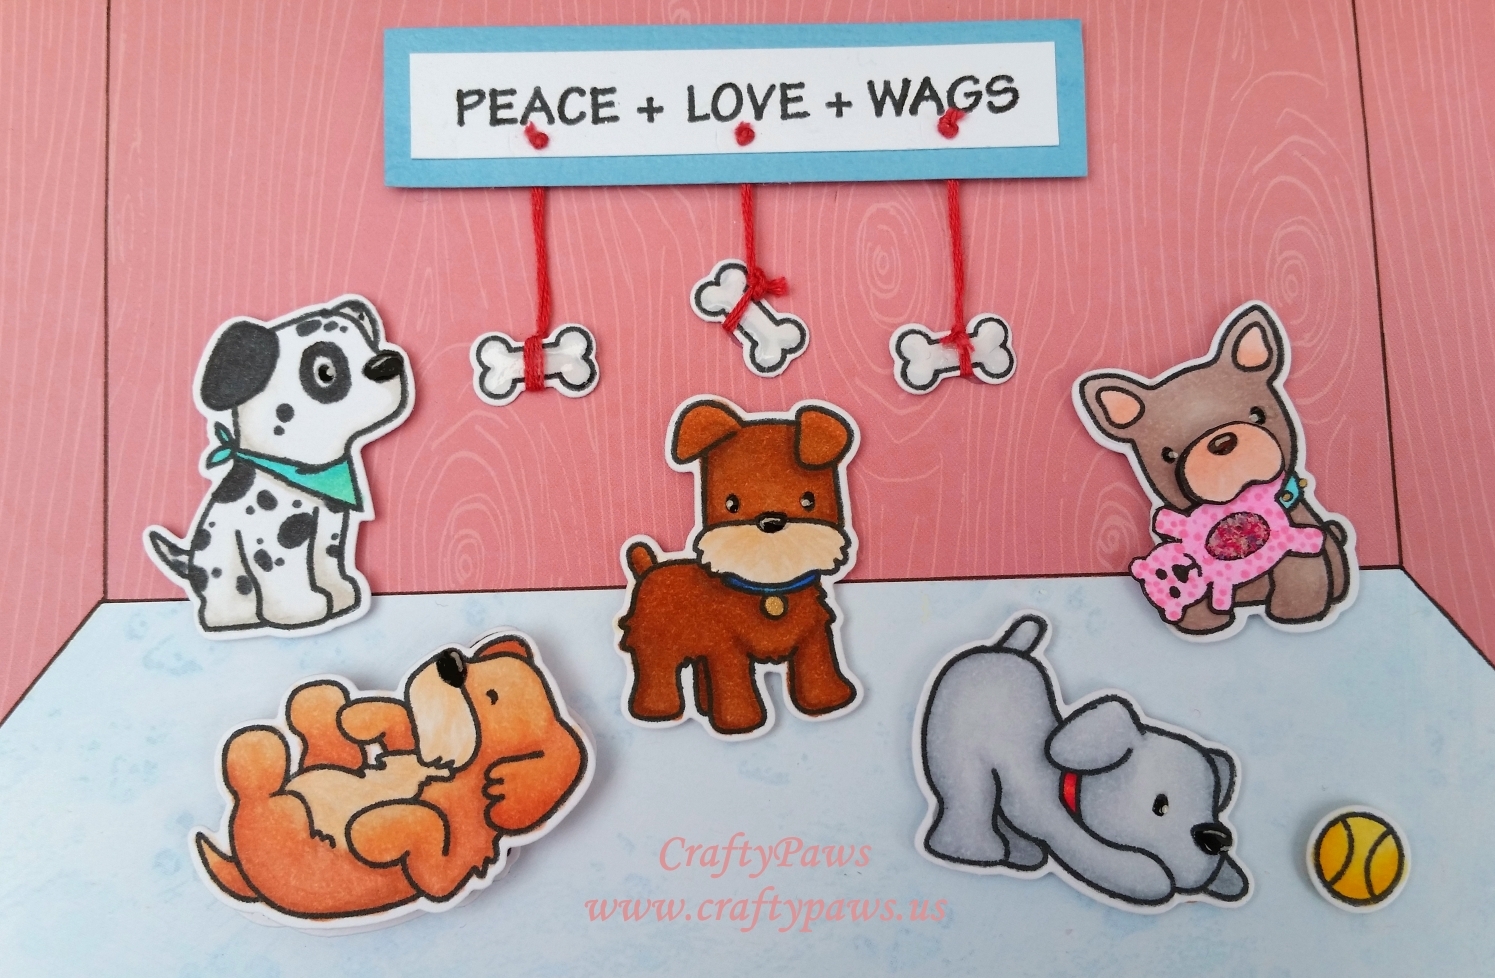 The following are the Copic colors I used for the puppies, tennis balls, and bones:
Dalmatian: W1, 8, 9; Bandana: BG11, 45
Rolling Golden Retriever: E21, 11, 13 and 41; Belly and muzzle: E41 and 41
Center Terrier-mix: E33, 35, 23, 37, 29; Muzzle: E41 and 51; Collar: B24, 29; Tag: Gold metallic Sakura Gellly Roll Pen
Weimaraner playing with ball: C1, 3, 4 and colorless blender; Collar: R22, 29
French Bulldog: E40 and 70; Ears and muzzle: R11; Collar: B01 ; Spikes: Gold metallic Sakura Gelly Roll Pen
Bear squeaky toy (drawn with a Copic 0.01 pt Multiliner pen and fussy cut to cover letter in stamp image): RV00, 02, 13 with belly covered in Raspberry Fizz Flower Soft for fuzzy texture
Tennis balls: Y11, 13, 15
Bones: C1 coated with Glossy Accents for shine
I started with a large 8.5″ x 12″ piece of heavy kraft card stock for the base. To accommodate the dimension of the pups, I also added a 1/8″ gusset at the top fold. I then cut a window out of the front panel with an X-Acto knife 7 3/4″ by 3 1/4″. I cut a second panel with the same dimensions so that I could insert the shaker pocket between these two panels to create a floating shaker on the front of the card without interfering with all the pups on the inside of the card. I created the shaker pocket using a scrapbook layout sleeve and a We R Memory Keepers Photo Sleeve Fuse Tool, filling it with tennis balls and bones that I stamped, colored and die cut from the Playful Pups set; pearlescent and gold sequins; and white seed beads (I find that adding something with a little dimension like beads helps all the shaker pieces move around better).
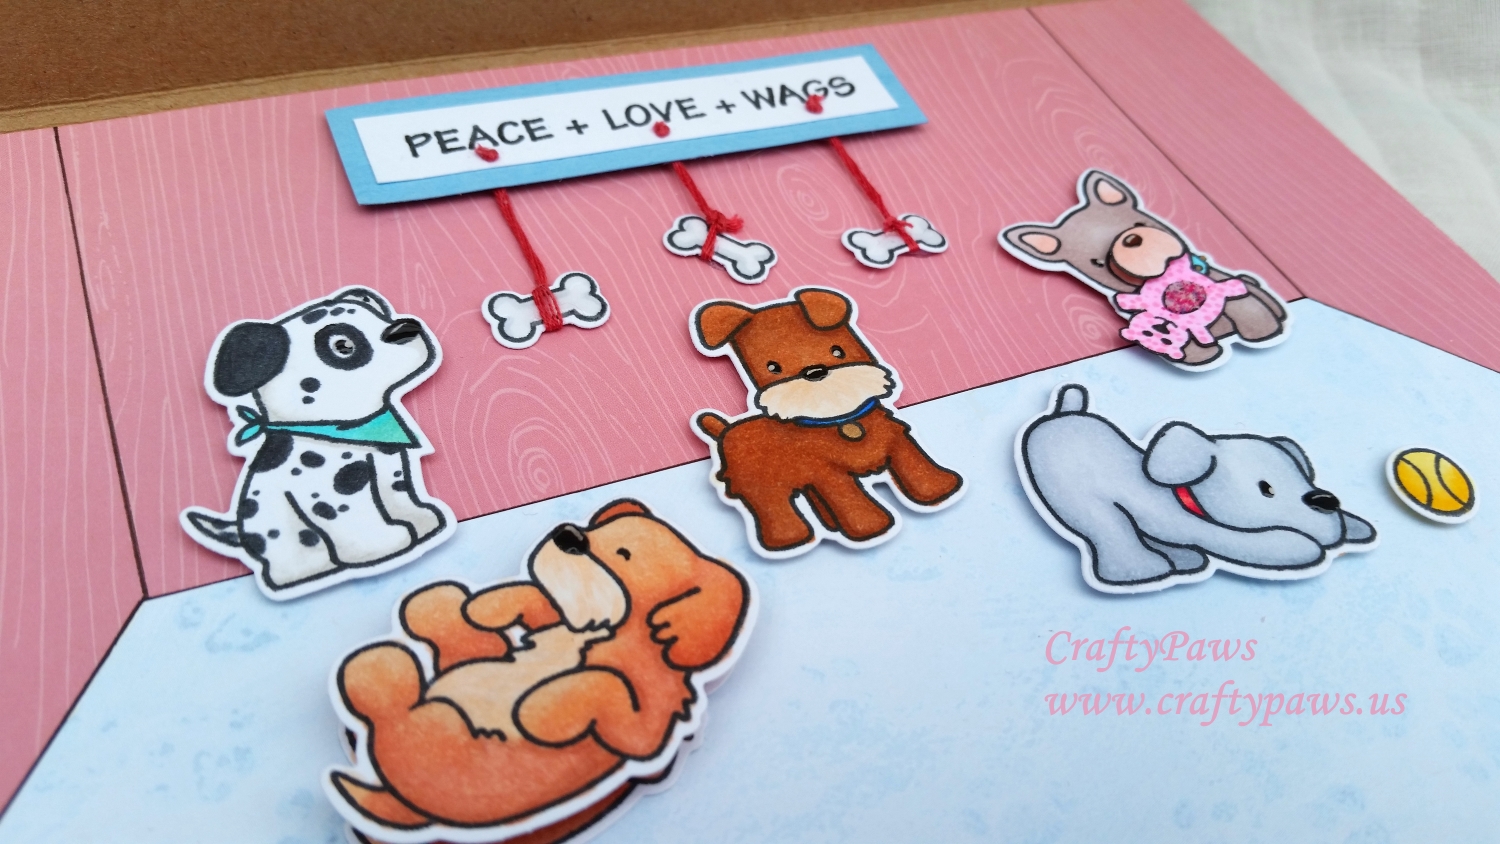 For the awning, I cut a piece of 2 3/4″ by 8.5″ piece of striped patterned paper and used the Martha Stewart Eyelet Lace Punch Around The Page Set
 to punch the end corners and along one edge of the paper. Then I scored the paper lengthwise at 3/8″ and 2 3/4″ to create the area to attach the awning at the top of the card and the drop overhang. To finish off the window, I just cut strips of white card stock to frame the opening and layered a couple of thinner strips at the top and bottom to add some visual weight to the window framing.
The puppy playroom inside was easy to create. I first cut a piece of pink wood grain patterned paper to 8.5″ x 4.5″. Then I found some pale blue puppy paw print paper that I thought would make the perfect flooring and cut that to 8.5″ x 3″. To create the look of a 3D room, I drew in vertical wall lines 1 1/4″ in from either side and 3″ down the card. I connected the bottoms of those lines with a horizontal line to create the back floor. Finally, I cut away the floor paper at a diagonal from the bottom of the wall lines to 1 1/2″ above the bottom of the card on both sides. If this is unclear, please watch the video where I point all of this out on the card so you can see what I’m describing.
Then it was just a matter of positioning all the adorable puppies that I had colored up and die cut using the matching Mama Elephant Creative Cuts die set. I popped all of them up on foam adhesive to add a little dimension and added a little extra fun with an extra muzzle layer for the French Bulldog which I fussy cut out and popped up with more foam adhesive and putting the whole Golden Retriever up on a home made action wobble (if you are interested in how to make an action wobble, see THIS VIDEO).
The following is a video share of this card:
This shaker-wobble-store front shaped card is being entered into the following challenges:
Simon Says Stamp Monday Use a Stamp + Blog Hop Challenge
Card Mania Pastel Challenge
Lil Patch of Crafty Friends Anything Goes Challenge
613 Avenue Create Anything Goes Challenge
Through the Craft Room Door Anything Goes Challenge
Simon Says Stamp Blog World Cardmaking Day Challenge (updated)
Thanks for stopping by, and I hope you have a PAWSOME day! WOOF
]]>
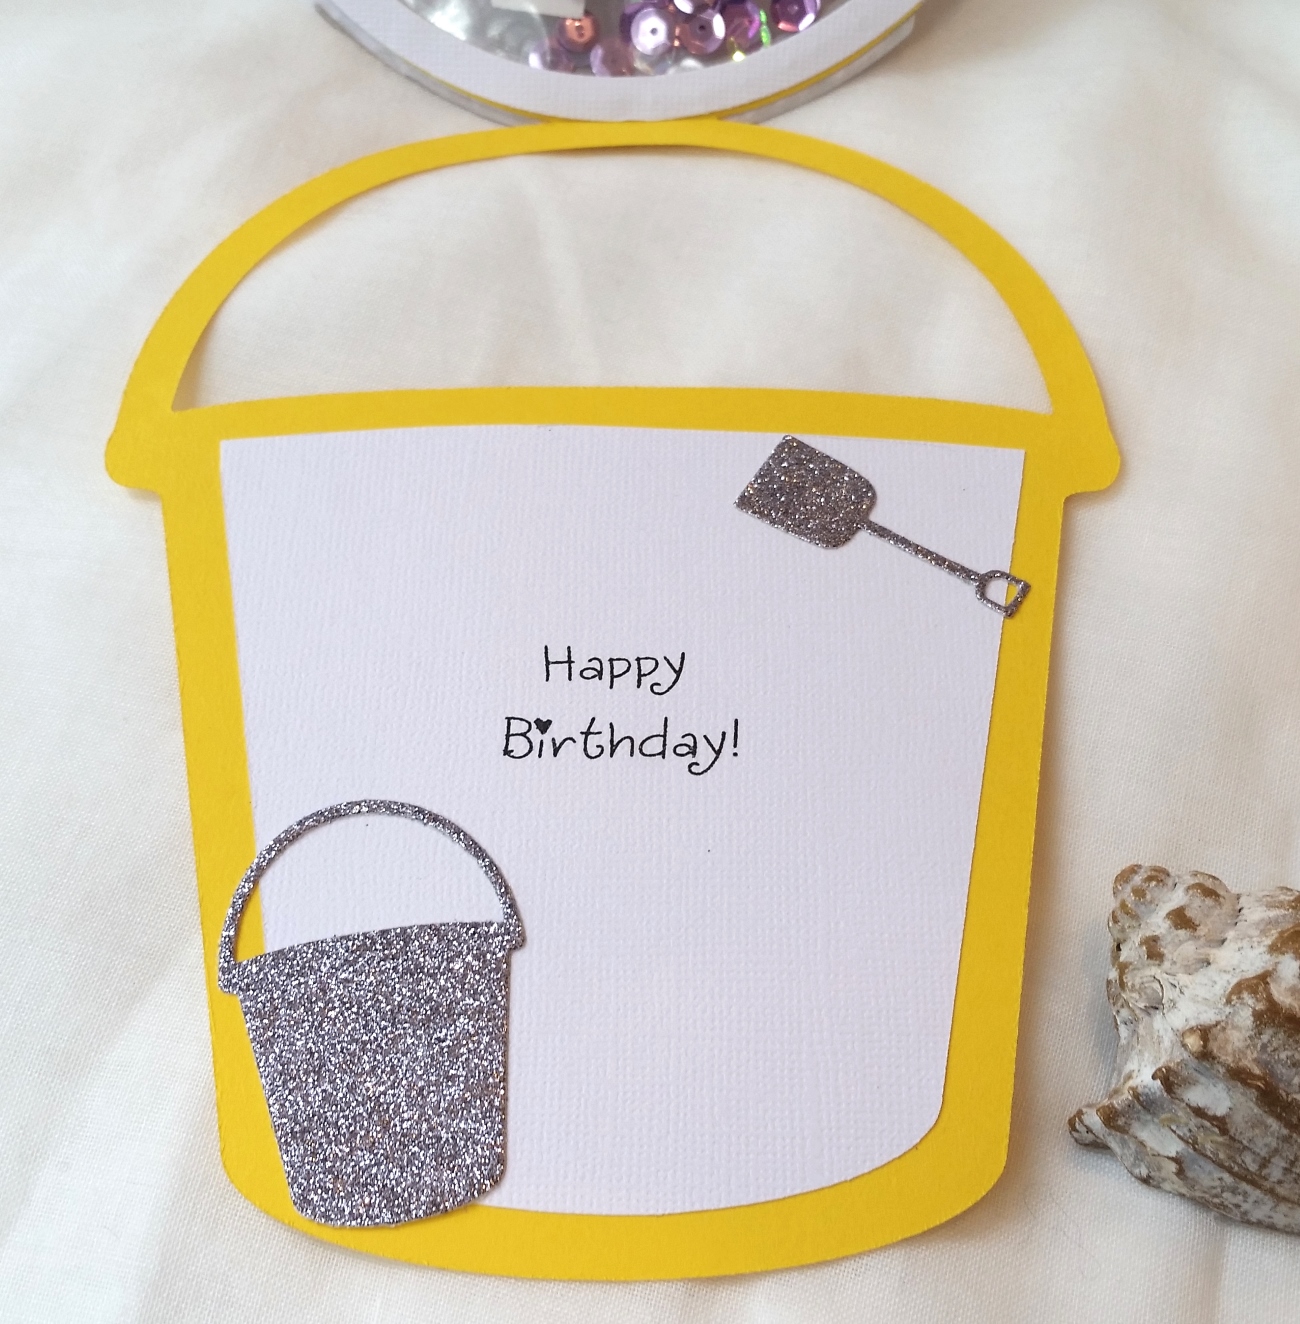
 I used the following dies from Diemond Dies for the construction:
The shaped base and all the layering base pieces: Bucket Mini Album Die
The dimensional bow at the top of the card: Bow Dies Set
The shovel shaker pieces and inside shovel accent: Sand Pail and Shover Die Set
The inside message area: Labels 2 Die
My readers can get an extra 10% off and free worldwide shipping at Diemond Dies on all orders of $35 or more by using the code: “thankskristina” at check out!
I used Whimsy Stamps’ “skippy and bobbin,” which was the first girl image stamp I ever bought (that was 2 years ago when I first started crafting on YouTube–WOW 2 years goes by fast when you’re having so much fun!). When I saw this stamp, I fell in love with this little girl and her best friend/golden retriever puppy (I can’t help but make up stories in my head about certain stamped images–LOL).
The following are the Copic colors I used to color up the image:
Skin: E50, 51, 53, 13 and R20 blush
Hair: E55, 57, 59 and 79
Pink parts of outfit: RV000, 02 and 04
Blue parts of outfit: B00, 01 and 04
White parts of outfit and puppy’s sailor’s cap: C1 and C3
Golden retriever puppy: E50, 53 and 55
I also added some sparkle on flowers of girl’s outfit and puppy’s dog tag with a Silver Metallic Sakura Gelly Roll Pen.
I wanted to make this card fun and feminine, as according to her mom, the recipient is definitely a “girly girl.” 🙂 However, I wanted it to be clean and simple too so that Skippy and Bobbin would be the center attraction. I kept it relatively clean by using only 3 metallic papers–a gorgeous damask in blue for the background sky, a shiny darker blue for the background ocean, and a soft shimmery cream for the bucket handle, dimensional bow, and beach sand.
The following is a process video sharing how I made this card:
This card is being entered into the following challenges:
Simon Says Stamp Work It Wednesday Die Cut Challenge
Simon Says Stamp Tie It Up Wednesday Challenge
Raisin Boat Summertime Challenge
Time Out Friendship is Golden Challenge
AAA Cards It’s So Hot! Challenge
Thanks for stopping by, and I hope you’re having a sun shiny day! WOOF
]]>
 I made a hinge shaped card using the die with bright yellow card stock. I also cut some polka dot “sand” hills and a white handle by running the die through again with different papers to layer on top. It required a little hand cutting as well to get the hills and the areas where the handle “attaches” to the pail, but the die made the pieces fit together easily. Then I made a shaker pocket with my Becky Higgins Project Life fuse tool, using the left over bucket inside die cut piece as a kind of template to get the shaping correct. For some added fun, I put tiny sea shells from a broken necklace, little glittered shovels from the Diemond Dies Sand Pail and Shovel Die Set, and pink and purple sequins into the pocket. The dimension of the sea shells actually helps plump up the pocket and allows the other shaker pieces to move around better.
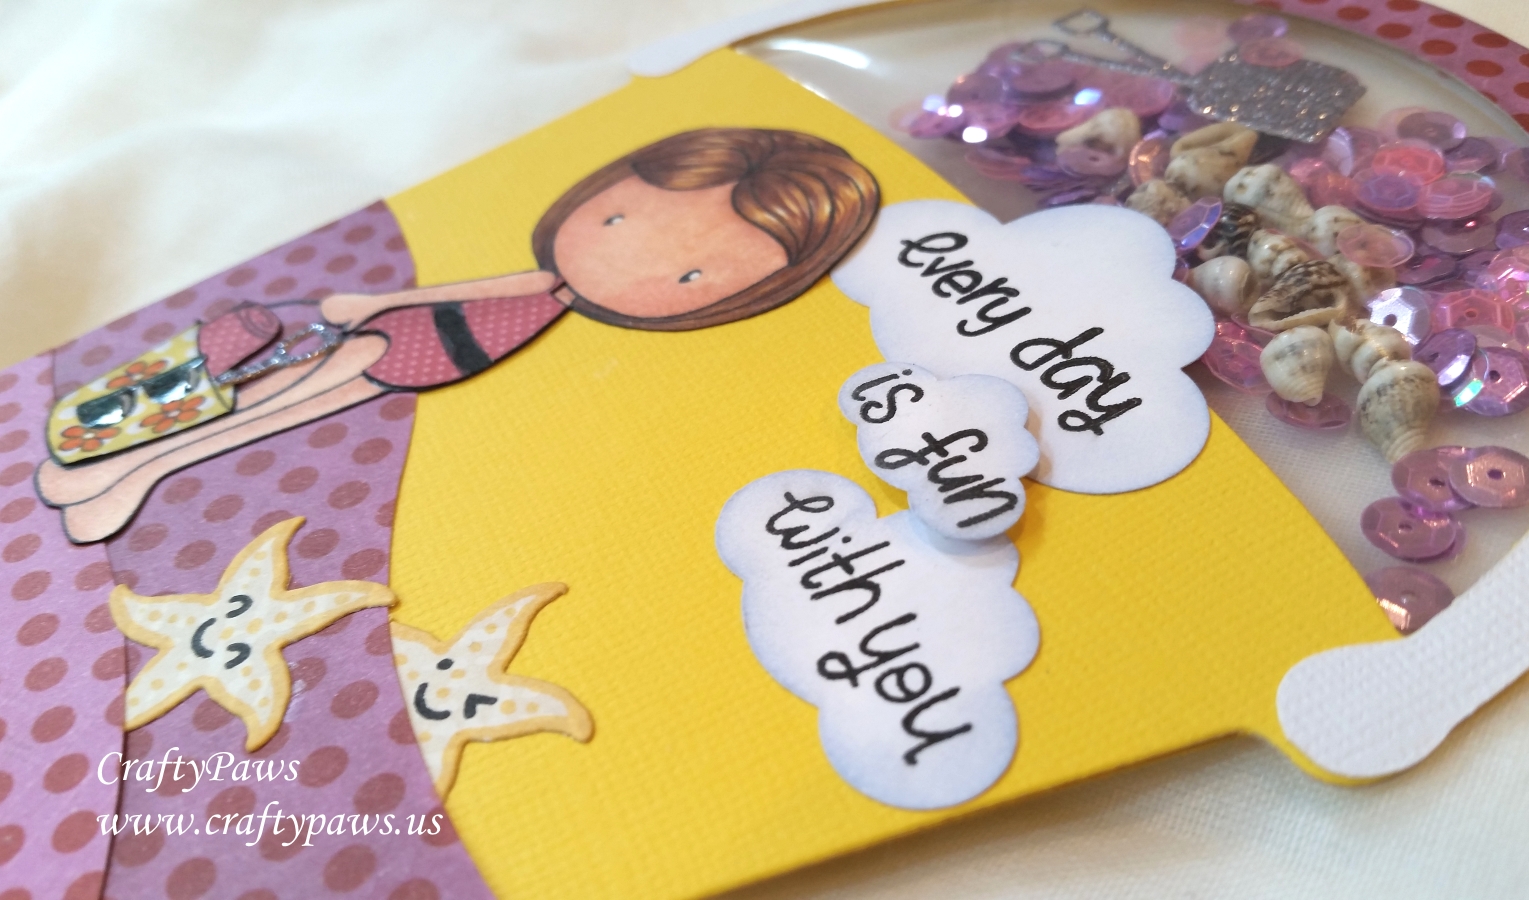
I Copic colored (colors listed below) and paper pieced Emma with scraps from my scrap box.
Skin: E000, E00, E11, E13 and R20 (for blush)
Hair: Y21, YR24, Y35, E25 and E29
Pail: Flowers YR04 and Shading C1
Shading on paper pieced swimsuit and beach towel: W1 and W3
 To add a little more shine and dimension, I also used a clear Wink of Stella on the pail, Glossy Accents and a white Gelly Roll pen on the sunglasses, and the top of an extra die cut shovel to make it look like Emma had a shovel in her pail that matched the shovels in the shaker.
To fill in the scene, I die cut a couple of starfish from the Diemond Dies Starfish Die Set and colored the edges and added dots using Copic Y35. To give the starfish a little personality, I also stamped little faces on them using the faces from the Lawn Fawn “Love You S’more” stamp set.
Lastly, I stamped out the sentiment, “every day is fun with you” using the same Lawn Fawn stamp set, but used some tape masking to break up the phrase the way I needed to in order to fit the words into the small, medium and large Fiskars cloud punches. To soften the edges of the clouds, I also inked the edges with a pale blue chalk ink. For the inside of the card, I used a “Happy Birthday!” sentiment from the Inky Antics Birthday Elephant stamp set and threw in an extra die cut shovel and pail for some extra sparkle. 🙂
My readers can get 10% off and free worldwide shipping at Diemond Dies by using the coupon code “thankskristina” at checkout on all orders of $35 or more
The following is a video share of this project:
This card is being entered into the following challenges:
MarkerPOP Summertime Challenge
Simon Says Stamp Work It Wednesday Die Cuts Challenge
Simon Says Stamp Wednesday Sparkle and Shine Challenge
Seize the Birthday Anything Goes Challenge
Card Mania Anything Goes Challenge (winner of honorable mention)
Thanks for stopping by and have a wonderful day! WOOF
]]>