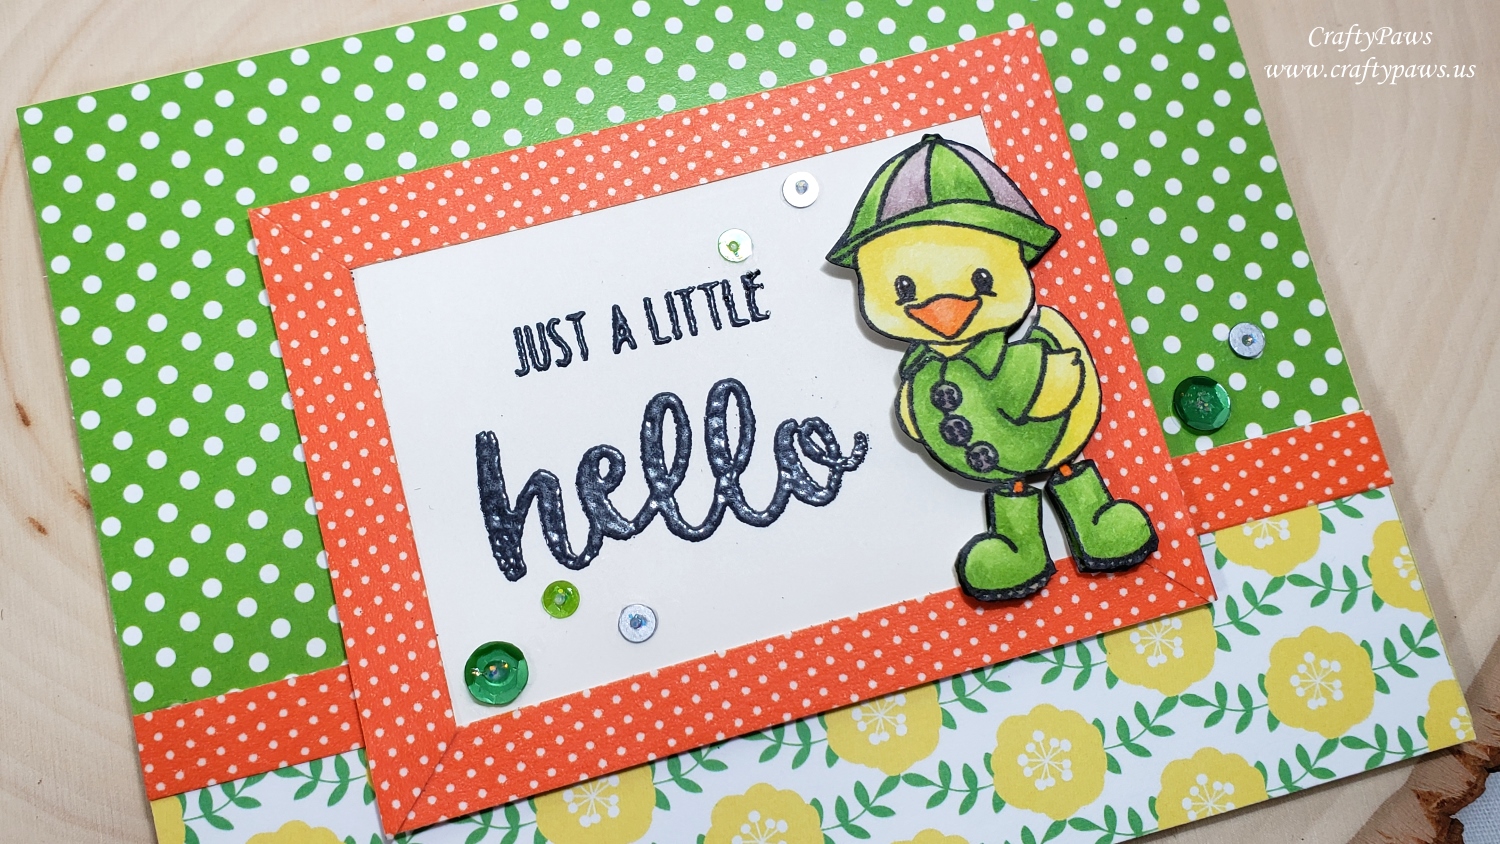
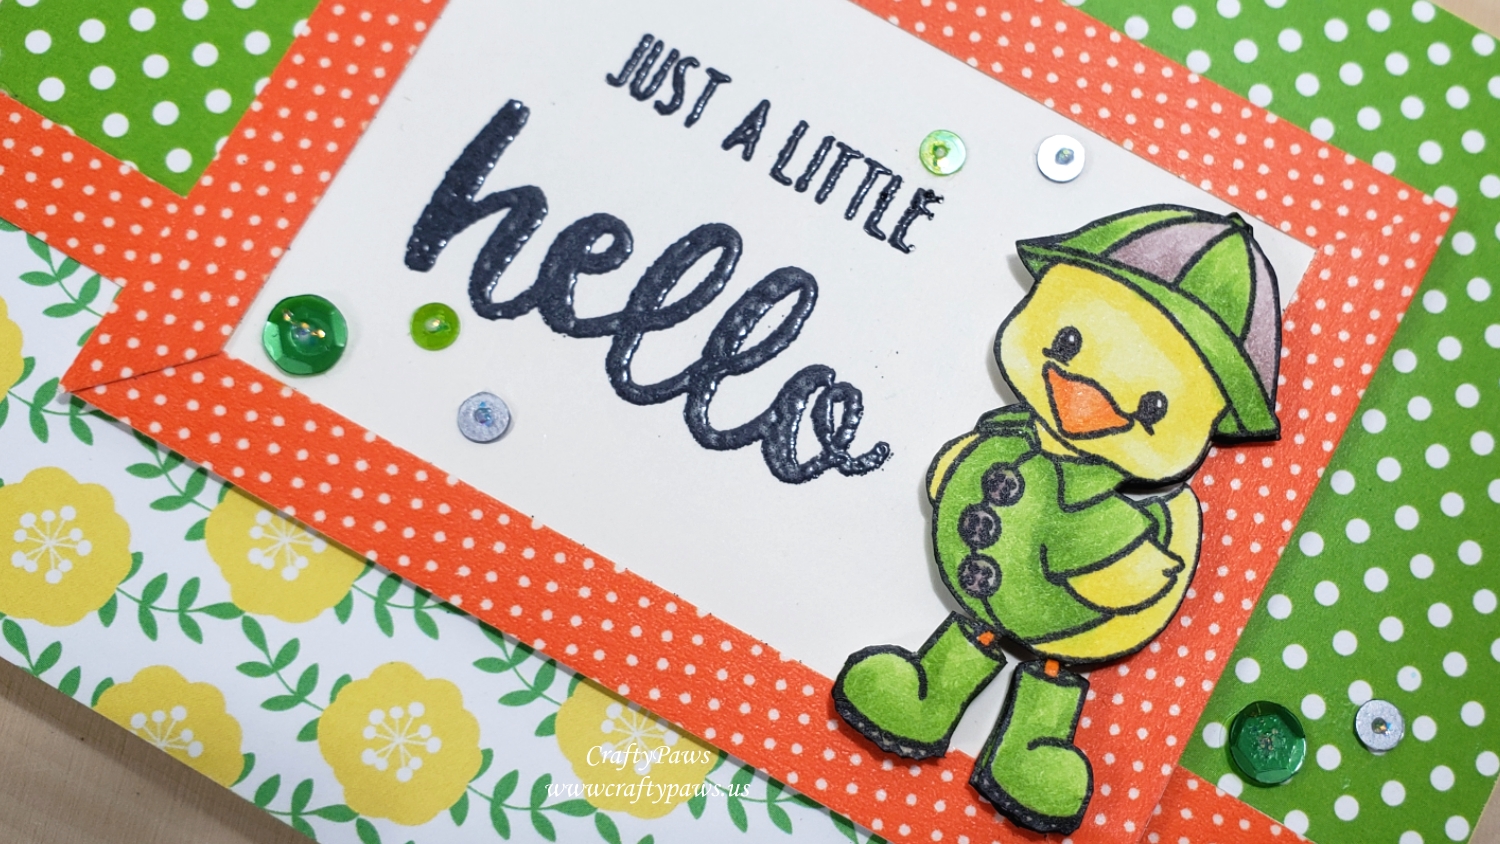
So for this card, I used two impressions of the same cute duck in a rain slicker image from the Scrapping for Less “Just Ducky” stamp set. I colored one up with Copics in fun summer citrus colors (summer showers are a constant where I live — in fact there is a huge thunder storm passing as I type):
Duck: Y11, Y13, YR00, YR04
Rain Slicker, Boots and Hat: YG03, YG25, E70, E71
I simply colored and inked the edges (using a Momento Tuxedo Black Marker) of the second image of the duck as an under layer to add dimension to the image by stacking it with double sided foam adhesive. I find that a simple trick like this really adds a lot of interest and is appreciated by card recipients (especially if they are not crafters and don’t know how easy this is!) 🙂
For the card front, I looked through my scrap box and found a fun green polka dot and a yellow floral patterned papers. I used the green on 2/3 of the front and the floral on 1/3 of the front. When I went looking for an orange patterned paper, I couldn’t find one, but did find a small orange polka dot washi tape! I used that washi tape on white card stock (so it would not show through the patterned papers beneath) and glued the strips around a piece of cream card stock as a frame as well as between the green polka dot and yellow floral papers.
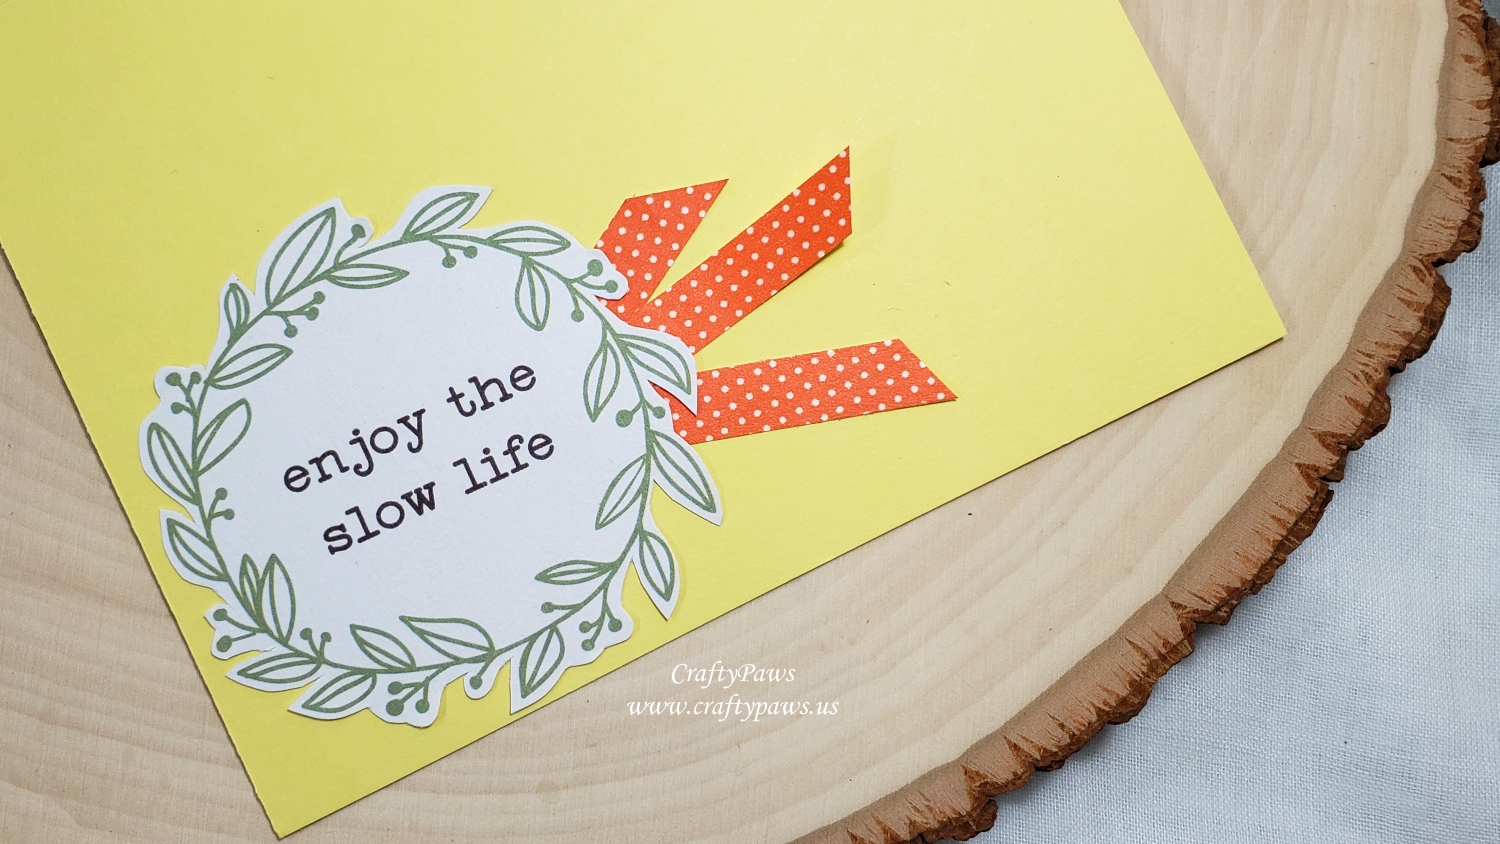
For the sentiment, I decided to heat emboss “JUST A LITTLE HELLO” from the Neat and Tangled “Better Together” stamp set. I used the EK Success Powder Tool to cut down on static, VersaMark Ink for the stamping, and Zing Charcoal embossing powder to create a thick embossed look that wasn’t too black/stark. I mounted that on more double sided foam adhesive to add a more dimension. Lastly, I used Ranger Multi-Medium Matte Adhesive to glue on 7 sequins in green and grey and topped them with Icicle Stickles to add a little extra sparkle too. The inside liner was kept simple with a Scrapping for Less ephemera piece that says, “enjoy the slow life” inside a green wreath. The only adornments to the inside sentiment are three orange polka dot flags made from left over washi tape scraps; this was an easy way to keep the inside coordinated with the card front.
CLICK on the following picture to watch the process video:
This card is being entered into the following challenges:
Crafter’s Castle Anything Goes with Optional Mixed Media Challenge
Simon Says Stamp Wednesday Masculine Challenge
Word Art Wednesday Anything Goes Challenge
Simon Says Stamp Work it Wednesday Summer Vibes Challenge
Crafting by Design Anything Goes Challenge
Stamping Sensations Show Your True Colors Challenge
Crafts Galore Encore Anything Goes Challenge
Through the Craft Room Door Anything Goes Challenge
MFT Color Challenge 118
]]>
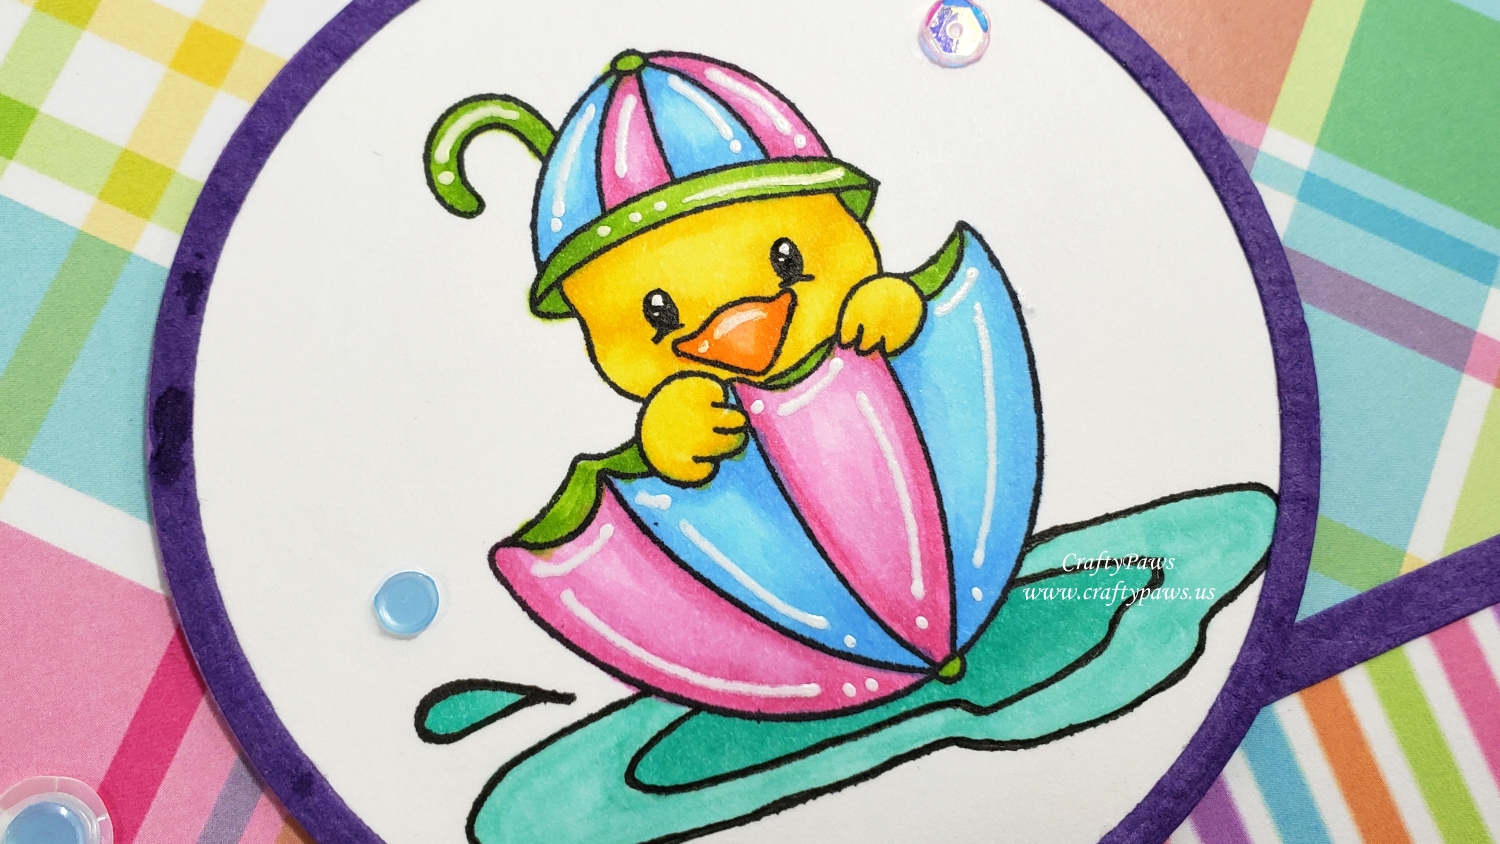
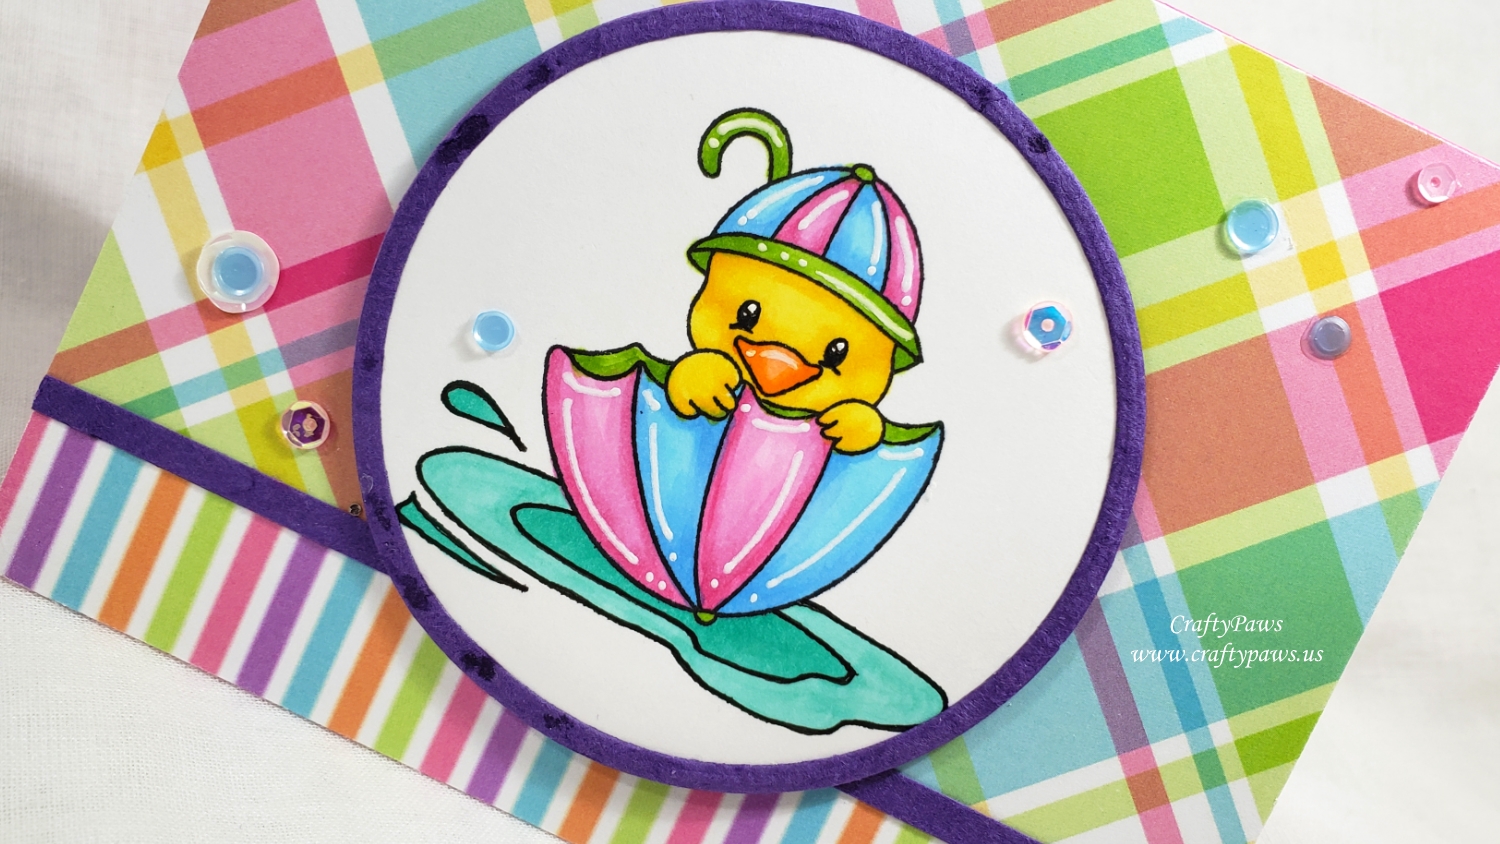
I colored up the duck tucked into the upturned umbrella with the following Copic colors to match the patterned plaid papers from the same Scrapping for Less collection:
Duck: Y13, Y15, YR00, YR16
Umbrella: B00, B12, YG03, YG25, RV52, RV55
Puddle that I doodled in with a Copic Multiliner Pen in 0.03 pt and re-outlined with a Faber-Castell XS point PITT Artist Pen: BG32 and BG23
I also added white highlight marks to the umbrella and the duck’s bill with a Uniball Signo White Gel Pen.
I used the Diemond Dies Die-Normous Stack-Ems Circle Nesting Die Set to cut out the image as well as die cut a frame for the image with purple handmade paper (for some added texture). I then used a plaid patterned paper and a striped pattern paper from this month’s Scrapping for Less Kit and covered the card front with these two patterned papers (about 2/3 and 1/3). I positioned a thin strip from more of the purple handmade paper between the two patterned papers to create a clean separation. Then I positioned the framed image centered on the card and overlapping the two patterned blocks.
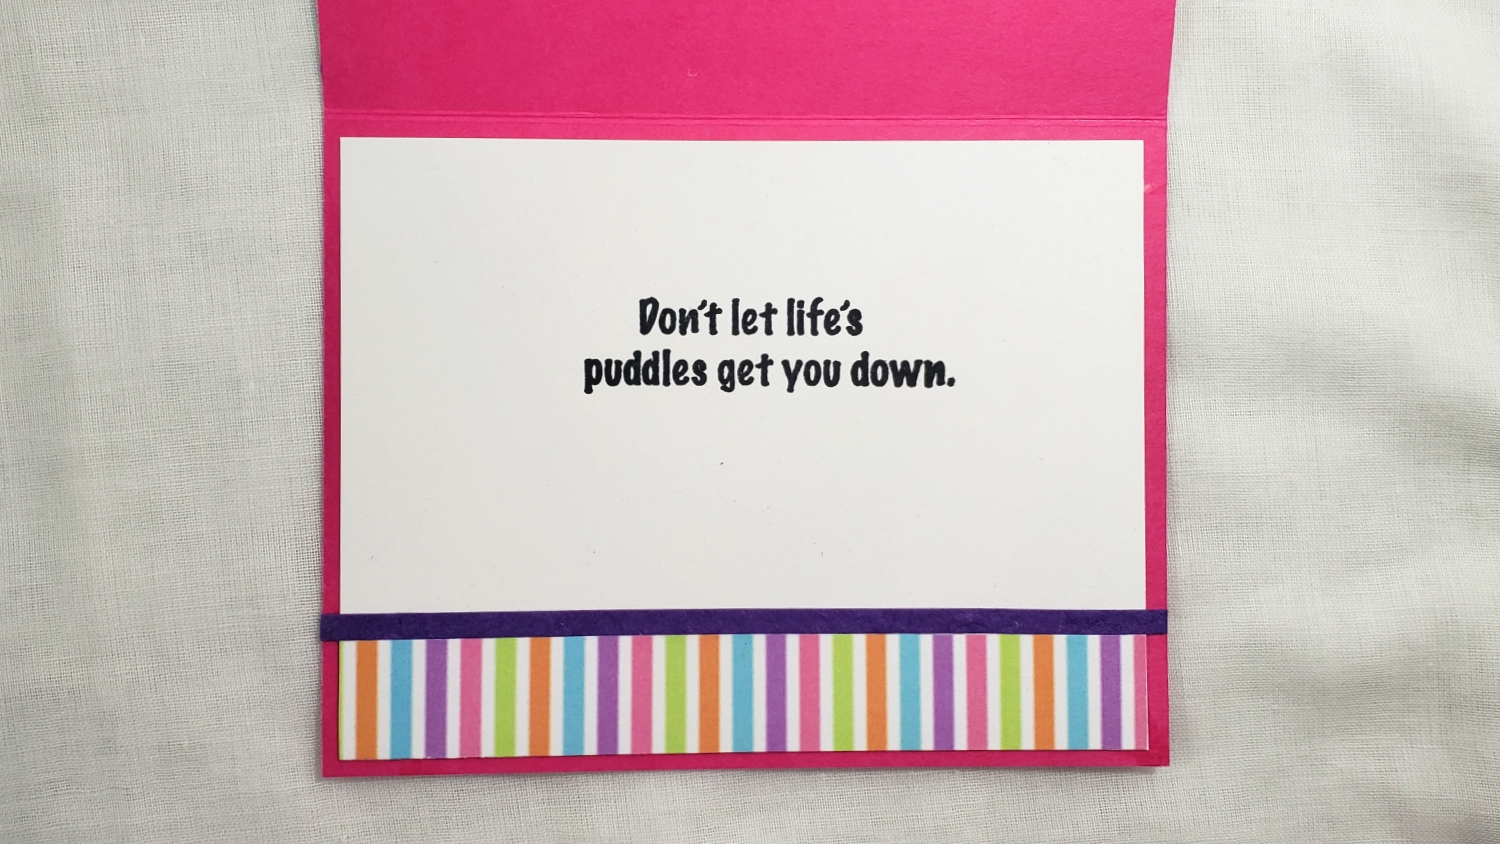
For the inside of the card, I used a sentiment from the Scrapping for Less add-on kit that says, “Don’t let life’s puddles get you down.” I used another scrap of the striped paper to coordinate the inside liner with the card front and added a similar purple strip to edge the striped paper from the white of the card liner. Lastly, as a finishing touch, I used Ranger Multi-Matte Medium to adhere 7 sequins on the card front to add a little sparkle and interest.
CLICK on the following picture to watch the start-to-finish card crafting video:
Disclosure: Many of the supplies I’ve used for today’s project are linked. Some may be affiliate links, which means if you make a purchase I receive a small commission at no extra cost to you. I truly appreciate your support toward the costs of running this blog!
This card is being entered into the following challenges:
Simon Says Stamp Monday Frame It Challenge
Word Art Wednesday Anything Goes Challenge
Creatalicious Anything Goes with Optional No Rectangles or Square Cards Challenge
Through the Craft Room Door Anything Goes Challenge
Cards Galore Encore Anything Goes Challenge
Penny Black and More Anything Goes Feminine Challenge
Simon Says Stamp Wednesday Bright Colors Mood Board Challenge


Copic Coloring:
The birds and the branch doodled in with a 0.1 pt Copic Multiliner Pen are colored using the following Copics:
Birds: G14, G17, E51 and E53
Branch with leaves and ground: E13, B14 and G17; W3
The cutsie bees were simply colored with these Copics: Y13, Y08, C7, B00 and B01
The scene for the “Hopping by with a Spring hello card is colored with the following Copic markers:
Frog: G00, G02 and G05 with R21 blush and belly
Lilly Pad: G02 and Go5; Reeds: G02, G05, and E57; Water: B00, B01, B21 and B24
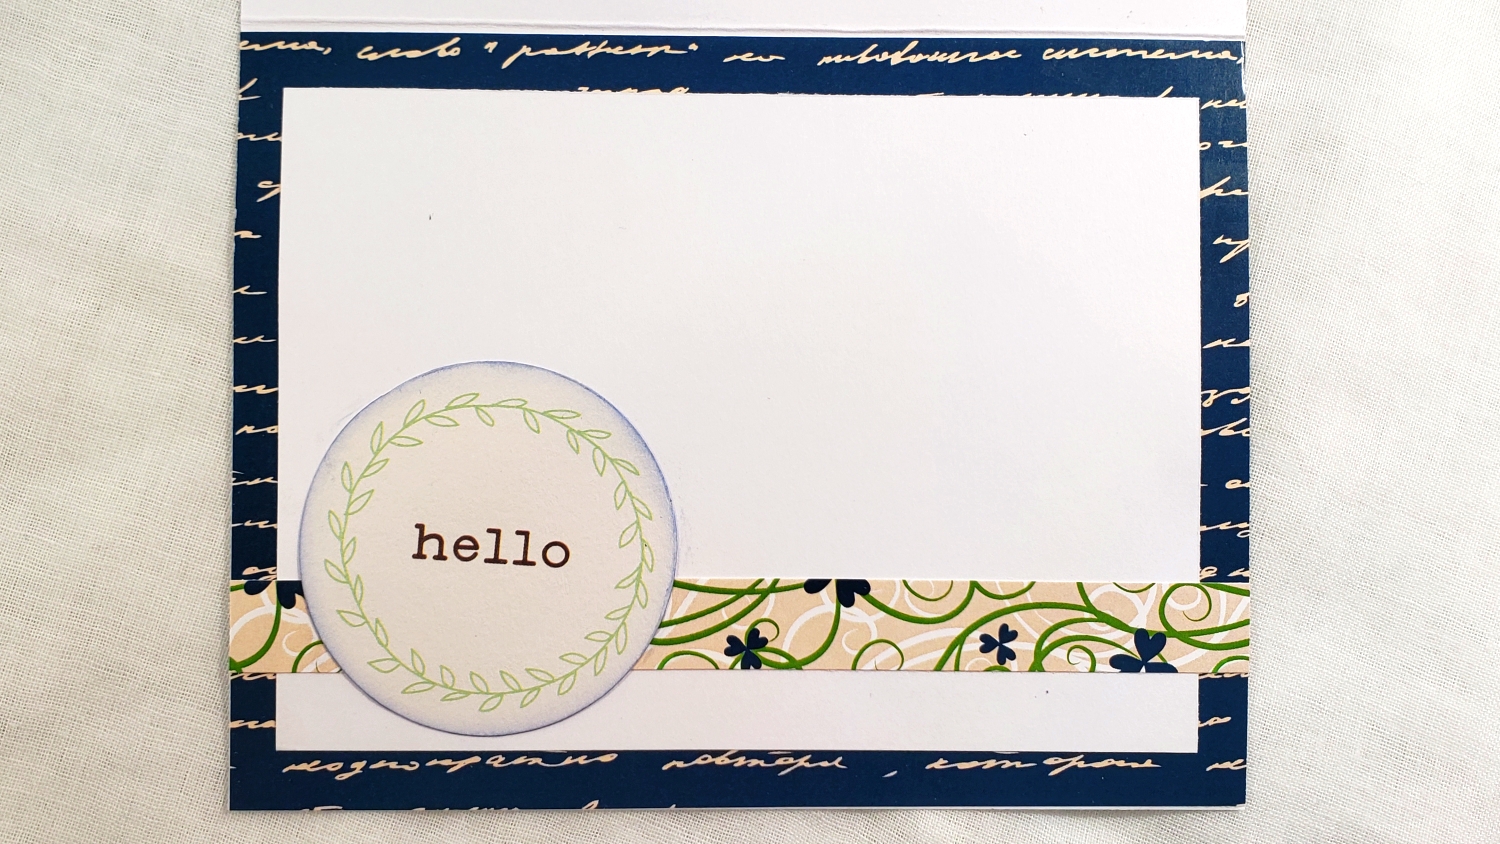
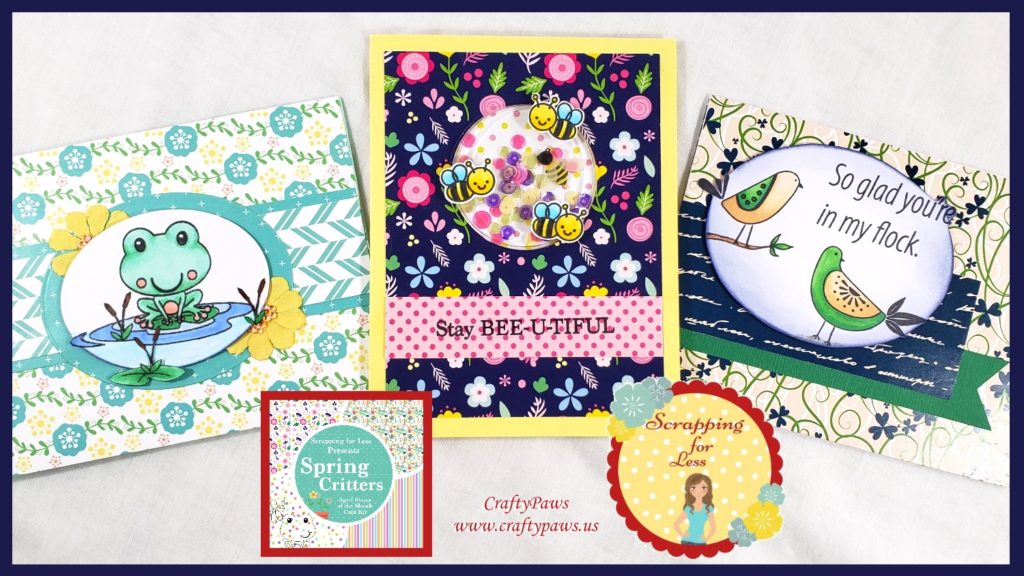
For each of the Spring Critter focal point images, I crafted cards to complement around them. The birds were accompanied by the sentiment “So glad you’re in my flock” from the Scrapping for Less Banana Split add-on collection stamp set. I used an oval die (hand fussy cutting around the areas that went beyond the oval) and inked the edges and a soft background with Tim Holtz Distress Ink in Chipped Sapphire. I actually followed one of the sketches included in this month’s kit and used the patterned papers from the Spring Birds collection (along with some green card stock from my scrap box) to quickly pull together the first card. The inside liner is more of the patterned paper scraps along with a “hello” ephemera piece, all from the same collection.
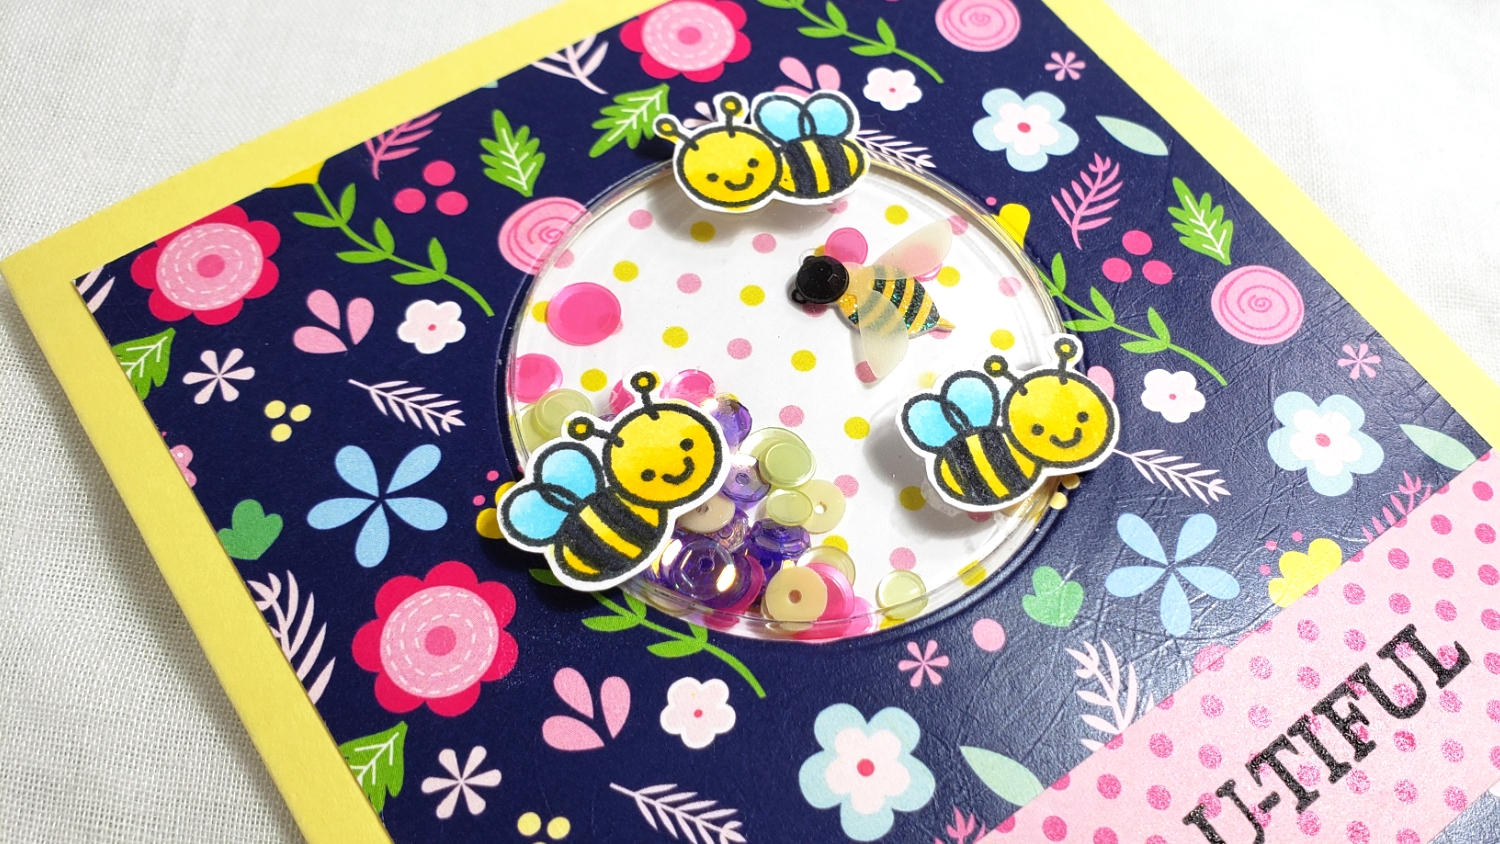
For the adorable bumble bee shaker card, I used the bright and cheerful patterned papers from the Spring Bees collection. I used a circle die to cut out an opening for an Impression Obsession Shake It Shaker Card Pouch (these are discontinued, but these Hampton Arts shaker pouches are similar), a Jolee’s Boutique 3D bee sticker and half of the sequin mix from the collection as fun-filled perfectly coordinated shaker. The sentiment I stamped out 3 times and coated with clear embossing powder to set and pop from the polka dot print paper, which was the reverse side of the springy floral used on the card front.
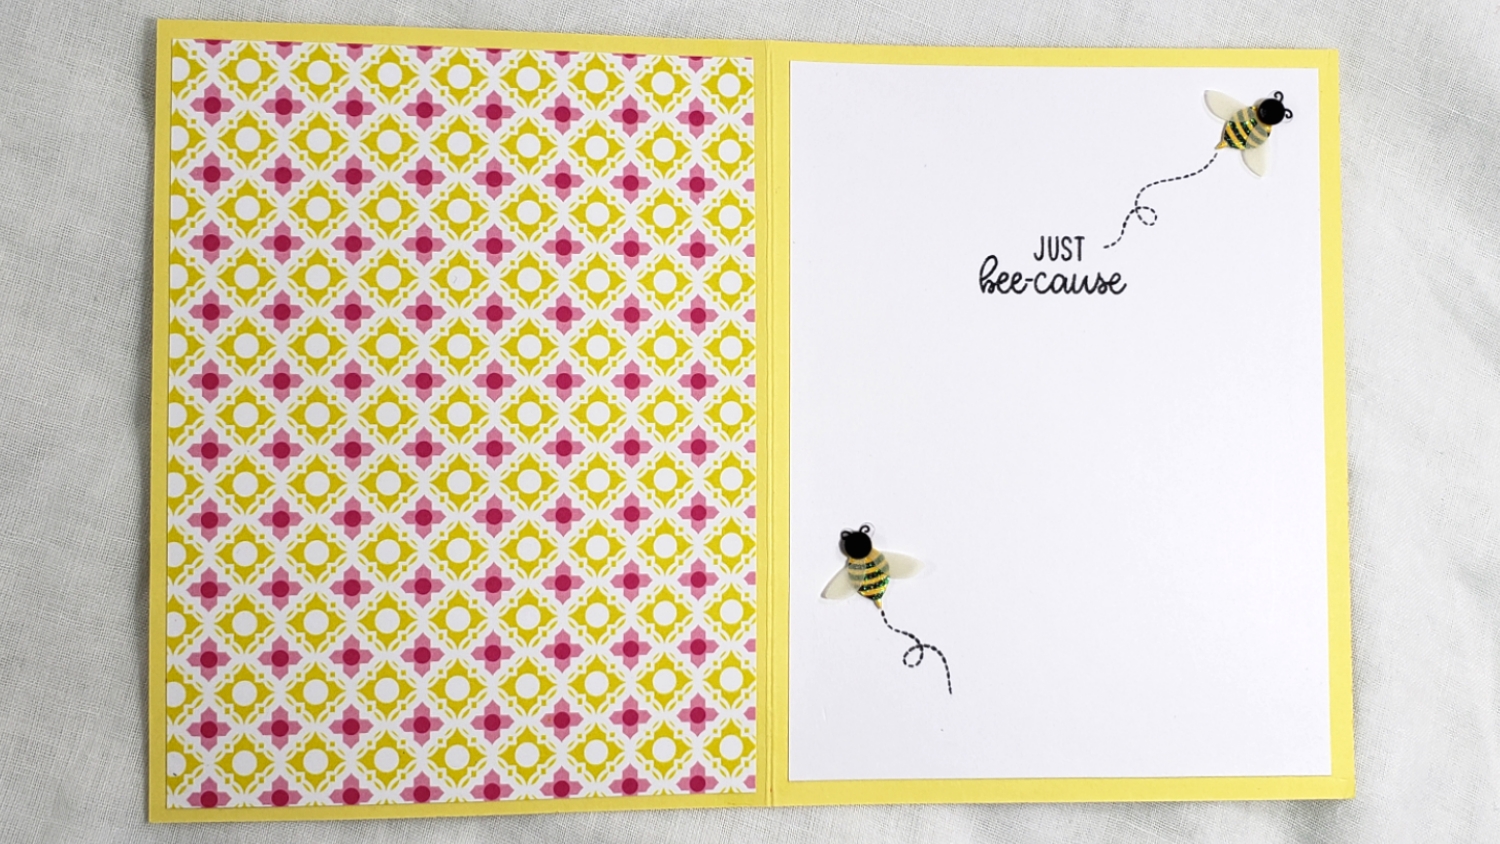
The inside liner was stamped with the “just bee-cause” sentiment and flight lines from the Sunny Studios stamp set and embellished with 2 more Jolee’s Boutique 3D bee stickers. Lastly, the 3 Copic colored bees were easily and permanently adhered onto the plastic shaker pouch using Ranger Multi Medium Matte Adhesive.
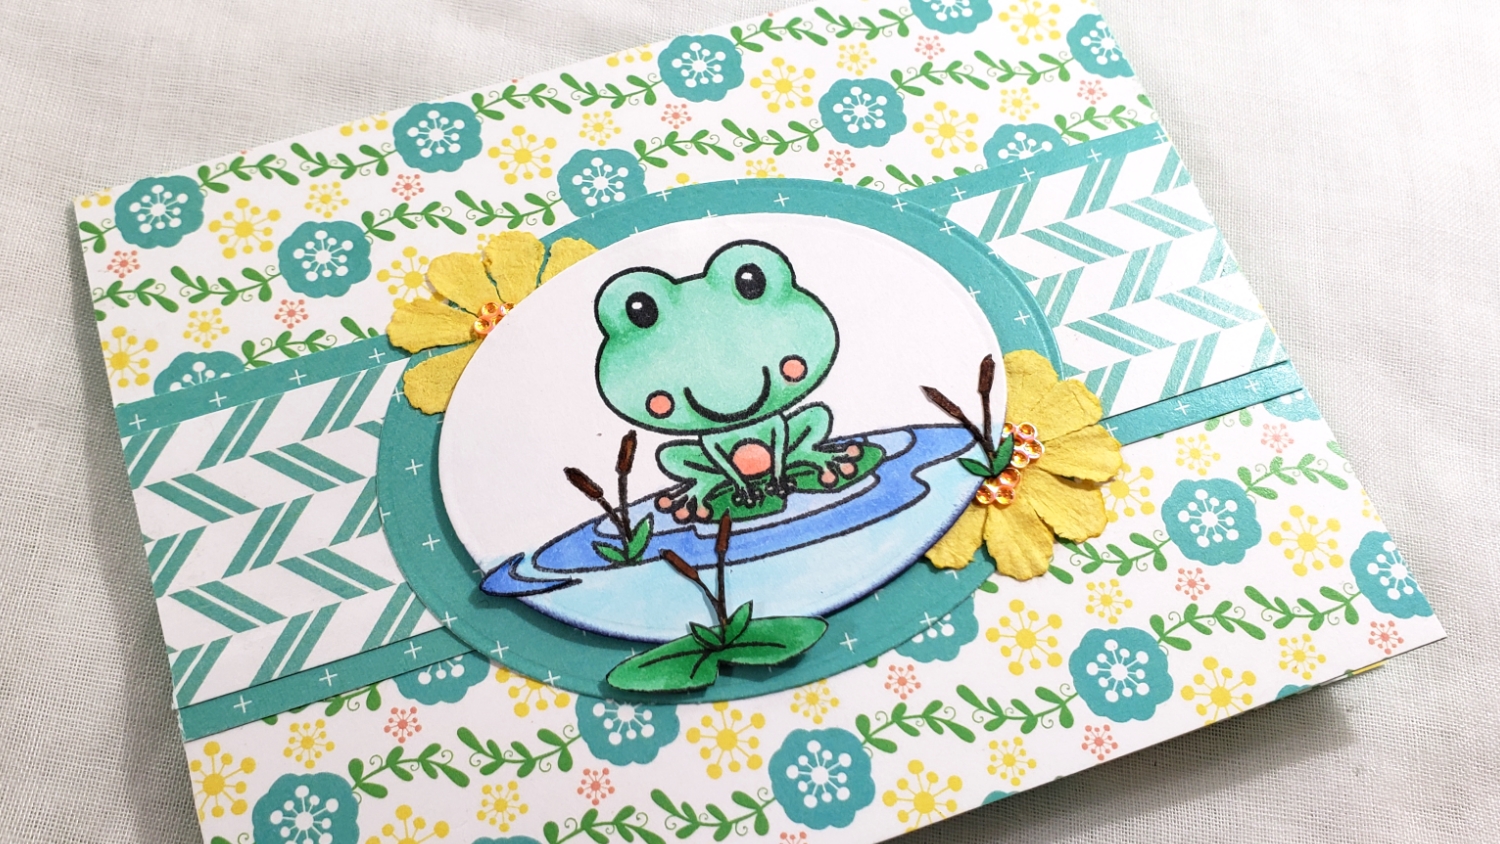
The third and last card was really designed on the fly inspired by the soft minty and sunny “Spring Fever” patterned papers from the Spring Frogs collection. I covered the card front with a graphic floral patterned paper then crafted a belly band look with 2 more patterned papers. I also used one of those smaller print papers to create a mat behind the Copic colored frog scene. To add interest, I die cut out using an oval die, but added an extra lily pad and reed plants to take the scene off the edge of the oval. Softness and a little sparkle were added by cutting one of the paper flowers from the kit in half, adding fancy floral sequin centers from the sequin mix for this collection, and tucking the partial dimensional flowers behind the scene.
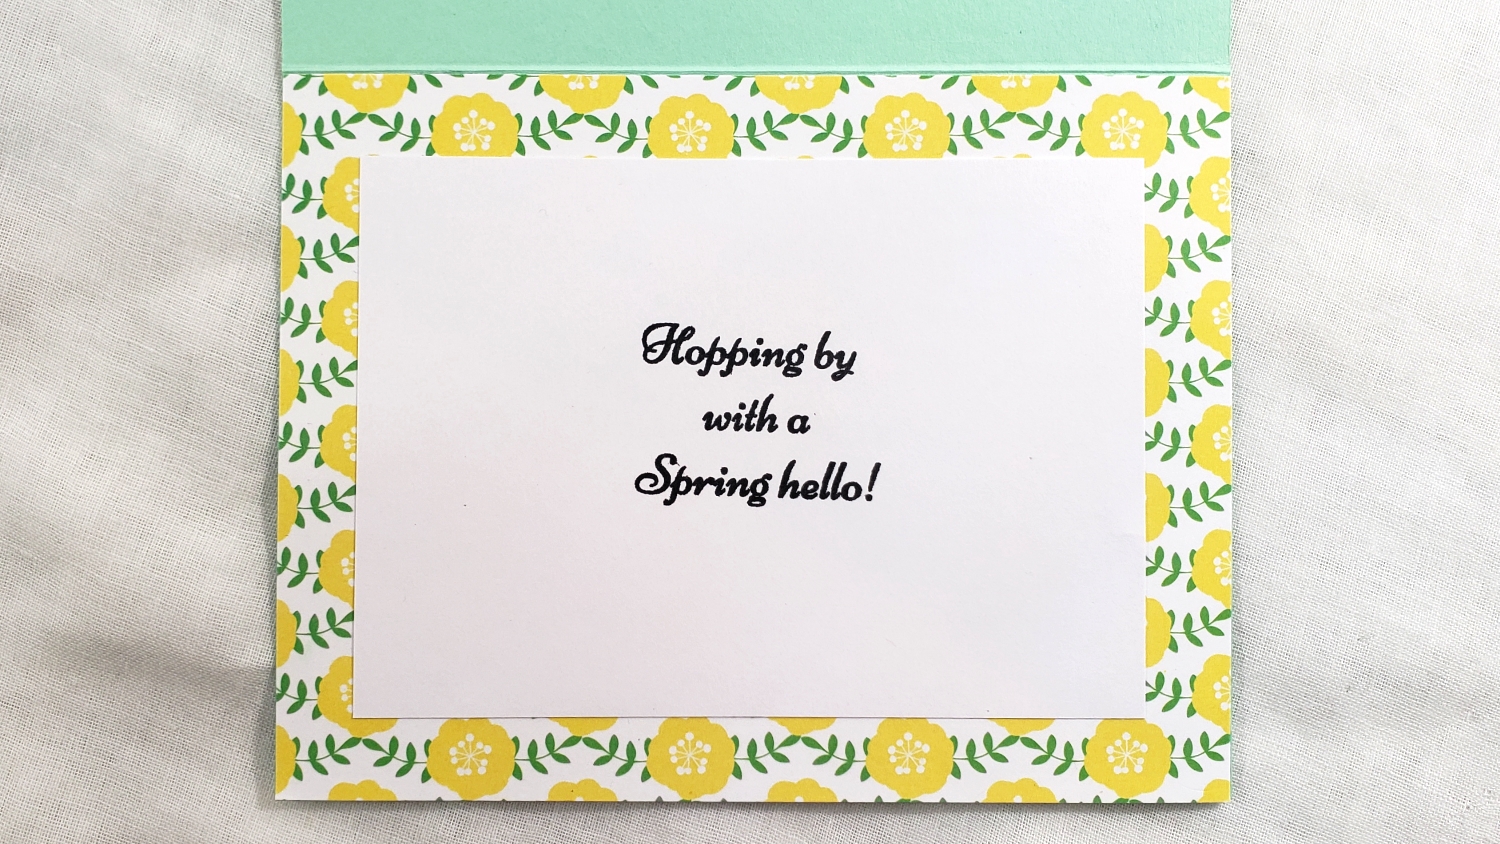
The inside for this card is a brighter lemon yellow floral paper framing a simple white card stock liner sheet. The liner sheet is stamped with the versatile sentiment: “Hopping by with a Spring hello!” so this card can be sent to anyone for any spring time occasion.
CLICK the following picture to watch the detailed process video of crafting these 3 cards:
Make sure you check out the Scrapping for Less BLOG HOP so you can join in our Rafflecopter giveaway. Next on the hop is JACKIE! All winners are announced each month in the Teresa Talks post on the blog on the first of the month.
Disclosure: Many of the supplies I’ve used for today’s project are linked. Some may be affiliate links, which means if you make a purchase I receive a small commission at no extra cost to you. I truly appreciate your support toward the costs of running this blog!
These Spring Cards are being entered into the following challenges:
Penny Black and More Spring in Full Swing Challenge
Simon Says Stamp Work it Wednesday Pets Challenge – Birds Card
Through the Craft Room Door Anything Goes Challenge
613 Avenue Create Anything Goes with Optional Wedding/Anniversary Challenge
The Male Room Challenge Anything Goes with Optional One Layer Challenge
Simon Says Stamp Wednesday Anything Goes Challenge
Word Art Wednesday Anything Goes Challenge
Creatalicious Anything Goes Challenge with Optional Black and White and One Color
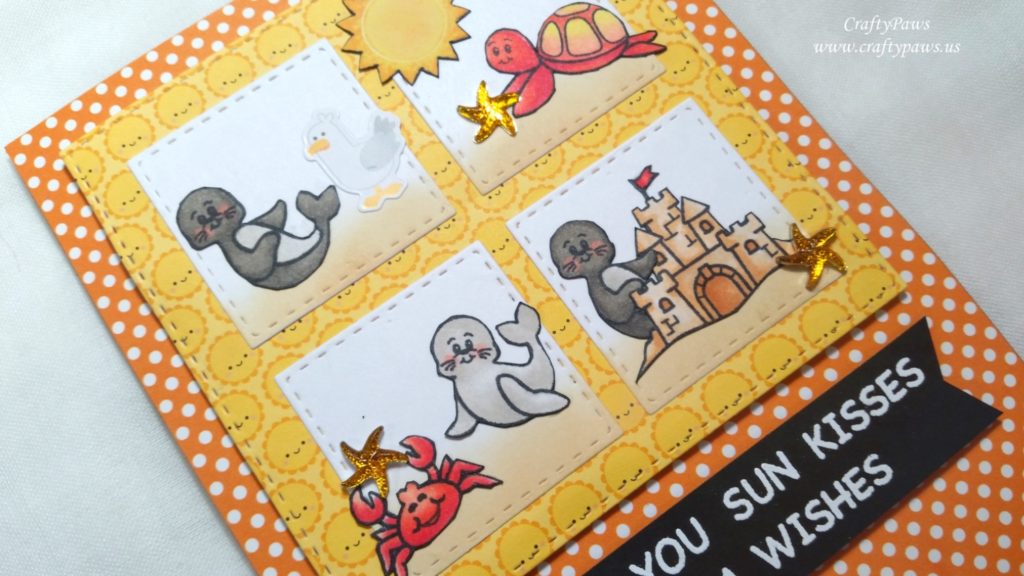
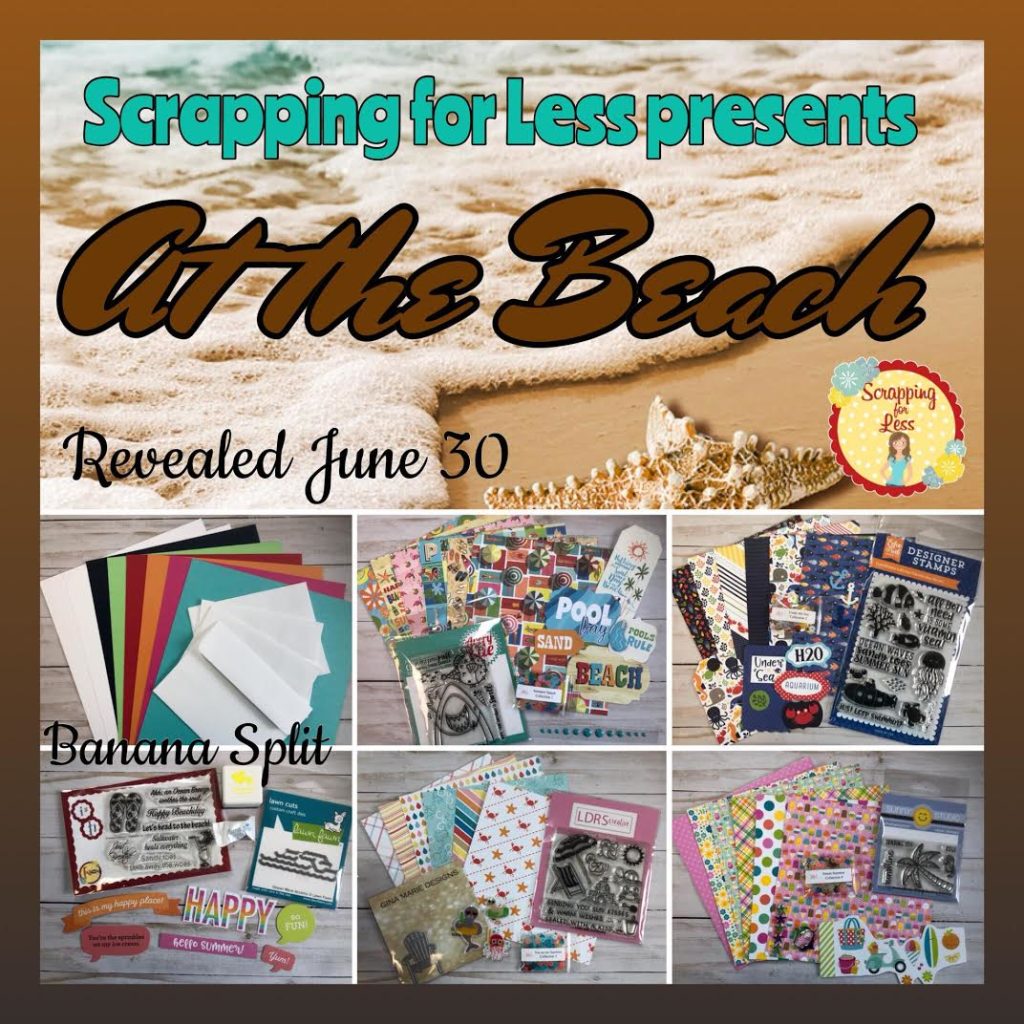
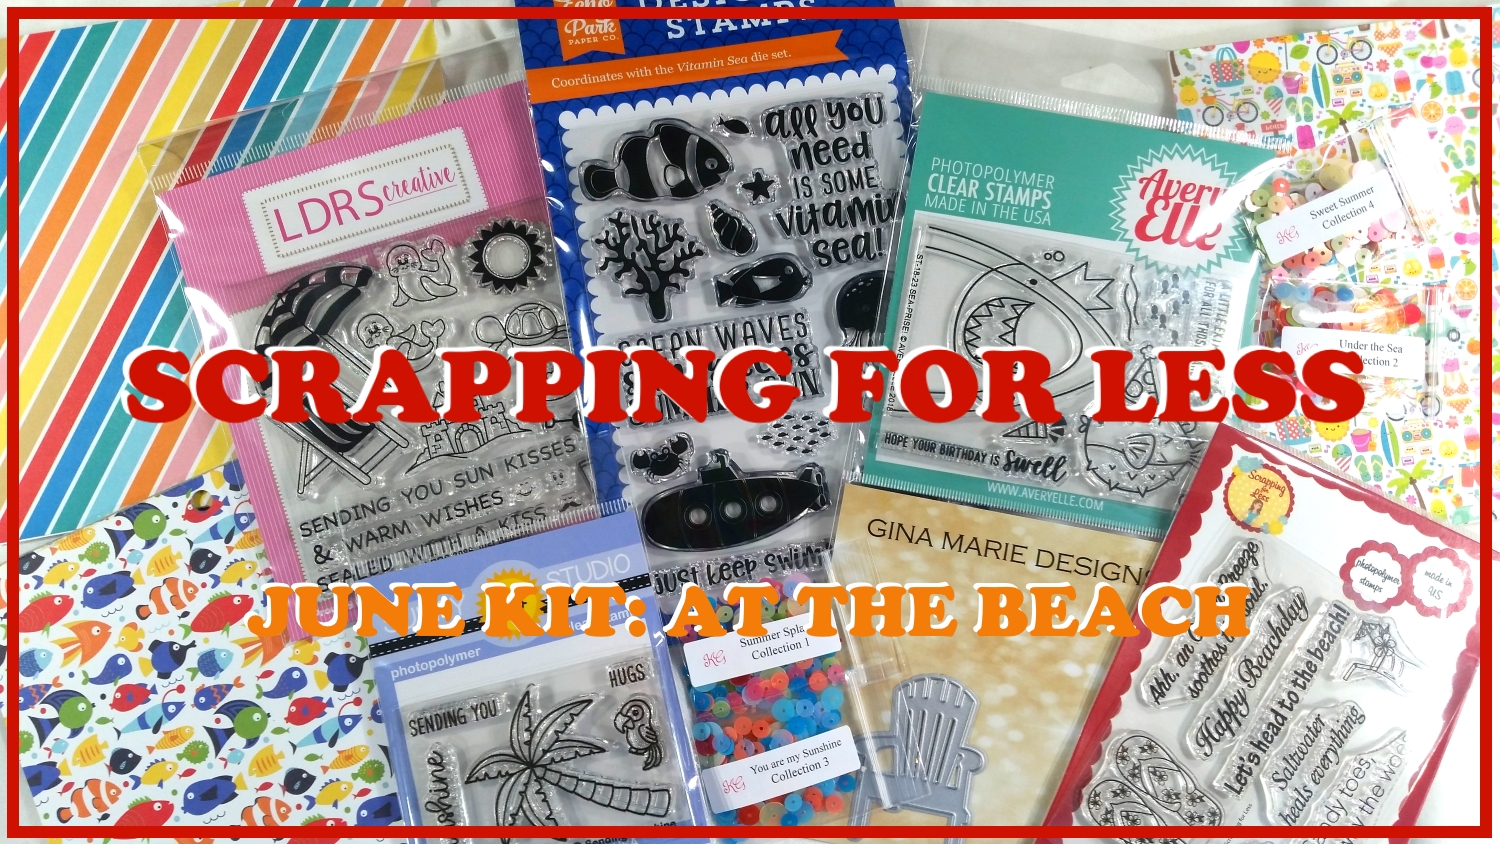
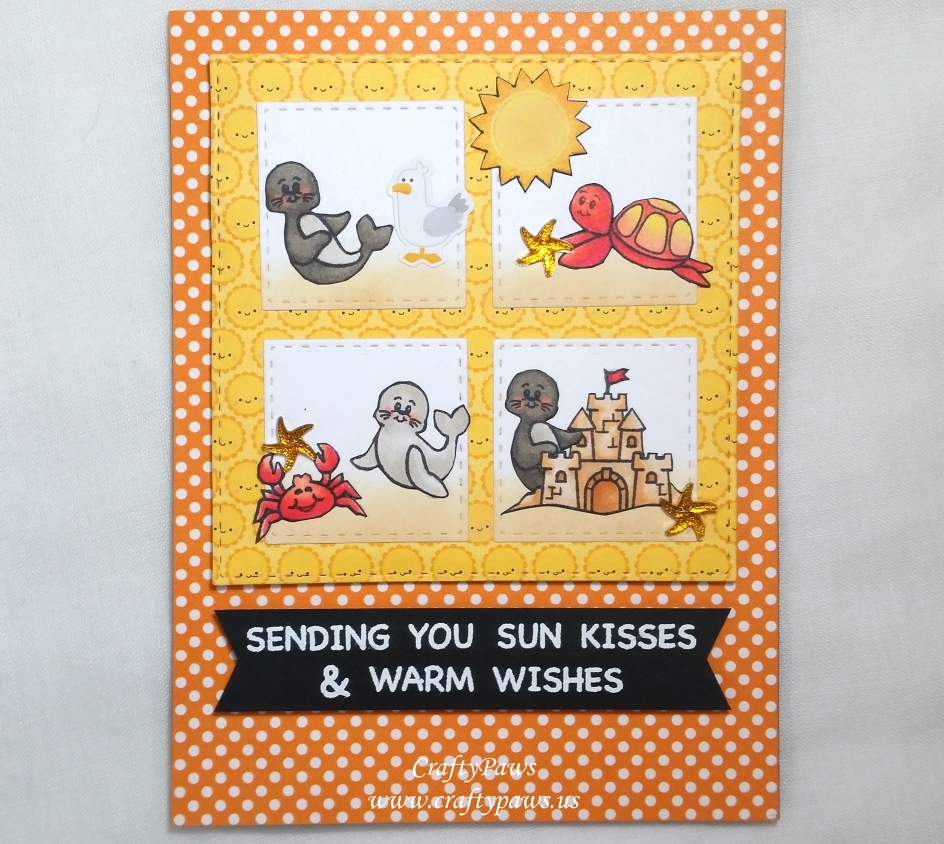 To create this sun shiny card, I used some fun papers from the Scrapping for Less June At the Beach Card Kit. The orange polka dot and the smiley face sun patterned papers are from the Doodlebug Designs “Sweet Summer” paper collection. I first, however, cut out four 1.5″ stitched squares from plain white card stock using the Simon Says Stamp Stitched Squares Die Set. These are then layered in a grid pattern over the smiley face sun paper that I die cut using the largest die from the Simon Says Stamp Stitched Squares Die Set. This whole assemblage is popped up on fun foam to add a bit of dimension to the card.
For the sentiment, I heat embossed, “sending you sun kisses & warm wishes” from the LDRS Creative “Just Beachy” stamp set also from the Kit. I used black card stock and Ranger Super Fine White Embossing Powder to ground the card with black (which is repeated in a lighter tone in the seals used in the scenes – oh, but I’m jumping ahead) and so that the words would pop. To match the depth of the framed die cut squares above it, I backed this sentiment strip with fun foam as well.
Then to create cute little scenes of sea animals all sending the birthday girl kisses and warm wishes, I stamped, Copic colored, and fussy cut out the following critters from the LDRS Creative “Just Beachy” stamp set:
 Seals: W0, W1, W3, W5, and R20 for blush
Sandcastle: E41, E51 and E53
Crab: R11, R22, and R35
Turtle, Y11, R11, R22, and R35
As the sun from the stamp set was a semi-solid stamp, I didn’t want to stamp this in black and then try to color up the inside. Instead, I stamped out the sun with Tim Holtz Distress Oxide Inks in Squeezed Lemonade and Carved Pumpkin and then filled in the inside lightly with both of those inks using a finger dauber. To match the black lines around the other stamped images, I inked the sun (and all the other images) with a Momento Tuxedo Black Marker for a finished look.
Before selecting which sea animals to put into which squares, in order to ground all the animals, I blended on some Tim Holtz Distress Oxide Ink in Antique Linen to the bottom 1/3 of each white square. Then all that was left was the fun of picking which critters would go where. As I had repeated the same seal image twice, I positioned one behind the sandcastle to make it look like he was building the sandcastle and I did not put them in squares directly above one another. Since the other seal and the turtle, were positioned looking to the left, I made sure they were on the right sides of the squares. I also located the crab and the turtle in kitty-corner squares so that the coral colored critters would be balanced on both sides of the card. As one of the little scenes appeared a bit bare, I also decided to add a little sea gull from the Sweet Summer Mini Icons sticker sheet from the Kit. Lastly, I added three yellow starfish gem stickers from the Kit to add a little sparkle.
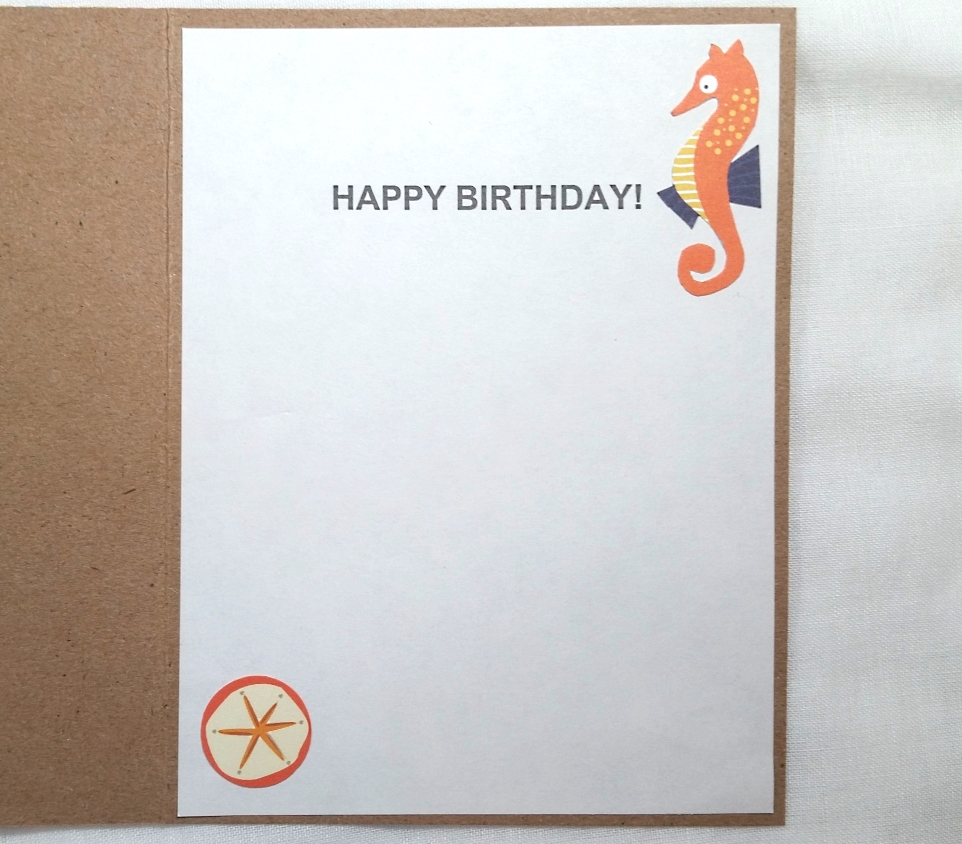
For the inside liner of the card, I simply printed out, “Happy Birthday!” onto some buff paper. Then I added a sand dollar and a sea horse image from the Carta Bella Frames and Tags (also from the Kit). The sand dollar was ready to go, but the sea horse had to be fussy cut out of a tag. Adding these little embellishments seemed to finish off the inside of the card nicely.
Please click the following picture to watch a process video of crafting this card:
Disclosure: Many of the supplies I’ve used for today’s project are linked. Some may be affiliate links, which means if you make a purchase I receive a small commission at no extra cost to you. I truly appreciate your support toward the costs of running this blog!
This card is being entered into the following challenges:
Simon Says Stamp Wednesday Use a Die or Punch Challenge
Simon Says Stamp Monday Add a Little Sparkle Challenge
Word Art Wednesday Anything Goes Challenge
Creatalicious Anything Goes with Optional No Patterned Papers Challenge
Card Mania Anything Goes Challenge
Lil Patch of Crafty Friends Anything Goes Challenge
MFT Birthday Project Challenge
Crafter’s Castle Anything Goes with Optional Christmas in July Challenge
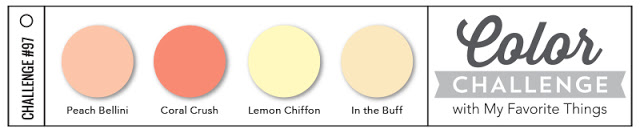
MFT Color Challenge 97
]]>
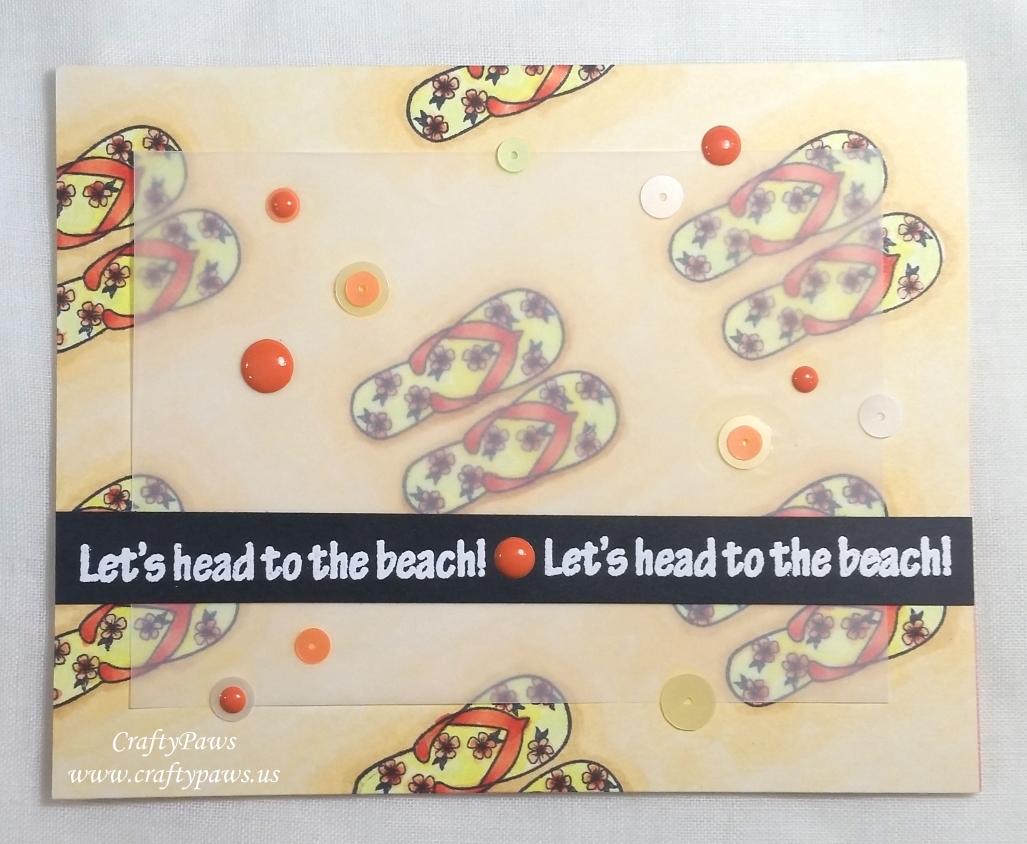
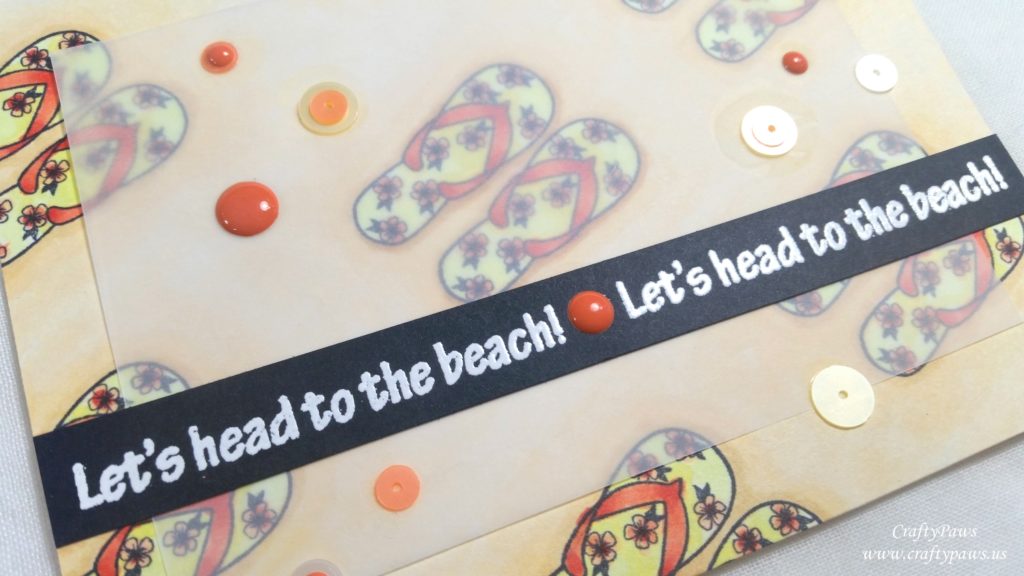
To keep these adorable flip flops the main focal point of the card, I divided up the card front into sections lightly with a pencil to create a grid. Then I stamped the flip flops repeatedly in an offset grid to create my own patterned paper. I wanted to create a sun-shiny card, so I stuck with warm buff, yellow, peach and coral colors and used the following Copics to color up the entire card front: E 50, E51, E53, Y00, Y11, R12, R22, and R35.
To add a bit of interest and soften the colors of the center part of the card, I cut a 3.25″ x 4.5″ piece of vellum to layer over the center of the card. Then to figure out a way to secure the vellum to the card front, I heat embossed the sentiment “Let’s head to the beach!” from the same stamp set two times using VersaMark Ink and Ranger Super Fine White Embossing Powder onto a strip of black card stock. I positioned that sentiment strip across the whole card front about 1/3 of the way up from the bottom, overlapping both the vellum and the card front, and I was able to hide a lot of glue behind the whole strip. Then to hide the areas where I tacked down the vellum while adding some sparkle to the card, I sprinkled clear, yellow and coral sequins as well as dark coral Carta Bella Enamel Dots in the open spaces between the flip flop images.
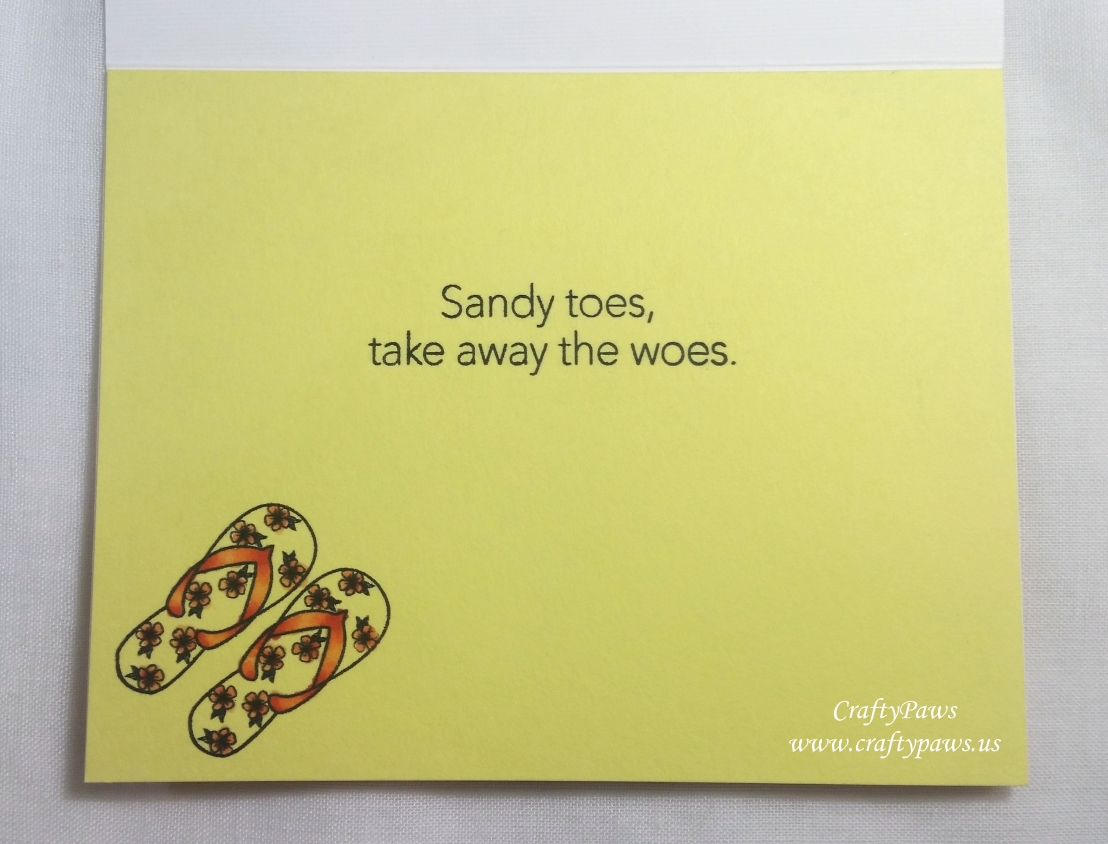
For the inside of the card, I used a scrap of yellow card stock and stamped another sentiment from the stamp set, “Sandy toes, take away the woes.” I also stamped out an additional set of flip flops in the lower left corner and colored it up the same way I did the flip flops on the card front to finish off the card liner.
Click the following picture to watch a process video of crafting this summertime card:
This card is being entered into the following challenges:
The Corrosive Challenge Anything Goes Challenge
Card Mania Anything Goes Challenge
Simon Says Stamp Work it Wednesday the Great Outdoors Challenge
Through the Craft Room Door Anything Goes Challenge
613 Avenue Create Anything Goes with Optional Create Your Own Paper Challenge
Simon Says Stamp Monday Add Some Sparkle Challenge
Simon Says Stamp Wednesday Fun in the Sun Challenge
Word Art Wednesday Anything Goes Challenge
Creatalicious Anything Goes with Optional No Patterned Papers Challenge
MFT Color Challenge 97
]]>
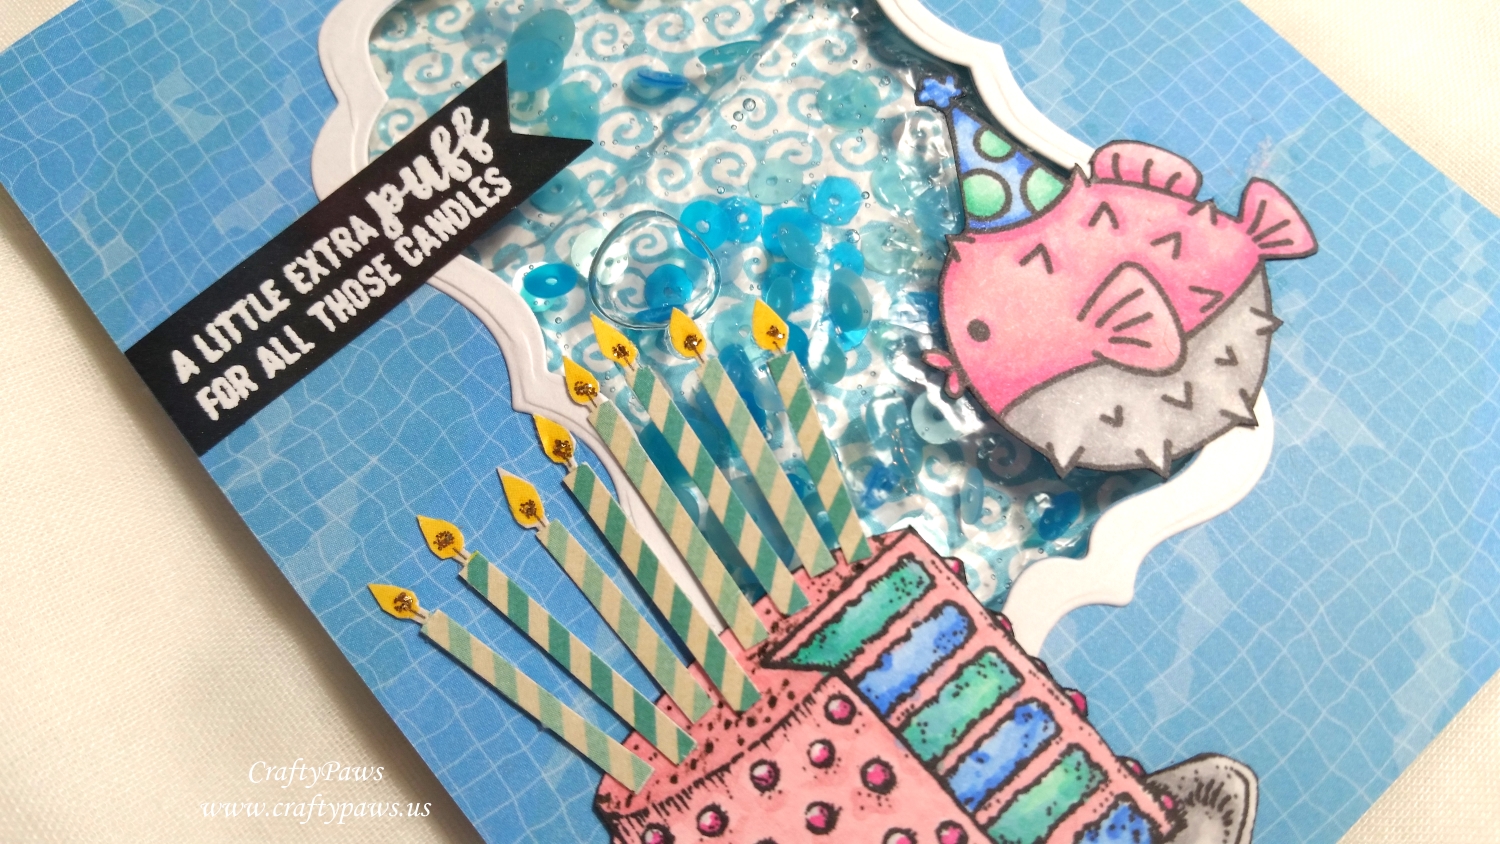
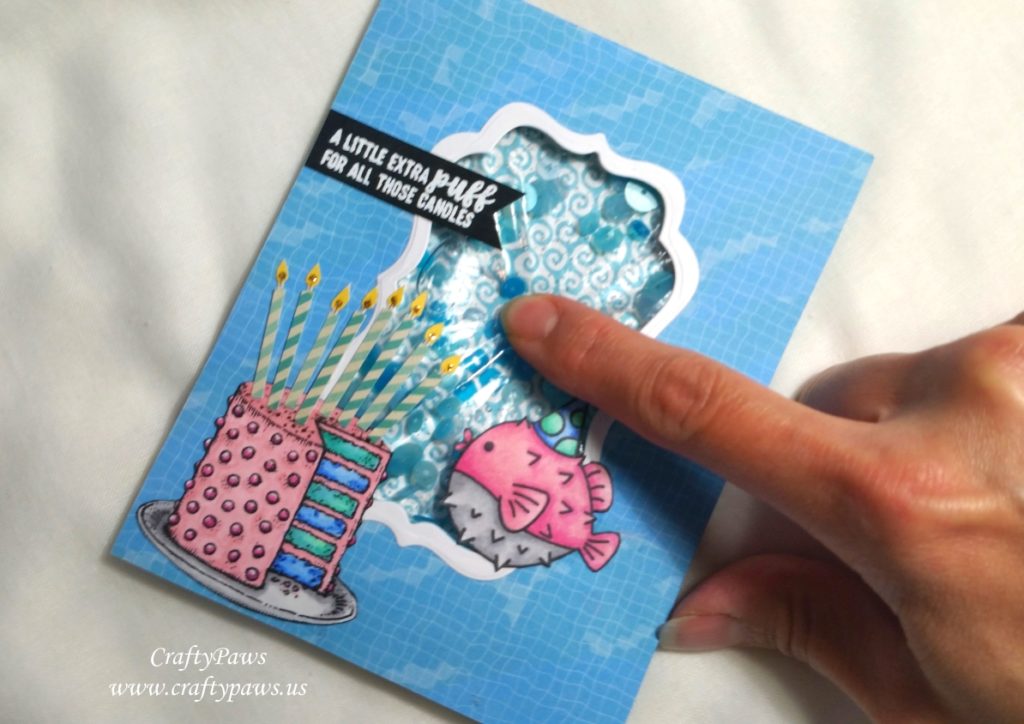
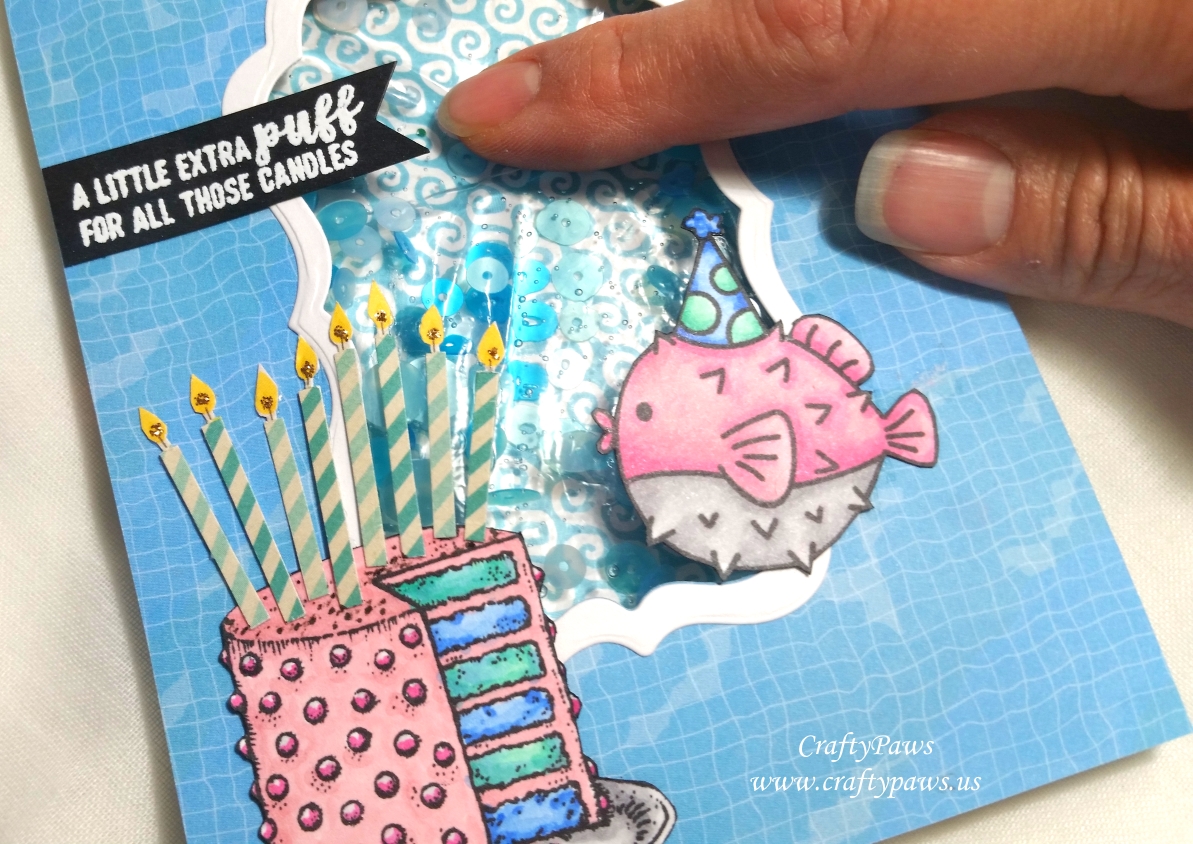 First I made the water shaker using a small zip-lock bag that I filled with hand sanitizer gel and light and medium blue sequins from the “You Are My Sunshine” collection sequins pack from the Kit. I made sure it was sealed up tight and then sandwiched it between two patterned papers. To support the edges of the card front, I surrounded the water shaker pocket with 11 mm foam dots after taping the shaker pocket to the card base. The background waves and the watery pool floor patterned papers are both from the Carta Bella “Summer Splash” paper collection from the Kit. For the card front, I die cut a window and framed it using the fourth and fifth largest dies from the Diemond Dies Labels 1 Nesting Die Set. I thought the curvy lines of this nesting die coordinated nicely with the watery theme of this card.
Note: My readers can get 10% off and free worldwide shipping on all orders of $35 or more from Diemond Dies by using the coupon code: thankskristina PLUS: This nesting die set is currently (as of June 6, 2018) reduced from $23.99 to $14.99!!!
 The inspiration for this card came from the adorable puffer fish from the Avery Elle “Sea-Prise!” stamp set from the Kit. I Copic colored this cutie with the following colors and fussy cut him out: RV11, RV55, B21, B24, BG11, BG23, N0, N2, and N3. Then I glued him into the lower right corner of the die cut window.
To give him something to blow, I also stamped, Copic colored (with the same colors I used on the fish), and fussy cut out a cake from the Power Poppy “Party Time” stamp set. I eliminated the cake topping banner and replaced them with eight striped candles that I fussy cut from an old patterned paper from my scrap box (sorry this is so old I have no idea what paper collection these candles are from). To make these birthday candles pop a bit more and stand up to the color intensity of the rest of the card, I added Champagne Stickles to the base of each candle flame. This added sparkle was a great, festive finishing touch.
I also cut off the foot of the cake stand so that the whole assembly would fit better on the card front with the puffer fish. The sentiment, also from the Avery Elle “Sea-Prise!” stamp set, is heat embossed with VersaMark Ink and Ranger Super Fine White Embossing Powder and says, “A little extra PUFF for all those candles.”
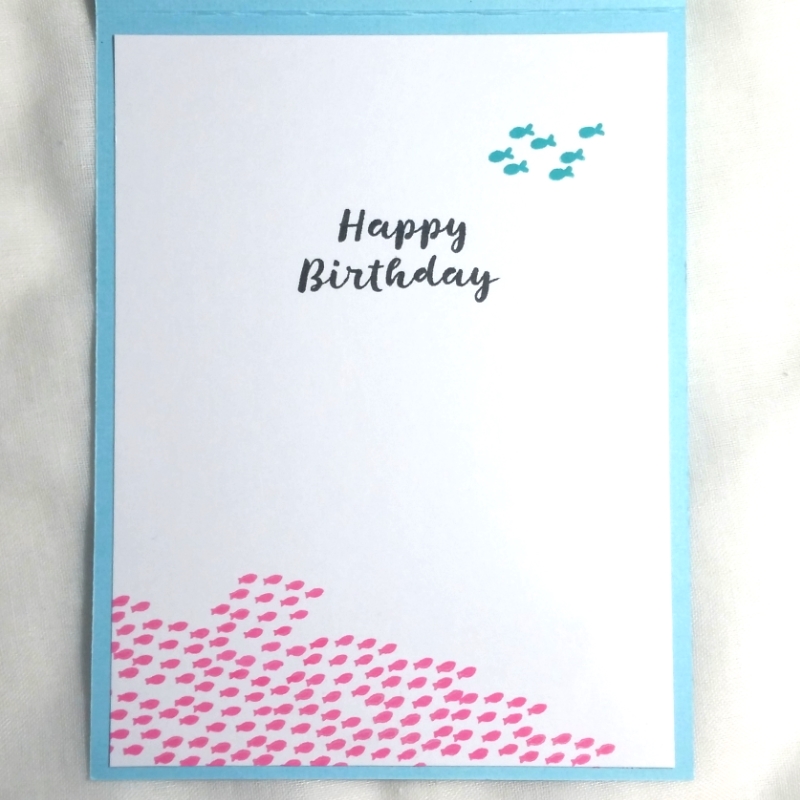
For the inside of the card, I used the school of fish stamp from both the Avery Elle “Sea-Prise!” (for upper right) and the Echo Park “Vitamin Sea” (for lower left) stamp sets. I repeated the colors from the card front by using the Tim Holtz Distress Oxide Inks in Peacock Feathers and Picked Raspberry. Because I wanted the inside card liner to have more visual weight at the bottom, I stamped out the school of fish repeatedly to make it a big mass (like the sort I’ve been seeing in the BBC Blue Planet video series). For the sentiment, I used the simple “Happy Birthday” stamp from the Power Poppy “Party Time” stamp set.
Click the following picture to watch the process video of crafting this card:
This water shaker card is being entered into the following challenges:
Cute Card Thursday Anything Goes Challenge
Simon Says Stamp Monday Red, White and/or Blue Challenge
Simon Says Stamp Wednesday Red, White and/or Blue Challenge
Word Art Wednesday Anything Goes Challenge
Creatalicious Anything Goes with Optional Hero Challenge
CAS-ual Friday Heat Embossing Challenge
Simon Says Stamp Work it Wednesday the Great Outdoors Challenge
Card Mania Anything Goes Challenge
Lil Patch of Crafty Friends Anything Goes Challenge
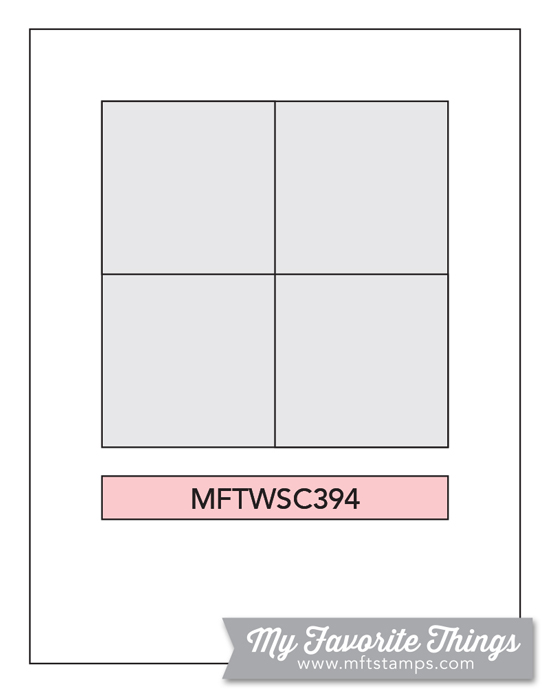
MFT Card Sketch Challenge #96
]]>
 I used the Blue Raspberry and the Nightshift Blue cardstock from the card kit to construct the twist pop card structure. Twist pop cards look complicated, but they’re really not if you take the assembly step by step (watching the video below should help too):
1. Card base (A): 11″ x 4.25″, scored at 5.5″
2. Twist pop mechanism (B): 8.5″ x 3″; scored at 2.75″, 5.75″, turn 90 degrees and score at 1.5″ (down middle); score an “X” through the middle and fold from sides into a house shape (video makes this much clearer)
3. Four panel scene pop up (C): 10″ x 3″; scored at 2.5″, 5″ and 7.5″; fold like a gate-fold card (toward the middle)
4. Position B centered inside A up close to the center score line of A.
5. Add glue to top triangle part of B and fold down A.
6. Flip A and B over and repeat adding glue to top triangle part of B and fold down A.
7. Open A and B, with B flaps all open.
8. Position C centered and on top of B, with gate-fold sides of C closed in toward the center.
9. Add glue to the upper right and lower left quadrants of B, then open C gate-fold sides out and attach to the glued areas of B.
10. Close whole card in, lifting up from the underside of B on both sides and the card will fully close. Re-open and the twist pop card mechanism will open up the whole card. VOILA!
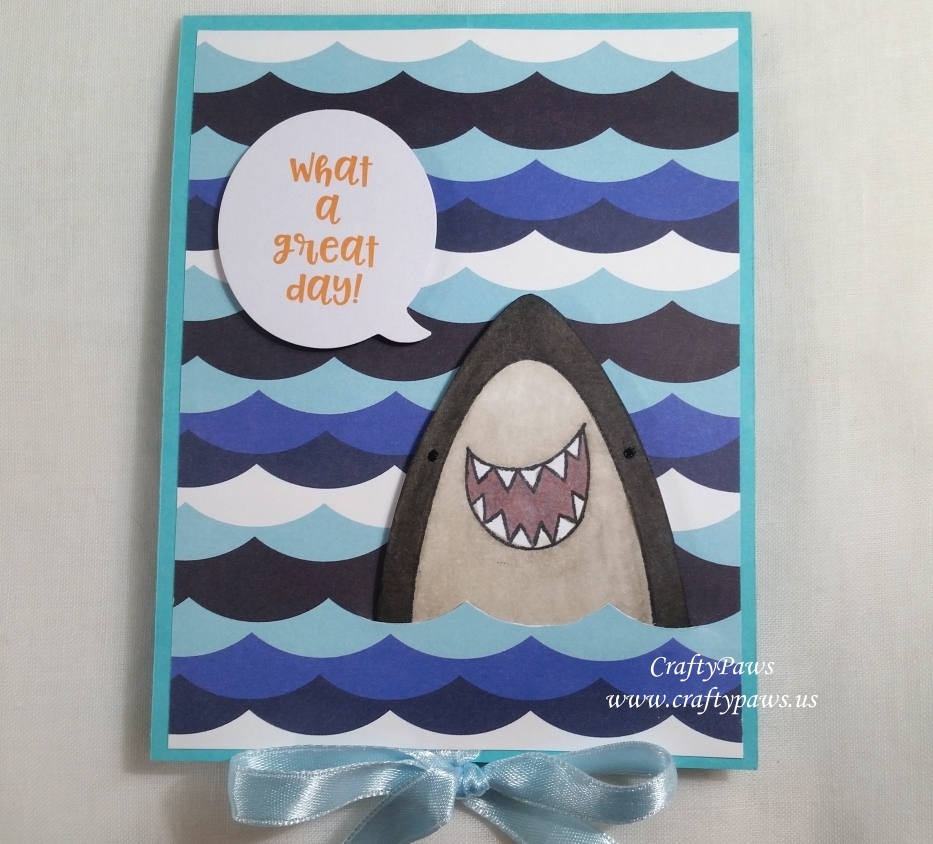
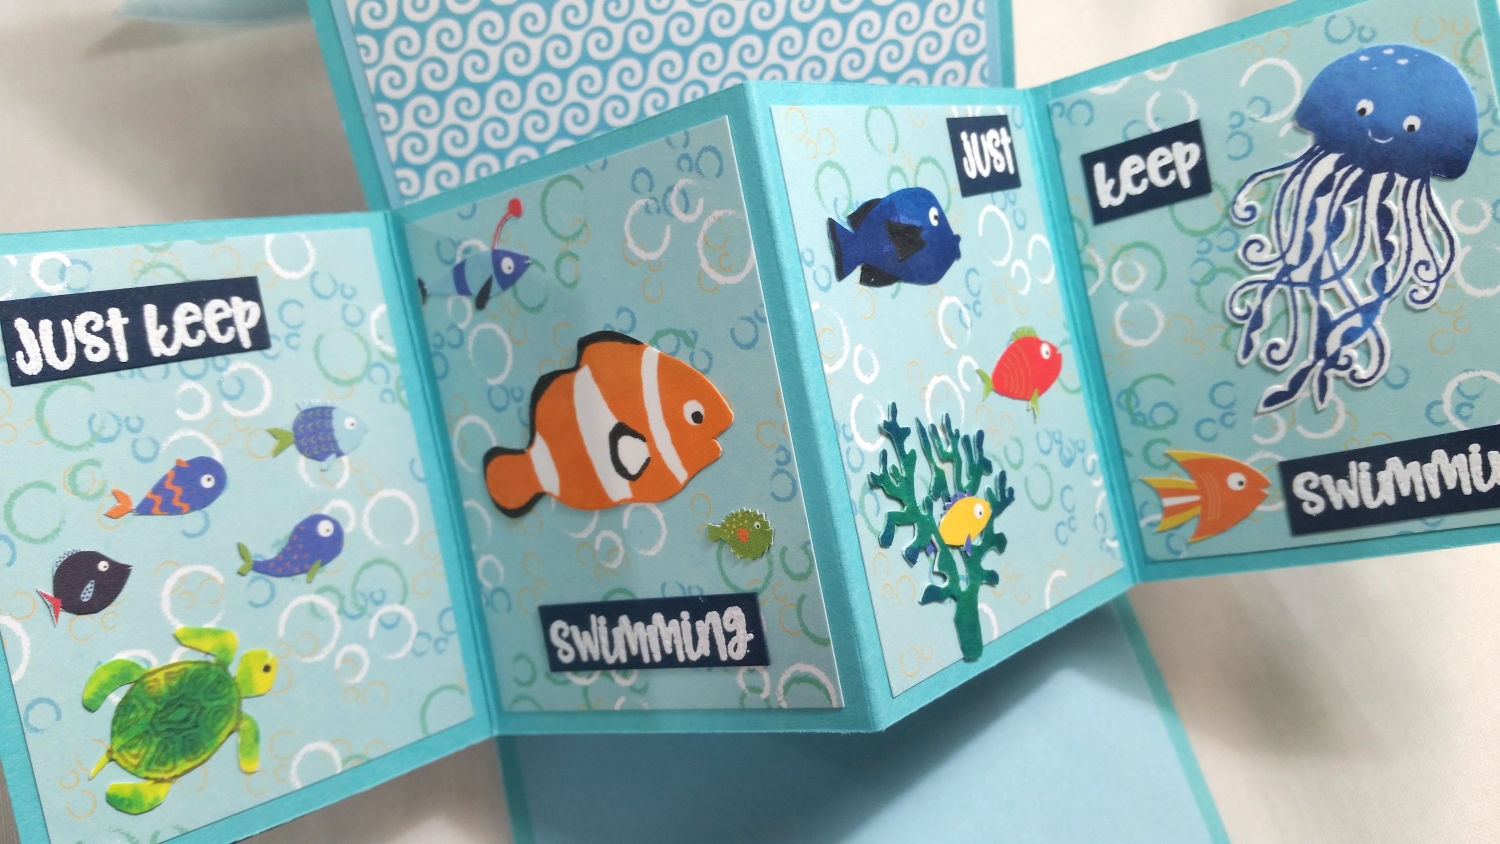
Next it’s just a matter of decorating the various surfaces of the card (front, back, top inside, top bottom, 4 panels). With the Scrapping For Less June Card Kit, I had so many options, it was actually hard to narrow down what I wanted to create. For the card front, I knew I wanted to use smiling shark from the Avery Elle “Sea-Prise!” stamp set. I wiped away the crown-hat and the hat tie under the shark’s mouth before stamping it out. Afterwards, I doodled back in the lines of the shark image that were inadvertently wiped away with a 0.1 pt Copic Multi-liner Pen. Then I used the following Copics to color the happy shark: W1, W3, W7, W9, N4 and R22. I also re-emphasized his eyes with a Sakura Black Glaze Pen. I fussy cut him out and then used an X-Acto blade to cut a slit for him to pop up out of the ocean waves patterned paper from the Echo Park “Under the Sea” paper collection. I popped him up on some fun foam and added one of the chit chat speech bubbles from the Scrapping For Less Banana Split Add-On that says, “What a Great Day!”
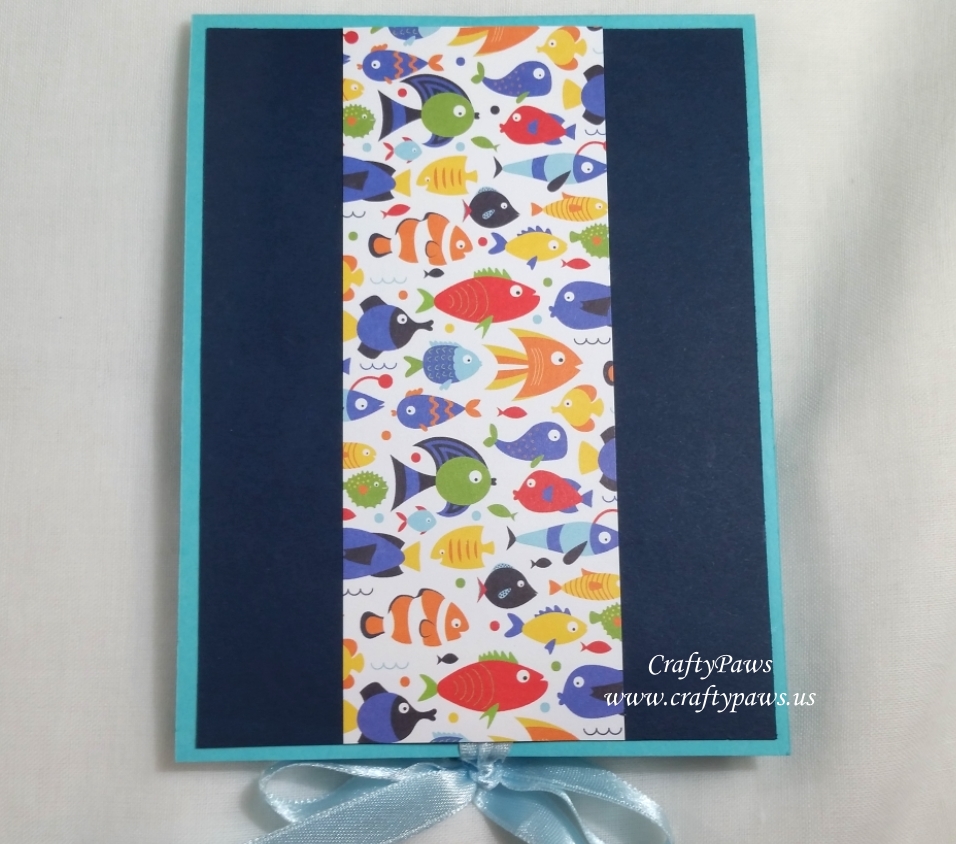
This is optional, but for my card closure, I hot glued a pale blue satin ribbon at the bottom, between the card front and the card base. I hot glued another piece of ribbon at the bottom of the back of the card base. Then I covered that back side with a scrap of the Nightshift Blue cardstock. To reinforce the back panel as well as repeat the Echo Park fish used on the side of the card, I used the scrap of the fish patterned paper (the reverse side of the ocean waves patterned paper) from the Echo Park “Under the Sea” paper collection. Now I had ribbon on the front and back of the card that I can tie together into a pretty bow as the closure.
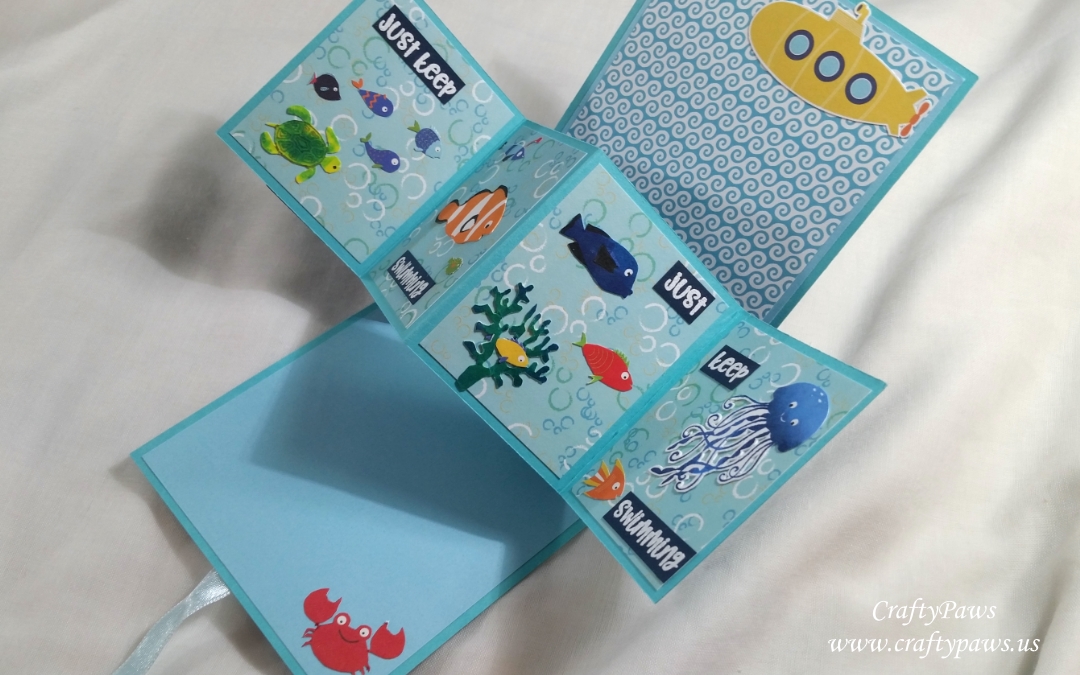
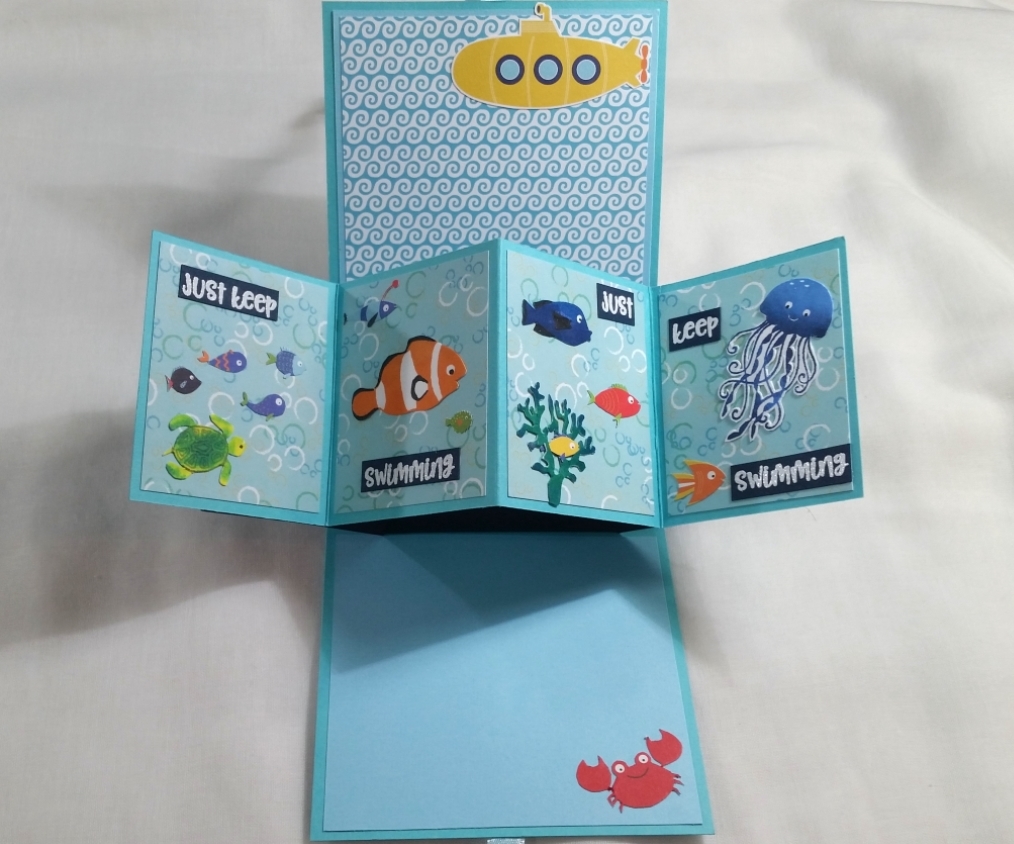
For the inside top panel of the card, I used the waves patterned paper from the Carta Bella “Summer Splash” paper collection and added a little yellow submarine from the Echo Park “Under the Sea Frames and Tags” cut-a-parts. for the inside bottom panel of the card, I simply added a pale blue scrap of card stock and embellished it with a cute little red crab also from the Echo Park “Under the Sea Frames and Tags” cut-a-parts.
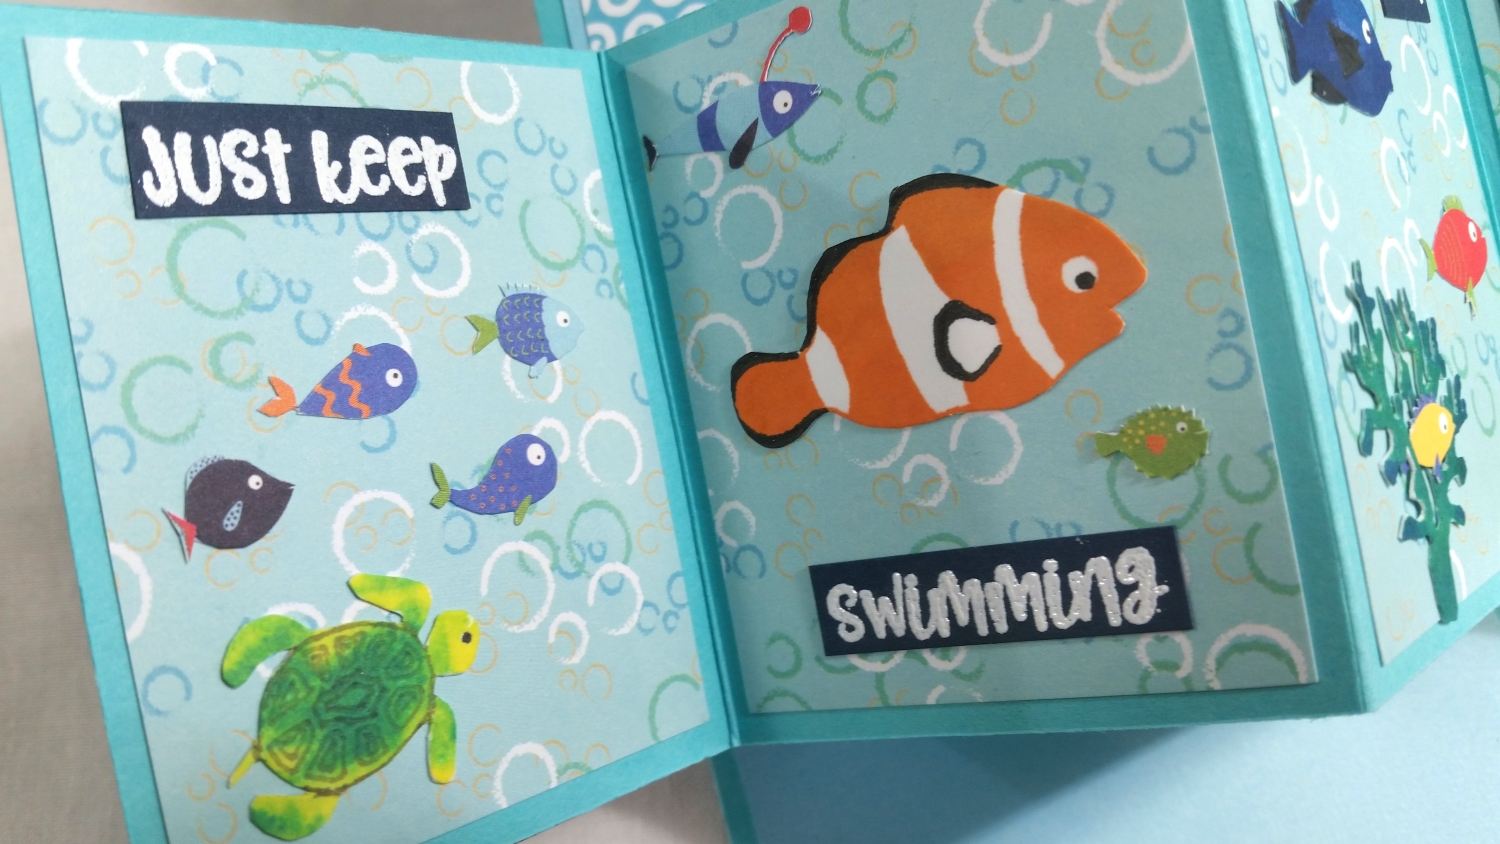
For the 4 panels, I matted each panel with the fun bubble patterned paper from the Little Darling Rubber Stamps “You Are My Sunshine” paper collection. Then I just took the left-over scraps of the cute fish patterned paper from the Echo Park “Under the Sea” paper collection (this is the reverse side of the wave patterned paper I used on the card front) and fussy cut out a bunch of fish. This was very labor intensive fussy cutting, but I just put on some music and went Zen with my favorite Fiskars Spring Loaded Scissors. 🙂 For larger (more focal-point worthy) ocean critters, I used the Echo Park “Vitamin Sea” stamp set and the LDRS Creative “In Your Face Orange” Hybrid Ink from the card kit, a little black ink pen, and the following mini ink cube colors I had in my stash to stamp out a turtle, clown fish, blue fish, seaweed, and jellyfish: SSS Orange Slush; and Hero Arts Fiesta Red, Deep Ocean, Lemon Yellow, Cornflower, Emerald Green and Navy.
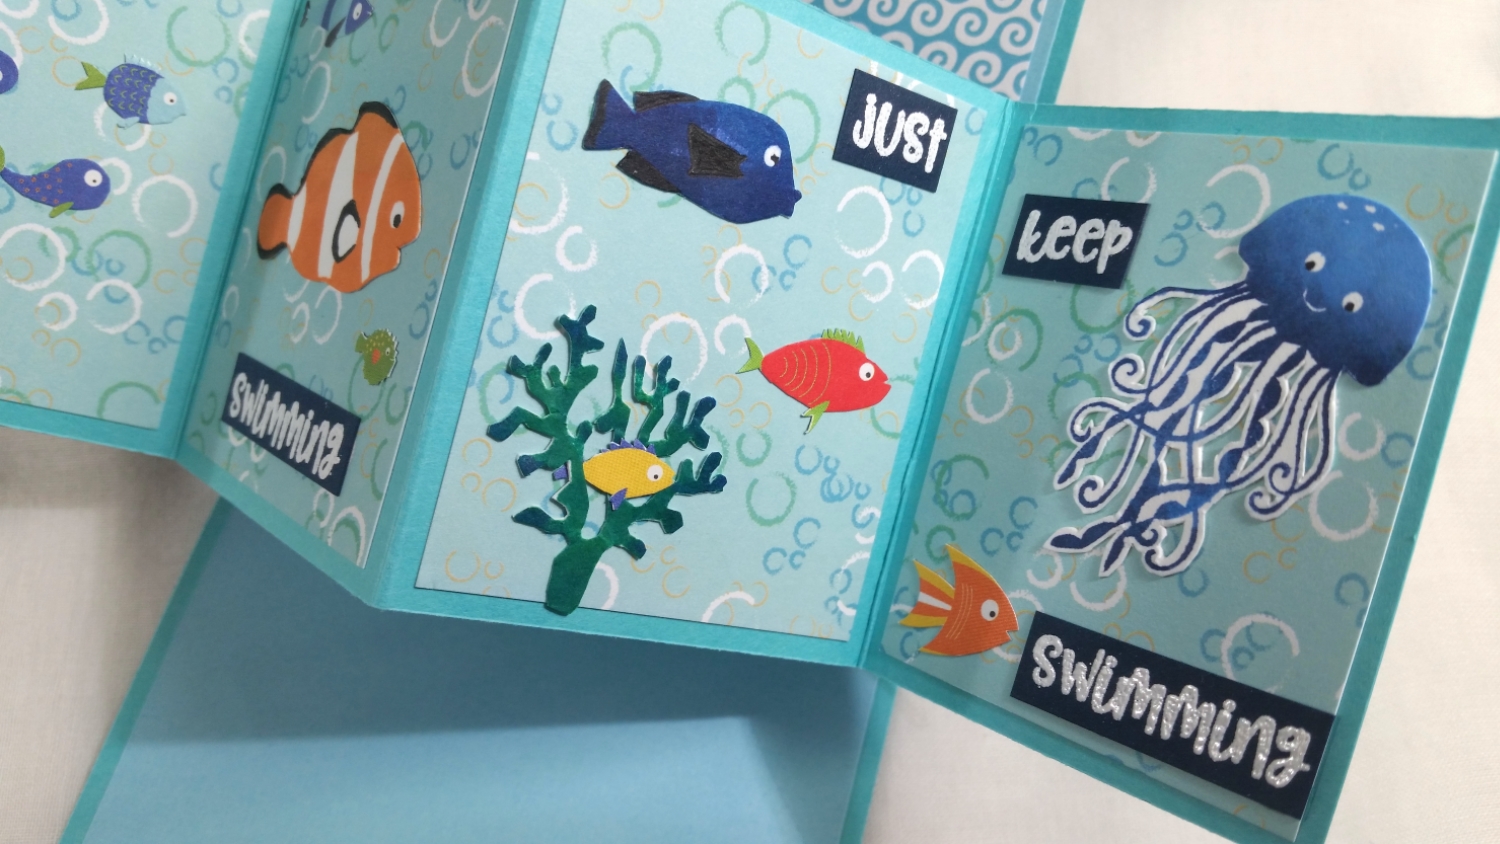
Lastly, I decided to use the “just keep swimming” sentiment from the Echo Park Echo Park “Vitamin Sea” stamp set. I used a scrap of the Nightshift Blue cardstock, VersaMark Ink and Ranger Super Fine White Embossing Powder to stamp out the sentiment twice. Then I cut apart the words to space them out on the 4 panels so that it would look like the school of fish swimming across the 4 panels were saying, “just keep swimming; just keep swimming” like in the Pixar movie, “Finding Nemo.”
I hope you enjoyed this stop on the Scrapping for Less Blog Hop. The next stop on the hop is: Theresa. The fabulous “At the Beach” card kit is available now. Thanks for stopping by today! Don’t forget to enter the Rafflecopter on the Scrapping for Less Blog!
Disclosure: Many of the supplies I’ve used for today’s project are linked. Some may be affiliate links, which means if you make a purchase I receive a small commission at no extra cost to you. I truly appreciate your support toward the costs of running this blog!
CLICK the following video to watch the process tutorial of how I crafted this twist pop card:
CLICK the following picture to watch my unboxing video of the Scrapping for Less June Card Kit: “At the Beach” (pssst: it has a GIVEAWAY!):
This twist pop card is being entered into the following challenges:
]]>
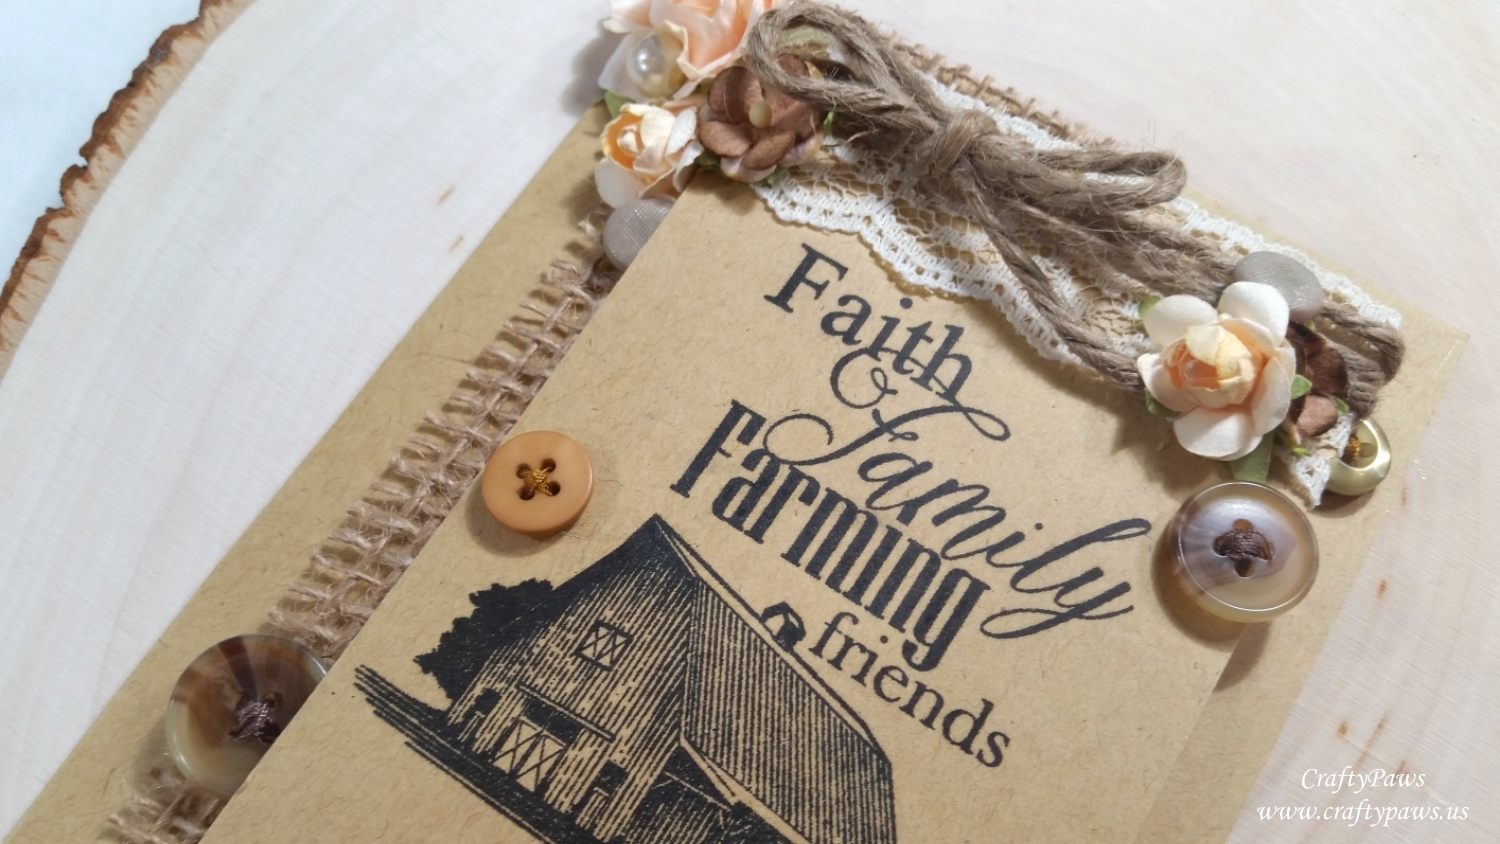
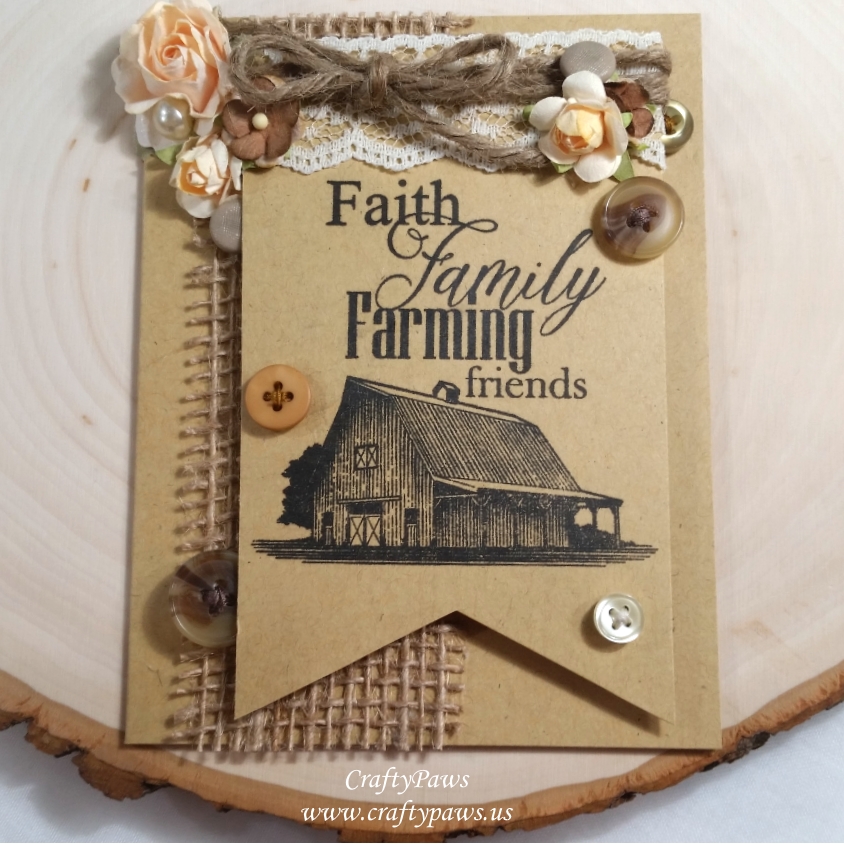 I started with the Kraft cardstock from the kit to make the card base as well as the card front piece onto which I stamped out the beautiful sentiment and barn. The stamp is so beautiful, that I almost could have stopped there, but of course, I didn’t. 🙂
I hand cut the stamped piece into a dove-tail banner shape and wrapped the top of the banner with a scrap of lace and a bit of twine. I added a twine bow to the twine wrappings and then to compensate for the bulk added by the twine, I backed the lower part of the banner with two layers of fun foam sheets.
Then to add more texture, before adhering the banner to the card base, I cut off a segment of the burlap ribbon from the kit. I took the time to cut off the finished edges of the burlap ribbon and fray all the edges in order to unleash the full power of and celebrate the rough form of burlap before I secured it to the card front. Like the twine bow, I adhered this off-center to the card front so reveal more of the ribbon and add interest.
Then I decided to soften the look of the card a bit more by adding three peachy tan paper flowers and two brown flowers. I created small clusters with these at the ends of both ribbon bow tails. I intentionally selected these flower colors because I wanted to keep the whol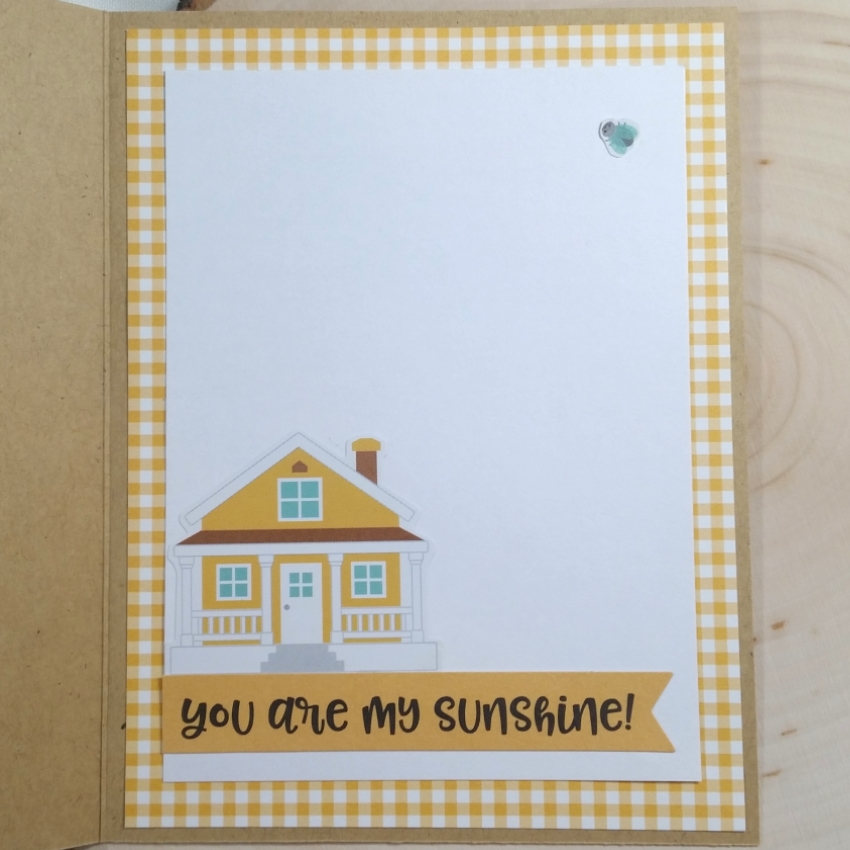 e card monochromatic to up the sophistication level.
Then for a bit of whimsy, I poured through my button stash and grabbed a pearl on, two putty colored linen covered ones, and a handful of mixed faux tortoiseshell, pearly white and tan buttons in different sizes. For those buttons with button holes, I also took the time to put thread through each one in a cross pattern. I didn’t want the buttons to look like they were just buttons from a button jar. Rather, I wanted them to look like they were re-used and upcycled from old clothes, and I think the threading helps give that impression.
True to the Primitive Style, I like the collected-over-time look of these various buttons. I think they add a sense of love and a thoughtfulness to the card. After futzing with each button’s positioning for a ridiculous amount of time, I finally decided to tuck some into the flower clusters, some behind the banner, and some on top of the banner.
For the inside of the card, I shifted the color scheme a bit and went with a country golden yellow gingham from the My Favorite Things “Tiny Checks” collection for the mat. I also added a country farmhouse and beetle sticker and a “you are my sunshine!” banner to decorate the liner; all of these pieces are from the Doodlebug “Down on the Farm” part of the Scrapping For Less May “In the Countryside” Double Dip Kit.
Disclosure: Many of the supplies I’ve used for today’s project are linked. Some may be affiliate links, which means if you make a purchase I receive a small commission at no extra cost to you. I truly appreciate your support toward the costs of running this blog!
The following is a process video of crafting this card:
This card is being entered into the following challenges:
Word Art Wednesday Anything Goes Challenge
Creatalicious Anything Goes Challenge with Optional Flowers
Lil Patch of Crafty Friends Anything Goes Challenge
Fab ‘n’ Funky Monochrome Challenge
613 Avenue Create Anything Goes with Optional Buttons and Bows Challenge – WINNER
Penny Black and More In the Garden Challenge
Crafty Gals Corner Anything Goes Challenge
Stamping Sensations Anything Goes Challenge
The Corrosive Anything Goes Challenge
]]>
 I constructed the card base shaped shirt and apron card using the following Diemond Dies (the video below shows how each die was used):
Baby Onesie Mini Album Die
Candy Corn Mini Album Die (for the bottom of the shirts and apron)
Candy Die Set (larger candy corn used to make apron arm holes)
Nesting Flower Pots Die Set (for collar opening of apron)
My readers can get 10% off and free worldwide shipping on all orders of $35or more at Diemond Dies by using the coupon code: thankskristina
The cardstock I used for this card are all from the Scrapping for Less May “In the Countryside” Card Kit. For the true red shirt card base, I used the Wild Cherry cardstock and the apron was made from the Whip Cream cardstock. I printed the sentiment, “FRIENDS [space for critters] (not food)” sentiment onto the Whip Cream cardstock directly from my computer printer before I cut out the apron shape, and I later traced the letters with a Sakura Black Glaze Pen to give it a more finished rich look.
The adorable little critters are from the Scrapping for Less “Piggy Picnic” stamp set and the Avery Elle “Barnyard” stamp set, both also from the Scrapping for Less May “In the Countryside” Card Kit. I used the following Copic colors to color up the critters:
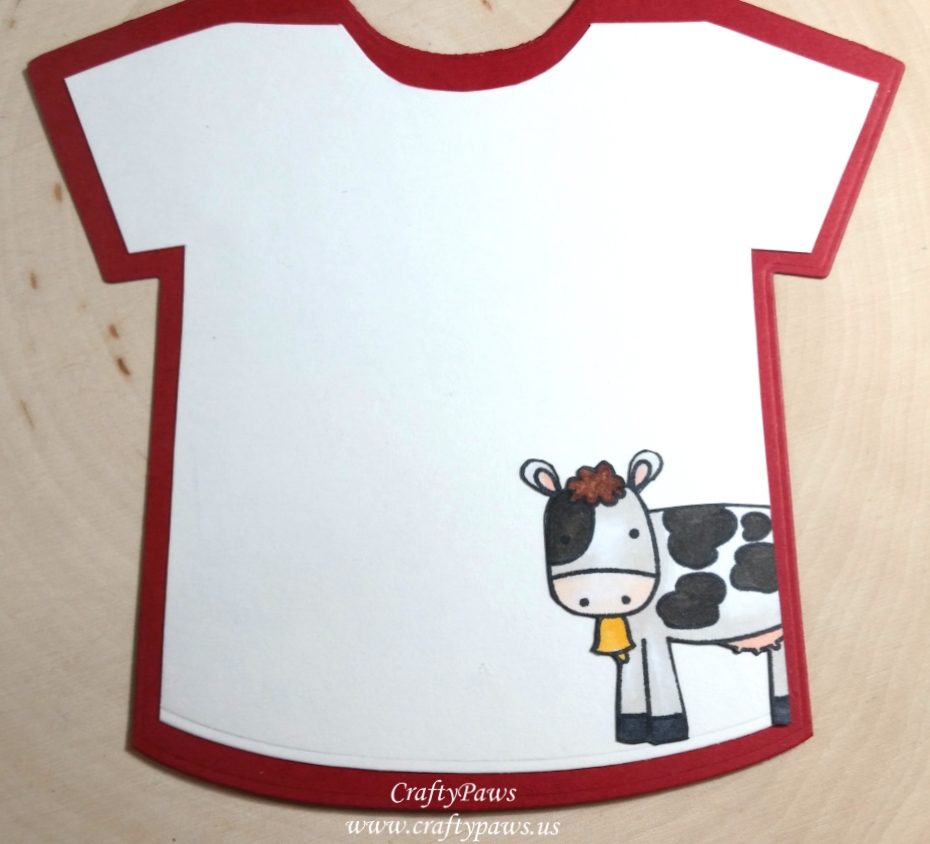 Chicks: Y11, Y21, Y35 and Y38
Lamb: W0, W3, E01 and R30 with C6 for hooves
Pig: R11, R12, R21 and R22 with C6 for hooves
The cow on the inside liner of the card is colored with:
W0, E000, W7, R30, E23, E29, C7 and Y35
Then I fussy cut out each animal and inked the edges of the cut paper with a Momento Tuxedo Black Marker for a finished look. Finally, I used double sided foam adhesive to pop up each of the critters on the front of the card for a little dimension. I simply glued the cow directly onto the card liner, because I didn’t want to add any bulk to the inside of the card.
For finishing touches, I added Ranger Glossy Accents to all the hooves and beaks of the critters as well as to the bell hanging off the cow. I also used my bone folder, a ruler, and my mouse pad (for cushion) to mimic the impressions left by die cutting along the edges of the apron front that I hand cut with scissors. While something like this dry embossing might seem like a small detail, it really gives a clean finished look.
Disclosure: Many of the supplies I’ve used for today’s project are linked. Some may be affiliate links, which means if you make a purchase I receive a small commission at no extra cost to you. I truly appreciate your support toward the costs of running this blog!
The following is a process video of creating this shaped card:
This card is being entered into the following challenges:
The Corrosive Anything Goes Challenge
Pause Dream Enjoy Anything Goes Challenge
Crafting By Design Paper Piecing Challenge
Stamping Sensations Anything Goes Challenge
Lil Patch of Crafty Friends Anything Goes Challenge
Through the Craft Room Door Anything Goes Challenge
Word Art Wednesday Anything Goes Challenge
Creatalicious Anything Goes with Optional Flowers Challenge
613 Avenue Create Anything Goes with Optional Buttons and Bows Challenge
The following is an unboxing video of the kit:
For my first guest designer project, I thought I would create a shadow box card using the adorable scene paper from the Carta Bella “Country Kitchen” and the super cute cow from Sunny Studio’s “Miss Moo” stamp set. I made this fun fold birthday card for my cousin’s son, who is a total country boy.
 The following are the dimensions and written directions for the card structure, using only one 8.5″ x 11″ piece of sour apple cardstock, also from the Scrapping For Less May Kit:
1. Cut cardstock in half to create two 5.5″ x 8.5″ pieces (I’m going to call them A and B)
2. With sheet A, score at 4.25″ (as if creating a standard side folding card base) and cut 0.5″ off of one side. Burnish along score
3. With sheet B, along the long side, score at 0.5″, 4.25″ and 4.75″, and cut a sliver off the end before the 0.5″ scored line. Burnish along scores
4. Use an open shape die, I used the Diemond Dies Nesting Ovals Die Set, to create the window opening of the shadow box on sheet B in the section between the 0.5″ and the 4.25″ score lines
5. Add adhesive to the 0.5″ portion of sheet B and adhere to sheet A by putting it up to the sheet A score line
6. Flip over combined sheets and add adhesive to the edges of the last segment of sheet B, between the 4.75″ score line and the sheet edge. Fold over and attach to the back side of the sheet A at the score line Voila! The structure is done. These instructions may be easier to refer to when making your own shadow box card, but watching the video below will probably make everything clearer.
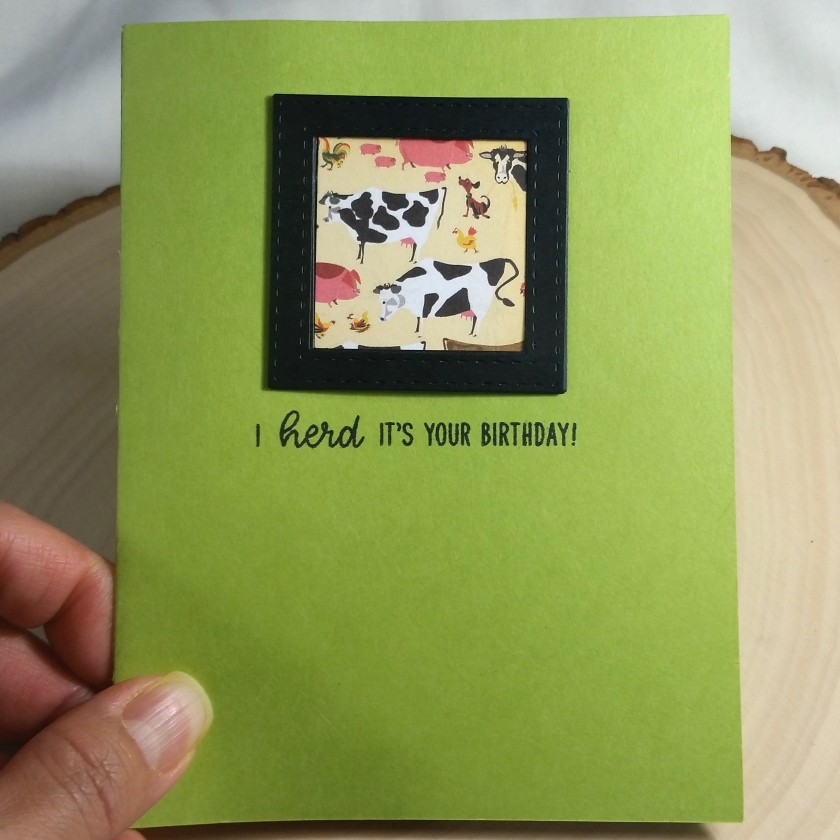
Decorating the back panel of the shadow box, which I did before putting together the above structure, was really simple (except that I cut the sheet down incorrectly so I had to fix the error – you’ll see in the video). I just used the farm/garden scene paper from the Carta Bella Country Kitchen collection. I also used the scraps for a little embellishment country house for the top of the shadow box opening as well as the reverse side (which was an adorable pattern paper of lots of cows with little dogs, pigs and chickens) for the front of the card.
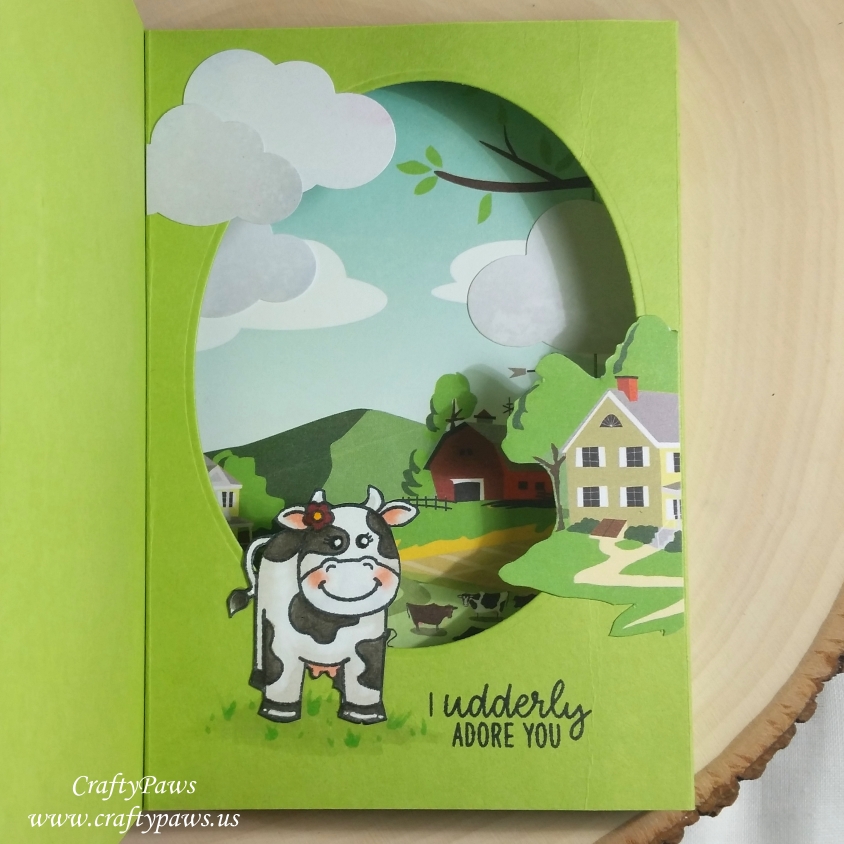 To cover up my cutting mistake, I used my versatile Fiskars Cloud Punches (x-large and large) to hide some seams as well as to add a little more interest to the top of the shadow box opening. Then to finish off the shadow box with a focal point cow, I Copic colored the adorable cow from the Sunny Studio’s “Miss Moo” stamp set with the following colors: Cow: C0, W0, W5 and W7 with R20 udder, blush and ears; Flower: Y38 and R89; Ground/Grass: C1 and G14. I used a sentiment from the Sunny Studio’s “Miss Moo” stamp set that says, “I udderly ADORE YOU” to complete the shadow box.
Since there was so much going on inside the card, I wanted to keep the card front simple. I used up another scrap of the cow pattern paper and framed it with a stitched square frame that I cut out using a Simon Says Stamp Stitched Squares Die Set. Under the little framed scene, I stamped out another sentiment from the Sunny Studio’s “Miss Moo” stamp set that says: “I herd It’s Your Birthday!
Disclosure: Many of the supplies I’ve used for today’s project are linked. Some may be affiliate links, which means if you make a purchase I receive a small commission at no extra cost to you. I truly appreciate your support toward the costs of running this blog!
The following is a process video of crafting this card (mistakes and all!):
This card is being entered into the following challenges:
Stamp Sensations Anything Goes Challenge
Simon Says Stamp Wednesday Frame It Challenge
Word Art Wednesday Anything Goes Challenge
Creatalicious Anything Goes with Optional Flowers Challenge
CAS-ual Fridays Boys of Summer Challenge
Lil Patch of Crafty Friends Anything Goes Challenge
Penny Black and More In the Garden Challenge
613 Avenue Create Anything Goes with Optional Buttons and Bows Challenge
Through the Craft Room Door Anything Goes Challenge
]]>