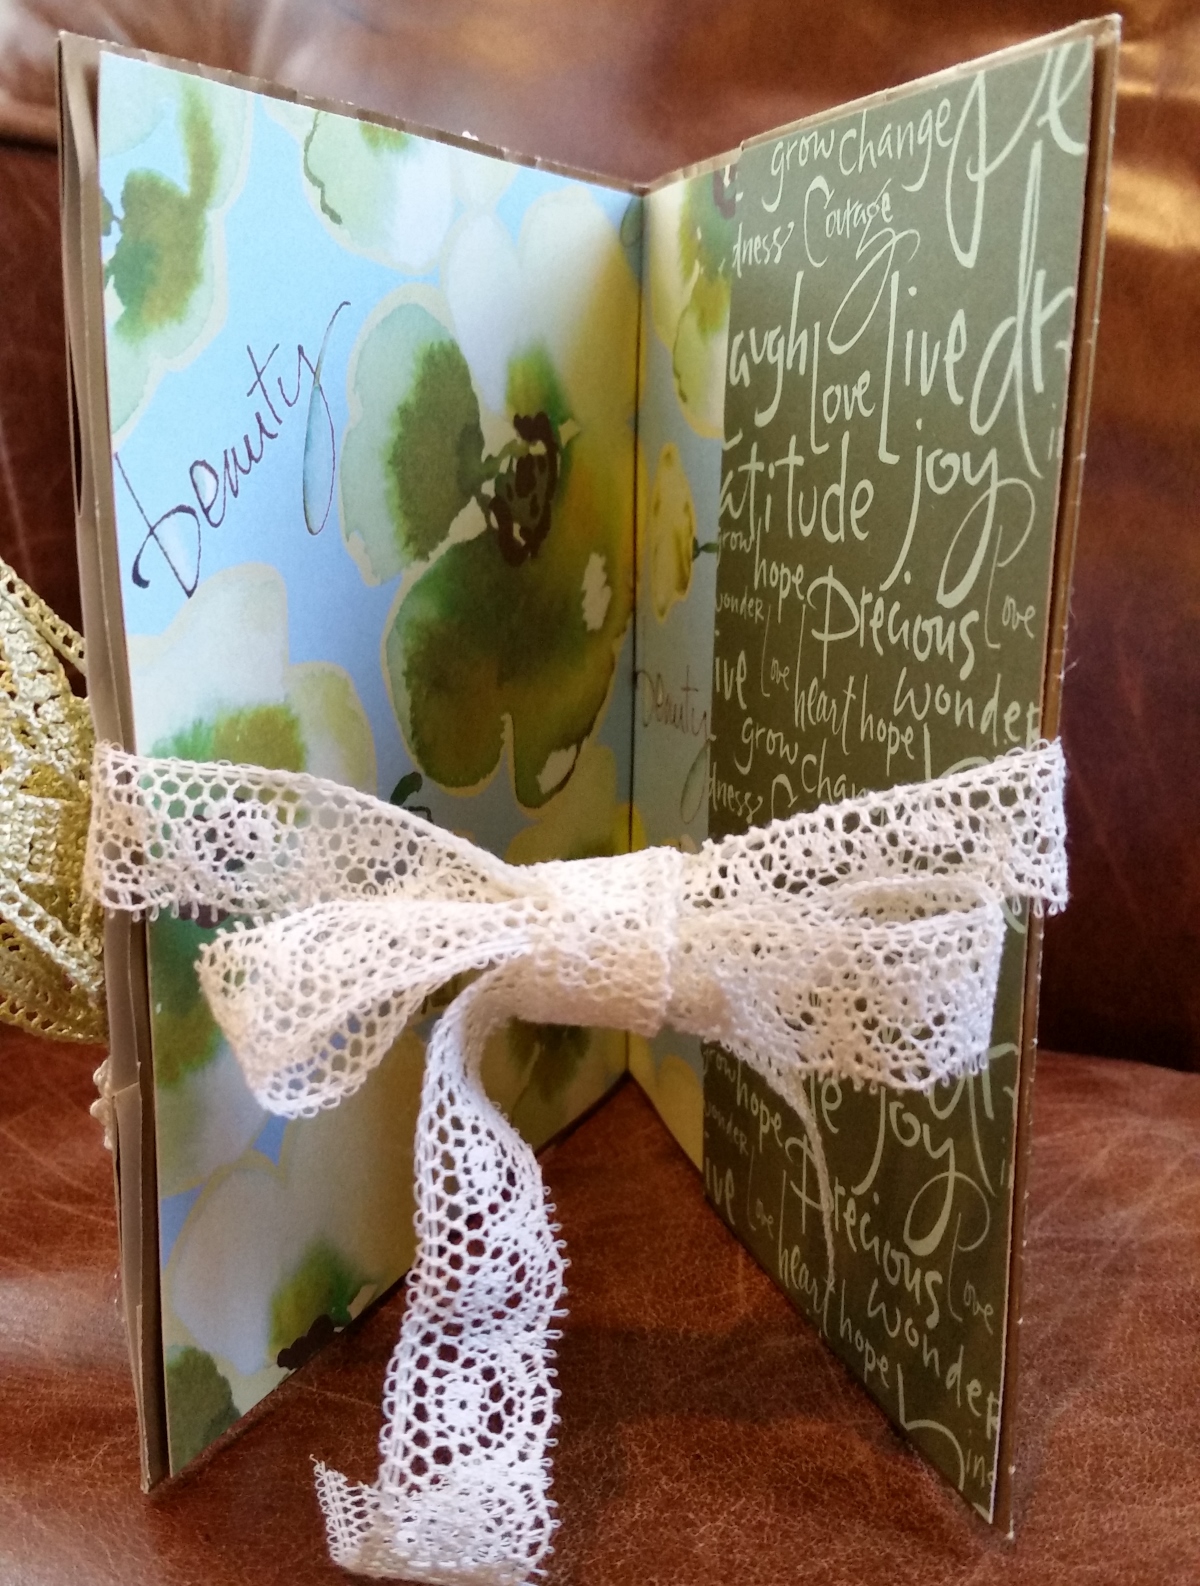
 I hadn’t made a paper bag card in a long time, and I thought it would be fun to try this again with a gold paper bag that I received with some crafty goodies recently. I followed THIS tutorial by Jamie (the owner of the Not2ShabbyShop).
I used the following Copic colors as well as a Copic multiliner pen in 0.03 pt to clear up the eyes and add more eyelashes (a girl can never have too many long lashes, right?!):
Skin: E000, 00, 11, 13, and BV01
Blush: R20
Hair: E55, 57 and 59
Eyes: G24, 94 and 99
Lips: R85 and 89
Butterfly: YR20 and 24
Shading on paper pieced dress: W1 and 3
In the video, in which I describe all the parts of decorating this card (like the love die cut from green/gold glitter paper and the pretty crocheted flowers below and above the beautiful crocheted green bow), I also show a comparison with another image that I colored with a yellow undertone skin color combination (E50, 51, 53 and R30):
This card is also being entered into the following challenges:
Teresa Renken’s 300+ Subbie Challenge
Craft-Dee BowZ Anything Goes with a Handmade Bow Challenge
Suzy Bee’s Anything Goes with a Twist…Add Flowers Challenge
Scrappin Stampers Facebook Lunch Bag Card May Challenge
Thanks for stopping by and hope you are having a wonderful day! WOOF
]]>
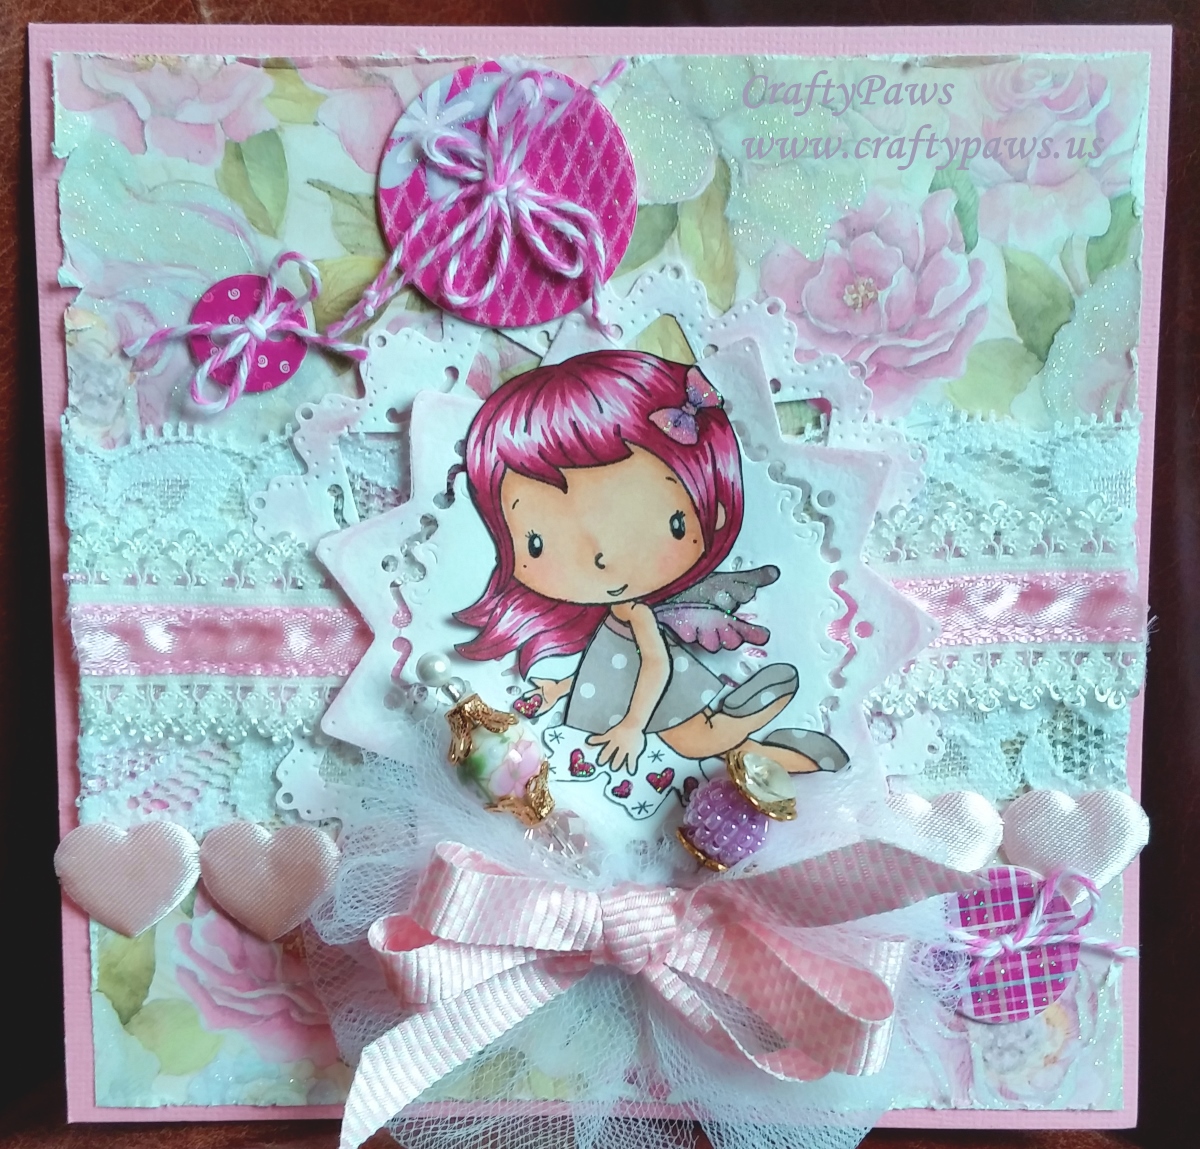 I used the adorable C.C. Designs Pixie and Cupid (both from the Not2ShabbyShop) as the focal points and colored them in to fit the person who would receive each one. Their skin was all colored with E50, 51, and 53 with R30 for the Cupid’s blush and R20 for Pixie’s blush. I also added glitter glue for some sparkle over the fairy wings an to little accessories like hair bows and the dandelion.
The pink Cupid’s hair was colored with R81, 83, 85 and 89
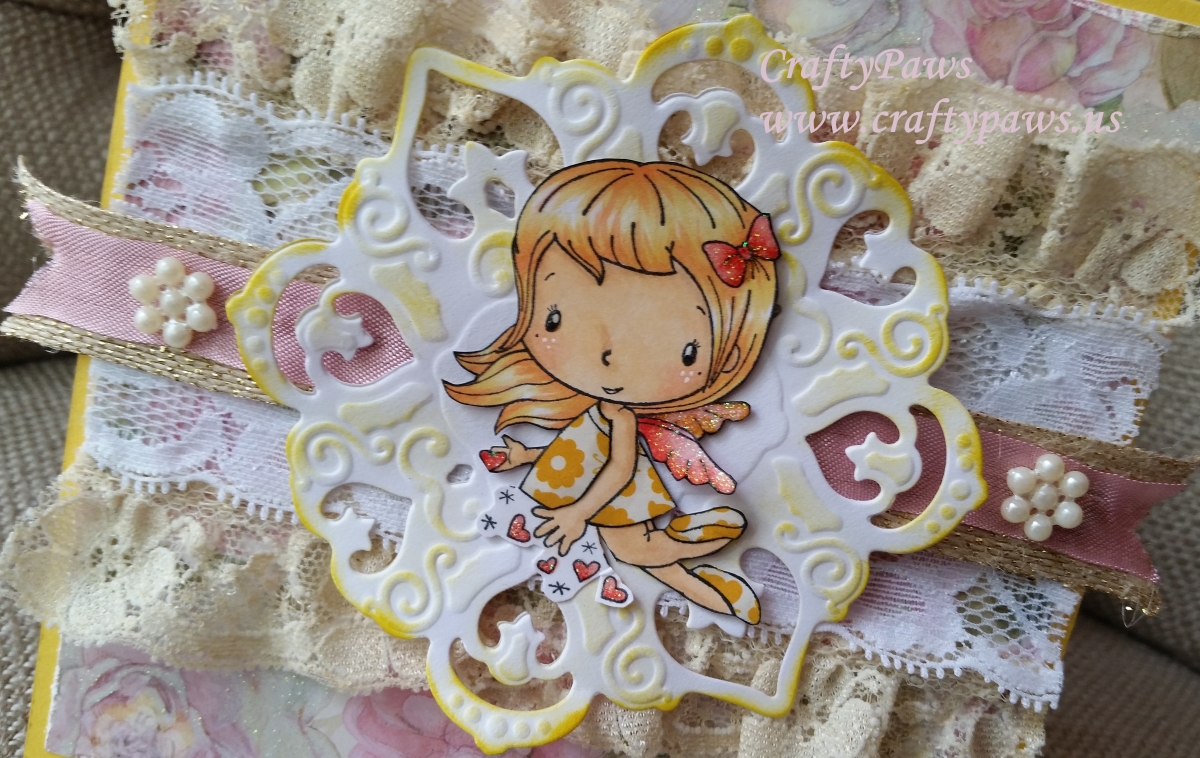
The blonde Cupid’s hair was colored with Y11, Y21 and YR02
The purple haired Pixie was colored with V01, 12, 15, 17, and 09. I also used V01 and 12 for her underskirt. Her wings and the flower on her head were colored with B00 and 01, and the dandelion was colored with V000 and YG13.
 I also took great care to paper piece each of their dresses and shoes. I love using scraps of patterned papers to do this because, once shaded with W1 and edges inked with a black marker, I think the paper piecing adds some fun more realistic details to most stamped images.
After coloring in the images, fussy cutting them out, and inking all of these edges too, I placed each image on pretty background die cuts, which I cut using Spellbinders Shapeabilities Pendants in Spades or Spellbinders Nestabilities in Majestic Elements. To help them pop from the backgrounds, which were chock full of laces, punched papers, chip board buttons, flat back pearls, ribbons, paper doilies, uniquely assembled paper flowers, stick pins, and patterned papers, I inked the edges of the die cuts with Tim Holtz Distress Inks in Victorian Velvet, Mustard Seed, and Peacock Feathers.
The following is a video share of these cards:
These 3 cutsie cards are being entered into the Simon Says Stamp Monday In the Middle Challenge
The blonde hair Cupid card is being entered into The Pink Elephant Photo Inspiration Challenge
The purple hair pixie card with all the flowers is being entered into the following challenges:
Simon Says Stamp May Flowers Challenge
Naughty Or Nice In Bloom Challenge
The pink haired Cupid card is being entered into the Craft-Dee Bowz Anything Goes with a Handmade Bow Challenge
Thanks for stopping by! Hope you’re having a wonderful crafty day! WOOF
]]>
 My readers can get 10% off at the Not2ShabbyShop by using the code CRAFTYPAWS at check out. Plus all orders of $6o or more automatically get free shipping!
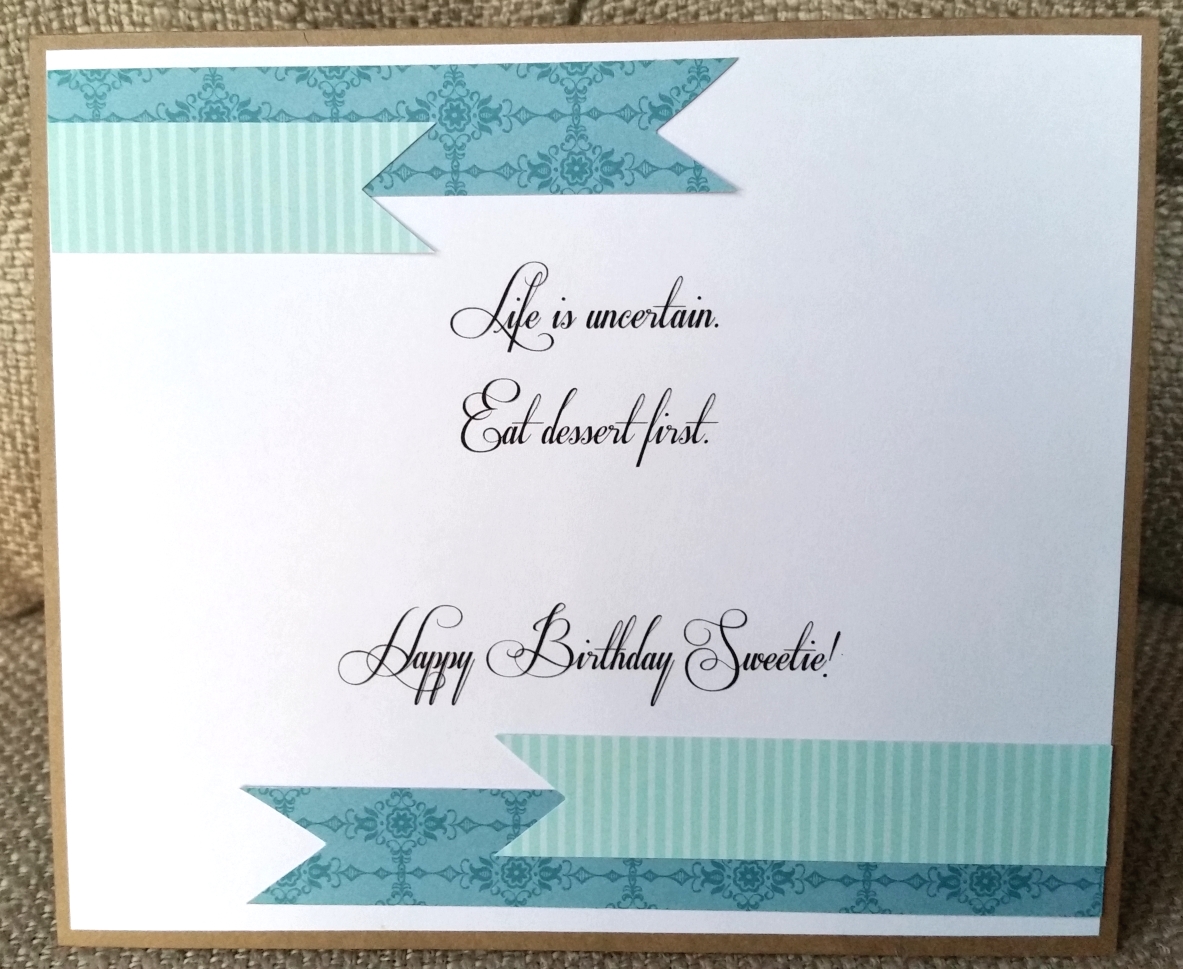
I colored up this little cutie to plop her on top of a home made cupcake embellishment and surrounded by others. This went perfectly with the funny birthday sentiment I printed out on my computer that says: “Life is uncertain. Eat dessert first. Happy Birthday Sweetie!”
Because I wanted to use some old Stampin’ Up! paper in pretty pastel colors that I had in my stash, I colored her up in blues and used the center scraps from the matting papers to paper piece her dress and shoes (those tiny pieces are trying to shade, fussy cut, and edge with black ink, but it is worth it in the end for the finished look).
I colored her up with the following Copic colors:
Hair: B00, 01, 02, 04 and 08
Skin: E50, 51, and 53 with R30 blush
Sash of bow and gossamer dress lining: B00 and 01
To add a little magic, I added glitter glue to her wings and clear Wink of Stella to her hair.
The following is a video share of this card:
This card is being entered into the following challenges:
The Pink Elephant Pastel Challenge
MarkerPOP Anything Goes Challenge
Thanks for stopping by and have a fabulous crafty day! WOOF
]]>
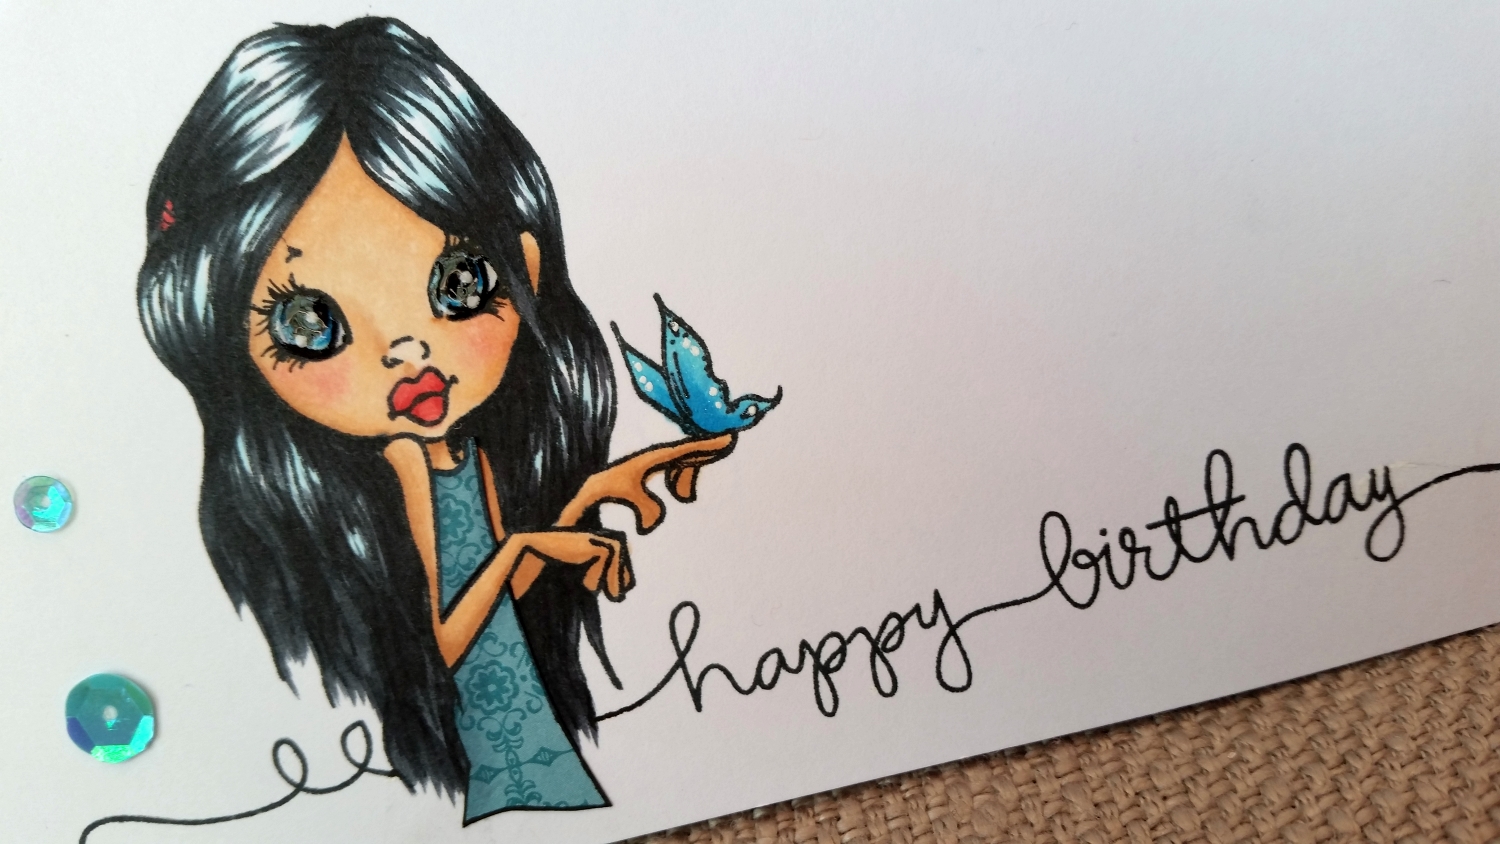 I picked a Saturated Canary stamp called “Little Loves,” which I received as part of my DT package from the Not2ShabbyShop, and decided to make a CAS card that would fit a #10 (business size) envelope, just to mix it up a bit. 🙂
Remember the Not2ShabbyShop is having an Easter sale through April 6, 2015. Use the coupon code: EASTER20 for 20% off your entire order. For the rest of April 2015, use the coupon code CRAFTYPAWS for 10% off! All orders of $60 or more also get free US shipping!
I stamped the image out on a piece of Georgia Pacific Card Stock, which is what I usually use for Copic coloring. Then I also stamped her out on a scrap of paper to make a quick mask so that I could use the happy birthday stamp from the Simon Says Stamp “Handwritten Borders” on either side of the girl. Because the “happy birthday” was not quite long enough to extend across the length of this longer card, I masked off the stamp with some tape, inked the stamp, removed the tape, and re-stamped more of the swirls from the happy birthday stamp to extend the sentiment.
I used the following Copic colors to color up the image:
Skin: E50, 51, 53 and R20 (blush)
Hair: C7, C9 and B00
Eyes and butterfly: B00, 02, 04, and 08
Lips and hair barrette: R22 and 24
I also used a bit of Glossy Accents, Clear Wink of Stella
, Sakura White Gelly Roll Pen
, and a 0.3 point black Copic Marker Multiliner
to add some shine, shimmer, highlights and clarifying details (like more eyelashes and eye liner).
The following is a video of the whole card making process:
This card is being entered into the following challenges:
Simon Says Stamp Wednesday Happy Birthday Challenge
The Pink Elephant Anything Goes Challenge
Seize the Birthday Anything Goes Challenge
Addicted to CAS Cute Challenge
Thanks for stopping by! Please subscribe if you wish, and have a great day! WOOF
]]>
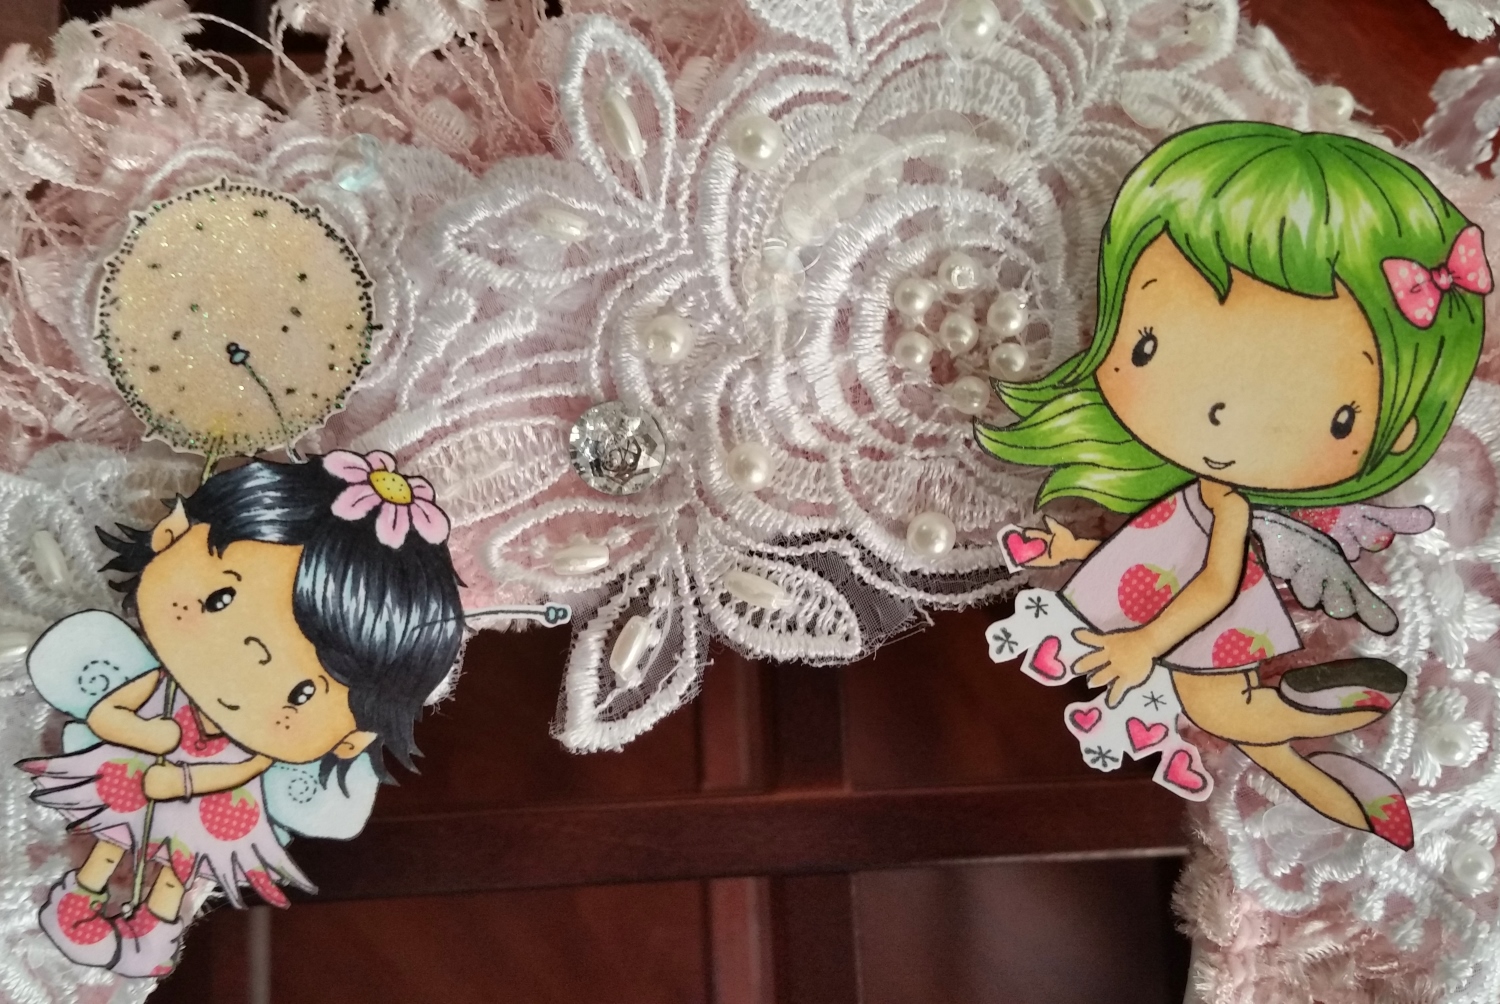
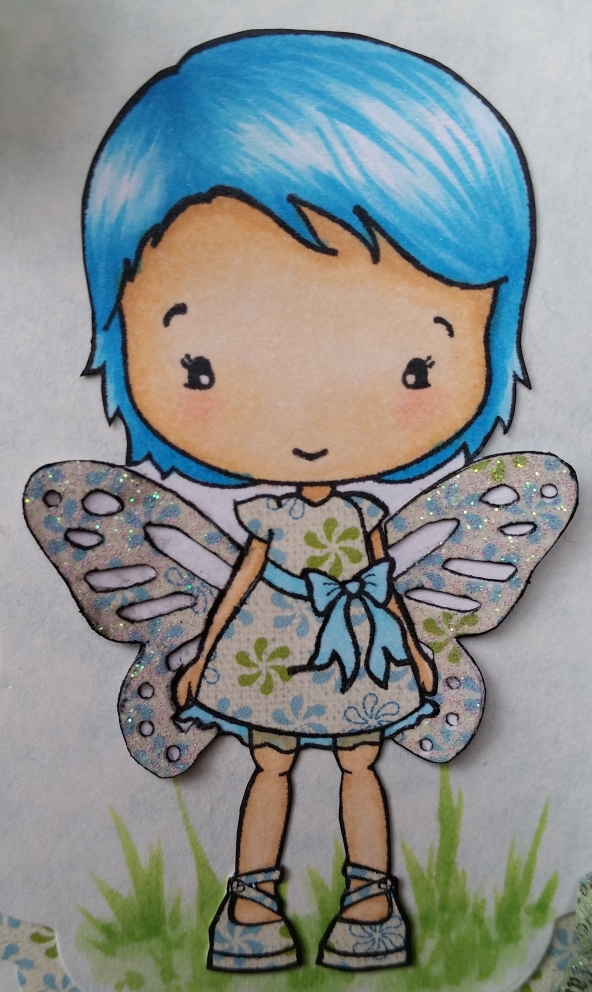
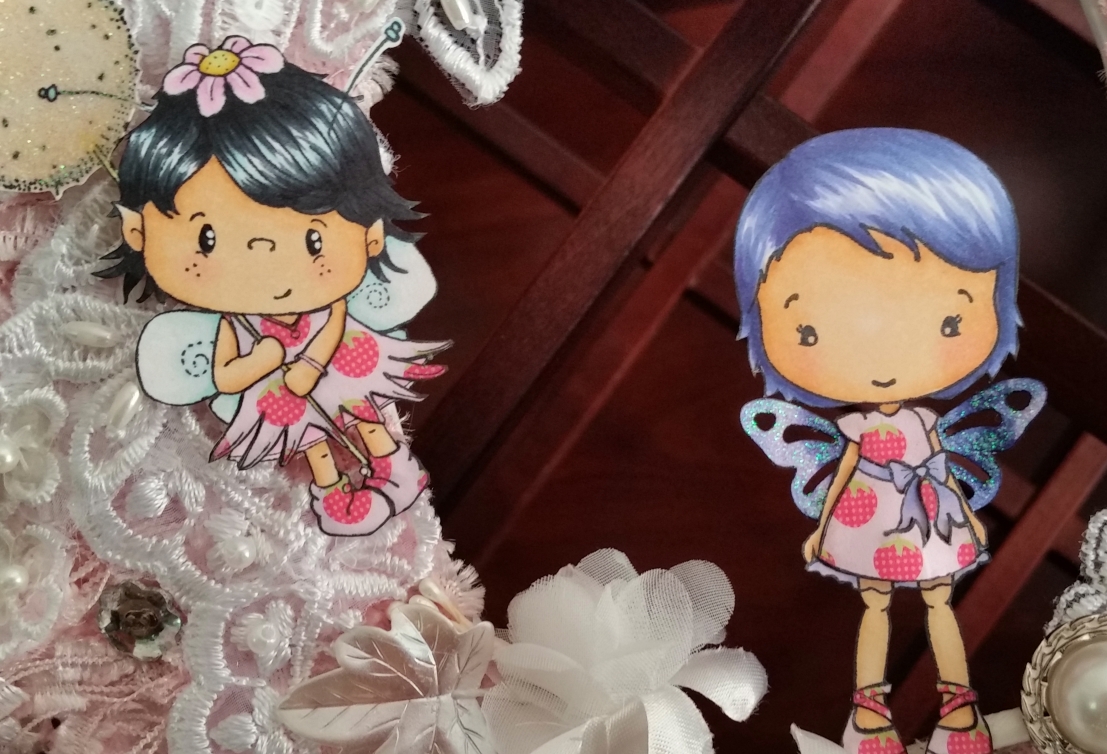 Oh I have so fallen in love with these adorable images from the Not2ShabbyShop — C.C. Designs Cupid, Pixie, and Garden Party Olivia. I wanted to use them in a Easter/spring wreath that I could use to decorate our front door for our upcoming Easter Sunday brunch.
I colored them all up with Copic markers, paper pieced each of them from a scrap of strawberry print patterned paper, added glitter glue to all their wings (I made Olivia’s using the medium Martha Stewart monarch butterfly punch), and Wink of Stella for shimmer to their hair.
 The following are the Copic colors I used:
Skin: E50, 51, 53 with blush R30
Pixie’s black hair: C7, C9 and B00
Cupid’s green hair: YG01, 11, 25 and 17
Olivia’s purple hair and wings : BV00, 02, 04 and 08
Shading everywhere: W1
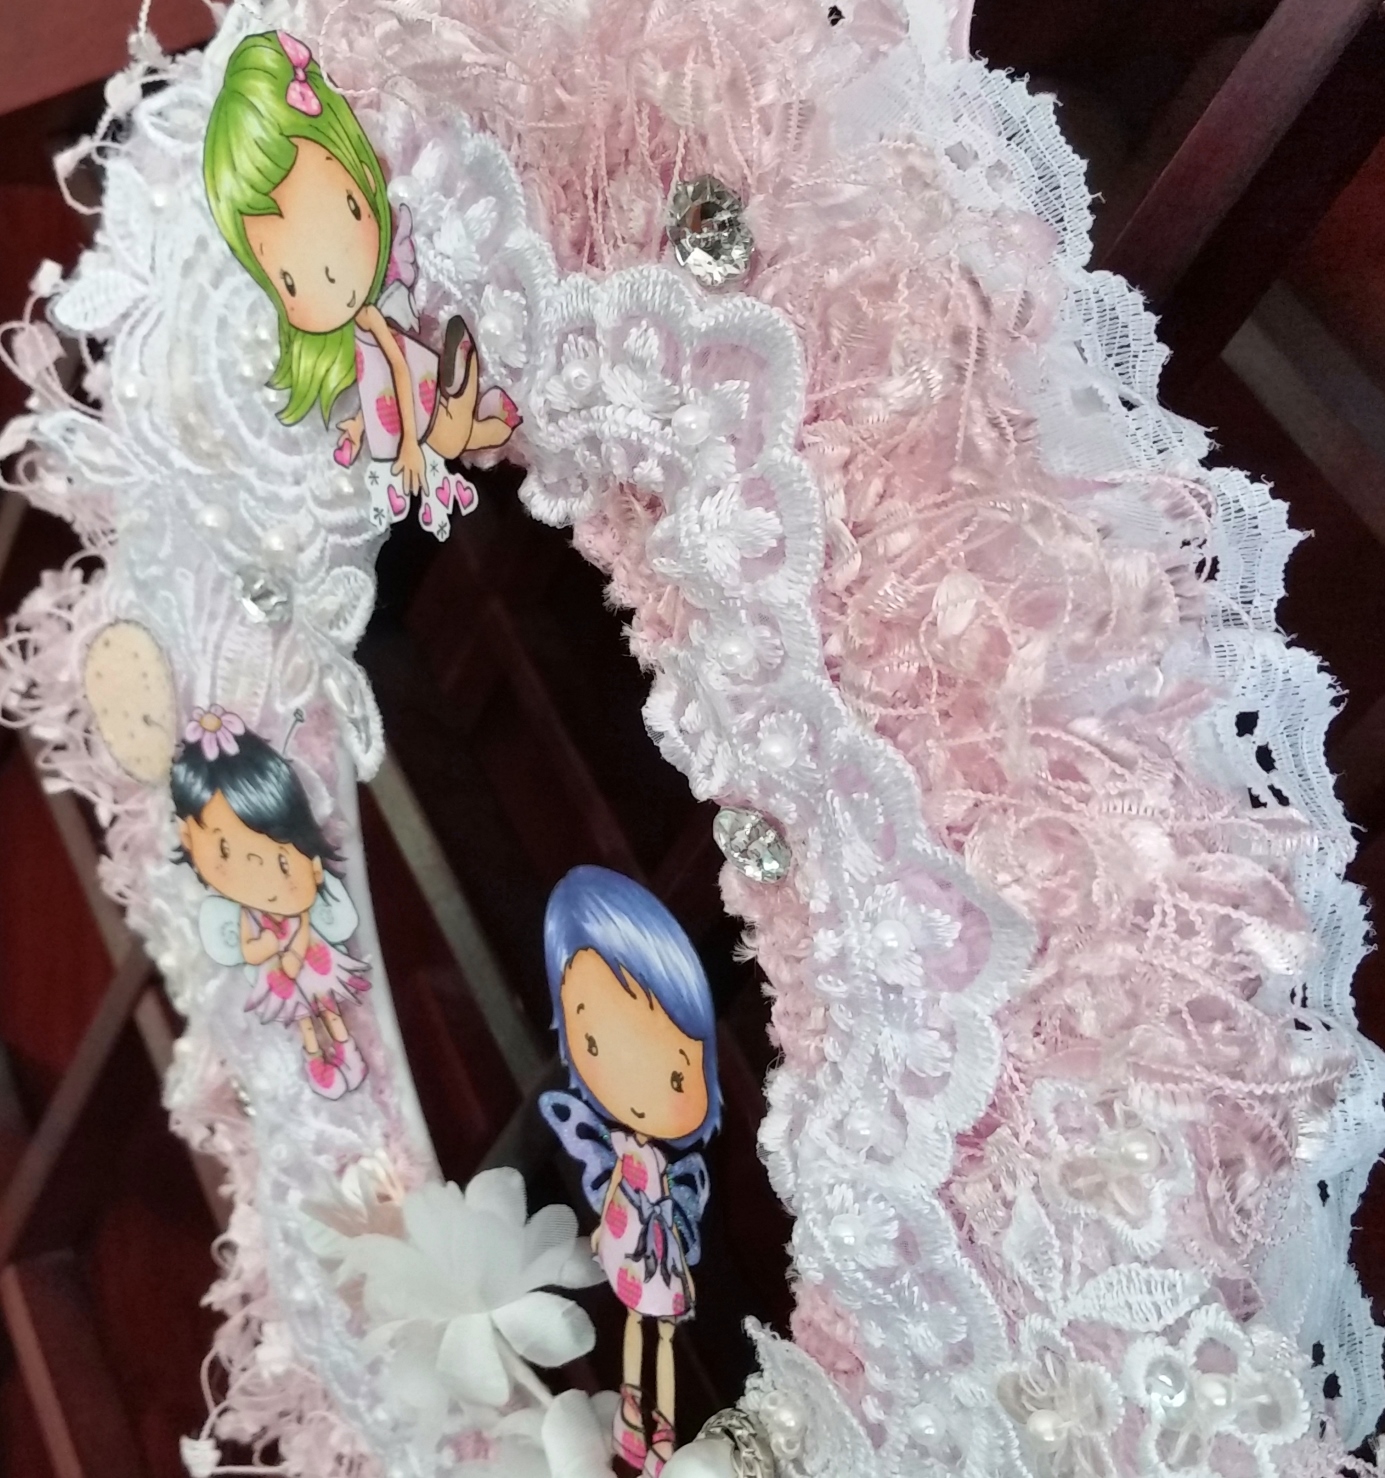 The paper piecing was probably the most time consuming. I wanted to use the same sweet strawberry print paper for all their dresses and shoes. However, the pattern was not tight enough to get a strawberry on each section so I stamped out smaller sections like Olivia’s shoes and shoe straps, Cupid’s wing, and Pixie’s dress sections multiple times. That way I could pick and chose the stamped sections I wanted to fussy cut them out to piece together.
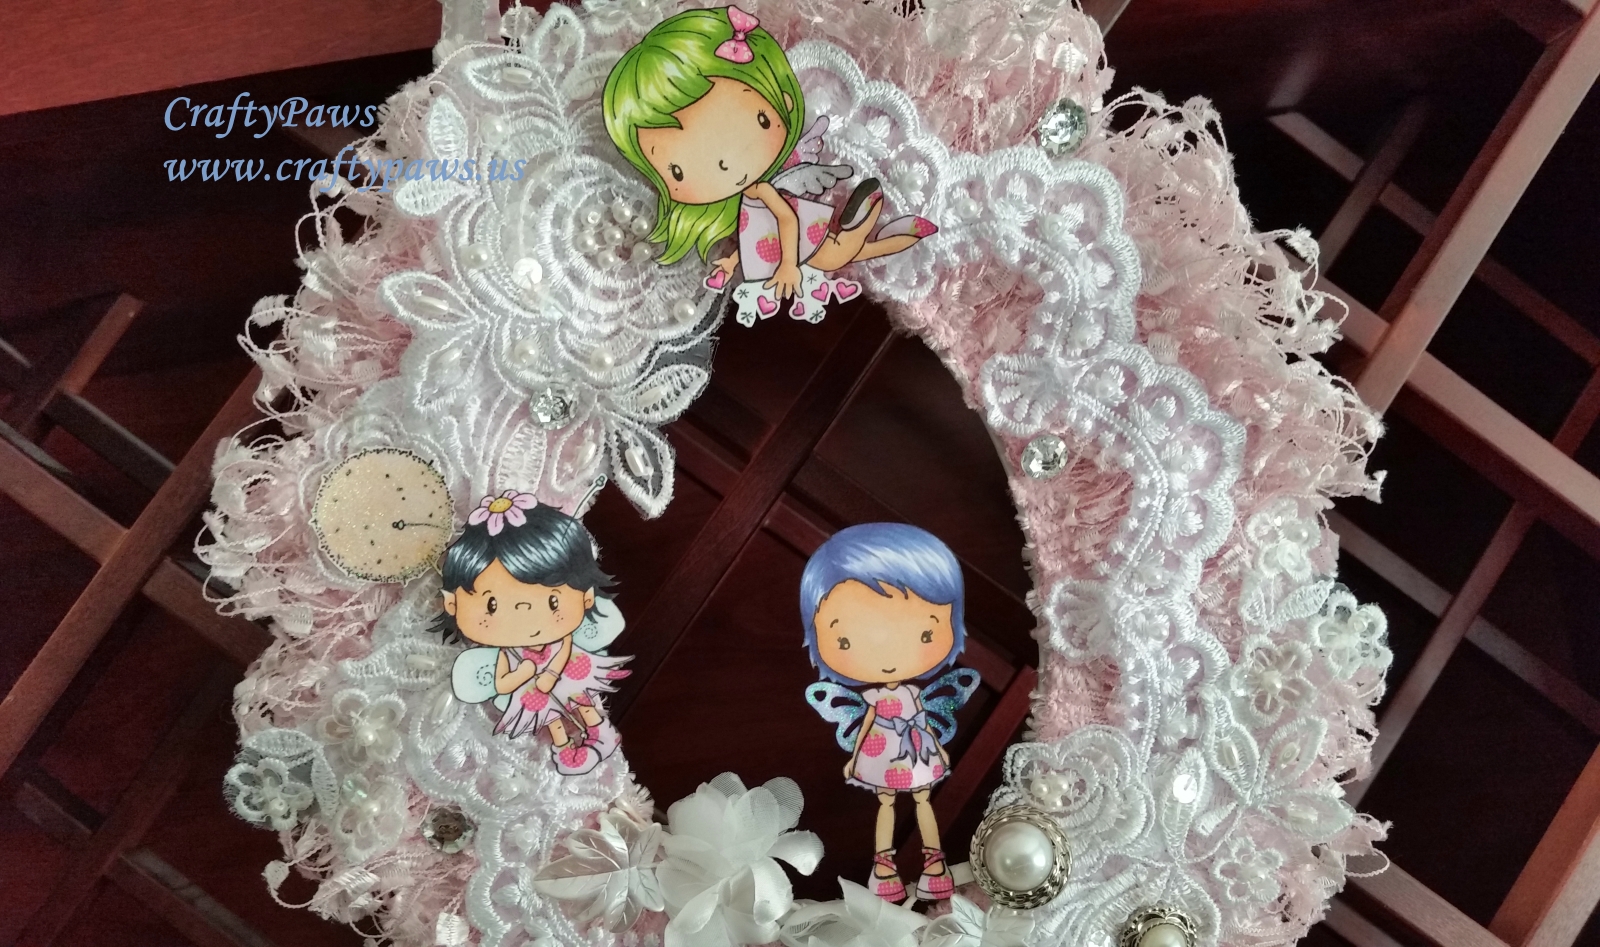 Also when I paper piece images, I make sure I use Copic W1 (or another soft grey color) to add shading to the patterned papers. Then I use a black marker along the edges of each piece (no matter how tiny) so that the white of the paper edge does not show. This order of shading before edging is important so that the shading does not pick up and smear the black edging ink. Finally after I glue each piece into place, I again go over the entire image (which I have also fussy cut), along the edges with a black marker.
The following is a process video sharing the entire wreath assembly, including all the laces, trims, bling, and the single and triple loop bows:
The Not2ShabbyShop is having an Easter SALE (until April 6, 2015): Use coupon code EASTER20 for 20% off everything in the store! After April 6, 2015, my readers can get 10% off using the code CRAFTYPAWS. All orders of $60 or more get free U.S. shipping.
This Easter wreath is being entered into the following challenges:
Simon Says Stamp Monday Pastel Challenge
The Pink Elephant Anything Goes Challenge
MarkerPOP Easter Challenge
Craft-Dee BowZ Anything Goes with a Bow Challenge
Thanks for stopping by and have a great crafty day! WOOF
]]>
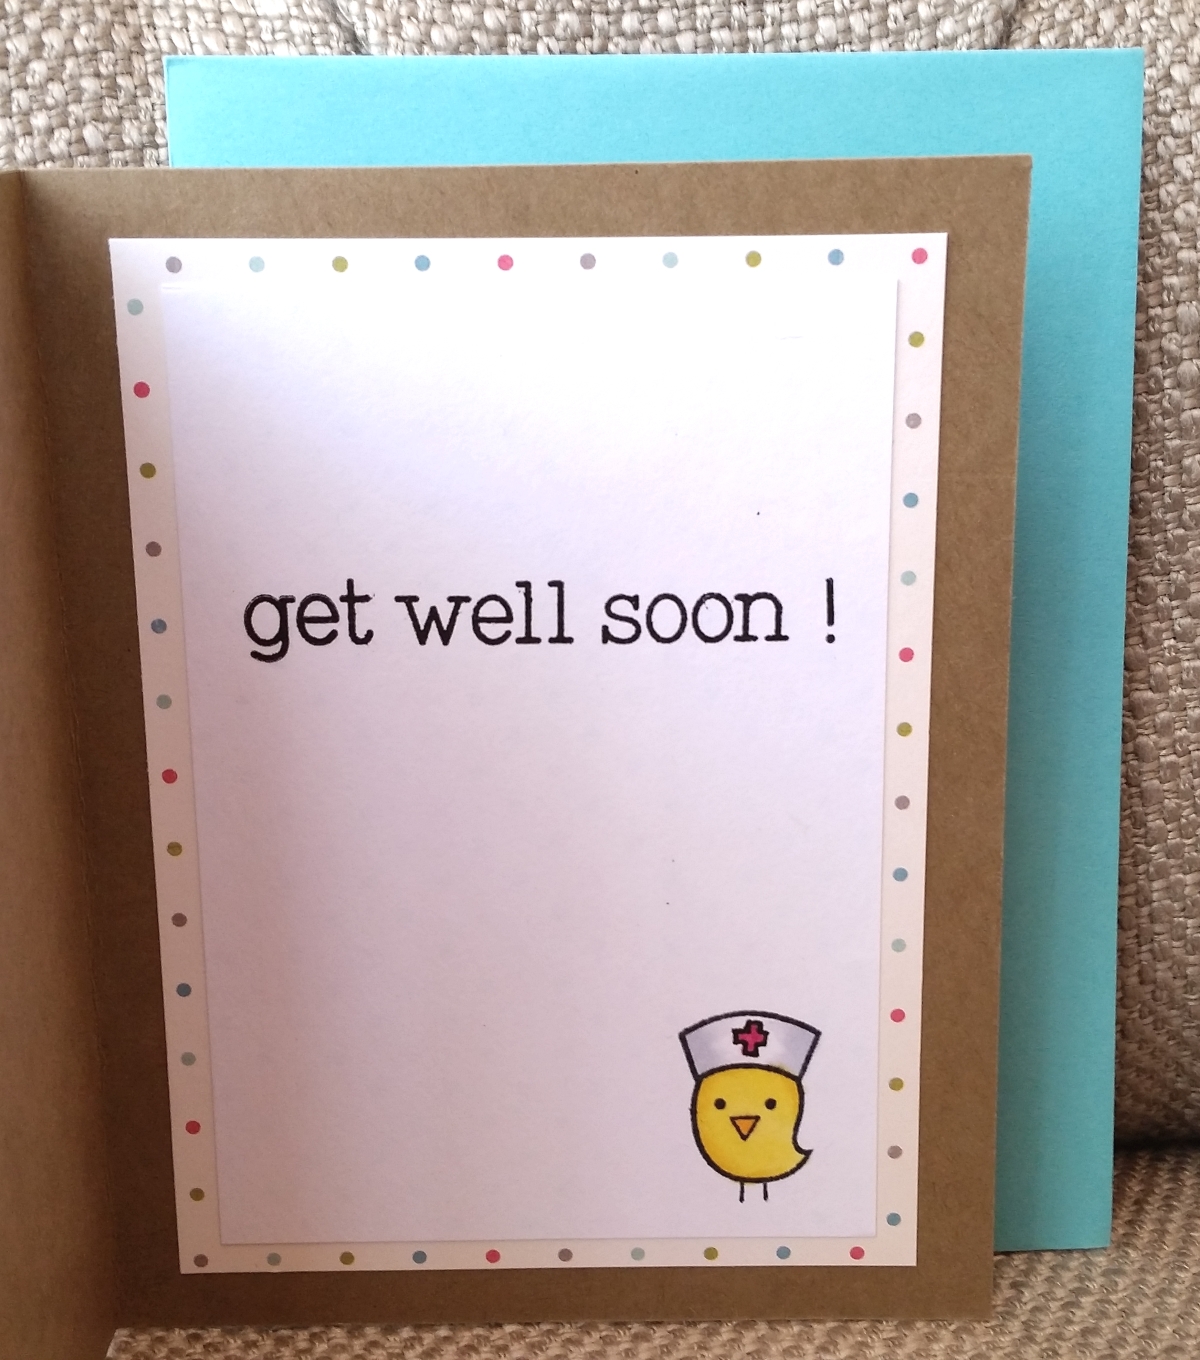 For the base I used kraft card stock and layered on a beautiful zentangle that my friend J. A. (YT: JuJu Pem) sent to me a couple years ago. I fussy cut out the main image from the zentangle to fit the base and added bits of Copic coloring (R11 and B00) to coordinate the zentangle flower with the C. C. Designs Pixie image that I Copic colored, paper pieced, Stickled, and fussy cut.
The following are the Copic colors I used:
Skin: E50, 51, and 53 with R30 for blush
Hair: E55, 57 and 59
Wings, flower hat, and underskirt: R20 and 30
Dandelion stem: YG11
Flower hat center: Y35
Then for the inside of the card, I just used a scrap patterned paper from my scrap box that seemed to have the same colors and used it to mat some white card stock for the “Get well soon!” sentiment and nurse chickie from the Lawn Fawn’s Get Well Soon stamp set. For the chick coloring, I used R39 for the cross, W1 for the hat, Y13 and 15 for the body and Y35 for the beak.
The Not2ShabbyShop carries the C.C. Designs Pixie and they are having a fabulous Easter sale through April 6, 2015! Use the coupon EASTER20 for 20% off! After April 6, 2015, use the coupon code CRAFTYPAWS for 10% off. They also offer free shipping automatically on all orders of $60 or more. Coupons cannot be combined.
This card is being entered into the following challenges:
Simon Says Stamp Work It Wednesday STAMP Challenge
Simon Says Stamp Pastels Monday Challenge
Simon Says Stamp Anything Goes Wednesday Challenge
The Pink Elephant Anything Goes Challenge
Thanks for stopping by and have a great crafty day! WOOF
]]>
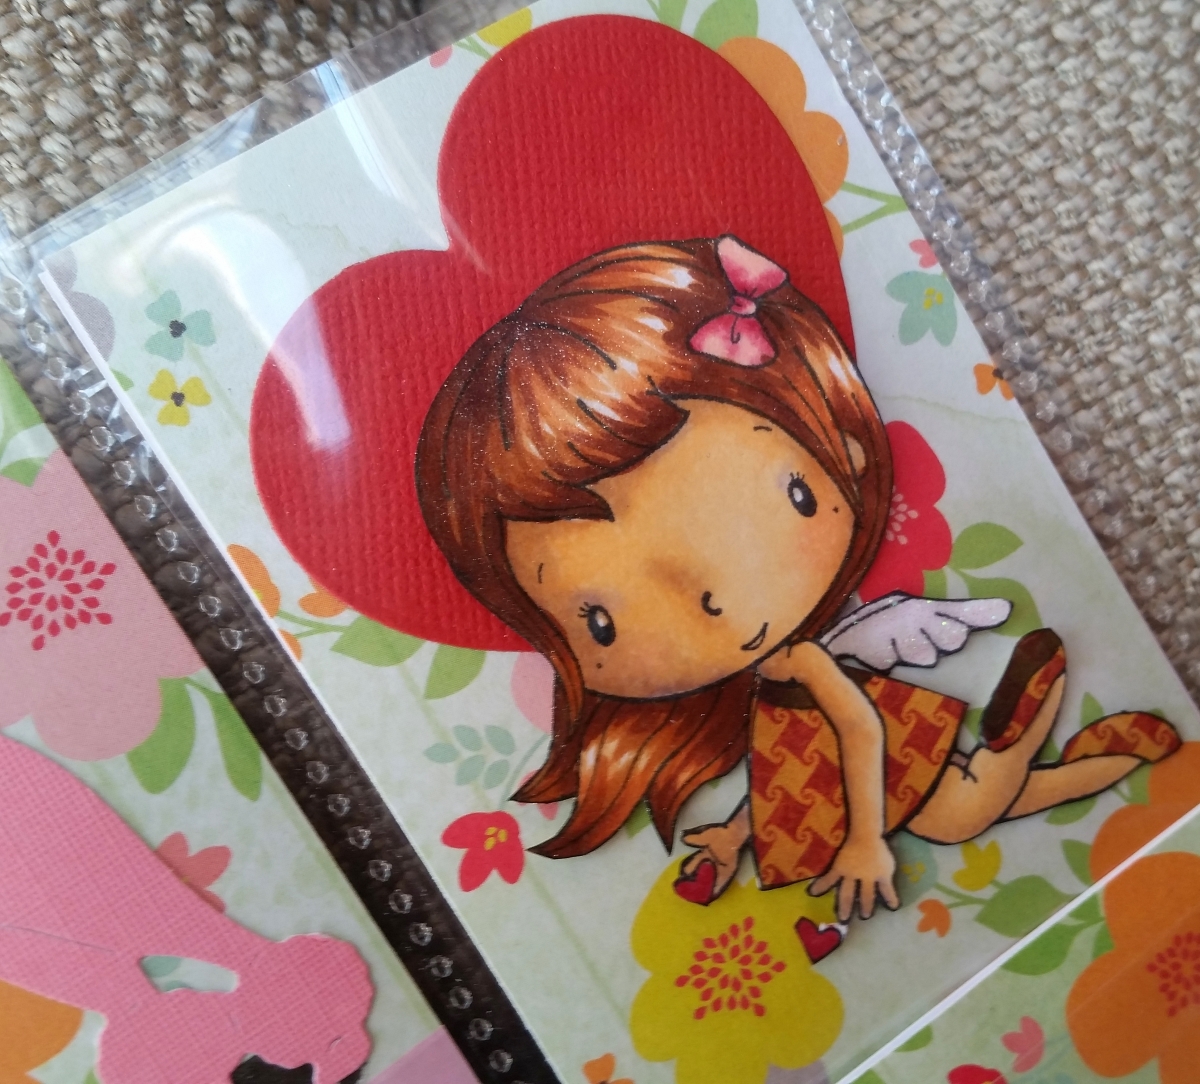
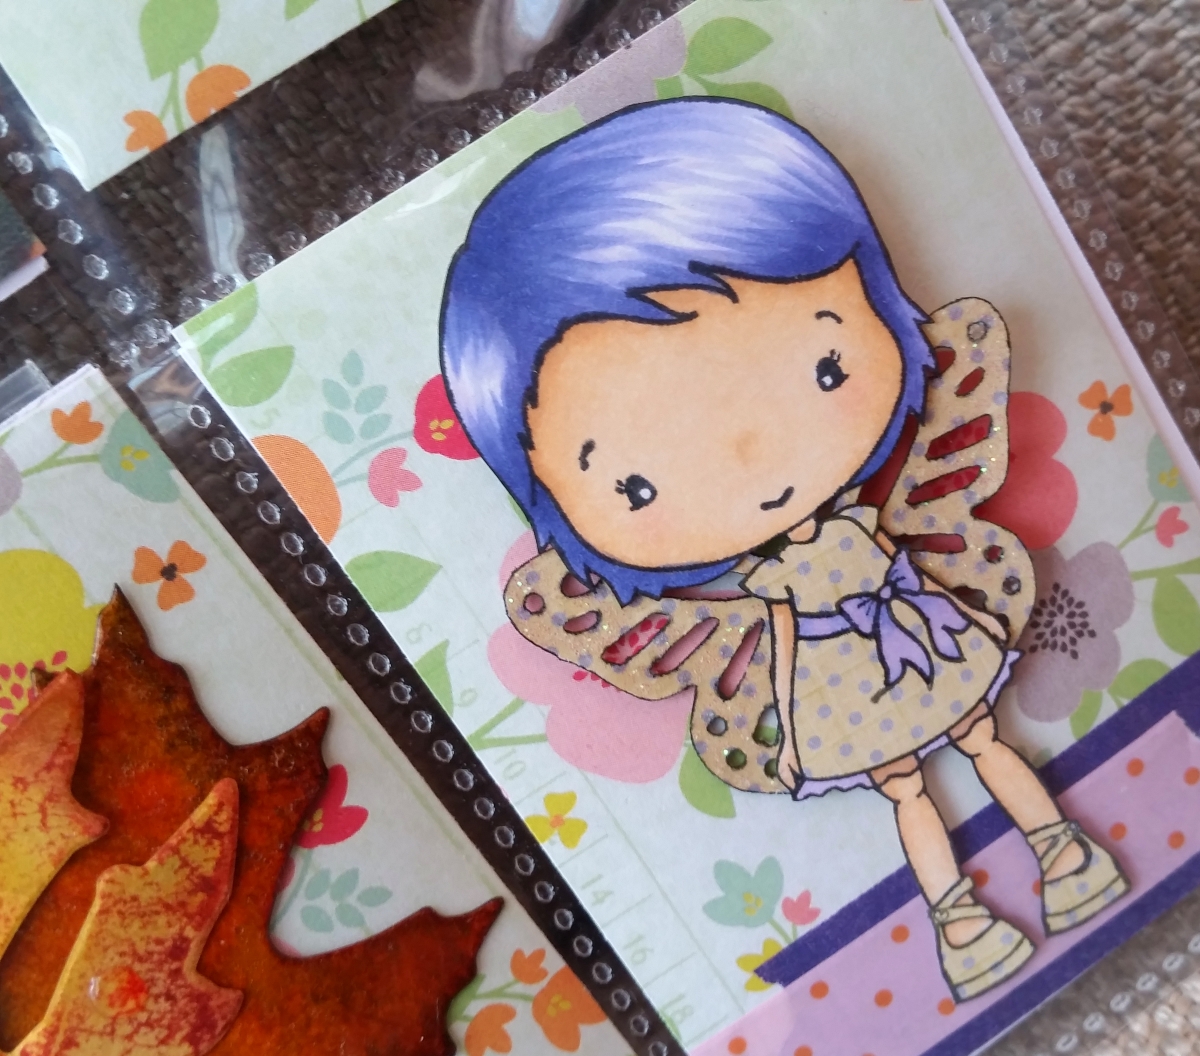 It took me several days, but I was able to assemble everything I wanted to include, including the little gifts in each pocket. The part that took the longest were the three stamped images from C.C. Designs–Swiss Pixie, Cupid, and Garden Party Olivia. Obviously Pixie started out as a fairy and Cupid also started off with wings, so for Olivia, I added butterfly wings using a Martha Stewart Large Monarch Butterfly Punch.
For Swiss Pixie, I just had fun with Copic coloring, adding some sparkle to the dandelion with glitter glue, and creating a patterned dress with a 0.3 pt Copic pen and a white Gelly Roll pen. The following are the Copic colors:
 Skin: E50, 51, and 53 and R11 for blush
Blue Hair: BG70, 10 and 13
Dress and shoes: RV00, 10, 52
Wings: B00 and 01
For Garden Party Olivia, I paper pieced her dress, shoes, and wings with a yellow and lavender polka dot paper. Again I added glitter glue to her wings to continue that magical sparkly look. The Copic colors are:
Skin: E50, 51, and 53 and R11 for blush
Purple hair and dress sash: BV00, 02 and 04
For Cupid, I paper pieced her dress and shoes with a fun orange and brick colored hounds tooth pattern. With Cupid I also decided to test out a new skin color combination–using a purple undertone for the shadows. I think this adds a darker and more realistic coloring. I need to practice more, but I really like the different look! The Copic colors are: Skin: E50, 51, 53 and BV00 and R20 for blush
Auburn Hair: E97, 99 and 29
The following is a process video of the whole pocket letter:
This pocket letter project is being entered into the following challenges:
Simon Says Stamp Wednesday Anything Goes Challenge
Simon Says Stamp Work It Monday STAMP Challenge
The Pink Elephant Anything Goes Challenge
Thanks for stopping by. If you enjoy this type of crafting, please subscribe. Have a great day! WOOF
]]>
 I made this spring time card in blues, greens and natural kraft colors. I started with a marbled blue paper card base, layered on some patterned paper from my stash and cropped the corners with the We R Memory Keepers Crop-A-Dile Corner Chomper. Then I added lots of layers and textures with delicate blue lace, a scrap of burlap fabric that I frayed, some homemade book paper and mulberry paper flowers, and some homemade enamel dots that were slightly irregularly shaped (which I thought went well with the natural burlap and book paper flowers).
I Copic colored and paper pieced Olivia as follows:
Hair: B00, 01, 02 and 04
Skin: E50, 51, 53 and R30 for blush
Green grass: YG11 and 13
Paper piecing her dress and punching out her fairy wings (using the Martha Stewart Large Monarch Butterfly punch) from the same patterned paper that coordinated with the background patterned paper lent a nice continuity. I will admit that the paper piecing and inking the edges of those tiny pieces, like her strappy shoes, was hard work, but I think those details make all the difference. I used the Diemond Dies Labels 1 Nesting Die Set to frame out the Olivia fairy with the same patterned paper and white card stock, which I inked with Tim Holtz Distress Ink in Peacock Feathers.
Lastly I added clear Wink of Stella to Olivia’s hair and glitter glue to her fairy wings for extra sparkle. 🙂
The following is a video share of this card:
My readers get 10% off at the Not2ShabbyShop by using the coupon code: CRAFTYPAWS
My readers get 10% off and free worldwide shipping at Diemond Dies by using the coupon code: thankskristina on orders of $35 or more
This card is being entered into the following challenges:
Card Mania Spring Challenge
Simon Says Stamp Wednesday Spring Pinterest Inspiration Challenge
The Pink Elephant Green Challenge
Naughty or Nice It’s Not Easy Being Green Challenge
Inspired by Crafting IBSIC #92 Color Challenge
Thanks for stopping by. Hope you’re having a great crafty day! WOOF
]]>
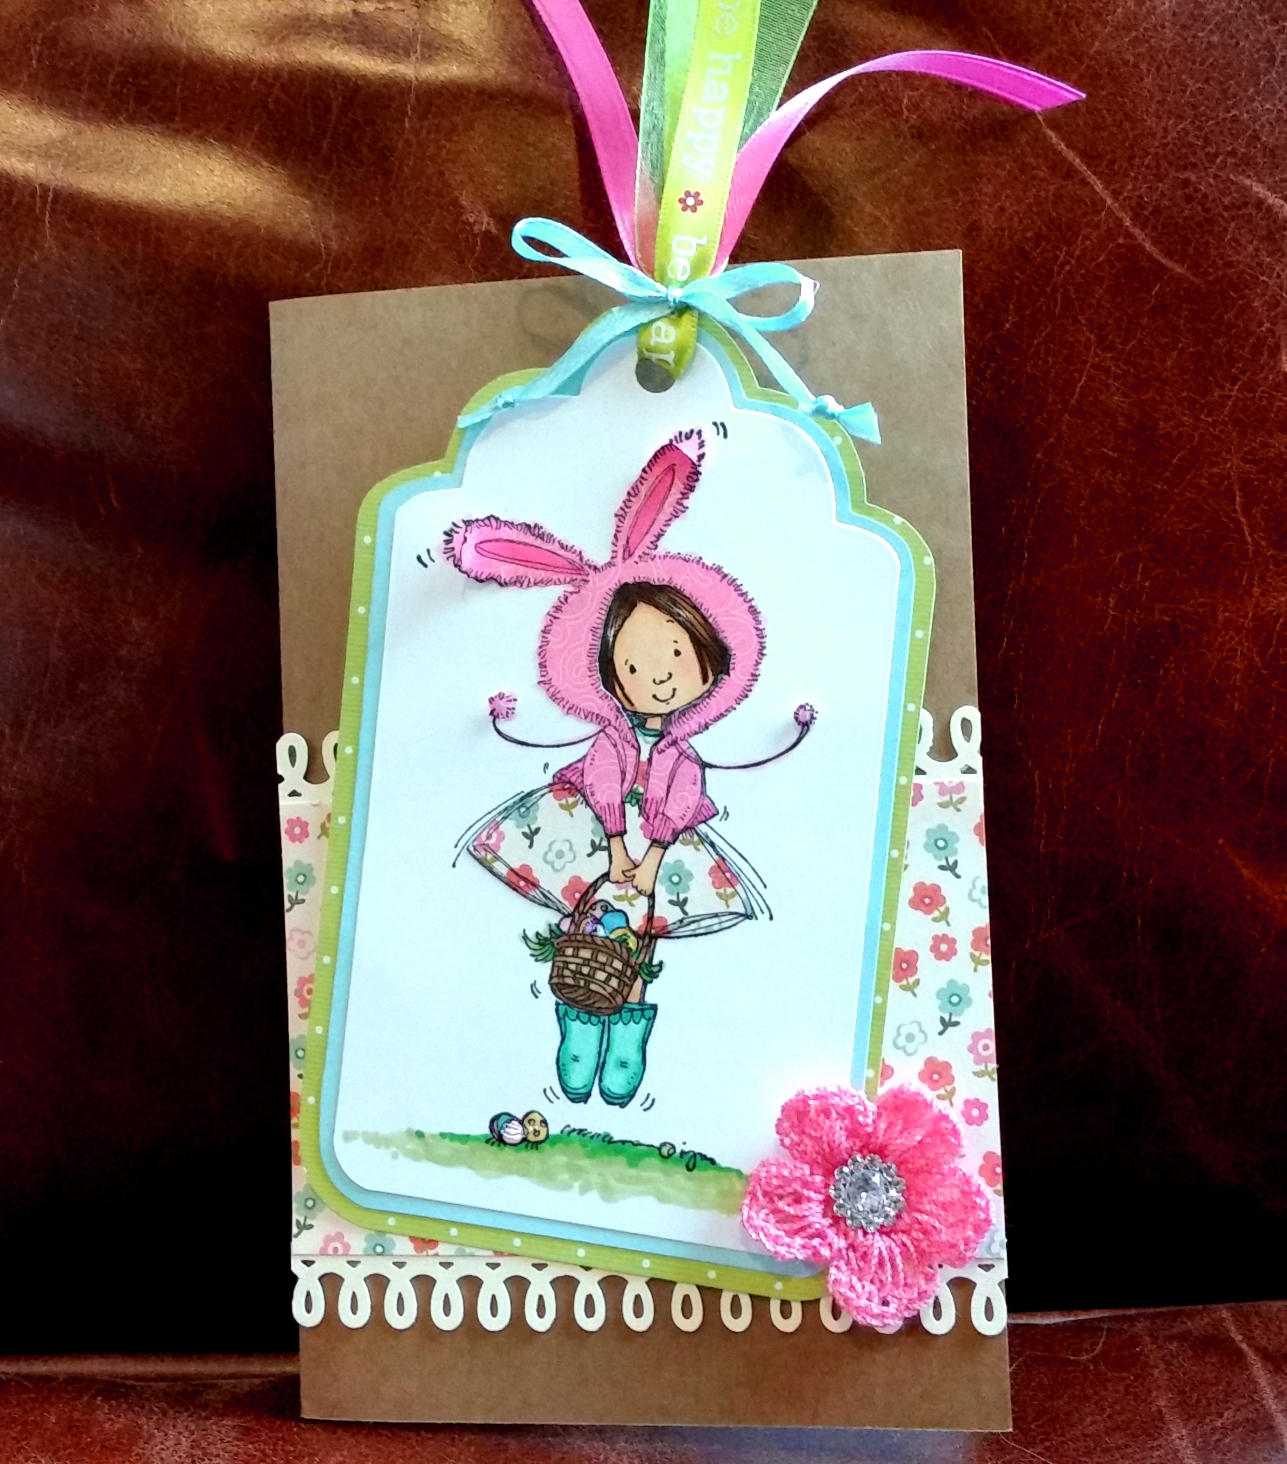 I made this tag card using the Stamping Bella “Valerie Bunny” stamp. She is so adorable, hopping along there in her fuzzy bunny jacket and her springy dress. I stamped it out a few times on different patterned papers so that I could do some fun paper piecing with scraps from my scrap box. I also added some dimension by curling the bunny ears of her hoody and popping up on tiny foam adhesive the pom poms of her strings. I thought that tiny bit of dimension helped give the illusion of Valerie hopping! LOL
I colored up the non-paper pieced parts with the following Copic colors:
Hair: E55, 57 and 59;
Skin: E50, 51, 53 and R30
Boots: BG10 and 24
Grass on ground and in basket: G43 and 09
Easter eggs: RV1, Y17, BG10 and B02
Lastly, I added a little shine to the eggs with Glossy Accents.
The tag part was relatively simple. I used the Diemond Dies Nesting Tag die set and then fussy cut around two more layers with more blue and green paper from my scrap box. I used an old McGill hole punch tat the top and used bits of various pink, green and blue ribbons to make a little tassle secured with a delicate bow (repeating the colors I used on the image an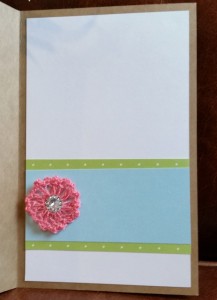 d the scrap papers I had used on the tag frame). Remember if making a purchase at Diemond Dies, use coupon code: thankskristina for an extra 10% off and free shipping on all orders of $35 or more!
I also decided to add a little background layering piece with the same patterned paper I used to paper piece Valerie’s dress and edged it with the border punch from the Martha Stewart Crafts Punch Around the Page, Loops Punch Set.
To add a little more softness, I added a crocheted pink flower from Michaels with a rhinestone center from my stash to the lower right corner. That ended up looking so sweet, that I decided to embellish the inside of the card a bit too and used some more scraps of patterned paper (the same that I had framed the tag with) and another crocheted flower.
The following is a video share of this tag/card:
This tag/card is being entered into the following challenges:
Simon Says Stamp Wednesday Spring Pinterest Inspiration Challenge
Craft-Dee BowZ Anything Goes with a Handmade Bow
Card Mania Spring Challenge
The Pink Elephant Green Challenge
Thanks for stopping by! WOOF
]]>
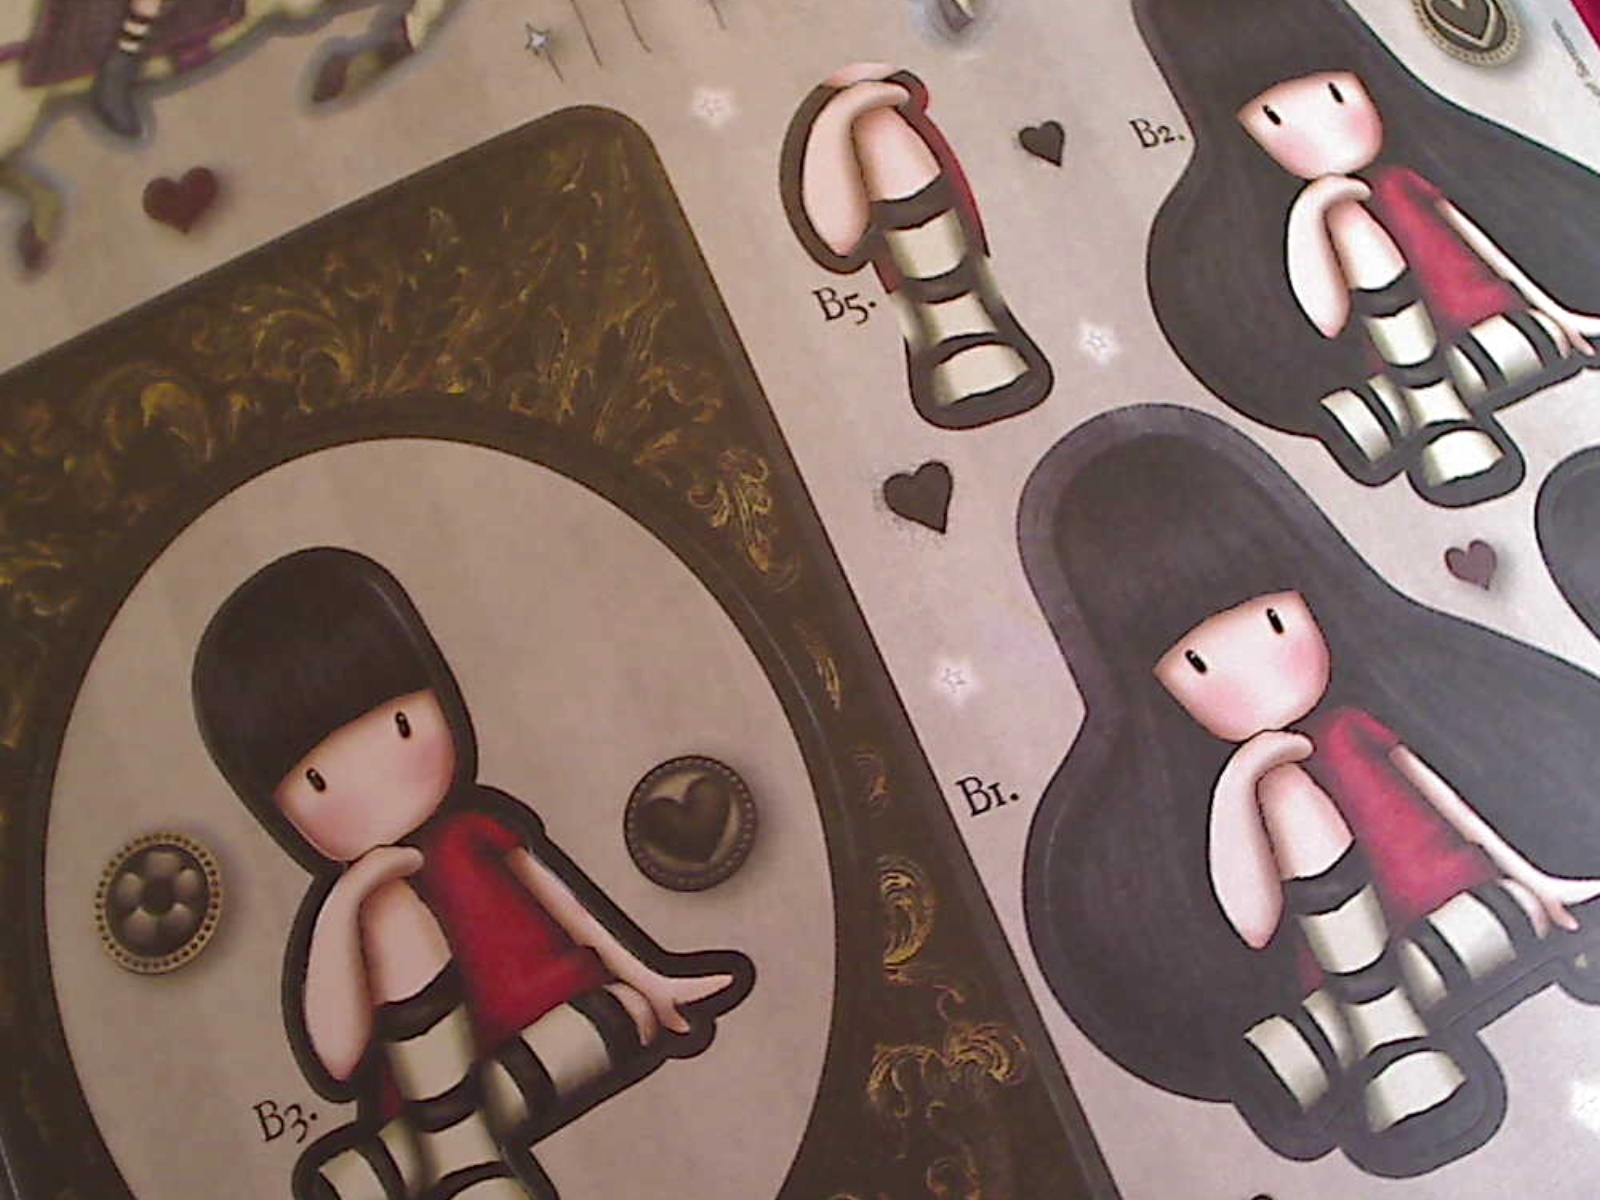 We’ve all been there. We need a card in a hurry, and we have nothing appropriate in our stash. Yes, I like to color images, but sometimes I just don’t have the time. These Gorjuss Girl decoupage kits (available at the Not2ShabbyShop) are perfect for just those occasions. Plus the look is so detailed and luxe that they would even be great to assemble and frame!
 The kit includes decoupage sheets that have the same image printed in numbered and partial layers (see photo above). They pop out easily, and with a little trimming (of the white nubs) and inking (of the paper edges), they can be adhered in layers with a little foam adhesive and look fabulous!
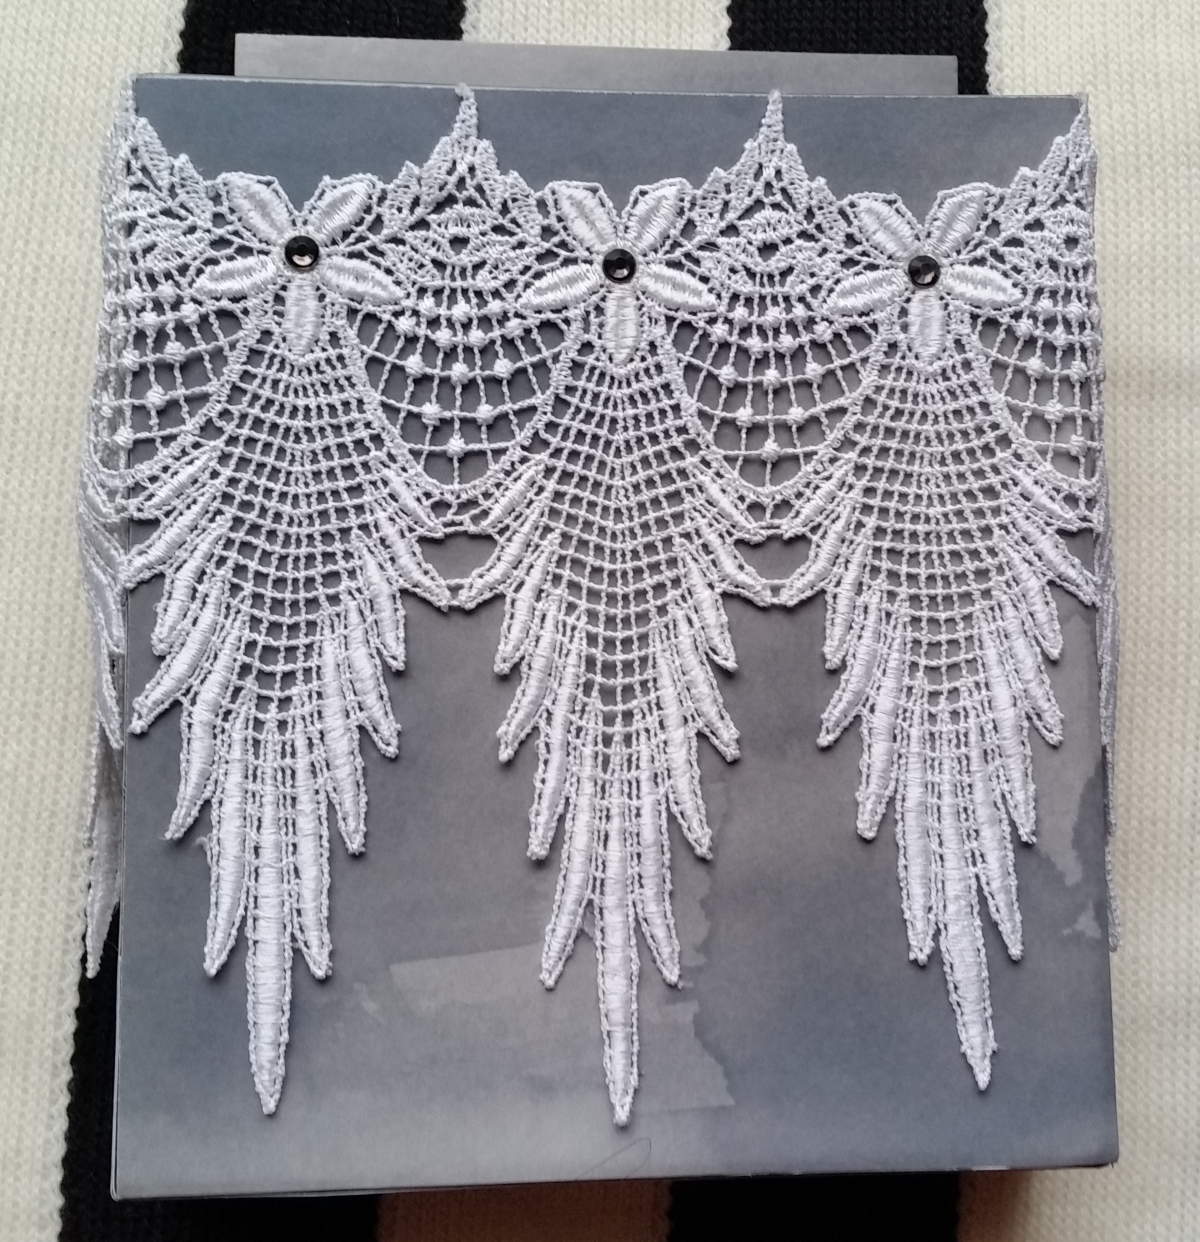
I ended up upcycled an old DVD box. I wrapped it first with some beautiful patterned paper from the Basic Grey Fresh Cuts collection. Then I had fun altering it with some beautiful Venice lace and a little bit of black crystal bling. I think it came out gorjuss! 😛
The following is a video share of this project (includes a couple extra Gorjuss Girl decoupaging tips):
This Altered Box project is being entered into the following challenges:
Simon Says Stamp Monday B is for Challenge
My readers get an extra 10% off any purchases at the Not2ShabbyShop through April 2015 by using the coupon code: CRAFTYPAWS
Thanks for stopping by! Please subscribe if you wish and have a great day! WOOF
]]>