LOVECRAFTS.COM Coupon: My readers can use the coupon code CRAFTYPAWS20 to get 20% off any orders of $10 or more. This coupon doesn’t apply to sale items, downloadable items and e-giftcards and you have to be logged in to use the code. Valid June 26, 2020 – July 26, 2020.
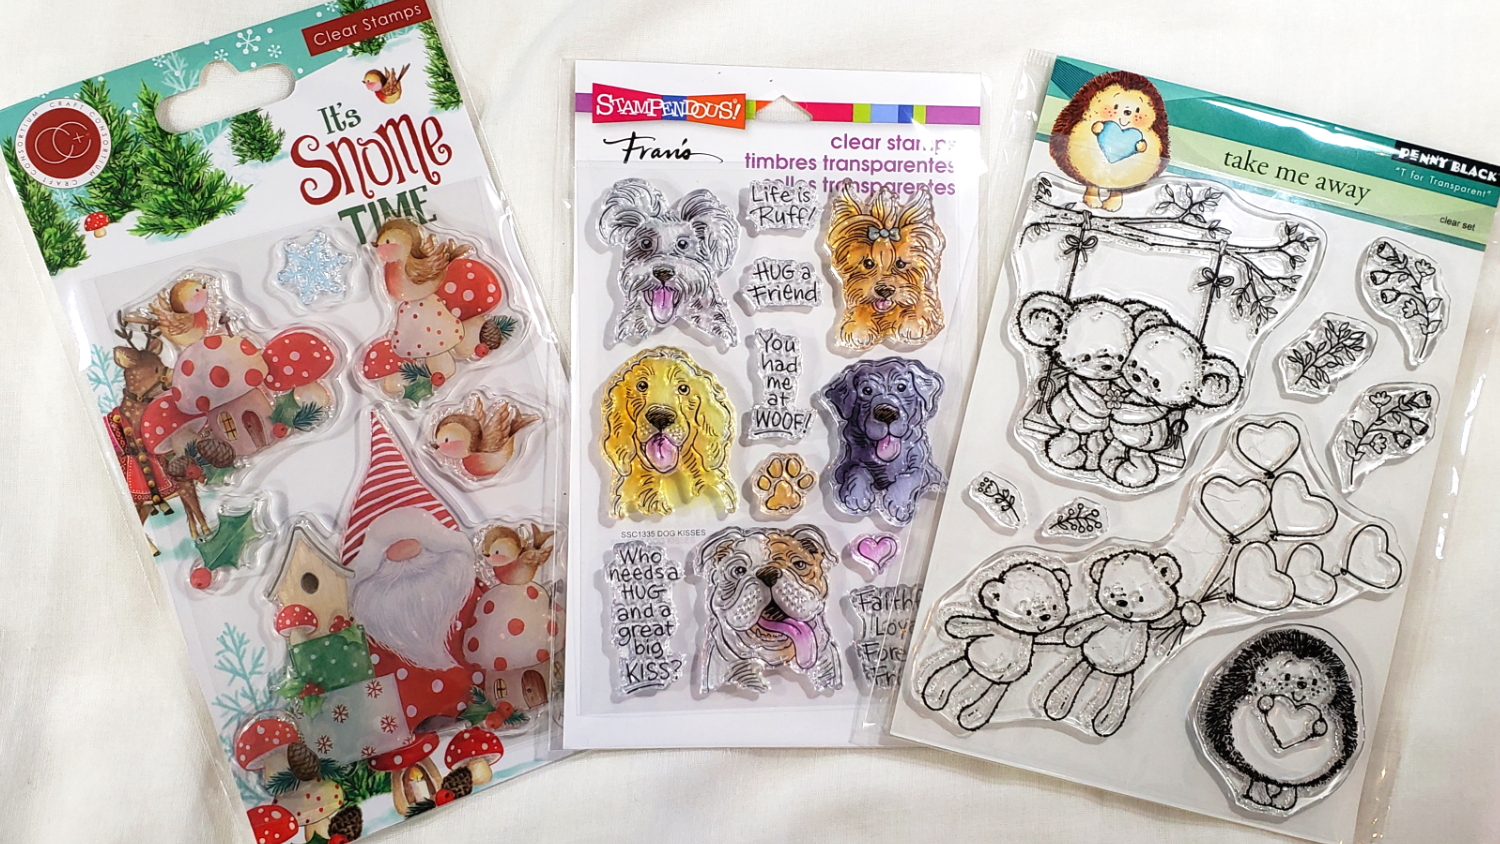
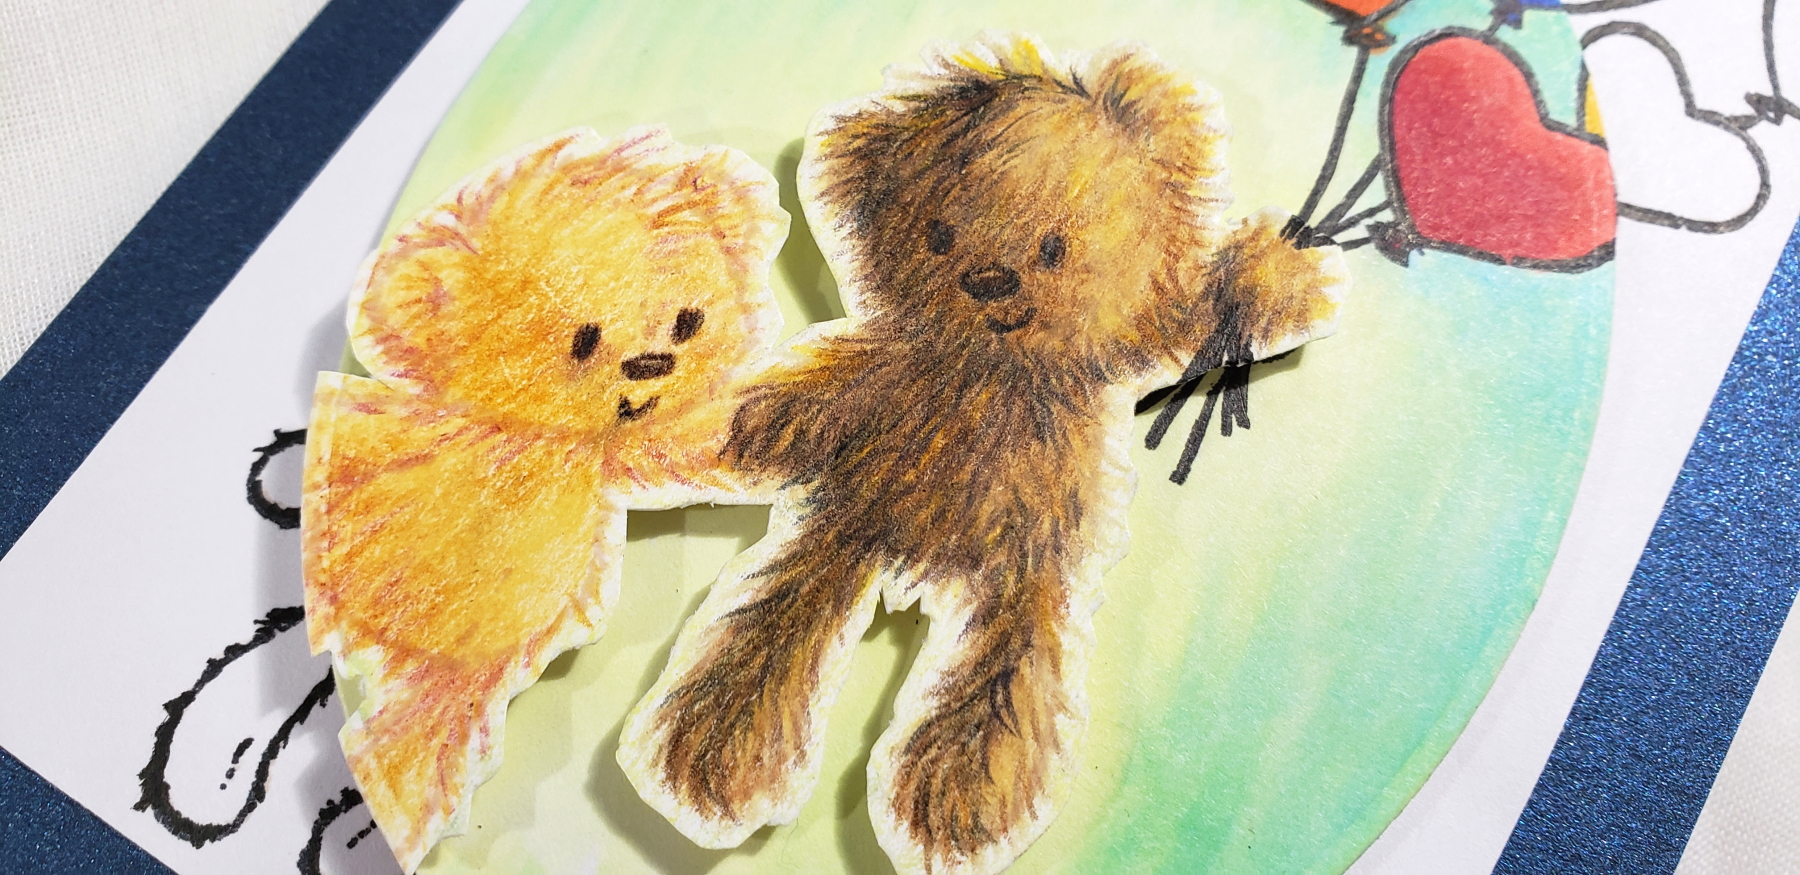
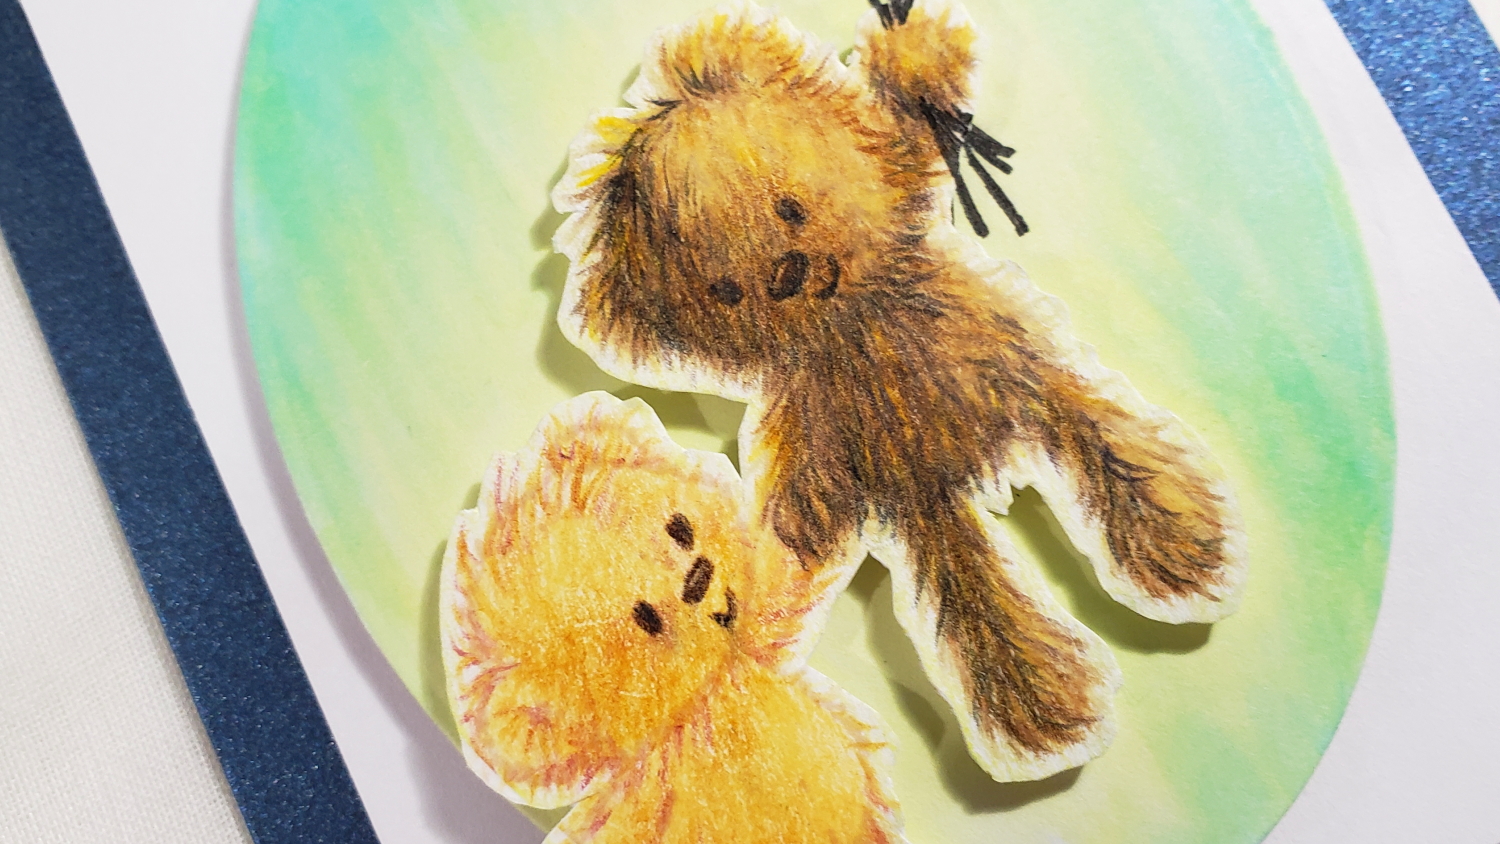
For my first project, I decided to use the adorable pair of teddy bears flying off with the bunch of heart balloons from one of my new-to-me FAVORITES: Penny Black Take Me Away Stamp Set. But rather than my usual full Copic coloring, I thought it would be fun to try some spotlight coloring (just inside the oval die cut area), no line coloring (achieved by stamping the image in Memento Desert Sand Ink), and coloring with colored pencils. I used Copics just a bit to simply get the teddy bears’ base colors down, but otherwise, I used Prismacolor Premier Colored Pencils, as listed below:
Dark Bear: Copic Base E41 + Prismacolors: Ginger Root (PC1084), Jasmine (PC1012), Sunburst Yellow (PC917), Light Umber (PC941), Chocolate (PC1082), Dark Umber (PC947), Espresso (PC1099), 90% Warm Grey (PC1058), Black (PC935)
Light Bear: Copic Base E50 + Prismacolors: White (PC938), Sand (PC940), Goldenrod (PC1034), Sienna (PC 1031), 90% Warm Grey (PC1058), Black (PC935)
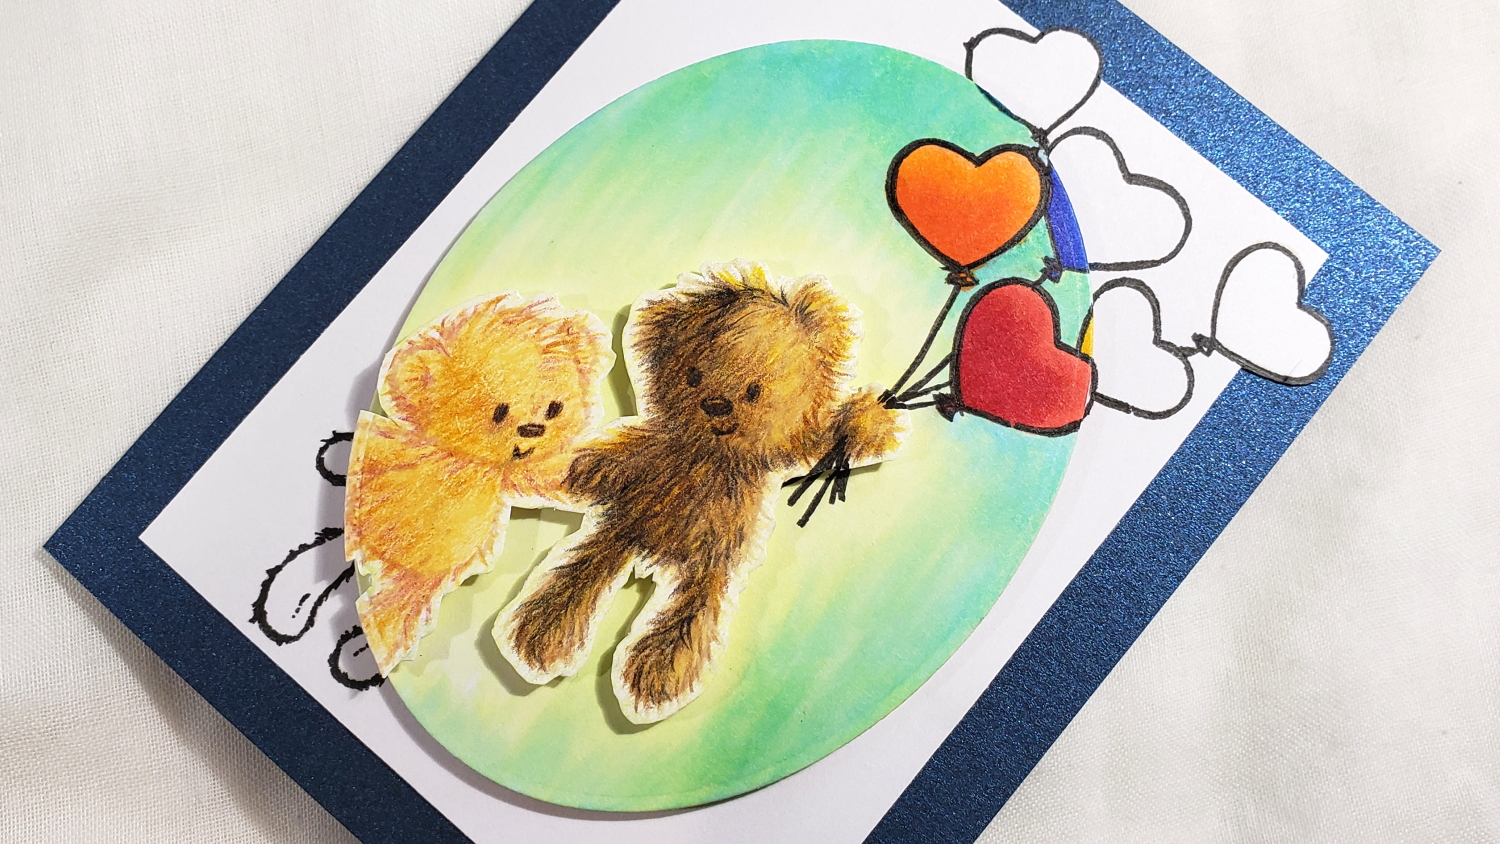
While I intended to color up the oval die cut area on which I had stamped out the image with colored pencils and leave the stamping outside of the oval uncolored, I had some problems blending the colored pencils on the background, so I fussy cut out the bears and then re-did the background with Copic markers as follows:
Red balloon: R22, R24, R29
Orange balloon: YR01, YR04, YR07
Yellow balloon (partial): Y19
Blue balloon (partial): B28
Background: Y00, YG11, B000, B00
An unintended benefit of fixing this oops was that I was able to add some extra dimension. I popped up the oval area with some fun foam and the teddy bears got an added lift with foam dots! I think this made the bears pop to life even more than just the spotlight (oval area) coloring would have done.
I stamped out the image again with with Memento Tuxedo Black Ink and then outlined the non-bear areas of the image with a 0.1 pt Copic Multiliner Pen to emphasize the contrast between the “realistic” no-line colored bears and the cartoony aspects of the rest of the stamped image. To finish off the card, I cut away more of the sides around the card front, specifically fussy cutting around two of the hearts off two of the edges, so that the card front would be framed by the shimmery dark blue cardstock card base.
CLICK on the following picture to watch my share about my DT haul from LoveCrafts as well as my colored pencil coloring:
Disclosure: Many of the supplies I’ve used for today’s project are linked. Some may be affiliate links, which means if you make a purchase I receive a small commission at no extra cost to you. I truly appreciate your support toward the costs of running this blog!
This card is being entered into the following challenges:
Simon Says Stamp Wednesday Anything Goes Challenge
Creatalicious Anything Goes with Optional No Design Paper Challenge
Word Art Wednesday Anything Goes Challenge
Lil Patch of Crafty Friends Anything Goes Challenge
Through the Craft Room Door Anything Goes Challenge
Penny Black and More Favorites Challenge
The Male Room Use Die Cuts Challenge
]]>
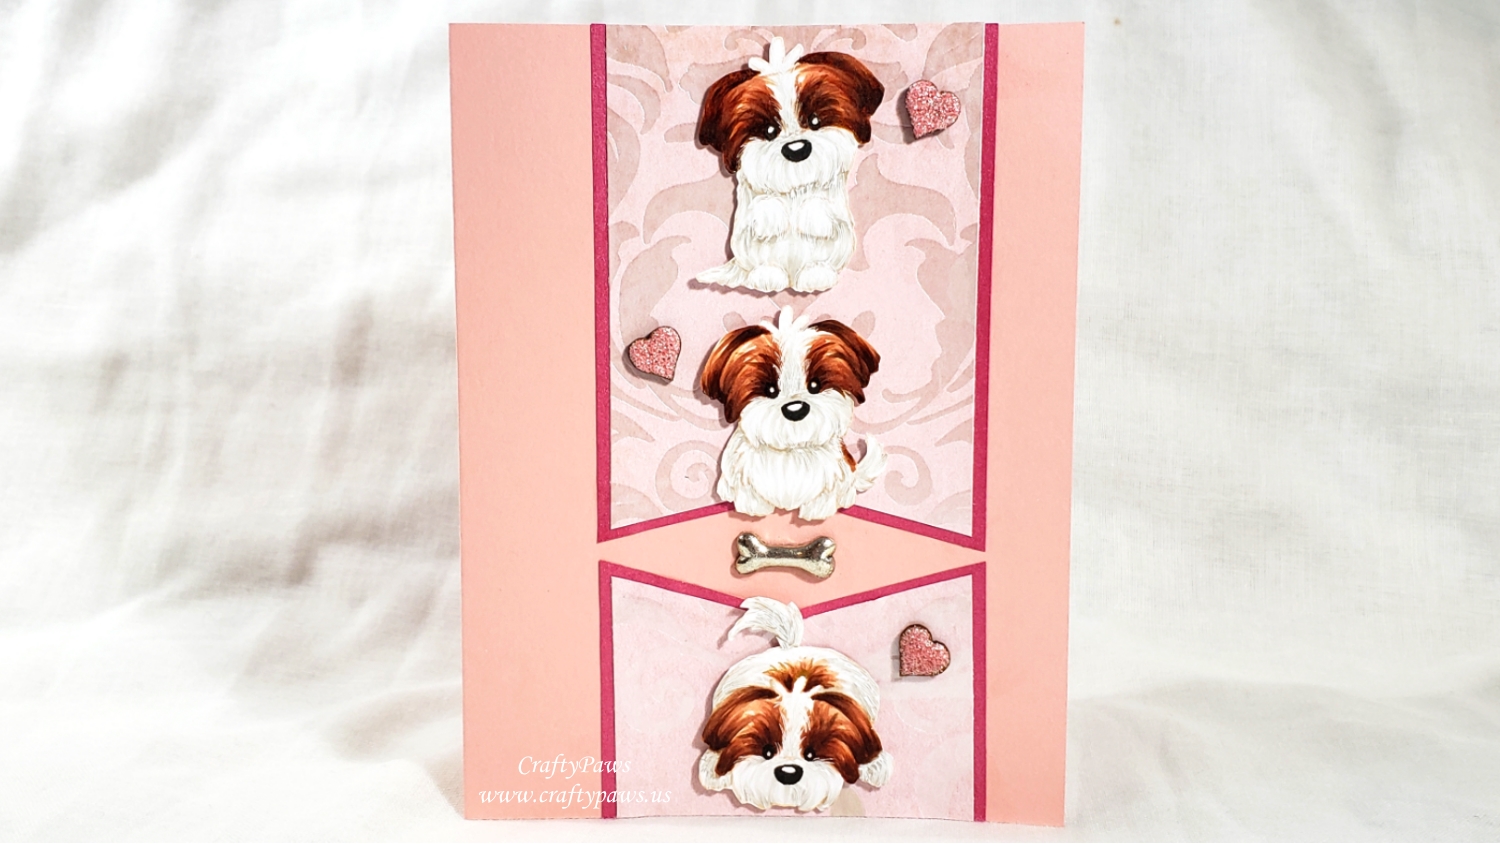
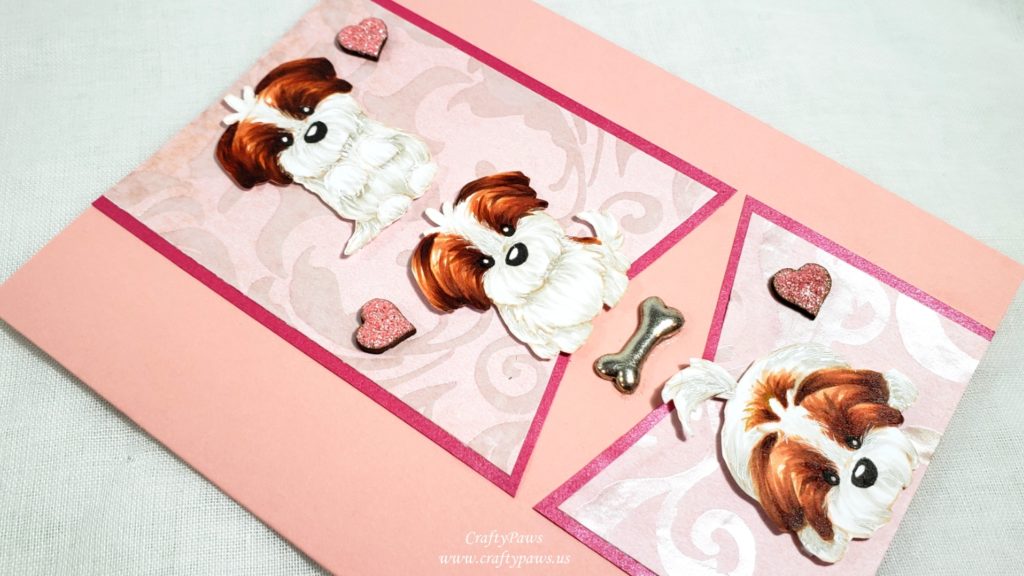
I used Memento Desert Sand Ink to ink them up to try a bit of no line Copic coloring, and I really love the results. To color up the pups like my sweet Havanese, I used a Copic Multiliner in 0.3 pt to define the eyes and noses, a White Sakura Gelly Roll gel pen to add white fur texture, and the following Copic colors:
White fur: W0 and W2
Brown fur: E11, E13, E15, and E57
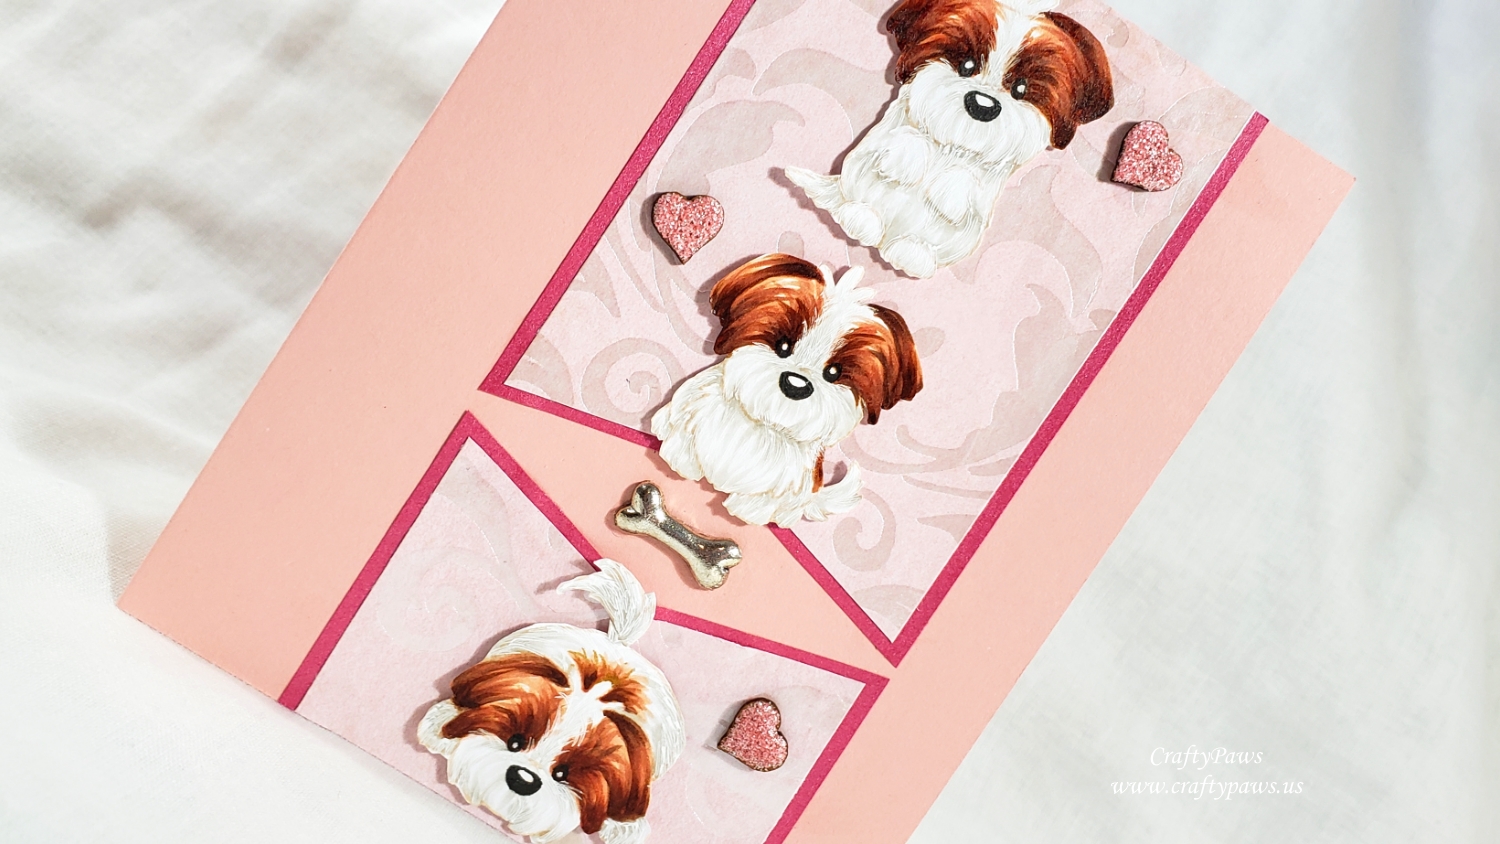
I fussy cut them out with my favorite Fiskars spring loaded reverse scissors. Then to highlight them, I mounted them with foam tape onto scraps of pale pink tone on tone damask patterned paper that I cut into pennant and mounted on dark pink shimmer card stock. The standing and sitting pups were positioned on the upper pennant and the pup ready to play was positioned on the lower.
I used 3 small wooden hearts from my stash and coated them with Hibiscus Pink Stickles for sparkle (I had to let these dry overnight) and glued a heart by each puppy. I cut off the shank of a metal bone button and it fit perfectly glued in with E6000 as an embellishment in the gap created by the two facing pennants, between the 2nd and 3rd puppies.
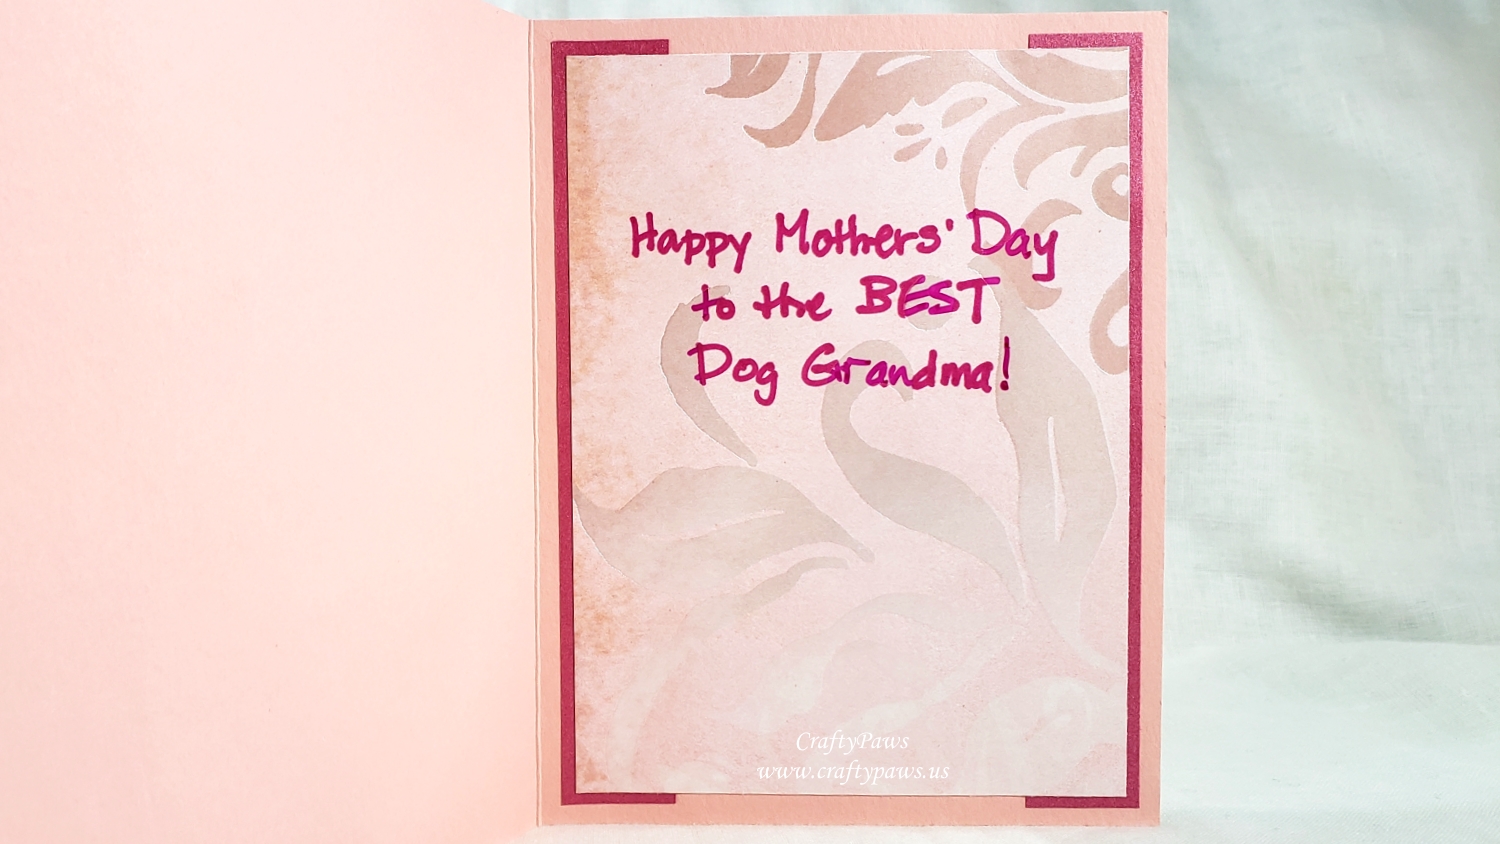
I used the left over scraps of the damask paper and the dark pink shimmer card stock to create a simple liner for the card. I hand printed the sentiment, “Happy Mothers Day to the BEST Dog Grandma!” using a hot pink Permanent Fine Point Sharpie.
CLICK on the following picture to watch the crafting process video:
Disclosure: Many of the supplies I’ve used for today’s project are linked. Some may be affiliate links, which means if you make a purchase I receive a small commission at no extra cost to you. I truly appreciate your support toward the costs of running this blog!
This puppy themed Mothers’ Day card is being entered into the following challenges:
Simon Says Stamp Wednesday For a Special Lady Challenge
Word Art Wednesday Anything Goes Challenge
Creatalicious Anything Goes with Optional Flowers Challenge
Simon Says Stamp Work It Wednesday Pet Project Challenge
Penny Black and More All Things Feminine with Anything Goes Challenge
Crafts Galore Encore Anything Goes Challenge
Through the Craft Room Door Anything Goes Challenge
Lil Patch of Crafty Friends Anything Goes Challenge
MFT Stamps Sketch Challenge #436

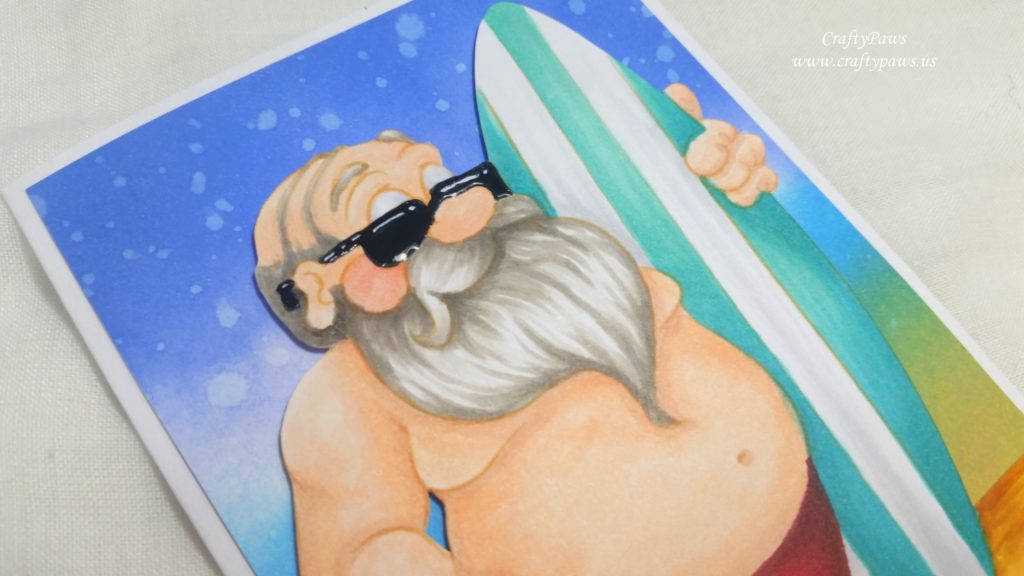
After uploading the image into Microsoft Word and lightening and de-saturating the image, I used the following Copic markers to color up Surfin’ Santa for some no-line coloring:
 Skin: E00, E01, E11, R30 (blush), R11 (toenails)
Beard, Mustache and Hair: W0, W1, W3, W5
Swim Trunks: R35, R37 and R39
Surfboard and Flip Flop Sandals: BG11, BG32, BG15, BG45 and N1
Wand: Y13, Y21, YR21, and YR24
Sunglasses: C9 with Uniball Signo White Gel Pen highlights and Ranger Glossy Accents for shine
For the background, I blended on some Tim Holtz Distress Oxide Inks in Fossilized Amber, Spiced Marmalade, Salty Ocean and Blueprint Sketch. They blended beautifully and each color transitioned into the next to create a fuzzy out-of-focused looking background that could be the sand, ocean, and sky behind Surfin’ Santa. I also sprinkled on some water to the darkest area and blotted the water droplets with a tissue to achieve a splattered, watery look. I popped up Surfin’ Santa with some double sided foam adhesive over top, and that’s it!
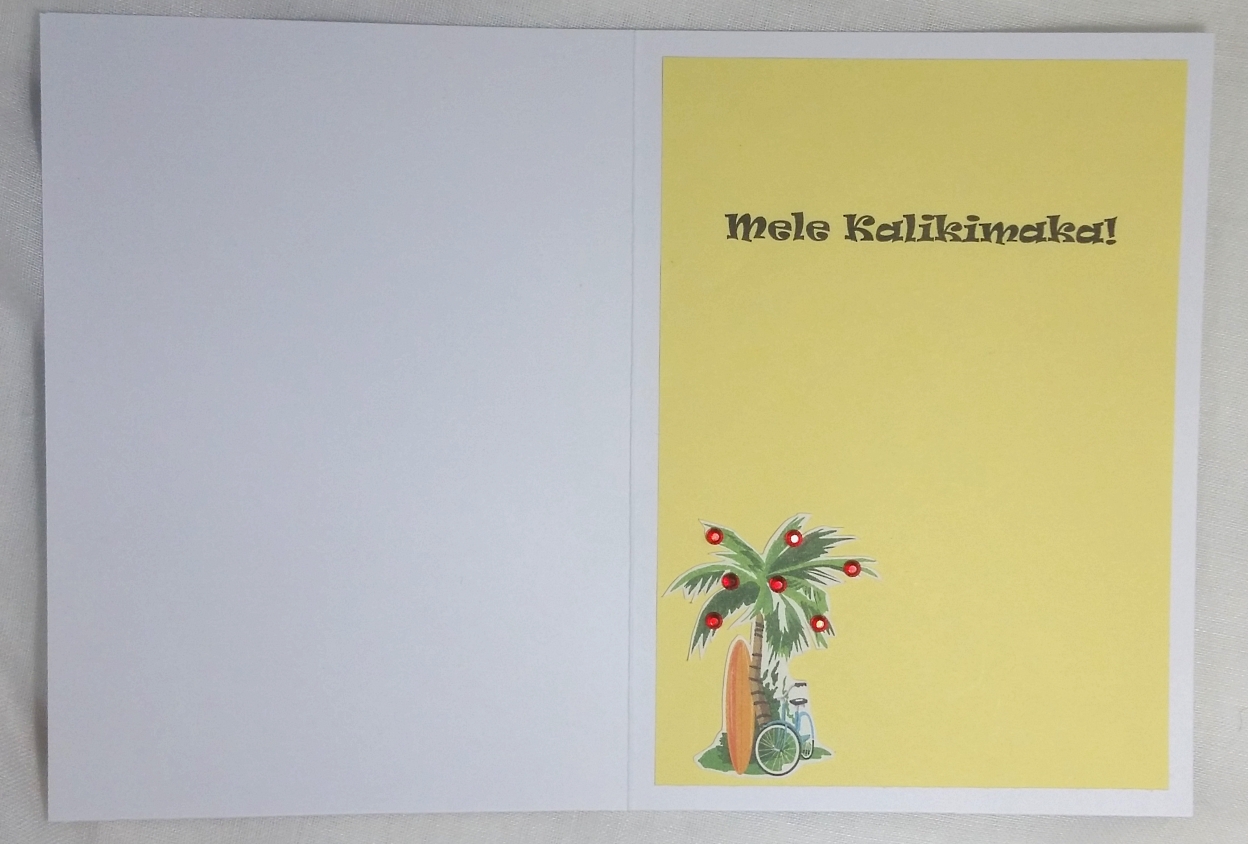
The inside of the card I simply printed out on my computer onto some yellow copy paper, “Mele Kalikimaka!” which means, “Merry Christmas” in Hawaiian. I fussy cut out a small image of a surf board and bicycle leaning on a palm tree that I had in my stash, and I adhered that to the lower left corner. Then to make it truly festive, I added red gems/bling stickers to the palm tree to make the mini-scene Christmas-y!
CLICK the following picture to watch the tutorial start-to-finish video of creating this card:
Disclosure: Many of the supplies I’ve used for today’s project are linked. Some may be affiliate links, which means if you make a purchase I receive a small commission at no extra cost to you. I truly appreciate your support toward the costs of running this blog!
This Surfin’ Santa card is being entered into the following challenges:
Digi Choosday Anything Goes Challenge
ABC Christmas Challenge U is for Upon and V is for Very Quick Challenge – Santa standing upon the sand (hehehe)
Simon Says Stamp Wednesday Let’s Get Ready for Christmas Challenge
Word Art Wednesday Anything Goes Challenge – WINNER
Creatalicious Anything Goes with Optional Use Texture Challenge
Cute Card Thursdays Anything Goes Challenge
Pause Dream Enjoy Anything Goes Challenge
Lil Patch of Crafty Friends Anything Goes Challenge
Through the Craft Room Door Anything Goes Challenge
Crafts Galore Encore Anything Goes Challenge
]]>
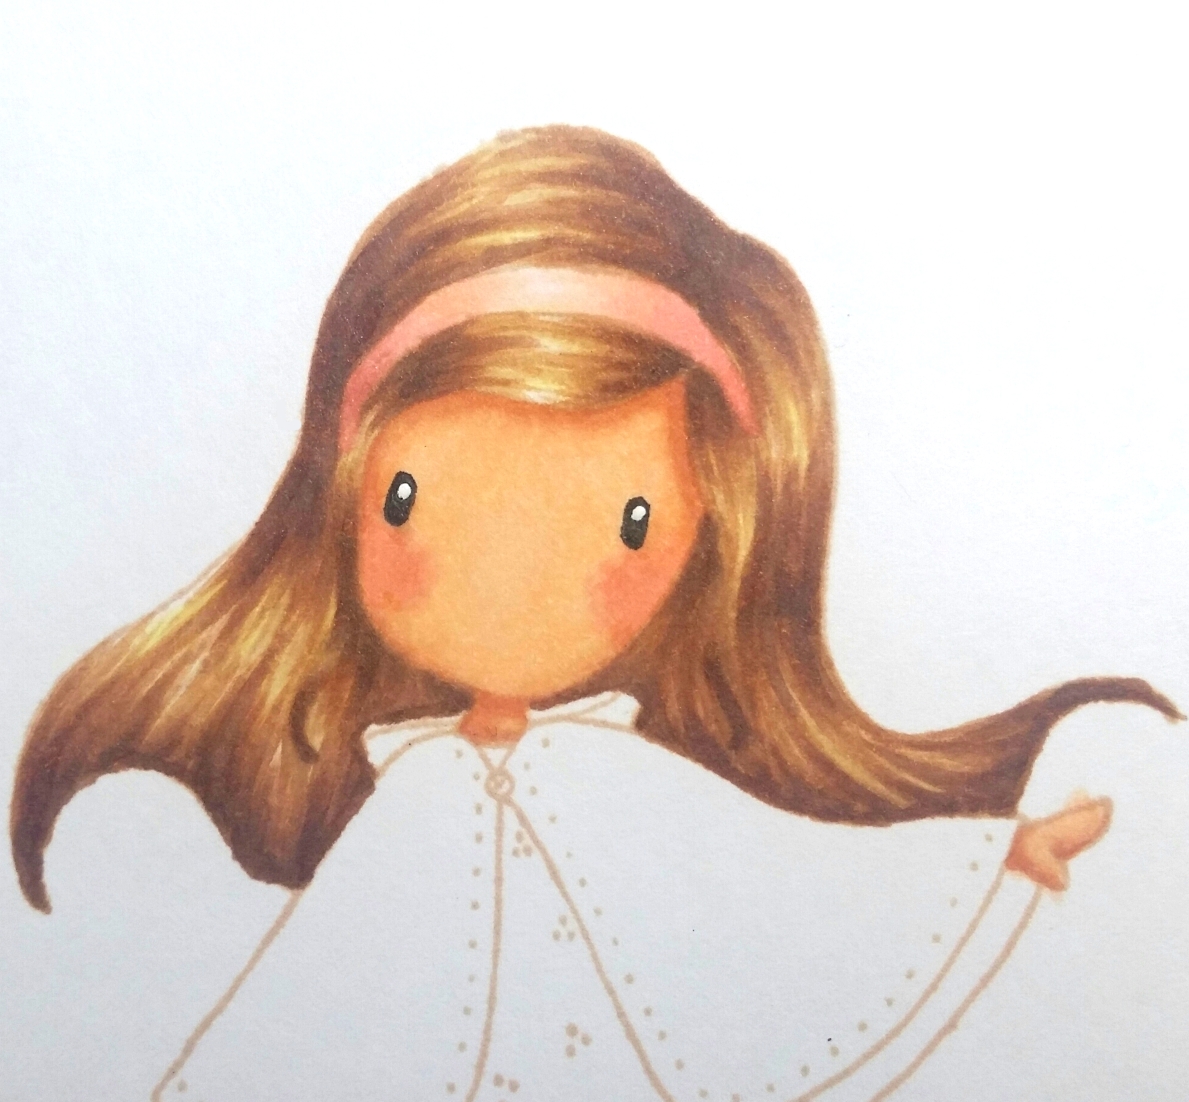 For the card front background I also dug into my stash and used a pretty pattern paper with hearts, flowers and birds from the “Pastels & Whites” paper stack by Craft Sensations (I took my Copic color cues from this paper). Rather than have the little girl just floating on the sea of pattern, I decided to use a Pretty Pink Posh Scallop Frame die with white card stock to create a frame. I wanted to ground the little girl so I found a scrap of patterned note paper in a shabby chic green with cream colored script that I cut with a Lawn Fawn Stitched Hillside die. I was going to just inset that hill into the frame, but I thought it might be nice to soften all of these patterns behind the little girl so she could remain the focal point without a lot of distracting pattern behind her. So I layered a piece of vellum paper behind the frame and over top of the hill and center of the background paper, and this softened the patterns nicely while still keeping them visible.
I stamped the main focal point Gorjuss Girl image with Momento Desert Sand Ink (my favorite ink for no line Copic coloring). Then I colored her up with the following Copic colors:
Skin: E000, E00, E01, E21, E11 and R20
Hair: Y11, E31, E33, E23, E25 and 0.3 pt Copic Multiliner Pen in Warm Gray for fine details (I think this was key to the final look)
Pink of headband, dress and tights: R30 and R32
Cape: YG01, YG13, YG03 and YG25
 Underskirt and gray of tights: W0, W1, W3 and White Prismacolor Colored Pencil
I also emphasized the black of her eyes with a 0.03 pt Copic Multiliner Pen in Black and added highlights to her eyes and dot details to her dress with a Uniball Signo White Gel Pen.
Lastly, I decided the little girl could be traipsing through a meadow to deliver a box of Valentines chocolates so I dug up this cute conversation heart stamp from an old Recollections Valentines set that also had never seen ink. I inked it up with Tim Holtz Distress Oxide Ink in Worn Lipstick for a soft pinky peachy look that I thought matched the colors in the background paper and the colors I’d used to color up the girl’s dress. I tucked the heart into her left hand (notice how her thumb overlaps the front while the rest of her hand is behind) before popping up the entire fussy cut girl on double sided foam adhesive for a little added interest and dimension.
Disclosure: Many of the supplies I’ve used for today’s project are linked. Some may be affiliate links, which means if you make a purchase I receive a small commission at no extra cost to you. I truly appreciate your support toward the costs of running this blog!
The following is a quick card share video:
This card is being entered into the following challenges:
Art Impressions Sweet Treats Challenge – box of chocolates she’s delivering. 🙂
Penny Black and More Love, Hearts and Flowers Challenge
Simon Says Stamp Monday Take Note Challenge
Simon Says Stamp Wednesday It Must Be Love Challenge
Word Art Wednesday Anything Goes Challenge
Creatalicious Anything Goes With Optional Love/Anniversary/Thinking of You Challenge
Through the Craft Room Door Anything Goes Challenge
Lil Patch of Crafty Friends Anything Goes Challenge
613 Avenue Create Anything Goes with Optional Love Challenge
]]>
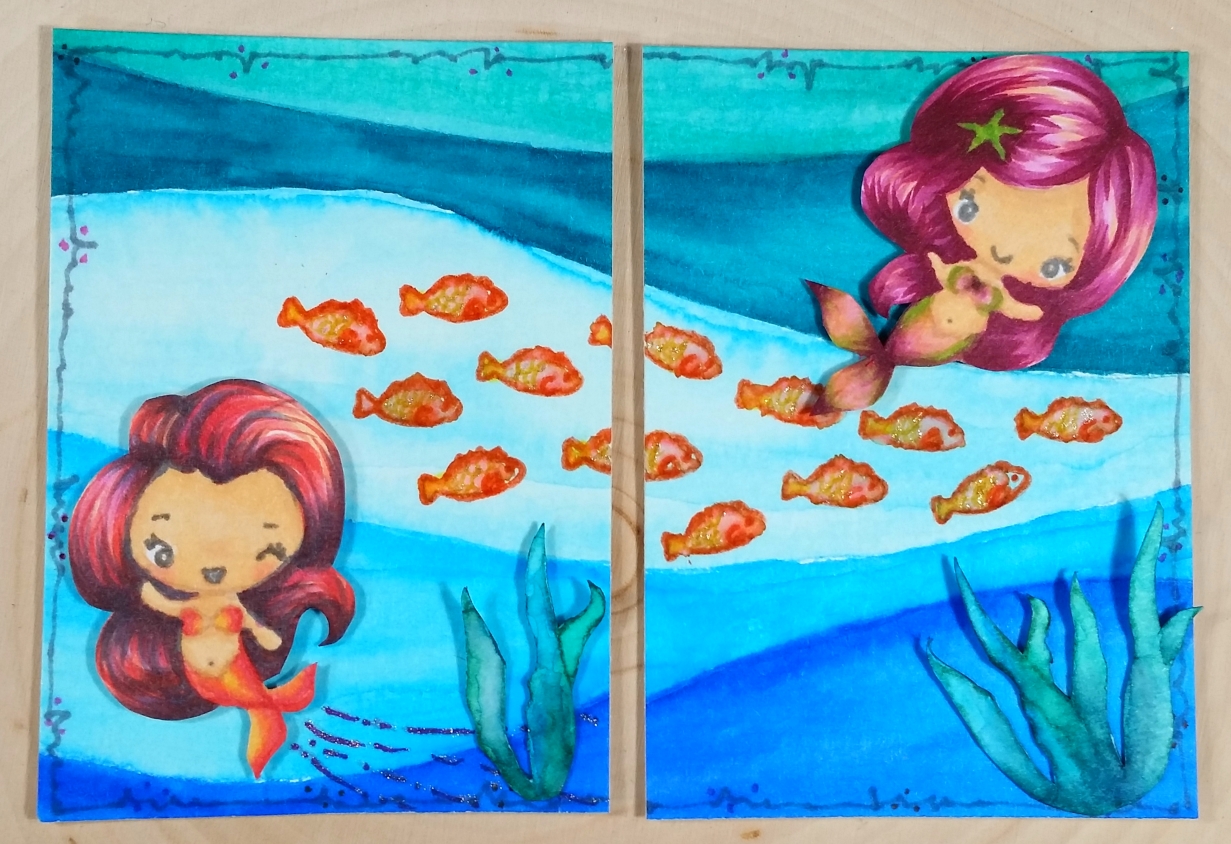
For the watery wavy background I used various blues and aquas from the 60 piece set of Zig Clean Color Real Brush Markers and free hand colored up the segments. I used a Pentel waterbrush to blend out each section, making sure to color 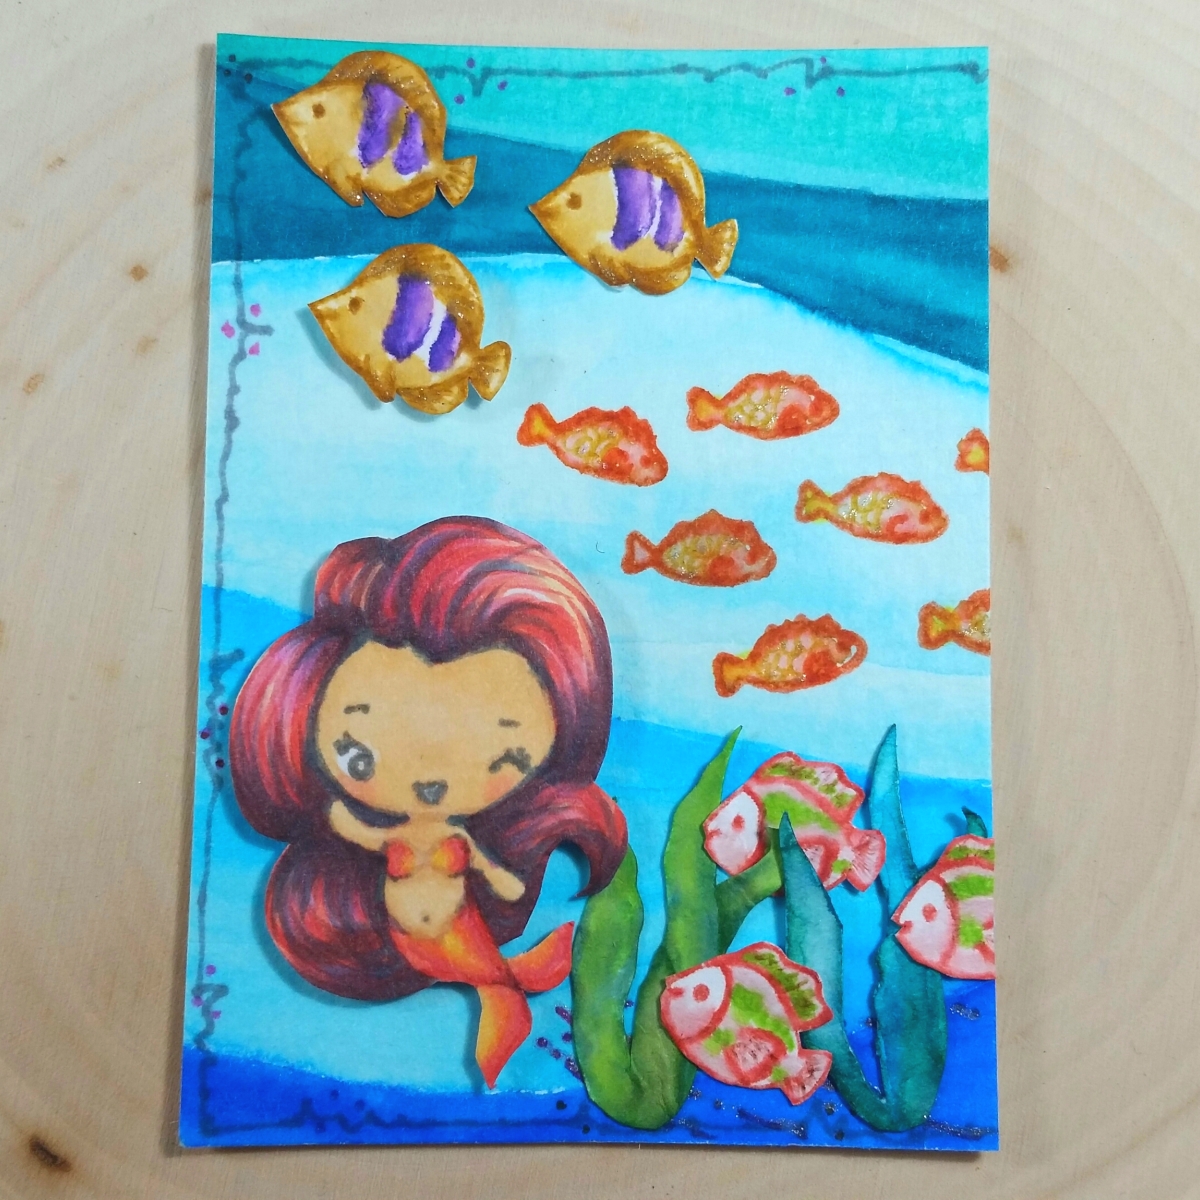 up the segments in alternating order so each segment could dry before the adjacent segment was watercolored so they would not bleed into each other. I also doodled out some zig-zaggy framing around both ATCs using Ultra Fine Point Sharpie Markers in Red, Hot Pink, Medium Pink, Purple and Gray.
For the school of orange fish, I inked up a simple fish stamp with a Ripe Persimmon Tim Holtz Distress Marker and colored the bodies with Wild Honey. For a little shimmer, I also added scales with a Clear Star Gelly Roll Pen. For the purple and yellow striped fish, I stamped out the fish with more Wild Honey and used Tim Holtz Distress Markers in Wilted Violet and more Wild Honey to watercolor them up. For the pink and green fish, I stamped the fish in Abandoned Coral and watercolored using Tim Holtz Distress Markers in Spun Sugar and Twisted Citron. The seaweed are colored up with Twisted Citron, Mowed Lawn, Peacock Feathers and Pine Needles, and the starfish are colored up with Squeezed Lemonade and Spiced Marmalade. I added more shimmer with the Gelly Roll Pen over the fins of the fish and the star fish as well. Except for the big school of orange fish, each of these little scene builders were painstakingly fussy cut out and glued on or popped up with double sided foam tape.
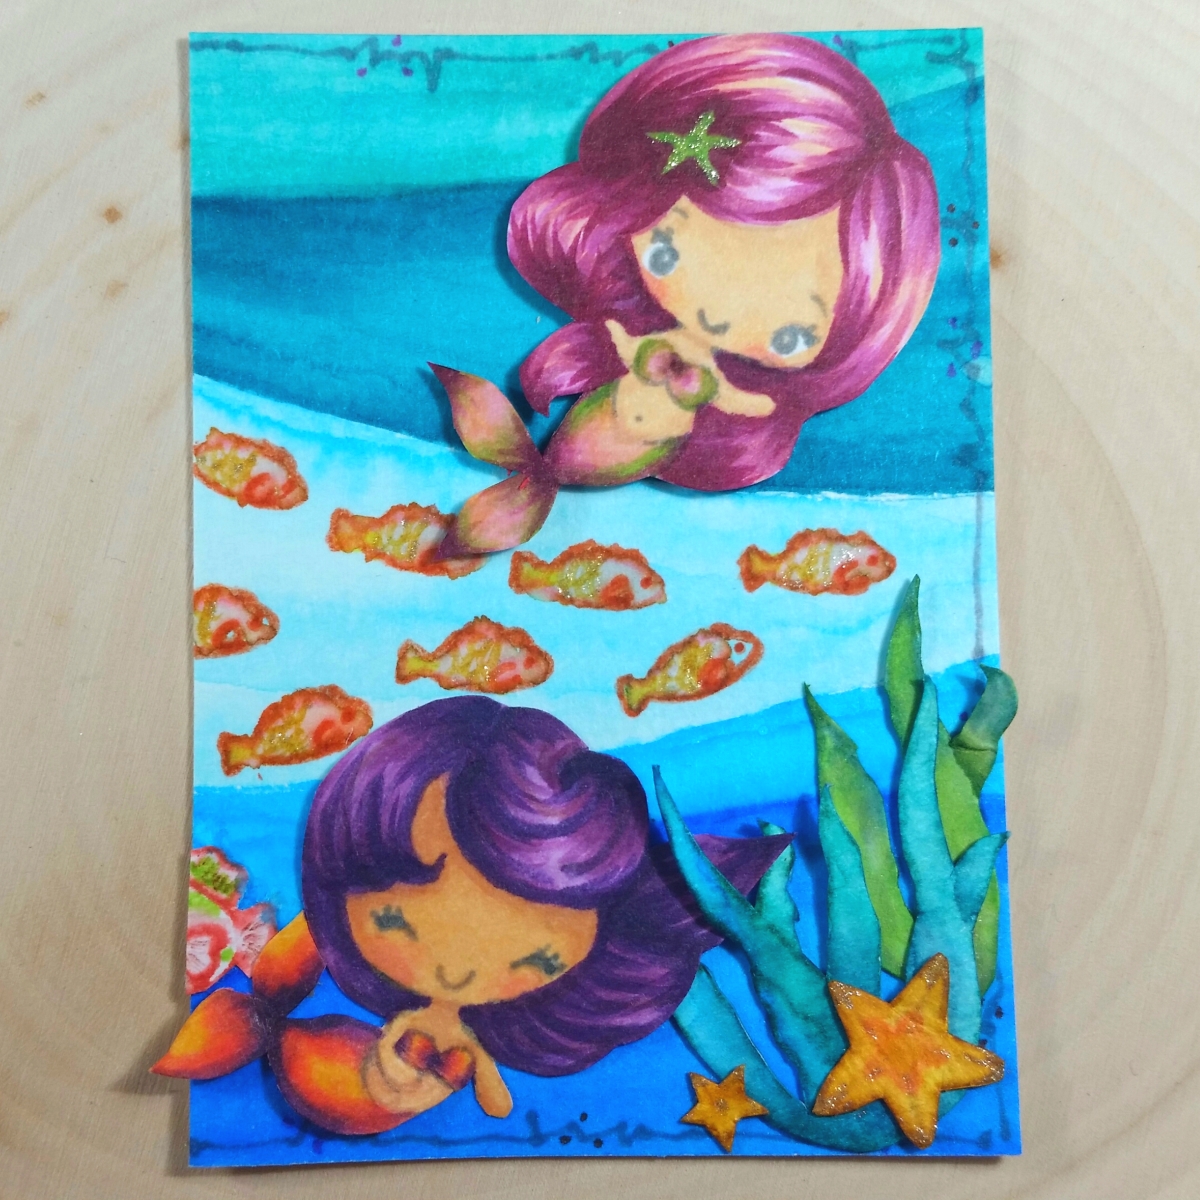 For the mermaids, I wanted a soft look, so I stamped out each with Momento Desert Sand Ink to do some no line coloring. I re-defined the facial features with a 0.3 pt Copic Multi-liner Pen in Cool Gray. Then I used the following Copic colors:
Mermaid with green starfish hair pin:
Skin: E51, E21, R20
Hair: YR21, RV52, RV66, RV69
Bikini top, mermaid tail, and starfish hair pin: YG25, YG17, RV52, RV55, RV66, RV69
Mermaid with purple hair:
Skin: E51, E21, E11, R20
Hair: V12, V15, V06, V09
Bikini top and mermaid tail: YR21, R22, V06 and V09
Mermaid winking:
Skin: E51, E21, R20
Hair: YR20, YR21, RV55 R24, C5
Bikini top and mermaid tail: YR20, YR21, R22, R24
The following is a video share of these ATCs that includes the no line coloring of the purple-haired mermaid:
These ATCs are being entered into the following challenges:
The Greeting Farm Farm Fresh Make a Scene Challenge
Lil Patch of Crafty Friends Anything Goes Challenge
Word Art Wednesday Anything Goes Challenge
Creatalicious Anything Goes with Optional Glitter/Bling Challenge
Not Just Cards Anything Goes Challenge
613 Avenue Create Anything Goes with Optional Shabby Chic Challenge
Penny Black and More All Creatures Great and Small Challenge
]]>
I crafted a CAS card with lots of details in the design and coloring because I know that is the style Mr. CraftyPaws likes most. The scene is all on one layer, with the critters and cheese (there was a lot of masking to make that pile of cheese) stamped in Momento Desert Sand ink. I stamped the sentiment in an arch with Momento Tuxedo Black ink by bending the sentiment on a stamping block. I thought this arch stretched across and kind of framed the scene nicely.
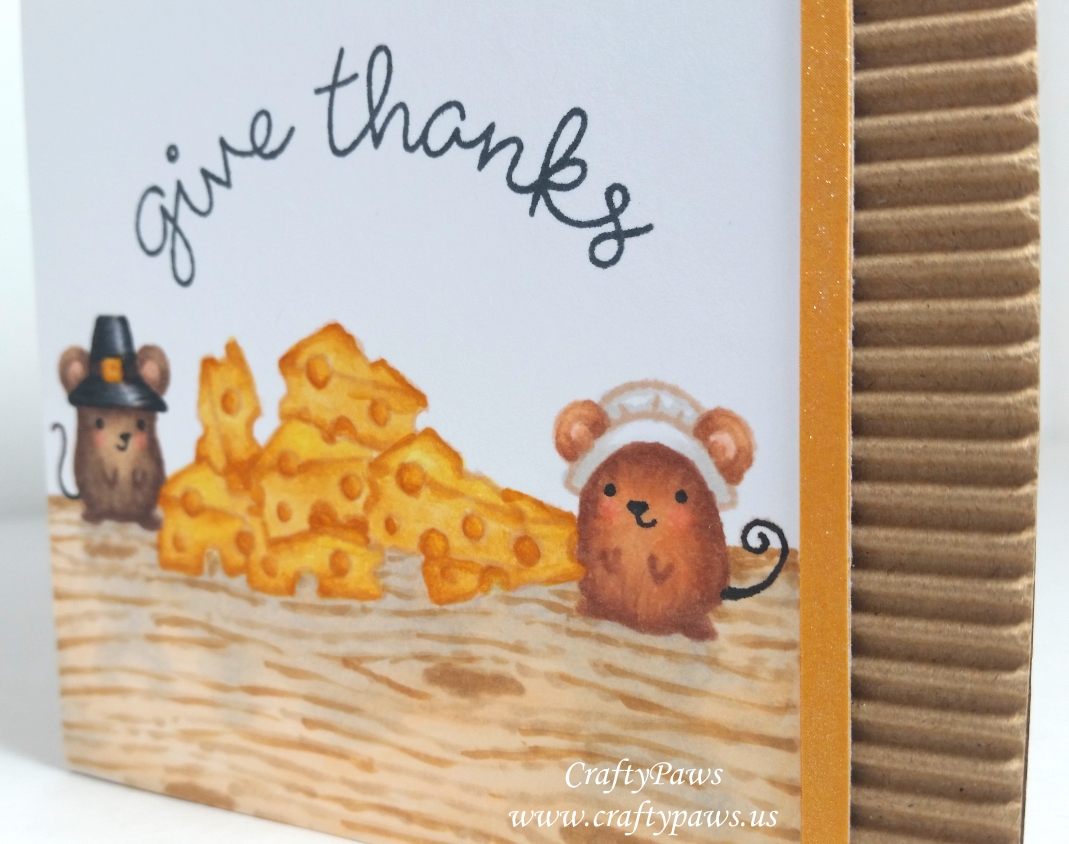 These are the Copic colors I used:
Pilgrim boy mouse: E41, 43, and 47 with ears in R30 and blush in R20
Pilgrim girl mouse: E21, 23, and 25 with ears in R30 and blush in R20
Pile of cheese and pilgrim hat buckle: Y11, Y21 and YR24
Pilgrim hat: N1, 5, 7, and 9 and E79 for hat band with some texture details with a 0.03 Copic Multiliner Pen
Pilgrim bonnet: N0 and 1
Wood grain tabletop with shadow cast from mice and cheese: N0, N1, C00, E51, E55
I am particularly proud of the faint cast shadow (I didn’t want to make this darker, even though a cast shadow probably would have been, because I didn’t want to detract attention from the cute mice and cheese pile) and the wood grain that I free hand drew/colored (following tips I learned in a Sandy Allnock Copic coloring class).
The card base is actually just a piece of kraft card stock, and I used some kraft corrugated card stock across the entire card front. Then I cut off about 1/2″ from the right side of the image panel so that the corrugated card stock would finish off one side of the card. Lastly I added a double layer of gold card stock strips topped with a heavy coating of Clear Wink of Stella to define the edge of where the image panel meets the corrugated card stock. It’s amazing what a little strip of color and shine add to a card!
The following is a video share of this card and yesterday’s card that I made for my brother:
This card is being entered into the following challenges:
Simon Says Stamp Monday Thanks/Thanksgiving Challenge
MarkerPOP Give Thanks Challenge
Simon Says Stamp Wednesday Thanks/Thanksgiving Challenge
Lawnscaping CAS Challenge #141 – WINNER
]]>
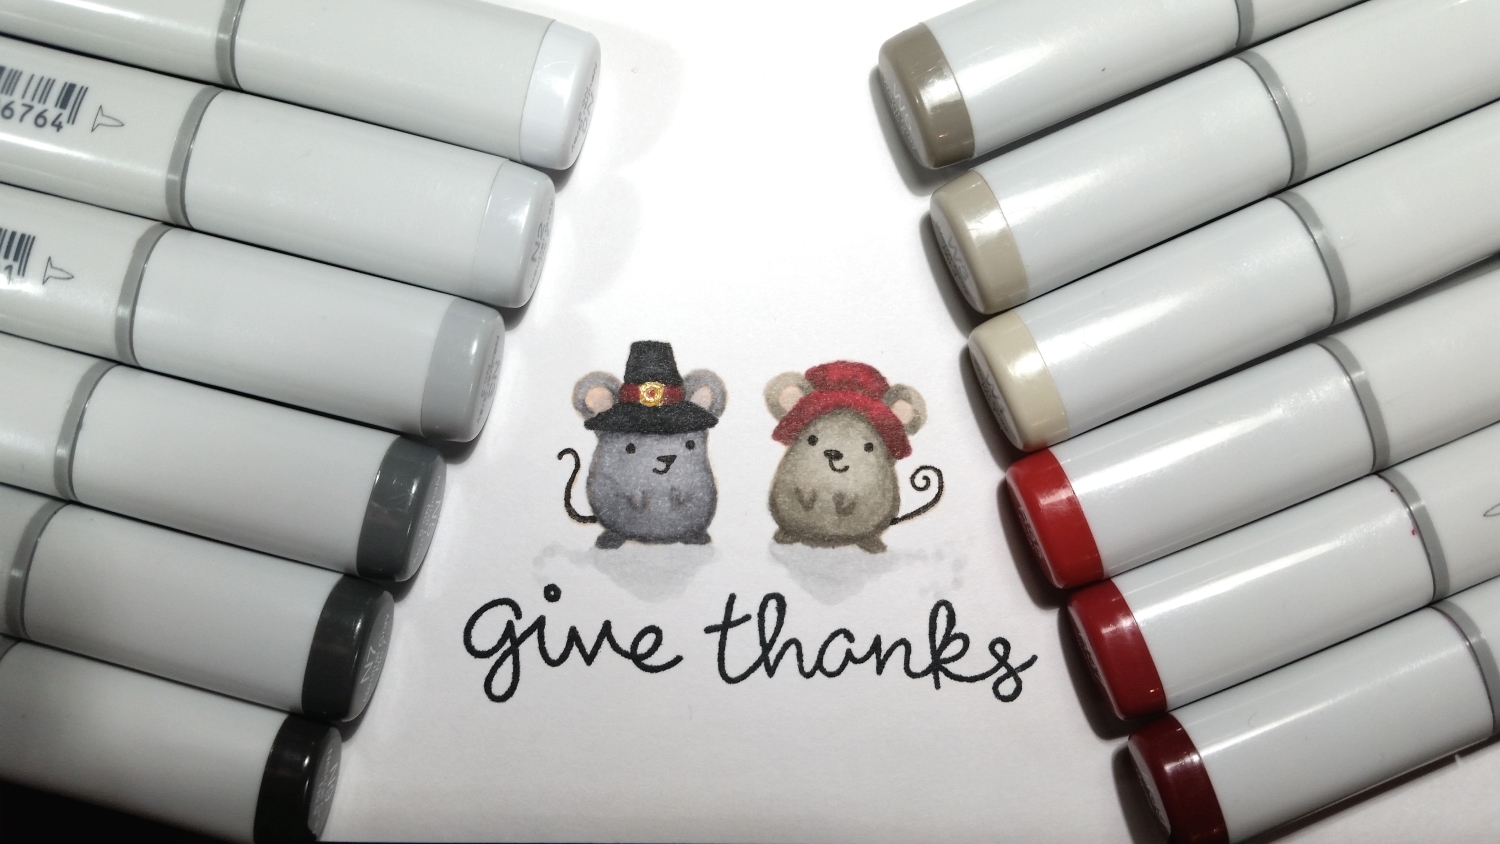
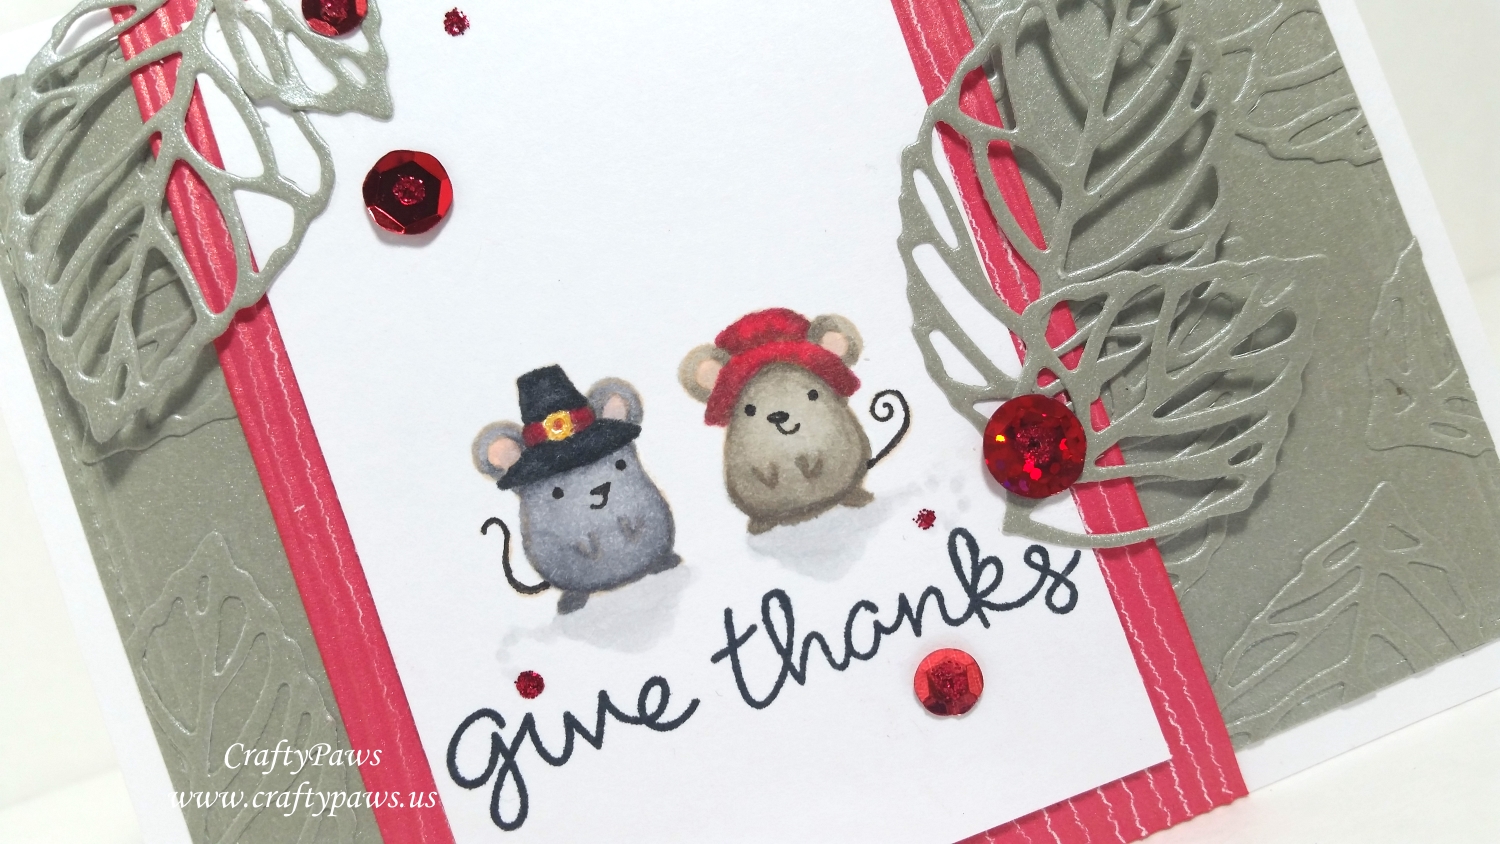
I did some simple no line coloring (stamped with Momento Desert Sand) with the Lawn Fawn Thankful Mice stamp set and the following Copic colors:
Dark Grey Mouse: N3, 5, 7 with a little R30 for inside the ears
Light Grey Mouse: W1, 3, 5 with a little R30 for inside the ears
Pilgrim Hat: N7 and 9 with R37 and YG17 for shading on the hat band
Pilgrim Bonnet: R35, 37, 39 with YG17 for shading
Shadows under the mice: N0 and 2
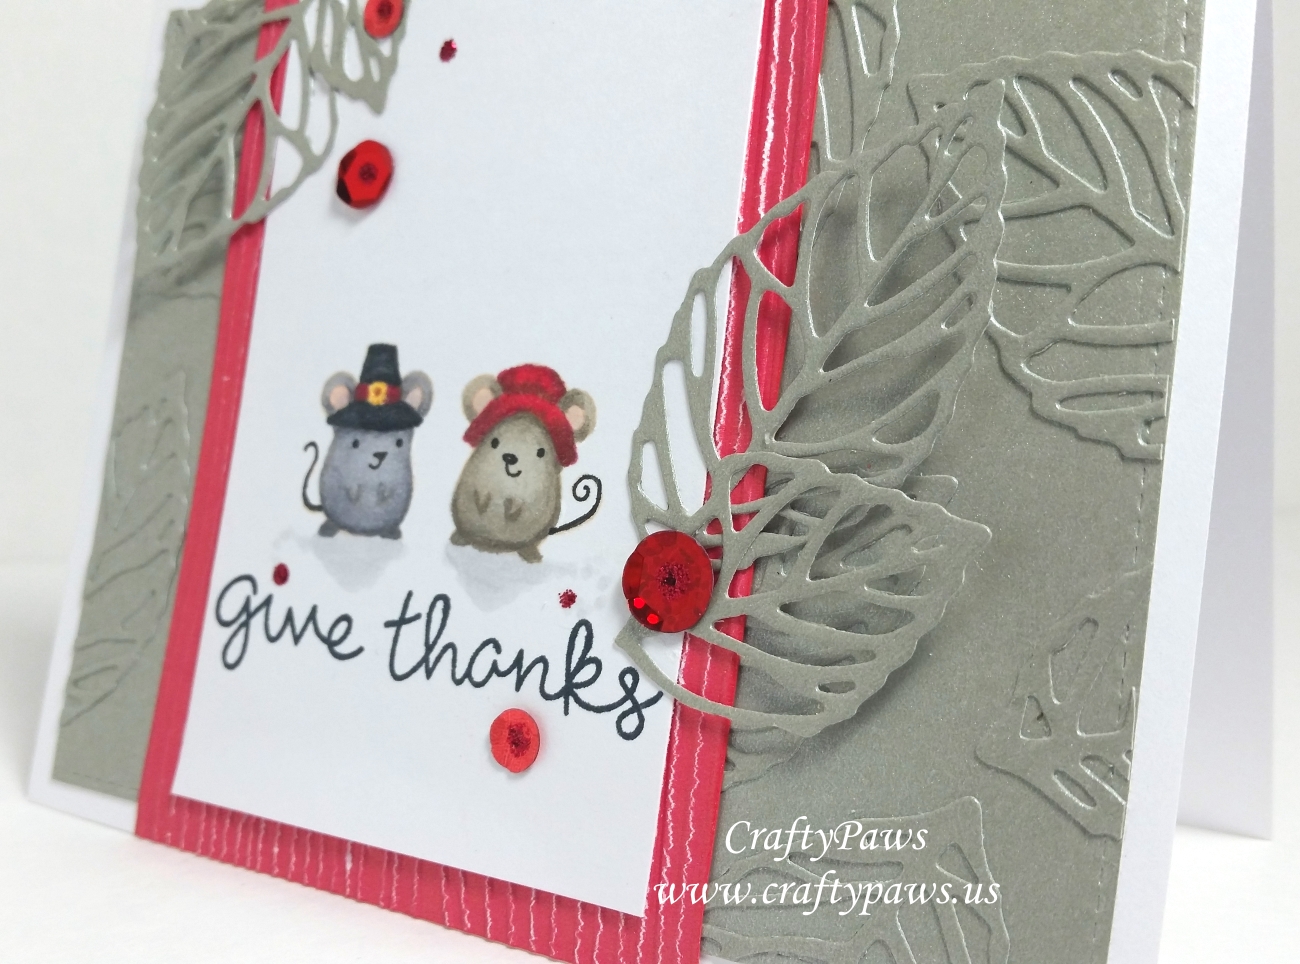 I stamped the accompanying sentiment, “give thanks,” just underneath. I used a burgundy shimmerz scrap of card stock and ran it through the wood grain embossing folder from The Paper Studio and die cut it with an MFT Die-Namics Stitched Rectangles STAX Die. Although at first I fretted about the shim I added causing a lot of cracking, ultimately I liked that rustic look even more than I think I would have if it hadn’t cracked so much.
Then for the background, I used a shimmery silver/grey Core’Dinations card base that I picked up on clearance at Walmart ($2 for a box of 40 cards and envelopes!). I used the large stitched rectangle from the MFT Die-namics Blueprints 15 Die Set and embossed and cut a panel from one half of the card base. Then I did some faux embossing (no cracks with this method) by die cutting out several leaves with the Diemond Dies Skeleton Leaf Die from the other half of the card base and gluing them all helter skelter on the panel. For a little extra interest, I die cut a few more skeleton leaves and hand cut some to be a bit smaller and attached them to the image panel with the ends left loose to add to the dimension. Lastly, I added some burgundy sequins in different sizes and dots of Cranberry Stickles to add sparkle and shine.
This card is being entered into the following challenges:
Simon Says Stamp Monday Thanks/Thanksgiving Challenge
Simon Says Stamp Wednesday Thanks/Thanksgiving Challenge
MarkerPOP Give Thanks Challenge
Word Art Wednesday Anything Goes Challenge
Addicted to Stamps and More CAS Challenge
Crafty Gals Corner Use a Sentiment Challenge
Just Keep on Creating Anything Goes Challenge
613 Avenue Create Anything Goes Challenge
MFT Card Sketch #306 Challenge
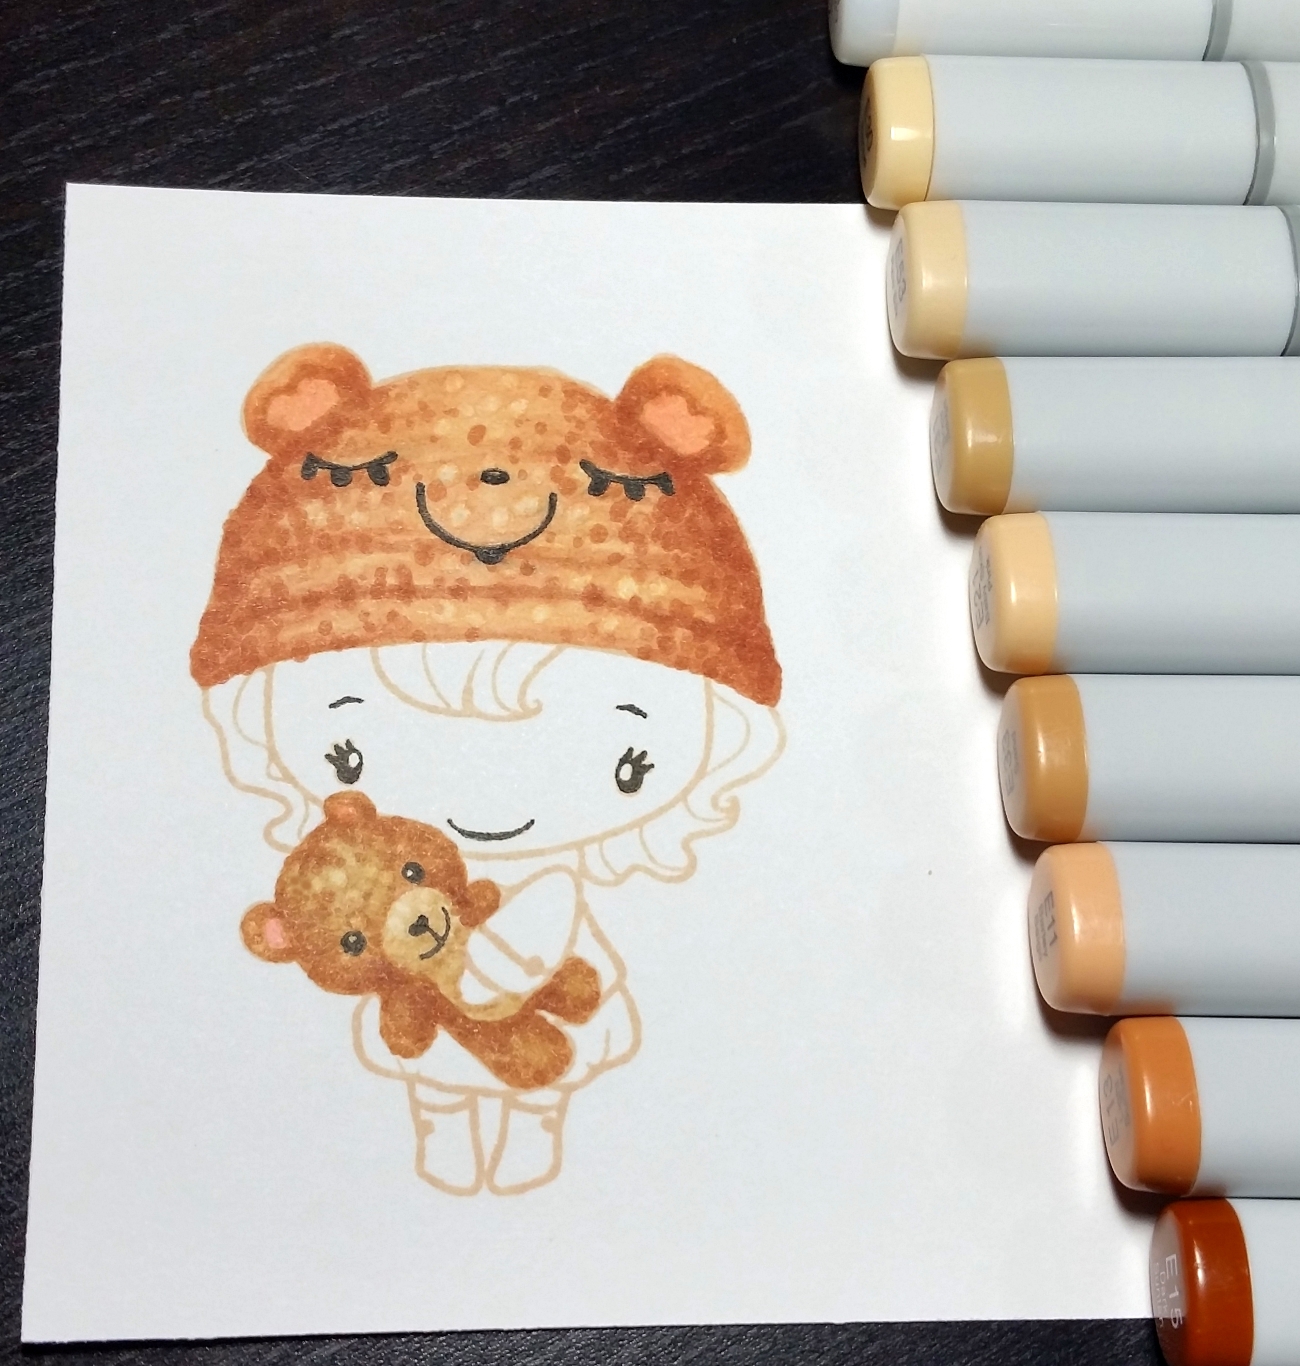 I decided to try no line coloring to give a softer warm look to the Cuddles Anya and practice the dot Copic coloring technique to give the impression of fuzzy texture for the hat and teddy bear. I stamped the image with Momento Desert Sand ink, and these are the Copic colors I used:
Skin: E50, 51, 53, 11 and R20
Hair: E55, 57 and 59
Hat: E21, 11, 13, and 15 with 0 for highlight texture
Teddy: E53, 30, 31, and 33 with 0 for highlight texture”
Bubble skirt, jacket, tights and scarf: YR31, 61, 12, 04 and 07 with E13, R24 and R27 for shadow and depth
I used a Copic multiliner pen in 0.03 pt to draw back in the eyes, eye brows, noses and mouths of the hat, Anya and teddy bear since the pale Desert Sand ink would become invisible after the Copic coloring. 🙂
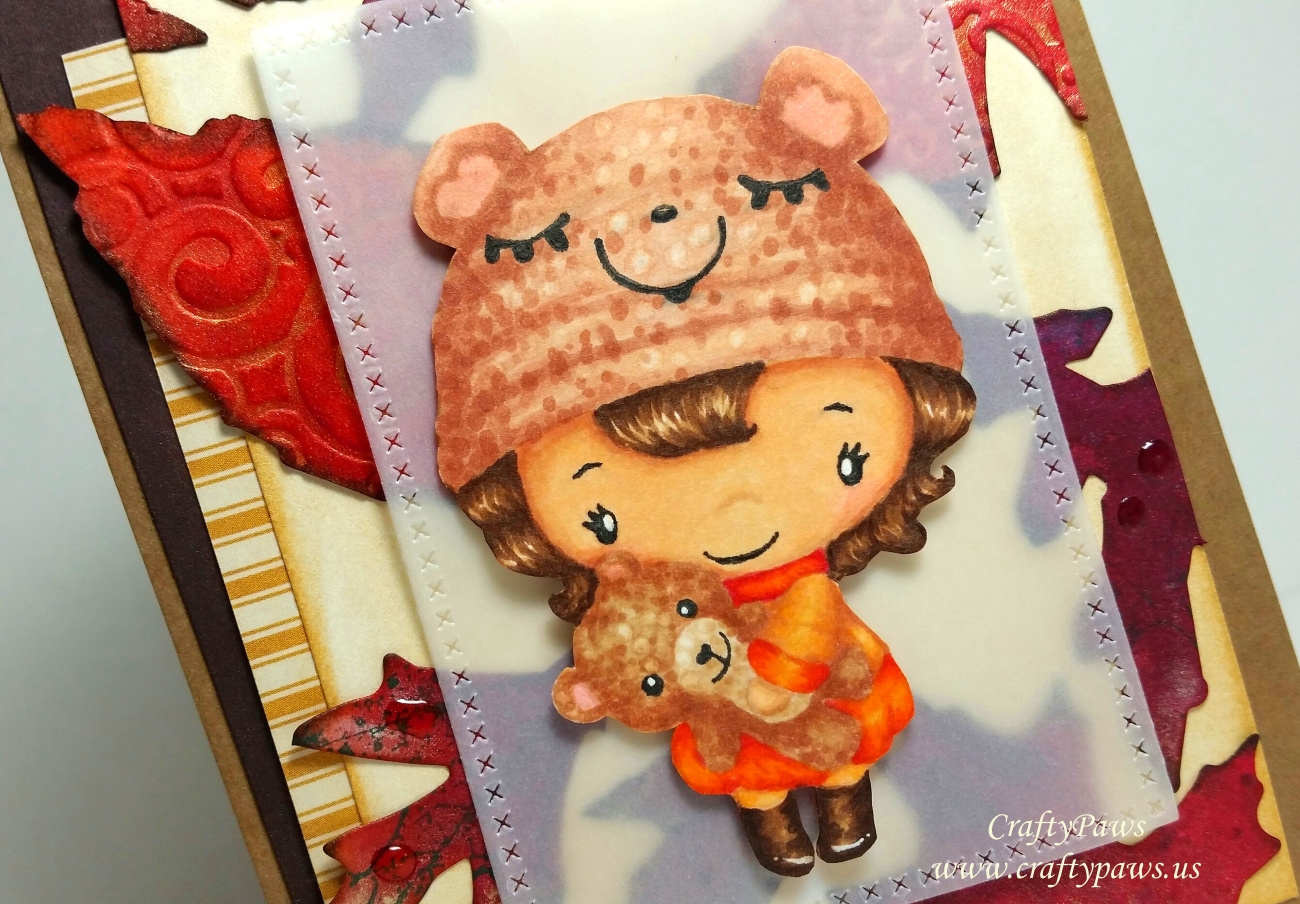
For the background, I rummaged through my paper scrap box and found some scraps in dark brown, a mustard stripe, and plain white card stock (onto which I blended on Delicata Golden Glitz ink) that I layered all off-kilter for some interest. The leaves, cut out with Alterations Tim Holtz Tattered Leaves dies, are sprayed, dry embossed and burnished with burgundy, red-orange, orange, brown and a hint of gold shimmers and inks. I love all the shine and sparkle of these leaves, and I even have a few clear Glossy Accents drops on a few leaves to mimic shiny dew drops. However, 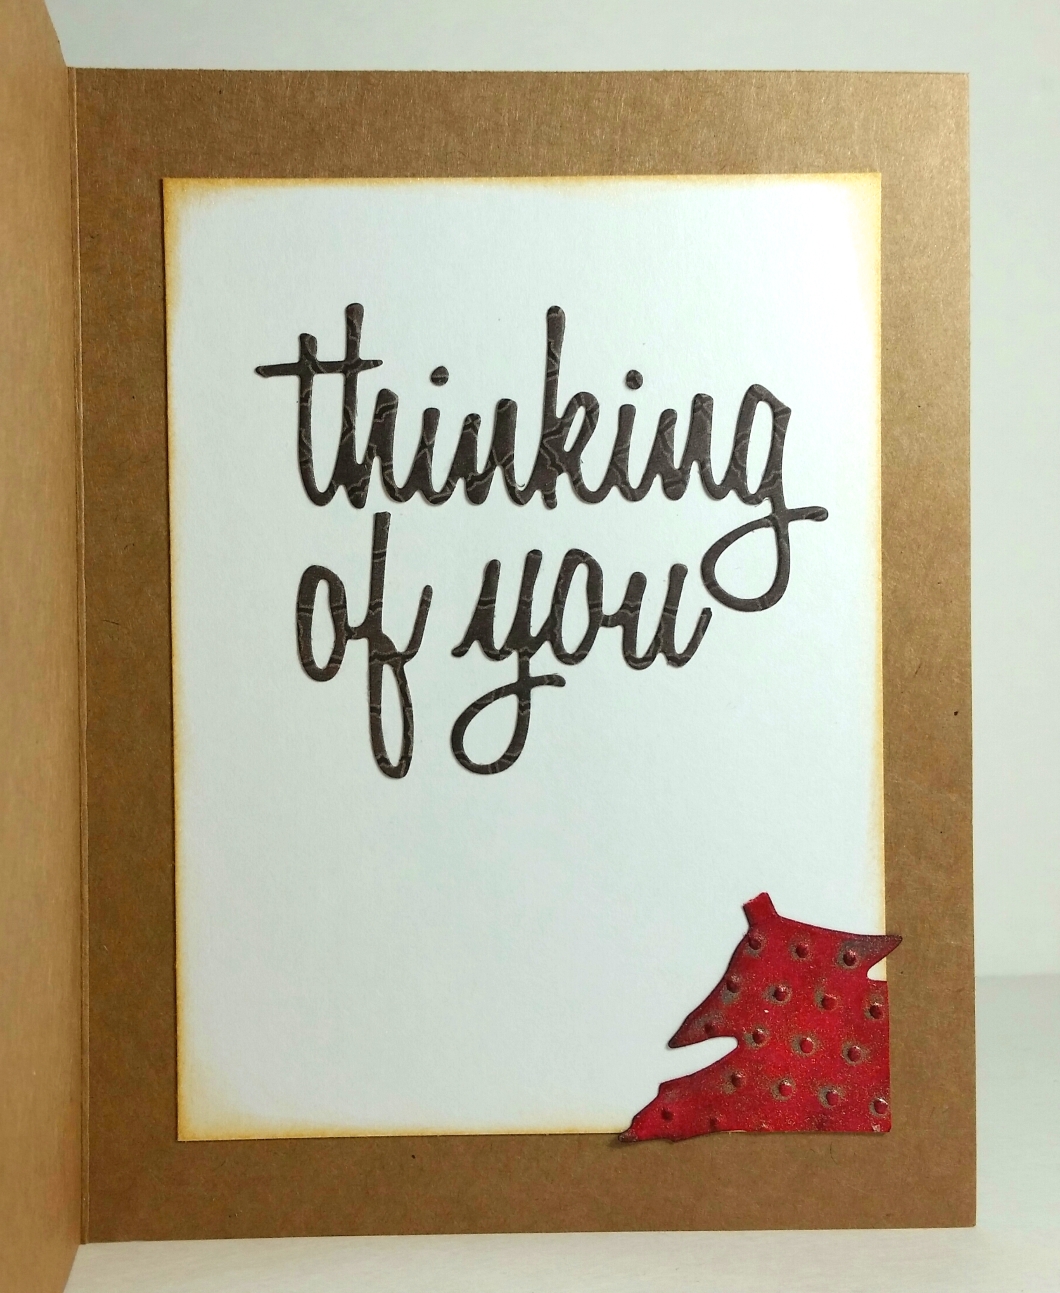 to mute the bold colors of the leaves where Cuddles Anya would be, I die cut a piece of vellum with an MFT Cross Stitched Rectangles die and layered that over the center area. This still revealed the beauty and detail of those leaves all along the edges beyond the vellum without detracting from the main focal point Anya with her teddy.
All of this was put on a simple kraft card stock card base to keep with the earthy theme. For the inside, I inked the edges of a white card stock liner with more Delicata Golden Glitz ink and used a tiny remnant scrap of a textured and inked die cut leave for a little accent. The simple “thinking of you” sentiment is die cut out from another dark brown scrap with the Tim Holtz Sizzix Celebration Words die set.
This card is being entered into the following challenges:
The Greeting Farm Farm Fresh Autumn Colors Challenge
Simon Says Stamp Monday Shine Bright Like a Diamond Challenge
CAS-ual Friday Orange, Brown and Kraft Color Challenge
Simon Says Stamp Wednesday Thinking of You Challenge
Word Art Wednesday Anything Goes Challenge
613 Avenue Create Anything Goes Challenge
Crafts Galore Encore Anything Goes Challenge
Creatalicious Anything Goes Challenge
Just Keep on Creating Anything Goes Challenge
]]>
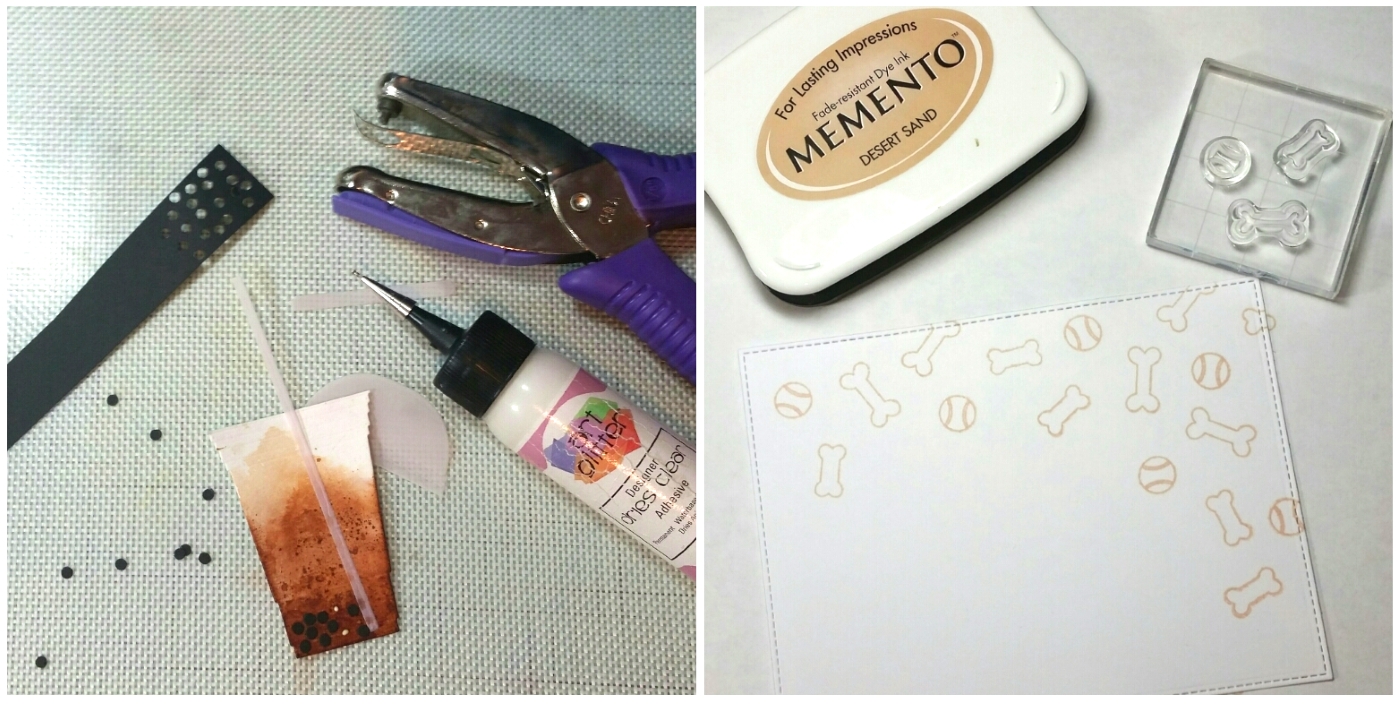
Two of her favorite things are mocha bubble tea (an ice tea with tapioca pearls) and her miniature apricot poodle, Boomer, so I thought I would combine the two in a totally personalized card. I started with a kraft card stock card base. Then for the first background layer, I created my own patterned paper using the small bone and tennis ball stamps from the MFT “You Make My Tail Wag” and “Lucky Dog” stamp sets with Momento Desert Sand ink. I cut that layer out with the large stitched rectangle die from the Die-namics Blueprints 15 Die Set.
 For the next layer, I ran a piece of white card stock through my Big Shot with a Darice paw print embossing folder then cut it down with the largest wonky rectangle die also from Die-Namics Blueprints 15 Die Set. I inked the edges with Tim Holtz Distress Ink in Tea Dye to add a finished look to the edges while maintaining the monochromatic color scheme. For the top layer with the sentiment, I couldn’t use the smaller wonky rectangle from Die-namics Blueprints 15 Die Set because I needed more room to fit the sentiment I wanted to use so I came up with a “work around.” I used the third largest die from the Die-namics Stitched Rectangle STAX Die Set and trimmed off two of the sides to create my own wonky rectangle! YAY for MacGyver crafty moments! The sentiment, which is from the MFT Stay Cool Stamp Set is stamped with Versafine Onyx Black ink.
For the focal point of the card, I die cut the cup from the Die-namics Cool Cup Die Set using 140 lb Strathmore watercolor paper and watercolored several layers of Tim Holtz Distress Ink in Tea Dye and Vintage Photo to create the look of a frosty cold mocha ice tea. With a little patience (to wait for layers of the watercoloring to dry between coats) and a little spraying with water to allow the ink to move naturally, the bubble tea came out looking quite realistic. I also cut out four of the dies from Cool Cup Die Set with vellum so that I could mimic the translucent look of disposable ice tea cups. Then to create the tapioca pearl bubbles I used a 1/8″ McGill hole punch to punch out a bunch of tiny black card stock circles. When I sandwiched them between the watercolored cup and the vellum cup and glued them into place with liquid glue, they looked very much like tapioca bubble tea pearls.
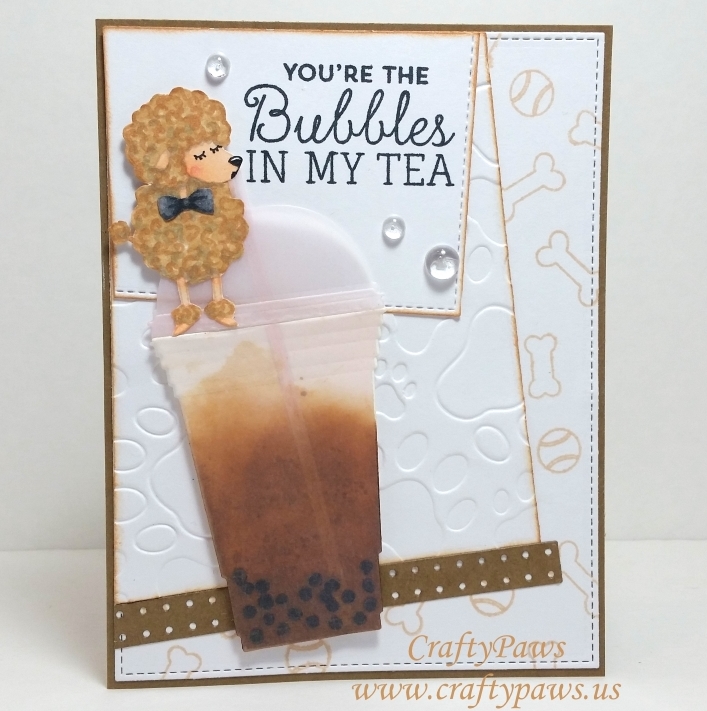
Lastly, I knew I had to add the poodle from the MFT “Lucky Dog” stamp set to represent my niece’s dog, Boomer. Because the stamp image has a pearl necklace, I decided to use no line coloring (rather than masked stamping) to hide the pearls with Copic coloring. I used Momento Desert Sand ink and then the following Copic colors to color up the poodle along with the bow tie from the same stamp set: E00, 01, 31, 33, 53 (skin and curly fur); R20 (blush); W3 and 5 (shadows); and N4, 5 and 7 (bow tie). Then I carefully fussy cut him out and layered him on top of the ice tea cup, snipping off and moving his tail to the other side of his body (so that it wouldn’t conflict with the straw) and tucking the vellum straw over the top part of his torso and back down behind his mouth so that it would look like he was drinking the bubble tea. I also doodled a little mouth with a Copic multiliner pen and hid the stamp image’s mouth with a little blush coloring. Both the bubble tea and the poodle are popped up on double sided foam adhesive to add extra dimension. The final finishing touches were three Pretty Pink Posh clear droplets in 4 mm and 6 mm sizes that I adhered with Glossy Accents to add a little blingy sparkle (I also think they coordinate nicely with the sentiment about bubbles).
I know it’s a crazy scene card, but I also know my niece will love it because it was made 100% just for her. I love that as crafters we can create anything we can dream up. We are only limited by our own imaginations. 🙂
The following is a video share of this card:
This card is being entered into the following challenges:
MFT Superstar Card Design Contest
Simon Says Stamp Wednesday Clean And Simple Challenge
MarkerPOP Watercolors Challenge
Word Art Wednesday Anything Goes Challenge
CAS-ual Fridays Dimension and Bling Challenge
Card Mania Earth Tones Challenge
Addicted to Stamps Anything Goes Challenge
Creatalicious Anything Goes Challenge
Craft Your Passion Anything Goes Challenge
Crafts Galore Encore Anything Goes Challenge
]]>
 This was my second try at no line coloring and I really like the softer look of the images with new favorite technique. I used Memento Desert Sand Ink
 to stamp the images and used the following Copic colors (skin for all 3 girls was with E50, 51 and 53 with R30 blush), white Sakura Gelly Roll pen for highlights and 0.03 pt Copic Multiliner pen for drawing in eyes:
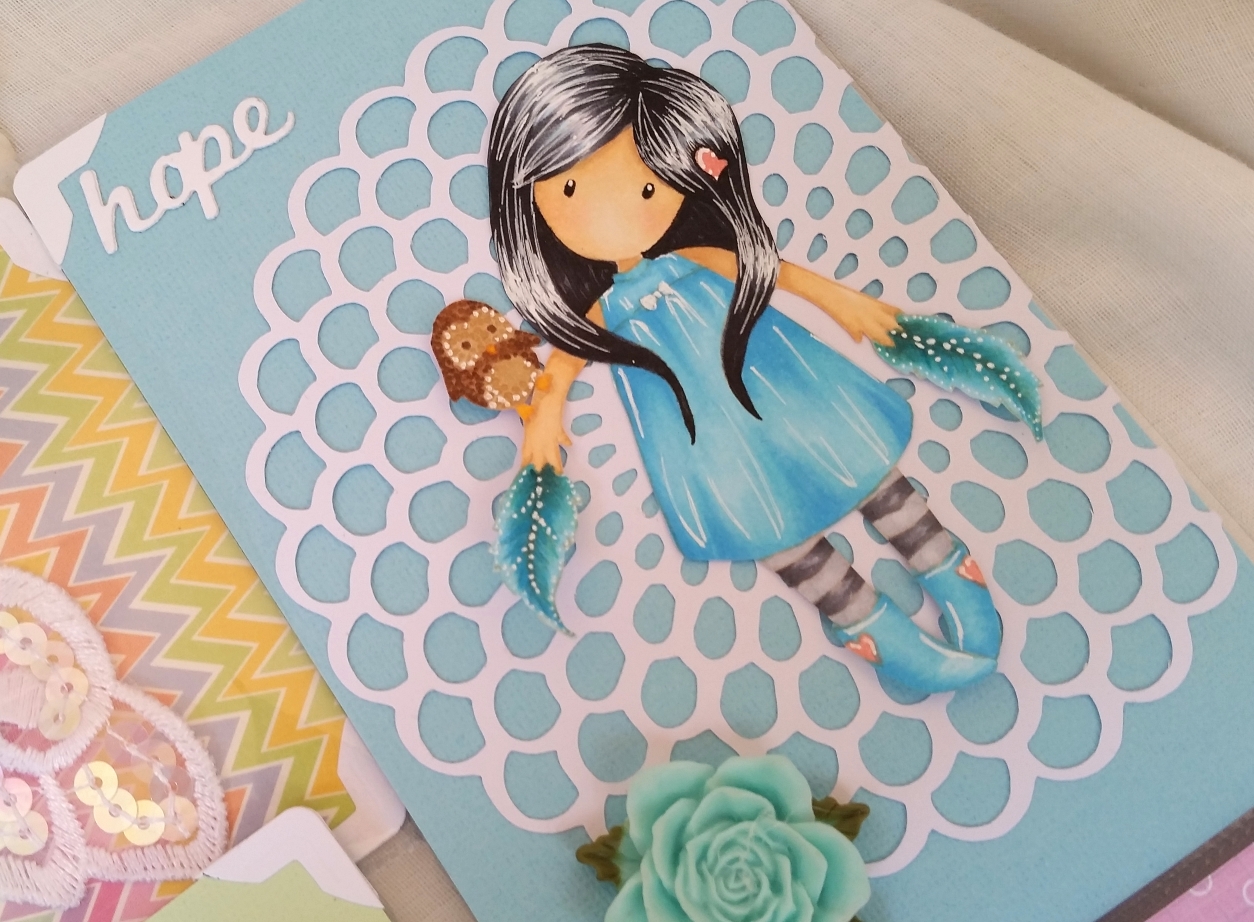
The Owl Gorjuss Girl:
Hair: C5, C7, C9, B00
Feathers: BG13, BG18, B00, B01 and B04
Dress and boots: B00, B01 and B04 with
Pink hearts: R32
Owl: E53, 55, 57 and 59
 Sweet Tea Gorjuss Girl:
Hair: E97, 99 and 29
Dress and hair bow: R11, 30 and 20
Teacup and saucer: E000, G20, G24 and W1
Bunny and drink me tag: YR20, YR31 and YR24
Ladybird Gorjuss Girl:
Hair: E55, 57 and 59
Dress: RV52, 55, and 66
Top petticoat: W1, 3, 5, 7, and 9
Underskirt: W1, 3, and 5
Striped stockings: RV10, 52, 55 and 66
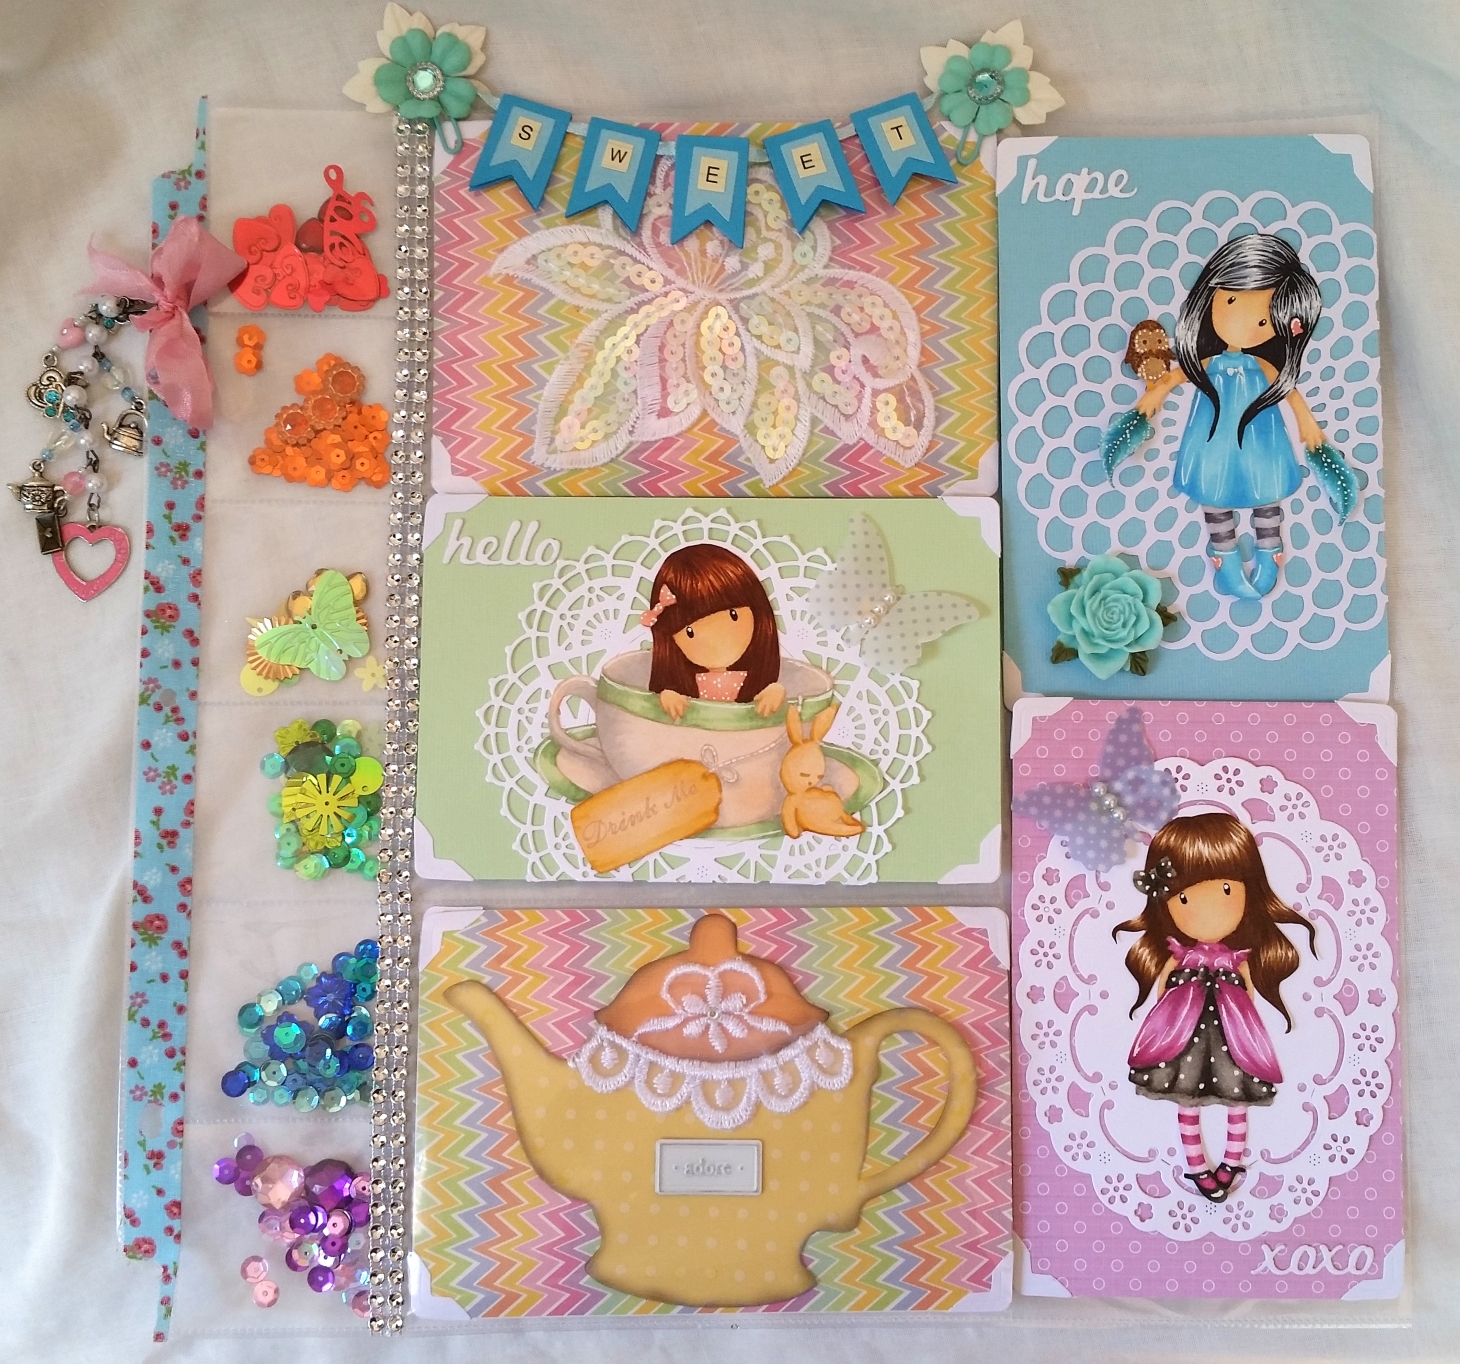
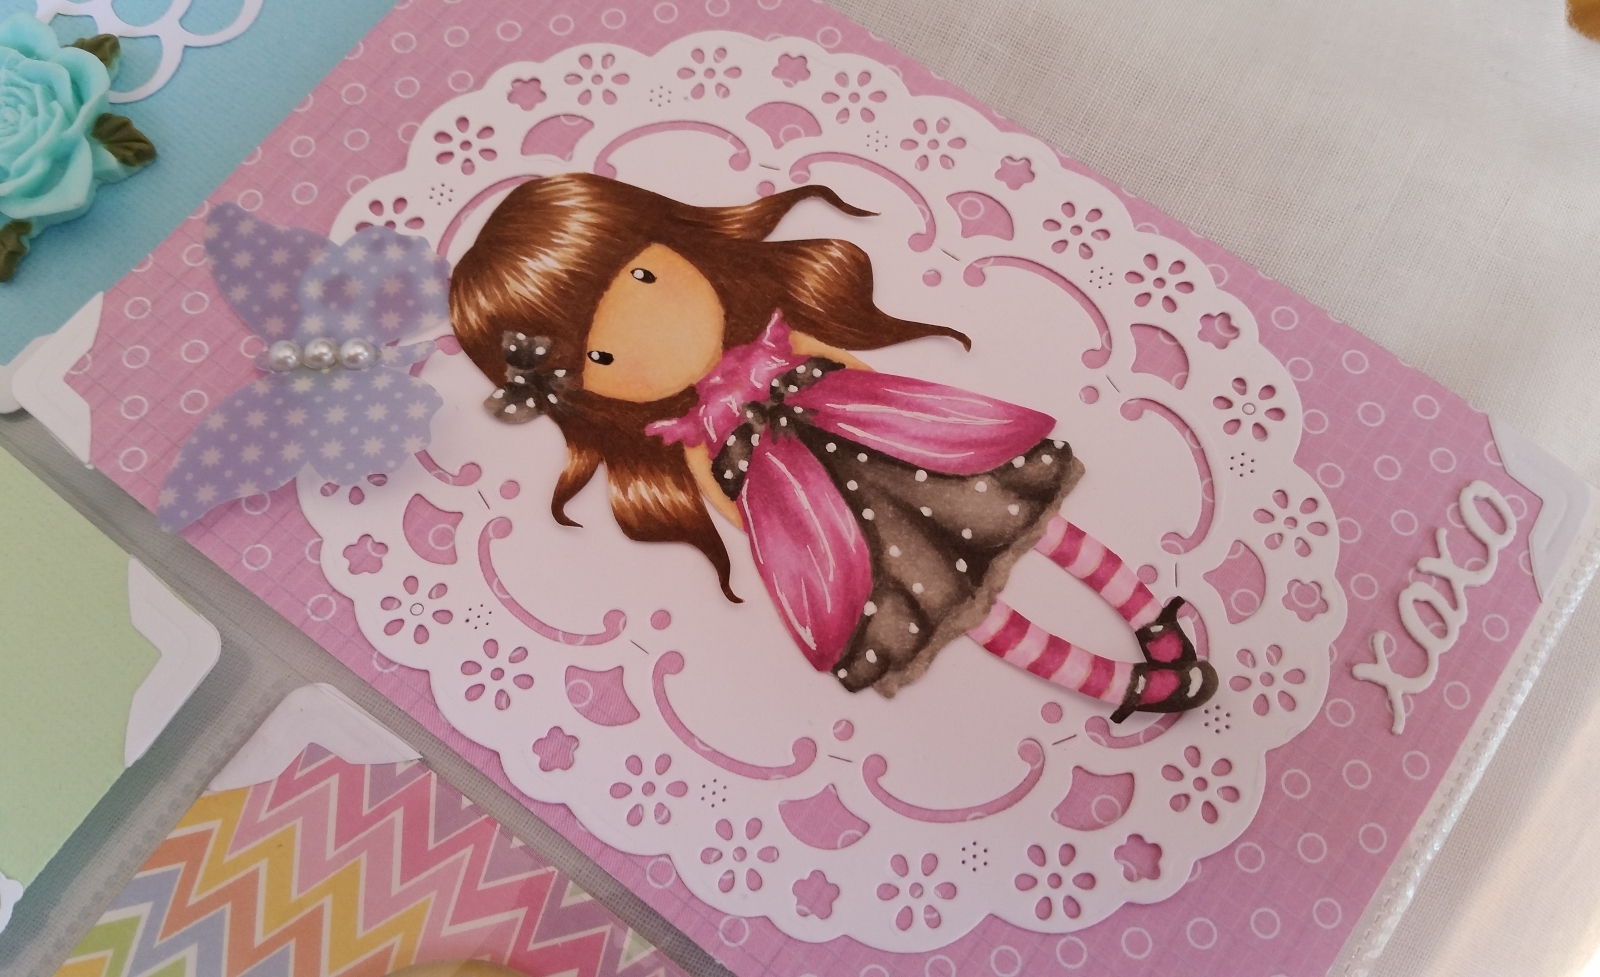
For each card with a Gorjuss Girl, I started with a pastel colored base, layered a white die cut doily and white photo corners that I die cut using my Tim Holtz Sizzix ATC and Photo Corners die. I also used the words “hope,” “hello,” and “xoxo” from the Diemond Dies Word Die Set #1 to add a kind of sentiment to each girl card. For small extra touches of embellishing without over stuffing the pockets, I added a couple of Jenni Bowlin Studio vellum butterflies and a resin aqua rose from my stash.
 For the other two large pockets, I used fun zig zag patterned paper from a DCWV Flowers & Butterflies mat stack. In the top pocket, I added a fancy lace sequin floral applique from my stash, and on top of the pocket altogether I added a banner that reads “SWEET” made using the Diemond Dies Mini Pennants Die Set, some thin aqua satin ribbon, some alpha stickers, and two handmade flower paper clips (to anchor the banner).
My readers can get 10% on orders of $35 or more at Diemond Dies by using the coupon code: “thankskristina”. Diemond Dies is having a 25% off SALE through June 24, 2015–on all orders of $99 or more, use the code “save25”. Only 1 coupon per order; cannot combine coupon codes.
In the bottom pocket, I die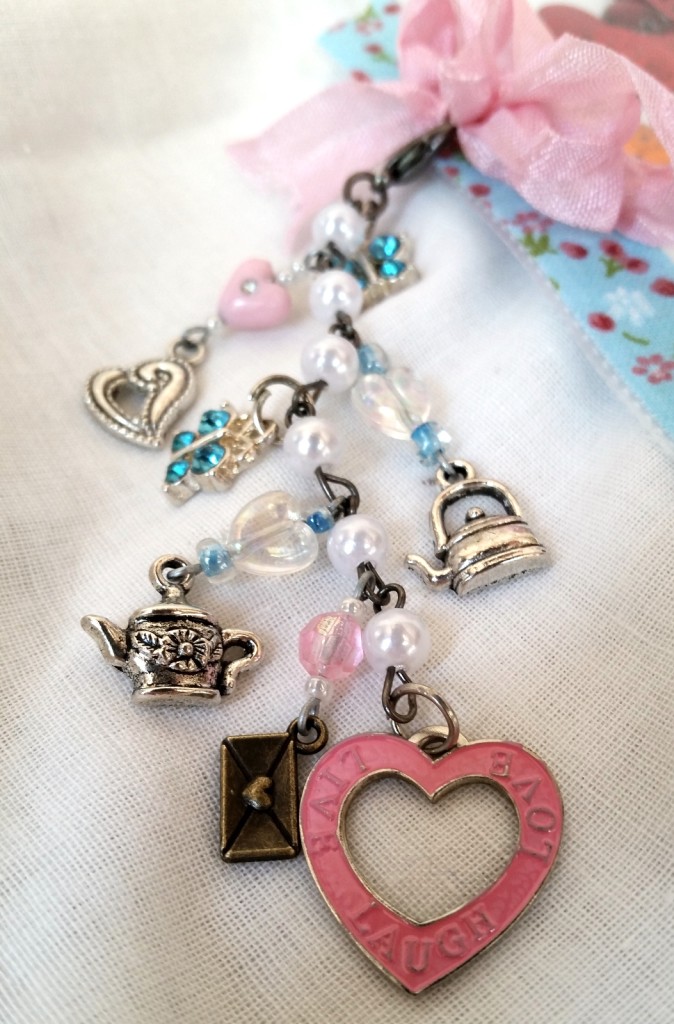 cut a tea pot using the Diemond Dies Mini Album Tea Pot Die. I separately cut out the top again with a different colored card stock to add interest and to cover up and shorten the neck of the tea pot so that it would fit into the horizontal pocket. To add a little interest to the tea pot, I added a polka dot vellum on top of the yellow card stock, a metal word embellishment that says “adore” and some scalloped lace to decorate the pot and lid. There are more fun crafty die cut and tea themed gifts in the back of each pocket , but I want to keep some of those a surprise for Marla so I won’t go into them here.
One of the fun things I got to do with this larger, non-standard sized pocket letter was to use the three skinny pockets on the left to make six shakers. I used the Becky Higgins Project Life Fuse Tool (which I LOVE) and gathered up sequins, confetti, bling pieces, and embellishments in all the rainbow colors and made a pocket shaker for each color. Then to finish off the edges, I added a couple rows of silver bling with hot glue over the right seam and floral fabric washi tape over the hole punched left side.
Lastly, for some added movement, I made a chunky dangle using tea pot charms, heart charms, blue crystal butterfly charms and various beads in clear, white, teal and pink. The dangle base is a beaded pearl chain with a lobster claw clasp by Spare Parts. I softened the hardness of the metal clasp and bit of chain at the top with a double loop pink seam binding bow.
The following is a video share of this Sweet Tea themed pocket letter:
This pocket letter is being entered into the following challenges:
Simon Says Stamp Work It Wednesday Rainbow Challenge
Simon Says Stamp Wednesday Favorite Technique Challenge
613 Avenue Anything Goes with an Optional Twist of Sights, Tastes, and Sounds Challenge (Winner)
One Sweet Challenge Die Cuts or Punches
Card Mania Metal Embellishments Challenge
Thanks for stopping by and have a wonderful crafty day! WOOF
]]>