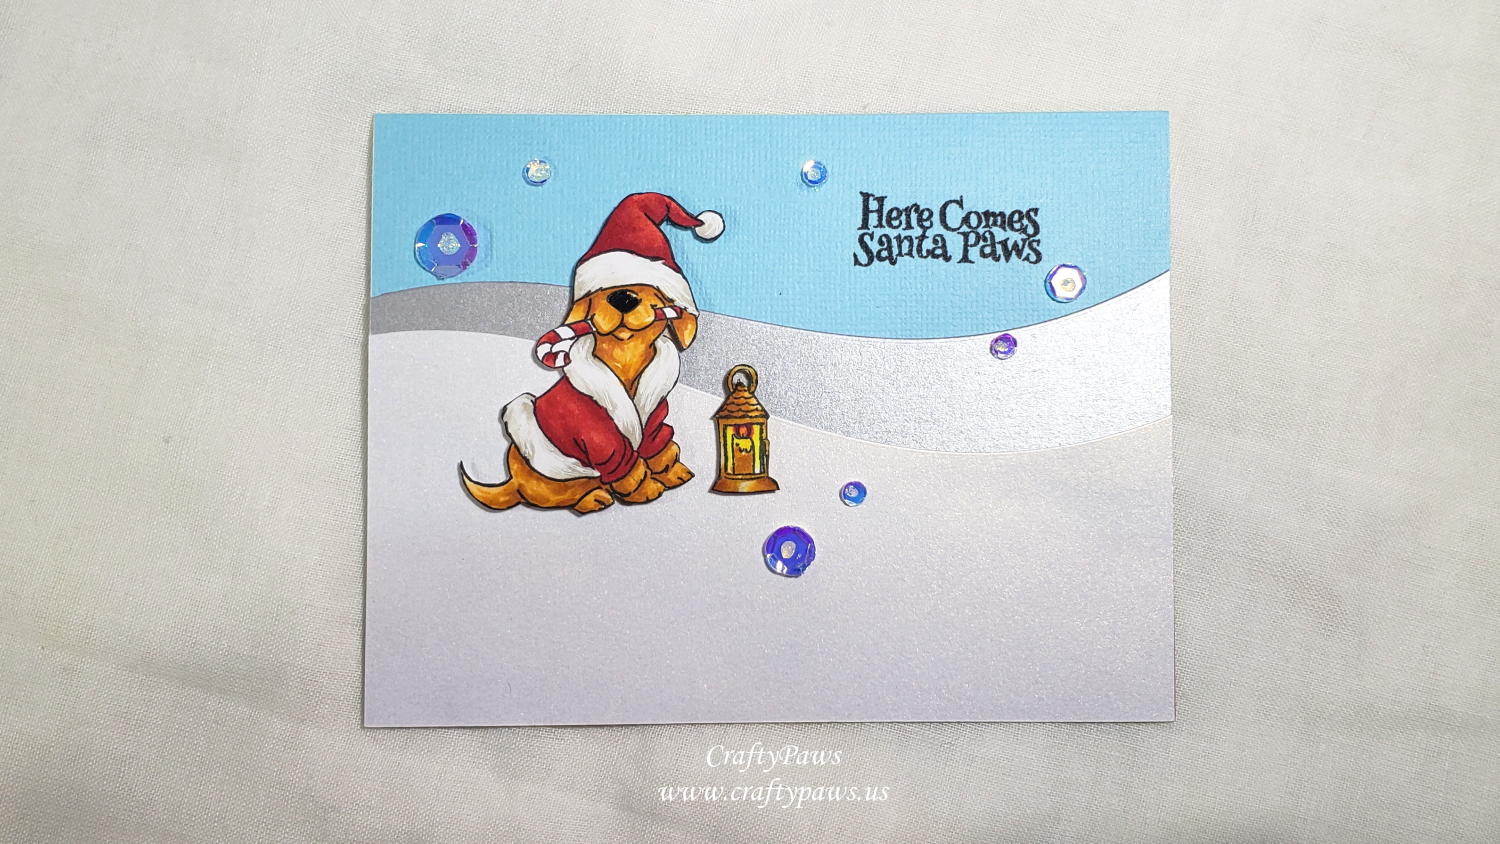
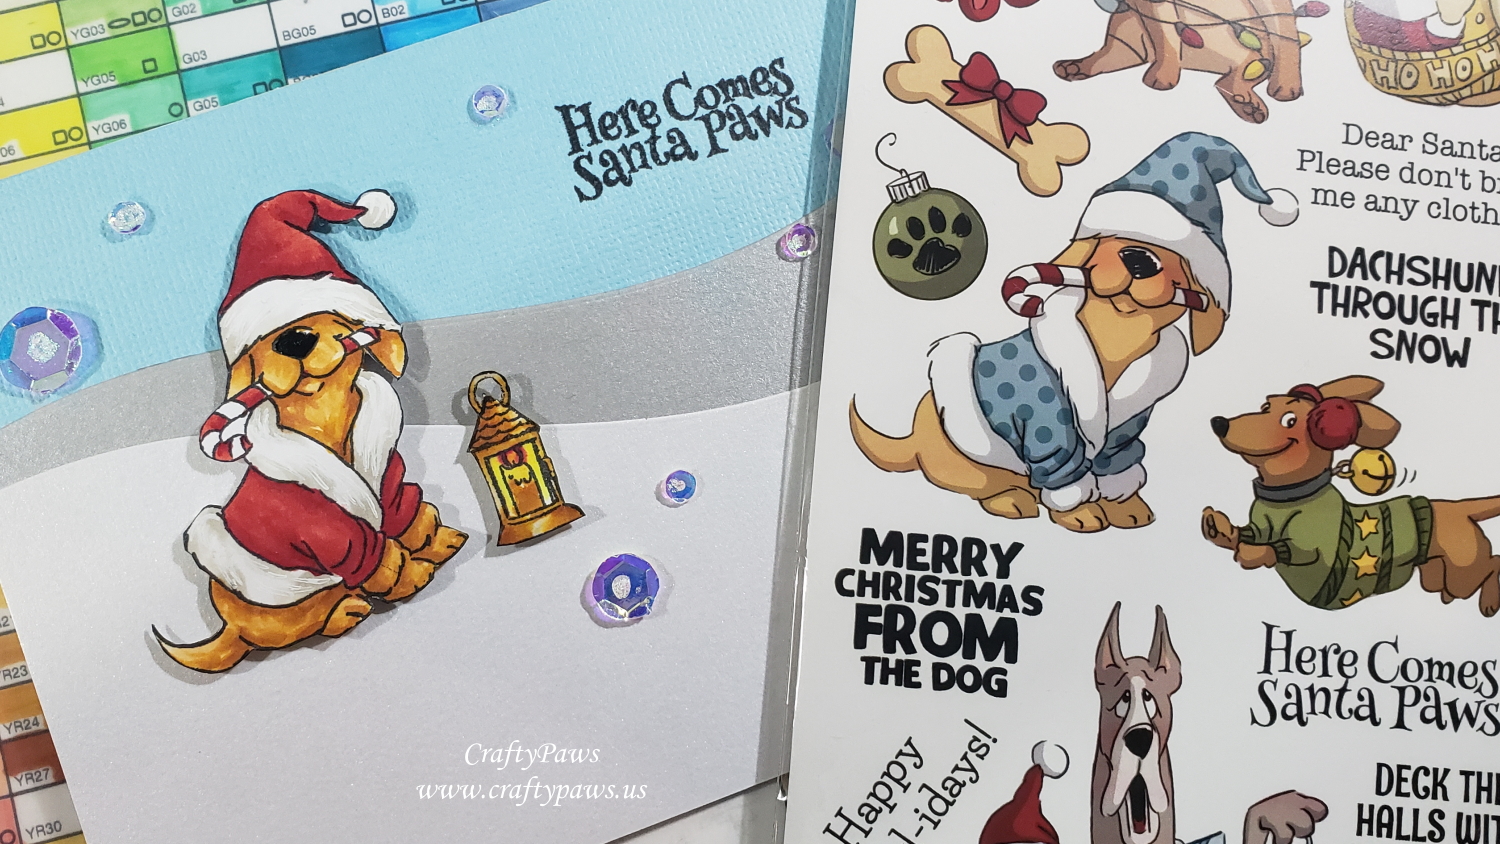
I stamped out the adorable pup with the Santa hat covering his eyes from the Art Impressions “Santa Paws” Stamp Set and colored him up like my niece’s dog, Boomer (even though the image is not a poodle), who is an apricot Poodle.
Dog: YR20, YR24, YR27
Santa hat and coat: R24, R27 and R29 with W0 and W1 for the fur trim
Flame: Y38 and R27 Lantern with candle: W1, YR20, YR24
Candy cane: R24, R27
I also used a Sakura Black Glaze Pen to add a tiny bit of shine and dimension to the nose and a Uniball Signo White Gel Pen to add some brightness and visual texture to the white fur trim.
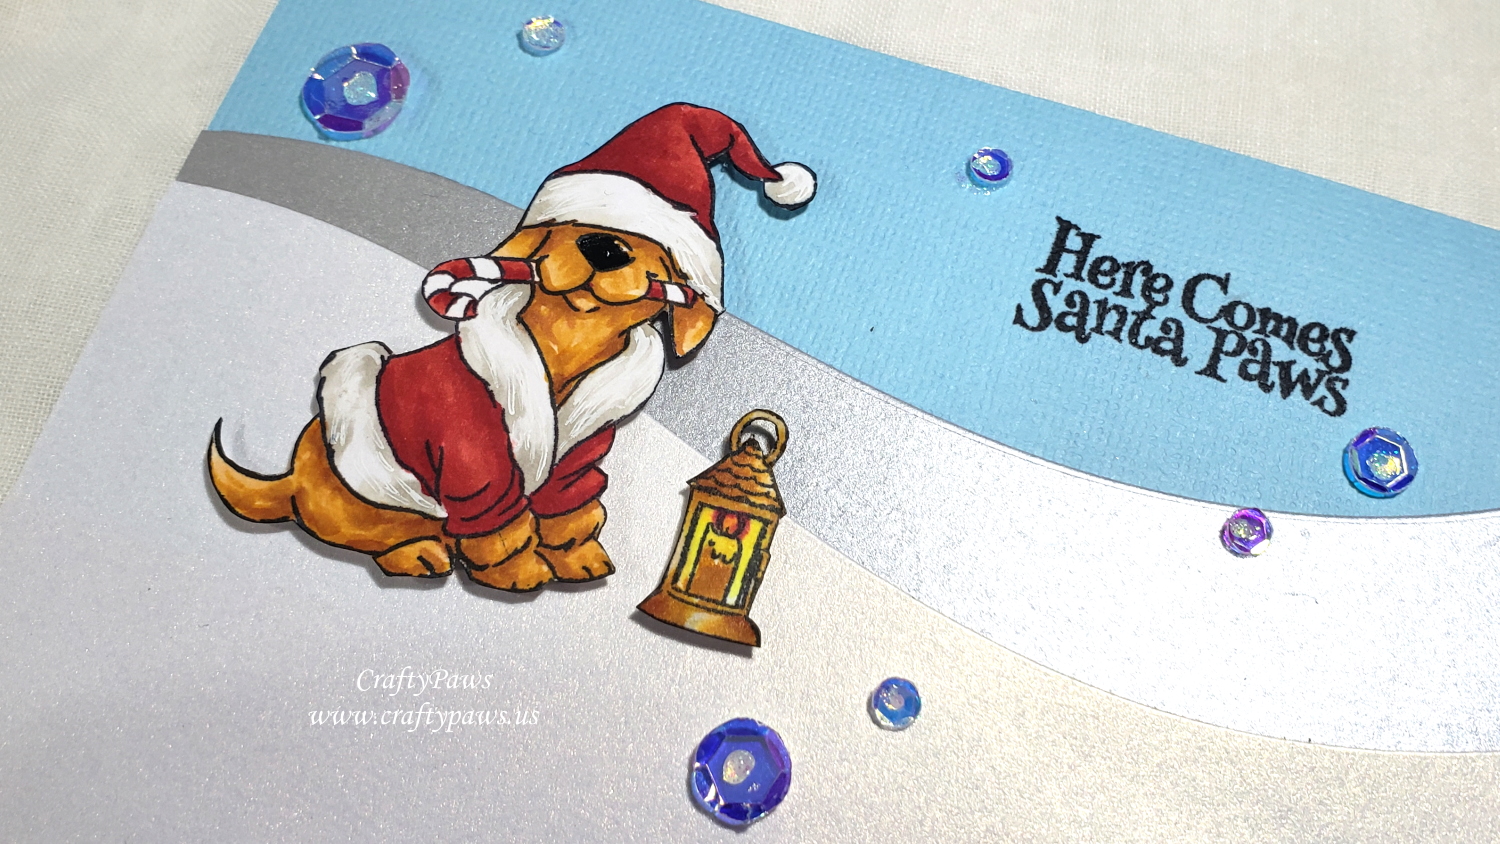
For the background, I used Lawn Fawn Stitched Hillside Dies and some scrap card stock in pale blue, silver and shimmery white. I used the “Here Comes Santa Paws” sentiment from the same Art Impressions “Santa Paws” Stamp Set. To add extra sparkle and shine, I added 7 iridescent sequins with glitter glue.
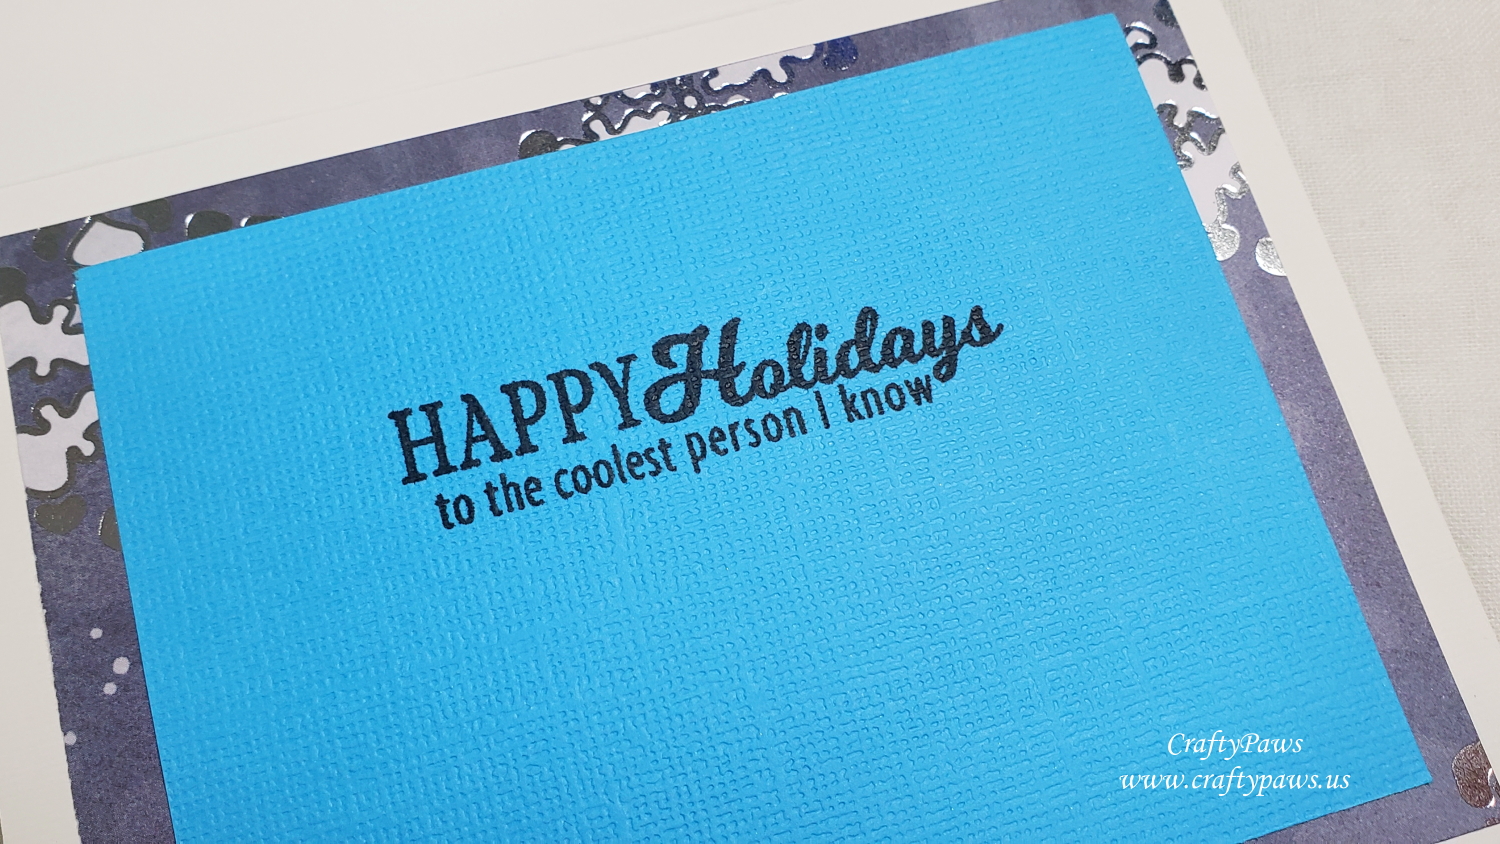
For the inside liner, I used some scrap foiled silver and blue snowflake patterned paper scraps from my scrap box. Then for the inside sentiment and note writing space, I cut a smaller bright blue card stock, and stamped the “Happy Holidays to the coolest person I know” stamp from the Sugar Pea Designs “Eskimo Kisses” stamp set.
CLICK on the following picture to watch the crafting process video:
Disclosure: Many of the supplies I’ve used for today’s project are linked. Some may be affiliate links, which means if you make a purchase I receive a small commission at no extra cost to you. I truly appreciate your support toward the costs of running this blog!
This card is being entered into the following challenges:
Simon Says Stamp Monday Celebrate Challenge
Simon Says Stamp Wednesday Sparkle and Shine Challenge
Creatalicious Anything Goes with Optional Christmas Challenge
Word Art Wednesday Anything Goes Challenge
Crafts Galore Encore Anything Goes Challenge
Crafty Gals Corner Tis the Season Challenge
Lil Patch of Crafty Friends Anything Goes Challenge
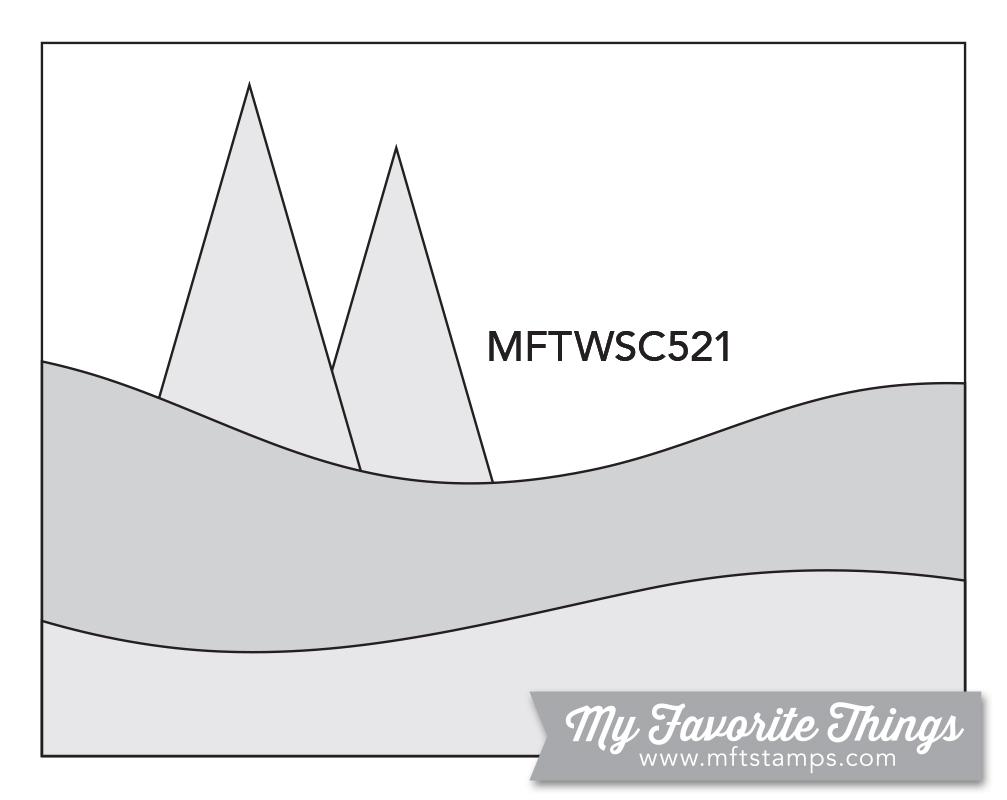
MFT Stamps Sketch Challenge 521
]]>
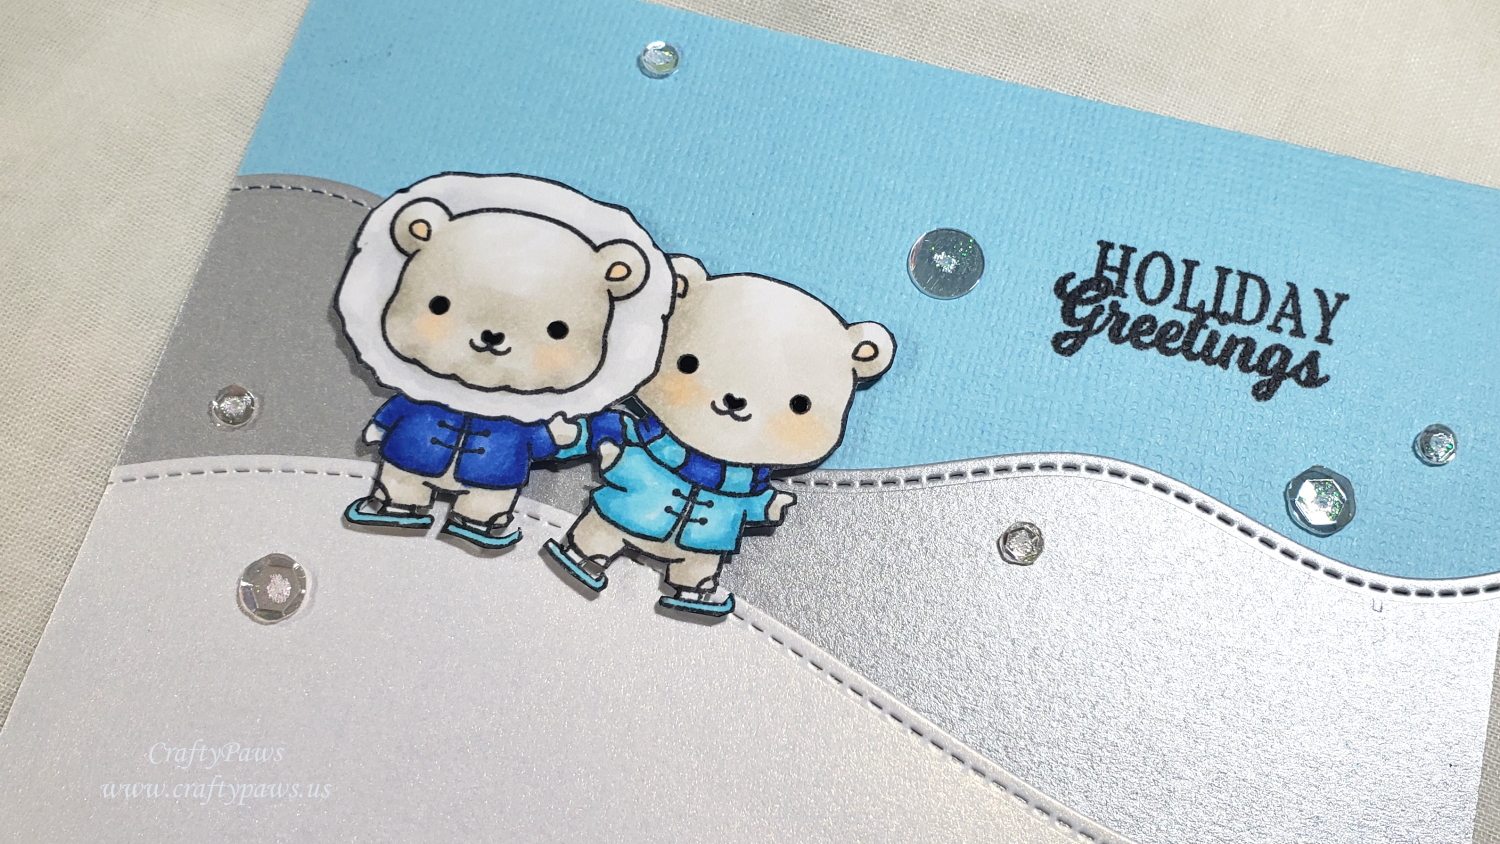
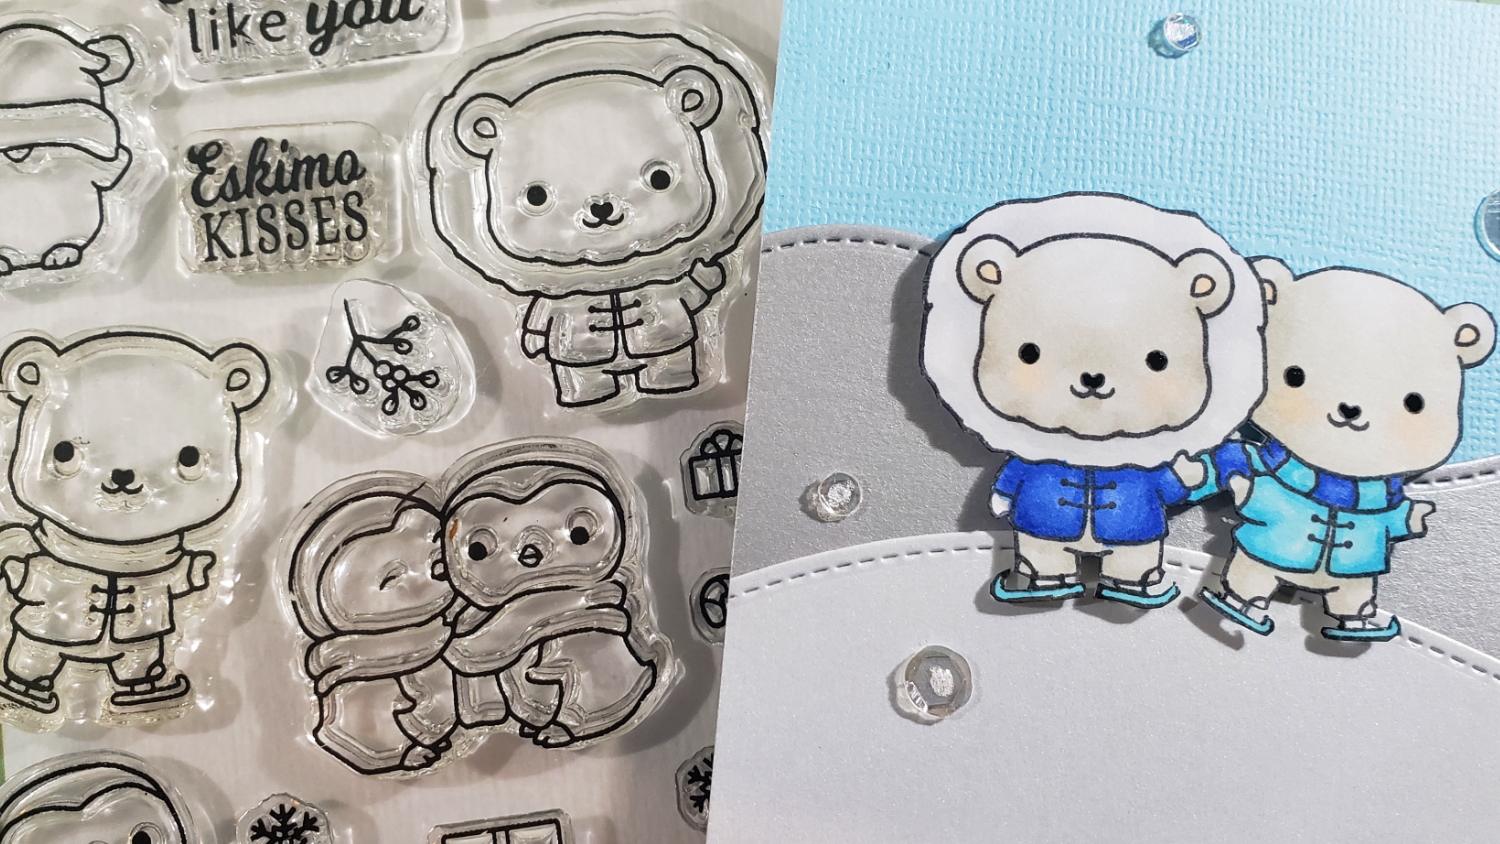
I Copic colored these cuties with just some blues and some warm and whites/greys to keep the scene looking cool:
Bear fur: W0 and W1 with a hint of blush to the cheeks and inside ears with E000
Fur trim on coat: C00 and C0
Dark blue: B24 and B28
Light blue: B00 and B01
I also used a Copic Multiliner Black Pen in 0.05 pt to doodle on skates onto the bear with the coat and stripes onto the scarf of the other bear just to make them coordinate better together. Lastly to add a bit of shine, I used a Sakura Black Glaze Pen on the noses and eyes.
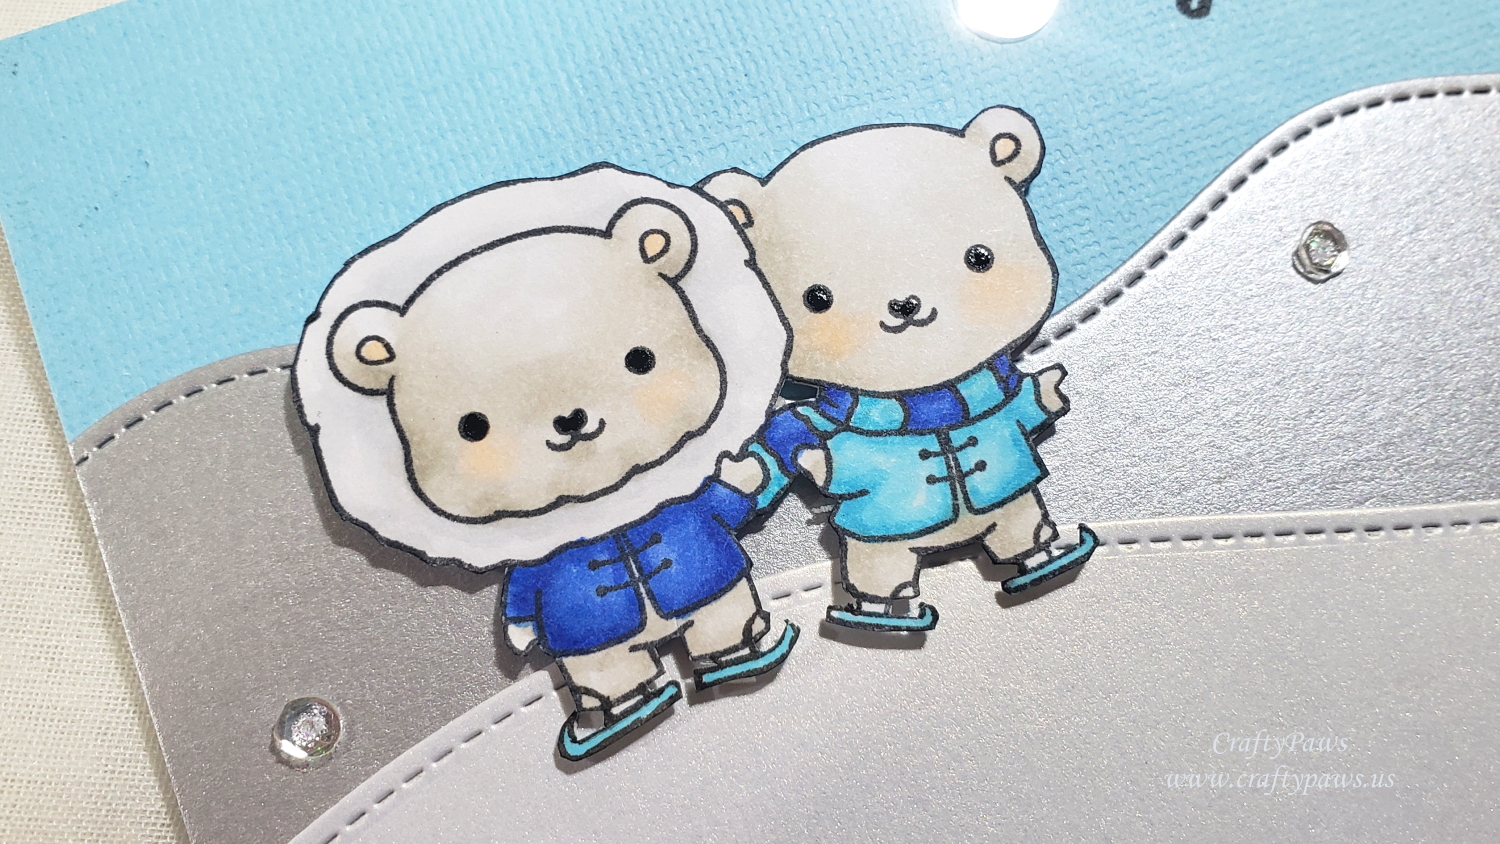
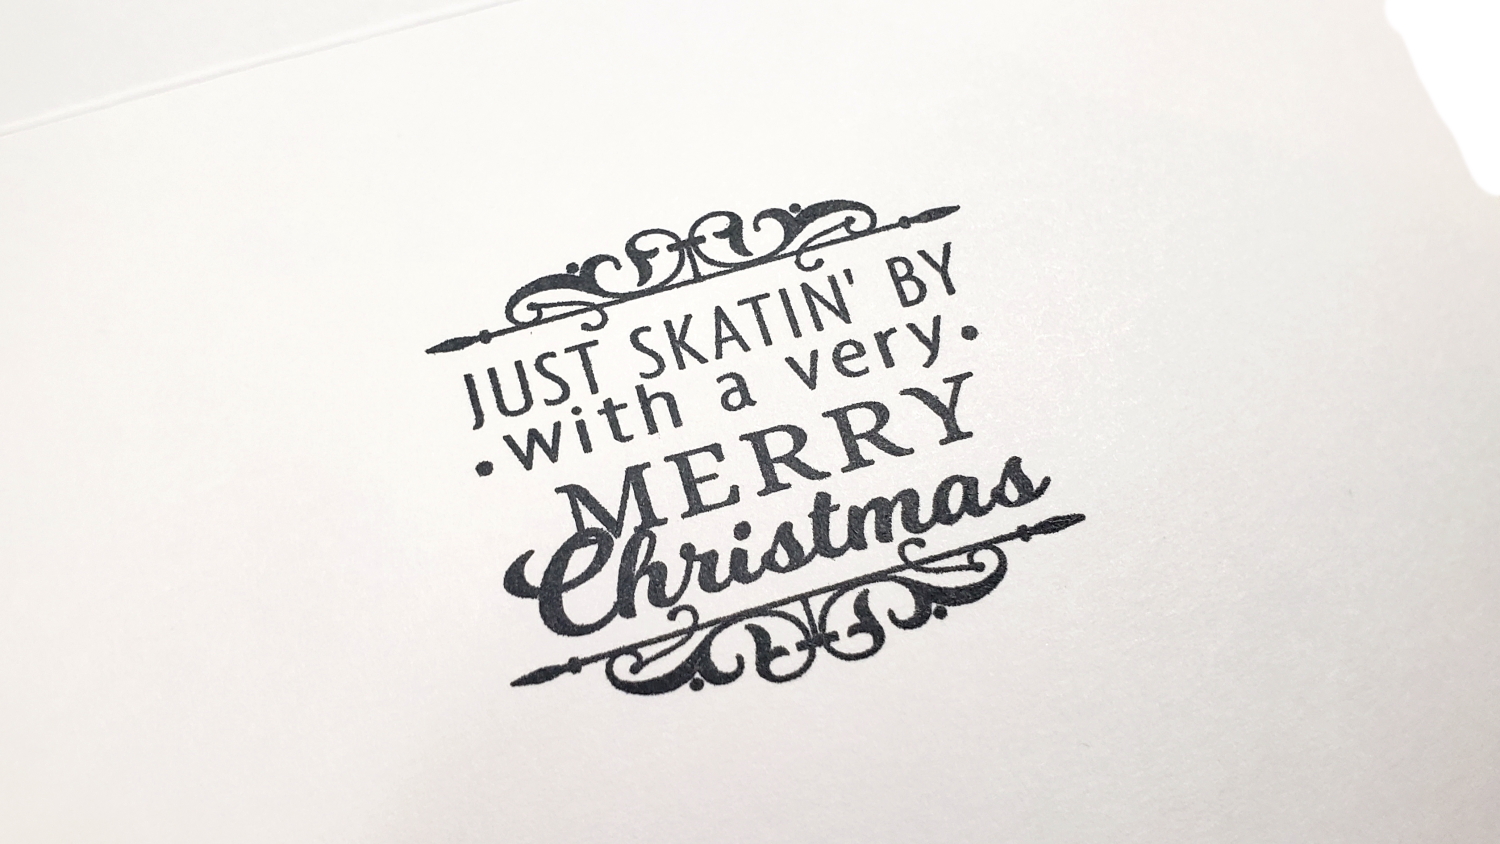
For the “scene” I used some shimmery silver or cool grey and white card stock and die cut “snow banks” with Lawn Fawn Stitched Hillside Dies. The sky is just some scrap pale blue card stock. The sentiment on the front is a simple “Holiday Greetings”, and the inside sentiment is the longer, perfectly coordinated sentiment, “Just Skatin’ By with a Very Merry Christmas”, both from the same Sugar Pea Designs “Eskimo Kisses” stamp set.
For some added sparkle, I added 7 (I love adding embellishments in odd numbers) sequins of different sizes to the card front. I used glitter glue to adhere them, adding even more shine.
CLICK on the following picture to watch the process video:
Disclosure: Many of the supplies I’ve used for today’s project are linked. Some may be affiliate links, which means if you make a purchase I receive a small commission at no extra cost to you. I truly appreciate your support toward the costs of running this blog!
This card is being entered into the following challenges:
MFT Stamps Sketch Challenge 521
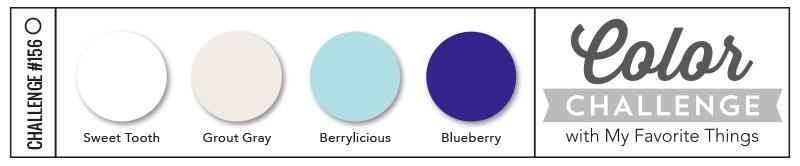
MFT Stamps Color Challenge 156
Simon Says Stamp Monday Celebrate Challenge
Simon Says Stamp Wednesday Sparkle and Shine Challenge
Creatalicious Anything Goes with Optional Christmas Challenge
Word Art Wednesday Anything Goes Challenge
Crafts Galore Encore Anything Goes Challenge
Crafty Gals Corner Tis the Season Challenge
Lil Patch of Crafty Friends Anything Goes Challenge
]]>
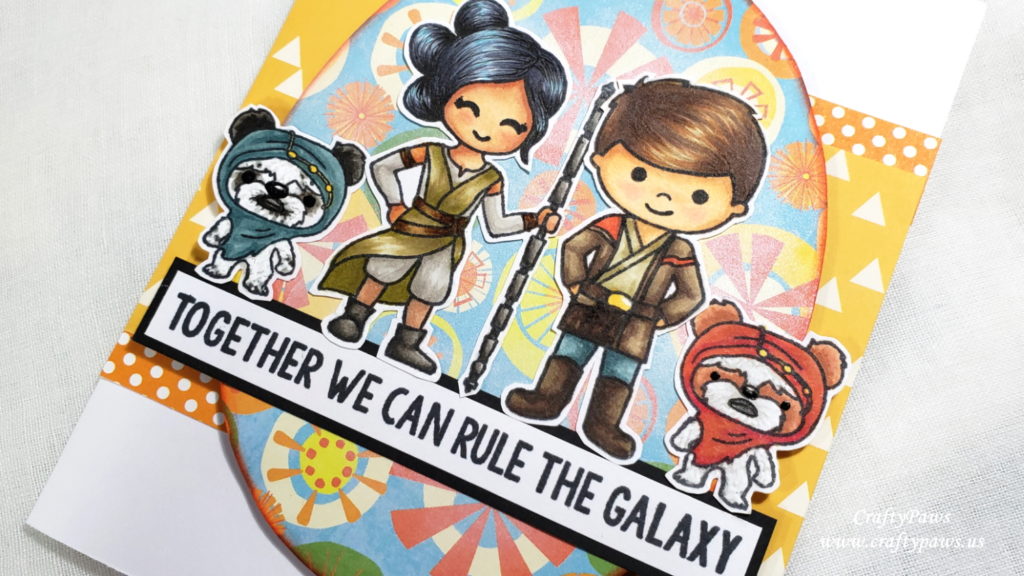
I have always thought that Ewoks looked like fluffy little dogs, like our sweet Havanese, Bandito, so I knew I could use the adorable Ewok image from the Kindred Spirits “Galactic Sequel” stamp set (one of my FAVORITE stamp sets) colored up distinctly with Copic Markers to represent our two pups:
White fur of Ewoks: W0, W1, and Uniball Signo White Gel Pen
Gold hood beading: Y35
Brown spots: E11, E13 and E15
Black and grey spots: W3, W4, W5, W7 and W9
Reddish brown hood: R22, R05, R29 and E55
Blue grey hood: BG72, BG75 and BG78
I also added a bit of shine and slight dimension by using a Sakura Black Glaze Pen for the noses and eyes, making Babaloo’s larger than Bandito’s like in real life.
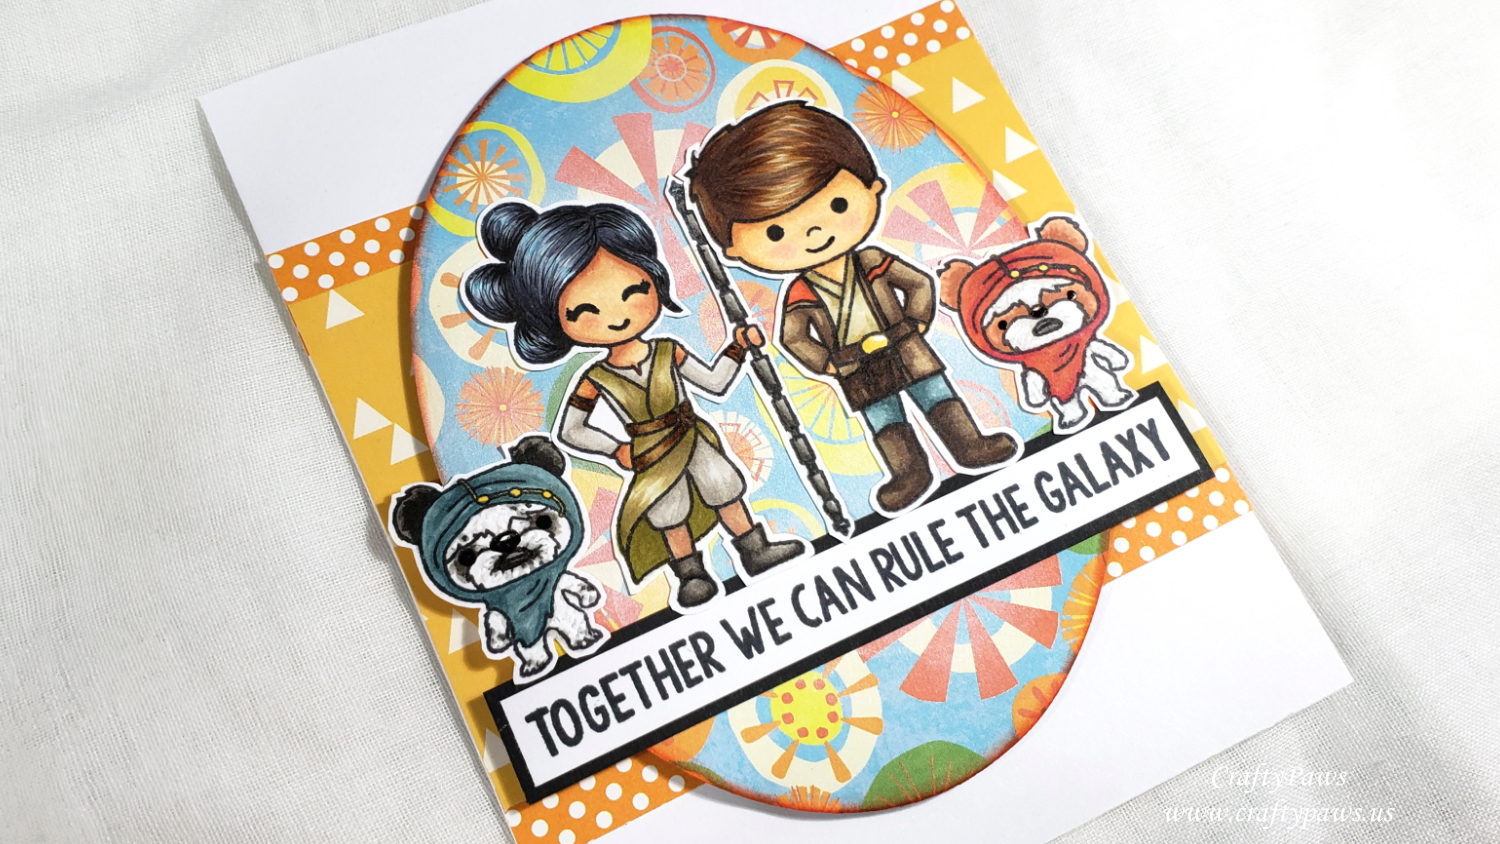
I decided to color up the Star Wars episodes VII, VIII and IX character Rey (also from the “Galactic Sequel” stamp set – RETIRED) as me. I altered the Luke stamp from the Kindred Spirits “Galactic Adventures” stamp set (also a favorite, but sadly also RETIRED) by doodling on Finn’s jacket and holster with a 0.1 pt Copic Multiliner Pen and colored him up as Mr. CraftyPaws:
Rey’s hair: B00, C5 and C7 with fine hair detail additions with a 0.05 pt Copic Multiliner Pen
Rey’s skin: E21, E11, E13 and R20 for blush
Rey’s arm wraps, shirt, and pantaloons: E42 and E43
Rey’s wrap dress: E81, E84 and YG95
Rey’s leather belts and wrist and arm wraps: E55 and E57
Rey’s boots and staff: W1, W4, W5 and W7
Finn’s Hair: E55, E57 and E49
Finn’s skin: E50, E51, E53 and R20 for blush
Finn’s pants: BG72, BG75 and BG78
Finn’s jacket: E43, E44 and E47 and R05 for red accents
Finn’s boots and gun holster: E44, E47 and E49
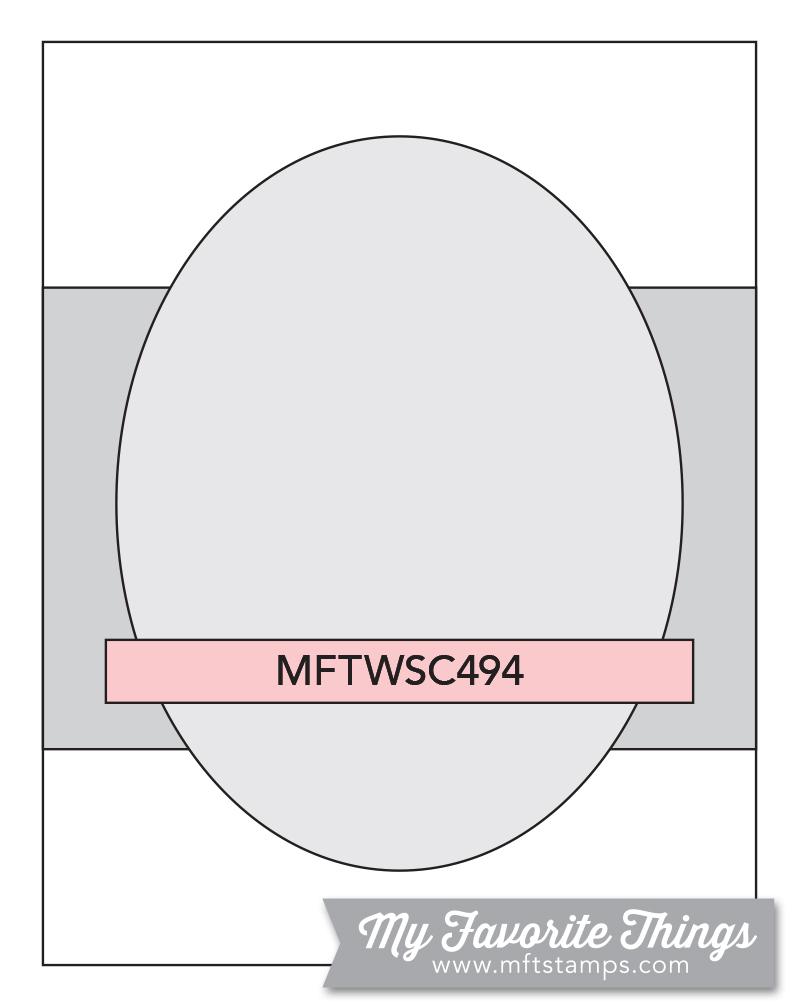
I fussy cut out the bunch with my favorite Spring Loaded Reverse Scissors by Fiskars, which was really helpful since my arthritis has been acting up recently. I intentionally left a bit of white edging around the images so that they would stand out from the busy background papers. For the background design, I followed a sketch from the current MFT Sketch Challenge (see below), using up a bunch of scrap patterned papers from my scrap box. I added a horizontal band with golden yellow paper with triangles on it, and added orange polka dot top and bottom borders. I topped the band with an oval die cut (this is the 4th largest die from the Diemond Dies Nesting Ovals Die Set) from some funky colorful burst patterned paper, which I popped up on fun foam (for added dimension) and muted by dabbing on Tsukineko Brilliance Moonlight White Pigment Ink behind where the images would be. I inked the edges of the oval with some Tim Holtz Distress Ink in Ripe Persimmon to form a crisp edge and coordinate with the orange of the polka dot paper and reddish brown Ewok hood.
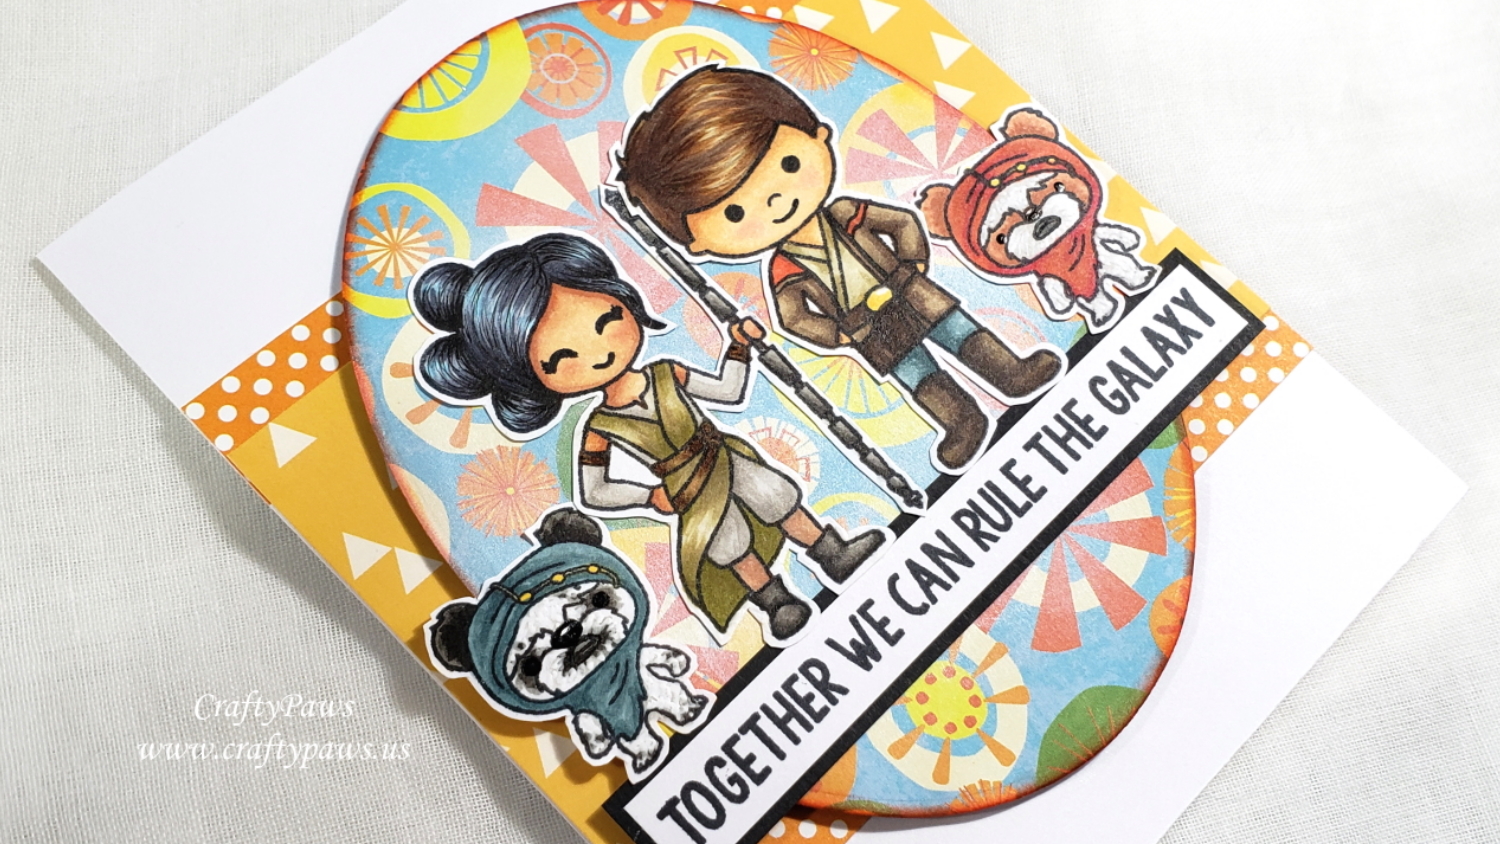
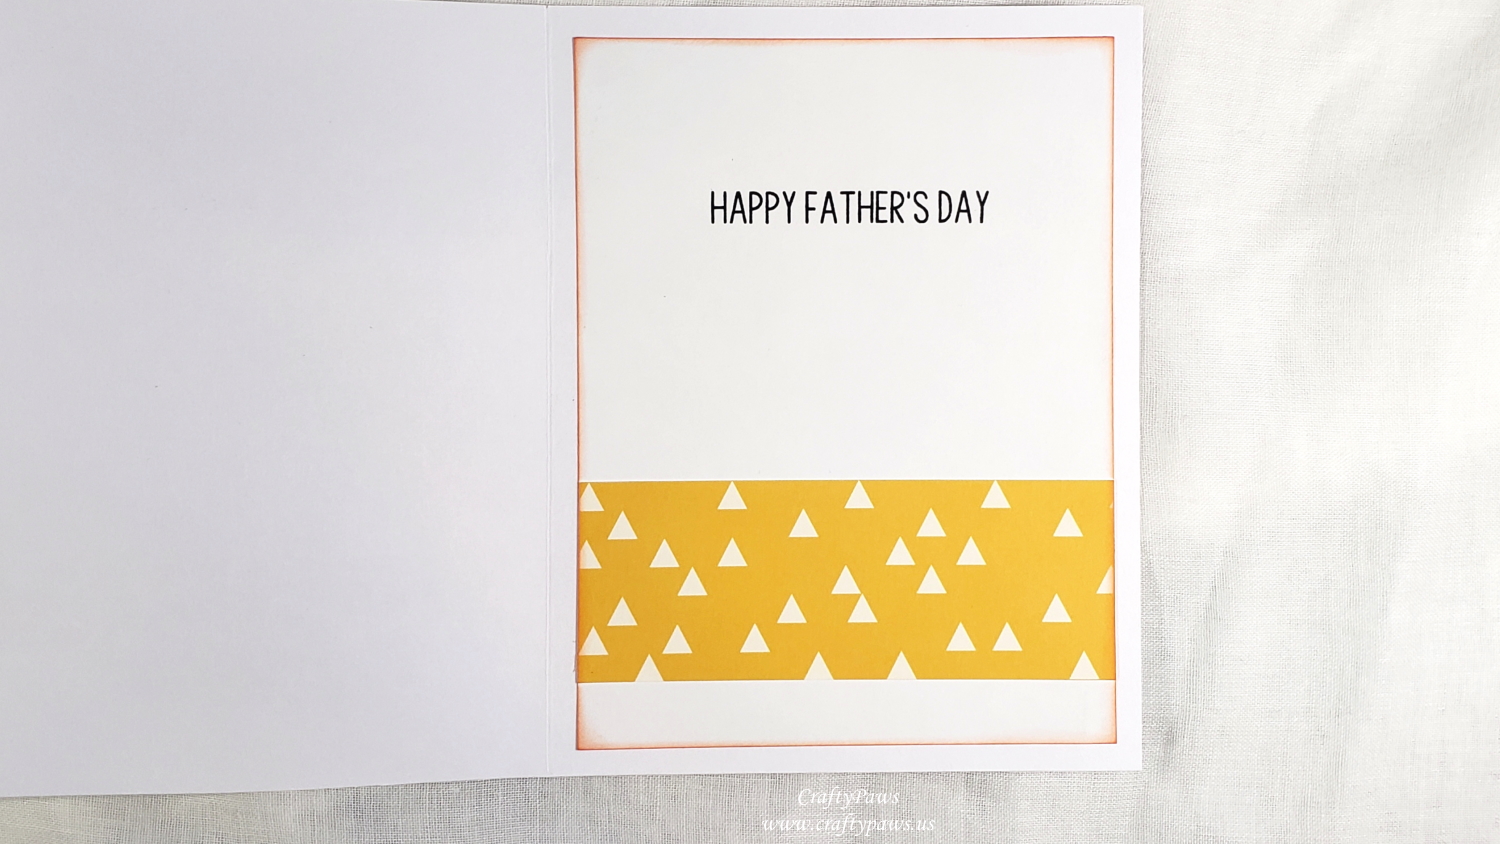
For the sentiment, I stamped out the “Together we can rule the galaxy” sentiment from the “Galactic Sequel” stamp set and matted it with some black card stock. For the inside liner, I stamped out “Happy Father’s Day” from the “Galactic Adventures” stamp set and just used a strip of the golden triangle paper in the lower 1/3 to add a bit of interest. I inked the edges of the liner with more Tim Holtz Distress Ink in Ripe Persimmon to add the touch of orange and mimic the inking of the oval on the card front.
CLICK the following picture to watch a Copic coloring and card share video:
Note: My readers can get 10% off and free worldwide shipping on all orders of $35 or more at DiemondDies.com if they use the code thankskristina at checkout.
Disclosure: Many of the supplies I’ve used for today’s project are linked. Some may be affiliate links, which means if you make a purchase I receive a small commission at no extra cost to you. I truly appreciate your support toward the costs of running this blog!
This card is being entered into the following challenges:
Word Art Wednesday Anything Goes Challenge
Through the Craft Room Door Anything Goes Challenge
Penny Black and More Favorite Stamps Challenge
Crafty Gals Corner You’re the Man Challenge
Stamping Sensations Make It Colorful Challenge
Creatalicious Anything Goes with Optional No Design Paper Challenge
]]>
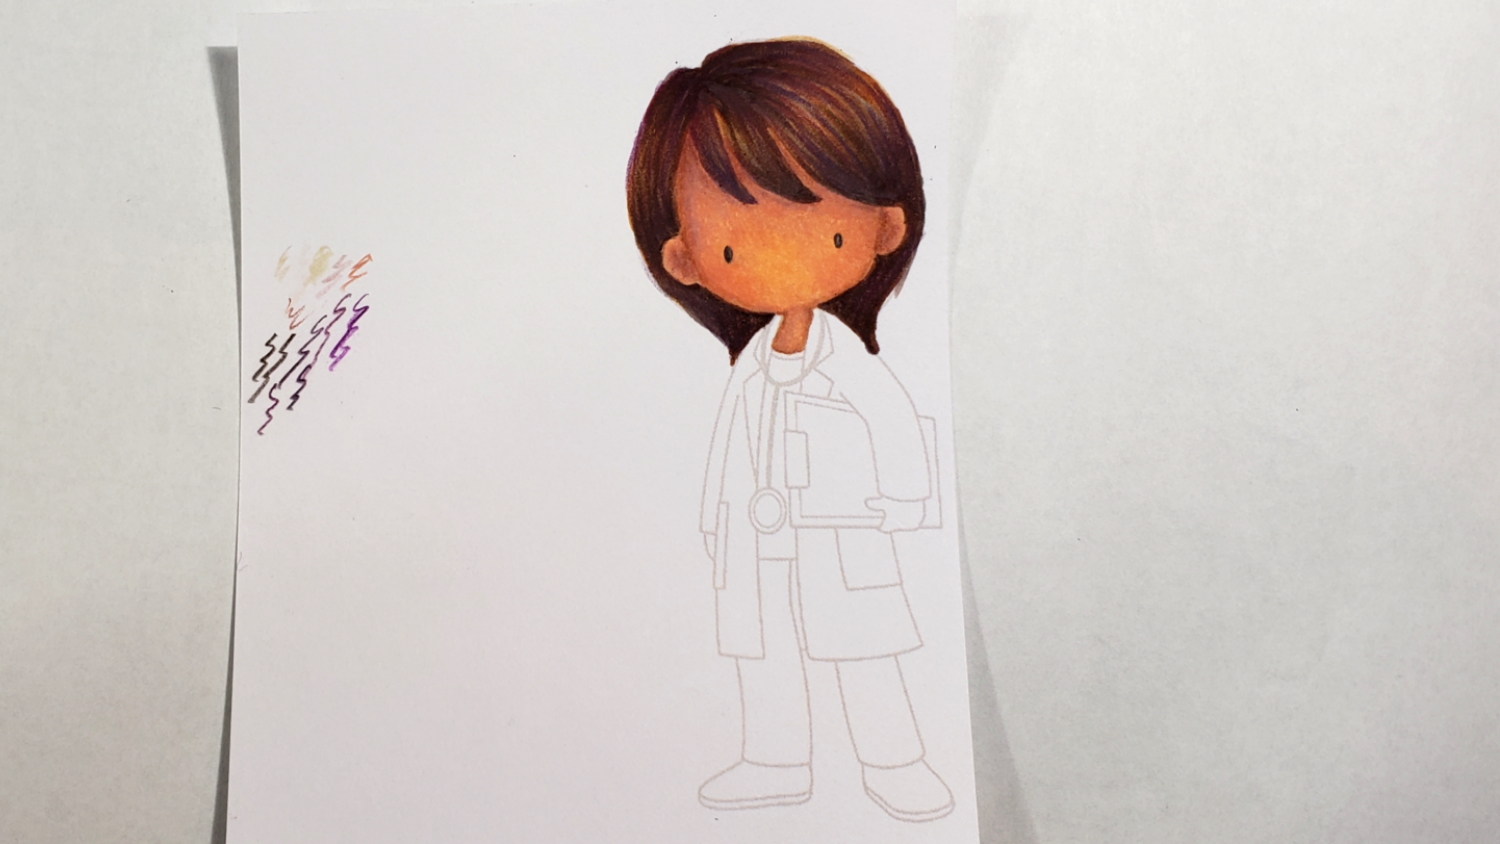
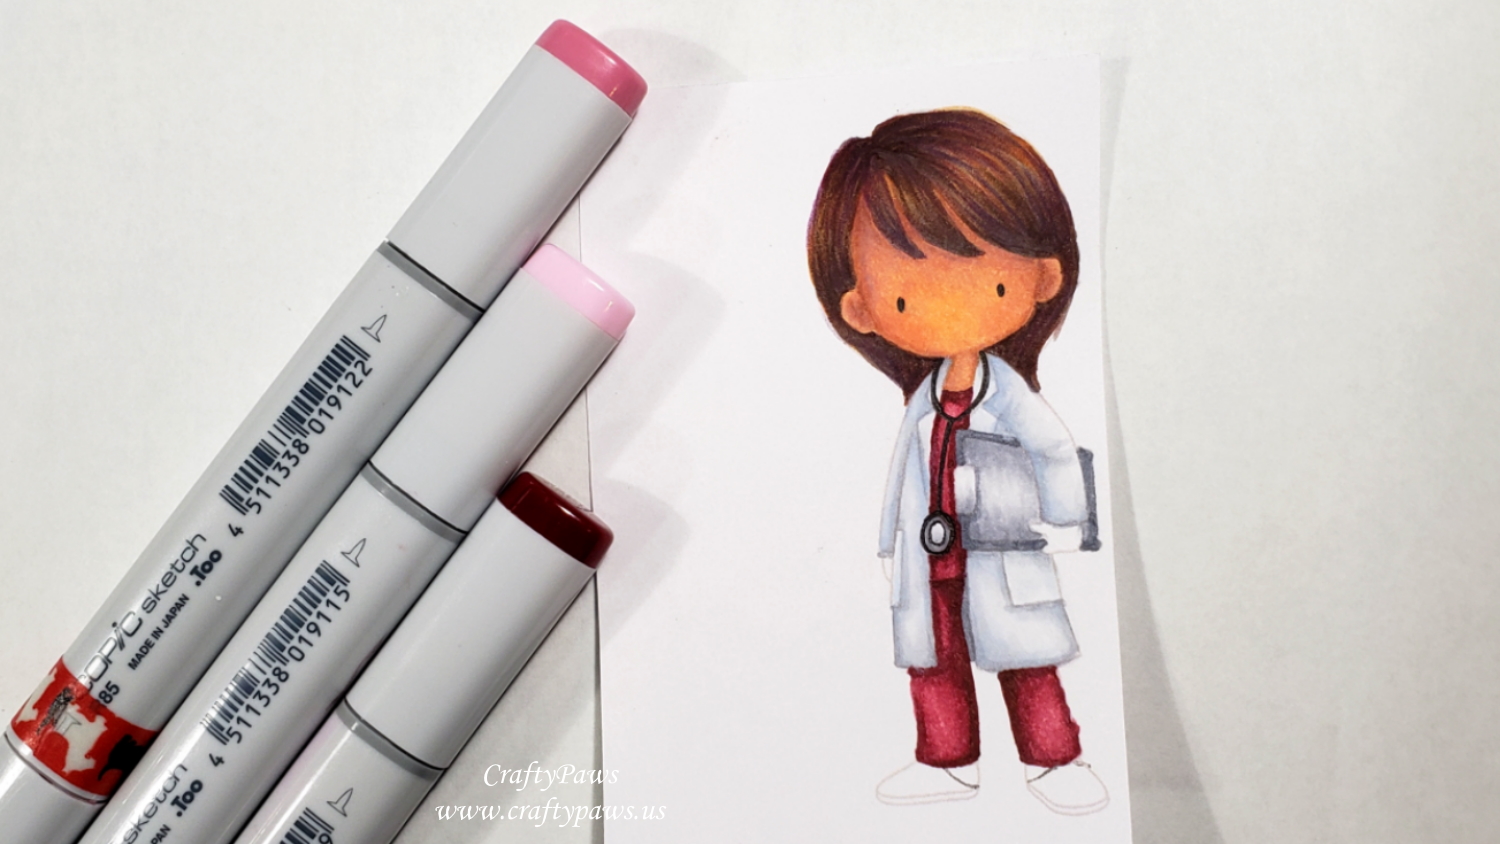
Then I had a ball coloring up the doctor called “Doctor’s Orders” with Copic Markers and Prismacolor Colored Pencils:
Skin: E01, E11, E13, R20 and Prismacolor Nectar (1092), Rosy Beige (1019), Chestnut (1081)
Dark Brown Hair: E33, E74, E29 and Prismacolor Black Cherry (1078), BLACK Grape (996), Dark Brown (947)
Lab coat: C00, C1, C3 and Prismacolor White (938), Powder Blue (1087) and Sky Blue Light (1086)
Clip Board, Stethescope and Socks: C00, C1, C2 and C4
Clogs (doodled in with a Warm Grey 0.3 pt Copic Multiliner Pen) and Gloves: B0000, B00, B02 with Prismacolor True Blue (903)
Scrubs: R81, R85 and R59
Eyes and Stethoscope doodled back in with a Black 0.05 Copic Multiliner Pen
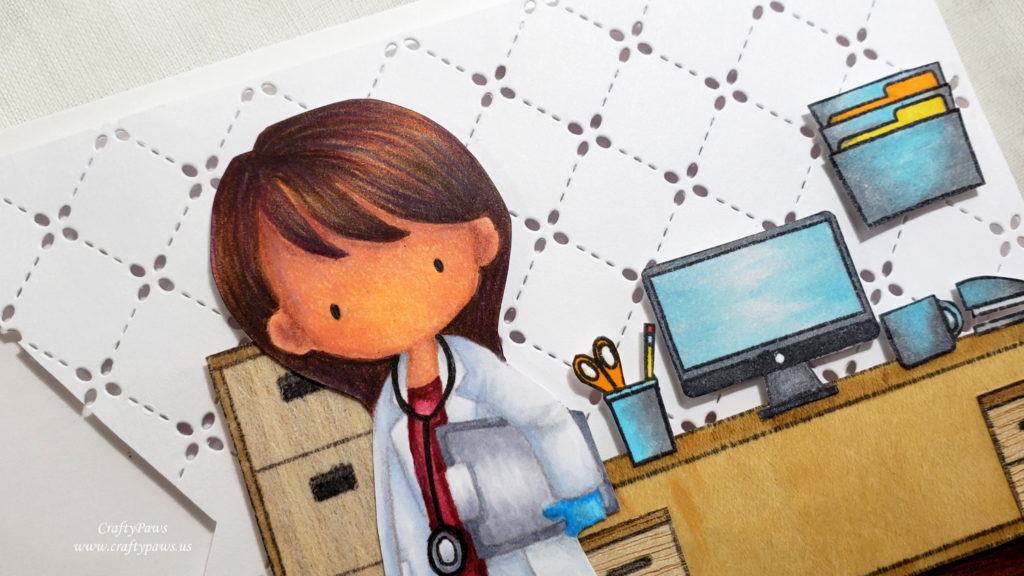
I have an awesome scene building stamp set from Three Room Studio called, “Cubiculture” so I decided to build a doctor’s office scene card. I stamped out the office furniture onto scraps of real oak and maple Wood Veneer Sheets from EK Tools. I also colored in the trim and handles of those furniture pieces with E43, N5 and N7 Copic Markers. I also stamped out the pencil holder with scissors and pencil, computer monitor, file holder, cut and stapler and used bright rainbow colors (to bring a sense of cheer and hopefulness) but with a blue-grey base (for a sense of reality): R27 (pencil eraser), Y15 (file and pencil), YR16 (scissors and file) and N0, N1, N3, N5 and N7 for all the other desk accessories. After fussy cutting out each of the pieces with my EK Tool Cutterbee Scissors (these super sharp scissors are great for details and getting through rougher materials like these wood veneer sheets), I built the scene with Art Glitter Glue and foam dot adhesives.
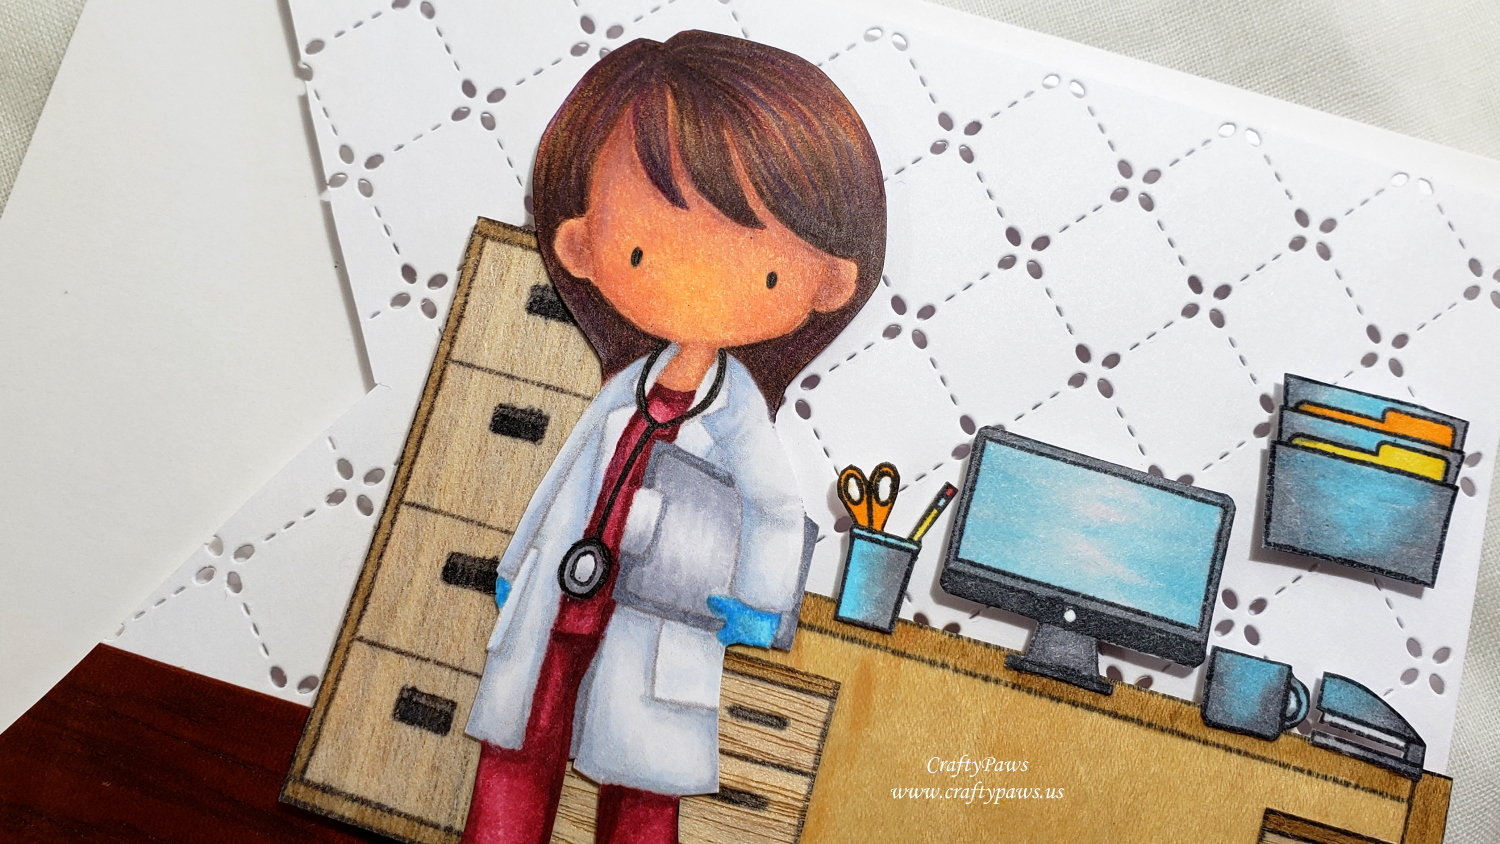
I assembled the whole scene on a white cardstock background that I die cut using the Lawn Fawn Quilted Backdrop Die for some fun dotty texture. I also laid down a mahogany wood veneer sheet to create a flooring. Because the doctor’s hair was a rich dark brown color with red undertones and the scrubs the doctor was wearing was a deep cardinal color, this flooring seemed to coordinate beautifully! I hand cut this background into a large pennant shape and mounted it with more foam dots onto a heavy weight white card base to add a bit of interest without distracting from the scene.
CLICK on the following picture to watch the card crafting video:
Disclosure: Many of the supplies I’ve used for today’s project are linked. Some may be affiliate links, which means if you make a purchase I receive a small commission at no extra cost to you. I truly appreciate your support toward the costs of running this blog!
This card is being entered into the following challenges:
Digi Chooseday Anything Goes Challenge
Stamping Sensations Somewhere Over the Rainbow Challenge
Simon Says Stamp Monday Create a Scene Challenge
Simon Says Stamp Wednesday Knock on Wood Challenge
Lil Patch of Crafty Friends Anything Goes Challenge
Creatalicious Anything Goes Challenge with Optional Marbled Background
Through the Craft Room Door Anything Goes Challenge
]]>
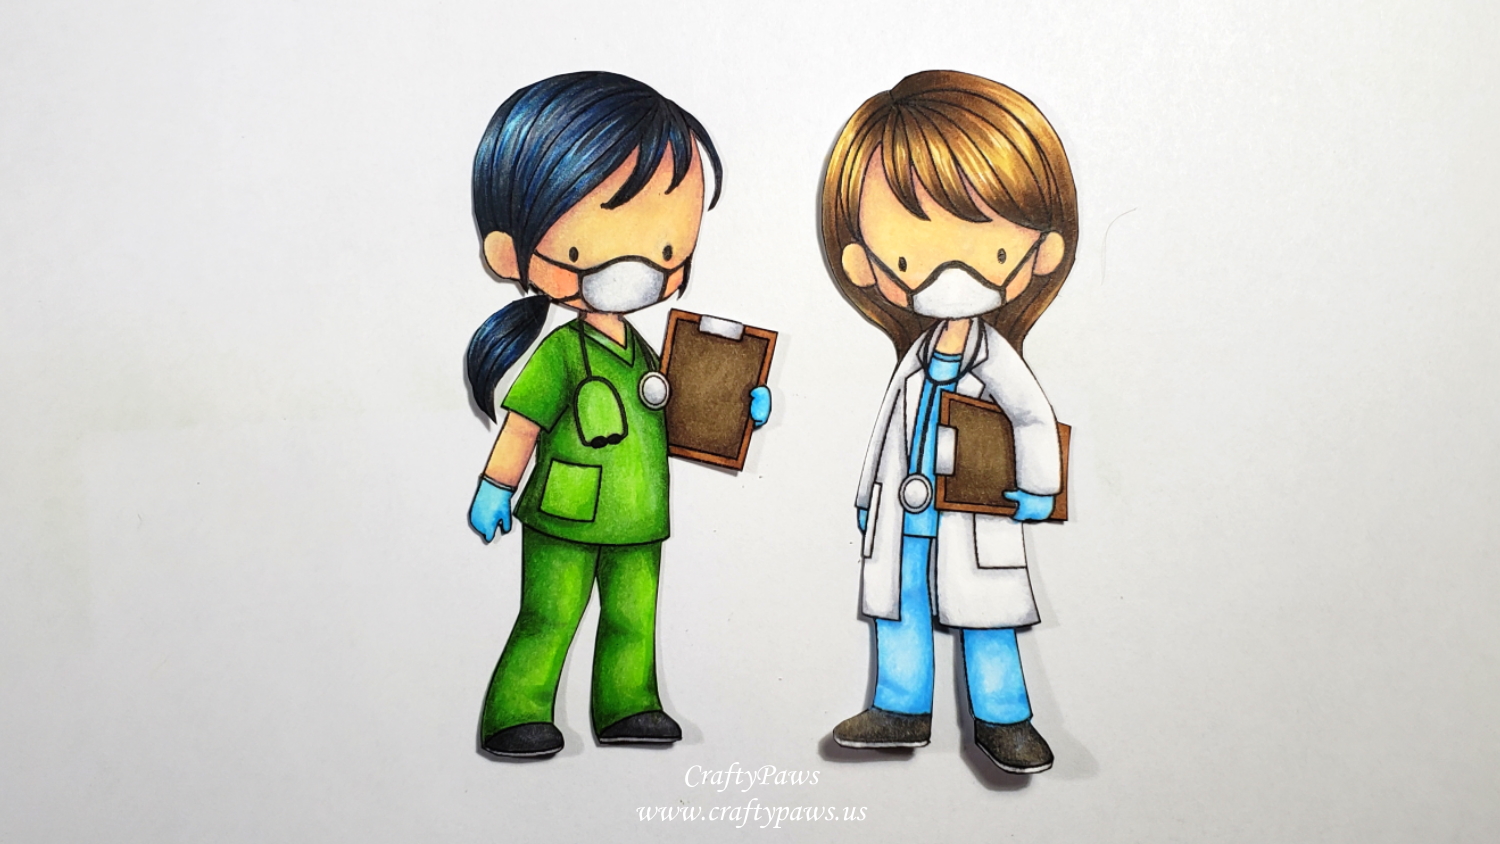
To highlight the Personal Protection Equipment (PPE) that our EVERYDAY ESSENTIAL HEROES sorely need, I downloaded the digis and then converted them to jpg using a screen grab. I erased the noses and mouths using paint.net. Then I was able to doodle on face masks and gloves using a 0.05 pt black Copic Multiliner Pen.

I colored the female nurse with my Copics, and then I had some fun add more vibrancy and detail with Prismacolor Premium Colored Pencils:
Wood Clipboard and Stethoscope: C00, C0 and C3 (for metal parts) and E23, E57 and E44 (for HIPPA compliant (no patient information visible on wooden clipboards)
Skin: E50, E51, E01, R20 (blush) with Prismacolor Beige (997); Light Peach (927); Shell Pink (1093); Ruby Beige (1019)l and Clay Rose (1017)
Shoes: N5 and N7 with C3 for soles
Blue Gloves: B0000, B01, B02, and B04 with Prismacolor Sky Blue Light (1086) and Non-Photo Blue (919)
Black Hair: B01, C4, C6 and C8 with Prismacolor Indigo Blue (901) and 99% Cool Grey (1067)
Green Scrubs: B12, G14 and G46 with Prismacolor Spring Green (913), Apple Green (912 and Kelp Green (1090)
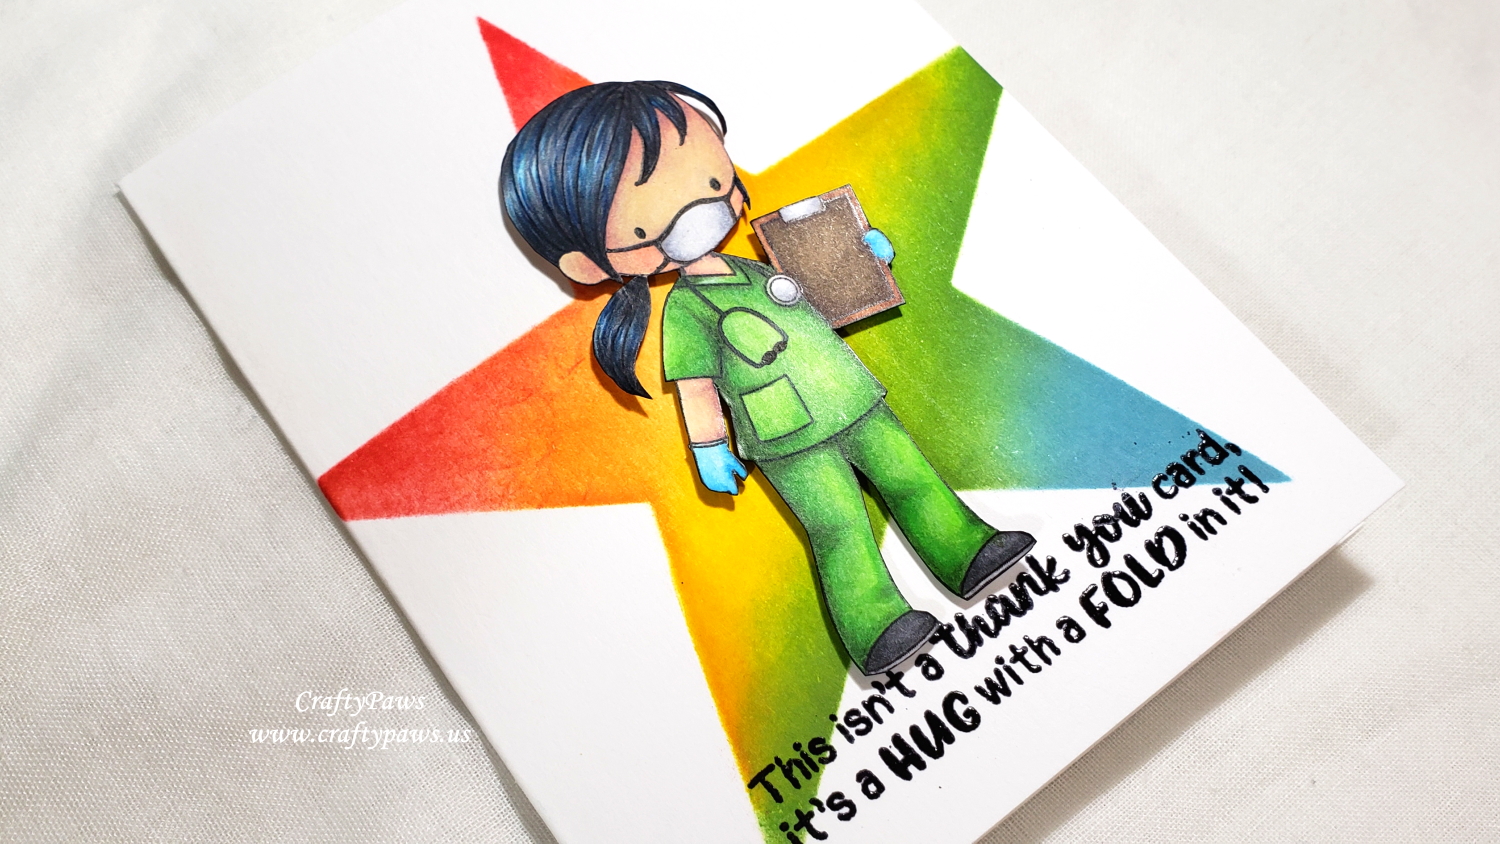
I then fussy cut the nurse with my Fiskars Reverse Spring Loaded Scissors and inked the edges with a Memento Tuxedo Black Marker for a clean finished look. To add some dimension, I also popped her up on double sided foam adhesive.
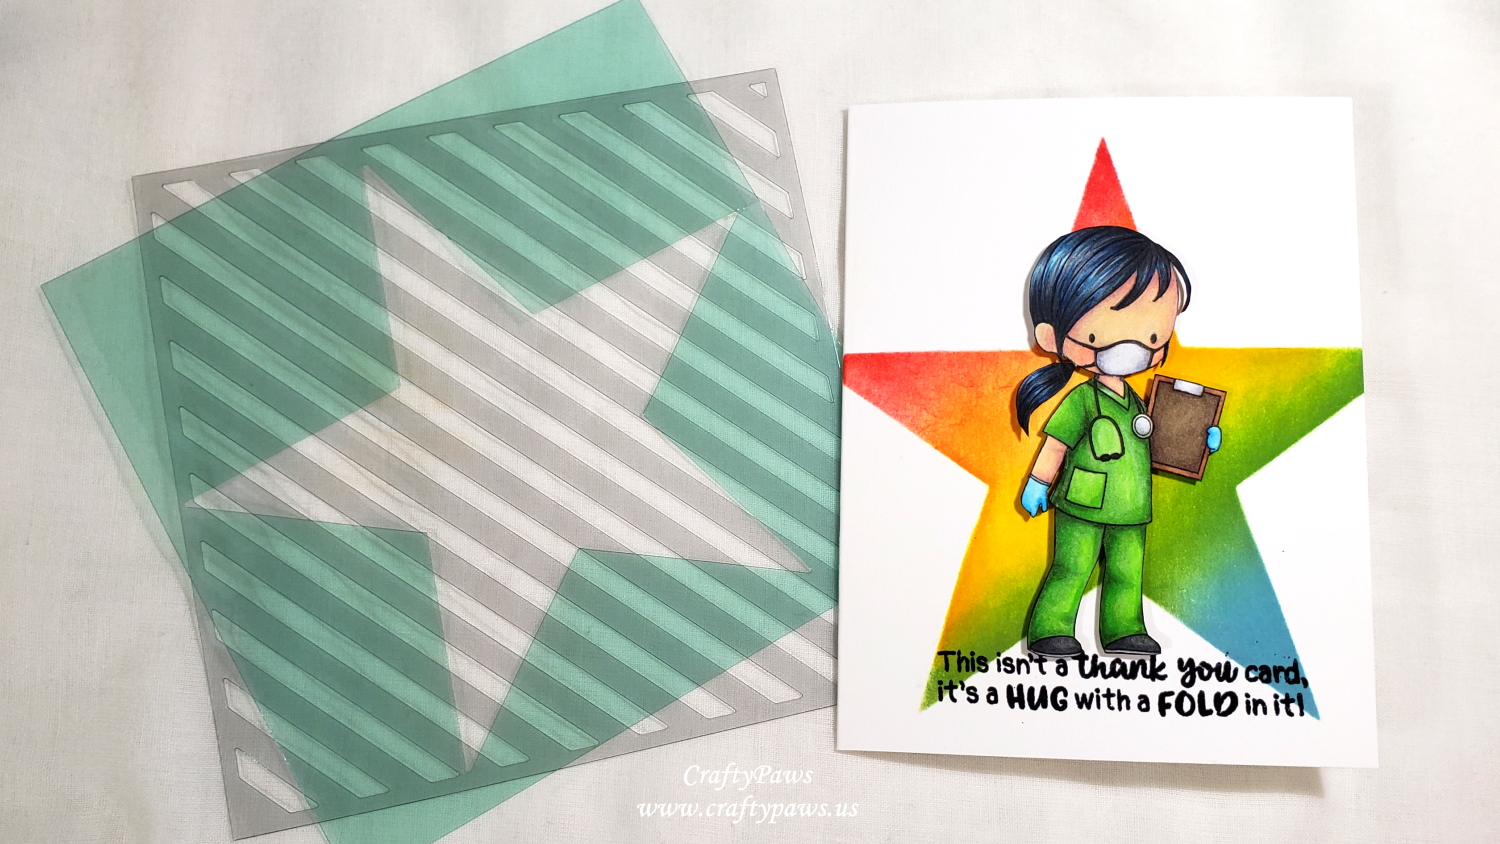
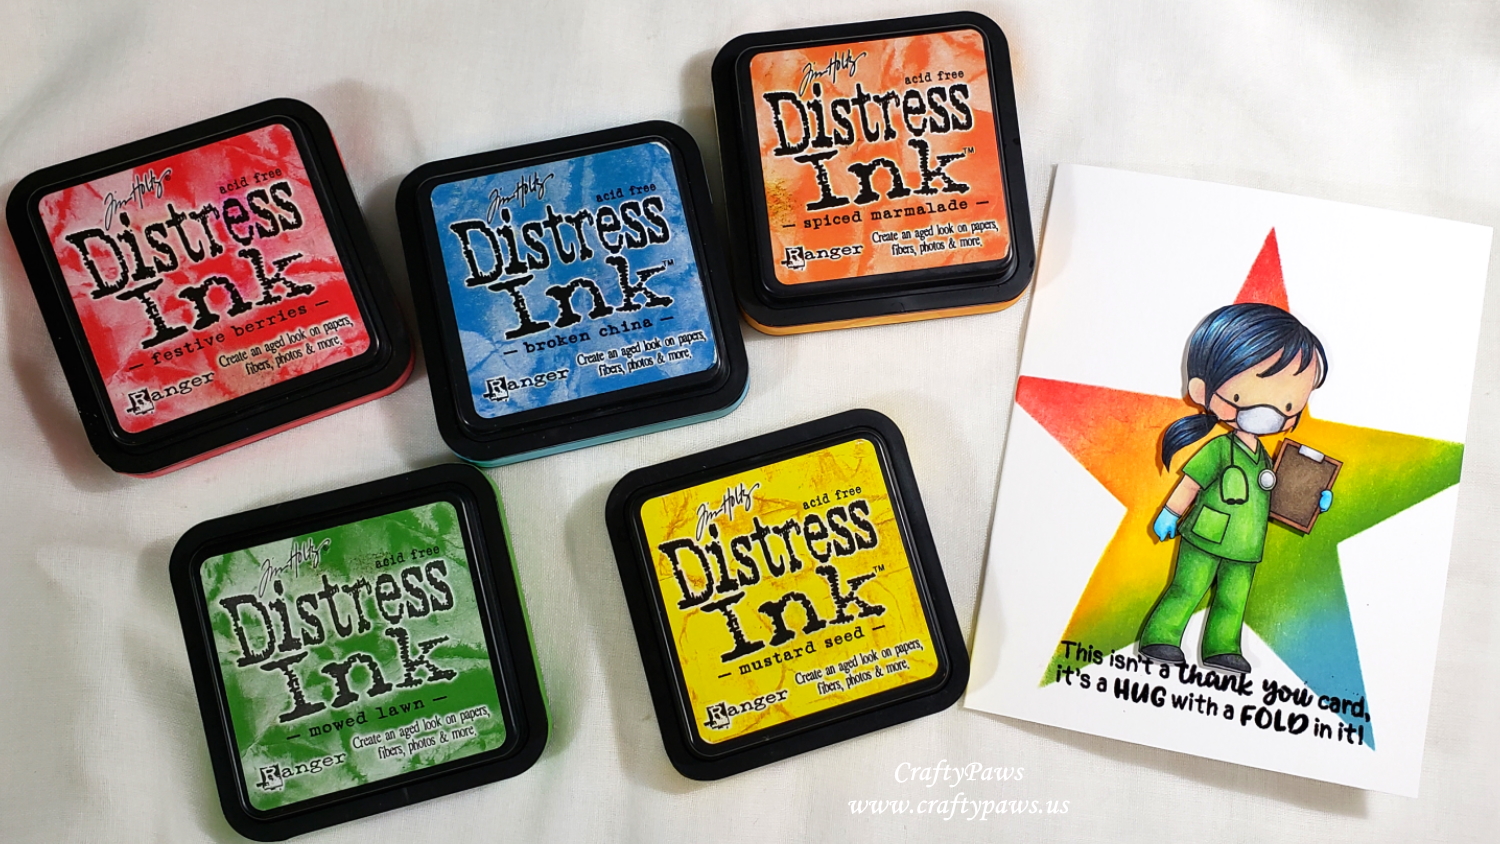
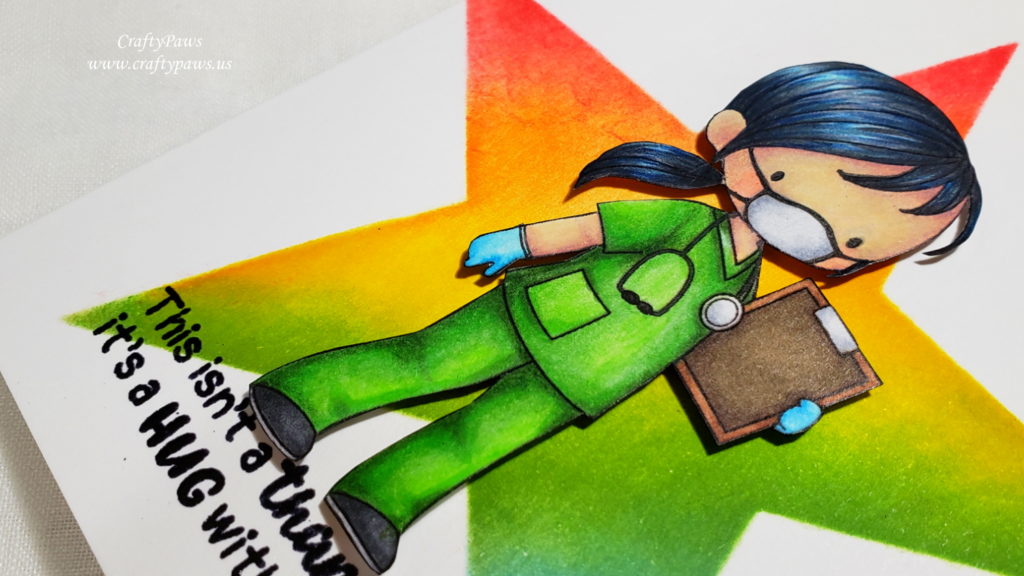
For a sharp CAS background, I used an old Heidi Swapp Star Stencil (retired) and blended on a rainbow of spring Tim Holtz Distress Inks in Festive Berries, Spiced Marmalade, Mustard Seed, Mowed Lawn (which seems to match the green scrubs perfectly) and Broken China. I thought the star could reference how I believe all these medical personnel are super stars for continuing their courageous work to help all of us right now.
To keep the nurse looking like she is just floating, I also decided to give her a sentiment to “stand on”. I used the “This isn’t a thank you card, it’s a HUG with a FOLD in it!” sentiment from the Newton’s Nook Designs “Thankful Thoughts” stamp set. To add a bit of shine and subtle dimension, I stamped the sentiment out with VersaMark Ink and heat embossed it with Black Ranger Embossing Powder.
I love how it all came out! I hope the nurse who receives the card can feel the love and appreciation with which it was made. CLICK on the following picture to watch the process video:
Disclosure: Many of the supplies I’ve used for today’s project are linked. Some may be affiliate links, which means if you make a purchase I receive a small commission at no extra cost to you. I truly appreciate your support toward the costs of running this blog!
This thank you card for an everyday heroine doctor is being entered into the following challenges:
Simon Says Stamp Monday E Challenge – Everyday Essential hero and embossing
Penny Black and More Anything Goes Challenge
Lil Patch of Crafty Friends Anything Goes Challenge
Creatalicious Anything Goes with Optional Marble Background Challenge
Word Art Wednesday Anything Goes Challenge
Through the Craft Room Door Anything Goes Challenge – WINNER
Crafts Galore Encore Anything Goes Challenge
Stamping Sensations Somewhere Over the Rainbow Challenge
Simon Says Stamp Wednesday Knock on Wood Challenge – HIPPA compliant wood clipboard 😁
]]>
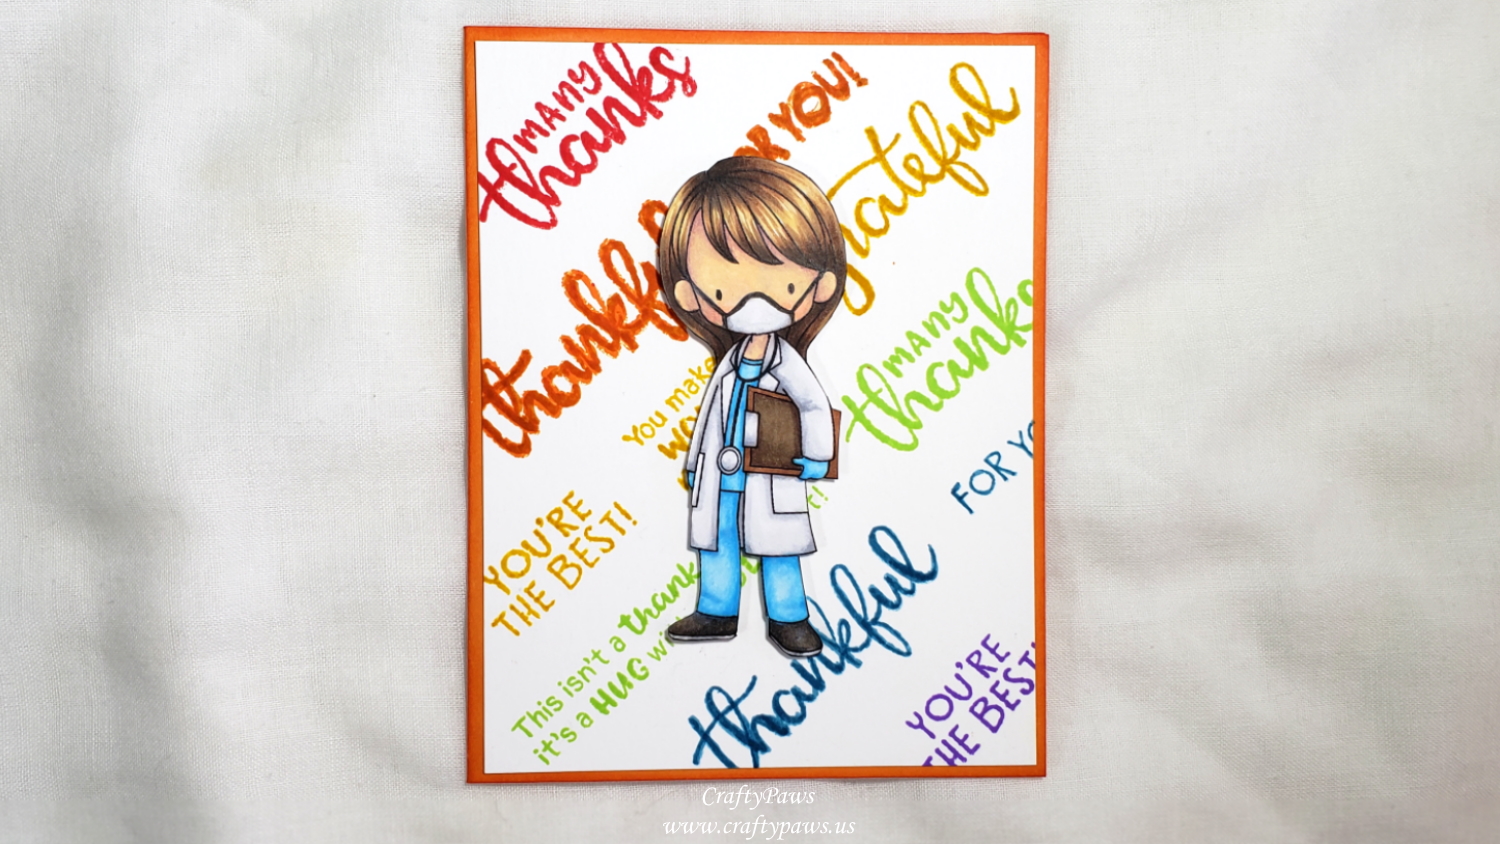
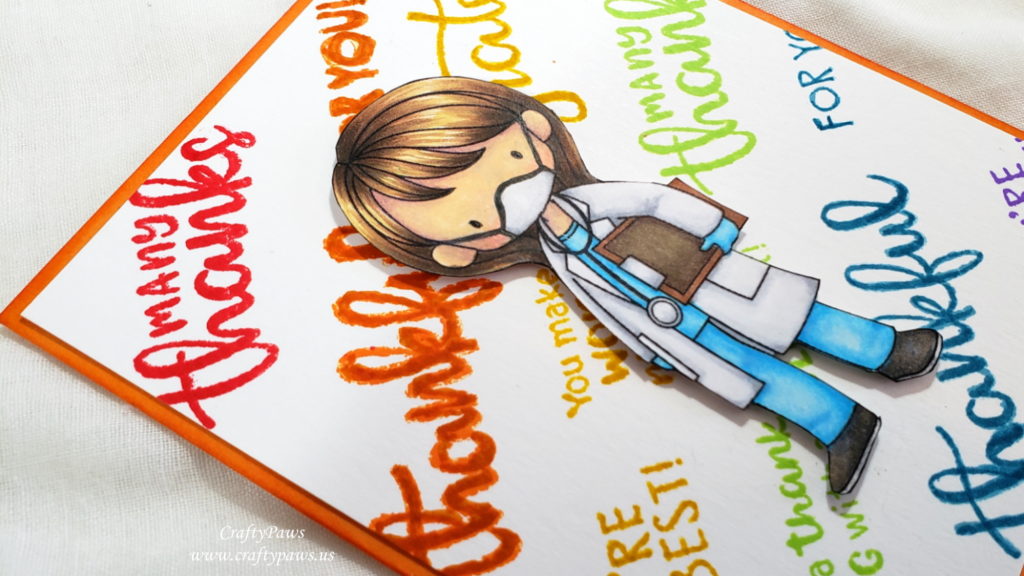
Because I wanted to emphasize the Personal Protection Equipment (PPE) that our EVERYDAY ESSENTIAL WORKER HEROES are sorely in need of, I downloaded the digis and then convertd them to jpg. Then I could edit them a bit using paint.net, to erase the noses and mouths, so that I could doodle on face masks and gloves using a 0.05 pt black Copic Multiliner Pen.
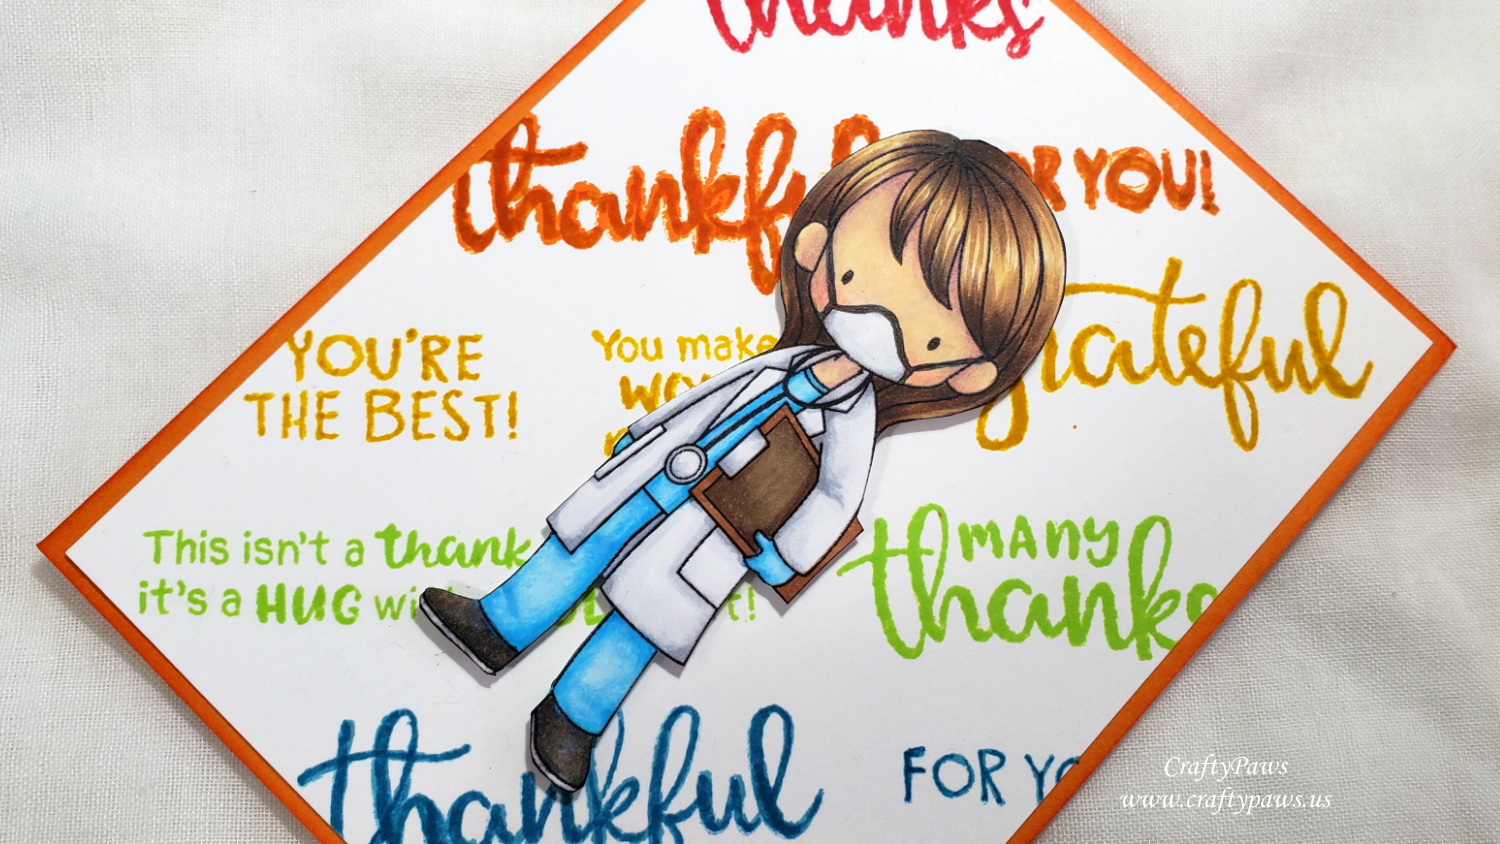
I colored the female doctor with my go-to coloring medium, Copics, and then I had some fun trying to add more vibrancy and detail with some Prismacolor Premium Colored Pencils:
Clip Board and Stethoscope: C00, C0 and C3 (for metal parts) and E23, E57 and E44 (for boards)
Skin: E50, E51, E01, R20 (blush) with Prismacolor Beige (997); Light Peach (927); Shell Pink (1093); Ruby Beige (1019)l and Clay Rose (1017)
Shoes: N5 and N7 with C3 for soles
Brown Hair: E55, E57 and E59 with Prismacolor Jasmine (1012) and Sepia (948)
Blue Scrubs and Gloves: B0000, B01, B02, and B04 with Prismacolor Sky Blue Light (1086) and Non-Photo Blue (919)
I then fussy cut them out with my favorite Fiskars Reverse Spring Loaded Scissors and inked the edges with a Memento Tuxedo Black Marker for a clean, crisp finished look. To add some extra interest onto the doctor, I also popped her up on double sided foam adhesive to give her some dimension.
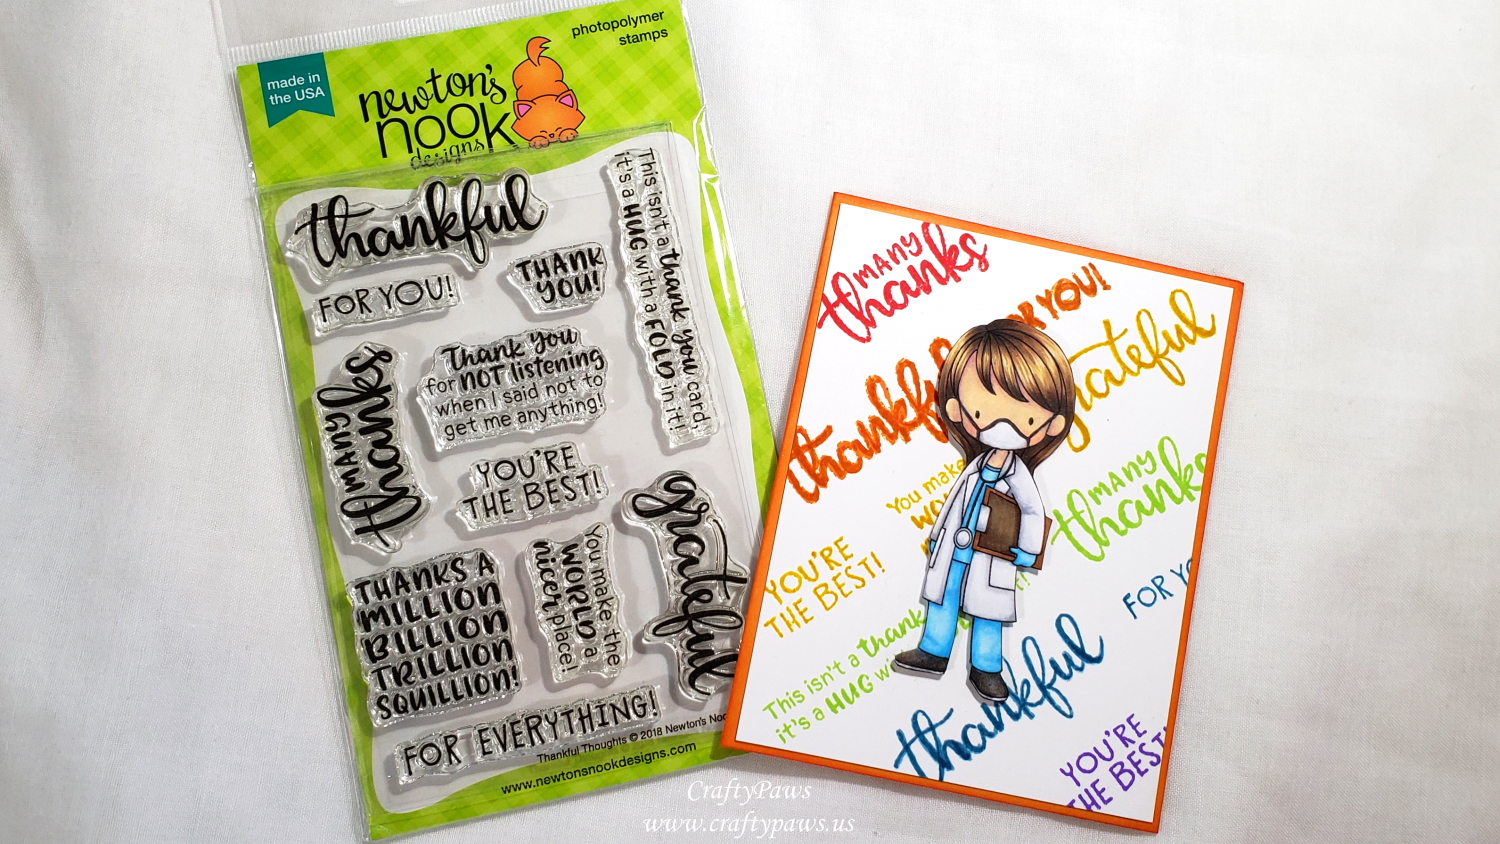
For the background, I decided to use a bunch of the sentiment stamps from Newton’s Nook Designs “Thankful Thoughts”. I positioned the words at a diagonal and inked up each row with rainbow bright springy colors of Tim Holtz Distress Inks in Festive Berries, Spiced Marmalade, Mustard Seed, Twisted Citron, Broken China and Wilted Violet. Where my MISTI slipped while stamping the Spiced Marmalade row, I used the matching Spiced Marmalade Distress Marker to tidy it up! As this extra layer of ink darkened that row, I decided to mount it on a similarly colored card stock card base to make it look more intentional. I also used the Mustard Seed and Broken China Markers to balance out the color saturation a bit throughout the background.
CLICK on the following picture to watch the process video:
Disclosure: Many of the supplies I’ve used for today’s project are linked. Some may be affiliate links, which means if you make a purchase I receive a small commission at no extra cost to you. I truly appreciate your support toward the costs of running this blog!
This thank you card for an everyday heroine doctor is being entered into the following challenges:
Simon Says Stamp Monday E Challenge – Everyday Essential worker hero
Penny Black and More Anything Goes Challenge
Lil Patch of Crafty Friends Anything Goes Challenge
Creatalicious Anything Goes with Optional Wedding Challenge
Word Art Wednesday Anything Goes Challenge
Through the Craft Room Door Anything Goes Challenge
Crafts Galore Encore Anything Goes Challenge
Stamping Sensations Somewhere Over the Rainbow Challenge
Simon Says Stamp Wednesday Spring Mood Board Challenge

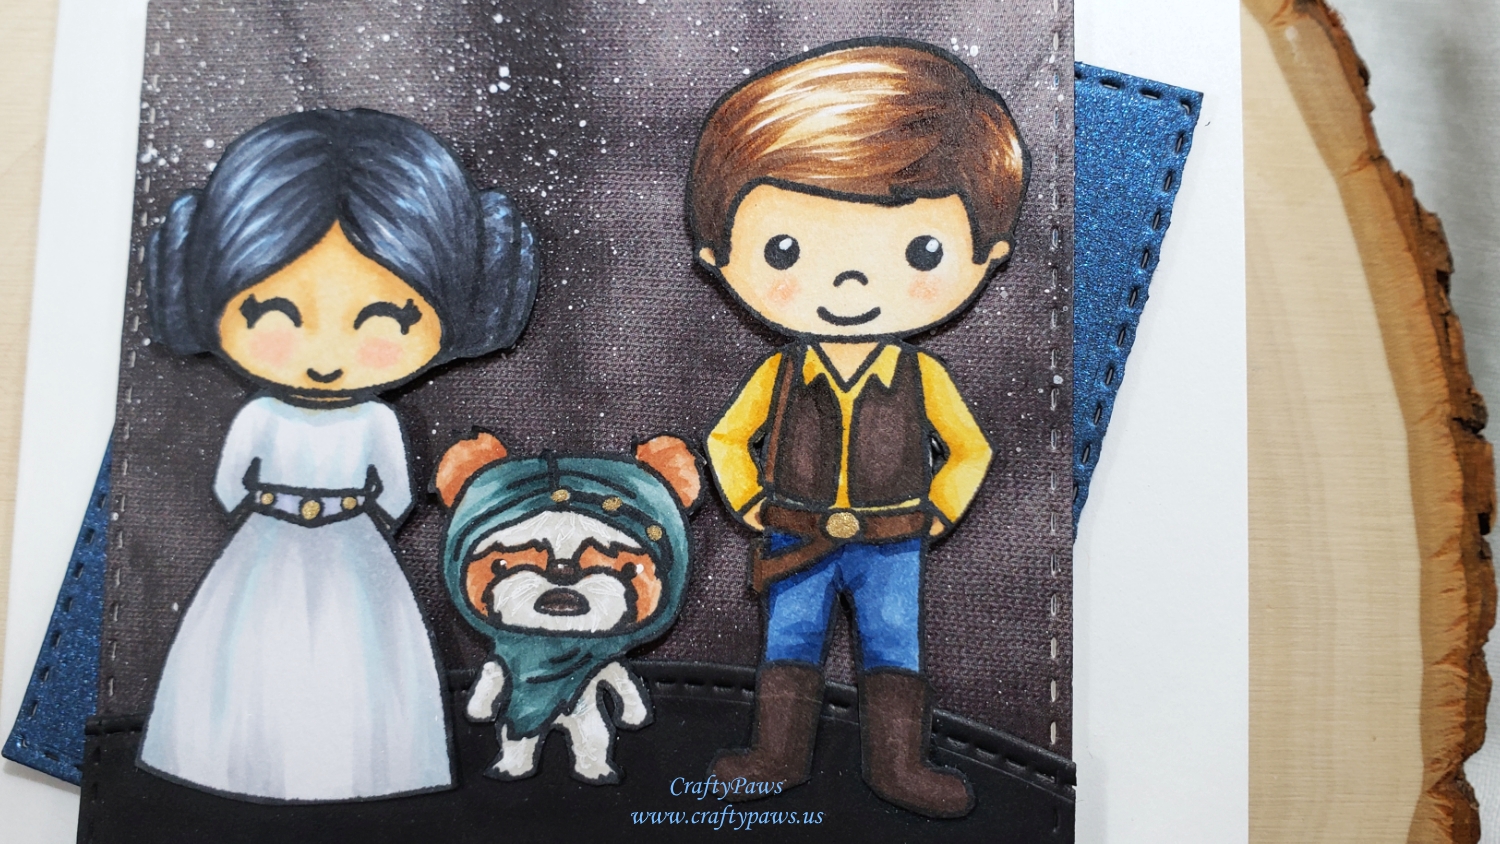
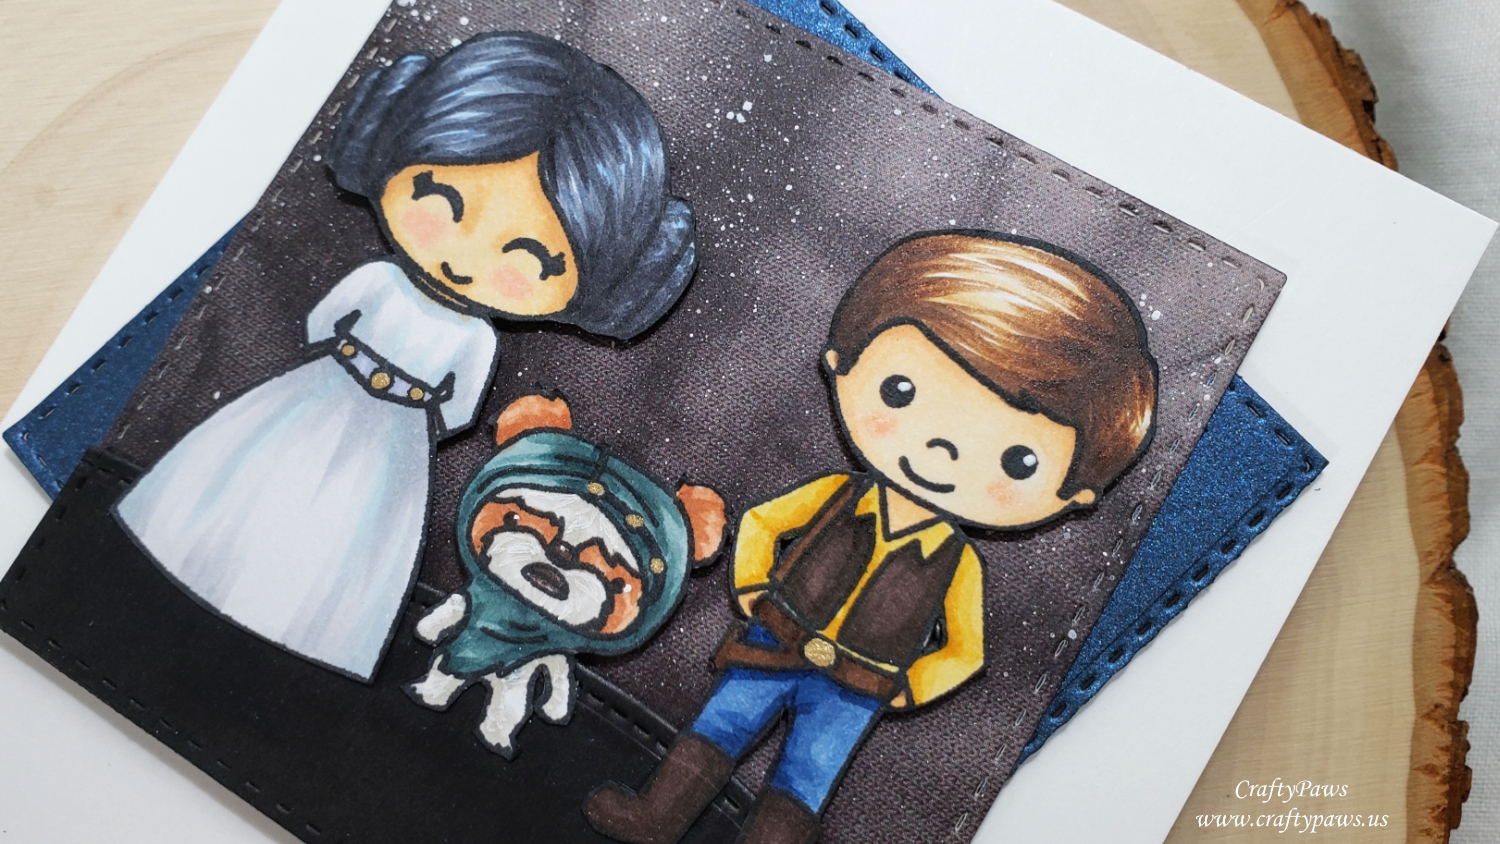
I decided that I could be Princess Leia, Mr. CraftyPaws could be Han Solo, and our Bandito could be (of course) an Ewok and used the following Copic colors:
Princess Leia: Hair: C6, C8, B000; Skin: E50, E51, E53, R21; Dress: C0, C1, C2, B32; Belt; C2 and B60
Han Solo: Hair: E53, E57, E59; Skin: E50, E51, E53, R30; Pants: B34 and B37; Belt: E59 and E79; Vest and Boots: E79 and E49; Shirt: Y21 and YR24
Ewok: Fur: W0, W1, E11, E13, E15; Headpiece: BG72, BG75 and BG78
I also used a Gold Gelly Roll Pen to add shiny details to Leia’s belt, the Ewok’s headpiece, and Han’s belt
As these images are clearly the “stars” of the card (pun intended), I kept the backgrounds simple. I die cut some black and grey patterned paper from an old DCWV The Tie-Dyed Stack (retired) using a Simon Says Stamp Stitched Squares Die. I splattered some watered down Copic Opaque White to create a galaxy background, and used black card stock and the Simon Says Stamp Stitched Squares Die and a Lawn Fawn Stitched Hillside Die to create a ground for the characters.
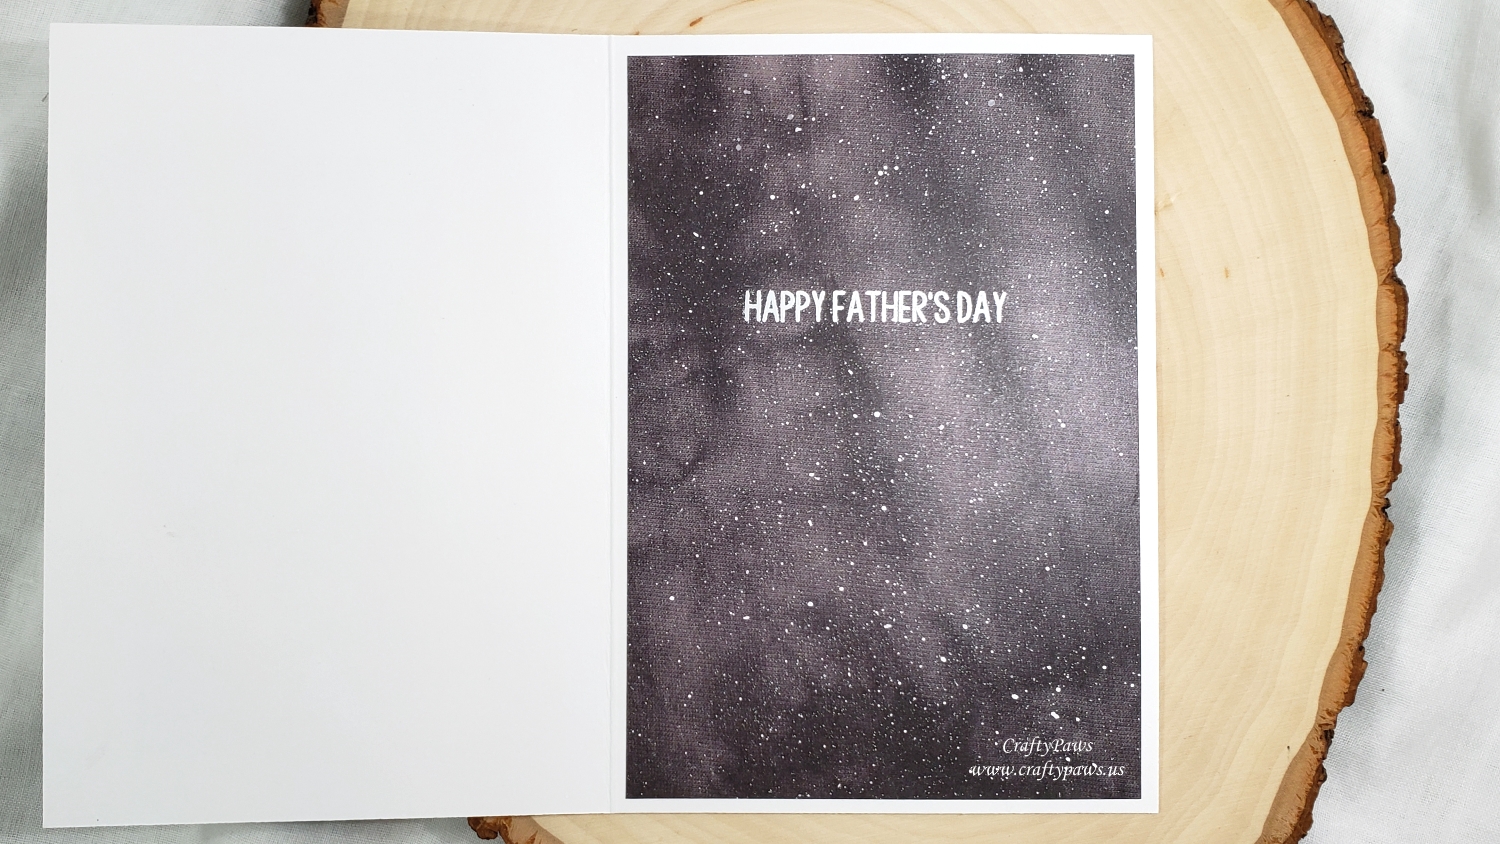
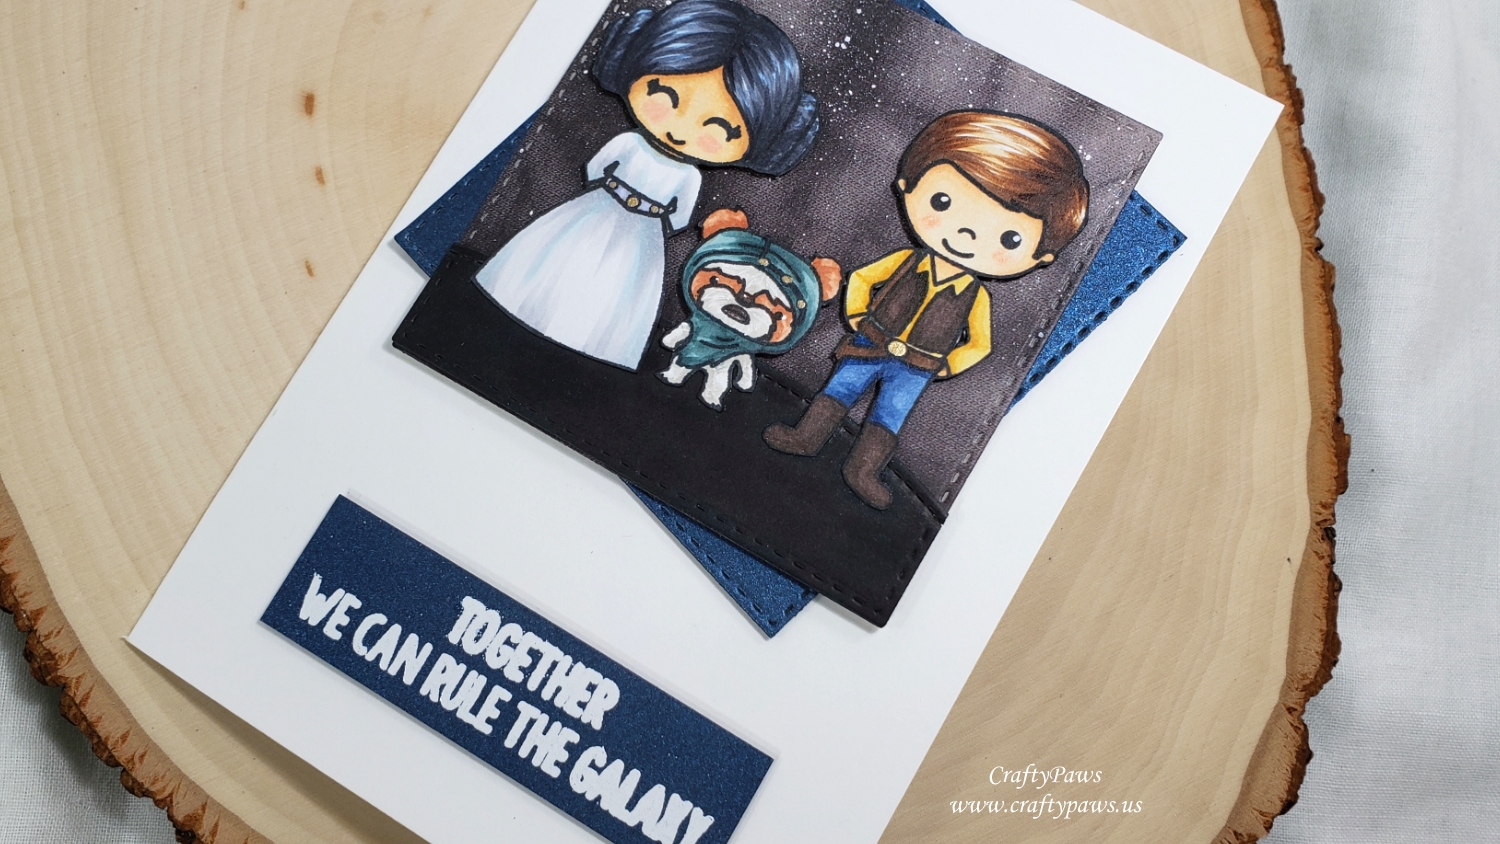
To add some more color, I die cut another stitched square from navy blue shimmer card stock and offset it behind the galaxy background square. Using VersaMark Ink and Ranger Super Fine Detail White Embossing Powder, I also heat embossed the sentiment, “Together We Can Rule the Galaxy” on more navy blue shimmer card stock to repeat the color and give the card a cohesive look. The sentiment, characters, and the squares assemblage are all popped up on double sided foam tape for added dimension and interest. The inside of the card liner was created by using more of the black and grey tie-dyed patterned paper with splattered on “stars.” The sentiment inside is also heat embossed, and simply says, “Happy Father’s Day”.
CLICK on the following picture to watch the process video of crafting this card:
Disclosure: Many of the supplies I’ve used for today’s project are linked. Some may be affiliate links, which means if you make a purchase I receive a small commission at no extra cost to you. I truly appreciate your support toward the costs of running this blog!
This card is being entered into the following challenges:
Word Art Wednesday Anything Goes Challenge
Creatalicious Anything Goes with Optional Blue Challenge
Through the Craft Room Door Anything Goes Challenge
Crafts Galore Encore Anything Goes Challenge
Lil Patch of Crafty Friends Anything Goes Challenge
Crafter’s Castle Anything Goes with Optional Mixed Media Challenge
Craft Gal’s Corner You’re the Man Challenge
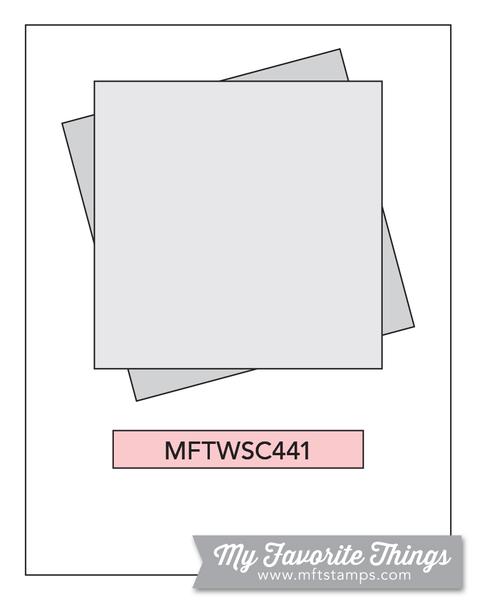
MFT Sketch Challenge 441
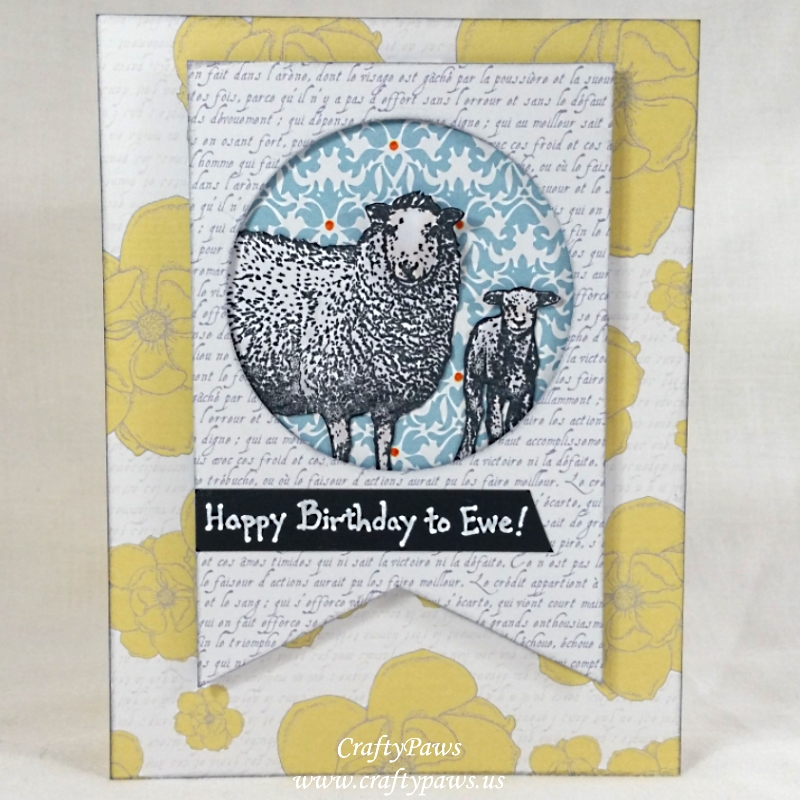
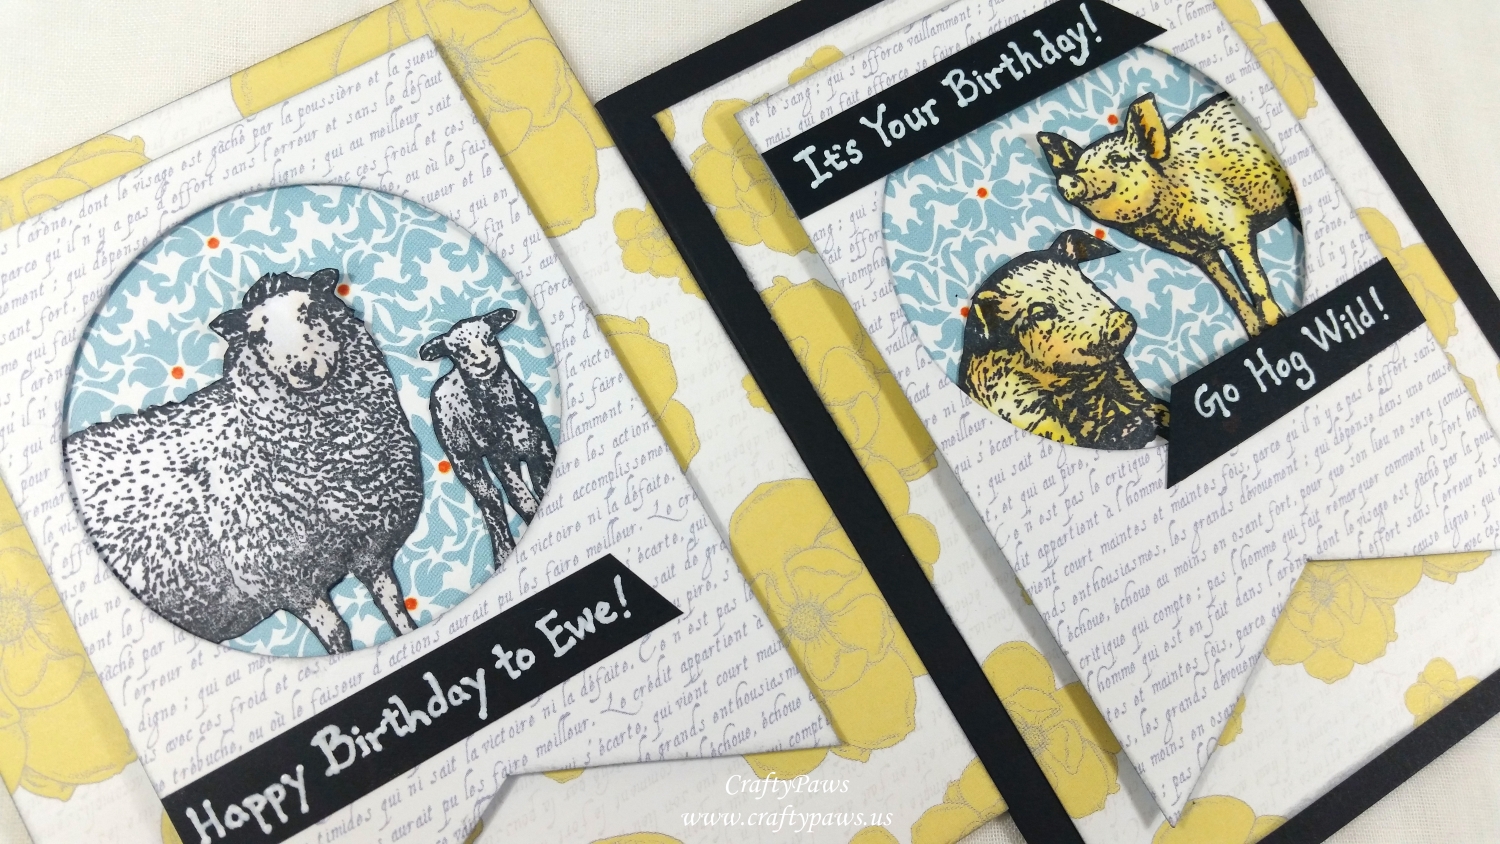
These farm animal stamp images are very realistic so they could certainly stand on their own without any coloring, but I wanted to add a hint of coloring so that they would coordinate with the patterned papers I wanted to use on these cards. So I used the following Copic colors to color up the sheep and pigs:
Sheep: N0, N1 and E000
Pigs: Y000, Y11, Y13, E01, N2
All the patterned papers are from a 6 x 6 My Mind’s Eye “Moments” paper pad (retired). And to give a nice finished look, I lightly inked the edges of all the paper pieces with Tim Holtz Distress Ink in Hickory Smoke.
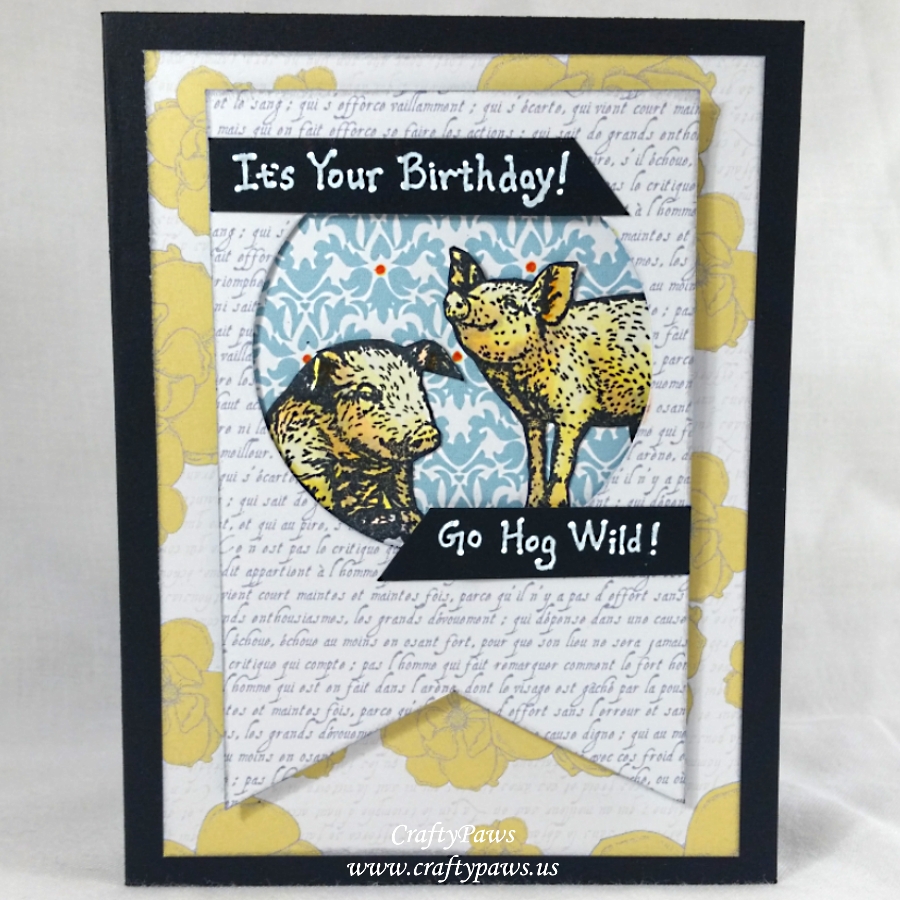
Next I fussy cut all the critters and inked the edges with a Tuxedo Black Momento Marker. This freed me up to position them exactly where I wanted to, which was in round windows die cut from hand cut pennant banners using Lawn Fawn Stitched Circle Stackable Dies. For a little interest and dimension, I layered and popped up the pennants on double sided foam adhesive over a blue damask patterned paper that I customized with small orange dots using a Tim Holtz Distress Marker in Riper Persimmon. Lastly, I added another layer of foam adhesive before I placed the whole assembly on a simple floral card front.
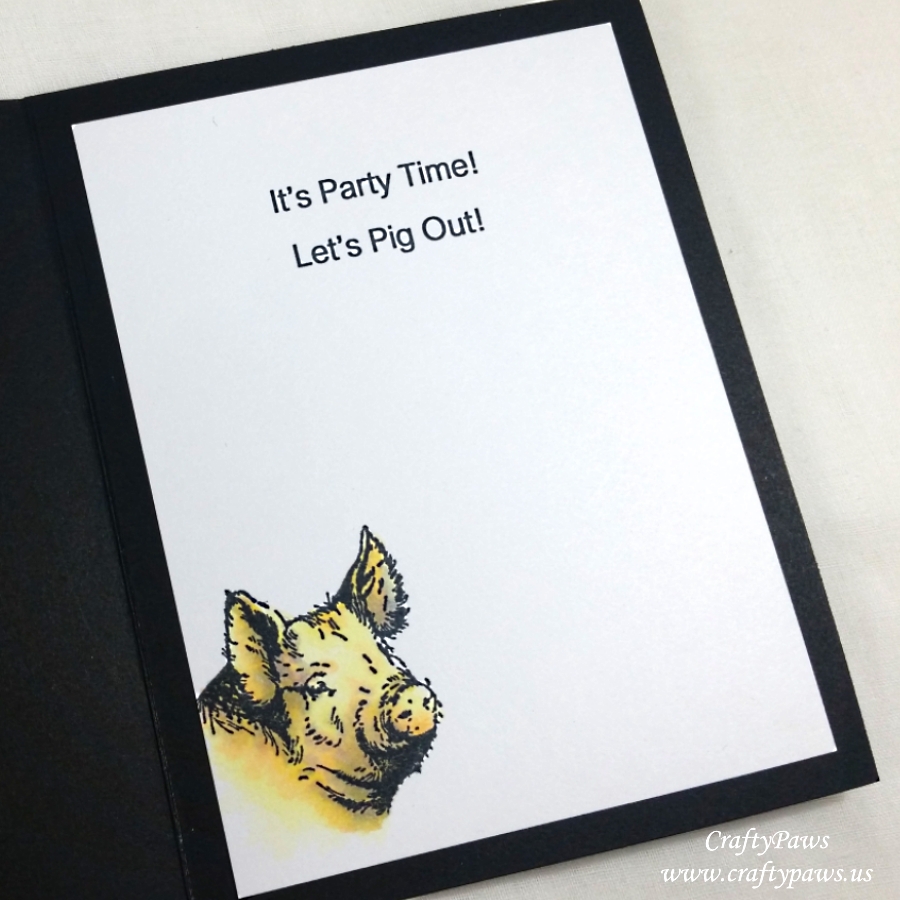 For the silly sentiment banners, I simply used a Uniball Signo White Gel Pen on black card stock. For the pig card, I wrote, “It’s Your Birthday! Go Hog Wild!” and inside the card, I printed out on my computer, ” “It’s Party Time! Let’s Pig Out!” for the card liner. For the sheep card, I wrote, “Happy Birthday to Ewe!”
I’m so glad I got to replenish my birthday card stash with these Joy! Crafts farm animals. I hope you enjoyed this post as much as I enjoyed crafting these punny cards. The following is a process video of crafting these cards:
Disclosure: Many of the supplies I’ve used for today’s project are linked. Some may be affiliate links, which means if you make a purchase I receive a small commission at no extra cost to you. I truly appreciate your support toward the costs of running this blog!
These cards are being entered into the following challenges:
Crafty Gals Corner Anything Goes Challenge
Lil Patch of Crafty Friends Anything Goes Challenge
Through the Craft Room Door Anything Goes Challenge
Crafts Galore Encore Anything Goes Challenge
Simon Says Stamp Monday Time Out Challenge
Simon Says Stamp Wednesday Animal Magic Challenge
Word Art Wednesday Anything Goes Challenge
Creatalicious Anything Goes with Optional Add a Sentiment Challenge
MFT Sketch Challenge #383

]]>
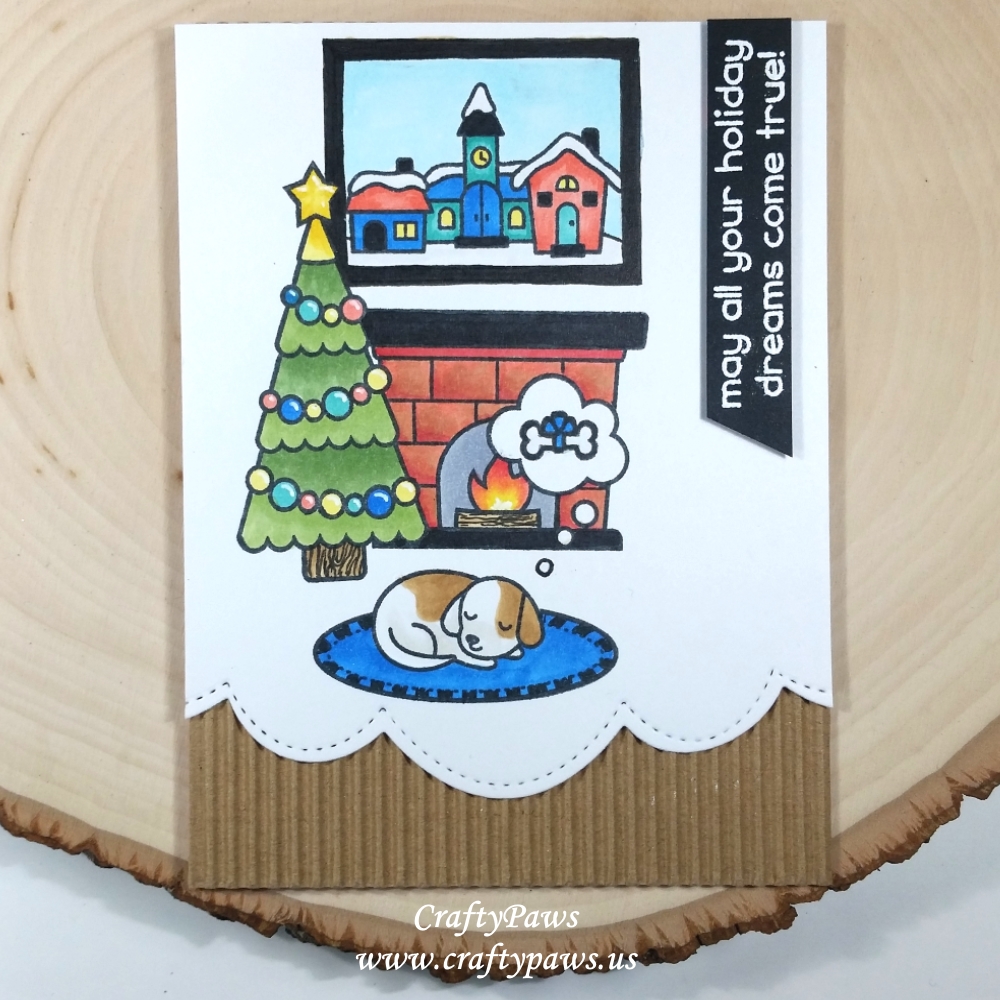 I decided to create a little scene using the pup, rug, fireplace, Christmas tree and thought bubble stamps. With a little simple masking I was able to get a layered scene. However, to fill in the space above the fireplace in the scene, I needed a little something more. I pulled out the snowy/icy village stamp from the Lawn Fawn “Ready, Set Snow” stamp set from 2015 and doodled a frame around it with a Copic Multiliner Pen in 0.1 pt. I thought the icy scene in the painting contrasted nicely with the main warm scene of the card.
Then with some simple Copic coloring (all the images are so small there is very little blending needed), I brought the little scene to life.
Puppy, fire log and tree trunk: W0 and E31 (which is basically like a kraft color) with wood grain doodled in with a Copic Multiliner Pen in 0.1 pt.
Fire place: E31, R22 and R35
Tree decorations and holiday village: Y13, R22, B000, B16 and BG13 with Uniball Signo White Gel Pen highlights on baubles
Fire: Y13, R22 and R35 with Uniball Signo White Gel Pen at fire core
Rug: B16; Tree: G43 and G24; Frame, mantle, hearth and rug trim: 100
All the baubles, the fire and the snow in the village scene got a healthy coating of Clear Wink of Stella shimmer too.
For a decorative lower edge for the card front, I used a Pretty Pink Posh Stitched Borders 2 die that I thought echoed the curves of the thought bubble, and then I backed the whole card front with some kraft corrugated card stock for some added dimension and texture.
The sentiment also came from the “Christmas Dreams” stamp set. I prepped a scrap of black card stock with my EK Success Powder tool and then used VersaMark Ink to stamp out the sentiment. I used Super Fine Detail Ranger Embossing Powder in White to heat emboss it, and then trimmed down the scrap to fit on the upper right side of the card (I had thought of putting it to the right just above the sleeping pup but the sentiment was too big and covered too much of the scene for my liking so I went with this vertical positioning).
The following is a process video of creating this Christmas scene card:
This card is being entered into the following challenges:
Card Mania Christmas Challenge
Lil Patch of Crafty Friends Anything Goes Challenge
Creatalicious Anything Goes with Optional Flourishes Challenge
Word Art Wednesday Anything Goes Challenge
Fab ‘n’ Funky Christmas Challenge
Crafty Gals Anything Goes Challenge
Simon Says Stamp Monday Icy Inspiration Challenge
Simon Says Stamp Wednesday Anything Goes Challenge
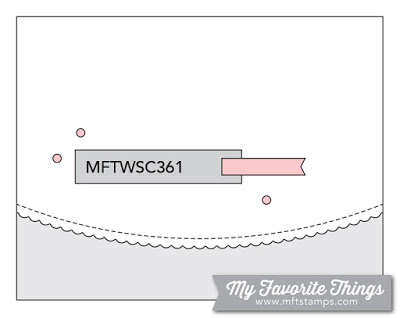
MFT Sketch Challenge 361
![]()
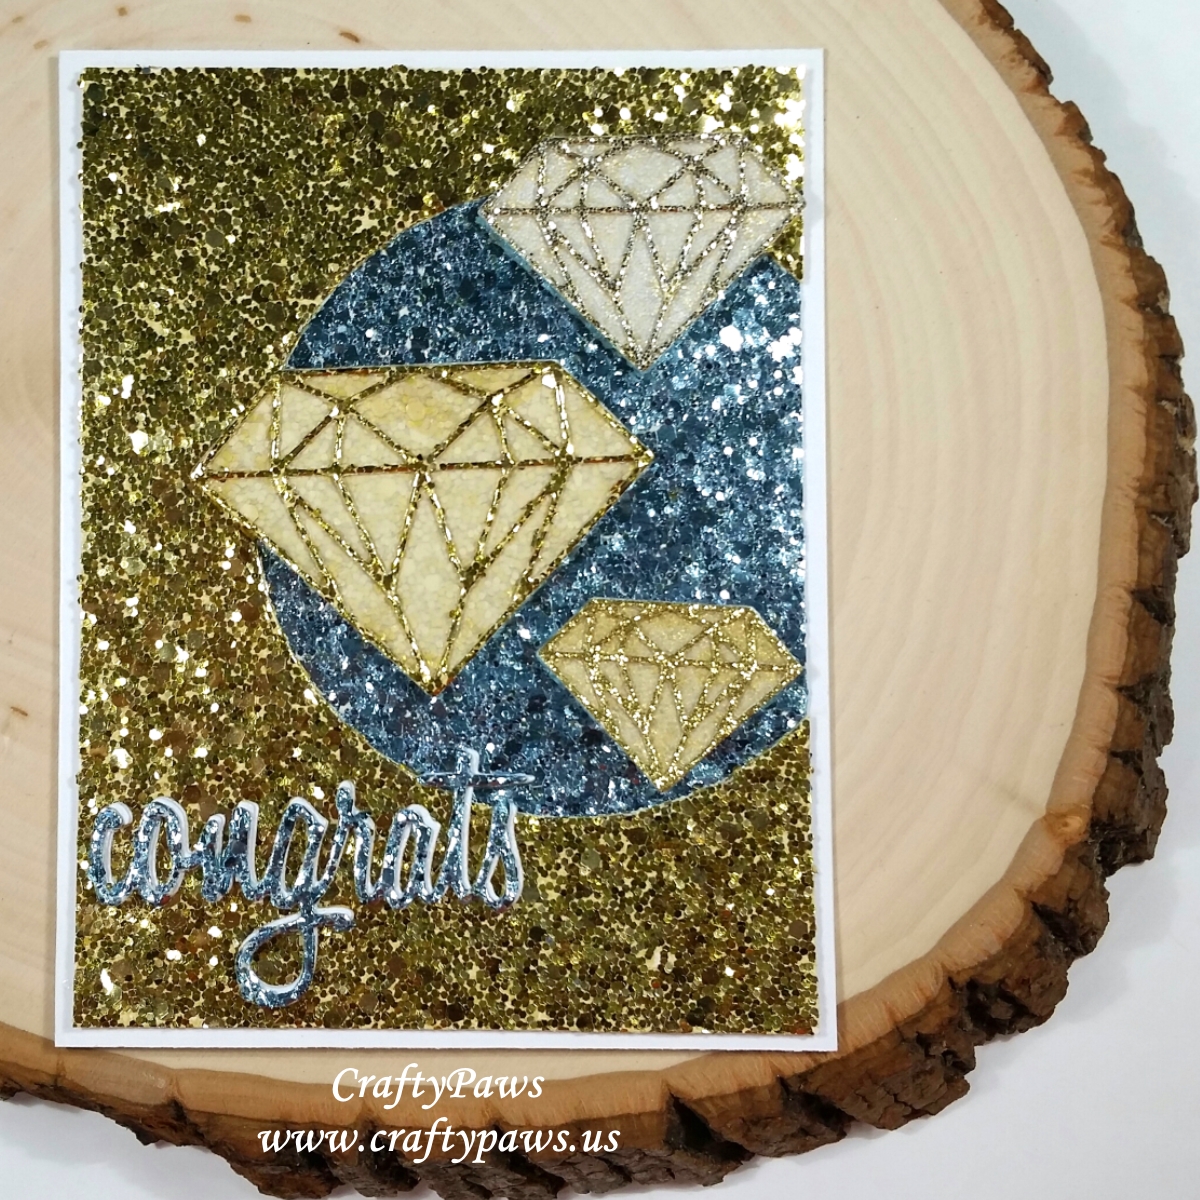 I used 4 different glittered cardstocks from my scrap box that had been langushing and throwing off glitter for the past 3 years! There is a silver, a fine gold, a big bold gold and a medium blue glittered cardstock. Since these card stocks are not coated, loose glitter does rub off and sometimes bald spots can form when cutting with guillotine cutters or fine detailed dies, but there is nothing as bright and sparkly as real, uncoated glitter. 🙂
For the base background panel, I used the blue glittered card stock to offset all the gold and silver diamonds. For the top background panel, I used the 12th largest circle from the Diemond Dies Die-Normous Stack-Ems Circle Nesting Die Set and cut out a round window so the base blue would be revealed.
I used the My Favorite Things Die-Namics Diamond Die Set (retired) that has backgrounds and detailed intricate facet layers in three sizes. I cut each diamond in a different colored glittered card stock and in between the base layer and the top layer, I sandwiched a background layer of die cut vellum. The vellum was a bit tricky to adhere to the virtually non-porous glitter cardstock, but a little patience and Glossy Accents ultimately worked. To add a little dimension, I also popped each of the diamonds up on double sided foam adhesive.
Lastly, for the sentiment, I cut out the “congrats” word from the Tim Holtz Sizzix Script Celebration Words Die Set. Actually I cut it out twice from white cardstock and once from the blue glittered cardstock and layered them all together, offsetting the white so they would help the blue stand out from the gold and blue glittered background panels. So yes, this entire card was made just with dies! No stamps (as much as I love them) were used in the creation of this card.
Disclosure: Many of the supplies I’ve used for today’s project are linked. Some may be affiliate links, which means if you make a purchase I receive a small commission at no extra cost to you. I truly appreciate your support toward the costs of running this blog!
This card is being entered into the following challenges:
Just Keep On Creating Anything Goes Challenge
Creatalicious Anything Goes with Optional Create Your Own Background Challenge
613 Avenue Create Anything Goes Challenge with Optional Masculine Card
Lil Patch of Crafty Friends Anything Goes Challenge
Word Art Wednesday Anything Goes Challenge
MFT Sketch Challenge #353