However, with some beautiful images I had been gifted from my crafty friend, Sherry (YT: Sherry Ramsey), and gorgeous trims and laces from MelsCraftBoutique, I actually think I came up with some ATCs that are interesting and tell a story (my favorite extra “layer” in crafting).
NOTE: This is my last Guest Design Team Project for MelsCraftBoutique so if you are interested in purchasing any items from her store, through the end of this month is your last chance to use the coupon code: CraftyPaws10 for 10% off your entire purchase of $15 or more and free U.S. shipping on orders of $40 or more.
The first one I made was the one with the pretty pink framed image. I covered the chipboard base with lace and then added a delicate bridal applique with beads and sequins from MelsCraftBoutique. To add a little more depth and interest I also tucked in here and there some plastic pink flowers that I cut from rings (sorry, these seem to be currently out of stock). I titled this ATC “Femme”.
For the second one, I pulled out my sewing machine and did a little sewing and spraying on a Ranger Inkssentials Sticky Backed Artist Trading Card. I had never used this product before, but I love it (I can’t wait to try painting on it). I first sprayed the canvas with a lavender Recollections spray and then layered over the top and sewed on a little strip of cotton script patterned fabric, some gorgeous scalloped embroidered trim and a 3″ wide delicate pale blue lace. To fill anchor a corner, I ad
 ded a fluffy flower from this flower spray. Lastly, I centered a beautifully regal lady image (which I painstakingly fussy cut) under the scalloped embroidered trim, which was sewn on a little wonky–kind of representing the extravagant lifestyle of the time kind of falling down around the royal court. I titled this ATC, “Hold On” or “A Stitch in Time”.
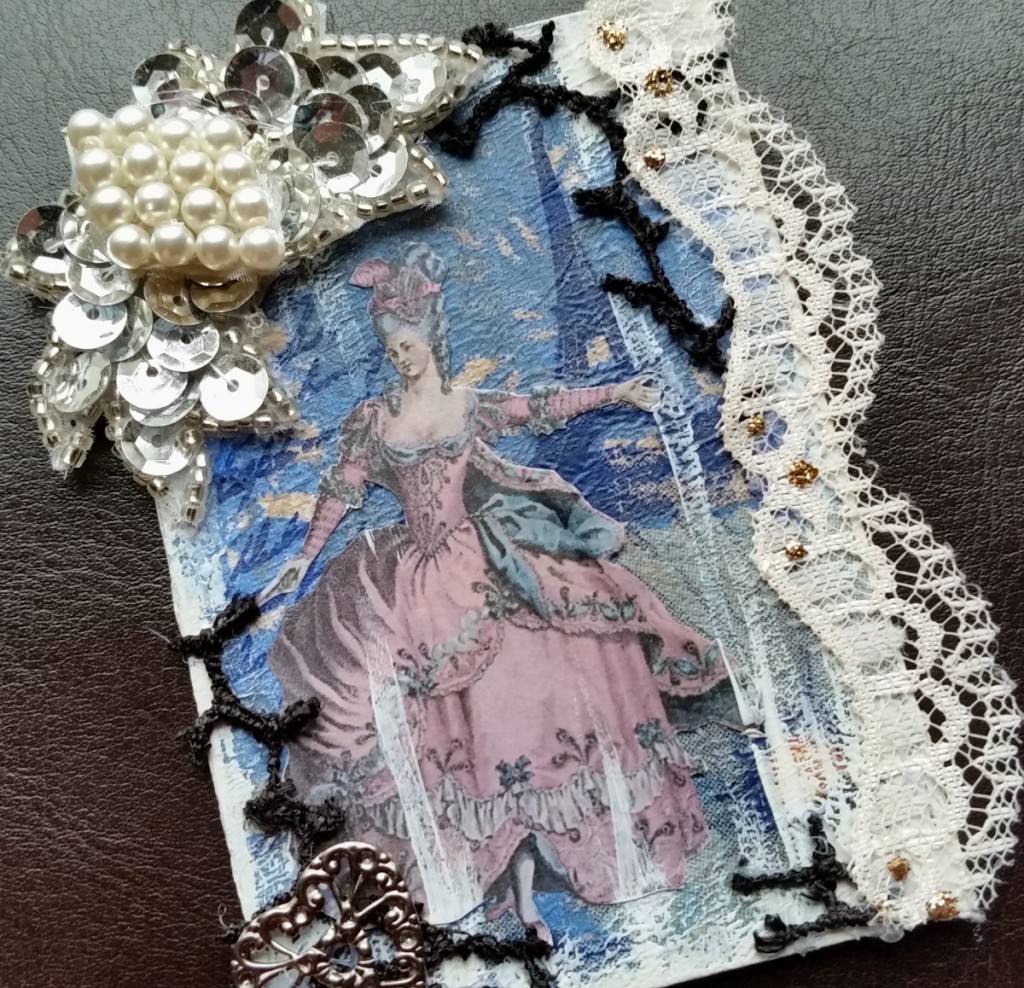
The third ATC is a little darker, this ATC base was created by decoupaging on a Parisian scene napkin in moody blues. I then used some gesso to create a painterly frame. Using Ranger Tim Holtz Distress Ink in Antique Linen, I softened the white of the gesso. On one corner I added a very blingy sequin and pearl applique (sorry, this seems to be out of stock but MelsCraftBoutique has other similar gorgeous pieces) and on the right side of the ATC, I placed a dainty scalloped ivory lace, dotted with Ranger Champagne Stickles
. In the other three corners I also tucked in background netting-type pieces that I cut apart from this stunning black Venice floral trim. This is supposed to represent the encroaching downfall of this royal line in France. This ATC is titled, “Life Is But A Dream.”
The following is a video share of the three ATCs:
These ATCs are being entered into the Simon Says Stamp Wednesday Add a Little Texture Challenge
Thanks for stopping by and have a great day! WOOF
]]>
 I wanted to make something that was bright, beautiful, and flowery because I thought something like that might be just what someone going through grieving might need. Plus, I am really craving spring. 🙂
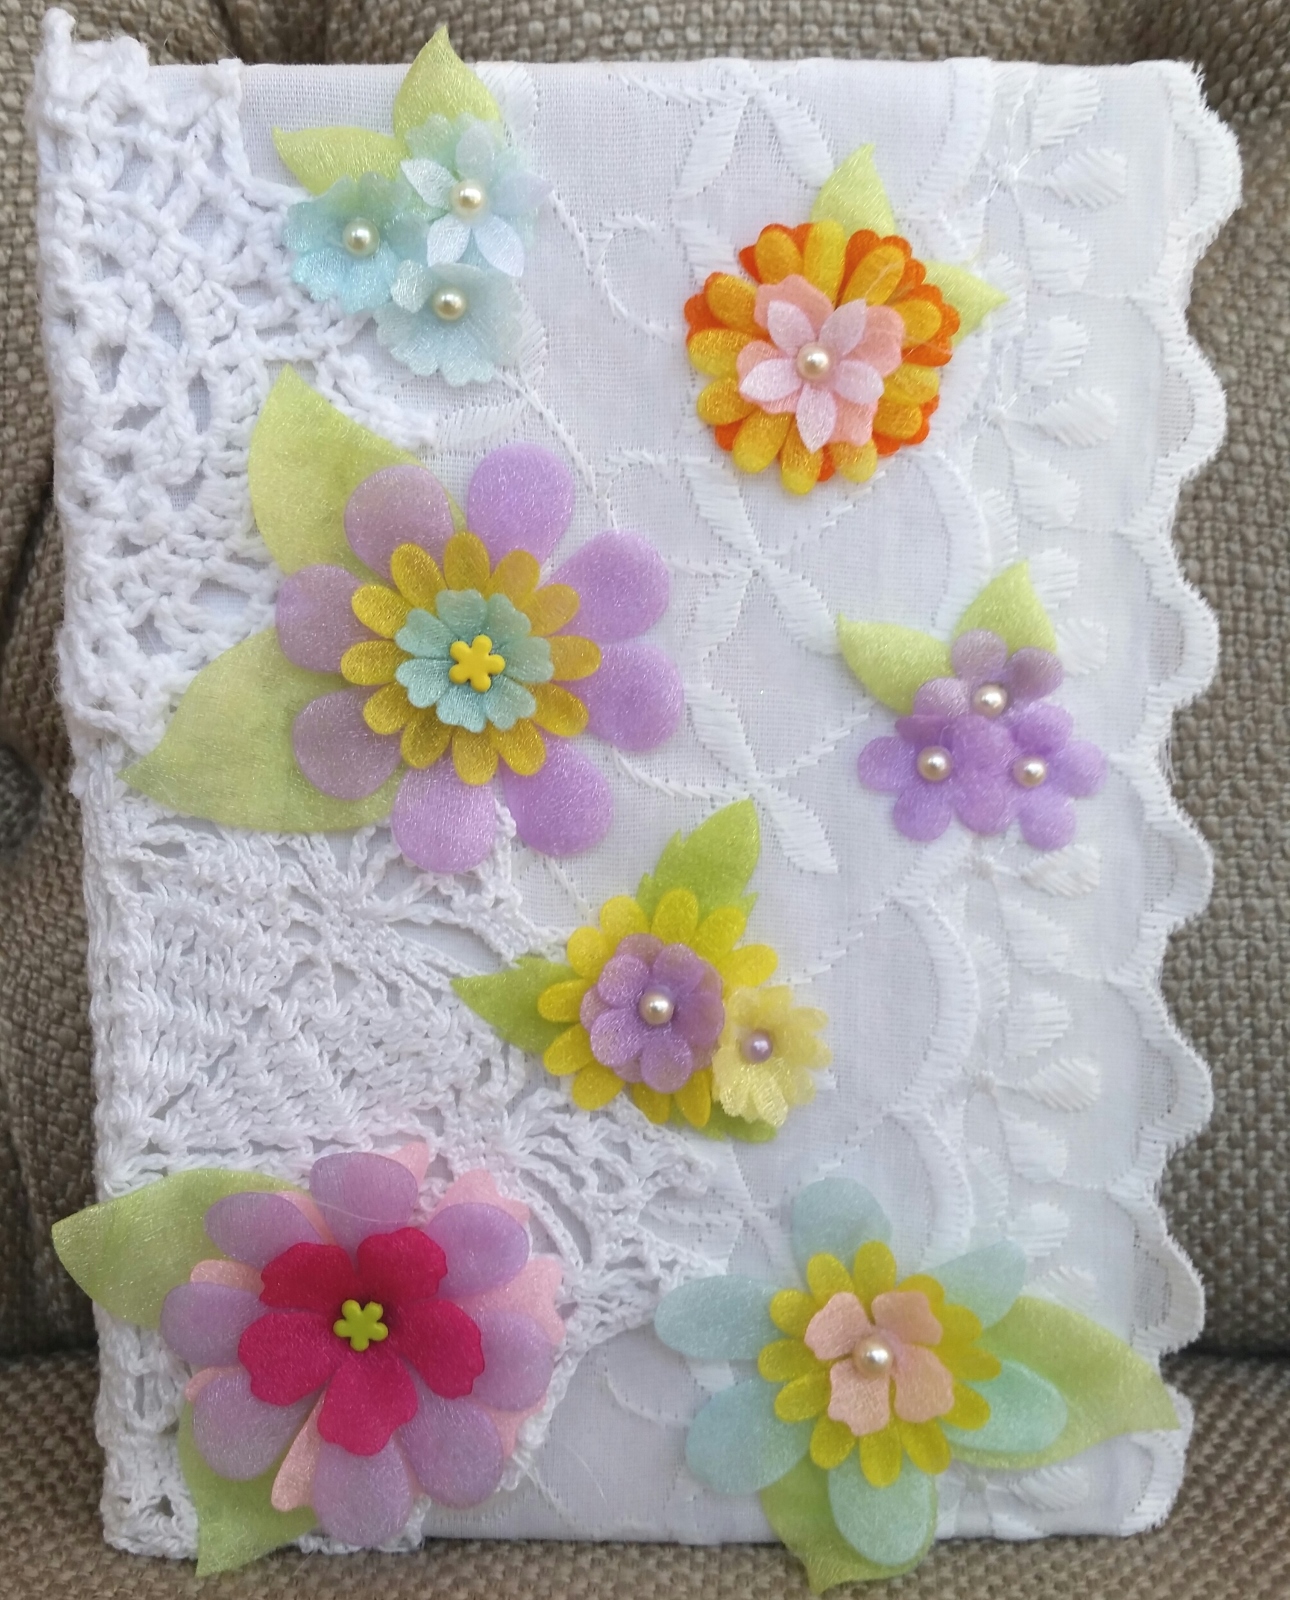
Because the journal I had was a very bright neon foiled book, I first put a coat of gesso on the front and back covers of the journal and let it dry overnight. Then I used a white cotton embroidered trim and an ivory embroidered trim from MelsCraftBoutique to cover the front and backs, leaving some overhang so that I could bring it around to the inside of the front covers. Note that the ivory trim has an unfinished back edge so it is on the bottom and the white trim has a finished edge (so there is less fear of unraveling) so it is on the top. These wide, opaque trims were perfect for covering these larger areas and creating a soft base.
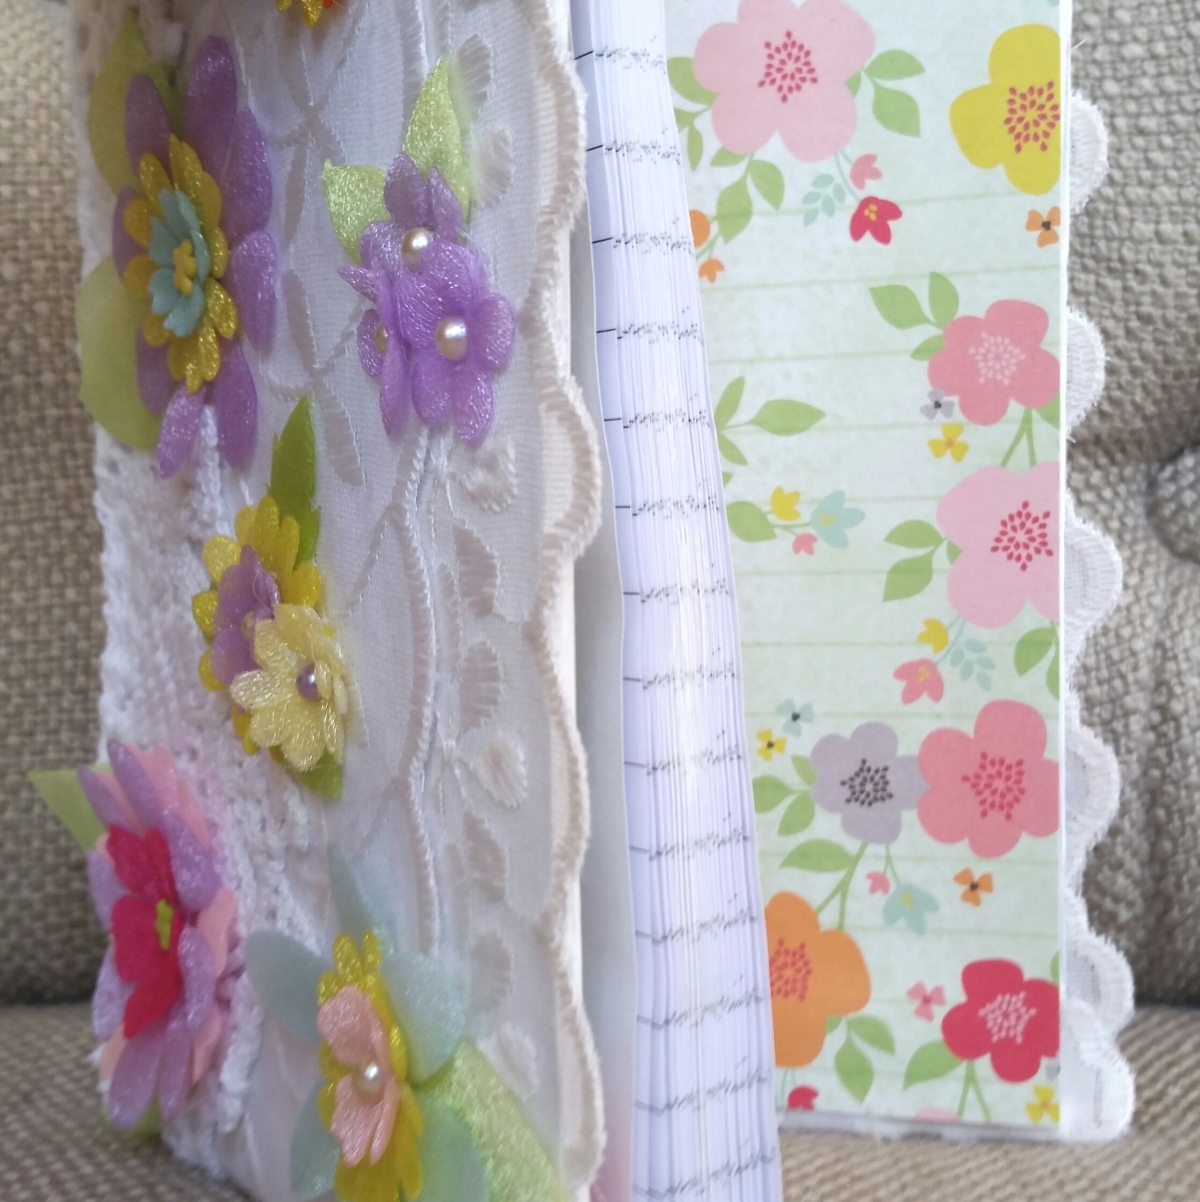 For the spine, I wanted to make sure that it stayed flexible so I decided to use knit doilies (rather than paper or less forgiving fabric). I used this larger doily on the bottom and a medium doily for the top, both from MelsCraftBoutique. It only took 2 doilies to cover the whole spine, and I think it added a nice soft touch.
My readers can get 10% off any orders of $15 or more from MelsCraftBoutique and if you are shipping to the U.S. and your order is $40 or more, you also get free shipping. Just use the coupon code: craftypaws10
I had fun adding leaves and flower layers in a rainbow of colors that are made from a very sheer, puffy fabric (sorry I don’t know the brand–they were gifted to me in a RAK yesterday (yes, I’m already crafting with these NEW items!) from my super sweet and talented friend, Priscilla (YT: Priscilla Del Valle). Lastly, I lined the inside of the front and back covers with patterned paper from the American Crafts Dear Lizzy Neapolitan 12 by 12 Inch paper pad (which seemed to match the flowers perfectly). This covers up all the rough edges of the trims and gives a nice finished look tot he book.
The following is a video showing the process of altering this composition book:
This altered composition book is being entered into the following challenges:
Simon Says Stamp Work it Wednesday NEW challenge
Simon Says Stamp Wednesday All Things Bright and Beautiful
Simon Says Stamp Monday H Challenge
Challenge Up Your Life Rainbow Challenge
Thanks for stopping by. Please subscribe if you wish and have a great day. WOOF!
]]>
 I first painted the tin using Rustoleum Painter’s Touch 2Xs Paint and Primer Heirloom Satin White spray paint. I just needed a base in case any of the edges of the tin showed through all the layers I had planned. It didn’t have to be smooth or pretty (and believe me it wasn’t since I did the spraying in the rain).
Then I covered the inside and outside front and backs of the tin with the patterned paper using Aleene’s Original Tacky Glue. This glue is great for getting a strong permanent hold, especially if you need some wiggle room time to align the paper perfectly. Just when I had finished patting myself on the back for remembering to secure the dainty ivory scallop lace I was going to use as the hanger before securing the back panel papers, I realized I had adhered the back panel papers upside down (as compared to the inside papers). I had to pull them off and then flip the tin and re-apply. I seriously put the wiggle room time to the test, but it worked!
 I then wove a dainty black heart lace through the buckle segments of the ivory Venice lace in bow knot design to create a very luxe looking trim to hot glue all around the outside edges of both sides of the tin as well as the inside of the deeper side of the tin. For the inside of the shallower lid side of the tin, I just lined it with more of the dainty black heart lace.
For the inside focal point for one side of the tin, I fussy cut out the quizzical cupid from the A side of the same Graphic 45 paper (cutting off the globe in one hand and the odd raven from the head). To give him a less green hue, I used Copic E51 and R30 for his skin. Adding clear Wink of Stella to the wings added a nice little magical shimmer. 🙂 To hit home the idea of Valentines, I put a little heart key charm in the cupid’s hand.
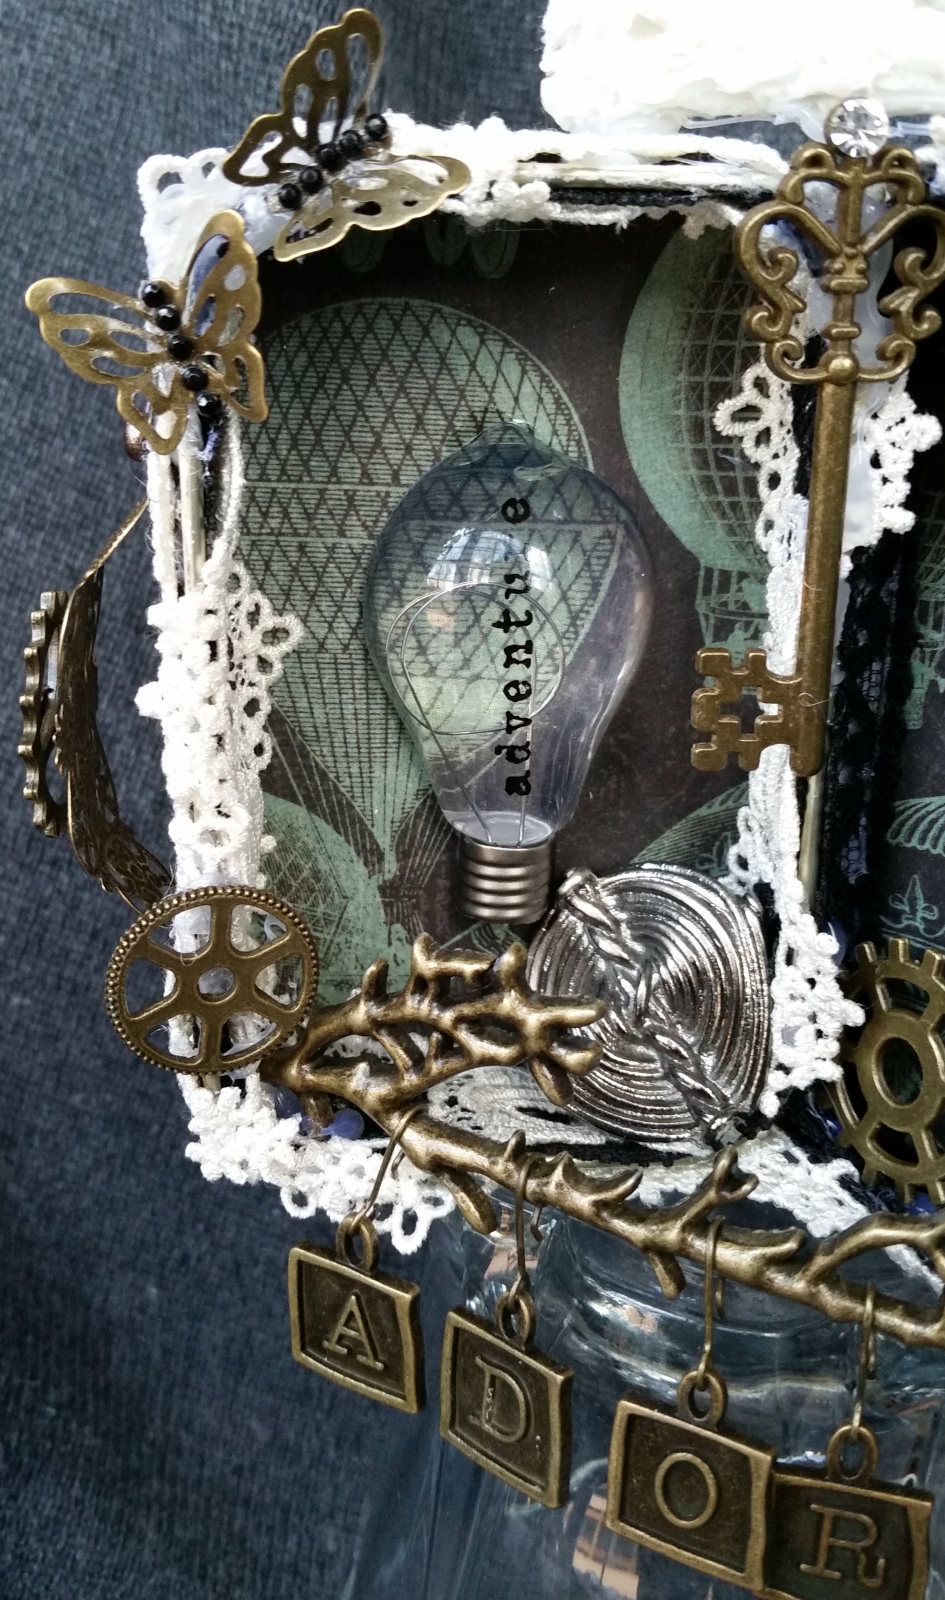
 For the other side of the tin, I simply used a large light bulb from the Prima Junkyard Findings collection that said “Adventure” (because isn’t love an adventure?). I thought the light bulb shape echoed the hot air balloon shapes in the background nicely.
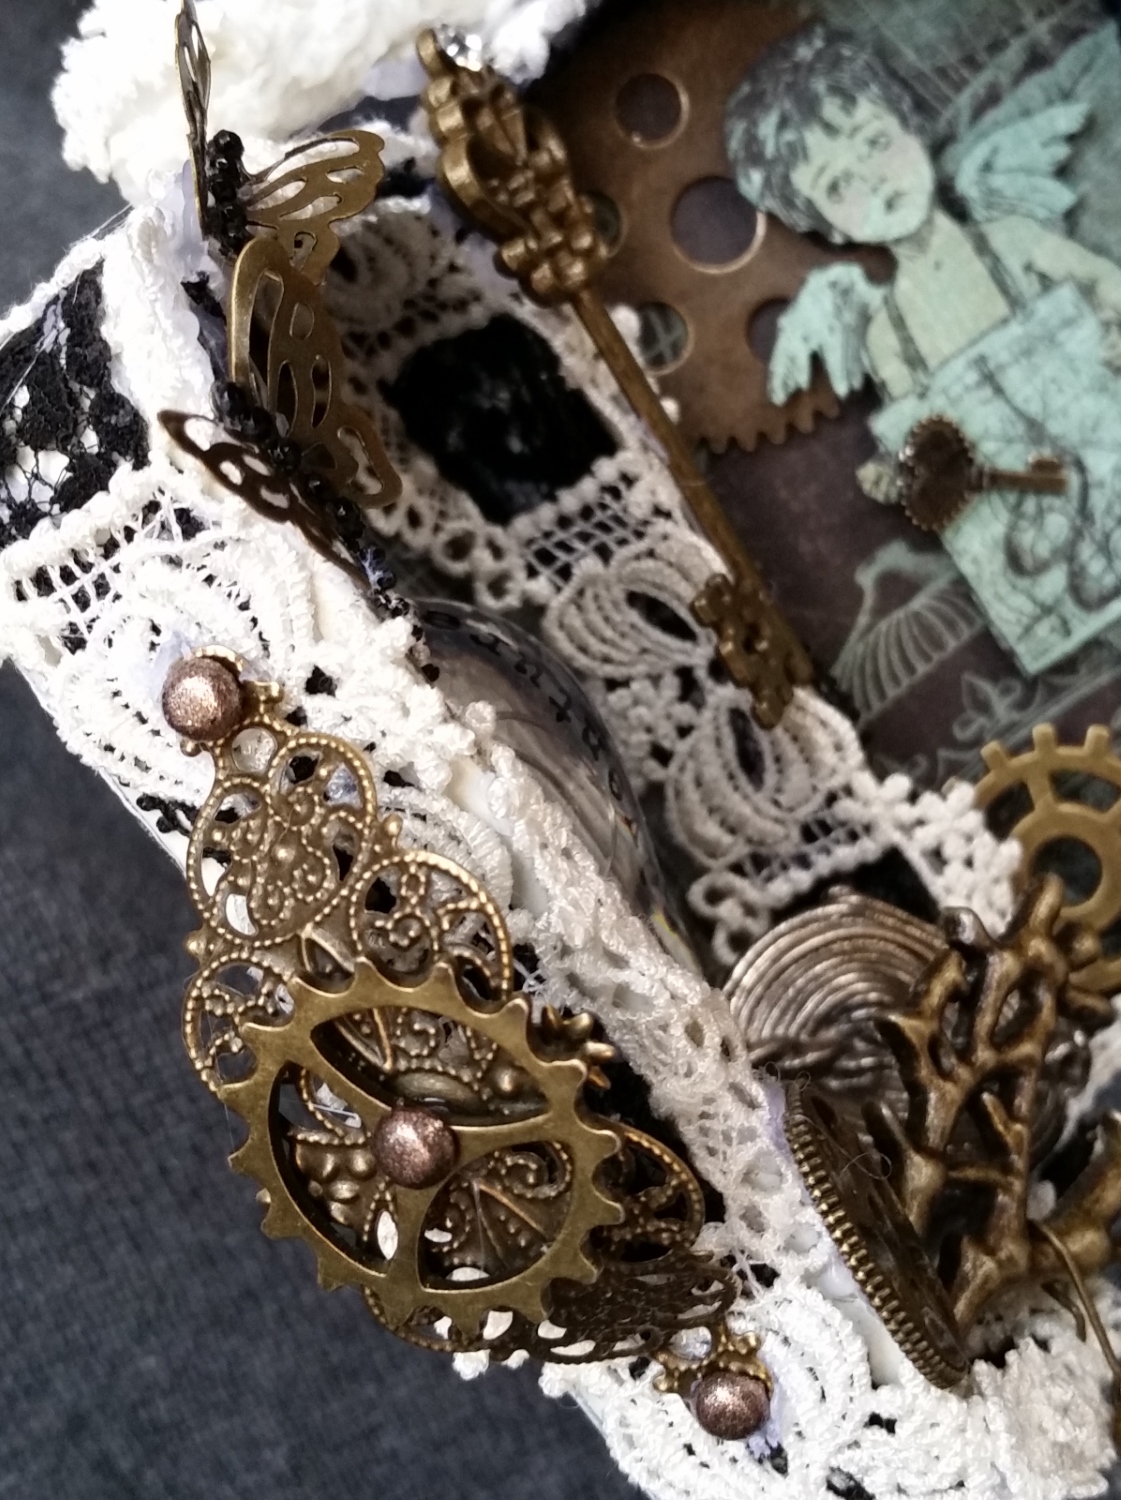
To create a kind of “handle” for the tin, I bent one of the filigree pieces from Mel’s shop. After cutting off the tails of some mini brads, I adhered them to the ends as well as in the middle to give the appearance of faux rivets securing the handle. To add a Steampunk flavor, I also added a little metal gear to the middle of the filigree. I used a gorgeous metal butterfly and a Steampunk style button from Mel’s shop to further decorate the tin.
To add more texture and interest to the tin, I added five more antique bronze gears. I also added an antique bronze key along the center seam and a couple more small metal butterflies (that makes THREE gorgeous metal butterflies, all of which I embellished by hand with black bling) to the upper left corner.
It was all looking pretty good, but then I remembered I had a Prima Vintage Trinkets set with a metal tree branch that had alpha charms hanging from it that spelled out “ADORE” and a little cream colored resin bird on a branch. After feeling badly about cutting off the raven from the top of the cupid’s head, I thought this would be a perfect way to replace the reference to nature. It was a little tricky securing these pieces, but with a little patience, E6000 (for a permanent, stronger hold), and hot glue (for a quick hold) it all set up well. I added a few tiny lace flowers, snipped off of a remnant scrap of the ivory Venice lace to the bird’s beak and the branch he is sitting on in order to soften that resin piece and to help carry through the romantic theme of this project.
Use coupon code CraftyPaws10 for 10% off your purchase at MelsCraftBoutique (min $15 order), and if you are in the U.S. and your order is $40 or more, this coupon code also gets you free shipping!
The following is a video share of this altered tin:
This Steampunk altered tin is being entered into the following challenges:
SanDee & Amelie’s 3D Three is My Lucky Number Challenge (Top 3 Winner)
The Pink Elephant Anything Goes Challenge
IBSIC #90 Hearts Challenge
Simon Says Stamp Wednesday Have A Heart Challenge
Thanks for stopping by and have a great day! WOOF
]]> This was a multi-day Steampunk project that took as much thinking time as creation time. I am so glad I tried this and got to use some items that I have been “hoarding” for a while. XD This was truly a “labor of love” and I love how it came out.
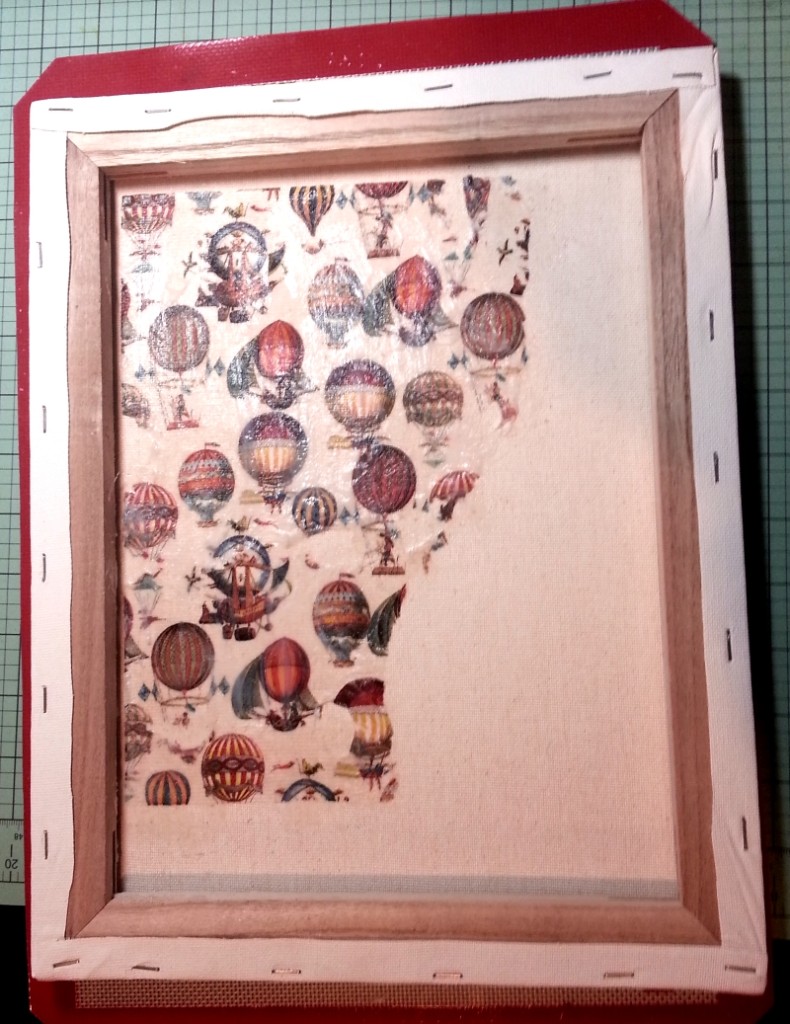
 I started with a plain 11″ x 14″ canvas that I had picked up on clearance for $2 at Big Lots. Using matt finish Mod Podge
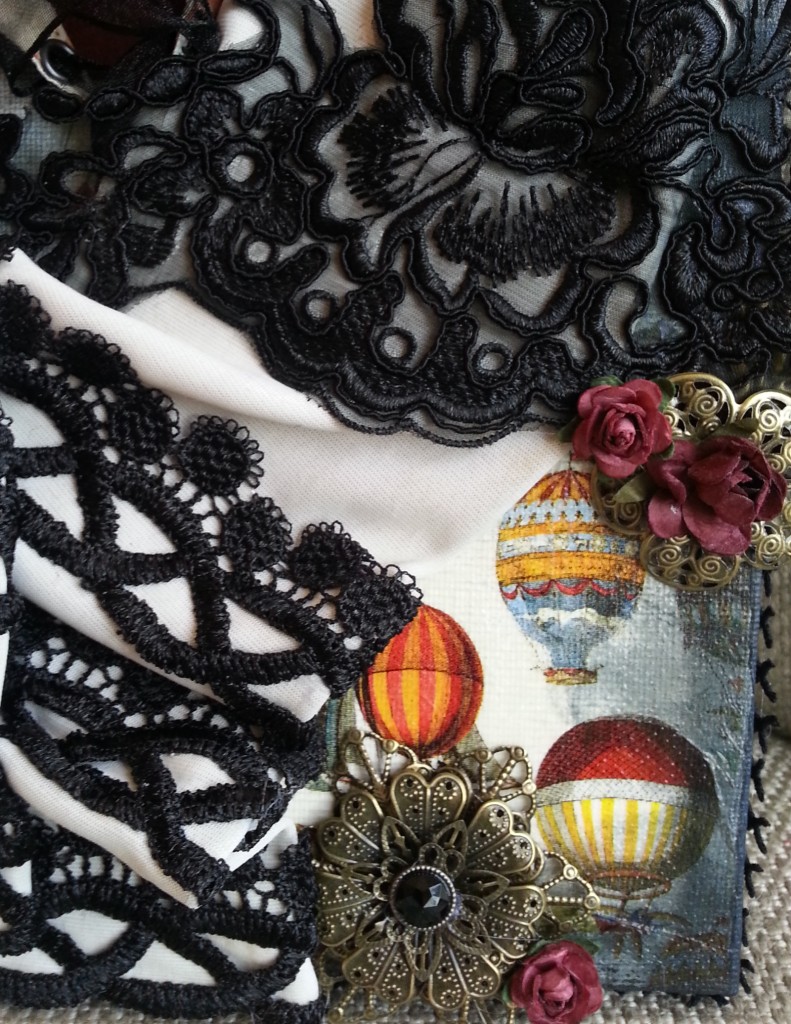
, I adhered a gorgeous napkin with a fabulous hot air balloon pattern on the front and back of the canvas (I had been saving this napkin for a special project for months). I knew I wanted to split open the canvas and fold the two sides forward to reveal the balloon pattern from the back. The napkin picked up the canvas texture beautifully.
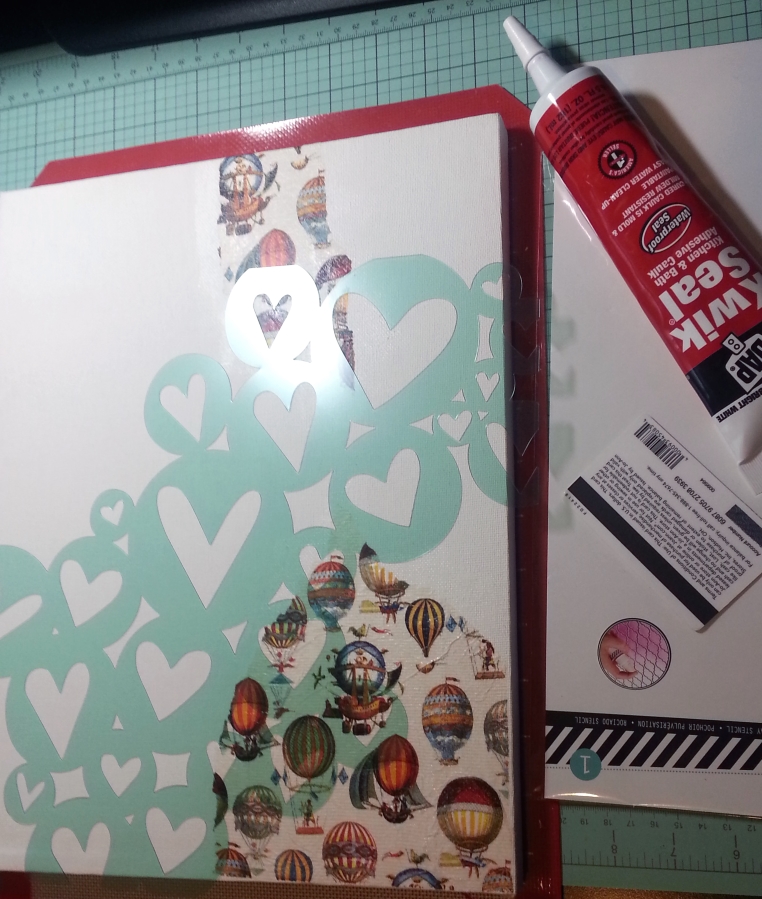
I then used the 12″ x 12″ Heidi Swapp Heart Cluster Stencil and some latex caulk from the hardware store to add some heart texture to the background. Once that had dried, I kept the stencil in place and sprayed some Chromatix ink using the Ranger Tim Holtz Distress Marker Spritzer Tool
to lay down some gorgeous vibrant color.
 I finished off the front edges of the canvas with a ink dauber and some Tsukineko Memento Tuxedo Black ink
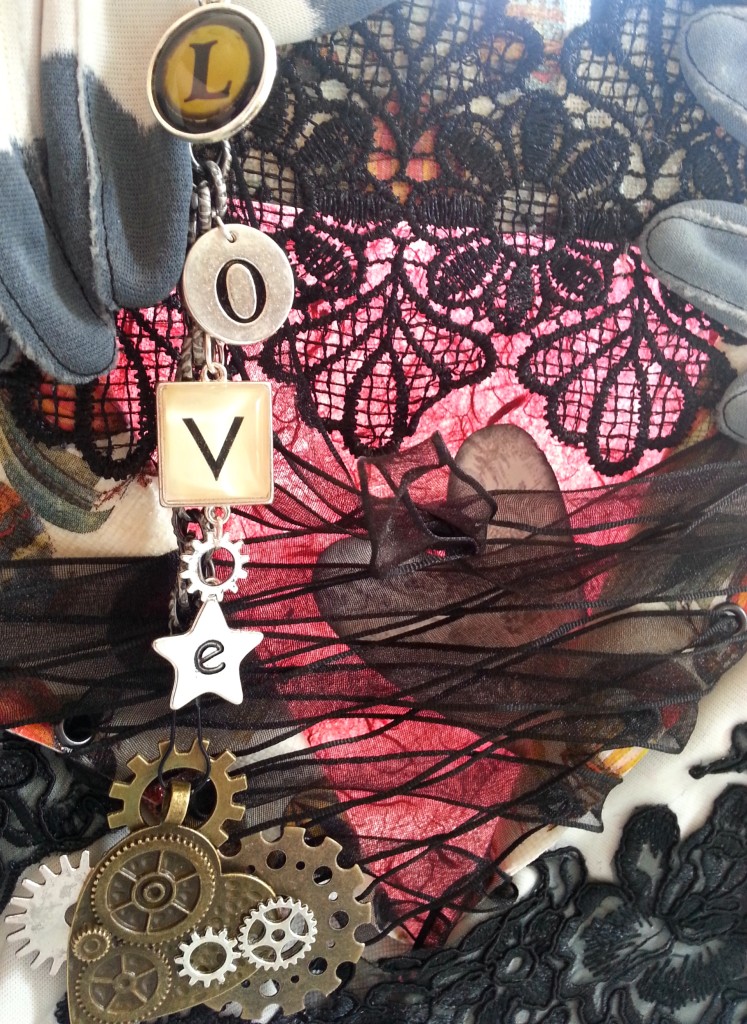
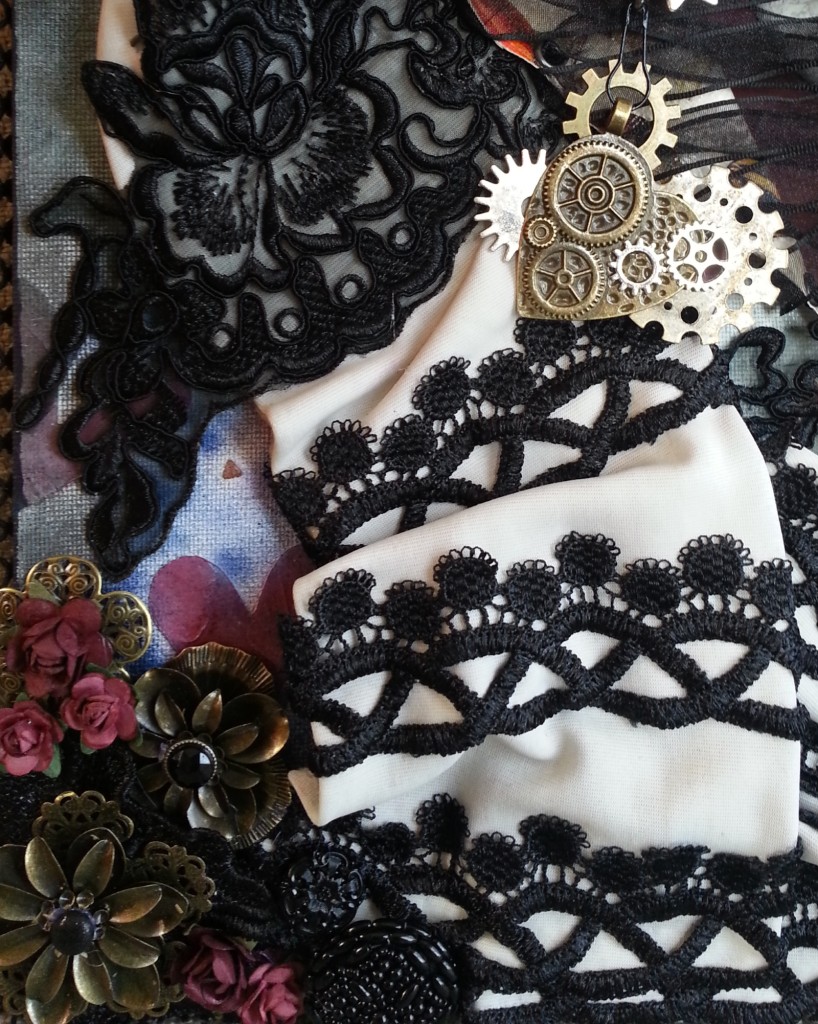
. I used a hodge podge of blue and black acrylic paints to create a dark dusty blue, which I painted all along the sides of the canvas. Over top of that, I used this beautiful embroidered heart trim from MelsCraftBoutique, which started the hearts and valentines theme of the project.
 For the corseting detail of the canvas flaps, I used a We R Memory Keepers Crop-A-Dile Eyelet and Snap Punch, Blue Handle
 and some black organza wired ribbon I had in my stash (I may swap this out for a thinner ribbon to reveal more of the back but haven’t decided yet). For the backing of the opening I had created, I used some treasured hand made burgundy paper as well as a toile patterned paper die cut heart that had been recently gifted to me (and seemed to perfectly match the heart shapes of the stencil I had used). I thought the flaps cleverly referenced the lapels of a jacket and this area with the heart a person’s chest.
 I had also been hoarding some beautiful vintage white opera length gloves and thought they would be perfect for this Steampunk project once I punched them up. I used these stunning organza flower trims at the wrists and three rows of this bold and whimsical Venice lace with tassel (kind of pom pom like, but more sophisticated) up the length of each arm.
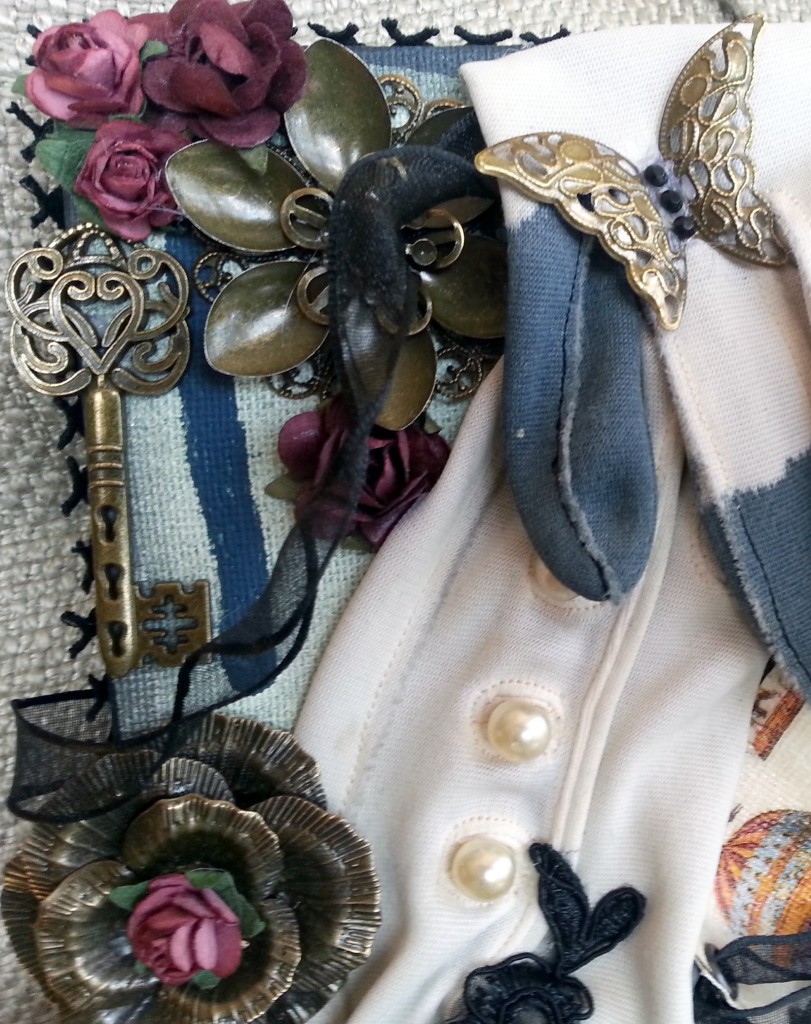 To bring in more romance, but with a metallic edge, I used various antique bronze flowers from MelsCraftBoutique as well as a butterfly from this collection for a faux ring. I also decided to “splurge” and added this hammered gun metal chain that was once a bracelet, some Blue Moon Tokens alpha charms to spell out LOVE (I couldn’t find this set again, but HERE
 is one that spells “AMORE”), and fantastic metal gear heart that I further embellished with more metal gears I had in my stash.
To soften where the metal flowers were added I also layered in a large black rose from this Venice floral trim underneath and some small mulberry paper wine colored roses above and next to the metal flowers. I used some faceted and glittery brads (snipping off the prongs with wire cutters) to some of the flower centers to add a little sparkle as well. In the main cluster in the lower left, I also added a small fancy glass button and a gorgeous large beaded button to fill in some empty spaces and add an even more luxe look.
 At the top of the canvas opening, I thought the raw edge was looking too bare, even though I had some of the beautiful napkin paper there. So a small segment of this gorgeous black Venice trim made a wonderful lacy topper, creating a kind of valance appearance.
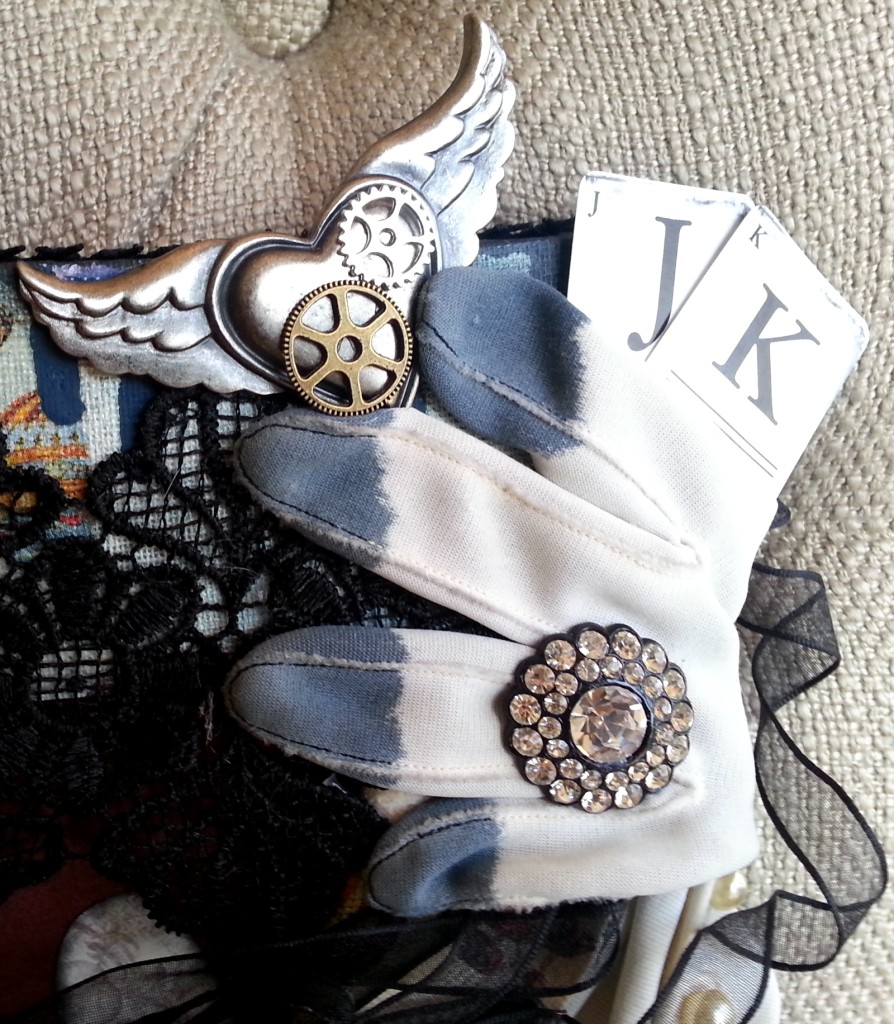
With so much going on everywhere, I wondered if I should leave a kind of space for the eyes to rest and leave the glove on the right empty. Well, I couldn’t do it. LOL I decided to tuck in J and K cards from the Alpha Cards by Tim Holtz Idea-ology set to represent me and my hubby as well as a metal heart with wings metal embellishment (to which I added a couple more metal gear charms) that I’ve been saving for that special project into the fingers. Lastly for that WOW moment, I added a huge midnight rhinestone button as another faux cocktail ring.
The following is a video share of this project:
This altered Steampunk Valentines canvas is being entered into the Simon Says Stamp Anything Goes Wednesday Challenge
Thanks for stopping by. May 2015 bring you and yours much happiness, great health, and wonderful crafty adventures! WOOF
]]>I loved making my first ornaments for this holiday season with a couple of free corks that I picked up at my local Whole Foods store and beautiful laces and trims from MelsCraftBoutique. A little galvanized steel wire from the hardware store, some hot glue, and some old baubles (if you want to add a dangle) with some standard jewelry making tools is all you need.
Inventory at Mel’s shop is updated all the time, but I’ve linked to all the products I used in these altered cork ornaments that she has in stock as of 12/14/2014: Bridal Applique, Shimmery Leaves, Flower Spray, and Mesh Leaves (mine started a slightly different shape, but these could be used the same way).
Remember, my readers can get 10% off minimum purchases of $15 at MelsCraftBoutique with the DT coupon code: CraftyPaws10. This coupon also gets you free U.S. shipping if your order is $40 or more!
MELSCRAFTBOUTIQUE CHRISTMAS SALE!!!
Different items will be on sale each weekday this week (Dec 15- 19, 2014).
Sale prices effective 7 am – 7 pm PST. All items will ship Dec. 22, 2014.
These sale prices can NOT be combined with DT coupon code.
MONDAY, Dec 15: 30% off on all of buttons
TUESDAY, Dec 16: 25% off all flowers
WEDNESDAY, Dec 17: 25% off all appliques
THURSDAY, Dec 18: 25% off all laces and trims
FRIDAY, Dec 19: 25% off all beads, leaves and doilies
The following is a tutorial video of how to make an altered cork ornament:
Thanks for watching! Please subscribe if you want to see more projects and tutorials. Have a great day! WOOF
]]>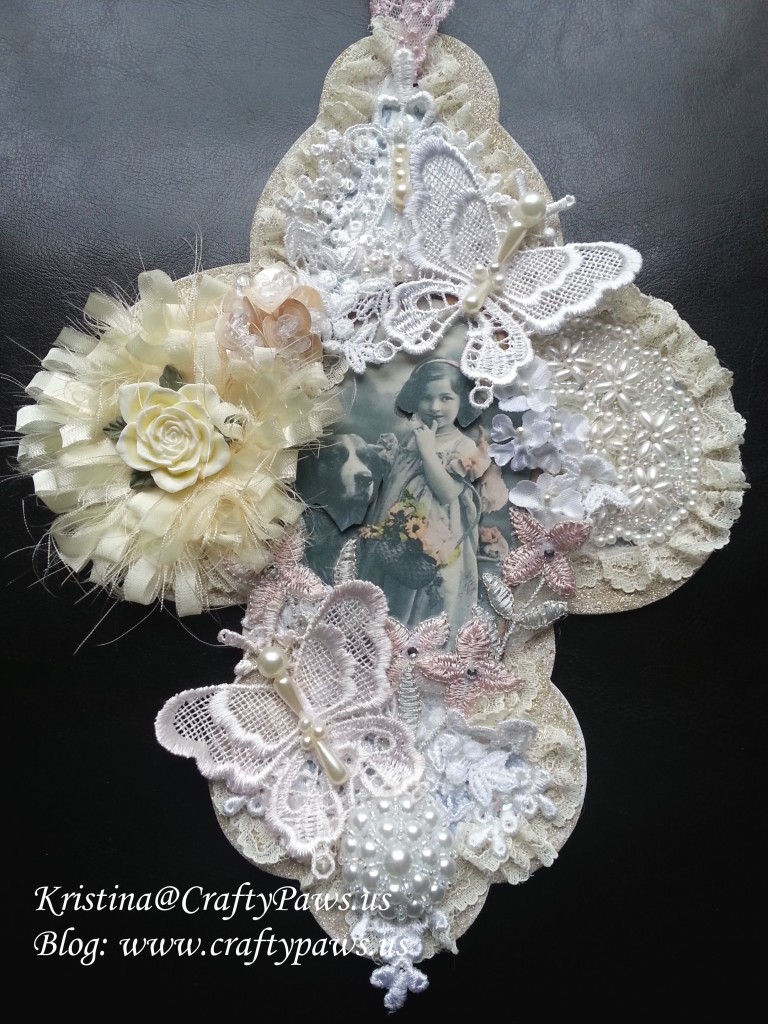 started, I love it and things just seem to come together, but getting started takes a little extra motivation for me. This fleur de lis wall hanging is one that has been sitting on my desk for over a week–that’s a long time for me since my OCD nature has me cleaning and putting things away constantly.
 The video below describes the entire process of creating this wall hanging so I won’t re-hash it here, but let’s just say I used a lot of Liquitex gesso, 2 whole sticks of hot glue, and oh, such gorgeous laces, appliques, trims, and buttons from MelsCraftBoutique! As a guest design team member for Mel’s Zibbet shop, I have the following coupon code: CraftyPaws10 to offer my subscribers so that you can get 10% off your entire order and free U.S. shipping on orders of $40 or more–YAY!
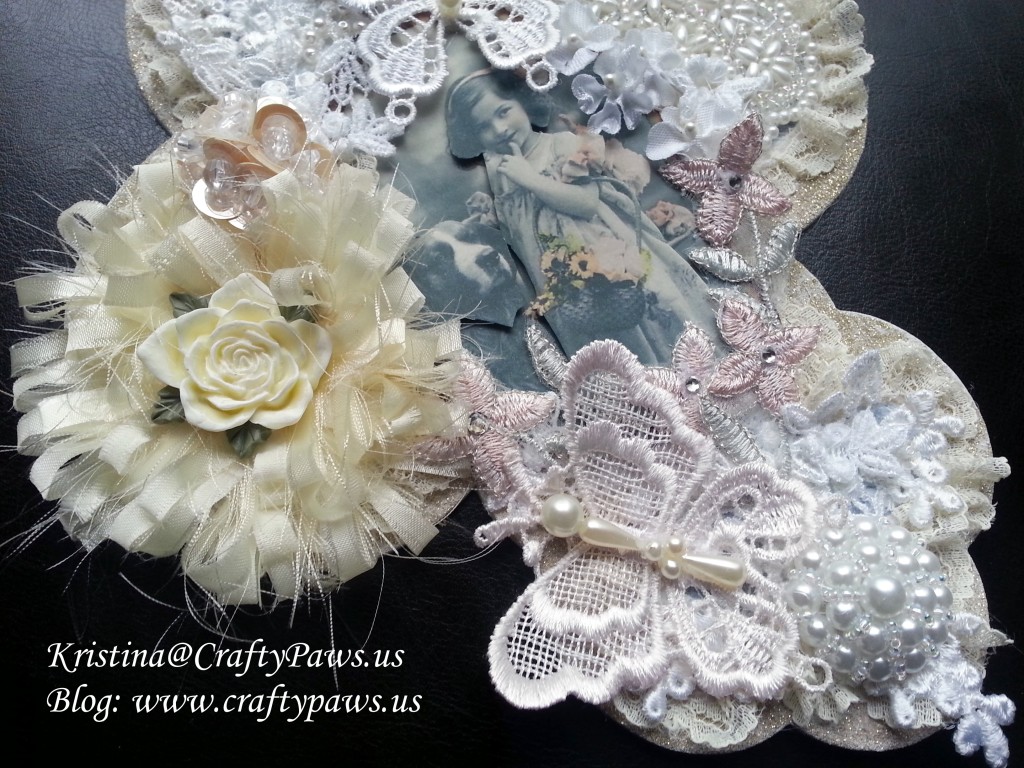
The Copic colors that I used to add hints of color to the adorable vintage picture of a girl and her dog are: V000, RV000, YG00, YR20 and R30. The products I used from MelsCraftBoutique are linked to below. They are stunningly beautiful and make even those of us who are a little Shabby Chic challenged look like we know what we’re doing. LOL
Resin Rose that I used as the center for the handmade flower.
White Venice Rose trim that I tucked into all the little gaps throughout the wall hanging.
White Bridal Beaded lace applique that I used at the top and bottom of the fleur de lis.
Butterfly appliques that add such fabulous dimension and interest.
White Beaded Bridal applique that has super detailed and delicate pearl beading and anchors the whole right side of the fleur de lis.
White pearl button that I used as a focal point toward the bottom of the wall hanging.
Pink pastel flower applique that I cut up and used to frame the bottom of the vintage dog and girl photo.
White millinery flowers that I tucked in to add a little dimension to the right of the photo
This wall hanging is also being entered into The Paper Nest Dolls Anything Goes Challenge
Thanks for stopping by and have a great day! WOOF
]]> Let me back up and share the process of how I prepared the canvas. I used Liquitex gesso to prime the 11″ x 14″ canvas. After drying for a few hours, I used three different stencils and some latex caulk (purchased at the hardware store) to create a fun textured background. I let that dry overnight and in the morning I started adding color.
First I used my Tim Holtz marker spritzer and Chromatix markers (I can’t bring myself to use up Copics or even Distress Markers for this) in Grape 3 and Marine 3 to create a fine misted bright color layer. Then I took my Tim Holtz Distress Ink in Forest Moss and Walnut Stain to add some darker shades to the tops of the caulked areas. I added even darker splatters with watered down black acrylic paint. Lastly to really deepen the canvas base and bring out all the textures, I dry brushed on black acrylic paint. Ohhh that last step really made the background complete because it brought to bear the power of using the full range of light to dark.
The lushness of the canvas comes from the gorgeous black organza and sequin appliques from MelsCraftBoutique. There is a larger flowers one and a medium rose one. Both are stunning. I cut them up to spread across the top and bottom of my canvas. I layered in one spray of vintage style black flowers that I also cut up to form two clusters. Around the whole canvas edge, I painted a purple mauve base to peek through the dainty black heart design lace. That combination of colors adds a romantic Steampunk feeling. To add a little movement, I topped the right flower applique with a black beaded applique (sorry there is only a similar white version in the shop now, but Mel is going to update the shop later this week).
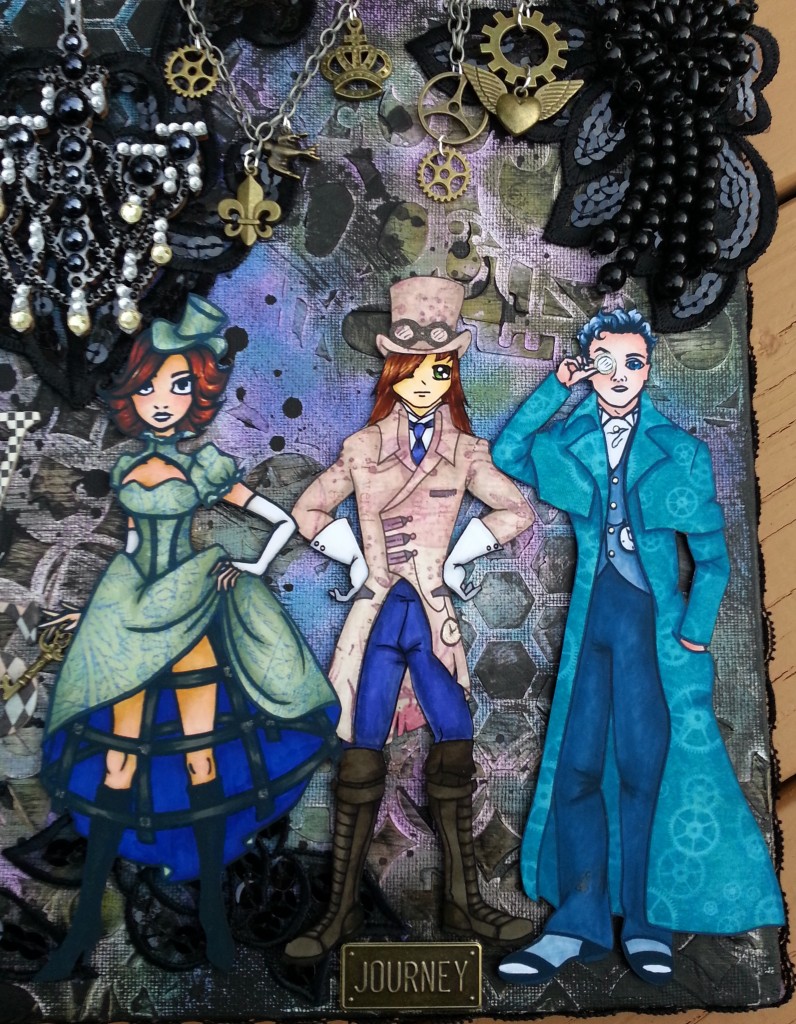
 The Copic coloring of the Steampunk characters was relatively simple. For their skin, I used E50, 51 and 53. Where I wanted blush, I added R20. The gloves, which I wanted to keep “white,” were colored with C1 and 3. Metal goggles were colored with C3, 5 and 7. Brown boots were E57 and 59. All paper pieced clothing was shaded with W1 and 3. Steampunk Barbies’s blonde hair was Y 32, YR24 and E23. Her blue green eyes were BG 72 and 78. Her ruffled skirt is BG70 and 72 with a top coating of clear Wink of Stella. Her jacket is paper pieced from a patterned paper from K & Company Designer Paper. Steampunk Willy’s tie and pants are BV13 adn 17 and his jacket and top hat are paper pieced from the DCWV “The Once Upon a Time” collection. The accents on his jacket are colored with V15 and 17. His brown hair is E55, 57 and 59. For Steampunk Scarlett and McSteamy, I followed the same coloring and paper piecing as I shared HERE and HERE.
I blinged out a wood veneer chandelier (which I first painted black and then made look metallic with silver Rub ‘n Buff) with black, clear, and champagne colored rhinestones. This was a tedious and time consuming job, but the wow factor definitely made it worthwhile. I hung it from a chain, which I swagged so I could add more movement to the project and additional interest with some small antique bronze charms.
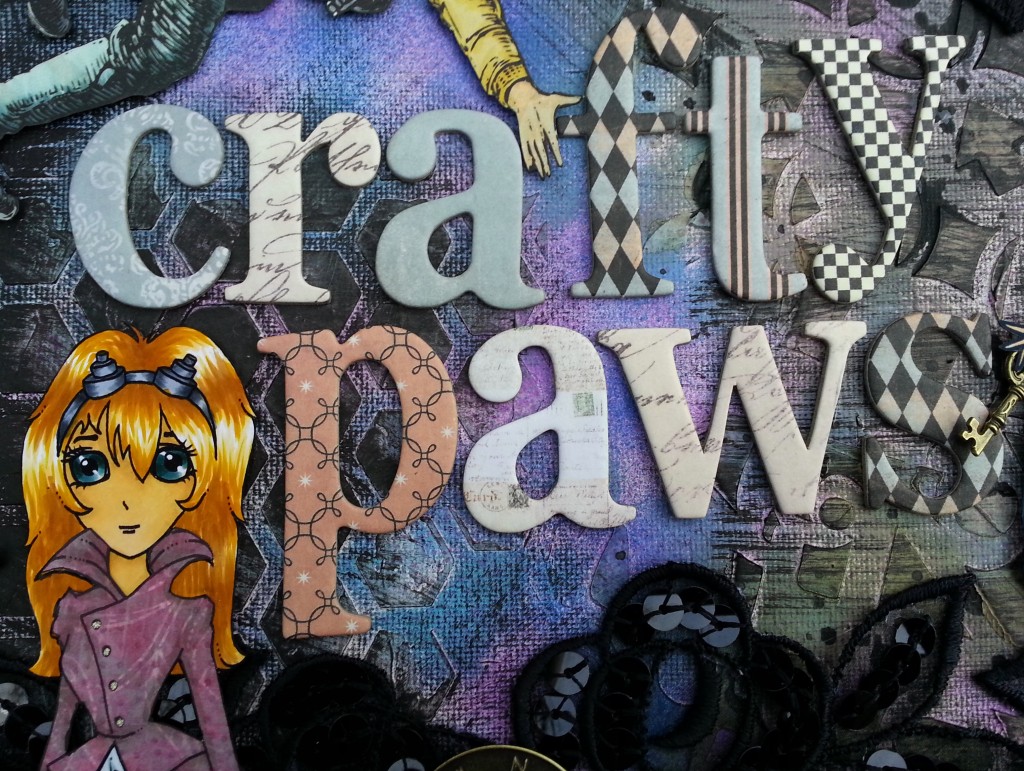
In addition to my own digis, I wanted my YT crafty name sign to include references to what I think and how I feel about crafting. My blog slogan is “remember to PAWS and enjoy the journey.” I wanted to reference that and found the perfect metal word sticker “journey” that Steampunk Willy could stand on. The flying man from the Steampunk Debutante paper is a great expression of taking risks and exploring the unfamiliar. The metal sticker with the arrow and the word, “explore,” that I could position by the flying man was perfect. Lastly, I wanted to include a metal compass to reference traveling in different directions and hopefully to reach new crafty destinations. Finally, I used some 7 Gypsies chipboard letters from their Venice collection, which I thought was whimsical and represented the fun that I have on my crafty adventures.
The following is a video share of this project.
This altered canvas is being entered into the following challenges:
SanDee & Amelia Steampunk November Destinations Challenge
Miriam’s Crafting Blog Steampunk Challenge
Challenge Up Your Life Anything Goes Challenge
Simon Says Stamp Wednesday Anything Goes Challenge
The Aviary Paper Wings Anything Goes Challenge
Thanks for stopping by. Please subscribe if you wish, and have a great day! WOOF
]]>
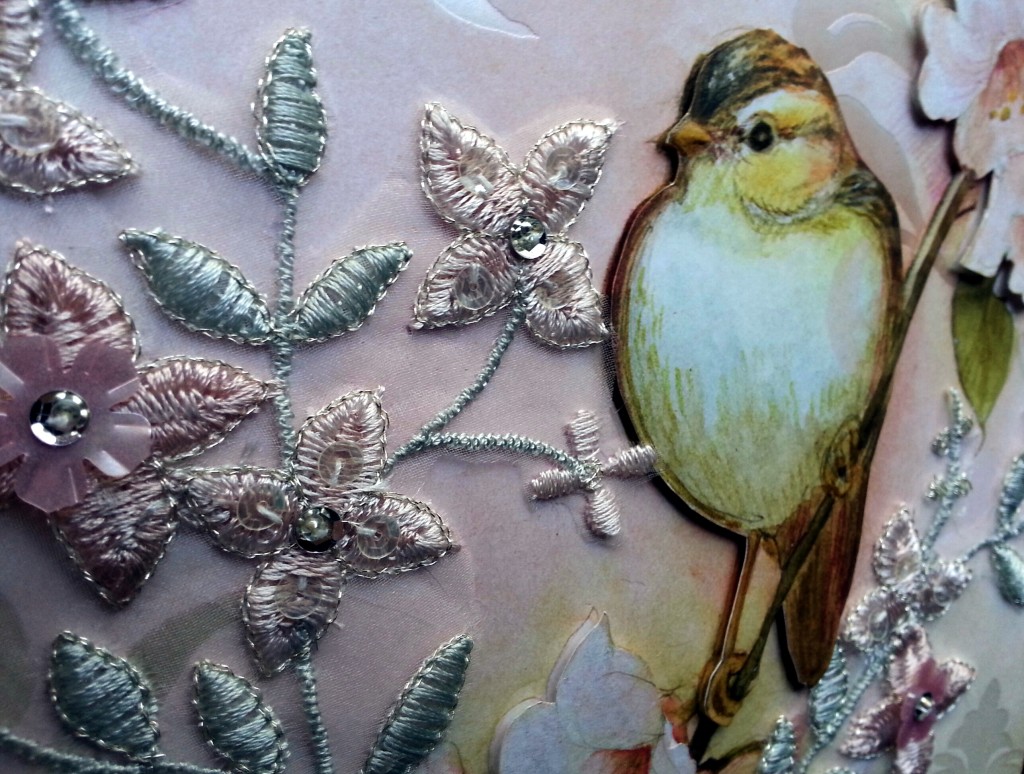 have to worry about the seams of the paper being perfectly matched. I covered the box using three 12×12 sheets of beautiful pink floral bird foil paper by K & Company. All that ground work took some time, but that pretty base was the work that made the rest of the embellishing with all the trims from MelsCraftBoutique pure fun. {MelsCraftBoutique Coupon Code: CraftyPaws10 for 10% off your entire purchase and FREE U.S. shipping on orders of $40 or more}
On the top of the box, I popped up a second fussy cut image of the bird and a few of the flowers from the paper using foam adhesive. To add sparkle and shine to the images I used my clear Wink of Stella and a bit of Glossy Accents. The trim that inspired this whole project is used most here. That fancy pastel flower applique that has a shimmery thread along the edges, fun flower sequins that have movement, and detailed sequins and beads at the flower centers takes my breath away.
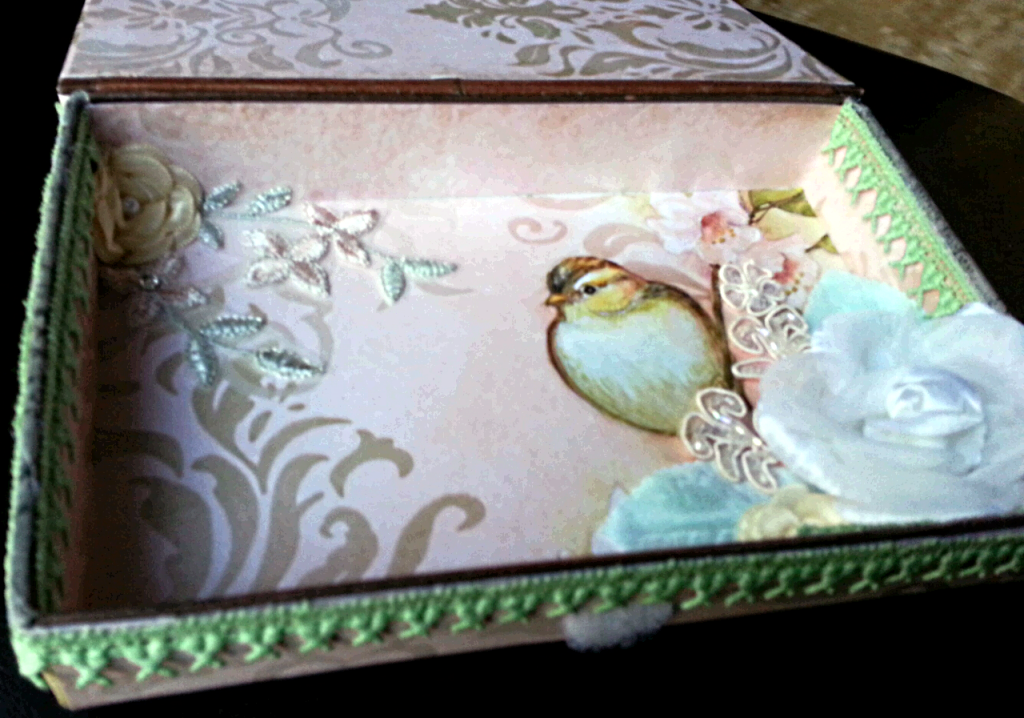 All around the sides of the box, I used a sweet embroidered heart trim in mint green. I thought that added soft color that coordinated nicely with the leaves in the paper. For the front flap, I wanted a WOW factor so I used the gorgeous beaded light pink flower trim that has such a sparkle from all the sequins. At the center I used an ivory rose resin flower, to mark where the hook and loop closure was underneath and to create a center focal point on the flap that could take the handling that area would likely see.
I did not want to overdo it on the inside of the box, as I wanted the box to be functional. However, I couldn’t help but embellish a little bit. I used one large charming white rose (which leaves I sprayed with green shimmer spray by Recollections) and two of the dainty ivory satin flowers. I also used all the bits and snippets of trim that were left over from the other areas of the box. I did not waste one inch of trim; they were too beautiful to let go to waste.
The following is a video share of this project:
This altered box project is being entered into the October Lawnscaping Patterned Paper Challenge
Thanks for stopping by! Please subscribe if you wish, and have a great day! WOOF
]]>
 laces, doilies, etc. are so beautiful and her prices are amazing! MelsCraftBoutique Coupon Code: At check out, use the code: CraftyPaws10, for 10% off your entire order and free U.S. shipping on orders of $40 or more!
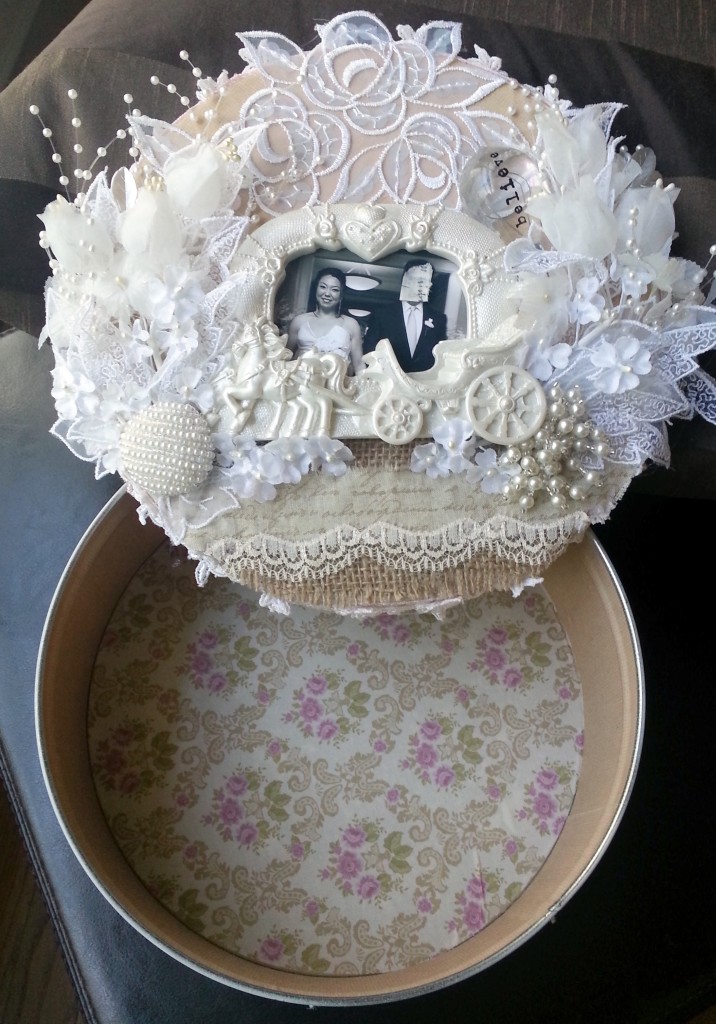
I wanted to make a special project for my first guest design team (GDT) project so I decided to upcycle a tin and alter it for an anniversary gift for my hubby (we recently celebrated our 6th wedding anniversary in the ER because I was ill with a kidney infection–sigh). I used a few things that were gifted to me by sweet crafty friends (DCWV fabric paper from Elaine (YT: todaylibrary); a bit of script fabric and burlap from Milissa (YT: Milissa d); and the carriage frame from Becca (YT: Stamping with Beccajb)), but everything else was from Mel’s shop.
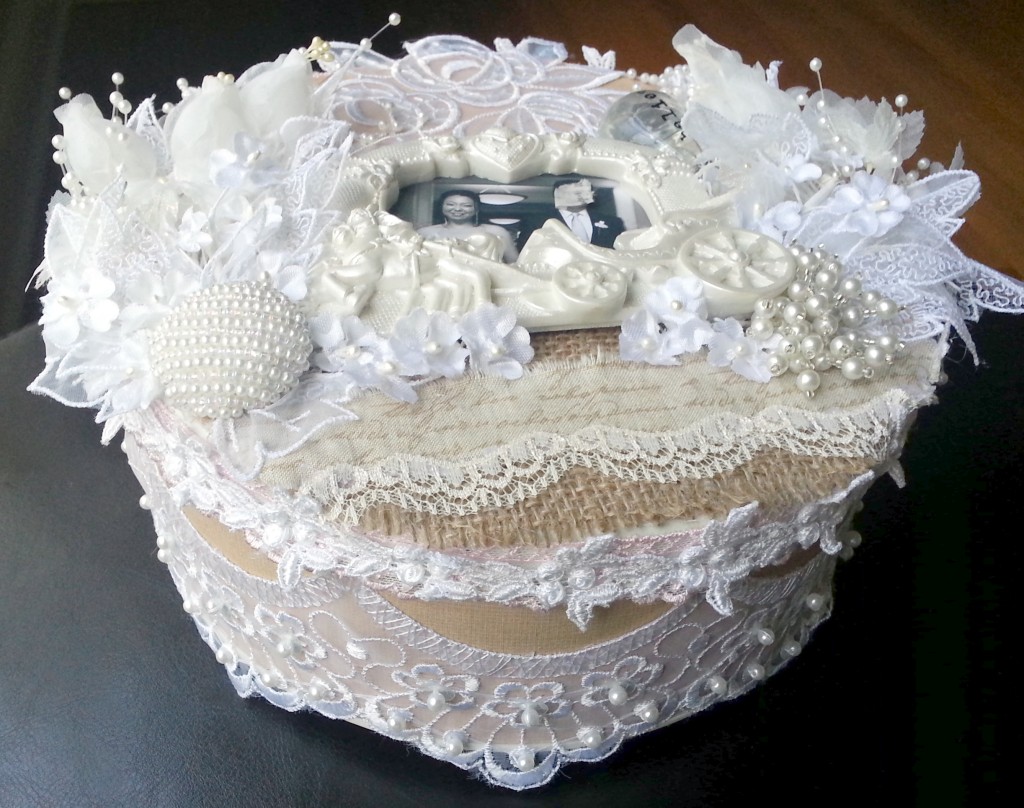 The side of the tin is really decorated with only one stunning embroidered bridal lace with pearls. I thought this lace was so beautiful that I wanted it to stand alone in all its glory. The side of the tin lid I lined with a soft pink embroidered flower trim that just overhung the edge of the lid and over top of that I added this very rich Venice rose trim.
Mel’s flower sprays are so luxe! I hardly had to do anything to them other than tuck in a few extra small millinery flowers and a couple of her shimmery vintage leaves here and there. Above the carriage frame, I used a beautiful organza applique of roses with iridescent sequins to create a kind of “sky” with the roses representing puffy clouds. For the “road” beneath the carriage, I used a bit of burlap, a snippet of fabric with pretty script and a dainty scalloped lace. For a touch of whimsy, I added a gorgeous round beaded applique behind the back wheel of the carriage; with the movement from the beads, it is reminiscent of a carriage racing forward kicking up some “dust.” To balance off that fabulous beading (and to give me a place to tuck under the base of the floral spray) I added a beautiful vintage button to the front of the carriage.
The following is a video share of this altered tin:
Thanks for stopping by! Please subscribe if you wish, and have a great day! WOOF
]]>