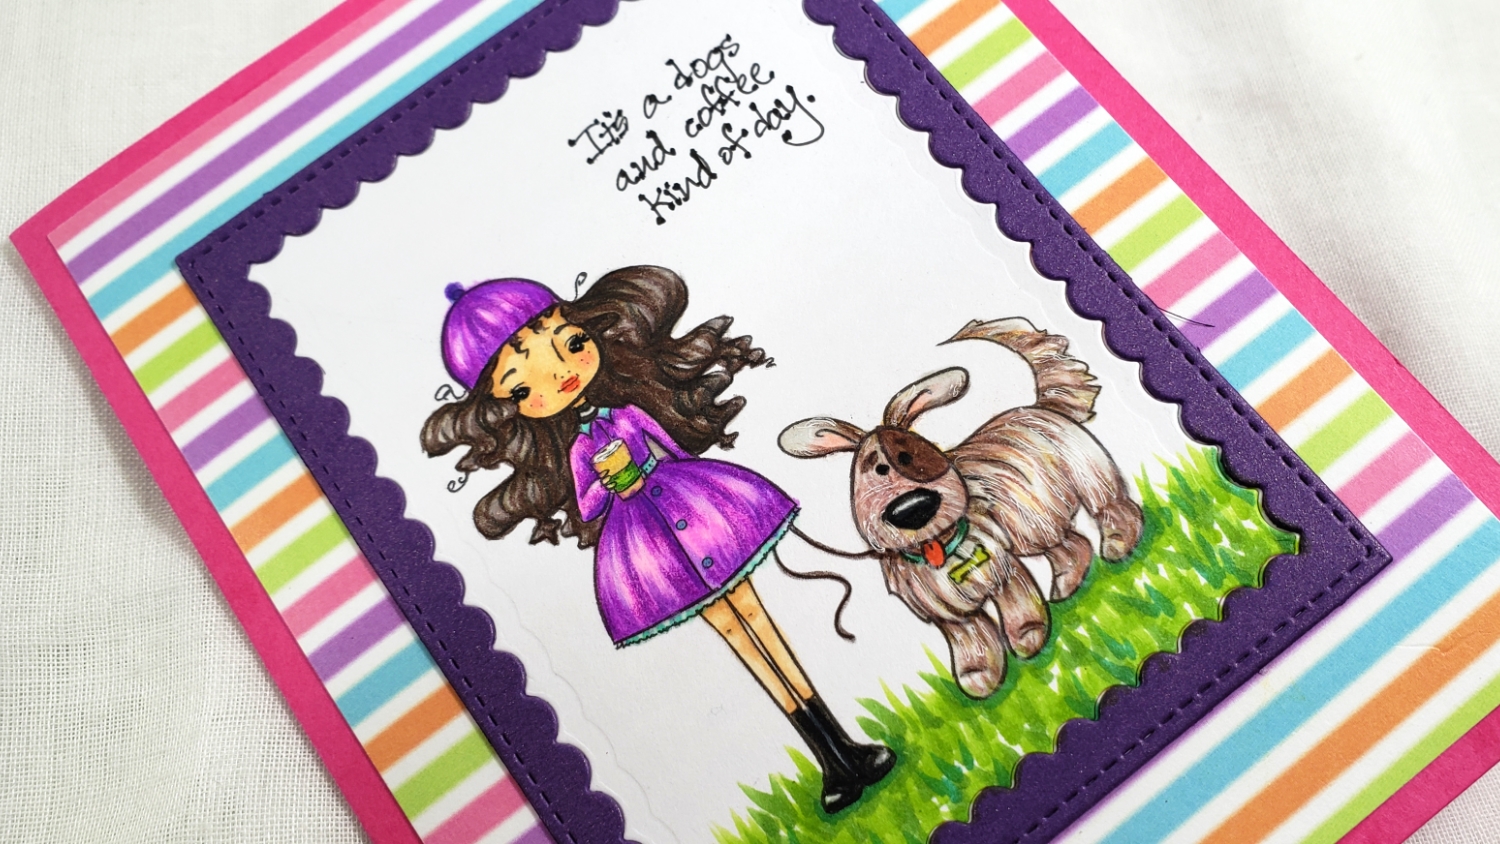
As my garden is in full spring bloom and I’ve been working outdoors a LOT painting my patio furniture, I thought I would pick some bright spring colors for this image. I first colored up Anna and Spike with the following Copics:
Skin: E51, E21 and R20 for blush
Hair: W1 and W3
Dress and hat: RV02, V04 with trim of dress using: BG11, BG13
Coffee cup: W1, YR21, YG25
Spike: W1, W3, YR21 and R20 for ears; Dog Collar: BG11, BG13; Dog Tag: YG25 and YR21
Lips and tongue: R08
Boots: W5 and W7
Grass: YG25, YG17 and G17
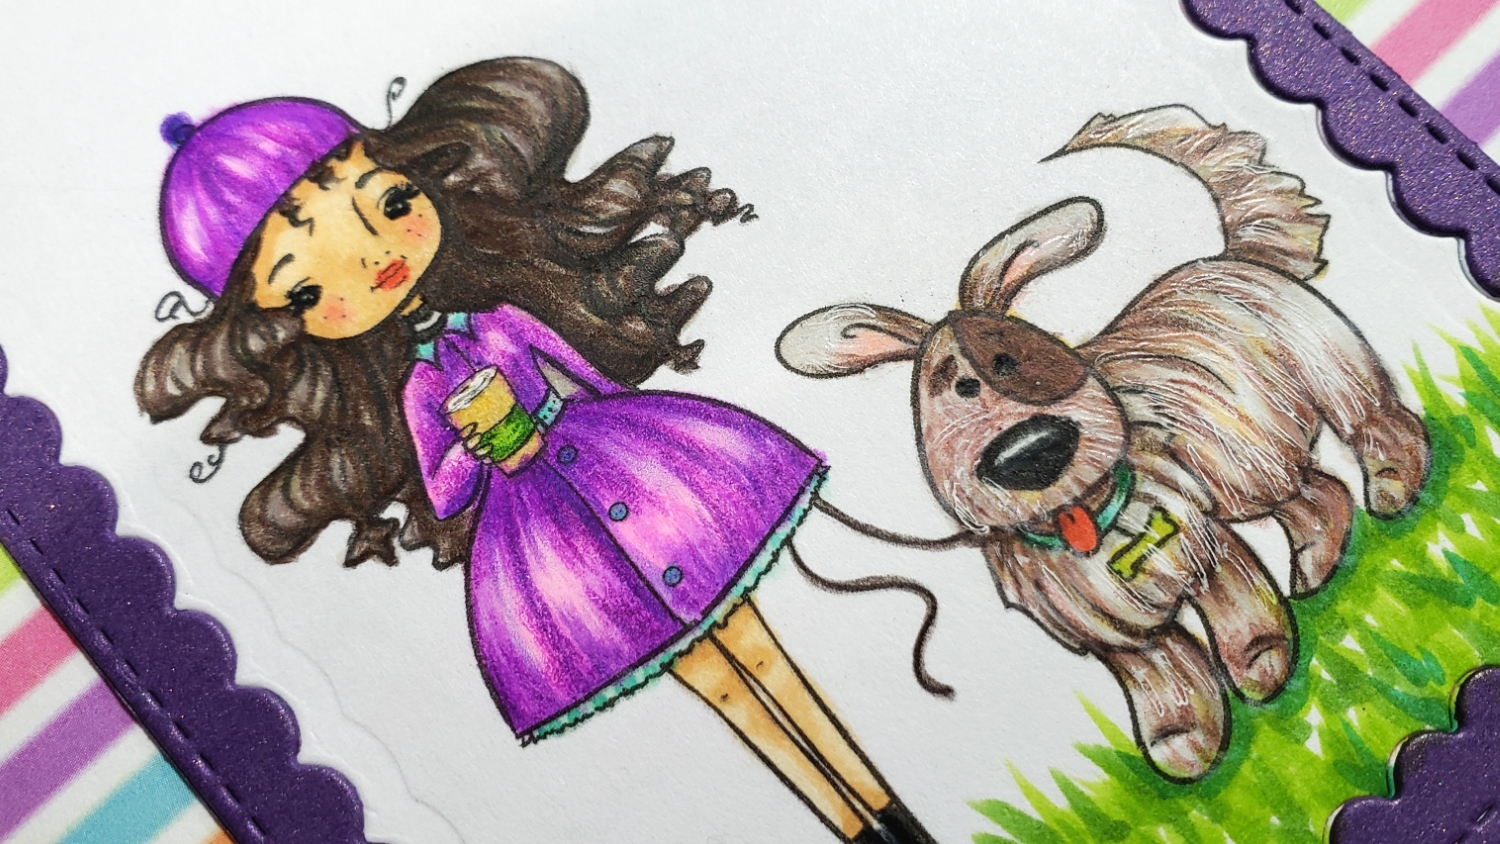
Then to add detail and texture I used the following Prismacolor Premier Color Pencils:
Hair: Metallic Gold (PC 950), Dark Umber (PC 947), Black (PC 935) and White (PC 938)
Dress: White (PC 938), Dahlia Purple (PC 1000),and Violet (PC 932)
Boots: Black (PC 935) and White (PC 938)
Spike: Chestnut (PC 1081), Dark Umber (PC 947), and White (PC 938) (I also added extra white fur with a Sakura White Gelly Roll Pen)
Coffee cup and Dog collar: Dark Green (PC 908)
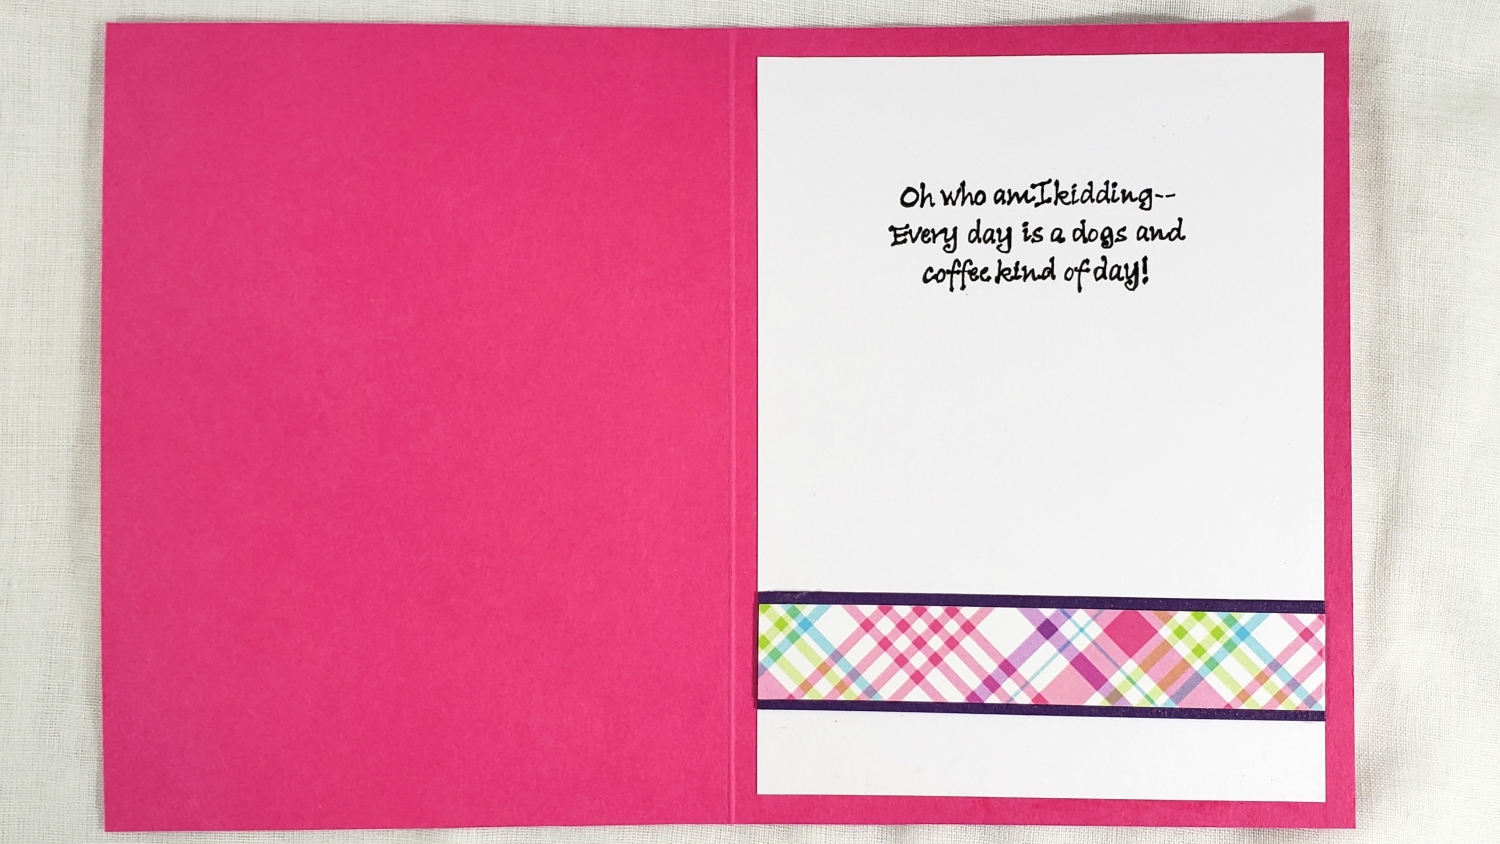
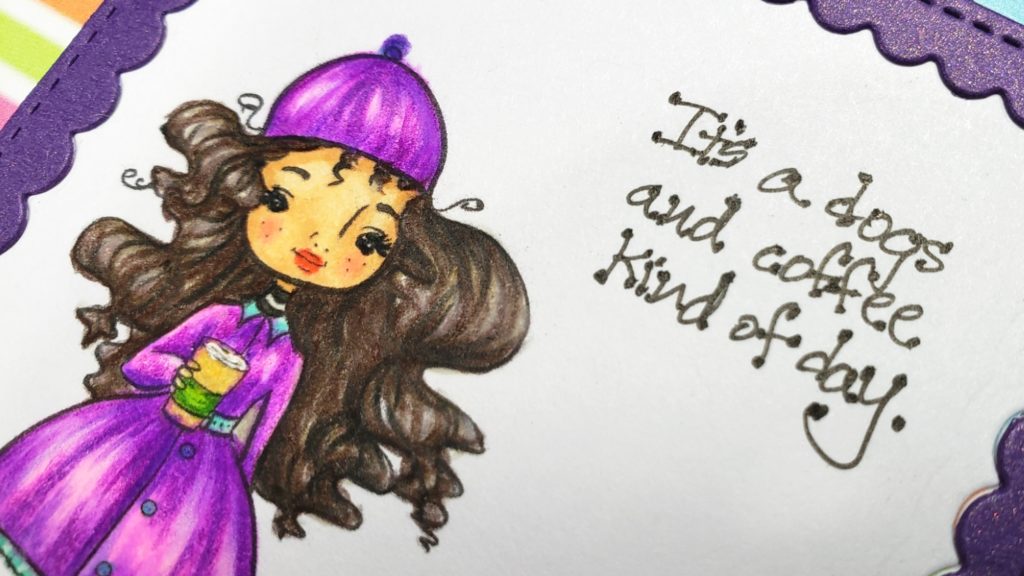
To keep the card focused on the colored image, I used complimentary colored card stock in bright pink for the card base, a fun striped rainbow colored card stock for the background, and a dark purple card stock for the frame around the picture. The frame was die cut using the smaller of the Pretty Pink Posh Scallop Frames Die Set. For a simple sentiment, I used a Faber Castell Pitt Pen in XS to hand write: “It’s a dogs and coffee kind of day.” on the front, and on the inside, it says: “Oh who am I kidding — Every day is a dogs and coffee kind of day!” And to keep the continuity of the card going, I used a plaid paper (the reverse of the striped paper on the card front) and a bit of extra dark purple card stock to add a patterned detail on the inside liner sheet.
CLICK on the following picture to watch a process video of creating this card (start to finish):
Next on the YouTube Craft Room Helpers Collaboration + Giveaway lineup is Jeanie – Scrapbookingmamaw: https://youtu.be/MJRJ2P5cvI0
Crafting By Design Anything Goes Challenge
Simon Says Stamp Work it Wednesday Pet Project Challenge
Word Art Wednesday Anything Goes Challenge
Creatalicious Anything Goes Challenge with Optional Flowers
Through the Craft Room Door Anything Goes Challenge
Crafts Galore Encore Anything Goes Challenge
]]>
I wanted to use non-traditional Valentines colors because, really, how often do we dress in the colors of a holiday? LOL Anyway, I also LOVED how Olga (the designer and owner of LBBS) drew her eyes so I knew I wanted to accentuate them with beautiful greens.
In addition to a Sakura White Gelly Roll Ink Pen for the dots on her dress, the following are the Copic colors I used:
Hair: E55, 57, and 59
Skin: E50, 51, and 53
Shoes and Socks: C7 and 1
Green dress and eyes: G43, 94 and 99
Heart: R83 and 85
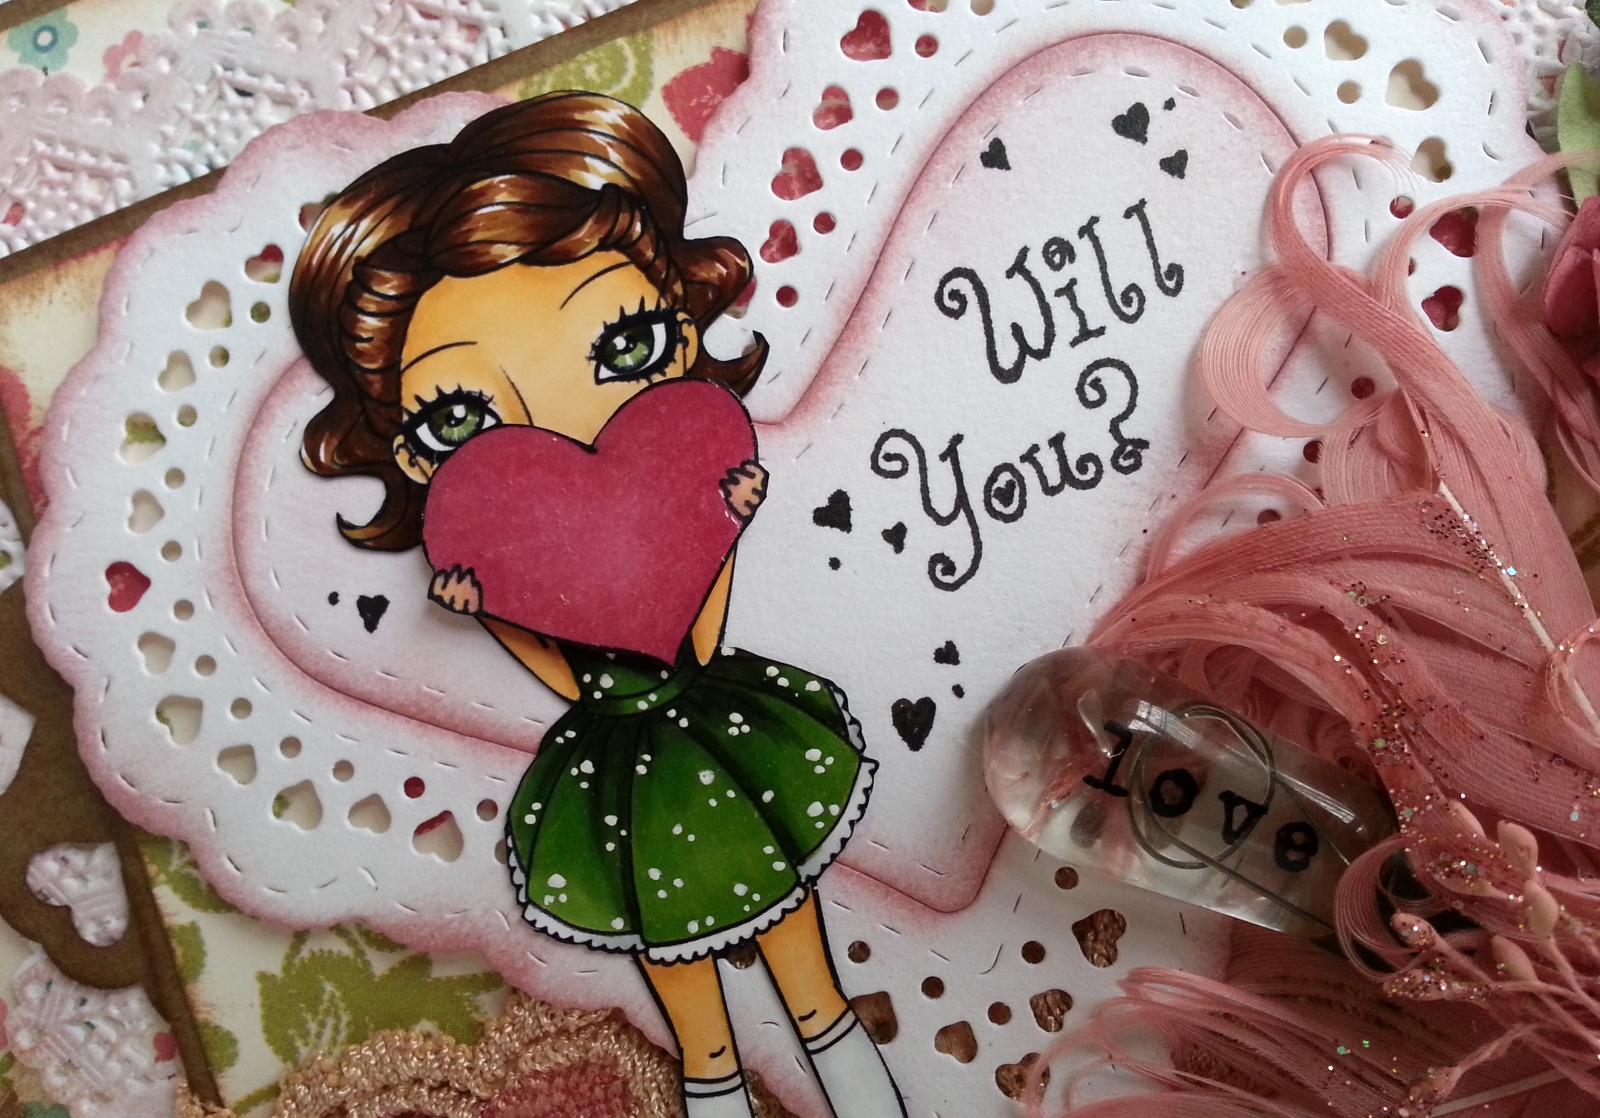 I don’t often make heavily layered cards, but I was totally in the mood for something detailed so I went for it. I started with a kraft card stock base and then layered a small flower patterned paper, then a square doily (which I dabbed with Ranger Tim Holtz Distress Victorian Velvet Ink
), another layer of kraft card stock, then another bolder flower patterned paper. I also decided to add a little peak of an EK Success Open Heart Scallop Circle punch out, which I punched out of a scrap of kraft and dabbed with Ranger Tim Holtz Distress Vintage Photo Ink
. I hot glued a snippet of peach colored stretchy heart lace from my stash to add a little softness and then to brighten and highlight the hearts, I colored the centers with Copic R85. Lastly I die cut a heart doily using a La-La Land Crafts Heart Doily Die
, which I also dabbed with Victorian Velvet, to finish it off and bring it in line with the other colors on the card. I popped this heart up on foam adhesive and then glued the little girl on top. Whew! That’s a lot of layers for me. 🙂
I put a lot into the flower cluster so it could hold up to all those layers. I started with a dramatic dusty rose colored feather flower from the Prima Le Coque Mystere collection. Then I mixed in mulberry paper leaves and flowers in darker rose and champagne yellow colors in varying sizes. I also added a Prima Junkyard Findings Vintage Light Bulb with the word “love” on it and tucked in a text bead with the word “kiss” on it. At this point I realized that the green of the girl’s eyes and dress needed to be repeated somewhere. Luckily I had the perfect pale green flat back pearls that I could use on all four corners of the card.
I decided to hand write “Will You?” on the heart doily to play off the coquettish look of the girl image, and I doodled a few little hearts and dots. The last bit of fun I added (really to cover up the garish red color I had originally colored the heart) was to print out the digi again and fussy cut out the girl’s hands and heart to pop them up on foam adhesive. This gives the impression that she is holding the heart forward and adds a bit of extra dimension. Finally, to add some shine and shimmer, I added Glossy Accents over the heart she is holding and Clear Wink of Stella
on the lacy part of the heart doily.
The following is a video share of this card:
This card is being entered into the following challenges:
CARDZ TV Any Occassion Card Challenge
Time Out Challenges Valentines with a Twist of Hearts
Raisin Boat Love Is In the Air Challenge
Simon Says Stamp Wednesday Have a Heart Challenge
Thanks for stopping by and have a great day! WOOF
]]>
 For the sentiment, I printed it out on my Canon PIXMA MX922 Wireless Color Photo Printer with Scanner, Copier and Fax
 in the perfect shade of green to match the papers I wanted to use. For the card base, the patterned papers, the cut-a-parts, and even the twisted blue raffia are all from the Jillibean Soup card kit called, “Birthday Bisque”. The vintagey feel seemed well-suited for this card.
I colored Simon on Bike with the following Copic colors: Skin: E50, 51, and 53; Hair: E 55, 74 and 59; Jeans: B93, 95, and 97; Tires: C9; Jacket: C7; White T-shirt: C1; Chrome of bike: C1 and 3; Red of motorcycle: R39 and 89. I also made some glare lines on his glasses with a White Sakura Gelly Roll Pen and I added Glossy Accents
over the glasses as well as the metal parts of the bike.
The trickiest part of this card was fussy cutting the image. The narrow and inside sections were difficult to cut, but I managed with a sharp X-ACTO #2 Knife. 🙂 After the detailed cutting, I popped up the whole image using foam adhesive, with the front wheel straddling the raffia ribbon to make it look like it was even further forward.
The following is a share of this card:
This card is being entered into the Simon Says Stamp Monday Transportation Challenge and
Seize the Birthday Anything Goes Challenge
Thanks for stopping by! Please subscribe if you wish, and have a great day! WOOF
]]>
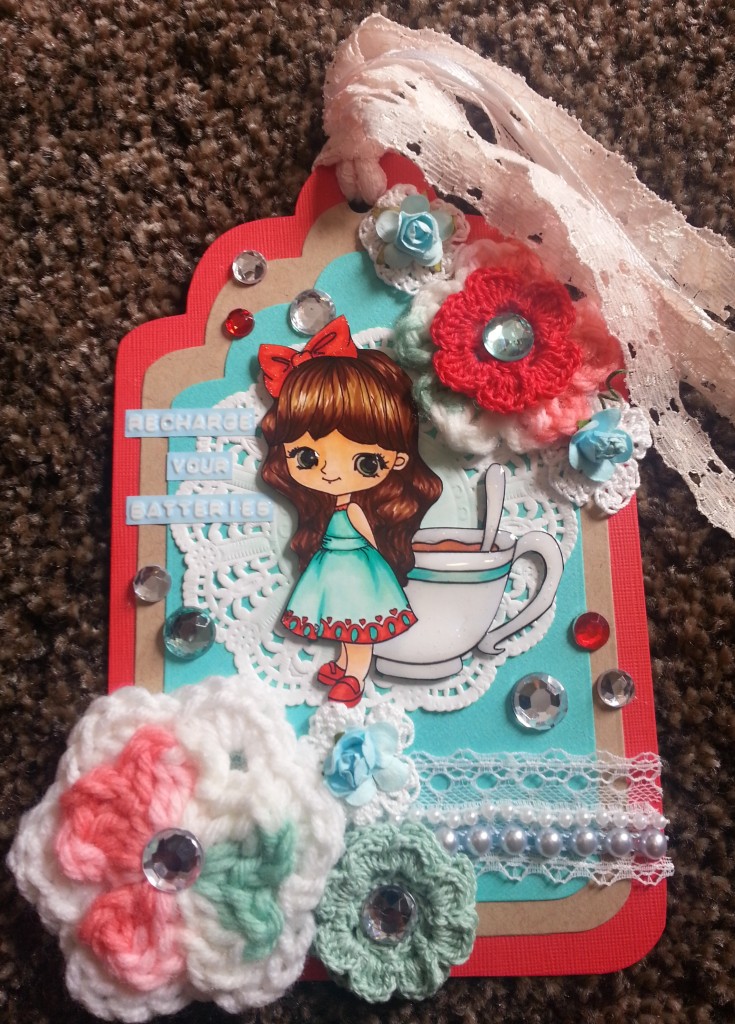 stock in those colors and make a sweet tag for a crafty friend, Elena (YT: Eleval Labat). She has been going through a lot, and I hoped that this tag with the “recharge your batteries” sentiment by Sticko might bring a smile to her face. DIEMOND DIES COUPON CODE: thankskristina gets you 10% off your entire purchase and free shipping on orders of $35 or more!
I used the three largest nesting tag dies to make the three tag base layers. Then I added a white paper doily, which I softly colored with my BG10 Copic marker to highlight the main focal image. The stamped girl is a Little Blue Button Stamps image called “Miss Lilly Tea.” What a cutie patootie, right?! I colored Miss Lilly up with the following Copic colors: Hair: E55, 57, and 59; Skin, E000, 00, and 11; Eyes: G94 and 99; Tea: E25 and 21; Cup and spoon: C1; Teal color on cup and dress: BG10 and 13; Red of bow, dress and shoes: R22 and 08.
I then rummaged through all of my crochet flowers and found some fabulous ones that coordinated perfectly with this color palette. They were all made for me by my crafty friends Brenda and Cheryl (YT: Brendahdp77 and delygirl1961, respectively). I added some small teal mulberry paper flowers on top of the smallest white crochet flowers and hot glued clear, aqua and red bling for some fun sparkle. To add a little more softness, I also added a bit of lace and small and medium pearl trims. The tassle at the top was made with delicate satin ribbon and flower lace. Lastly, I added Glossy Accents over Miss Lilly’s eyes, and over the tea cup and spoon. This is a special addition on this tag for Elena because she was the first person who told me about Glossy Accents! 🙂
The following is a video share of this tag:
This tag is also being entered into the following challenges:
Inspired by Stamping IBSIC #87 Color Challenge
Challenge Up Your Life Anything Goes Challenge
The Aviary: Paper Wings Productions Anything Goes Challenge
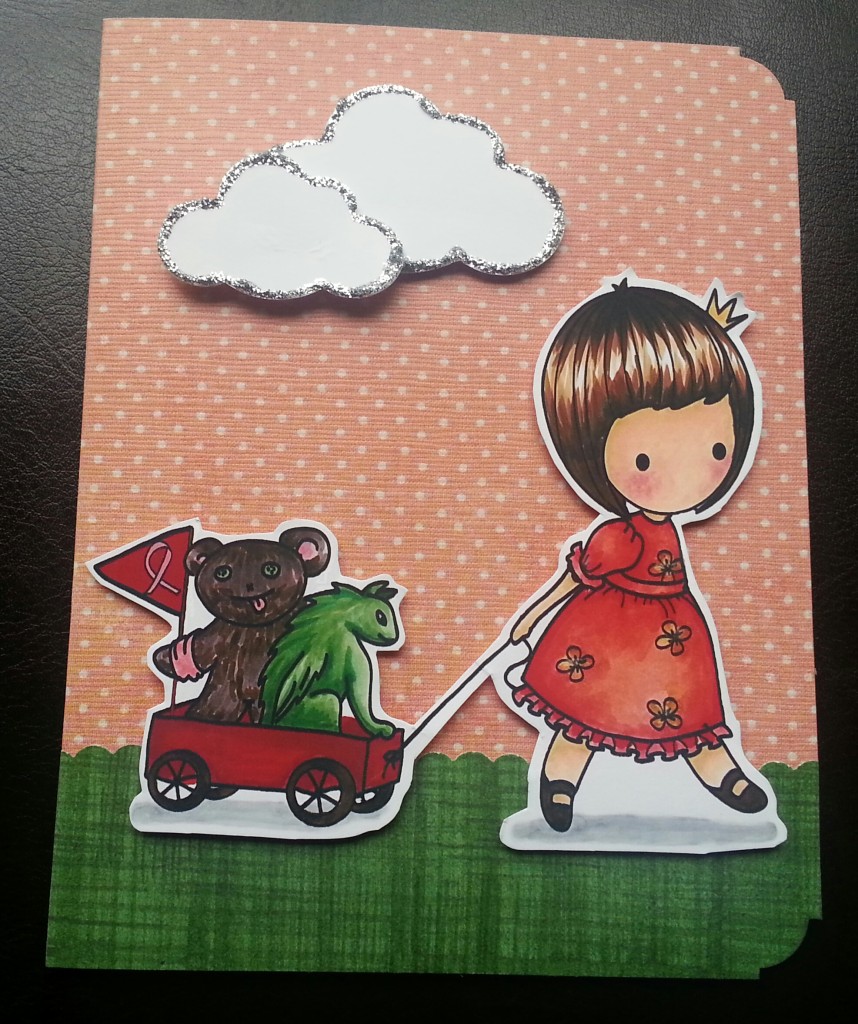 October is Breast Cancer Awareness month, and one of my crafty friends, Beth (YT: Bethsscrapbookroom) is hosting a challenge asking folks to make cards or tags or something for folks battling breast cancer. I had this adorable digital stamp called, “Help is Coming” from Olga Ishenko, the designer of Little Blue Button Stamps, and knew this was the perfect opportunity to use it.
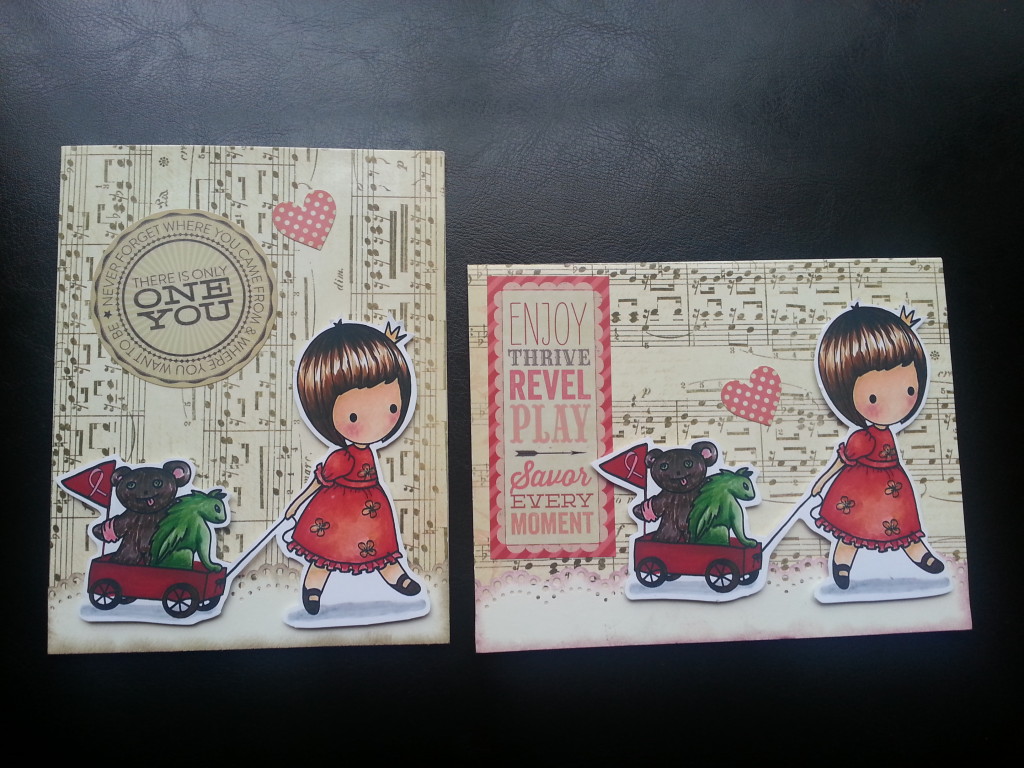 My big dilemma was how was I going to make a handful of cards since I am such a slow Copic colorer? Then I learned from another crafty friend, Candace (YT: Candace Scarborough) that after coloring an image, one could scan it into a computer and then print out as many colored copies as needed. Brilliant! So I took my time and colored in one image very carefully using the following Copic colors (yes, there are a ton of colors in this one): Dragon: YG 61, 63, and 67; Teddy bear: E70, 74, R30, and RV13; Dress: YR00, 02, 07 and E07; Skin: E50, 51 and 53 and R30; Wagon and pennant: YR 07 and E07; Hair: E55, 57 and 59; Shoes E59; Teddy Bear’s bandage: R30 and RV13; Crown and flowers on dress: YR31 and YR24; and Shadow under girl and wagon: N0 aand N2.
After scanning it in, I was also able to clean up some of the areas where I colored outside the lines using a free program called paint.net, before printing out multiple copies to fussy cut out and add to cards! What would have taken me a week to create, I was able to create in 1 1/2 days! YAY!
The following is a video share of the cards:
This first card is being entered into the Simon Says Stamp Work it Wednesday Color Recipe Challenge and
Kraftin’ Kimmie Stamps Wonderful Wednesday Anything Goes Challenge
Thanks for stopping by and have a great day! WOOF
]]>The card base is Bazzill pink textured cardstock. I layered a scrap piece of white cardstock and then used an extra piece of pink cardstock which I ran through my Big Kick with a happy birthday embossing folder. To pick up the raised parts of the embossed paper, I smudged on white ink with my index finger. To add more interest and a springy look to the background, I also glued white flower and small pearlescent sequins.
The cutie patootie stamped image is from Little Blue Button Stamps and is called Miss Lilly Big Cupcake. I colored her up with my Chromatix and Copic markers and added some extra sparkle and shine with Glossy Accents on her eyes and the cherry and glitter glue on the frosting of the cupcake. To give Miss Lilly and the cupcake something to stand on, I used my Martha Stewart doily edge punch and added some sheer blue ribbon to pick up the color of Miss Lilly’s headband and dress.
Thanks for stopping by, and have a great day! WOOF
]]>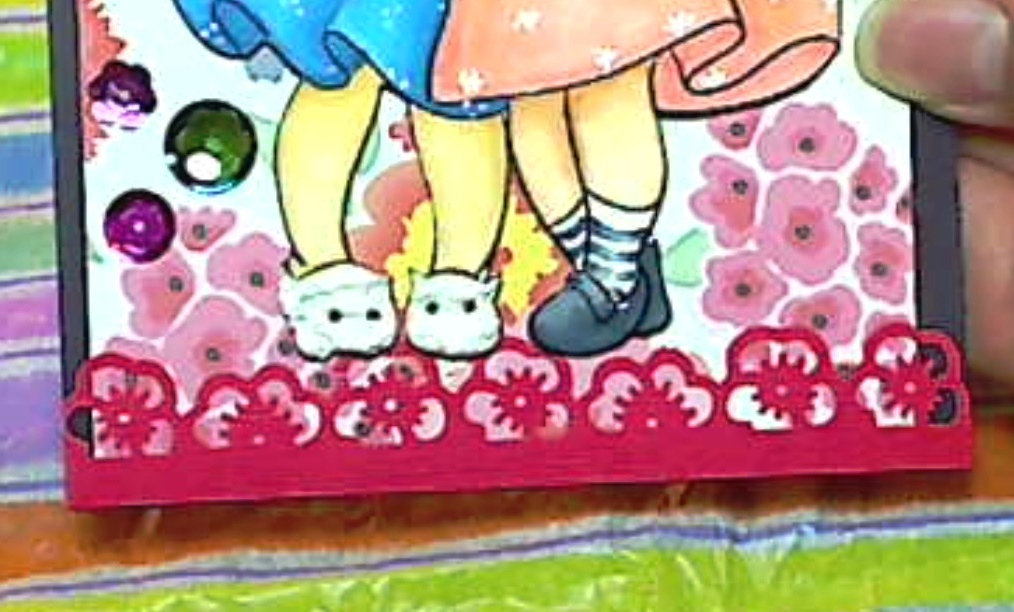 I wanted to make a cute pocket tag for a crafty friend (YT: Charlotte Miller) who has two little girls. When I saw this super cute pair of girls as a freebie digi stamp from Little Blue Button Stamps, I knew it would be perfect for what I had in mind. I colored them up using my Copic markers (I have 26 and am pining for more but am waiting patiently for a sale), making them blondes (like Charlotte) but making sure to use different shades for skin and hair so that they looked like individuals. Does that make any sense? I used my Martha Stewart pansy edge punch to make a cute border on the top and bottom of the tag (this also gave the girls something to “stand” on). I also played with a new-to-me material called Liquid Applique (which you squeeze out and then heat up with a heat tool to puff up). What fun it was to be able to make the little kitty slippers one of the girls is wearing dimensional and puffy!
I used a portion of a rich eggplant colored box as the tag base, used beautiful scraps that were left overs from a shipping box that had been decorated with Dear Lizzy Lucky Charm floral patterned paper, little scraps of orange and red card stock from my scrap box (yes, I only keep one and it is 1.5″ x 10″ x 13″), and even some chenille ribbon that I re-used from lovely packaging that I received in a happy mail. Of course there were new satin ribbons and some fun bright sequins too, but the vast majority of this project was made from bits and bobs. I love that!
If you are feeling up for a new crafty challenge, you might consider trying to make a project with only 3 new things (I didn’t count adhesives in that number). I certainly had fun trying it. 🙂
This is also entered into the Simon Says Stamp Work it Wednesday.
The following is a process video in which I assemble this tag:
Thanks for stopping by! Hope you are having a great day. WOOF
]]>