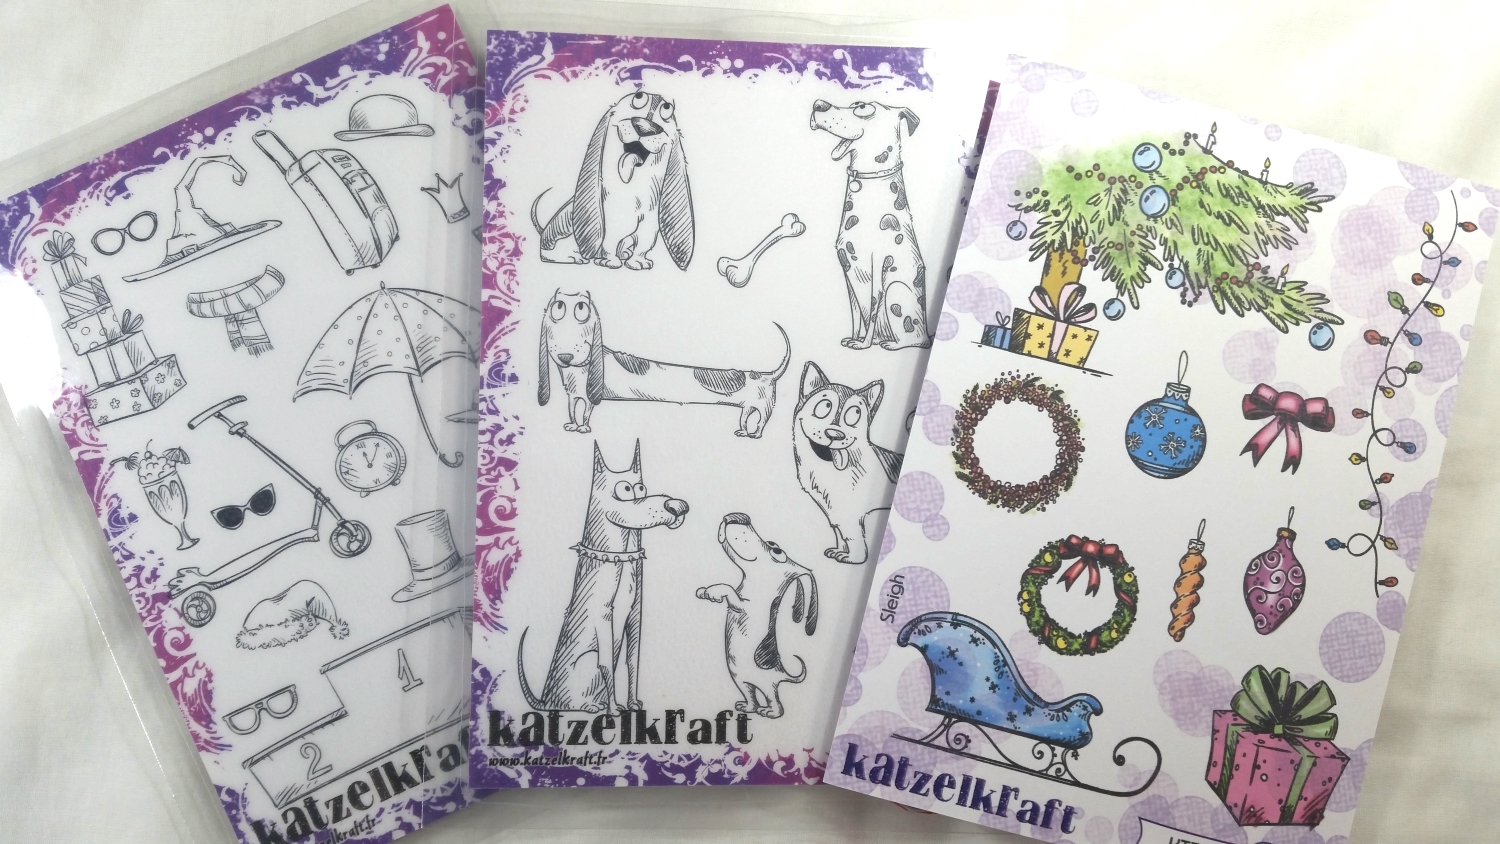
I first Copic colored all the images with the following colors:
Max Dog: White: W0; Eyes: YR24, E23 and E25; Brown spots: E23, E25 and E29; Light brown face: E11, E13, E23
Faux antler: Y11 and Y19
Scarf/present: BG11, BG13, R35 and R39
Sleigh: Y19, R35, R37, and R39
Presents: G14, YG09, G09, Y19, Y38, R35, R37 and R39
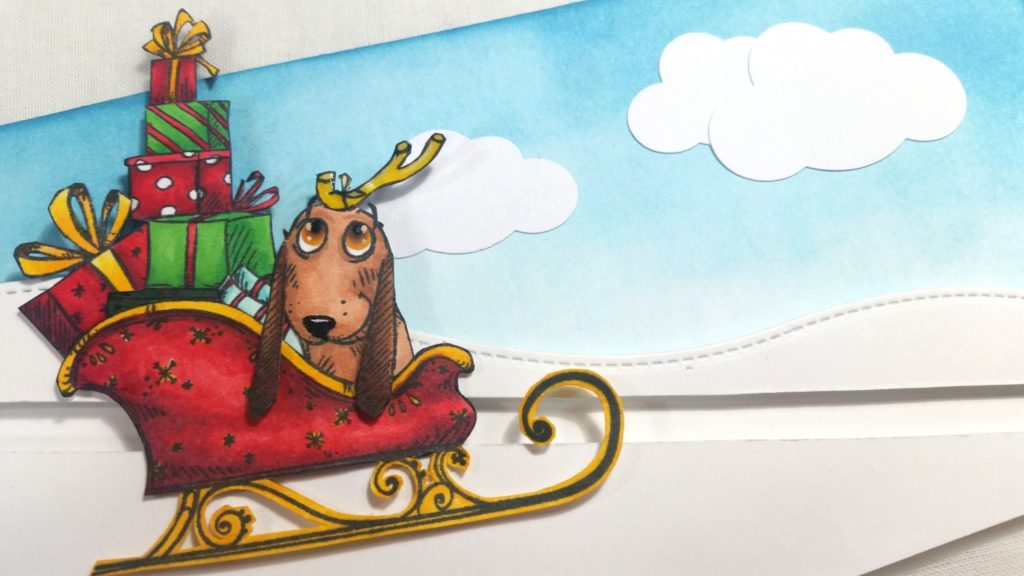
Then I fussy cut out all the pieces I wanted to include in the slider assembly. Then with a bit of doodling for the faux reindeer antler and a little craft surgery to foreshorten Max’s body and keep his ears flapping freely in front of the sleigh edge, I put together Max riding in a sleigh filled with Christmas presents.
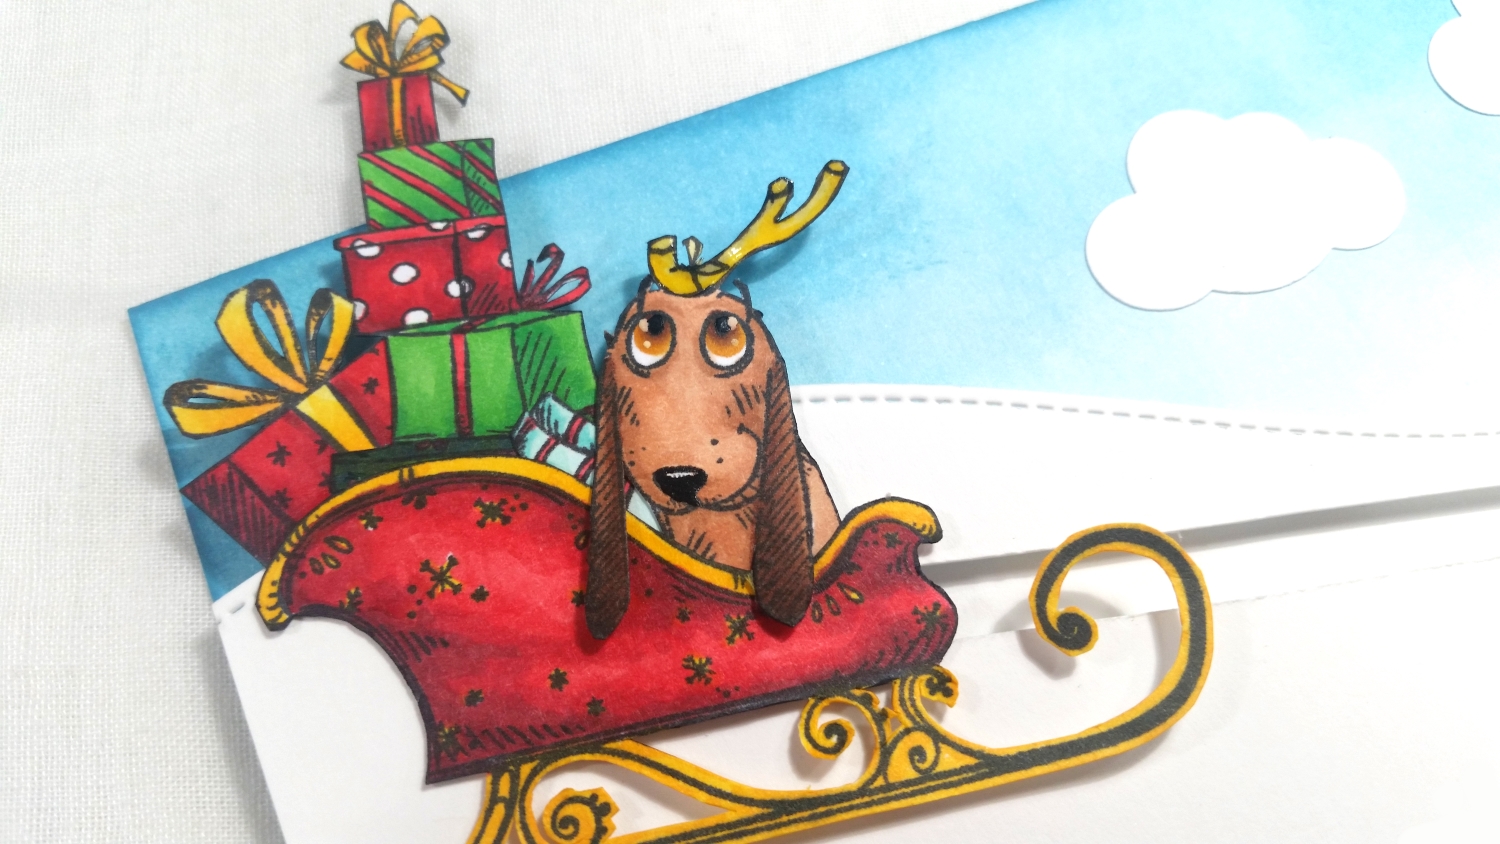
I wanted to keep the card background simple so as not to distract from the main puppy-sleigh focal point so I simply blended on some Distress Ink in Tumbled Glass and Broken China and then punched out some clouds using Fiskars X-Large and Large Cloud Punches. The slider mechanism was easy too. I used some Lawn Fawn Stitched Hillside dies to create one long wavy snowy hillside on some heavy weight card stock. Because the slider assembly was so large, I wanted the sliding distance long enough to appreciate the interactive element so I made the card 4″ x 8.5″.

I used a metal ruler and an X-Acto blade to cut out a slider opening almost the full length of the hillside. I then attached small, but thick, foam dots to a scrap of heavy weight cardstock and lined it up so that the foam dots would come through the slider opening. Then I popped up the entire outside edges of the snowy hillside piece with thick foam dots (if you only have fun foam or thinner foam dots, you can double them up). Then I attached the doggy sleigh assembly to the small foam dots from the front of the slider opening.
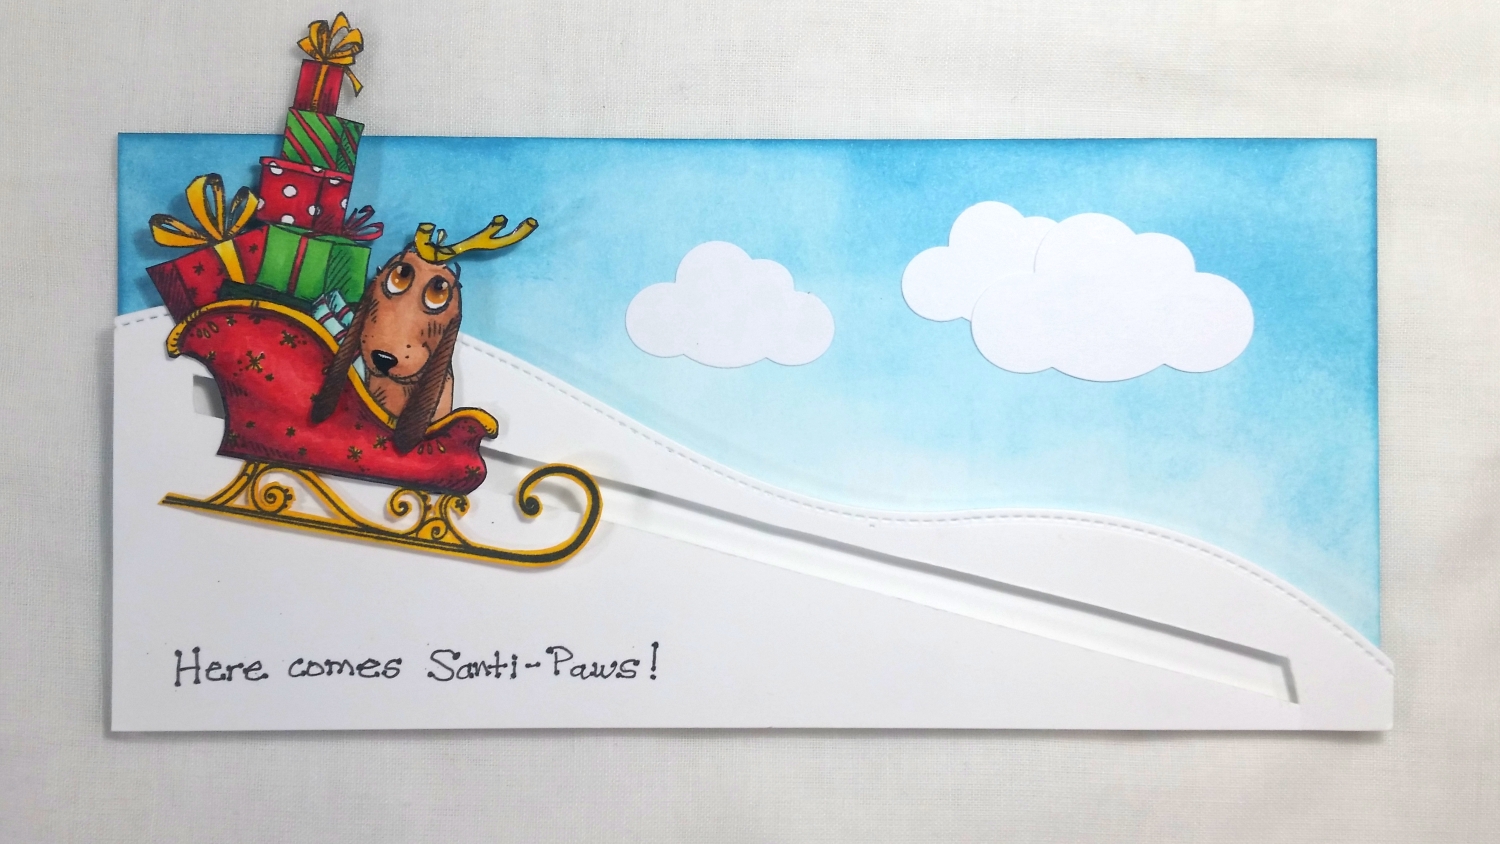
As often happens to me, I forgot to stamp my sentiment onto the snowy hillside before putting the whole card together. Because now the hillside was too unevenly popped up to stamp on, I simply wrote out with a Distress Marker in Black Soot, “Here comes Santi-Paws!” in the lower left corner. The slider mechanism works perfectly, and I think the dog and Grinch-loving recipient will really enjoy this fun, interactive card.
Please CLICK on the following picture if you’d like to watch the process video of crafting this card:
Disclosure: Many of the supplies I’ve used for today’s project are linked. Some may be affiliate links, which means if you make a purchase I receive a small commission at no extra cost to you. I truly appreciate your support toward the costs of running this blog!
This Doggy Christmas Slider Card is being entered into the following challenges:
Fab ‘n’ Funky All Creatures Great and Small Challenge
Through the Craft Room Door Anything Goes Challenge – WINNER
613 Avenue Create Anything Goes with Optional Clean and Simple Challenge
Stamping Sensations I Spy with My Little Eye Something Beginning with B Challenge – Boxes, Bows and Blue skies
Pause Dream Enjoy Cards Challenge
The Corrosive Challenge Anything Goes Challenge
Simon Says Stamp Wednesday Anything Goes Challenge
Word Art Wednesday Anything Goes Challenge
Creatalicious Anything Goes with Optional Texture Challenge
Simon Says Stamp Work it Wednesday Celebrate It Challenge
]]>
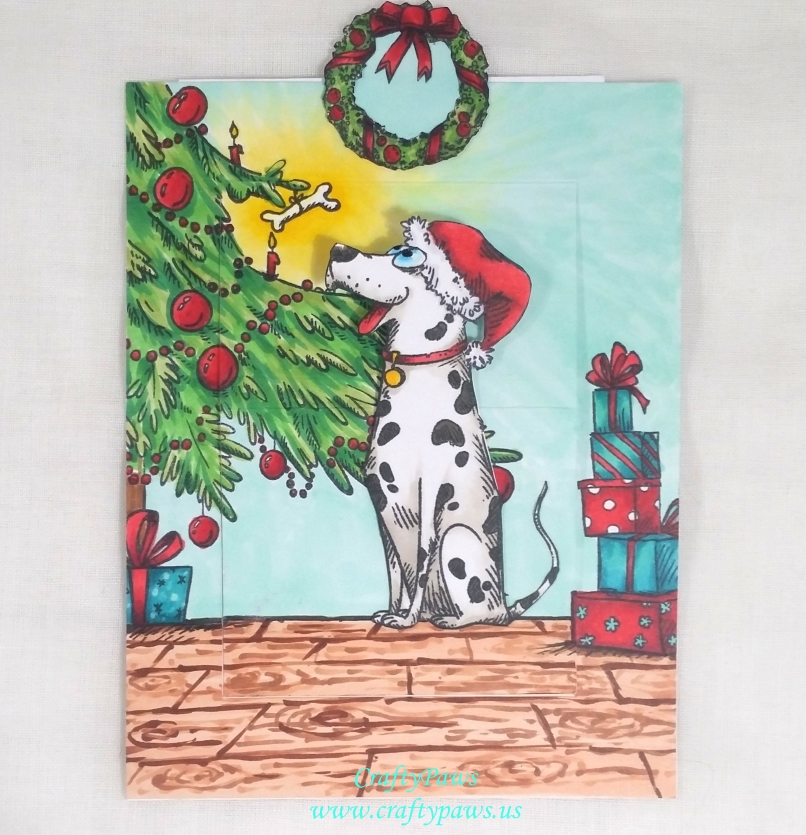
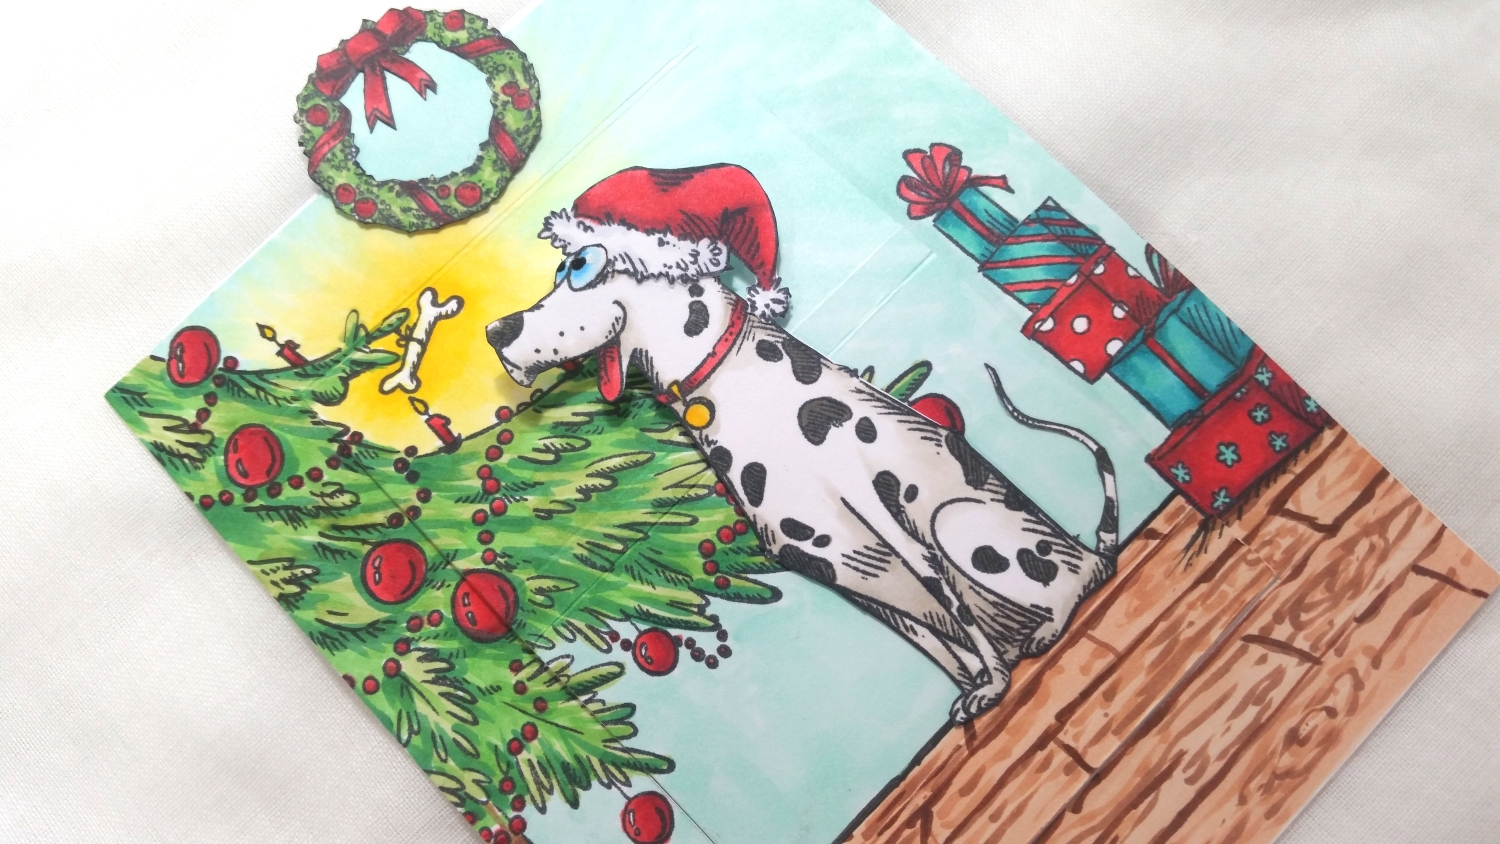
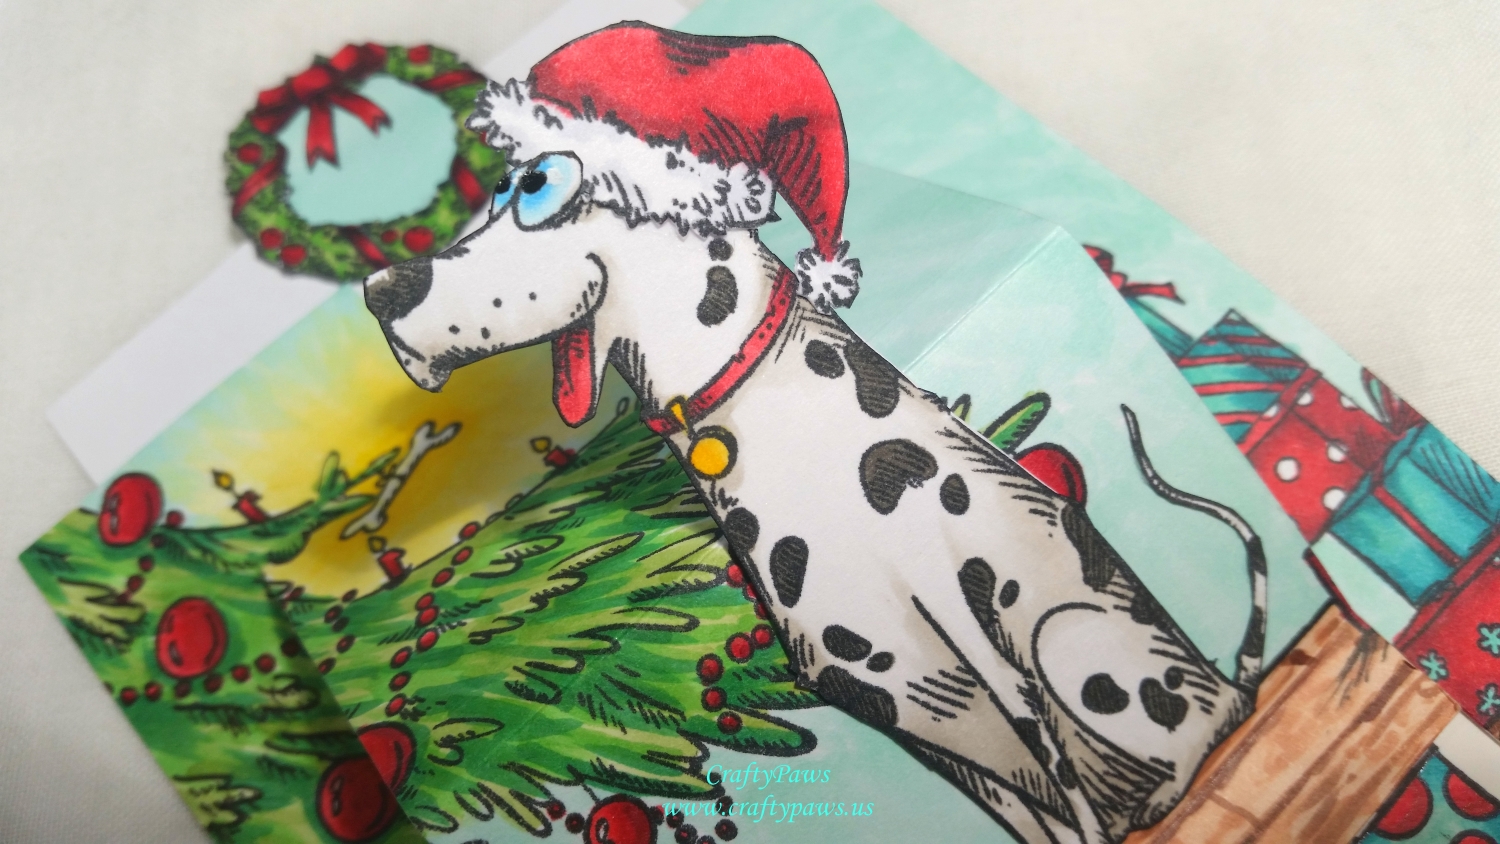
I chose the Dalmatian from the Dogs Stamp Set as the focal point of my card. I Copic colored him using the following colors:
White: W0 and W1; Black: W5;
Eyes: B000 and B02 with Signo Uniball White Gel Pen and Black Glaze Pen;
Tongue and Collar: R35 and 37;
Tag: Y15 and Y19
Then I fussy cut him out, taking care to also cut around his eyes about halfway down so that I could position the Santa hat from the Funny Accessories Stamp Set fully onto his head.
For the card front background, I used the Christmas tree base from the Sleigh Stamp Set and using a 0.1 pt Copic Mulit-liner Pen I doodled a bit more of the decorated Christmas tree in order to extend the height of the tree. I also doodled a dog bone hanging from a tree branch as a special doggy-themed Christmas decoration. To fill out a little more of the background scene I added a stack of presents to the right side of the panel from the Funny Accessories Stamp Set, and then Copic colored/drew in a wood floor and the rest of the scene using the following colors:
Santa Hat: R35, R37 and R39 and C1 Yellow aura around bone: Y00, Y11, Y13, Y08
Tree: G43, G14, G17 Red accents: R35, R37 and R39 Teal accents: BG32, BG23, BG45 and BG49
Wall: BG11 Wood Floor: E11, E13, E25, E29
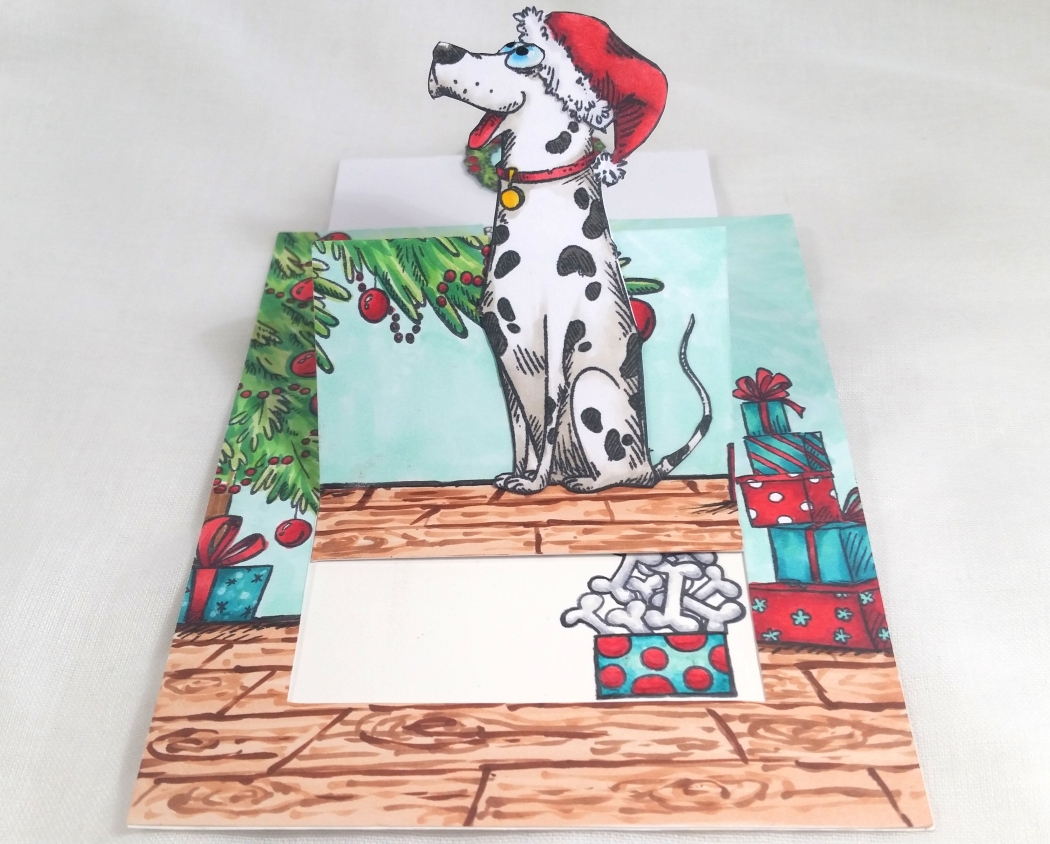
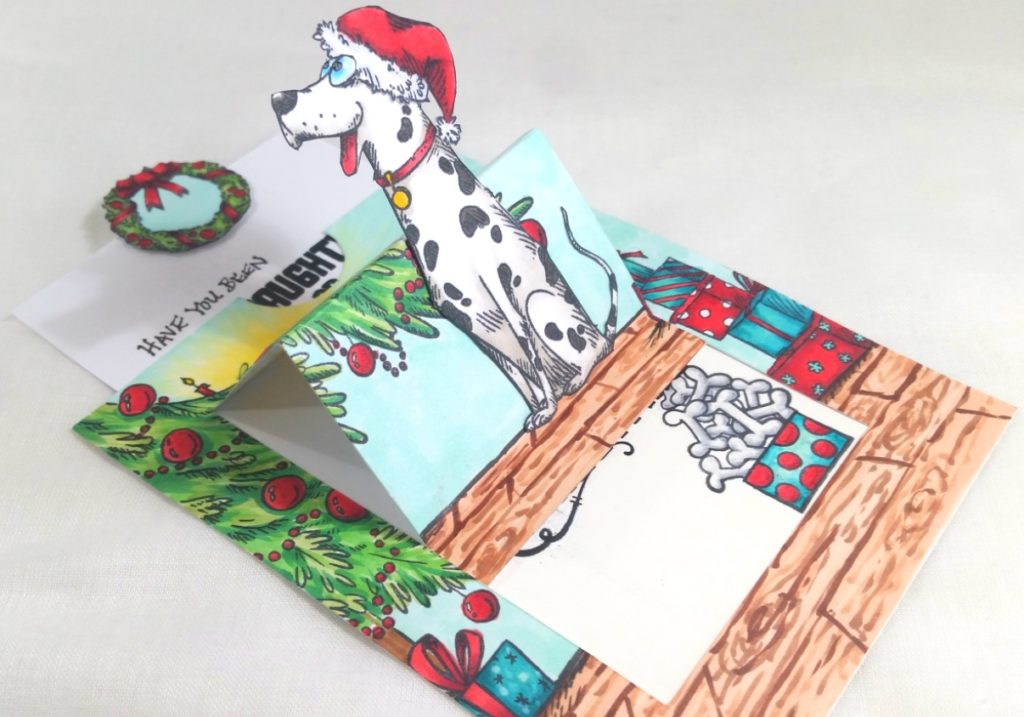
The following are the instructions to create the pop-up mechanism:
* Use the decorated card front measuring 4.25″ x 5.5″ (A2 size)
* Use an X-Acto blade and cut 0.75″ from the left, bottom and right sides of the card; take care to leave the top 0.75″ at the top side uncut.
* Turn the card 90° so the top of the card front is now on the left and use a score board to score at: 0.75″, 2.5″ and 4.25″ between the cut lines.
* Burnish the scored lines so that you form a valley at the 4.25″ line, a hill at the 2.5″ line and a valley at the 0.75″ line.
The following are the directions to create the slider mechanism:
* Cut a smaller slider piece of cardstock to 3.25″ 4.75″
* Use Scor-Tape (glue works too) on the back of the bottom smallest section of the pop-Up mechanism you made above.
* Attach the smaller slider piece of cardstock, centered and lined up to the edge of the bottom smallest section of the pop-Up mechanism.
* Now use Scor-Tape (glue works too) on the back of the card front around the left, bottom and right sides, beyond the center-cut pop-up mechanism area and attach this to an A2 sized card base.
* Optional: You can cut out a thumb window at the top of the cardfront and/or add a pull tab to the top of the smaller slider piece of cardstock. I did both and took the opportunity to create a pull tab using the Christmas wreath from the Katzelkraft Sleigh Stamp Set.
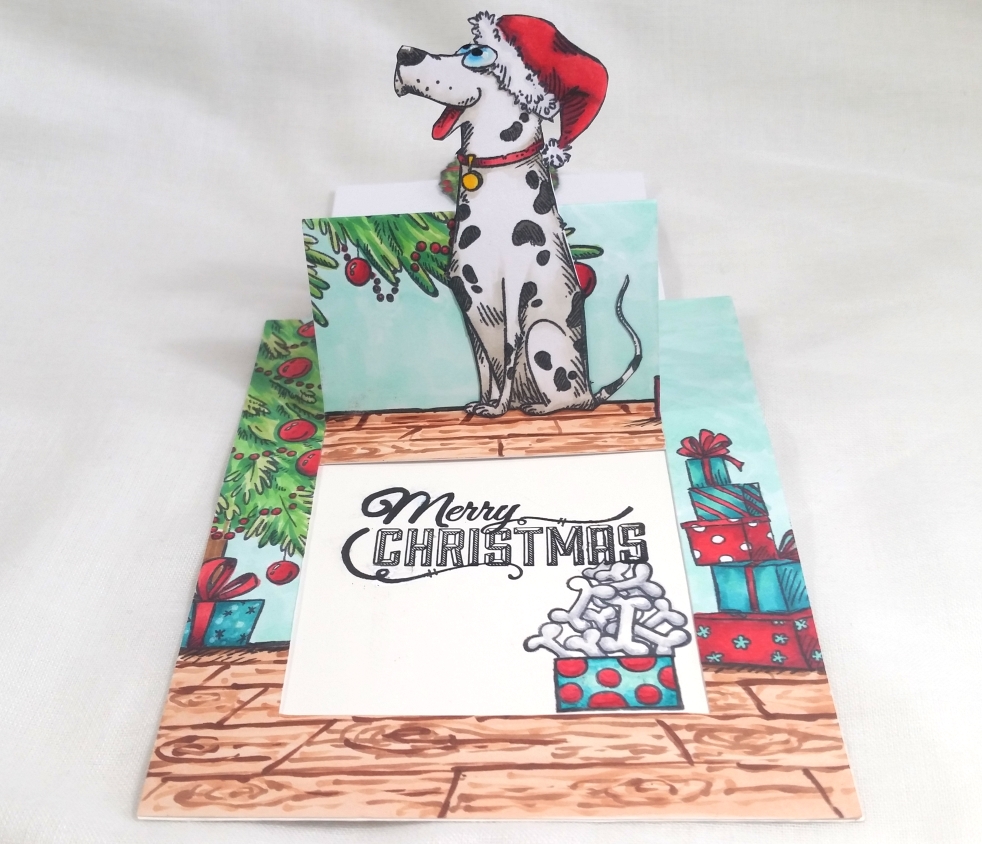
 I hand wrote and used a couple of stamps from a Prima “Merry Nice” Stamp Set to add a sentiment on the top half of the slider piece that says: “Have you been naughty or nice?” and a stamp on the bottom half of the slider piece that says: “Merry Christmas”. For a bit more embellishment inside the card, I also stamped a box full of bones from an old Hampton Art Furry Christmas Stamp Set, and I colored it up to match the stack of presents on the right side of the card.
CLICK THE FOLLOWING PICTURE to watch the process tutorial video of crafting this slider pop up card:
Disclosure: Many of the supplies I’ve used for today’s project are linked. Some may be affiliate links, which means if you make a purchase I receive a small commission at no extra cost to you. I truly appreciate your support toward the costs of running this blog!
This card is being entered into the following challenges:
The Corrosive Challenge Anything Goes
Simon Says Stamp Work it Wednesday Celebrate it Challenge
Creatalicious Anything Goes with Optional Circles Challenge
Word Art Wednesday Anything Goes Challenge
Lil Patch of Crafty Friends Anything Goes Challenge
Fab ‘n’ Funky Christmas Challenge
613 Avenue Create Anything Goes with Optional Clean and Simple Challenge
Through the Craft Room Door Anything Goes Challenge
Crafty Gals Corner 3+ Layers Challenge
Stamp Sensations I Spy Something with a B Challenge – Baubles, Boxes, Bows, Bones
]]>
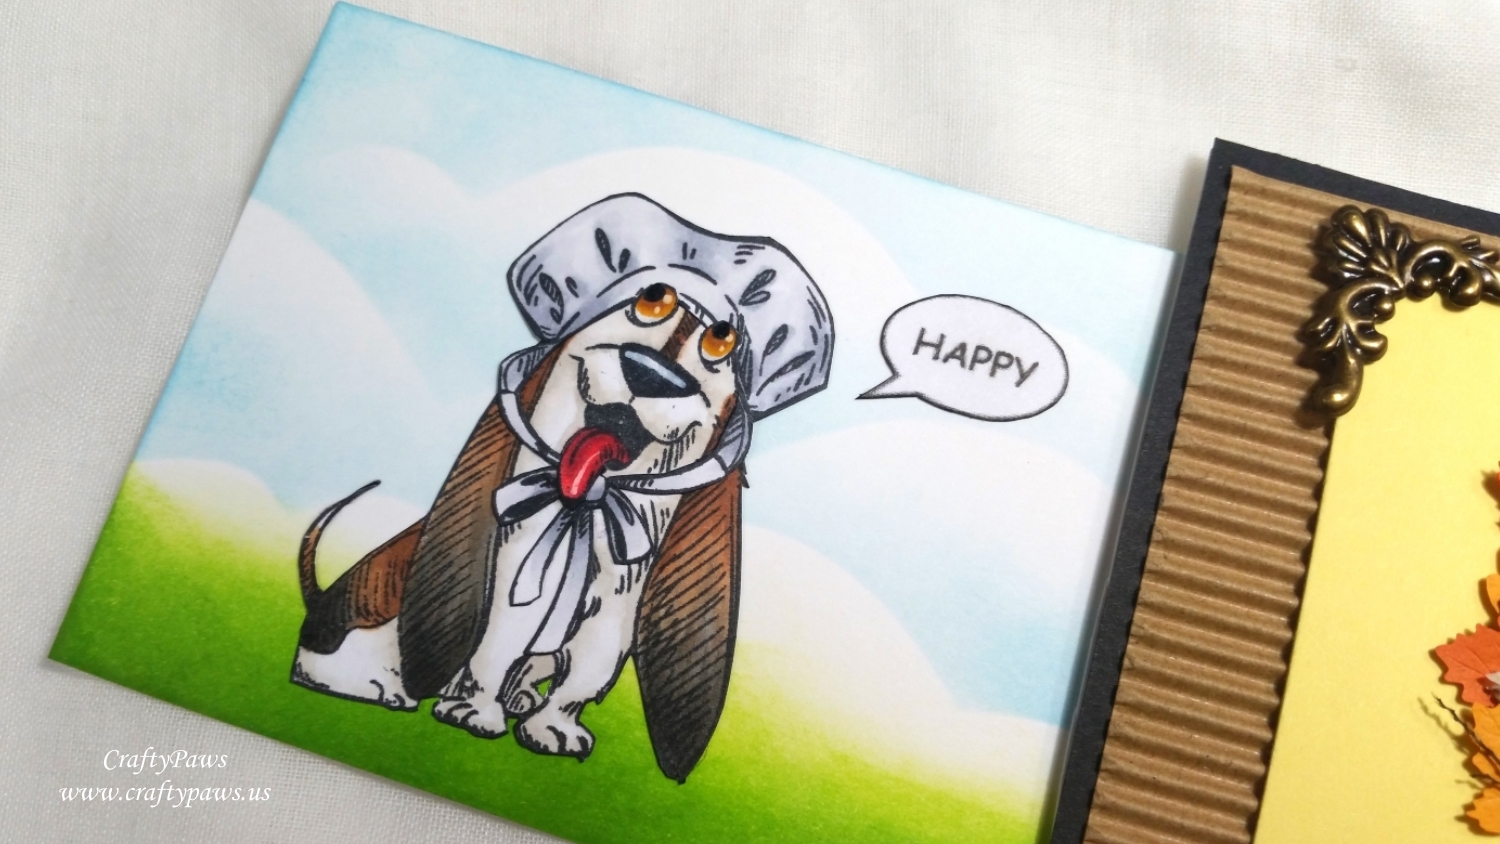
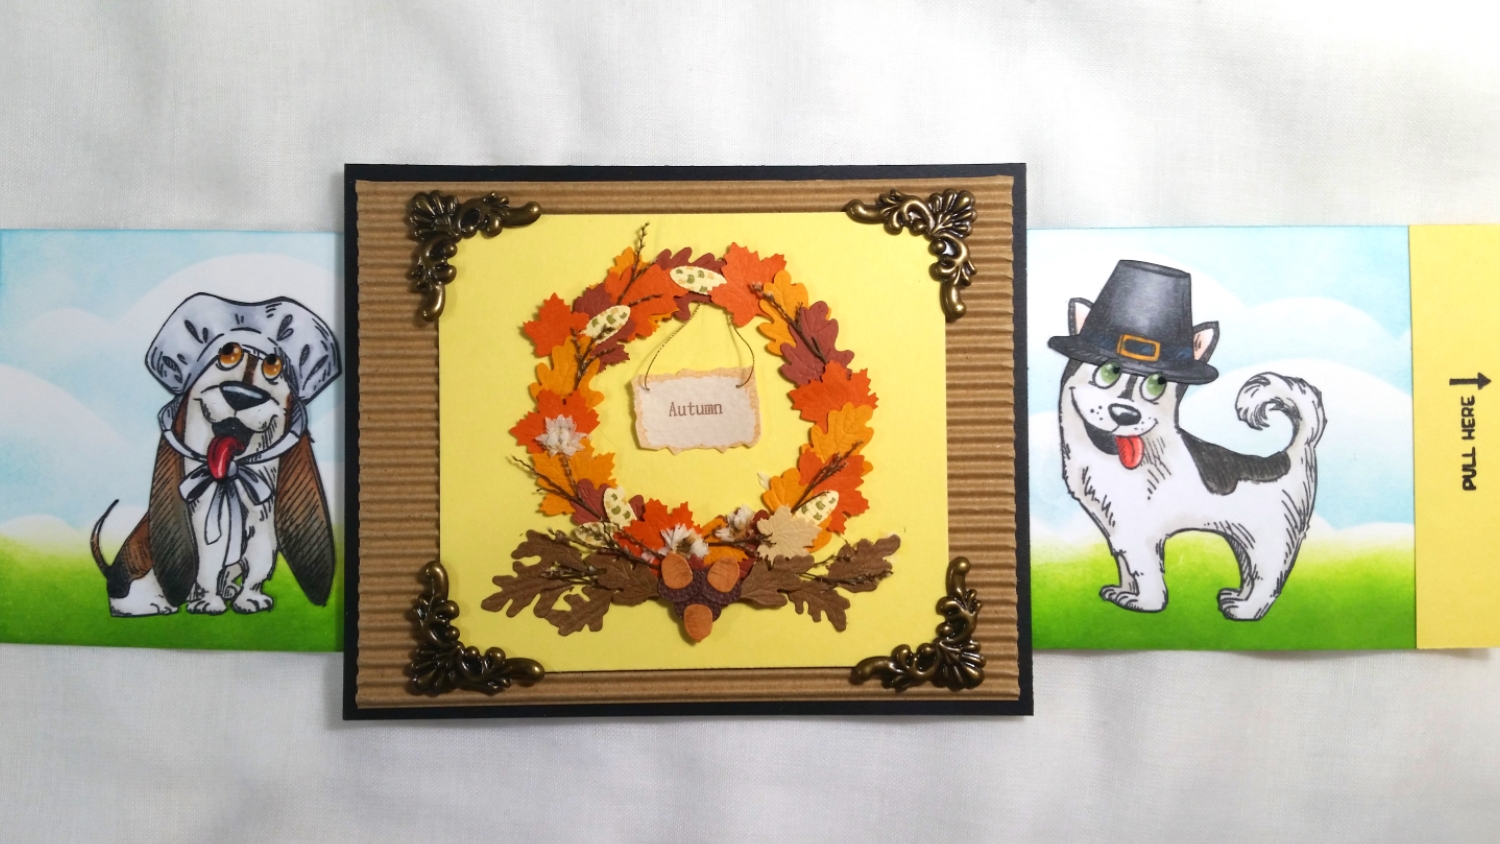
I first Copic colored the Husky and the Basset Hound as well as the Pilgrim bonnet and top hat with the following Copic colors:
Basset Hound: Tongue: R35 and R39; White: W0 and W1; Dark areas: W5 and W7; Brown areas: E23 and E25; Eyes YR24 and E23; Nose: C8
Husky: White: W0 and W1; Black: W5 and W7; Tongue: R22 and R24; Inner Ear: R30; Eyes: G24, G94 and G46 with Signo Uniball White Gel Pen and Sakura Black Glaze Pen
Pilgrim Bonnet: C00, C0, C1, C2 and C3
Pilgrim Top Hat: N3, N4, N5, N7, Y38, and B99
Then I fussy cut them and inked the edges with a Momento Tuxedo Black Marker.
Then I prepped the various panels to create the double slider card structure as follows:
- Front Panel, Slider Mechanism Panel and Back Panel: 4.25″ x 5.25″
- Slider Mechanism Panel (positioned horizontally) is then prepped using an X-Acto blade to cut vertical slits 0.25″ away from either side, and 0.75″ away from the top and bottom
- Left Slider Panel is cut 3.25″ x 4 5/8″
- Right Slider Panel is cut 3.25″ x 5 1/8″
- Then a strip of heavy duty plastic is cut to 2.5″ x 11″, this is looped through the slits of the Slider Mechanism Panel and secured with strong double sided tape like Scor-Tape


Word Art Wednesday Anything Goes Challenge
Creatalicious Anything Goes with Optional Circles Challenge
Simon Says Stamp Work it Wednesday Celebration or Birthday Challenge
Lil Patch of Crafty Friends Anything Goes Challenge
Through the Craft Room Door Anything Goes Challenge
Crafts Galore Encore Anything Goes Challenge
613 Avenue Create Anything Goes with Optional Clean and Simple Challenge
Crafty Gals Corner 3+ Layers Challenge
Stamping Sensations I Spy with My Little Eye Something Beginning with B Challenge – Basset Hound, Pilgrim Bonnet, speech Bubbles, Blue skys
Simon Says Stamp Wednesday Pop it Up Challenge
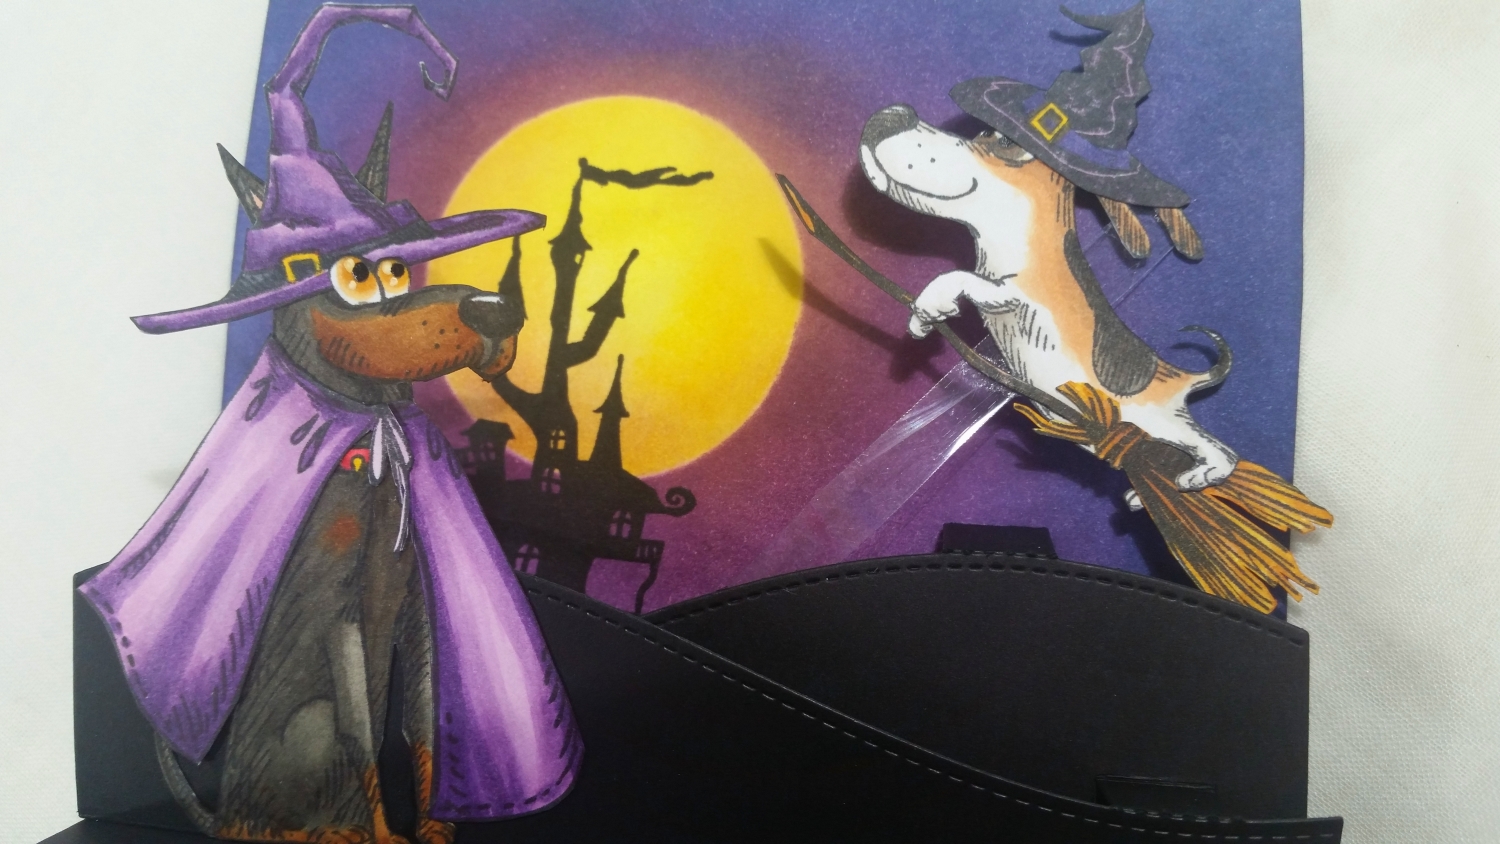
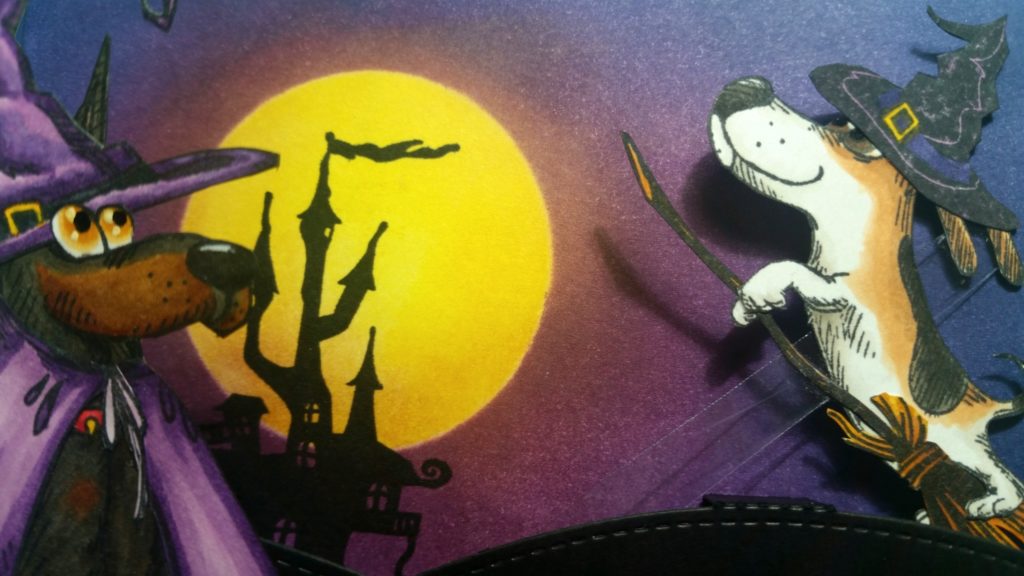
For this HOWLoween interactive scene card, I used the Doberman and Beagle from my absolute favorite Katzelkraft Dogs Stamp Set along with the witches hat from the Katzelkraft Funny Accessories Stamp Set, the small witches hat and haunted mansion from the new Katzelkraft Halloween Stamp Set, and the cape and broom from the Katzelkraft Pilgrim Stamp Set.
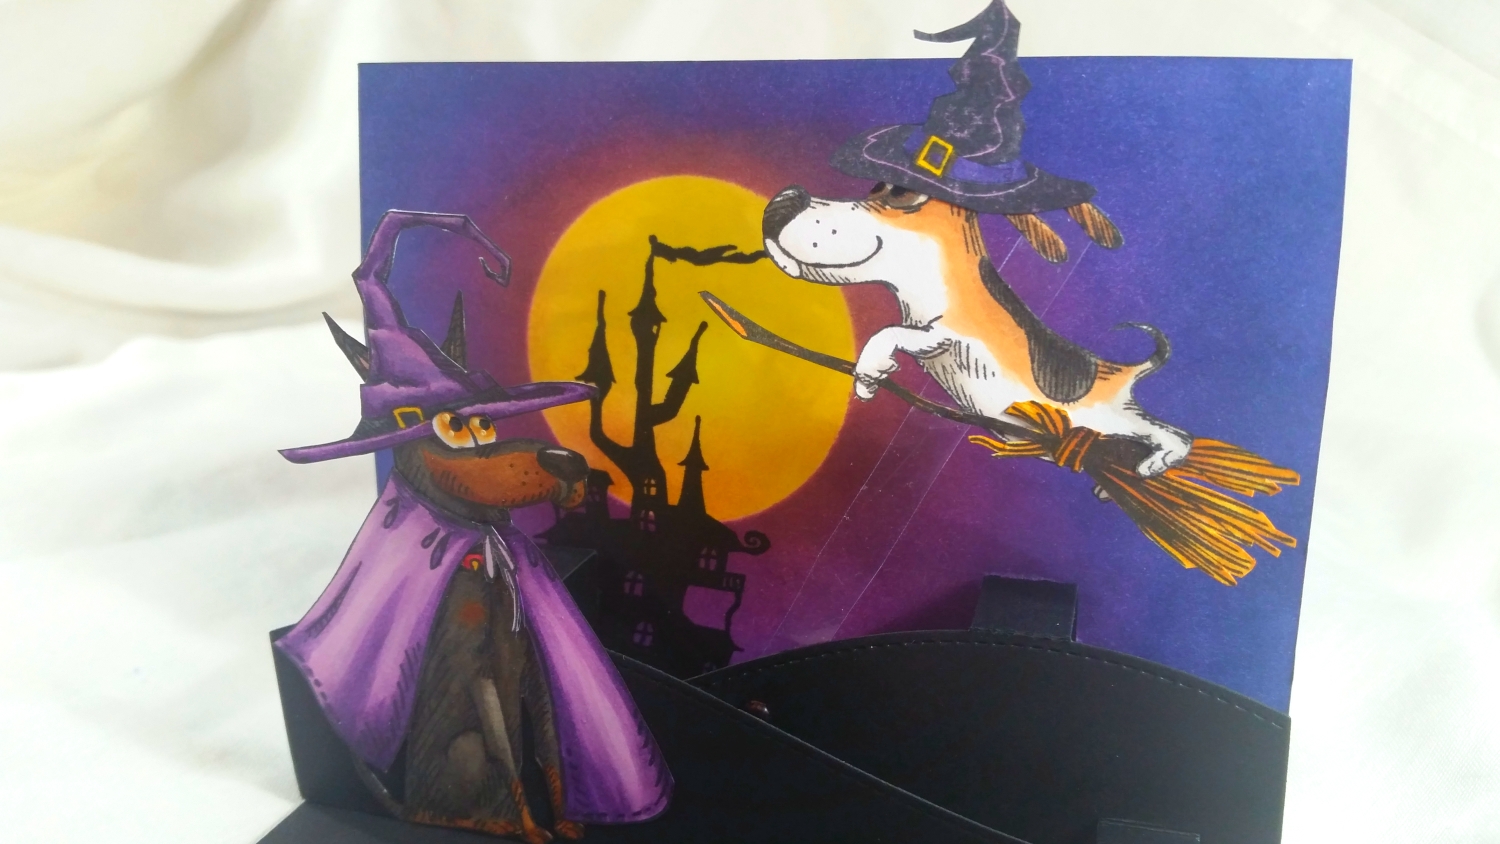
I Copic colored all the stamped images (except the haunted mansion, which I used as a silhouette for the background) using the following colors:
Doberman: Brown: E35 and E39; Black: W5 and W7; Nose: W9; Collar: R35, R37 and Y19; Eyes: YR21, YR24 with Signo Uniball White Gel Pen and Sakura Black Glaze Pen; Ear: R30
Beagle: White: W0 and W1; Black: W5 and W7; Brown: E21 and E23; Eyes: W5 and E23 with Signo Uniball White Gel Pen and Sakura Black Glaze Pen
Witch’s Hat and Cape: V12, V15, and V09; C7 and C8; Y19. Broom: YR24 and E15
I then fussy cut all the pieces out and combined the witches hat and the cape on the Doberman, cutting the pup’s ears and re-attaching them behind and around the hat to make them more visible and slightly trimming the cape to fit the dog’s body a bit better. I gave the beagle the smaller witches hat and cut around his paws so that I could tuck him around the broom, and he could fly through the air.
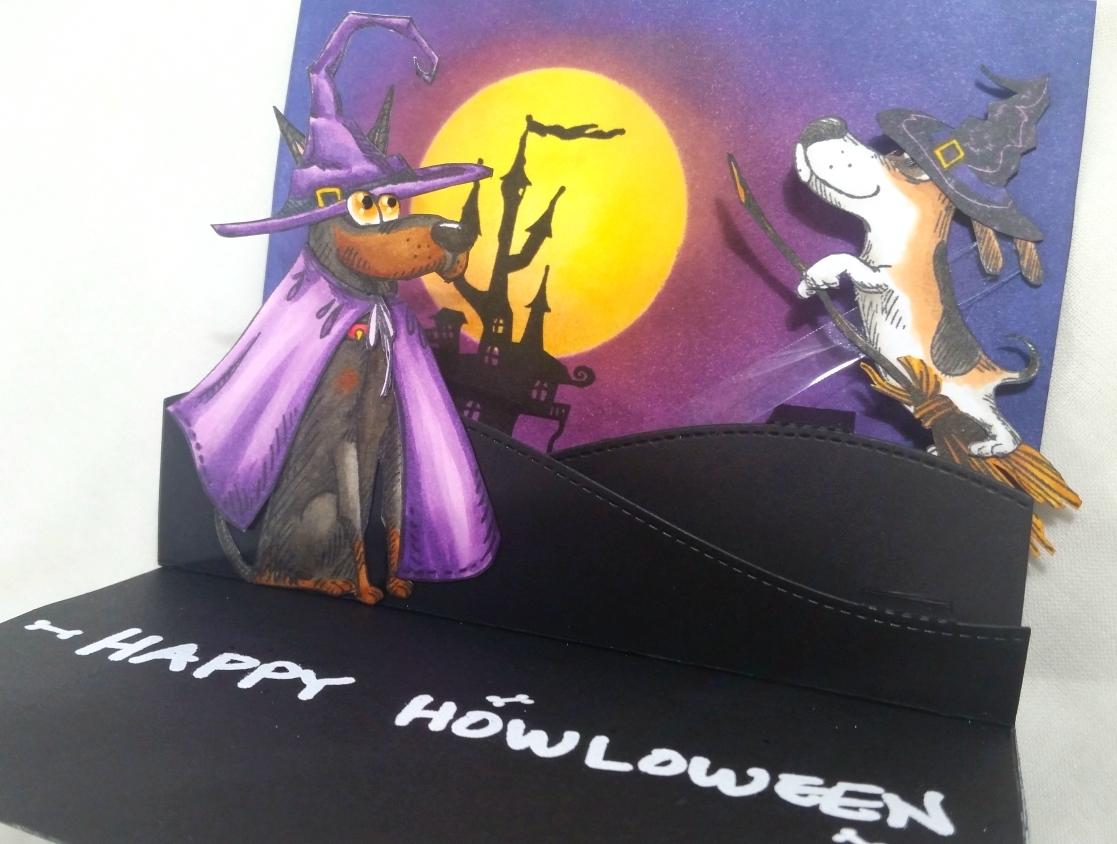
For the background (the top half of the card), I made a mask with the 6th largest Diemond Dies Circle Nesting Die and some thick cardstock and blended on some Distress Inks in Mustard Seed and Squeezed Lemonade to create a bright moon. I next used the cut out circle as a mask over the moon and blended on Distress Inks in Seedless Preserves, Dusty Concord and Chipped Sapphire to create a night sky. To soften the edges of the moon and give it a bit of dimension, I blended on a little Seedless Preserves around the edges. Lastly I stamped the haunted mansion so that the turrets would be silhouetted by the moon and add interest to the background.
To create the foreground, I layered the card base bottom of this top folding card with thin black cardstock. Then I used the Lawn Fawn Stitched Hillside Pop Up Die with extra heavy weight black cardstock and attached it to the card at the center fold. For an added bit of interactive fun I added a clear plastic piece (salvaged from some craft product packaging) to the the back hill with a tiny brad and glued the bloom riding Beagle to the other end. The Beagle can now swing … or fly through the air! I glued the witchy Doberman to the front hill, looking up at his flying buddy. As a finishing sentiment, I used a VersaMarker Pen and heat embossed “Happy Howl-oween” with Ranger Super Fine White Embossing Powder to the card base.
Please click on the following picture if you’d like to watch the process video of crafting this card:
Disclosure: Many of the supplies I’ve used for today’s project are linked. Some may be affiliate links, which means if you make a purchase I receive a small commission at no extra cost to you. I truly appreciate your support toward the costs of running this blog!
This card is being entered into the following challenges:
Cute Card Thursday Anything Goes Challenge
Crafty Gals Corner Anything Goes Challenge
Lil Patch of Crafty Friends Anything Goes Challenge
Through the Craft Room Door Anything Goes Challenge
Catch the Bug Make Us Smile Challenge
Pause Dream Enjoy Cards Challenge
Simon Says Stamp Monday Stamp It On Challenge
Simon Says Stamp Wednesday Stamp On It Challenge
Creatalicious Anything Goes with Optional Pastel Colors Challenge
Simon Says Stamp Work it Wednesday Favorite Stamping Technique Challenge
]]>
For the background, I used an inexpensive piece of Seth Cole Heavyweight Watercolor paper (if you want a more deeply colored saturated look, I’d recommend a less absorbent paper like Strathmore Bristol Paper or Strathmore Watercolor Paper). I actually used some DAP Kwik Seal Latex Caulk as a modeling paste alternative and pushed it through the stencil with a palette knife to get some fun texture at a great price!
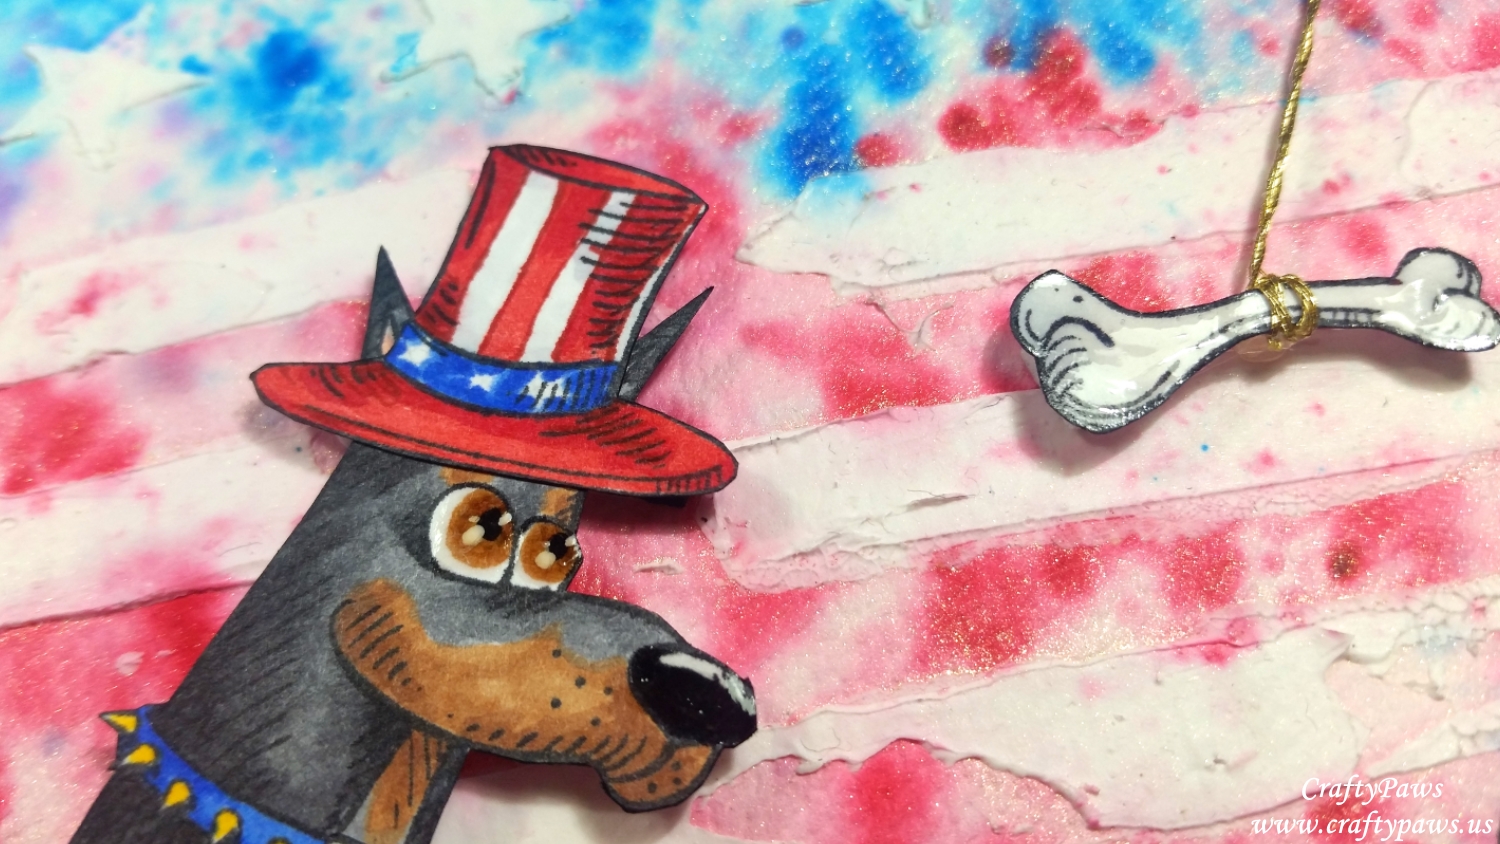
The American Doberman Loving on that Sweet Treat Bone! LOL
After letting it fully dry (doing the next, very watery step requires full drying or the caulk could lift up), I sprinkled some Ken Oliver Color Bursts in Indigo, Merlot, Ultramarine Blue and Alizarin Crimson. Then for a little added shimmer, I spritzed it with Heidi Swapp Color Shine in Sheer to disperse the pigment granules. To keep the caulked stars and stripes more white, I re-wet those areas with water using a paint brush and dabbed up as much loose pigment as I could with a paper towel. I love the blurry yet bright patriotic background.
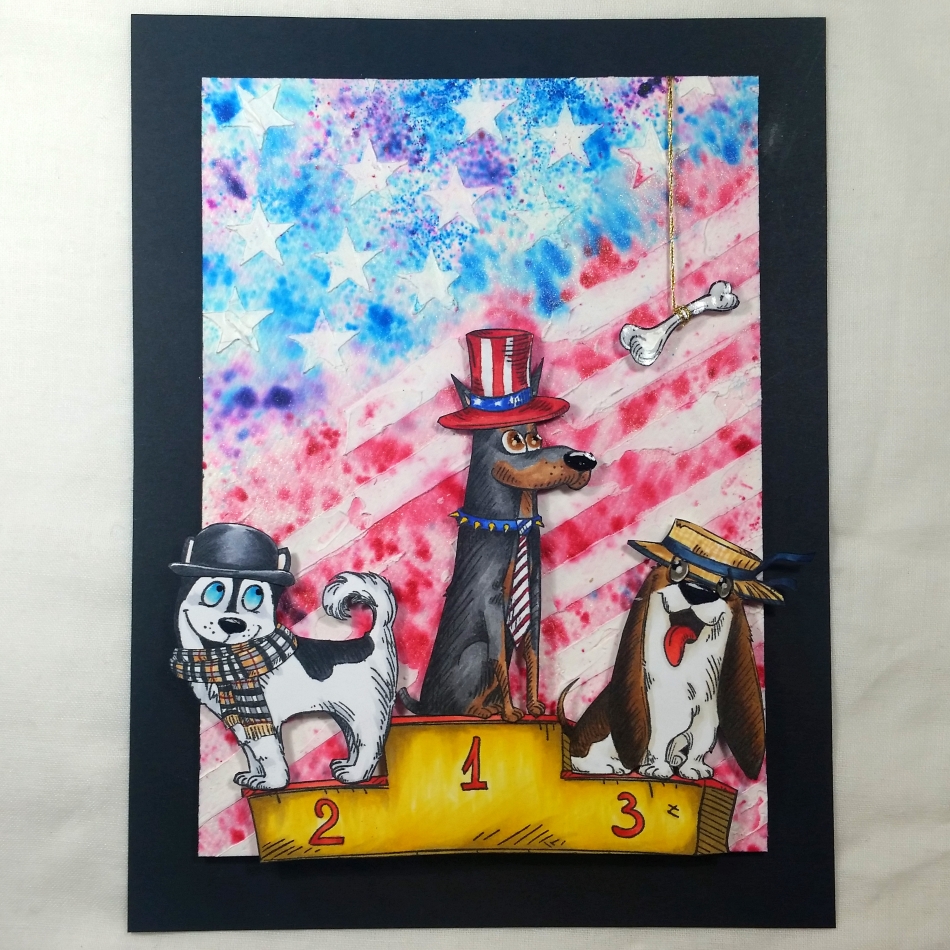
The International Doggy Representatives
For the international doggy athletes (hehehe), I used the following Copics to color the Katzelkraft Dogs and Funny Accessories:
American Doberman (I cut off and re-attached the ears so they would show beyond the top hat):
Top hat and tie: R27, R29, B24, B28, C1
Collar: B24, B28, Y19
Doberman dog: E23, E25, N4, N5, N7, N9; R20 inside ear (I docked the tail as well); and C8 for the nose
British Husky (I covered up the tongue with the scarf):
“Burberry” scarf: C4, C8, E53, E55, and fine point of Festive Berries Distress Marker
Derby hat: C4, C6 and C8
Husky dog: C1, C2, C6, C8, B000, B01 and B02 with R20 inside ear
Italian Basset Hound (I fussy cut the eyes and overlayed them on top of the hat so that the hat would sit down on the dog’s head):
Gondolier hat (I added brim trim and streamers): E50, E53, E55, Y11, B97 and B99
Basset hound dog: W0, W1, E55, E57, E59, W7; R14 and R24 for tongue; and C8 for the nose
Podium: Y11, Y26, Y28, E43, Y15, R14, R24 and R27
Bone: C0 and C1
There was a lot of fussy cutting, altering, doodling, etcetera, and while time consuming, it was sooo much fun. I was totally in my crafty zone!
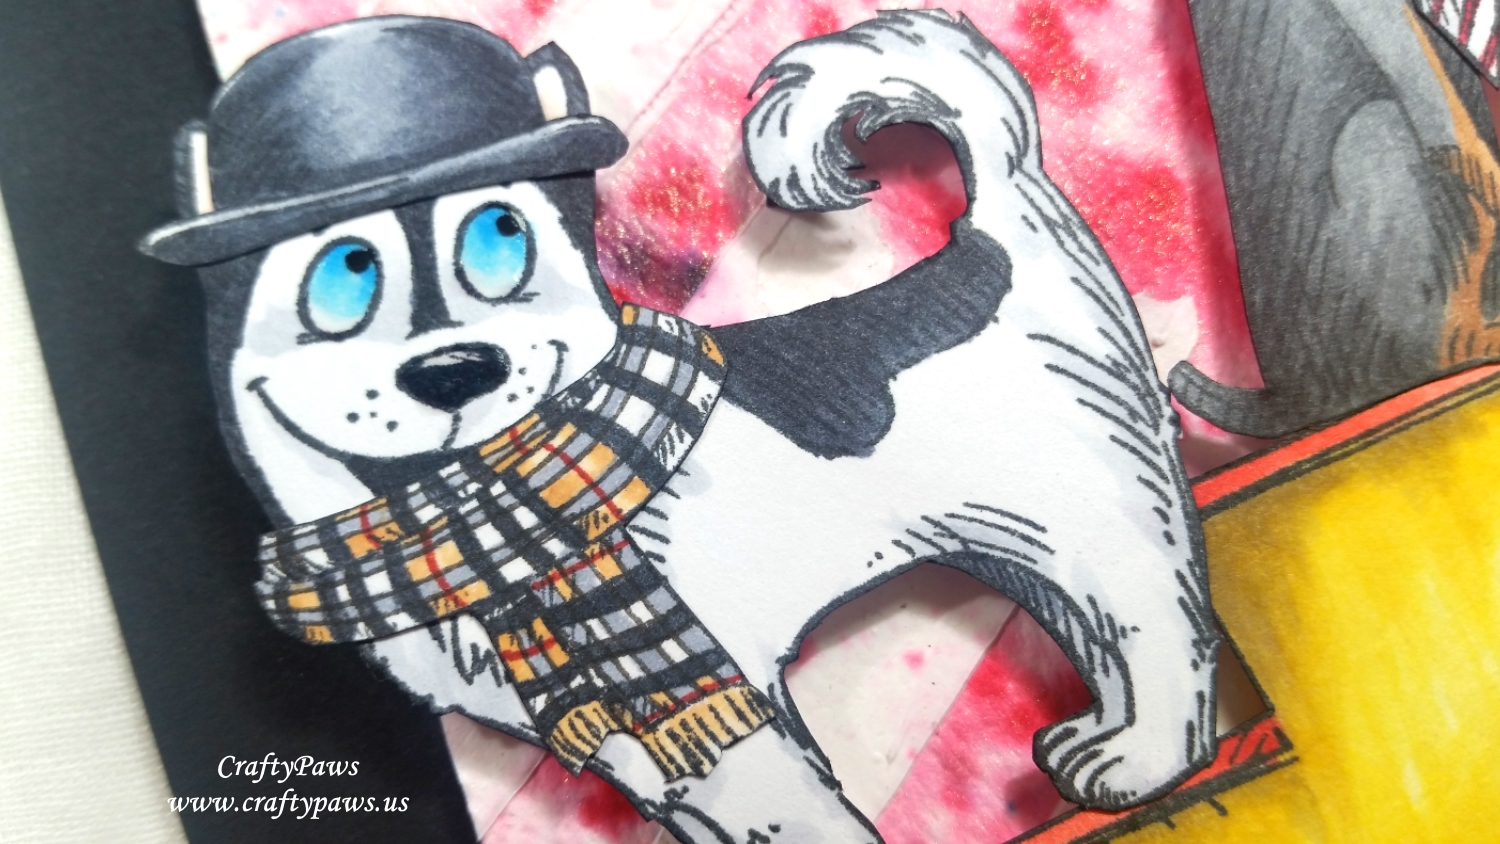
Dapper British Husky Donning “Burberry” Scarf and Derby
I popped everything up with double sided foam dots and also backed the entire stars and stripes background on a sheet of fun foam for added dimension. For a bit of added fun, I also put together 3 strands of DMC gold metallic thread and tied it around a bone to hang in the air in the upper right of the scene. This bone is the sweet treat prize that all the dogs are eyeing. 🙂 For a finishing touch, I added shine to the bone and all the puppy eyes and noses with Ranger Glossy Accents.
The following is a video share, including the stenciling and color bursts spritzing process:
Disclosure: Many of the supplies I’ve used for today’s project are linked. Some may be affiliate links, which means if you make a purchase I receive a small commission at no extra cost to you. I truly appreciate your support toward the costs of running this blog.
This doggy Olympics piece is being entered into the following challenges:
Simon Says Stamp Monday Love is in the Air Challenge
Word Art Wednesday Anything Goes Challenge
Creatalicious Anything Goes with Optional Love/Anniversary/Thinking of You Challenge
Lil Patch of Crafty Friends Anything Goes Challenge
Art Impressions Sweet Treat Challenge
Through the Craft Room Door Anything Goes Challenge
Crafty Gals Corner Anything Goes Challenge
Crafts Galore Encore Anything Goes Challenge
613 Avenue Create Anything Goes with Optional Love Challenge
]]>
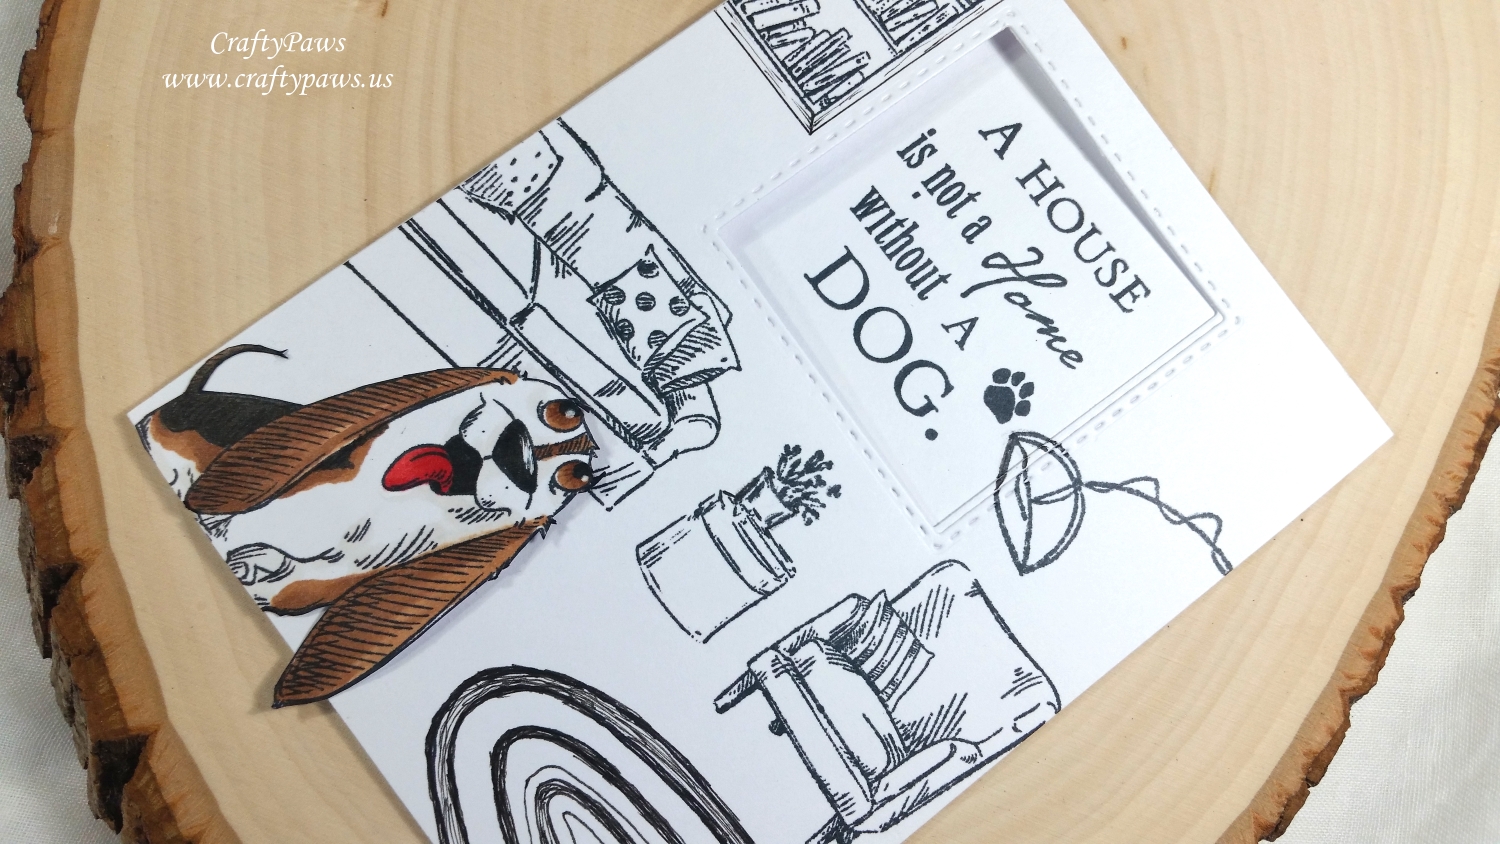
The hardest part of this for me was trying to narrow down what doggy themed project I was I was going to create. After all, with a name like CraftyPaws, you can imagine how many doggy crafty goodies are in my stash. 🙂 I decided to do a process video sharing how to do a windowed card with the sentiment peeking out from inside as well as spotlighting adorable dog images from Katzelkraft’s Dogs Stamp Set by only coloring the pups in the scenes.
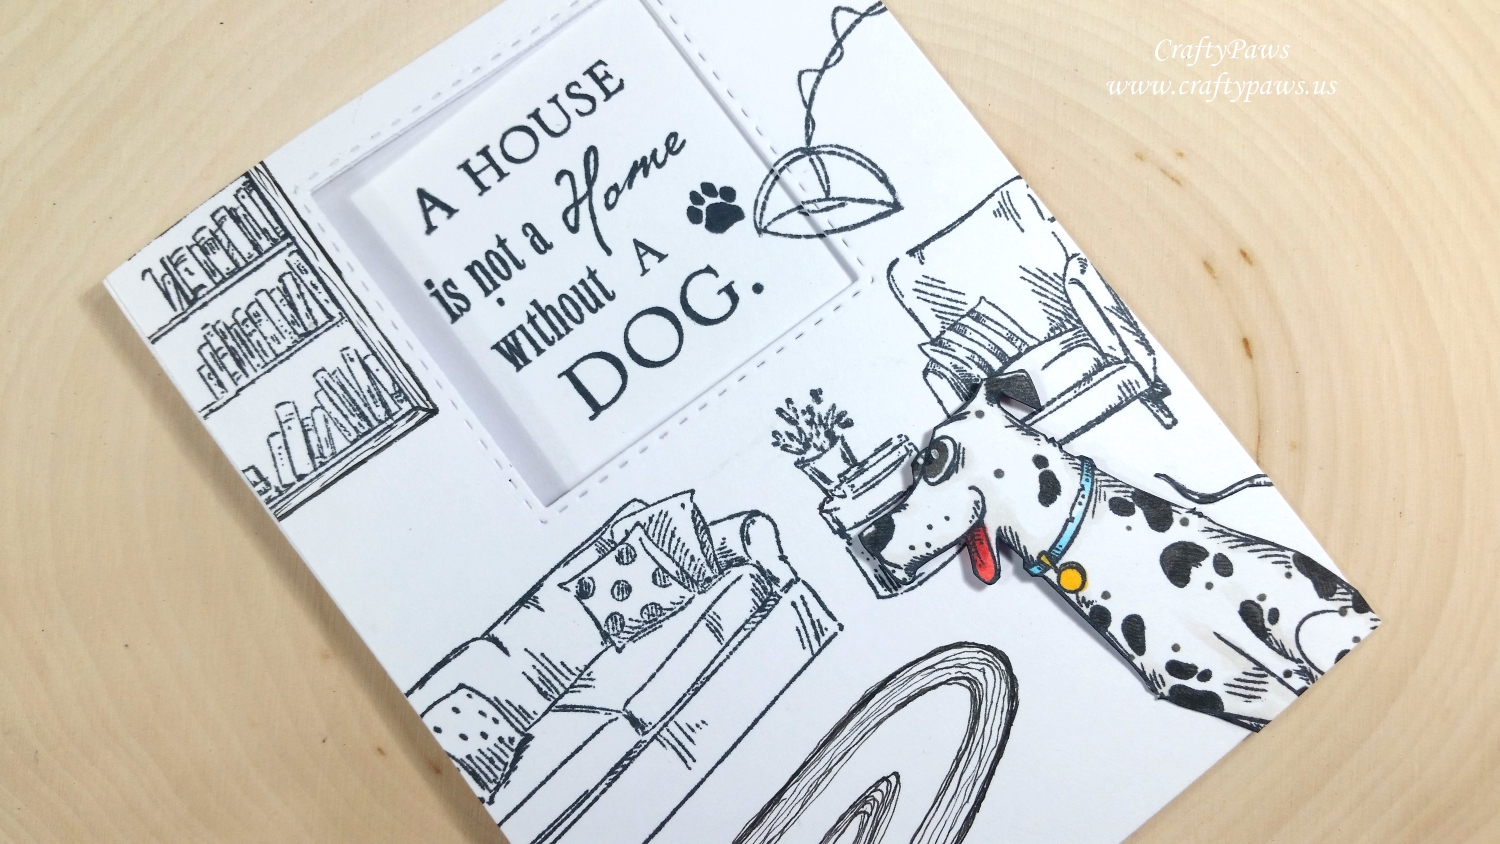
To first create the living room scene, I used the Joy Crafts “Home Sweet Home” stamp set (I love how these stamps have a sketchy drawn look similar to the Katzelkraft’s Dogs). I intentionally left the upper middle section empty to leave room for the sentiment window.
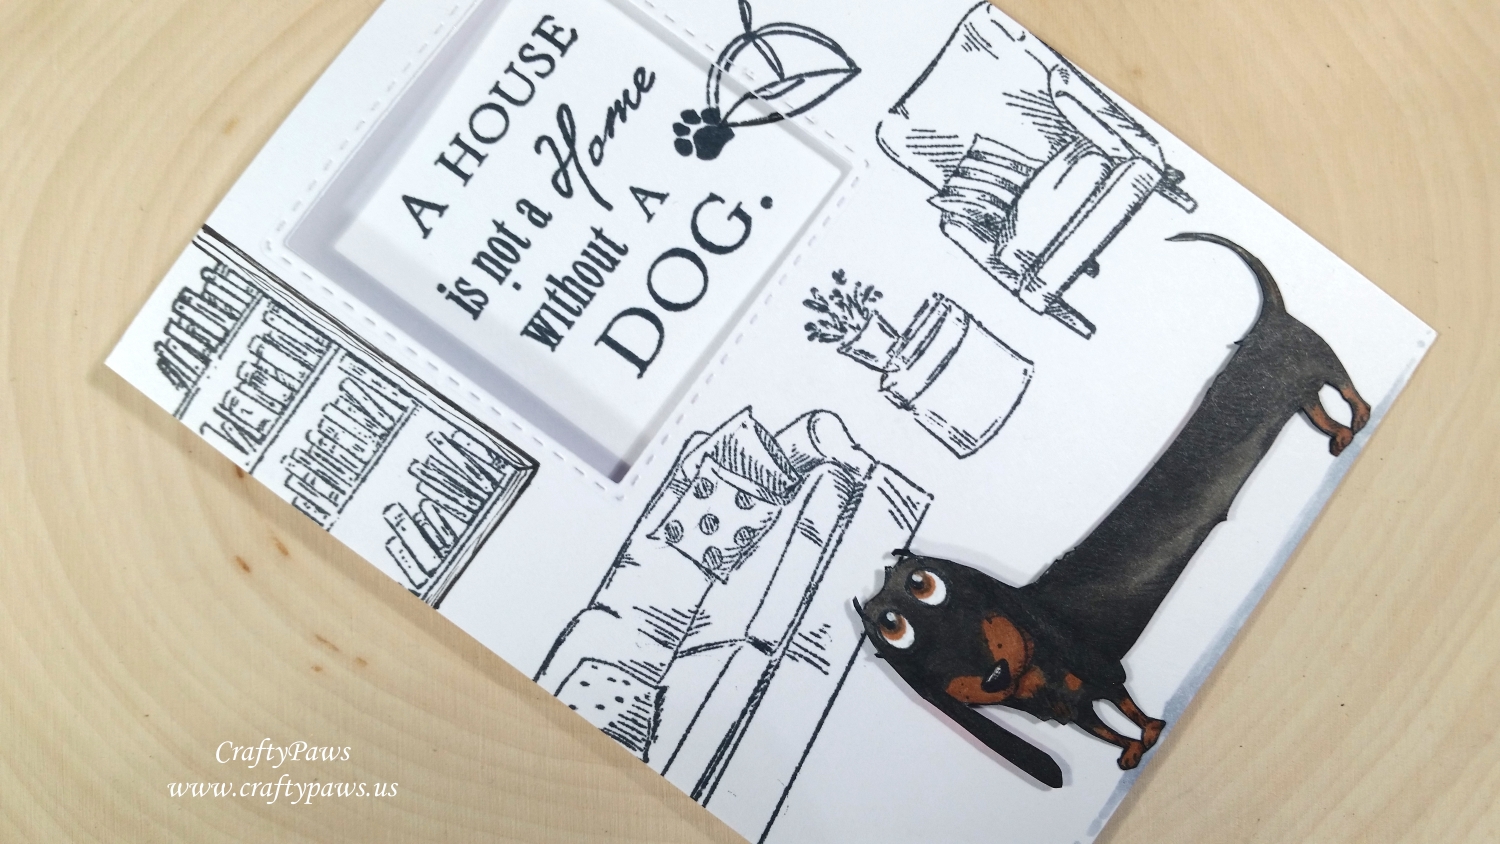
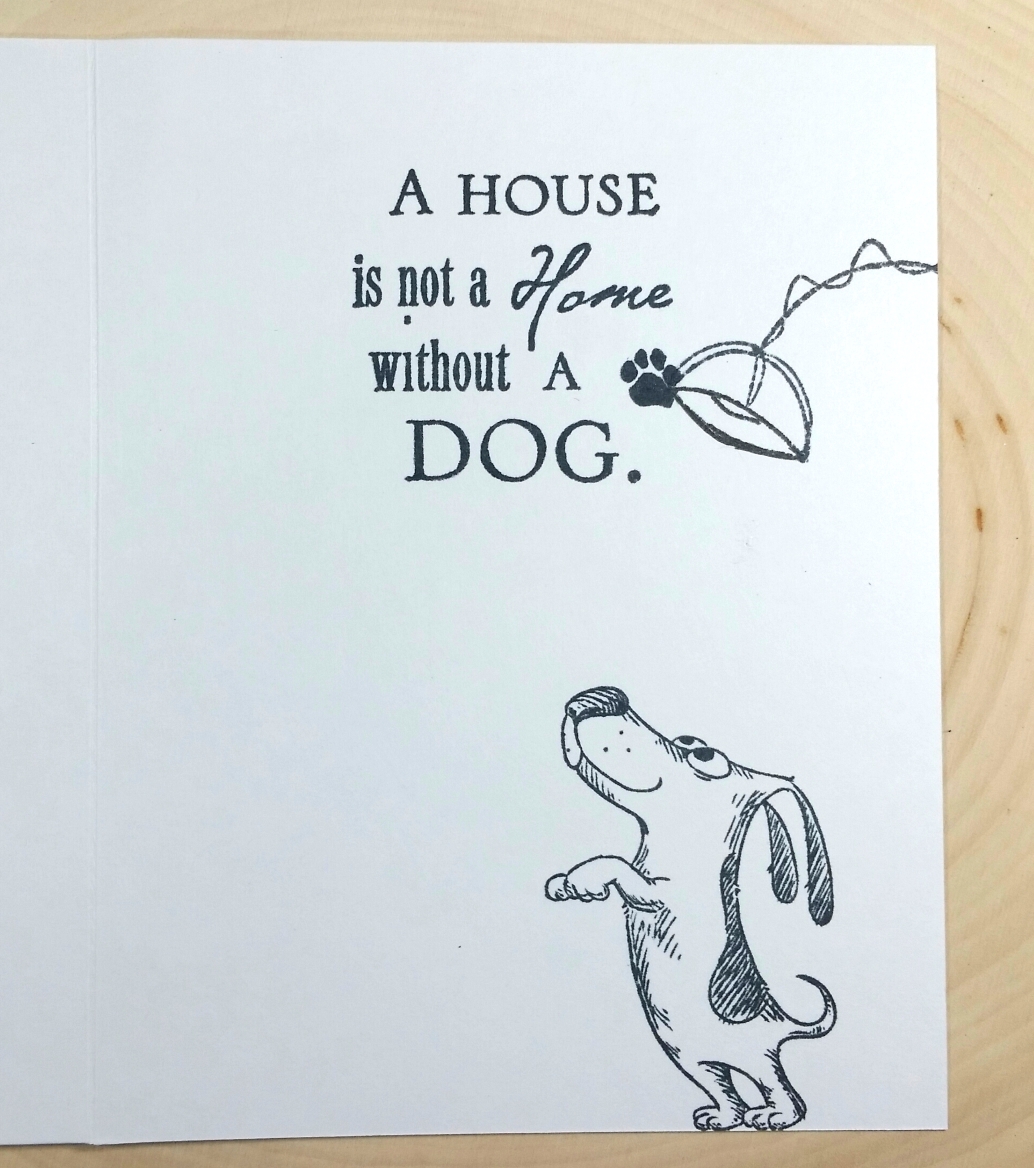
Then I used the 4th largest Simon Says Stamp Stitched Squares Die Set to die cut a window from the card front as well as a thin copy paper template. I then positioned the paper template on the inside right side of the card base and used my MISTI stamping tool to position the sentiment from Cloud 9 Design’s Dogs Sentiment Stamp Set that reads, “A HOUSE is not a Home without a DOG.” I then re-positioned the template the the outside card base front and die cut that window again. Provided I didn’t accidentally shift the die, the card front can now be positioned exactly over the card base front and the window opening should perfectly align so that the sentiment can be seen even from the front even before the card is opened.
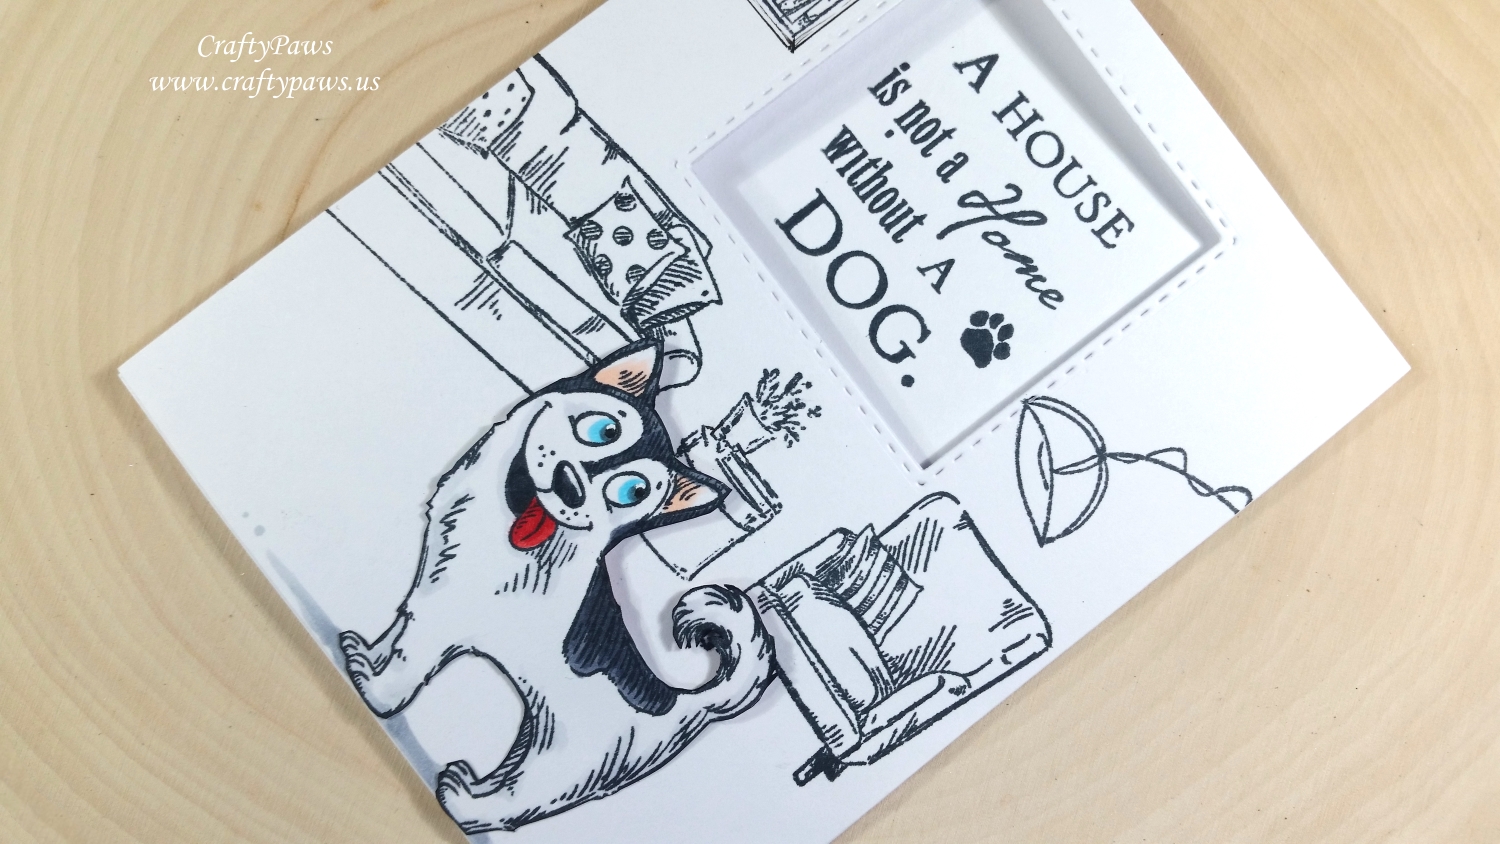
Using Google images of Basset Hounds, Dalmatians, Huskies, and Dachshunds as references, I used the following Copic colors for these pups:
Basset Hound: W1, W7, W9, E23, E25, 100
Dalmatian: Collar, Tag and Tongue: B01, Y17, R24 and R27; Dalmatian: W7 and W9
Husky: Ears, Eyes and Tongue: R30, B01, R27 and R29; Husky: C1, C5 and C7
Dachshund: W5, W7, W9, E23, E25 and 100
 I fussy cut all these pups out with Fiskars Spring Loaded Scissors and then inked the edges with a Momento Tuxedo Black Marker to hide the white edge of the cut card stock. Then it was a matter of positioning each pup into the scenes. I popped each of them up on double sided foam adhesive for a little dimension, but securely glued down their feet and some of their skinny tails with Art Glitter Glue (with a fine nozzle tip) so they could go through the post without fear of being damaged.
For two of the pups that were a little taller, I positioned the pups so they looked like they were popping into the scene from the foreground off the front edge of the card and cut off any overhanging parts. For the other two, I put them completely in the scenes and grounded them by adding shadows below them using a Copic C3 marker.
For 3 of the cards, I ended up adding an extra pup inside the card as well. This was primarily because I had underestimated the space needed for the die cut window in the living room scene and had had to cut the side of the over-hanging lamp. To make the card front scene look complete, I had to stamp the lamp inside the card as well. Then to make the lamp not look like an oddity, I added the extra pup as an accent to the interior of the card. I actually think these card interiors came out looking ok – sometimes mistakes create opportunities!
The following is a process video showing how to construct these cards, including a sampling of the Copic coloring as well (remember to leave the answer to the question posed in the video in the comment section of the video to be eligible for the prize):
Disclosure: Many of the supplies I’ve used for today’s project are linked. Some may be affiliate links, which means if you make a purchase I receive a small commission at no extra cost to you. I truly appreciate your support toward the costs of running this blog!
These cards are being entered into the following challenges:
Word Art Wednesday Anything Goes Challenge
Simon Says Stamp Monday It’s a Dog’s Life Challenge
Lil Patch of Crafty Friends Anything Goes Challenge
Just Keep on Creating Anything Goes Challenge
Creatalicious Anything Goes with Optional Halloween Challenge
Not Just Cards Anything Goes Challenge
Through the Craft Room Door Anything Goes Challenge
]]>