
I essentially inked the stamp selectively — just around the cats, and wiping away over-inked areas like the moon and fence post tops with my DIY stamp shammy. Then I would reposition my card front around on my MISTI stamp tool and stamp the cats again. Leaving enough space to also heat emboss the sentiment, “Happy Halloween” from the Halloween Word Stamp Set, I was able to get most of 7 cats on this card!
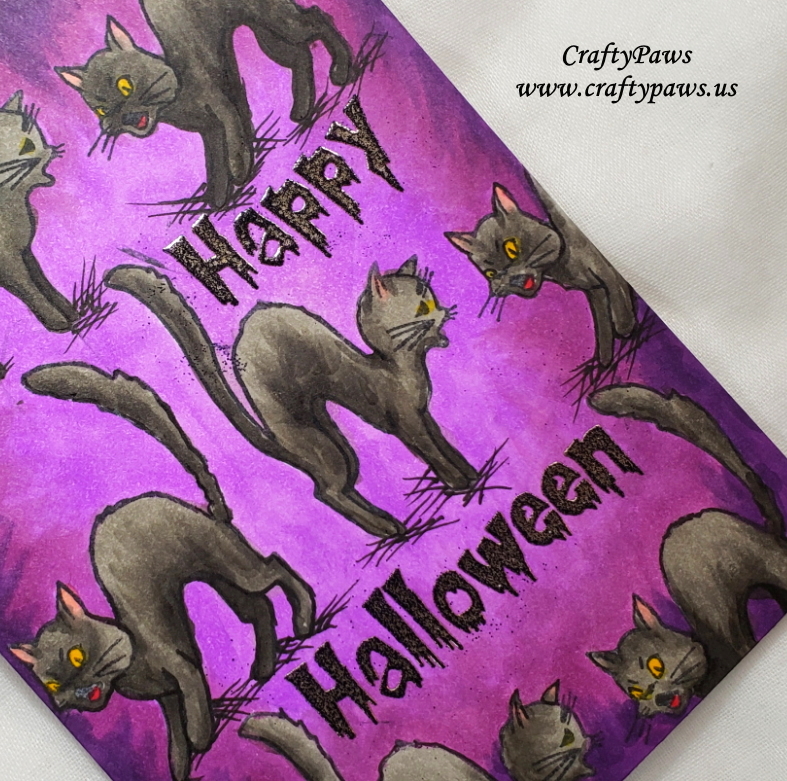
Then I used the following Halloween/fall Copic colors to fully color up this card front:
Background: W04, V06 and V09
Cats: W3, W5, W7 with R21 ears and Y19 eyes and R29 tongue
Lastly, I used VersaMark Ink to stamp out the sentiment and Ranger Liquid Platinum Embossing Powder and Ranger Super Fine Black Embossing Powder to heat emboss the sentiment. The platinum base with the black overlay matched the warm grey of the cats perfectly and added a hint of shine and dimension to pull the card perfectly together.
CLICK the following picture to watch the whole start to finish crafting video:
Disclosure: Many of the supplies I’ve used for today’s project are linked. Some may be affiliate links, which means if you make a purchase I receive a small commission at no extra cost to you. I truly appreciate your support toward the costs of running this blog!
This Halloween kitties card is being entered into the following challenges:
Penny Black and More Animals Challenge
Simon Says Stamp Monday Stamp It Challenge
Creatalicious Anything Goes with Optional Humor Challenge
Simon Says Stamp Work it Wednesday Celebrate It Challenge
Through the Craft Room Door Anything Goes Challenge
Crafty Gals Corner Fall Colors Challenge
Crafting By Design Anything Goes Challenge
The Male Room Autumn Challenge
]]>
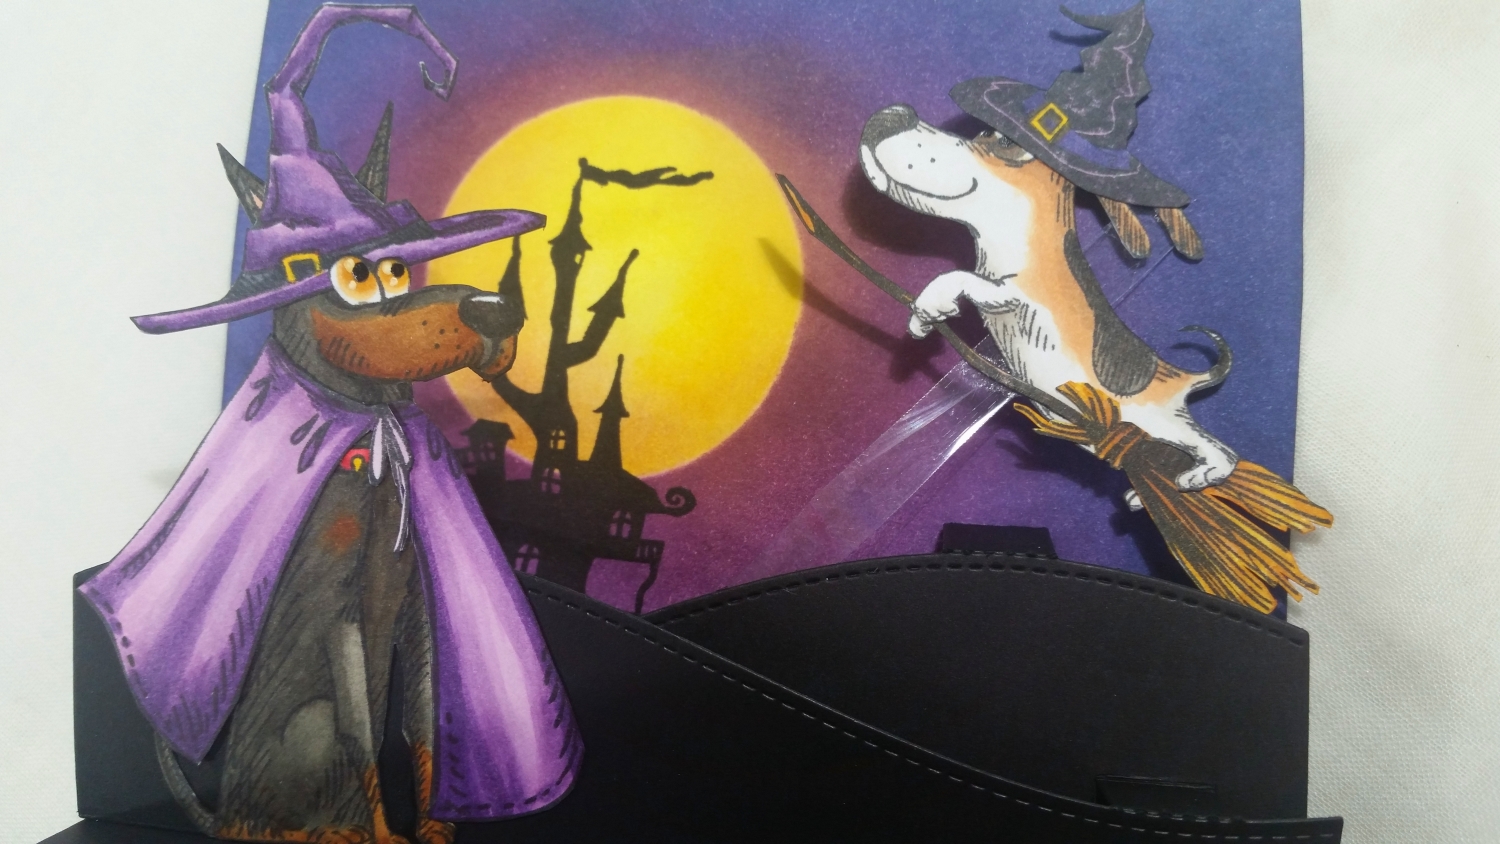
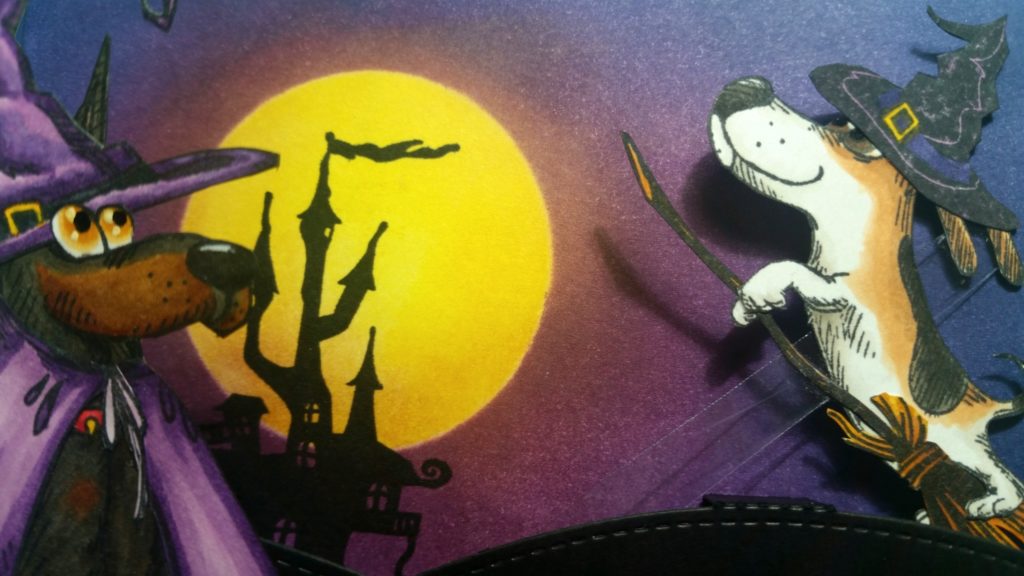
For this HOWLoween interactive scene card, I used the Doberman and Beagle from my absolute favorite Katzelkraft Dogs Stamp Set along with the witches hat from the Katzelkraft Funny Accessories Stamp Set, the small witches hat and haunted mansion from the new Katzelkraft Halloween Stamp Set, and the cape and broom from the Katzelkraft Pilgrim Stamp Set.
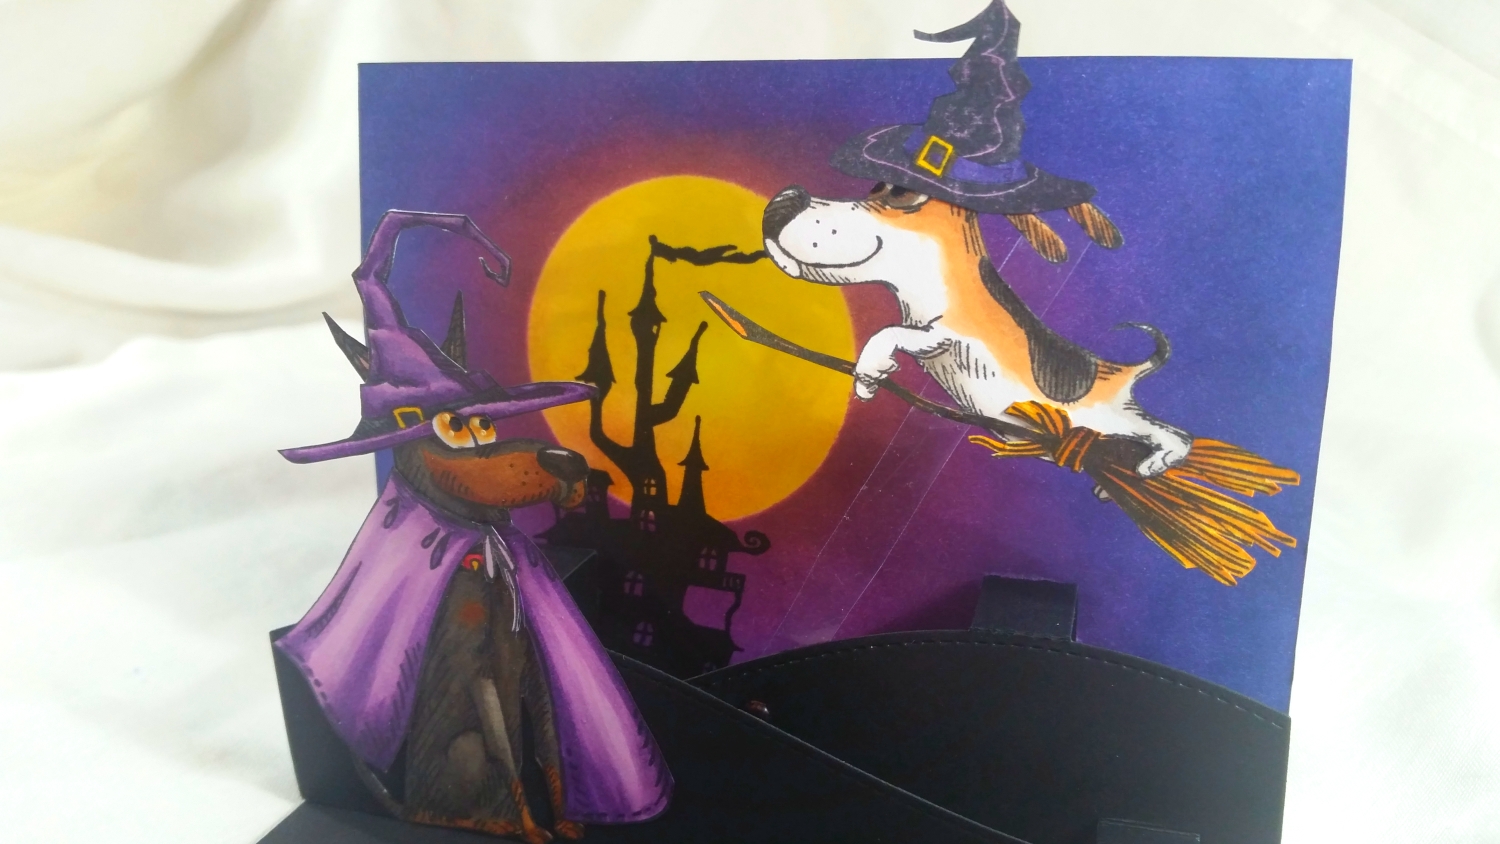
I Copic colored all the stamped images (except the haunted mansion, which I used as a silhouette for the background) using the following colors:
Doberman: Brown: E35 and E39; Black: W5 and W7; Nose: W9; Collar: R35, R37 and Y19; Eyes: YR21, YR24 with Signo Uniball White Gel Pen and Sakura Black Glaze Pen; Ear: R30
Beagle: White: W0 and W1; Black: W5 and W7; Brown: E21 and E23; Eyes: W5 and E23 with Signo Uniball White Gel Pen and Sakura Black Glaze Pen
Witch’s Hat and Cape: V12, V15, and V09; C7 and C8; Y19. Broom: YR24 and E15
I then fussy cut all the pieces out and combined the witches hat and the cape on the Doberman, cutting the pup’s ears and re-attaching them behind and around the hat to make them more visible and slightly trimming the cape to fit the dog’s body a bit better. I gave the beagle the smaller witches hat and cut around his paws so that I could tuck him around the broom, and he could fly through the air.
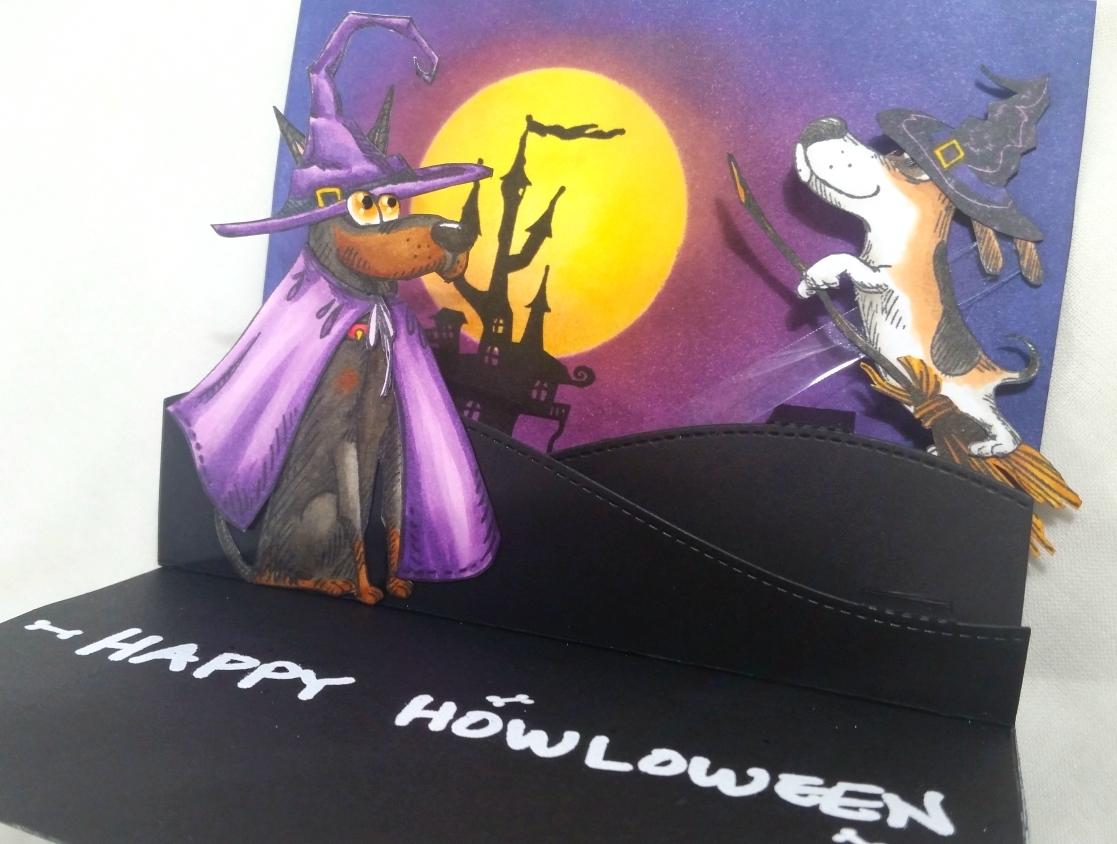
For the background (the top half of the card), I made a mask with the 6th largest Diemond Dies Circle Nesting Die and some thick cardstock and blended on some Distress Inks in Mustard Seed and Squeezed Lemonade to create a bright moon. I next used the cut out circle as a mask over the moon and blended on Distress Inks in Seedless Preserves, Dusty Concord and Chipped Sapphire to create a night sky. To soften the edges of the moon and give it a bit of dimension, I blended on a little Seedless Preserves around the edges. Lastly I stamped the haunted mansion so that the turrets would be silhouetted by the moon and add interest to the background.
To create the foreground, I layered the card base bottom of this top folding card with thin black cardstock. Then I used the Lawn Fawn Stitched Hillside Pop Up Die with extra heavy weight black cardstock and attached it to the card at the center fold. For an added bit of interactive fun I added a clear plastic piece (salvaged from some craft product packaging) to the the back hill with a tiny brad and glued the bloom riding Beagle to the other end. The Beagle can now swing … or fly through the air! I glued the witchy Doberman to the front hill, looking up at his flying buddy. As a finishing sentiment, I used a VersaMarker Pen and heat embossed “Happy Howl-oween” with Ranger Super Fine White Embossing Powder to the card base.
Please click on the following picture if you’d like to watch the process video of crafting this card:
Disclosure: Many of the supplies I’ve used for today’s project are linked. Some may be affiliate links, which means if you make a purchase I receive a small commission at no extra cost to you. I truly appreciate your support toward the costs of running this blog!
This card is being entered into the following challenges:
Cute Card Thursday Anything Goes Challenge
Crafty Gals Corner Anything Goes Challenge
Lil Patch of Crafty Friends Anything Goes Challenge
Through the Craft Room Door Anything Goes Challenge
Catch the Bug Make Us Smile Challenge
Pause Dream Enjoy Cards Challenge
Simon Says Stamp Monday Stamp It On Challenge
Simon Says Stamp Wednesday Stamp On It Challenge
Creatalicious Anything Goes with Optional Pastel Colors Challenge
Simon Says Stamp Work it Wednesday Favorite Stamping Technique Challenge
]]>
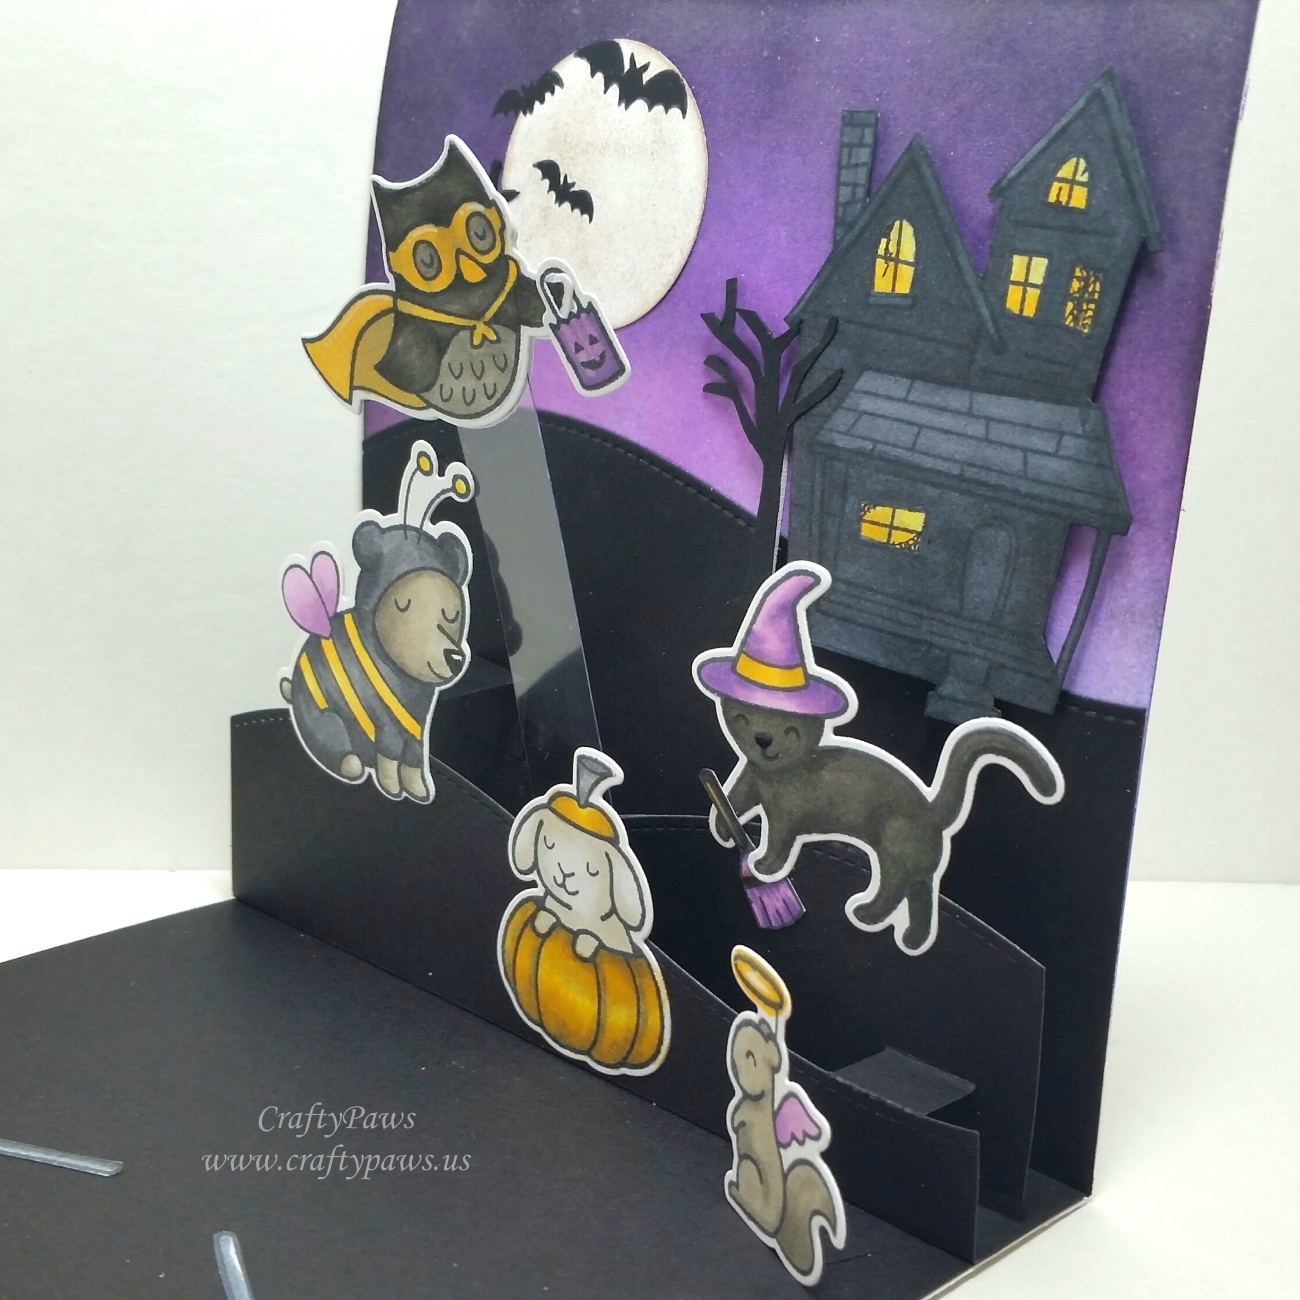
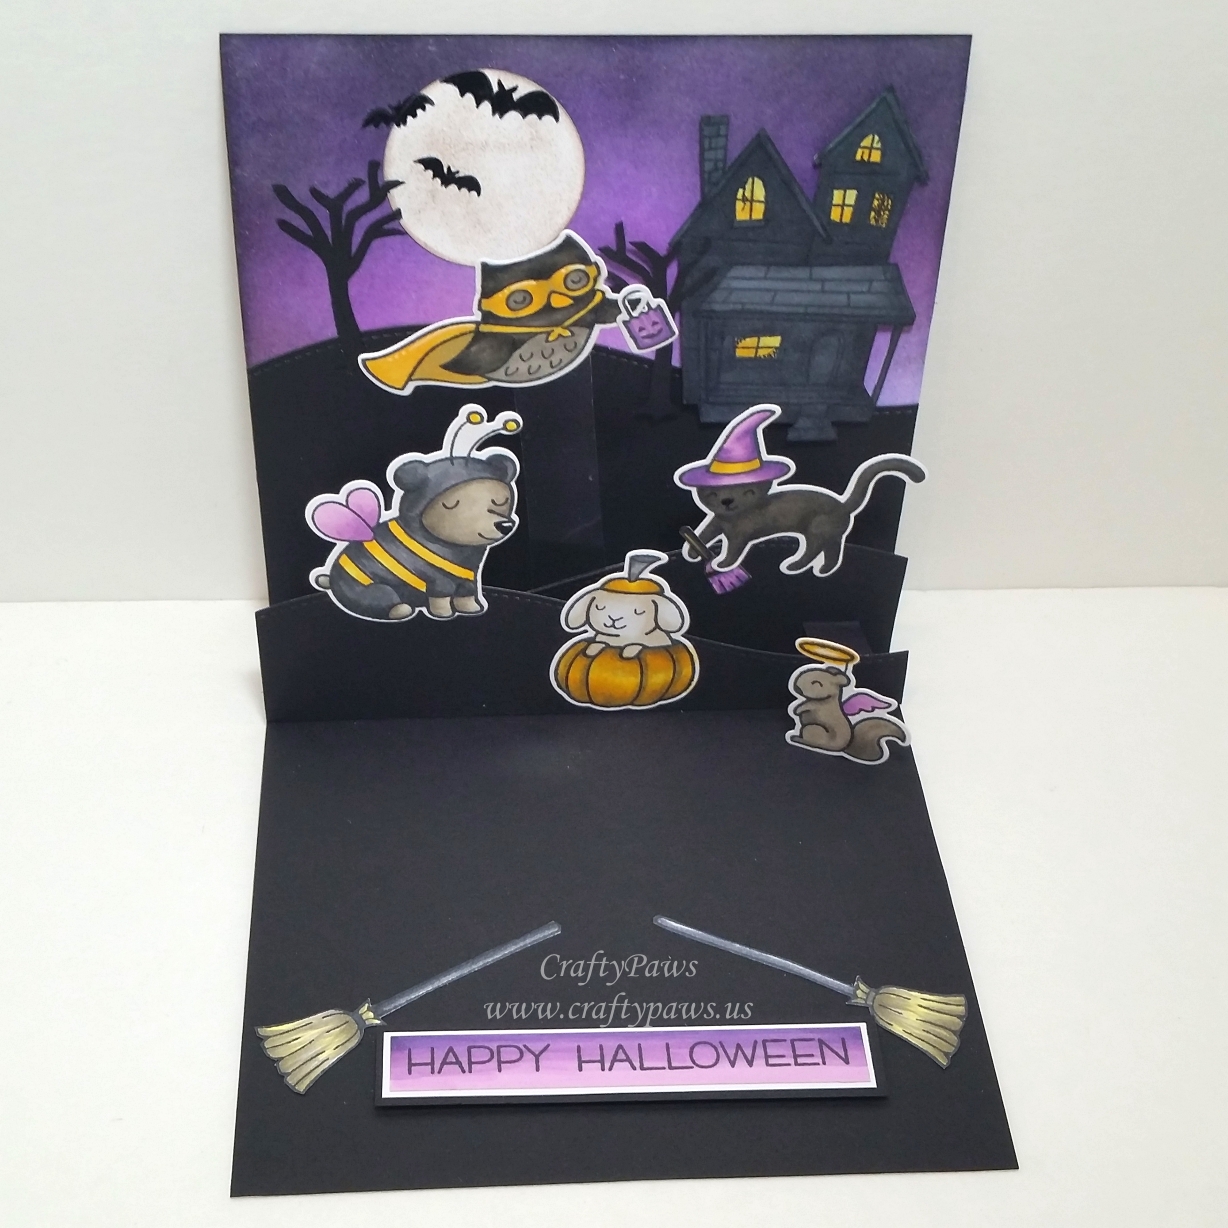 I made the background sky by blending on some Tim Holtz Distress Ink in Shaded Lilac, Seedless Preserves, Wilted Violet and Black Soot. I cut out a circle and lightly dabbed some Pumice Stone Distress Ink on it and around the edges to create a moon. I stamped out a few bats from the Lawn Fawn Happy Haunting stamp set and then went over the top of them with a black Sakura Glaze Pen to give them a bit of shine and depth in front of the moon. Then I stamped out and hand fussy cut a couple of spooky barren trees from black card stock. Lastly I stamped out the haunted house from the same stamp set and colored it up with Copic N5, N7 and Y13 and Y17 for the windows (I doodled some cracks, spider webs, and tattered curtains in the windows to add some fun spooky details). To make the haunted house more of a “character” in the scene, I popped it up on foam adhesive to bring it forward a bit.
To construct the pop up structure, I used one of the Lawn Fawn Stitched Hillside dies for the background and the Lawn Fawn Stitched Hillside Pop Ups Die for the foreground layers all with black card stock. To reinforce the layer on which I attached a piece of clear plastic (salvaged from some packaging) with a brad to create the interactive mechanism for the trick-or-treating masked owl to fly across the sky, I used an extra piece of black card stock using another one of the Lawn Fawn Stitched Hillside dies and lined up this extra piece behind the pop up layer piece. I LOVE how all of the Lawn Fawn hillside dies match up like this!
 Then for all the Lawn Fawn Critters in Costume, I used lots of Copic markers, but kept everything in the black, purple or yellow-orange color scheme. These are the marker colors I used:
Masked owl: W3, 5, 7, 9 and Y13 and Y17; Trick-or-treat bag (from the Lawn Fawn Booyah stamp set): V12, 15 and 17
Bear in bee costume: Wings: V12 and 15; Bear: W0, 1, and 3; Bee costume: N5 and 7
Bunny in pumpkin: Pumpkin: W3, Y13 and Y17; Stem: N5 and 7; Bunny: W0 and W1
Cat witch: Hat and broom (broom from the Lawn Fawn Booyah stamp set): W3, Y13, Y17, V12, V15, and V17; Cat: W7 and W9
Squirrel angel: Halo: Y17; Squirrel: W3 and W5
To add a little something to the card base “floor” I stamped out two witches brooms from the Lawn Fawn Happy Haunting stamp set and colored them up with N5, N7, Y13, W3 and W5. For the sentiment that the brooms would flank, I used the “Happy Halloween” sentiment from Lawn Fawn Booyah stamp set and colored up the background with an ombre look with V12, 15 and 17.
I used the coordinating dies to cut out all the critters and adhered all but the masked owl and the squirrel angel to the various layers of the pop up stiched hillsides. I used E6000 to glue the masked owl to the plastic strip that I attached with a brad to the middle layer of the pop up. Lastly I cut a little strip of black card stock that I folded in half to attach to the back of the squirrel angel and the “ground” of the card to add just a bit more dimension to this already super dimensional card.
The following is a short video share of this card:
This card is being entered into the following challenges:
Lawnscaping Color Scheme Challenge #140 – black, purple, and yellow-orange – WINNER
MarkerPOP Halloween Challenge
Simon Says Stamp Monday Autumn Challenge — Halloween is one of the things I love about autumn!
Word Art Wednesday Anything Goes Challenge
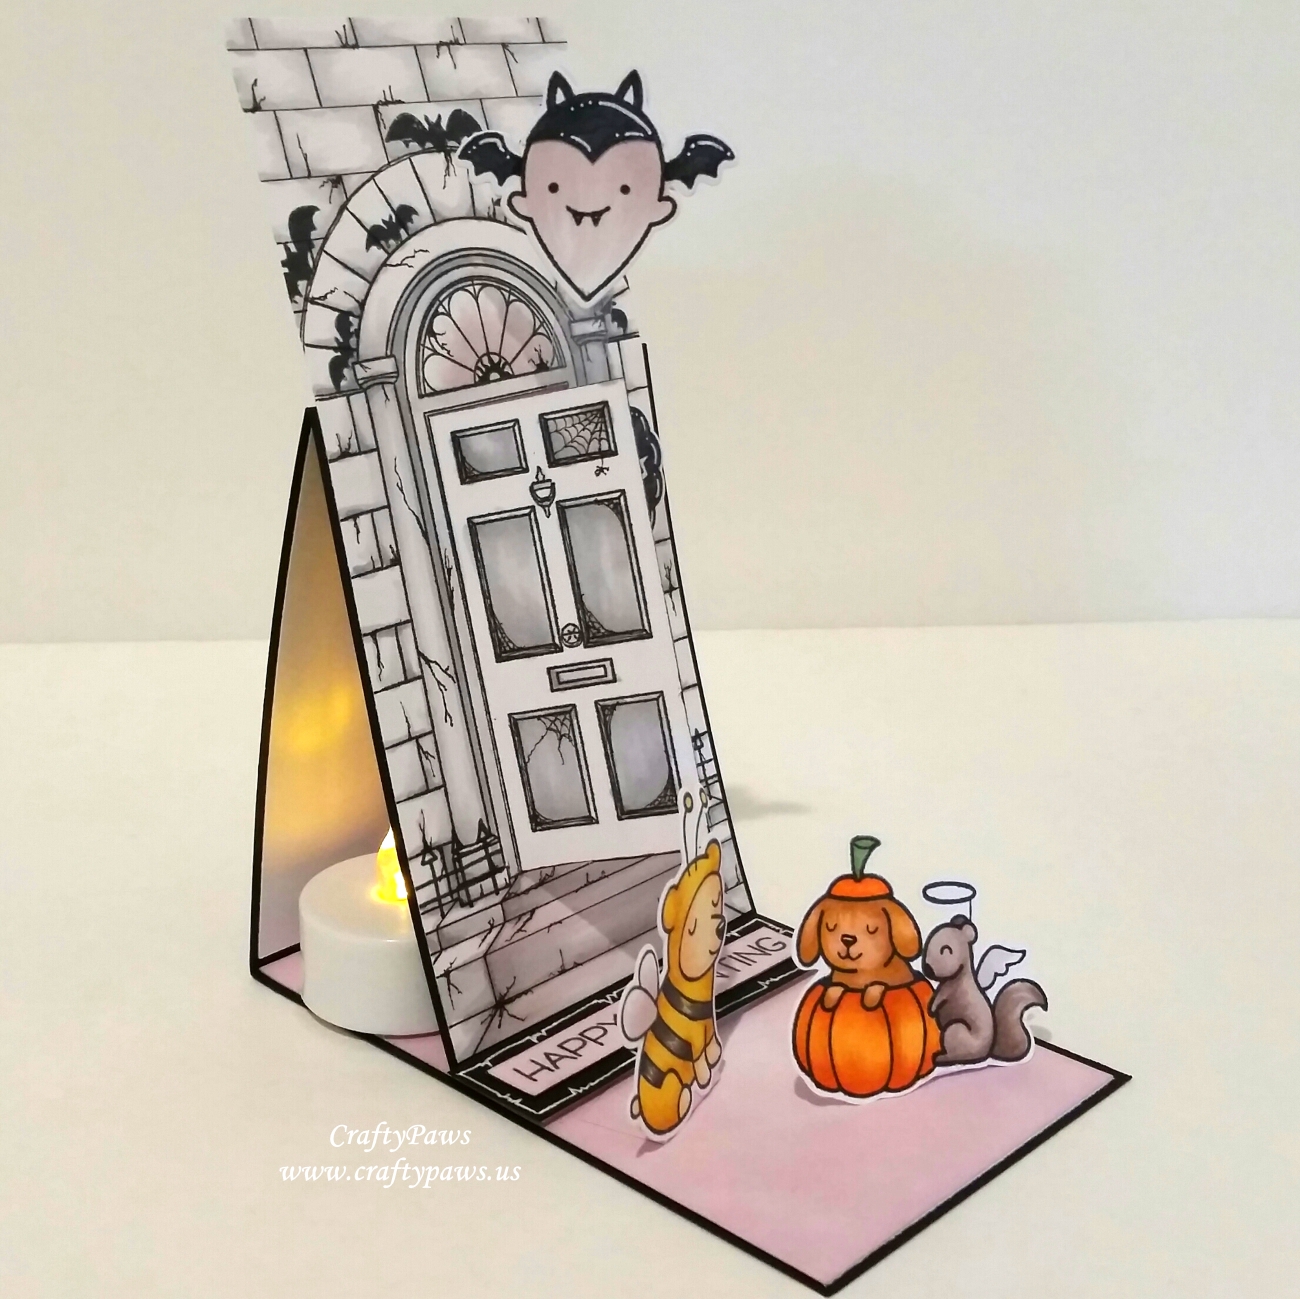
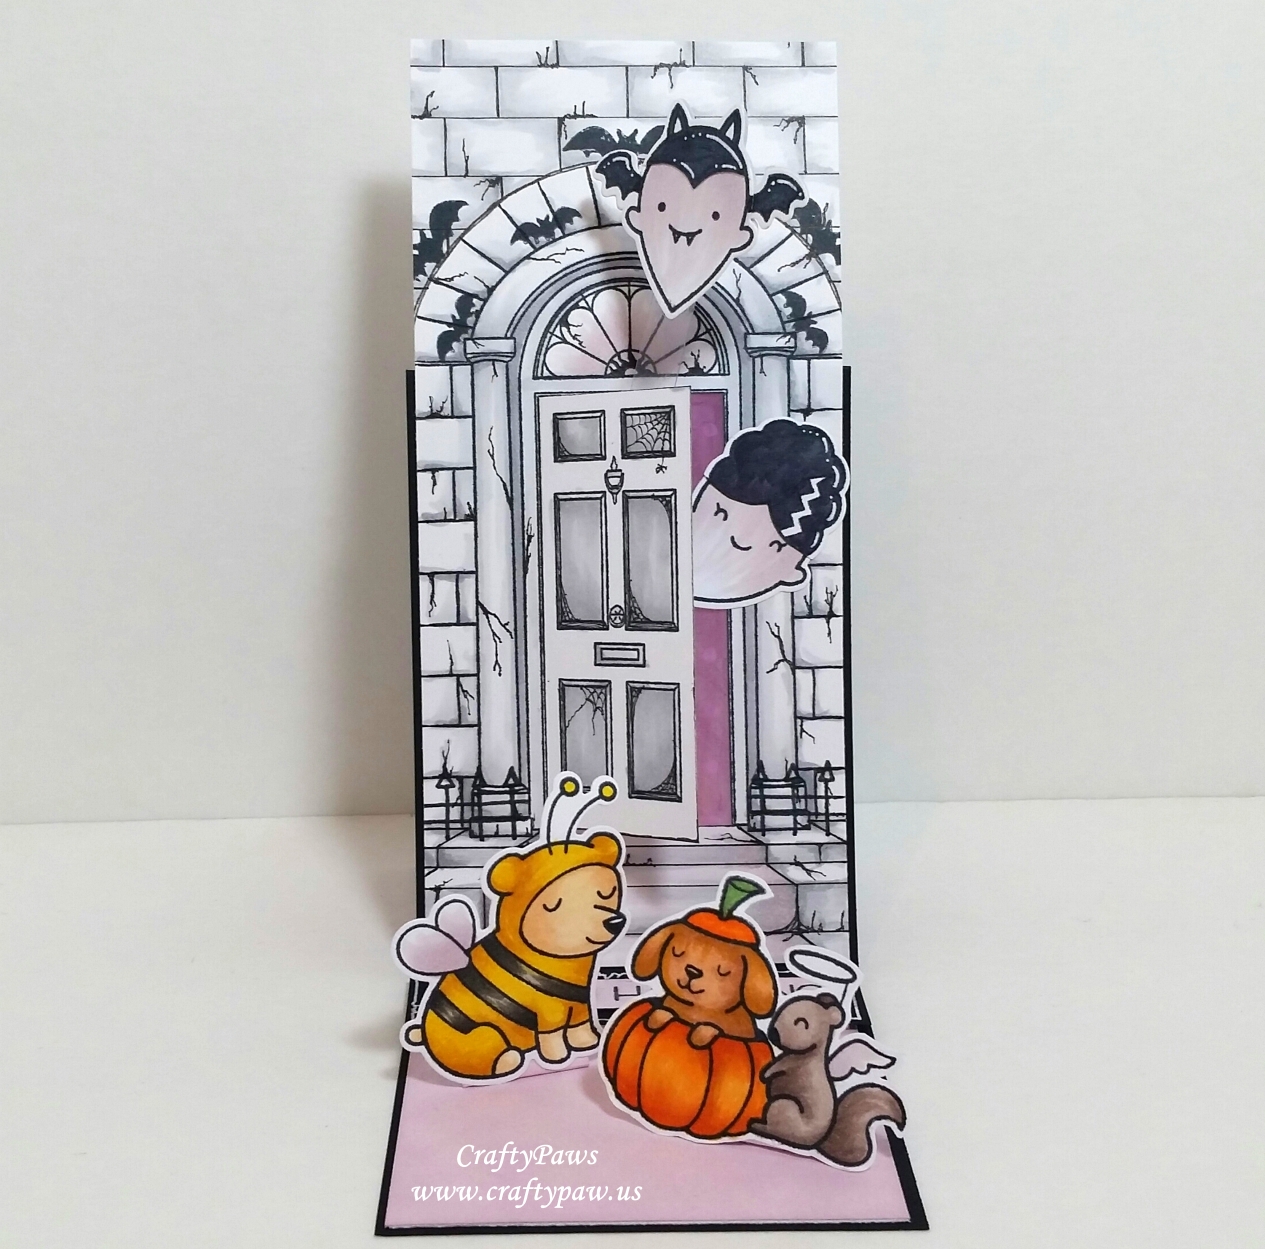 I decided I would make a tall easel card so I stamped out the door with a bit of space above and below it and doodled on rows of bricks above the arched door and drew front steps (taking care to try to keep the depth perspective with the angles) below. To make it more Halloweeny, I used a Copic Multi-Liner Pen in 0.05 pt to draw in cracks, spider webs, spiders, and cracks in the windows. For some fun details, I used the little fence and the bats from the Lawn Fawn Happy Haunting to add some details to the doorway. Then I used an X-Acto blade to hand cut the door so that it could be swung open. For even more realism, I stamped the door stamp on the inside of the door too so that when it is opened it has all the details that the outside image has. To create the “screen door,” I took a polka dot scrap of vellum, colored the back side of it with a Copic purple in V06 for a nice touch of color, and glued it to the door opening. When the battery operated tea light is turned on behind this, there is a beautiful glow. The rest of the mansion entry is lightly colored with Copic greys in N1, 2, and 3 with hints of luminescence in the transom window and stairs with V91.
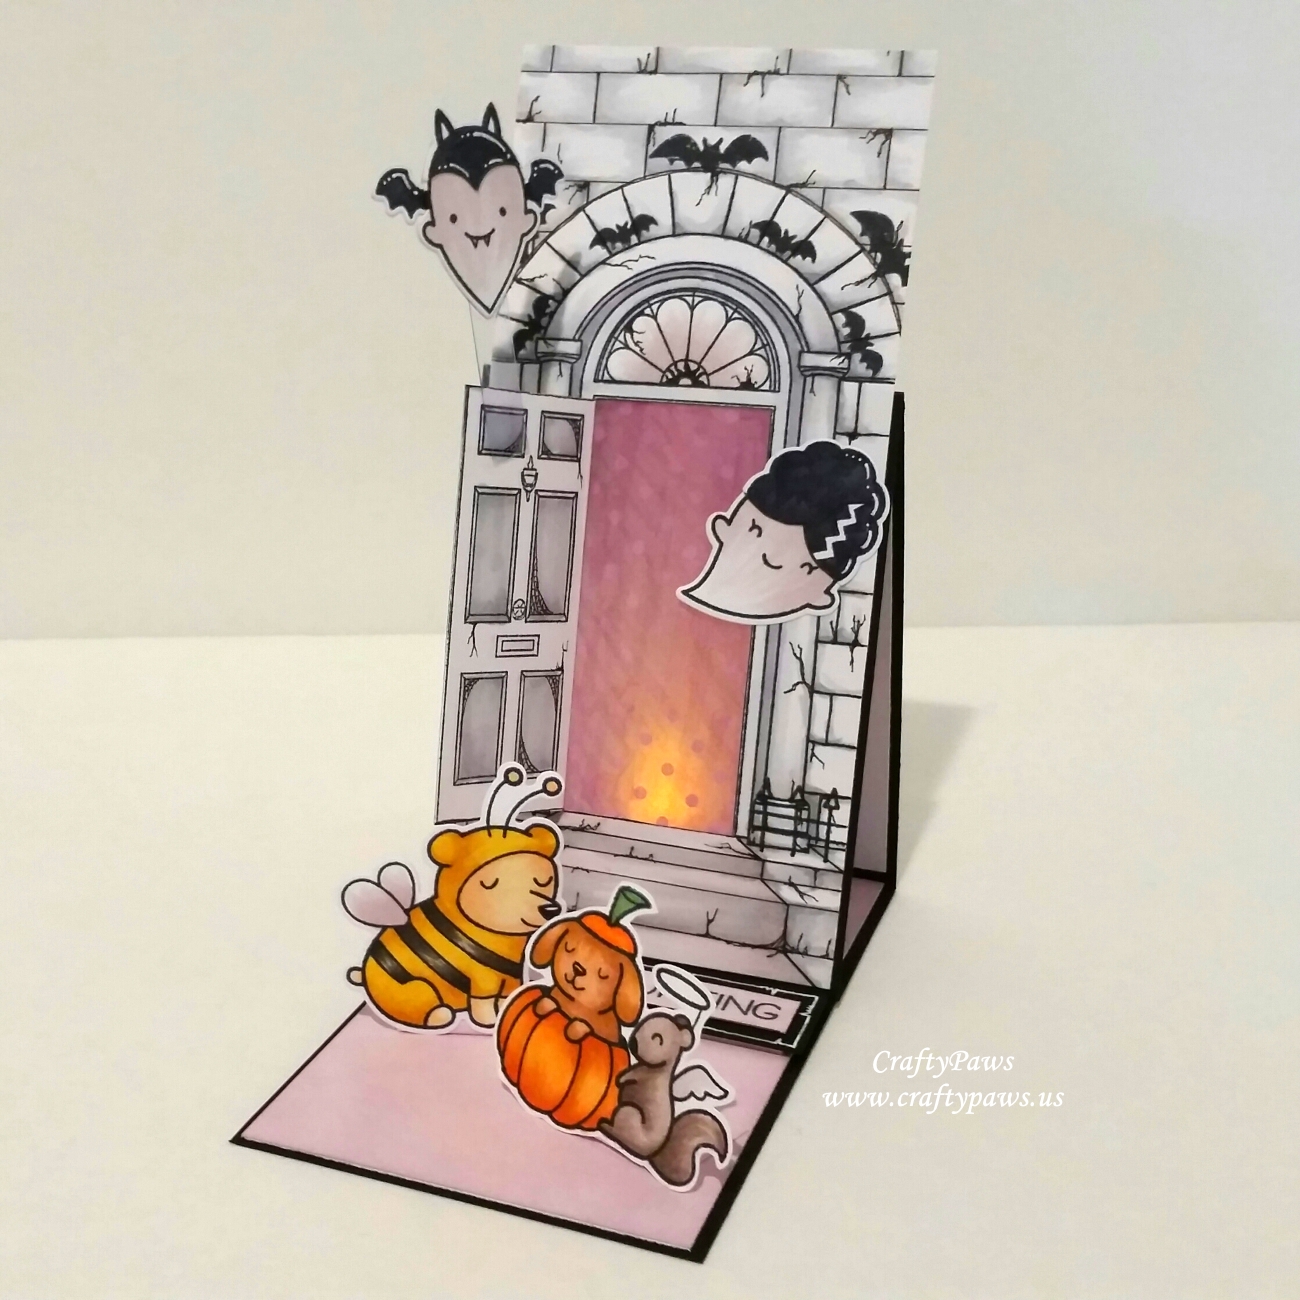 For the ghostly couple residing in the haunted mansion, I used the Lawn Fawn Booyah stamp and die set to make up a Mr. Batty Ghost and a Mrs. Frankenstein Ghost. The coloring was simple with a bit of Copic V91 for a pale purpley ghostly hue and C7 for a black, but not solid black look. The Mrs is peering out from the doorway, as if to say, “Welcome!” and the Mr. is attached to the front door with a strip of clear plastic that I salvaged from some packaging so that he swings out to say “Booyah.” To maintain the “realism” of the couple (LOL), I stamped and die cut out the Mr Batty Ghost two times and sandwiched the plastic strip between so that from whichever direction you see him (front or back), he looks complete. I stamped out “Happy Haunting” from the stamp set, matted it (doodling some jaggedy lines for some detail with a white Sakura Gelly Roll pen), and popped it up on double sided foam adhesive to create the stopper for the easel mechanism.
 Then Copic colored up a three of the Lawn Fawn Critters in Costume and die cut and fussy cut them out (two were masked and combined — I didn’t want the white space between them — so using the matching dies wasn’t possible). The following are the Copic colors I used:
Bumble bee dog: Y15, YR24, W0, W3, W7, E50, E11 and V91
Pumpkin dog: E21, E11, E33, YR12, YR24, YR04, YR07, G24 and G94
Angel squirrel: E70, 71 and V91
I also added clear Wink of Stella on all the wings as well as on the Mr. and Mrs. Ghost for a little magical sparkle.
To match the walkway with the steps of the mansion, I blended on Tim Holtz Distress Ink in Milled Lavender for the ground where the trick-or-treating critters were coming up. To have the costumed critters propped up, I simply cut up and folded scrap card stock that I also inked to match/disappear into the walkway and glued them to their backs.
The following is a video share of this card:
This card/tea light holder is being entered into the following challenges:
Simon Says Stamp Monday Autumn Challenge – WINNER
MarkerPOP Halloween Challenge
Addicted to Stamps and More Anything Goes Challenge
Word Art Wednesday Anything Goes Challenge
Card Mania Let It Shine Challenge
Lil Patch of Crafty Friends Anything Goes Challenge
Creatalicious Anything Goes Challenge with Optional Halloween
Craft Your Passion Anything Goes Challenge
Crafty Gals Corner Be Fa-BOO-Lous Challenge
Penny Black and More Autumn Challenge

]]>
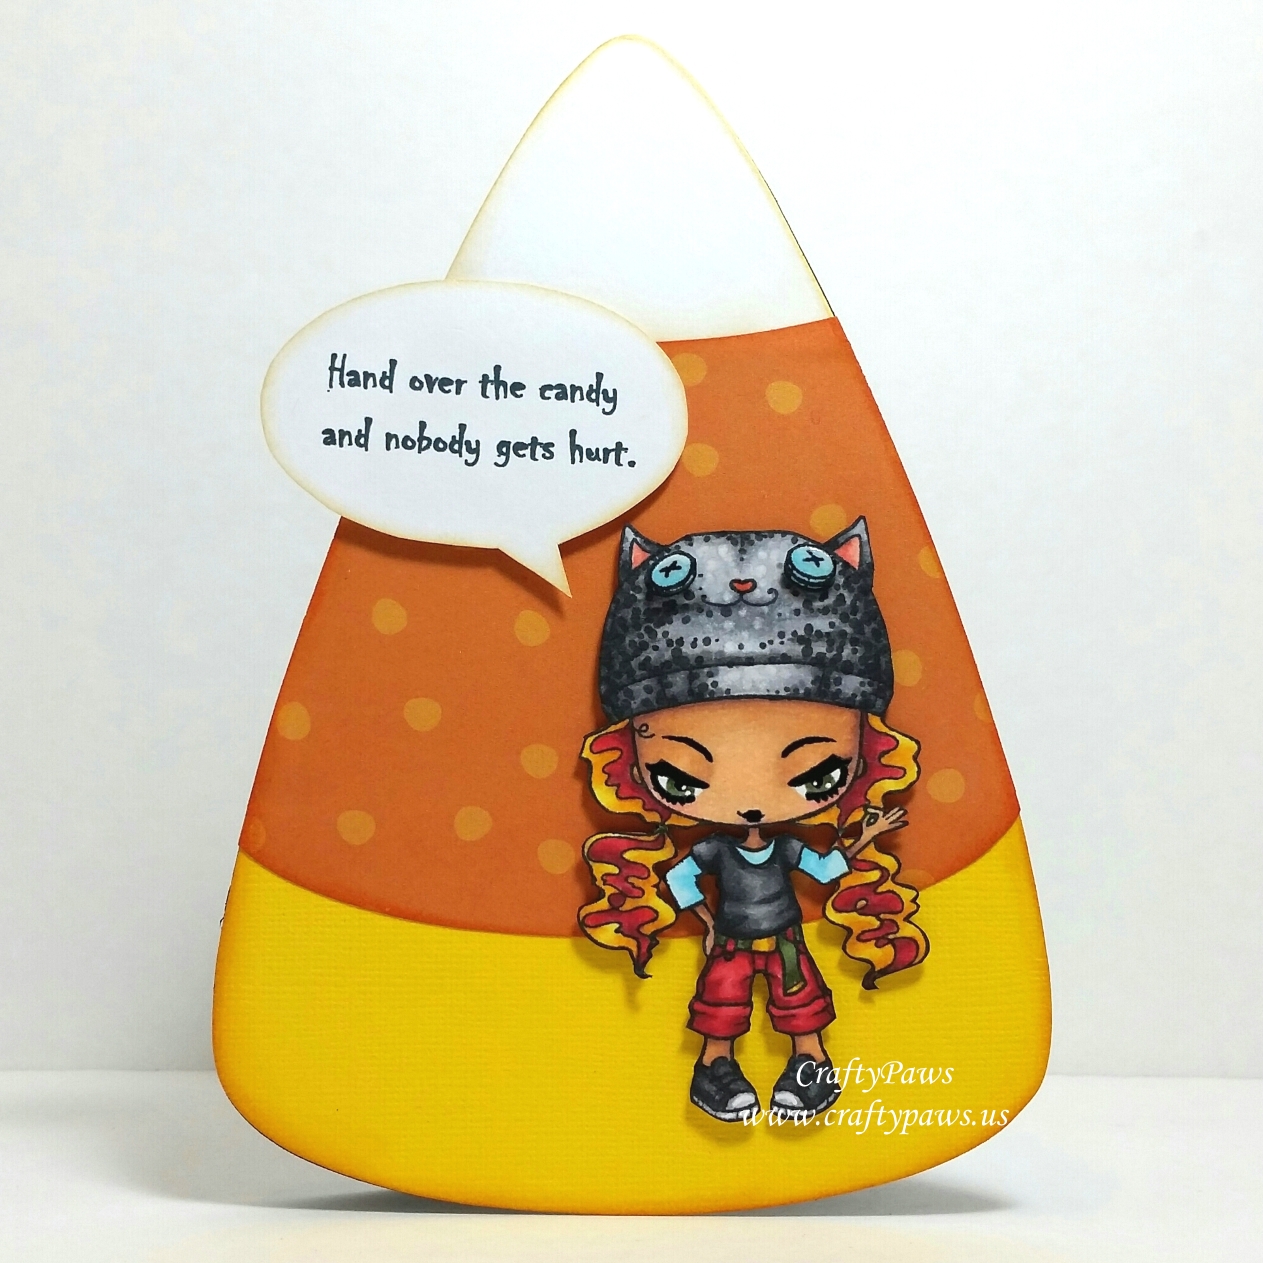 For the focal image, I colored up The Greeting Farm Creeper Crew’s Thursday (she’s retired, but there are similar Creeper Crew images available HERE) in the following autumn/Halloween Copic colors:
Skin: E000, 00, 21, 04 and R20 for blush
Red hair streaks and jeans: R22, 35, 37 and 39
Yellow hair streaks: Y11, Y15, Y38 and E33
Blue 3/4 sleeve shirt and button eyes of cat hat: B000, 00 and 01
Sneakers, cat hat, and black T-shirt: N1, 3, 5, 7, 9 with 0 for dotting texture in lighter area of cat hat
Pink of cat hat ears and nose: R20 and 22
Canvas belt and eyes: G43, 85 and 99
Black shine of eyes, eye brows and lips are with Sakura black Glaze pen
White shine of button eyes and white part of sneakers are with Sakura white Gelly Roll pen
I fussy cut her out with my favorite Fiskars Easy Action Micro Tip spring loaded reverse scissors and an X-Acto blade (for the inside cut away areas). Then I took the time to ink the cut edges with a Faber-Castell Pitt SB point pen so that the white edges would be covered and the image would look finished. I had stamped out and colored the button eyes of the cat hat, fussy cut those out, popped those up on foam adhesive to add a little extra dimension, and coated them with Glossy Accents for some extra shine too. The whole image is popped up on double sided foam adhesive to add a little dimension and interest.
Then to express the attitude of this little girl (whom I imagine as a teenager with lots of sass) I printed from my computer with a free spooky font called Chiller, a sentiment that reads, “Hand over the candy and nobody gets hurt.” I die cut it out with a speech bubble die from the Sizzix I Heart This die set and inked the edges with Tim Holtz Distress Ink in Antique Linen before popping it on the card with double sided foam adhesive.
The following is a tutorial for how to create the candy corn shaped card base, including the inking up of each segment with Tim Holtz Distress Ink in Mustard Seed, Spiced Marmalade and Antique Linen:
This card is being entered into the following challenges:
The Greeting Farm Farm Fresh Spooky Fun Challenge
MarkerPOP Color Challenge #105

Simon Says Stamp Wednesday Halloween Inspiration Challenge
Lil Patch of Crafty Friends Anything Goes Challenge
Through the Craft Room Door Anything Goes Challenge
Crafts Galore Encore Anything Goes Challenge
613 Avenue Create Anything Goes Challenge
Creatalicious Anything Goes Challenge
Penny Black and More Autumn Color Challenge
]]>
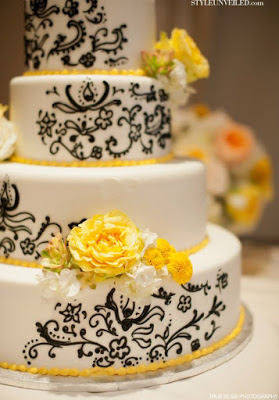 this beautiful, elegant wedding cake image (see left) from Winnie & Walter’s Pinterest Inspiration Challenge with Heather P. Not only did it inspire the color scheme, but it even informed the decision of the felt flourish ribbon trim.
I started the background by stenciling a “spider web” with the Tim Holtz Shatter stencil (yes, I know it’s supposed to be shattered glass, but I think the circular fracturing also looks like a crazy spider web) and Distress Inks in Squeezed Lemonade, Hickory Smoke, and Black Soot. I thought the yellow would nicely put the focus and spotlight The Greeting Farm’s Creeper Crew Wednesday (she’s retired, but HERE is a link to some other Creepers — and some of them are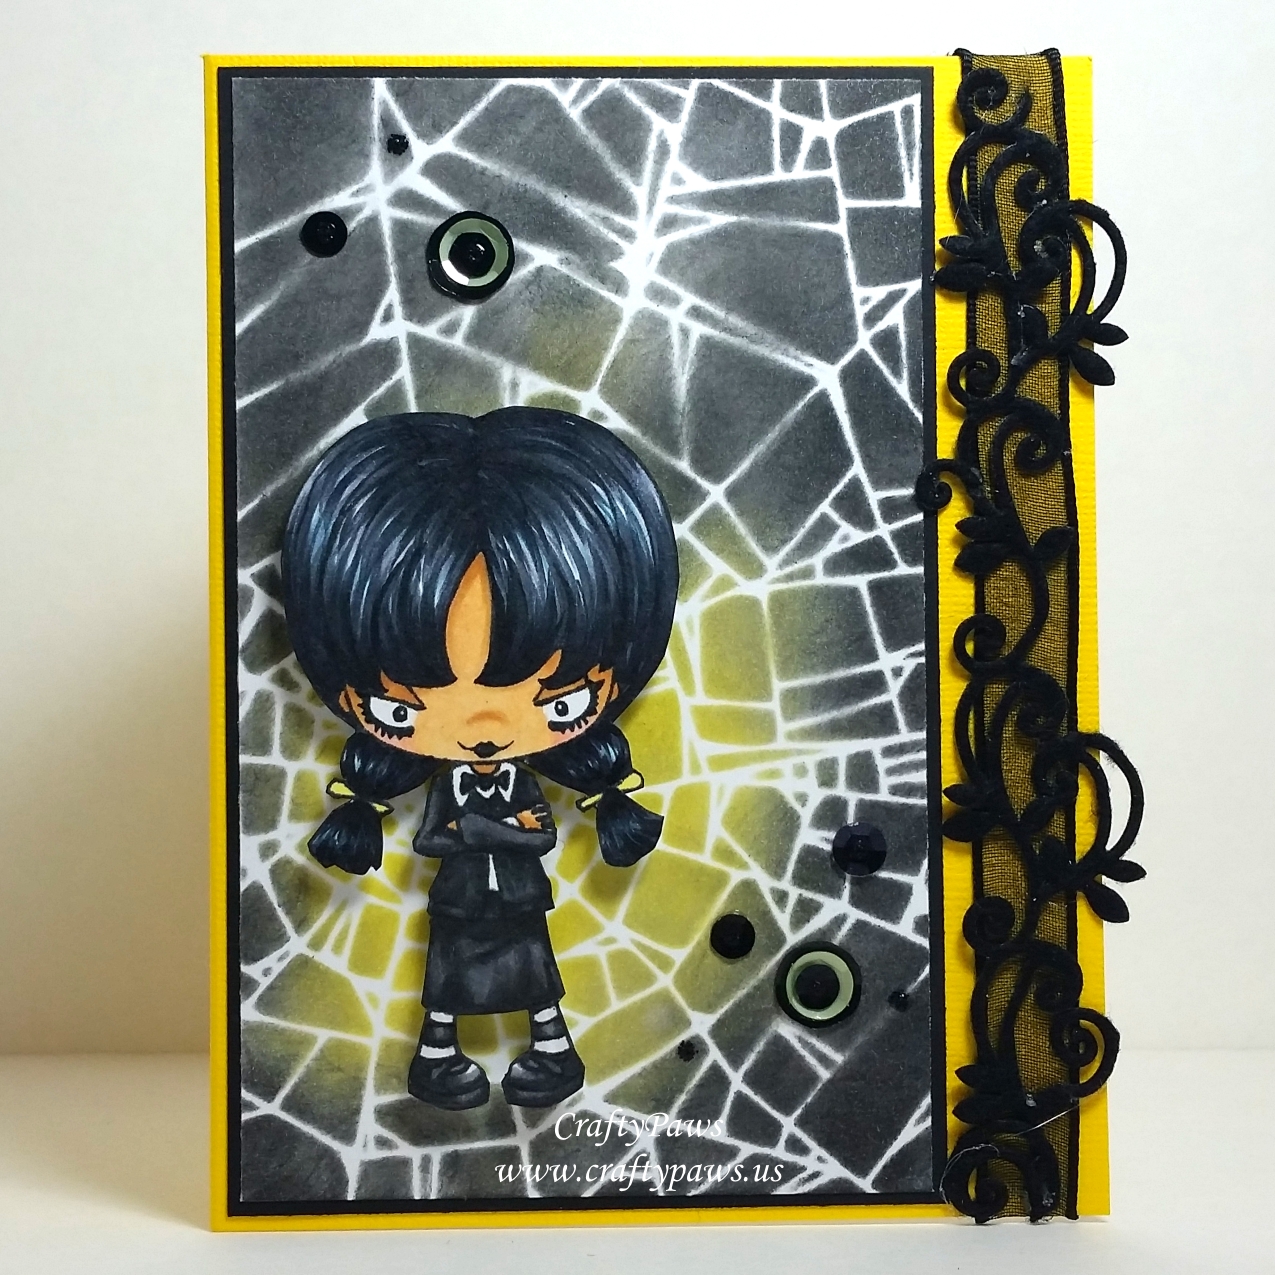 currently on sale!), that I colored up with the following Copic colors: Skin: E50, 51, 53 and R20; Hair: B01, C7 and C9; Clothes and Shoes: N1, 3, 5, 6 and 9; and bows: Y13
I added a 1/8″ black matting and then adhered it left justified on a bright yellow card base. To the right hand side, I added some sheer black wire rimmed ribbon from my stash and hot glued bits of an old Recollections felt flourish ribbon trim on top. As a finishing touch, I picked out some small, medium and large black sequins to add a little sparkle to the web (and perhaps allude to spiders?). But before I glued those down with Glossy Accents, I tried stacking some black and yellow sequins together and loved the look (somehow they remind me of googly eyes). To give the sequins a finished look, I covered the center holes with a little dot of Ebony Recollections glitter glue.
The following is a process video sharing how I made this card:
This card is being entered into the following challenges:
Winnie & Walter’s Pinterest Inspiration Challenge with Heather P
The Greeting Farm Farm Fresh Spooky Fun Challenge
Simon Says Stamp Monday Halloween Challenge
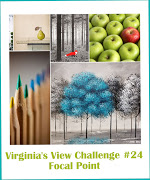
Virginia’s View Focal Point Challenge
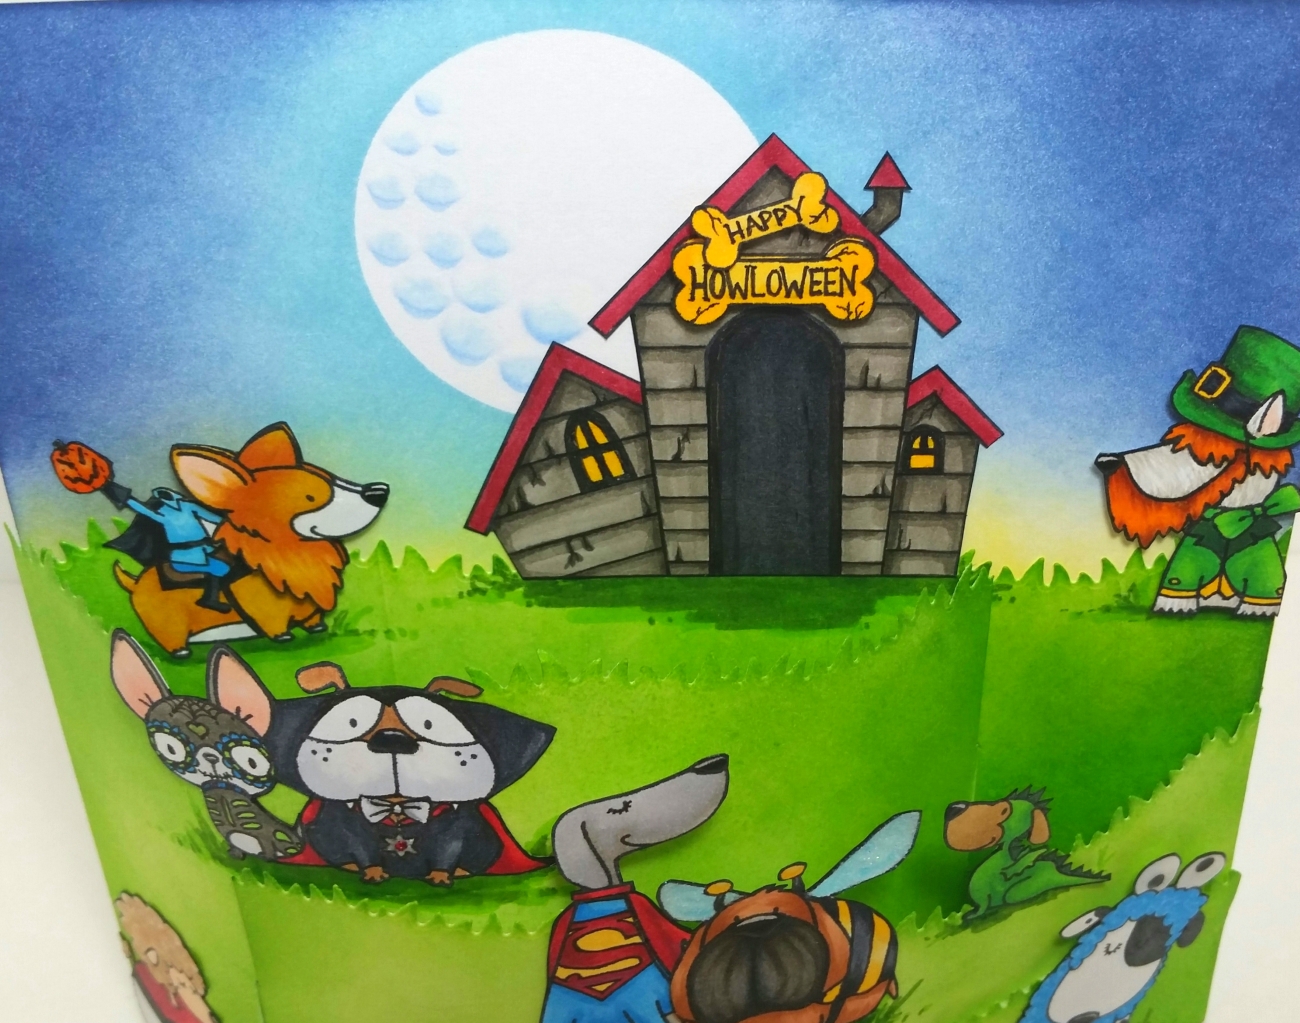
]]>
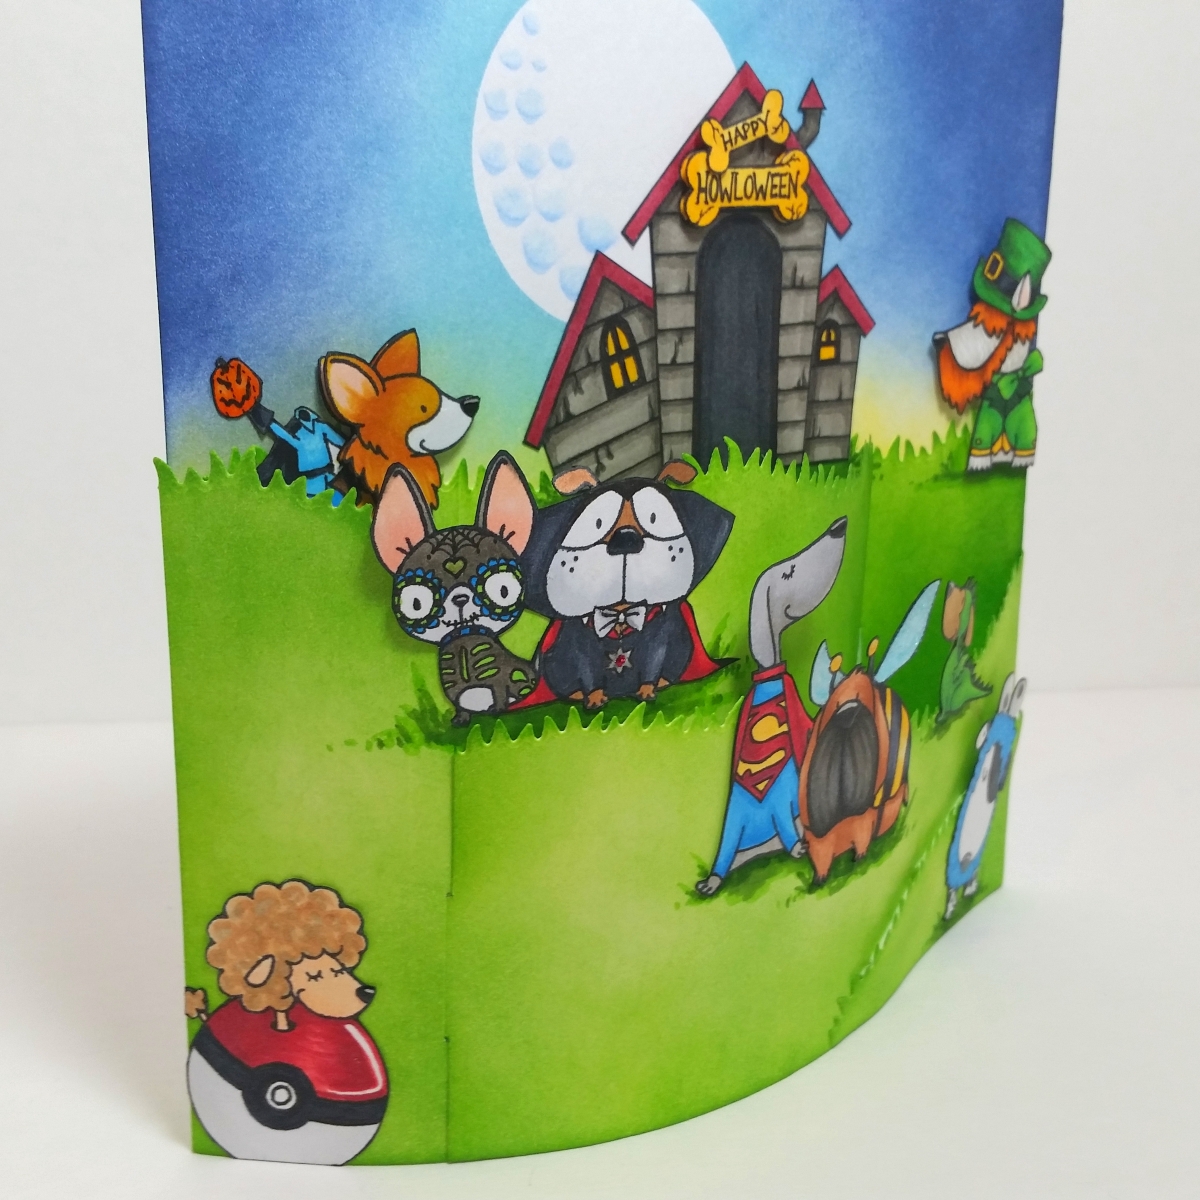 To design the costumes for each dog, I stamped them out on scratch paper and doodled different costumes on them to see what would work best for each pup. When I’d figured out a particular costume-dog combo, I paid close attention to what lines from the stamp I should wipe off before stamping (using a stamp shammy made this process much easier). Then I carefully did the partial stamping of each dog and drew the costume on with a Copic Multi-liner pen in 0.05 pt. I used the following Copic colors for each dog and then painstakingly fussy cut them out, making sure I inked the edges of the cut out images so that the white edges wouldn’t show:
Corgi with Headless Horseman: Corgi: C0, R11, Y26, YR24 and E97; Horseman: B02, B05, C7, C9 and E47; Pumpkin head: YR65 and 07
Westie turned Leprechaun: Westie: R11, W1, W3 and white gelly roll pen for furry details; Beard and hair: YR65, YR24, YR16, E97 and E99; Vest, hat buckle and cuffs: Y17
Chihuahua with Day of the Dead Body Painting: W5, W7, N0, R11, R20, YG07 and B05
Dracula: R35, R37, R39, C4, C6, C9, E23 (with Cranberry Stickles on the medal for sparkle/bling)
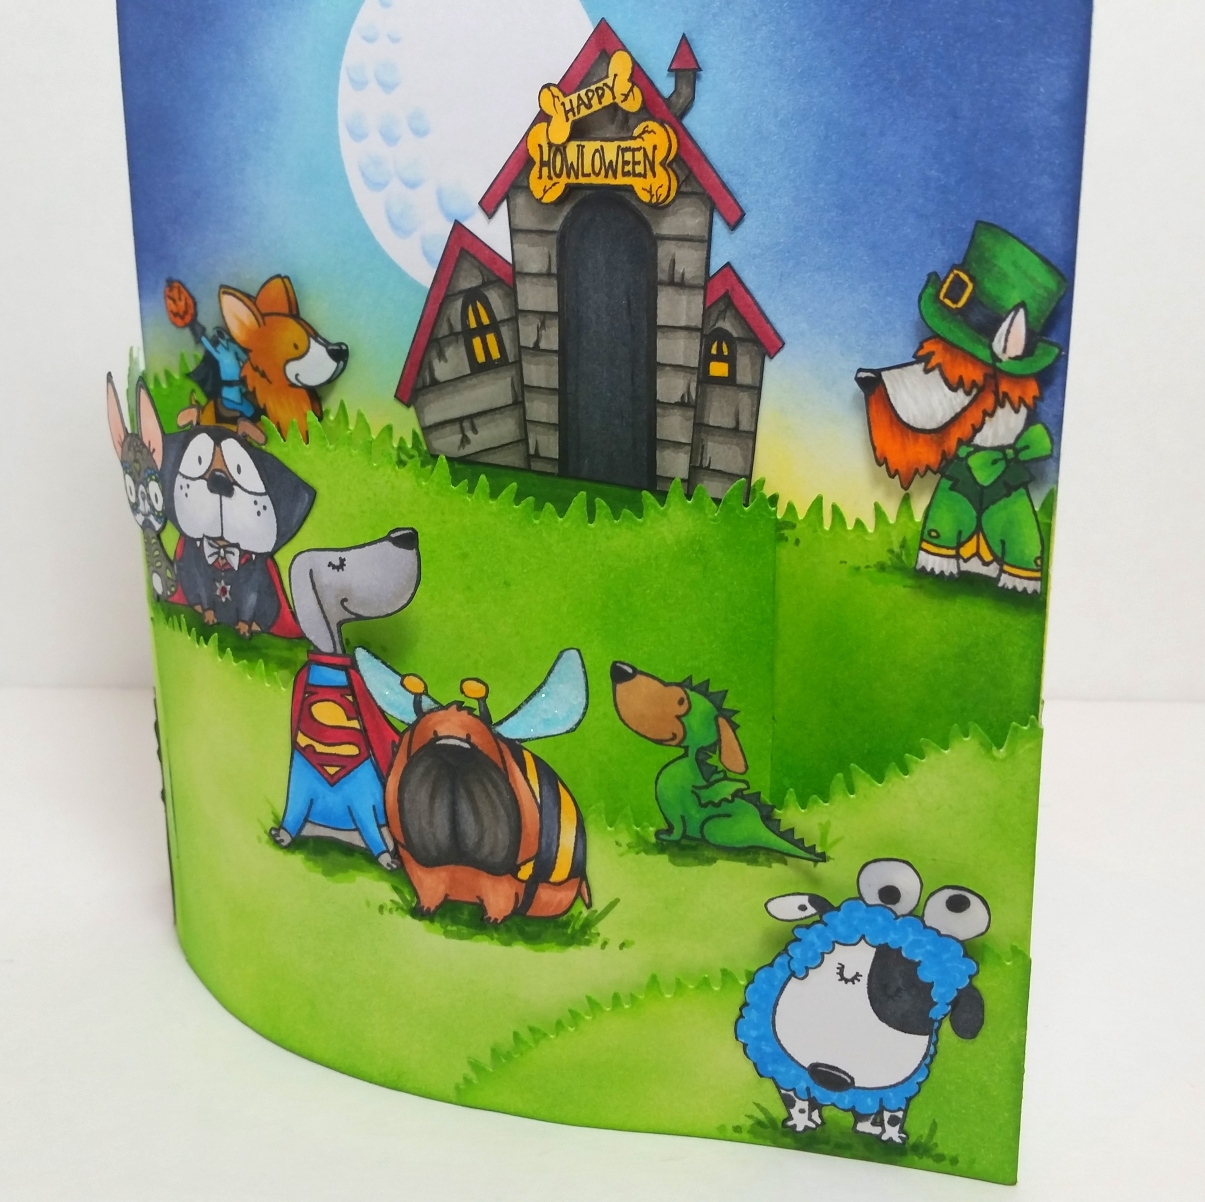 Weimeraner turned Superdog: B02, B05, R37, R39, Y35; Weimeraner: W3 and N2
Bumble Bee Dog: C6, C8, B000, B00, Y21 and Y35 (with iridescent glitter glue on wings for extra sparkle/bling)
Dragon: E55, YG07, YG09, G09, G29
Poodle turned Pokeball: Poodle: E00, E01, E21, E31, E33 and W3; Pokeball: C000, C00, R35, R37 and R39
Dalmatian turned Cookie Monster: C0, C1, B02, B05, and N7
I also added Glossy Accents to all the eyes (including Cookie Monsters’) and noses of the dogs and the windows of the haunted dog house for shine.
I also made a doggy haunted mansion by following the same partial stamping and drawing steps on the dog house from the “You Make My Tail Wag” stamp set. Only to create this larger haunted mansion, I stamped out parts of the house three times and combined them to create a wonky, off-kilter haunted house. I even altered the building sign by adding a smaller bone stamp to the top and popping both bones up on dimensionals after writing in “HAPPY HOWLOWEEN” on the two bones.
For the card itself, I decided to try my hand at a bendy card so that I would have lots of layers on which to create a scene for all these pups. I started with the back base panel of 6.5″ x 6.5″, and used Distress Inks in Squeezed Lemonade, Tumbled Glass, Faded Jeans, and Chipped Sapphire to create a sky at dusk. Before blending on the color, however, I made a simple round mask from a post-it note so that I could create a moon. I used Copic B21 and erased 3/4 of each circle with a 0 to create the look of craters (a technique I learned from Sandy Allnock).
View From Above, Showing Bendy Grassy Hills Panels
To create the look of hills, I cut 2 panels measuring 6.5″ x 4″ and die cut the top edge with one of the My Favorite Things Die-Namics Grassy Hills die set. I used one panel for the ground of the back base panel and the second one for the left panel, which I scored and folded back 1/2″ on the left side to glue behind the base panel. To create the right panel hill, I cut another piece of card stock to 6.5″ x 2.75″, die cut the top edge with another one of the Grassy Hills dies, and scored and folded back 1/2″ on the right side to glue behind the base panel. To make the tabs for the panels to fit into slits (coming next) that naturally create a curve when assembled, I marked 1/4″ on the opposite edge of the folded back edges and simply hand cut tabs. To create the slits, I used an X-Acto blade and measured 1.5″ from the right side of the back base panel to cut the slit into which the left panel would fit, and measured 1.5″ from the left side of the glued-in left panel to cut a slit into which the right (front) panel would fit. For all of the grassy hill panels, I used Tim Holtz Distress Inks and Markers in Twisted Citron and Mowed Lawn to blend on color as well as add shadows and hints of grass under and around each pup.
The following is a video share of this card:
This card is being entered into the following challenges:
MFT Superstar Card Design Challenge – 2nd Entry (first entry was #145)
CAS-ual Fridays Dimension and Bling Challenge
Lil Patch of Crafty Friends Anything Goes Challenge
Through the Craft Room Door Anything Goes Challenge
613 Avenue Create Anything Goes Challenge
Craft Your Passion Anything Goes Challenge
Addicted to Stamping Make Your Mark Challenge
Just Keep on Creating Anything Goes Challenge – WINNER
There is a really fun Chase Freedom commercial with a really peppy tune called, “Worship You” by Vampire Weekend that was one of the inspirations for this card.
HERE is a link to the song/video
Creatalicious Anything Goes with an Optional Inspired by a Tune Challenge
Simon Says Stamp Monday Inspired by Music Challenge – WINNER
]]>
I have had this fantasmic Charmaine Flannery’s Defiance stamp from Sweet Pea Stamps for a while now and have been itching to ink her up as the air turns cold and we are approaching October. The stamp is very detailed, and I love to watercolor with Tim Holtz Distress Markers with fine images like this–watercoloring is so forgiving!
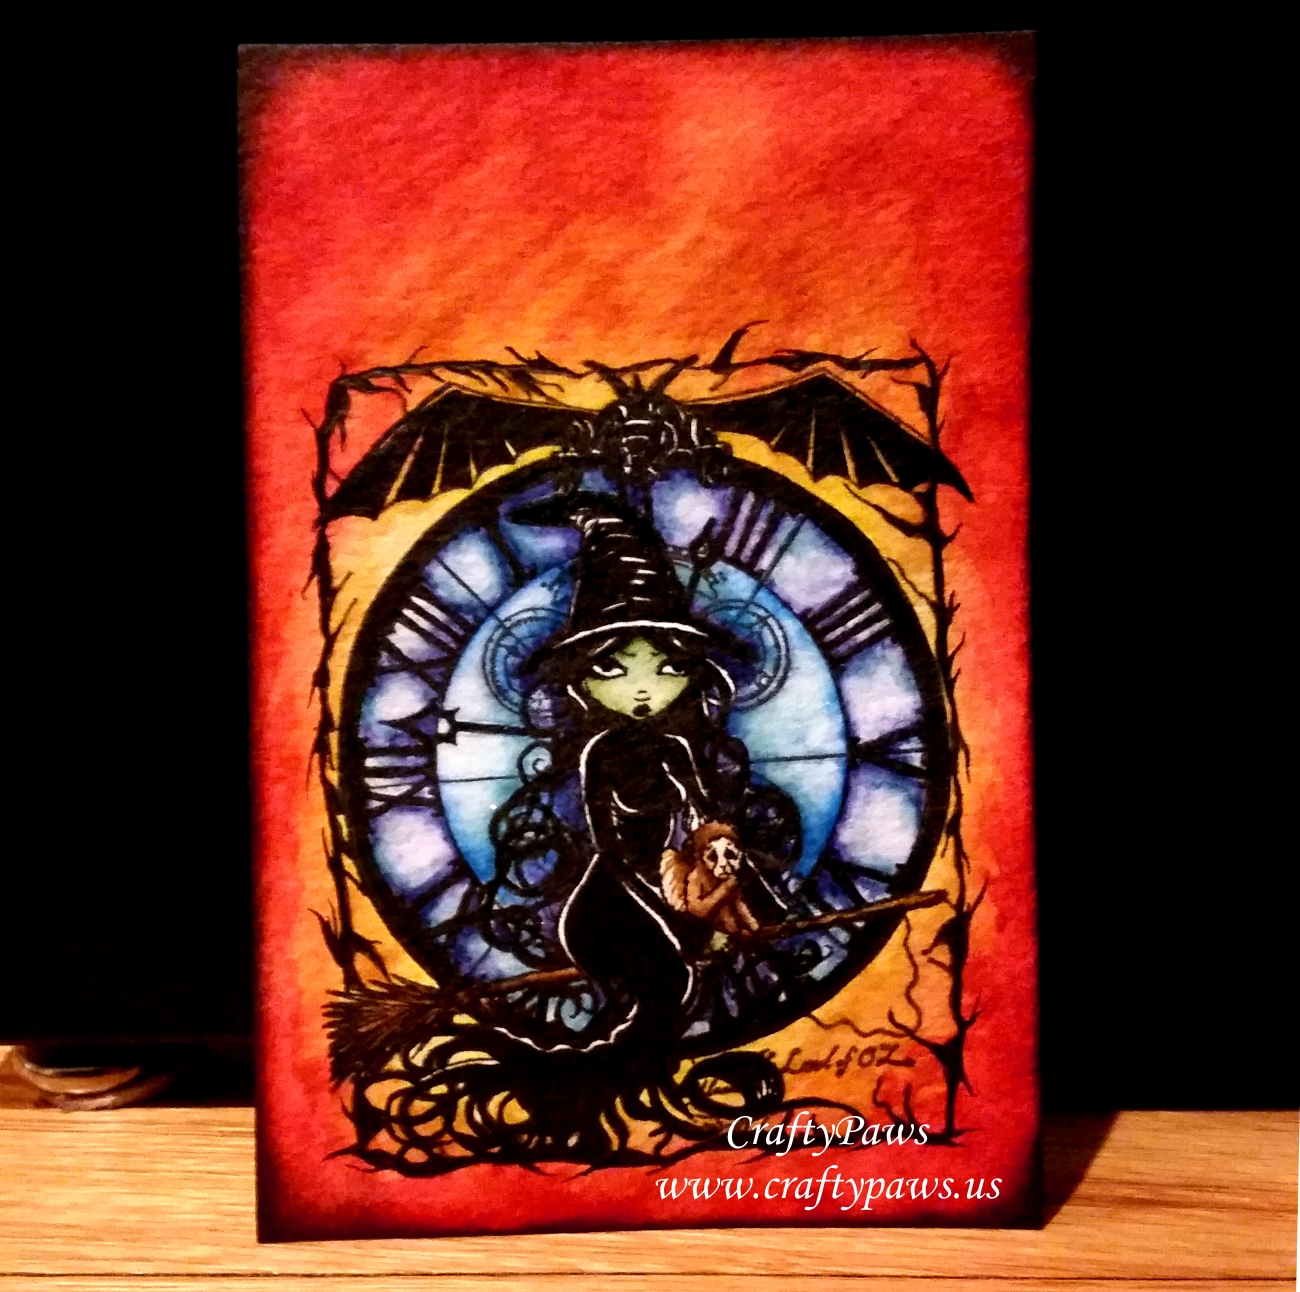 I knew I wanted to create a back-lit image with the clock face colored in an way that would look like it was illuminated from the inside–think warbly old stained glass. While I wanted Elphaba (the Wicked Witch from the West) to have a little color, I wanted most of her to look silhouetted, with highlights that would seem like reflected light from the clock. I also wanted the rest of the background to be ombre colored to mimic a fiery sunset in autumn colors. I used these Tim Holtz Distress Markers to achieve this look and a Faber-Castell Pitt Pen in B point to ink in the silhouetted areas:
Face of clock: Broken China, Salty Ocean, Peacock Feathers, Chipped Sapphire
Elphaba’s skin: Mowed Lawn, Salty Ocean
Flying monkey: Antique Linen, Tea Dye, Vintage Photo
Broom: Tea Dye, Vintage Photo
Background: Mustard Seed, Spiced Marmalade, Wild Honey, Festive Berries
When I thought I was done with the coloring, I used black Versafine ink and a finger dauber to distress and ink the edges of the card. Then I noticed that the stamped image had a thin cracked edging. It didn’t seem substantial enough to match the way I had silhouetted the main image so I took a thin Uniball pen and kind of doodled around the cracking to make it look more like a thorny thicket-like frame. Oh yes, I liked this much better. 🙂 I added some clear wink of Stella over the top of the clock face to add a shimmer and was relieved to find that the India Ink from the Faber-Castell Pitt Pen did not bleed at all. YAY!
The following is a process video of this watercolored card:
This card is being entered into the following challenges:
Simon Says Stamp Work It Wednesday STAMPtember Challenge
MarkerPOP Halloween Challenge
Simon Says Stamp Wednesday No Designer Paper Challenge
One Sweet Halloween Challenge
Simon Says Stamp Monday Ombre Challenge
Oddball Art Fall Is In the Air Challenge
Cardz TV Fall Icons Challenge
The Shabby Tea Room Swirls and Twirls Challenge – WINNER
Thanks for stopping by and I hope you have a spooktacular day! WOOF
]]>
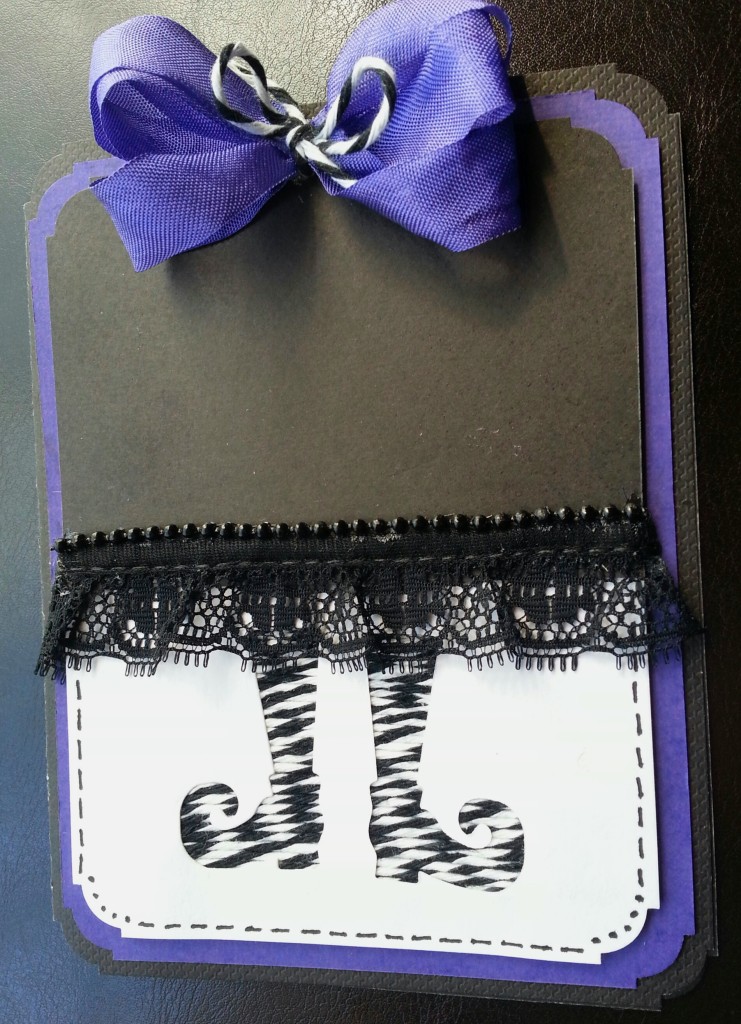 When I recently received the latest Design Team Package from Diemond Dies with all of the new Halloween dies, I was so excited–like a kid on Christmas morning! LOL There were so many great new dies and my mind started reeling with ideas for how I could use the dies differently. REMEMBER: Diemond Dies is having a 10% off everything sale through today, October 5, 2014 and you can also use my coupon code: thankskristina, for an extra 10% off plus free worldwide shipping on orders over $35!
These two projects, which I made with the “witches boots die set,” are so different. The Halloween card was made with basic Bazzill card stock in black, purple, white, and orange. I used the small witches boot die to cut out little windows and backed the opening with a small scrap of paper on which I wound black and white bakers twine back and forth, adhering the twine to the scrap with wet glue. To make the top of the witch’s 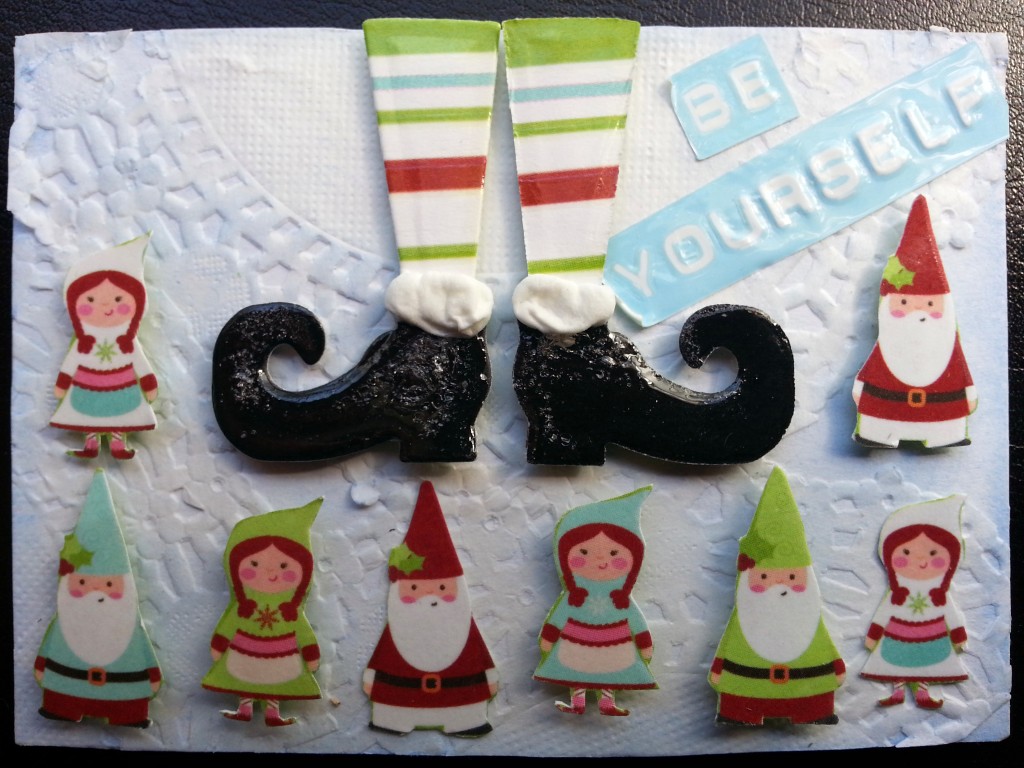 dress, I just used black card stock and trimmed the edge, where it met the white card stock, with black gathered lace and black pearl trim. For a little softness, I added a triple loop purple seam binding bow cinched with more bakers twine that is also tied in a little bow.
Inside I used the Diemond Dies Labels 1 Nesting Die framed with a scrap of orange card stock, the corners of which I punched with my Martha Stewart bats corner punch. The sentiment inside says, “Happy witches to you on Halloween” (I love a good pun) and is from a Hampton Arts clear stamp set.
The Christmas ATC was made with the same Diemond Dies “witches boots die set,” but using different papers gives it a fanciful elvish look! The base of the ATC is made with white card stock layered with scraps of white paper doily. I used a baby blue colored Tsukineko ink and a light touch with a finger dauber to give the background a nice wintery icy look. The other paper I used is by Imaginisce and is called “Gingerbread Village.” I fussy cut each one of those elves out of that paper and added dimension by using foam adhesive to pop them up. I also used the stripe area of the same paper for the large elf socks. Using black cardstock I cut out the elf boots and covered them with Glossy Accents for some shine. I topped them with puffy Marvy Uchida Liquid Applique in white. Warning: The heat it takes to puff up the Liquid Applique can make Glossy Accents and plastic based stickers curl and bubble so you may want to do the heating before applying those other materials.
The following is a video share of both projects:
The Halloween card is being entered into The Paper Nest Dolls Anything Goes Plus a Bow Challenge and
The Paper Wings Productions Halloween or Black and Orange October Challenge and
The Craft-Dee BowZ Anything Goes Include a Handmade Bow Challenge
Thanks for stopping by. Please subscribe if you wish, and have a great day! WOOF
]]>