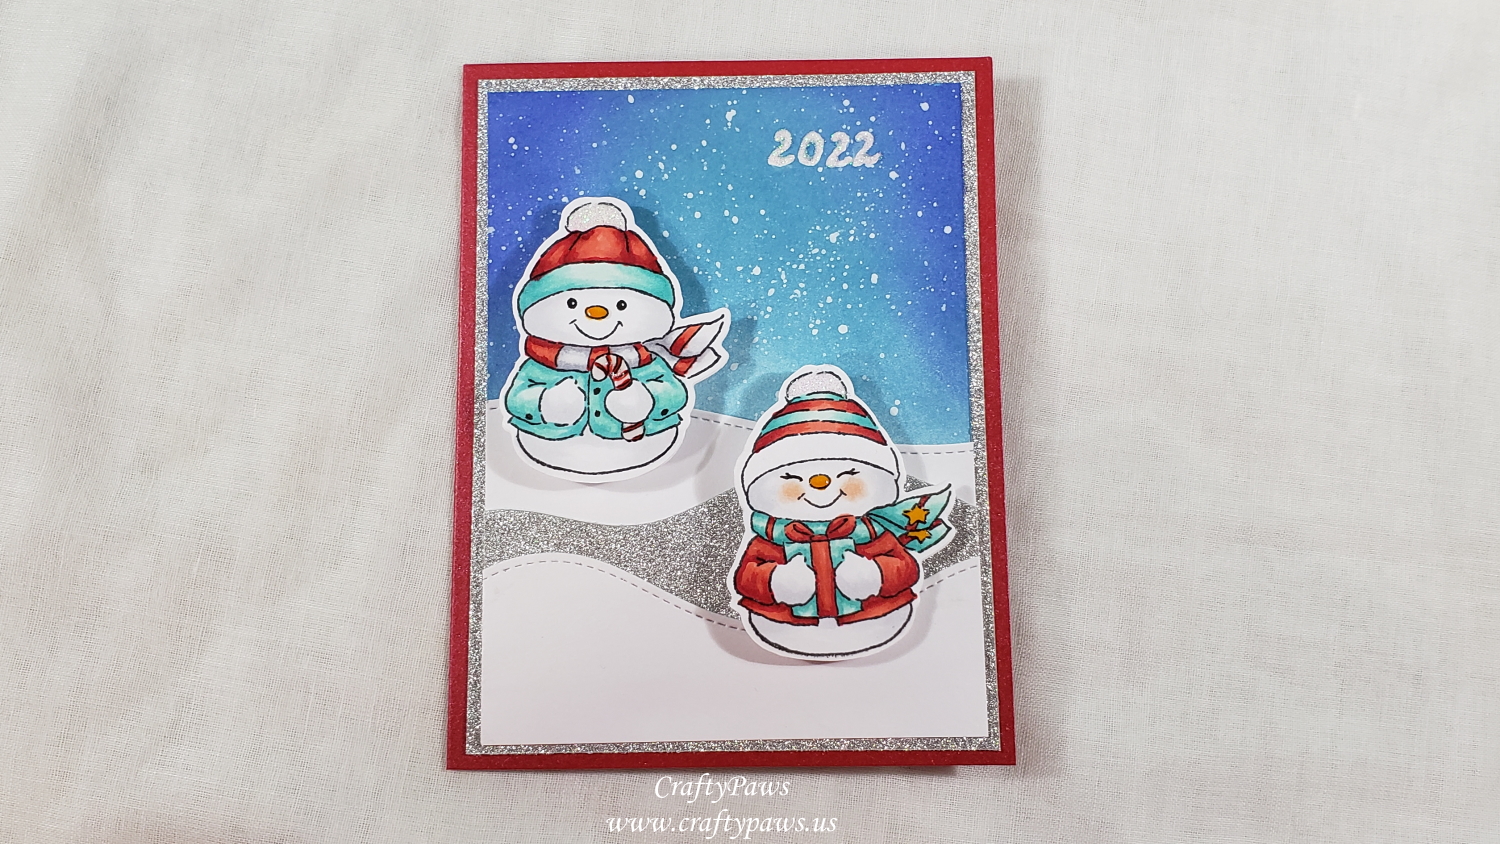
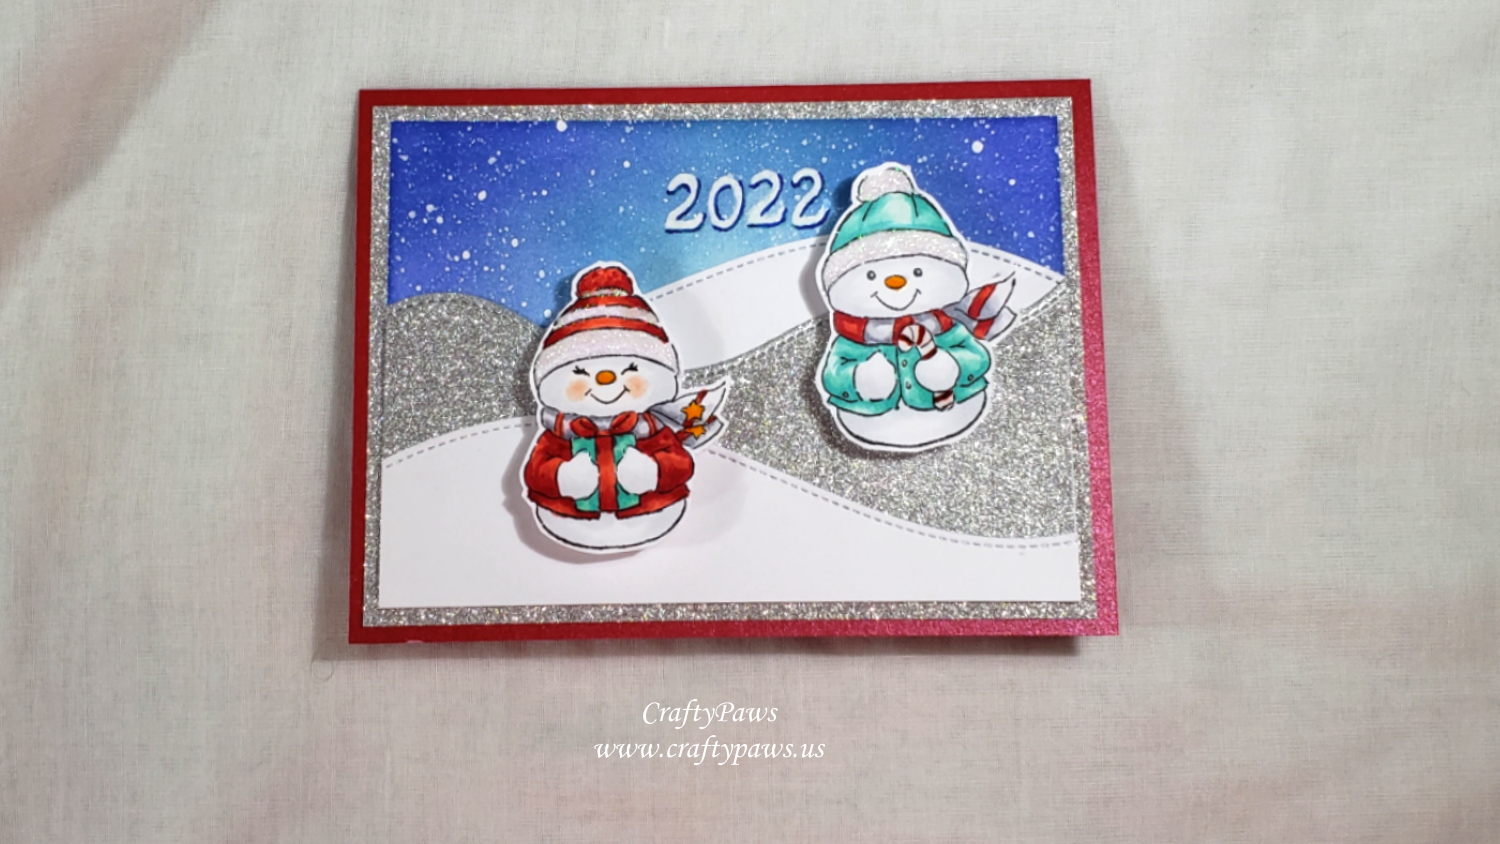
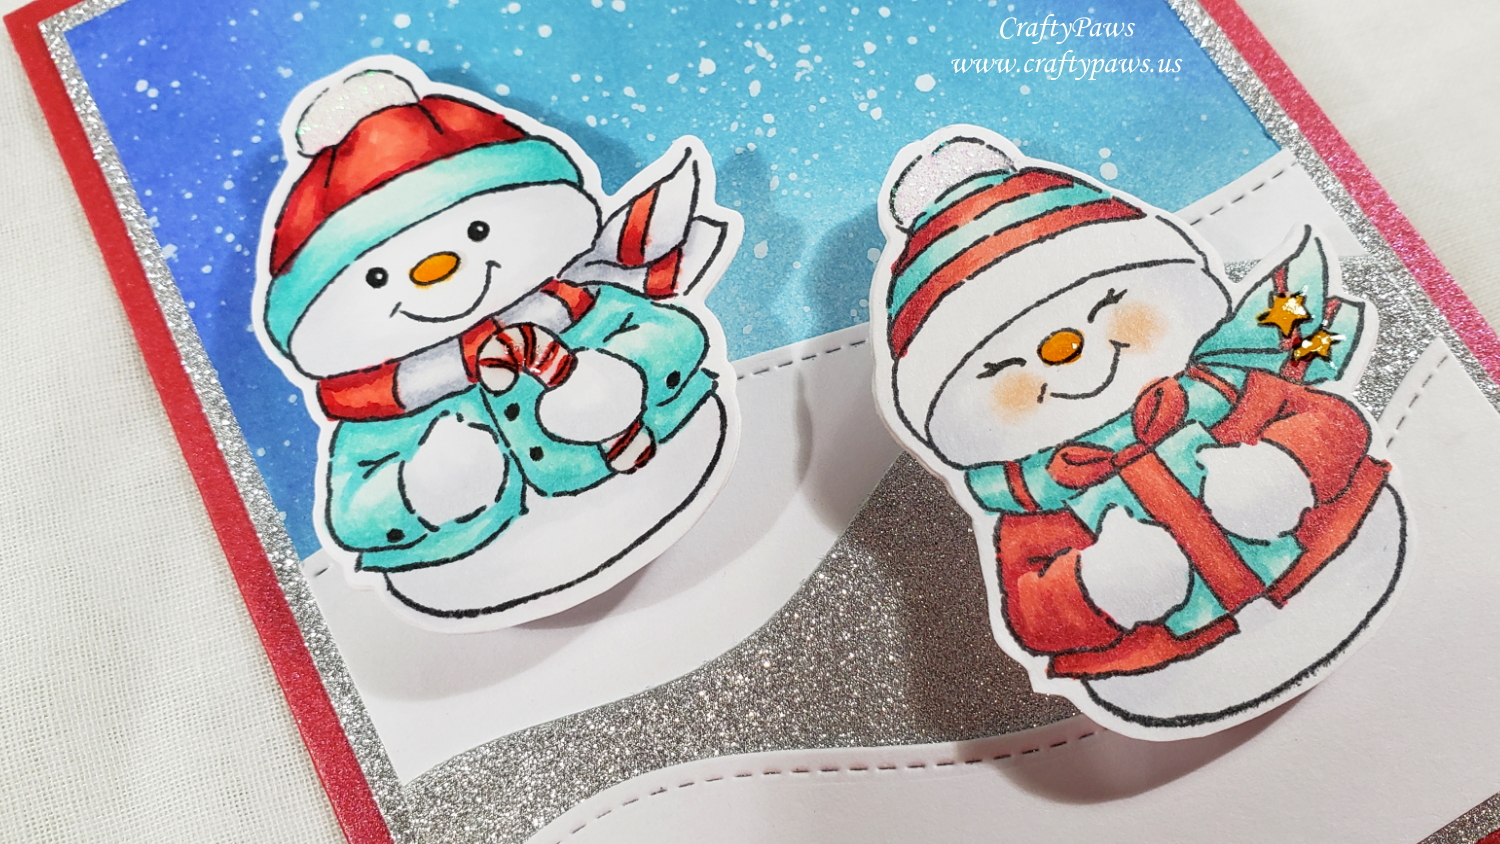
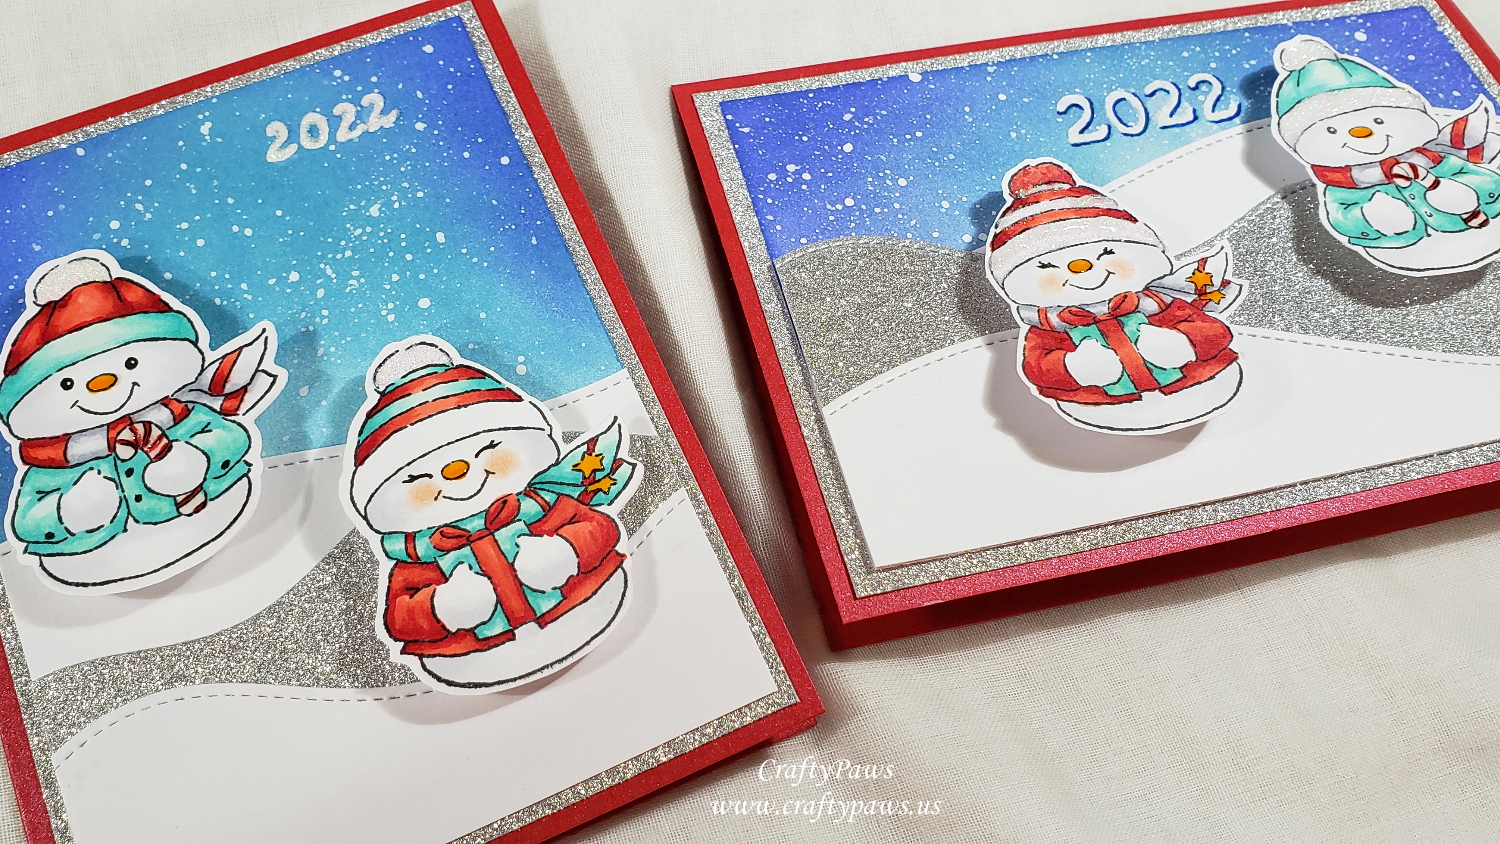
I used the Art Impressions Hampton Art snowman stamp and die set that I picked up a couple of years ago but had failed to use until now. The snowman and snowwoman (I made one more feminine by drawing in lashes with a 0.1 pt Copic Multiliner Pen) were pretty simple to color up, and with the cutting die that fit both images, they were really easy to prep. i used the following Copic markers to simply color them up in one of my favorite holiday color combinations (aqua, red, and white (grey)):
Noses (as if they were carrots) and stars on scarf: Y38 and YR04
Blush: R30, softened with 0 colorless blender
Aqua: BG10, BG32 and BG13
Red: R22, R24 and R29
White (grey): C00, C1 and C3
For the background, I wanted to create a sky with falling snow and a foreground with layers of snowy hillsides. I used one of my most used dies for the layers of snow, the Lawn Fawn Stitched Hillside Die. To add texture and sparkle, the middle layer was cut from silver fine glitter cardstock and the first and third layers were from plain white cardstock. The sky was made by blending on Tim Holtz Distress Ink in Broken China and Blueprint Sketch, and splattering white acrylic paint with an old toothbrush for a snowy effect.
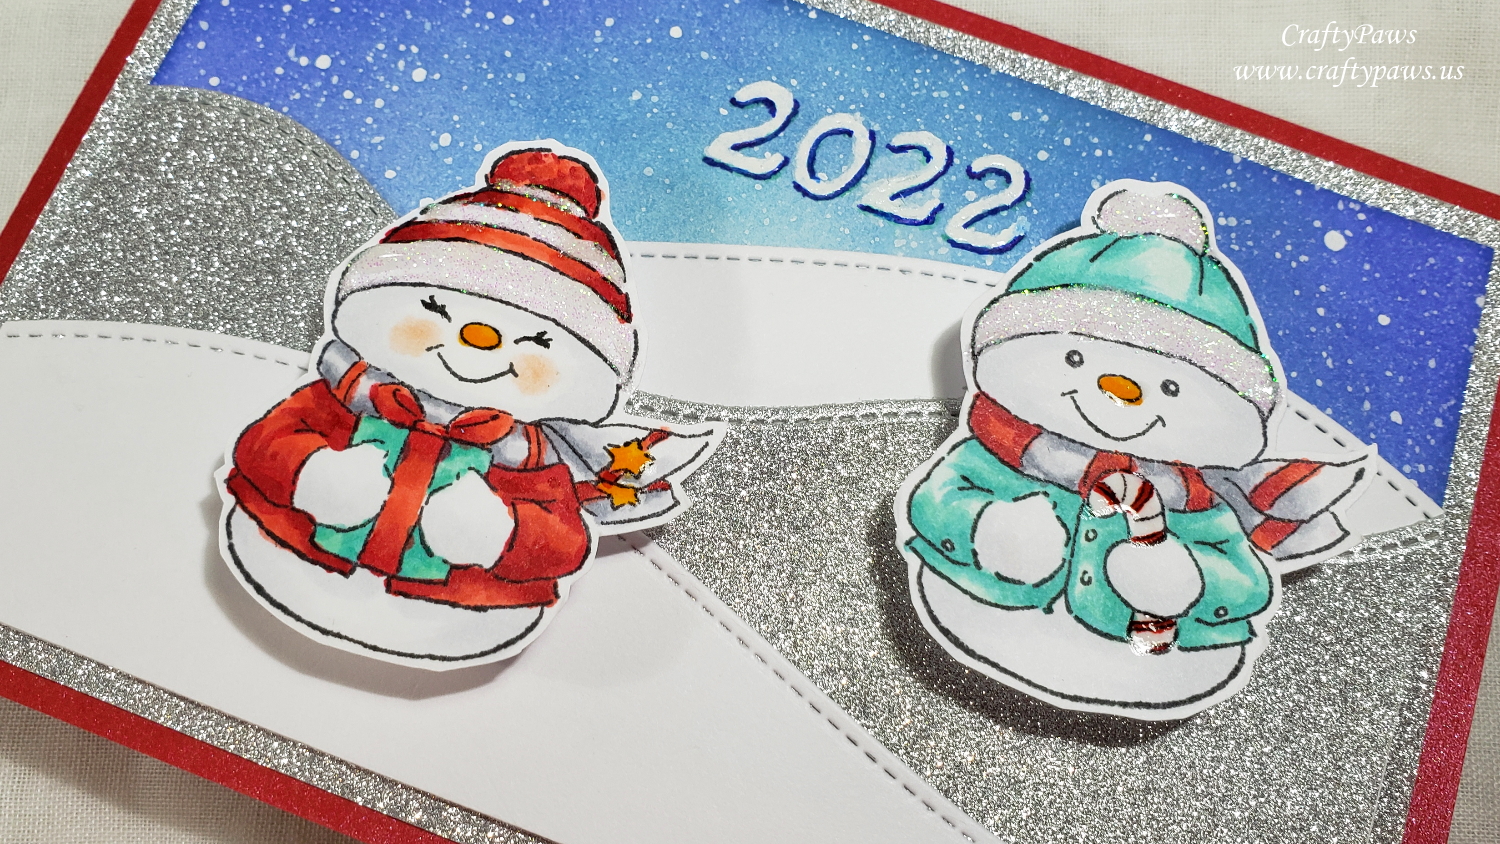
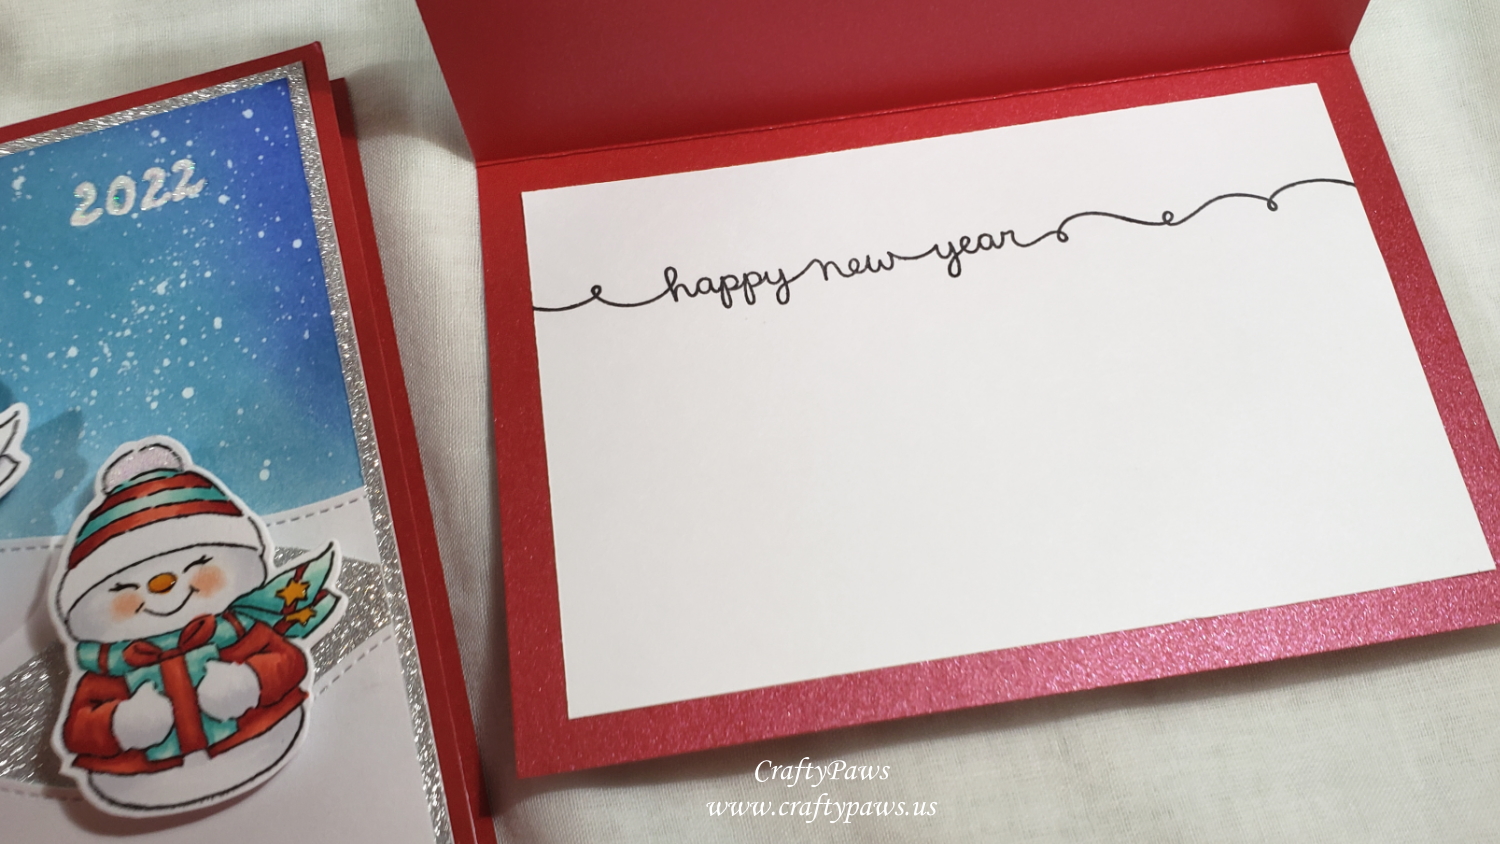
To make this a new years card, rather than a holiday card, I used a white paint Sharpie marker to write “2022” and used glitter glue to add sparkle or added shadowing with an Ultra Fine Point Sharpie marker in navy. For the inside card liner, I used another favorite sentiments stamp set, the Lawn Fawn Winter Scripty Sayings to add a “happy new year” sentiment.
To add a classic festive look, I matted the card front onto more fine glitter silver cardstock before putting the whole thing on a shiny red cardstock card base. I also added shine to the candy cane and noses with Ranger Glossy Accents and sparkle to the snow people’s clothes with glitter glue. Lastly, to inject some added fun, I put the snow people up on InkyStamper Wobbles (I’ve made these by hand with wire wrapped around a pencil, but I have to say, using ready-made ones are much easier).
Please CLICK on the photo below to watch the process video of how to craft this card:
Disclosure: Many of the supplies I’ve used for today’s project are linked. Some may be affiliate links, which means if you make a purchase I receive a small commission at no extra cost to you. I truly appreciate your support toward the costs of running this blog!
These cards are being entered into the following challenges:
Through the Craft Room Door Anything Goes Challenge
Crafts Galore Encore Anything Goes Challenge
Crafty Gals Corner Merry and Bright Challenge
Word Art Wednesday Anything Goes Challenge
]]>
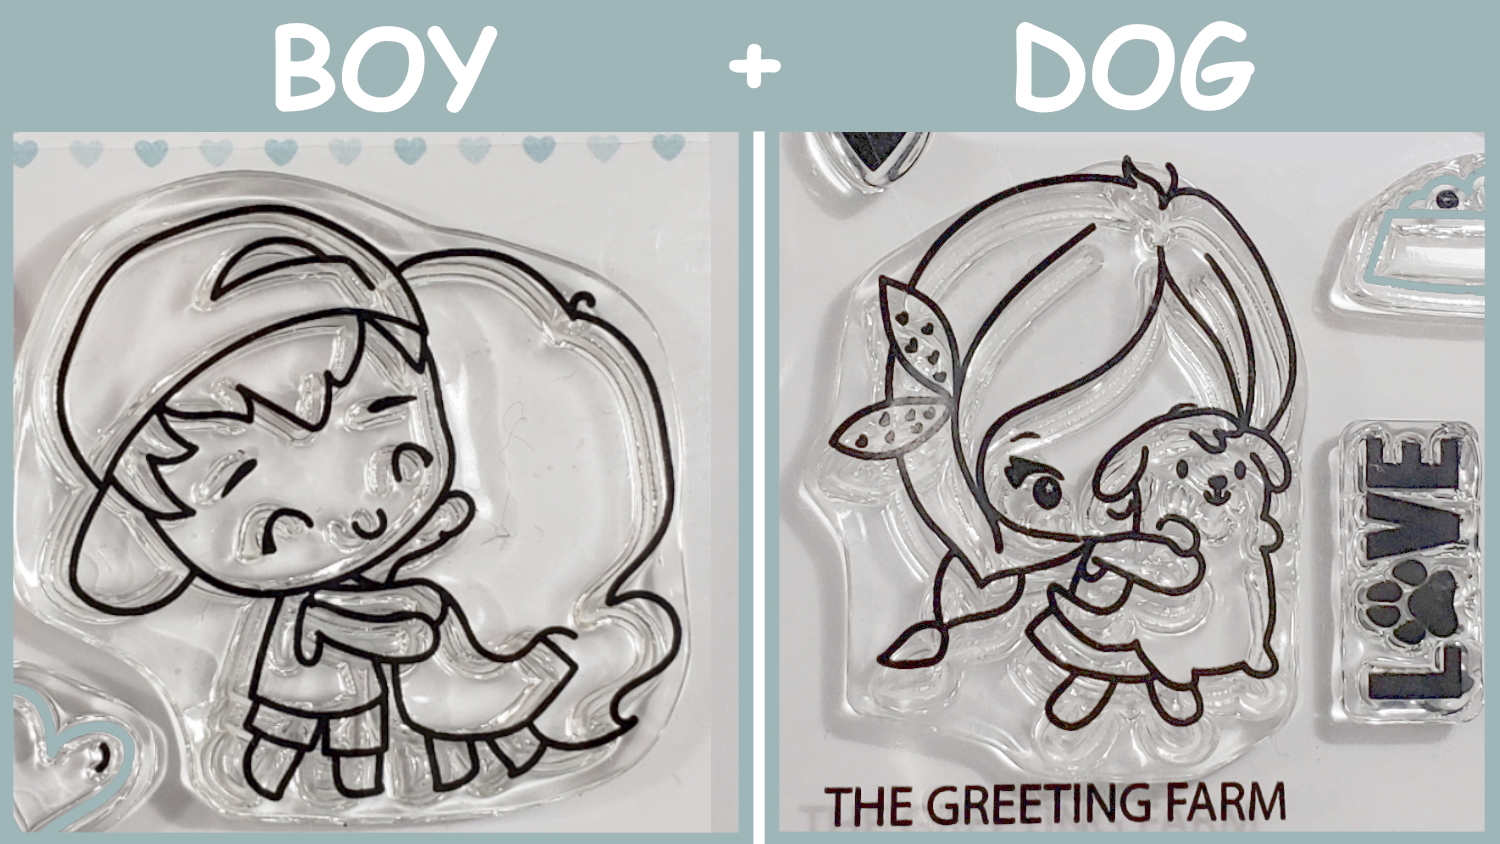
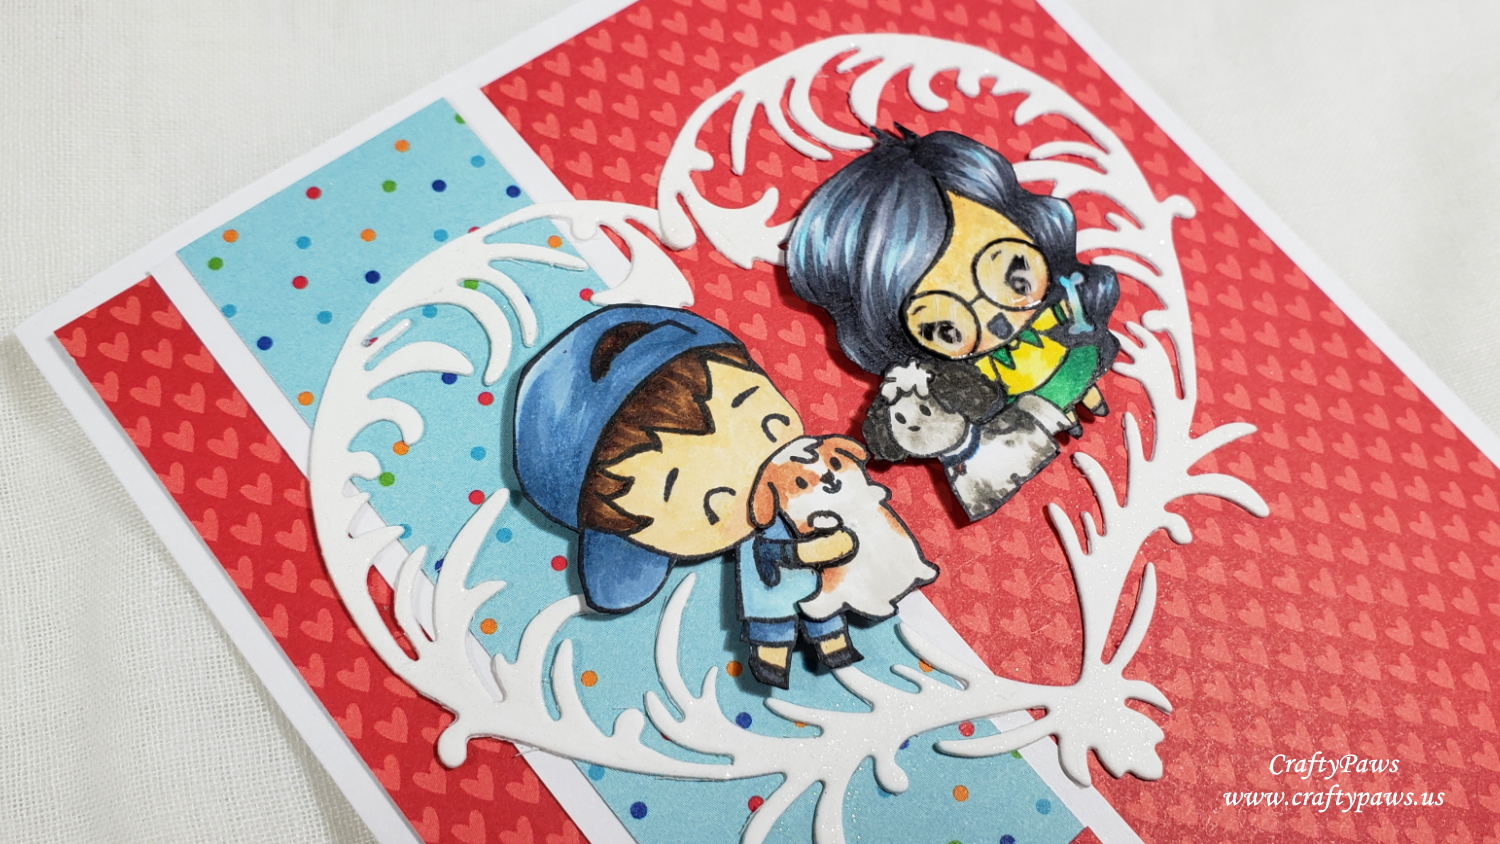
I used the boy and girl hugging image from “So This is Love” and just used the little boy facing toward the left to represent Mr. CraftyPaws. I altered him a bit more by doodling on short sleeves with a 0.05 pt Copic Multi-liner Pen since Mr. CraftyPaws would never wear a sleeveless shirt (lol). Then I stamped out just the little pup being held up by the girl with a braid from “The Snuggle Is Real” set to represent our little Havanese, Bandito, and tucked him in Mr. CraftyPaws’ arms.

For the girl representing me, I thought the girl with the glasses from The Snuggle Is Real would be the closest match. However, our Lhasapoo, Babaloo, does not look anything like the bulldog in that stamp. So I masked off the bulldog and doodled on the rest of the skirt of the little girl, adding details like the collar and long cuffed sleeves, with a 0.05 pt Copic Multi-liner Pen. For the dog representing Babaloo, I used the little dog with the bow from the same stamp set, but masked off the bow and doodled on a top-knot and shortened the ears and tail.
![]()
Then it was a matter of coloring up all the images to make them look like a family portrait!
Boy (Mr. CraftyPaws): Hair: E55, E57 and E59; Hat, Shirt and Shorts: B52, B93, B97; Skin: E50, E51, R30; Vest: B000 and B52
Brown and White Dog (Bandito): W0, E11 and E13
Black and White Dog (Babaloo): W0, W3, W5, W7 with B97 collar
Girl (Me): Hair: B01, C3, C5 and C7; Skin: E50, E51, E53. R30; Collar and Skirt: G05 and G09; Sweater: Y02 and Y08; Bone W0 and B01
To add a little shine, I added some glass streak marks on the glasses with a Signo Uniball White Gel Pen and topped the glasses with Ranger Glossy Accents. I fussy cut all the images with my favorite Fiskars Spring Loaded Scissors, inked all the edges for a finished look with a Memento Tuxedo Black Marker, and layered them together.

For the card front design, I decided to pull out one of my heart dies, the Diemond Dies Je T’Adore Heart, to “frame” the family portrait. I coated the frame with a coating of Clear Wink of Stella for some added shimmer. For the background papers, I used my much hoarded (and one of my FAVORITE) Doodlebug Designs “Puppy Love” 6 x 6 Paper Pad and picked out a heart patterned paper and used the reverse pale blue polka dot paper for a little strip of added interest. I backed that strip with white cardstock to match the width of the white border of the card front, and place that strip, toward the left side, following the design rule of thirds.

Lastly, for the sentiments I used the phrases from the cut apart pages of the Puppy Love paper pad that I thought would suit a Valentine’s Day card for Mr. CraftyPaws: “Great News…”, “I {heart} You” (with dabs of Glossy Accents on the hear), and “We Belong Together” are staggered along the left bottom third of the card front. On the inside card liner, I used, “Good Times!”, “Pawsitively Perfect!” and “You’re a Treat!” It was so fun designing and crafting this totally personal card for Mr. CraftyPaws. He’ll never know the extra steps I took to make this customized family portrait card, but I know he’ll love it all the same.
CLICK on the following picture to watch the process video and enter the GIVEAWAY from the YouTube video for a chance to win a set of The Greeting Farm “The Snuggle Is Real” stamp set!
Disclosure: Many of the supplies I’ve used for today’s project are linked. Some may be affiliate links, which means if you make a purchase I receive a small commission at no extra cost to you. I truly appreciate your support toward the costs of running this blog! All giveaway rules are listed in the description box of the YouTube video. The giveaway is not sponsored by or in any way affiliated with YouTube, Instagram, or The Greeting Farm.
This card is being entered into the following challenges:
Simon Says Stamp Wednesday Anything Goes Challenge
Creatalicious Anything Goes Challenge with optional use of craft
Word Art Wednesday Anything Goes Challenge
Lil Patch of Crafty Friends Anything Goes Challenge
Through the Craft Room Door Anything Goes Challenge
Crafts Galore Encore Anything Goes Challenge
Stamping Sensations Favorite Stamps Challenge
]]>
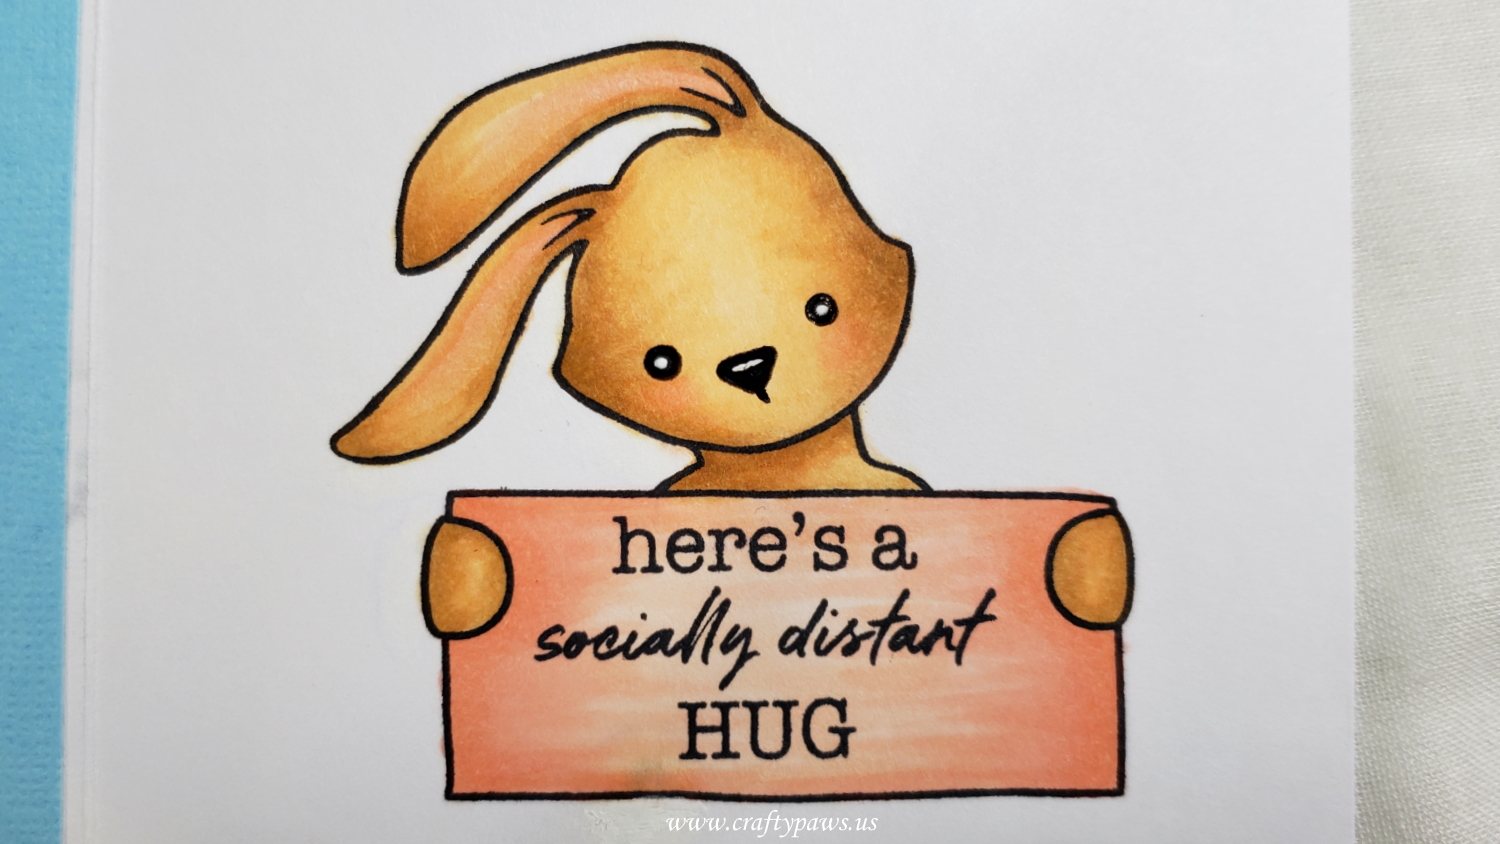
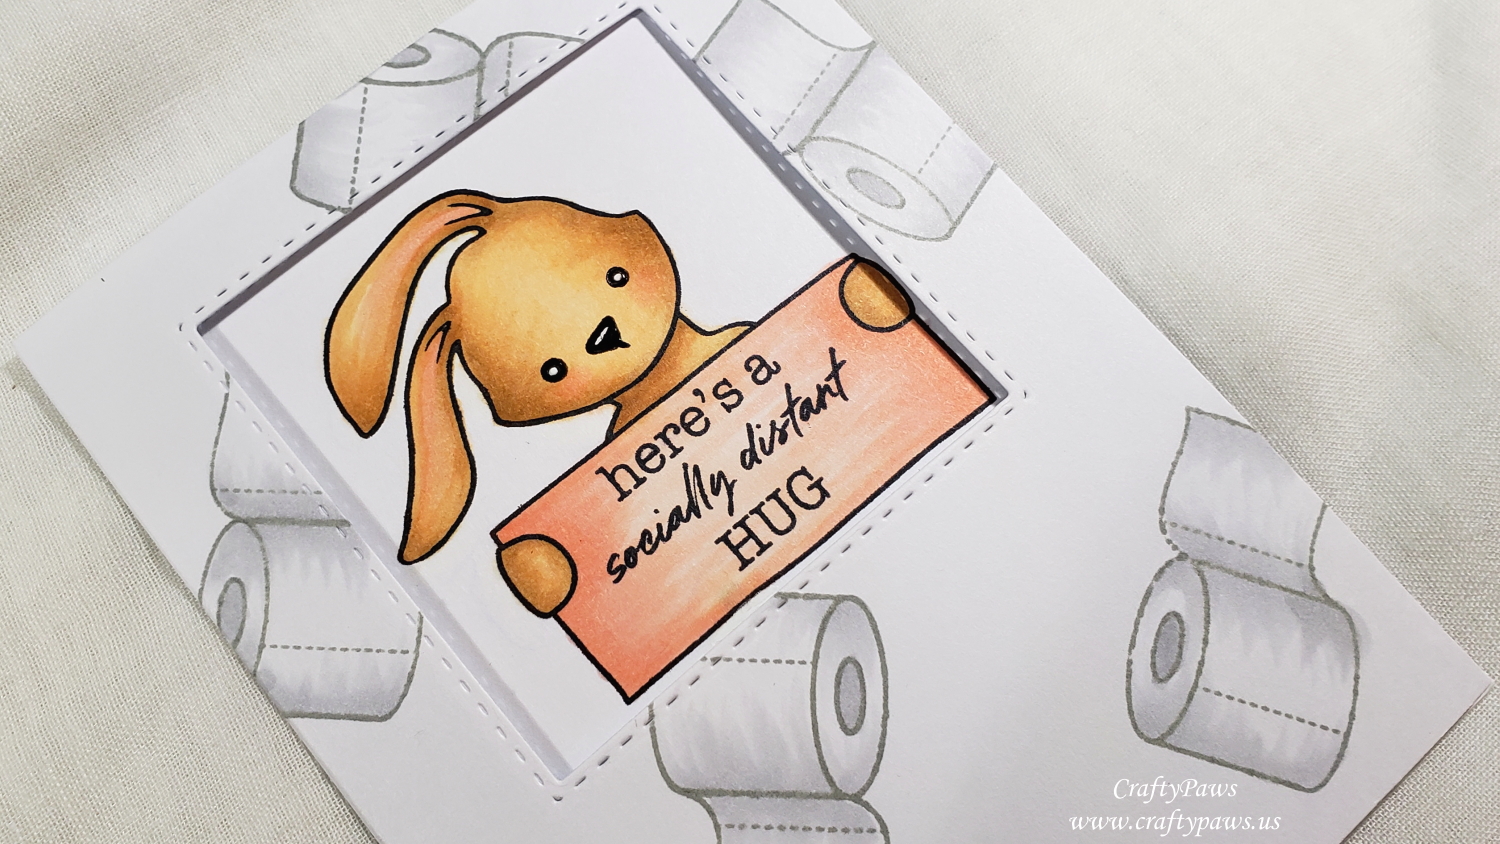
I used the following Copic colors to keep the card soft and sweet:
Rabbit: E51, E53, E55 and R20 and R30 for blush and inside of ears
Sign: R20 and R30
Toilet paper rolls stamped with Simon Says Stamp Smoke Dye Ink: N1
I also added a bit of shine with a Sakura black glaze pen and highlights with a Signo Uniball White Gel Pen for the nose and eyes.
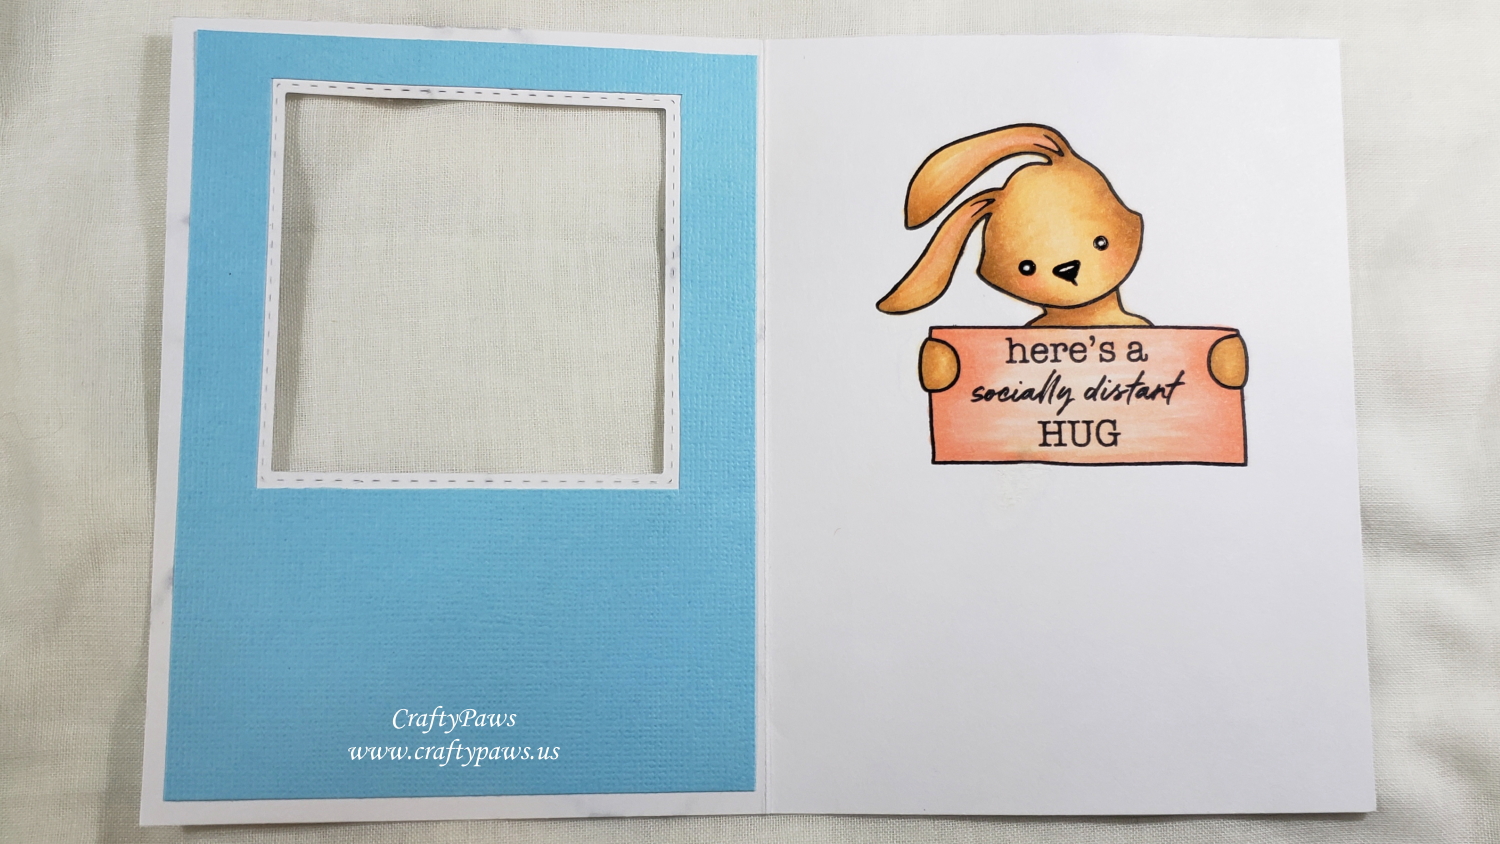
For the peekaboo window, I used the Simon Says Stamp Stitched Squares Die Set. I estimated the size and positioning I would need for the peekaboo window for the bunny, and luckily it turned out pretty good. However, a better process order would have been to die cut the opening first and then stamping the image in the open window. 🙂 Also, because the Copic ink bled through the card stock, I did line the back side of the card front as well as the back of the card for a clean look.
CLICK on the following picture to watch the whole process video, including the Copic coloring:
Disclosure: Many of the supplies I’ve used for today’s project are linked. Some may be affiliate links, which means if you make a purchase I receive a small commission at no extra cost to you. I truly appreciate your support toward the costs of running this blog!
This card is being entered into the following challenges:
Simon Says Stamp Wednesday Layer It Up Challenge
Creatalicious Anything Goes with Optional Halloween Challenge
Word Art Wednesday Anything Goes Challenge
Lil Patch of Crafty Friends Anything Goes Challenge
Through the Craft Room Door Anything Goes Challenge
]]>
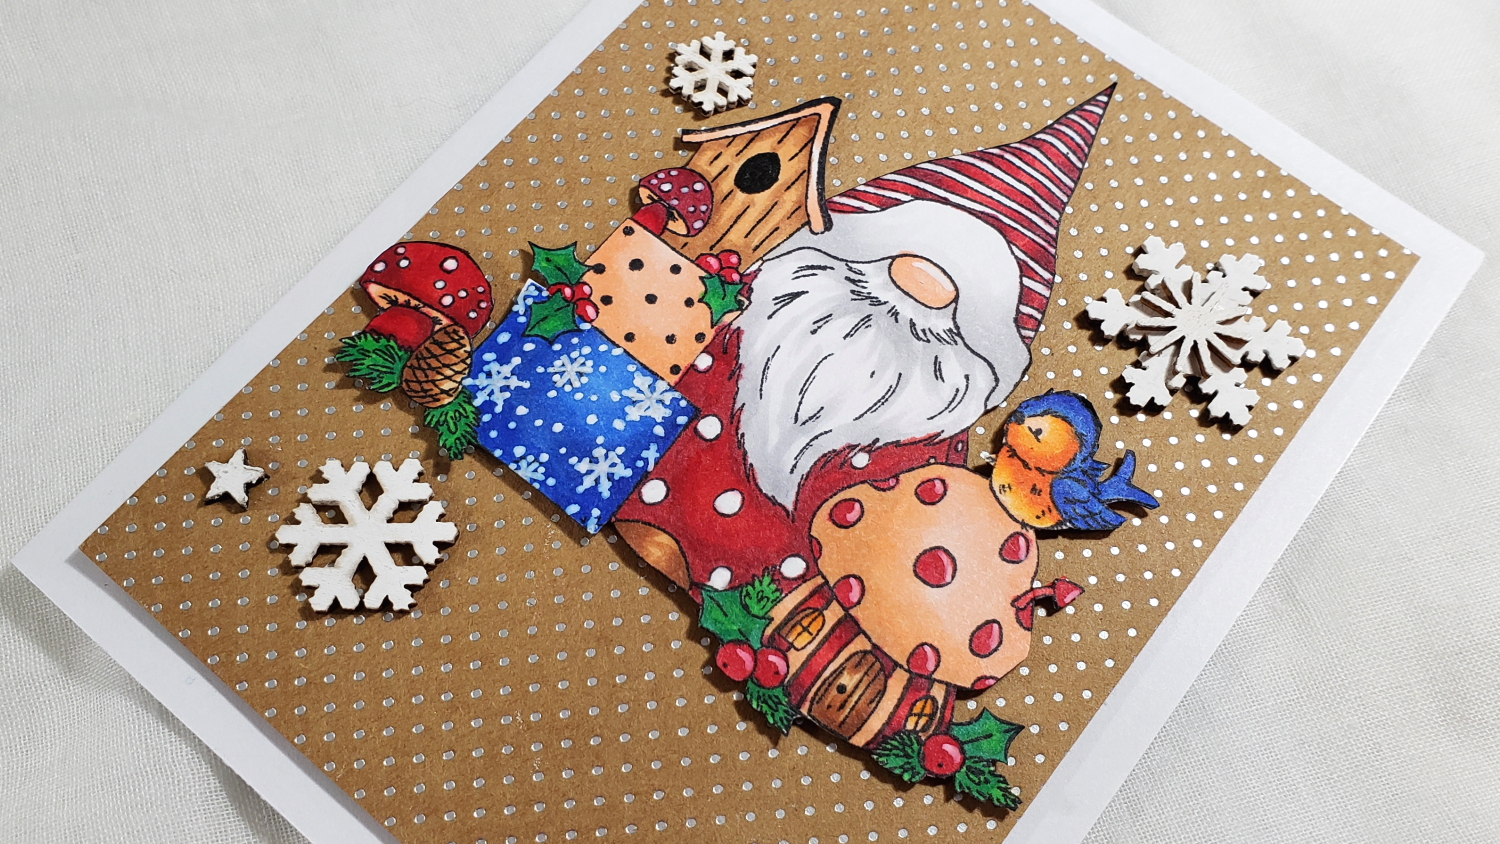
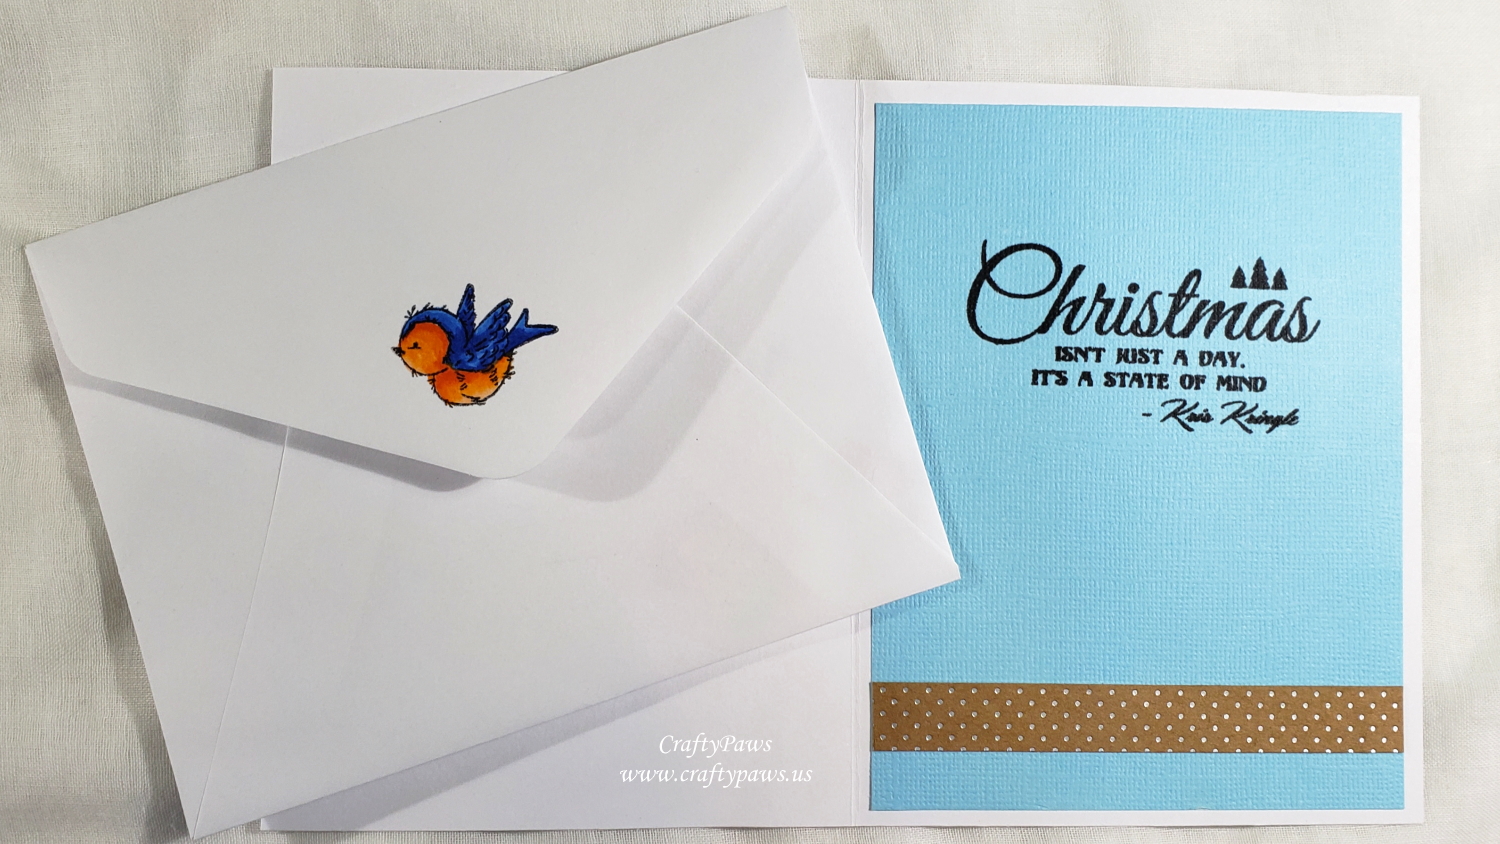
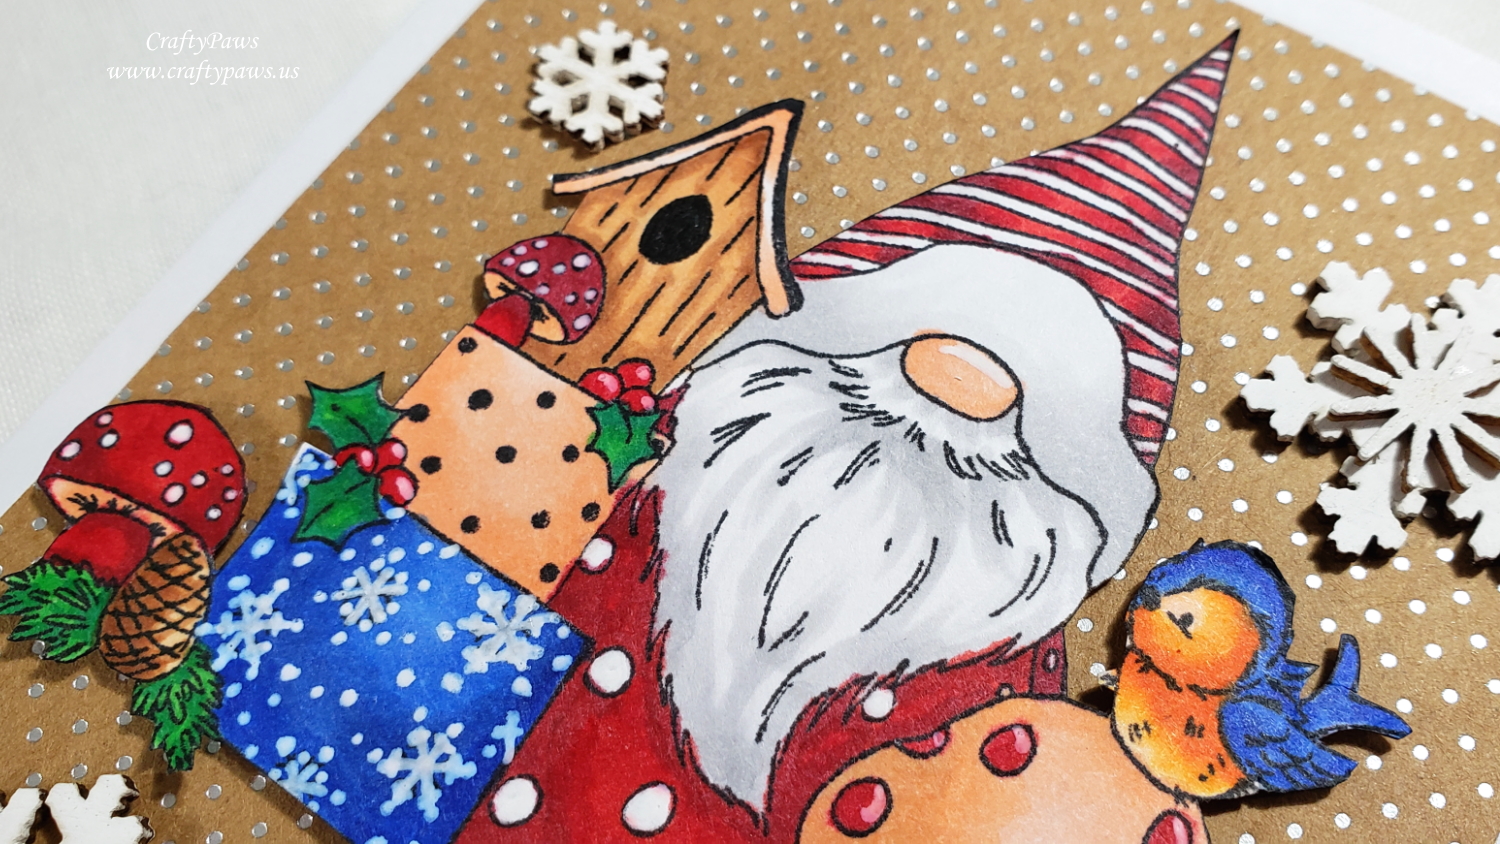
I’m using 3 stamps from this It’s Snome Time collection “Robin Mishchief” stamp set that I got from LoveCrafts.com (by the way, they’re having a 15% off all their paper pads at present and there are some adorable It’s Snome Time pads). I used the largest image on some card stock for the main card image and I used two smaller stamps to decorate a coordinated envelope. These are the Copic colors I used:
Red areas: R27, R29 and R39
White areas (beard, fur on hat): N0 and N1
Orange areas: YR01, YR04 and YR07
Brown areas: E21, E31 and E23
Peach areas (nose, mushroom house, package): R11, R12, E21 and E31
Blue areas: B24, B26 and B28
Green areas: G14, YG09 and G17
I also added some highlight marks and cleaned up the white spots that I had accidentally colored into with a Uniball Signo White Gel Pen.
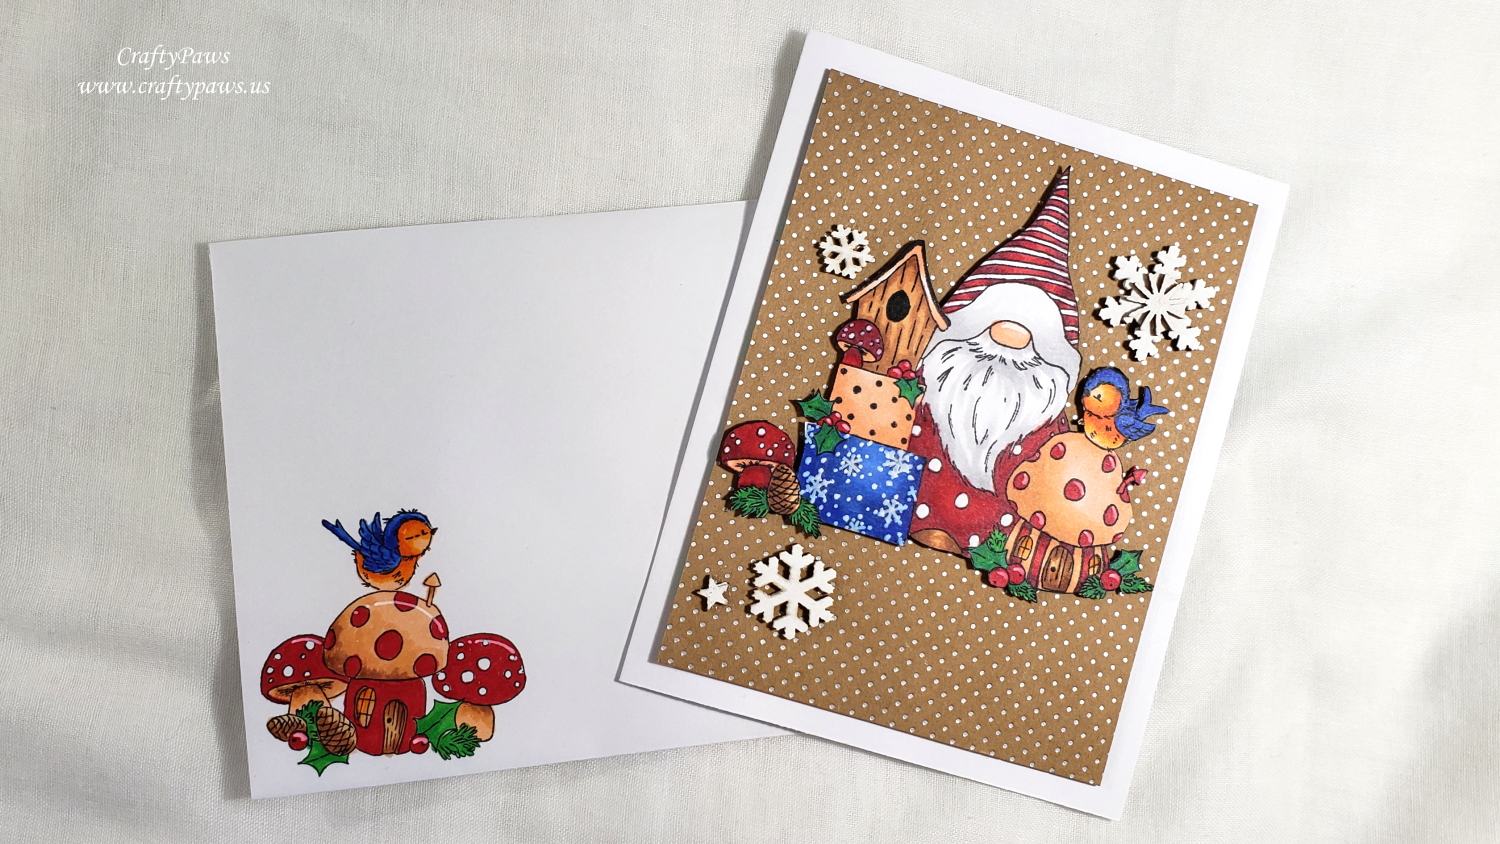
I fussy cut the main image with my Fiskars Reverse Spring Loaded Scissors and then popped up the main image with foam dots onto a craft and silver foiled polka dot card front. I also glued on a thin fun foam sheet under that card front so that I could add a little dimension from the card base. For the card liner, I used a scrap of light blue craft paper and simply added a left over strip of the craft and silver foiled polka dot paper. The wonderful sentiment, “Christmas Isn’t Just a Day. It’s a State of Mind. – Kris Kringle” from The Project Bin’s “Maybe Christmas” stamp set.
Lastly, as a finishing touch, I used craft paint to color white some wood veneer snowflakes and stars from my stash, which I layered onto the card front for some added interest. I love the dimension and the cozy feel that is created with the craft paper and the wood embellishments.
CLICK on the following picture to watch the process video:
This card and matching envelope are being entered into the following challenges:
Simon Says Stamp Wednesday Layer It Up Challenge
Creatalicious Anything Goes with Optional Halloween Challenge
Word Art Wednesday Anything Goes Challenge
Lil Patch of Crafty Friends Anything Goes Challenge
Fab ‘n’ Funky Christmas Challenge
Through the Craft Room Door Anything Goes Challenge
Crafts Galore Encore Anything Goes Challenge
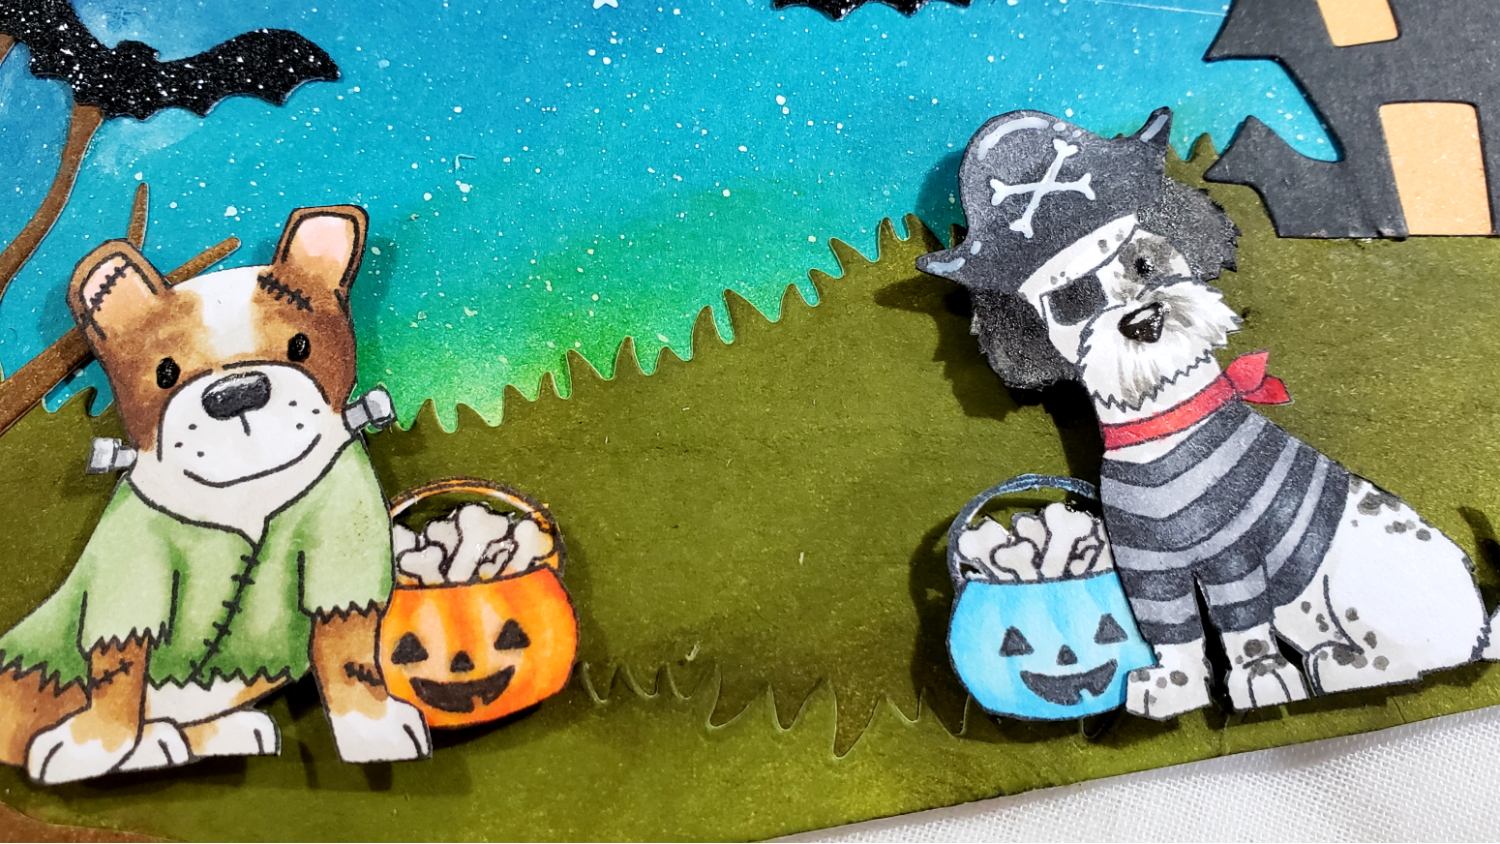
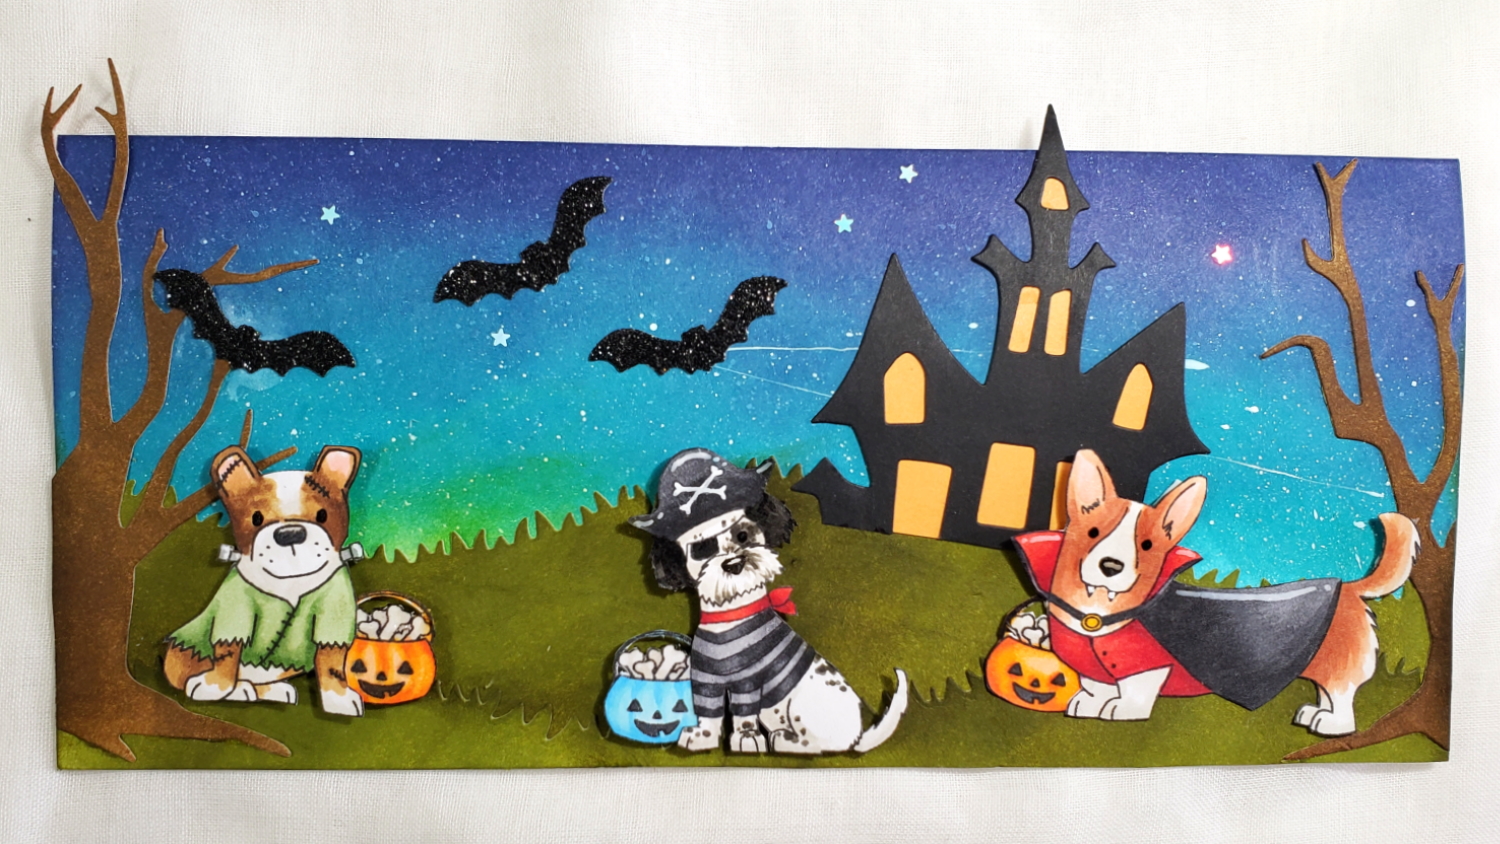
I don’t normally keep a lot of colored card stock, and I like the softer, more natural look of inked card stock for die cutting, so I made this slim line scene card largely with inked papers. The background sky was blended on with Tim Holtz Distress Ink in Chipped Sapphire and Peacock Feathers with a hint of sunset yellow added with Mustard Seed. The MFT Grassy Hillsides were colored with Tim Holtz Distress Ink in Peeled Paint and Forest Moss. And the Diemond Dies Spooky Tree (sold out but this is a similar spooky tree) was inked up with Tim Holtz Distress Ink in Gathered Twigs and Walnut Stain. The only part that I die cut from colored papers was the Diemond Dies Spooky House, which I made with black and tangerine orange card stock scraps.
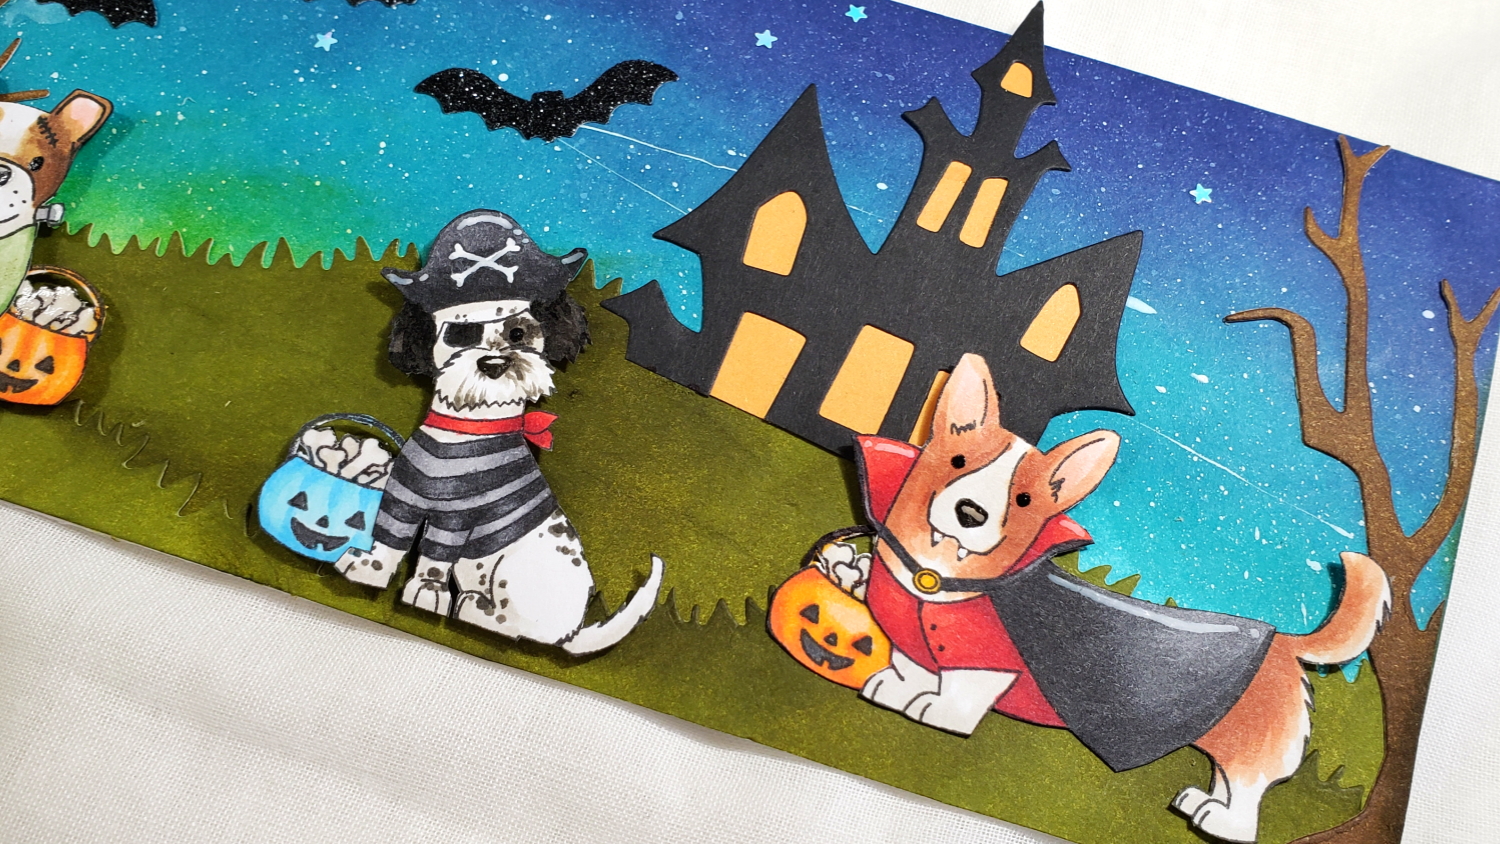
For the Fun Stampers Journey Costumed Cuties, I Copic colored and fussy cut out all the puppies and the Jack-O-Lantern treat bags filled with bones as follows:
Corgi Dracula:
Ears: R20; Brown fur: E11, E13 and E15; White fur: W0 and W1; Cape: N4, N5, and N9; R24, R27, R29 and R39; Cape closure: Y38
Pirate Pup (colored up like my Babaloo):
Black fur: W7, and W9; White fur: W0 and W1; Red scarf: R24, R27 and R29; Black hat and black and grey striped shirt: N2, N3, N4, N5, N7 and N9
Bulldog Frankenstein’s Monster:
Brown fur: E55, E57 and E59; Ears: R20; Green shirt: YG61, YG63, and YG67; White and grey side screws: W0 and N2
Jack-O-Lantern Treat Bags:
Blue: B00, B01 and B02; Orange: YR01, YR04 and YR09
I added highlight lines with Signo Uniball White Gel Pen, darkened the eyes and noses with Sakura Black Glaze Pen and added shine on the bones and noses with Ranger Glossy Accents.
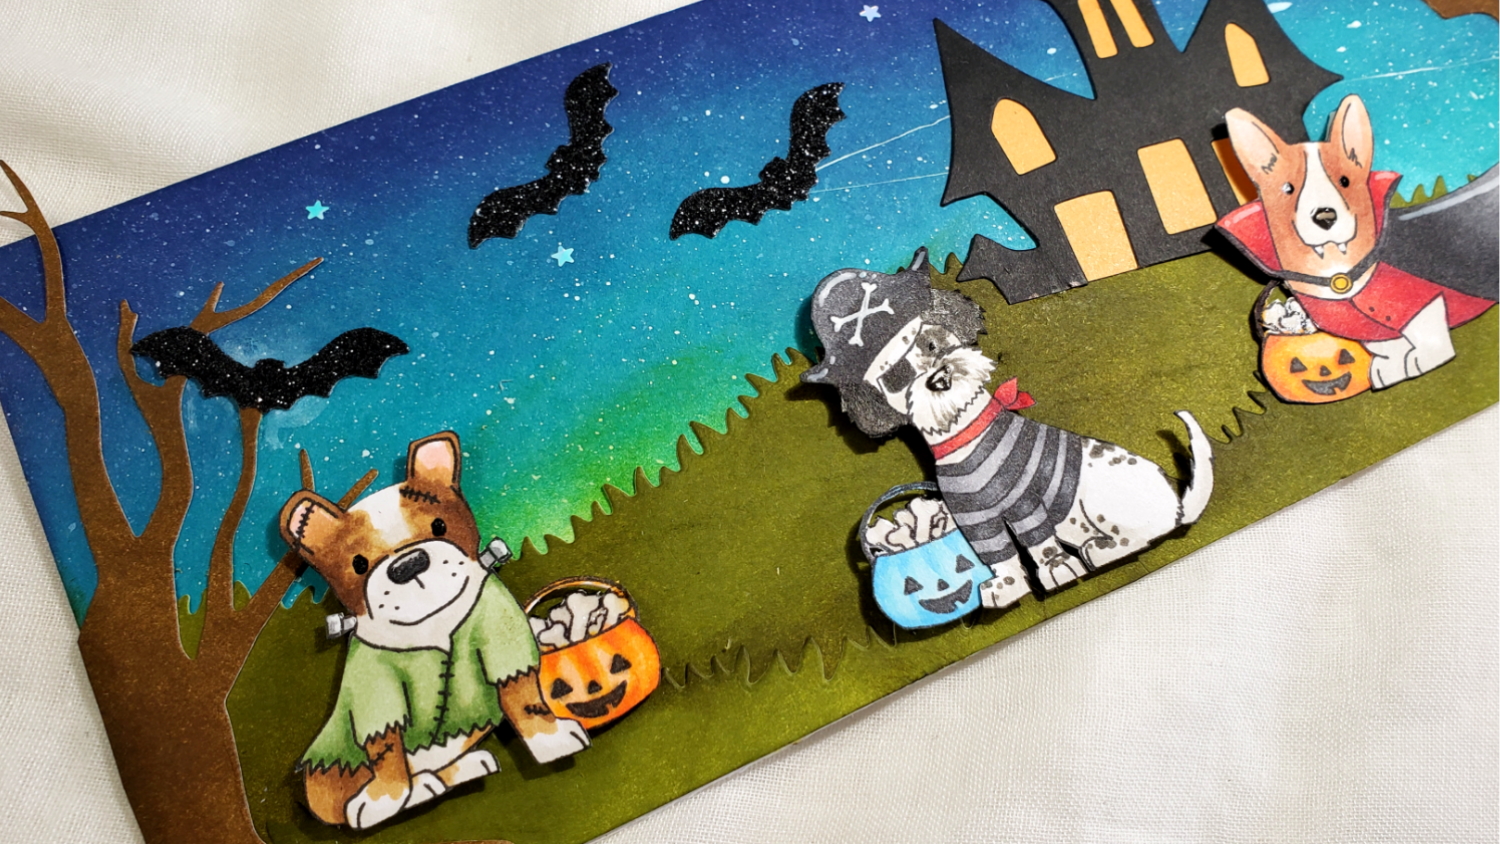
To add some extra little finishing touches, I splattered on some white acrylic paint to create the sense of a starry night. To cover up some of my over-splatter and smudges, I added 3 glittered card stock bats (they were included in my collab package). As a finishing touch a also used Art Glitter Glue with a Fine Tip Nozzle to glue on a handful of tiny metallic stars that were part of the sequin mix.
CLICK on the picture below to watch the card making process video:
Disclosure: Many of the supplies I’ve used for today’s project are linked. Some may be affiliate links, which means if you make a purchase I receive a small commission at no extra cost to you. I truly appreciate your support toward the costs of running this blog!
This card is being entered into the following challenges:
Simon Says Stamp Wednesday Make It Sparkle Challenge – glitter star sequins
Creatalicious Anything Goes with Optional Shaped Card Challenge
Lil Patch of Crafty Friends Anything Goes Challenge
Art Impressions Scenic Route Challenge
Crafts Galore Encore Anything Goes Challenge
Through the Craft Room Door Anything Goes Challenge
]]>
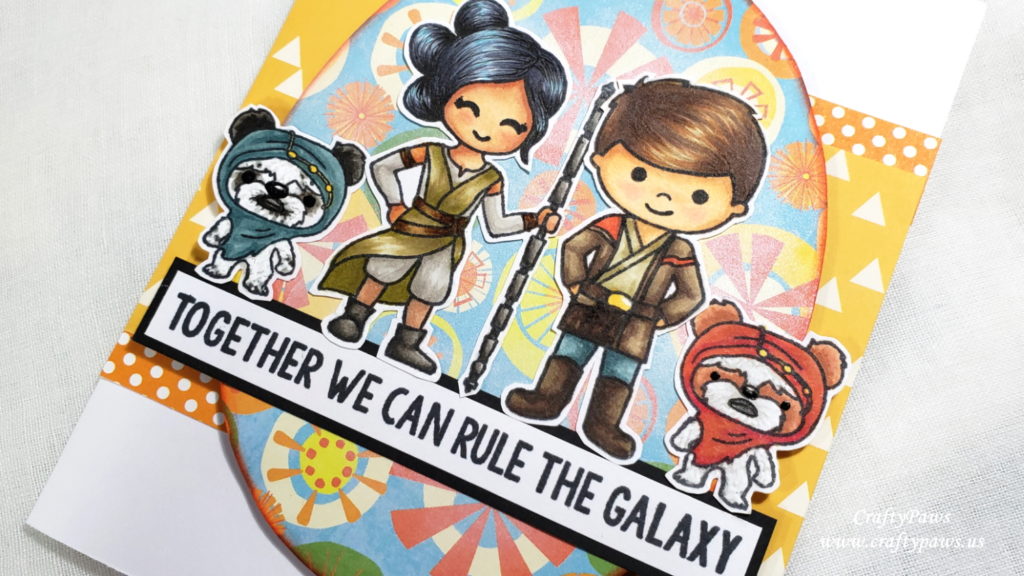
I have always thought that Ewoks looked like fluffy little dogs, like our sweet Havanese, Bandito, so I knew I could use the adorable Ewok image from the Kindred Spirits “Galactic Sequel” stamp set (one of my FAVORITE stamp sets) colored up distinctly with Copic Markers to represent our two pups:
White fur of Ewoks: W0, W1, and Uniball Signo White Gel Pen
Gold hood beading: Y35
Brown spots: E11, E13 and E15
Black and grey spots: W3, W4, W5, W7 and W9
Reddish brown hood: R22, R05, R29 and E55
Blue grey hood: BG72, BG75 and BG78
I also added a bit of shine and slight dimension by using a Sakura Black Glaze Pen for the noses and eyes, making Babaloo’s larger than Bandito’s like in real life.
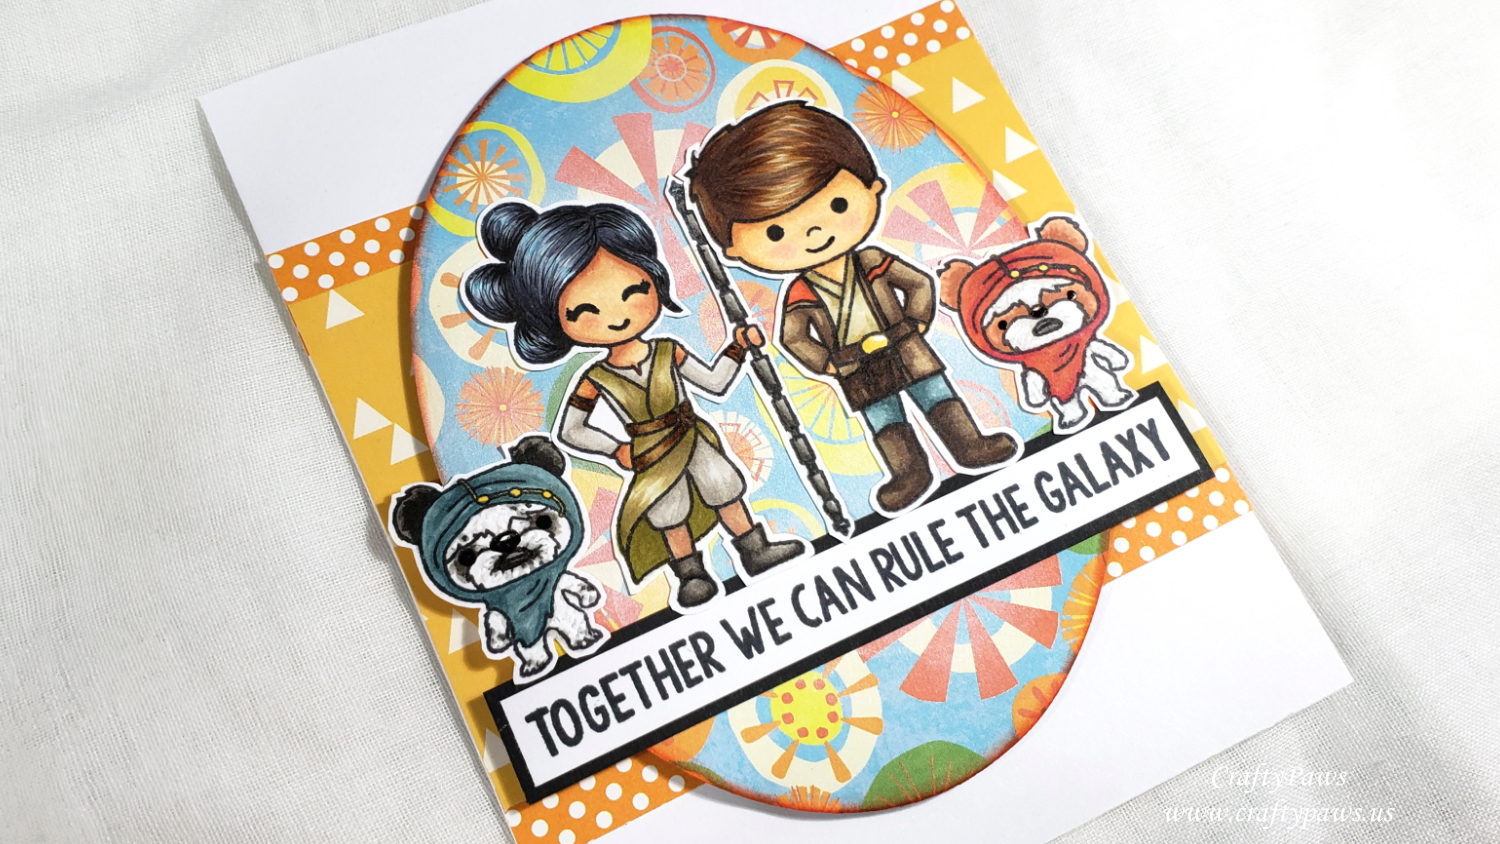
I decided to color up the Star Wars episodes VII, VIII and IX character Rey (also from the “Galactic Sequel” stamp set – RETIRED) as me. I altered the Luke stamp from the Kindred Spirits “Galactic Adventures” stamp set (also a favorite, but sadly also RETIRED) by doodling on Finn’s jacket and holster with a 0.1 pt Copic Multiliner Pen and colored him up as Mr. CraftyPaws:
Rey’s hair: B00, C5 and C7 with fine hair detail additions with a 0.05 pt Copic Multiliner Pen
Rey’s skin: E21, E11, E13 and R20 for blush
Rey’s arm wraps, shirt, and pantaloons: E42 and E43
Rey’s wrap dress: E81, E84 and YG95
Rey’s leather belts and wrist and arm wraps: E55 and E57
Rey’s boots and staff: W1, W4, W5 and W7
Finn’s Hair: E55, E57 and E49
Finn’s skin: E50, E51, E53 and R20 for blush
Finn’s pants: BG72, BG75 and BG78
Finn’s jacket: E43, E44 and E47 and R05 for red accents
Finn’s boots and gun holster: E44, E47 and E49
I fussy cut out the bunch with my favorite Spring Loaded Reverse Scissors by Fiskars, which was really helpful since my arthritis has been acting up recently. I intentionally left a bit of white edging around the images so that they would stand out from the busy background papers. For the background design, I followed a sketch from the current MFT Sketch Challenge (see below), using up a bunch of scrap patterned papers from my scrap box. I added a horizontal band with golden yellow paper with triangles on it, and added orange polka dot top and bottom borders. I topped the band with an oval die cut (this is the 4th largest die from the Diemond Dies Nesting Ovals Die Set) from some funky colorful burst patterned paper, which I popped up on fun foam (for added dimension) and muted by dabbing on Tsukineko Brilliance Moonlight White Pigment Ink behind where the images would be. I inked the edges of the oval with some Tim Holtz Distress Ink in Ripe Persimmon to form a crisp edge and coordinate with the orange of the polka dot paper and reddish brown Ewok hood.
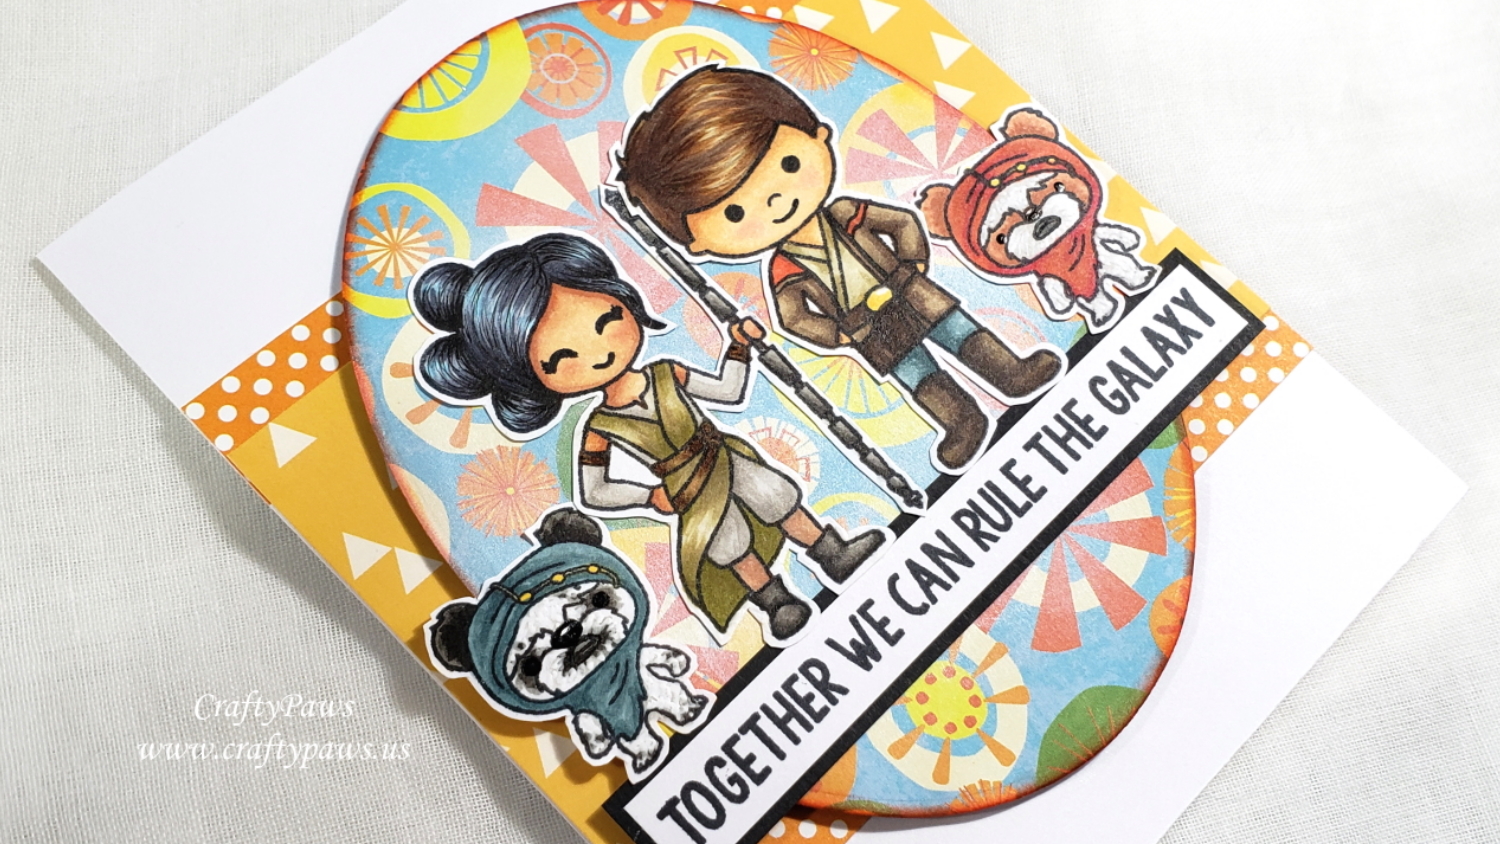
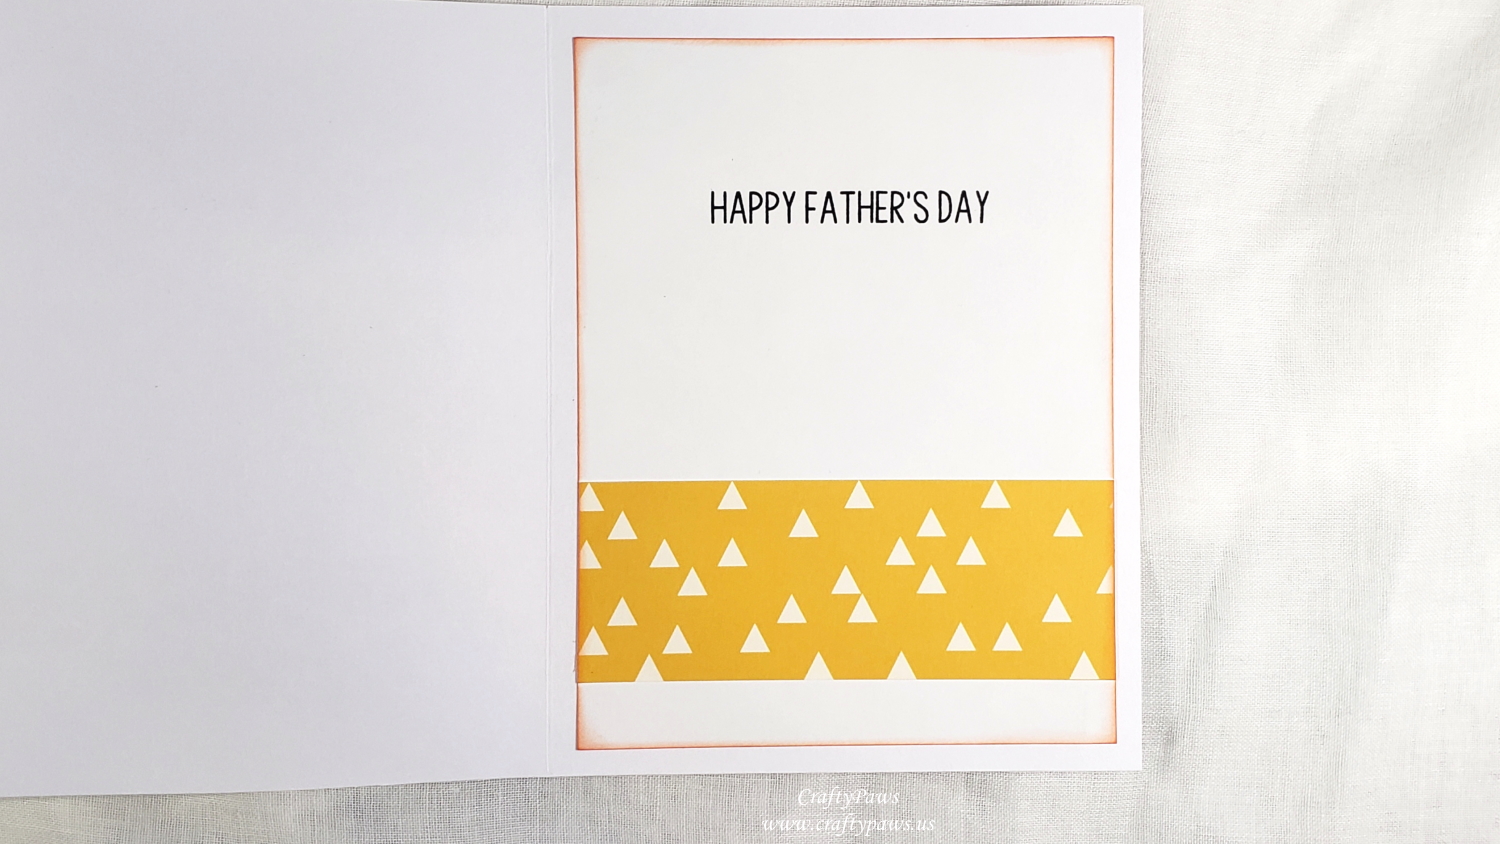
For the sentiment, I stamped out the “Together we can rule the galaxy” sentiment from the “Galactic Sequel” stamp set and matted it with some black card stock. For the inside liner, I stamped out “Happy Father’s Day” from the “Galactic Adventures” stamp set and just used a strip of the golden triangle paper in the lower 1/3 to add a bit of interest. I inked the edges of the liner with more Tim Holtz Distress Ink in Ripe Persimmon to add the touch of orange and mimic the inking of the oval on the card front.
CLICK the following picture to watch a Copic coloring and card share video:
Note: My readers can get 10% off and free worldwide shipping on all orders of $35 or more at DiemondDies.com if they use the code thankskristina at checkout.
Disclosure: Many of the supplies I’ve used for today’s project are linked. Some may be affiliate links, which means if you make a purchase I receive a small commission at no extra cost to you. I truly appreciate your support toward the costs of running this blog!
This card is being entered into the following challenges:
Word Art Wednesday Anything Goes Challenge
Through the Craft Room Door Anything Goes Challenge
Penny Black and More Favorite Stamps Challenge
Crafty Gals Corner You’re the Man Challenge
Stamping Sensations Make It Colorful Challenge
Creatalicious Anything Goes with Optional No Design Paper Challenge
]]>
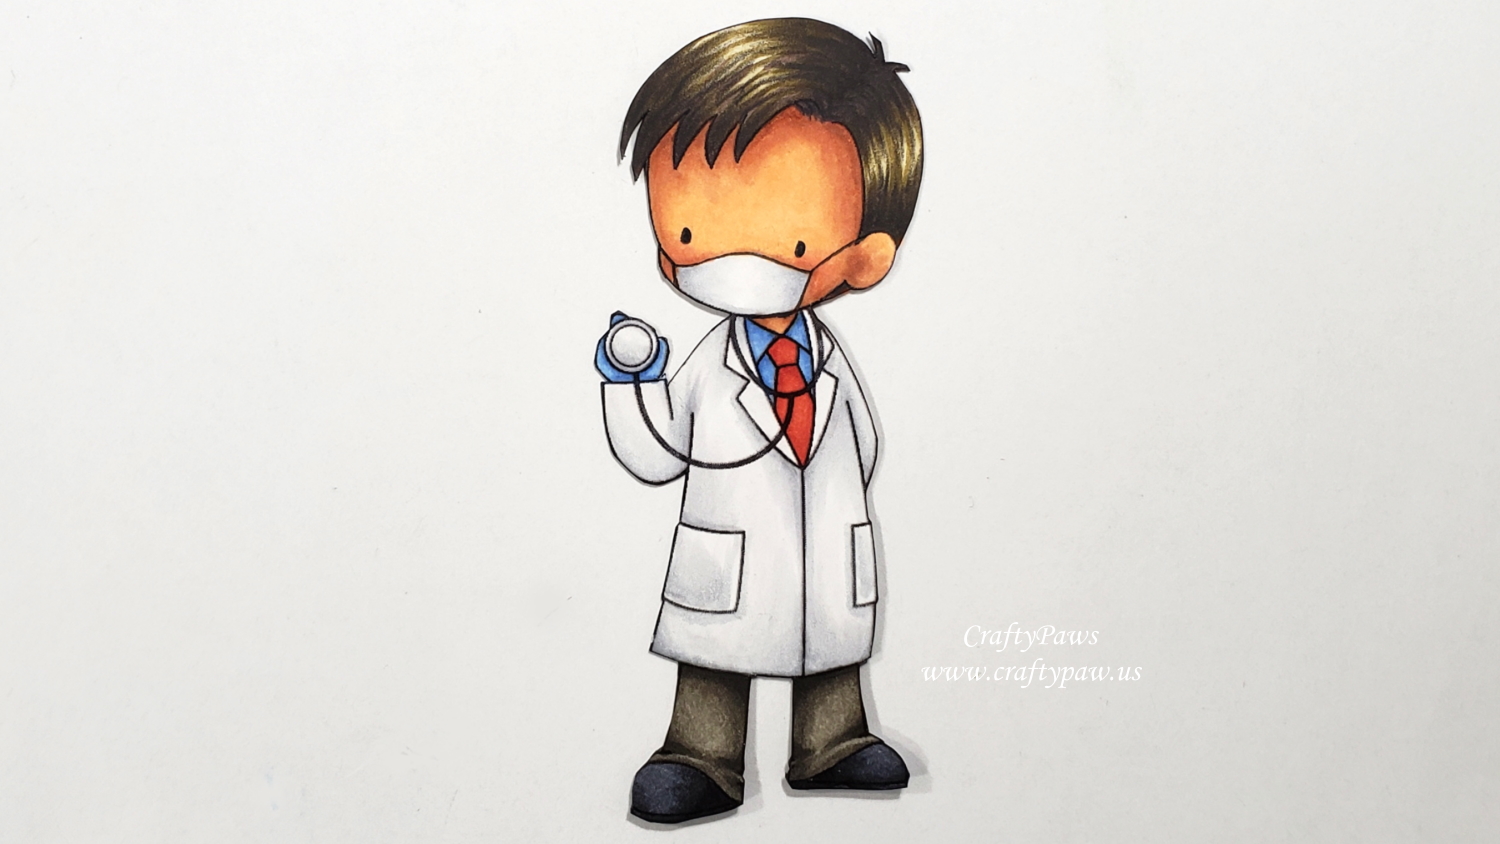
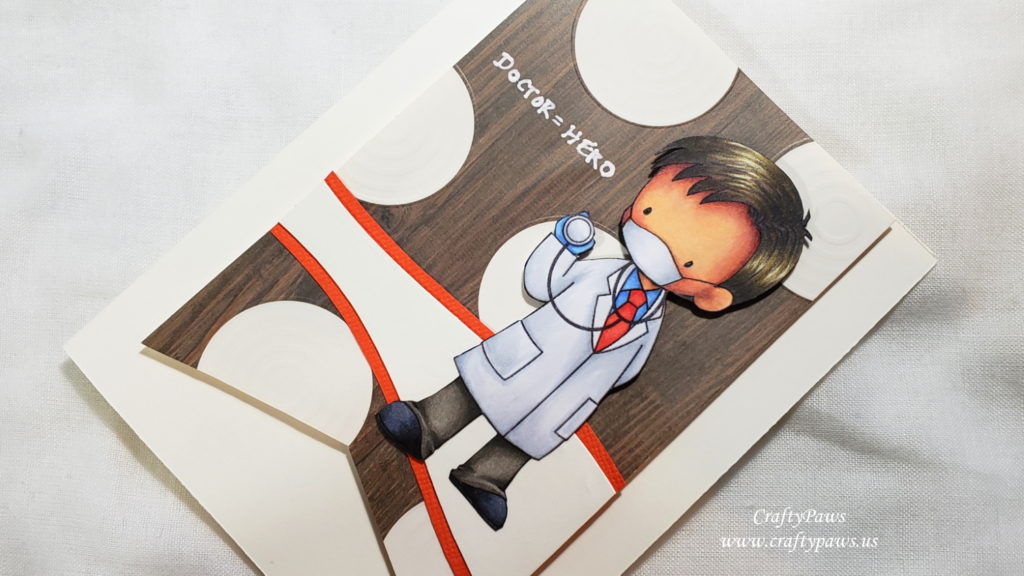
I wanted to give this doctor a Mediterranean look so I chose the following Copics and Prismacolor Premium Colored Pencils:
Skin: E00, E11, E13 and R20 (blush) with Prismacolor Beige (997) and Black Cherry (1078)
Hair: E81, E84, E87, E79 and 90% Warm Grey (1058)
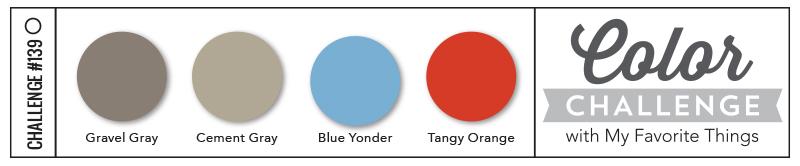
Everything else I picked using the MFT Color Challenge in mind:
Lab coat and mask (doodled on with a 0.05 pt black Copic Multiliner Pen): C00, C01 and C2 with White Prismacolor Colored Pencil (938)
Blue shirt and glove: B21 and B23
Red tie: R14 and R27
Grey pants: W3, W5 and W7
Shoes: C3, C5, C6 and C9
I fussy cut out the image with my very Fiskars Reverse Spring Loaded Scissors and inked the edges (especially the nooks and crannies from the back) with a Memento Tuxedo Black Marker.
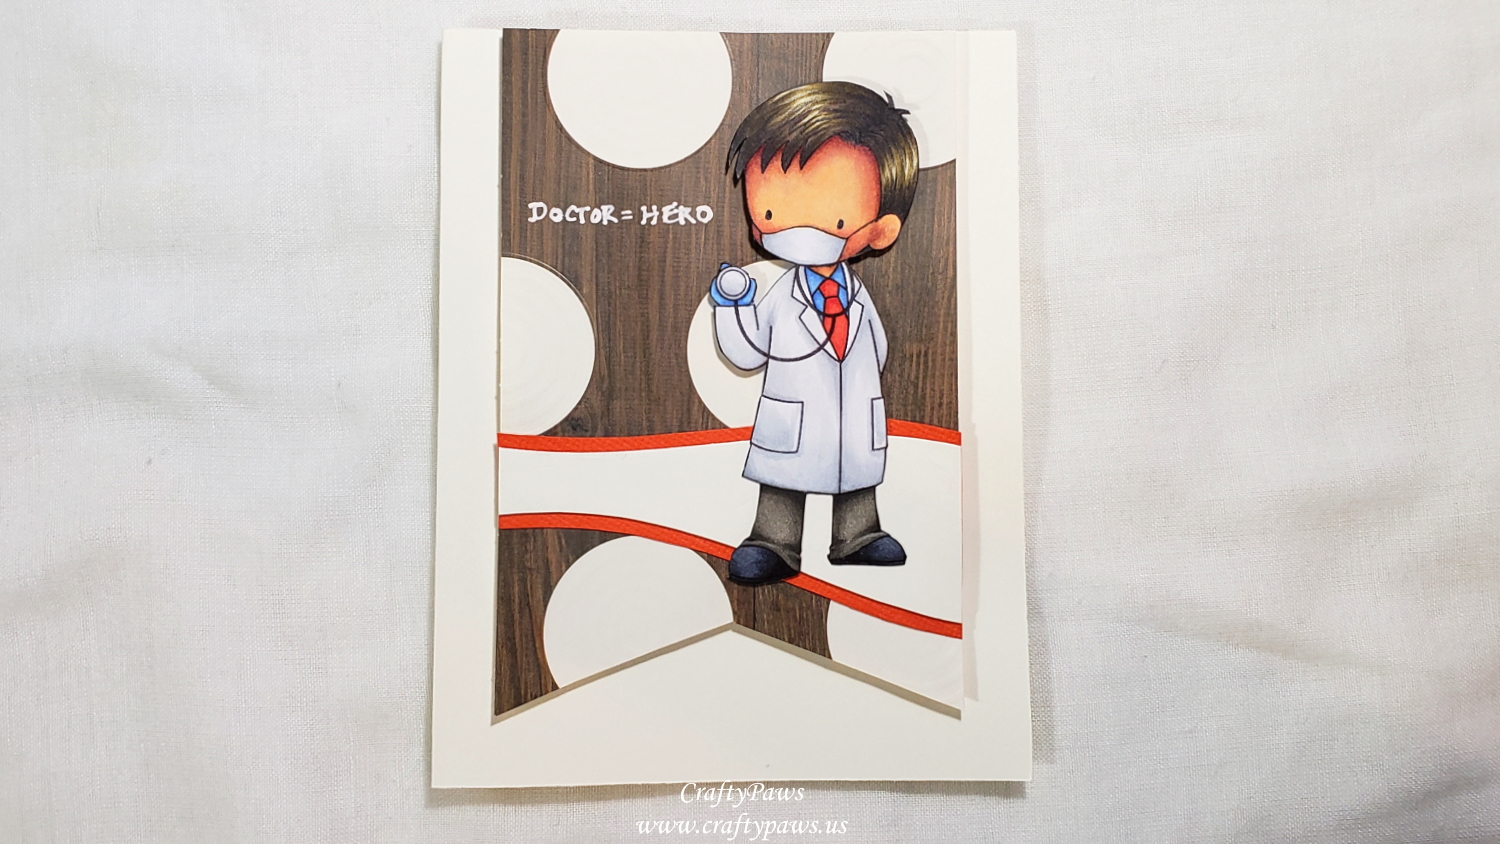
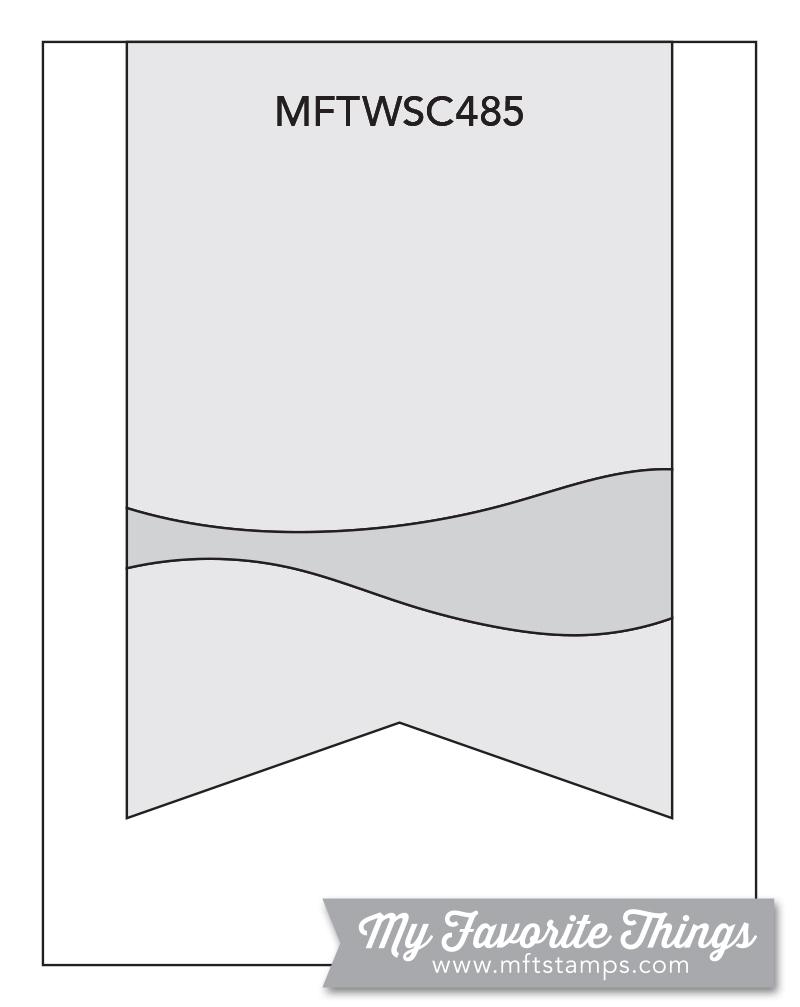
For the background, I followed the MFT Sketch Challenge and used up some great wood grained paper that had a fun large cream spots pattern. I hand cut the banner and even the swoosh design that I thought gave the doctor a great “grounding” with more scraps from my scrap box.
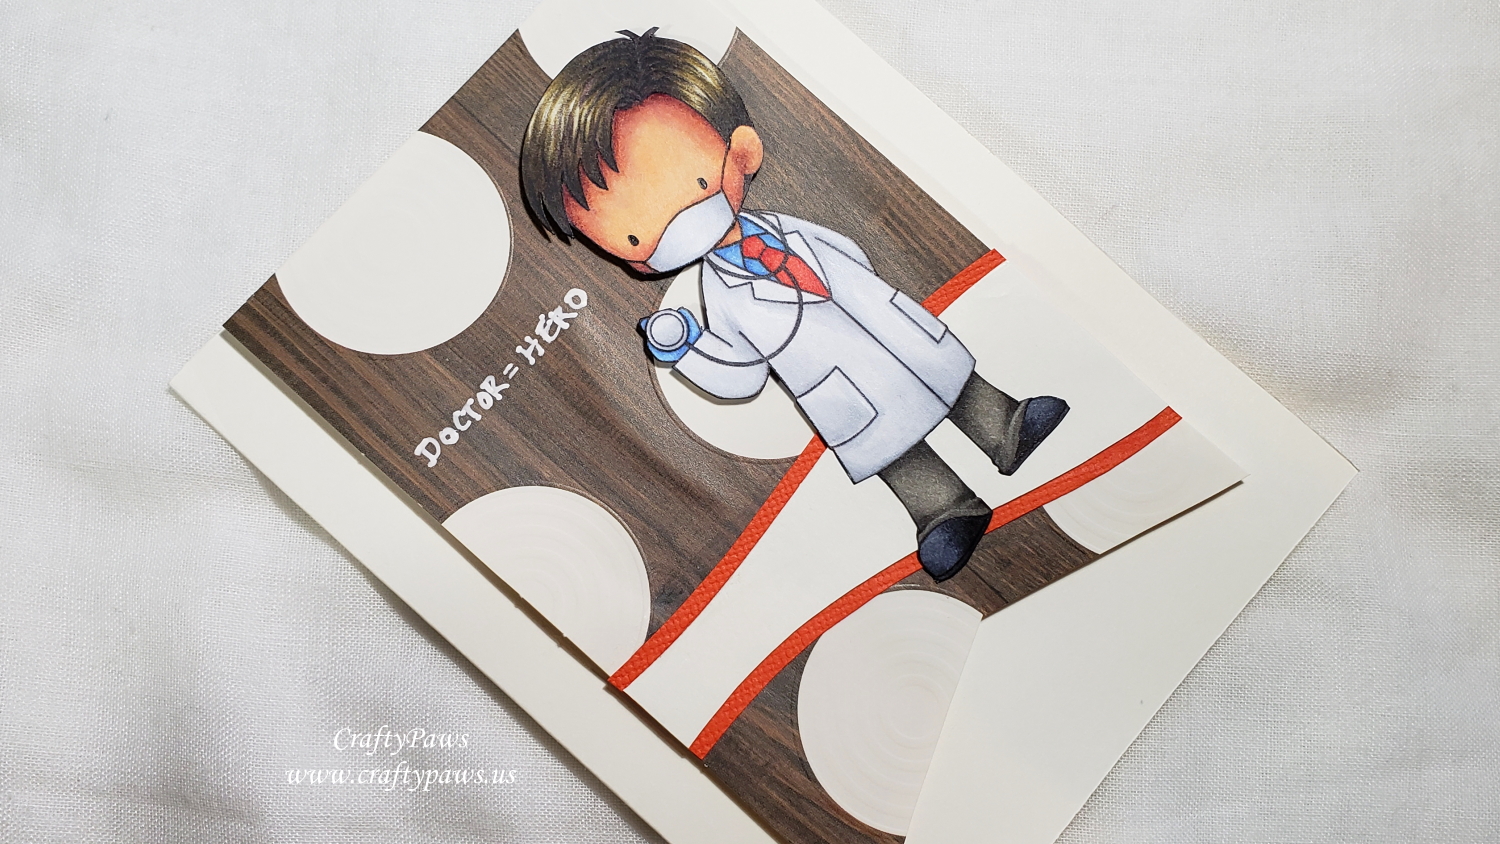
I popped up the doc on double sided foam adhesive for his head and torso and glued him down behind his legs and feet onto the swoosh floor that I had layered up to add a little interest. I also popped up the whole banner with fun foam that I glued down to add extra dimension.
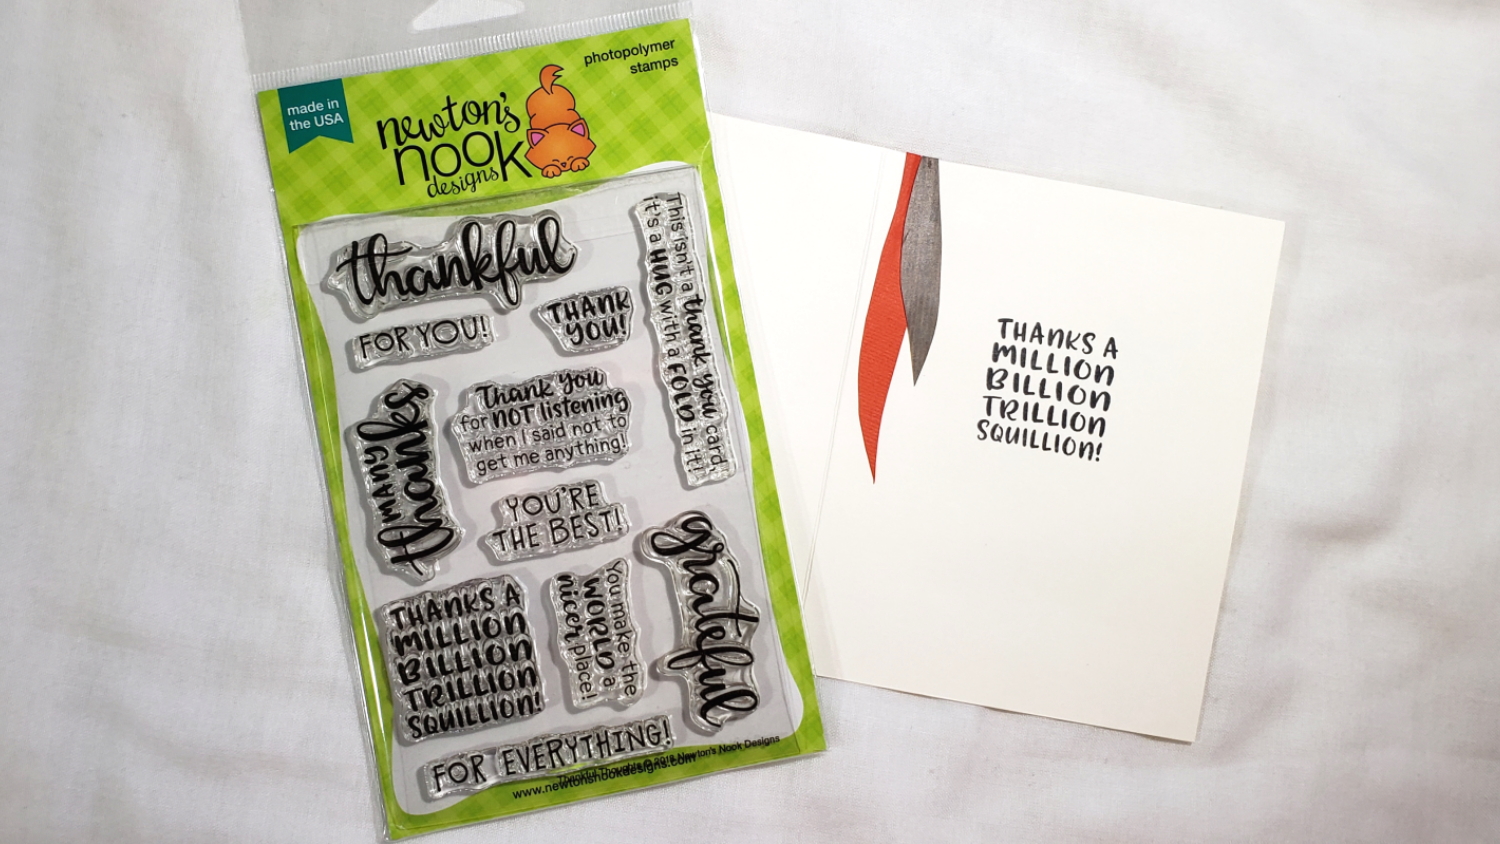
There was a perfect “blank” spot just to the left of the doc on the patterned wood grain polka dot paper so I hand wrote in with a Uniball Signo White Gel Pen, “DOCTOR = HERO”. For the inside liner I stamped out a sentiment from the Newton’s Nook Designs “Thankful Thoughts” stamp set, “THANKS A MILLION BILLION TRILLION SQUILLION!” I also added some hand cut “squills” (is that a word?) from left over scraps of the wood grained paper and the tangy orange card stock I had used on the doctor’s tie and the borders around the swoosh floor.
CLICK on the picture below to watch the process video of crafting this card:
Disclosure: Many of the supplies I’ve used for today’s project are linked. Some may be affiliate links, which means if you make a purchase I receive a small commission at no extra cost to you. I truly appreciate your support toward the costs of running this blog!
This card is being entered into the following challenges:
Simon Says Stamp Monday E is for? Challenge – Everyday Hero
Simon Says Stamp Wednesday Knock on Wood Challenge
Creatalicious Anything Goes Challenge with Optional Marble Background
Word Art Wednesday Anything Goes Challenge
Fab ‘n’ Funky Spots or Dots Challenge
Through the Craft Room Door Anything Goes Challenge
MFT Color Challenge #139
MFT Wednesday Sketch Challenge #485
]]>
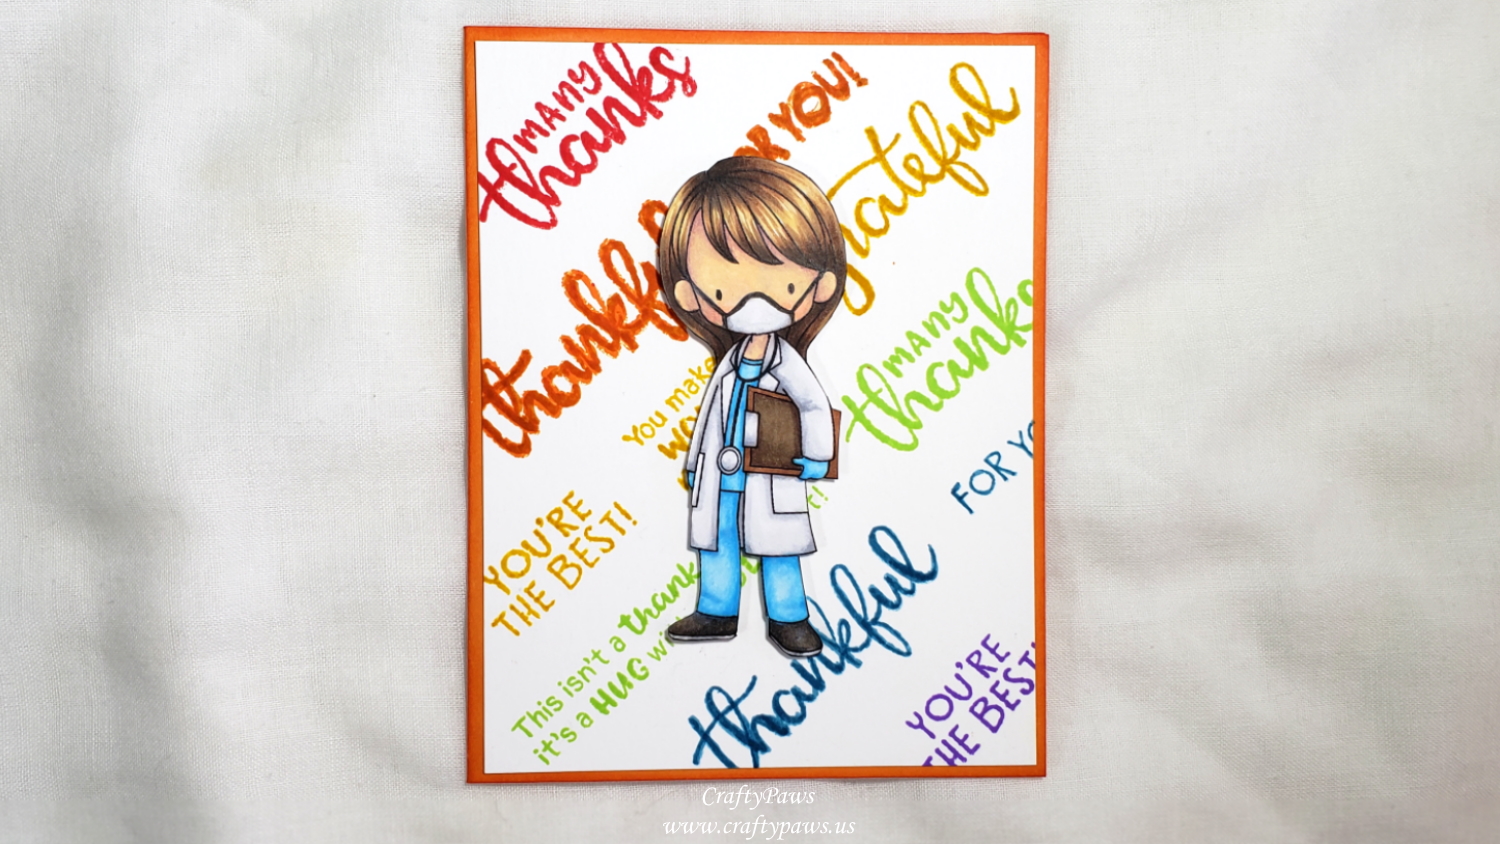
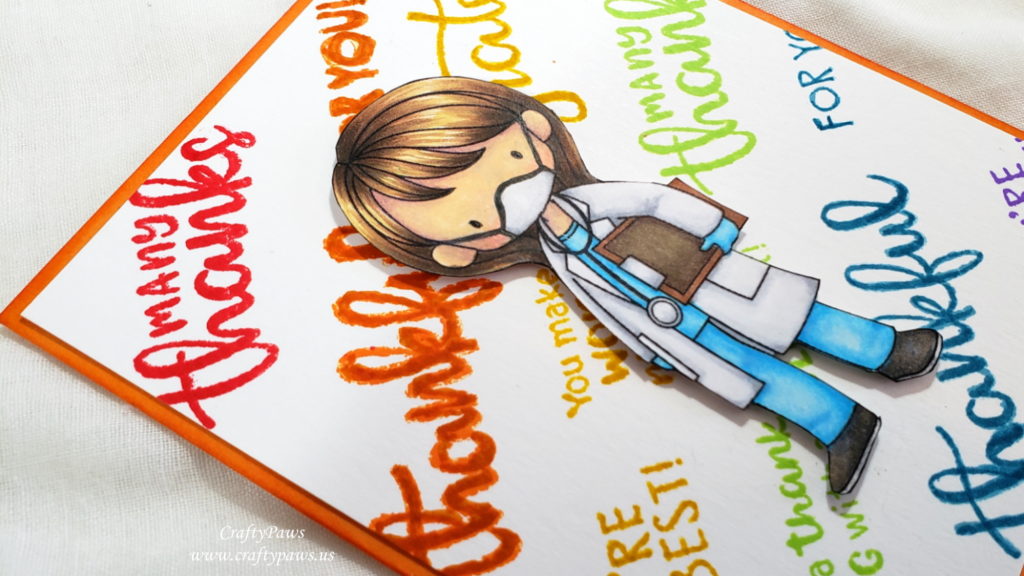
Because I wanted to emphasize the Personal Protection Equipment (PPE) that our EVERYDAY ESSENTIAL WORKER HEROES are sorely in need of, I downloaded the digis and then convertd them to jpg. Then I could edit them a bit using paint.net, to erase the noses and mouths, so that I could doodle on face masks and gloves using a 0.05 pt black Copic Multiliner Pen.
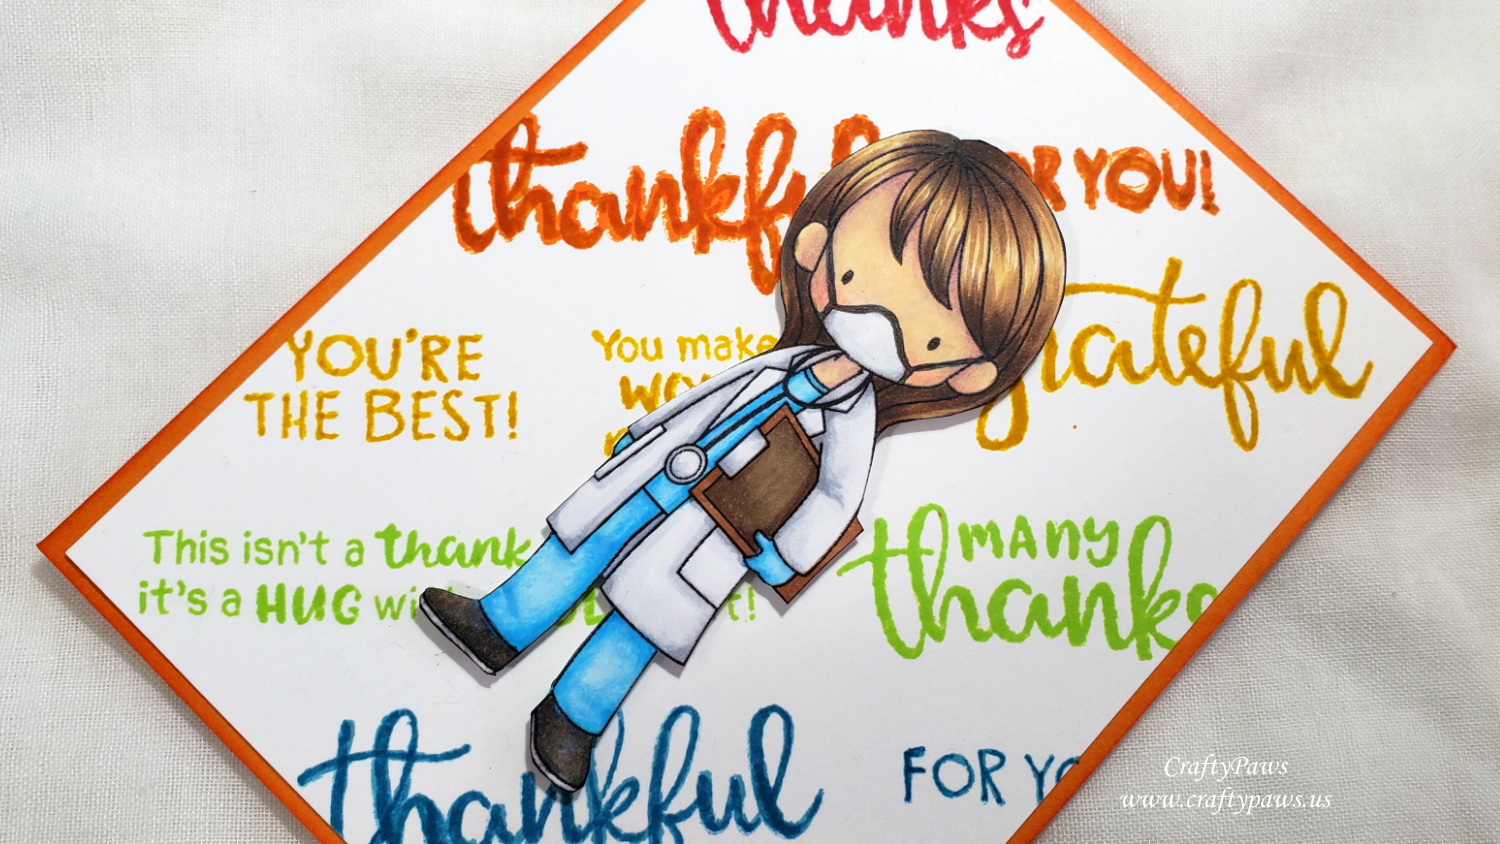
I colored the female doctor with my go-to coloring medium, Copics, and then I had some fun trying to add more vibrancy and detail with some Prismacolor Premium Colored Pencils:
Clip Board and Stethoscope: C00, C0 and C3 (for metal parts) and E23, E57 and E44 (for boards)
Skin: E50, E51, E01, R20 (blush) with Prismacolor Beige (997); Light Peach (927); Shell Pink (1093); Ruby Beige (1019)l and Clay Rose (1017)
Shoes: N5 and N7 with C3 for soles
Brown Hair: E55, E57 and E59 with Prismacolor Jasmine (1012) and Sepia (948)
Blue Scrubs and Gloves: B0000, B01, B02, and B04 with Prismacolor Sky Blue Light (1086) and Non-Photo Blue (919)
I then fussy cut them out with my favorite Fiskars Reverse Spring Loaded Scissors and inked the edges with a Memento Tuxedo Black Marker for a clean, crisp finished look. To add some extra interest onto the doctor, I also popped her up on double sided foam adhesive to give her some dimension.
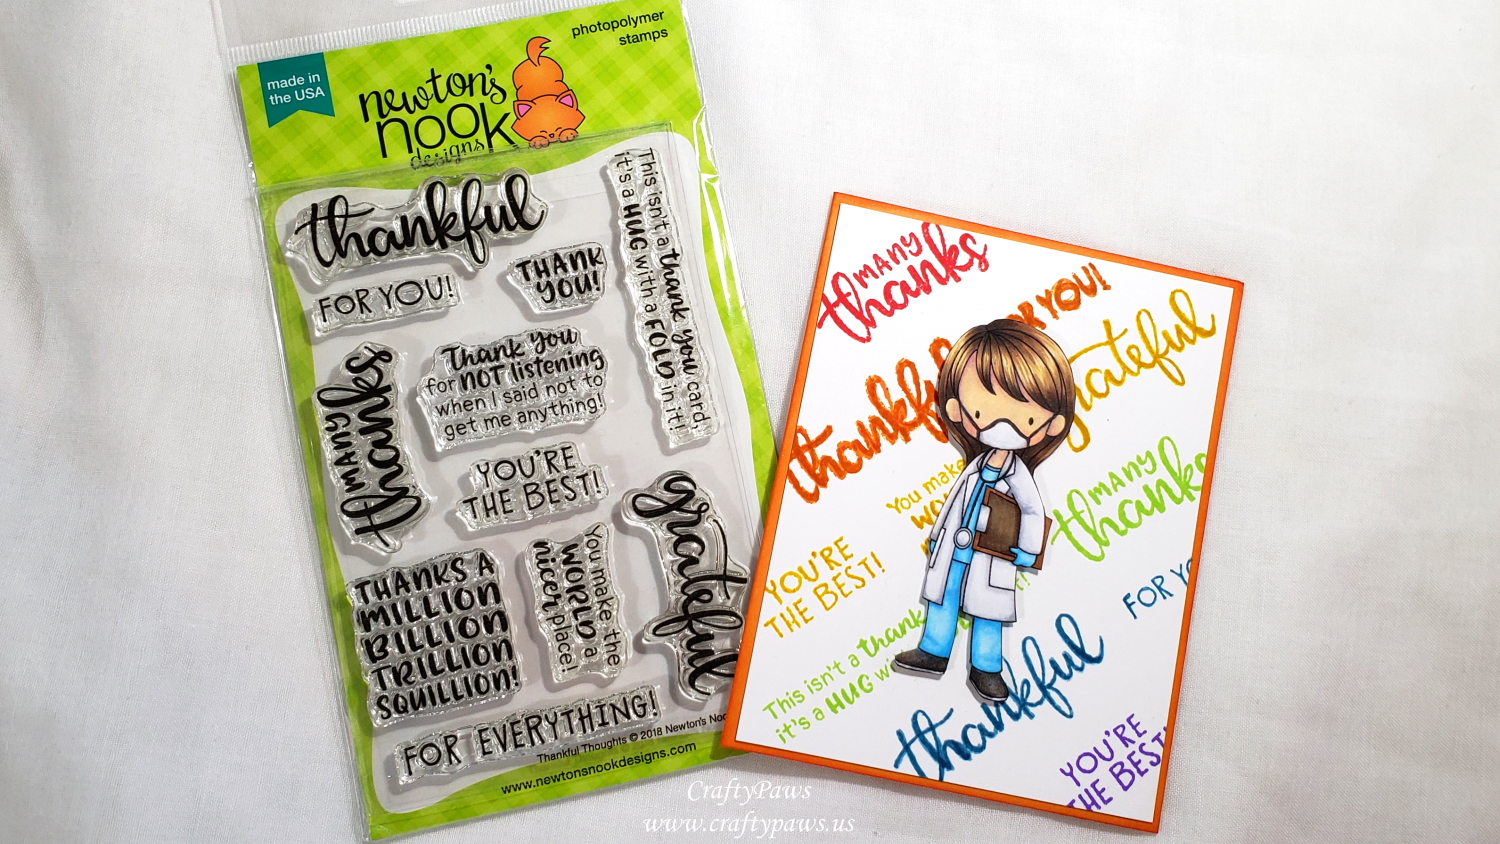
For the background, I decided to use a bunch of the sentiment stamps from Newton’s Nook Designs “Thankful Thoughts”. I positioned the words at a diagonal and inked up each row with rainbow bright springy colors of Tim Holtz Distress Inks in Festive Berries, Spiced Marmalade, Mustard Seed, Twisted Citron, Broken China and Wilted Violet. Where my MISTI slipped while stamping the Spiced Marmalade row, I used the matching Spiced Marmalade Distress Marker to tidy it up! As this extra layer of ink darkened that row, I decided to mount it on a similarly colored card stock card base to make it look more intentional. I also used the Mustard Seed and Broken China Markers to balance out the color saturation a bit throughout the background.
CLICK on the following picture to watch the process video:
Disclosure: Many of the supplies I’ve used for today’s project are linked. Some may be affiliate links, which means if you make a purchase I receive a small commission at no extra cost to you. I truly appreciate your support toward the costs of running this blog!
This thank you card for an everyday heroine doctor is being entered into the following challenges:
Simon Says Stamp Monday E Challenge – Everyday Essential worker hero
Penny Black and More Anything Goes Challenge
Lil Patch of Crafty Friends Anything Goes Challenge
Creatalicious Anything Goes with Optional Wedding Challenge
Word Art Wednesday Anything Goes Challenge
Through the Craft Room Door Anything Goes Challenge
Crafts Galore Encore Anything Goes Challenge
Stamping Sensations Somewhere Over the Rainbow Challenge
Simon Says Stamp Wednesday Spring Mood Board Challenge

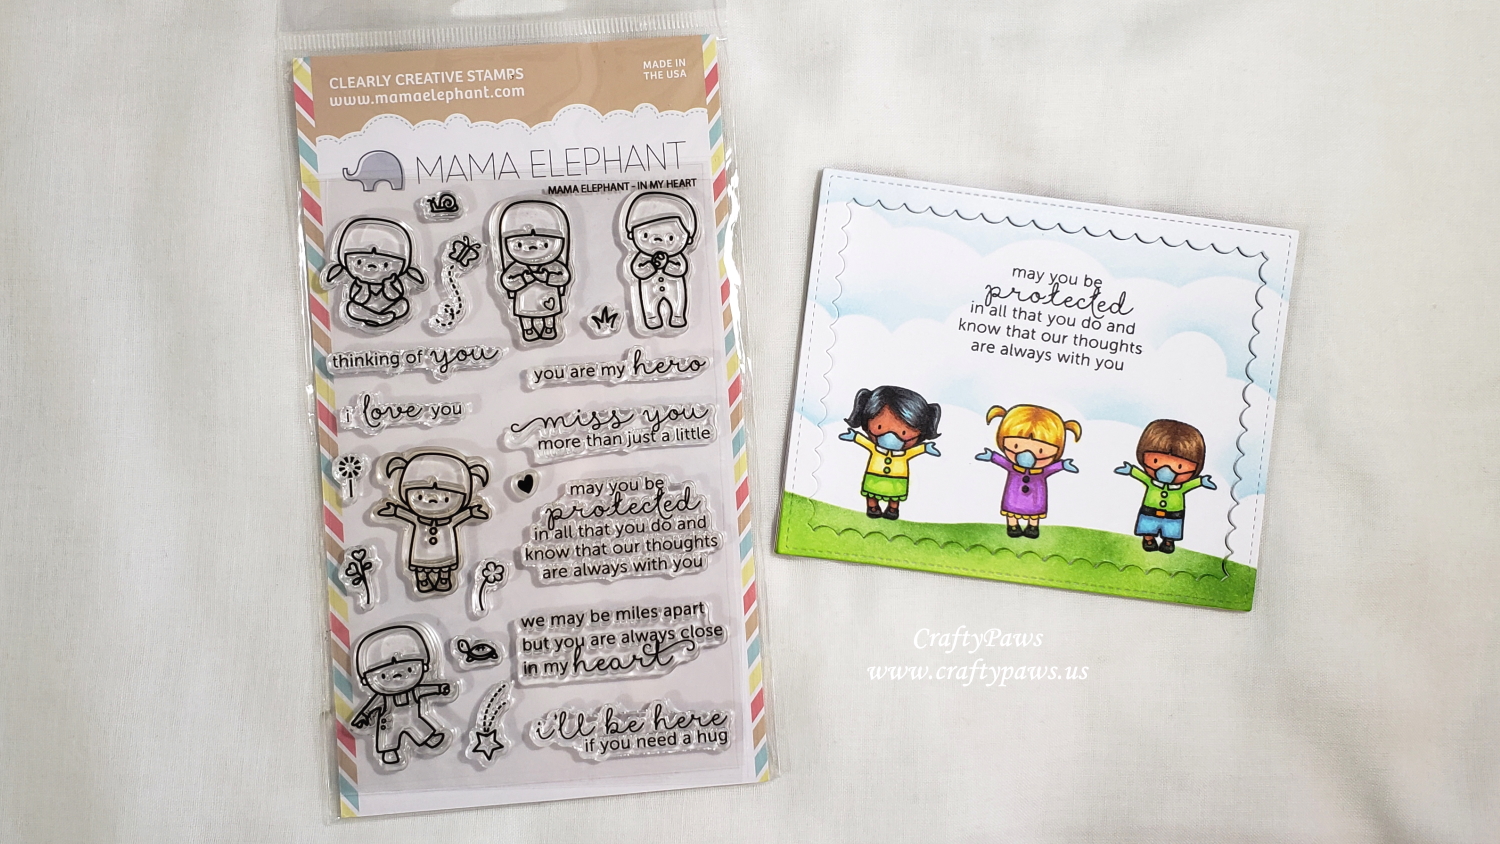
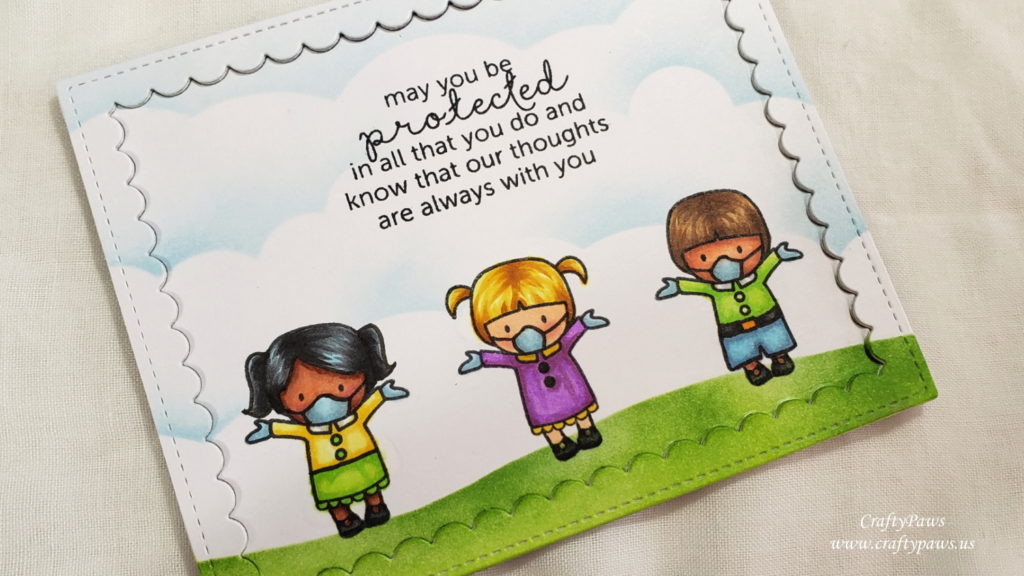
When I pulled the stamp set out, I realized there were amazingly appropriate sentiments in the set too. For my card, I used, “may you be protected in all that you do and know that our thoughts are always with you” (I mean how perfect is that for the times right now?). For the inside liner, I also used: “you are my hero”.
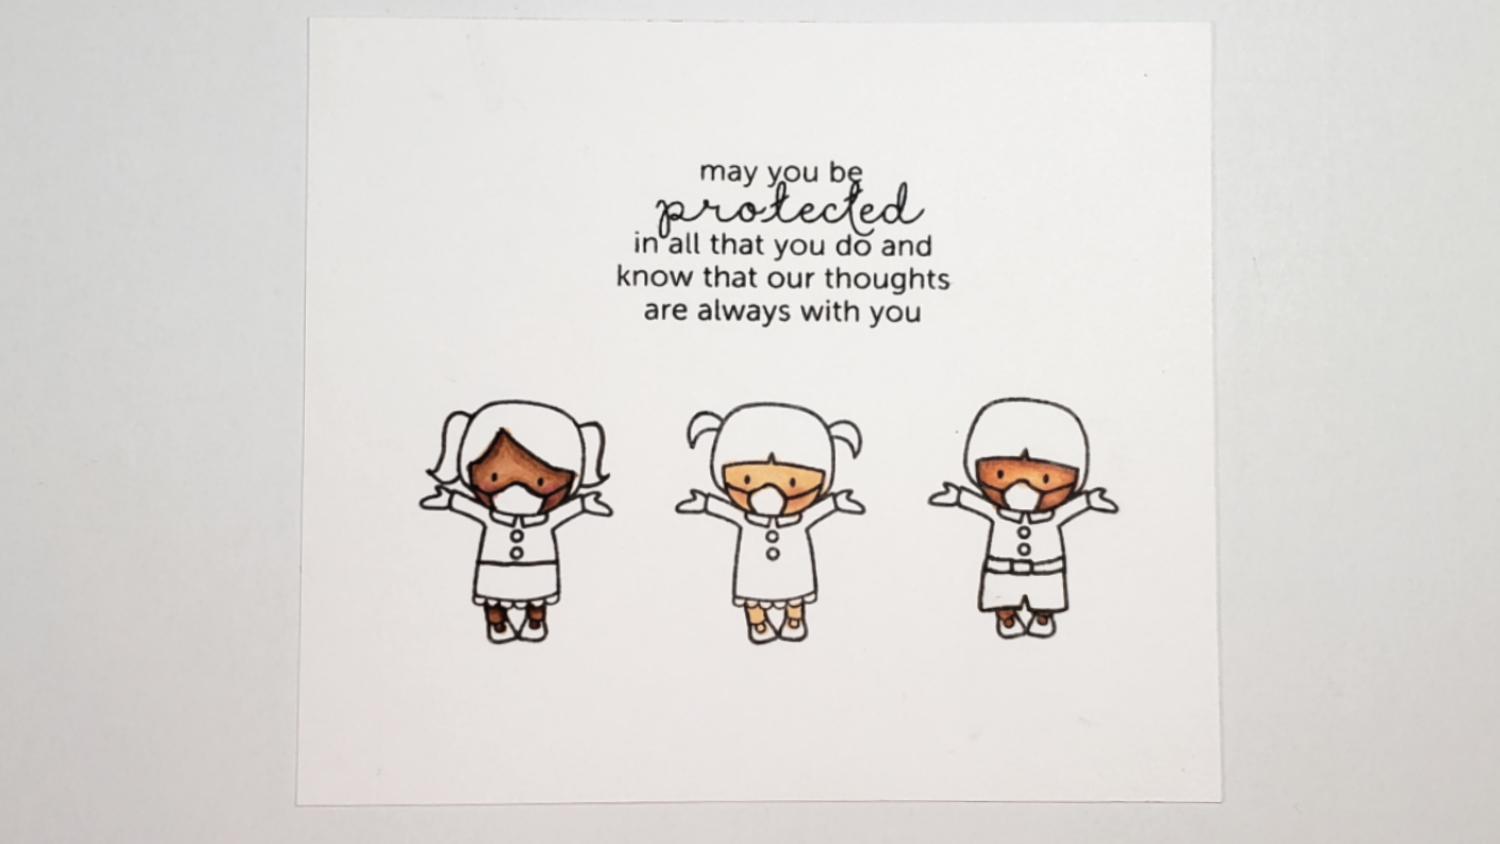
I masked off certain parts of the little girl stamp with bits of washi tape, inked up the stamp, removed the washi bits, and stamped out 3 kiddos! Then I used a 0.1 pt Copic Multiliner Pen to doodle on some changes to the kids’ hair, clothes and added masks! I also colored up and fussy cut out another girl from the stamp set (the one grasping her chest) to decorate the inside liner.

Then I used the following Copic colors to bring the kiddos to life. Note that I used different color combinations for the skin tones because I wanted to represent the human rainbow of our front line heroes and bright spring colors for the clothes to suggest hope and life for the future:
Girl in Skirt: Skin: E11, E13, E25 and RV34 (blush); Top: Y11, Y15, N1 (collar) and YG05 (buttons); Skirt: YG01, YG03 and YG05; Hair: B01, N6 and N9
Girl in Dress: Skin: E00, E01 and R20 (blush); Dress: Y15, V04 and V06; Hair: Y11, Y15 and YR24
Boy in Pants: Skin: E01, E02, E11, E13 and R20 (blush); Top: YG01, YG03, YG05 and N1 (collar); Pants: B00, B52 and B45; Belt: YR16, N6 and N9; Hair: E55, E57 and E59
Masks and Gloves: N1, B00 and B52
All Shoes: N6 and N9

Girl with Long Hair (on inside liner): Skin: E01, E02 and R20 (blush); Hair: B02, C4, C6 and C8; Dress: RV02, RV04, RV06 and V06 (heart); Tights: V06 and V17; Mask and Gloves: B02 and B04
The backgound sky was made with a My Favorites Things Cloud Stencil and some Tim Holtz Distress Ink in Tumbled Glass blended on. The grass/ground was made against a simple homemade stencil and Tim Holtz Distress Ink In Twisted Citron and Mowed Lawn. I was just careful to lighten the blending around the sentiment and the kids’ feet since I was too lazy to make masks. 😀
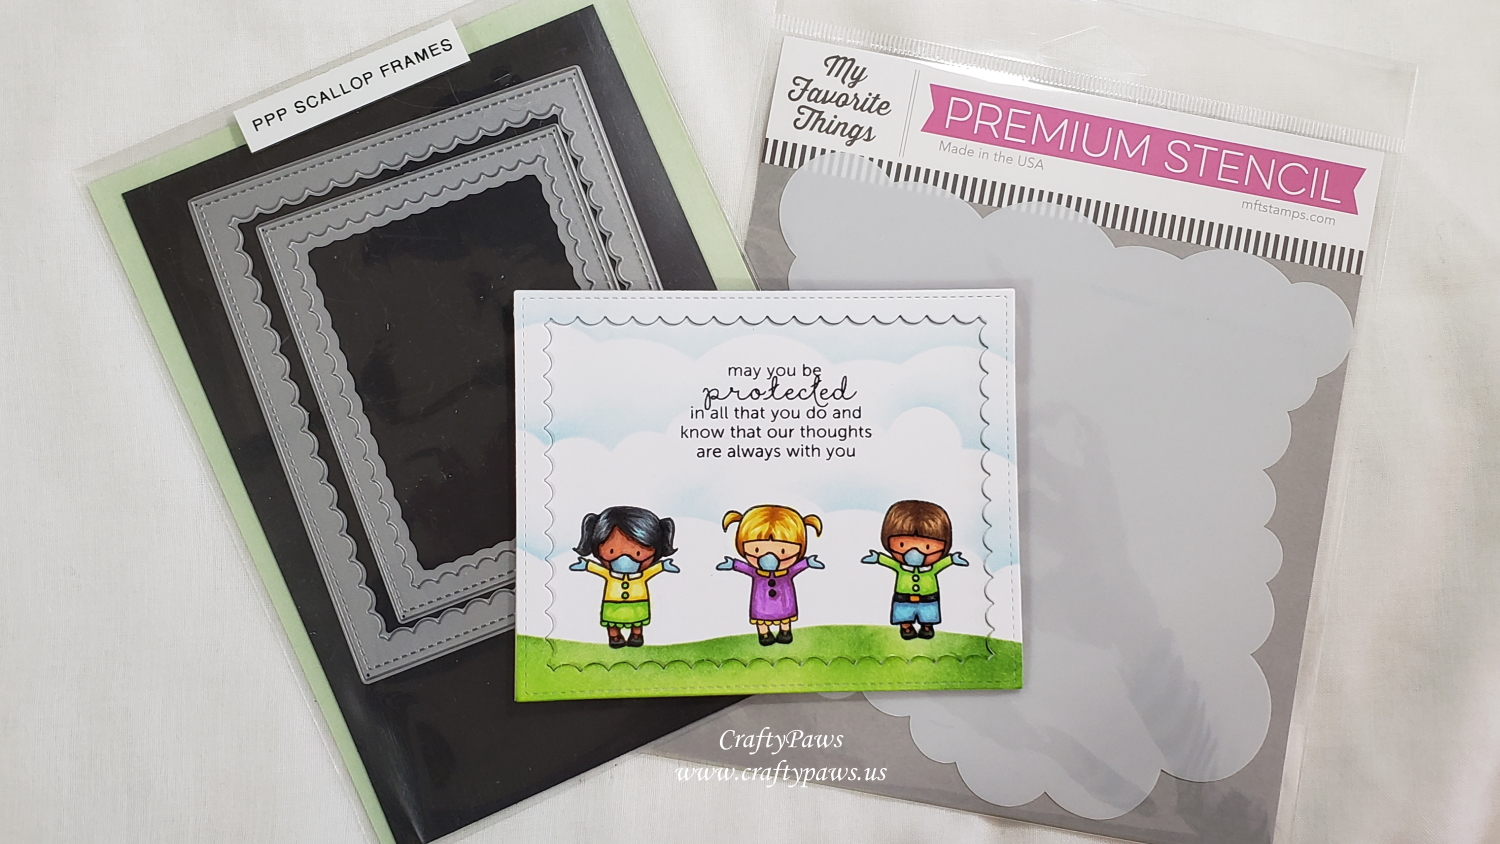
To add a little dimension to this otherwise single layer card, but keep it looking crisp and simple in the style of the stamps, I used the large Pretty Pink Posh Scallop Frames die. I cut the scallop frame 4 additional times from card stock scraps and stacked them under the finished card front frame. I love how that came out looking more “finished” while not distracting or cluttering the general CAS style.
CLICK on the photo below to watch my process video:
Disclosure: Many of the supplies I’ve used for today’s project are linked. Some may be affiliate links, which means if you make a purchase I receive a small commission at no extra cost to you. I truly appreciate your support toward the costs of running this blog!
This card is being entered into the following challenges:
Crafts Galore Encore Anything Goes Challenge
Crafty Gals Corner Easter/Spring Challenge
Creatalicious Anything Goes with Optional Wedding Challenge
Word Art Wednesday Anything Goes Challenge
Penny Black and More Anything Goes Challenge
Simon Says Stamp Wednesday Mood Board Challenge
]]>
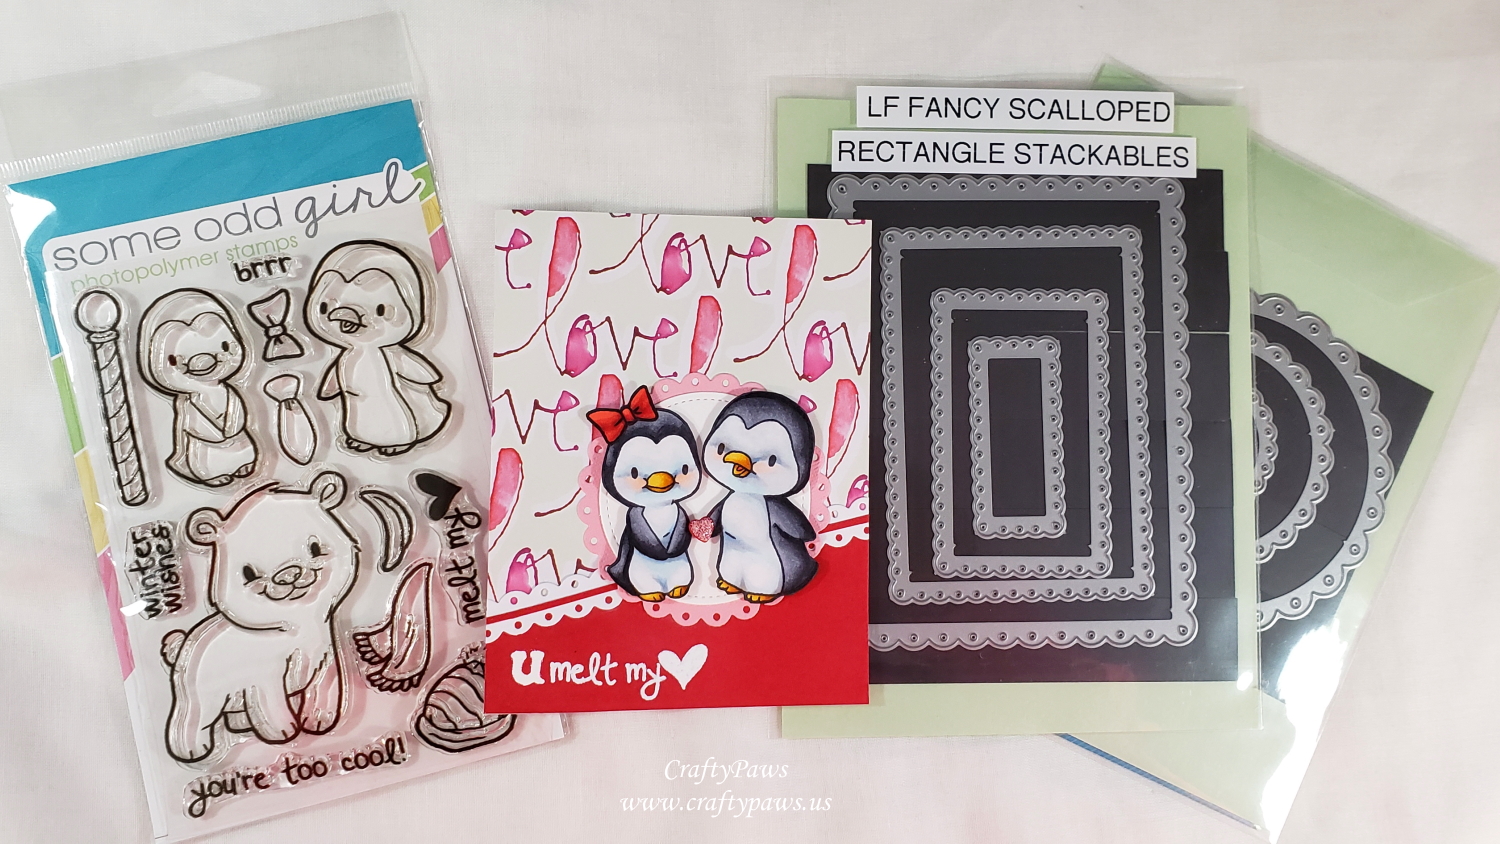
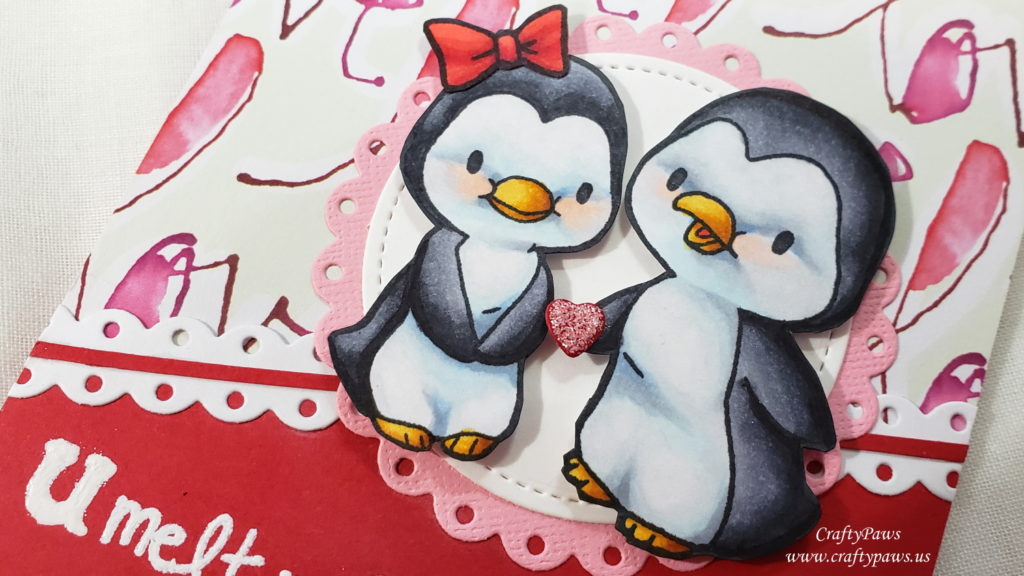
To color the images, I kept the black areas of the penguins light enough to not lose detail and effect the look of chubbiness, and I added pale blues and light greys to the white parts for dimension and interest. These might not be the typical colors one uses to color “white” and “black”, but these are the Copic colors I used:
Black parts of penguins: C3, C4, C6 and C8
White parts of penguins: 0, B000, B32, C0, C1, C2 and R00
Beaks and feet: Y21, YR24 and YR27
Bow: R22, R24, R29 and R39
I fussy cut out the images with my favorite Fiskars Spring Loaded Scissors and inked the edges of the images to hide the white cut edges with a Memento Tuxedo Black Marker. I then glued the bow onto the girl penguin using my favorite Art Glitter Glue with Fine Tip Nozzle to make her extra feminine. 🙂
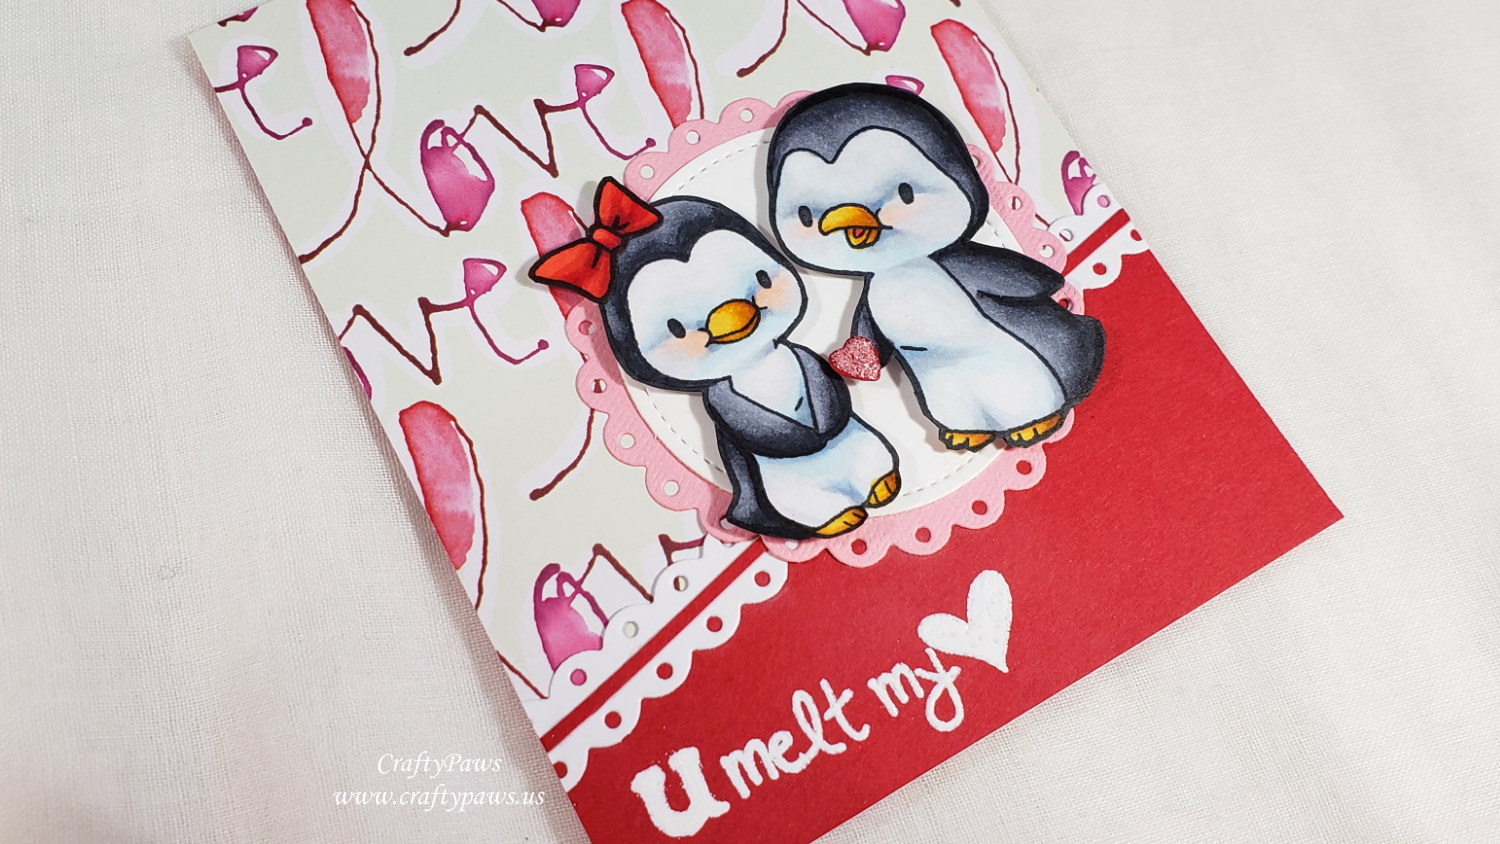
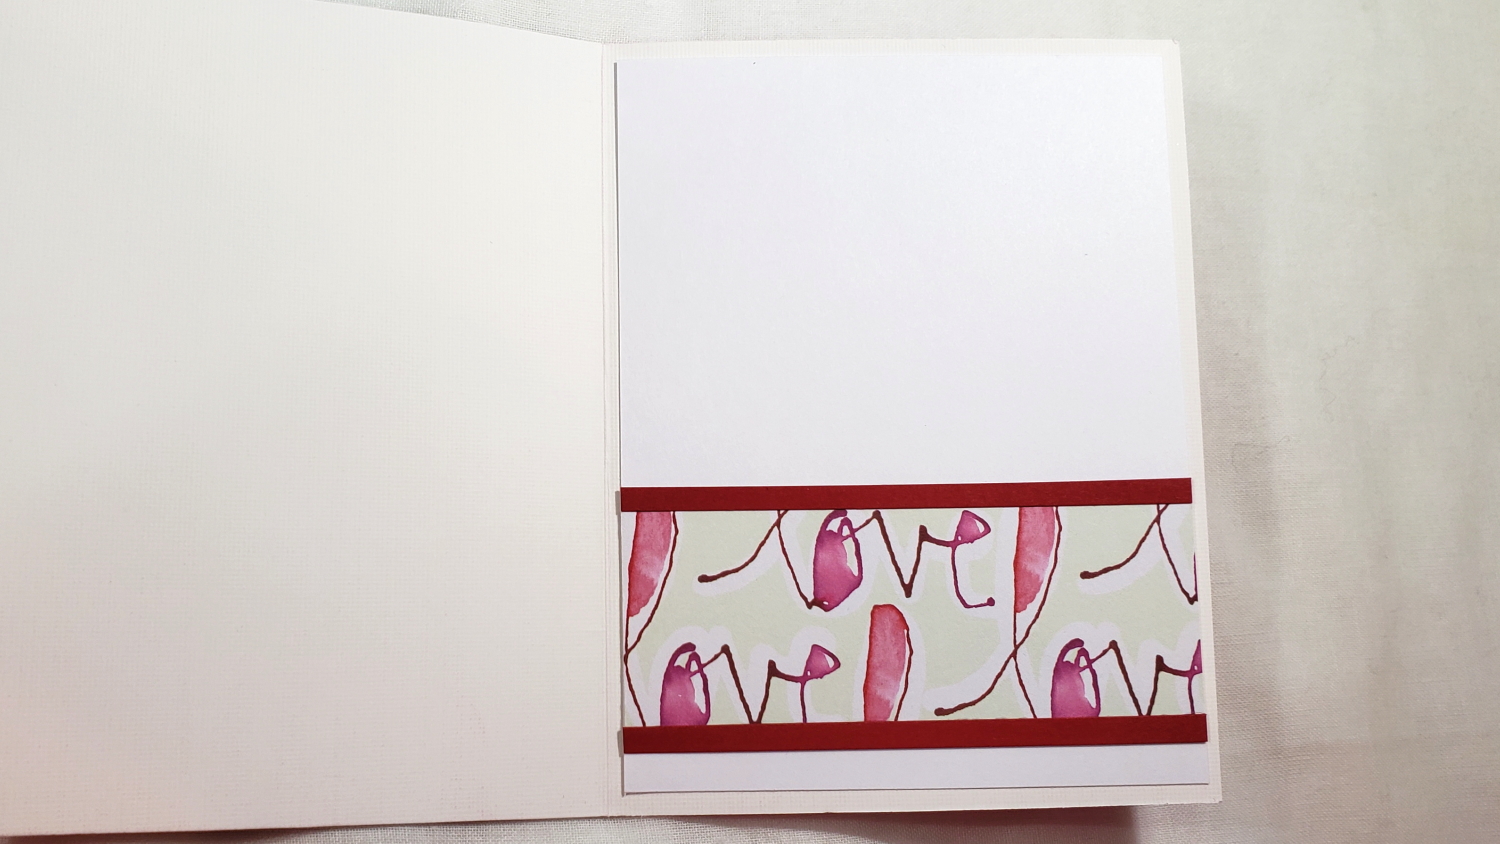
For the card front I used an old patterned paper that has been languishing in my scrap box for years (yes, years!) that had “love” repeated over and over in reds and pinks on a white and pale green background. I also used scrap red cardstock to add a “ground” and visually weight the bottom 1/3 of the card. Where the background papers meet, I used a Lawn Fawn Fancy Scalloped Rectangle die and flipped it to create a fancy scalloped border. And a small strip of red cardstock through the middle of the border added a nice crispness.
To set off the penguin couple, I used a Lawn Fawn Fancy Scalloped Circle Die and the Gina K Designs Stitched Circle Die with pink and white cardstock. Then to really bring out the penguins, I popped them up on foam dots. As a finishing touch, I die cut a tiny heart using the Lawn Fawn Happy Hello coordinating die set and placed it in the male penguin’s fin so that it would look like he was giving his mate a heart. A thick coating of Hibiscus Pink Stickles over the red heart both softened the color and added sparkle.
CLICK on the following picture to watch the process video of crafting this card:
Disclosure: Many of the supplies I’ve used for today’s project are linked. Some may be affiliate links, which means if you make a purchase I receive a small commission at no extra cost to you. I truly appreciate your support toward the costs of running this blog!
This card is being entered into the following challenges:
Crafty Gals Corner Winter Fun Challenge
Word Art Wednesday Anything Goes Challenge
Fab ‘n’ Funky In the Pink Challenge
Stamping Sensations Feminine Challenge
Through the Craft Room Door Anything Goes Challenge
Penny Black and More Animals, Birds and Butterfly Challenge
Simon Says Stamp Wednesday with Love Challenge
Creatalicious Anything Goes with Optional Hearts Challenge
MFT Wednesday Sketch Challenge #475