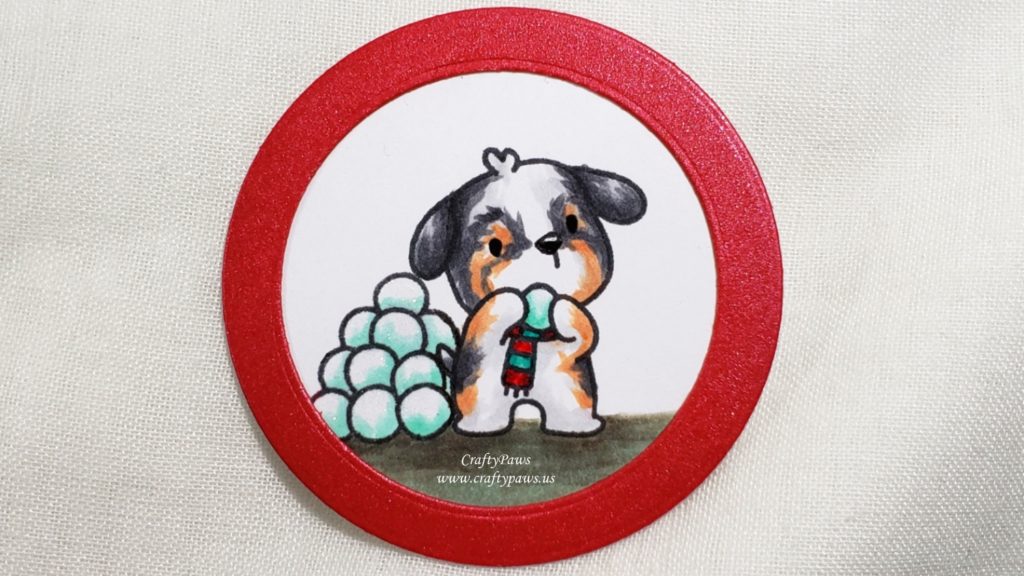
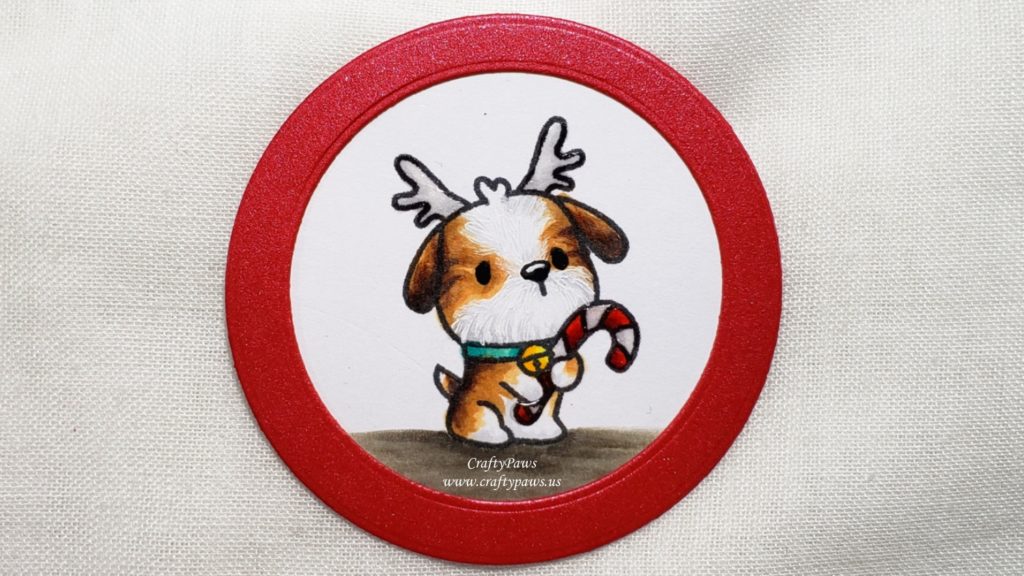
For the 7th – 9th parts of the wreath, I used three more of the pups from the Mama Elephant Yappy Woofmas stamp set and Copic colored them using the following colors (featuring my favorite Christmas color combination – red, white and aqua):
Australian Shephard with snowballs: N3, N5, E11, E13
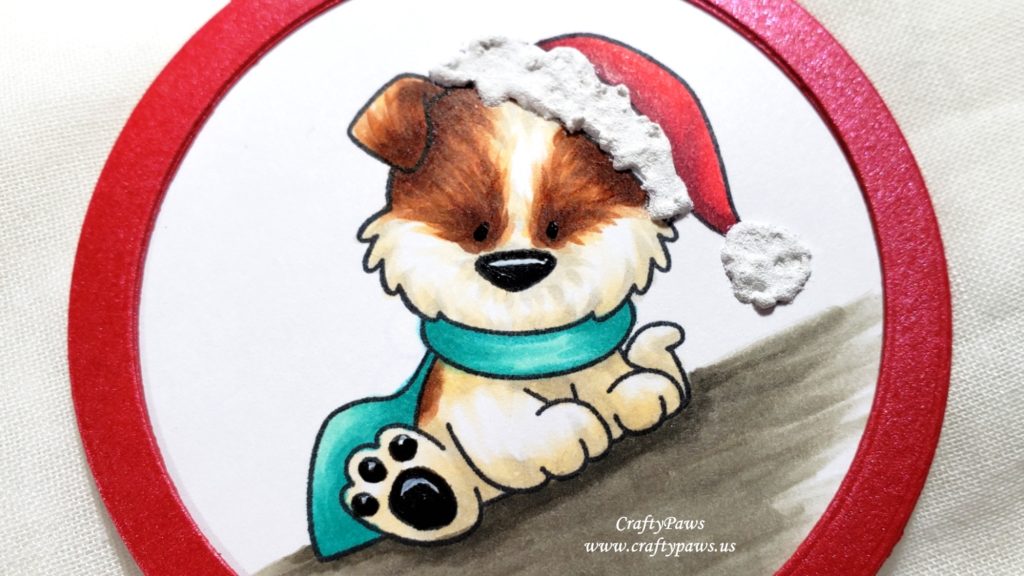
Terrier with snowballs: N0, N3, N5, R30 with Uniball Signo White Gel Pen details for furry texture
Bernese Mountain Dog with antlers: N0, E53, E55, E57 and E79
with Uniball Signo White Gel Pen details for furry texture
Floors: W3 and W5
Santa hat, candy cane, snowballs, collar, bell, antlers and scarves: C0, Y13, Y17, BG11, BG13, BG15, R35, R37, and R39
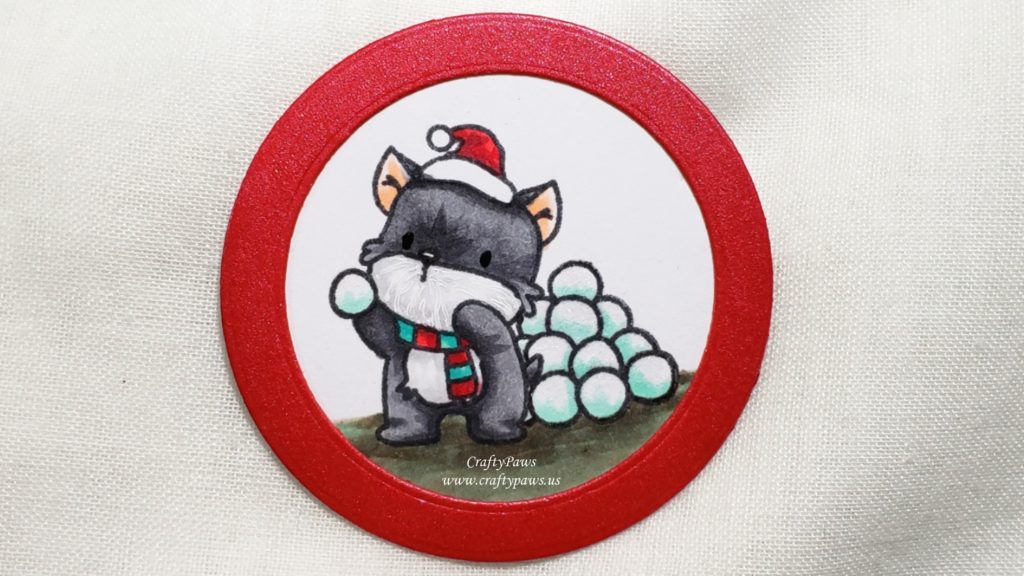
I also used the Uniball Signo White Gel Pen to add highlights to the noses and used a Sakura Black Glaze Pen to emphasize the eyes and noses. Since I was keeping all of these tags CAS (clean and simple with zero embellishments), to add a bit of interest, I added Clear Wink of Stella to the candy cane and all the snowballs for some sparkle and shimmer as well as Ranger Glossy Accents to the antlers and the candy cane for some high shine.
I die cut the images using the 7th largest circle die from the Diemond Dies Die-Normous Stack-Ems Circle Nesting Die Set. Then to create frames for the pieces, I used beautiful sparkly shimmer red card stock and the 5th and 7th largest circles from the Diemond Dies Die-Normous Stack-Ems Circle Nesting Die Set.
My readers can get 10% off and free worldwide shipping at Diemond Dies on all orders of $35 or more by using the code “thankskristina” at check out.
Disclosure: Many of the supplies I’ve used for today’s project are linked. Some may be affiliate links, which means if you make a purchase I receive a small commission at no extra cost to you. I truly appreciate your support toward the costs of running this blog!
CLICK on the following picture to watch the process of creating these tags:
These puppy tags are being entered into the following challenges:
Crafty Gals Corner Anything Goes Challenge
Word Art Wednesday Anything Goes Challenge
Creatalicious Anything Goes with Optional Christmas w Snowflakes
Card Mania Christmas Challenge
Lil Patch of Crafty Friends Anything Goes Challenge
Penny Black and More Traditional Christmas Colors Challenge
Stamping Sensations Winter Sparkle Challenge
Through the Craft Room Door Anything Goes Challenge
ABC Christmas Y – favorite thing and Z – zero embellishment Challenge
Fab ‘n’ Funky Cute Christmas Challenge
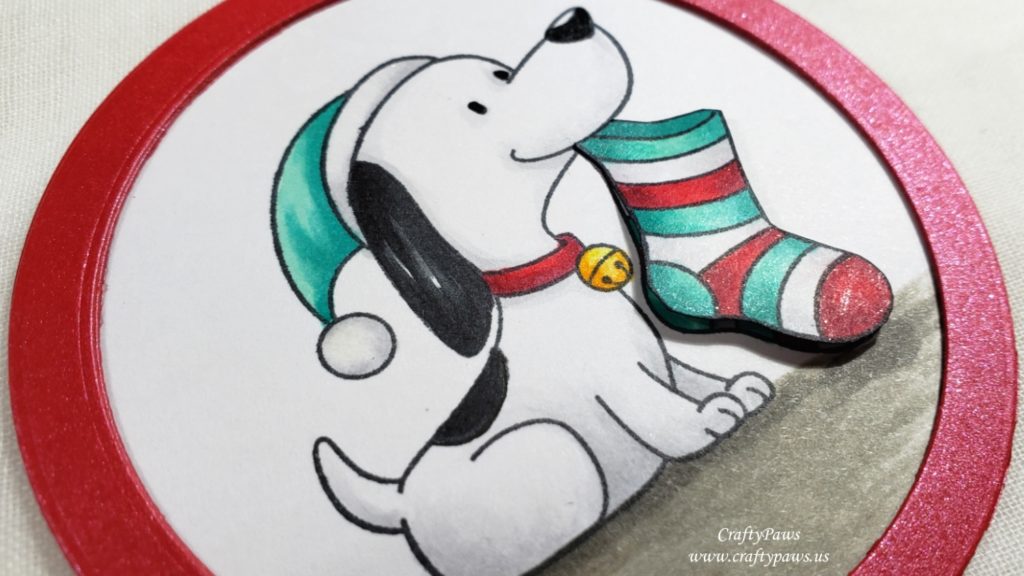
For the 3rd and 4th parts of the wreath, I used the other two adorable dogs from the MFT Happy Pawlidays stamp set (one of my all time favorite holiday stamp sets) and Copic colored them using the following colors (featuring my favorite Christmas color combination – red, white and aqua):
Snoopy-look-alike: N0, N1, N7 and N9
Yellow lab: Y13, Y15, Y26, Y28, E57
Floors: W3 and W5
Hat, stocking, bell, collar and lights: E11, Y17, BG11, BG13, BG15, R35, R37 and R39
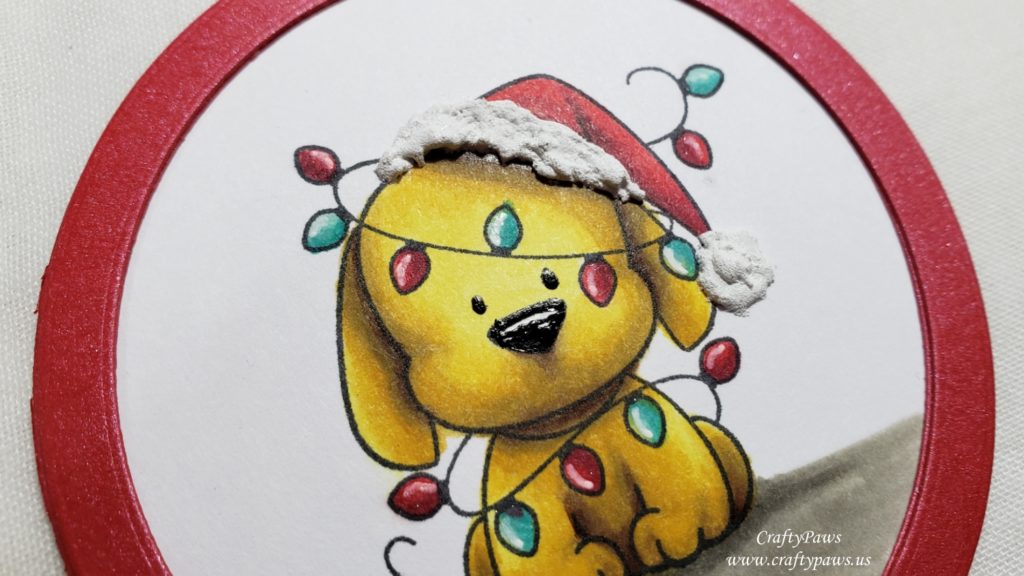
I added a high shine detail with a Uniball Signo White Gel Pen, a deep black shine for the puppies’ eyes and noses with aSakura Black Glaze Pen, and a shimmery sparkle on the stocking and holiday lights with a Clear Wink of Stella Pen. I also stamped out the stocking that the Snoopy-look-alike pup is holding again, colored it, and fussy cut it out to it pop up for a little added interest and dimension. For the yellow lab, I added DecoArt Snow Writer to add texture to the faux fur of the Santa hat.
I die cut the images using the 11th largest circle die from the Diemond Dies Die-Normous Stack-Ems Circle Nesting Die Set. Then to create frames for the pieces, I used beautiful sparkly shimmer red card stock and the 9th and 11th largest circles from the Diemond Dies Die-Normous Stack-Ems Circle Nesting Die Set — I cut each frame out twice and stacked them to add dimension and sturdiness.
CLICK on the image below to watch the process video:
Disclosure: Many of the supplies I’ve used for today’s project are linked. Some may be affiliate links, which means if you make a purchase I receive a small commission at no extra cost to you. I truly appreciate your support toward the costs of running this blog!
These tags are being entered into the following challenges:
Simon Says Stamp Monday Warm Winter Wishes Challenge
Word Art Wednesday Anything Goes Challenge
Simon Says Stamp Wednesday Christmas Challenge
Card Mania Christmas Challenge
ABC Christmas: Y – Fave things DOGS + Z – Zero Embellishments Challenge
Lil Patch of Crafty Friends Anything Goes Challenge
Fab ‘n’ Funky Cute Christmas Challenge
Crafty Gals Corner Anything Goes Christmas Challenge
Penny Black and More Traditional Christmas Colors Challenge
Stamping Sensations Winter Sparkle Challenge
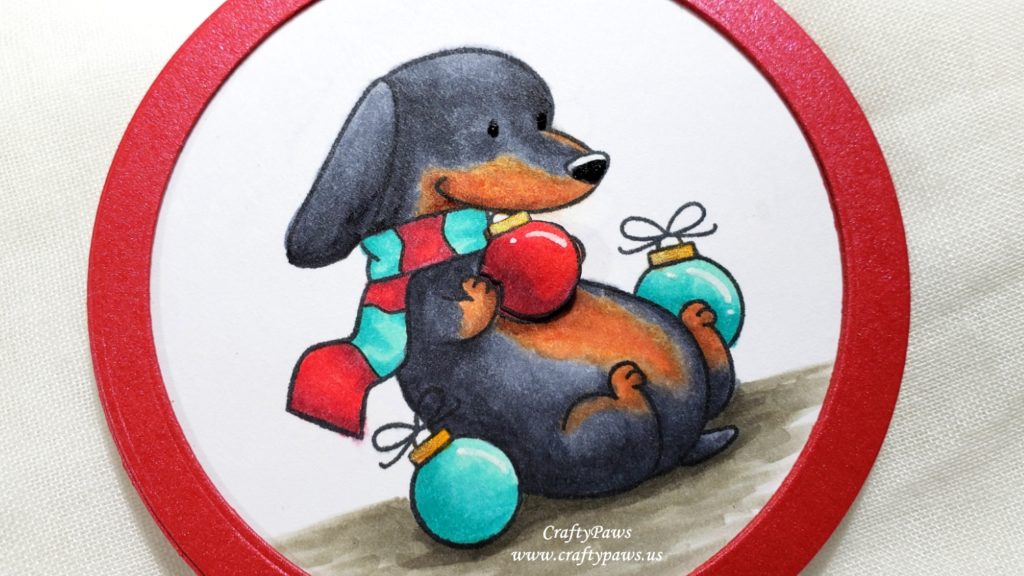
For the first two parts of the wreath, I used the adorable dachshund and the fluffy look-alike of my Bandito from the MFT Happy Pawlidays stamp set (one of my all time favorite holiday stamp sets) and Copic colored them using the following colors (featuring my favorite Christmas color combination – red, white and aqua):
Dachshund dog: C3, C4, C5, C6, C7, E11, E23
Bandito-look-alike dog: E50, W1, E53, E11, E23 and E25
Ornaments, hat and scarves (to one of which I added stripes with a 0.03 pt Copic Multiliner Pen): E11, Y17, BG11, BG13, BG15, R35, R37 and R39
Floors: W3 and W5
I love how these pups look warm and cozy, ready to send warm winter wishes.
I added a high shine detail with a Uniball Signo White Gel Pen, a deep black shine for the puppies’ eyes and noses with a Sakura Black Glaze Pen, and a shimmery sparkle on the ornaments with a Clear Wink of Stella Pen. I also stamped out the ornament the dachshund pup is holding again, colored it, and fussy cut it out to pop up that special ornament for a little added interest and dimension. Similarly, for the Bandito-look-alike pup, I added DecoArt Snow Writer to add texture to the Santa hat faux-fur.
I die cut the images using the 11th largest circle die from the Diemond Dies Die-Normous Stack-Ems Circle Nesting Die Set. Then to create frames for the pieces, I used beautiful sparkly shimmer red card stock and the 9th and 11th largest circles from the Diemond Dies Die-Normous Stack-Ems Circle Nesting Die Set — I cut each frame out twice and stacked them to add a bit of dimension and sturdiness.
CLICK on the image below to watch the process video:
Disclosure: Many of the supplies I’ve used for today’s project are linked. Some may be affiliate links, which means if you make a purchase I receive a small commission at no extra cost to you. I truly appreciate your support toward the costs of running this blog!
These puppy tags are being entered into the following challenges:
Simon Says Stamp Monday Warm Winter Wishes Challenge
Word Art Wednesday Anything Goes Challenge
Creatalicious Anything Goes with Optional Use a Stencil Challenge
Card Mania Christmas Challenge – WINNER
ABC Christmas: Y – Fave things DOGS + Z – Zero Embellishments Challenge
Lil Patch of Crafty Friends Anything Goes Challenge
Crafters Castle Anything Goes with Optional Ornaments Challenge
Crafty Gals Corner Anything Goes Christmas Challenge
Penny Black and More Traditional Christmas Colors Challenge
Stamping Sensations Winter Sparkle Challenge
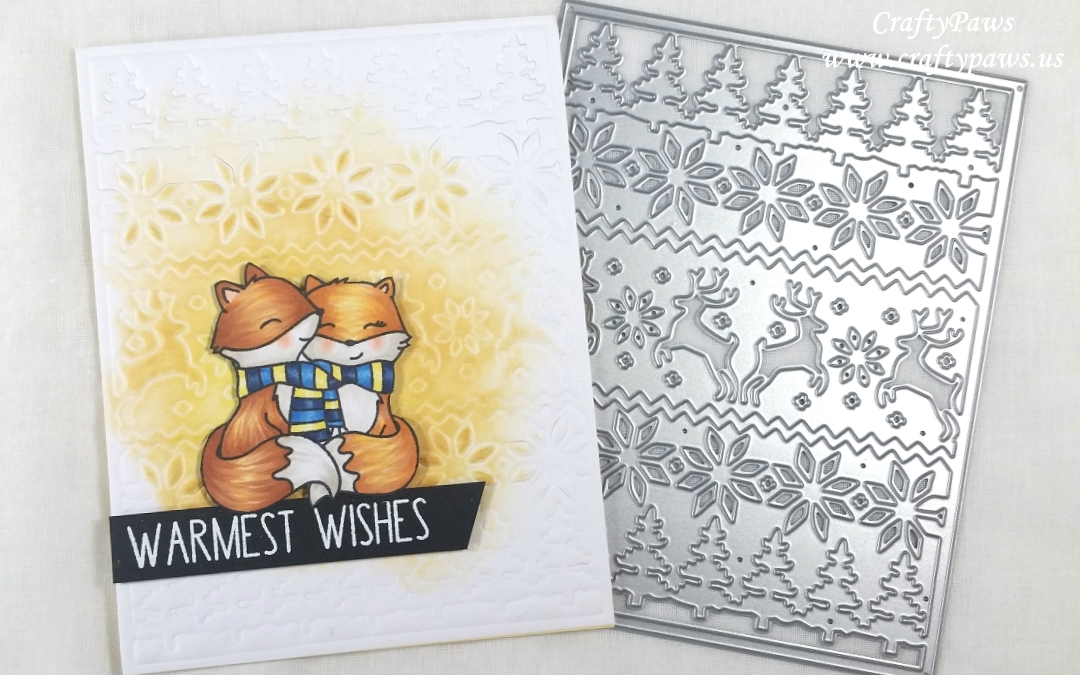
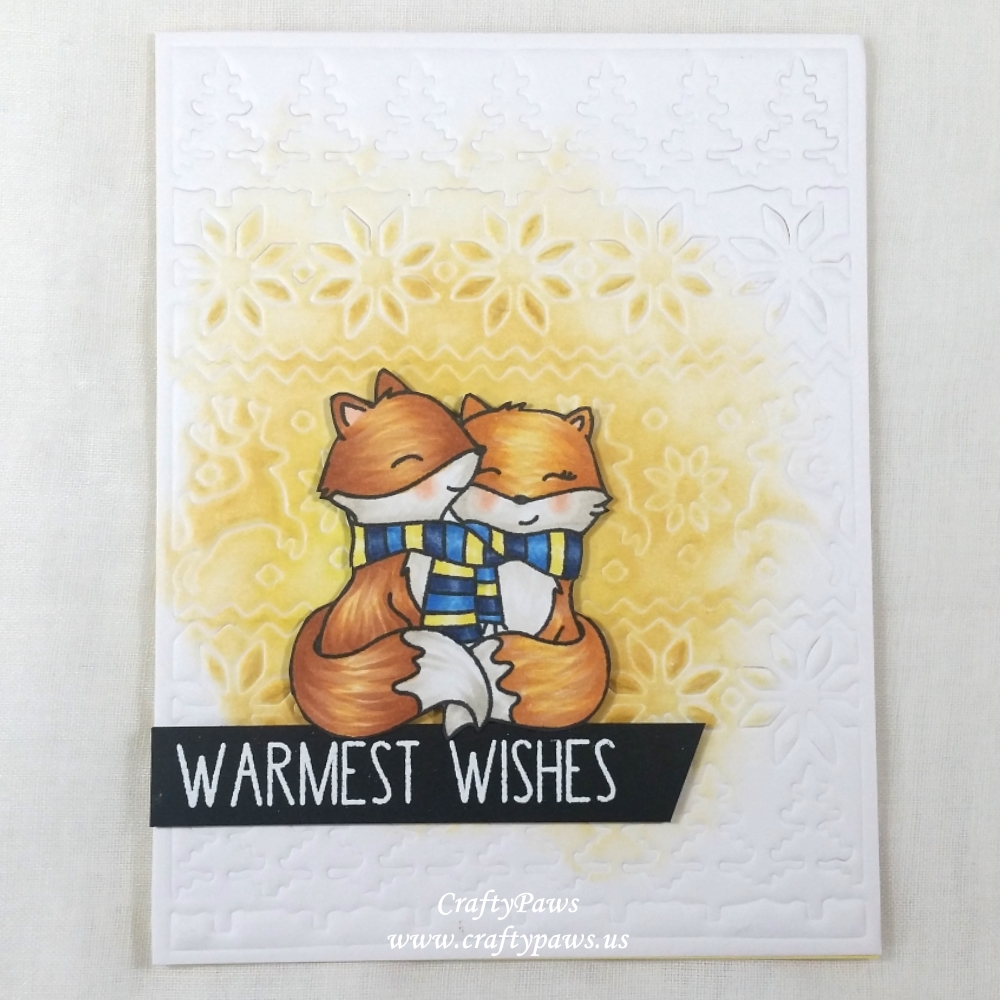
The card design started with the entire background being embossed with the Cozy Ugly Sweater Cover Plate Die on plain white card stock. To emboss with a wafer thin die, I use my Sizzix Big Shot with the Extended Multipurpose Platform (a Multipurpose Platform can also be bought separately if your die cutting machine didn’t come with it) with the following “sandwich”:
 1: I lift up the top flap of the multipurpose platform so the #2 flap is off the platform.
2: I lay down one Spellbinders Cutting Plate (these work the same and are often cheaper than the Sizzix brand)
3: I lay down my die, cutting surface facing up
4: I top the die with card stock I want embossed
5: I lay down a Sizzix Silicone Embossing Mat (this feels rubbery)
6: Lastly I top the whole assembly with a Sizzix Impressions Pad (this seems a little thicker and less hard than a standard cutting plate
This seemed like the perfect background for the cute and cozy little foxes from the new-to-me Neat & Tangled “Merry Kisses” stamp set! I colored up the foxes with the following Copic colors:
Male Fox: YR21, YR14, E13 and E15 with W0 and W1 for the grey parts and R30 for the ears and blush
Female Fox: Y00, YR21, YR14 and E13 with W0 and W1 for the grey parts and R30 for the ears and blush
Dark blue of scarf: B34, B37 and B39
Medium blue of scarf: B12, B14 and B16
Yellow of scarf: Y00 and Y13
I fussy cut out the foxes with my favorite Fiskars Spring Loaded Scissors and inked the edges with a Momento Tuxedo Black Marker for a nice, finished look.
To add a warm glow around the fox couple, I used finger daubers and Tim Holtz Distress Ink in Squeezed Lemonade and Scattered Straw on the embossed background. For a bit of shimmer, I also coated the area with some Clear Wink of Stella. I stamped out the “Warmest Wishes” sentiment from the stamp set with VersaMark Ink on black card stock and used Ranger Super Fine Detail White Embossing Powder. I simply hand cut it into a flag for the foxes to sit on. I popped up both the sentiment and the foxes with double sided foam adhesive squares to add a little extra dimension.
The following is a process video of the embossing sandwich and the Copic coloring:
My readers may use the Diemond Dies Coupon Code: thankskristina on all orders of $35 or more and get free worldwide shipping and 10% off! Plus know that on sales of any dies that I have designed (Cozy Ugly Sweater Cover Plate Die, Mandala Snowflake Die Set, and Holiday Words Die Set), part of the proceeds will be donated to no-kill animal shelters. YAY!
Disclosure: Many of the supplies I’ve used for today’s project are linked. Some may be affiliate links, which means if you make a purchase I receive a small commission at no extra cost to you. I truly appreciate your support toward the costs of running this blog!
This card is being entered into the following challenges:
Simon Says Stamp Work it Wednesday New to You Challenge
Simon Says Stamp Wednesday Anything Goes Challenge
Card Mania Christmas Challenge
Lil Patch of Crafty Friends Anything Goes Challenge
Penny Black CAS Challenge
Word Art Wednesday Anything Goes Challenge
Crafty Gals Corner Anything Goes Challenge
Not Just Cards Anything Goes Challenge
Creatalicious Anything Goes with Optional Monochrome Christmas Challenge
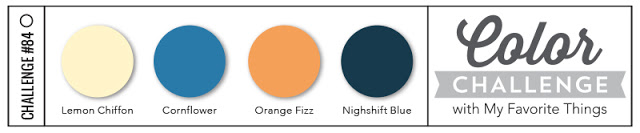
MFT Color Challenge #84
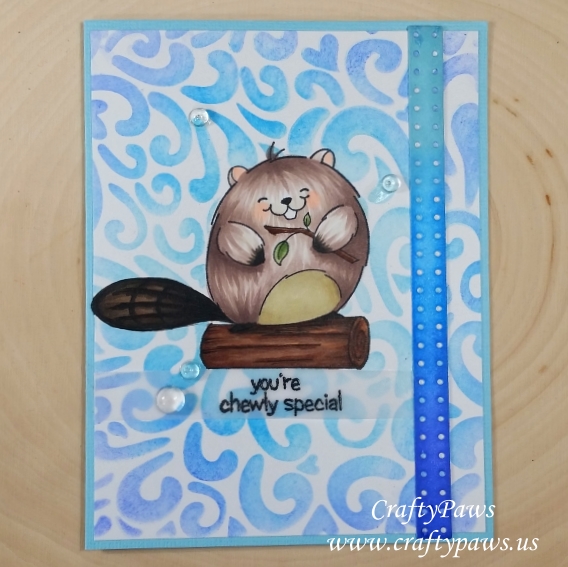 I made this mostly single layer card by stamping out the beaver from the Whimsy Stamp set “Furry Friendship.” I then created a mask to put over the stamped image so that I could use the Balzer Designs “Mini Heart Swirls” 6×6 stencil and blend on Tim Holtz Distress Inks in Tumbled Glass, Salty Ocean and Blueprint Sketch. I thought the hearts and swirls could kind of reference water on which the beaver could build a dam. LOL I created an ombre look, going from light to dark blues in an oval form around the cute little beaver.
For the beaver, I used the following Copic colors:
Beaver body: E70, E71, E74; Beaver belly: W1, E40, E81
Log and twig: E23, E25, E29 and E74
Leaves: YG61, YG64
Beaver tail, feet and hands: E23, E25, E29, W5, W7, W9
Cheeks and ears: R30
To add a little interest, I die cut a dotted strip from the MFT Die-Namics Blueprint 15 die set a couple of times and glued them stacked together to make it a little more sturdy. Then I blended on the same Tim Holtz Distress Inks in Tumbled Glass, Salty Ocean and Blueprint Sketch to create an ombre look on this strip. I added this to the right side of the card, and I think that balanced out nicely the visual weight of the dark beaver’s tail on the left side of the card.
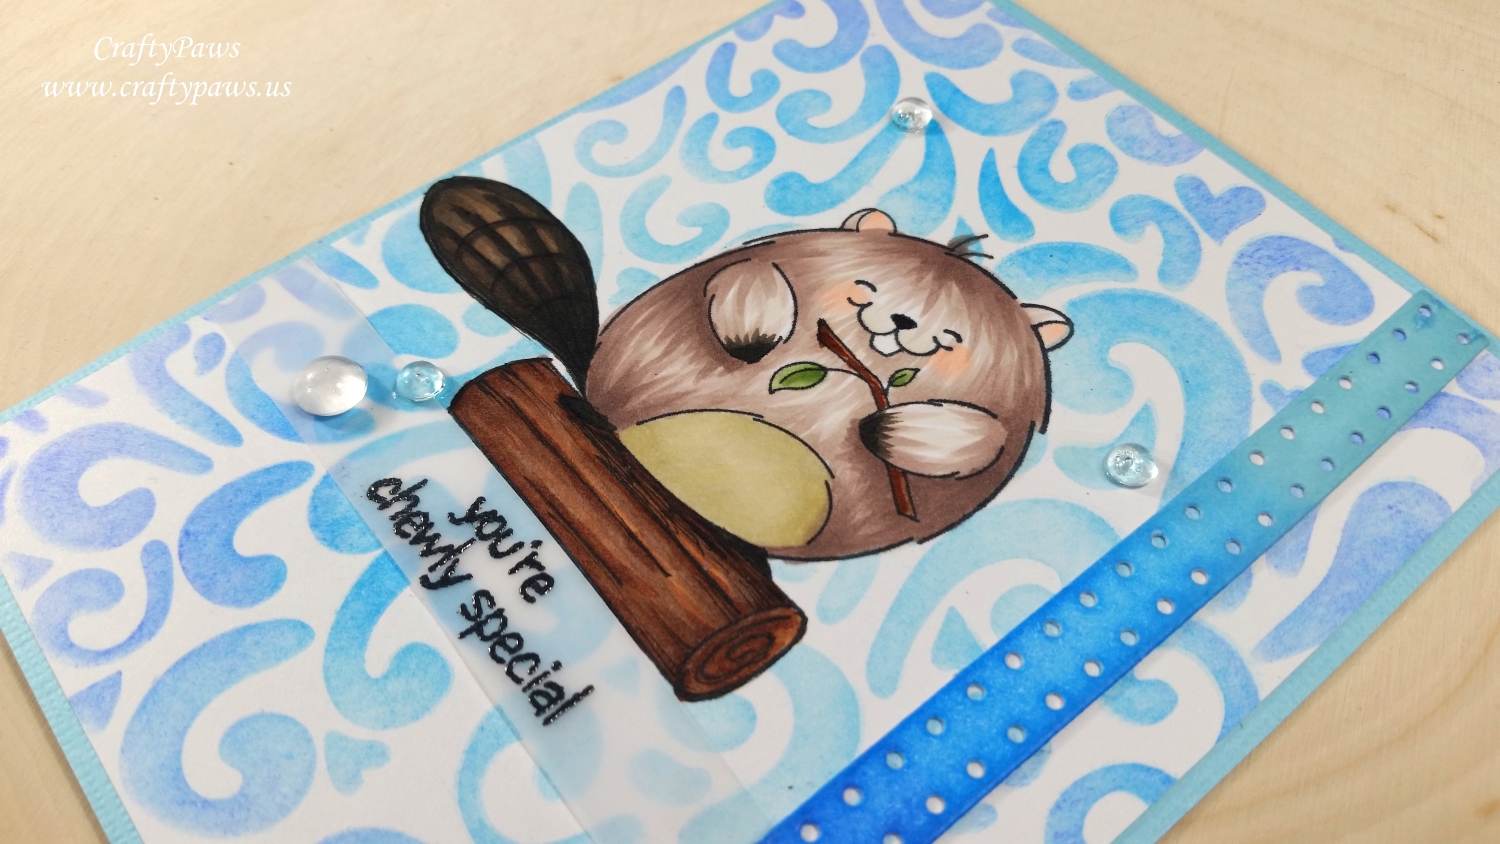
For the sentiment, I used VersaFine black onyx ink to stamp out “you’re chewly special” from the stamp set, and I used Charcoal Zing! Embossing Powder (it looks black in the pictures, but there is a slight softness to this charcoal that complements the softer look of the card design) to heat emboss the sentiment on a strip of vellum. I used Glossy Accents to glue the vellum into place in a couple of spots and then to camouflage the main glued down area, I used Pretty Pink Posh Clear Droplets in 4mm and 6mm to add some finishing touch sparkly embellishments. I thought these droplets also echoed the watery background nicely.
The following is a start-to-finish video of creating this card:
This card is being entered into the following challenges:
Whimsy Stamps Anything Goes Challenge 97
Penny Black and More For the Boys Challenge
Simon Says Stamp Wednesday Anything Goes Challenge
Simon Says Stamp Work It Wednesday Add Sparkle Challenge
Word Art Wednesday Anything Goes Challenge
613 Avenue Create Anything Goes with Optional Monochrome Challenge
Crafty Gals Corner Anything Goes Challenge
Creatalicious Anything Goes With Optional Stars Challenge
Lil Patch of Crafty Friends Anything Goes Challenge
MFT Sketch Challenge #343
]]>
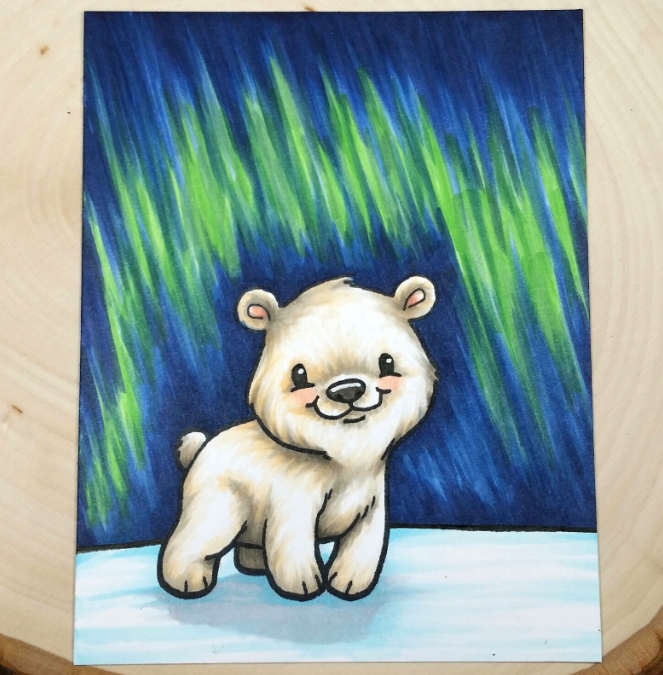 To add a bit of fun for me, I tried a new-to-me Copic coloring technique, taking a chance by trying to color an Aurora Borealis (aka Northern Lights) background sky. This was a total experiment, and I could have ruined the Copic colored bear, but I figured–nothing ventured, nothing gained. I was so excited as it started to come together. I felt lucky that it turned out — almost as lucky as I felt when I once saw the Northern Lights when I was on a family vacation cruise to Alaska 13 years ago.
I used the following Copic colors for the whole single layer card scene:
Polar bear with his “white” fur: E50, E51, W0, W1, W3, W5, W7, R30, and R20
Northern Lights sky background: G14 (yes, green!), B34, B37, B39
Snowy/icy foreground with the cast shadow: B000, B01, C1 and C2
While this is a clean and simple single layer card, I actually layered a LOT of Copic colors for what I think came out to be a rich layered and dimensional look. The following is a Copic coloring process video showing the coloring of the polar bear:
This card is being entered into the following challenges:
Simon Says Stamp Work It Wednesday Green Challenge
Simon Says Stamp Wednesday Bit O Green Challenge
Simon Says Stamp Layer it Up Challenge
CASology Melt Challenge
Word Art Wednesday Anything Goes Challenge
Creatalicious Challenge Anything Goes with Optional Pearls or Gems
Lil Patch of Crafty Friends Anything Goes Challenge
Addicted to Stamps and More Clean and Simple Challenge
Penny Black and More Anything Goes Challenge
MarkerPOP Lucky Pot of Gold (Green) Challenge
For the card base, I used favorite papers from my scrap box from the Graphic 45 “Steampunk Spells” and the “Bohemian Bazaar” collections. I also knew I wanted to add a little sparkle so I laid down some sparkly gold glitter tape for the floor where the girl and her pups are walking and also created a couple of paw prints by laying down two rows of the tape on thin copy paper and punching out a small paw print with a Marvy Uchida punch. I backed the paws with white card stock and then framed it with another layer of black card stock. I also used some letter stickers to spell out “crafty” and backed that on black card stock to create my name, “CraftyPaws”. Because I knew I was going to raise at least some of these on foam adhesive, I also edged the black card stock on all the pieces with a Faber-Castell SB width PITT artist pen (this eliminates the white edge and gives a more finished look).
For the images, I paper pieced the girl’s T-shirt and skirt with tiny scraps from my scrap box (in patterns I thought I would wear in shades of my favorite color, blue) and used the following Copic colors: Hair: C7, C9 and B02; Shoes: C7 and 9; Skin: E50, 51, and 53; Blush: R11; Dog in arms: W1, W3, E 23 and E25; Poodle: E11 and E21; Leash: B02. I also used a little Glossy Accents over everyone’s eyes, the dogs’ noses, and the girl’s shoes.
The following is a video tutorial on the Copic coloring, paper piecing, and card assembly:
https://www.youtube.com/watch?v=SUlcnv8Cxzw&feature=youtu.be
This card is being entered into the following challenges:
The Pink Elephant Anything Goes Challenge and
The Paper Nest Dolls Anything Goes Challenge
Thanks for stopping by and have a great day! WOOF
]]>
I colored up these two foxes from C.C. Designs called, “Sir Rupert with Tea” and “Sir Rupert with Cane” using the following Copic colors and pens: Hat and bow tie: B95 and 97; Dark brown ears and paws: C74 and 79; White tail, chest and snout: W1 and 3; Eyes: BG75 and 78; Brown of body: E97 and 99. Chair for the tea sipping fox: YR31 and 24; Staff for the walking fox: Clear Star Gelly Roll pen. White shine spot on eyes: White Gelly Roll pen. Darkening edges of fussy cut images: Faber Castell PITT artist pen in SB size. Lastly, to add some dimension, I added Glossy Accents to the eyes, glasses, walking staff, and tea cup and saucer.
The following is a process video showing how I colored the walking fox:
Thanks for stopping by. Please subscribe if you wish, and have a great day! WOOF
]]>