
I was so happy to be able to easily create this over-sized card using the Inloveartshop Stackables Spiral Pattern Decor Dies to create a background that highlights two focal point images. I cut out 4 sizes of the stackable spiral circles in various shades of purple — lavender, periwinkle, and deep purple. I stacked them progressively smaller and then spaced them out on a white card front on a periwinkle card base. To keep a cohesive look, I connected the stacked spirals with a strip of lavender card stock through the middle of the card. I also used a simple circle die (from the versatile Diemond Dies Die-Normous Stack-Ems Circle Nesting Die Set) to create a light background from which the puppy images could pop. NOTE: My readers can get 20% off by using the DISCOUNT CODE: G-36967 at the Inloveartshop checkout.
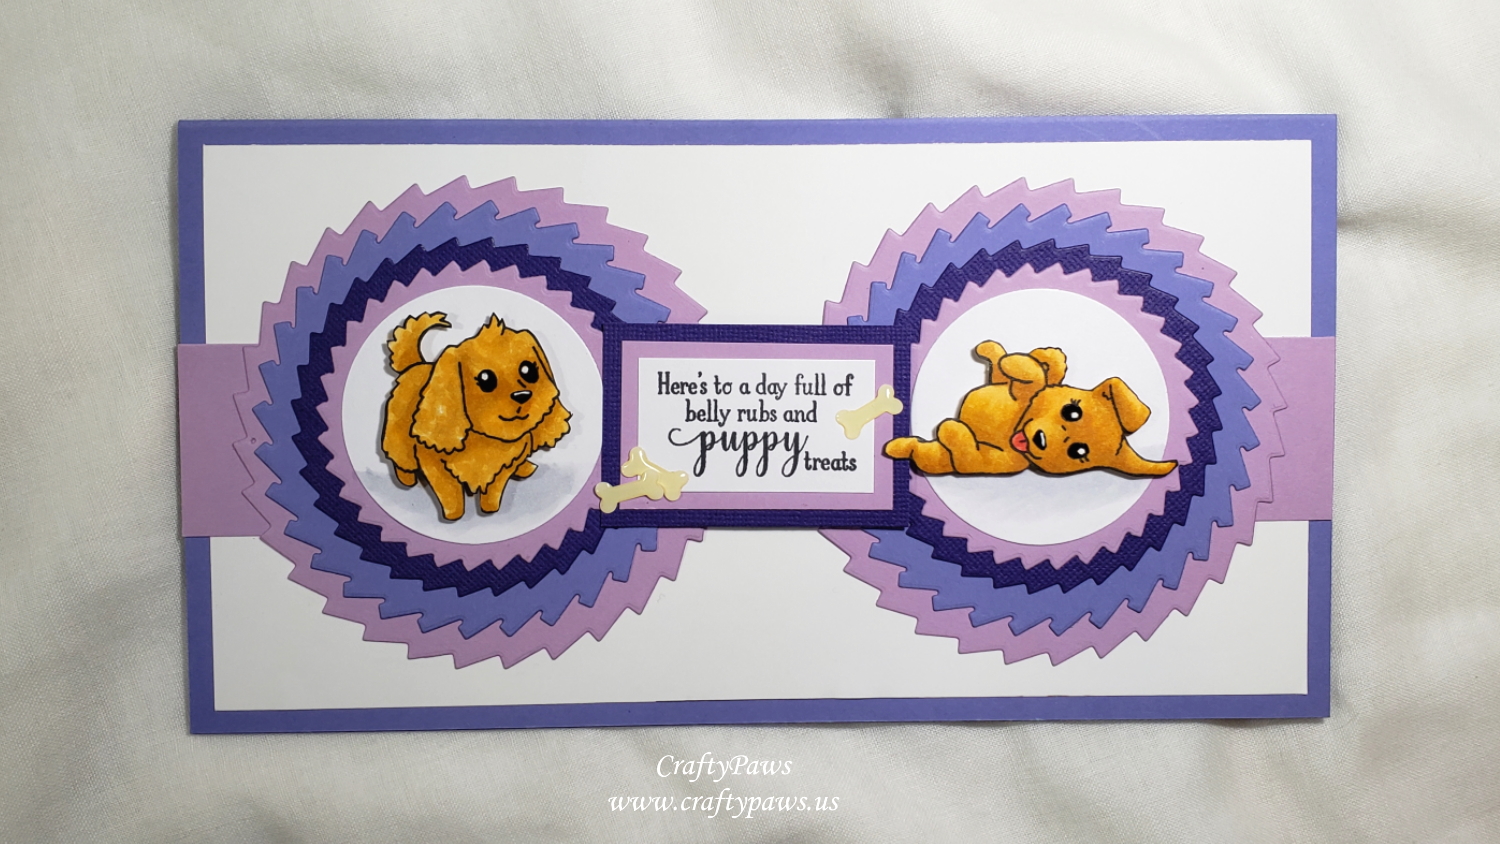
For the focal images, I finally got to color up the poodle and the paws-up puppy from the Gina K Designs “Playful Pups” stamp set (retired). As my niece’s new puppy is an apricot mini poodle (like my sweet Biscuit was), I colored up the dogs with the following Copic colors:
Fur: YR21, YR23, YR24
Nose: W7
Tongue: R22 and R24
Ground for background white circles: C1
After fussy cutting them with my Fiskars Spring Loaded Reverse Scissors, I inked the edges of the cut images with a Memento Tuxedo Black Marker for a clean finished look. I also popped up the puppies on double sided foam adhesive to add even more dimension.
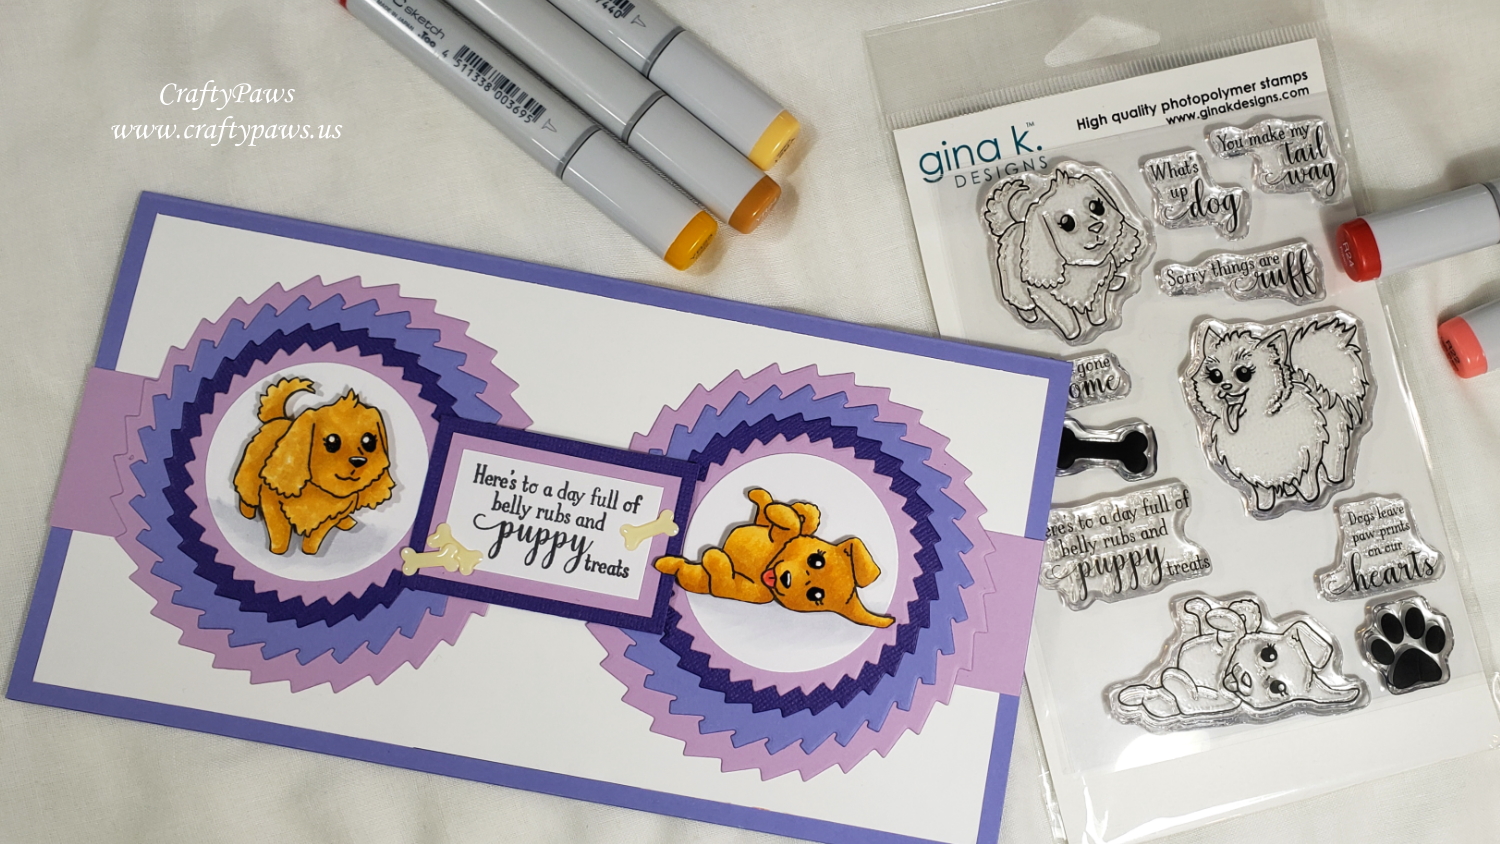
For the sentiment, I used the “Here’s to a day full of belly rubs and puppy treats” from the same stamp set. To help the sentiment stand out, I matted them with more scraps of the lavender and deep purple card stock that I had used for the background, and I also back the sentiment with more double sided foam adhesive. I had a few enamel bones from a Doodlebug Designs sticker set from the Puppy Play Collection (retired), so I added 3 to the sentiment for embellishments.
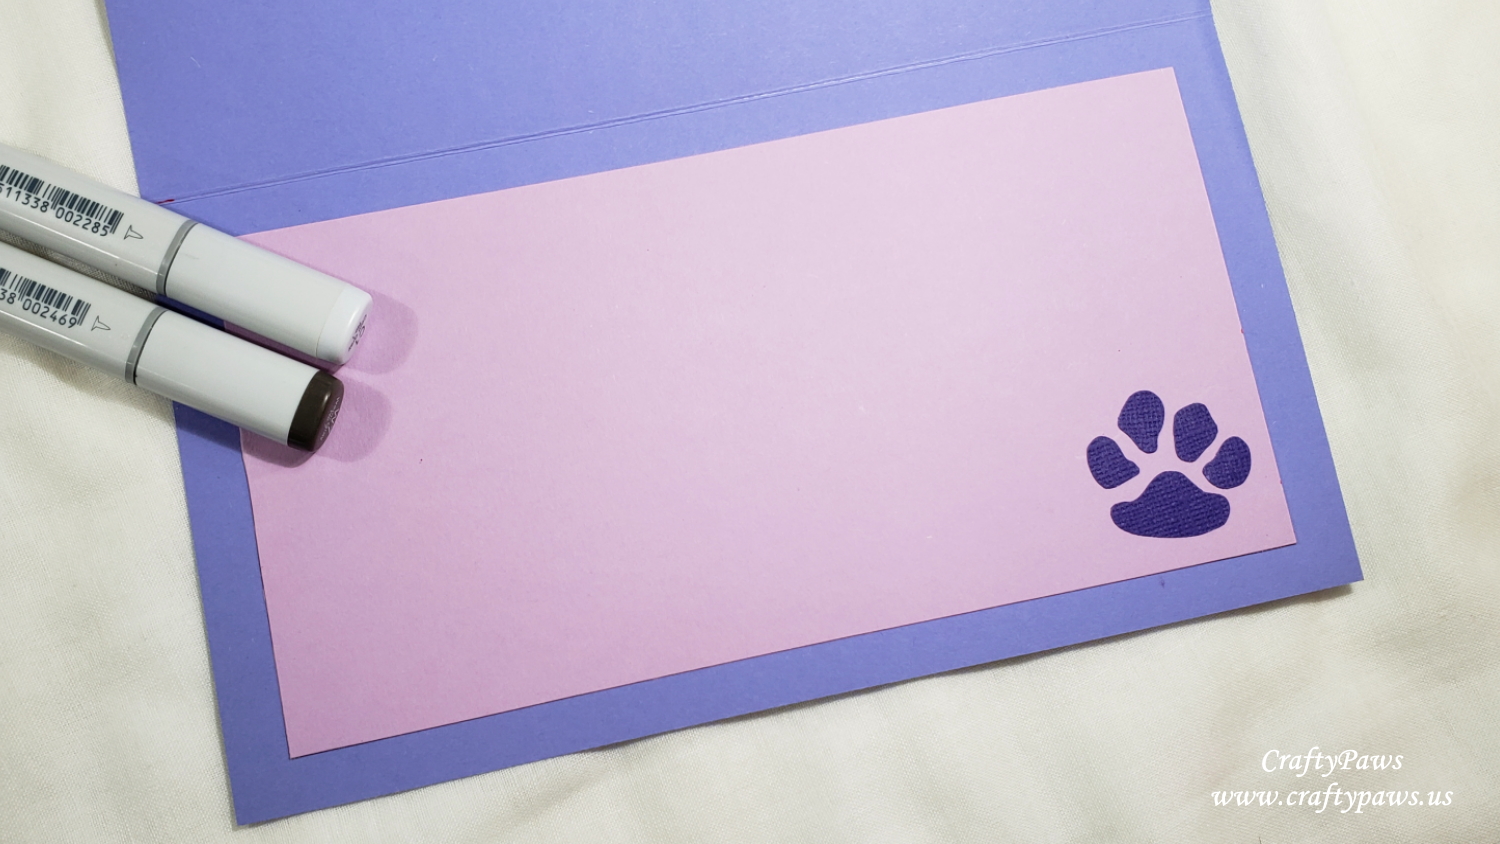 For the inside card liner, I used the remainder of the lavender card stock sheet. And for a little interest, I also used an old Fiskars Furry Friends Paw Squeeze Punch with a bit of the deep purple card stock for an accent paw print inside the card.
CLICK on the picture below to watch the card making video:

Disclosure: Many of the supplies I’ve used for today’s project are linked. Some may be affiliate links, which means if you make a purchase I receive a small commission at no extra cost to you. I truly appreciate your support toward the costs of running this blog!
This card is being entered into the following challenges:
Creatalicious Anything Goes with Optional Use Green Challenge
Word Art Wednesday Anything Goes Challenge
Through the Craft Room Door Anything Goes Challenge
Crafts Galore Encore Anything Goes Challenge
Stamping Sensations Monochromatic Challenge – purples
]]>
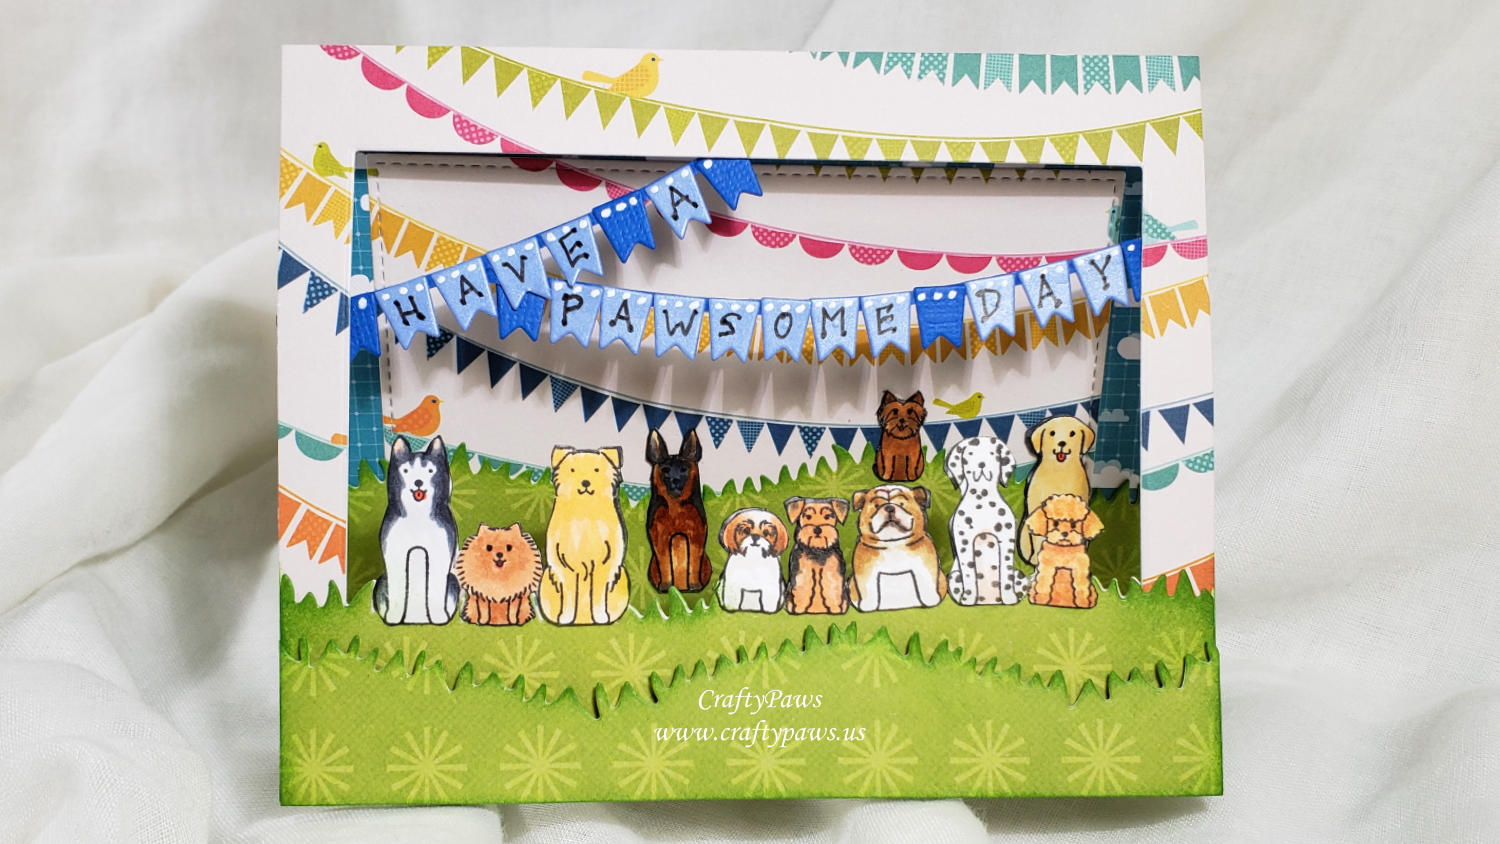
These are the Copic colors I used to color up each of the dogs:
Husky: R20, R24, C00, C5, C7
Pomeranian: E11, E13
Golden Retriever: W1, E51, E53, Y21
Havanese: W0, E11, E97, E37
Airedale Terrier: E11, E97, W5, W7
Bulldog: 0, W5, R20, E31, E35
Dalmatian: R30, W0, W7
Poodle: E51, E21, E11
Labrador Retriever: W0, E50, E51
Norwich Terrier: E30, E33, E13, E44
German Shepherd: R20, E21, E33, E23, C5, C7
I fussy cut all the dogs, front and back, with my trusty Fiskars Spring Loaded Scissors and inked all the edges with a Memento Tuxedo Black Marker.
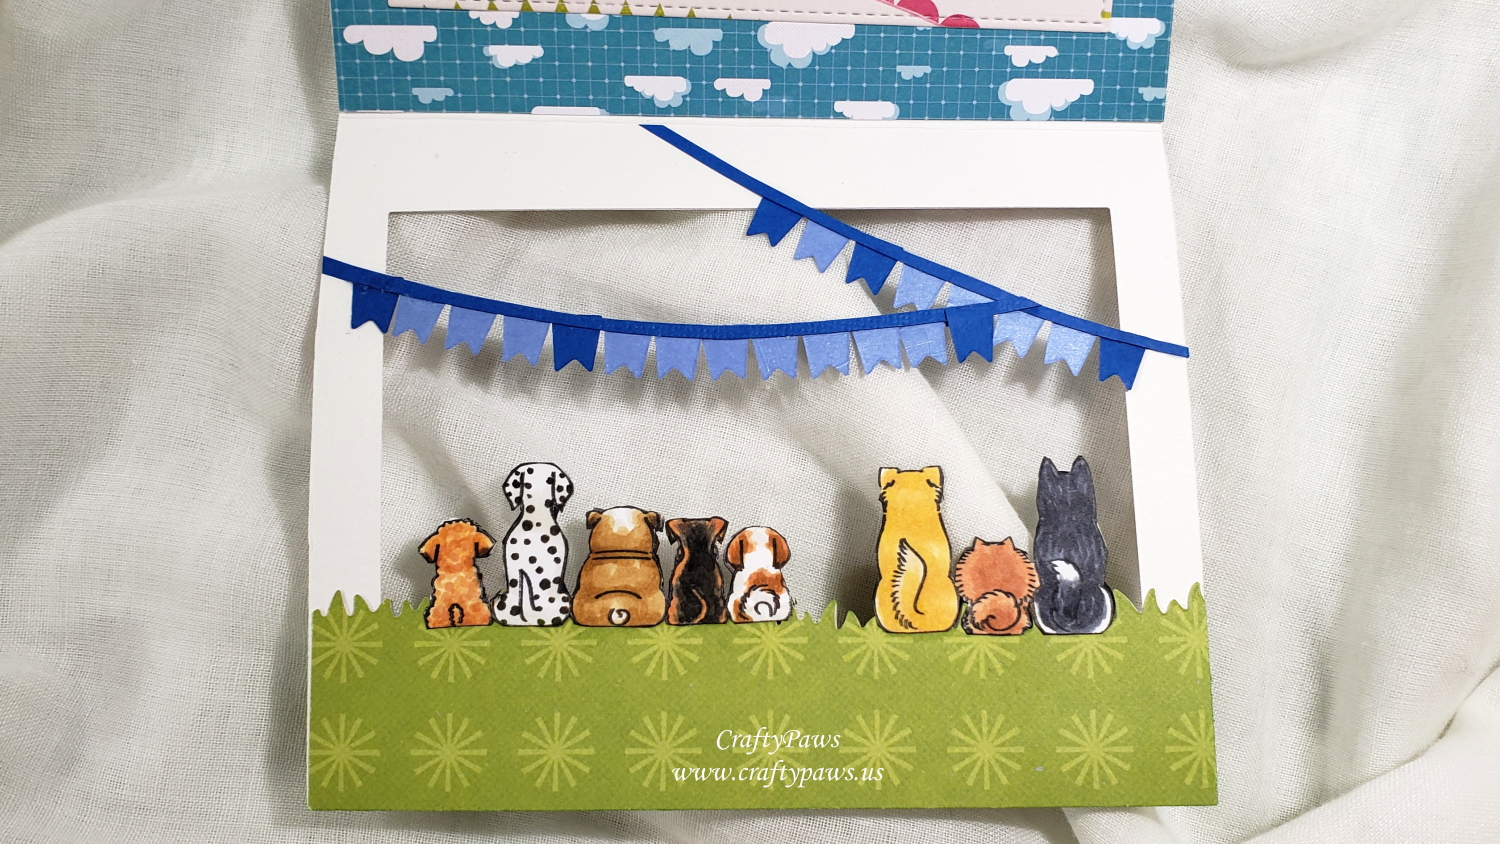
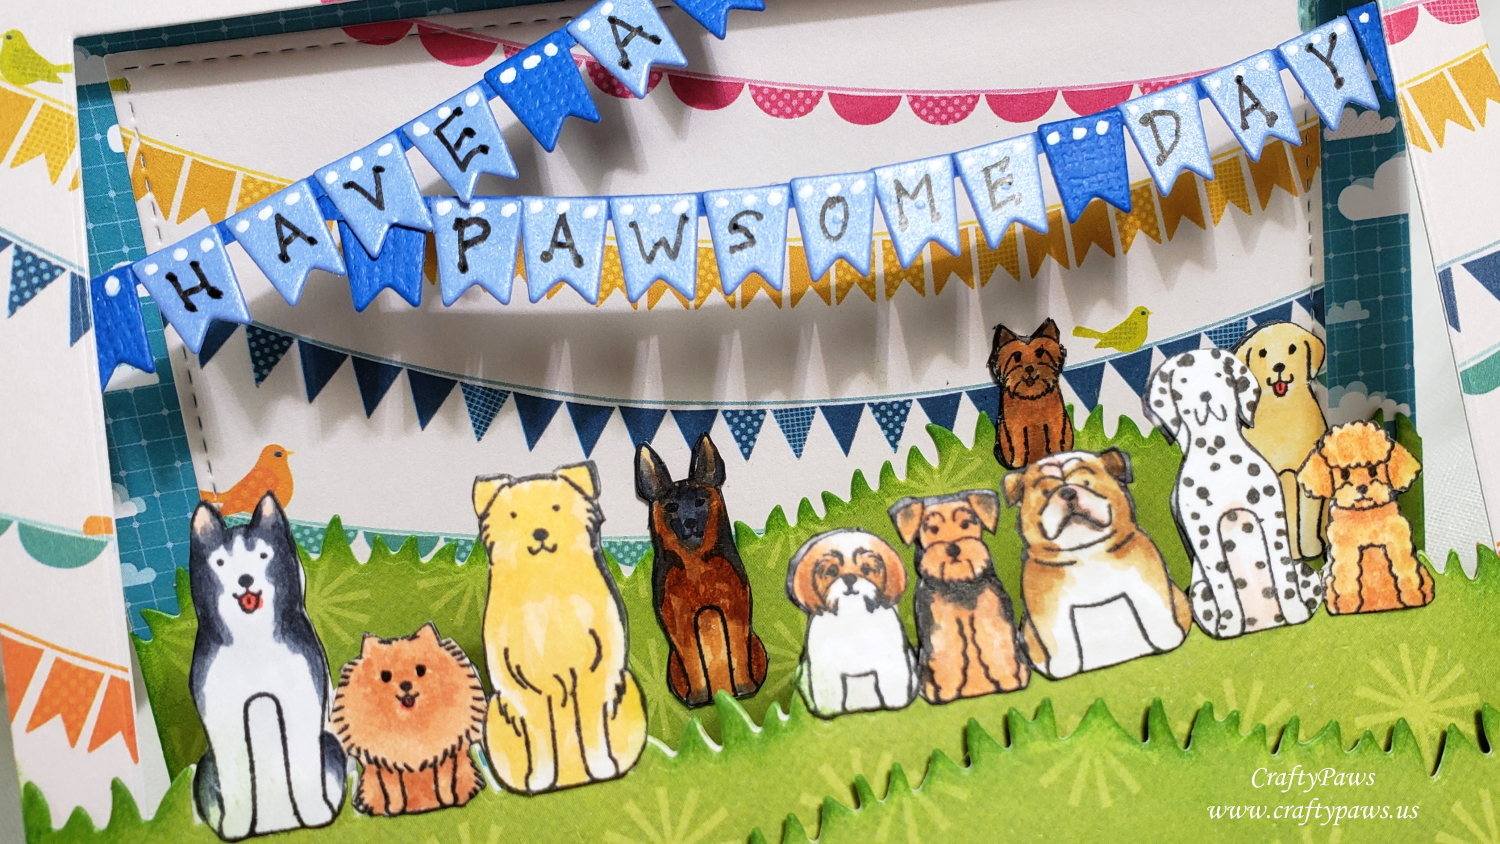
Then to design the card, I knew I wanted to take advantage of the back sides of the dogs so I wanted a card with a window. I used the larges of the MFT Die-namics Stitched Rectangles Dies to cut out a hole. Then I wanted a “ground” for the pups so I used the MFT Grassy Hills Dies to cut four grounds from a scrap of green patterned paper (front layer popped up on double sided foam adhesive, ground in front of window, ground behind window, and background scene ground). I used Tim Holtz Distress Ink in Mowed Lawn to ink all the edges for a bit of added visual dimension.
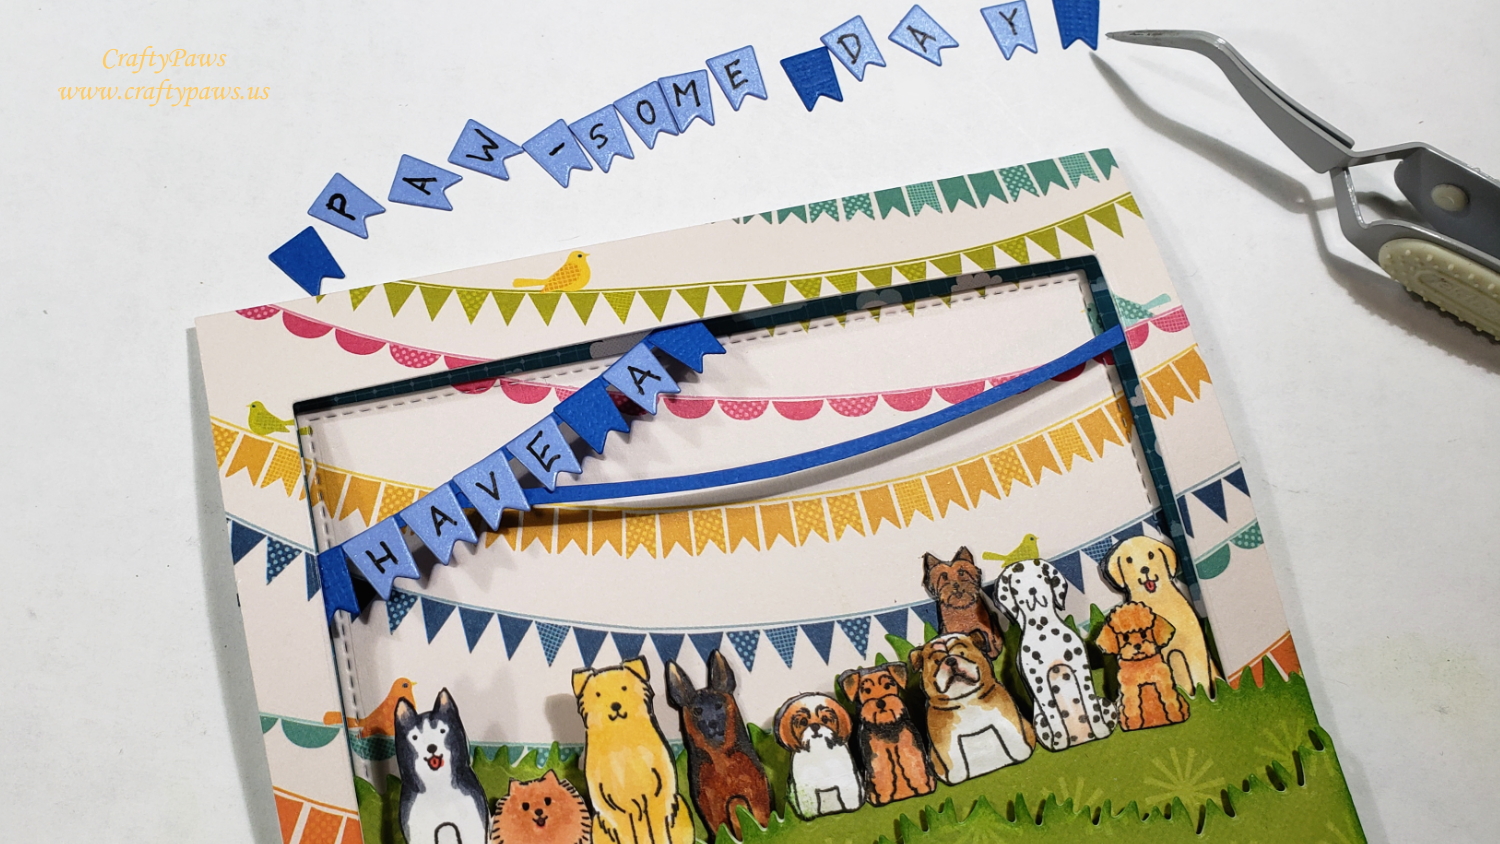
For the background, I found a festive banners patterned paper from an old Pebbles “Sunny Side” 6 x 6 paper pad and for the edges of the inside liner, I found a fun cloud patterned paper from an old Studio Calico “Here and There” 6 x 6 paper pad. For the sentiment, I wanted to continue with the 3D layered look so I used a Lawn Fawn Stitched Journaling Card Die Set that had tiny pennants so I could make my own banner that I attached behind the front window and wrote, “HAVE A PAWSOME DAY” with a Faber-Castell S pt. Pitt Pen. For added detail, I added dots to the tops of each pennant with a Uniball Signo White Gel Pen.

Because the window was too small to lay out all the dogs in a row, as they were in the stamps, I cut them apart and added groups of them: The first three were the Husky, Pomeranian, and the Golden Retriever. Then I left a little space so you could see the grassy bottom edge of the window. Next came the Havanese, the Airedale Terrier, Bulldog, Dalmatian, and Miniature Poodle. The German Shephard, Norwich Terrier, and Labrador Retriever were perfect for the inside liner and added lots of interest to the inside layer of the card. I think it actually came out better this way than having all the dogs in a single row. Sometimes rolling with the adjustments necessary as we craft a card, makes the card even better than we originally envisioned!
CLICK on the following picture to watch the process video:
Disclosure: Many of the supplies I’ve used for today’s project are linked. Some may be affiliate links, which means if you make a purchase I receive a small commission at no extra cost to you. I truly appreciate your support toward the costs of running this blog!
This card is being entered into the following challenges:
Lil Patch of Crafty Friends Anything Goes Challenge
Simon Says Stamp Monday Use a New/Unused Stamp Challenge
Simon Says Stamp Wednesday Something New Challenge
Creatalicious Anything Goes with Optional Good Luck Charms Challenge
Word Art Wednesday Anything Goes Challenge
Through the Craft Room Door Anything Goes Challenge
Crafts Galore Encore Anything Goes Challenge
Stamping Sensations Favorite Stamps Challenge
]]>
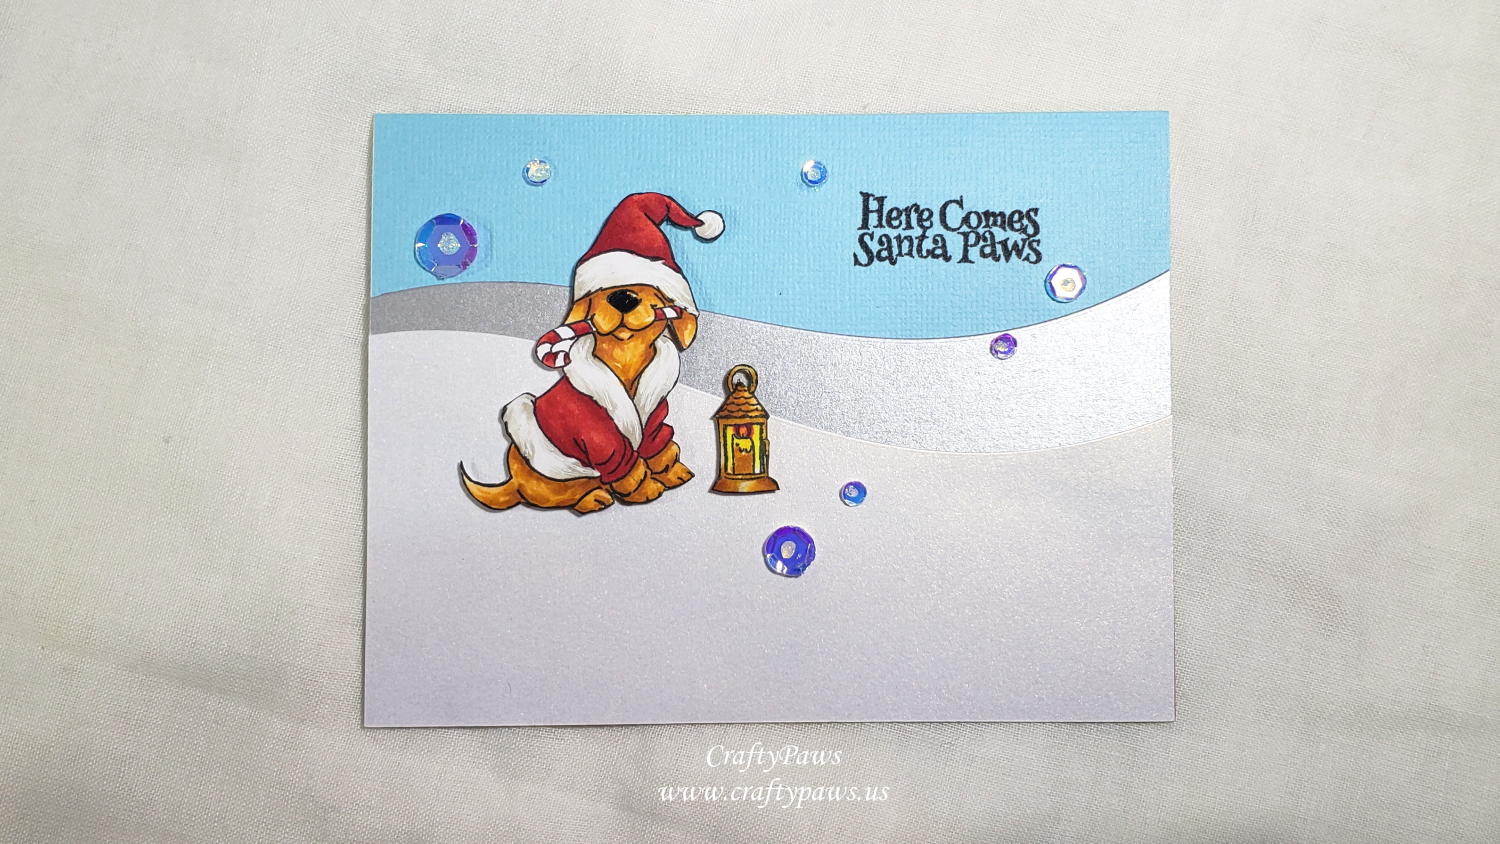
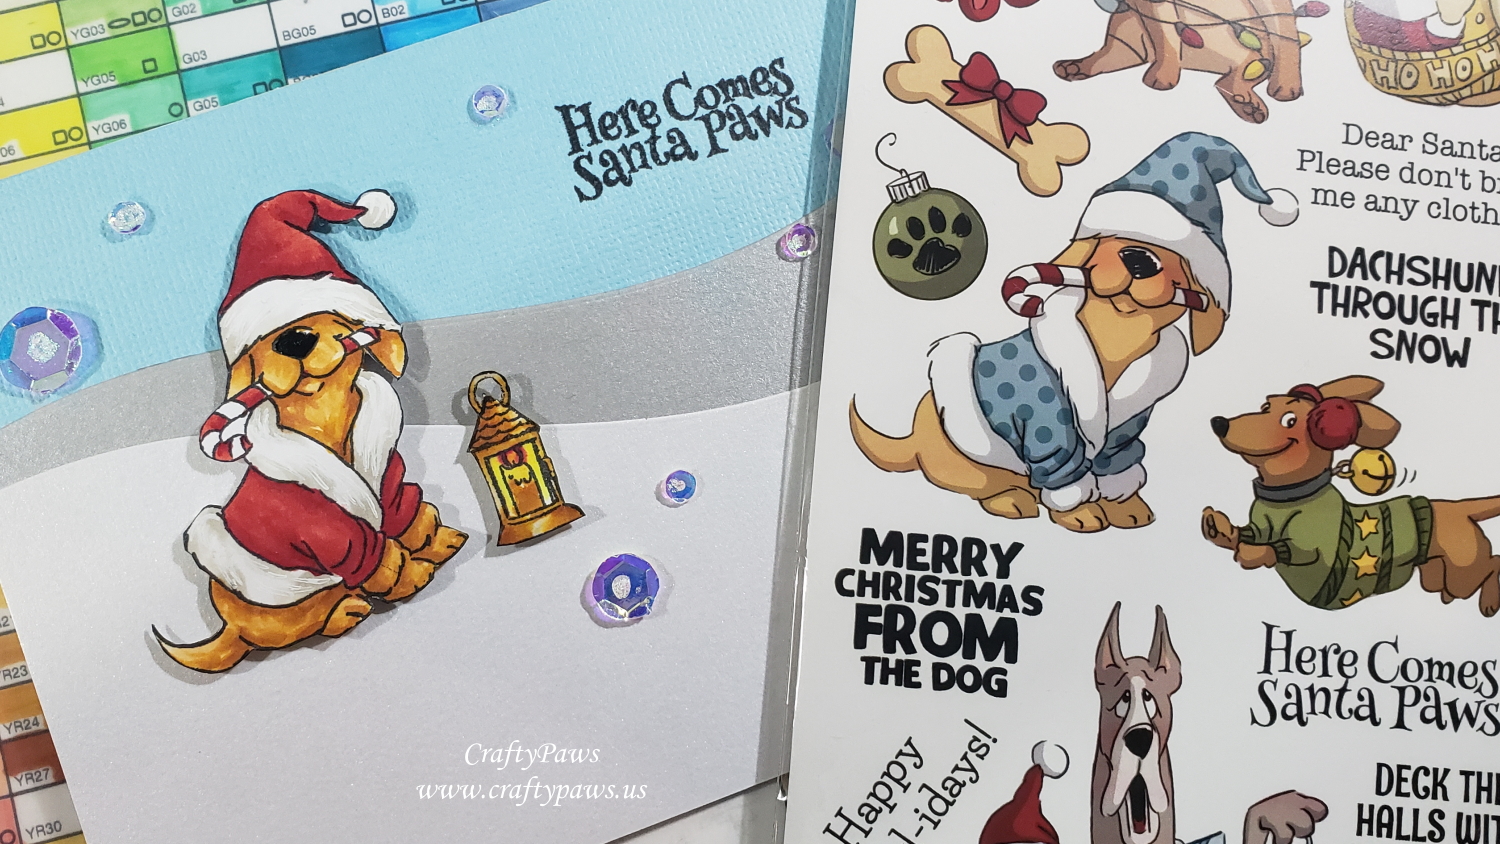
I stamped out the adorable pup with the Santa hat covering his eyes from the Art Impressions “Santa Paws” Stamp Set and colored him up like my niece’s dog, Boomer (even though the image is not a poodle), who is an apricot Poodle.
Dog: YR20, YR24, YR27
Santa hat and coat: R24, R27 and R29 with W0 and W1 for the fur trim
Flame: Y38 and R27 Lantern with candle: W1, YR20, YR24
Candy cane: R24, R27
I also used a Sakura Black Glaze Pen to add a tiny bit of shine and dimension to the nose and a Uniball Signo White Gel Pen to add some brightness and visual texture to the white fur trim.
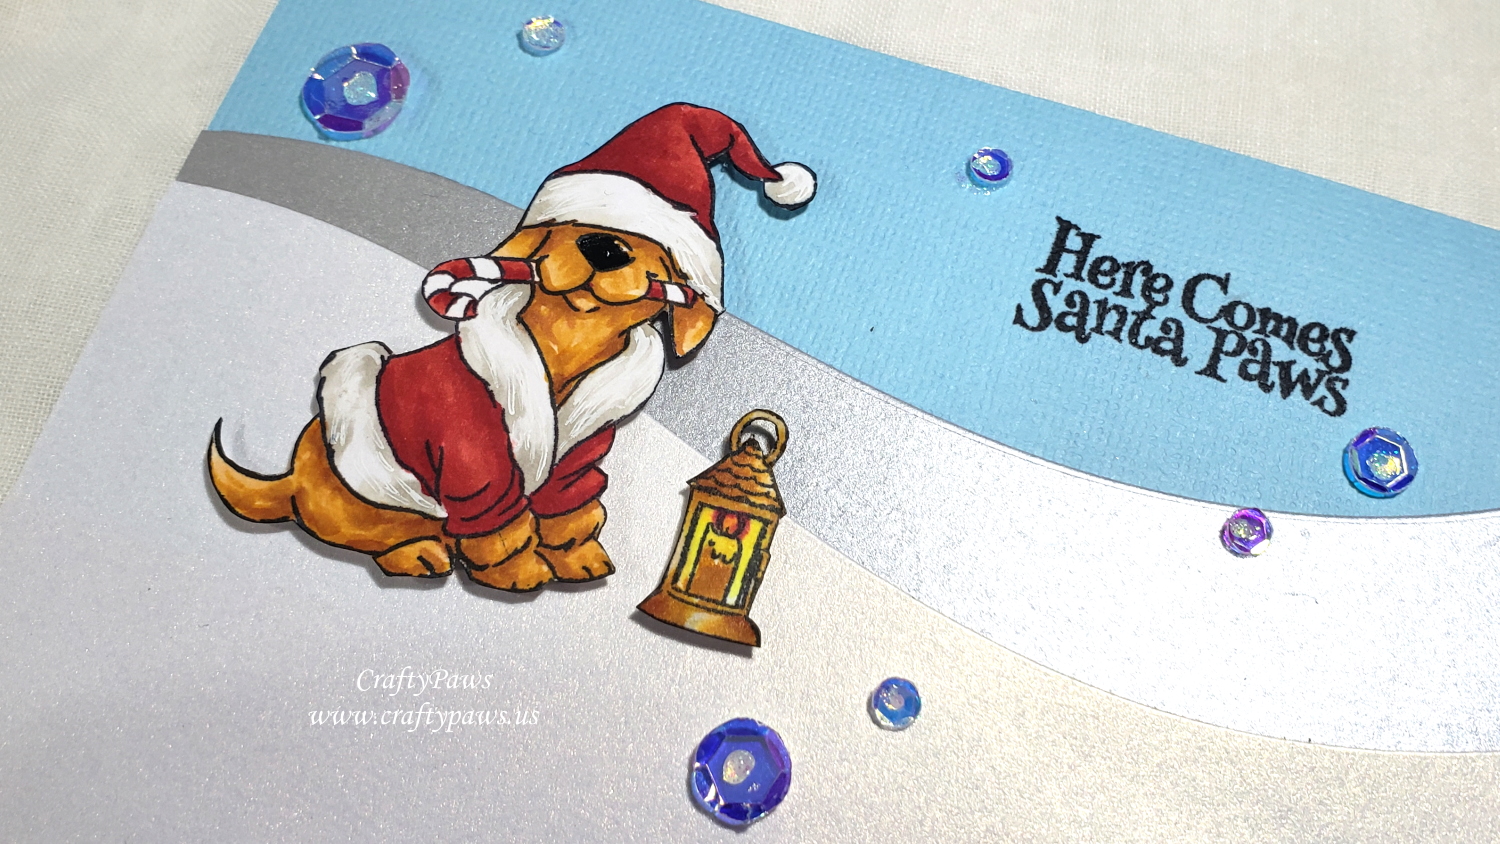
For the background, I used Lawn Fawn Stitched Hillside Dies and some scrap card stock in pale blue, silver and shimmery white. I used the “Here Comes Santa Paws” sentiment from the same Art Impressions “Santa Paws” Stamp Set. To add extra sparkle and shine, I added 7 iridescent sequins with glitter glue.
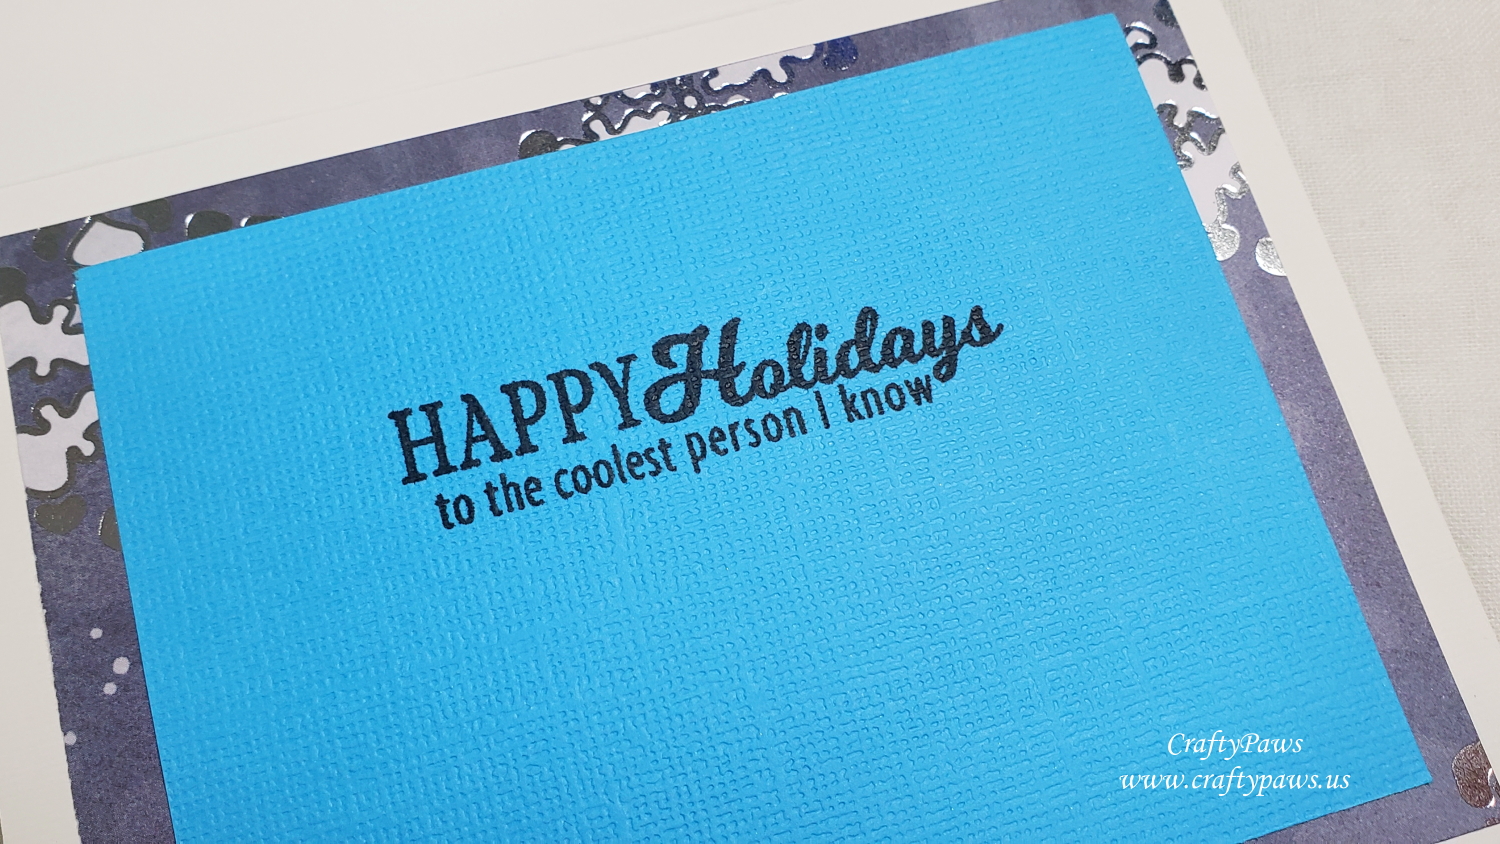
For the inside liner, I used some scrap foiled silver and blue snowflake patterned paper scraps from my scrap box. Then for the inside sentiment and note writing space, I cut a smaller bright blue card stock, and stamped the “Happy Holidays to the coolest person I know” stamp from the Sugar Pea Designs “Eskimo Kisses” stamp set.
CLICK on the following picture to watch the crafting process video:
Disclosure: Many of the supplies I’ve used for today’s project are linked. Some may be affiliate links, which means if you make a purchase I receive a small commission at no extra cost to you. I truly appreciate your support toward the costs of running this blog!
This card is being entered into the following challenges:
Simon Says Stamp Monday Celebrate Challenge
Simon Says Stamp Wednesday Sparkle and Shine Challenge
Creatalicious Anything Goes with Optional Christmas Challenge
Word Art Wednesday Anything Goes Challenge
Crafts Galore Encore Anything Goes Challenge
Crafty Gals Corner Tis the Season Challenge
Lil Patch of Crafty Friends Anything Goes Challenge
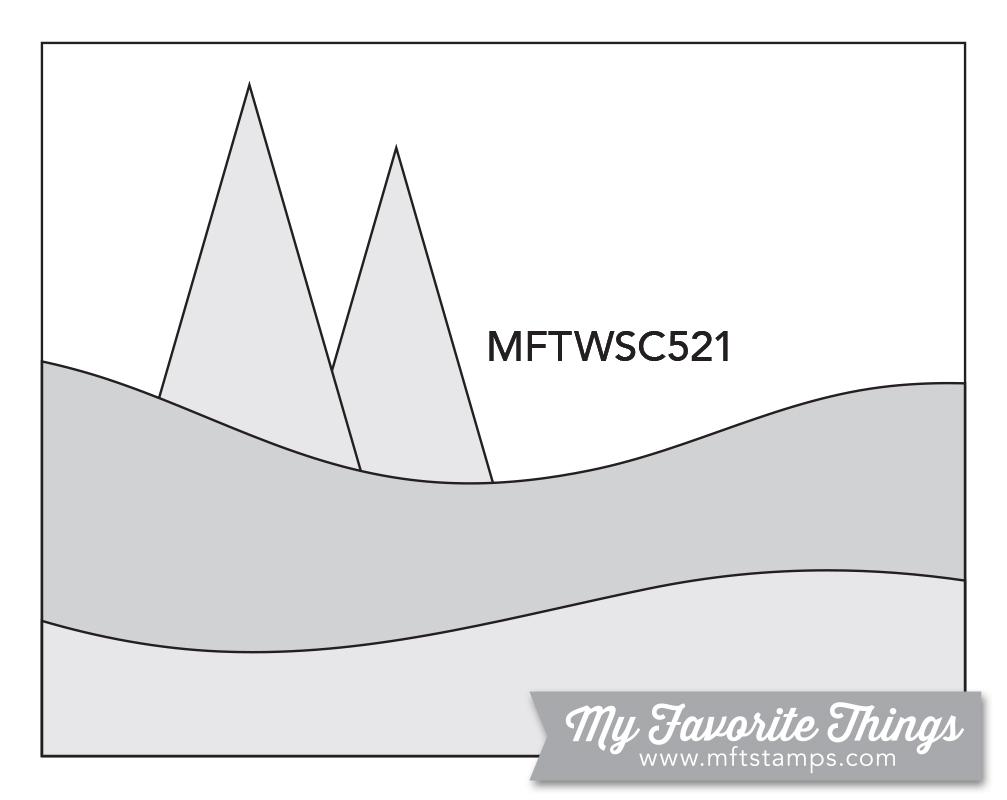
MFT Stamps Sketch Challenge 521
]]>
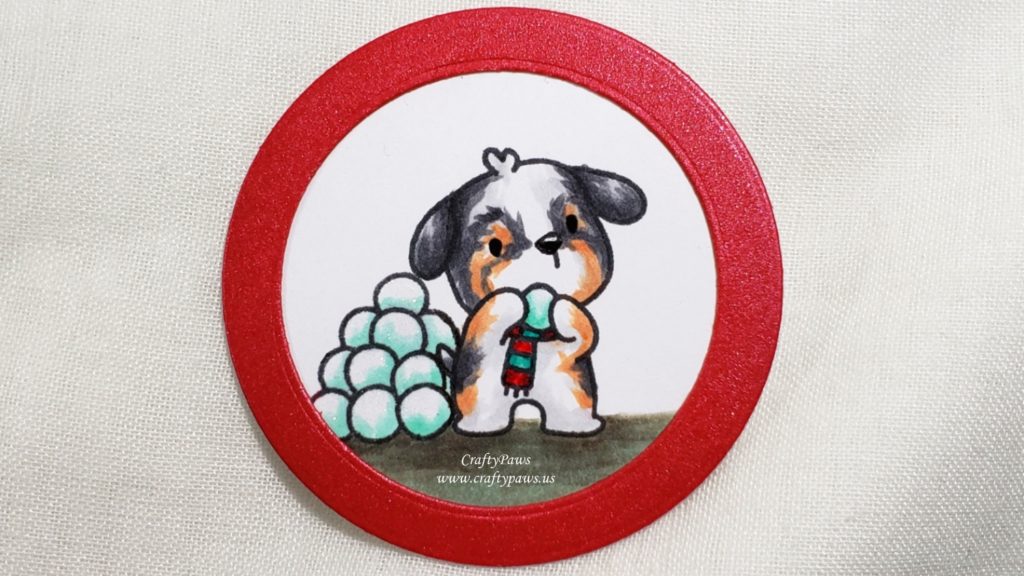
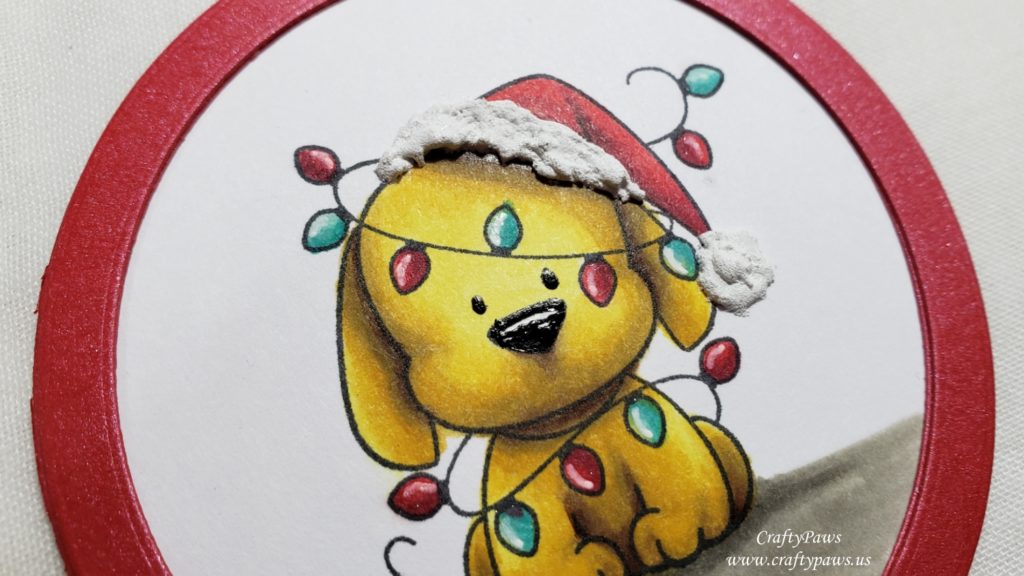
For the 7th – 9th parts of the wreath, I used three more of the pups from the Mama Elephant Yappy Woofmas stamp set and Copic colored them using the following colors (featuring my favorite Christmas color combination – red, white and aqua):
Australian Shephard with snowballs: N3, N5, E11, E13
Terrier with snowballs: N0, N3, N5, R30 with Uniball Signo White Gel Pen details for furry texture
Bernese Mountain Dog with antlers: N0, E53, E55, E57 and E79
with Uniball Signo White Gel Pen details for furry texture
Floors: W3 and W5
Santa hat, candy cane, snowballs, collar, bell, antlers and scarves: C0, Y13, Y17, BG11, BG13, BG15, R35, R37, and R39
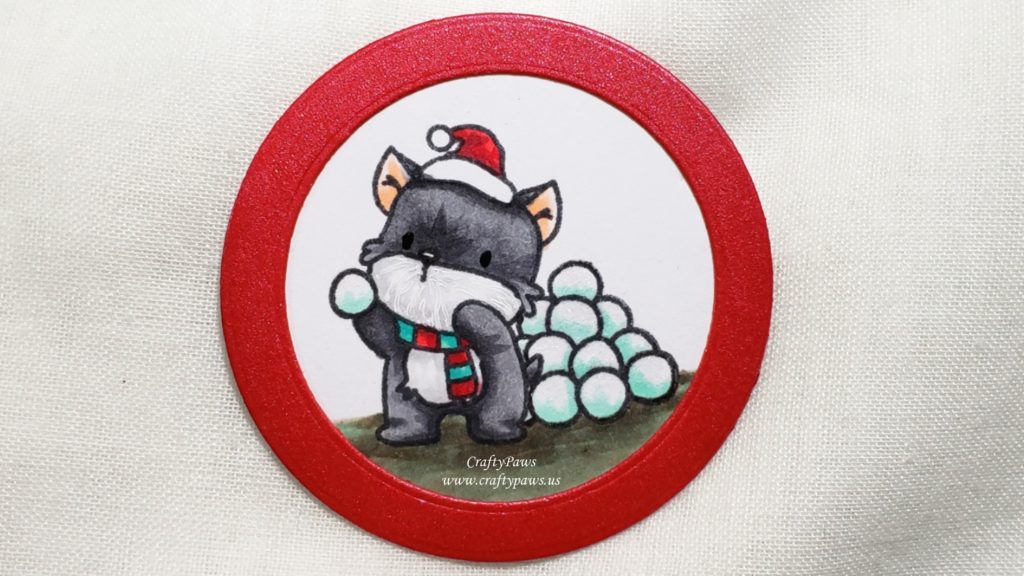
I also used the Uniball Signo White Gel Pen to add highlights to the noses and used a Sakura Black Glaze Pen to emphasize the eyes and noses. Since I was keeping all of these tags CAS (clean and simple with zero embellishments), to add a bit of interest, I added Clear Wink of Stella to the candy cane and all the snowballs for some sparkle and shimmer as well as Ranger Glossy Accents to the antlers and the candy cane for some high shine.
I die cut the images using the 7th largest circle die from the Diemond Dies Die-Normous Stack-Ems Circle Nesting Die Set. Then to create frames for the pieces, I used beautiful sparkly shimmer red card stock and the 5th and 7th largest circles from the Diemond Dies Die-Normous Stack-Ems Circle Nesting Die Set.
My readers can get 10% off and free worldwide shipping at Diemond Dies on all orders of $35 or more by using the code “thankskristina” at check out.
Disclosure: Many of the supplies I’ve used for today’s project are linked. Some may be affiliate links, which means if you make a purchase I receive a small commission at no extra cost to you. I truly appreciate your support toward the costs of running this blog!
CLICK on the following picture to watch the process of creating these tags:
These puppy tags are being entered into the following challenges:
Crafty Gals Corner Anything Goes Challenge
Word Art Wednesday Anything Goes Challenge
Creatalicious Anything Goes with Optional Christmas w Snowflakes
Card Mania Christmas Challenge
Lil Patch of Crafty Friends Anything Goes Challenge
Penny Black and More Traditional Christmas Colors Challenge
Stamping Sensations Winter Sparkle Challenge
Through the Craft Room Door Anything Goes Challenge
ABC Christmas Y – favorite thing and Z – zero embellishment Challenge
Fab ‘n’ Funky Cute Christmas Challenge
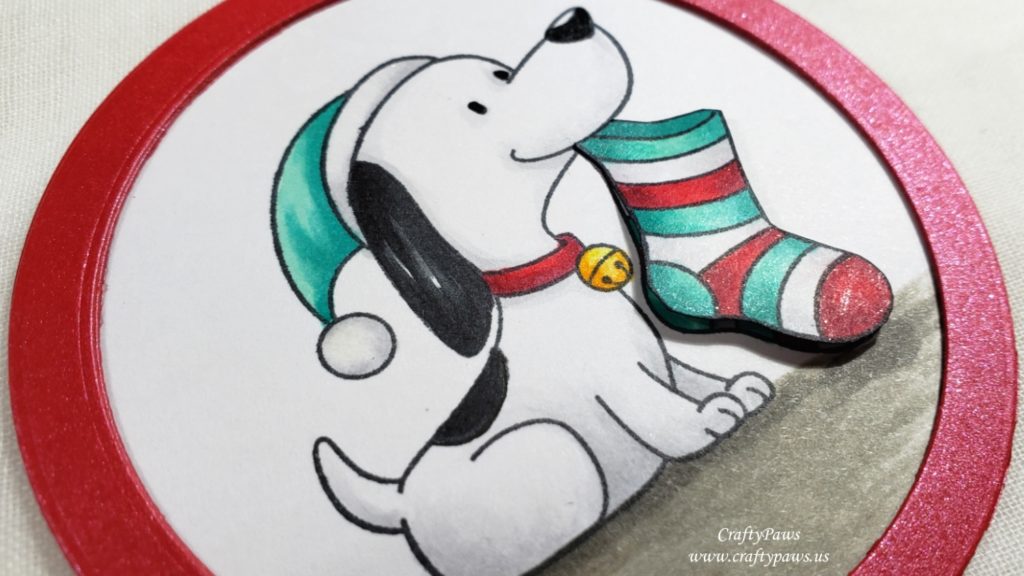
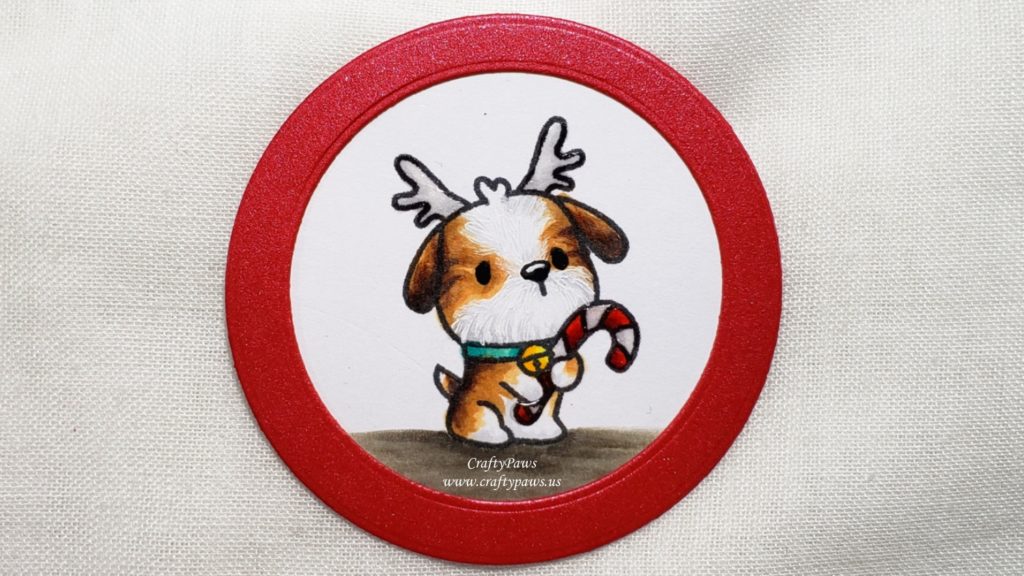
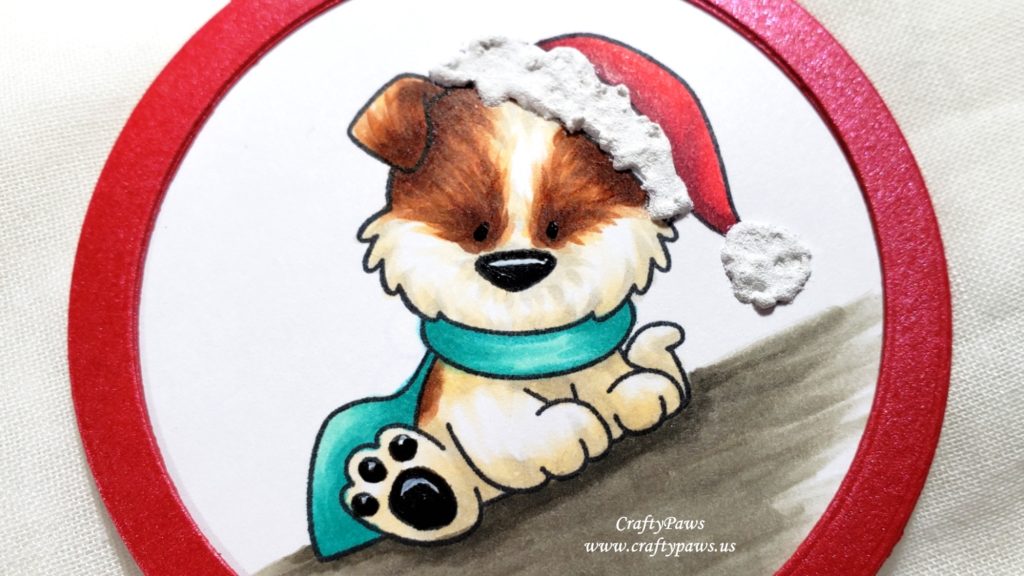
For the 3rd and 4th parts of the wreath, I used the other two adorable dogs from the MFT Happy Pawlidays stamp set (one of my all time favorite holiday stamp sets) and Copic colored them using the following colors (featuring my favorite Christmas color combination – red, white and aqua):
Snoopy-look-alike: N0, N1, N7 and N9
Yellow lab: Y13, Y15, Y26, Y28, E57
Floors: W3 and W5
Hat, stocking, bell, collar and lights: E11, Y17, BG11, BG13, BG15, R35, R37 and R39
I added a high shine detail with a Uniball Signo White Gel Pen, a deep black shine for the puppies’ eyes and noses with aSakura Black Glaze Pen, and a shimmery sparkle on the stocking and holiday lights with a Clear Wink of Stella Pen. I also stamped out the stocking that the Snoopy-look-alike pup is holding again, colored it, and fussy cut it out to it pop up for a little added interest and dimension. For the yellow lab, I added DecoArt Snow Writer to add texture to the faux fur of the Santa hat.
I die cut the images using the 11th largest circle die from the Diemond Dies Die-Normous Stack-Ems Circle Nesting Die Set. Then to create frames for the pieces, I used beautiful sparkly shimmer red card stock and the 9th and 11th largest circles from the Diemond Dies Die-Normous Stack-Ems Circle Nesting Die Set — I cut each frame out twice and stacked them to add dimension and sturdiness.
CLICK on the image below to watch the process video:
Disclosure: Many of the supplies I’ve used for today’s project are linked. Some may be affiliate links, which means if you make a purchase I receive a small commission at no extra cost to you. I truly appreciate your support toward the costs of running this blog!
These tags are being entered into the following challenges:
Simon Says Stamp Monday Warm Winter Wishes Challenge
Word Art Wednesday Anything Goes Challenge
Simon Says Stamp Wednesday Christmas Challenge
Card Mania Christmas Challenge
ABC Christmas: Y – Fave things DOGS + Z – Zero Embellishments Challenge
Lil Patch of Crafty Friends Anything Goes Challenge
Fab ‘n’ Funky Cute Christmas Challenge
Crafty Gals Corner Anything Goes Christmas Challenge
Penny Black and More Traditional Christmas Colors Challenge
Stamping Sensations Winter Sparkle Challenge
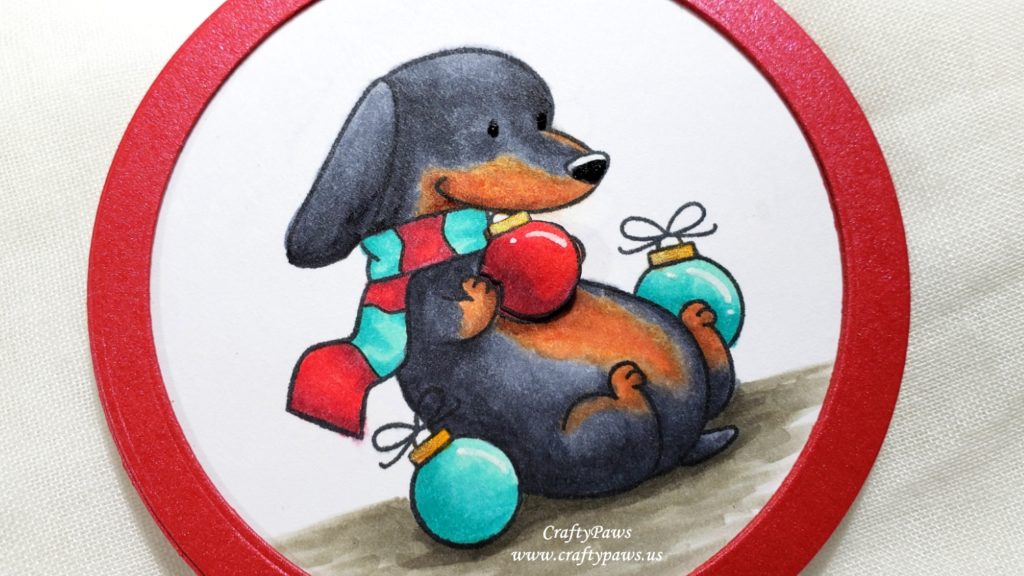
For the first two parts of the wreath, I used the adorable dachshund and the fluffy look-alike of my Bandito from the MFT Happy Pawlidays stamp set (one of my all time favorite holiday stamp sets) and Copic colored them using the following colors (featuring my favorite Christmas color combination – red, white and aqua):
Dachshund dog: C3, C4, C5, C6, C7, E11, E23
Bandito-look-alike dog: E50, W1, E53, E11, E23 and E25
Ornaments, hat and scarves (to one of which I added stripes with a 0.03 pt Copic Multiliner Pen): E11, Y17, BG11, BG13, BG15, R35, R37 and R39
Floors: W3 and W5
I love how these pups look warm and cozy, ready to send warm winter wishes.
I added a high shine detail with a Uniball Signo White Gel Pen, a deep black shine for the puppies’ eyes and noses with a Sakura Black Glaze Pen, and a shimmery sparkle on the ornaments with a Clear Wink of Stella Pen. I also stamped out the ornament the dachshund pup is holding again, colored it, and fussy cut it out to pop up that special ornament for a little added interest and dimension. Similarly, for the Bandito-look-alike pup, I added DecoArt Snow Writer to add texture to the Santa hat faux-fur.
I die cut the images using the 11th largest circle die from the Diemond Dies Die-Normous Stack-Ems Circle Nesting Die Set. Then to create frames for the pieces, I used beautiful sparkly shimmer red card stock and the 9th and 11th largest circles from the Diemond Dies Die-Normous Stack-Ems Circle Nesting Die Set — I cut each frame out twice and stacked them to add a bit of dimension and sturdiness.
CLICK on the image below to watch the process video:
Disclosure: Many of the supplies I’ve used for today’s project are linked. Some may be affiliate links, which means if you make a purchase I receive a small commission at no extra cost to you. I truly appreciate your support toward the costs of running this blog!
These puppy tags are being entered into the following challenges:
Simon Says Stamp Monday Warm Winter Wishes Challenge
Word Art Wednesday Anything Goes Challenge
Creatalicious Anything Goes with Optional Use a Stencil Challenge
Card Mania Christmas Challenge – WINNER
ABC Christmas: Y – Fave things DOGS + Z – Zero Embellishments Challenge
Lil Patch of Crafty Friends Anything Goes Challenge
Crafters Castle Anything Goes with Optional Ornaments Challenge
Crafty Gals Corner Anything Goes Christmas Challenge
Penny Black and More Traditional Christmas Colors Challenge
Stamping Sensations Winter Sparkle Challenge
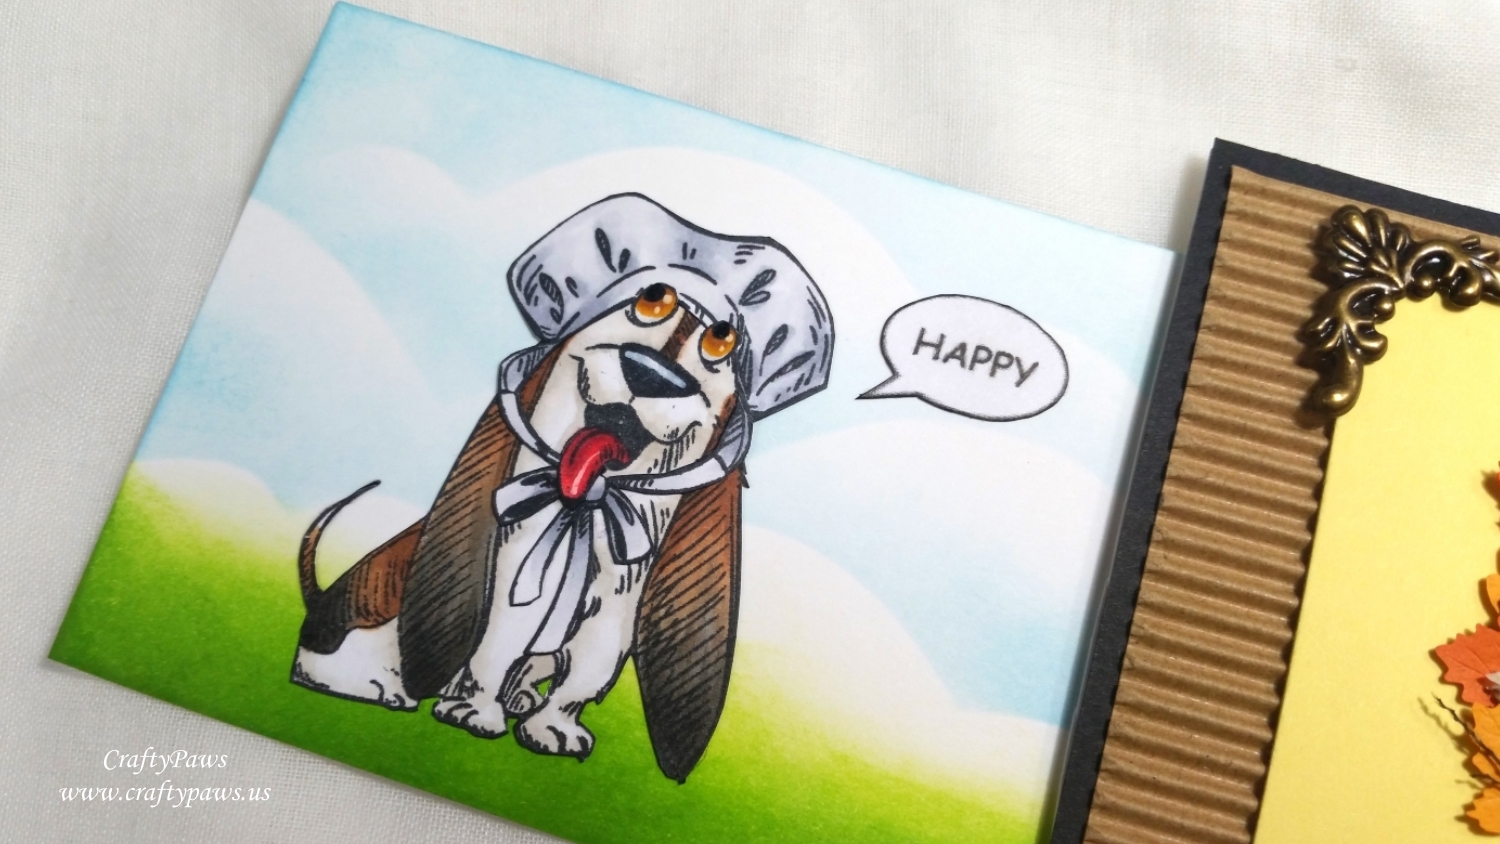
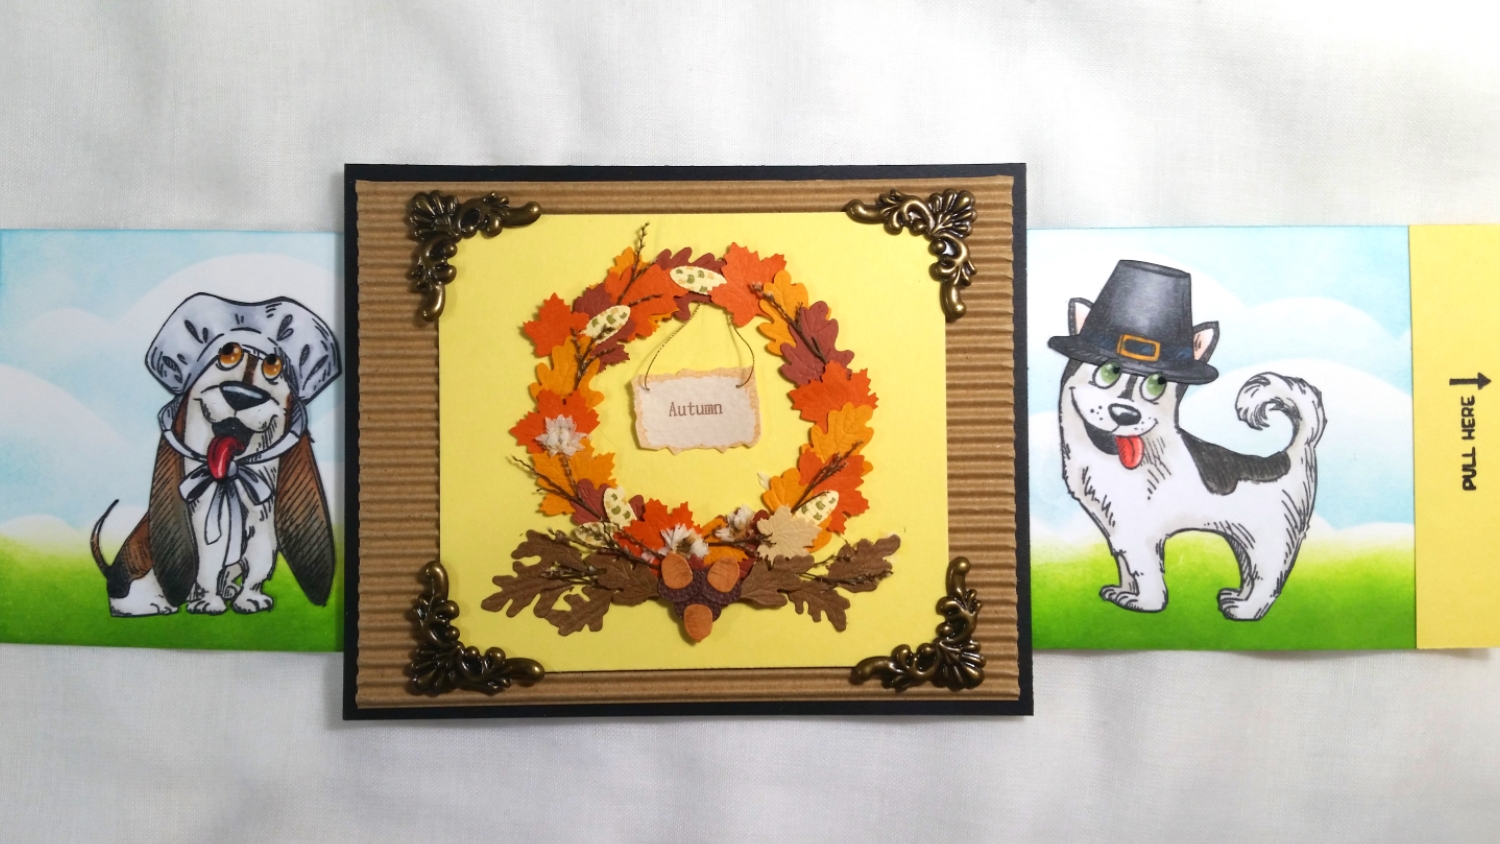
I first Copic colored the Husky and the Basset Hound as well as the Pilgrim bonnet and top hat with the following Copic colors:
Basset Hound: Tongue: R35 and R39; White: W0 and W1; Dark areas: W5 and W7; Brown areas: E23 and E25; Eyes YR24 and E23; Nose: C8
Husky: White: W0 and W1; Black: W5 and W7; Tongue: R22 and R24; Inner Ear: R30; Eyes: G24, G94 and G46 with Signo Uniball White Gel Pen and Sakura Black Glaze Pen
Pilgrim Bonnet: C00, C0, C1, C2 and C3
Pilgrim Top Hat: N3, N4, N5, N7, Y38, and B99
Then I fussy cut them and inked the edges with a Momento Tuxedo Black Marker.
Then I prepped the various panels to create the double slider card structure as follows:
- Front Panel, Slider Mechanism Panel and Back Panel: 4.25″ x 5.25″
- Slider Mechanism Panel (positioned horizontally) is then prepped using an X-Acto blade to cut vertical slits 0.25″ away from either side, and 0.75″ away from the top and bottom
- Left Slider Panel is cut 3.25″ x 4 5/8″
- Right Slider Panel is cut 3.25″ x 5 1/8″
- Then a strip of heavy duty plastic is cut to 2.5″ x 11″, this is looped through the slits of the Slider Mechanism Panel and secured with strong double sided tape like Scor-Tape


Word Art Wednesday Anything Goes Challenge
Creatalicious Anything Goes with Optional Circles Challenge
Simon Says Stamp Work it Wednesday Celebration or Birthday Challenge
Lil Patch of Crafty Friends Anything Goes Challenge
Through the Craft Room Door Anything Goes Challenge
Crafts Galore Encore Anything Goes Challenge
613 Avenue Create Anything Goes with Optional Clean and Simple Challenge
Crafty Gals Corner 3+ Layers Challenge
Stamping Sensations I Spy with My Little Eye Something Beginning with B Challenge – Basset Hound, Pilgrim Bonnet, speech Bubbles, Blue skys
Simon Says Stamp Wednesday Pop it Up Challenge
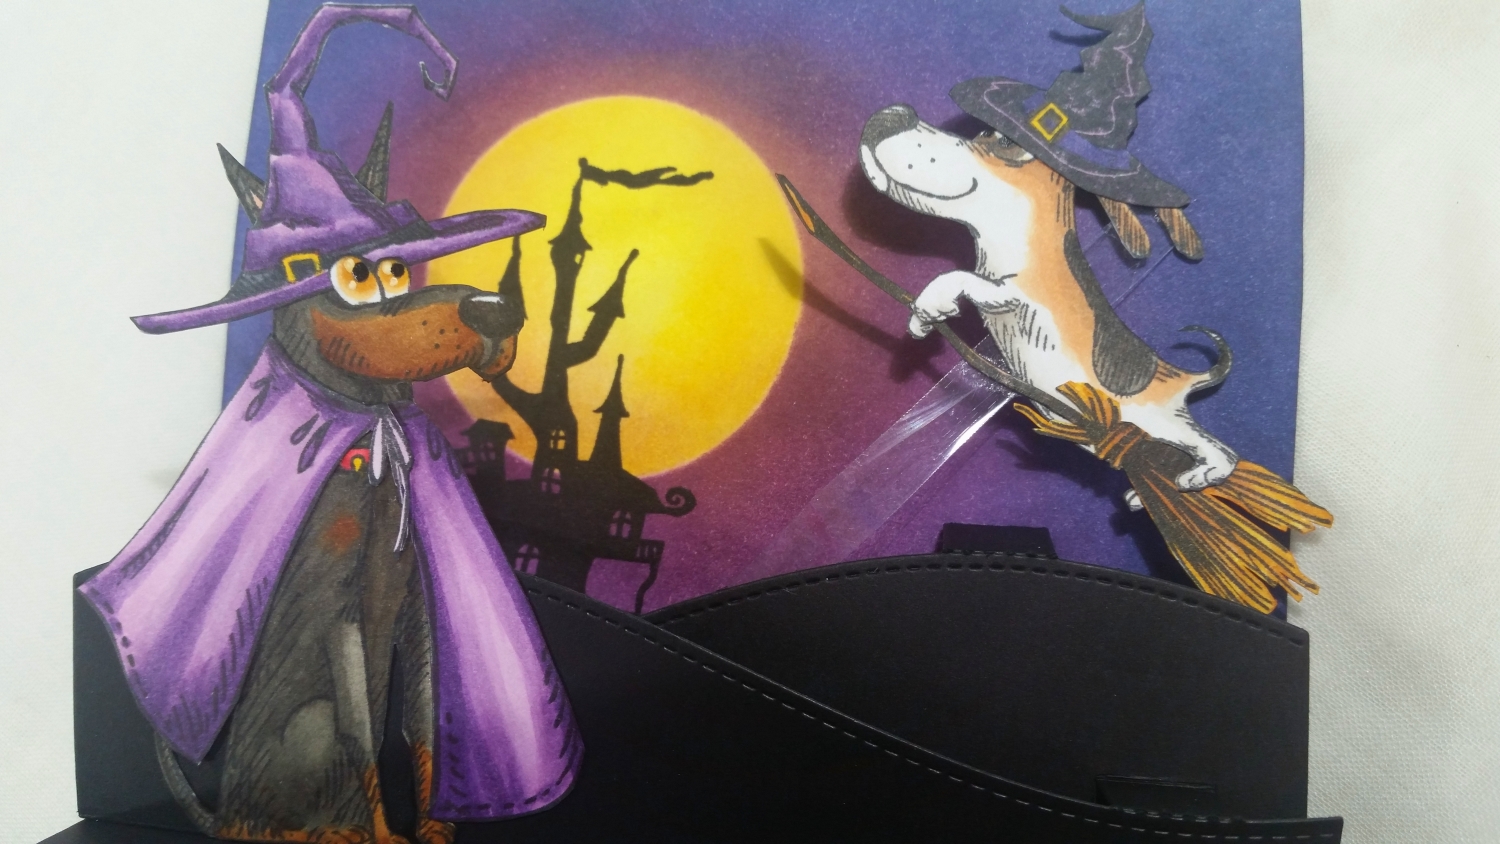
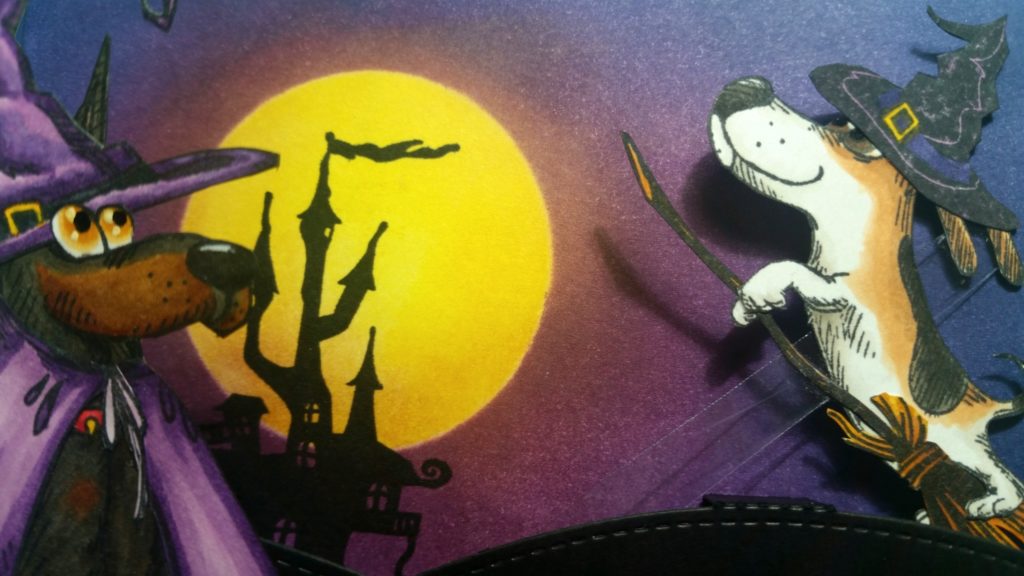
For this HOWLoween interactive scene card, I used the Doberman and Beagle from my absolute favorite Katzelkraft Dogs Stamp Set along with the witches hat from the Katzelkraft Funny Accessories Stamp Set, the small witches hat and haunted mansion from the new Katzelkraft Halloween Stamp Set, and the cape and broom from the Katzelkraft Pilgrim Stamp Set.
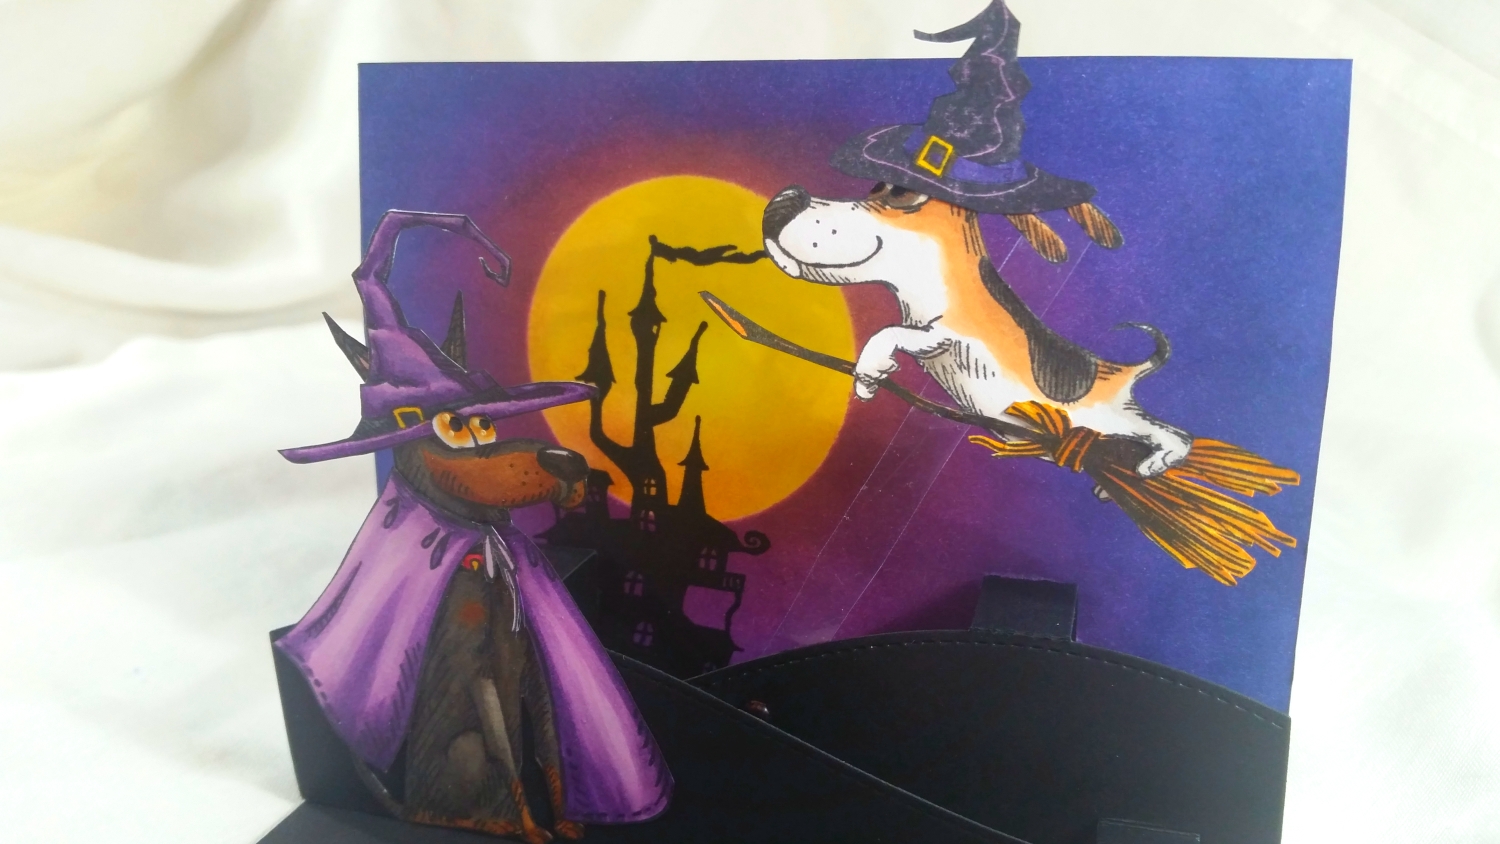
I Copic colored all the stamped images (except the haunted mansion, which I used as a silhouette for the background) using the following colors:
Doberman: Brown: E35 and E39; Black: W5 and W7; Nose: W9; Collar: R35, R37 and Y19; Eyes: YR21, YR24 with Signo Uniball White Gel Pen and Sakura Black Glaze Pen; Ear: R30
Beagle: White: W0 and W1; Black: W5 and W7; Brown: E21 and E23; Eyes: W5 and E23 with Signo Uniball White Gel Pen and Sakura Black Glaze Pen
Witch’s Hat and Cape: V12, V15, and V09; C7 and C8; Y19. Broom: YR24 and E15
I then fussy cut all the pieces out and combined the witches hat and the cape on the Doberman, cutting the pup’s ears and re-attaching them behind and around the hat to make them more visible and slightly trimming the cape to fit the dog’s body a bit better. I gave the beagle the smaller witches hat and cut around his paws so that I could tuck him around the broom, and he could fly through the air.
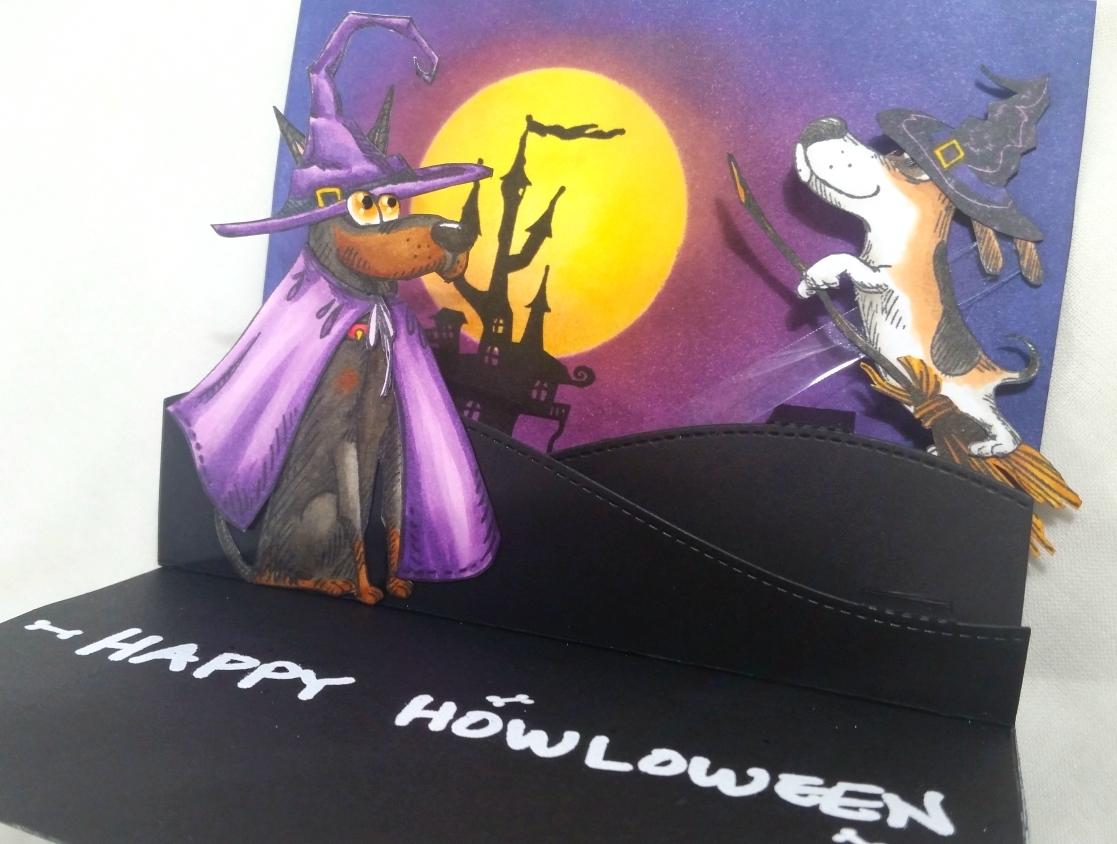
For the background (the top half of the card), I made a mask with the 6th largest Diemond Dies Circle Nesting Die and some thick cardstock and blended on some Distress Inks in Mustard Seed and Squeezed Lemonade to create a bright moon. I next used the cut out circle as a mask over the moon and blended on Distress Inks in Seedless Preserves, Dusty Concord and Chipped Sapphire to create a night sky. To soften the edges of the moon and give it a bit of dimension, I blended on a little Seedless Preserves around the edges. Lastly I stamped the haunted mansion so that the turrets would be silhouetted by the moon and add interest to the background.
To create the foreground, I layered the card base bottom of this top folding card with thin black cardstock. Then I used the Lawn Fawn Stitched Hillside Pop Up Die with extra heavy weight black cardstock and attached it to the card at the center fold. For an added bit of interactive fun I added a clear plastic piece (salvaged from some craft product packaging) to the the back hill with a tiny brad and glued the bloom riding Beagle to the other end. The Beagle can now swing … or fly through the air! I glued the witchy Doberman to the front hill, looking up at his flying buddy. As a finishing sentiment, I used a VersaMarker Pen and heat embossed “Happy Howl-oween” with Ranger Super Fine White Embossing Powder to the card base.
Please click on the following picture if you’d like to watch the process video of crafting this card:
Disclosure: Many of the supplies I’ve used for today’s project are linked. Some may be affiliate links, which means if you make a purchase I receive a small commission at no extra cost to you. I truly appreciate your support toward the costs of running this blog!
This card is being entered into the following challenges:
Cute Card Thursday Anything Goes Challenge
Crafty Gals Corner Anything Goes Challenge
Lil Patch of Crafty Friends Anything Goes Challenge
Through the Craft Room Door Anything Goes Challenge
Catch the Bug Make Us Smile Challenge
Pause Dream Enjoy Cards Challenge
Simon Says Stamp Monday Stamp It On Challenge
Simon Says Stamp Wednesday Stamp On It Challenge
Creatalicious Anything Goes with Optional Pastel Colors Challenge
Simon Says Stamp Work it Wednesday Favorite Stamping Technique Challenge
]]>
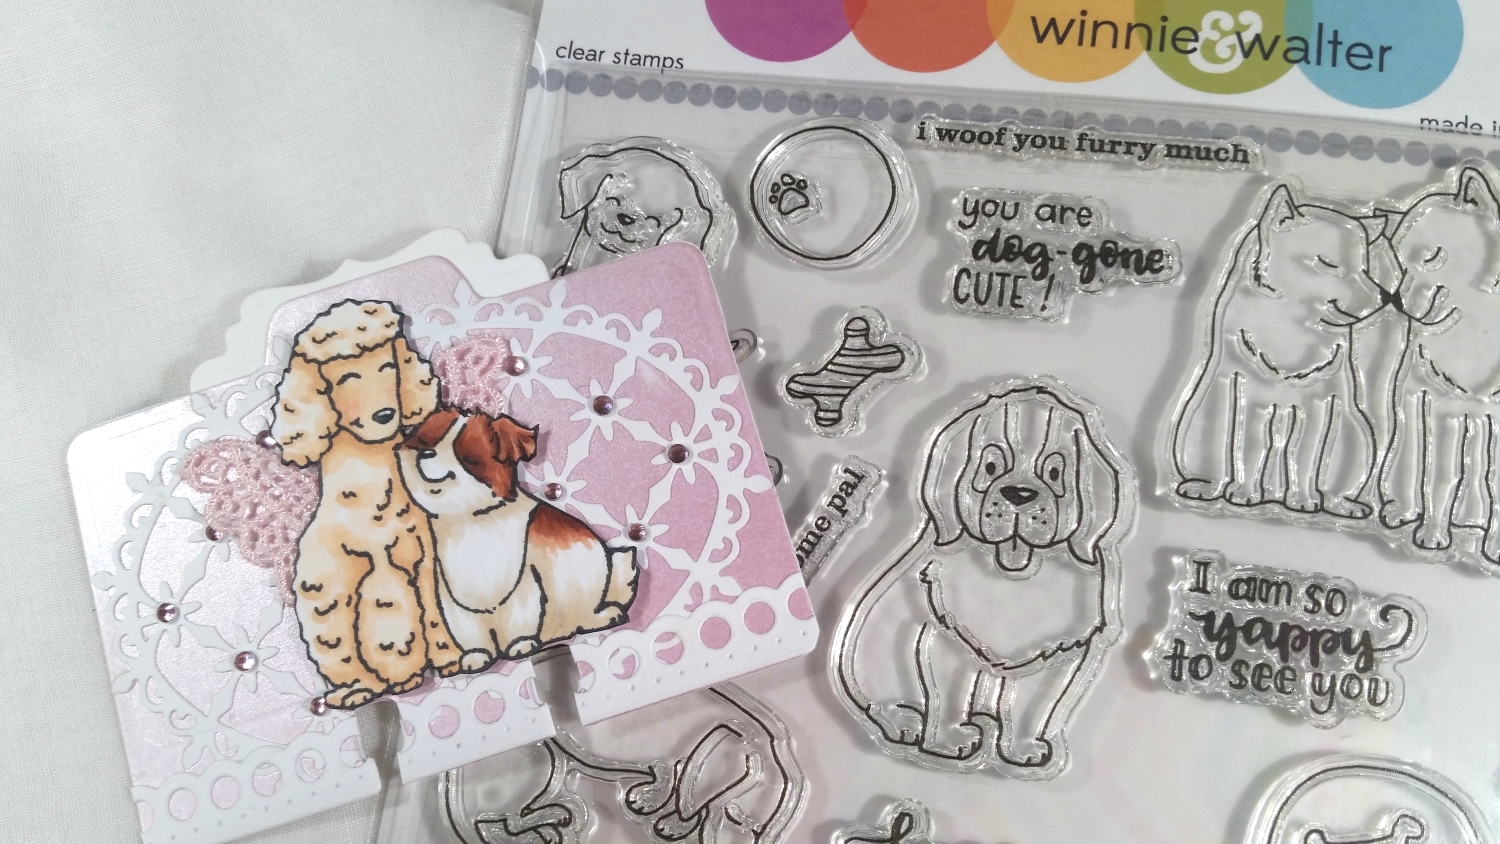
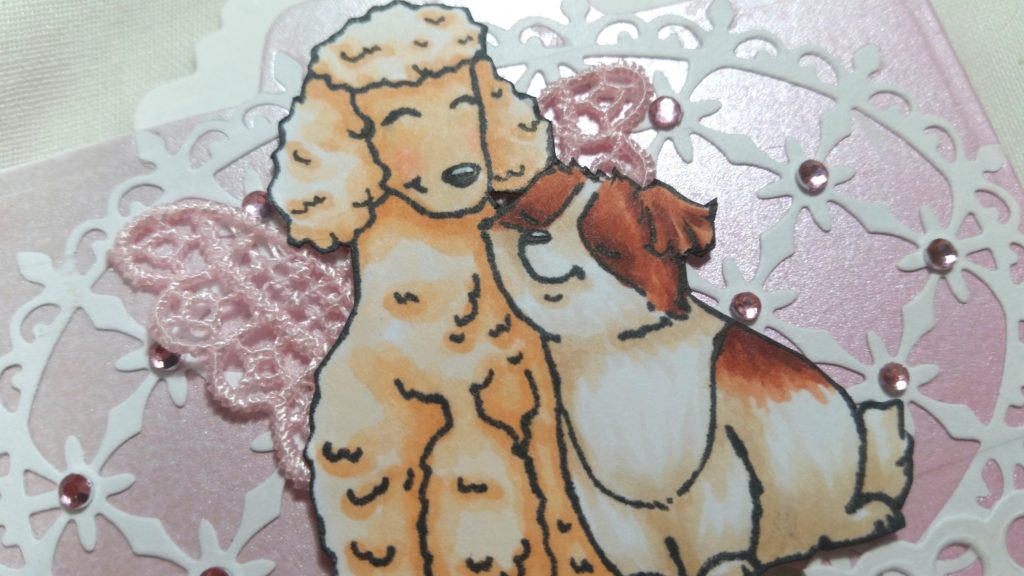
It’s been a couple of months since my Miniature Poodle, Biscuit, passed away, and while I still get choked up when I think of her, I finally thought I was in an emotional place where I could use the Winnie & Walter “Dog-gone Cute” stamp set that I had purchased because there was a stamp that looked like my fur babies, Biscuit and Bandito (it was delivered after by Biscuit’s passing over the Rainbow Bridge). It’s one of my favorite stamp sets because of this stamp, but it was a bit tricky to get up the nerve to ink it up. 🙂
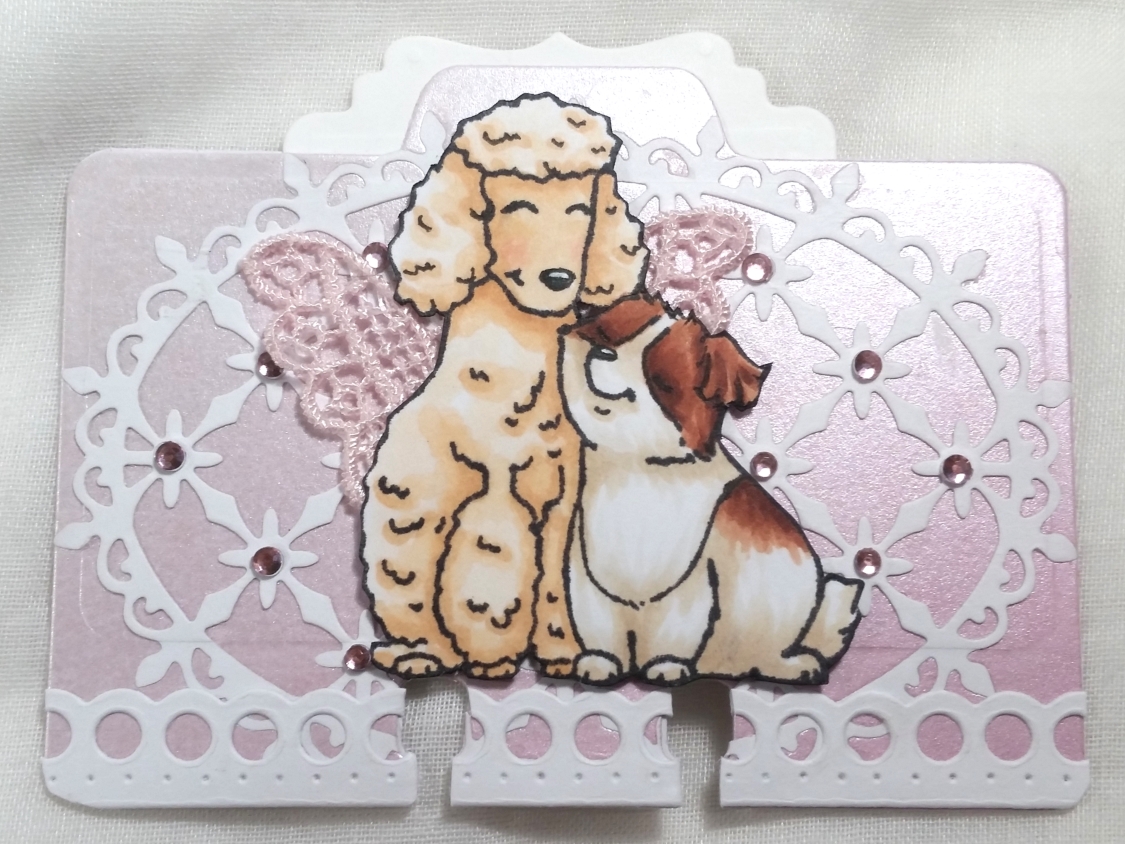
Using a 0.03 pt Copic Multi-liner Pen, I altered the little spotted pup’s ears to better match my Bandito, who’s a Havanese and has drop ears (how-to in video below), and then used the following Copic colors to color up the two pups:
Poodle: E50, E51, E53 and R30
Havanese: E40, E41, E11, E13, E15 and E18
I also added shiny nose highlights with a Uniball Signo White Gel Pen
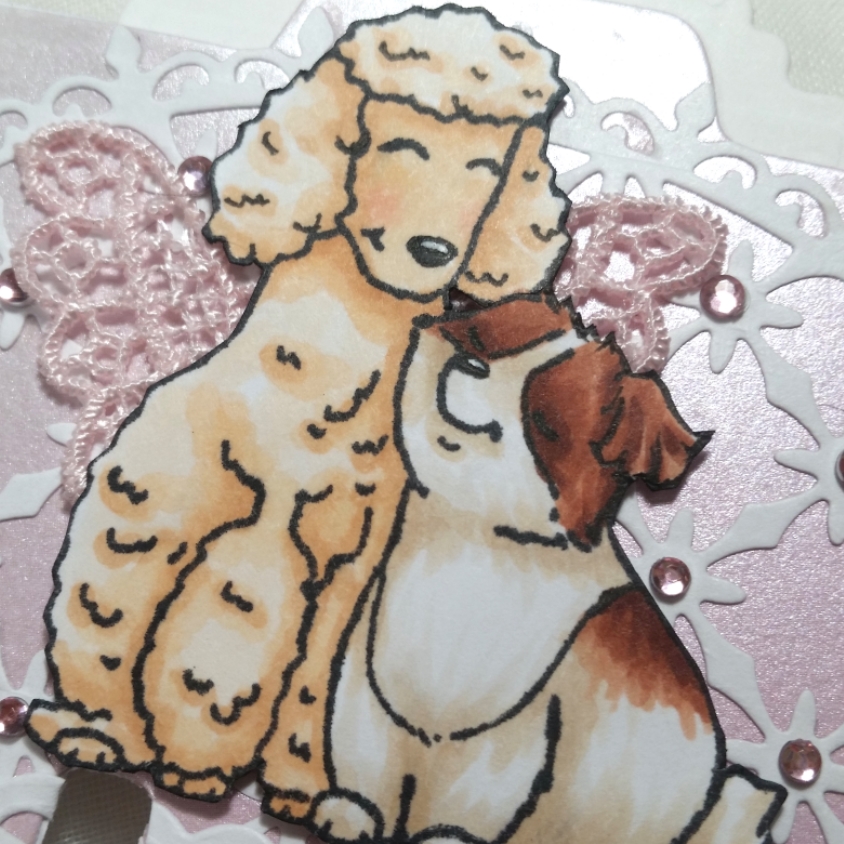
For the base of the Rolodex card I used a Spellbinders Shapeabilities “Address Book” Die Set. I die cut out the center-tab version twice from some very thick pearlescent ombre pink card stock from my scrap bin. I also die cut out a flourished tab from that same set from plain white card stock to sandwich between the two Rolodex cards to reinforce and embellish the tab. I covered the front of the Rolodex with an oval trellis die cut to decorate the background. After adding wings from a butterfly applique to make the Poodle image into an angel, I popped up the pups with double sided foam adhesive and centered them onto the Rolodex card. To give them something to sit on (and not have them look like they were floating), I also added a scalloped open circle die cut border, snipping off the excess that overlapped the edges of the Rolodex or covered up the bottom slots with my favorite Fiskars Spring Loaded Scissors. To add a little sparkle, I added some tiny pink gems into each cross-section of the trellis background that was still visible (not covered by the pups).
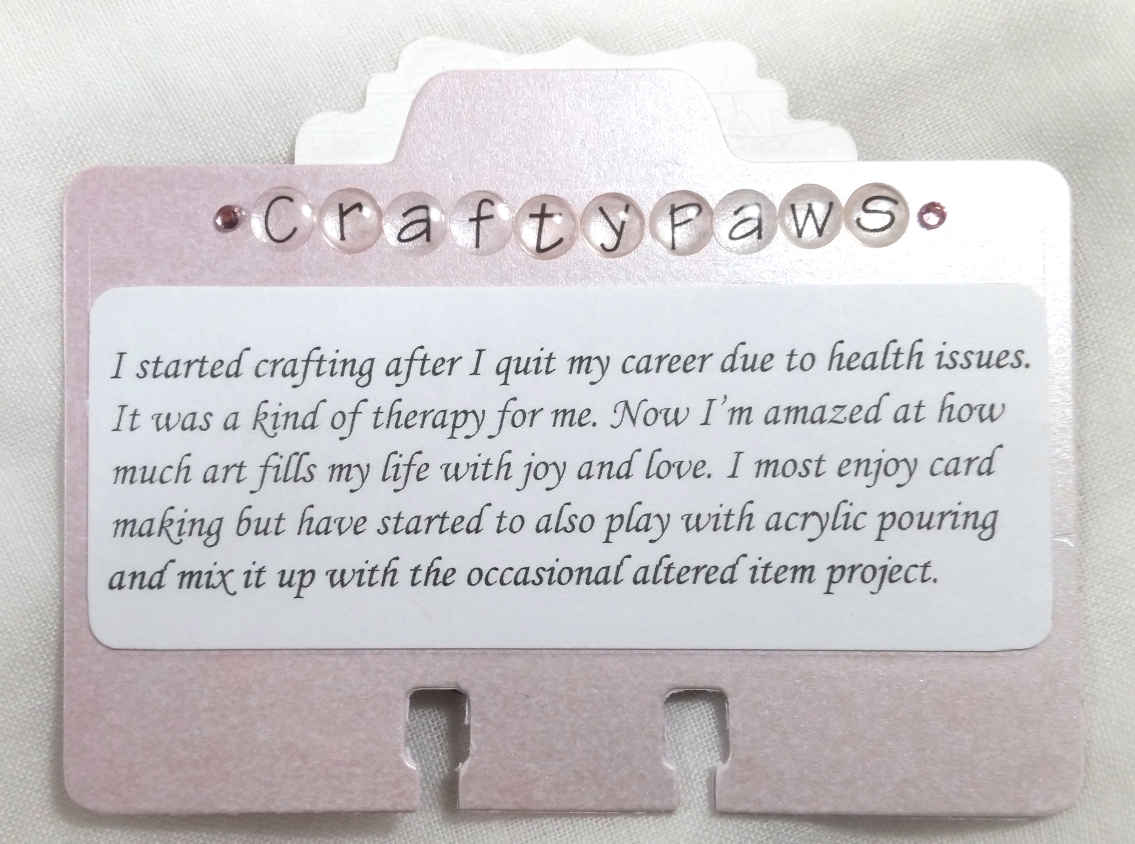
For the backside of the Rolodex, I labeled the top with my YouTube name: CraftyPaws with some old epoxy alpha stickers from my stash. I also added 2 pink gems on either side of CraftyPaws to coordinate with the gems on the front of the Rolodex. Then I typed up on my computer (because I don’t like my handwriting) the answers to the questions that Carolina asked for us to include: 1. how I started crafting, and 2. what do I most enjoy crafting. After printing out the answers and cropping to fit into the back of the Rolodex, I used my We R Memory Keepers Crop-A-Dile Corner Chomper to round the corners.
Click the following picture to watch the whole process video:
Disclosure: Many of the supplies I’ve used for today’s project are linked. Some may be affiliate links, which means if you make a purchase I receive a small commission at no extra cost to you. I truly appreciate your support toward the costs of running this blog!
This Rolodex is being entered into the following challenges:
613 Avenue Create Anything Goes with Optional Magic/Fantasy Challenge
The Corrosive Anything Goes Challenge
Penny Black and More I Spy a B Challenge – Biscuit and Bandito
Word Art Wednesday Anything Goes Challenge
Creatalicious Anything Goes with Optional No Square or Rectangular Card Challenge
Lil Patch Anything Goes Challenge
Fab ‘n’ Funky Babies Challenge
Through the Craft Room Door Anything Goes Challenge
Stamping Sensations Current Favorite Stamp Challenge
]]>
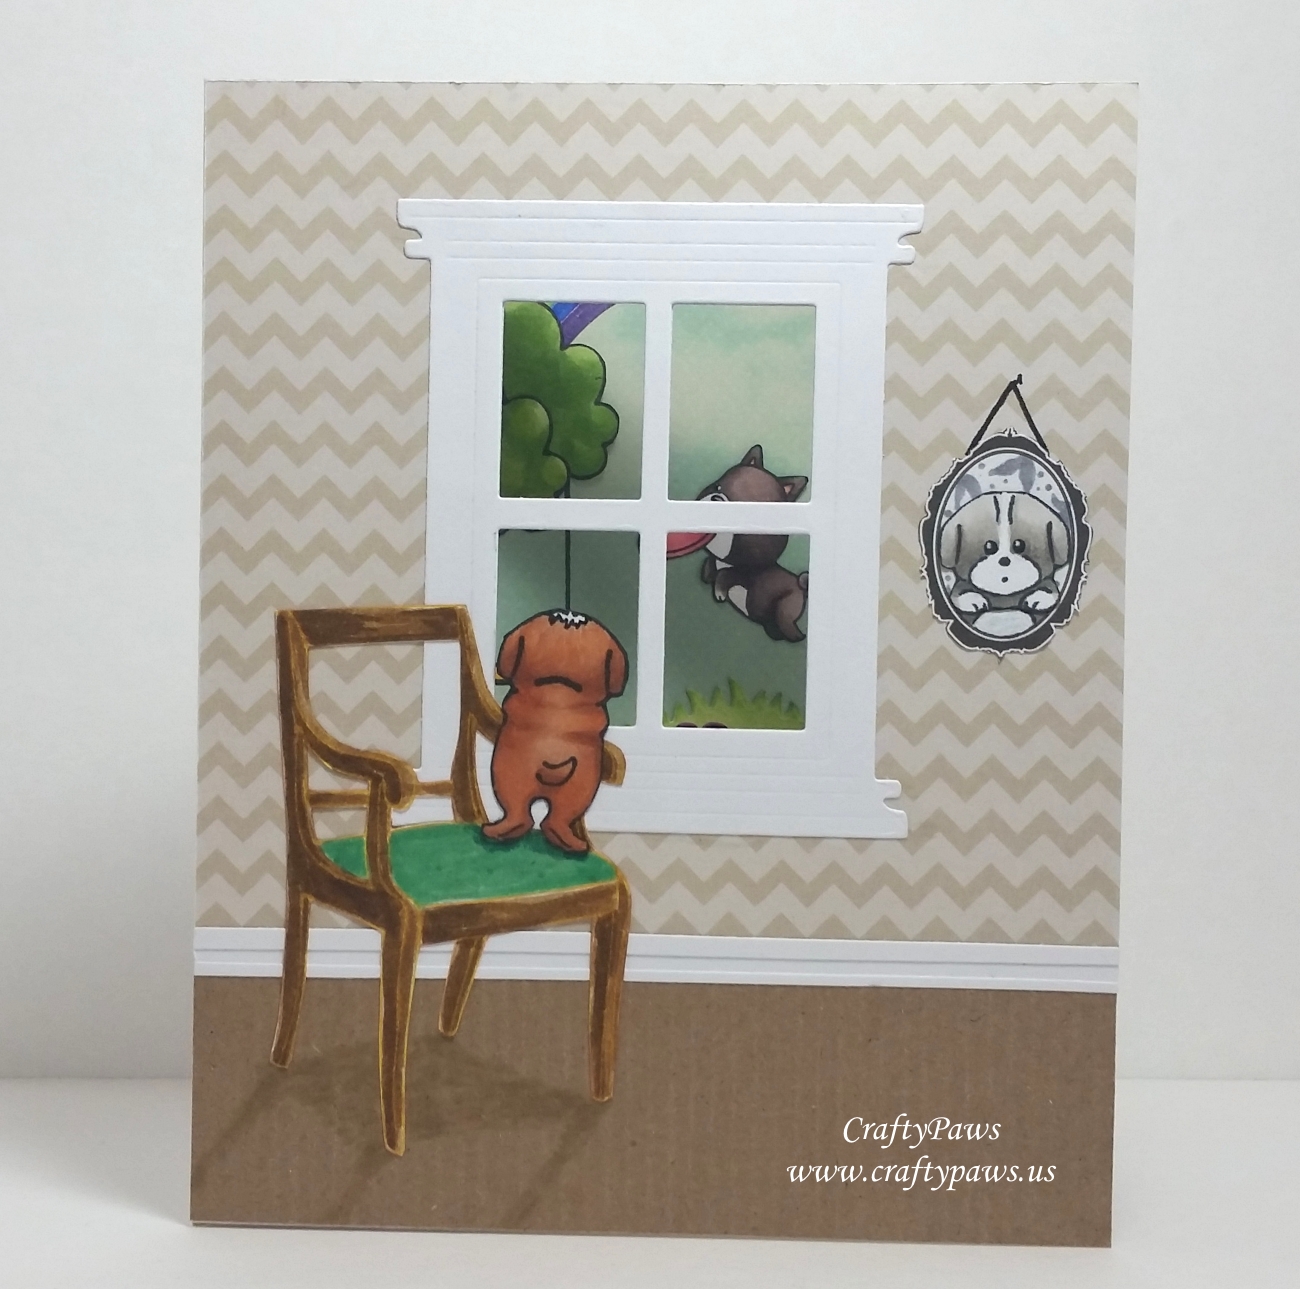 I created a card on which the front would be the interior of a home with a dog peering out of a window. I used the Art Impressions “Mini Front and Back Cat and Dog” stamp set for the back side of the pup on the card front. I also colored up an extra one of the fronts so I could create a black and white puppy portrait to “hang on the wall”. To make the scale right, I had to add a chair for the tiny pup to stand on to get a view out of the window, and I was lucky to find a chair image from the same Prima “Lady Bird” paper collection that I used for the tone on tone chevron “wallpaper.” I colored up the sketch of the chair with the following Tim Holtz Distress Markers: Vintage Photo, Tea Dye, Cracked Pistachio and Mowed Lawn and then fussy cut it out with scissors and an Xacto knife. I also fussy cut out the portrait frame from an older Recollections paper stack simply called Printed Scrapbook Papers. For the centerpiece window, I used the Diemond Dies Window Dies Set and again used my Xacto blade to cut through the entire card front.
For the reverse side of the card front, I created a scene of the outside of the home. I used the Tim Holtz stencil called Bricked and blended on Tim Holtz Distress Ink in Fired Brick and Tea Dye. I die cut out another 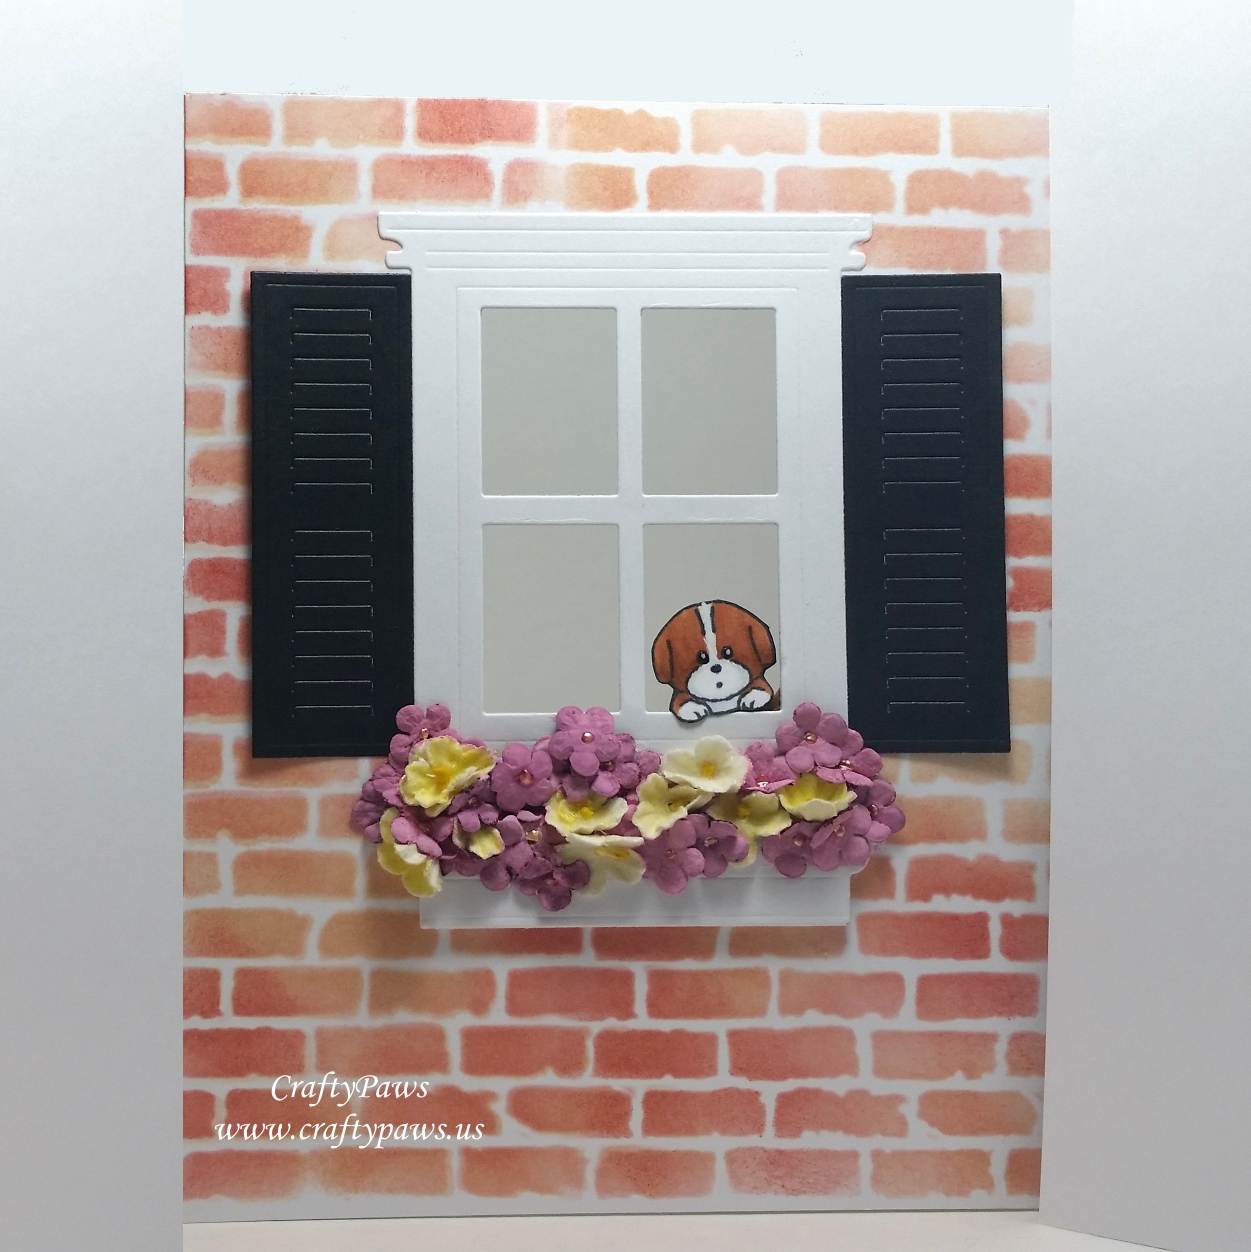 Diemond Dies Window Die and positioned it so that the puppy looked like he was peering out of the window. I also used the Diemond Dies Shutter Die and the Window Box Die to fill out the scene. I added lots of tiny paper flowers that I had in my stash, painting the burgundy ones with “Baby Pink” Plaid acrylic paint to soften the color. I used gold Ranger Liquid Pearls to add shiny centers to the flowers.
Finally, for the scene of puppies celebrating summer and partying in the dog park (and hopefully inviting and enticing the puppy inside to join them! LOL), I used an old cloud patterned paper from my stash. To make the grassy background, I used white card stock inked with Tim Holtz Mowed Lawn and Twisted Citron Distress Inks and die cut with a My Favorite Things “Grassy Hills” die set. For the sandy playground foreground, I inked up more white card stock with Tim Holtz Tea Dye and Antique Linen Distress Inks and die cut the back edge with the Lawn Fawn “Stitched Hillside” die set. Then for the playground equipment, the tree, and the spotted dog on the slide, I used the Lawn Fawn “Let’s Play” stamp set, fussy cutting each piece out (rather than using the coordinating dies that I actually have) because I didn’t want the white edge around each image. For the small bush and the upper left side of the tree, I also used the cloud from the 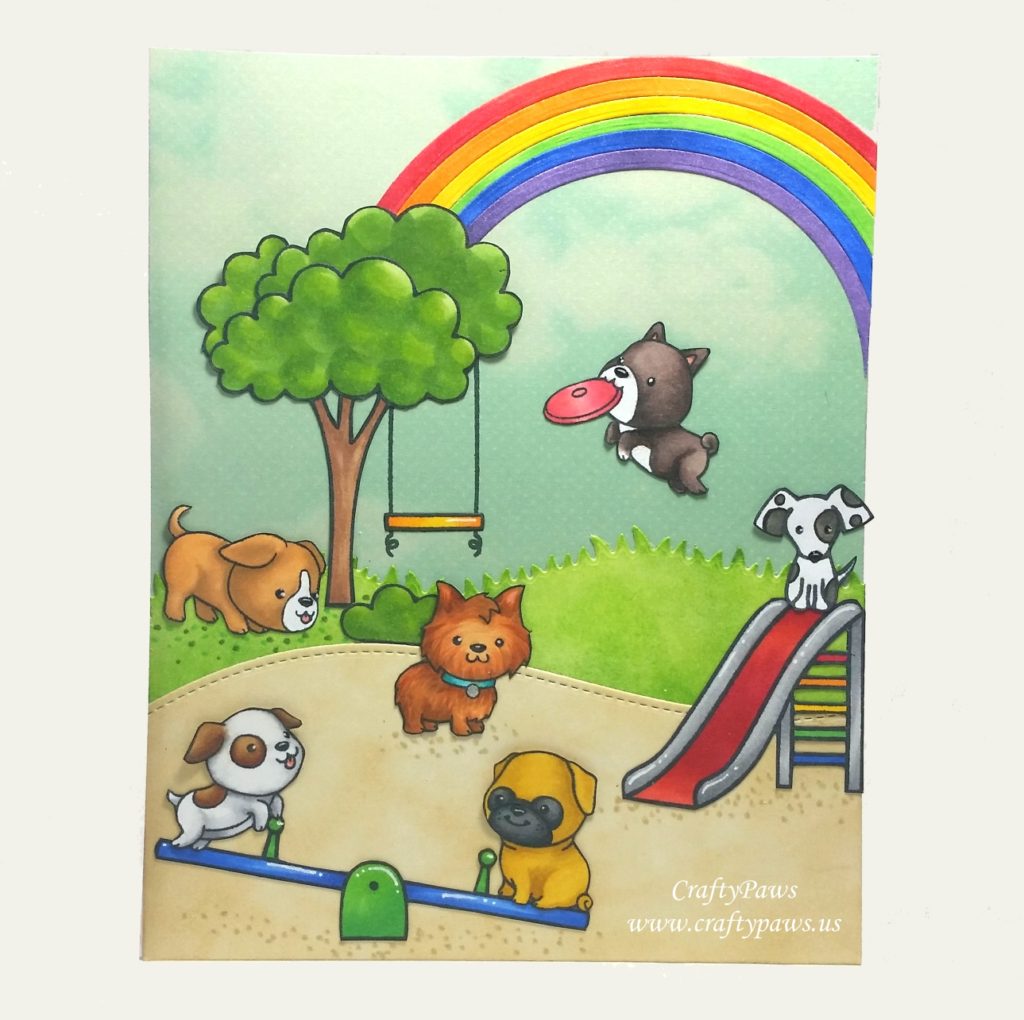 Lawn Fawn “Hello Baby” stamp set and just colored them up like greenery. The other dogs at play are all from the Clearly Besotted “Playful Pooches” stamp set. I love how all the pups seemed too coordinate so nicely even though they were from three different stamp companies!
The following are all the Copic colors I used:
AI Puppy: E13, 15, 97 and 99 (brown body) and C0 and 1 (white paws and face)
AI Puppy in Portrait: W3 and 5 with N4 for background
LF Puppy on Slide: N0, 2 and 4
Pug on Teeter Totter: N3, 5, 7 (dark face) and Y11, 13, 21 and 26 (fawn-colored body)
Spotted dog on Teeter Totter: E31, 35 and 39 (spots); N0, 1, 3, and 0 (white body); and R20 (tongue)
Frisbee dog: E70, 71, 74 and 79 (dog); R30, 20 and 32 with RV21, 23 and 25 (ears and frisbee)
Fluffy dog in center of playground: E51, 21, 97 and 99 with BG32 and 45 (collar)
Sniffing dog by tree: E51, 53 and 55 with R20 (tongue)
Tree tops and bush: YT13, 25 and 17
Finally the upper right side of this inside scene seemed a little empty so I created a rainbow using the Diemond Dies Die-Normous Stack-Ems Circle Nesting Die Set. I cut out several rings with 7 adjacent circle dies and tucked in one end of the rings behind the tree top. The other side pf the rings just cleared the edge of the card so I simply cut off the overhang so it would look like the rainbow continued off the card. To color up each of the rings, I used the following Copic colors: R24 and 29; YR04; Y19; YG07 and 07; B24 and 18; V17. I repeated these same colors to color up the playground equipment because I thought the bright colors added to the cheerfulness of the card, and I wanted to repeat the same colors for a cohesive look on the card.
My readers can get 10% off and free worldwide shipping at Diemond Dies on all orders of $35 or more by using the coupon code: thankskristina
The following is a video sharing the design of the card as well as a process video of coloring up the pug (by request):
This multi-scene card is being entered into the following challenges:
Lawnscaping Patterned Palooza Challenge
Simon Says Stamp Monday Celebrate Challenge
Simon Says Stamp Wednesday Fabulous Florals Challenge
MarkerPOP Create a Scene Challenge
Word Art Wednesday Anything Goes Challenge
Card Mania Let’s Party Challenge
613 Avenue Create Anything Goes Challenge
Craft Your Passion Anything Goes Challenge
Creatalicious Anything Goes Challenge
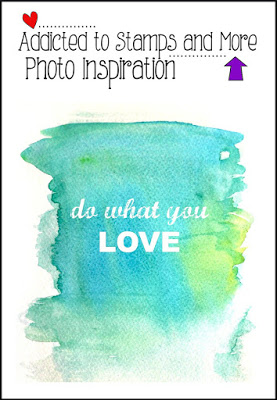
Addicted to Stamps – Photo Inspiration – Do What You Love – Don’t wait inside waiting for an invitation; join in the fun and celebrate life! Play with dogs–as many as you can find! LOL
]]>