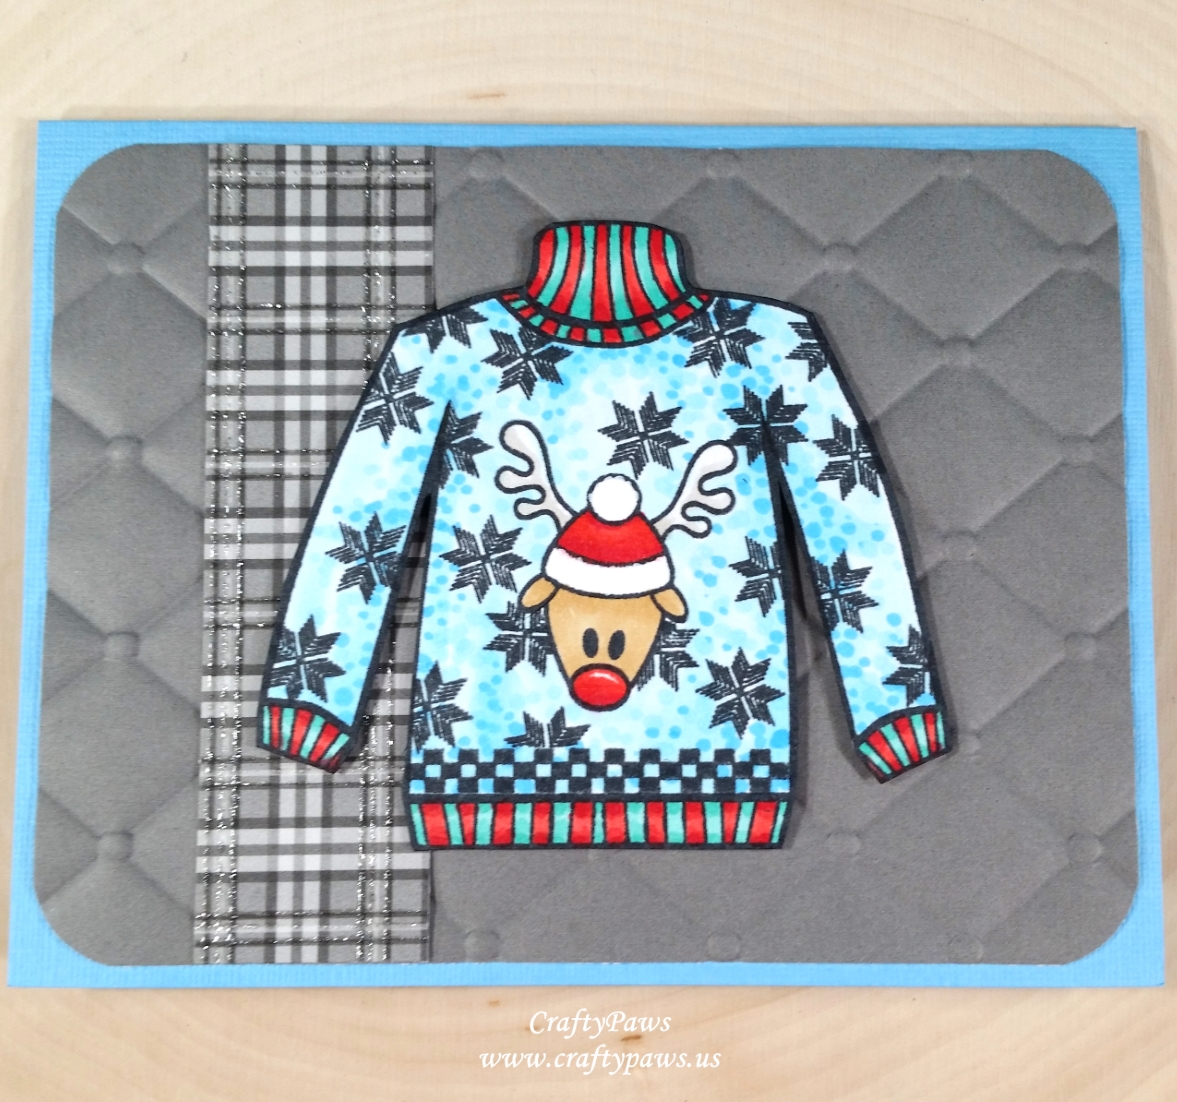
 I stamped out the outline sweater stamp 3 times and was able to create 3 distinct sweater designs by combining this stamp with others. For the first sweater, I stamped out the deer head from the “Ugly Sweater Weather” stamp set and added even more “ugly” patterns from the stamp set to make the sweater super busy. I did take care to mask off the ribbed areas so that I didn’t over-stamp them with the snowflake and checkerboard patterns. Then I colored it up with the following Copic colors, adding a fun boucle texture to the background:
Red: R24, 27 and 29
Blue background: B000, 00, 02
Teal stripes: BG32 and 23
Deer head and antlers: E31 and W1
For the second sweater, I used the super cute penguin from the Joy Clair “Christmas Penguins” stamp set and stamped it onto the sweater as if it was peering into the body of the sweater from the lower right. I kept it simple and colored up all the holiday lights in the following rainbow of colors and the sweater in neutral grays:
R27, YR15, Y08, G08, B06, V17 and N1, 3, 5, 7 and 9

For the third sweater, I stamped out the itty bitty penguin from the Joy Clair “Christmas Penguins” stamp set over and over in a helter skelter random pattern. Again, I took care to do a little masking around the edges of the sweater and the cuffs and neck areas so that the penguins would not over-stamp the ribbing of the sweater or go off the edge of the sweater body and also simultaneously stamp over the arm areas. Again this Copic coloring was super simple; since the images were small, I could almost skip the shading on them and could focus on just coloring up the background for the nubby sweater texture: Hats: R27 and 29; Belt and belt buckle: N7 and YR16; Penguin beaks: YR15
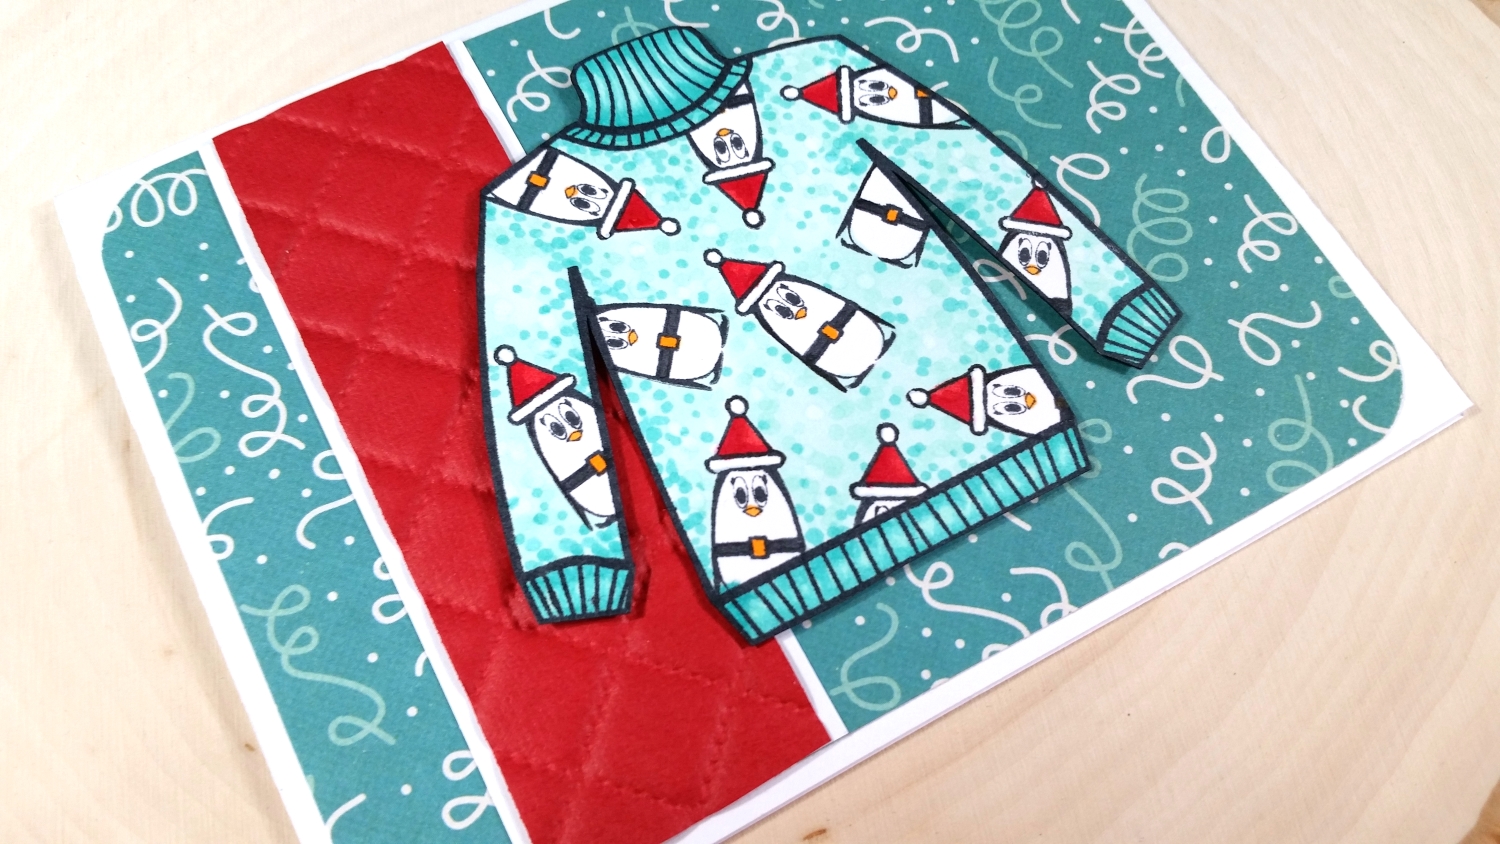
After prepping all the sweaters, I fussy cut them out and inked the white cut edges with a Tsukineko Tuxedo Black Marker. Then it was a matter of using up scrap papers from my scrap box and adding some interesting, but not too distracting horizontal, top-folding card bases. I 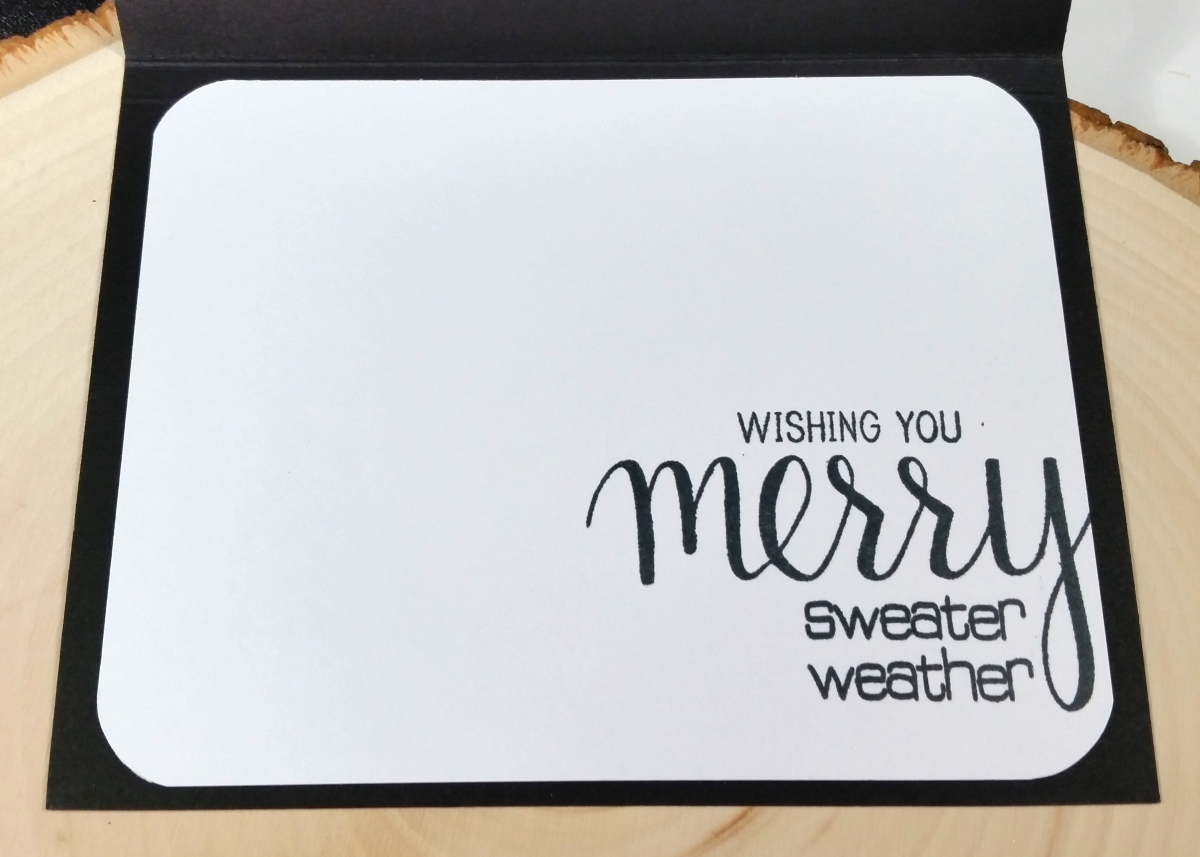 started with a background card front with rounded edges and added a strip of a different colored or patterned (and sometimes glittered) paper along the left side. To add some textural interest, I used the two embossing folders from the We R Memory Keepers Next Level Quilted Set (I thought the idea of quilting would go nicely with the sweater theme) for some of the plain papers as well.
For the inside sentiments, I used the “Don we now our ugly sweater” and the “Get Your Tacky On!” from the “Ugly Sweater Weather” stamp set for two of the cards. For the third card, I combined the “sweater weather” sentiment from the “Ugly Sweater Weather” stamp set with some of the text from a Hero Arts Merry Stamp & Cut set to make the inside sentiment say, “wishing you merry sweater weather”!
The following is a process video sharing how I made these sweater designs:
These cards are being entered into the following challenges:
Simon Says Stamp Wednesday Add a Sentiment Challenge
Word Art Wednesday Anything Goes Challenge
Lil Patch of Crafty Friends Anything Goes Challenge
Creatalicious Anything Goes with Optional Glitter/Bling Challenge
Penny Black and More All Creatures Great and Small Challenge – small and large penguins
Crafts Galore Encore Anything Goes Challenge
Through the Craft Room Door Anything Goes Challenge
Fab ‘n’ Funky Anything Goes Challenge
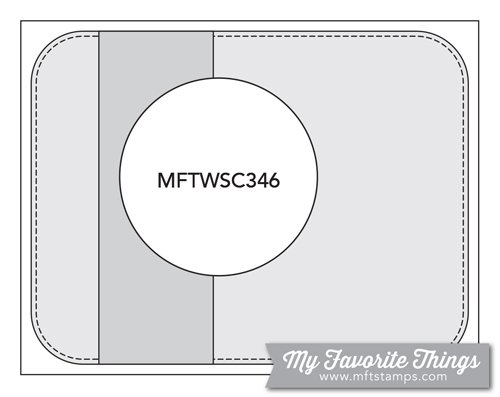
MFT Sketch Challenge #346
]]>
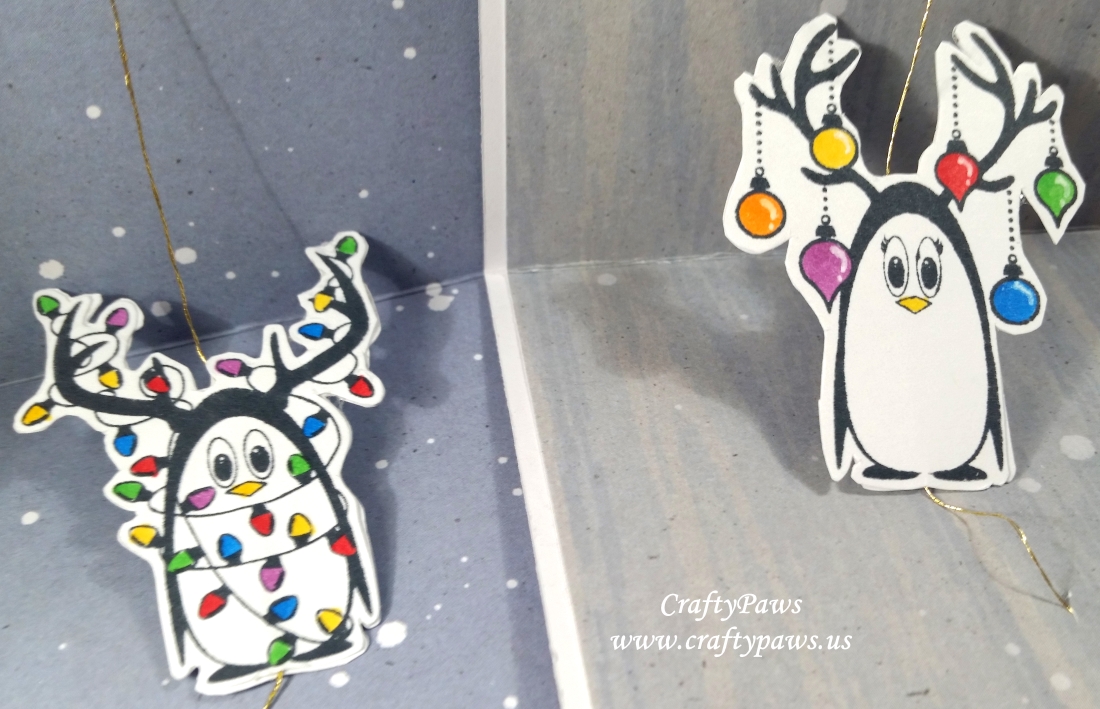
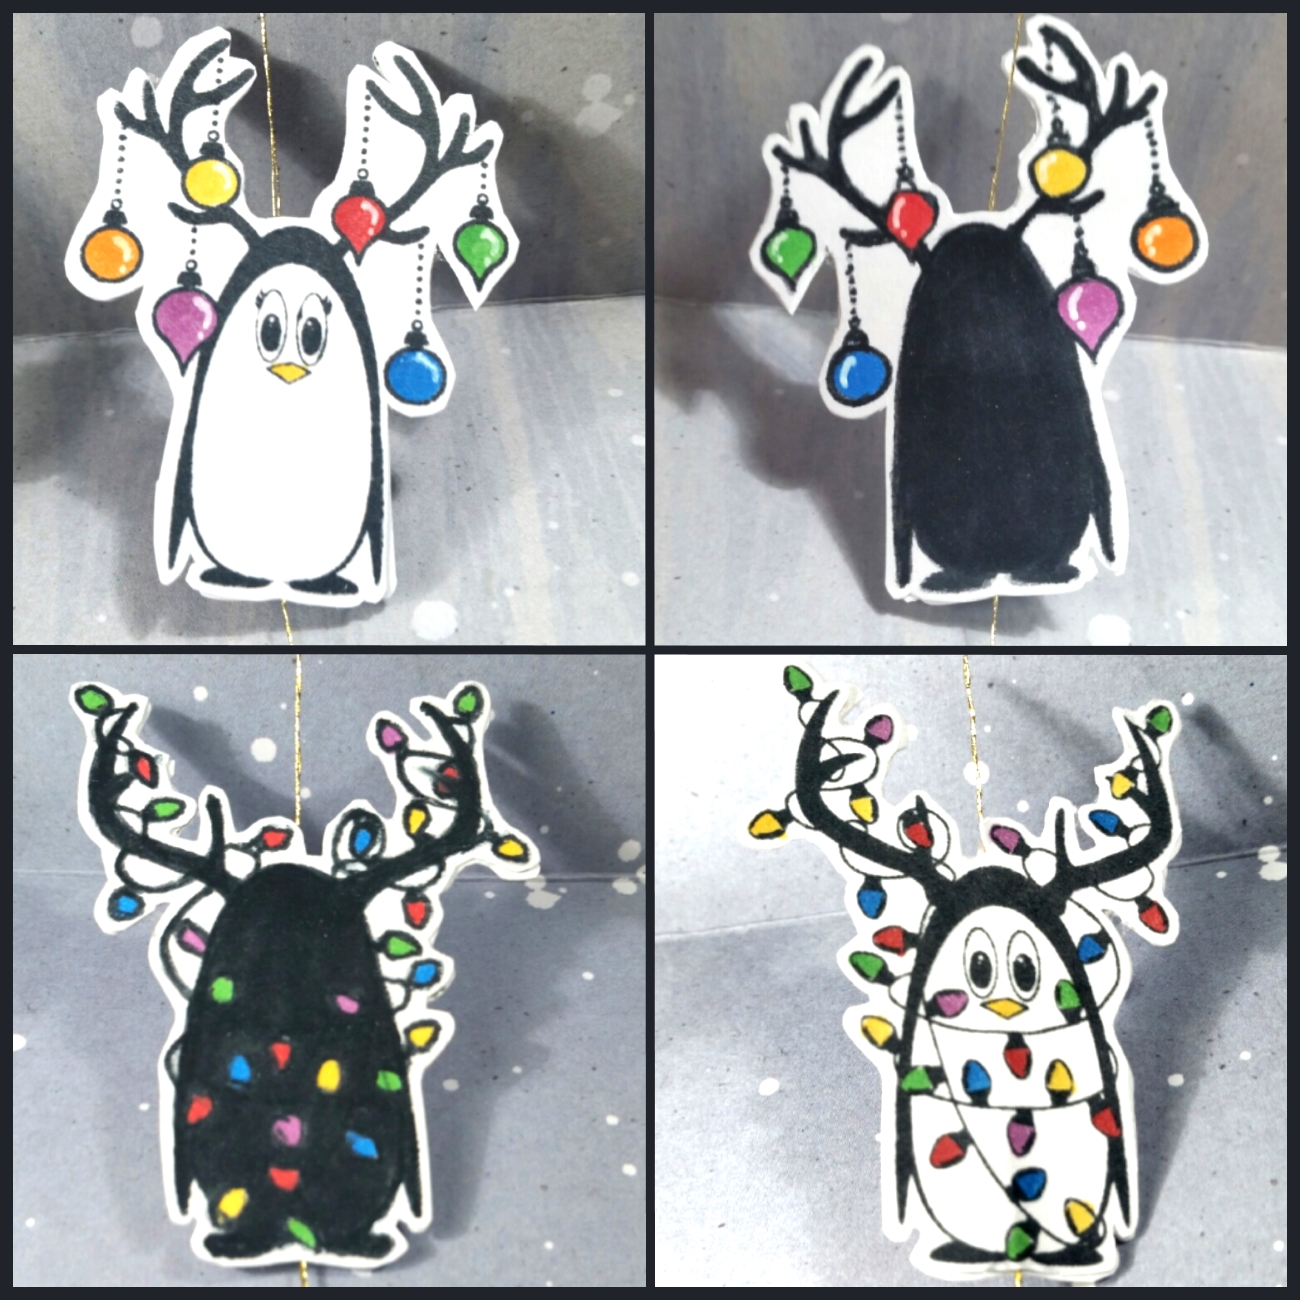 I used 4 of the penguins from the super cute Joy Clair Christmas Penguins stamp set, and made them into front and back images. For the penguins that were not symmetrical (like the ones with the ornaments or Christmas lights on the antlers), I first did some mirror stamping (there are mirroring stamp sets like the Paper Smooches Mirror Block Stamp Set, but I used the smooth side of the very full wood grain stamp from the Lawn Fawn “Woodgrain Backdrops” set) using Momento Tuxedo Black Ink (the start-to-finish video below shows the details of how to do this). Then I crisped up the lines/details and filled in the faces with a Momento Tuxedo Black Dual Marker to make the back sides of the penguins.
For the perfectly symmetrical penguins like the ones with the Christmas sweaters, I simply stamped them out twice and filled in the faces of one of each penguin with the Momento Tuxedo Black Dual Marker to make the back side images. A little simple Copic coloring (for a rainbow of ornaments and lights: R27, YR04, Y15, YG09, B06, V06 and pink and aqua sweaters: RV52, RV55, BG32) and fussy cutting and these front-and-back penguin images were ready to sandwich a little thread to become spinners!
For the card bases, I actually used two card bases for each card. The papers, which are all in dusty blue shades with white splatters that look like snowflakes, are from an old 2013 Recollections Christmas Watercolors paper stack. There is an outer card base that measures 4.25″ x 11″ and is scored at 5.5″. This card base card front is decorated with various Diemond Dies snowflake die cuts (Icy Snowflake Die Set, Snowflake #1, and Winter Snowflake Die Set) using blue metallic card stock and white card stock with Nuvo Glitter Drops in Midnight Sky for extra shine and textural interest.
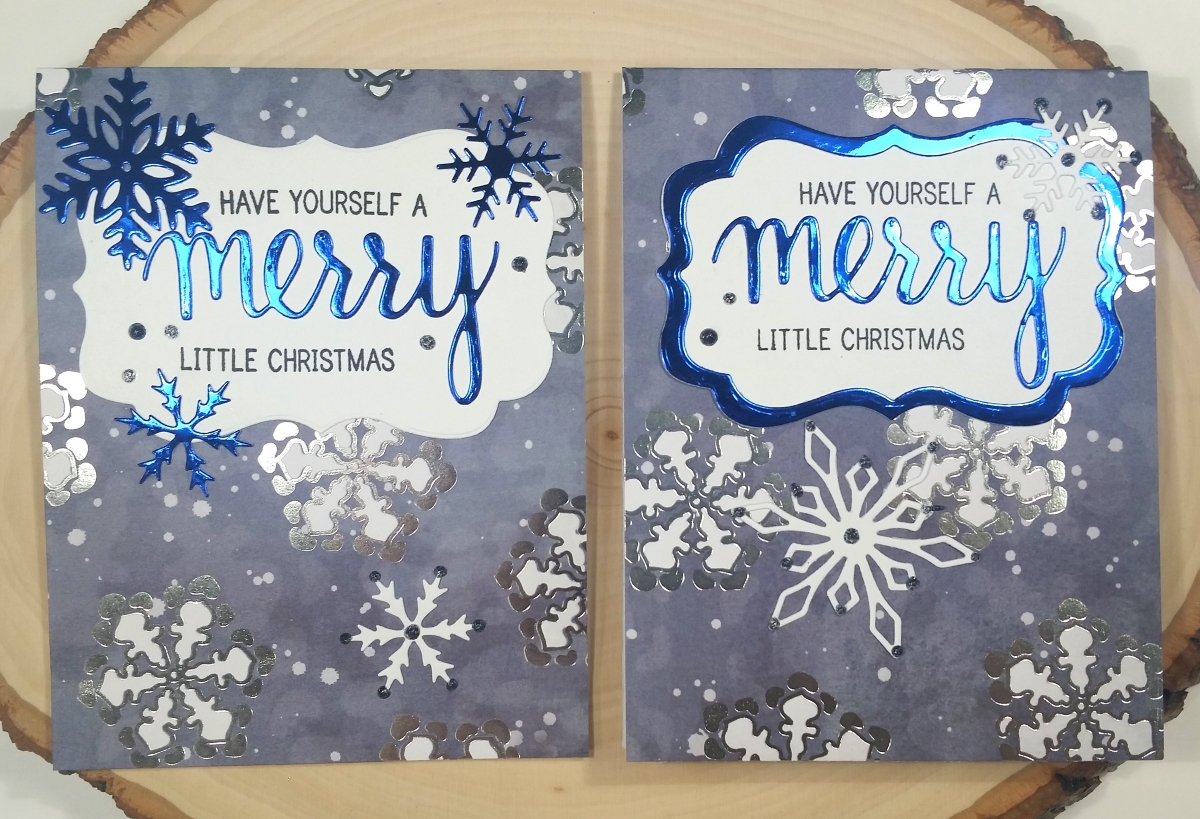
For the sentiment on the card front, I used the Hero Arts Merry Stamp & Cuts on top of a Diemond Dies Labels 1 die cut base. I had just enough blue metallic card stock to cut a couple of label frames and a handful of the snowflakes for bright shiny pops of color. All the delicate die cuts were glued on with my favorite wet glue: Art Glitter Glue with a fine metal tip nozzle. The sentiment, which I stamped using a MISTI around the die cut “MERRY,” reads, “HAVE YOURSELF A MERRY LITTLE CHRISTMAS.”
There is also an inside liner card base that measures 4″ x 10.75″ and is scored at 5 3/8″. These are simply decorated with a single large white die cut snowflake (Icy Snowflake Die Set, Snowflake #1, and Winter Snowflake Die Set) in the lower left or right corner of the top-folding card.
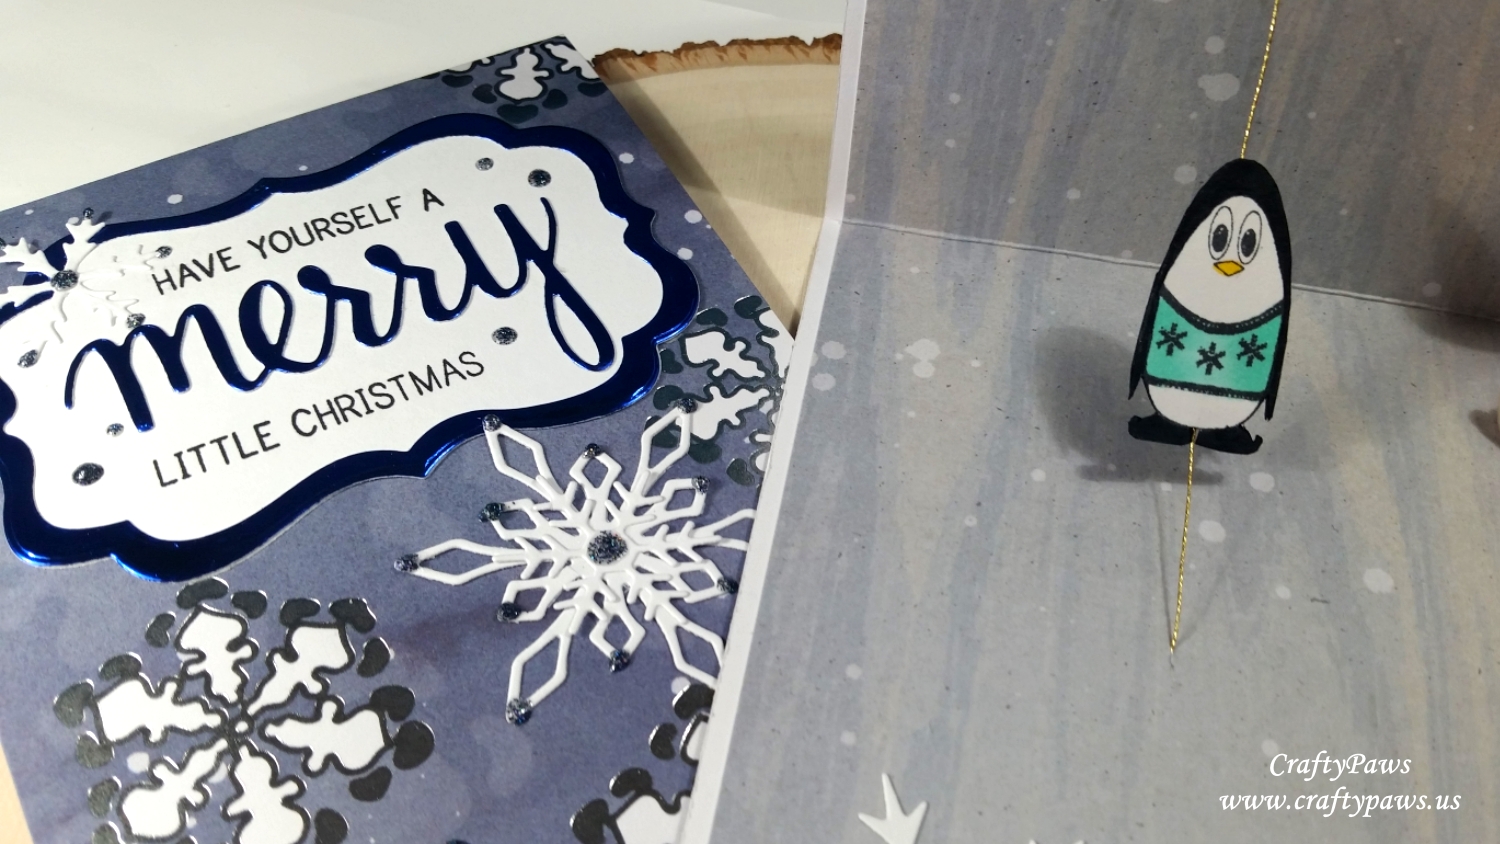
To attach the spinner mechanism to this inside liner, I cut a small slit in the middle of the card (through both layers) with an X-Acto knife and threaded through the slits a thin thread; mine was DMC gold metallic thread, but you could use a fishing line or clear line for a more invisible magic look. When the thread could span the card open to about 90 degrees, then I secured the thread on the back side of the card liner with 5mm adhesive sticky tape. I then sandwiched the front and back of a penguin around the middle of that thread to make the spinner.
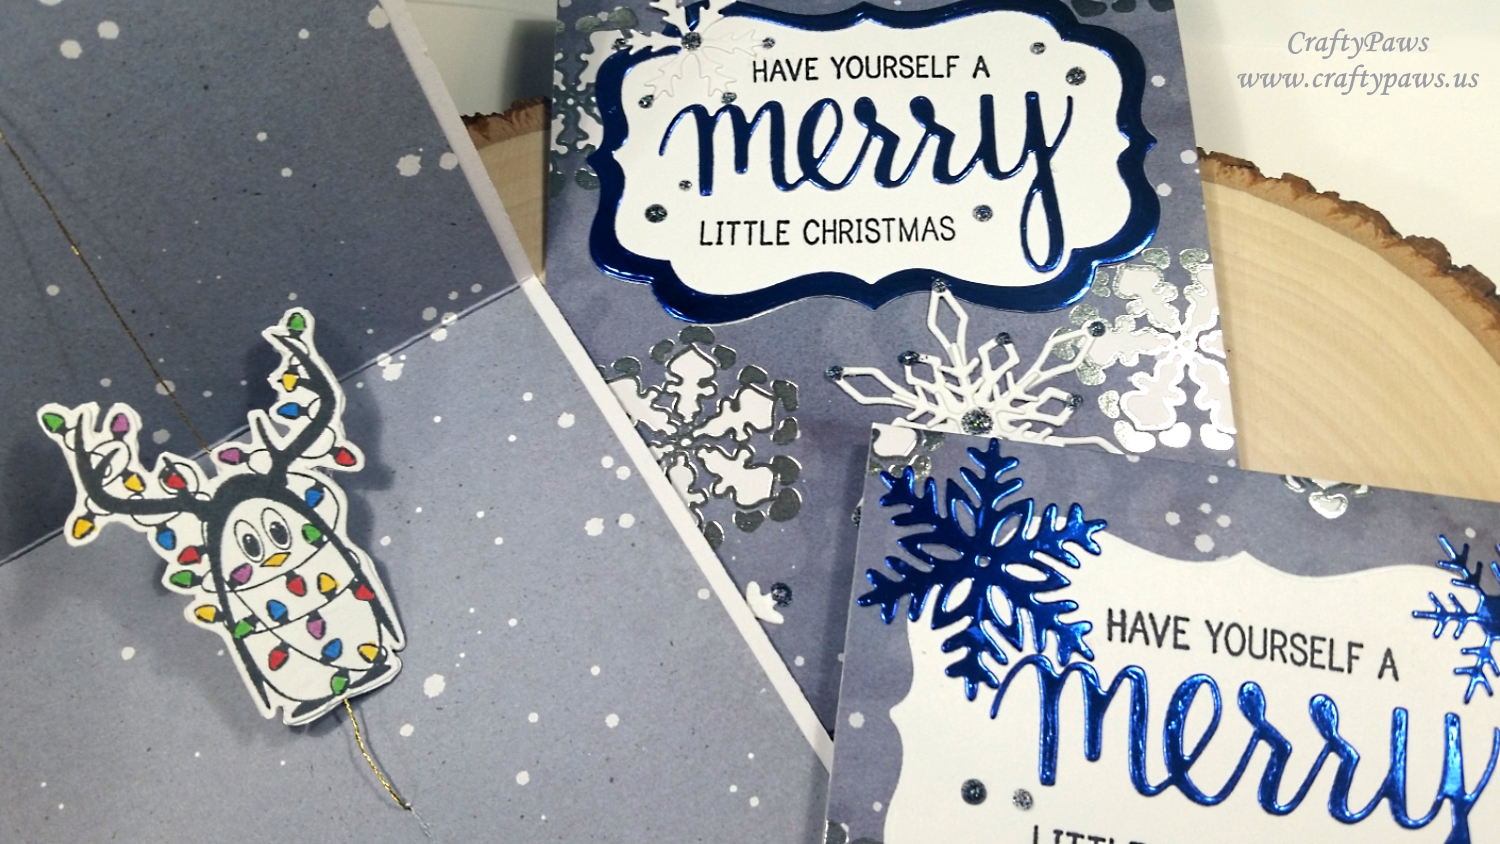
The last step was to position the inside card base inside the outside card base and adhering everything securing into place with more 5mm adhesive sticky tape. The inside liner card base is about 1/8″ smaller on all sides from the outside card base so there is a nice matted look to the card interior.
This is the start-to-finish process video for creating these cards:
These spinner cards are being entered into the following challenges:
Joy Clair Anything Goes with Optional Layers Challenge – WINNER
Simon Says Stamp Work It Wednesday Add Sparkle Challenge
Simon Says Stamp Wednesday Splatter It Challenge
Card Mania Party Challenge
Lil Patch of Crafty Friends Anything Goes Challenge
Through the Craft Room Door Anything Goes Challenge
Not Just Cards Anything Goes Challenge
Word Art Wednesday Anything Goes Challenge
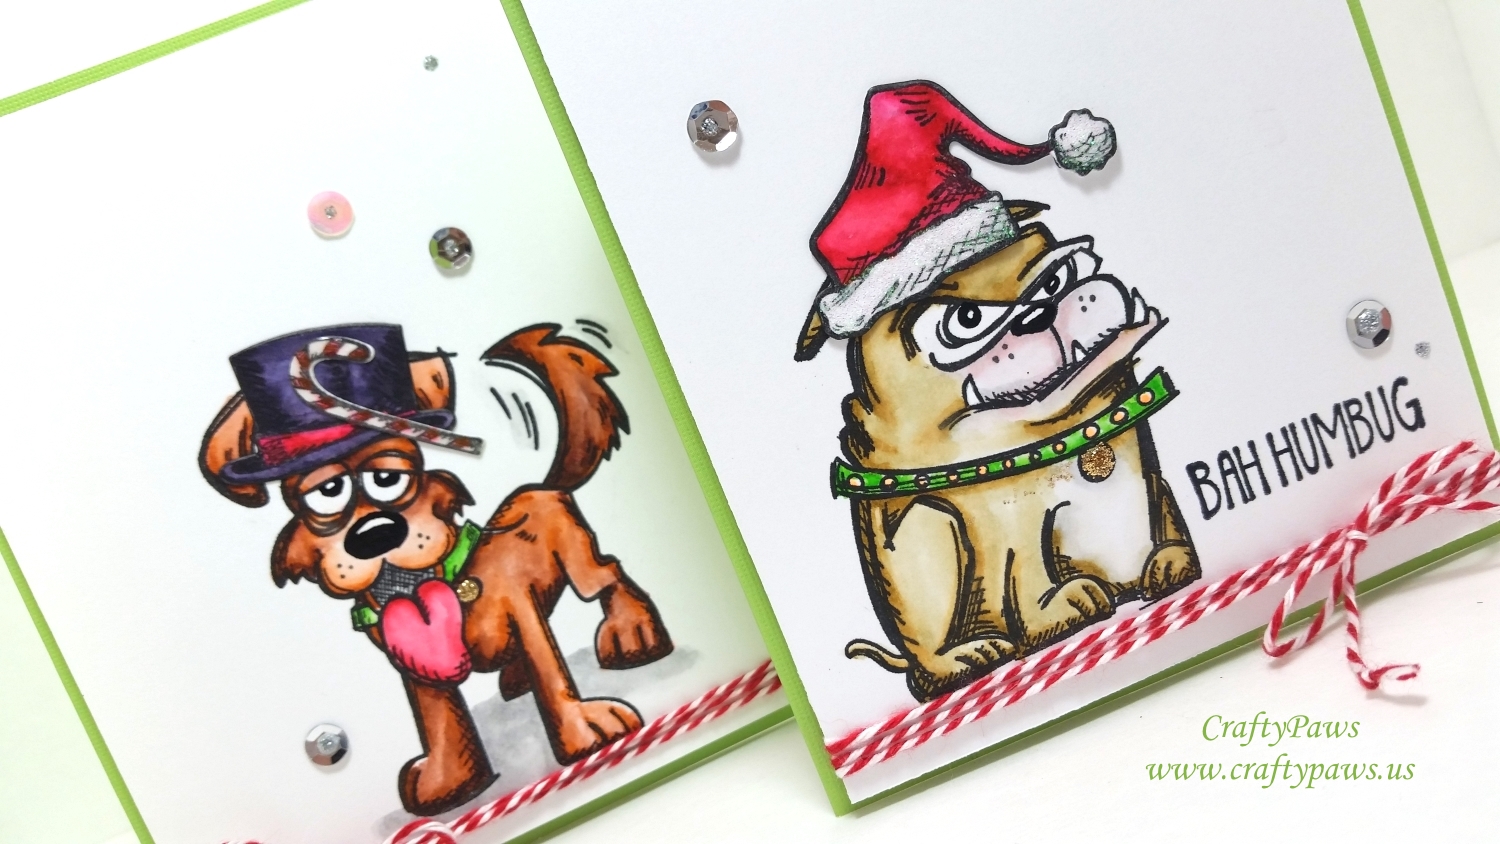
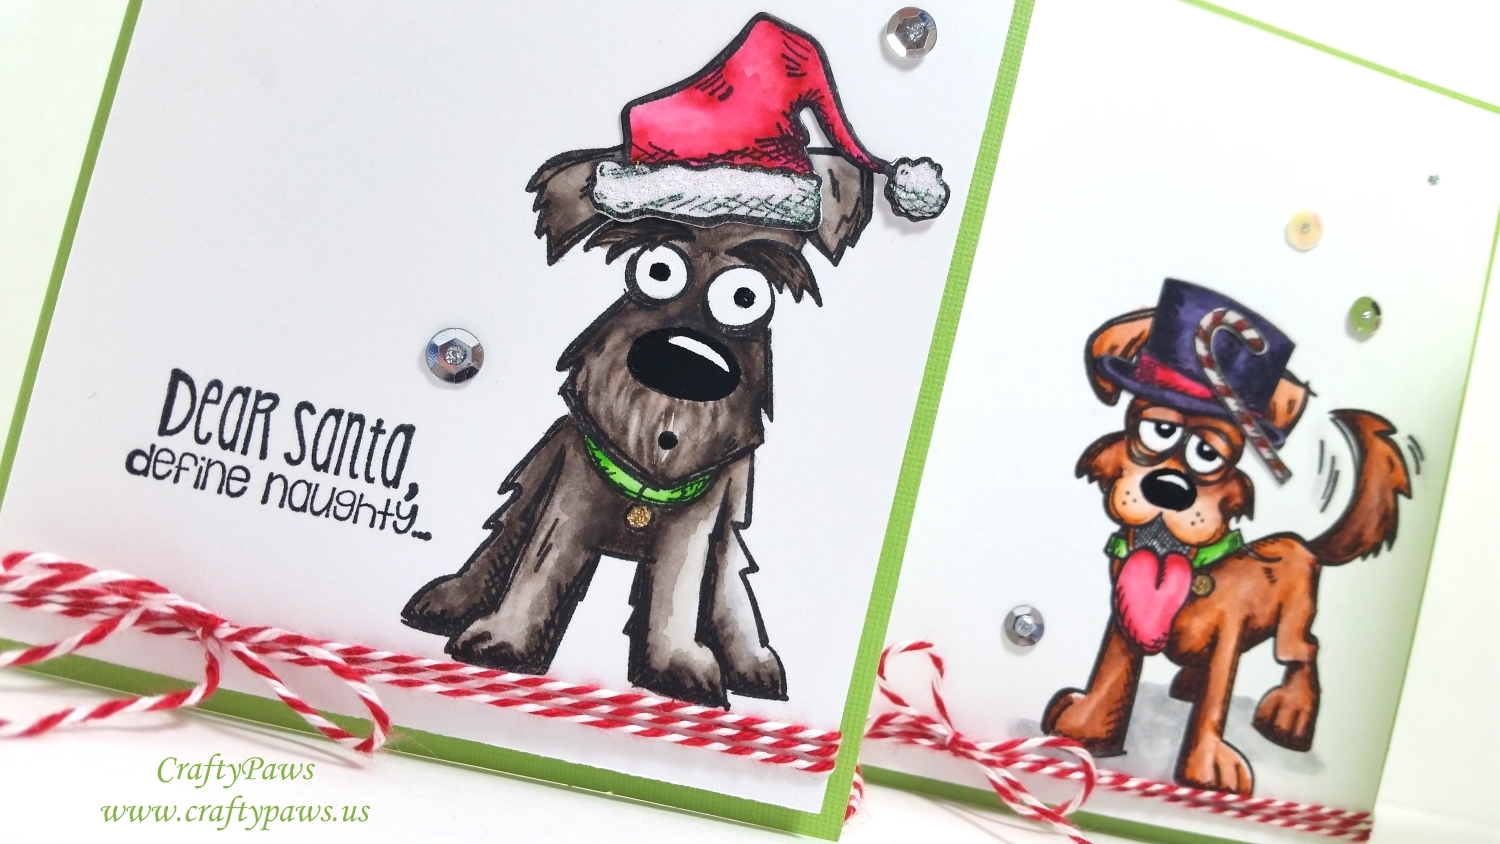
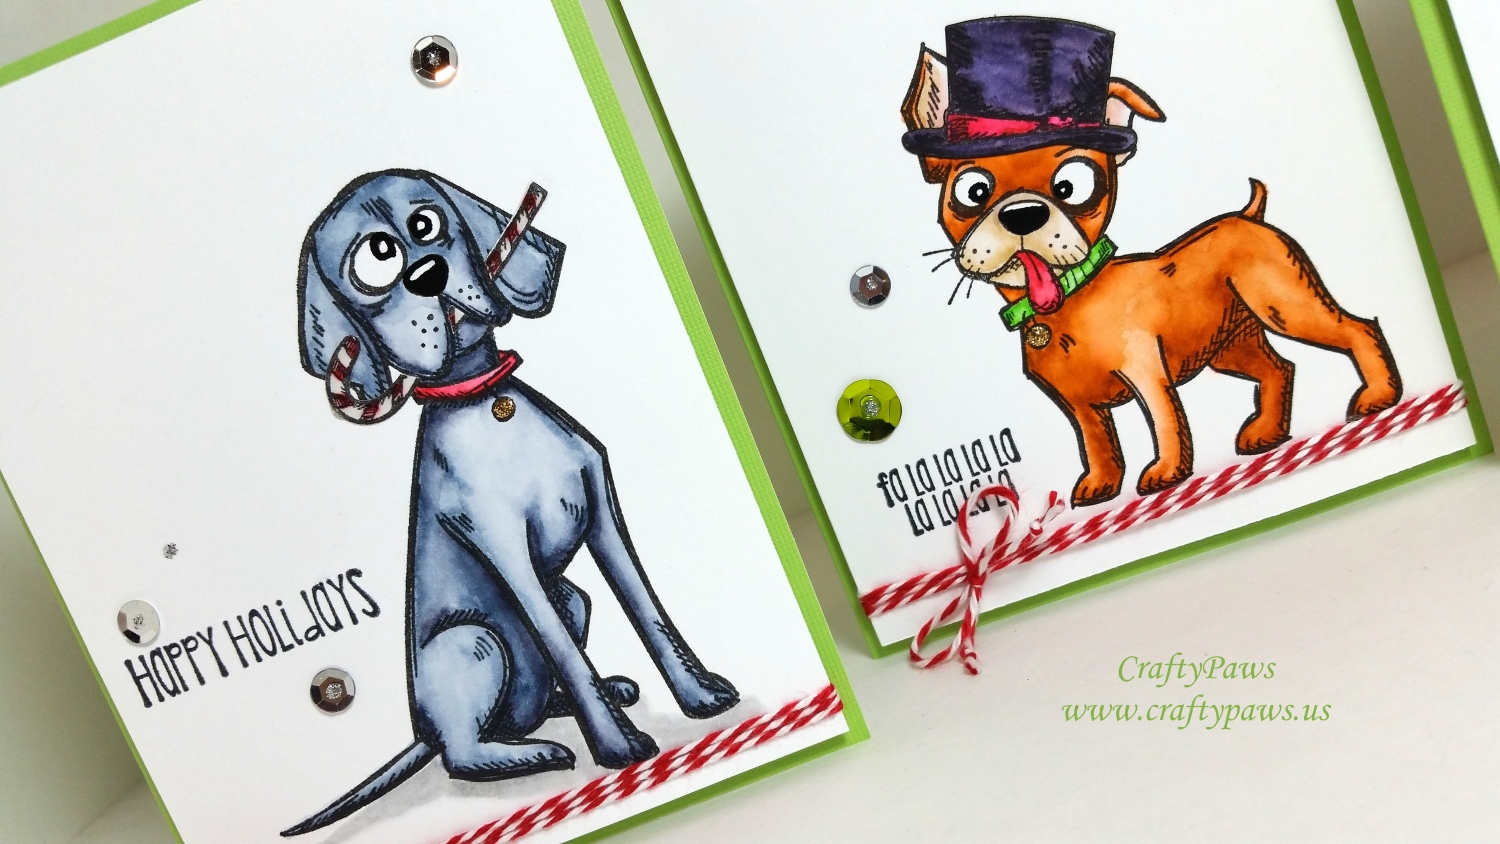
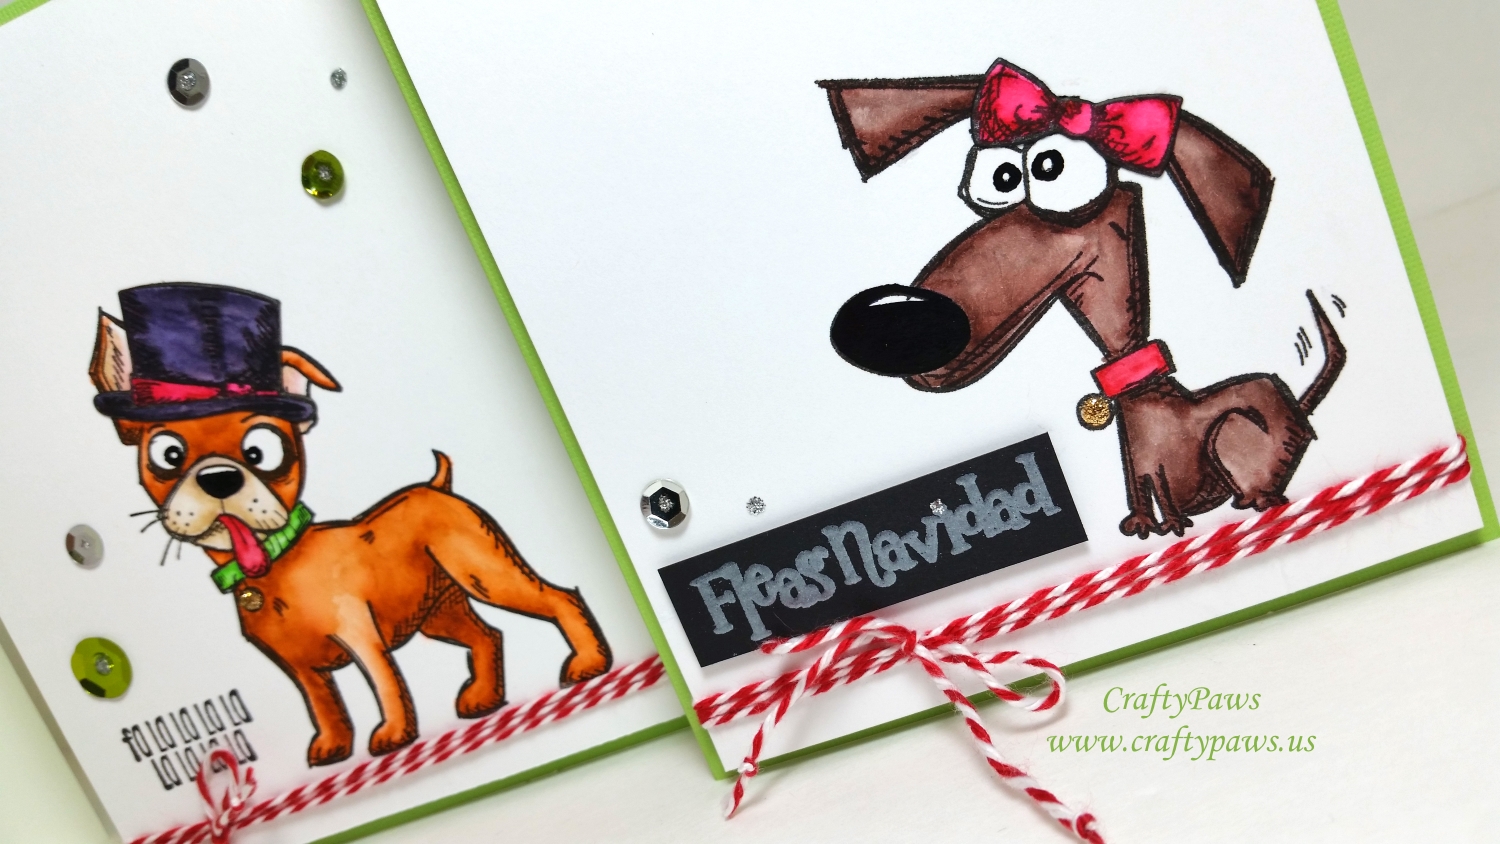
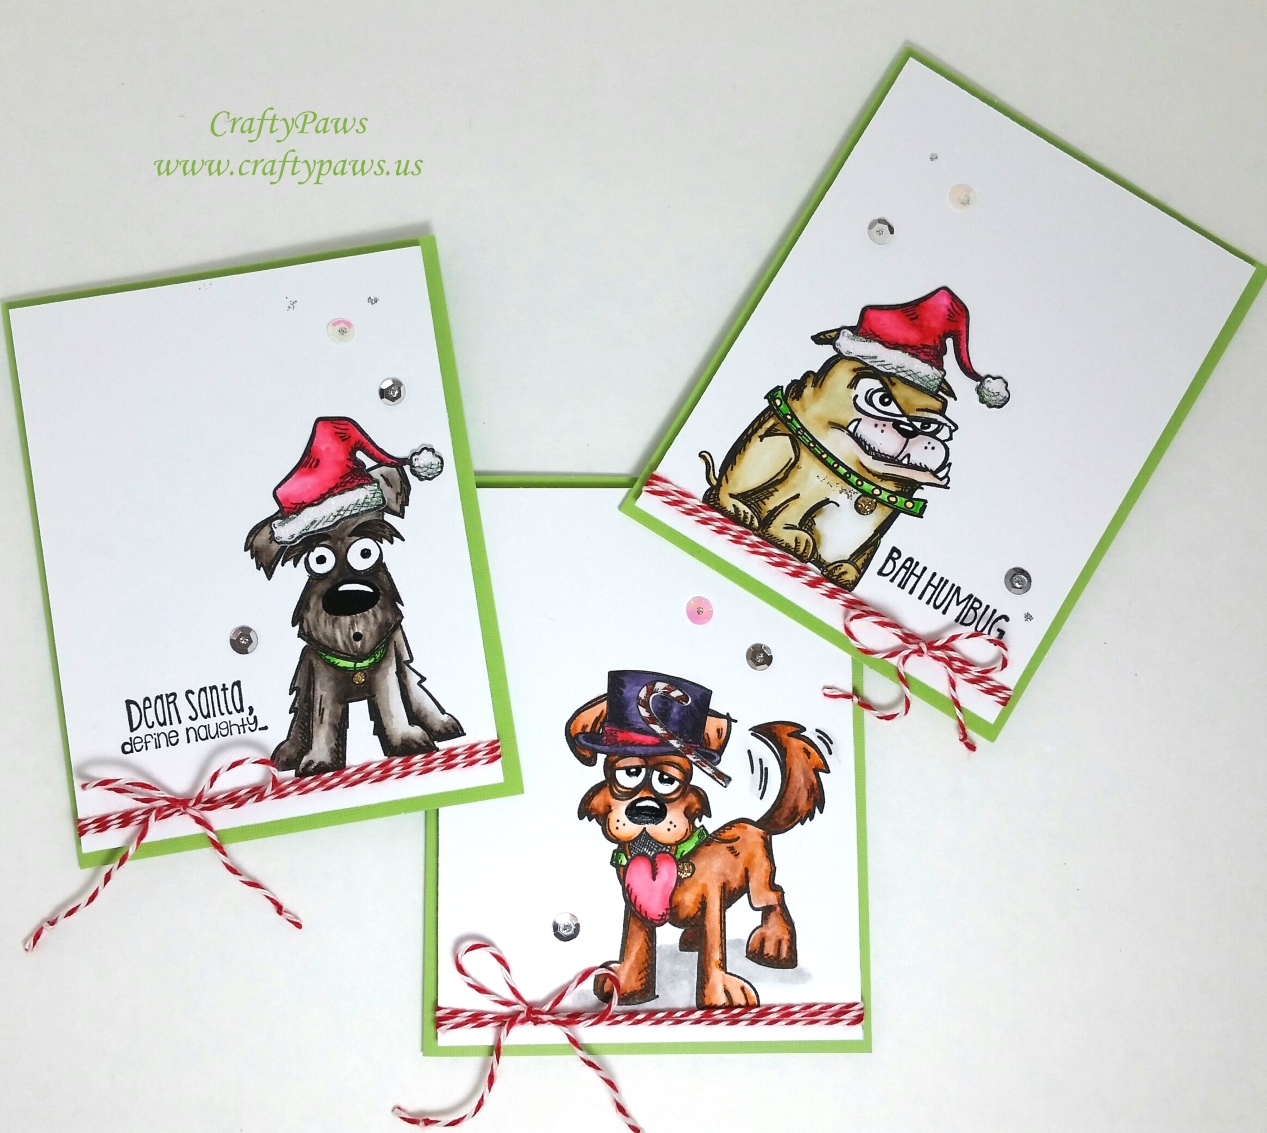 I stamped the dogs directly onto Strathmore Bristol Paper that I cut down to 4″ x 5.25″ and stamped out all the accessories onto scraps that I die cut out with the Crazy Things Coordinating Dies (I am a huge fan of these dies because they don’t leave any white border around the images so they don’t disrupt the look of any scene building) to mix and match with the dogs on the cards. The following are the colors I used (dogs listed clockwise from top left in main picture):
Weimeraner: Blue Gray (090) and Gray (092)
Dachshund: Dark Brown (062)
Boxer: Brown (060)
Scottish Terrier: Gray Brown (094) and Dark Brown (062)
Bulldog: Light Gray (091), Oatmeal (064), Dark Oatmeal (066) and Light Pink around muzzle
Shaggy Mutt: Brown (060) and Dark Brown (062)
I also colored in the accessories with Geranium Red (029), May Green (047) and Black (010) and added Glossy Accents over the candy canes, iridescent glitter glue on top of the white fluffy areas of the Santa hats, and gold Distress Stickles over the dog tags.
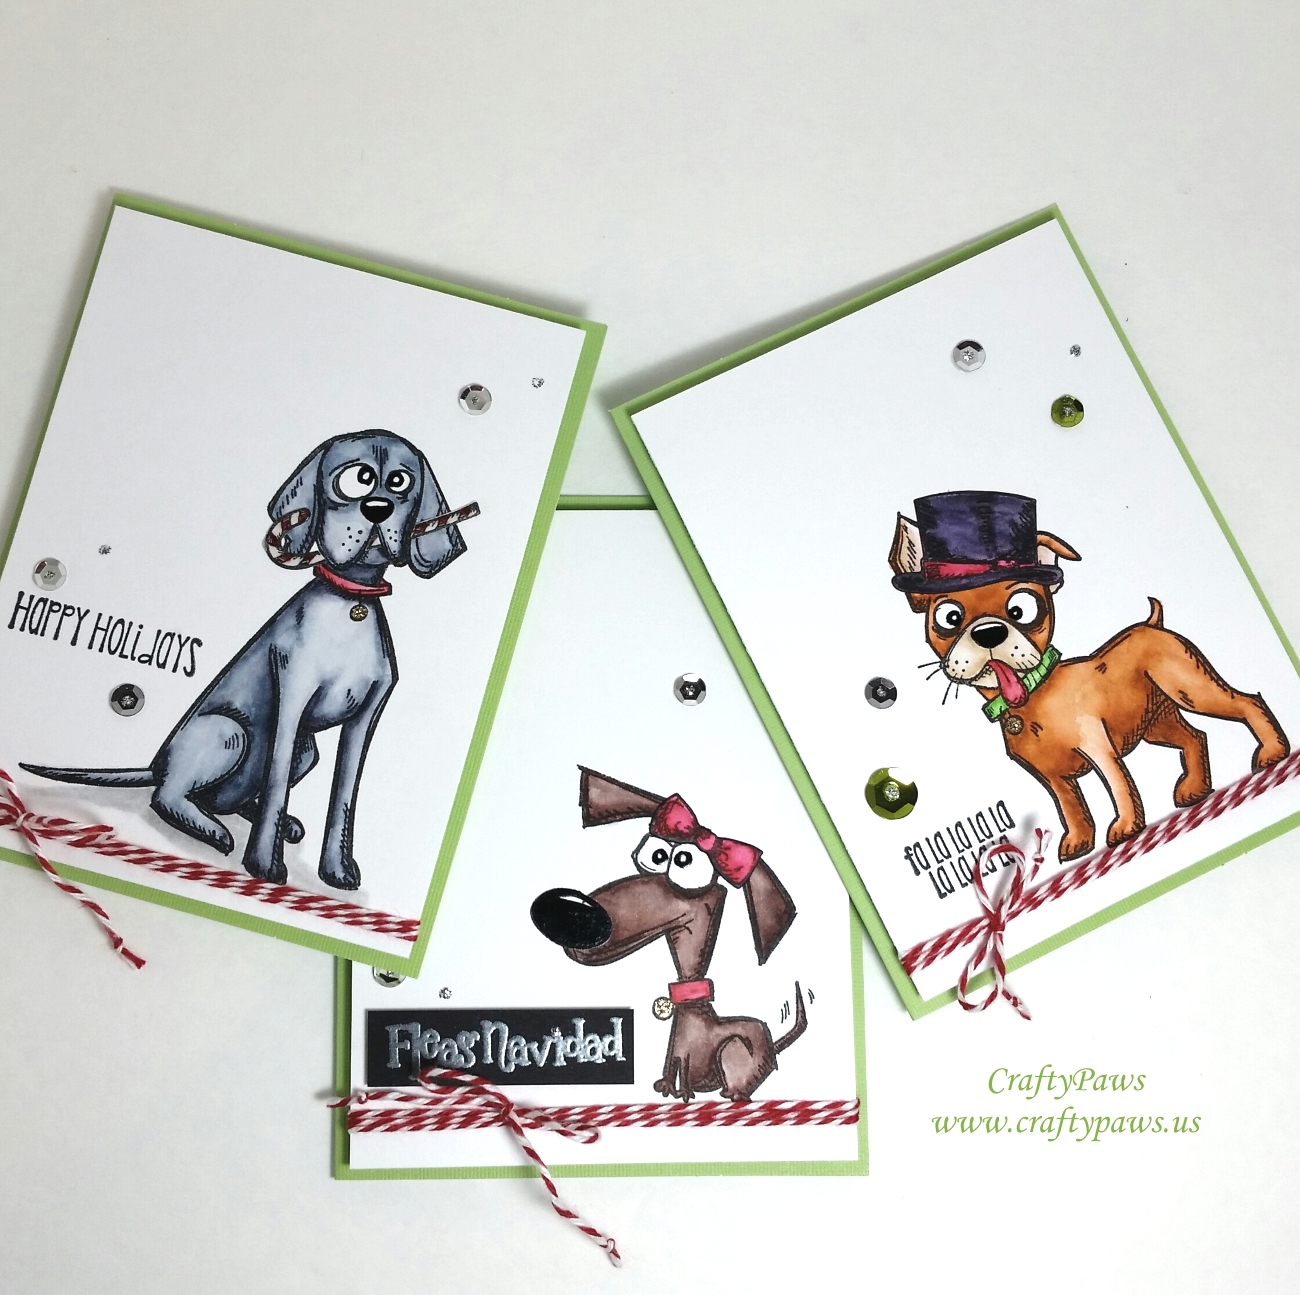 I had positioned each of the dogs in the lower left or lower right of each card front so that I would have the option of stamping out a sentiment just to the left or right of the dogs. Most of the sentiments are from the C.C. Designs “Snarky Christmas” stamp set (sorry, this is from 2014 and is retired), although I have one from My Creative Time “Christmas Doggy” (I smeared this one so I had to heat emboss this on black card stock to cover up the oops) and another from Prima “Merry Nice” (the “Naughty or Nice” inside the card with the Shaggy Mutt).
I also wrapped some red and white baker’s twine (from the Dollar Tree 3 pack!) 3 times around the card fronts and added a bow before popping up the whole card front with double sided foam adhesive onto green card bases from a Michael’s Hot Buy cards and envelopes set. Lastly, I added some well-positioned sequins onto each card with Glossy Accents and topped each sequin hole with silver Distress Stickles for a finished look.
The following is a short share and watercoloring tips video of a couple of the crazy dogs:
These cards are being entered into the following challenges:
Word Art Wednesday Anything Goes Challenge
Simon Says Stamp Monday Thinking of You Challenge
Simon Says Stamp Wednesday Thinking of You Challenge
Fab ‘n’ Funky Animals Challenge
Crafts Galore Encore Anything Goes Challenge
Creatalicious Anything Goes Challenge
Craft Your Passion Anything Goes Challenge
Addicted to Stamps and More Holiday Challenge – WINNER
MarkerPOP Sketch Challenge #107

]]>
 Since these cards are going to be for seniors, I wanted to have an elegant traditional look so I thought about using white poinsettia flowers as the main focal point. I found an image of one online that I printed out and fussy cut out. I bordered half of the petals with Champagne Stickles and used an embossing tool to give the flowers some sparkle, texture and dimension. I layered these on top of gold foil paper doilies and layered one of these flower-doily combos on top of embossed textured card stock that I inked with Hickory Smoke Tim Holtz Distress Ink. I layered the other on top of polka dot vellum that I adhered onto a corrugated kraft card base. All this layering was great and gave a nice finished look, but I thought they were a little too predictable.
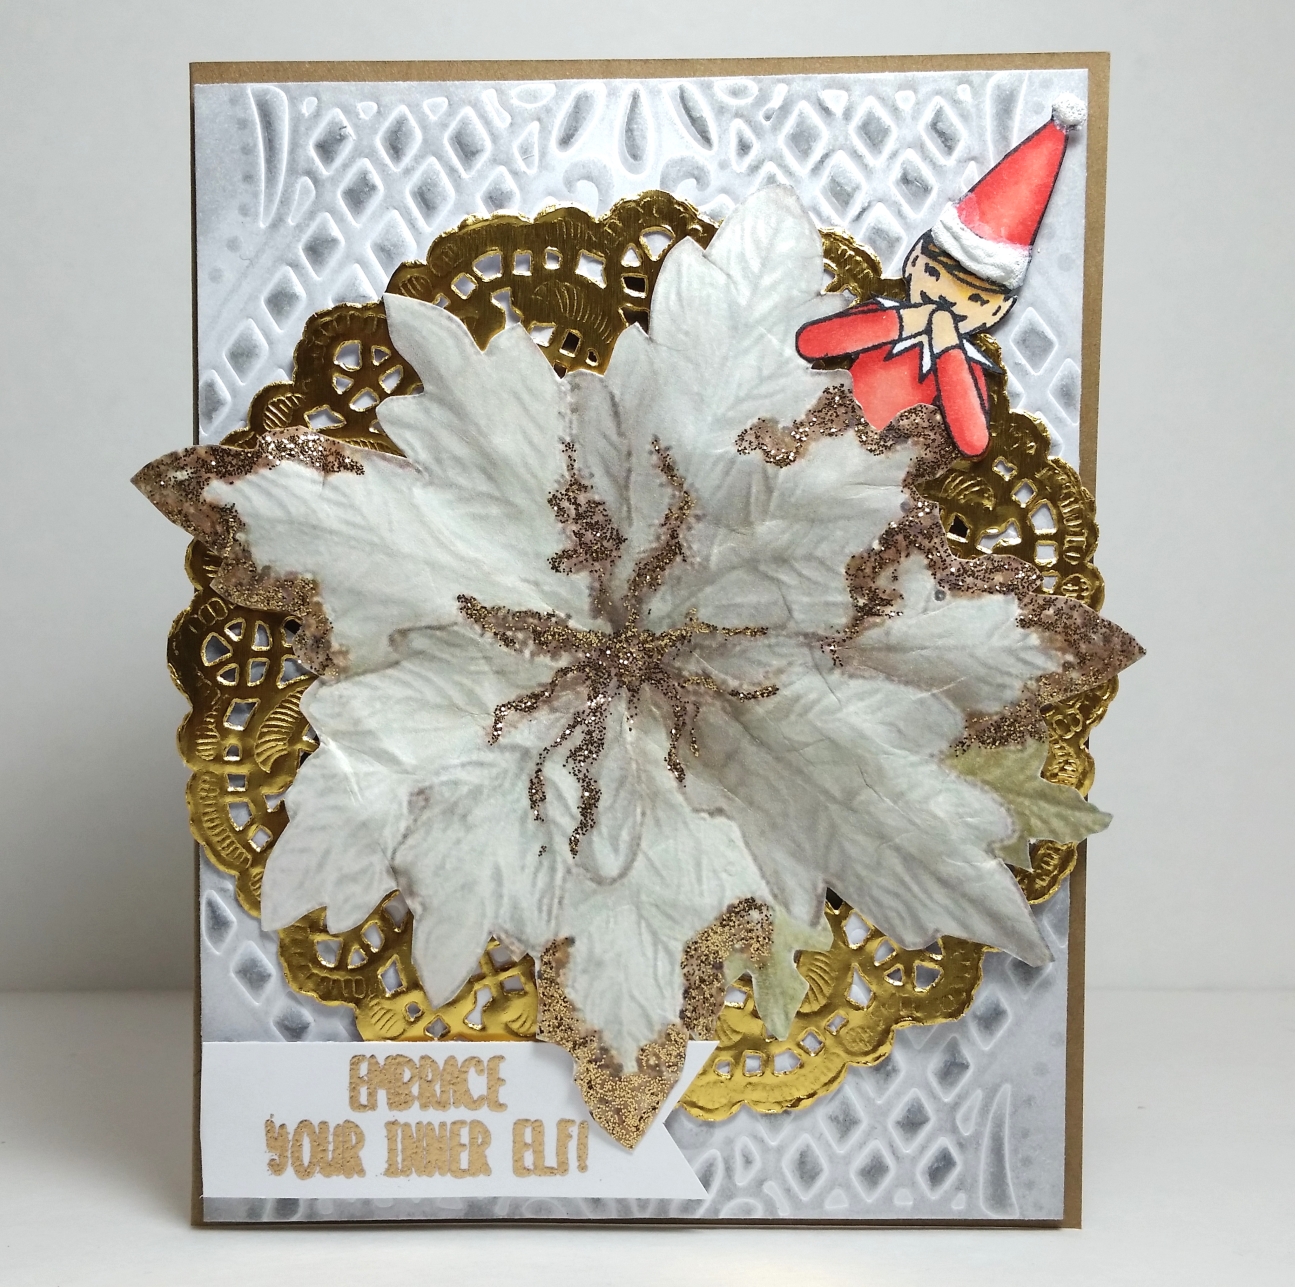 So to add a little whimsy, I decided to use the Essentials by Ellen “ELF’D” stamp set that I fell in love with but only got to use once last year. I stamped out a couple of them and colored them up with the following Copic colors:
Skin: E51, E53 and BV000 (for shadow); Hair: E55 and Y35; Red elf: R14, 17 and 37; Coral elf: R21, 22 and 24; and Black boots: 100
I fussy cut them both out and inked the edges so you can’t see the white edge of the paper. Then for the fluffy white parts of their hats, I used DecoArt Snow Writer to add some dimension and texture.
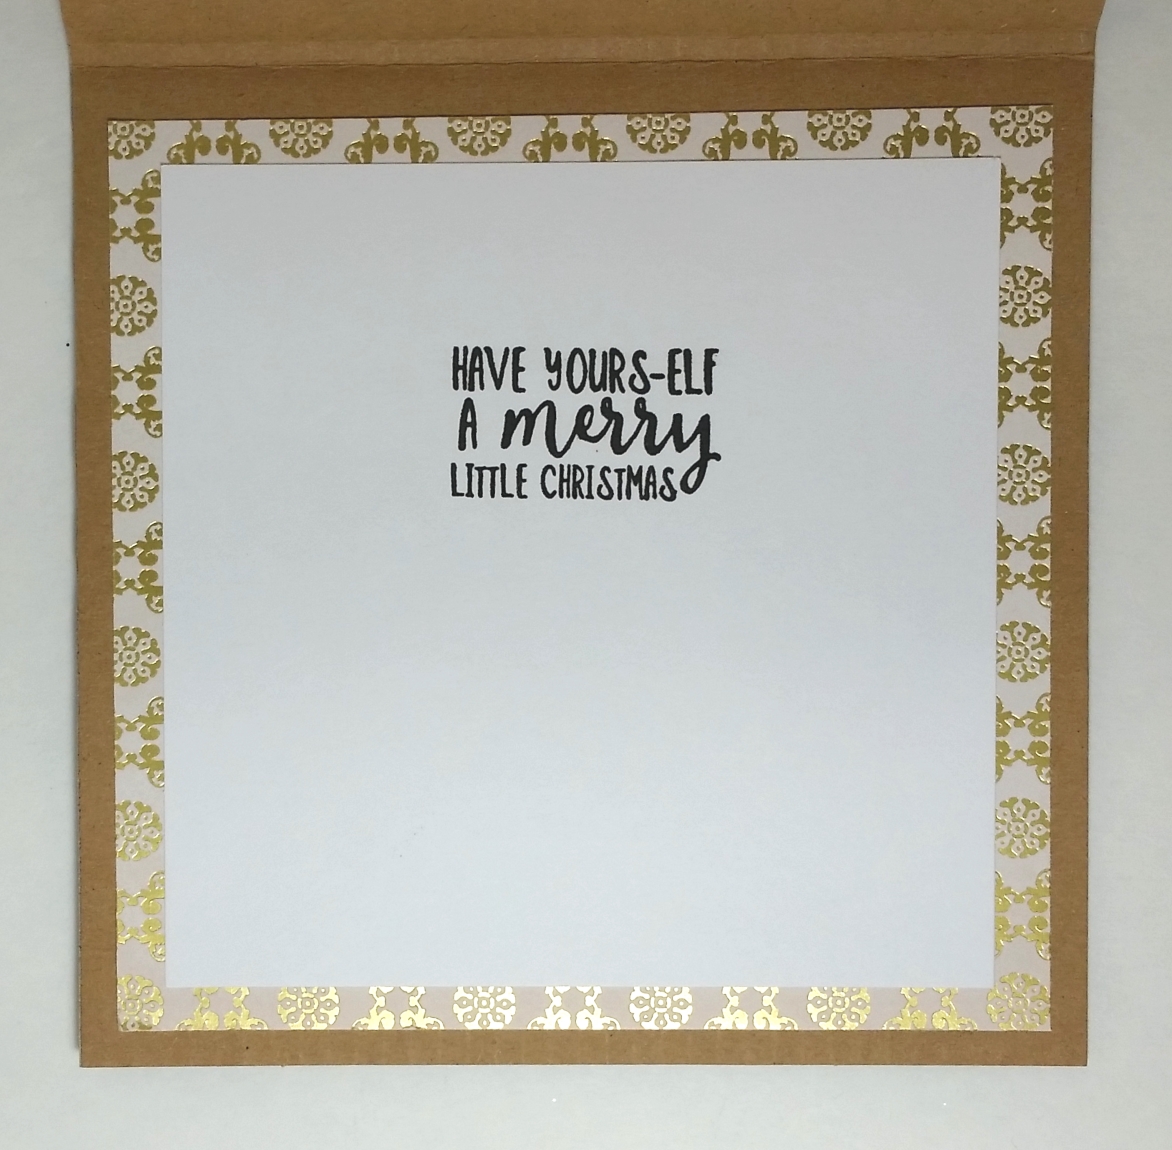 Oh yes, these little cuties–one popping up from behind a flower and the other sitting in the center of a flower–added just the right touch of fun. I heat embossed the “Embrace Your Inner Elf” sentiment with Ranger Queen’s Gold embossing powder and hand cut these sentiments into a fishtail banner. I popped these up on foam dots and added them to the lower left of the card fronts. I kept the insides of the cards simple, simply matting white card stock with some gold foil patterned paper scraps and stamping out another sentiment from the stamp set: “Have Yours-Elf A Merry Little Christmas.”
These Christmas cards are going to be entered into the following challenges:
Simon Says Stamp Wednesday Make for the Border Challenge
CAS-ual Fridays Time to Color Challenge
Lil Patch of Crafty Friends Anything Goes Challenge
Fab ‘n’ Funky Anything Goes Challenge
Word Art Wednesday Anything Goes Challenge
Creatalicious Anything Goes Challenge
Craft Your Passion Anything Goes Challenge
Crafty Gals Corner Any Holiday Challenge
Addicted to Stamps and More Make Your Mark Challenge
Essentials by Ellen August Pin-Sights Challenge – white flower, coral color (popping up elf)
]]>
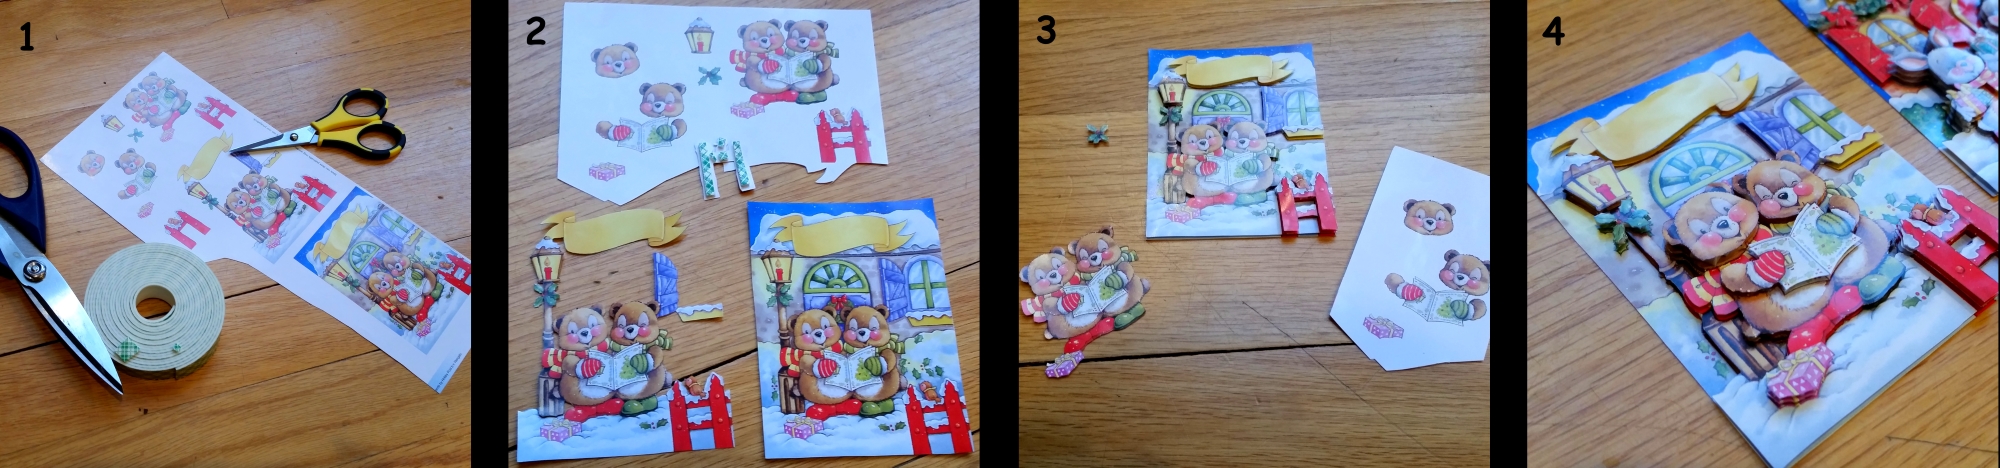
Without taxing my weary head to much, I thought the best way to do that would be to try my hand at a couple more of those 3D layered cards so I pulled out another card kit from my friend Jane Nielsen. It took a lot of detailed fussy cutting for each layer, and lots of double sided foam adhesive, but I think the images were so adorable that the cards turned out super cute.
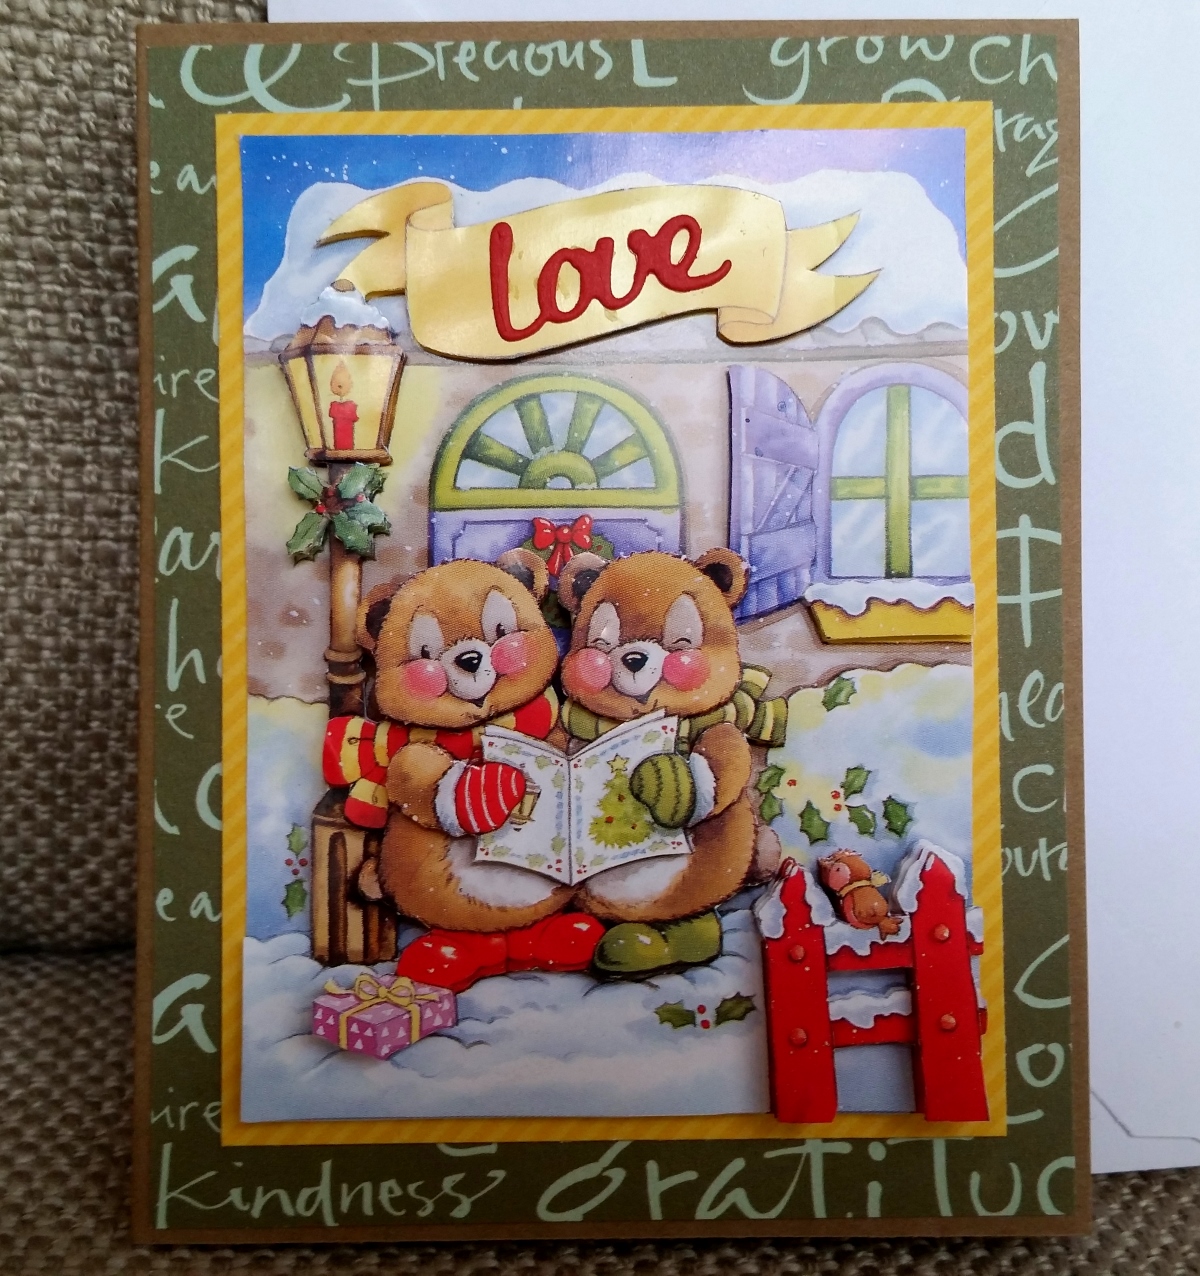
I got to use up more scraps from my scrap box (YAY!) to frame the layered images and create the card base. Other than that, the only other additions are the “xoxo” and “love” die cut words that I cut out of red card stock using the Diemond Dies Word Die Set #1. This is a fabulous, really versatile die set that I have used countless times.

These two Christmas cards are being entered into the following challenges:
Through the Craft Room Door Anything Goes Challenge
613 Avenue Create Anything Goes Challenge
Lil Patch of Crafty Friends Anything Goes Challenge
Card Mania Color Combo Challenge
]]>
 I did a few different versions, but the one that I made the most of was using my digi called, “Happy Howlidays.” I colored up a couple of different versions and settled on this one with teals, pink, red and of course the pups are colored like my Biscuit and Bandito. I used the following Copic colors: Santa outfit and Deer’s bow: R22 and 24; Deer Poodle: E50, 51 and 53; Santi-Paws Dog: E23, E25 and W1; Sled: BG10, 23 and 45; Bag of toys: RV21 and 13; Antlers: W1; Straps of harness: E74. To add a little interest, I used a Sakura White Gelly Roll Pen
 to add some dots to the bag of toys, and a Sakura Metallic Gold Gelly Roll Pen
to add some shimmer to the bell around the Deer Poodle. I added some shine to the antlers, noses and eyes with Glossy Accents. Lastly to add some fun to the cards, I used White Uchida Liquid Applique
around the Santi-Paws outfit and puffed up the faux fur areas. This is so easy and fun to watch (like heat embossing on steroids). I LOVE this effect!
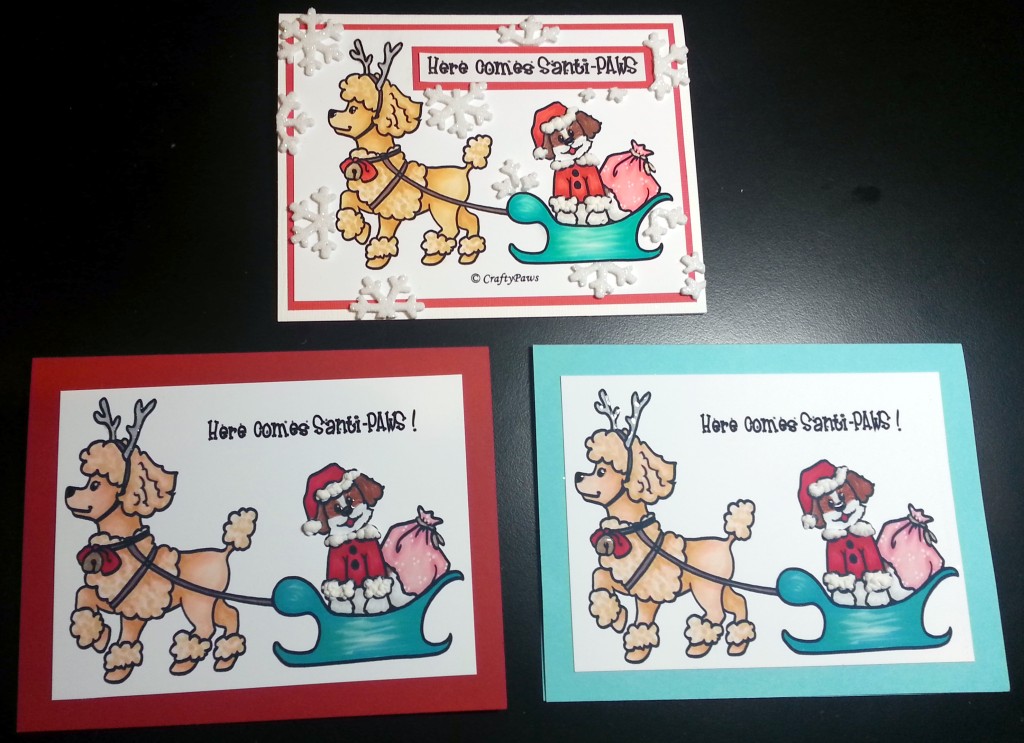 Each of the cards are a little different in terms of card base colors, added stickers, patterned papers, and the addition of lace, but overall they were made in more or less assembly line fashion (a first for me, as I normally don’t make more than 1 or 2 of any one thing). I scanned in the colored digi, added the new sentiment, “Here Comes Santi-Paws” (either by banner or directly above the digi), and printed them out. For some cards, I just printed out the whole colored digi and used that as the top layer of the card. For other cards, I used my Silhouette Cameo
 to cut out the scanned in digi so that I could put them on snowflake embossed backgrounds. SIDE NOTE: I got my Silhouette Cameo recently (an early Christmas present), and I have to say this may be the best crafty purchase I’ve ever made. It can fussy cut out detailed images in seconds! Seriously, this is my new favorite craft tool.
The top card is being entered into the Simon Says Stamp Wednesday Anything Goes Challenge and
The Naughty or Nice Winter Holidays Challenge
I hope you are all having a wonderful holiday season and that 2015 brings you happiness, prosperity and wonderful crafty adventures! Thanks for stopping by! WOOF
]]> cute. But, yes, they are little. The largest ones are about 1.5″ tall and the smallest are just under 1″. Assembled together they make adorable cards (as you can see), but singly, they could be great for little gift tags.
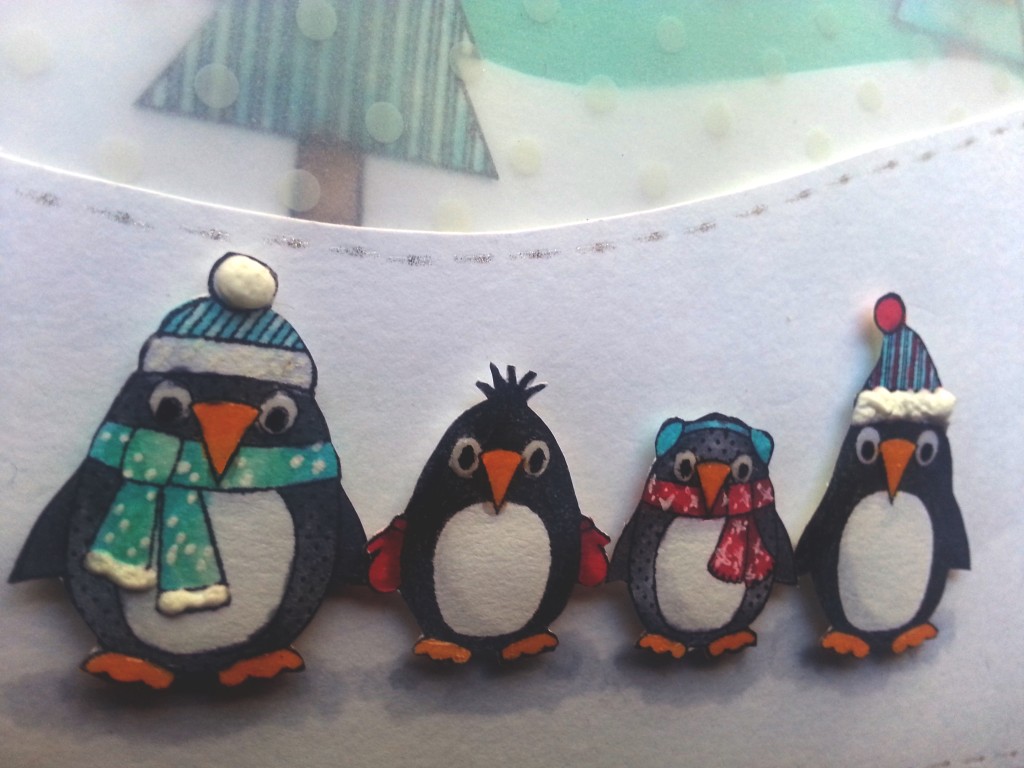
I decided to try one of my new favorite color combinations: red, teal, white, black and kraft (that’s in the Christmas tree trunks) and used the following Copic marker colors: Red: RV29 and R39; Teal: BG10, 13, and 45; White (well actually greys: C1, 3, 5, and 7; Black: Copic multiliner in 0.3; Kraft: E70 and 74. Ok, there is also a teeny pit of Y38 for the beaks and feet of the penquins. 🙂 I also added some dot and hash details to the scarves on two of the penguins using a Sakura White Gelly Roll Medium Point Pen.
.
These cards were all about playing with some fun crafty goodies. I wanted to play with some white polka dot vellum paper because I thought it could help make a snowy scene by layering it with some hand cut snow banks. I tried using some glittery white embossing powder (I must say that I didn’t like the fuzziness created by the glitter–or maybe that’s from my heavy handed stamping with VersaMark Ink) to stamp the sentiment “Christmas Blessings” on top of the vellum. I also tried Uchida Liquid Applique Marker in White for the puffy parts of the hats and scarves. Not everything came out perfectly, but that’s ok since these are handmade cards after all.
For added shimmer and sparkle. I added Glossy Accents on the beaks, feet, and eyes of the penguins. I also added faux stitch lines on all the snow banks using a clear star Gelly Roll pen. Finally I twinkled up all the Christmas trees with both the clear star Gelly Roll pen and the metallic gold Gelly Roll pen.
The following is a process video of these cards:
These cards are being entered into the Inspired by Stamping #87 Color Challenge and
The Simon Says Stamp Anything Goes Monday Challenge and
The Addicted to Stamps Holiday Challenge and
The Paper Nest Dolls Anything Goes Challenge
Thanks for stopping by. Hope you’ll consider subscribing. Have a great day! WOOF
]]>