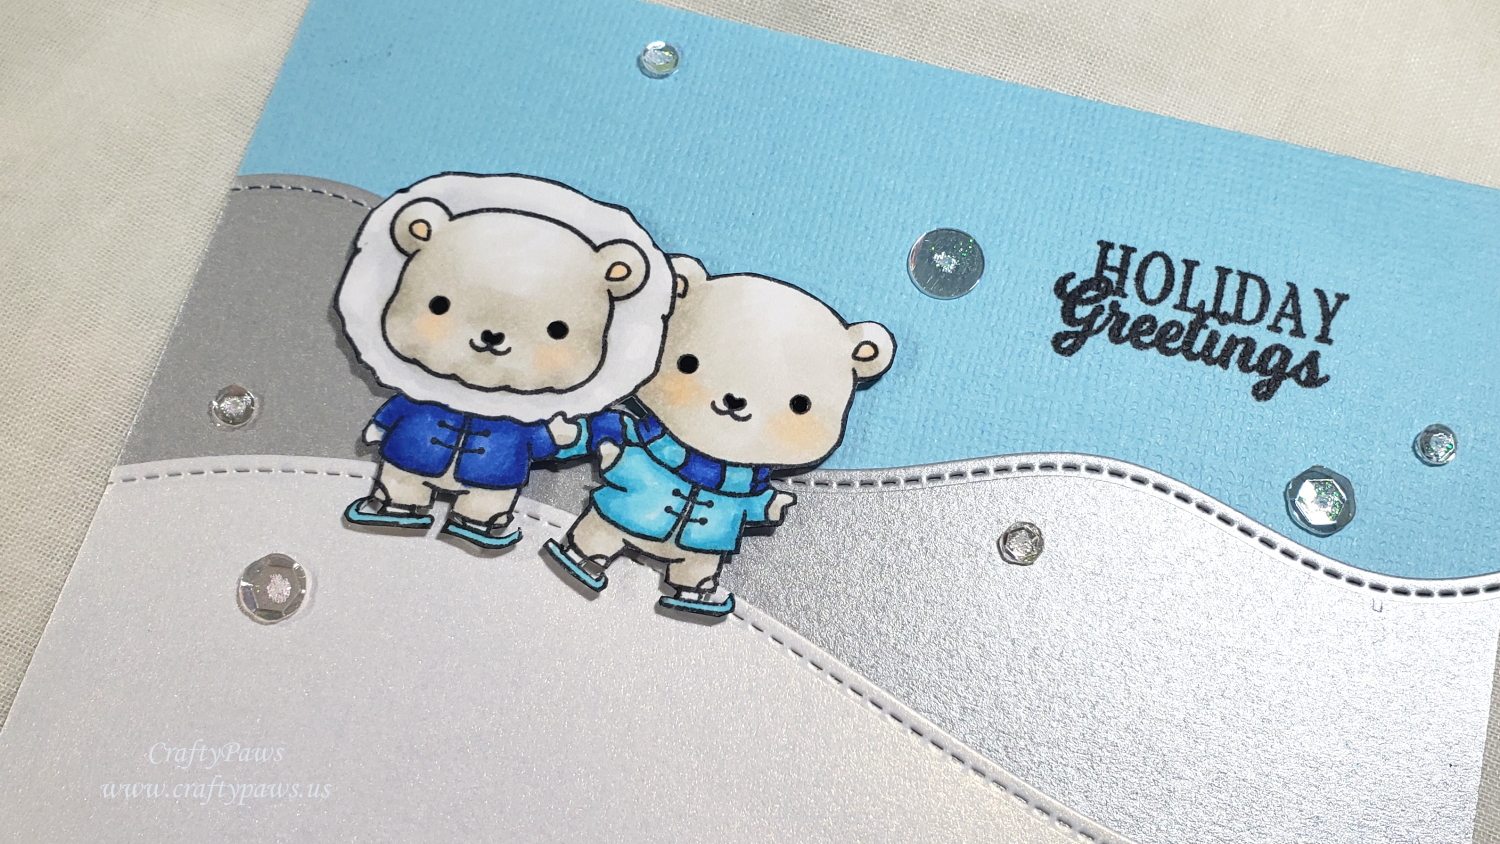
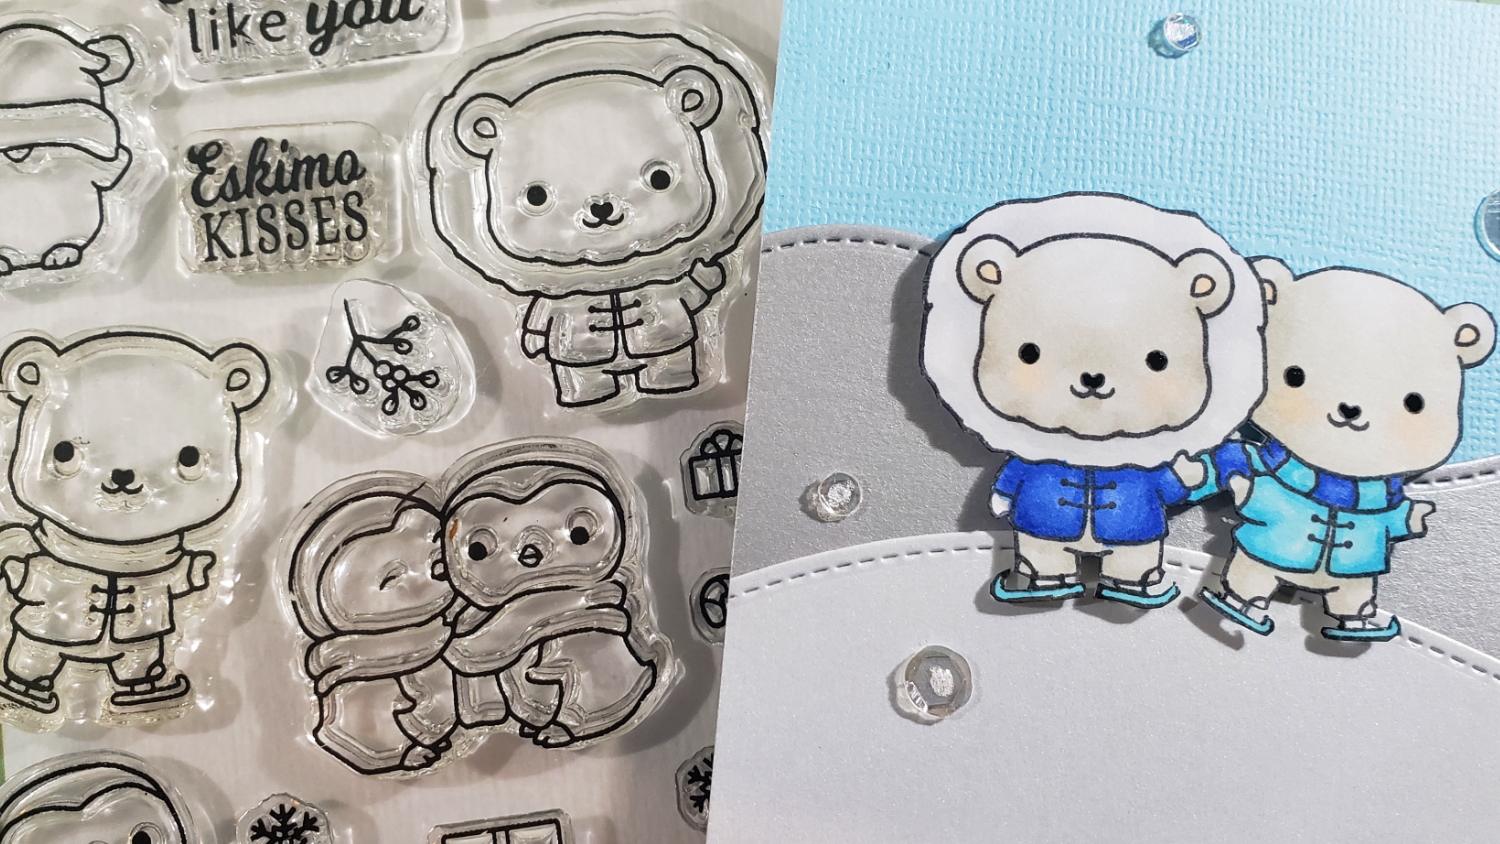
I Copic colored these cuties with just some blues and some warm and whites/greys to keep the scene looking cool:
Bear fur: W0 and W1 with a hint of blush to the cheeks and inside ears with E000
Fur trim on coat: C00 and C0
Dark blue: B24 and B28
Light blue: B00 and B01
I also used a Copic Multiliner Black Pen in 0.05 pt to doodle on skates onto the bear with the coat and stripes onto the scarf of the other bear just to make them coordinate better together. Lastly to add a bit of shine, I used a Sakura Black Glaze Pen on the noses and eyes.
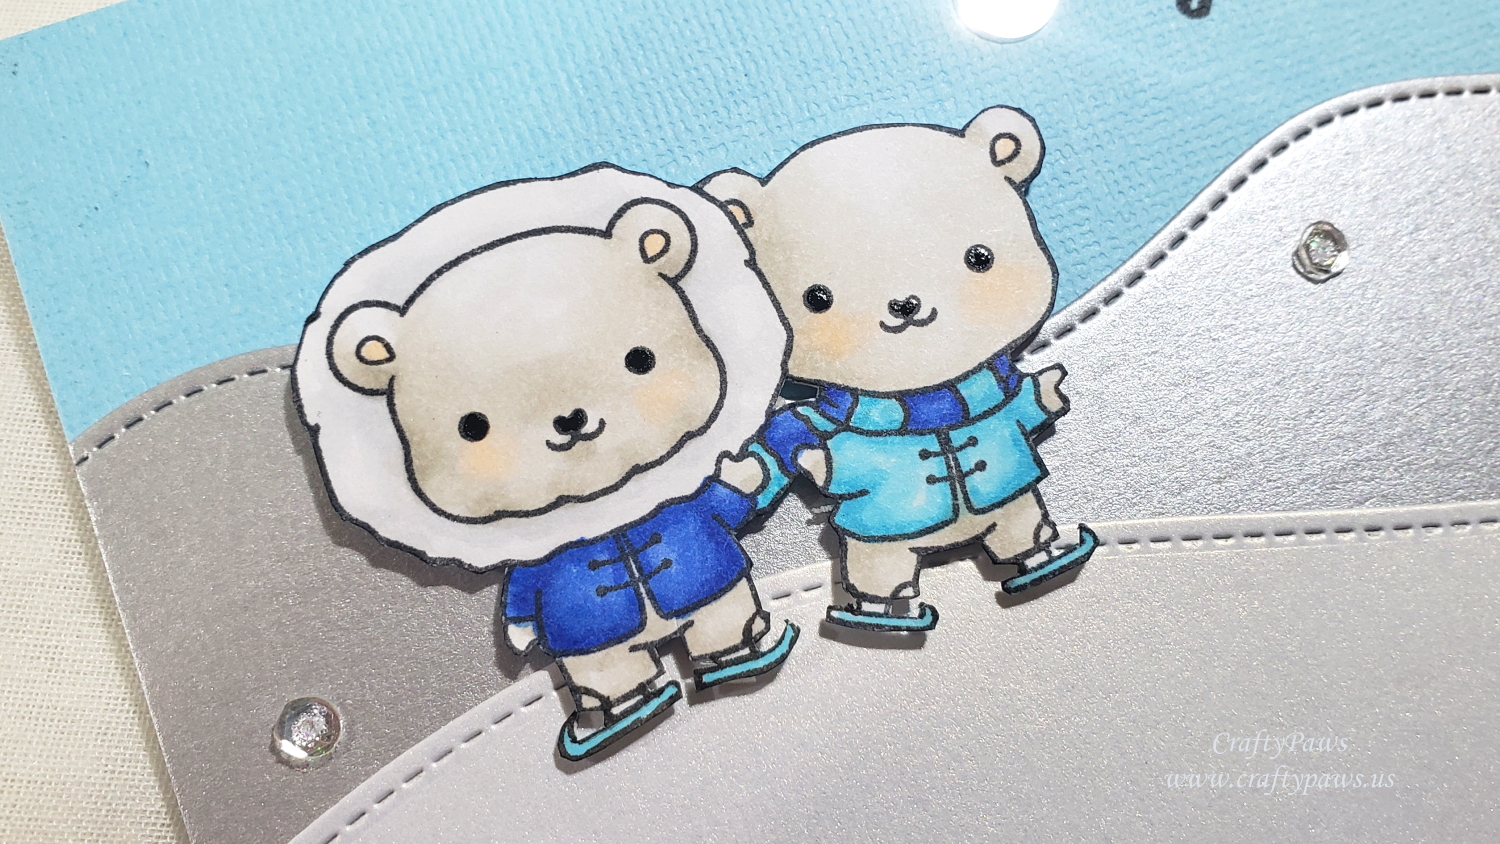
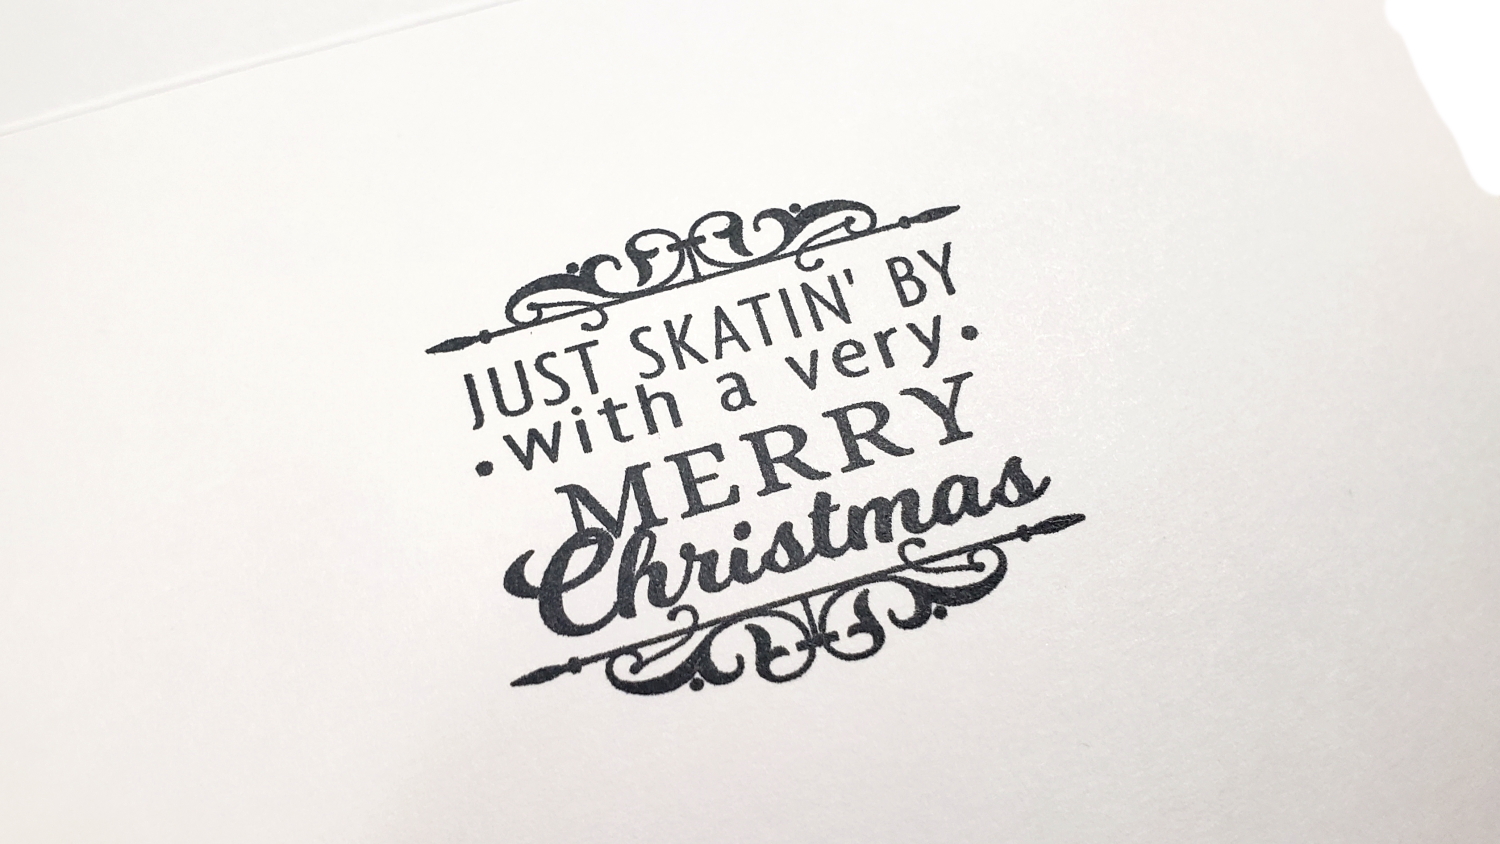
For the “scene” I used some shimmery silver or cool grey and white card stock and die cut “snow banks” with Lawn Fawn Stitched Hillside Dies. The sky is just some scrap pale blue card stock. The sentiment on the front is a simple “Holiday Greetings”, and the inside sentiment is the longer, perfectly coordinated sentiment, “Just Skatin’ By with a Very Merry Christmas”, both from the same Sugar Pea Designs “Eskimo Kisses” stamp set.
For some added sparkle, I added 7 (I love adding embellishments in odd numbers) sequins of different sizes to the card front. I used glitter glue to adhere them, adding even more shine.
CLICK on the following picture to watch the process video:
Disclosure: Many of the supplies I’ve used for today’s project are linked. Some may be affiliate links, which means if you make a purchase I receive a small commission at no extra cost to you. I truly appreciate your support toward the costs of running this blog!
This card is being entered into the following challenges:
MFT Stamps Sketch Challenge 521
MFT Stamps Color Challenge 156
Simon Says Stamp Monday Celebrate Challenge
Simon Says Stamp Wednesday Sparkle and Shine Challenge
Creatalicious Anything Goes with Optional Christmas Challenge
Word Art Wednesday Anything Goes Challenge
Crafts Galore Encore Anything Goes Challenge
Crafty Gals Corner Tis the Season Challenge
Lil Patch of Crafty Friends Anything Goes Challenge
]]>
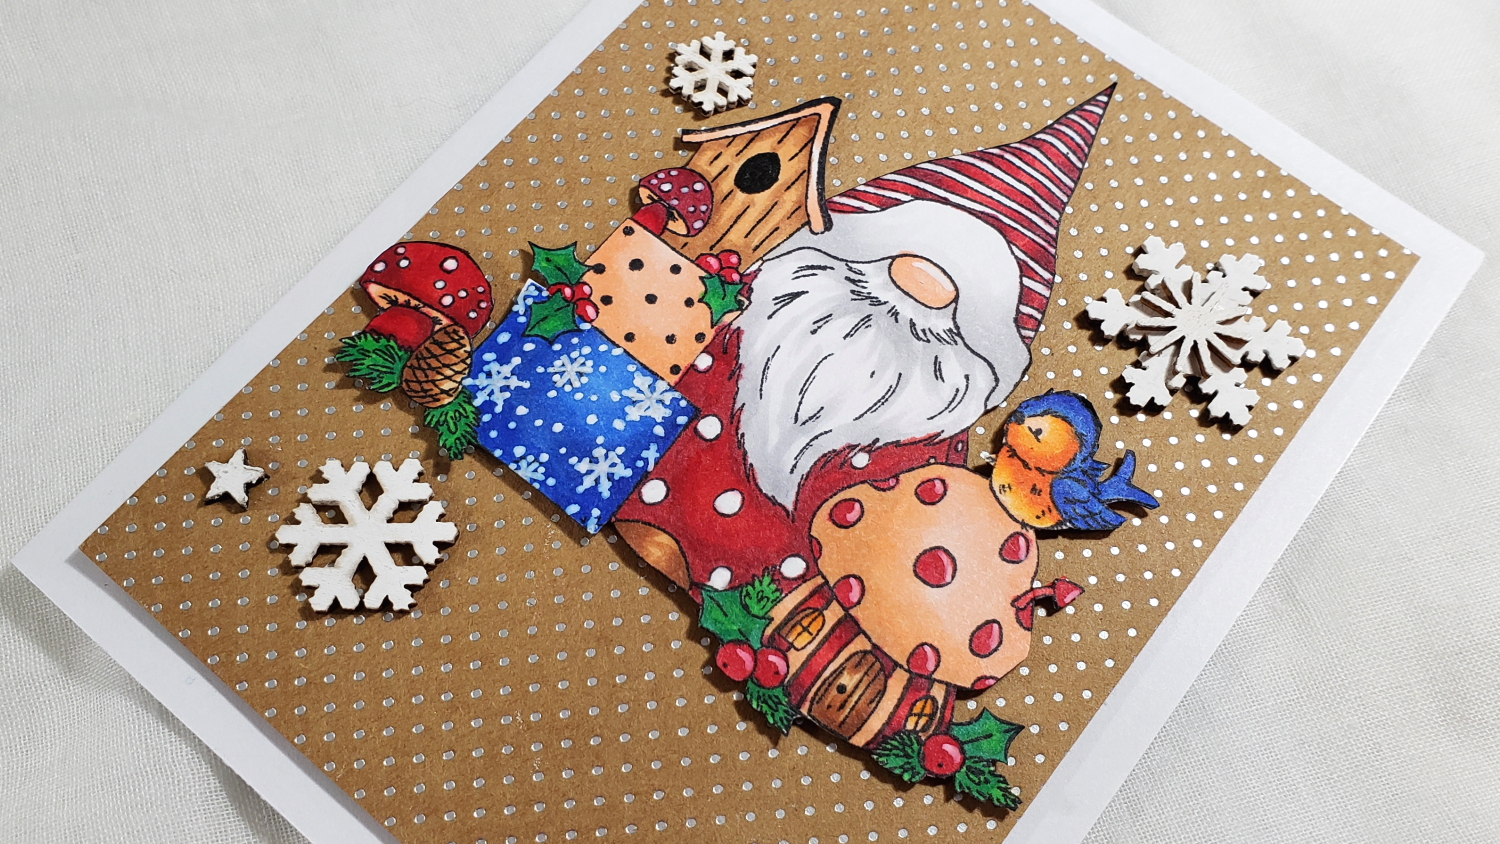
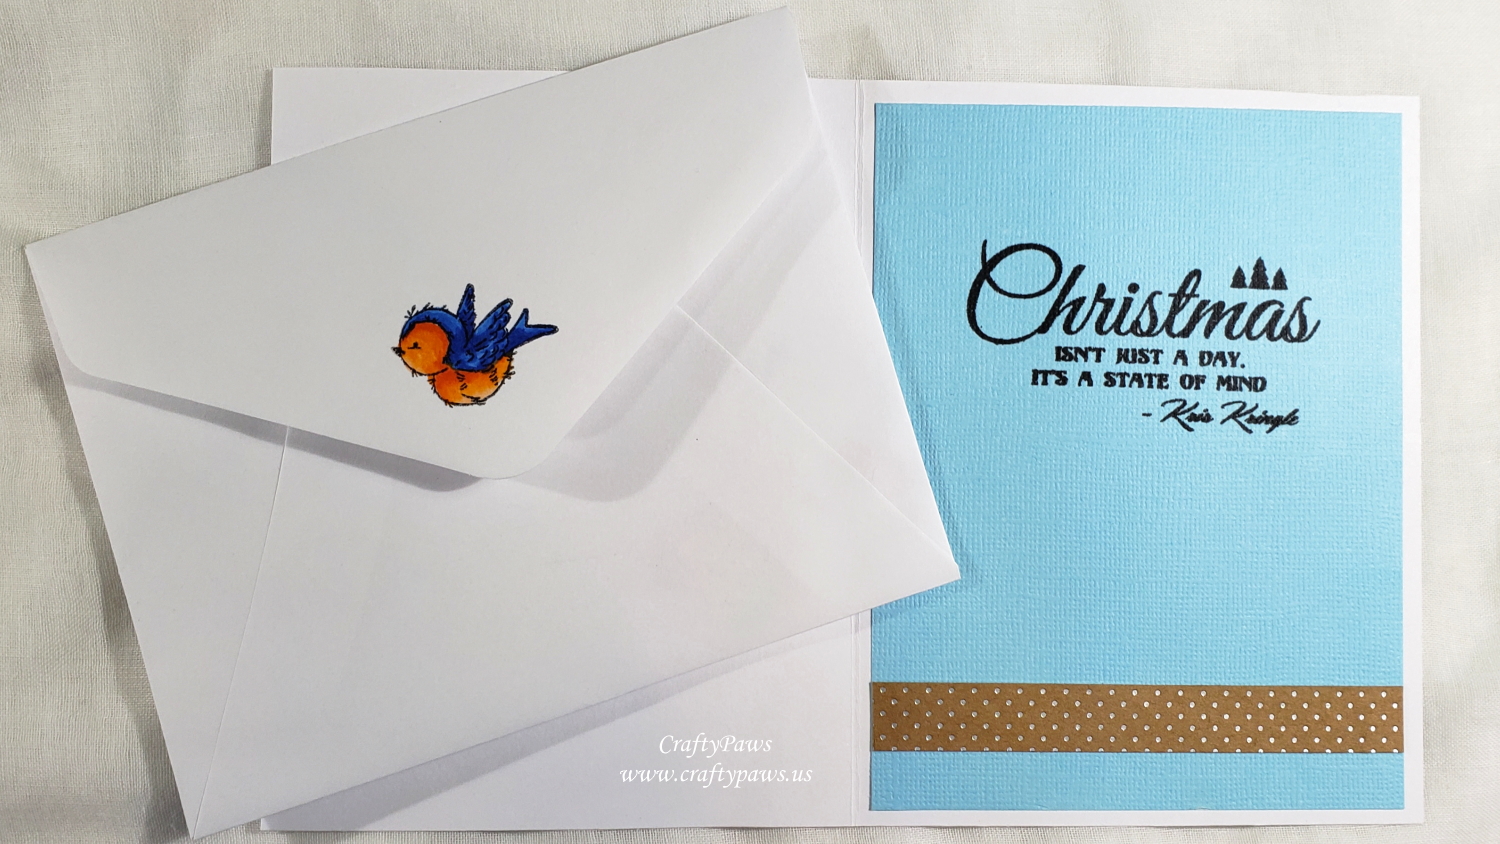
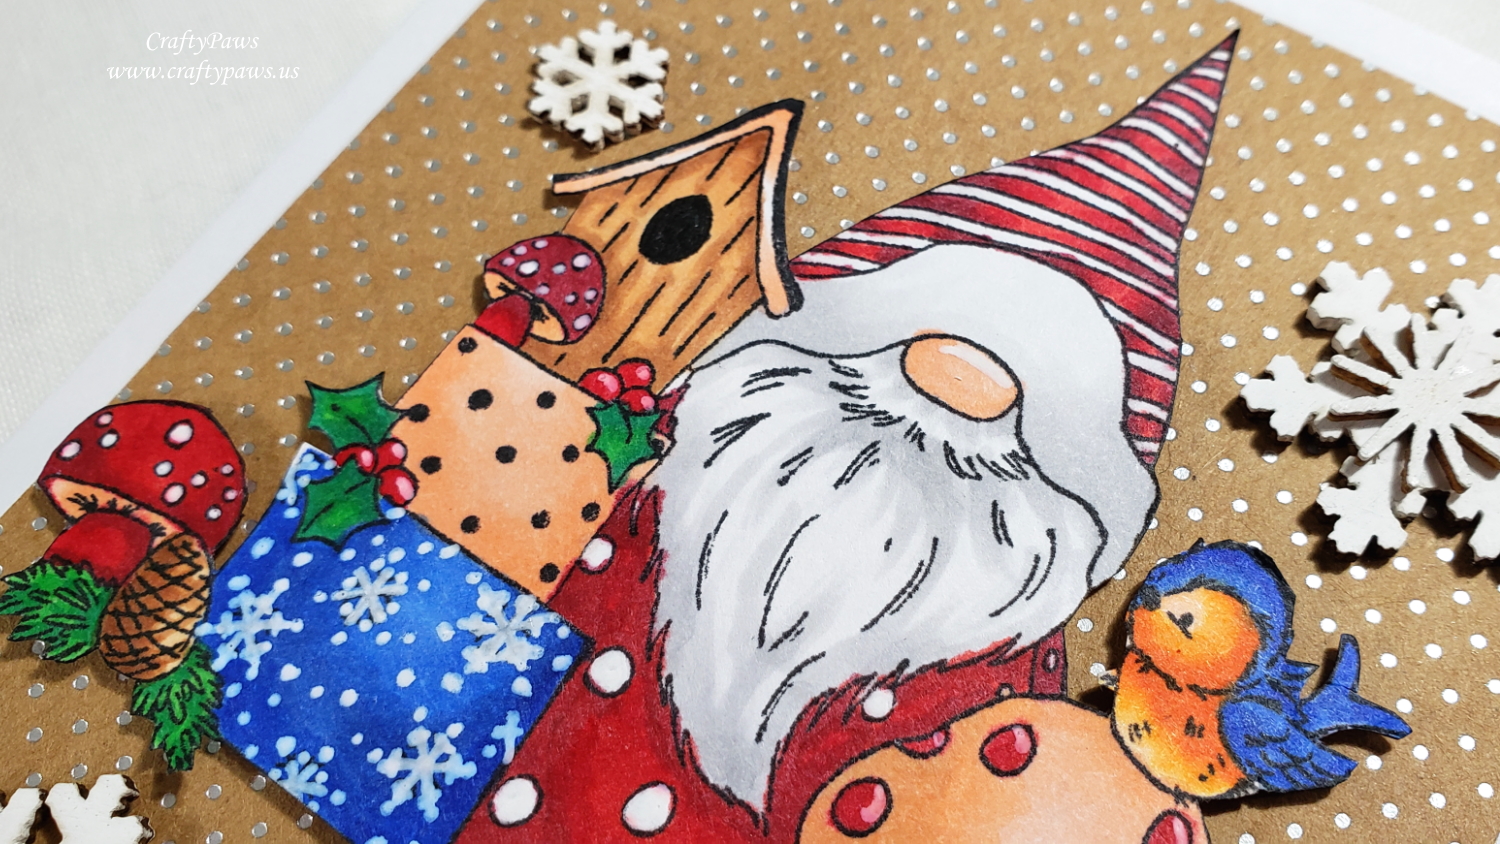
I’m using 3 stamps from this It’s Snome Time collection “Robin Mishchief” stamp set that I got from LoveCrafts.com (by the way, they’re having a 15% off all their paper pads at present and there are some adorable It’s Snome Time pads). I used the largest image on some card stock for the main card image and I used two smaller stamps to decorate a coordinated envelope. These are the Copic colors I used:
Red areas: R27, R29 and R39
White areas (beard, fur on hat): N0 and N1
Orange areas: YR01, YR04 and YR07
Brown areas: E21, E31 and E23
Peach areas (nose, mushroom house, package): R11, R12, E21 and E31
Blue areas: B24, B26 and B28
Green areas: G14, YG09 and G17
I also added some highlight marks and cleaned up the white spots that I had accidentally colored into with a Uniball Signo White Gel Pen.
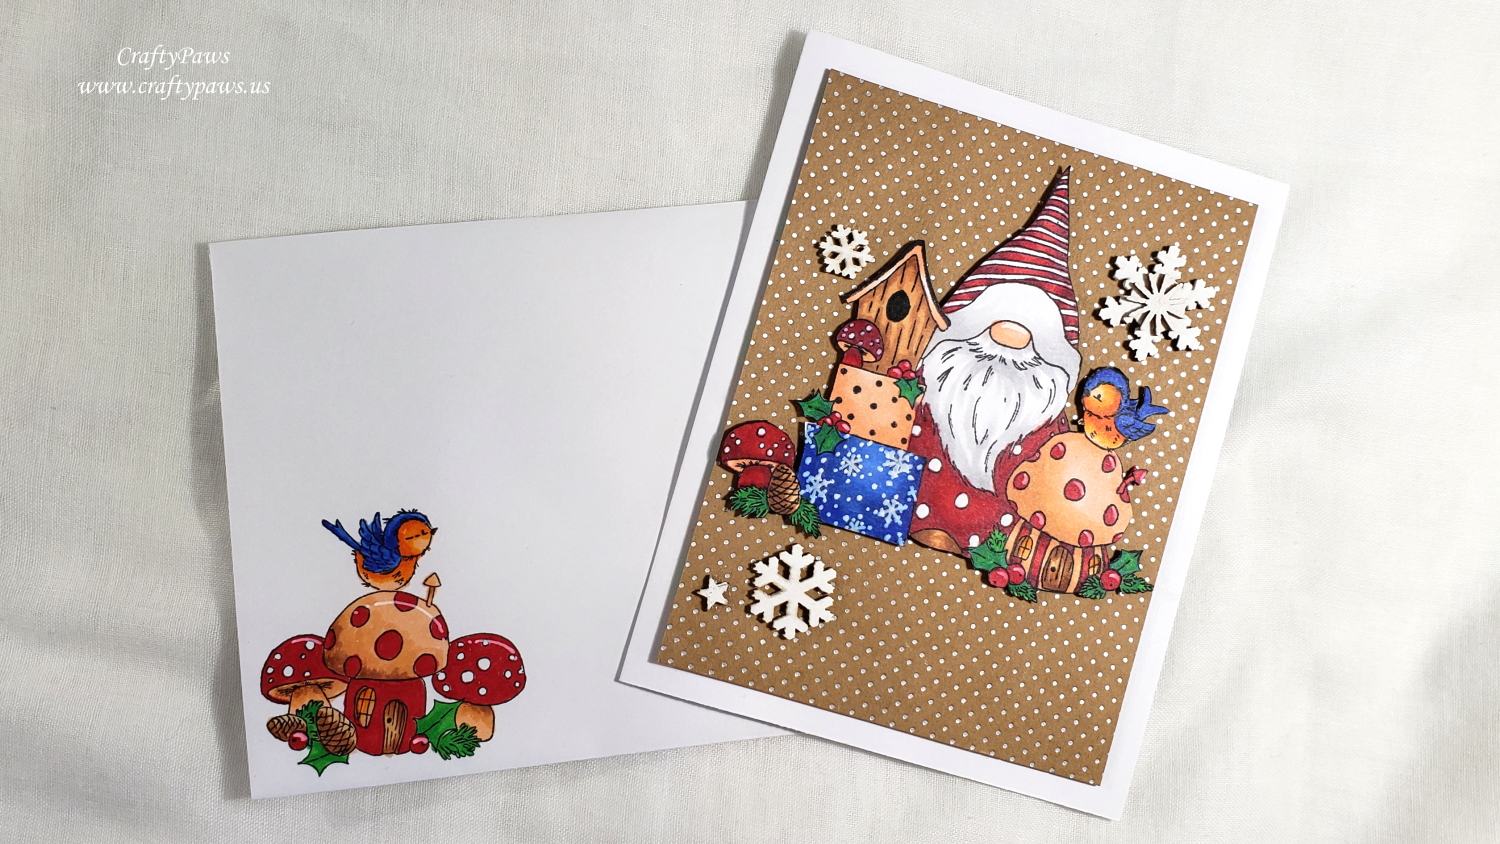
I fussy cut the main image with my Fiskars Reverse Spring Loaded Scissors and then popped up the main image with foam dots onto a craft and silver foiled polka dot card front. I also glued on a thin fun foam sheet under that card front so that I could add a little dimension from the card base. For the card liner, I used a scrap of light blue craft paper and simply added a left over strip of the craft and silver foiled polka dot paper. The wonderful sentiment, “Christmas Isn’t Just a Day. It’s a State of Mind. – Kris Kringle” from The Project Bin’s “Maybe Christmas” stamp set.
Lastly, as a finishing touch, I used craft paint to color white some wood veneer snowflakes and stars from my stash, which I layered onto the card front for some added interest. I love the dimension and the cozy feel that is created with the craft paper and the wood embellishments.
CLICK on the following picture to watch the process video:
This card and matching envelope are being entered into the following challenges:
Simon Says Stamp Wednesday Layer It Up Challenge
Creatalicious Anything Goes with Optional Halloween Challenge
Word Art Wednesday Anything Goes Challenge
Lil Patch of Crafty Friends Anything Goes Challenge
Fab ‘n’ Funky Christmas Challenge
Through the Craft Room Door Anything Goes Challenge
Crafts Galore Encore Anything Goes Challenge
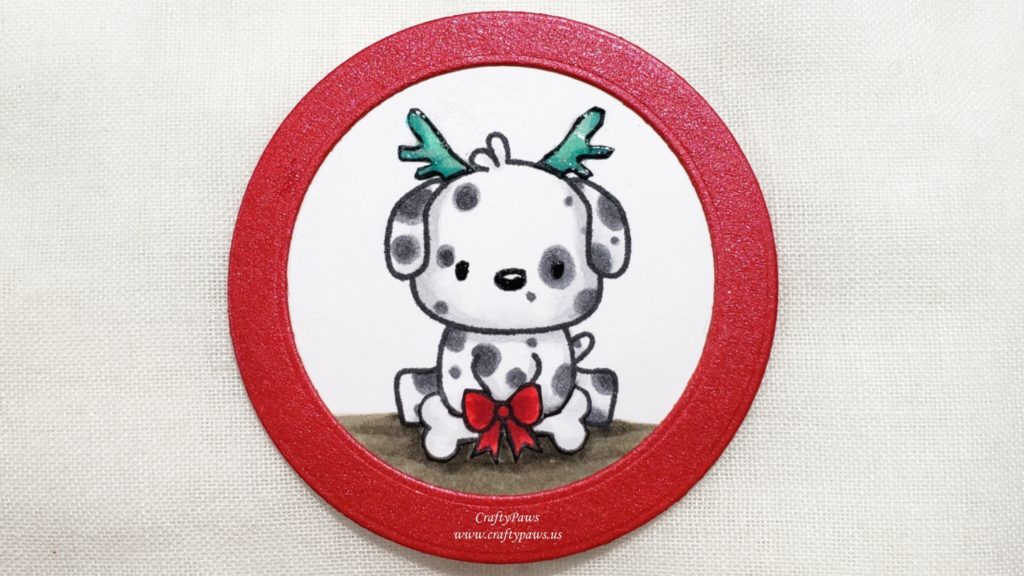
For the 11th and 12th parts of the wreath, I used two critters from the Mama Elephant Lunar Animals stamp set along with a few accessories from the Mama Elephant Yappy Woofmas stamp set and Copic colored them using the following colors (featuring my favorite Christmas color combination – red, white and aqua):
Dalmatian doing the splits: N0, N4, N5
Siberian Husky (TRIED SOMETHING NEW by modifying rabbit from the Lunar Animals into a dog by erasing the ink in the ear areas before stamping and then doodling in the prick ears with a Copic Multiliner Pen in 0.1 pt): N0, N1, N3, N4, N5, R30
Floors: W3 and W5
Antlers (from one of the Yappy Woofmas dogs), bone and bow (also from Yappy Woofas and fussy cut around so the Dalmatian looks like he’s holding it), and present: N0, BG11, BG13, BG15, R35, R37, and R39
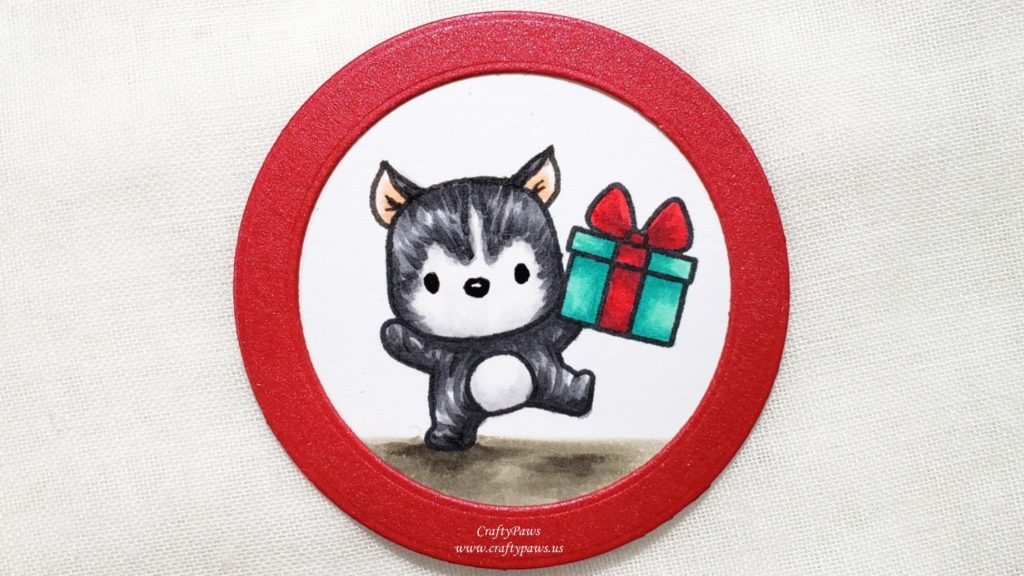
I used a Sakura Black Glaze Pen to emphasize the eyes and noses, and since I was keeping all of these tags CAS (clean and simple with zero embellishments). However, to add a bit of interest I added Clear Wink of Stella to the present as well as the bow on the bone for some sparkle and shimmer. I also coated the antlers with Ranger Glossy Accents for some high shine.
I die cut the images using the 7th largest circle die from the Diemond Dies Die-Normous Stack-Ems Circle Nesting Die Set. Then to create frames for the pieces, I used beautiful sparkly shimmer red card stock and the 5th and 7th largest circles from the Diemond Dies Die-Normous Stack-Ems Circle Nesting Die Set.
My readers can get 10% off and free worldwide shipping at Diemond Dies on all orders of $35 or more by using the code “thankskristina” at check out.
CLICK on the following picture to watch the process of creating these tags:
Disclosure: Many of the supplies I’ve used for today’s project are linked. Some may be affiliate links, which means if you make a purchase I receive a small commission at no extra cost to you. I truly appreciate your support toward the costs of running this blog!
These little critters given Christmas puppy facelifts are being entered into the following challenges:
Word Art Wednesday Anything Goes Challenge
Creatalicious Anything Goes with Optional Christmas with Snowflakes Challenge
Simon Says Stamps Work it Wednesday Try Something New Challenge
Card Mania Christmas Challenge
Lil Patch of Crafty Friends Anything Goes Challenge
Fab ‘n’ Funky Cute Christmas Challenge
ABC Christmas Y – favorite (dogs) and Z – zero embellishments Challenge
Through the Craft Room Door Anything Goes Challenge
Stamping Sensations Winter Sparkle Challenge
Crafty Gals Corner Anything Goes Challenge
]]>
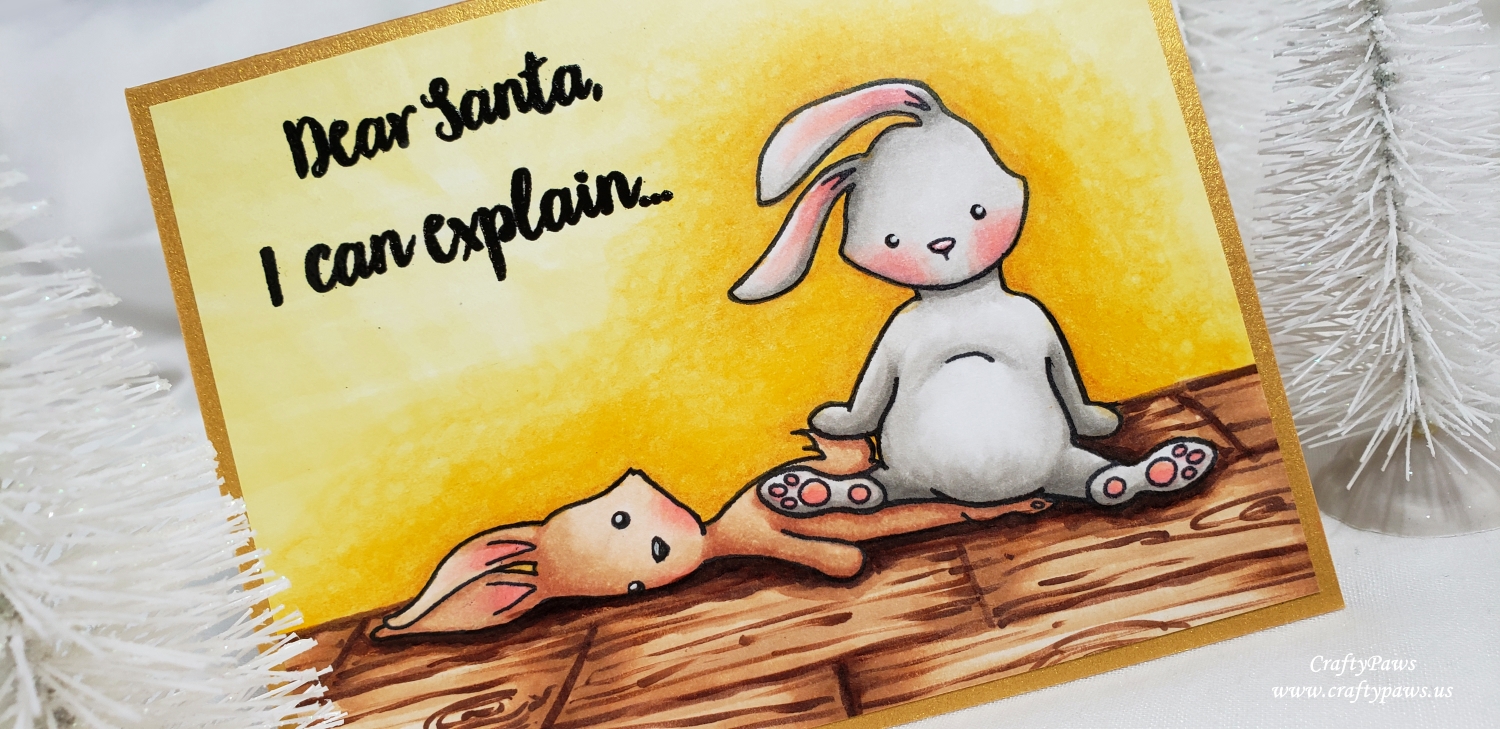
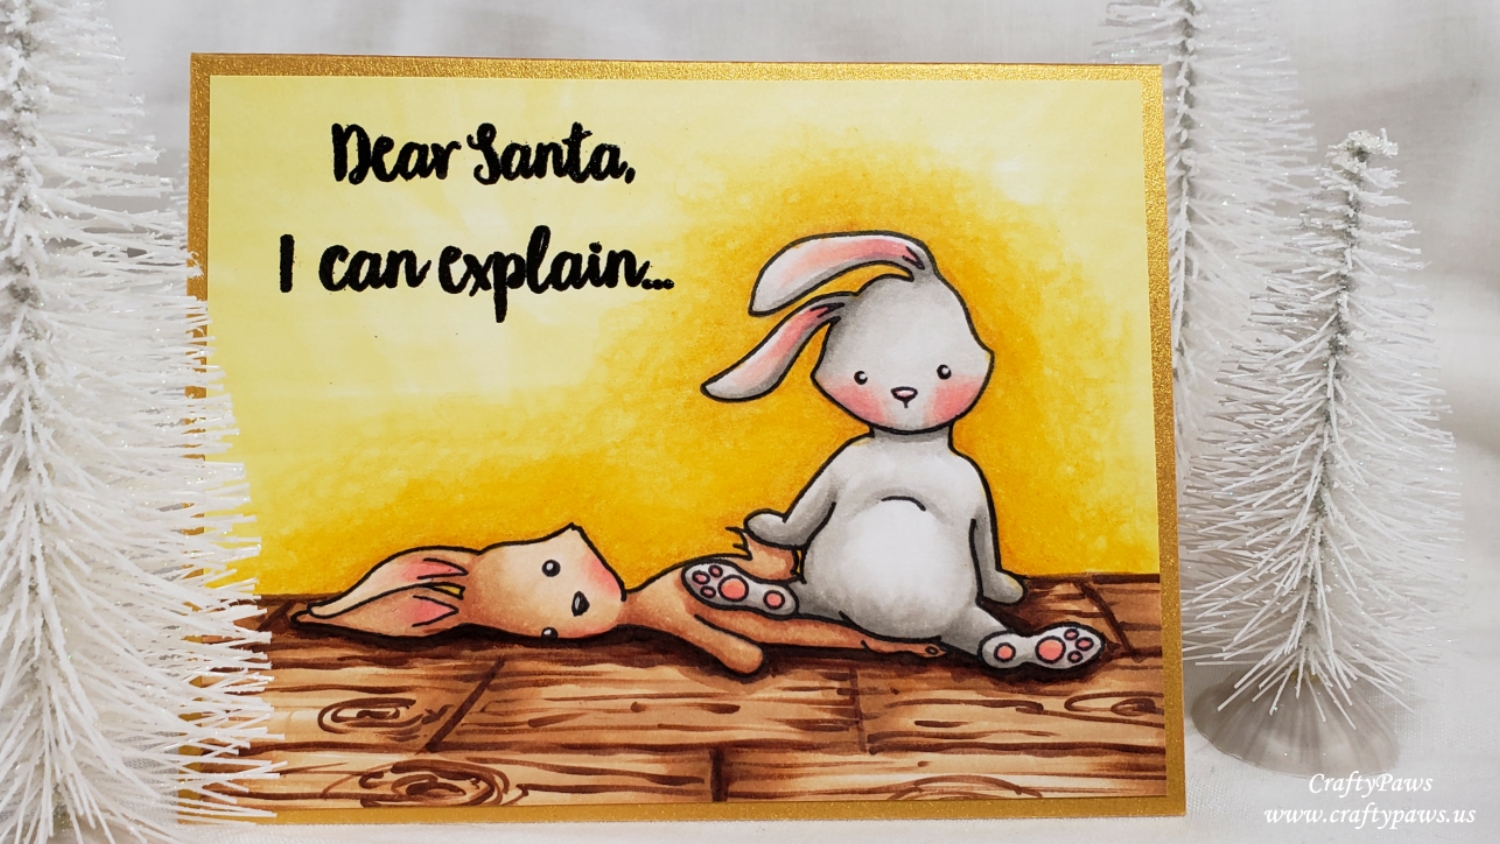
I decided to combine the flattened bunny from the original “Blah Bunny” stamp set and positioned the sprawled out seated bunny with arms back from the “Blah Humbunny” stamp set to create a scene of two bunnies caught in a moment of full-on sibling wrestling. I first stamped out the seated bunny slightly askew, masked him with a post-it note cut out, and then stamped the flattened bunny underneath him. I really like how it looks like the seated bunny has pinned his sister, and how she looks like she may be squeezing her way out from under him.
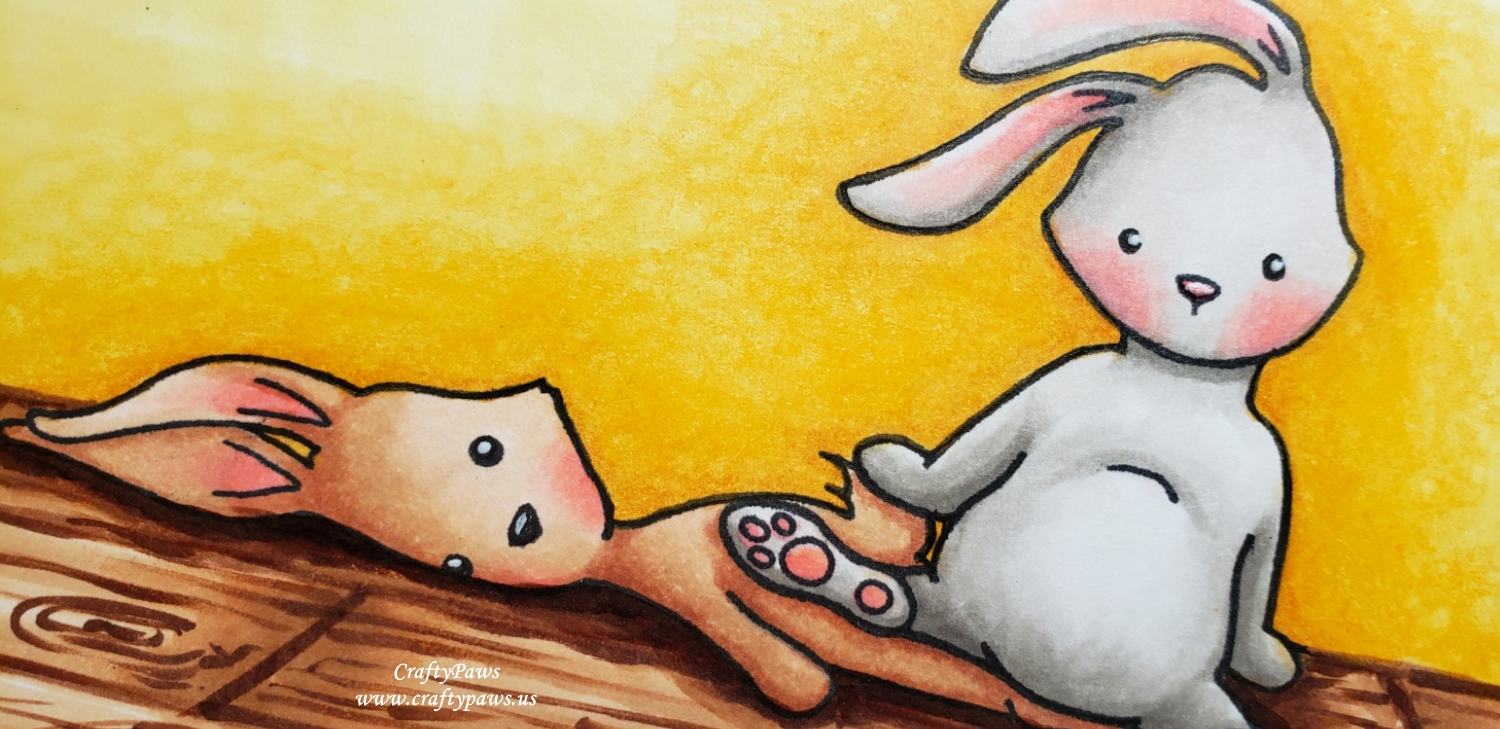
I used the following Copic colors to color up the scene:
Flattened Bunny: E30, E31, E33, R30, R32 and W7 (nose)
Seated Bunny: W0, W1, W3, R30 and
Wood floor: E55, E57, E59
Background wall: Y11 with golden halo around the bunnies added with Prismacolor Colored Pencils in Sunburst Yellow (PC917), Yellow Ochre (PC 942), and Goldenrod (PC 1034)
I also added white highlights to the eyes and noses with a Uniball Signo White Gel Pen and intensified the stamping after the color pencil coloring that faded them out with a 0.03 pt Copic Multiliner Pen
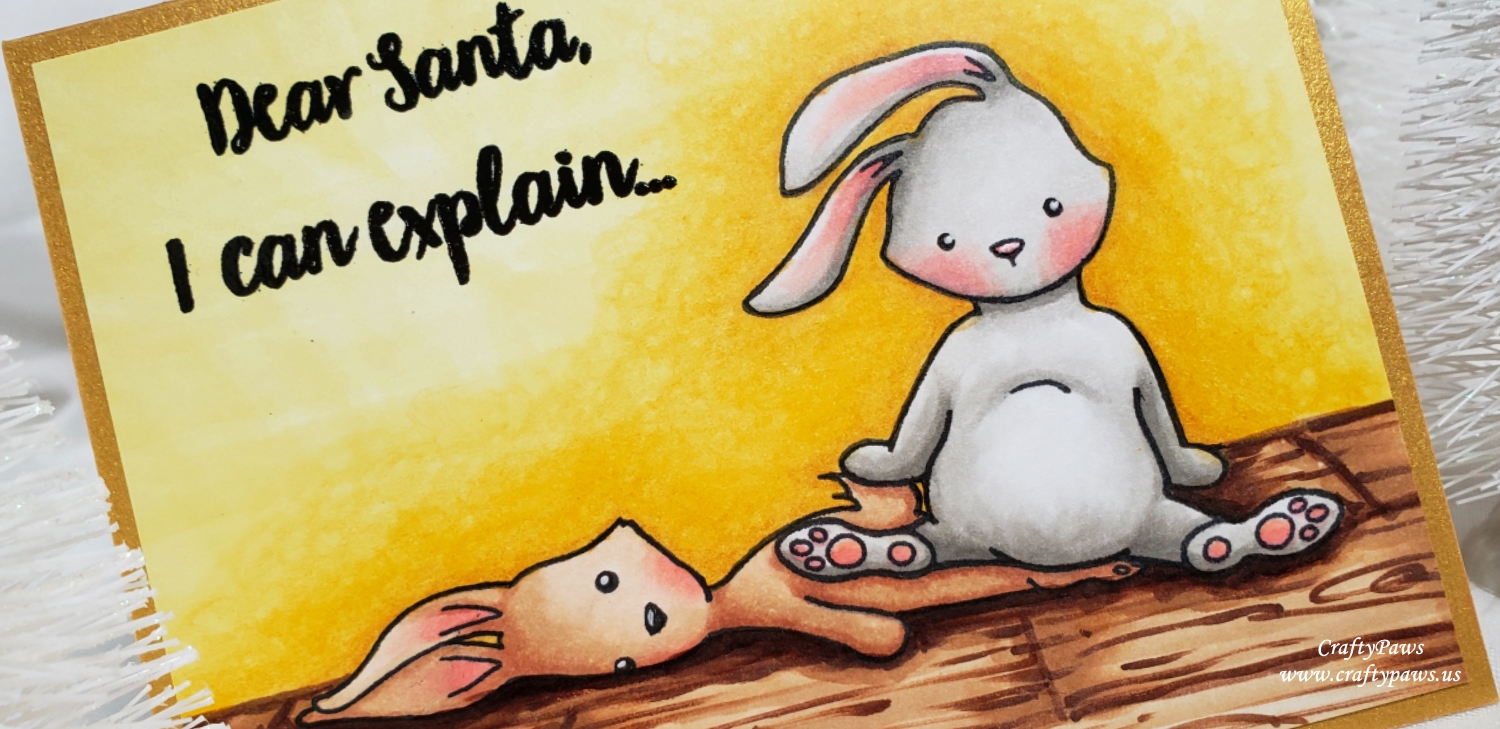
For the sentiment that brings the whole scene together, I stamped out “Dear Santa, I can explain…” from the “Blah Humbunny” stamp set with Versafine Black Onyx Ink. Then I sprinkled Ranger Black Embossing Powder over top and used my heat tool to set and make is embossed and shiny. I wanted to golden halos around the bunnies to be re-emphasized so I cut down the card front a bit and adhered it to a shiny gold card base, with just an 1/8th of the card base showing all around.
CLICK on the image below to watch the start-to-finish process video:
Disclosure: Many of the supplies I’ve used for today’s project are linked. Some may be affiliate links, which means if you make a purchase I receive a small commission at no extra cost to you. I truly appreciate your support toward the costs of running this blog!
This card is being entered into the following challenges:
Lil Patch of Crafty Friends Anything Goes Challenge
The Corrosive Challenge Anything Goes
613 Avenue Create Anything Goes with Optional Christmas/Winter Challenge
Creatalicious Anything Goes Challenge with Optional Layer It Up
Simon Says Stamp Wednesday Anything Goes Challenge
Word Art Wednesday Anything Goes Challenge
Simon Says Stamp Work It Wednesday Ho Ho Holiday Challenge
Just Keep On Creating Anything Goes Challenge
ABC Christmas W and X Challenge

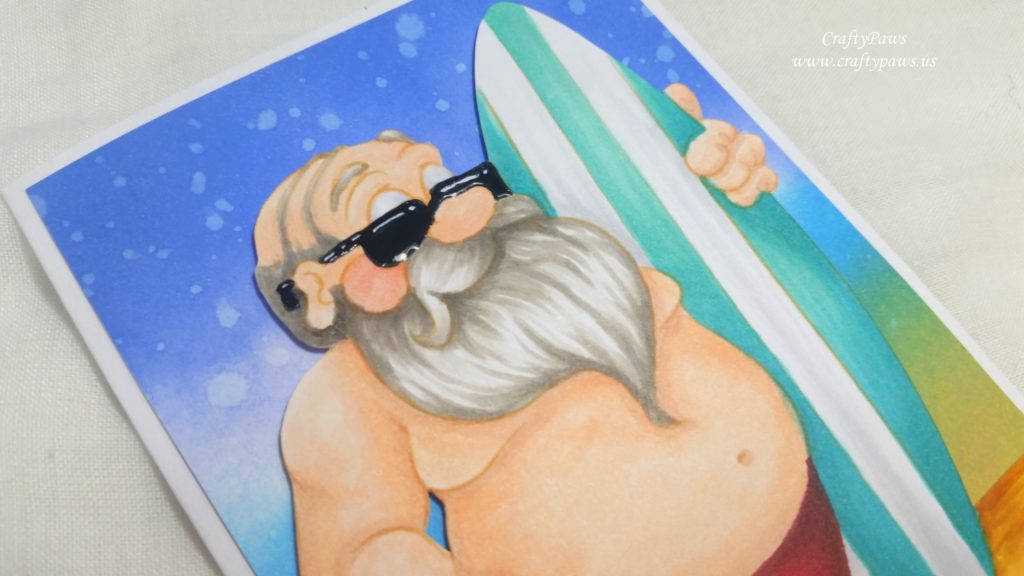
After uploading the image into Microsoft Word and lightening and de-saturating the image, I used the following Copic markers to color up Surfin’ Santa for some no-line coloring:
 Skin: E00, E01, E11, R30 (blush), R11 (toenails)
Beard, Mustache and Hair: W0, W1, W3, W5
Swim Trunks: R35, R37 and R39
Surfboard and Flip Flop Sandals: BG11, BG32, BG15, BG45 and N1
Wand: Y13, Y21, YR21, and YR24
Sunglasses: C9 with Uniball Signo White Gel Pen highlights and Ranger Glossy Accents for shine
For the background, I blended on some Tim Holtz Distress Oxide Inks in Fossilized Amber, Spiced Marmalade, Salty Ocean and Blueprint Sketch. They blended beautifully and each color transitioned into the next to create a fuzzy out-of-focused looking background that could be the sand, ocean, and sky behind Surfin’ Santa. I also sprinkled on some water to the darkest area and blotted the water droplets with a tissue to achieve a splattered, watery look. I popped up Surfin’ Santa with some double sided foam adhesive over top, and that’s it!
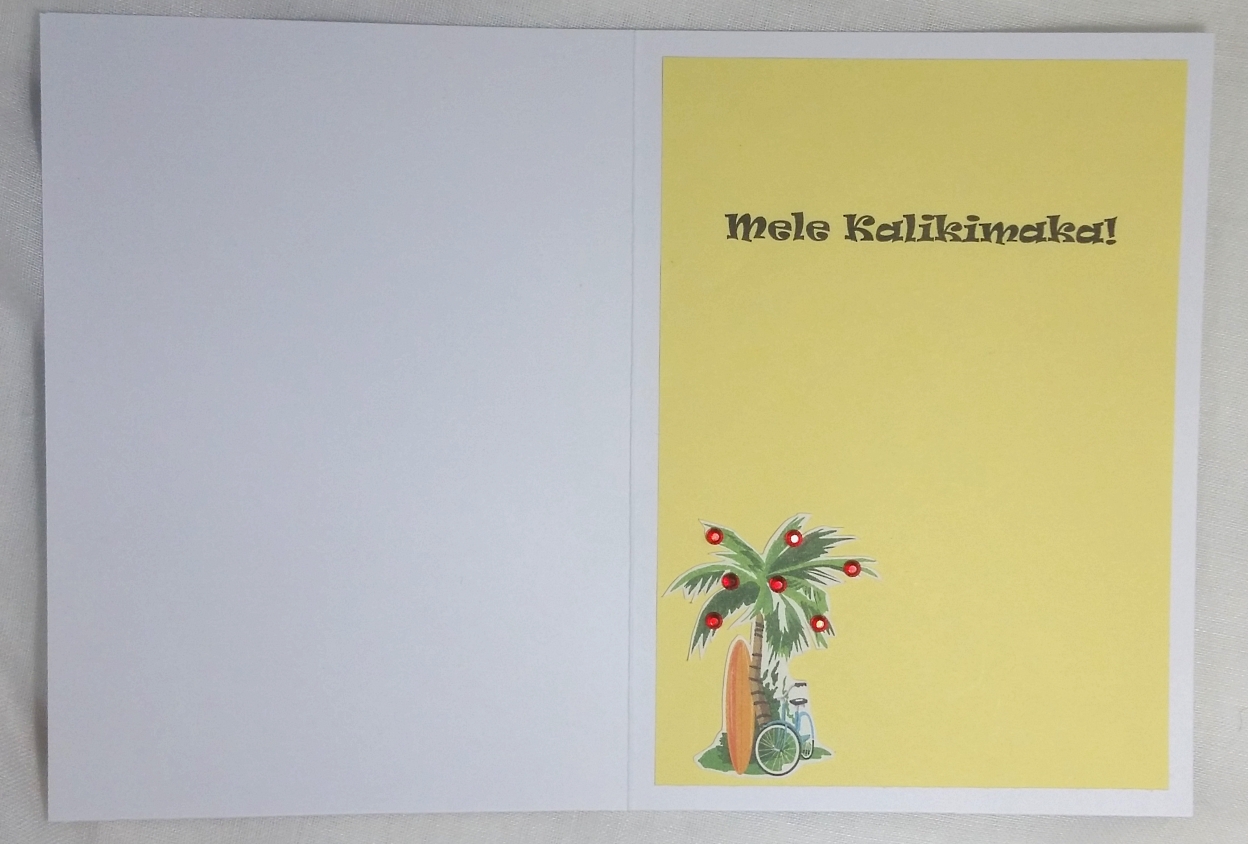
The inside of the card I simply printed out on my computer onto some yellow copy paper, “Mele Kalikimaka!” which means, “Merry Christmas” in Hawaiian. I fussy cut out a small image of a surf board and bicycle leaning on a palm tree that I had in my stash, and I adhered that to the lower left corner. Then to make it truly festive, I added red gems/bling stickers to the palm tree to make the mini-scene Christmas-y!
CLICK the following picture to watch the tutorial start-to-finish video of creating this card:
Disclosure: Many of the supplies I’ve used for today’s project are linked. Some may be affiliate links, which means if you make a purchase I receive a small commission at no extra cost to you. I truly appreciate your support toward the costs of running this blog!
This Surfin’ Santa card is being entered into the following challenges:
Digi Choosday Anything Goes Challenge
ABC Christmas Challenge U is for Upon and V is for Very Quick Challenge – Santa standing upon the sand (hehehe)
Simon Says Stamp Wednesday Let’s Get Ready for Christmas Challenge
Word Art Wednesday Anything Goes Challenge – WINNER
Creatalicious Anything Goes with Optional Use Texture Challenge
Cute Card Thursdays Anything Goes Challenge
Pause Dream Enjoy Anything Goes Challenge
Lil Patch of Crafty Friends Anything Goes Challenge
Through the Craft Room Door Anything Goes Challenge
Crafts Galore Encore Anything Goes Challenge
]]>
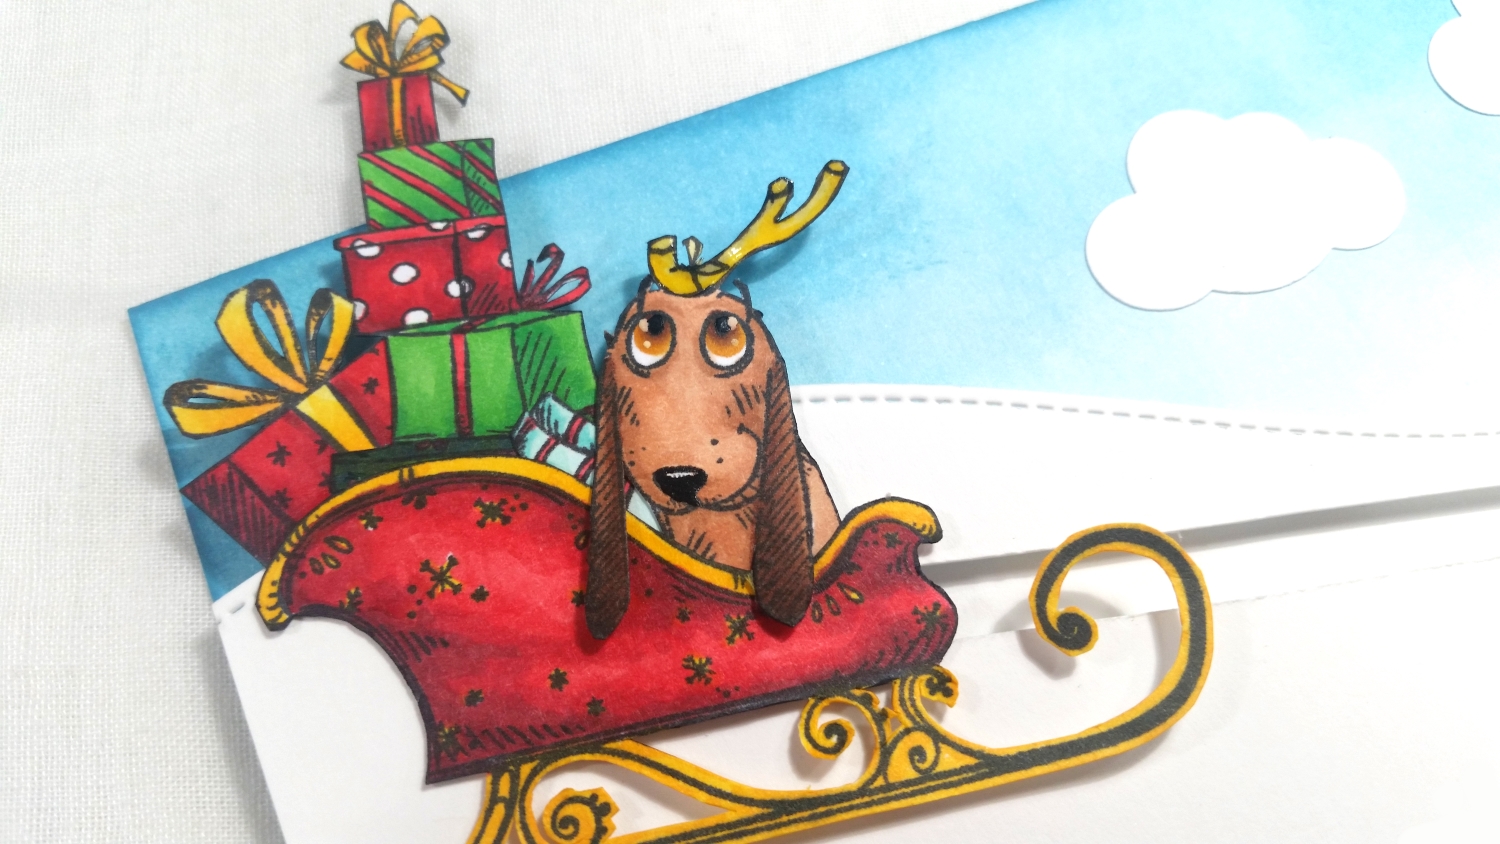
I first Copic colored all the images with the following colors:
Max Dog: White: W0; Eyes: YR24, E23 and E25; Brown spots: E23, E25 and E29; Light brown face: E11, E13, E23
Faux antler: Y11 and Y19
Scarf/present: BG11, BG13, R35 and R39
Sleigh: Y19, R35, R37, and R39
Presents: G14, YG09, G09, Y19, Y38, R35, R37 and R39
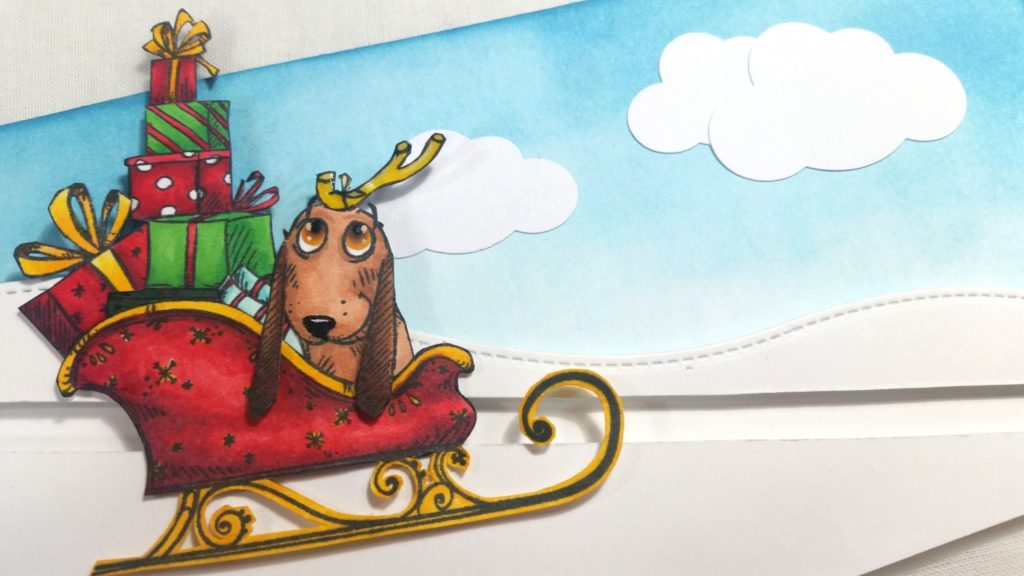
Then I fussy cut out all the pieces I wanted to include in the slider assembly. Then with a bit of doodling for the faux reindeer antler and a little craft surgery to foreshorten Max’s body and keep his ears flapping freely in front of the sleigh edge, I put together Max riding in a sleigh filled with Christmas presents.
I wanted to keep the card background simple so as not to distract from the main puppy-sleigh focal point so I simply blended on some Distress Ink in Tumbled Glass and Broken China and then punched out some clouds using Fiskars X-Large and Large Cloud Punches. The slider mechanism was easy too. I used some Lawn Fawn Stitched Hillside dies to create one long wavy snowy hillside on some heavy weight card stock. Because the slider assembly was so large, I wanted the sliding distance long enough to appreciate the interactive element so I made the card 4″ x 8.5″.

I used a metal ruler and an X-Acto blade to cut out a slider opening almost the full length of the hillside. I then attached small, but thick, foam dots to a scrap of heavy weight cardstock and lined it up so that the foam dots would come through the slider opening. Then I popped up the entire outside edges of the snowy hillside piece with thick foam dots (if you only have fun foam or thinner foam dots, you can double them up). Then I attached the doggy sleigh assembly to the small foam dots from the front of the slider opening.
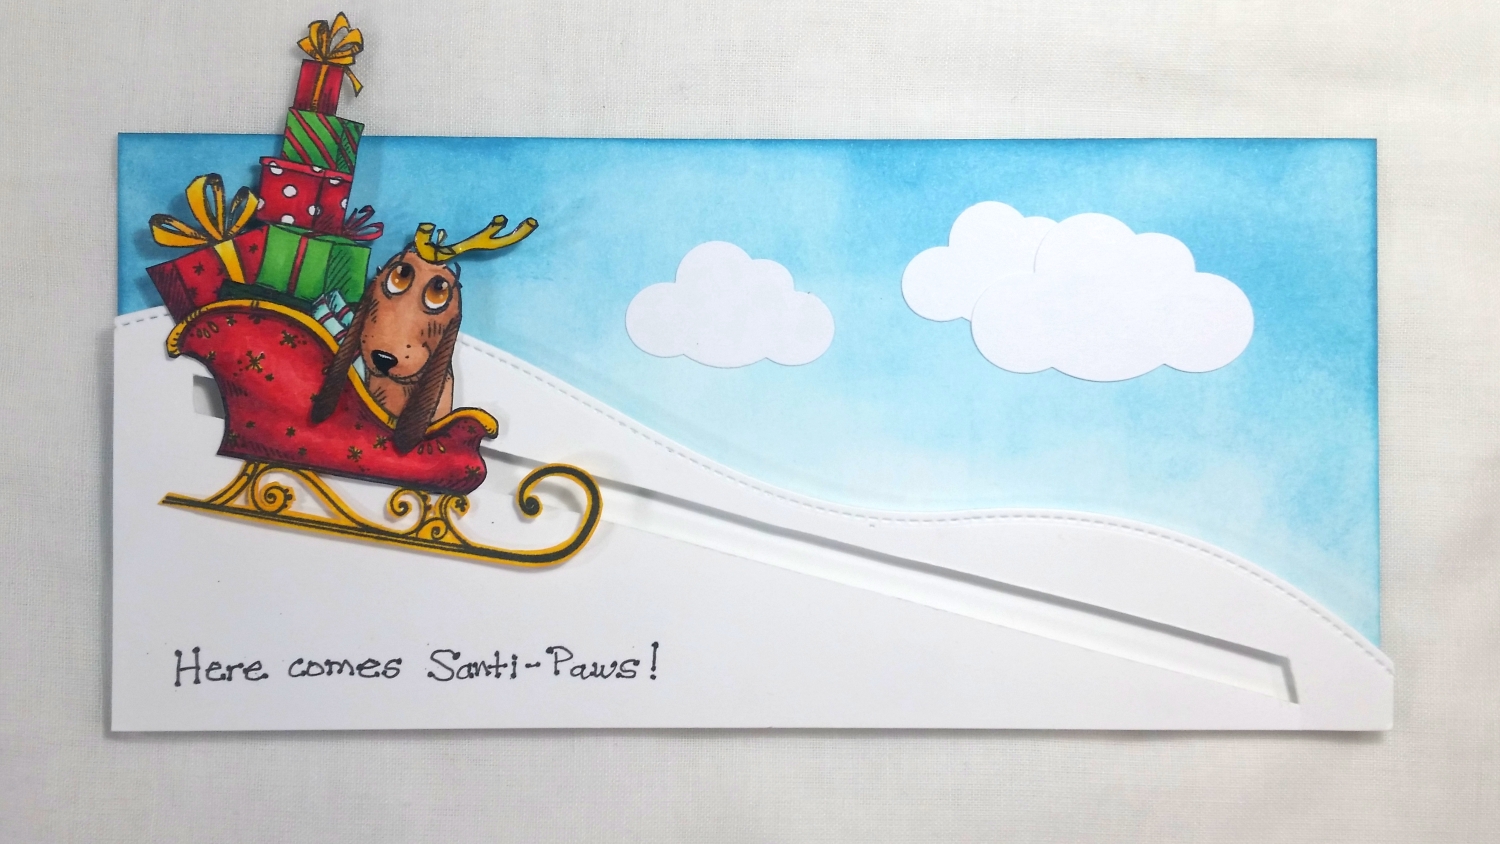
As often happens to me, I forgot to stamp my sentiment onto the snowy hillside before putting the whole card together. Because now the hillside was too unevenly popped up to stamp on, I simply wrote out with a Distress Marker in Black Soot, “Here comes Santi-Paws!” in the lower left corner. The slider mechanism works perfectly, and I think the dog and Grinch-loving recipient will really enjoy this fun, interactive card.
Please CLICK on the following picture if you’d like to watch the process video of crafting this card:
Disclosure: Many of the supplies I’ve used for today’s project are linked. Some may be affiliate links, which means if you make a purchase I receive a small commission at no extra cost to you. I truly appreciate your support toward the costs of running this blog!
This Doggy Christmas Slider Card is being entered into the following challenges:
Fab ‘n’ Funky All Creatures Great and Small Challenge
Through the Craft Room Door Anything Goes Challenge – WINNER
613 Avenue Create Anything Goes with Optional Clean and Simple Challenge
Stamping Sensations I Spy with My Little Eye Something Beginning with B Challenge – Boxes, Bows and Blue skies
Pause Dream Enjoy Cards Challenge
The Corrosive Challenge Anything Goes Challenge
Simon Says Stamp Wednesday Anything Goes Challenge
Word Art Wednesday Anything Goes Challenge
Creatalicious Anything Goes with Optional Texture Challenge
Simon Says Stamp Work it Wednesday Celebrate It Challenge
]]>
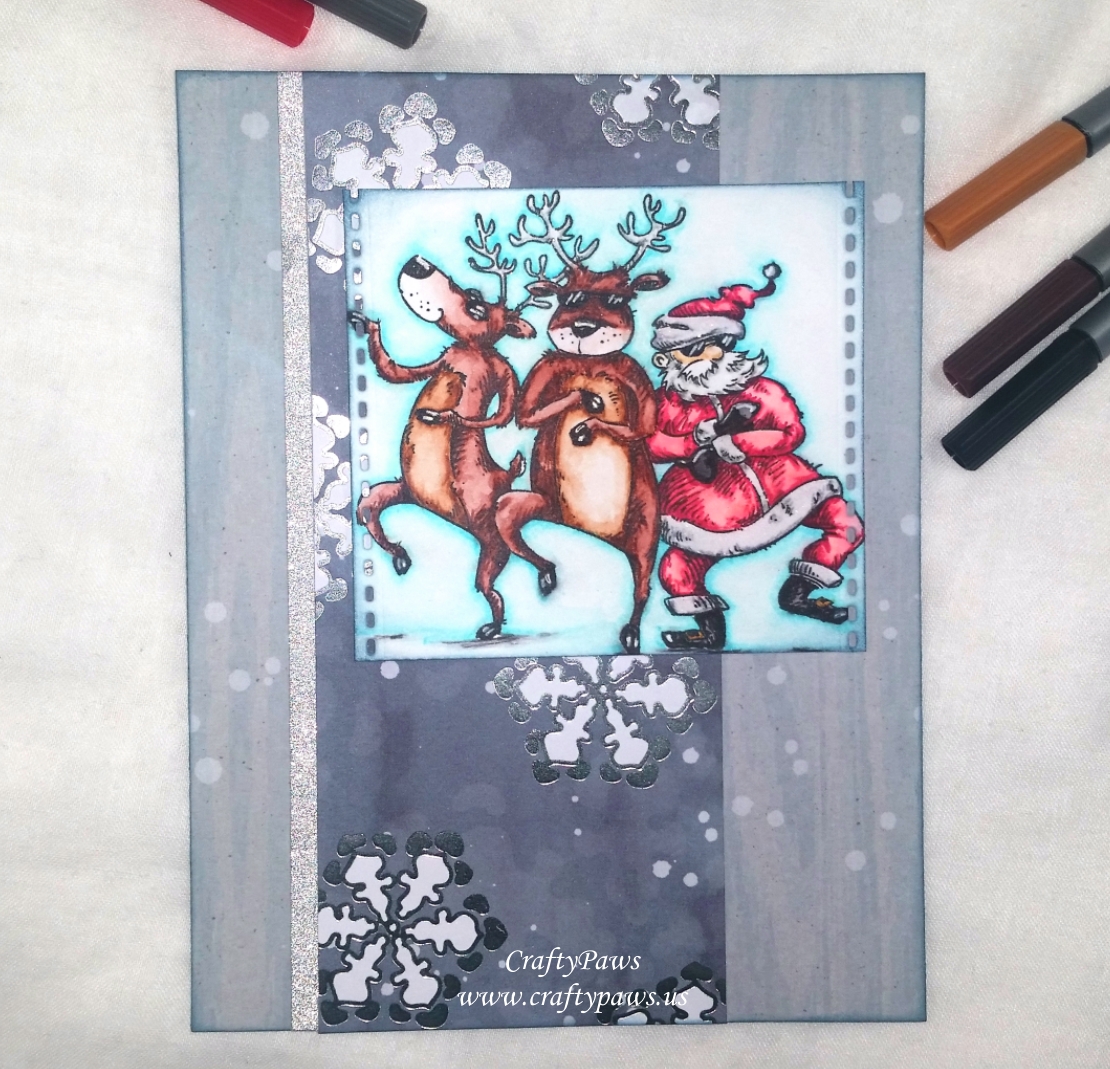 I also got a chance to re-evaluate some more Arteza products (I’ll be sharing a full separate video review of these in a following post). In short, I LOVE the Arteza Fineliner Pens. To color up this image, I used 8 of them: brown, tan, yellow, red, black and three greys and a fine point Arteza water brush to blend out the inks for a watercolored look. Getting into tiny nooks and crannies of the image was so easy with these fineliner pens!
I also used the Arteza Arctic Blue (117) Real Brush Pen and a water brush to create a soft blue haloing background. For some highlighting details, I used a Uniball Signo White Gel Pen on the sun glasses, noses, hooves, boots and gloves; and I added some magical shimmer to the antlers and Santa’s white fur trim with a Clear Wink of Stella Pen.
For the card front, I used scraps from my scrap box from a 2012 Recollections Christmas paper pad called “Memories Never Melt” and inked the edges with some Tim Holtz Distress Ink in Faded Jeans. For a little sparkle, I added a thin strip of silver glitter washi tape on one side. To add the look of a film strip cell (like this was a pic from a music video – hahaha), I used one of the Neat & Tangled Tiny Cuts border dies on the two sides of the image, again inking the edges with more Tim Holtz Distress Ink in Faded Jeans to maintain a cohesive look.
 Inside the card, I used the remaining scraps of the Recollections patterned paper from my scrap box. To make it a little more festive, I doodled some bursting stars with the Arteza Black Fineliner Pen. Then to drive home the fun Gangnam Style theme, I used Ranger Super Fine Embossing Powder on a scrap of dark blue card stock to heat emboss the sentiment from the stamp set. I cut it into a simple banner shape and added that as the final touch on the card liner.
Disclosure: Many of the supplies I’ve used for today’s project are linked. Some may be affiliate links, which means if you make a purchase I receive a small commission at no extra cost to you. I truly appreciate your support toward the costs of running this blog!
Arteza Coupon: If by chance you want to purchase any Arteza products, you can use the COUPON CODE (BOE-TOZ-460) for 10% off.
The following is a video sharing the coloring of this image:
This card is being entered into the following challenges:
Word Art Wednesday Anything Goes Challenge
Creatalicious Anything Goes Challenge with Optional Birthday
Through the Craft Room Door Anything Goes Challenge
613 Avenue Create Anything Goes with Optional Reuse/Upcycle Challenge
Art Impressions Water Color Wonders Challenge
Lil Patch of Crafty Friends Anything Goes Challenge
Card Mania Embossing Challenge
Penny Black and More Feature a Creature Challenge
Stamp Sensations Forest Friends Challenge
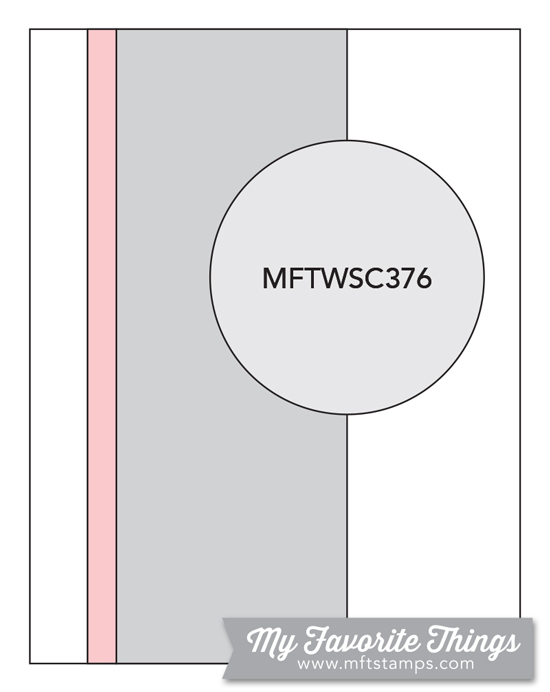
MFT Sketch 376 Card Challenge
]]>
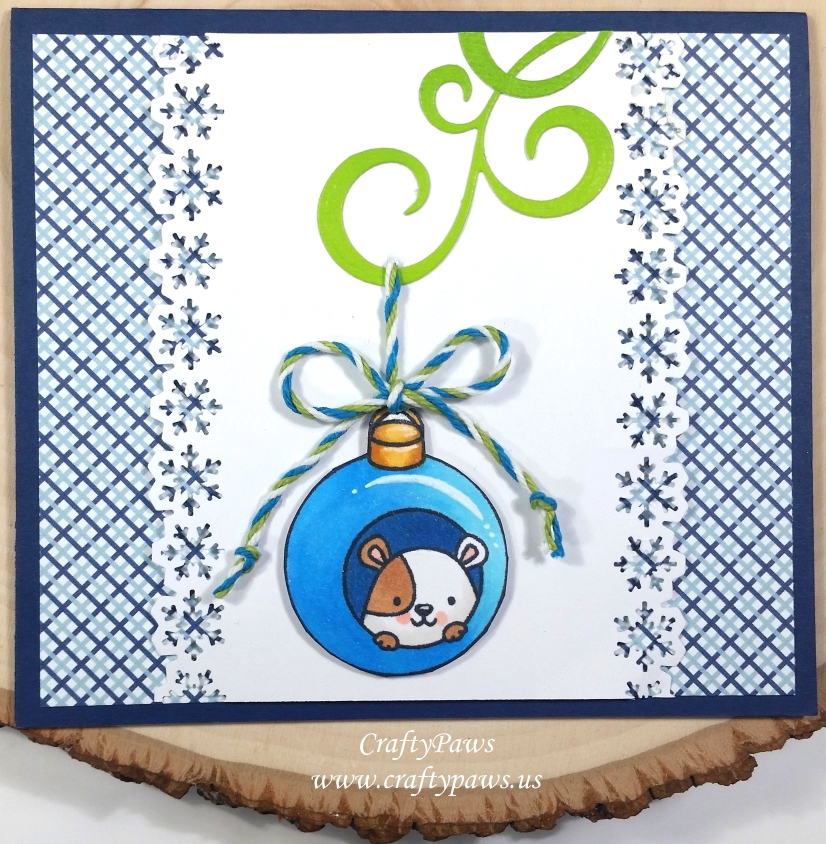
I decided to combine the adorable little hamster peeking out from an ornament from the “Hammie Holiday Fun” stamp set with the Pine Branch Die and the Swirly Flourish Die from Diemond Dies to create mini close-up scenes of Christmas tree boughs with an ornament. For the tree boughs, I first added some Tim Holtz Distress Ink in Mowed Lawn and Pine Needles to give the green card stock scraps I had a bit more interest and color variation. Then I used the dies and arranged the die cuts from the upper right or upper left sides of the card front. For the faux loops from which the ornaments would hang, I used a thick embroidery needle to punch holes in the card fronts so that the baker’s twine I looped through the front of the card front would look straight and taut. I added bows to the hangers for a decorative touch.
For the Hammies in the ornaments I used the following Copic colors along with highlights added with a Uniball Signo White Gel Pen and shimmer with Clear Wink of Stella:
Ornament hangers: YR31 and YR24
Blue ornament: B01, B12, B04, B16 and N3
Brown spotted Hammie: W0, E33, and R20
Red ornament: R22, R24, R27, R29 and N3
Black spotted Hammie: W0, R20 and W5
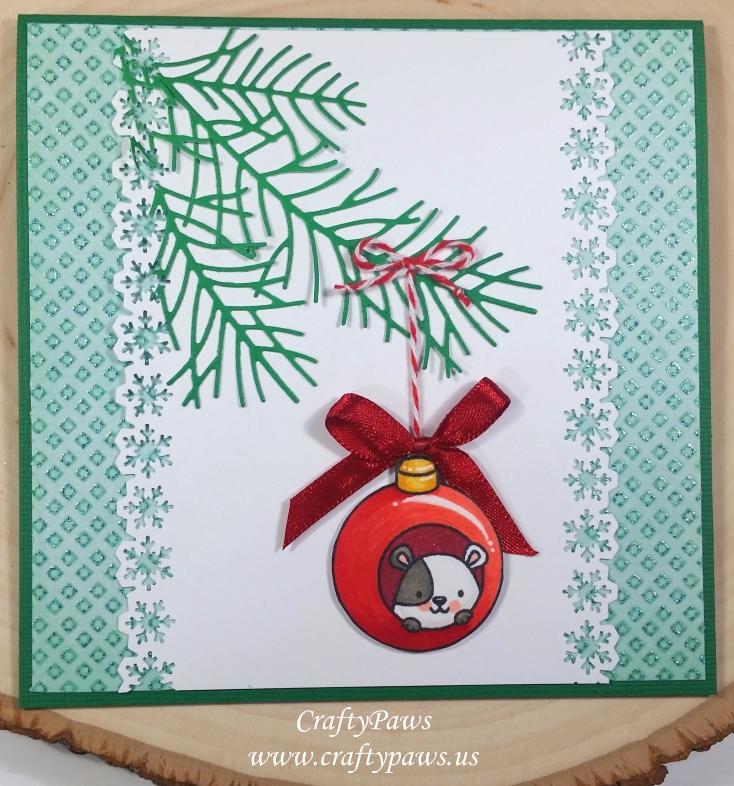
Then because I thought the card front was looking too plain, I attempted to use dies to trim down the sides. However, because I had already added the ornaments and baker’s twine, there was too much dimension to safely run the dies through my die cutting machine. I decided to try a Martha Stewart Aspen Snowflake Punch Around the Page (retired) to trim up the sides of the card front; however, due to the various layers of the die cuts I had trouble punching through the card front and bough dies. I ended up mangling a bit of the card front, but luckily I was able to trim off the troublesome areas and make non-standard sized cards. To layer behind the card fronts, I used some patterned papers from the “Moments” My Mind’s Eye paper pad for the blue plaid and “The Doodlin’ Around” stack from DCWV for the glittered green diamond paper. Then I mounted both onto navy and green card stock card bases.
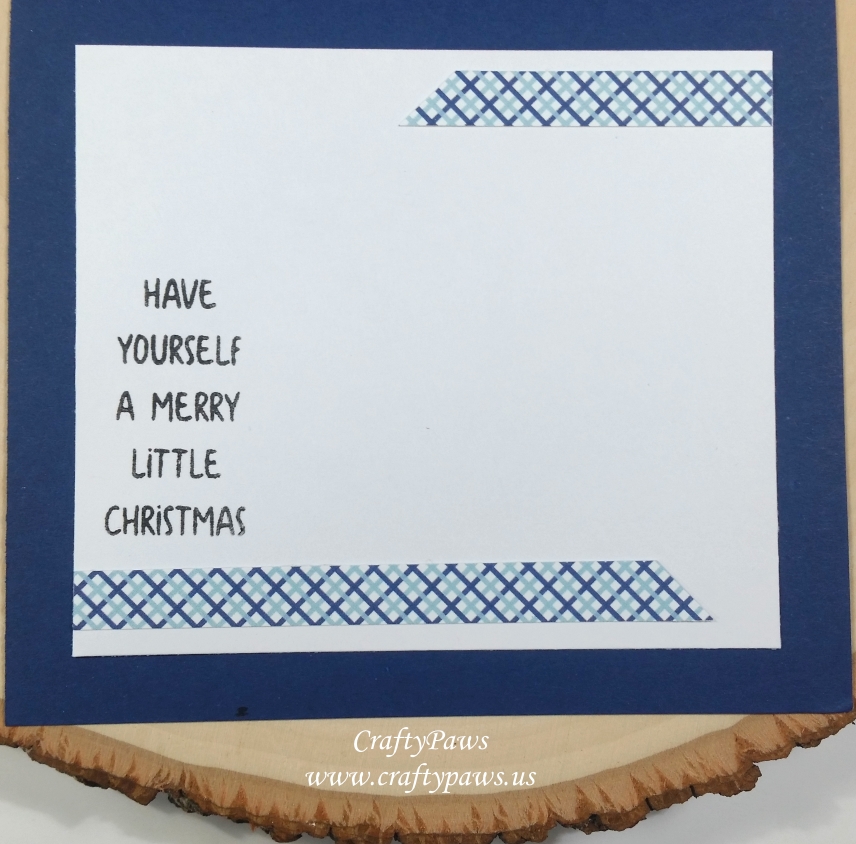
I kept the insides of the cards simple. I just lined them with white card stock and used some of the scrap patterned papers from the front of the card to either make little banners or a pocket for a gift card. The sentiment is from the Hammie Holiday Fun stamp set and is stamped with VersaFine Black Onyx Ink (my favorite ink for crisp clear sentiments).
The following is a process video sharing how I made the cards:
Discount for My Readers: If you are making a purchase at Diemond Dies (for whom I’m a Design Team Member) you can get a 10% discount and free worldwide shipping on all orders of $35 or more by using the coupon code: thankskristina.
Disclosure: Many of the supplies I’ve used for today’s project are linked. Some may be affiliate links, which means if you make a purchase I receive a small commission at no extra cost to you. I truly appreciate your support toward the costs of running this blog!
These cards are being entered into the following challenges:
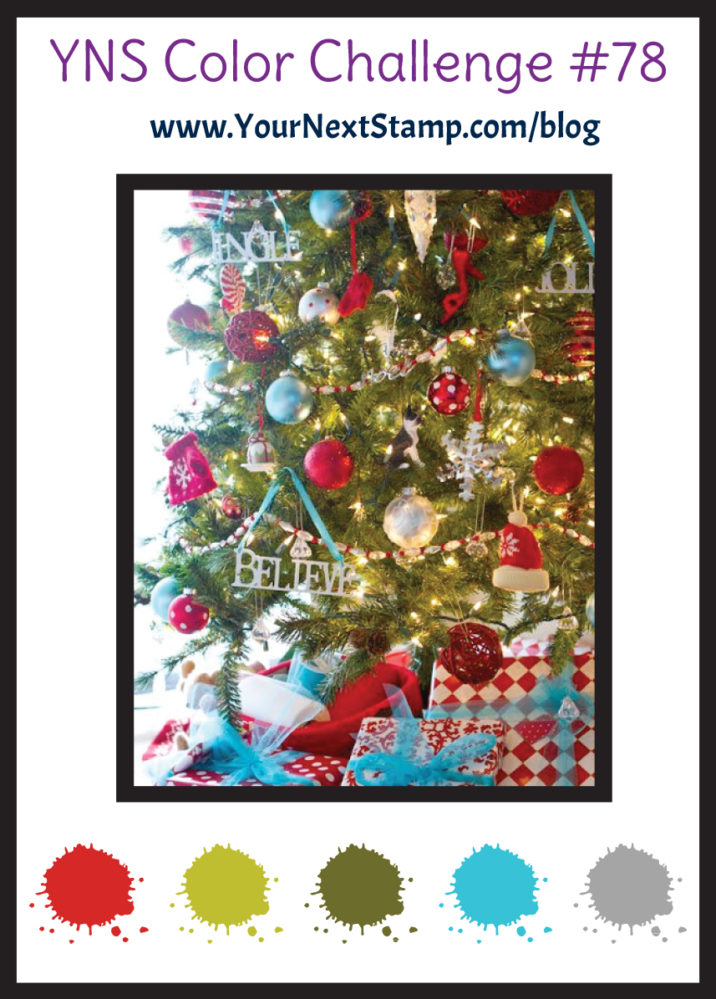
Your Next Stamp Color Challenge #78 – red, blue, greens, grey
Through the Craft Room Door Anything Goes Challenge
Crafts Galore Encore Anything Goes Challenge
613 Avenue Create Anything Goes Challenge with Optional Christmas or Winter
Crafty Gals Corner Anything Goes Challenge
Not Just Cards Anything Goes Challenge
Lil Patch of Crafty Friends Anything Goes Challenge
CAS-ual Fridays Winter Blues Challenge – blue ornament card
Creatalicious Anything Goes With Optional Flourishes Challenge – blue ornament card with flourish tree branch
Word Art Wednesday Anything Goes Challenge
]]>
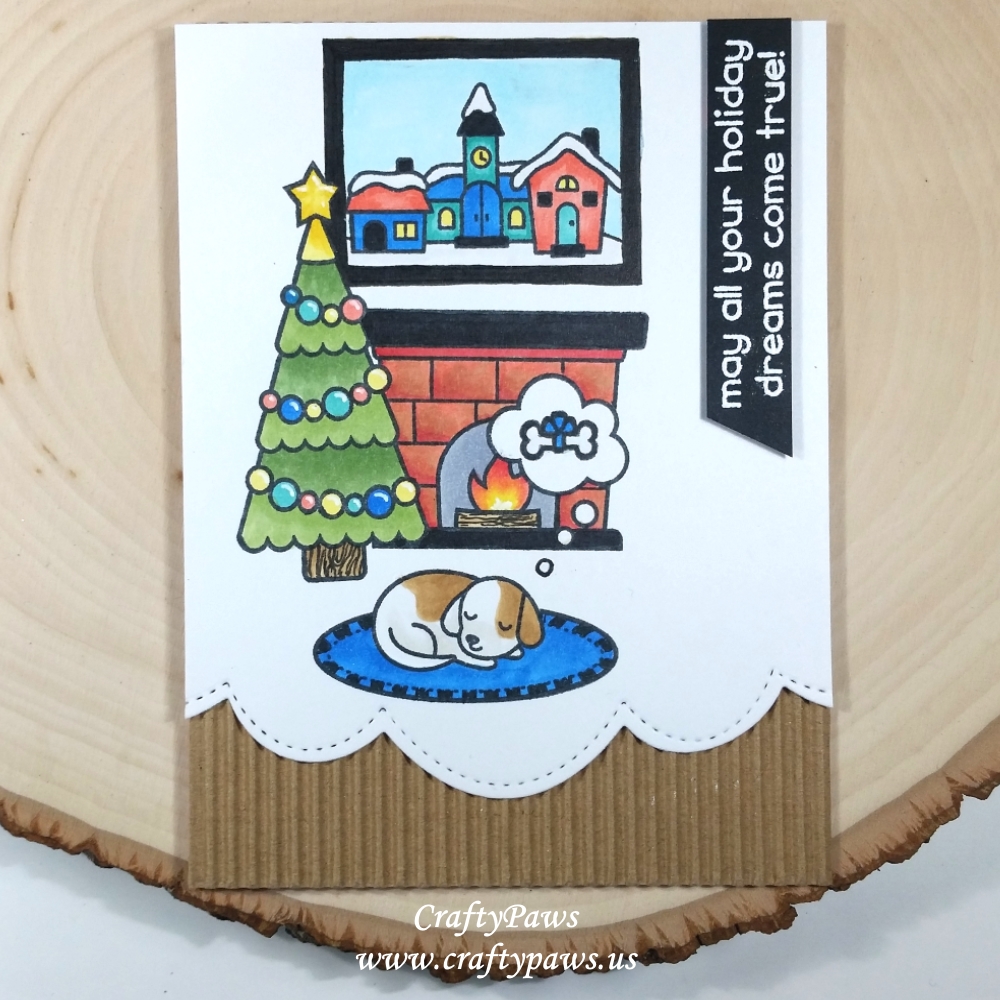 I decided to create a little scene using the pup, rug, fireplace, Christmas tree and thought bubble stamps. With a little simple masking I was able to get a layered scene. However, to fill in the space above the fireplace in the scene, I needed a little something more. I pulled out the snowy/icy village stamp from the Lawn Fawn “Ready, Set Snow” stamp set from 2015 and doodled a frame around it with a Copic Multiliner Pen in 0.1 pt. I thought the icy scene in the painting contrasted nicely with the main warm scene of the card.
Then with some simple Copic coloring (all the images are so small there is very little blending needed), I brought the little scene to life.
Puppy, fire log and tree trunk: W0 and E31 (which is basically like a kraft color) with wood grain doodled in with a Copic Multiliner Pen in 0.1 pt.
Fire place: E31, R22 and R35
Tree decorations and holiday village: Y13, R22, B000, B16 and BG13 with Uniball Signo White Gel Pen highlights on baubles
Fire: Y13, R22 and R35 with Uniball Signo White Gel Pen at fire core
Rug: B16; Tree: G43 and G24; Frame, mantle, hearth and rug trim: 100
All the baubles, the fire and the snow in the village scene got a healthy coating of Clear Wink of Stella shimmer too.
For a decorative lower edge for the card front, I used a Pretty Pink Posh Stitched Borders 2 die that I thought echoed the curves of the thought bubble, and then I backed the whole card front with some kraft corrugated card stock for some added dimension and texture.
The sentiment also came from the “Christmas Dreams” stamp set. I prepped a scrap of black card stock with my EK Success Powder tool and then used VersaMark Ink to stamp out the sentiment. I used Super Fine Detail Ranger Embossing Powder in White to heat emboss it, and then trimmed down the scrap to fit on the upper right side of the card (I had thought of putting it to the right just above the sleeping pup but the sentiment was too big and covered too much of the scene for my liking so I went with this vertical positioning).
The following is a process video of creating this Christmas scene card:
This card is being entered into the following challenges:
Card Mania Christmas Challenge
Lil Patch of Crafty Friends Anything Goes Challenge
Creatalicious Anything Goes with Optional Flourishes Challenge
Word Art Wednesday Anything Goes Challenge
Fab ‘n’ Funky Christmas Challenge
Crafty Gals Anything Goes Challenge
Simon Says Stamp Monday Icy Inspiration Challenge
Simon Says Stamp Wednesday Anything Goes Challenge
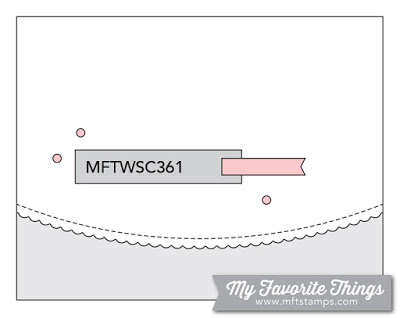
MFT Sketch Challenge 361
![]()
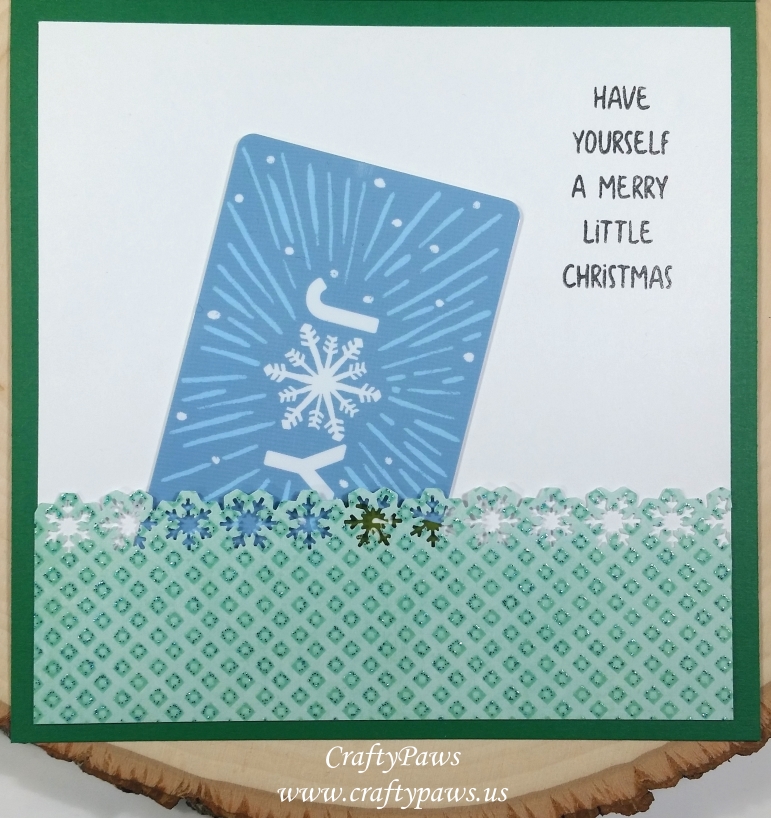
I first stamped the little Santa hat from the Your Next Stamp “Hammie Holiday Fun” stamp set and then created a quick post-it note mask to cover it up. Next I stamped out the pup pulling the toy train set with another baby pup from the “Playful Pups” stamp set, positioning the duo so that the Santa 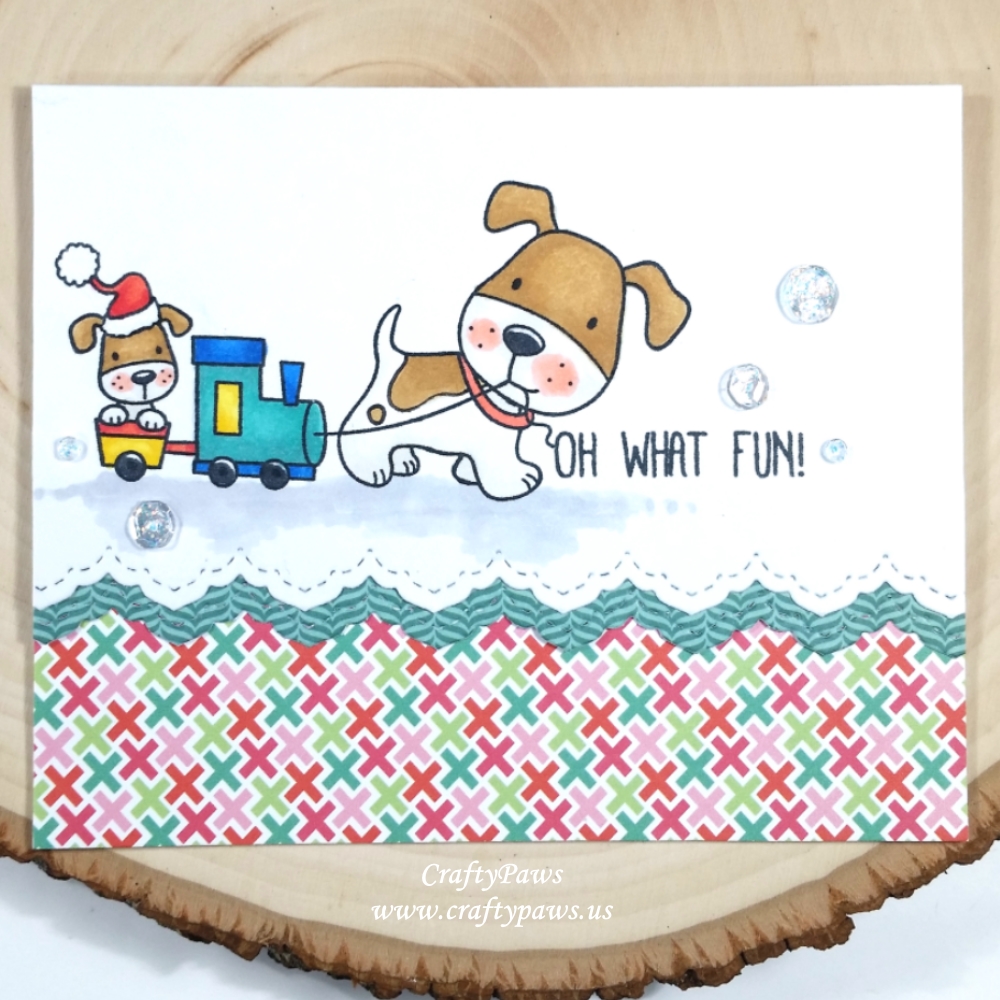 hat would look like it was being worn by the little pup. Lastly, I took a sentiment from the Avery Elle “Oh What Fun” stamp set and connected it with the string of the toy train just to the right of the pups. Using a Copic Multiliner Pen in 0.1 pt, I also doodled in a little stripe detail into the train car, a couple of spots on the bigger pup, and a hint of a smile on the big pup too. To add a little interest, I cut down this card front with a Pretty Pink Posh Stitched Borders 2 die, leaving a pretty decorative edge on the bottom.
I used the following Copic colors to color up this little scene:
Pups: W0, E30, E31 and R20
Coral Santa hat: R22 and R35
Train engine: B16, BG13, N2 and Y13
Train car: Y13, R22 and R35
Train tires and puppy noses: C7
Shadow to ground the scene: C1
For the patterned papers in the lower 1/3 of the card front, I used the Pretty Pink Posh Stitched Borders 2 die to cut out a scrap of blue-green small patterned paper for an additional decorative border. I paired that with a cross patterned paper with corals and blue-greens. Lastly, to add a little sparkle, I added 5 clear sequins in varying sizes and topped each with some Icicle Stickles.
The following is a process video:
Disclosure: Many of the supplies I’ve used for today’s project are linked. Some may be affiliate links, which means if you make a purchase I receive a small commission at no extra cost to you. I truly appreciate your support toward the costs of running this blog!
This card is being entered into the following challenges:
Card Mania Christmas Challenge
613 Avenue Create Anything Goes with Optional 3D Challenge
Creatalicious Anything Goes With Optional Flourishes Challenge
Crafty Gals Corner Anything Goes Challenge
Fab ‘n’ Funky Christmas Challenge
Lil Patch of Crafty Friends Anything Goes Challenge
Crafts Galore Encore Anything Goes Challenge
Simon Says Stamp Wednesday Anything Goes Challenge
MFT Sketch Challenge #361