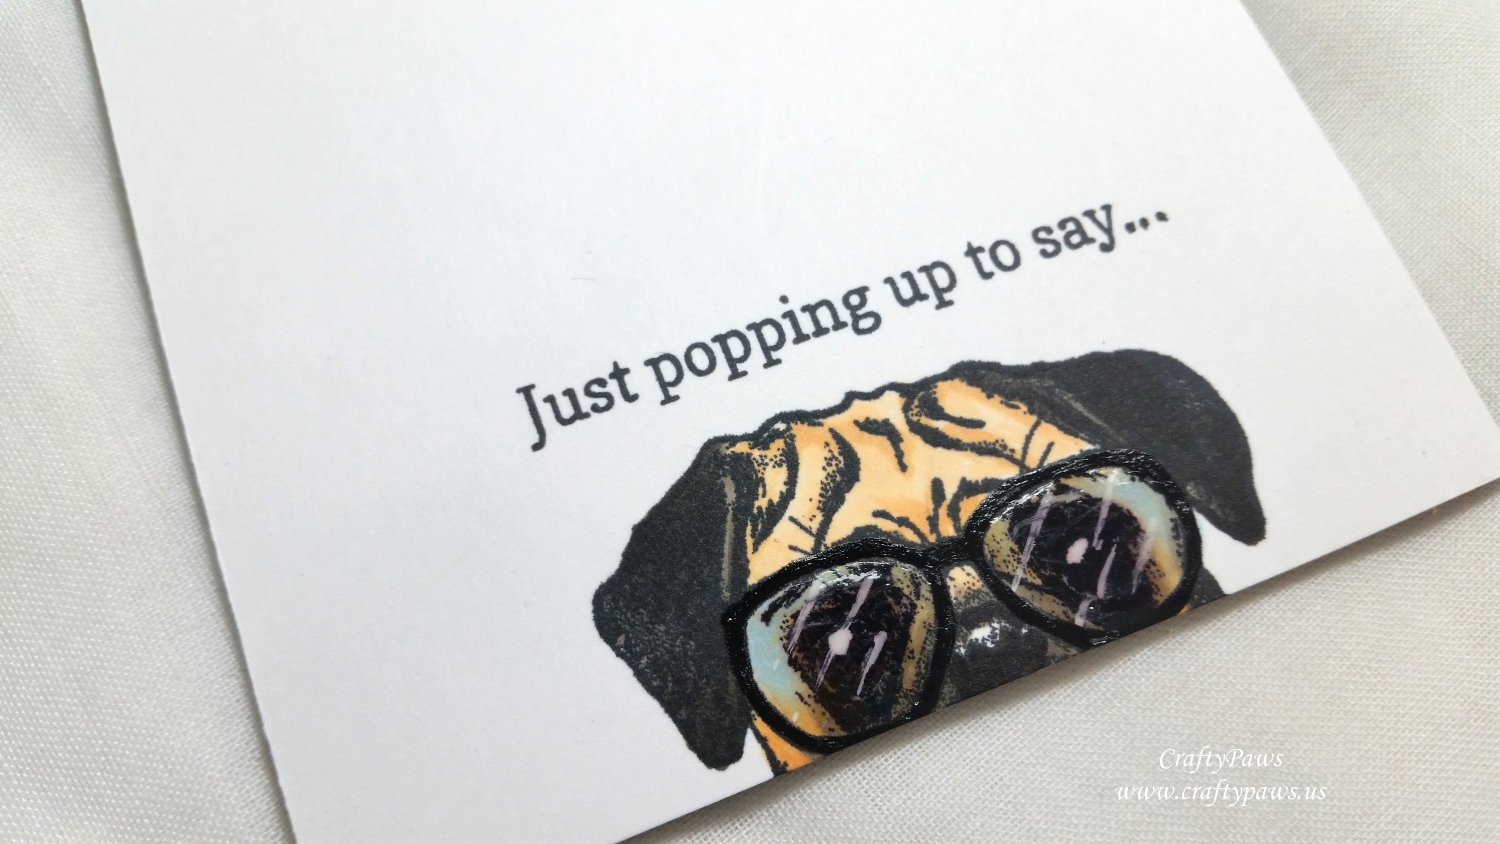
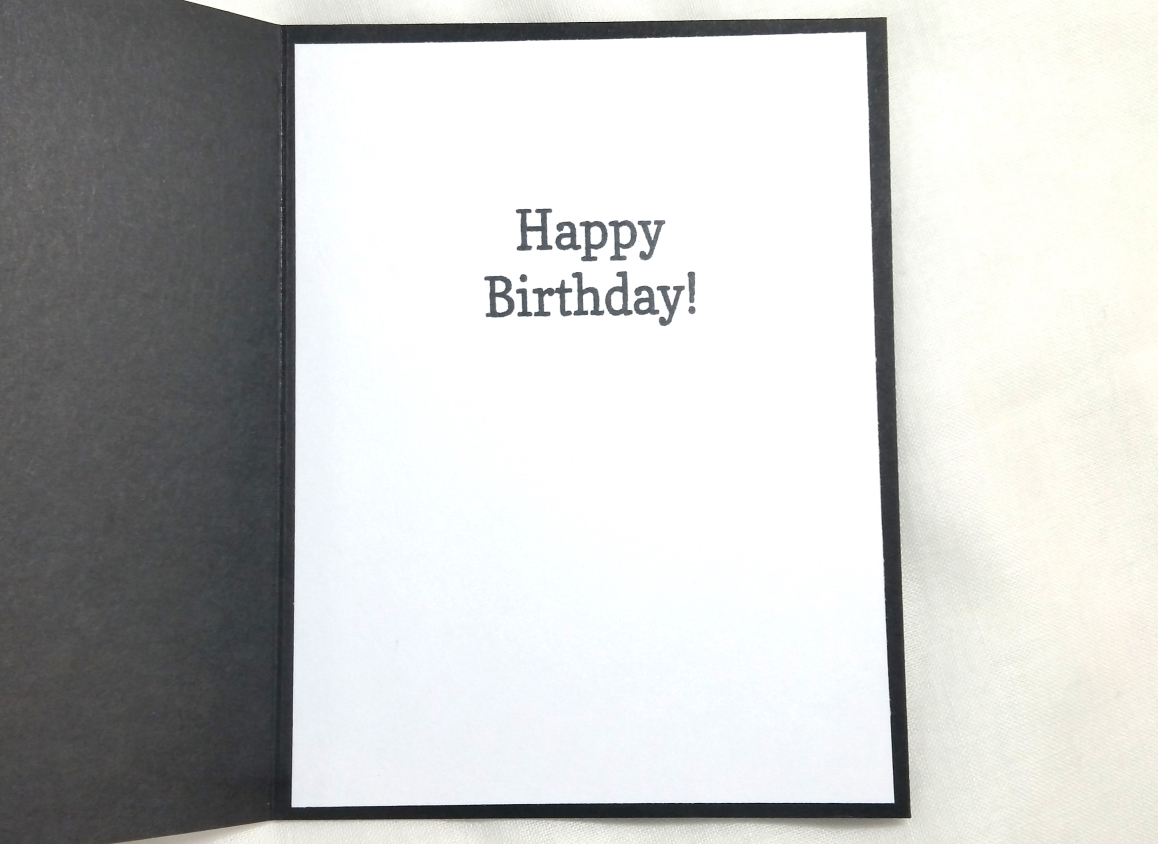
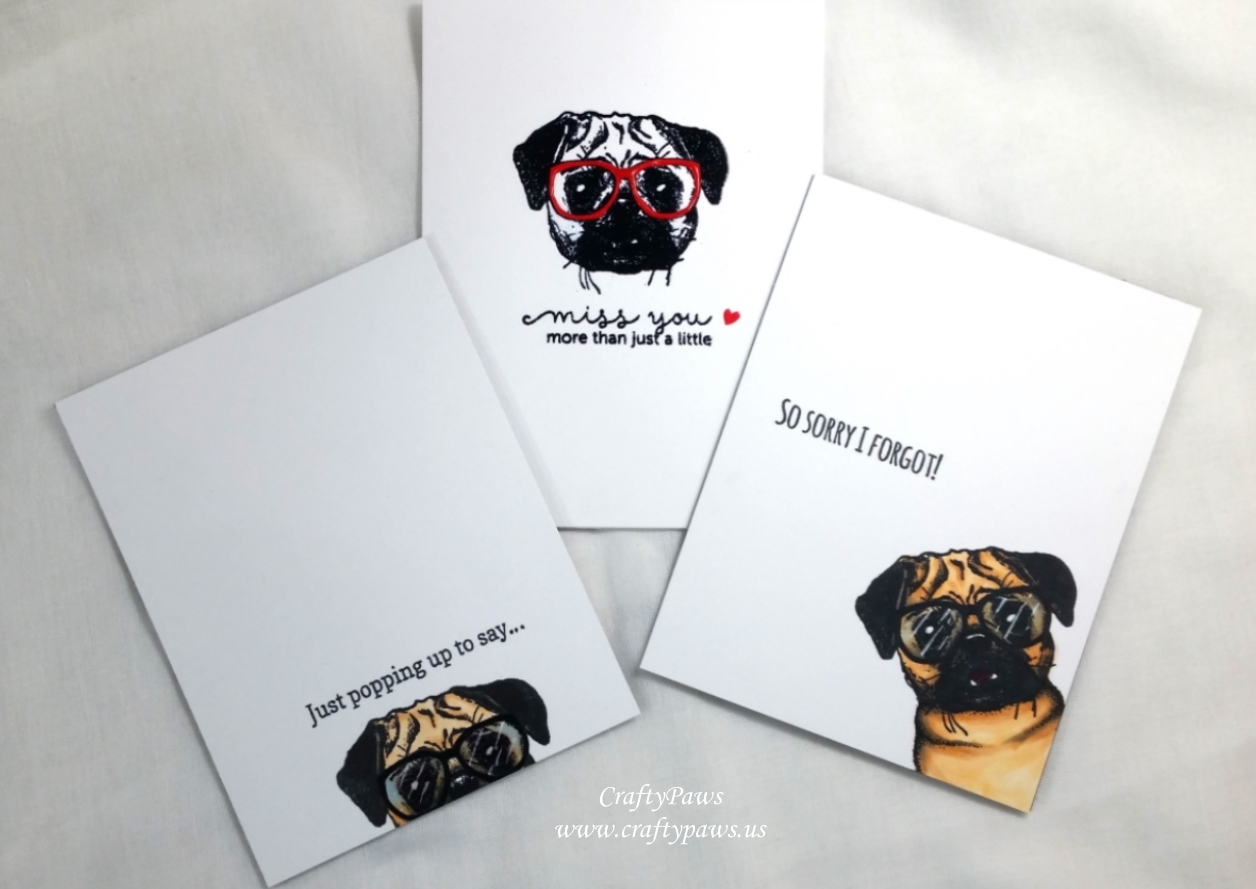
For my first card, the hipster glasses and the adorable wrinkles on the Pug’s forehead, seemed to scream out for a partial, top-only stamping with a cute accompanying saying, “Just popping up to say…” with the inside of the card saying, “Happy Birthday!” (or it could be finished off with so many other sayings, like “Hello!” or “Surprise!”) (the sentiments are from the Neat & Tangled “Out of the Box” stamp set).
I kept the vast majority of the card front crisp white, and Copic colored the image (E51, E53, W5, W7, and B41), including reflection lines on the eye glasses with a Uniball Signo White Gel Pen. I also added Black Sakura Glaze Pen for the eye glass frames and Ranger Glossy Accents for the eye glasses.
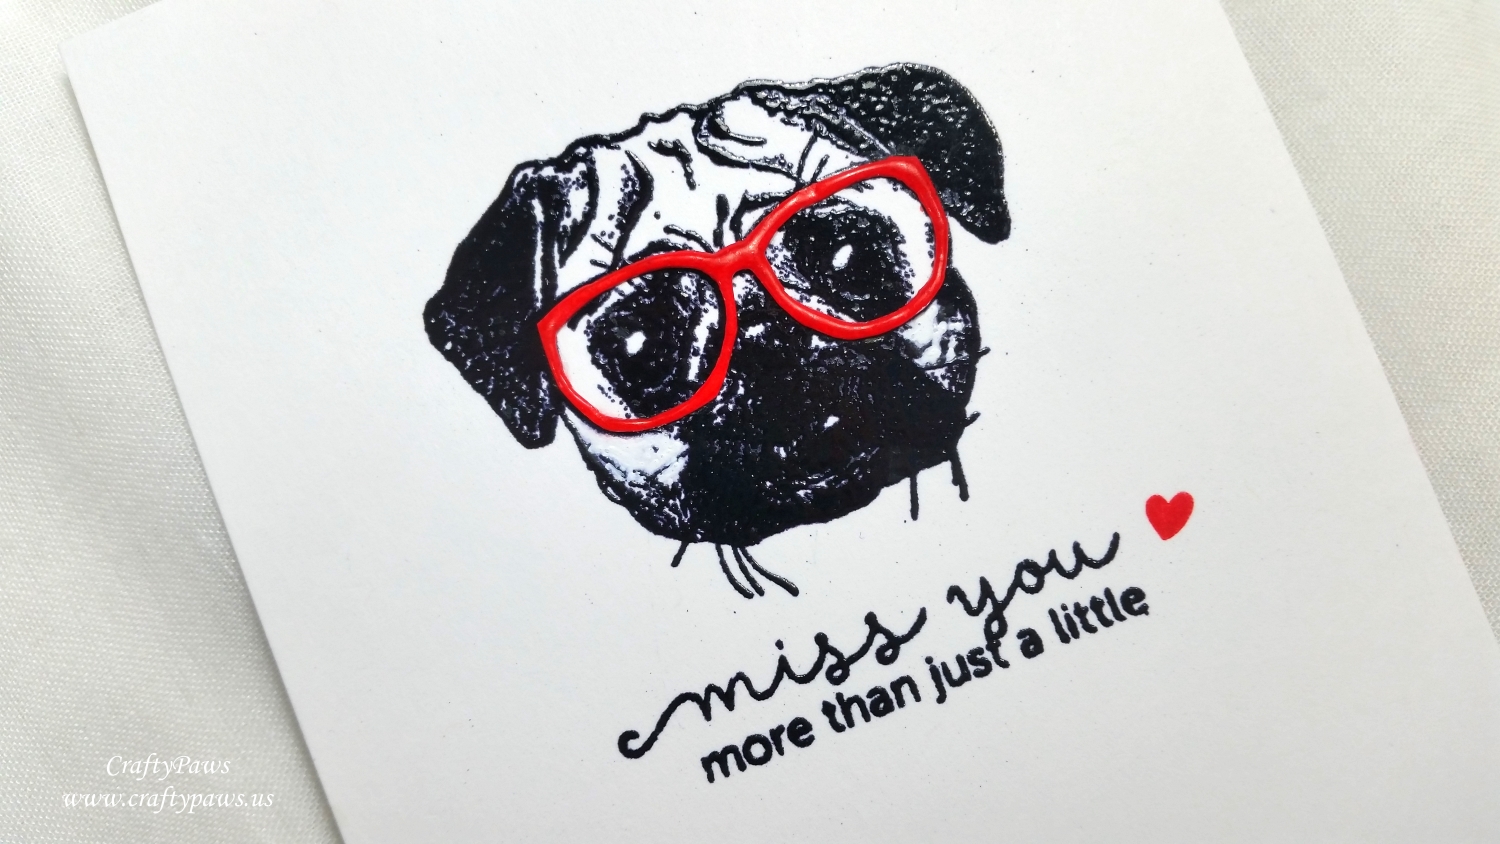
For the second card, I wanted to play off the concerned expression of the Pug so I used a sentiment from the Mama Elephant “In My Heart” stamp set that says: “MISS YOU more than just a little.” Because I wanted to keep this card super simple, I used VersaMark Ink and Ranger Super Fine Black Embossing Powder to stamp the image and the sentiment. Then, to add a pop of color, I heat embossed a little heart by the sentiment and the eye glass frames with Ranger Adirondack Brights Watermelon Pigment Ink and clear embossing powder. This bit was somewhat tricky in that I had to hand fussy cut the inside and outside of the eye glass frames and then heat emboss this tiny, delicate piece; but it was well worth the extra effort for this added dimension and interest.
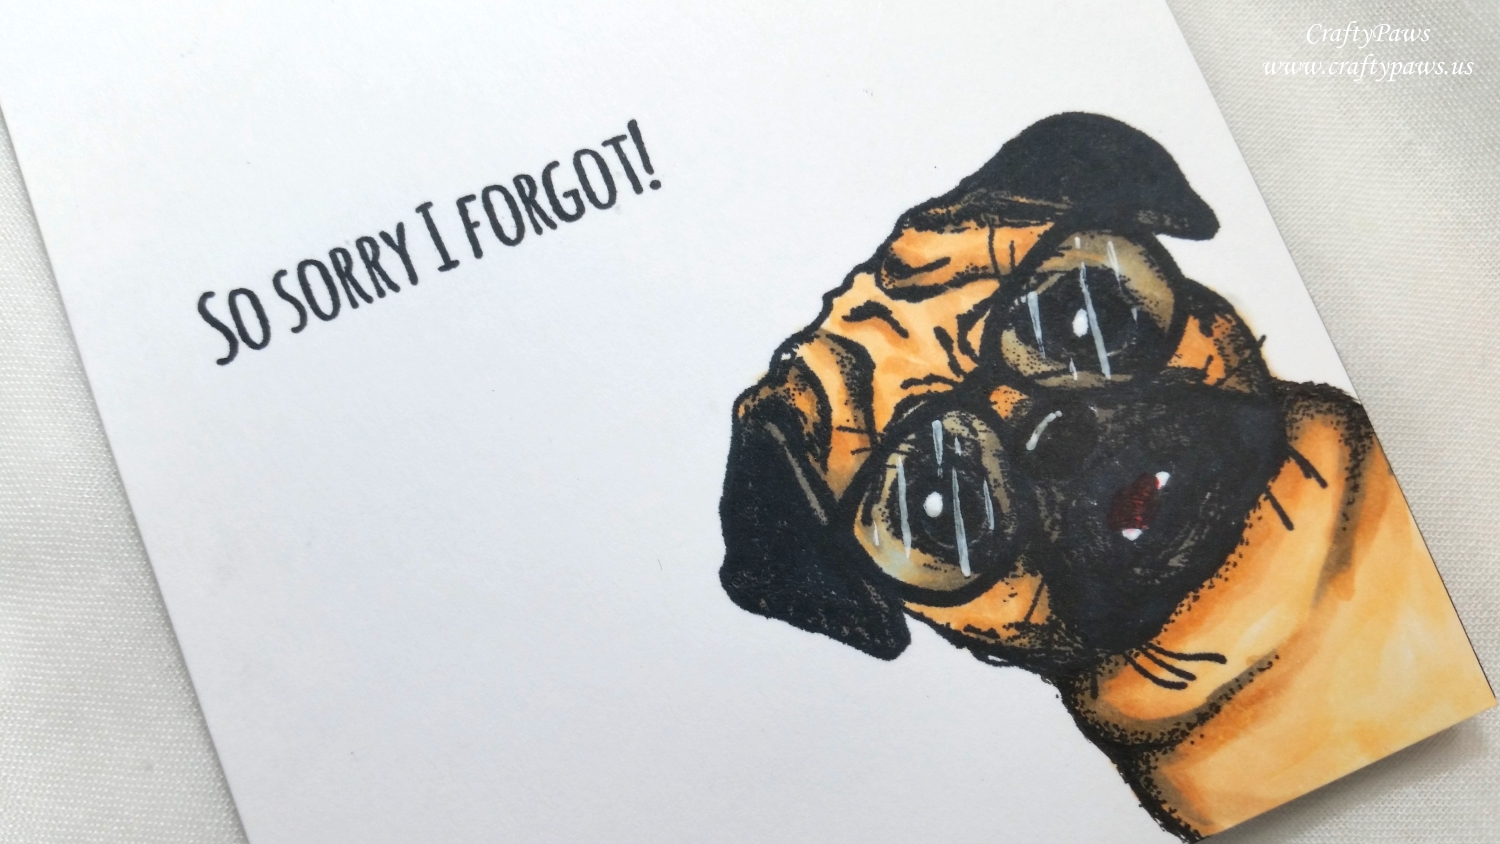
For the third and final card, again, compliments the Pug dog’s worried expression. This time, I stamped the dog head at an angle at the lower right corner of the card front and doodled in the top part of his body with Copic Multiliner Pens in 0.1 pt and 0.03 pt. Then I Copic colored the full image (E51, E53, W5, W7, R27, and B41), adding Uniball Signo White Gel Pen reflection marks on the glasses.

Then I used the “So Sorry I Forgot!” sentiment from the Gerda Steiner Designs “Howl Are You?” stamp set. The inside card liner is stamped with “Happy Birthday,” and “BELATED” both also from the same Gerda Steiner set. For a bit of whimsy, I spaced out the words so that I could use a Red Ultra Fine Point Sharpie marker to add a red carrot to indicate the insertion of the “BELATED”.
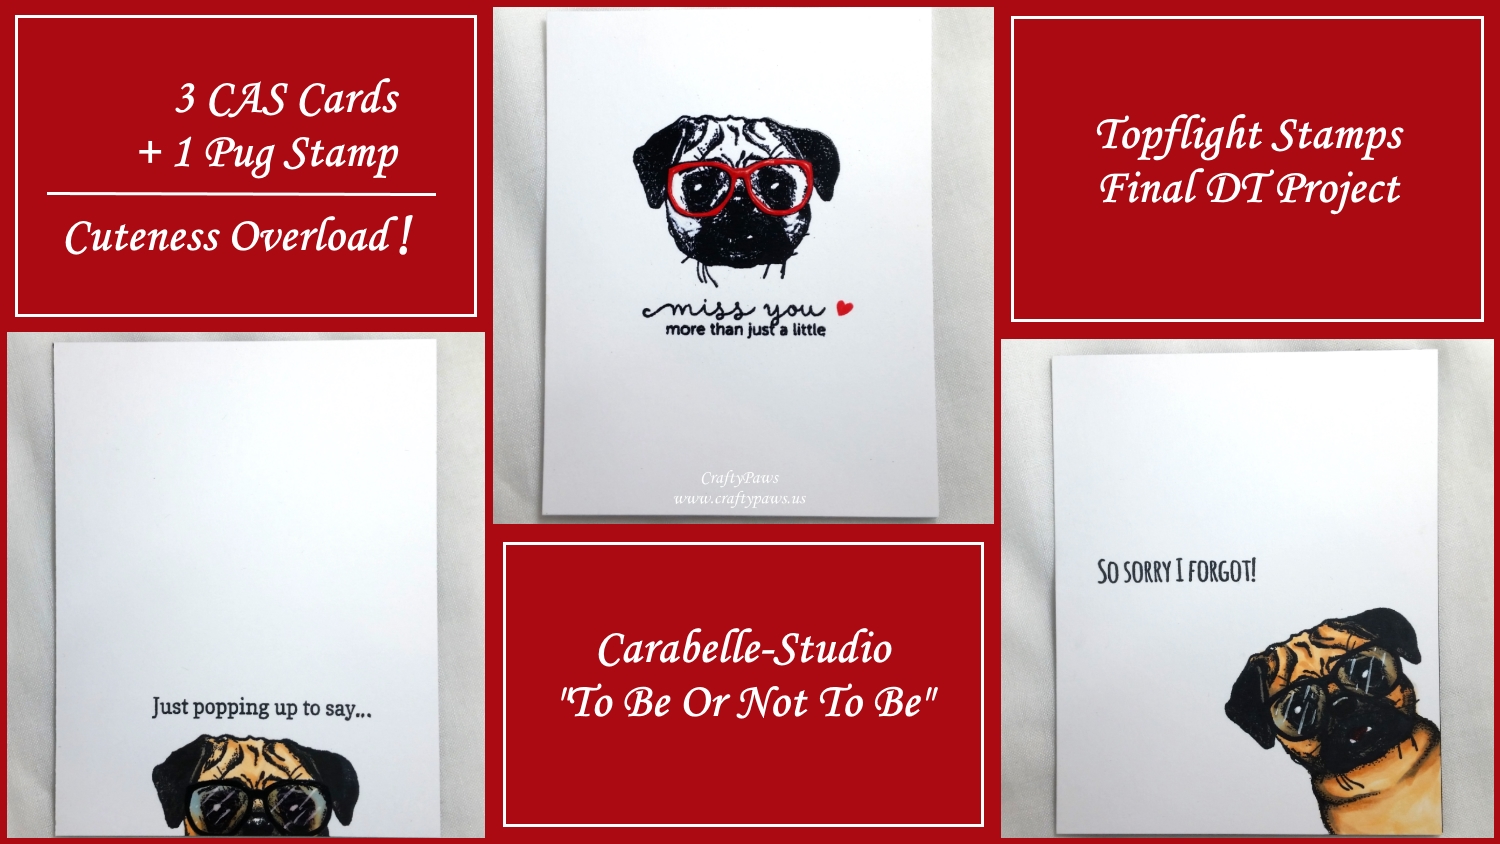
I think this Pug dog stamp is so sweet, and I hope that the personality exuded from these Puggy CAS cards will bring smiles to the recipients. 🙂
Disclosure: Many of the supplies I’ve used for today’s project are linked. Some may be affiliate links, which means if you make a purchase I receive a small commission at no extra cost to you. I truly appreciate your support toward the costs of running this blog!
Click on the following picture to watch the process video of creating all three of these CAS cards:
These cards are being entered into the following challenges:
Happy Little Stampers Smile CAS Challenge
613 Avenue Create Anything Goes with Optional Buttons and Bows Challenge
Simon Says Stamp Wednesday Anything Goes Challenge
Word Art Wednesday Anything Goes Challenge
Creatalicious Anything Goes with Optional Flowers Challenge
Lil Patch of Crafty Friends Anything Goes Challenge
Through the Craft Room Door Anything Goes Challenge
Crafty Gals Corner Anything Goes Challenge
The Corrosive Anything Goes Challenge
]]>
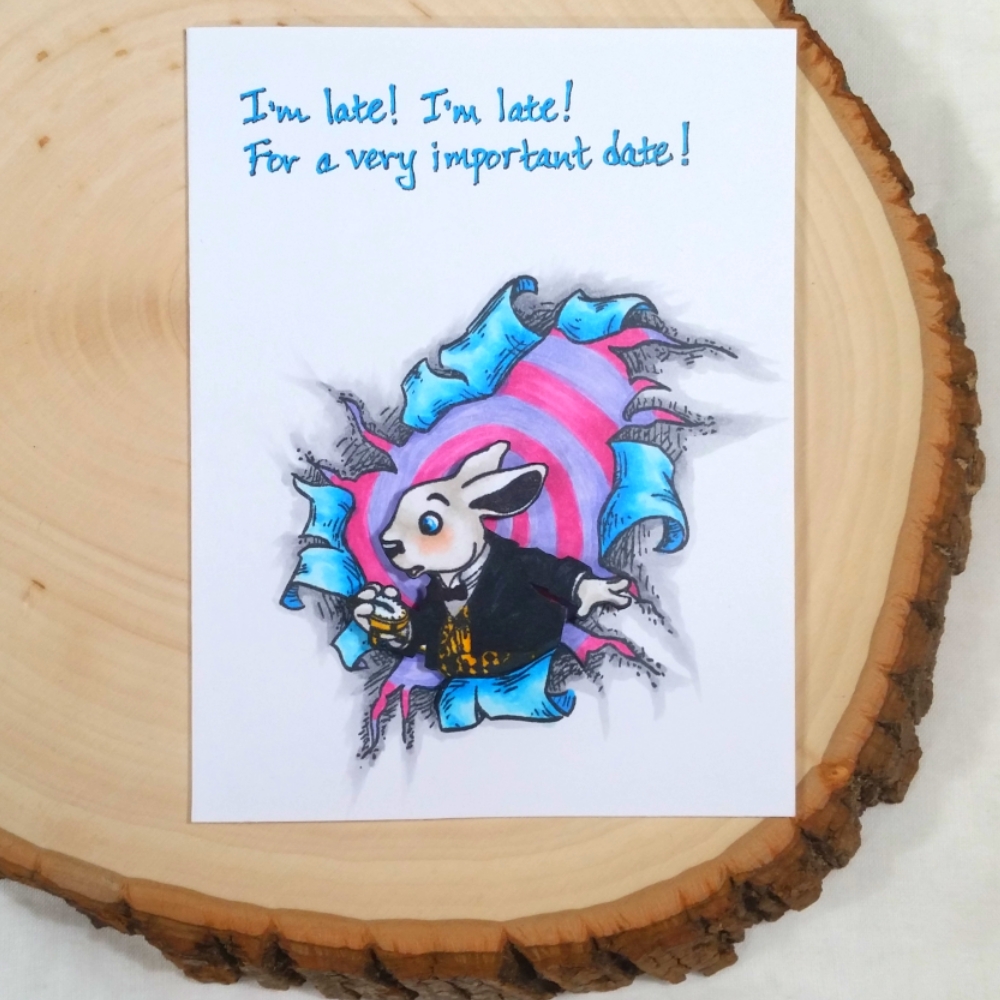 I thought the white rabbit looking at his pocket watch from the Carabelle Studio Alice’s Advetures in Wonderland Stamp Set would be perfect for a belated birthday card. Since only the upper half of the rabbit is depicted in the stamp, I knew I wanted to create something he could pop out of or stand behind. Then I remembered I had the fanciful Katzelkraft Torn Paper Stamp Set.
Taking cues from the fabulous colors of the Cheshire Cat and Alice’s blue dress from Alice in Wonderland, I used the following Copic colors:
Swirly hole: BV01, BV02, RV55
Torn curled paper: B000, B01, B02 and B04
Shadow areas of paper: N1 and N4
Then for the white rabbit, I kept the coloring simple using the following:
Rabbit: W0 and W1 with R30 blush and B01 eyes
Vest and pocket watch: Y35 and YR24
Overcoat: N9
Pocket watch glass: B00
Collar and cuffs: N1 and N2
 To create a little dimension, I popped up the fussy cut rabbit up on foam dots, and I used an X-Acto blade to cut out the bottom part of the torn paper hole to tuck the rabbit behind so that it would look like the rabbit was bursting forth from the magical Alice in Wonderland world. Not only to cover up this little surgery, but also to hide the bleed through of the Copic coloring of the torn paper hole, I lined the back side of this card front with some teal card stock.
I hand wrote the card front sentiment, “I’m late! I’m late! For a very important date!” using an Ultra Fine Point Sharpie Marker in Teal (to coordinate with the blue paper curls) and added a super fine shadow to the letters with a Copic Multiliner Pen in 0.05 pt.
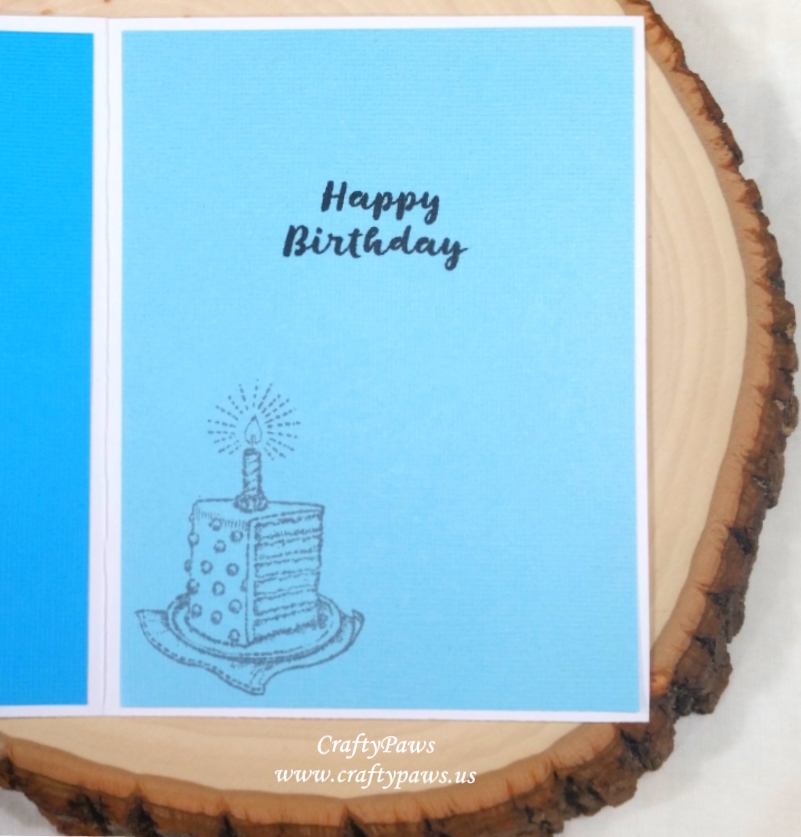
Then to finish off the inside of the card, I used stamps from the Power Poppy “Party Time” stamp set. I stamped out the huge cake slice with Lawn Fawn Premium Dye Ink in Hippo and the sentiment, “Happy Birthday” with Momento Tuxedo Black Ink.
Disclosure: Many of the supplies I’ve used for today’s project are linked. Some may be affiliate links, which means if you make a purchase I receive a small commission at no extra cost to you. I truly appreciate your support toward the costs of running this blog!
The following is a process video of creating this card:

This card is being entered into the following challenges:
Simon Says Stamp Wednesday Use More than One Stamp Challenge
Word Art Wednesday Anything Goes Challenge
Creatalicious Anything Goes with Optional All that Glitters Challenge
Lil Patch of Crafty Friends Anything Goes Challenge
Through the Craft Room Door Anything Goes Challenge
613 Avenue Create Anything Goes with Optional Mainly Blue Challenge
Penny Black and More Anything Goes Challenge
Crafty Gals Corner Anything Goes Challenge
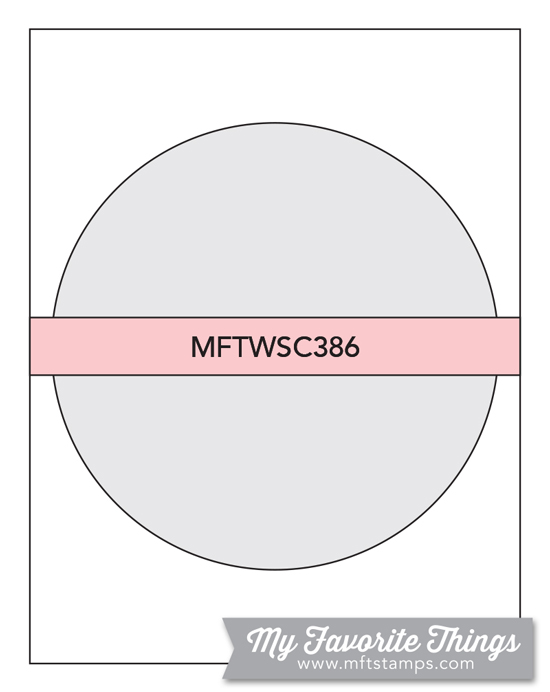
MFT Sketch Challenge #386
]]>
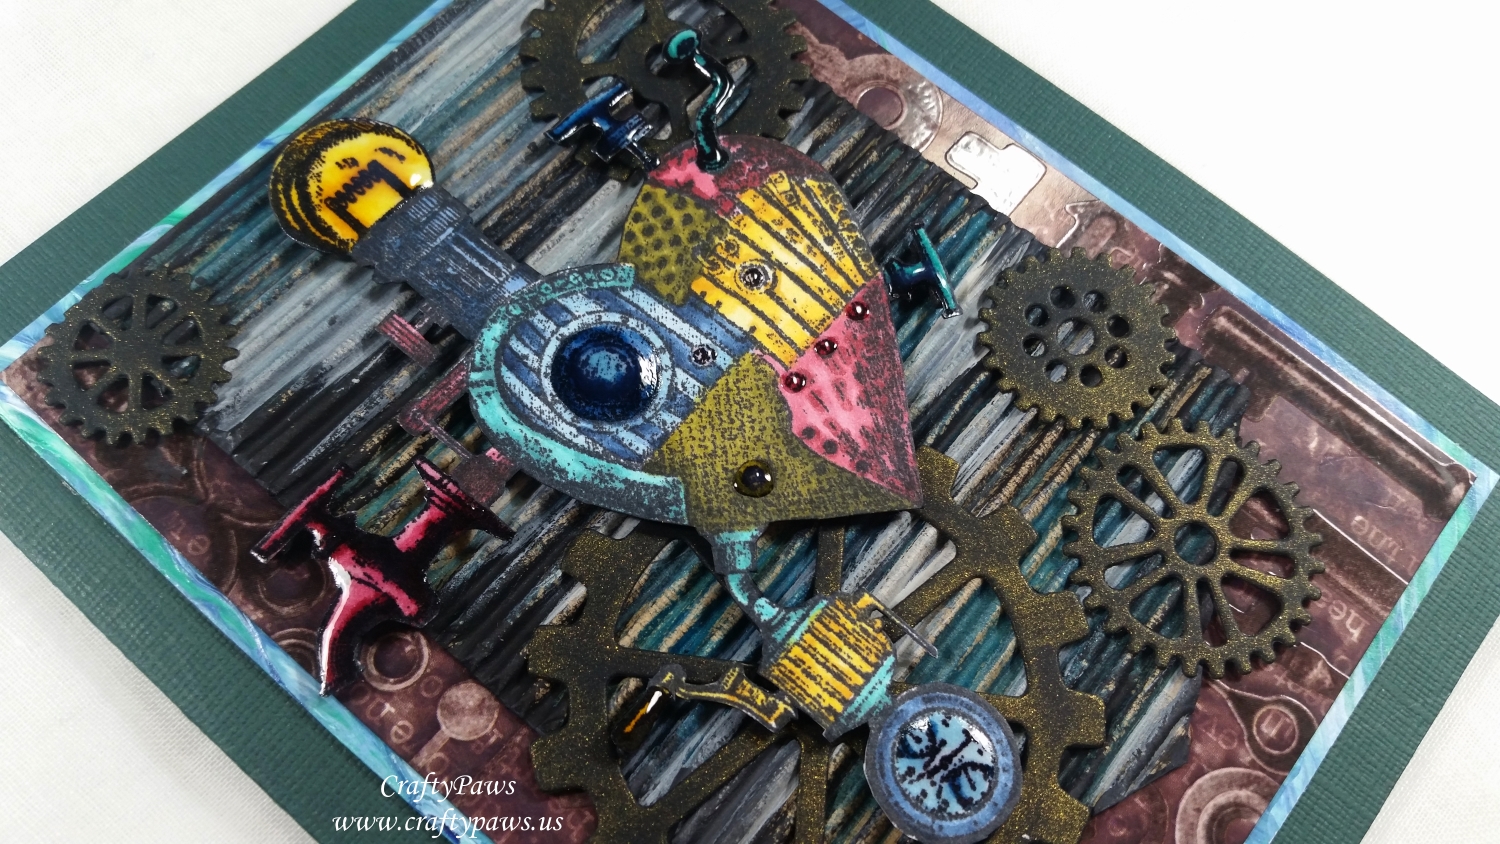
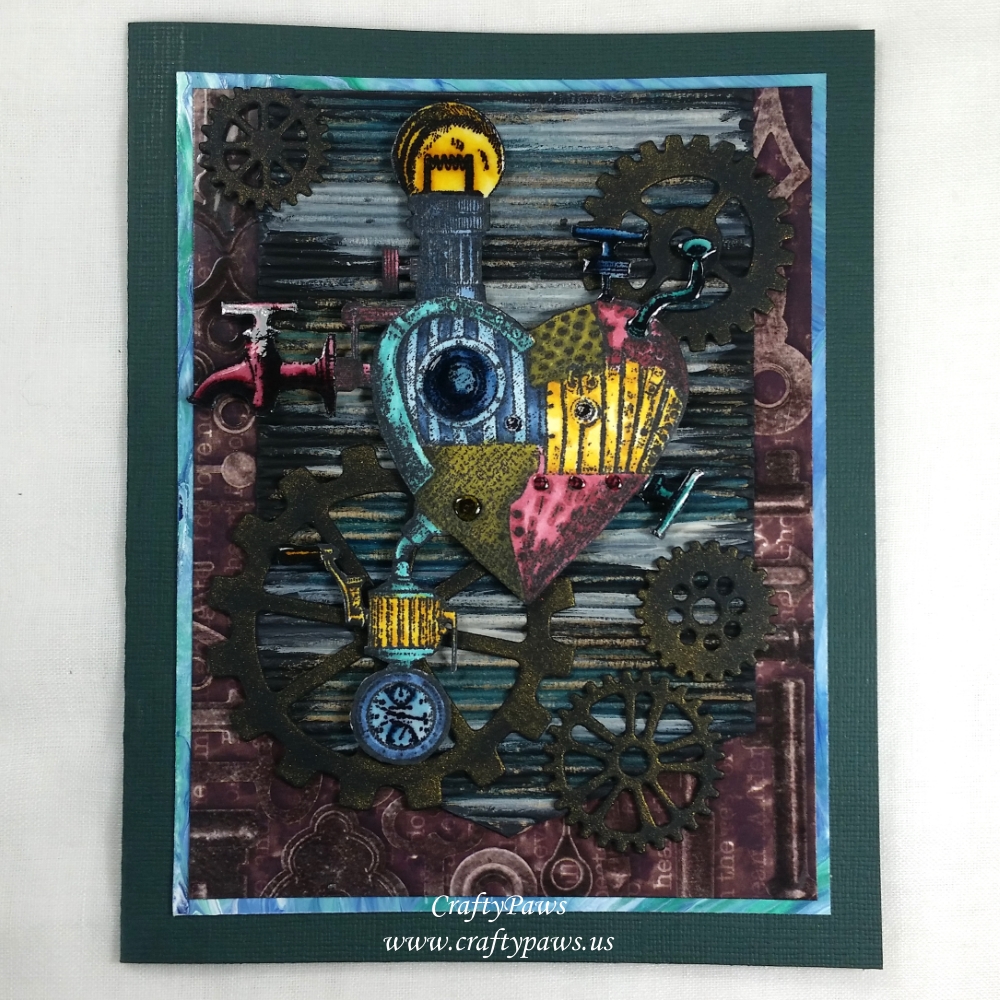 I created this Industrial Steampunk style card inspired by the striking Carabelle-Studio “The heart has its reasons” stamp set. I Copic colored it in the following rich secondary tones: Khaki: YG95, YT97, YG99; Golden Yellow: Y00, Y15, YR24; Teal: BG13, BG15, BG18; Burgundy: R83, R85, R89; Blues: B52, B93, B95, B97 and B99. Next I painstakingly fussy cut it out and carefully backed each part of the detailed image up on fun foam for added dimension. I also coated some parts of the image with Ranger Glossy Accents to give it some shine and interest.
For the card front, I really wanted to create a layered and textured grungy background. I rummaged through my paper scrap box and found some thick watercolor paper that I had long-ago painted with DecoArt fluid acrylics in Titanium White, Phthalo Blue, Cobalt Teal Blue, and Cerulean Blue. Just a bit of that peeks around the next layer up, which is a glossy and slightly textured patterned paper of keys and clock work hands that has been in my scrap box for years! I also found a bit of corrugated kraft card stock that I cut into a banner shape and then loosely painted with streaks using a DecoArt Media turquoise shimmer mister, dry brushed black acrylic paint and added light swaths of Martha Stewart Multi-Surface Satin Putty acrylic paint. I love the way the liquid mediums highlight the texture of the corrugated card stock and give this banner layer the look of something that has gotten painted numerous times over many years.

For some Steampunk accents, I die cut 5 gears from 100 lb black card stock using some Diemond Dies Steampunk Gears Dies. To give them a metallic shimmer, I blended on some Delicata Golden Glitz Pigment Ink to the die cut gears. I positioned them around and behind the top focal point image layer, which was the beautiful Steampunk heart image. The whole assembly was mounted on a dark forest green cardstock card base. My readers can get 10% off and free worldwide shipping on all orders of $35 or more at Diemond Dies by using the coupon code: thankskristina
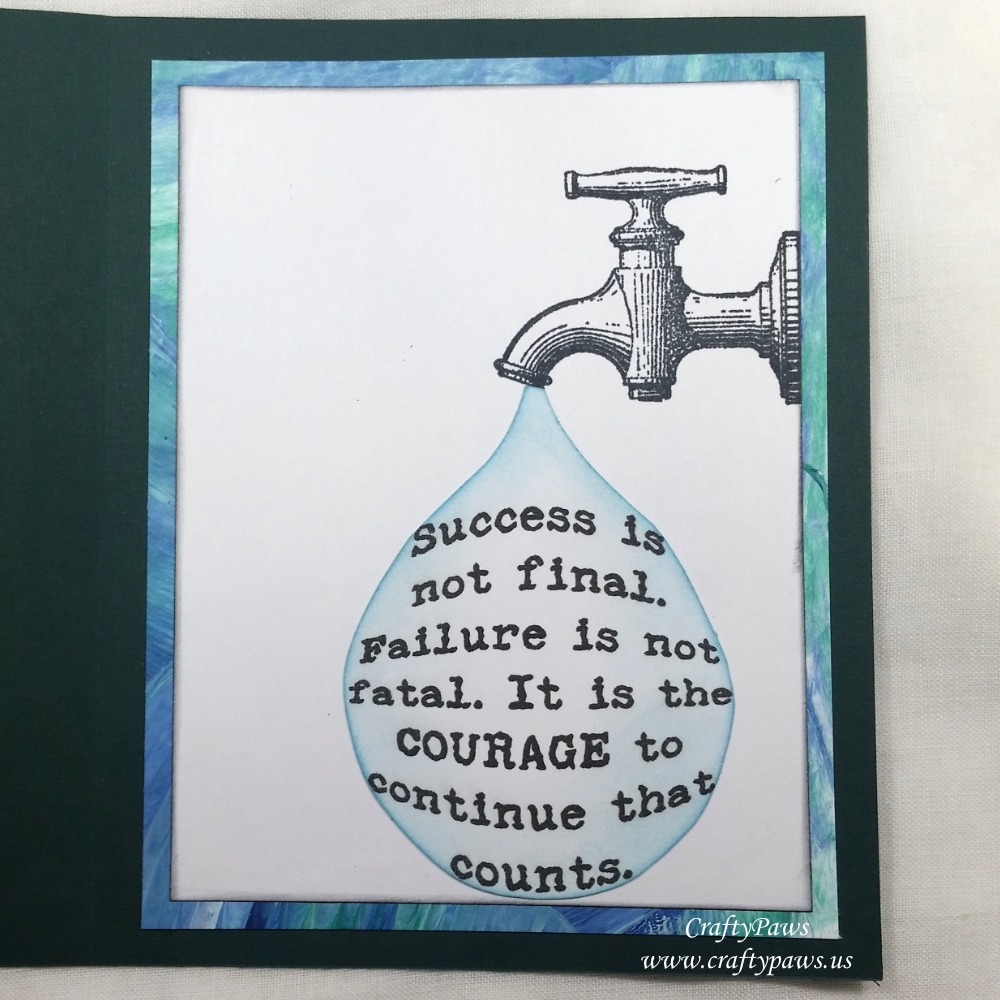 For the inside card liner, I simply stamped out the faucet from the Carabelle Studio “The heart has its reasons” stamp set on the upper right side. I matted it on more of the watercolor paper with the blue and green fluid acrylic paint to echo the matting on the card front.
Then I used Microsoft Word to shape the quote into a droplet shape. I inserted a circle shape that I made white with a white outline. Then I right clicked to insert text. I used a free distressed typewriter font to type in the quote in black. Then I used the “format” tab and clicked the “text effects” choice button which opened a drop down menu that had the “transform” choice as the last option. I clicked on the various options to shape the text into a rounded circle shape that I hoped I could cut into the form of a big drop of water. I printed out the quote and hand fussy cut it out into the droplet shape. Lastly, to add a bit of color and set the shaped sentiment apart from the white liner sheet, I blended on some Tim Holtz Distress Ink in Tumbled Glass.
Disclosure: Many of the supplies I’ve used for today’s project are linked. Some may be affiliate links, which means if you make a purchase I receive a small commission at no extra cost to you. I truly appreciate your support toward the costs of running this blog!
The following is a video share along with a Copic coloring process video:
This Steampunk Industrial card is being entered into the following challenges:
CropStop April Linky Party Challenge #38
Simon Says Stamp Wednesday Anything Goes Challenge
Word Art Wednesday Anything Goes Challenge
Creatalicious Anything Goes with Optional Dies or Punches Challenge
Lil Patch of Crafty Friends Anything Goes Challenge
Crafty Gals Corner Anything Goes Challenge
613 Avenue Create Anything Goes Challenge with Optional Use Vellum
Through the Craft Room Door Anything Goes Challenge
SanDee & Amelia’s Anything Goes Steampunk Industrial Challenge
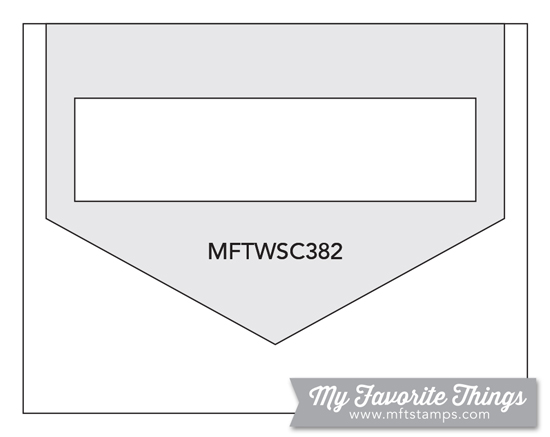
MFT Sketch Challenge #382
]]>
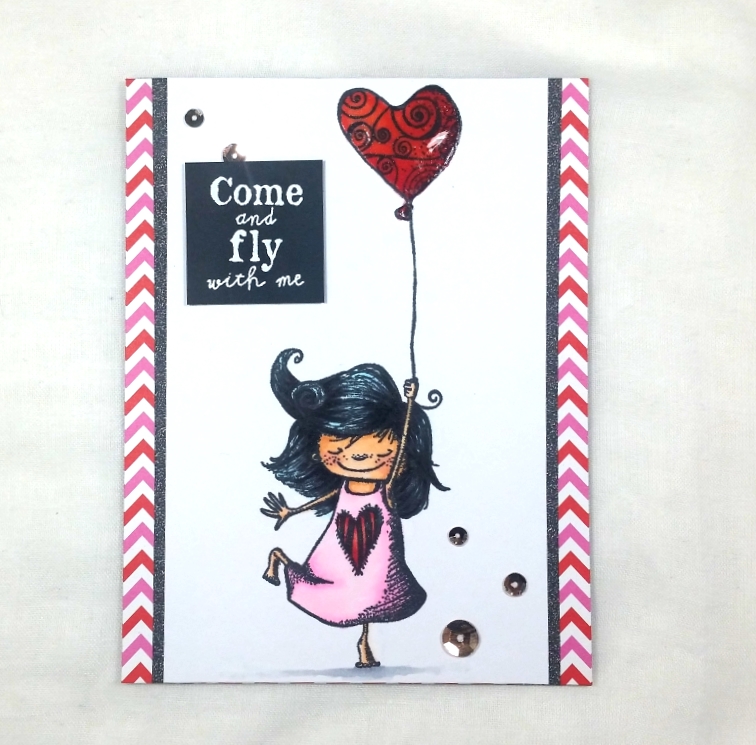 I used the following Copic colors to color up this cutie and her balloon:
Skin: E000, E00, E01, E21 and R20
Blue black hair: B000, B00, C7, C8 and C9
Dress: RV00, RV02, R22, R24 and R29
Balloon: R22, R24 and R29
Shadow on ground: C1 and C2
I used Clear Wink of Stella to add shimmer to both the balloon and the heart on the little girl’s dress, and added a coating of Ranger Glossy Accents on the Balloon for high shine.
I first stamped out the sentiment in the upper left, but ended up getting stray ink marks so I had to figure out how to hide that. I ended up stamping out the sentiment with VersaMark Ink on a scrap of black card stock and used Super Fine White Ranger Embossing Powder to heat emboss it. I popped this sentiment piece on double sided foam adhesive to add a little dimension, and I think it looks much better this way than how I had originally stamped out the sentiment just directly on the card front.
 For a little extra visual texture, I added gun metal glitter washi tape to both sides of the card front and also backed the whole piece with some fun pink and red chevron patterned paper from the Doodlebug Design “Lovebirds” 6 x 6 paper pad (retired). For a sparkly finishing touch I added a handful of sequins in various sizes to the lower right and upper left of the card front.
It’s one of my goals this year to focus a bit more on the insides of my cards, so for this one I trimmed the sides of the card liner with scraps of the same Doodlebug chevron patterned paper. I also decided to stamp out from the stamp set, the large quilt heart and the heart balloon again.
Unfortunately, I smeared the heart balloon a little bit, but I ended up camouflaging that with little eyelash lines that I doodled all around the hearts with a 0.03 pt. Copic Multi-liner Pen. Again, having to address a little mistake I think made the card better! 🙂
Disclosure: Many of the supplies I’ve used for today’s project are linked. Some may be affiliate links, which means if you make a purchase I receive a small commission at no extra cost to you. I truly appreciate your support toward the costs of running this blog!
The following is a start to finish process video of crafting this card:
This card is being entered into the following challenges:
Simon Says Stamp Wednesday Anything Goes Challenge
Word Art Wednesday Anything Goes Challenge
Creatalicious Anything Goes with Optional Girly Challenge
Card Mania Embossing Challenge – WINNER
Lil Patch of Crafty Friends Anything Goes Challenge
Through the Craft Room Door Anything Goes Challenge
613 Avenue Create Anything Goes with Optional Love Challenge
Crafty Gals Corner Anything Goes Challenge
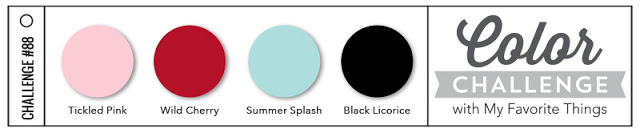
MFT Color Challenge #88
]]>
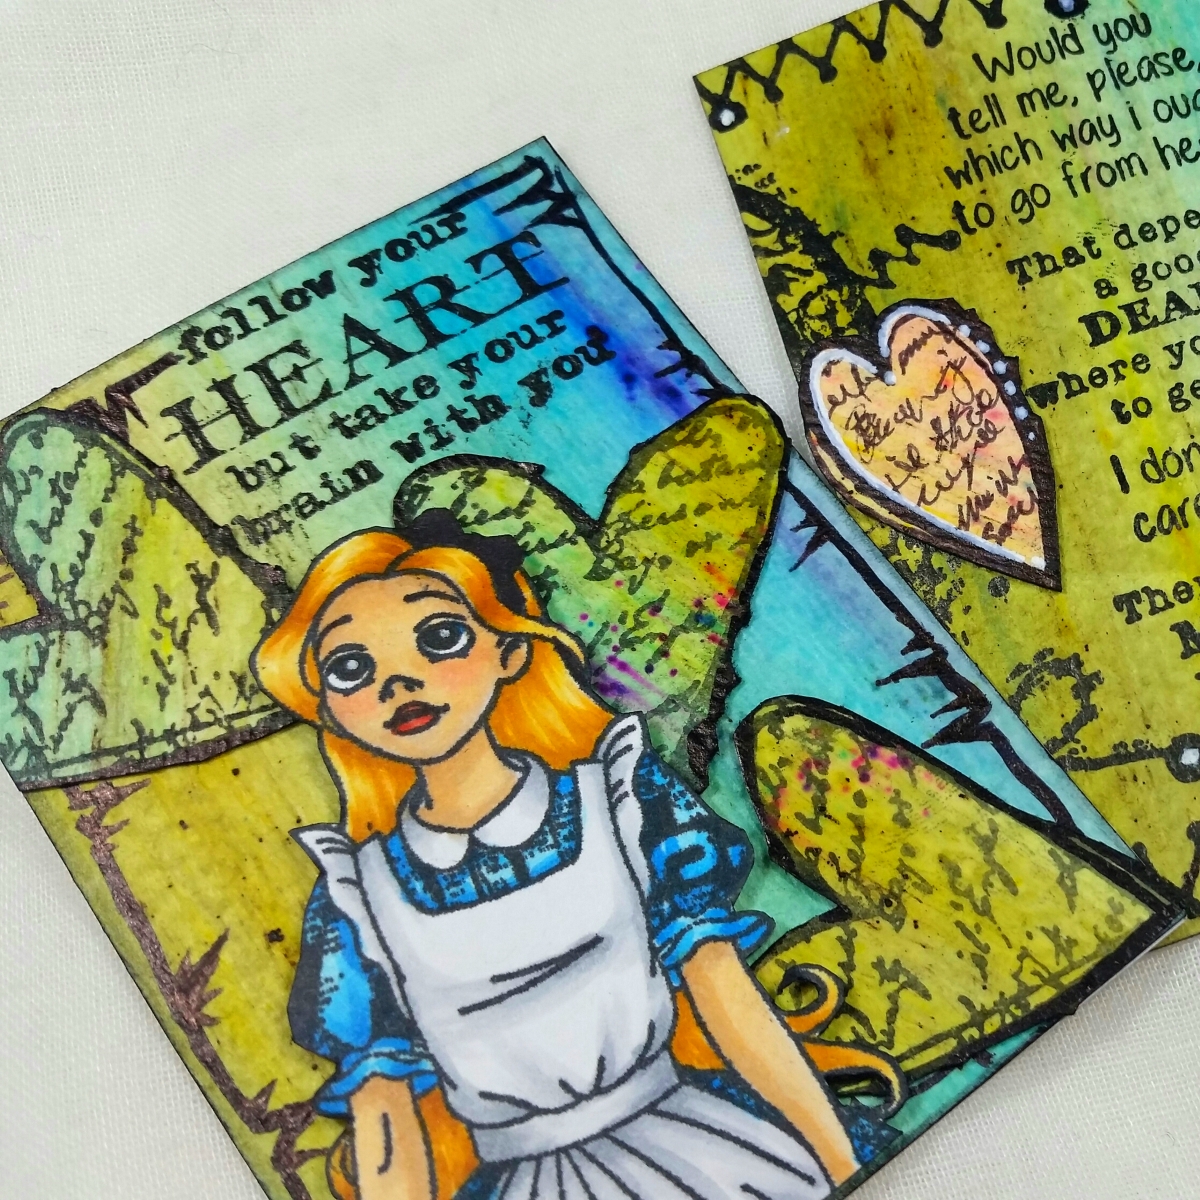 I stamped out the top part of the Alice and the White Rabbit and used the following Copic colors on them:
Skin: E50, E51, E21, R20, BV000
Lips: R14 and R17
Hair: Y11, YR24 ???
Blue dress: B01, B04 and B06
White apron: C1 and C3
White Rabbit: W1, W3, R20, Y11, YR24
I fussy cut them out and inked the edges with a Tuxedo Momento Black Marker to give them a finished look, all ready for them to be popped up on some ATCs.
But then I wondered what type of background would compliment them, while not competing with or distracting from them? I thought about spritzing some watercolor paper with pigment powders but then I researched how to use the PaperArtsy Infusions (which were also in my design team package) and found an interesting NEW-to-me use for them with glaze medium that created a variegated wood grain look. Since I didn’t have glaze medium but had some Liquitex Matte Medium, I thought I would experiment just brushing these powders on with the matte medium onto Strathmore Cold Press Watercolor Paper. Oooh the effect was so neat! The walnut stain granules in the Infusions released more slowly than the pigment powders, but with a little patience brushing, they activated beautifully. I wanted a bluish – greenish – yellow background, but since I only had the Lemoncello and The Sage Infusions, I also added some Ken Oliver Color Burst powder in Ultramarine Blue. The Color Bursts are brighter and the Infusions have a more vintage and distressed look, but working them together, muted the Color Bursts enough to create a well-blended, colorful wood grain background.
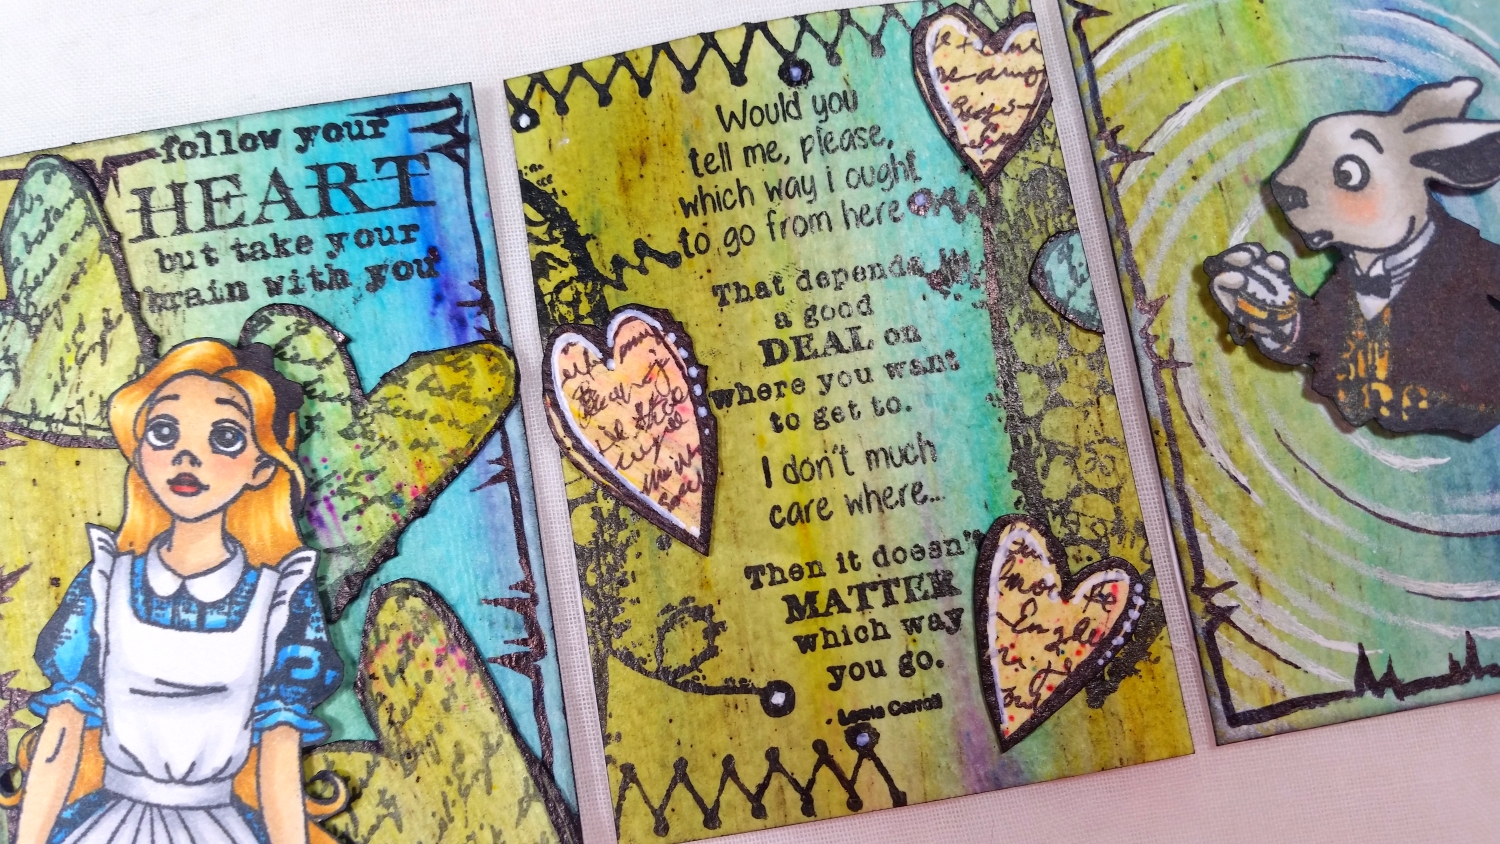
When this background paper was all dry, I cut them it down to size for 3 ATCs, plus some left over. For the ATCs with Alice and the White Rabbit, I inked the edges of the ATCs with Tim Holtz Distress Ink in Black Soot and also took Fine Point and Ultrafine Point black Sharpie Markers to doodle on some spikey lines to frame them.
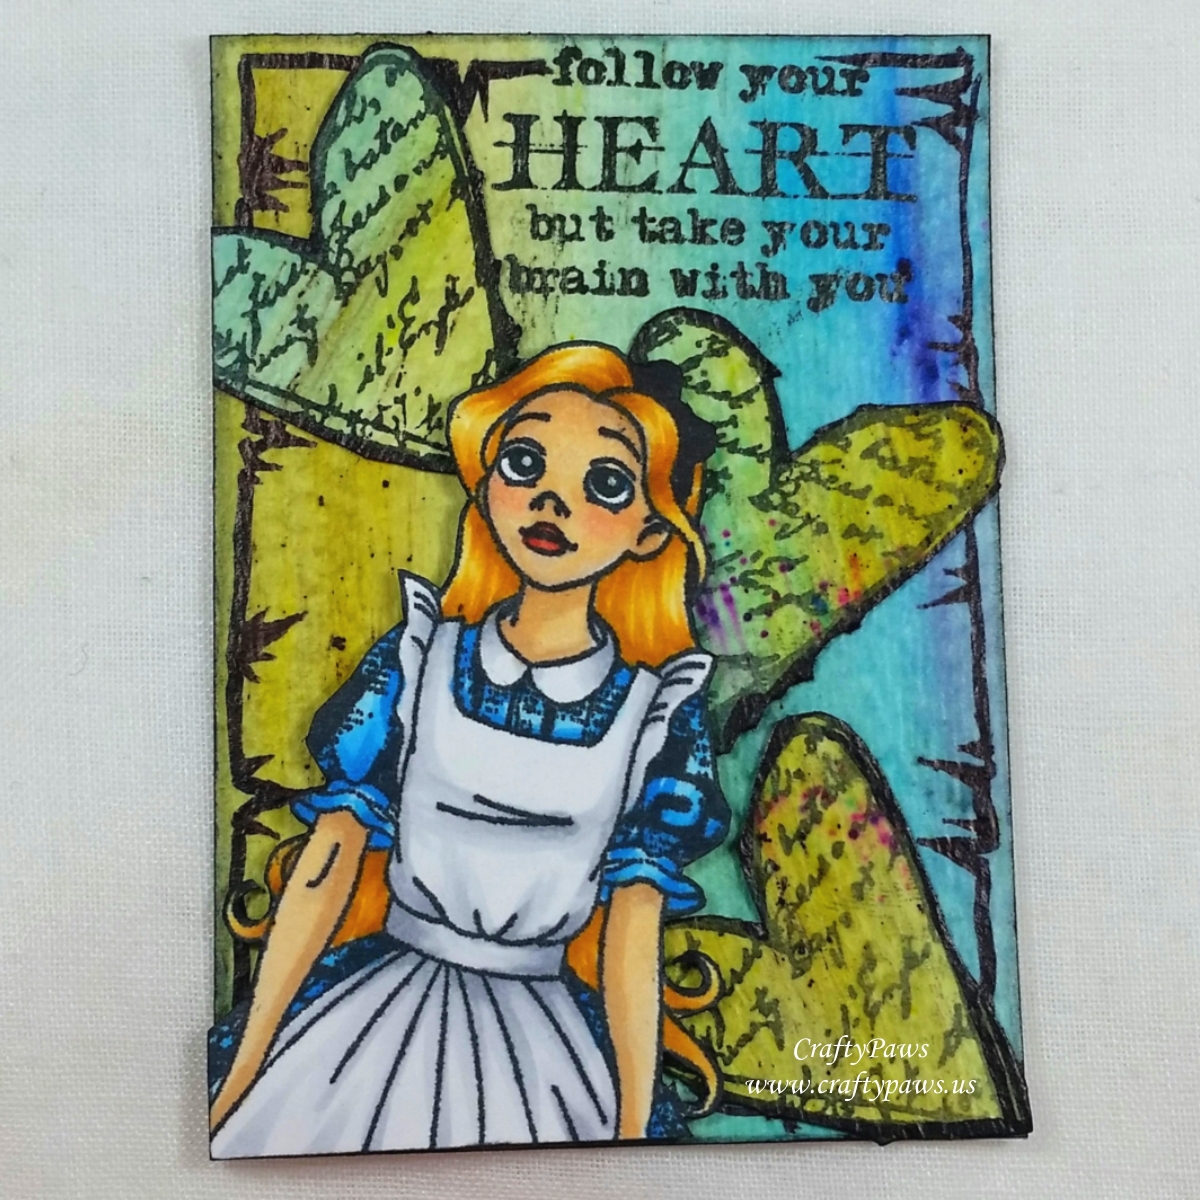
For the Alice ATC, I stamped out the sentiment from the Follow Your Heart stamp set in the upper right corner. I also stamped out three of the smaller hearts from the set onto the left over background paper and fussy cut those out to add some interest and slight dimension behind Alice.
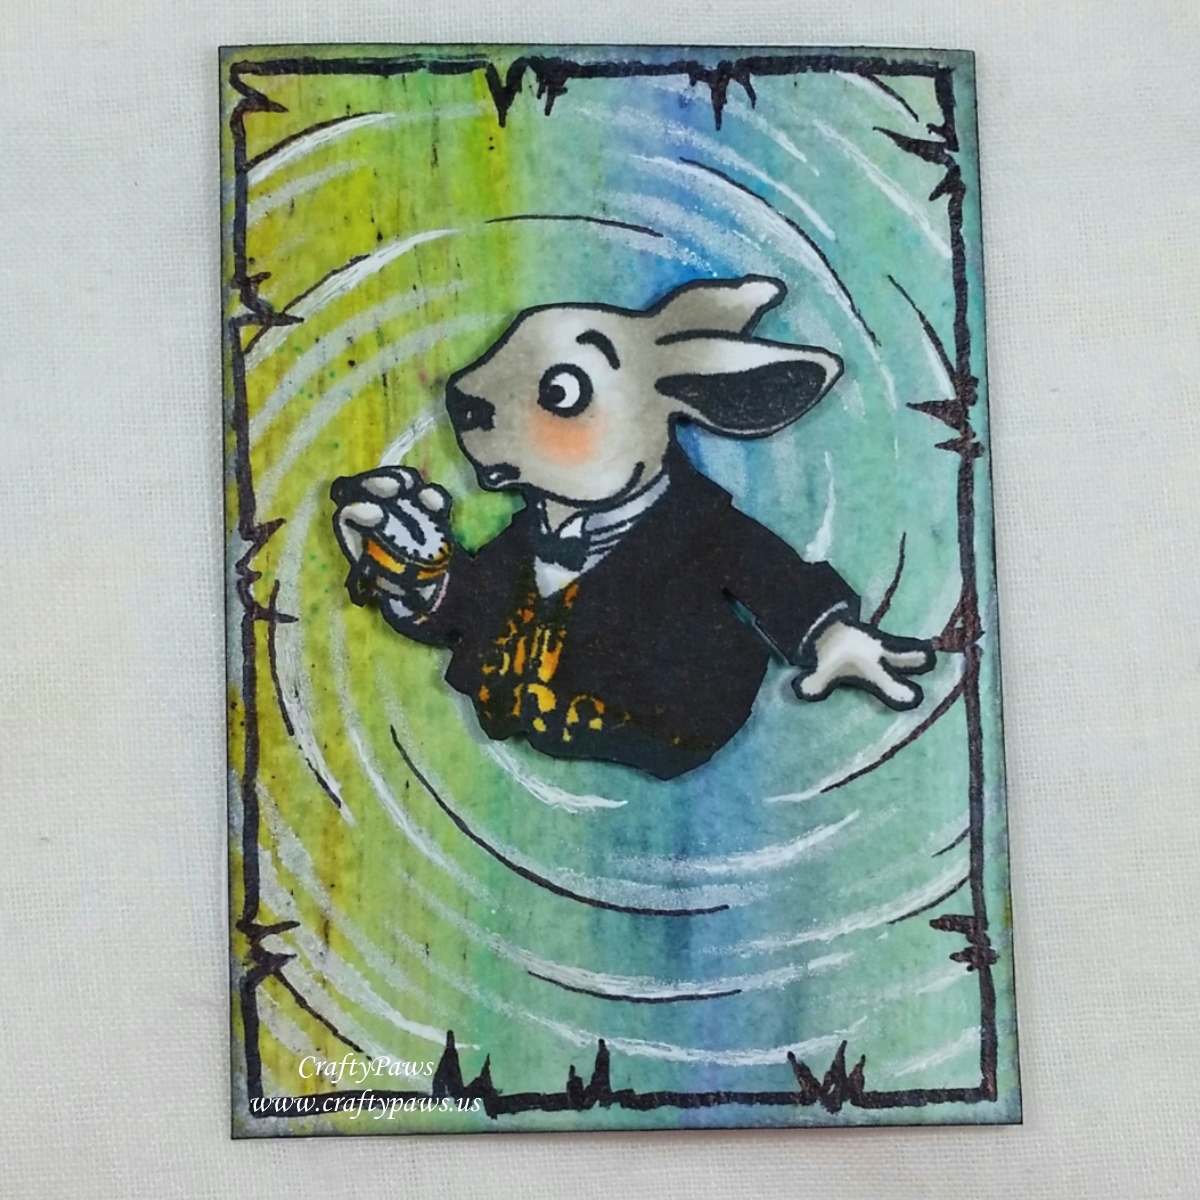
For the White Rabbit ATC, I used a DecoArt stencil by Andy Skinner called, Tornado with some Brilliance Moonlight White pigment ink to create a swirly whirly look. I highlighted some of the white swirls with my trusty Uniball Signo white gel pen and I also lined some of the swirls with an extra fine point black Sharpie.
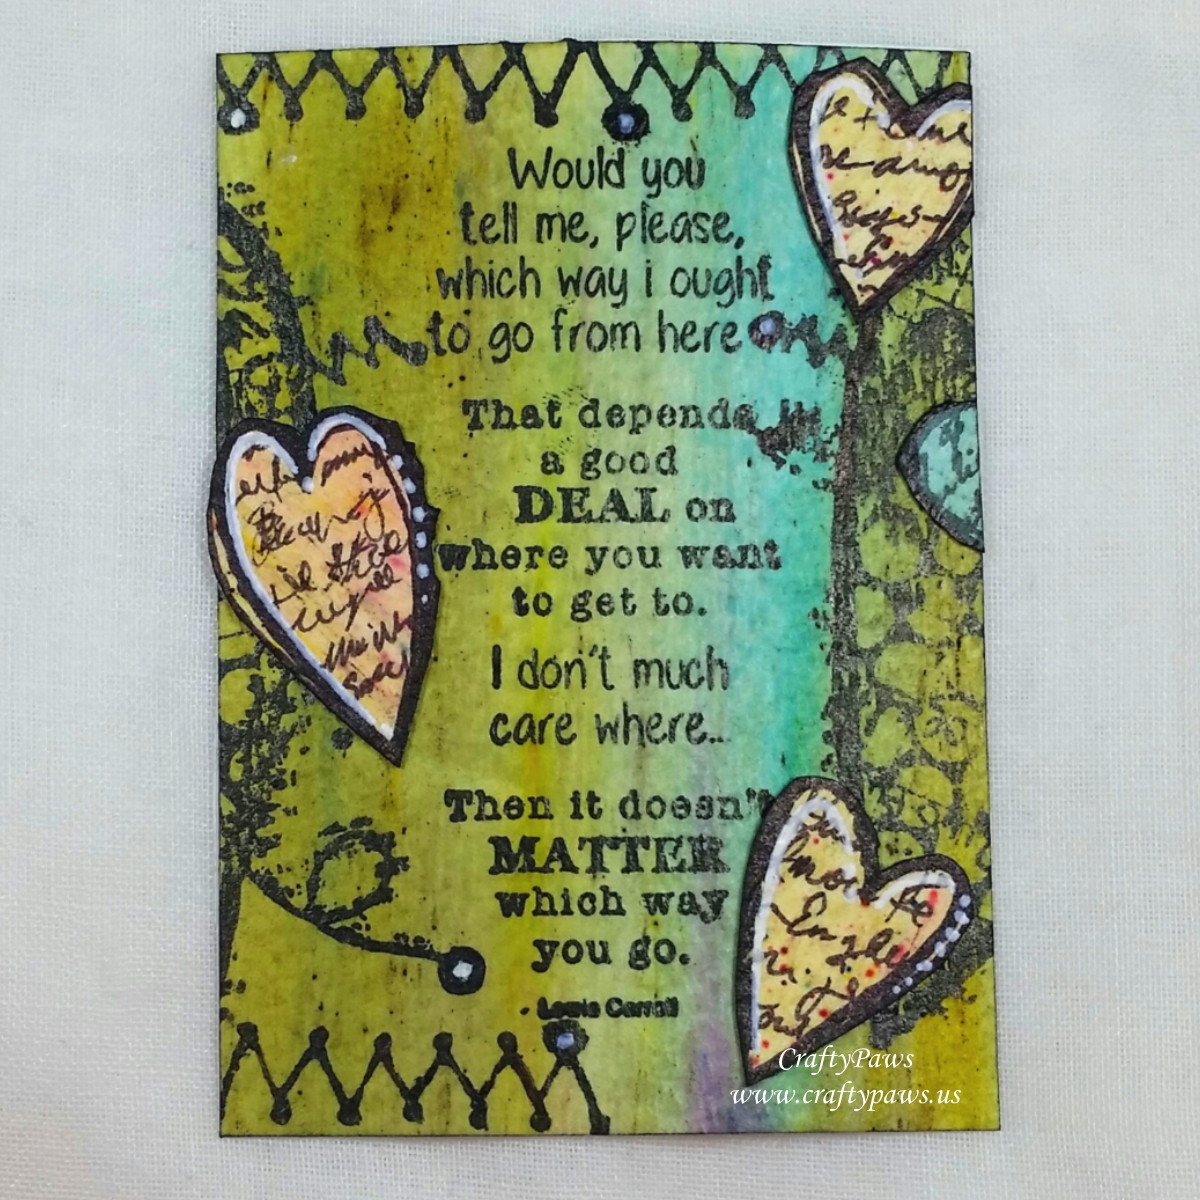
For the middle ATC with the main sentiment from the Alice’s Adventures stamp set, I used sections of the large heart stamp from the Follow Your Heart stamp set and the zigzag line stamp to kind of frame the sentiment. I also doodled some hearts with faux scripty writing in them on some more of the left over background paper and fussy cut those out to add some color contrast and dimension onto this ATC.
The following is a process video sharing a lot of what I did to create these ATCs:
Disclosure: Many of the supplies I’ve used for today’s project are linked. Some may be affiliate links, which means if you make a purchase I receive a small commission at no extra cost to you. I truly appreciate your support toward the costs of running this blog!
These ATCs are being entered into the following challenges:
Oddball Art Feature a Creature Challenge
Creatalicious Anything Goes with Optional Cute Challenge
Crafty Gals Corner Anything Goes Challenge
Word Art Wednesday Anything Goes Challenge
Simon Says Stamp Wednesday Layer it Up Challenge
Lil Patch of Crafty Friends Anything Goes Challenge
Through the Craft Room Door Anything Goes Challenge
613 Avenue Anything Goes with Twist Create Something New Challenge
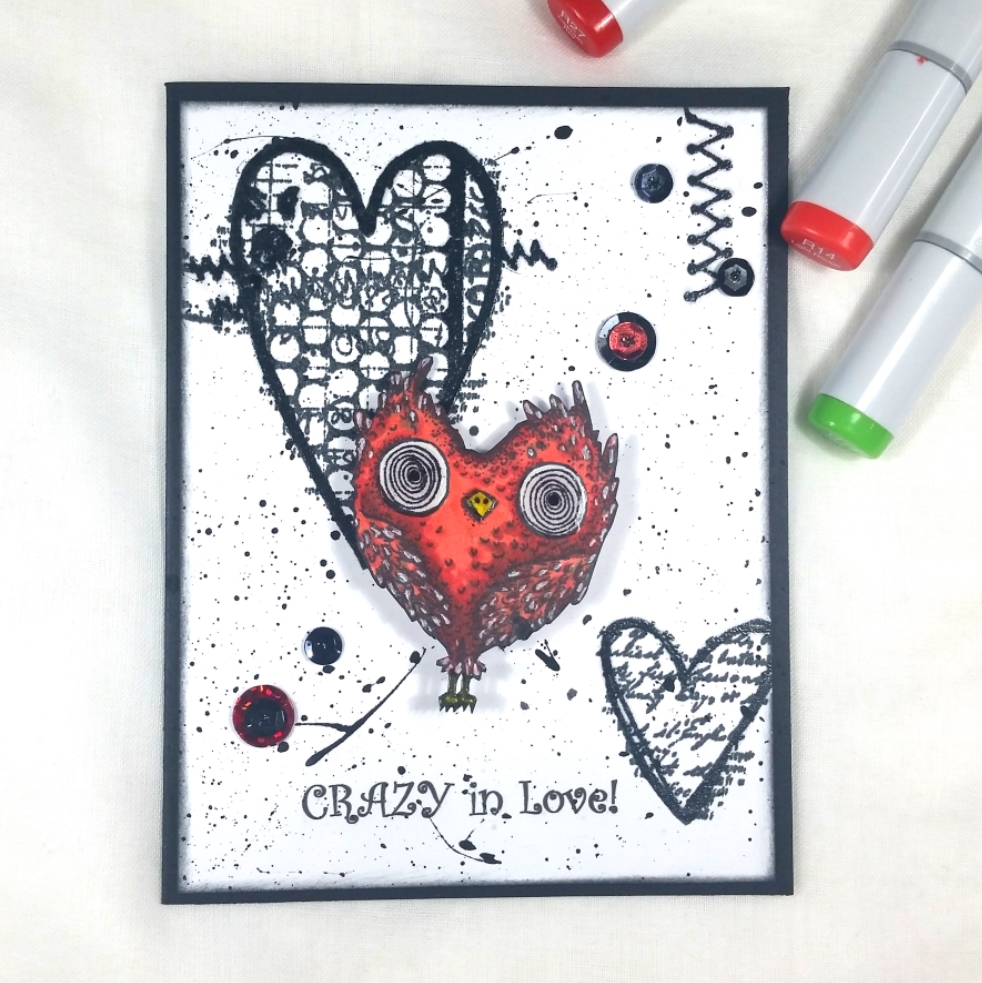 I Copic colored the bird with the following colors:
Beak and legs: Y19
Body: R14, G14 (that’s right a green!), and R27
I also flicked on some highlights to a lot of the darkly stamped feathers with a Uniball Signo White Gel Pen and coated the beak, claws and eyes with Glossy Accents for shine. I fussy cut out this bird with a Fiskars Spring Loaded Scissors and inked the edges with a Momento Tuxedo Black Marker for a finished look.
I wanted a Valentines themed background, but I didn’t want to distract from the crazy love-sick bird, so I used three of the stamps from the new-to-me Carabelle-Studio Follow Your Heart stamp set but did not add any color to them. Instead, I added some dimension and shine to parts of these background images using a Tsukineko VersaMarker and clear embossing powder for some heat embossing. I inked the edges of the card front with Tim Holtz Distress Ink in Black Soot, and to add a bit of grunge while keeping it pretty CAS, I also watered down some black acrylic paint and splattered it on with a wet paint brush.
To emphasize that mad, unstable feeling of new love, I thought adding the bird to the card front with a DIY action wobble would be fun. For a finishing touch and to add a little sparkle, I also added red and black sequins in varying sizes to the background.
The following process video shows the start-to-finish creation of this card, including how to make a DIY action wobble mechanism HERE
Disclosure: Many of the supplies I’ve used for today’s project are linked. Some may be affiliate links, which means if you make a purchase I receive a small commission at no extra cost to you. I truly appreciate your support toward the costs of running this blog!
This card is being added to the following challenges:
Creatalicious Anything Goes with Optional Wishes Challenge
Word Art Wednesday Anything Goes Challenge
Crafty Gals Corner Anything Goes Challenge
Through the Craft Room Door Anything Goes Challenge
613 Avenue Create Anything Goes with Optional Twist Something New Challenge
Card Mania Monochromatic Challenge
Lil Patch of Crafty Friends Anything Goes Challenge
Penny Black and More Something New Challenge
Addicted to CAS Music Challenge
]]>
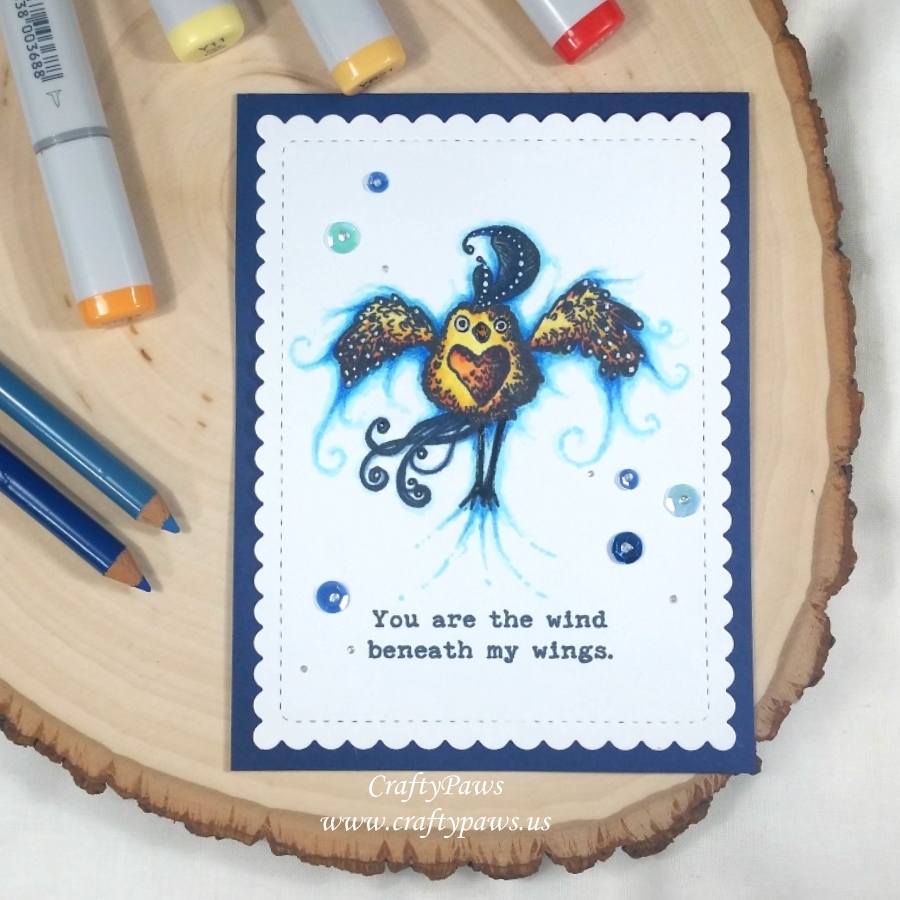 I printed out the sentiment: “You are the wind beneath my wings.” from my computer and then stamped out the whimsical flying bird with a heart shaped breast with Momento Tuxedo Black Ink. Then I Copic colored the bird and the surrounding swirly air/wind with the following Copic colors:
Bird: Y11, YR21, YR14, R14, B34, B37 and B39
Air: B000, B00, B01
To add a little deeper detailed coloring in the “nooks and crannies” of the air around the bird, I also used a couple of Prismacolor color pencils in Blue Mediterranee (PC1022) and Bleu Denim (PC1101). For a little magical shimmer on the bird, I added a coat of Clear Wink of Stella. To help the darker areas of the bird pop, I added some dotting details with a Uniball Signo White Gel Pen. Lastly I also added Ranger Glossy Accents to the bird’s eyes, beak and legs for some dimension and shine.
For a finishing touch on the CAS card, which I die cut using a WPlus9 Sunshine Layers die, I glued on a smattering of sequins topped with tiny dots of Platinum Liquid Pearls to cover the holes in the sequin centers. For added texture, shine and balance, I also added a handful of teeny tiny Platinum Liquid Pearl dots close to the sequin clusters.
The following is a process video of the coloring of this card:
Disclosure: Many of the supplies I’ve used for today’s project are linked. Some may be affiliate links, which means if you make a purchase I receive a small commission at no extra cost to you. I truly appreciate your support toward the costs of running this blog!
This card is being entered into the following challenges:
Simon Says Stamp Work It Wednesday New Challenge
Simon Says Stamp Monday Something New Challenge
Simon Says Stamp Wednesday Something New Challenge
CASology Encourage Challenge
Creatalicious Anything Goes Challenge
Word Art Wednesday Anything Goes Challenge
Crafty Gals Corner Anything Goes Challenge
Lil Patch of Crafty Friends Anything Goes Challenge
Cards Galore Encore Anything Goes Challenge
MFT Color Challenge #84
]]>