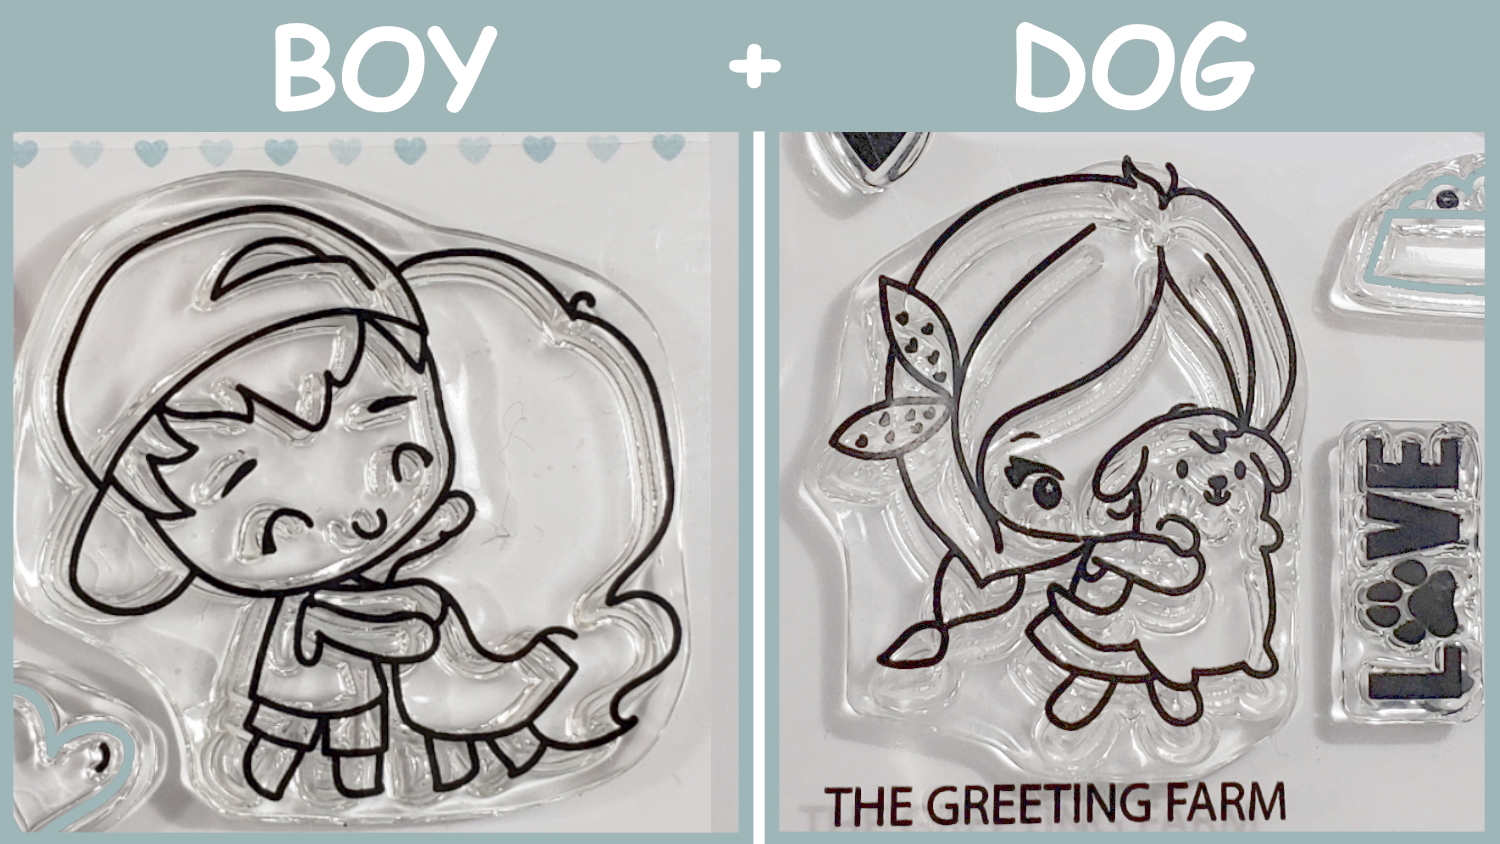
I used the boy and girl hugging image from “So This is Love” and just used the little boy facing toward the left to represent Mr. CraftyPaws. I altered him a bit more by doodling on short sleeves with a 0.05 pt Copic Multi-liner Pen since Mr. CraftyPaws would never wear a sleeveless shirt (lol). Then I stamped out just the little pup being held up by the girl with a braid from “The Snuggle Is Real” set to represent our little Havanese, Bandito, and tucked him in Mr. CraftyPaws’ arms.

For the girl representing me, I thought the girl with the glasses from The Snuggle Is Real would be the closest match. However, our Lhasapoo, Babaloo, does not look anything like the bulldog in that stamp. So I masked off the bulldog and doodled on the rest of the skirt of the little girl, adding details like the collar and long cuffed sleeves, with a 0.05 pt Copic Multi-liner Pen. For the dog representing Babaloo, I used the little dog with the bow from the same stamp set, but masked off the bow and doodled on a top-knot and shortened the ears and tail.
![]()
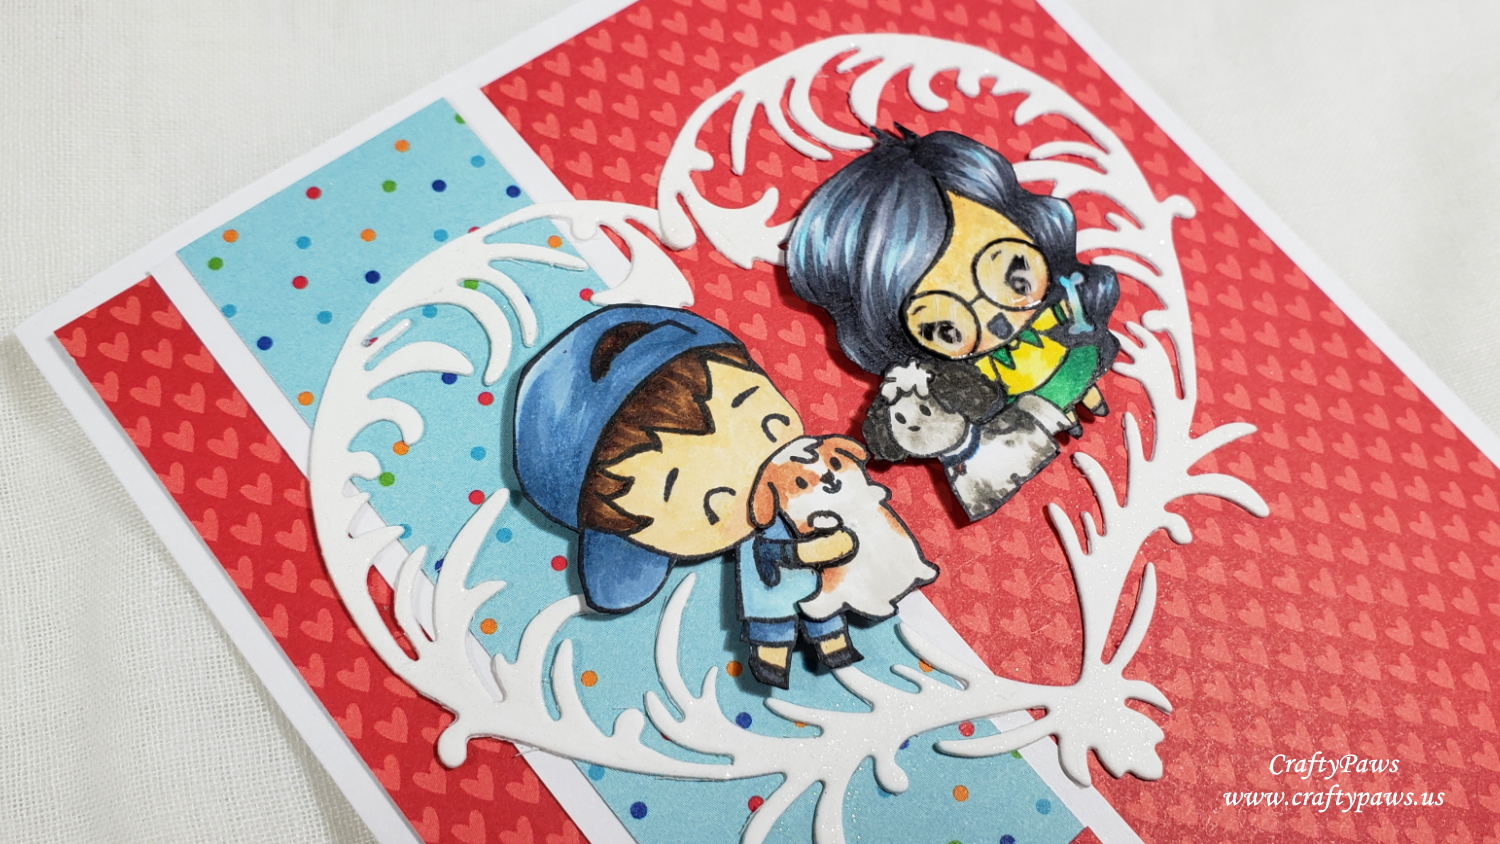
Then it was a matter of coloring up all the images to make them look like a family portrait!
Boy (Mr. CraftyPaws): Hair: E55, E57 and E59; Hat, Shirt and Shorts: B52, B93, B97; Skin: E50, E51, R30; Vest: B000 and B52
Brown and White Dog (Bandito): W0, E11 and E13
Black and White Dog (Babaloo): W0, W3, W5, W7 with B97 collar
Girl (Me): Hair: B01, C3, C5 and C7; Skin: E50, E51, E53. R30; Collar and Skirt: G05 and G09; Sweater: Y02 and Y08; Bone W0 and B01
To add a little shine, I added some glass streak marks on the glasses with a Signo Uniball White Gel Pen and topped the glasses with Ranger Glossy Accents. I fussy cut all the images with my favorite Fiskars Spring Loaded Scissors, inked all the edges for a finished look with a Memento Tuxedo Black Marker, and layered them together.

For the card front design, I decided to pull out one of my heart dies, the Diemond Dies Je T’Adore Heart, to “frame” the family portrait. I coated the frame with a coating of Clear Wink of Stella for some added shimmer. For the background papers, I used my much hoarded (and one of my FAVORITE) Doodlebug Designs “Puppy Love” 6 x 6 Paper Pad and picked out a heart patterned paper and used the reverse pale blue polka dot paper for a little strip of added interest. I backed that strip with white cardstock to match the width of the white border of the card front, and place that strip, toward the left side, following the design rule of thirds.

Lastly, for the sentiments I used the phrases from the cut apart pages of the Puppy Love paper pad that I thought would suit a Valentine’s Day card for Mr. CraftyPaws: “Great News…”, “I {heart} You” (with dabs of Glossy Accents on the hear), and “We Belong Together” are staggered along the left bottom third of the card front. On the inside card liner, I used, “Good Times!”, “Pawsitively Perfect!” and “You’re a Treat!” It was so fun designing and crafting this totally personal card for Mr. CraftyPaws. He’ll never know the extra steps I took to make this customized family portrait card, but I know he’ll love it all the same.
CLICK on the following picture to watch the process video and enter the GIVEAWAY from the YouTube video for a chance to win a set of The Greeting Farm “The Snuggle Is Real” stamp set!
Disclosure: Many of the supplies I’ve used for today’s project are linked. Some may be affiliate links, which means if you make a purchase I receive a small commission at no extra cost to you. I truly appreciate your support toward the costs of running this blog! All giveaway rules are listed in the description box of the YouTube video. The giveaway is not sponsored by or in any way affiliated with YouTube, Instagram, or The Greeting Farm.
This card is being entered into the following challenges:
Simon Says Stamp Wednesday Anything Goes Challenge
Creatalicious Anything Goes Challenge with optional use of craft
Word Art Wednesday Anything Goes Challenge
Lil Patch of Crafty Friends Anything Goes Challenge
Through the Craft Room Door Anything Goes Challenge
Crafts Galore Encore Anything Goes Challenge
Stamping Sensations Favorite Stamps Challenge
]]>

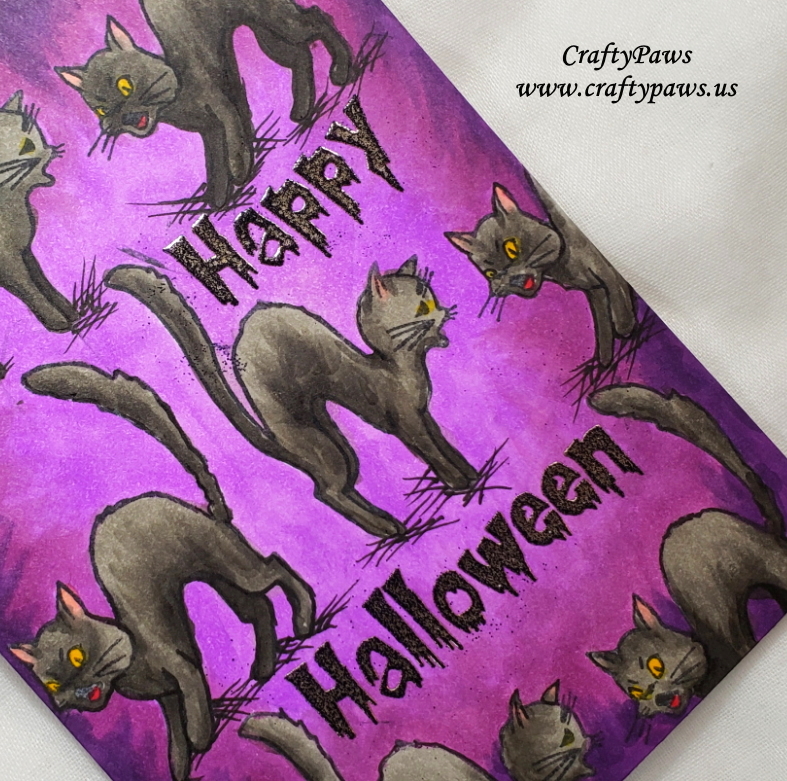
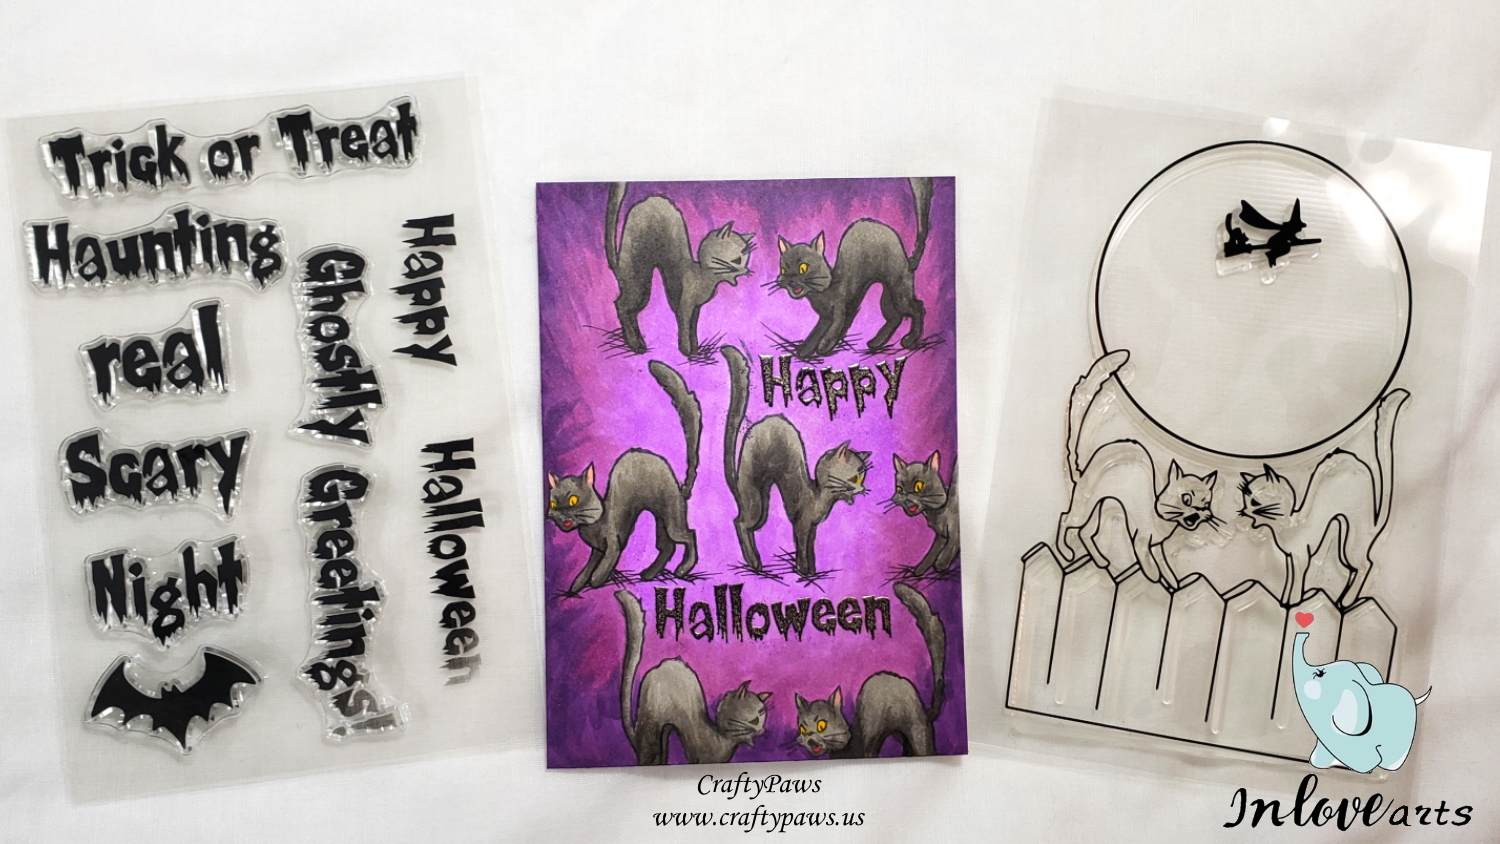
I essentially inked the stamp selectively — just around the cats, and wiping away over-inked areas like the moon and fence post tops with my DIY stamp shammy. Then I would reposition my card front around on my MISTI stamp tool and stamp the cats again. Leaving enough space to also heat emboss the sentiment, “Happy Halloween” from the Halloween Word Stamp Set, I was able to get most of 7 cats on this card!
Then I used the following Halloween/fall Copic colors to fully color up this card front:
Background: W04, V06 and V09
Cats: W3, W5, W7 with R21 ears and Y19 eyes and R29 tongue
Lastly, I used VersaMark Ink to stamp out the sentiment and Ranger Liquid Platinum Embossing Powder and Ranger Super Fine Black Embossing Powder to heat emboss the sentiment. The platinum base with the black overlay matched the warm grey of the cats perfectly and added a hint of shine and dimension to pull the card perfectly together.
CLICK the following picture to watch the whole start to finish crafting video:
Disclosure: Many of the supplies I’ve used for today’s project are linked. Some may be affiliate links, which means if you make a purchase I receive a small commission at no extra cost to you. I truly appreciate your support toward the costs of running this blog!
This Halloween kitties card is being entered into the following challenges:
Penny Black and More Animals Challenge
Simon Says Stamp Monday Stamp It Challenge
Creatalicious Anything Goes with Optional Humor Challenge
Simon Says Stamp Work it Wednesday Celebrate It Challenge
Through the Craft Room Door Anything Goes Challenge
Crafty Gals Corner Fall Colors Challenge
Crafting By Design Anything Goes Challenge
The Male Room Autumn Challenge
]]>
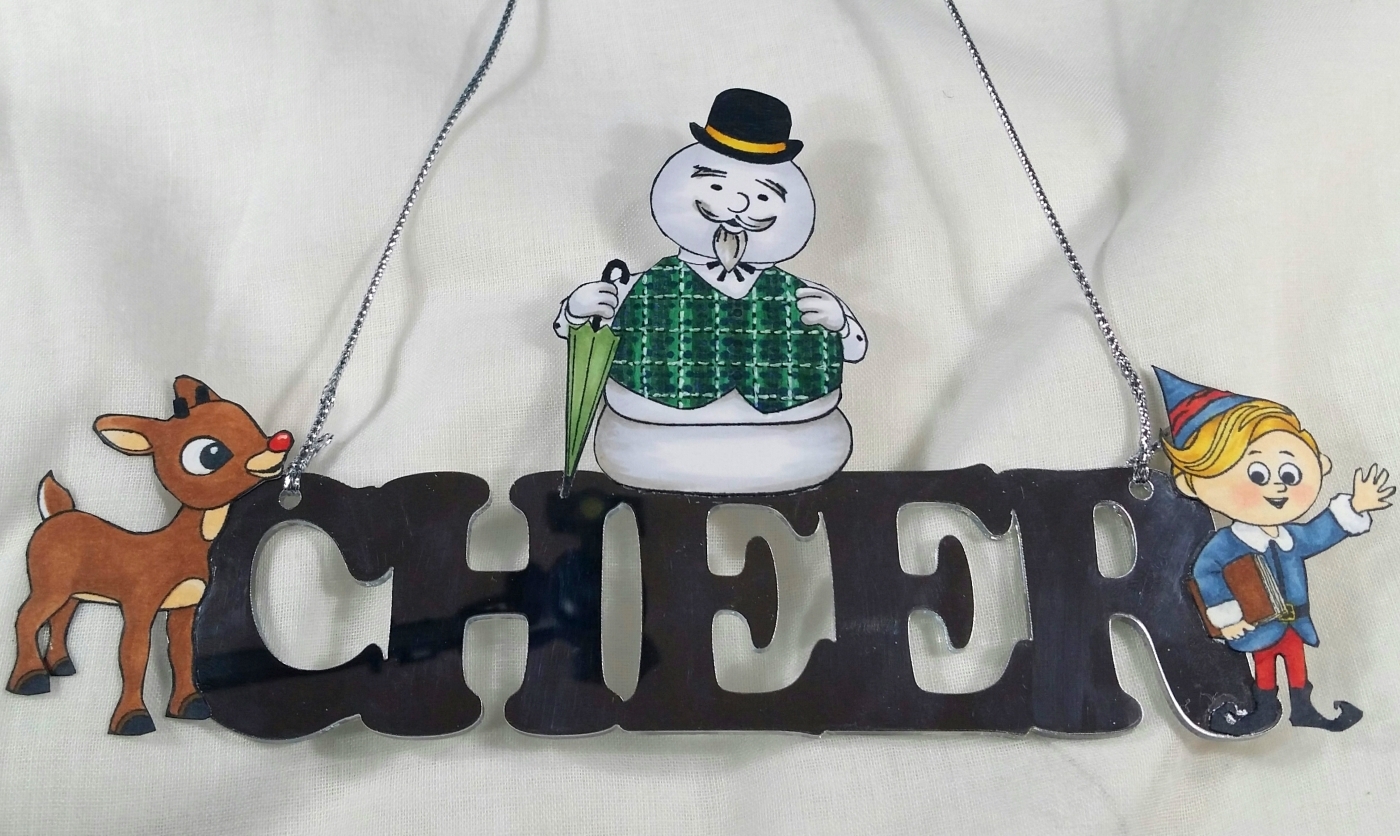 Because the stamps are acrylic (not photopolymer) each image needed to be stamped out 4 times to get clean crisp images. This was made possible with my Mini MISTI (which is a lifesaver for less-than perfect stamping). With the top of a bow from the Lawn Fawn Baaah Humbug Stamp Set, I was even able to add a Clarice to the ensemble of characters (see video for how-to details)!
I used the following Copic colors to color up all the characters:
Rudolph: Nose: R05, R24 and R27; Lighter areas: E50 and E51; Brown hide and hooves: E35, E23 and E87
Clarice: Lighter areas: E50 and E51; Brown hide and hooves: E35, E23 and E87; Polka dot red bow: R05, R24 and R27 with Uniball Signo White Gel Pen
Sam the Snowman: Snowman: C0, C1 and W3; Umbrella: G24 and YG63; Hat band: Y00 and Y15; Vest: G17, G29, B39 with stitching details added with dot coloring and faux stitching using a Uniball Signo White Gel Pen
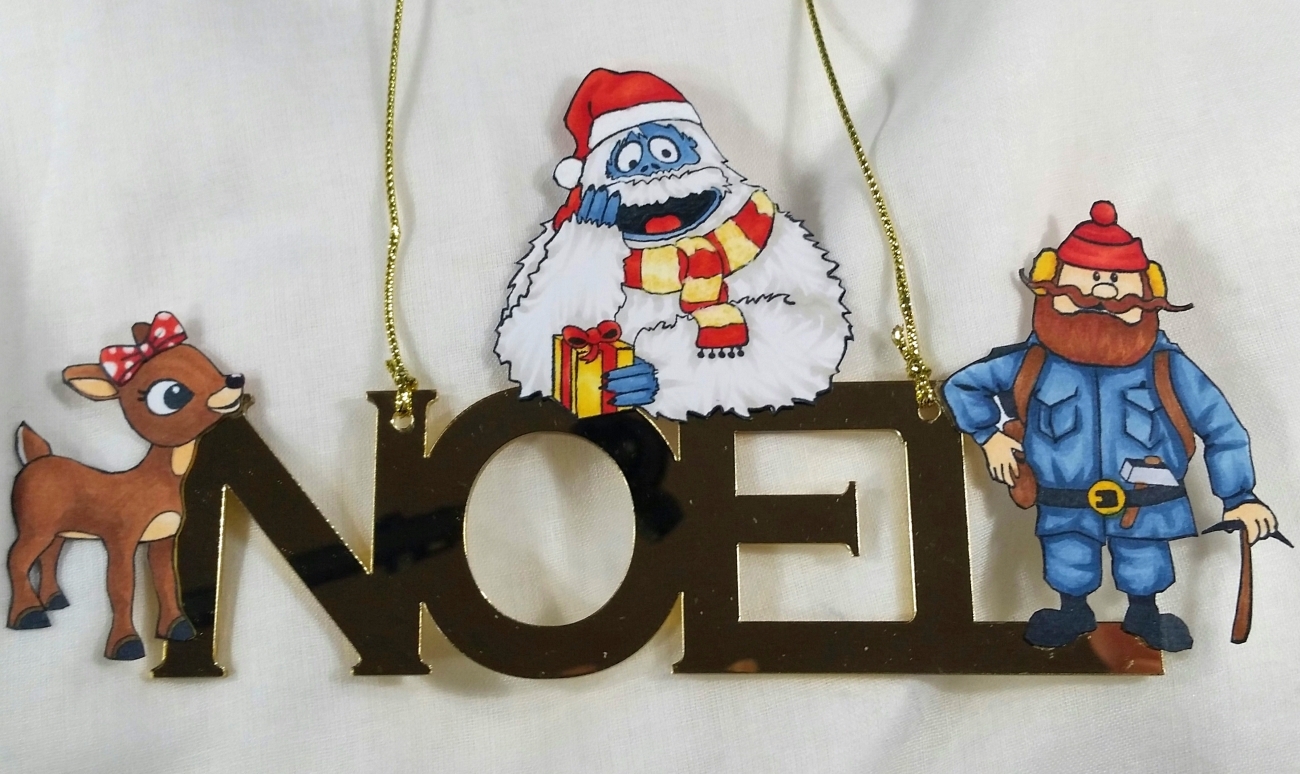 Yukon Cornelius: Skin: E50 and E51; Ear muffs: Y15 and YR24; Hat: R05, R24 and R27; Wood handles and satchel: E23 and E37; Beard and mustache: E99 and E07; Blue coveralls: B93, B95 and B97; Hammer head: C3
Bumble the Abominable Snowman: Reds: R05, R24 and R27; Blue face and hands: B93 and B95; Yellows: Y00 and Y15; Fur: W0 and W3
Hermey the Elf: Skin: E50, E51 and R30; Hair: Y00, Y15 and YR24; Reds: R05, R24 and R27; Blues: B93, B95 and B97; and Book: E23 and E37 and C1
I fussy cut each image with my favorite Fiskars Spring Loaded Scissors and inked the edge of the cut images with a Momento Tuxedo Black Marker and glued them around a couple of Celebrate It acrylic mirrored word ornaments that I had picked up in some after-Christmas Michaels grab bags last year. The silver “CHEER” and gold “NOEL” mirrored words are so sparkly (although the pictures don’t seem to capture it). I used my favorite Art Glitter Glue with Fine Tip Nozzle, but I suspect the Beacon 3-in-1 Glue would work well with these nonporous word ornaments too.
The following is a video share of the tweaks I made to the stamps and the overall project description:
Disclosure: Many of the supplies I’ve used for today’s project are linked. Some may be affiliate links, which means if you make a purchase I receive a small commission at no extra cost to you. I truly appreciate your support toward the costs of running this blog!
These ornaments are being entered into the following challenges:
Simon Says Stamp Monday Party Challenge
Simon Says Tamp Wednesday Stitch It Challenge
Addicted to CAS Sparkle Challenge
Card Mania Christmas Challenge
Penny Black and More CAS Challenge
Lil Patch of Crafty Friends Anything Goes Challenge
Word Art Wednesday Anything Goes Challenge – WINNER
Creatalicious Anything Goes Challenge with Optional Monochromatic Christmas
613 Avenue Create Anything Goes with Optional Christmas/Winter Challenge
Not Just Cards Anything Goes Challenge
]]>
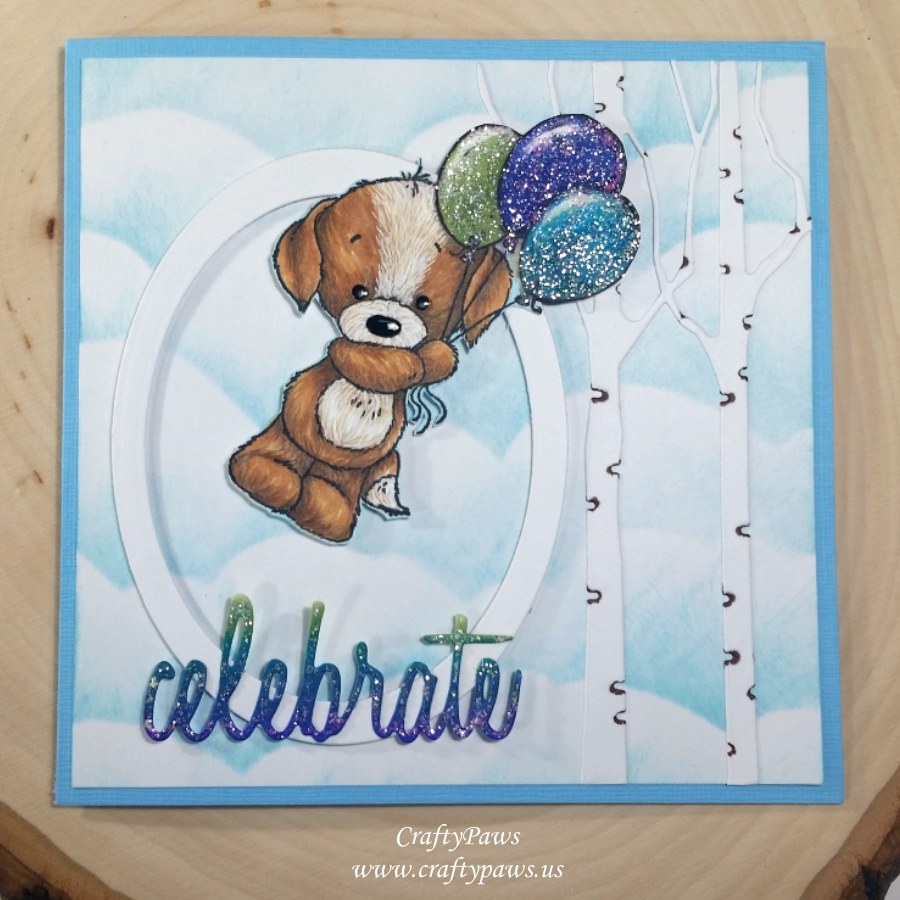 I altered this stamp a bit, just by inking up the stamp and wiping away the fizzled out balloon on the ground before stamping it on my card stock. I stamped it with Momento Tuxedo Black Ink and then used the following Copic colors to color him up:
White areas: E40, E70 and Uniball Signo white gel pen and white Gelly Roll gel pen for details
Brown areas: E31, E33, E23, E25 and warm gray 0.3 pt Copic Multi-Liner Pen for details
Nose and eyes: C9
Balloons: YG61, YG63, B66, B69, BG45 and BG49
For the background, I freestyle drew and cut out a stencil for clouds and then used an ink blending tool and Tim Holtz Distress Ink in Tumbled Glass to create the impression of puffy white clouds. I also used a Memory Box Birch Trio Die to cut out a couple of birch trees to give a sense of a scene high up in the trees. To make the birch trees a bit more realistic, I Copic colored the indented areas along the trunks with a Copic E25.
To frame the main puppy image (which I fussy cut and was going to raise up at an angle to give the impression of the puppy being lifted up by the balloons), I die cut an oval frame using the 3rd and 4th largest dies from the Diemond Dies Ovals Nesting Die Set. I popped the oval frame just a smidge by using some rolled up double sided adhesive. Then I popped up the puppy with Stampin’ Up! Dimensionals foam dots, placing him over the edge of the oval frame to emphasize lift and movement of the pup flying through the air with the balloons.
I wanted the sentiment to coordinate with the balloon colors, so I blended the same marker colors on a small scrap of card stock. I blended back and forth to create a kind of ombre effect. Then I die cut the “celebrate” word die from the Sizzix Script Celebration Word Die Set from this ombre colored scrap. I love how it came out!
I’m not sure how I feel about the sparkle I added at the last minute, but I went ahead and used some Glitz glitter glue from Recollections over the top of the balloons and the “celebrate”. I like the sparkle, but I feel like some of the nice Copic coloring, especially on the balloons, was lost. I also added some Glossy Accents to the puppy’s eyes and nose for a bit of shine.
The following is a start to finish process video of crafting this card:
This card is being entered into the following challenges:
Whimsy Inspirations Anything Goes Challenge #97
Simon Says Stamp Wednesday Anything Goes Challenge
Simon Says Stamp Work It Wednesday Add Sparkle Challenge
Simon Says Stamp Monday You’ve Got the Edge Challenge
Creatalicious Anything Goes Challenge with Optional Summer
Through the Craft Room Door Anything Goes Challenge
Word Art Wednesday Anything Goes Challenge
Lil Patch of Crafty Friends Anything Goes Challenge
MFT Color Challenge #74
]]>
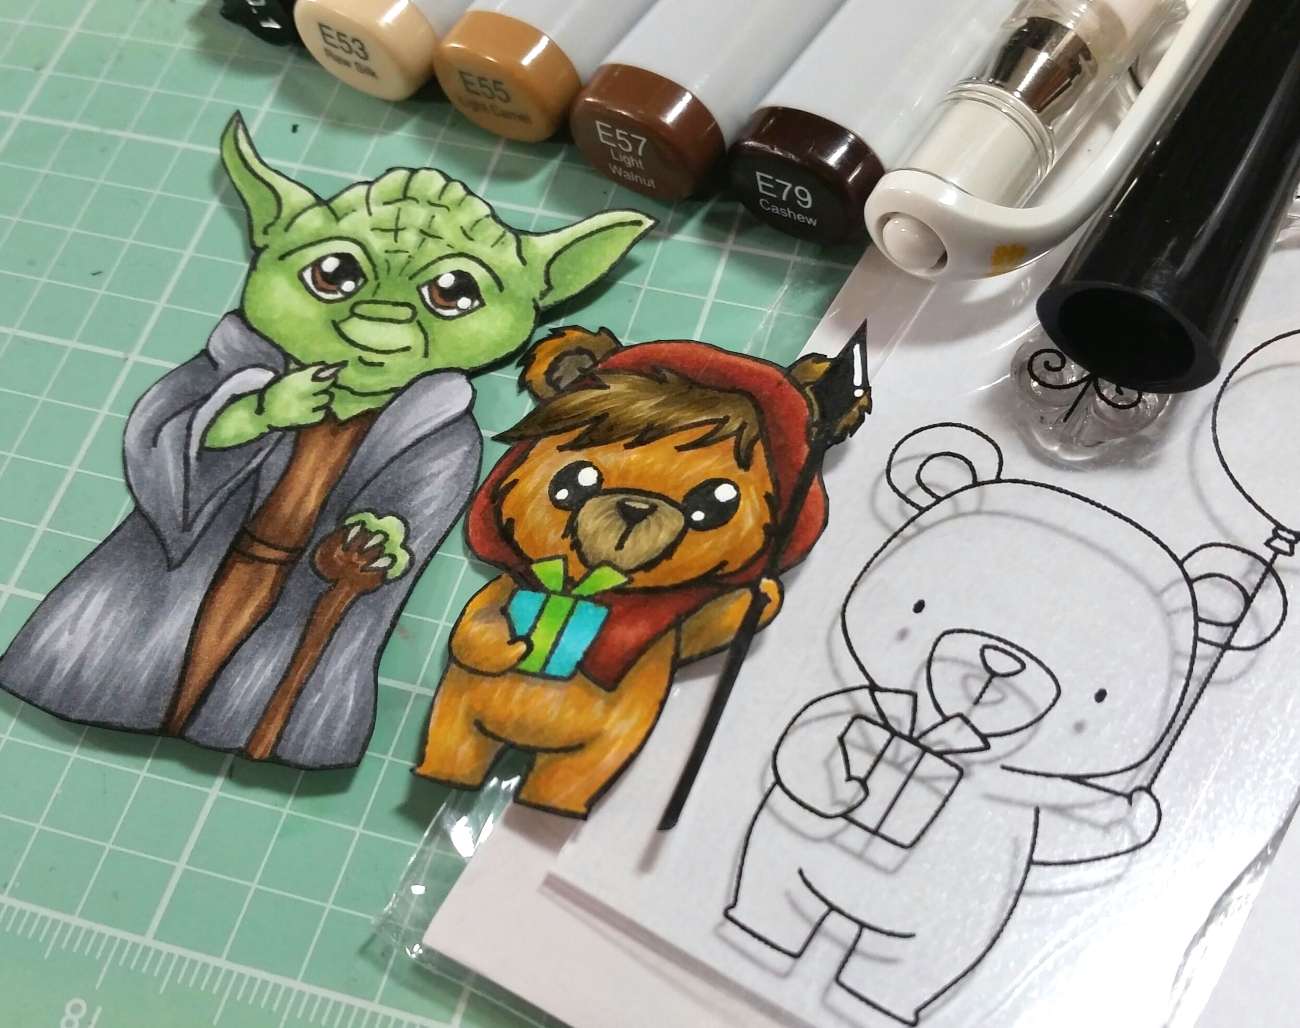 One of my new year’s resolutions was to get back to drawing a bit again, so I decided to draw a cartoony Chewbacca (who’s great for furry Copic coloring) and Yoda (because he has the best quotes). The second half of the video below is a speed drawing of both characters. I used the following Copic colors for them:
Chewbacca: E53, E55, E57, E59, E79 and C1
Yoda: G40, G43 and G24; Claws: W3; Tunic and cane: E55, E57 and E59; and Robe: N1, N3 and N5
Then when I re-looked at the new-to-me My Favorite Things “Beary Special Birthday” stamp set, I started seeing how these bears could be turned into Ewoks (our favorite characters because they look so much like our little Havanese, Bandito). The video below shows in detail how I altered one of these bears to become an Ewok. I used the following Copic colors for this cutie:
Bangs and muzzle: E81, E84, E87, E57, E29 and W5; Hood: E15, E19 and E29; Body: E31, E33, E55, Y28 and YR24; and Present: BG15, BG45, YG25 and G14
The following is a step-by-step video on how to alter stamps with a bonus bit of doodling:
]]> To make this card for Sa’fyre, I picked Amelia from The Greeting Farm’s “OA Special Delivery” stamp set. She’s holding a letter, which I could have left, but I decided to alter the image to have her holding a pile of presents from the Lawn Fawn Toboggan Together stamp set. The video below, shows the process for how to do that.
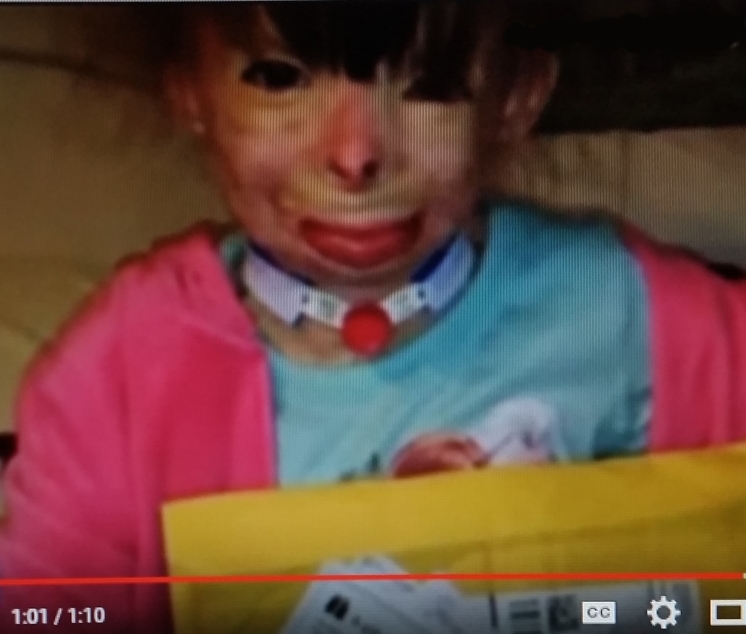
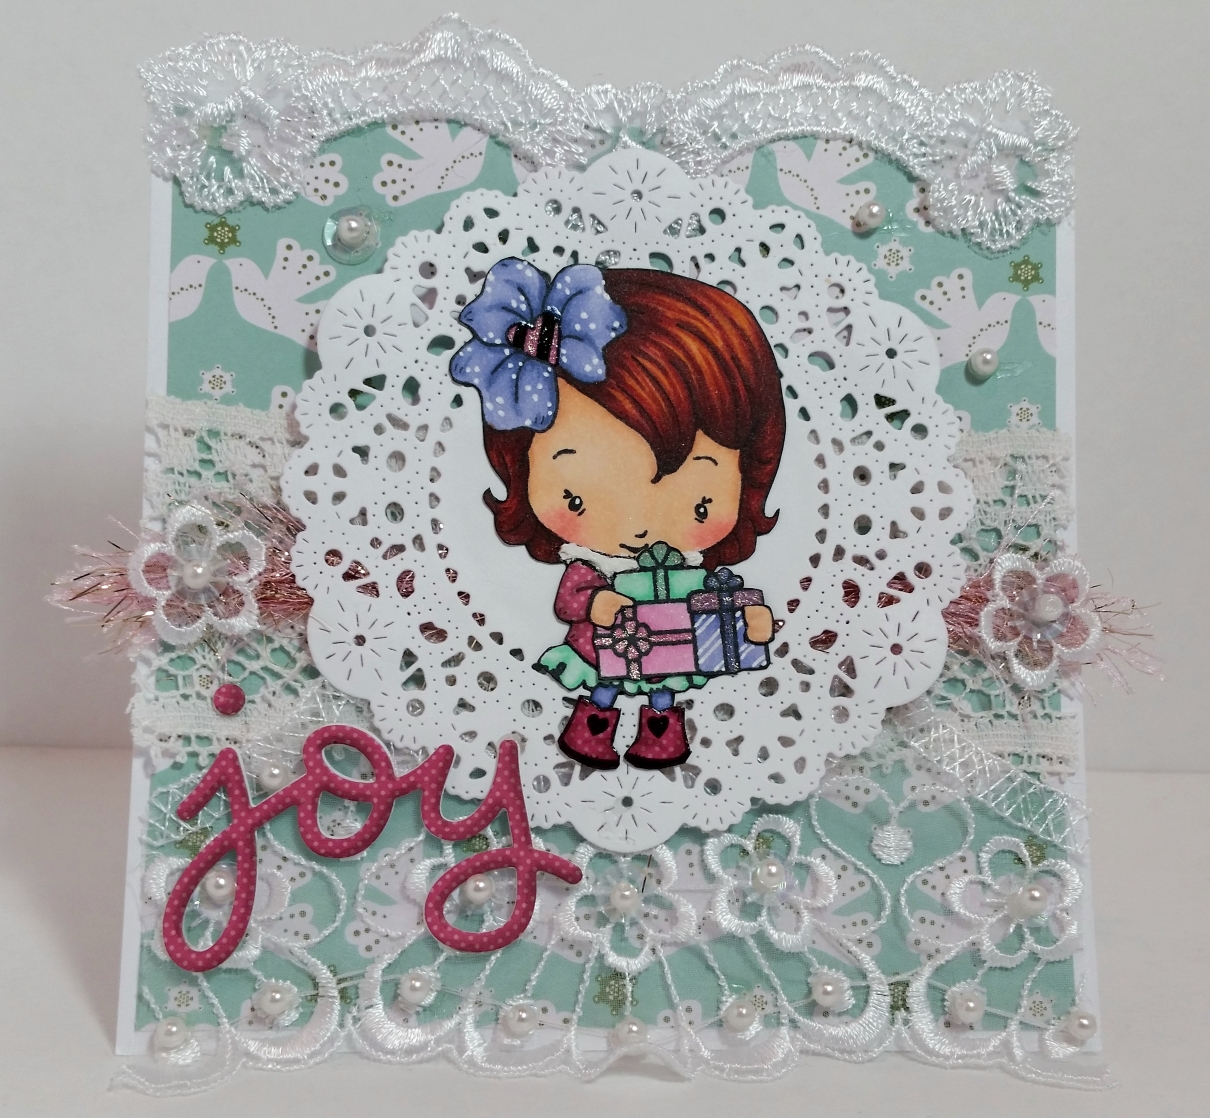 I colored up Amelia in an outfit matching one of the pictures of Sa’fyre from the news clip by coloring her up with the following Copic colors:
Skin: E50, 51 and 53 with R20 for blush
Hair: YR31, YR24, E15, E09, E18
Dress: BG 10, 11, and 23
Flower barrette: R85, BV01, BV02 and BV04
Presents: BG10, BG11, BG23, R81, R83, R85, BV01, BV02 and BV04 with sparkle added with a Sakura Clear Star Gelly Roll pen.
To add a little interest, I paper pieced her coat and boots (shaded with W1 and W3) with a little scrap of pink polka dot paper, and I drew in some little polka dots on the barrette and and stripes on the purple present with a Sakura White Gelly Roll pen. Lastly, I added a pinch of Glossy Accents to the heart of the barrette and Amelia’s boots to add a little shine and a dash of DecoArt Snow Writer to her collar for some wintery dimension.
For the card background, I used an aqua patterned paper with white doves from the Lawn Fawn Fa La La collection and then layered three different lace trims with sequins and pearls from www.FlairByMe.com, a paper die cut doily that I have been hoarding for about a year (LOL), and some pink and gold eyelash trim. I also fussy cut out a couple of applique flowers with pearl centers from one of the laces to top off the eyelash trim detail. Finally, I die cut “joy” from the Lawn Fawn Scripty Joy die three times and glued them together to get some added dimension and thickness using the same polka dot paper that I had used to paper piece Amelia’s coat and boots.
The following is a process video that includes how to swap out the letter in Amelia’s hands for a pile of presents:
This card is being entered into the following challenges:
The Greeting Farm December Christmas Challenge
MarkerPOP Anything Goes Challenge
Raisin Boat Christmas and New Years Challenge
Simon Says Stamp Work It Wednesday Holiday Card Challenge
Simon Says Stamp Monday Just A Pinch Challenge
Lil Patch of Crafty Friends Anything Goes Challenge
Card Mania Christmas Challenge
Whimsy Stamps Anything Goes Winter Challenge
Simon Says Stamp Wednesday Die Crazy Challenge