
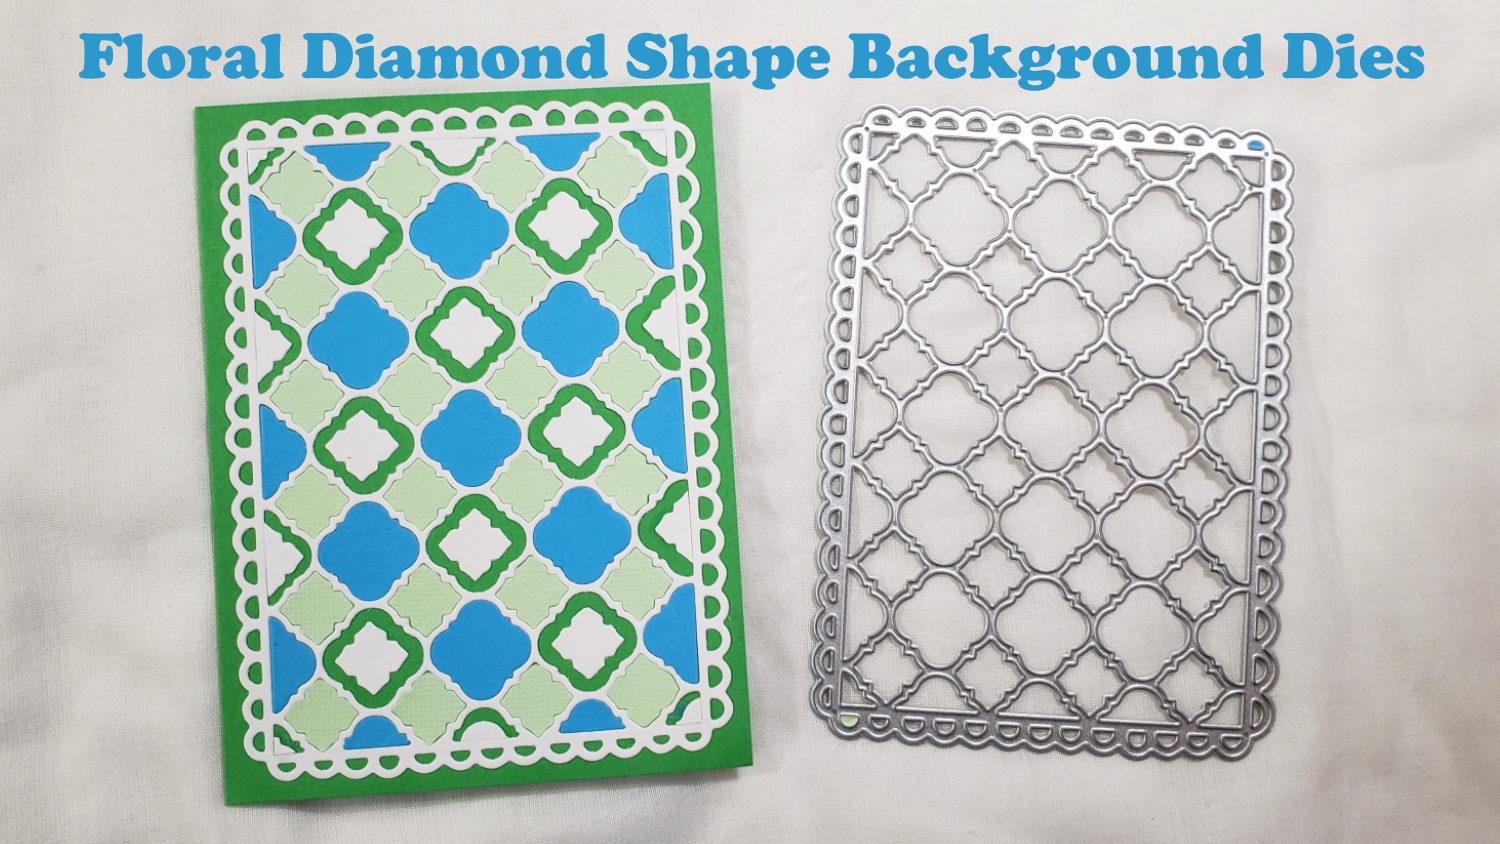
As I looked down the barrel of less than 1 week to Christmas, I started to panic, noting that I only had 1 pre-made handmade holiday card. So I decided to try to make some “mass-make” cards. I used the Altenew Bells and Bows stamp and die set, the JOY from the Diemond Dies Holiday Words Die Set, and a card base I made ages ago with the Floral Diamond Shape Background Dies. NOTE: I’m not sure if these codes still work, but at Diemond Dies you might try “thankskristina” at checkout for 10% off and free shipping on orders of $35 or more AND at inloveartshop.com you might try the code G-36967 for 20% off.
First I stamped out the big and small bows as well as the bell using 3 grey tone Lawn Fawn Fundamentals inks in Manatee, Hippo, Storm Cloud, and my Memento Tuxedo Black. (Watch my video below to get some tips on how to best align the layering stamps for perfect results!) Then I used the accompanying dies to cut them out. Lastly I created card bases with scraps from my patterned paper scrap bin using the rule of thirds to make 4 cards and added the stamped bows with double sided foam adhesive to add special handmade details and dimension:
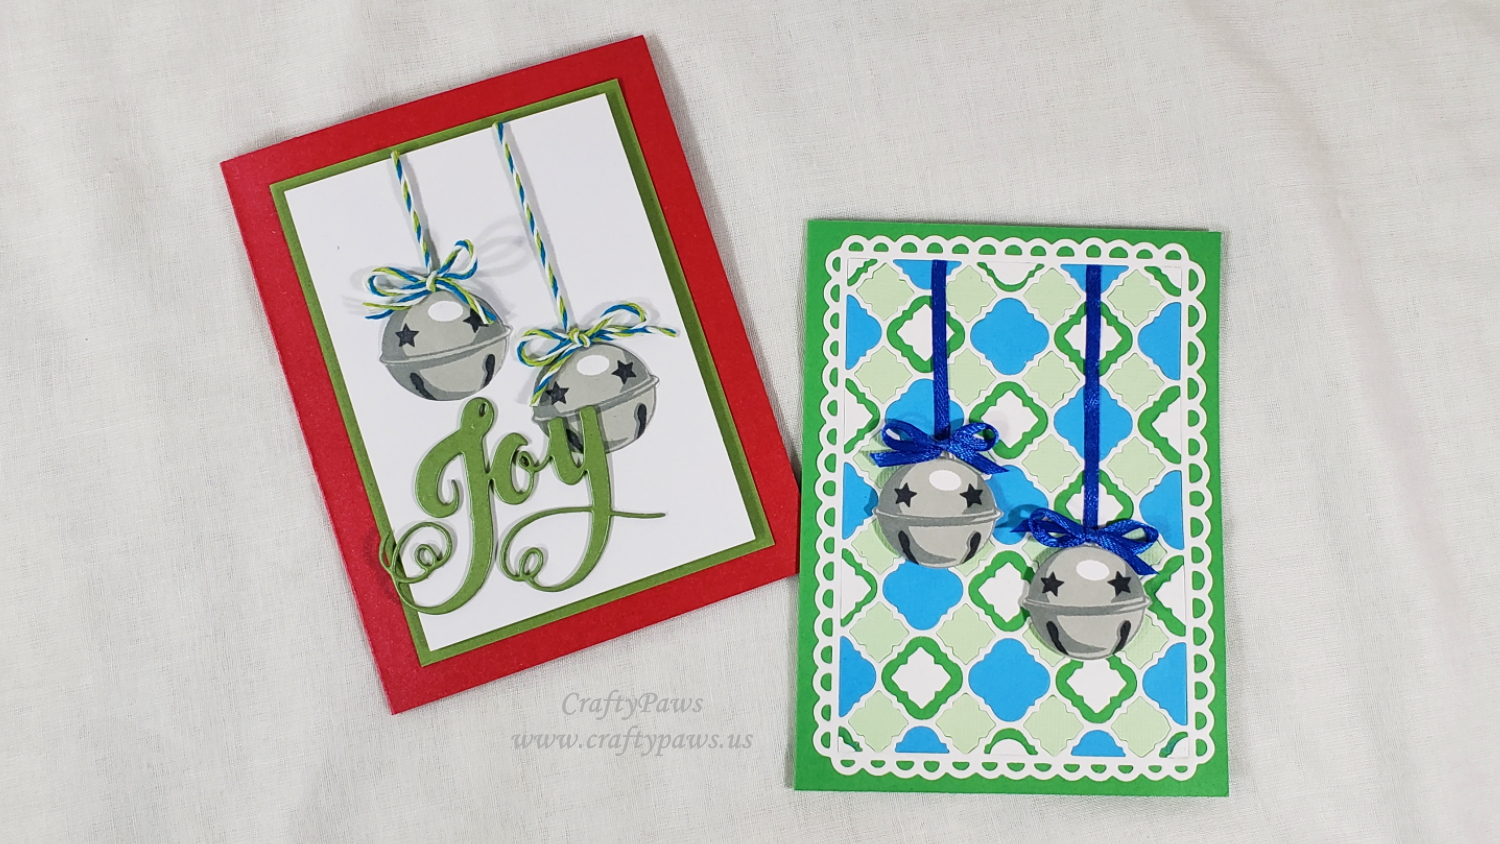
I decided to pair the remaining 4 stamped bells onto 2 cards that I made using an old card base made with the aforementioned inloveartshop floral diamond background die with thin blue satin ribbon and another layered card base using tri-colored bakers twine. I think the key to making quick cards but getting the payoff (and credit) for the unique special feeling of handmade is to add dimension with foam adhesive, interest with ribbons and twine, or bling it on with glittered papers or sequins.
CLICK on the picture below to watch my video tutorial:
Disclosure: Many of the supplies I’ve used for today’s project are linked. Some may be affiliate links, which means if you make a purchase I receive a small commission at no extra cost to you. I truly appreciate your support toward the costs of running this blog!
These cards are being entered into the following challenges:
Stamping Sensations Choose a Theme and Stamp It Challenge
Crafts Galore Encore Anything Goes Challenge
Simon Says Stamp Wednesday Bling It On Challenge – especially the glittered plaid Joy cards
Creatalicious Anything Goes with Optional Traditional Christmas Colors Challenge
Word Art Wednesday Anything Goes Challenge
]]>

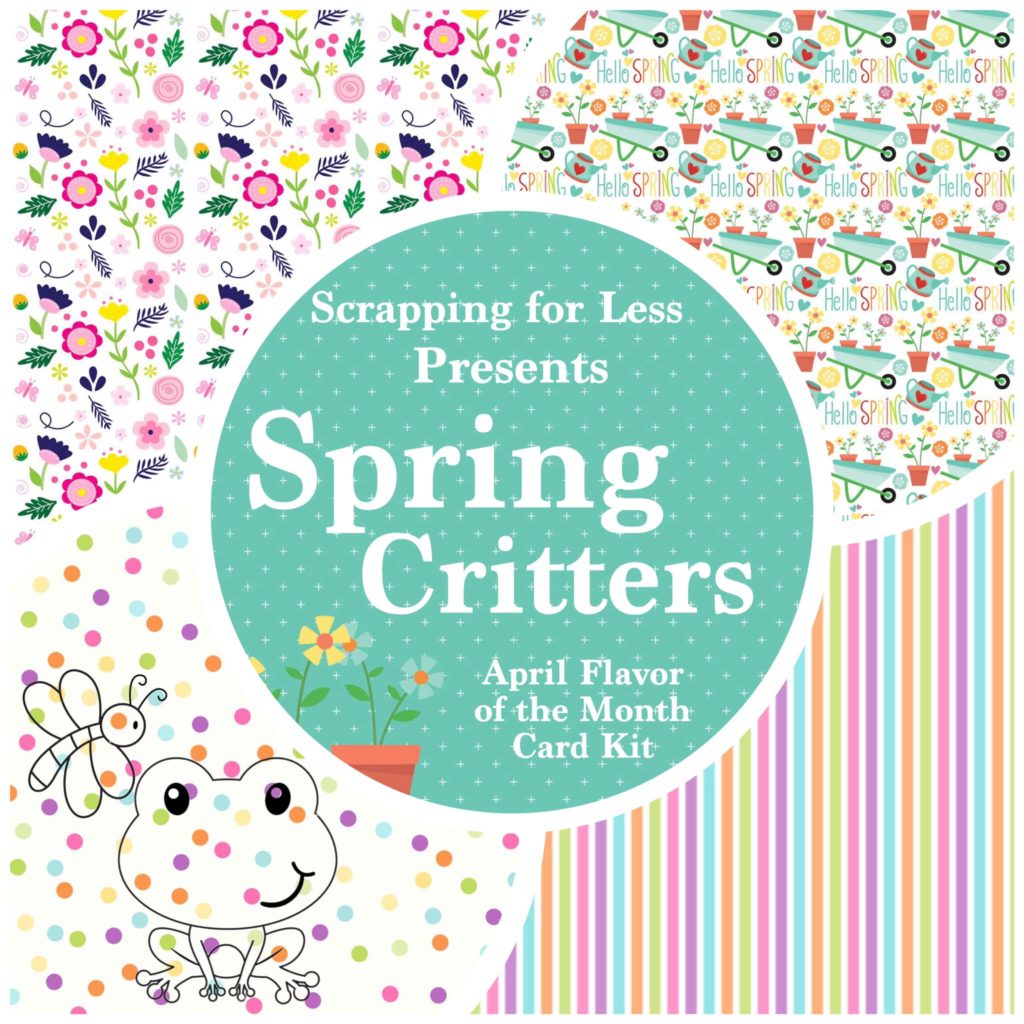
If you’re not familiar with Scrapping for Less Flavor of the Month Card Kits, they are so chock full and a fabulous value! Each basic kit is called a “Double Dip Sundae” and includes 4 collections, some quality card stocks and envelopes. This month’s 4 collections are: Spring Bees, Spring Birds, Spring Frogs and Spring Ducks; and includes a sampling of patterned papers, a stamp set, a sequins mix and a variety of stickers or ephemera to make card making a snap! There is also an add-on collection called the “Banana Split” which also has some fun and useful items that coordinate with the basic kit. This month’s Banana Split includes a fabulous sentiment stamp set that coordinates with all the other stamp sets, Bo Bunny washi, a banner die, and Ranger Multi Matte Medium.
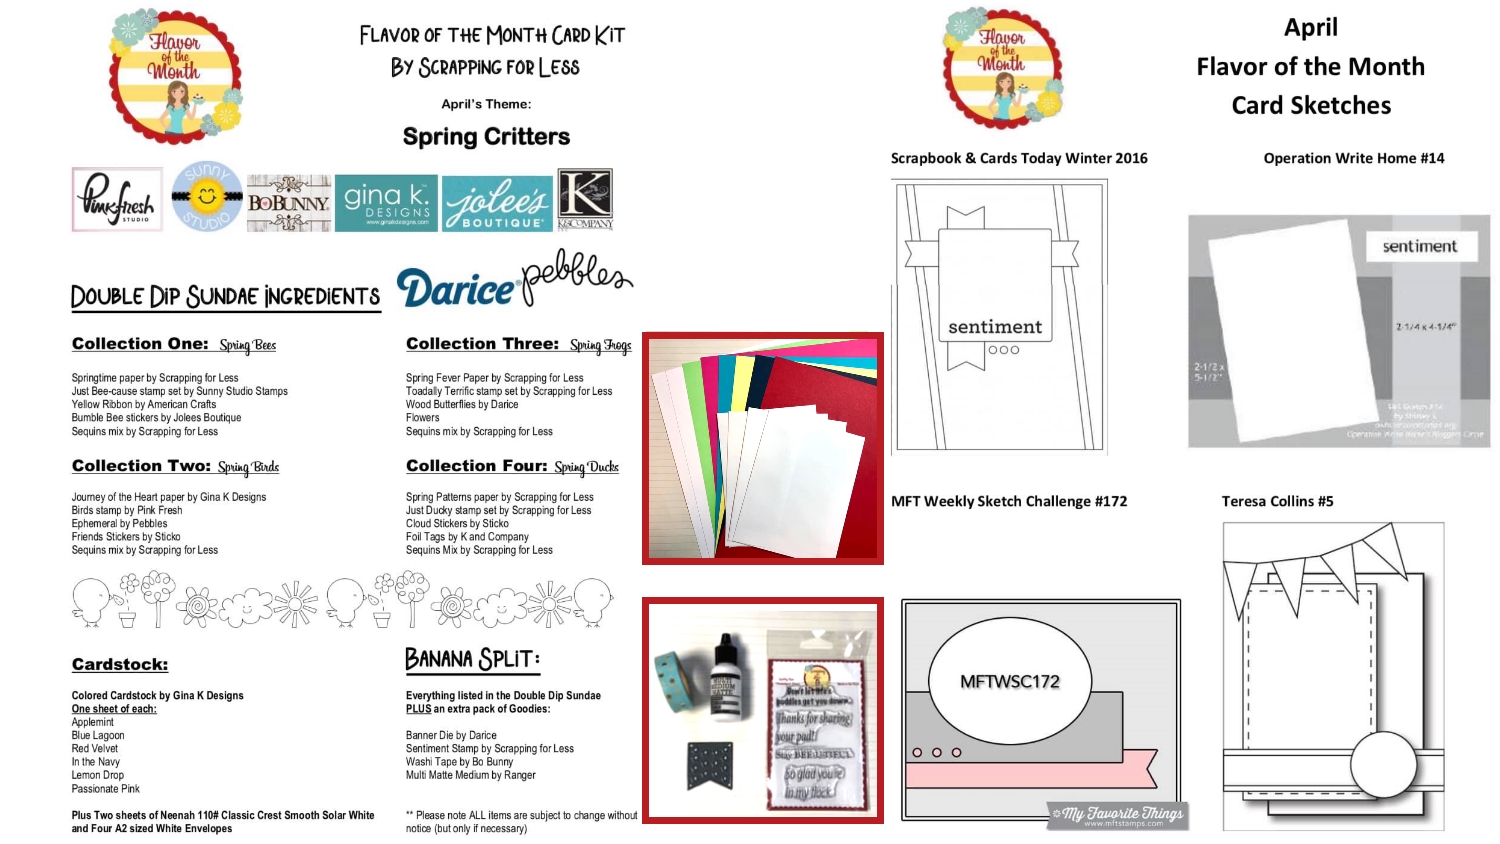
The kit comes with a list of all the items included in the kit as well as a sheet of great sketches to help you create fabulous cards quickly and easily. If you want more inspiration for what can be created with this kit, check out my next post, which will be part of a Scrapping for Less Blog Hop, and of course there is a GIVEWAWAY!
If you’re interested in seeing all that the April 2019 kit includes, please check out the following video:
]]>
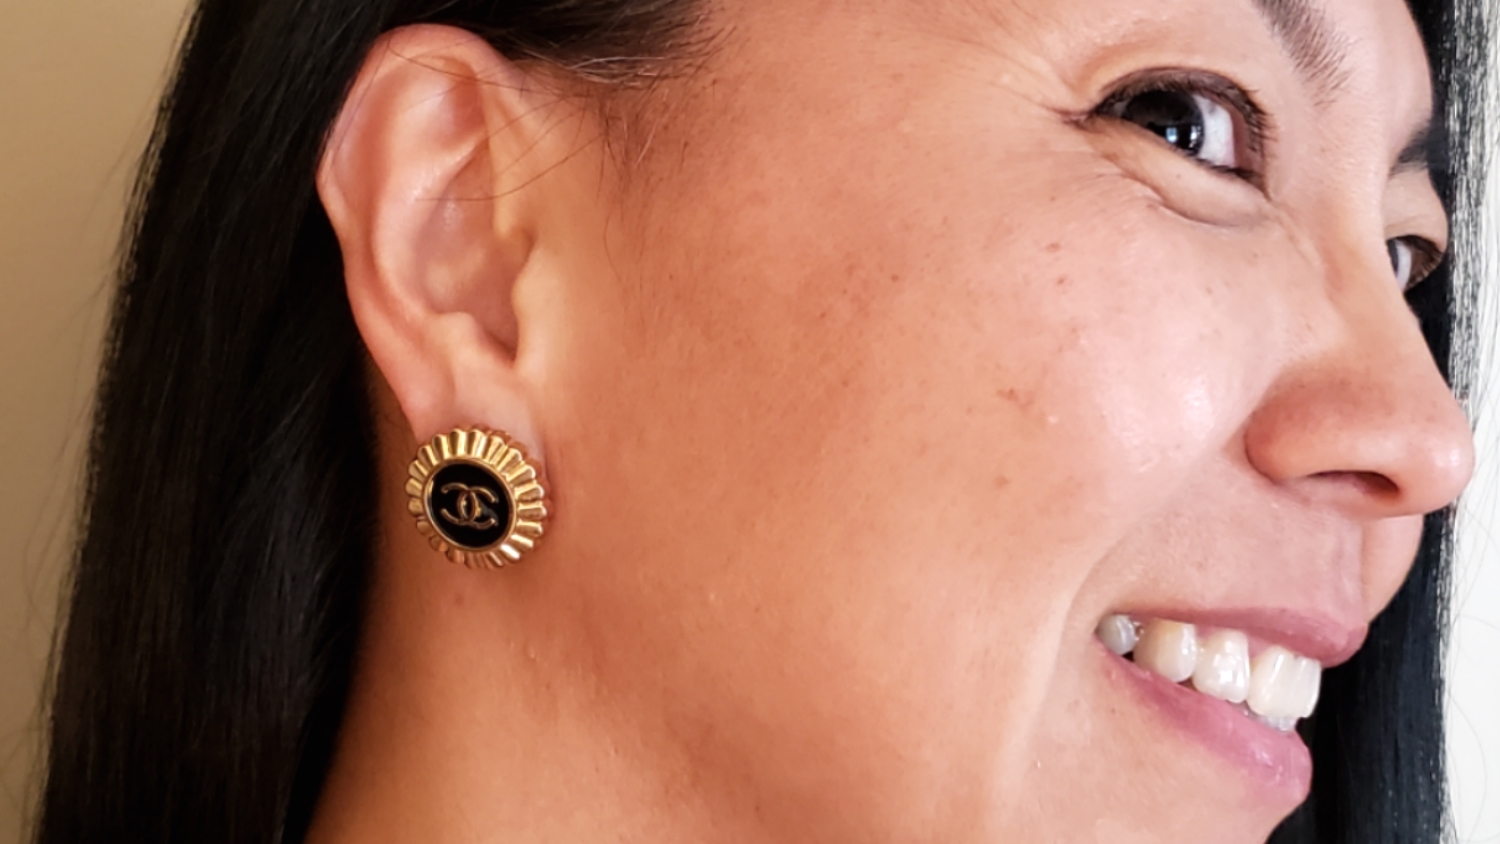
First I bought 2 black and gold sets of vintage buttons and a pair of silver bottle cap style buttons. I used wire cutters to cut off the shanks from the back of the buttons (please use gloves and protective eye wear in case small metal pieces fly), and where I couldn’t get low enough on the shank (the gold button shanks were very thick), I ground them down with a metal file.
Next I used some EnviroTex Jewelry Clay, completely mixing equal small amounts of A clay with B clay. Then I carefully inset the clay into the wells on the backs of the buttons. If your buttons are flat, you could skip this step completely, but mine had deep wells so I had to level the backs to the edges of the buttons. Have patience at this point: to fully cure, you need to leave this jewelry clay for 24 hours.
What I should have done next is paint the clay on the earring backs, but I jumped to attaching the Jewelry Shoppe 18K gold (nickel free) 8mm earring posts with E6000 glue. When that had fully dried after a couple of hours, I painted 2 coats of Artist’s Loft metallic acrylic paint — gold for the gold earrings and a mix of silver and white for the silver earrings.
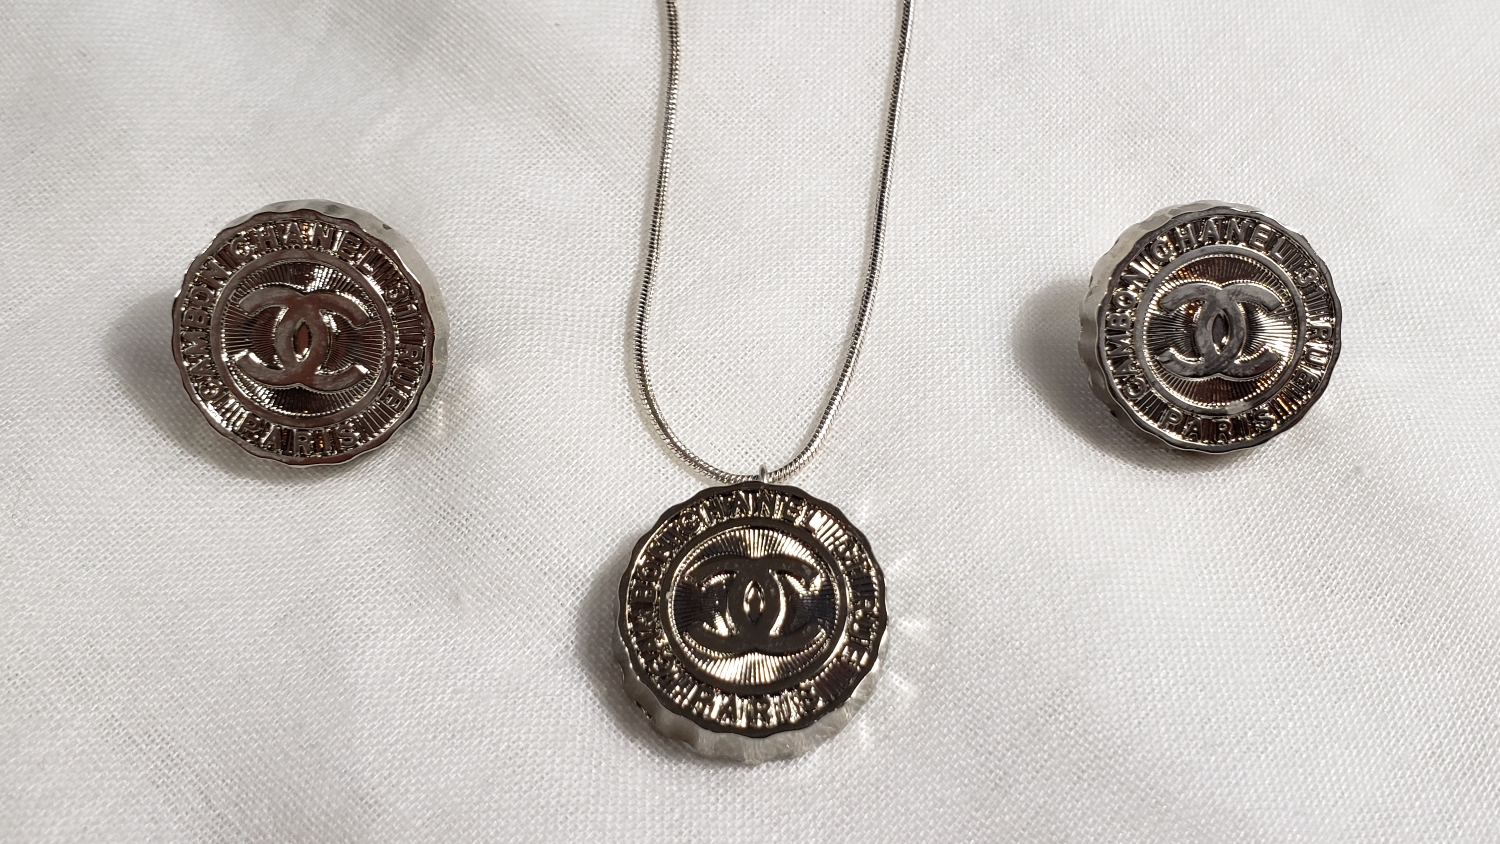
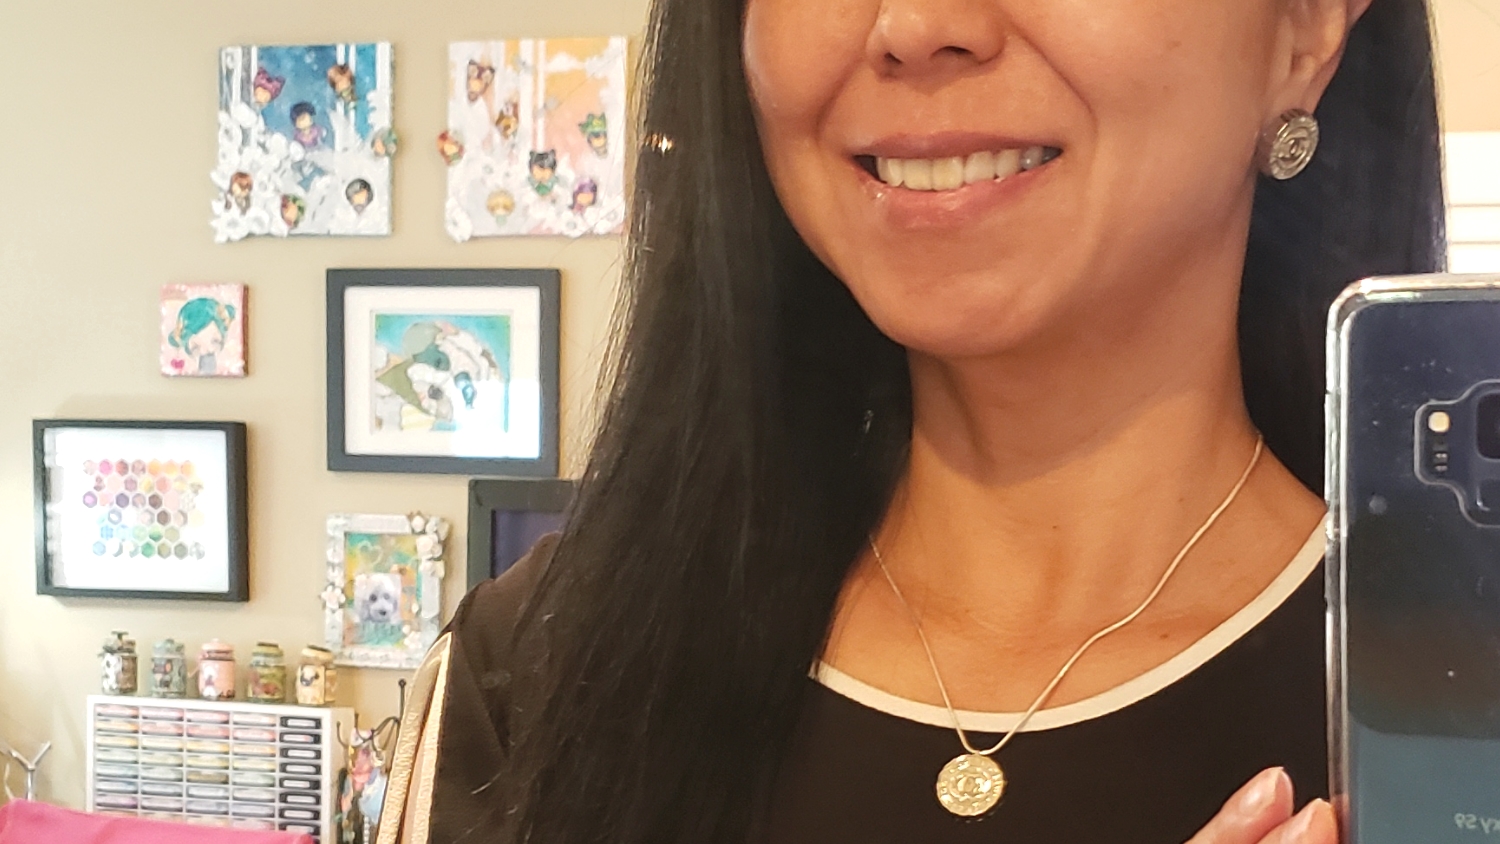
One of the eBay sellers actually sent me a bonus button so I also made a pendant necklace with that extra! To create this necklace pendant, I used flat and round pliers to create a eye loop pin from silver wire. Then, before the jewelry clay could fully dry, I inserted this eye loop pin into the soft clay, making sure it was centered at the top of the button design (the silver bottle cap designed buttons had a top and bottom). Again, after this clay fully cured, I painted the back with Artist’s Loft metallic silver and white acrylic paint and put a thin silver chain through the eye loop.
CLICK the picture below to watch the step by step process video of how I converted these Chanel buttons into authentic Chanel earrings:

Disclosure: Many of the supplies I’ve used for today’s project are linked. Some may be affiliate links, which means if you make a purchase I receive a small commission at no extra cost to you. I truly appreciate your support toward the costs of running this blog!
These Chanel earrings are being entered into the following challenges:
Simon Says Stamp Wednesday Anything Goes Challenge
Word Art Wednesday Anything Goes Challenge
Through the Craft Room Door Anything Goes Challenge
Crafts Galore Encore Anything Goes Challenge
Crafter’s Castle Anything Goes with Optional Use Glitter
]]>
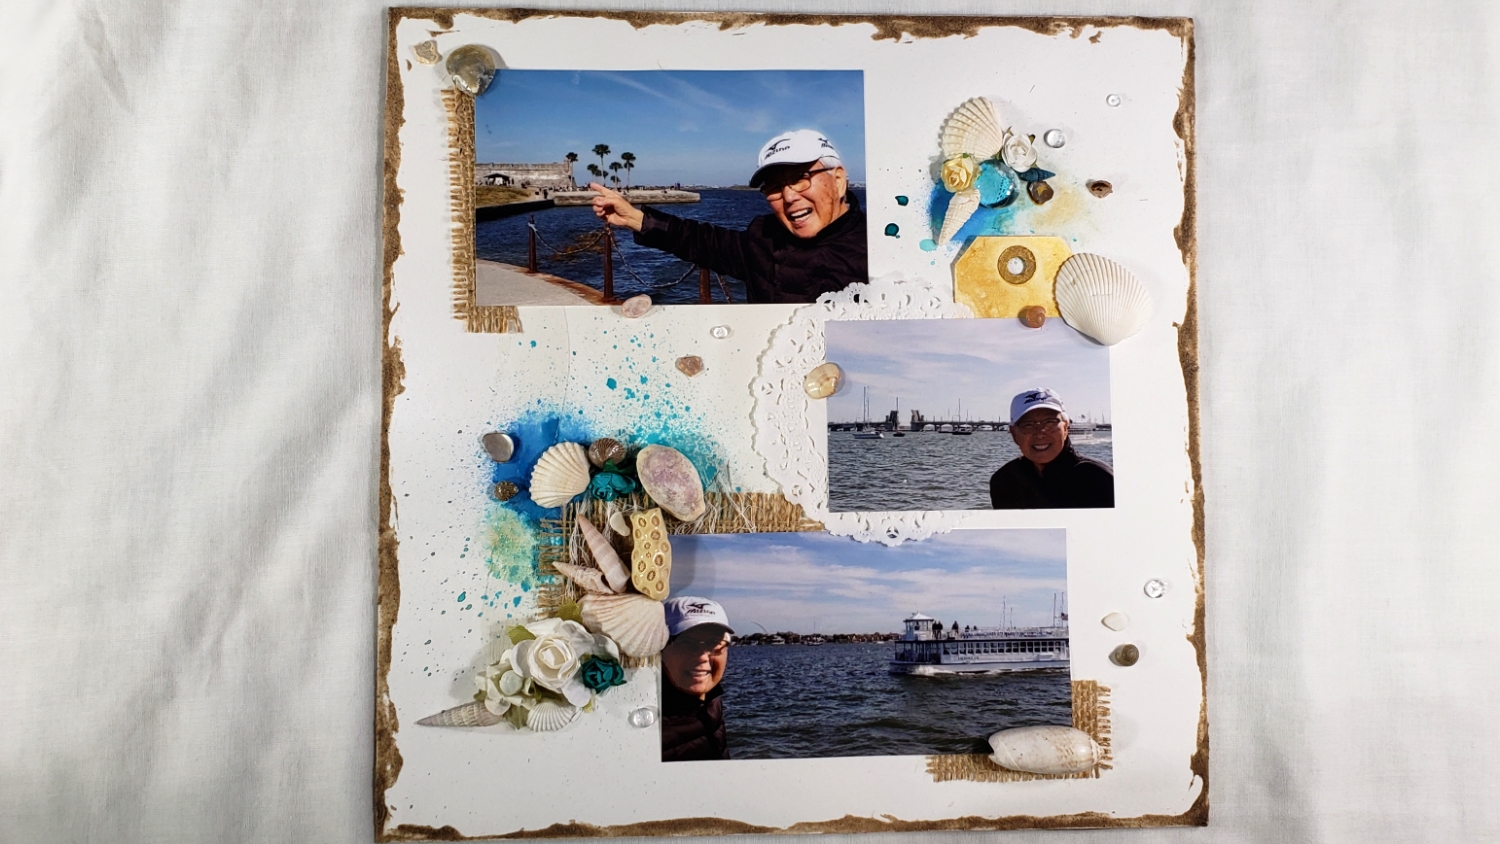
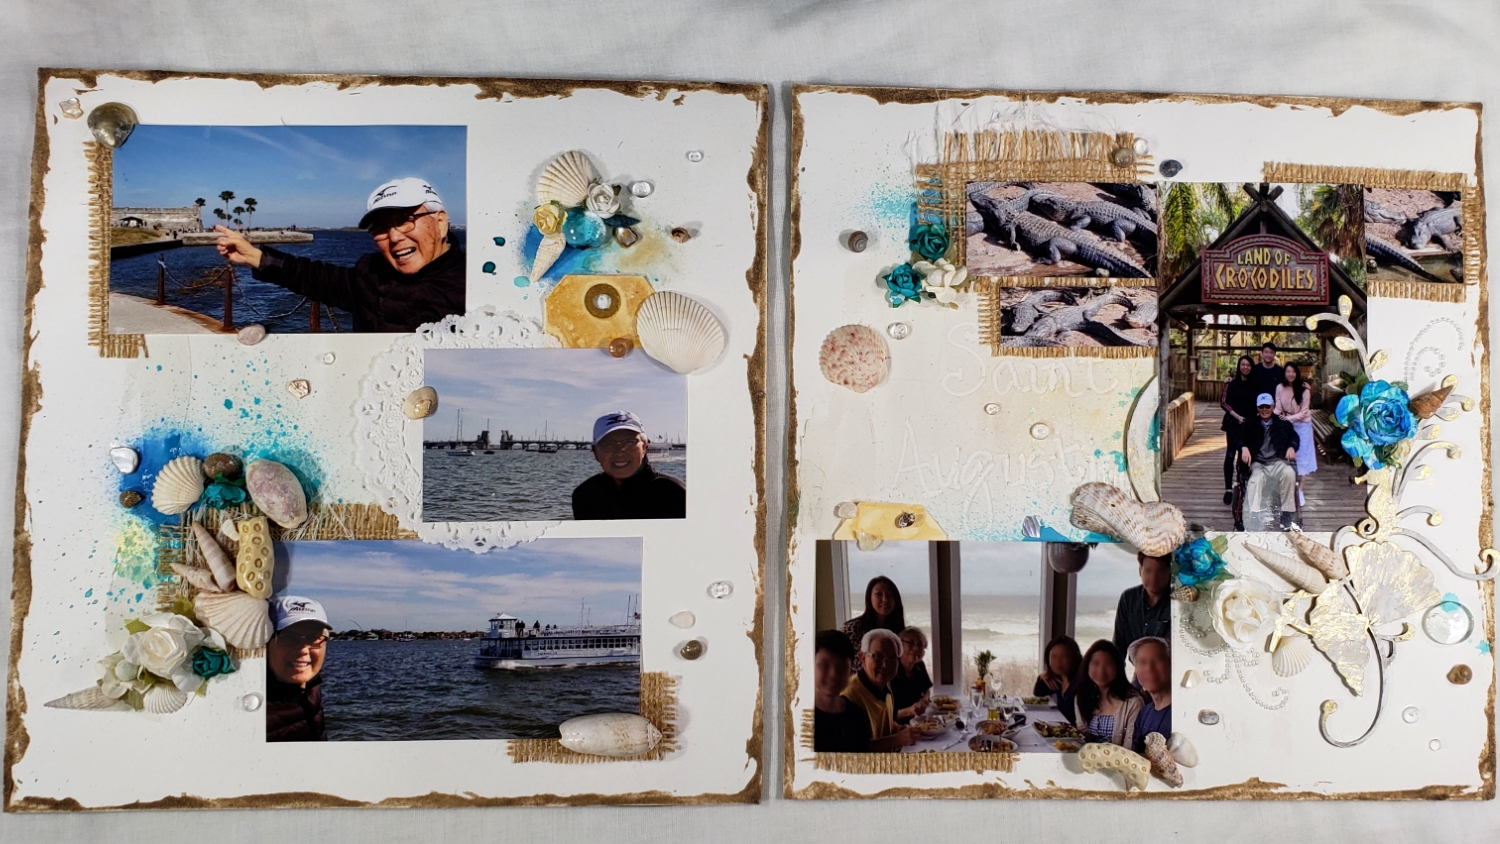
The bases are Canson XL Series Watercolor Textured Paper, which is incredibly robust and perfect for mixed media. The edges were distressed with new-to-me Art Anthology Mud Texture Paste. Then for the background texture, especially visible where I hand wrote “Saint Augustine” with the back end of a paintbrush, I used Art Anthology Sandstone Stone Effects. For the chip board pieces, I used Liquitex Gesso to soften the look and then rubbed on with my fingers some Art Anthology Gold Metal Effects to add a shimmer.
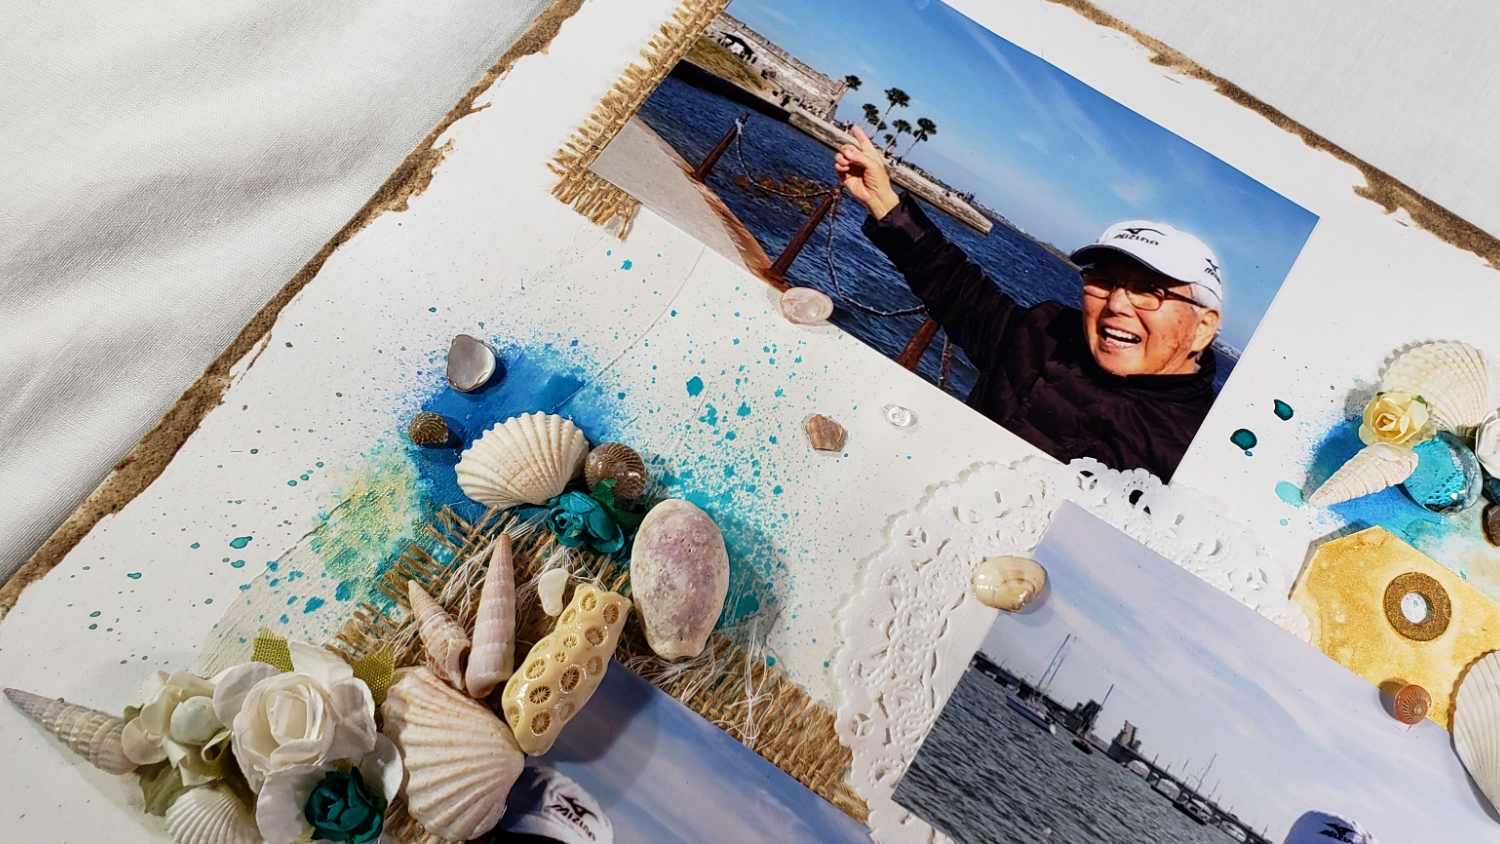
The other background elements to add texture, interest, warmth, and sea-worn look, I used gauze cheesecloth fibers, burlap (with the ends frayed), white flowers sprayed aqua with Art Anthology Siesta Key Spray, seashells, coral, paper doilies, pearl sticker gems, Heidi Swapp Gold Color Shine sprayed manila tags, and clear Pretty Pink Posh 4mm droplets and 6mm droplets.
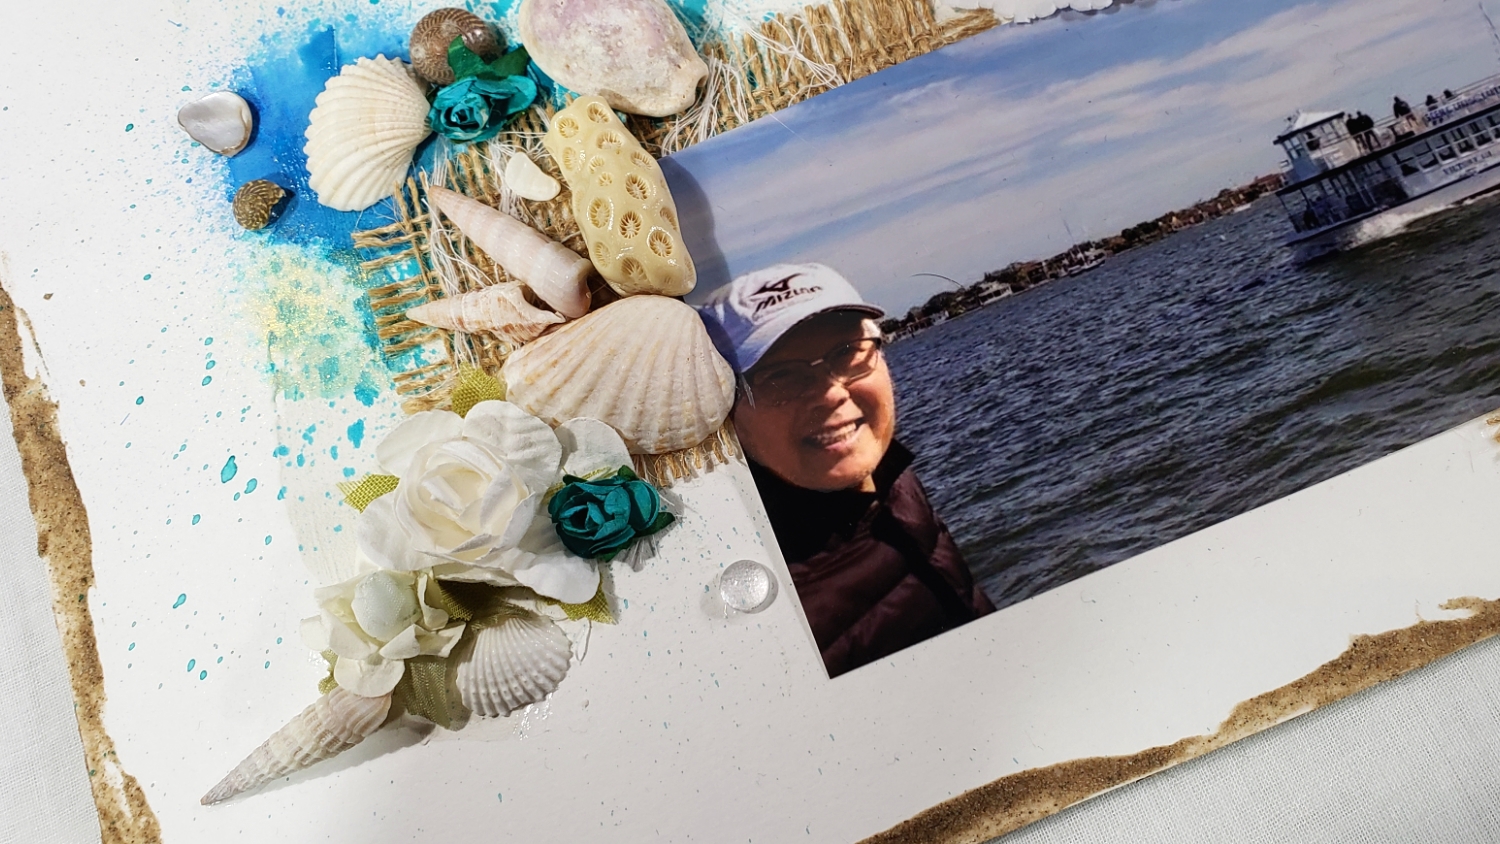
Then it was a matter of finding the pictures from our vacation that I thought would be fun to feature on the layouts. As these are going to be gifts for my dad I used 3 pictures of my dad at the St. Augustine down town area by the water, bridge and Castillo de San Marcos. For the second half of the spread, I used our family Christmas lunch picture (this was the only picture that had our whole family in it! – we were really bad about taking pictures), and a picture of my dad, me and my niece and nephew at the famous St. Augustine Alligator Farm.
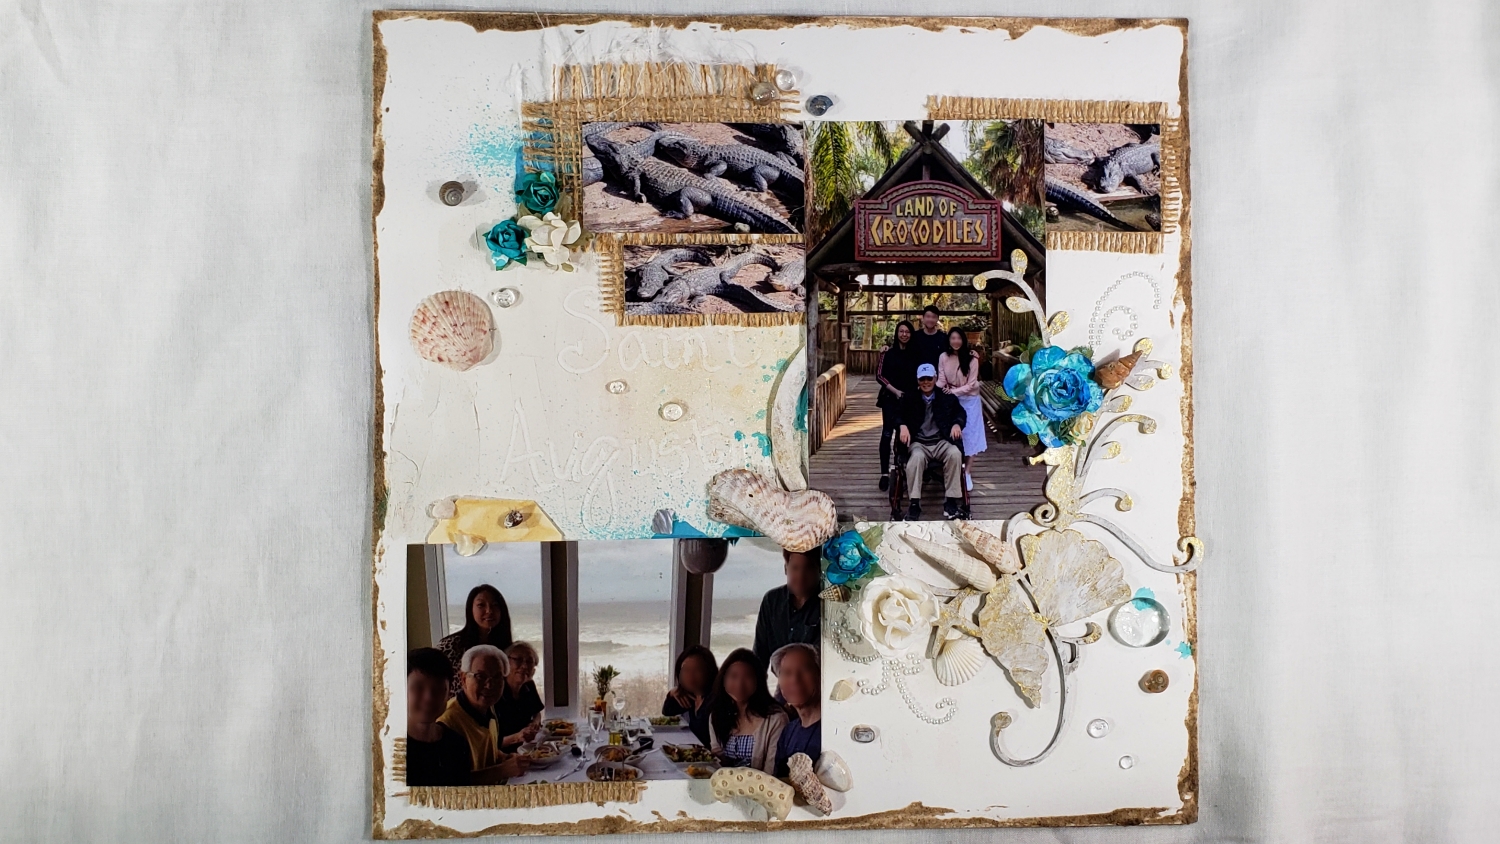
To secure everything in place I used E6000 Glue (for permanent hold) and my Adtech hot glue gun (for quick placement, while the E6000 cures). Due to the very textured nature of many of the embellishments, many other wet glues would be less secure and not suitable. To make the layouts into display pieces, I also backed them with scrap cardboard (watch video for details). All these mixed media techniques are something relatively new to me, but I love the final results, and I think my dad will love these layouts as a keepsake gift!
CLICK on the following picture to watch the quick share and how to make these layouts displayable pieces (there is also a quick share of a shadowbox gift idea that I’ll describe in more detail on my next post):
Disclosure: Many of the supplies I’ve used for today’s project are linked. Some may be affiliate links, which means if you make a purchase I receive a small commission at no extra cost to you. I truly appreciate your support toward the costs of running this blog!
These layouts are being entered into the following challenges:
Simon Says Stamp Wednesday Something New Challenge
Simon Says Stamp Monday Use Something New Challenge
Word Art Wednesday Anything Goes Challenge
Creatalicious Anything Goes with Optional Something New Challenge
Simon Says Stamp Work it Wednesday Try Something New Challenge
Crafter’s Castle Anything Goes with Optional Fun Technique Challenge
613 Avenue Create Anything Goes with Optional Watercoloring Challenge
Crafts Galore Encore Anything Goes Challenge
Through the Craft Room Door Anything Goes Challenge
Lil Patch of Crafty Friends Anything Goes Challenge
]]>
US only. Paypal, friends and family.
If you want to pay non-friends-and-family, it will add $3 to the price.
Email me at kristina@craftypaws.us with the lot # you want.
The following is Destash video 1:
Lot 1: Tilda Magnolia – $55 REDUCED to $45 shipped
Lot 2: SOLD Stamps and Dies Lot
Lot 3: SOLD Vintage Country
Lot 4: SOLD Vintage
The following is Destash video 2:
Lot #5: SOLD Celebrations – $40 shipped
Lot #6: SOLD Clean & Simple Lot – $40 shipped
Lot #7: Girl Stamps – $40 REDUCED to $35 shipped
Lot #8: SOLD Cutsie Lot – $40 shipped
Lot #9: SOLD Huge Stamps – $45 shipped
Thanks for stopping by!
]]>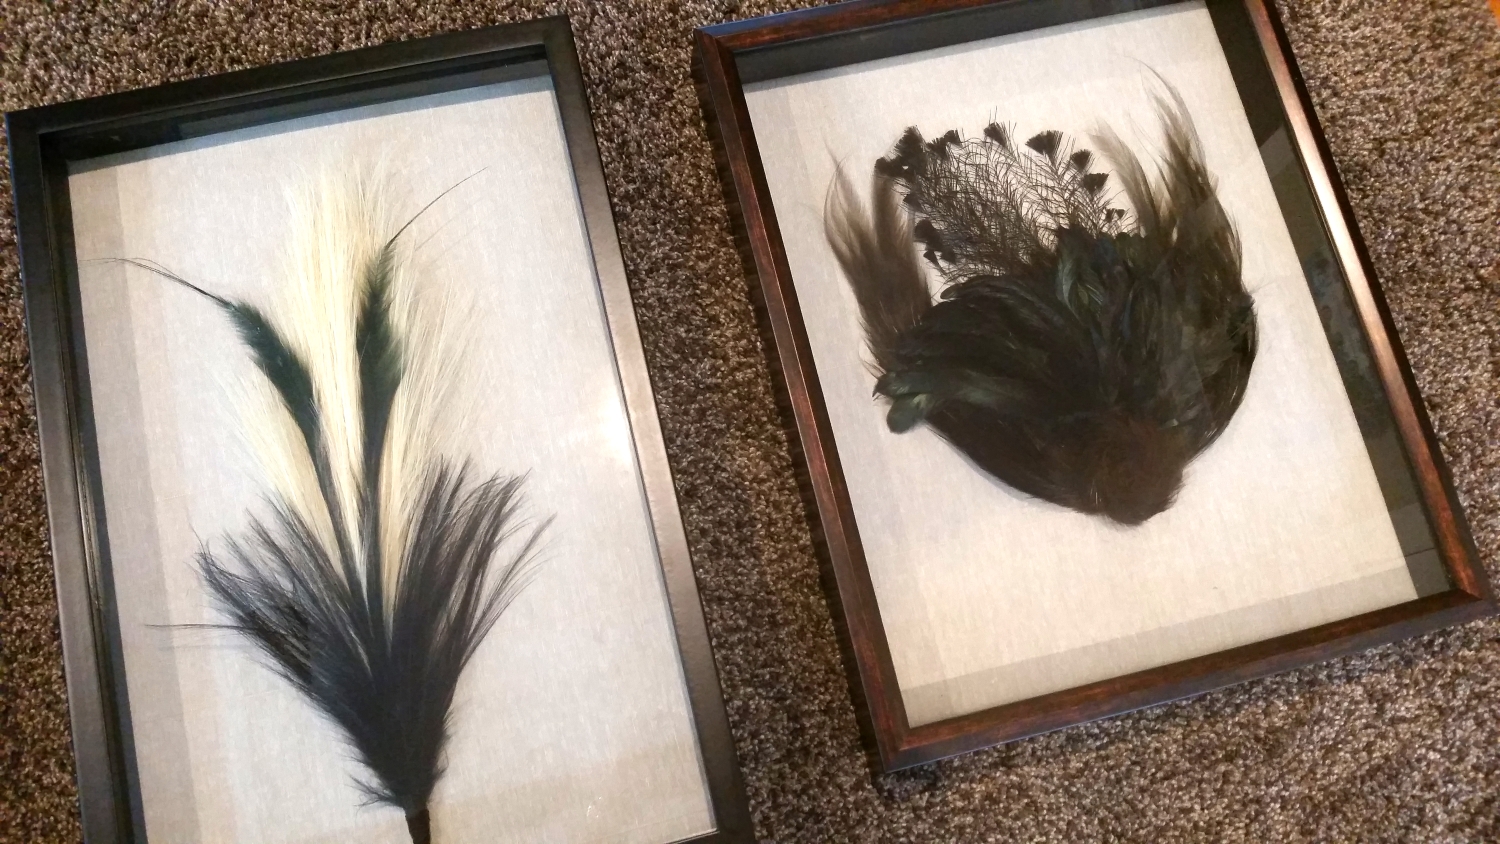
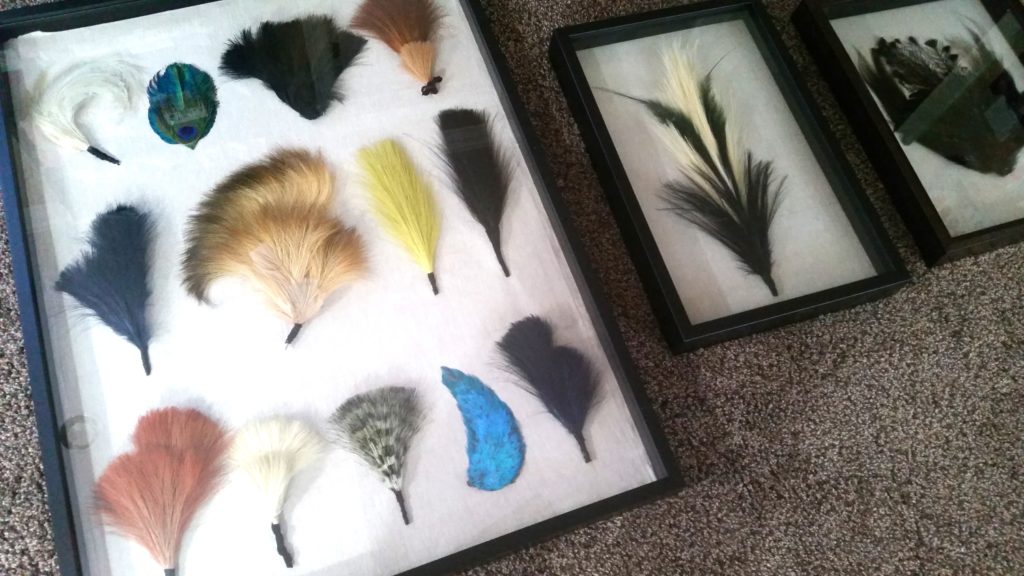
I have been thinking long and hard about how to honor my hubby’s grandmother and highlight these beautiful feathers in a lasting and impactful way. I finally decided I could achieve this by curating the mass of feathers and displaying them in shadow boxes. I gathered 4 shadow boxes (2 from my stash that I could re-purpose and 2 from Michaels when they had a 60% off sale) and lined the backs of all of them with some remnant linen fabric that I upcycled from old Ikea curtains.
Then it was a matter of trying different combinations of feathers. I wanted to play with colors, textures, and general grouping shapes. I hot glued some into shaped clusters, and grouping others into rows after carefully wrapping the bases with black wired ribbon. I “cheated” a little and dyed one dingy clump of white feathers into a teal/aqua color with Tattered Angel and DecoArt shimmer mist, and I added one peacock feather assembly I bought from Michaels just to brighten up the collection and add some pops of blue (my favorite color). In the end, I wanted to create home decor art that would communicate the importance of these vintage feathers to our family history while still fitting in with our contemporary aesthetic. I think by combining, lining up, and grouping the feathers in these shadow boxes, I was able to do just that.
The following is a video share of these shadow box art pieces:
These feather shadow boxes are being entered into the following challenges:
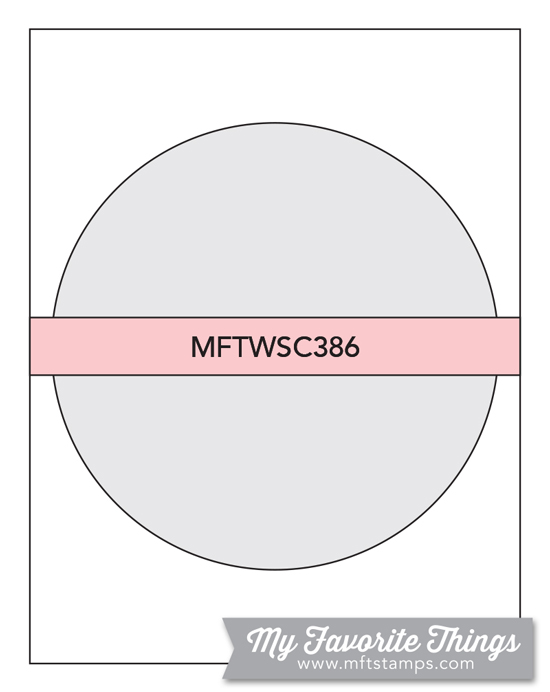
MFT Sketch Challenge #386
Word Art Wednesday Anything Goes Challenge
Creatalicious Anything Goes with Optional All that Glitters Challenge
Card Mania Anything But a Card Challenge
613 Avenue Create Anything Goes with Optional Mainly Blue Challenge
Crafty Gals Corner Anything Goes Challenge
Lil Patch of Crafty Friends Anything Goes Challenge
]]>
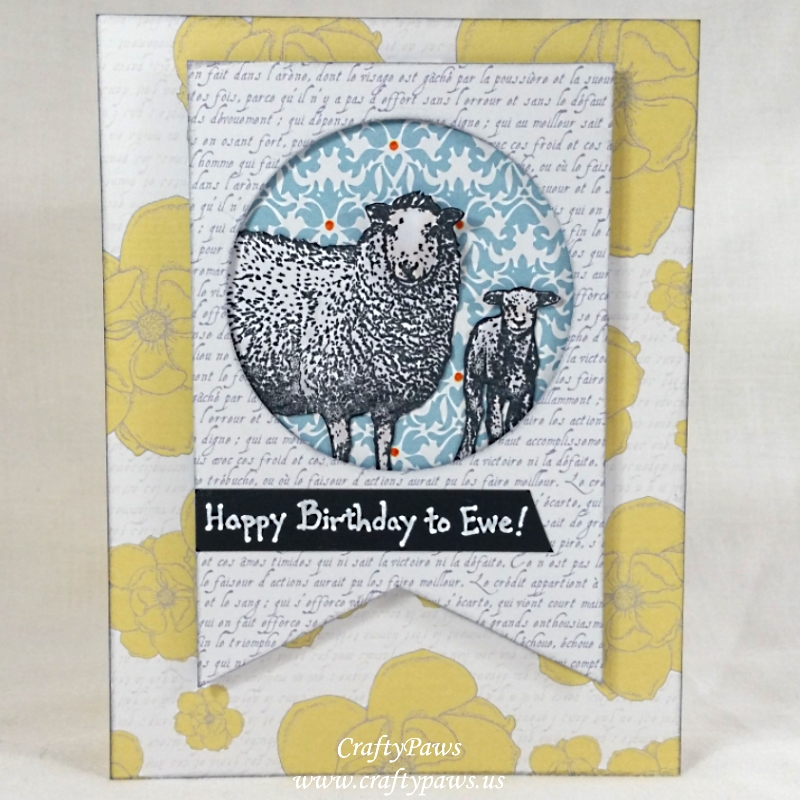
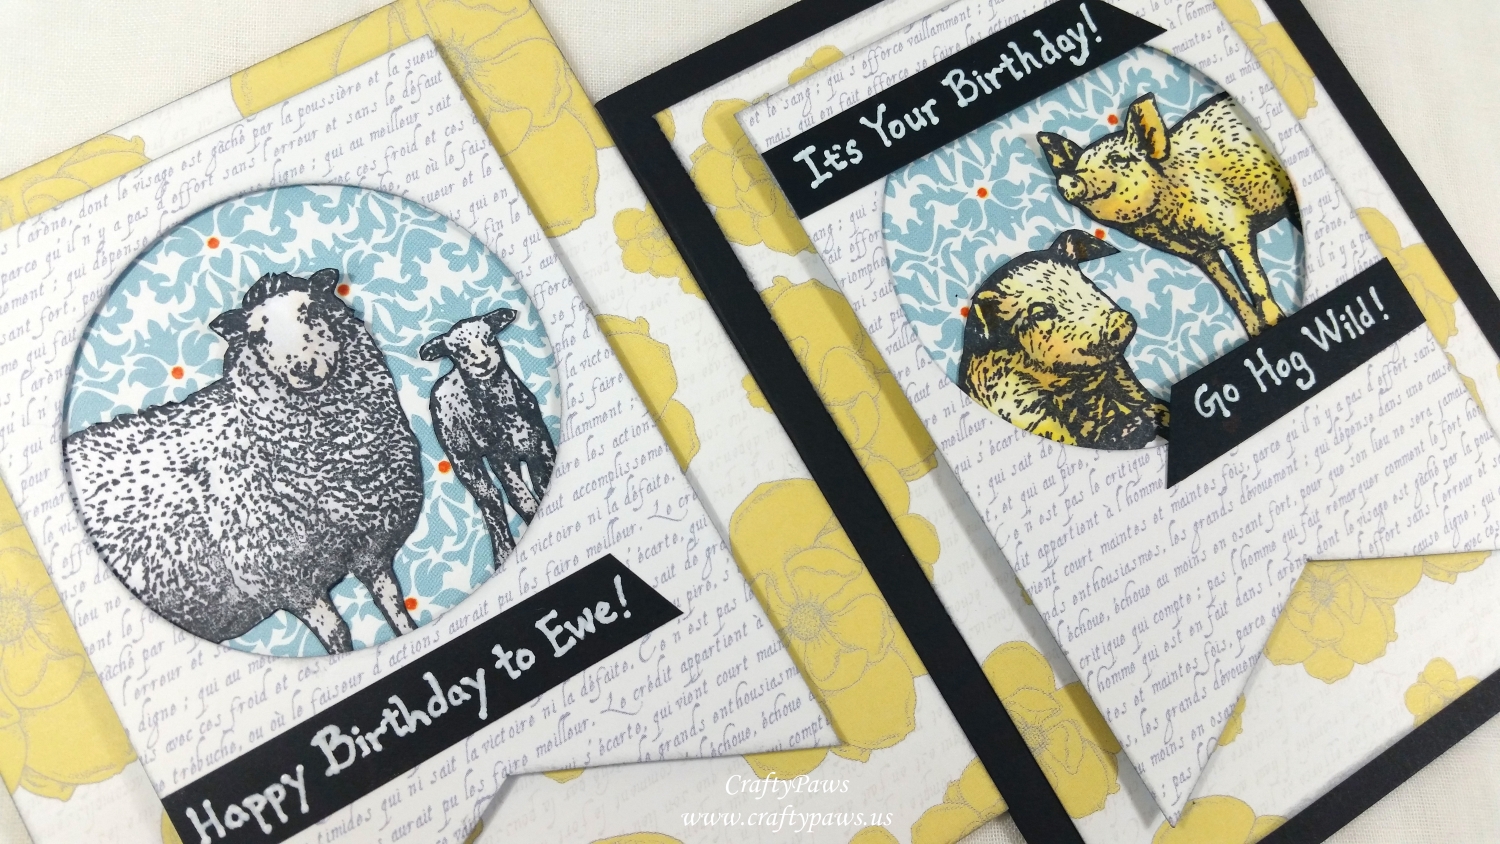
These farm animal stamp images are very realistic so they could certainly stand on their own without any coloring, but I wanted to add a hint of coloring so that they would coordinate with the patterned papers I wanted to use on these cards. So I used the following Copic colors to color up the sheep and pigs:
Sheep: N0, N1 and E000
Pigs: Y000, Y11, Y13, E01, N2
All the patterned papers are from a 6 x 6 My Mind’s Eye “Moments” paper pad (retired). And to give a nice finished look, I lightly inked the edges of all the paper pieces with Tim Holtz Distress Ink in Hickory Smoke.
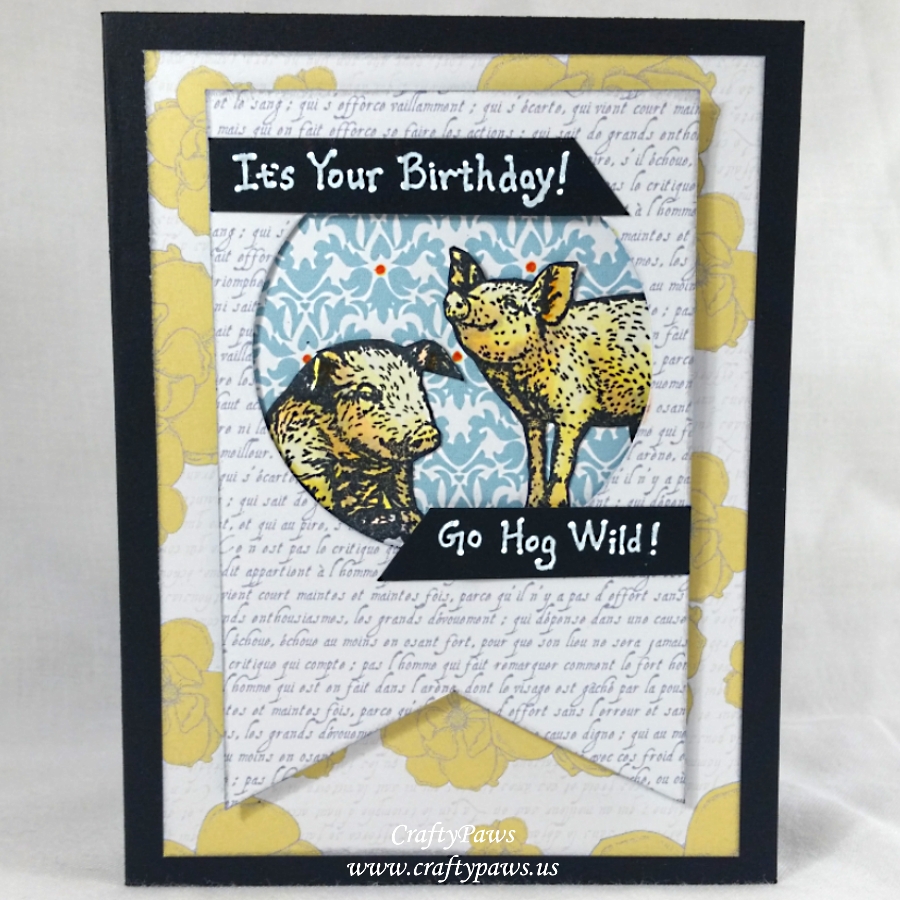
Next I fussy cut all the critters and inked the edges with a Tuxedo Black Momento Marker. This freed me up to position them exactly where I wanted to, which was in round windows die cut from hand cut pennant banners using Lawn Fawn Stitched Circle Stackable Dies. For a little interest and dimension, I layered and popped up the pennants on double sided foam adhesive over a blue damask patterned paper that I customized with small orange dots using a Tim Holtz Distress Marker in Riper Persimmon. Lastly, I added another layer of foam adhesive before I placed the whole assembly on a simple floral card front.
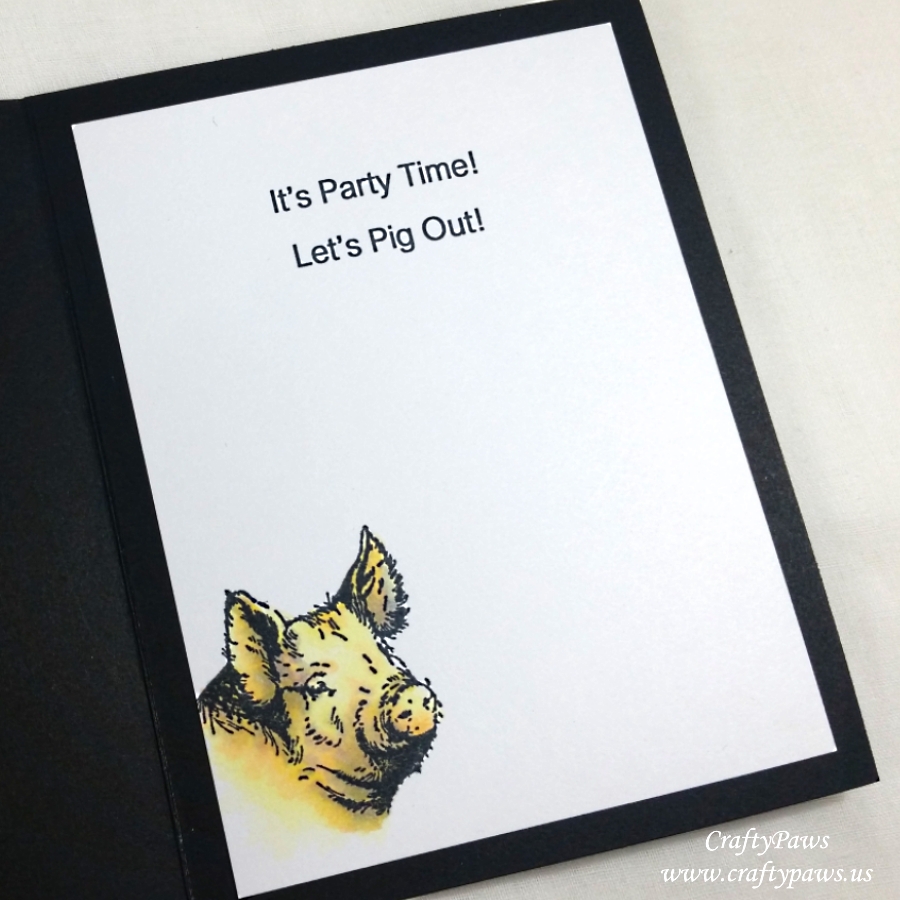 For the silly sentiment banners, I simply used a Uniball Signo White Gel Pen on black card stock. For the pig card, I wrote, “It’s Your Birthday! Go Hog Wild!” and inside the card, I printed out on my computer, ” “It’s Party Time! Let’s Pig Out!” for the card liner. For the sheep card, I wrote, “Happy Birthday to Ewe!”
I’m so glad I got to replenish my birthday card stash with these Joy! Crafts farm animals. I hope you enjoyed this post as much as I enjoyed crafting these punny cards. The following is a process video of crafting these cards:
Disclosure: Many of the supplies I’ve used for today’s project are linked. Some may be affiliate links, which means if you make a purchase I receive a small commission at no extra cost to you. I truly appreciate your support toward the costs of running this blog!
These cards are being entered into the following challenges:
Crafty Gals Corner Anything Goes Challenge
Lil Patch of Crafty Friends Anything Goes Challenge
Through the Craft Room Door Anything Goes Challenge
Crafts Galore Encore Anything Goes Challenge
Simon Says Stamp Monday Time Out Challenge
Simon Says Stamp Wednesday Animal Magic Challenge
Word Art Wednesday Anything Goes Challenge
Creatalicious Anything Goes with Optional Add a Sentiment Challenge
MFT Sketch Challenge #383

]]>
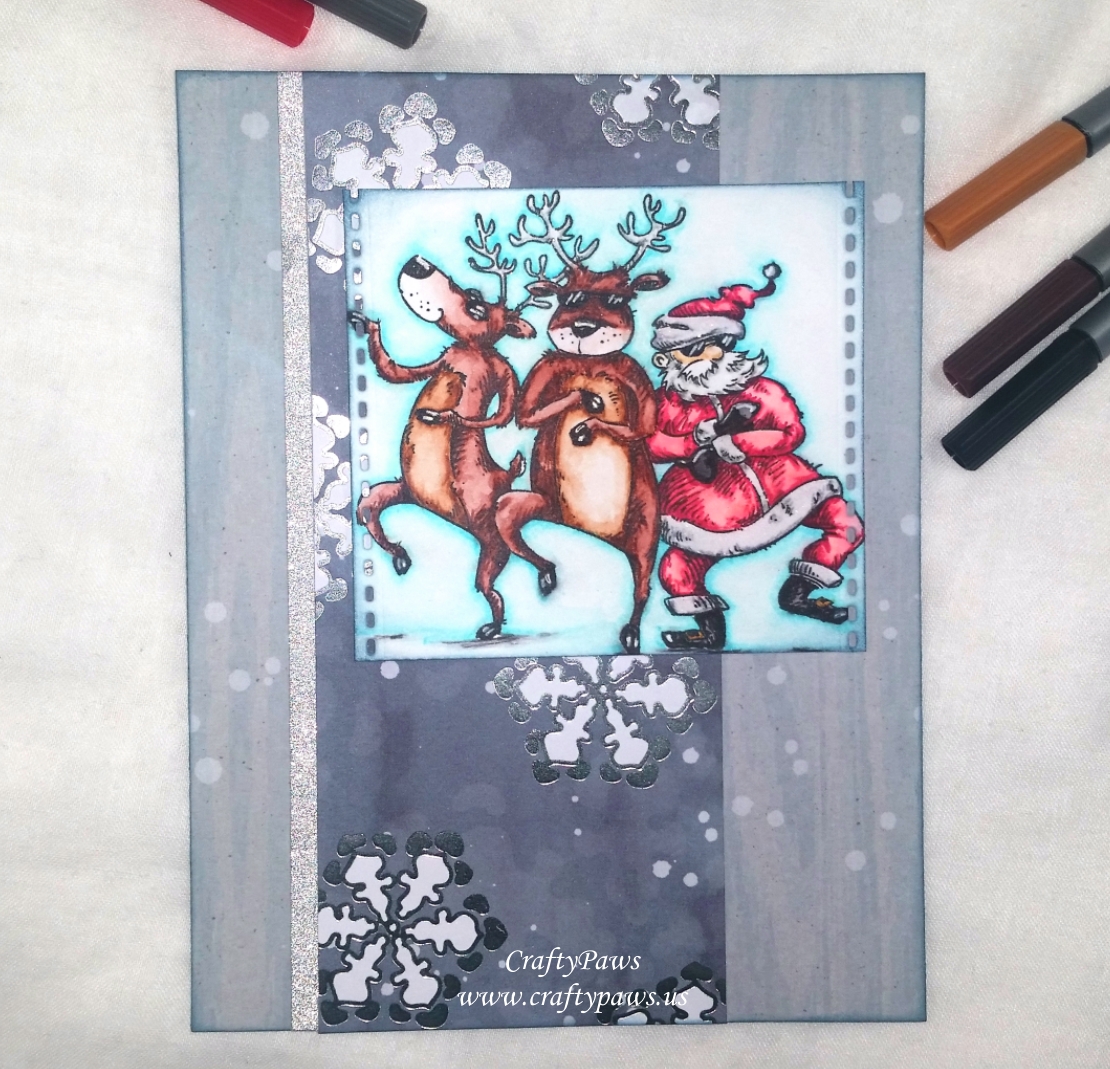 I also got a chance to re-evaluate some more Arteza products (I’ll be sharing a full separate video review of these in a following post). In short, I LOVE the Arteza Fineliner Pens. To color up this image, I used 8 of them: brown, tan, yellow, red, black and three greys and a fine point Arteza water brush to blend out the inks for a watercolored look. Getting into tiny nooks and crannies of the image was so easy with these fineliner pens!
I also used the Arteza Arctic Blue (117) Real Brush Pen and a water brush to create a soft blue haloing background. For some highlighting details, I used a Uniball Signo White Gel Pen on the sun glasses, noses, hooves, boots and gloves; and I added some magical shimmer to the antlers and Santa’s white fur trim with a Clear Wink of Stella Pen.
For the card front, I used scraps from my scrap box from a 2012 Recollections Christmas paper pad called “Memories Never Melt” and inked the edges with some Tim Holtz Distress Ink in Faded Jeans. For a little sparkle, I added a thin strip of silver glitter washi tape on one side. To add the look of a film strip cell (like this was a pic from a music video – hahaha), I used one of the Neat & Tangled Tiny Cuts border dies on the two sides of the image, again inking the edges with more Tim Holtz Distress Ink in Faded Jeans to maintain a cohesive look.
 Inside the card, I used the remaining scraps of the Recollections patterned paper from my scrap box. To make it a little more festive, I doodled some bursting stars with the Arteza Black Fineliner Pen. Then to drive home the fun Gangnam Style theme, I used Ranger Super Fine Embossing Powder on a scrap of dark blue card stock to heat emboss the sentiment from the stamp set. I cut it into a simple banner shape and added that as the final touch on the card liner.
Disclosure: Many of the supplies I’ve used for today’s project are linked. Some may be affiliate links, which means if you make a purchase I receive a small commission at no extra cost to you. I truly appreciate your support toward the costs of running this blog!
Arteza Coupon: If by chance you want to purchase any Arteza products, you can use the COUPON CODE (BOE-TOZ-460) for 10% off.
The following is a video sharing the coloring of this image:
This card is being entered into the following challenges:
Word Art Wednesday Anything Goes Challenge
Creatalicious Anything Goes Challenge with Optional Birthday
Through the Craft Room Door Anything Goes Challenge
613 Avenue Create Anything Goes with Optional Reuse/Upcycle Challenge
Art Impressions Water Color Wonders Challenge
Lil Patch of Crafty Friends Anything Goes Challenge
Card Mania Embossing Challenge
Penny Black and More Feature a Creature Challenge
Stamp Sensations Forest Friends Challenge
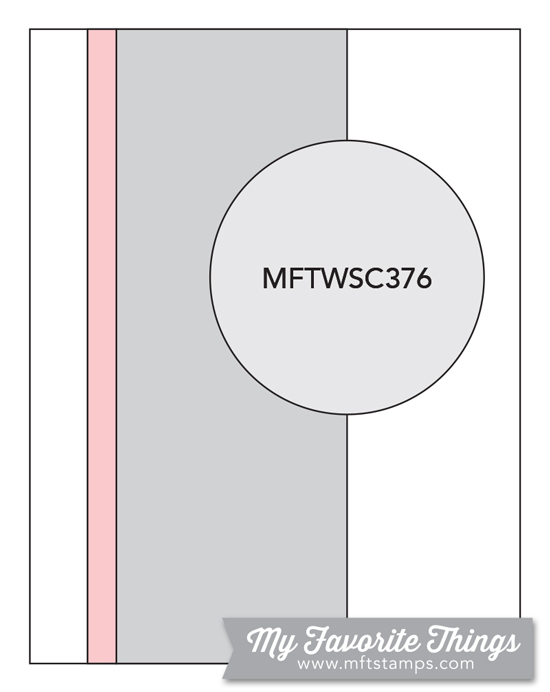
MFT Sketch 376 Card Challenge
]]>
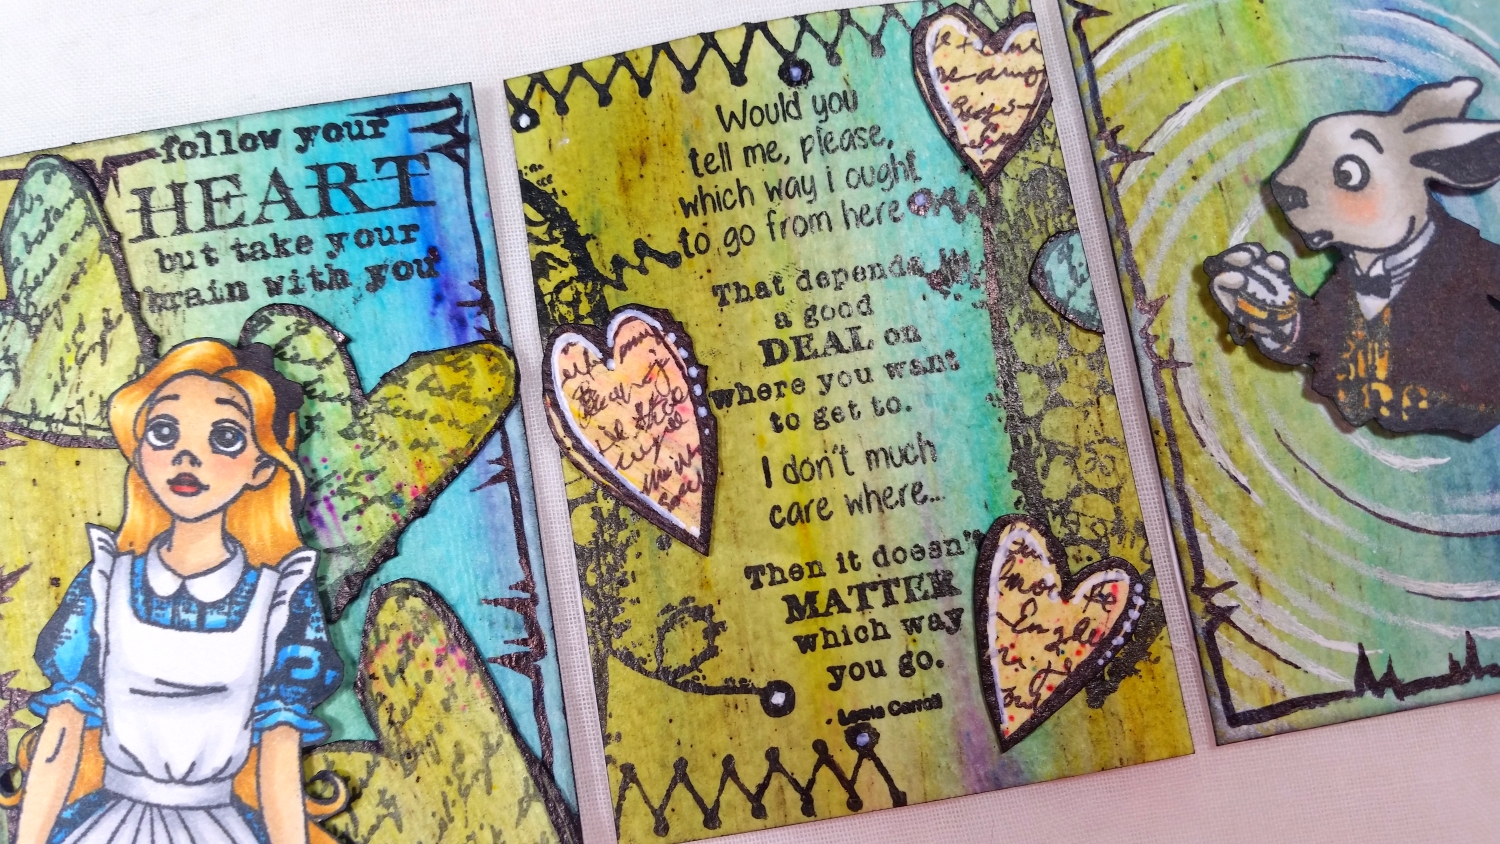
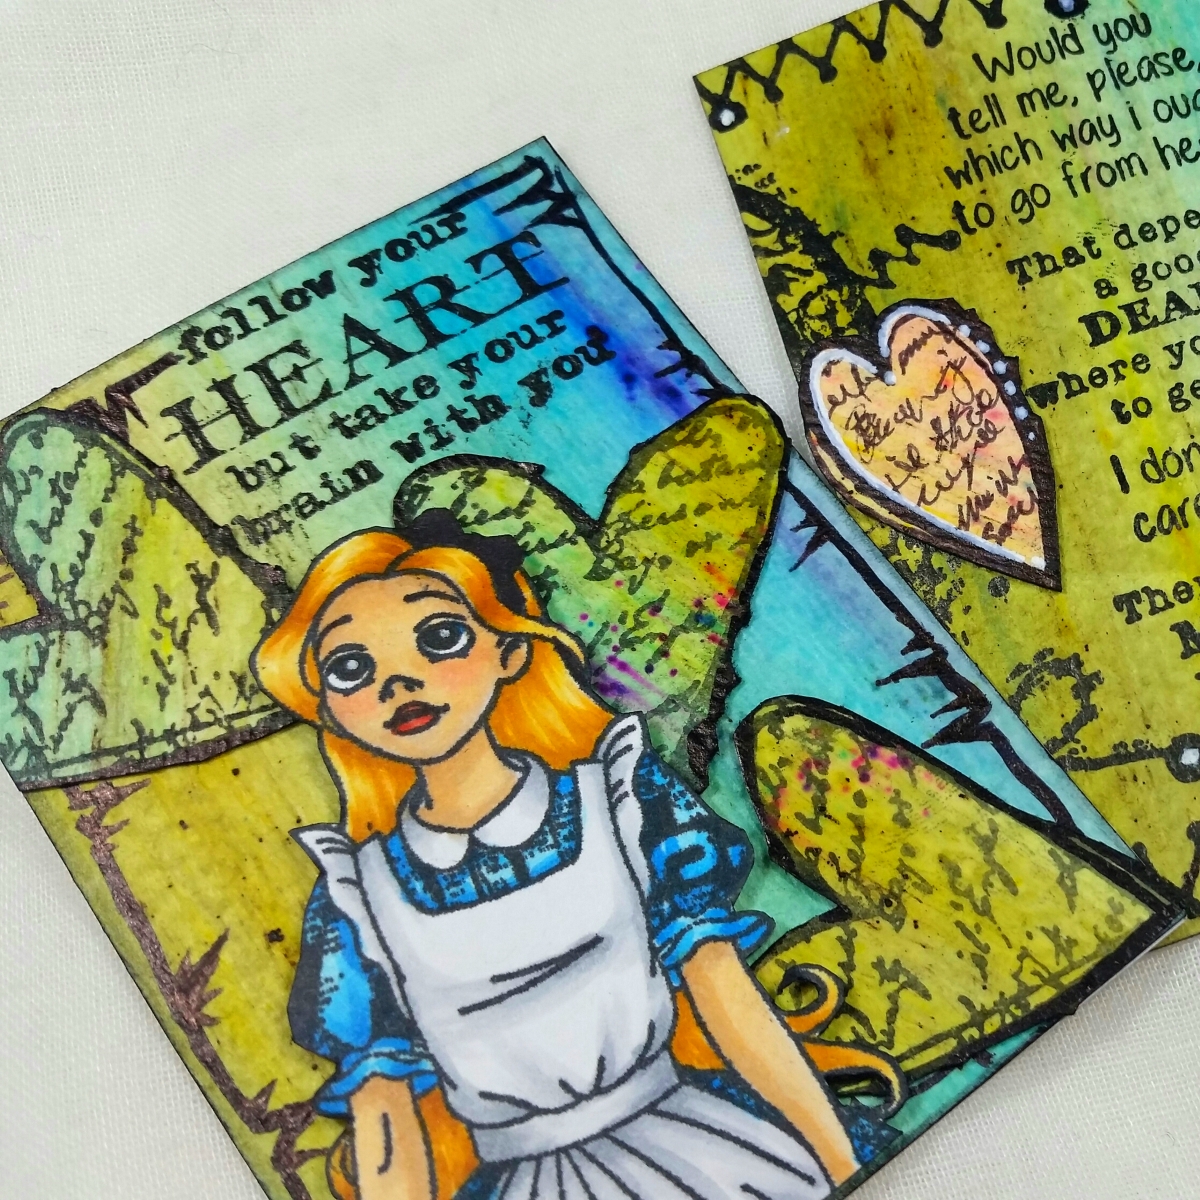 I stamped out the top part of the Alice and the White Rabbit and used the following Copic colors on them:
Skin: E50, E51, E21, R20, BV000
Lips: R14 and R17
Hair: Y11, YR24 ???
Blue dress: B01, B04 and B06
White apron: C1 and C3
White Rabbit: W1, W3, R20, Y11, YR24
I fussy cut them out and inked the edges with a Tuxedo Momento Black Marker to give them a finished look, all ready for them to be popped up on some ATCs.
But then I wondered what type of background would compliment them, while not competing with or distracting from them? I thought about spritzing some watercolor paper with pigment powders but then I researched how to use the PaperArtsy Infusions (which were also in my design team package) and found an interesting NEW-to-me use for them with glaze medium that created a variegated wood grain look. Since I didn’t have glaze medium but had some Liquitex Matte Medium, I thought I would experiment just brushing these powders on with the matte medium onto Strathmore Cold Press Watercolor Paper. Oooh the effect was so neat! The walnut stain granules in the Infusions released more slowly than the pigment powders, but with a little patience brushing, they activated beautifully. I wanted a bluish – greenish – yellow background, but since I only had the Lemoncello and The Sage Infusions, I also added some Ken Oliver Color Burst powder in Ultramarine Blue. The Color Bursts are brighter and the Infusions have a more vintage and distressed look, but working them together, muted the Color Bursts enough to create a well-blended, colorful wood grain background.
When this background paper was all dry, I cut them it down to size for 3 ATCs, plus some left over. For the ATCs with Alice and the White Rabbit, I inked the edges of the ATCs with Tim Holtz Distress Ink in Black Soot and also took Fine Point and Ultrafine Point black Sharpie Markers to doodle on some spikey lines to frame them.
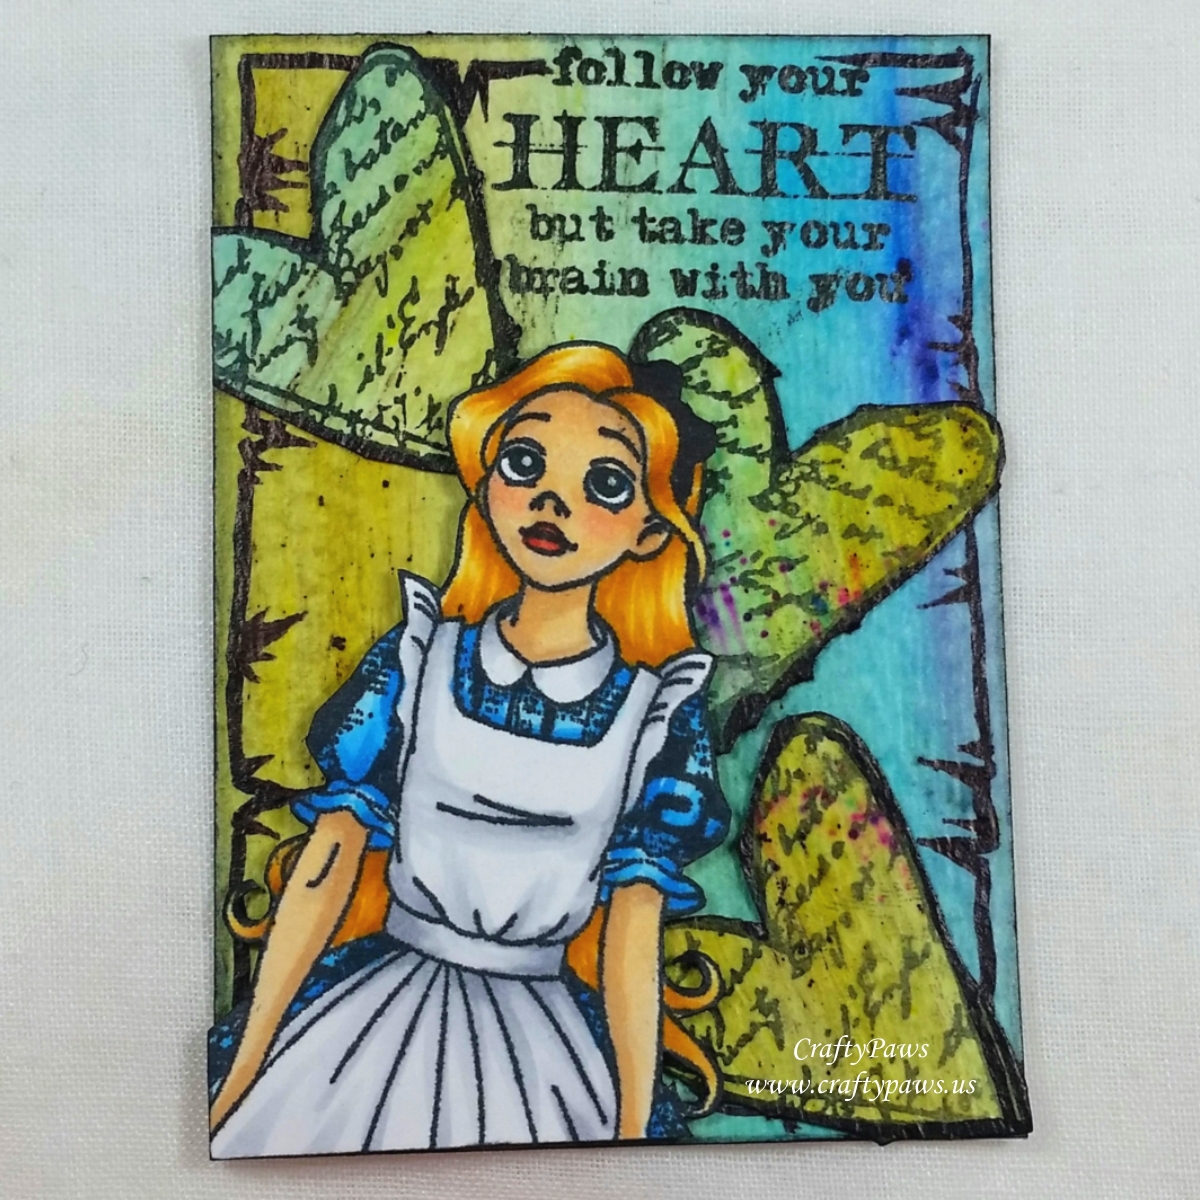
For the Alice ATC, I stamped out the sentiment from the Follow Your Heart stamp set in the upper right corner. I also stamped out three of the smaller hearts from the set onto the left over background paper and fussy cut those out to add some interest and slight dimension behind Alice.
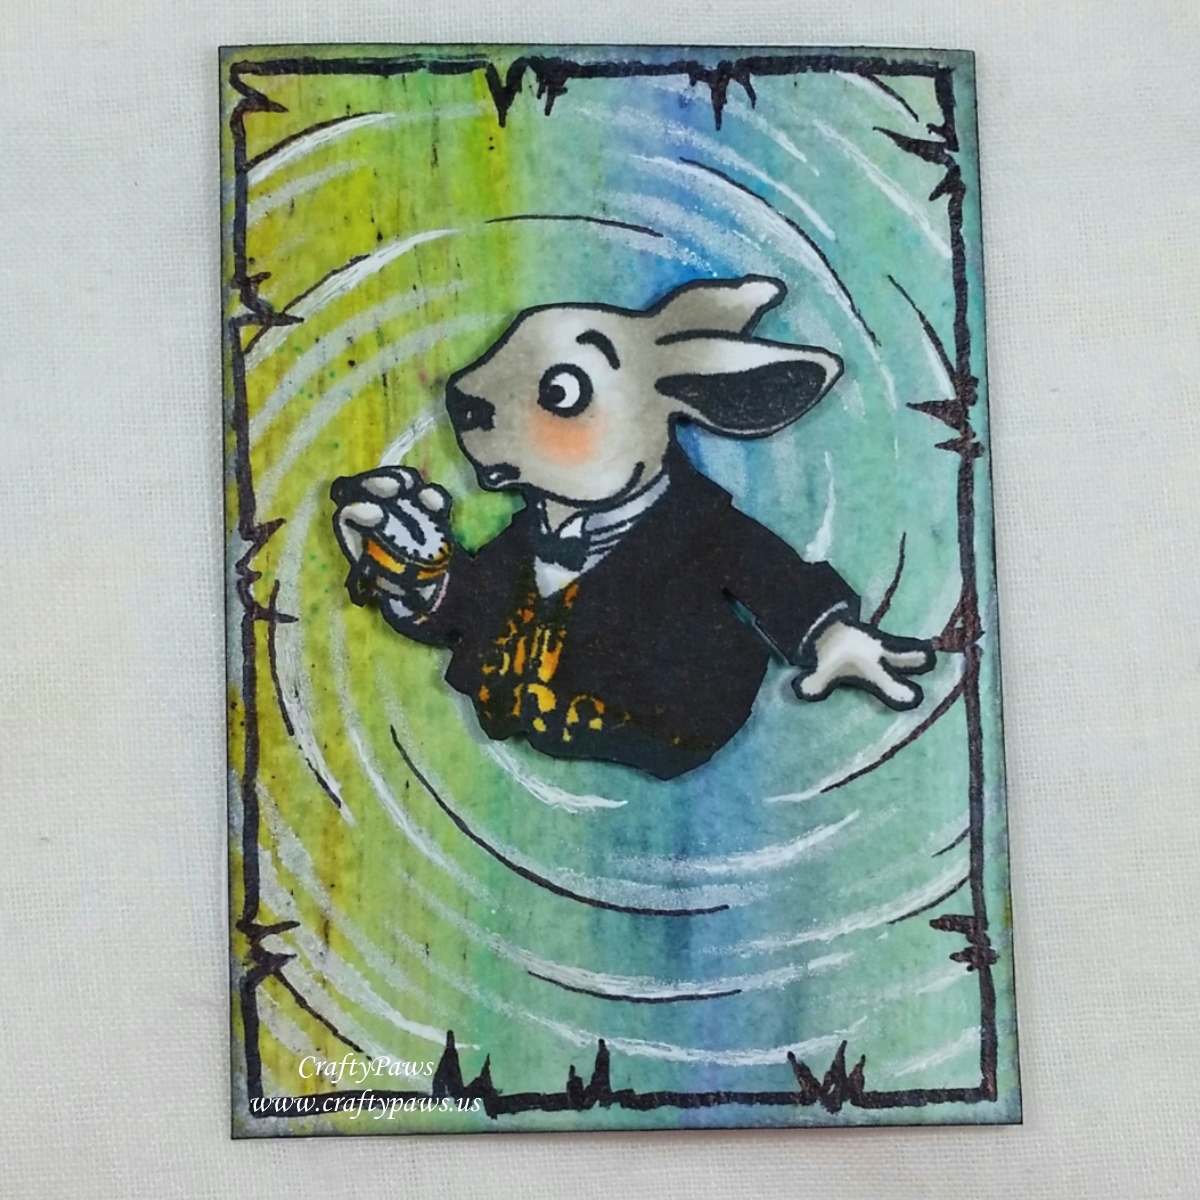
For the White Rabbit ATC, I used a DecoArt stencil by Andy Skinner called, Tornado with some Brilliance Moonlight White pigment ink to create a swirly whirly look. I highlighted some of the white swirls with my trusty Uniball Signo white gel pen and I also lined some of the swirls with an extra fine point black Sharpie.
For the middle ATC with the main sentiment from the Alice’s Adventures stamp set, I used sections of the large heart stamp from the Follow Your Heart stamp set and the zigzag line stamp to kind of frame the sentiment. I also doodled some hearts with faux scripty writing in them on some more of the left over background paper and fussy cut those out to add some color contrast and dimension onto this ATC.
The following is a process video sharing a lot of what I did to create these ATCs:
Disclosure: Many of the supplies I’ve used for today’s project are linked. Some may be affiliate links, which means if you make a purchase I receive a small commission at no extra cost to you. I truly appreciate your support toward the costs of running this blog!
These ATCs are being entered into the following challenges:
Oddball Art Feature a Creature Challenge
Creatalicious Anything Goes with Optional Cute Challenge
Crafty Gals Corner Anything Goes Challenge
Word Art Wednesday Anything Goes Challenge
Simon Says Stamp Wednesday Layer it Up Challenge
Lil Patch of Crafty Friends Anything Goes Challenge
Through the Craft Room Door Anything Goes Challenge
613 Avenue Anything Goes with Twist Create Something New Challenge
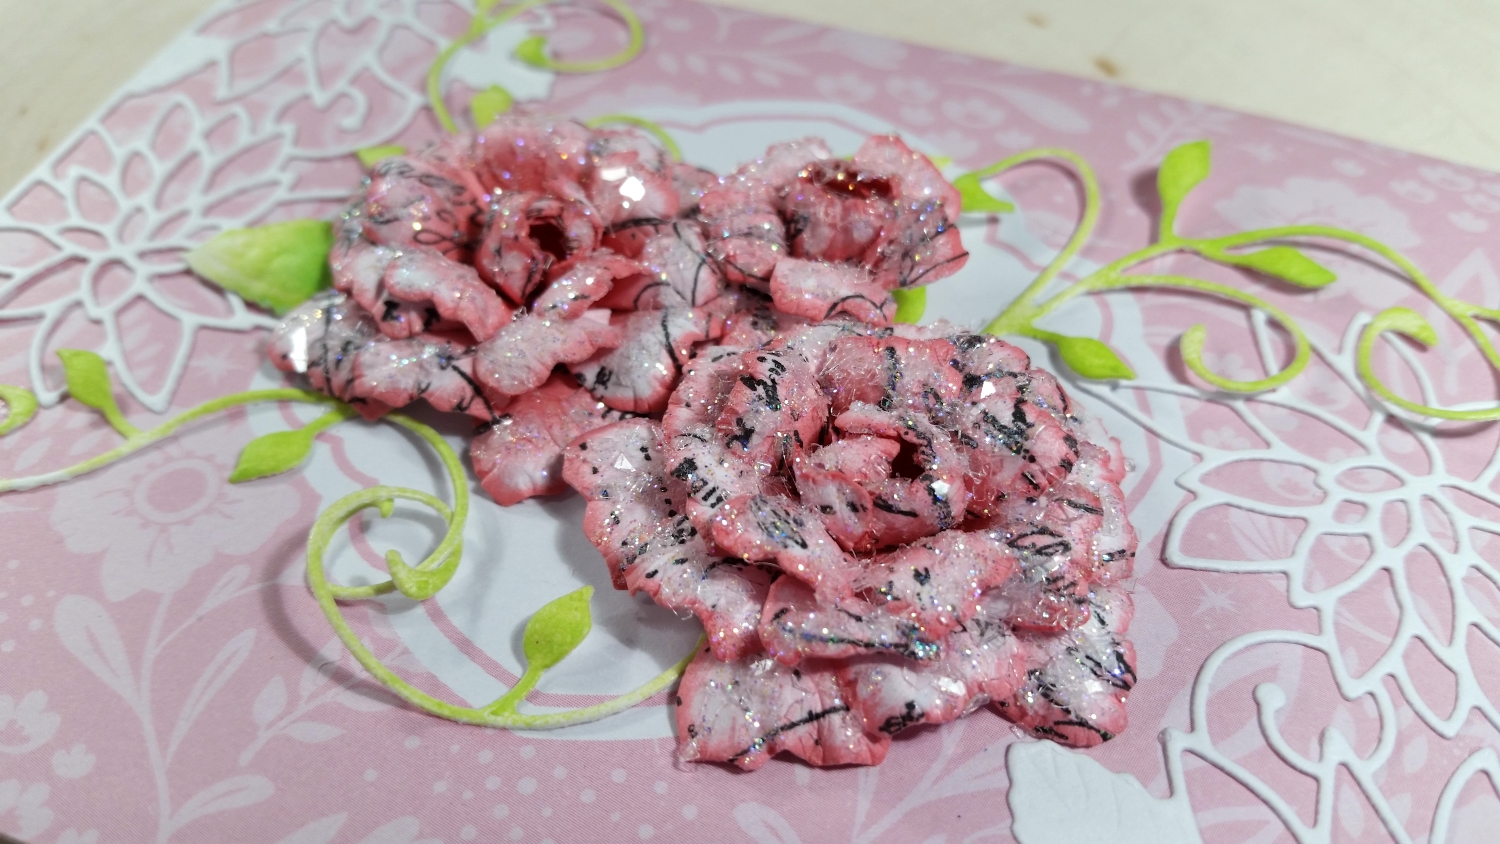
I used the Diemond Dies Sugar Plum Flower Die Set, the Natures Flourish Die, and the Medley of Leaves Die to create a flower cluster for a feminine shabby chic style card. The process of how I stamped, inked/colored, and shaped the roses are in the video linked below, so I’ll just list the products I used and then describe the rest of the card. NOTE: My readers can get 10% off and free worldwide shipping on all orders of $35 or more at Diemond Dies by using the code “thankskristina” at check out.
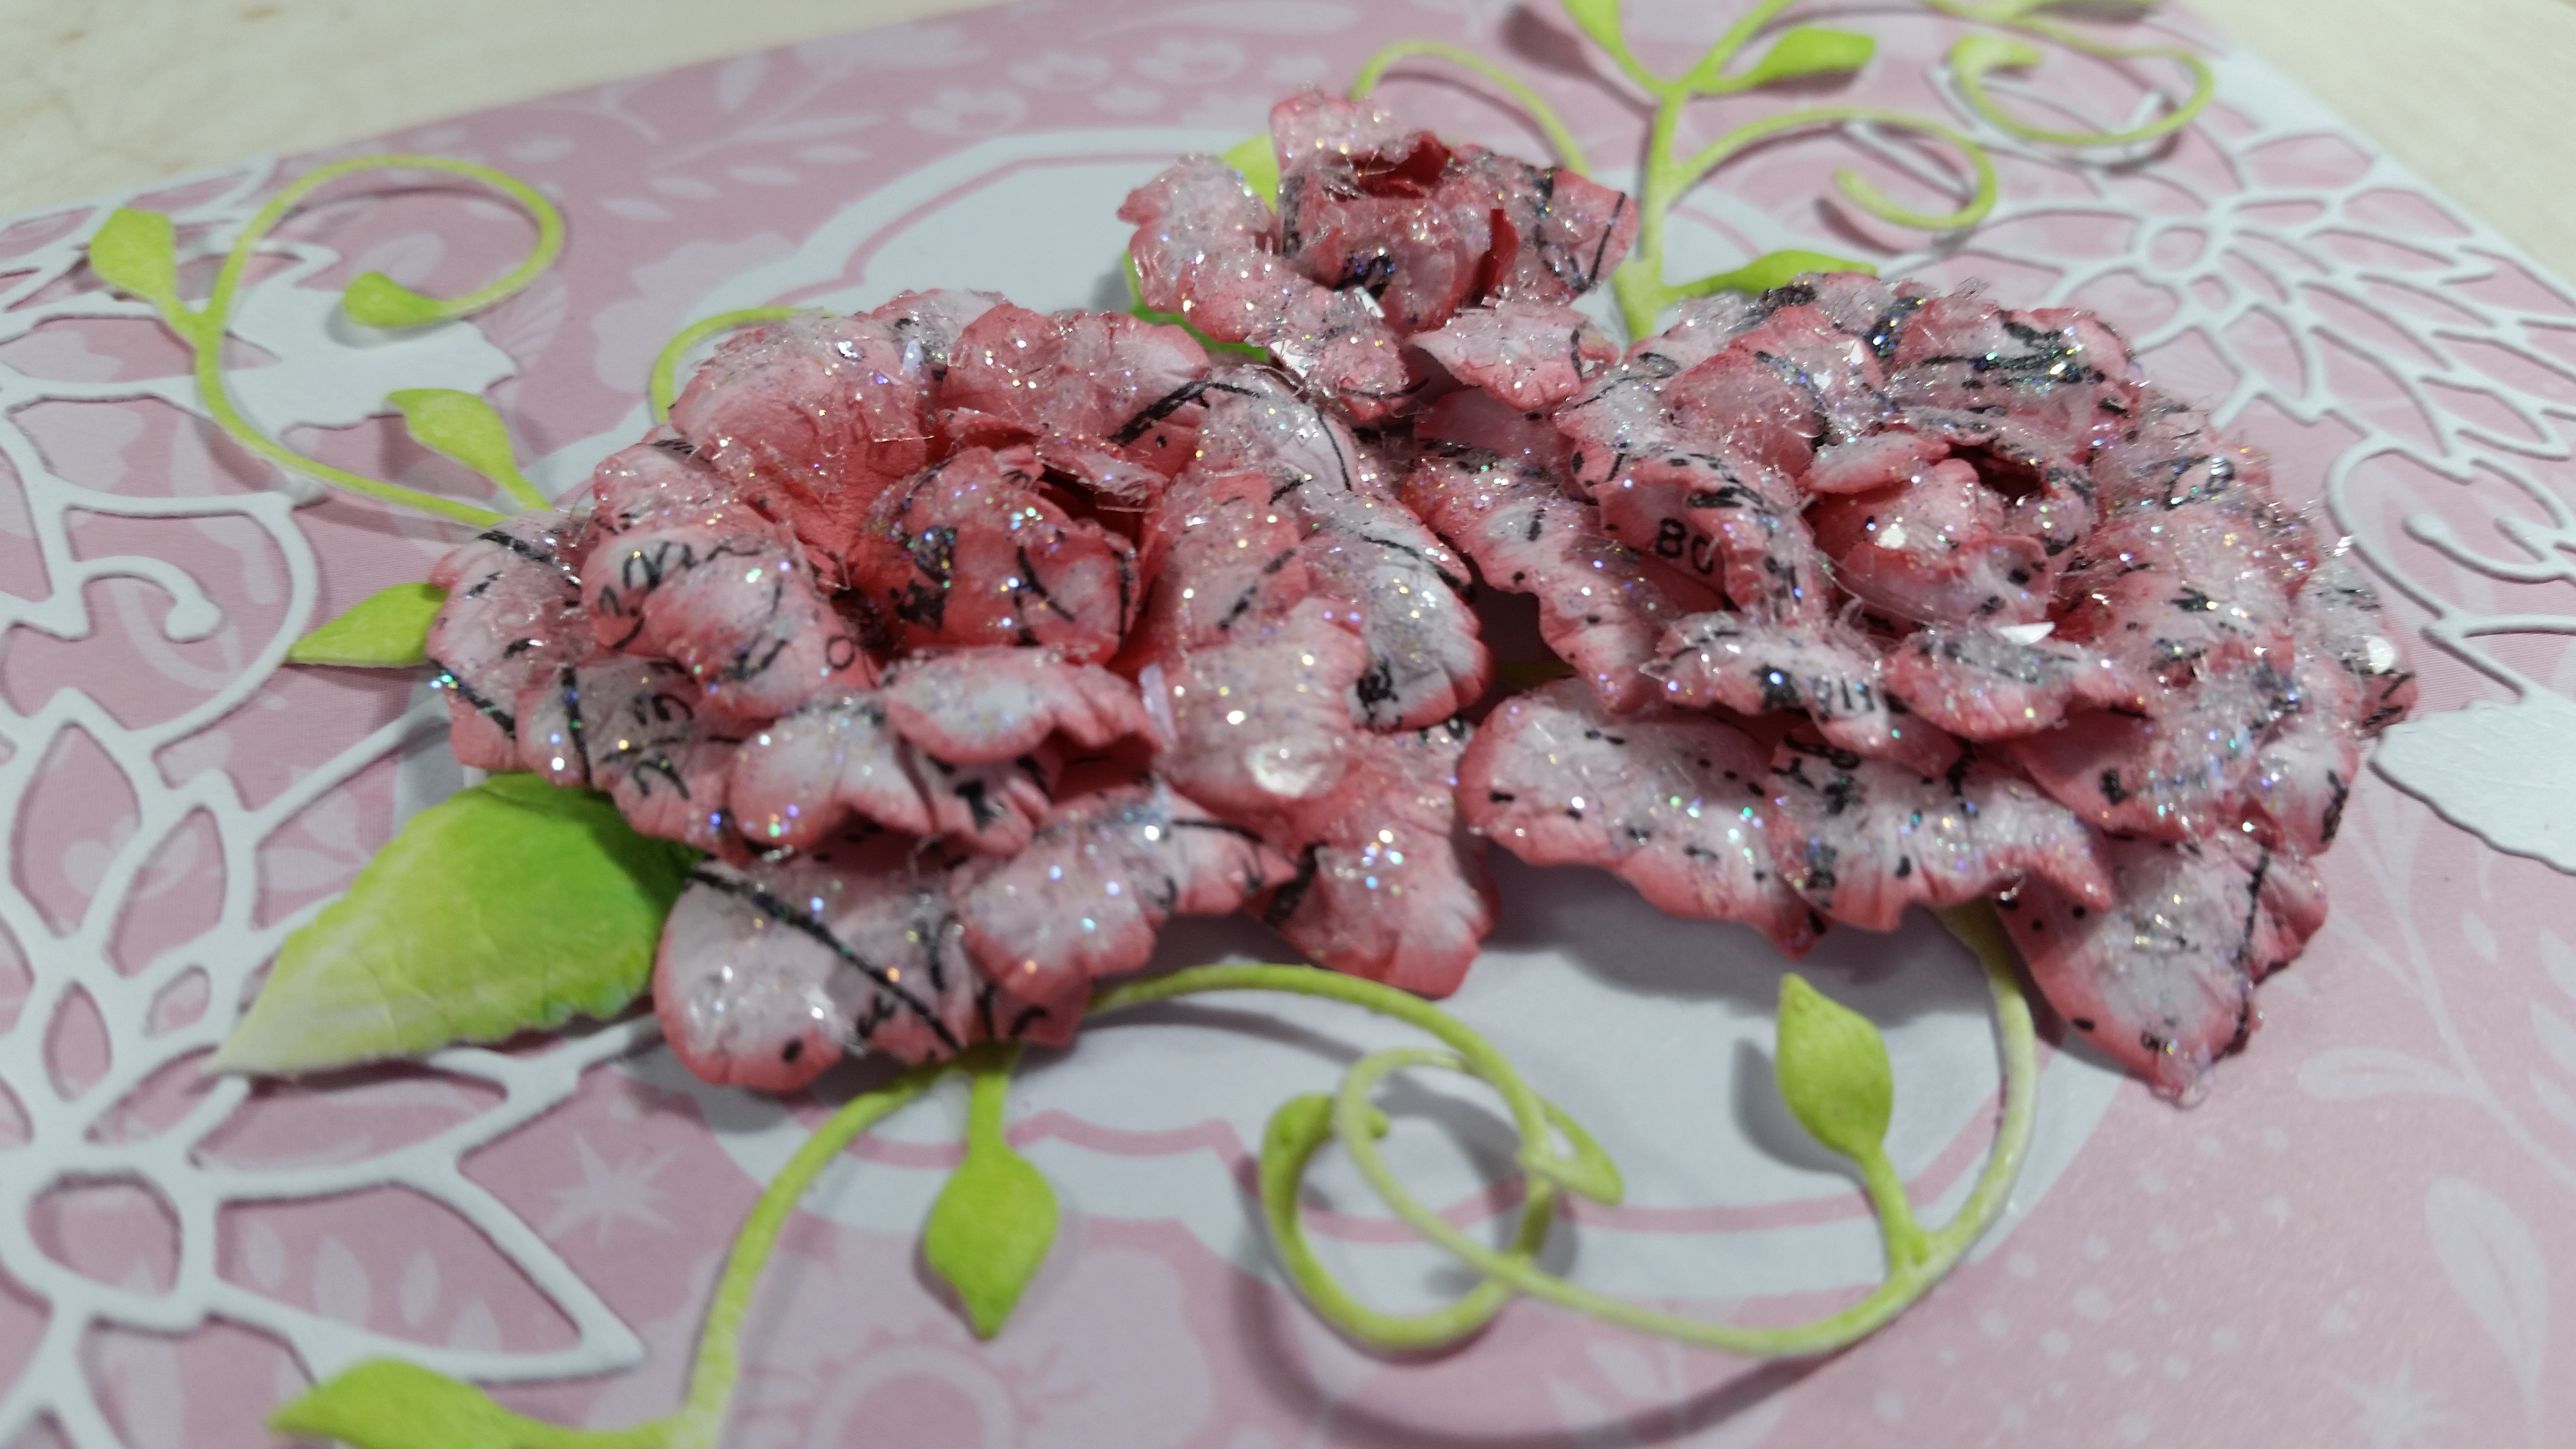
I started by stamping plain white Georgia Pacific Premium card stock with Versafine Black Ink and an old (from 2013) Heidi Swapp Script Background Stamp. Then I used the flower dies to cut out various sizes of flowers. I inked them with Tim Holtz Distress Ink in Spun Sugar and Worn Lipstick and then shaped them using a Spellbinders Tool ‘n One with the Embossing Stylus Tips on top of 2 stacked mouse pads (they have the perfect amount of give and resistance). To add that all-important shimmer and sparkle I sketched on Art Glitter Glue with a fine tip nozzle and sprinkled extra fine iridescent glitter. Then I sketched on another layer of Art Glitter Glue and sprinkled on Diamond Dust (which is actually super thin shards of real glass).
 To add some interest and fullness, I also cut out the flourish and leaves dies from white card stock and inked them with Tim Holtz Twisted Citron and an old American Crafts ink in green. I clustered the flourishes, leaves and roses together in the center of a card base from a Michaels Hot Buy card base and envelopes package called “Uptown Chic” (60 cards and envelopes for $5 – now that’s a deal!).
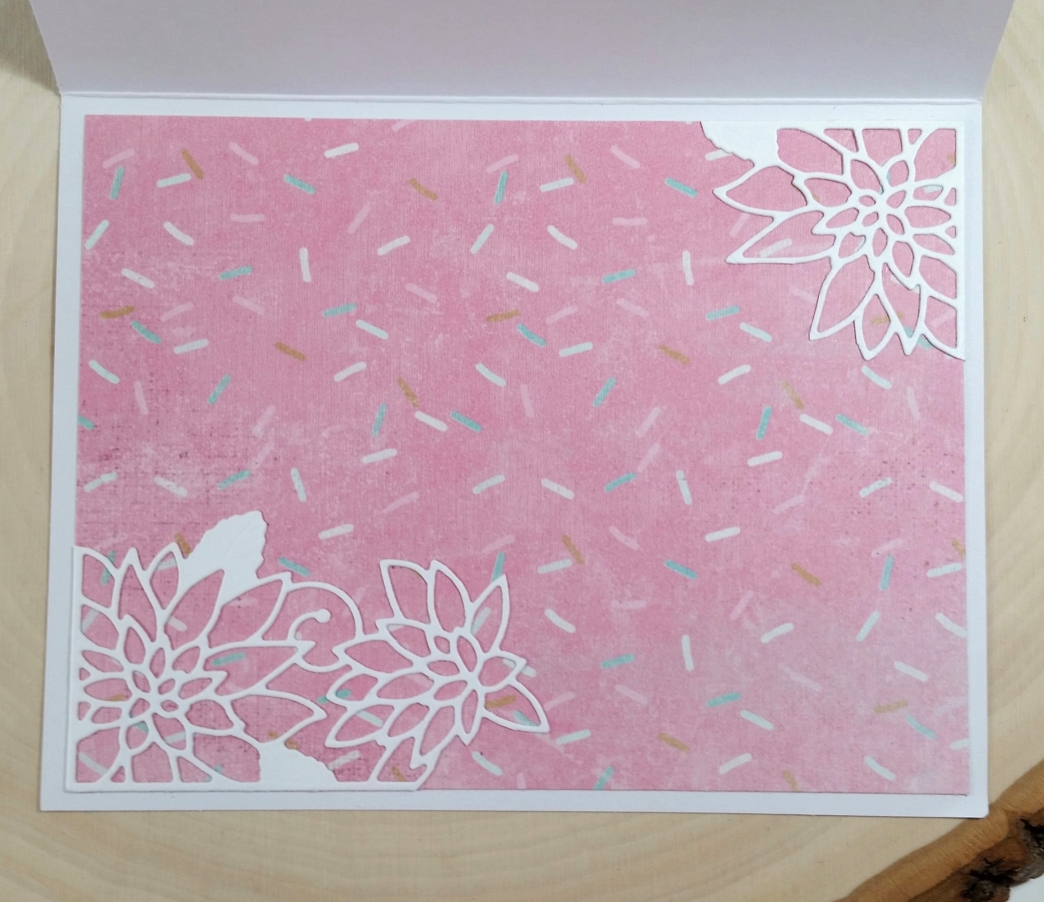
To give a more finished look to the card, I also die cut a couple of Memory Box Chrysanthemum Corner Dies and glued them onto the upper left and lower right corners of the card front. I used an Authentique “Sweetness” collection sprinkles patterned paper scrap to the inside of the card as a card liner and added a couple more of the chrysanthemum corner dies as accents.
The following is a process video of how to make these paper roses:
This card is being entered into the following challenges:
Simon Says Stamp Work It Wednesday Add Sparkle! Challenge
Simon Says Stamp Monday Get In Shape Challenge
Word Art Wednesday Anything Goes Challenge – WINNER
Lil Patch of Crafty Friends Anything Goes Challenge
Fab ‘n’ Funky Patterned Paper Challenge
Through the Craft Room Door Anything Goes Challenge
613 Avenue Create Anything Goes with Optional Monochrome Challenge
Creatalicious Anything Goes with Optional Summer Challenge
Not Just Cards Anything Goes Challenge
]]>