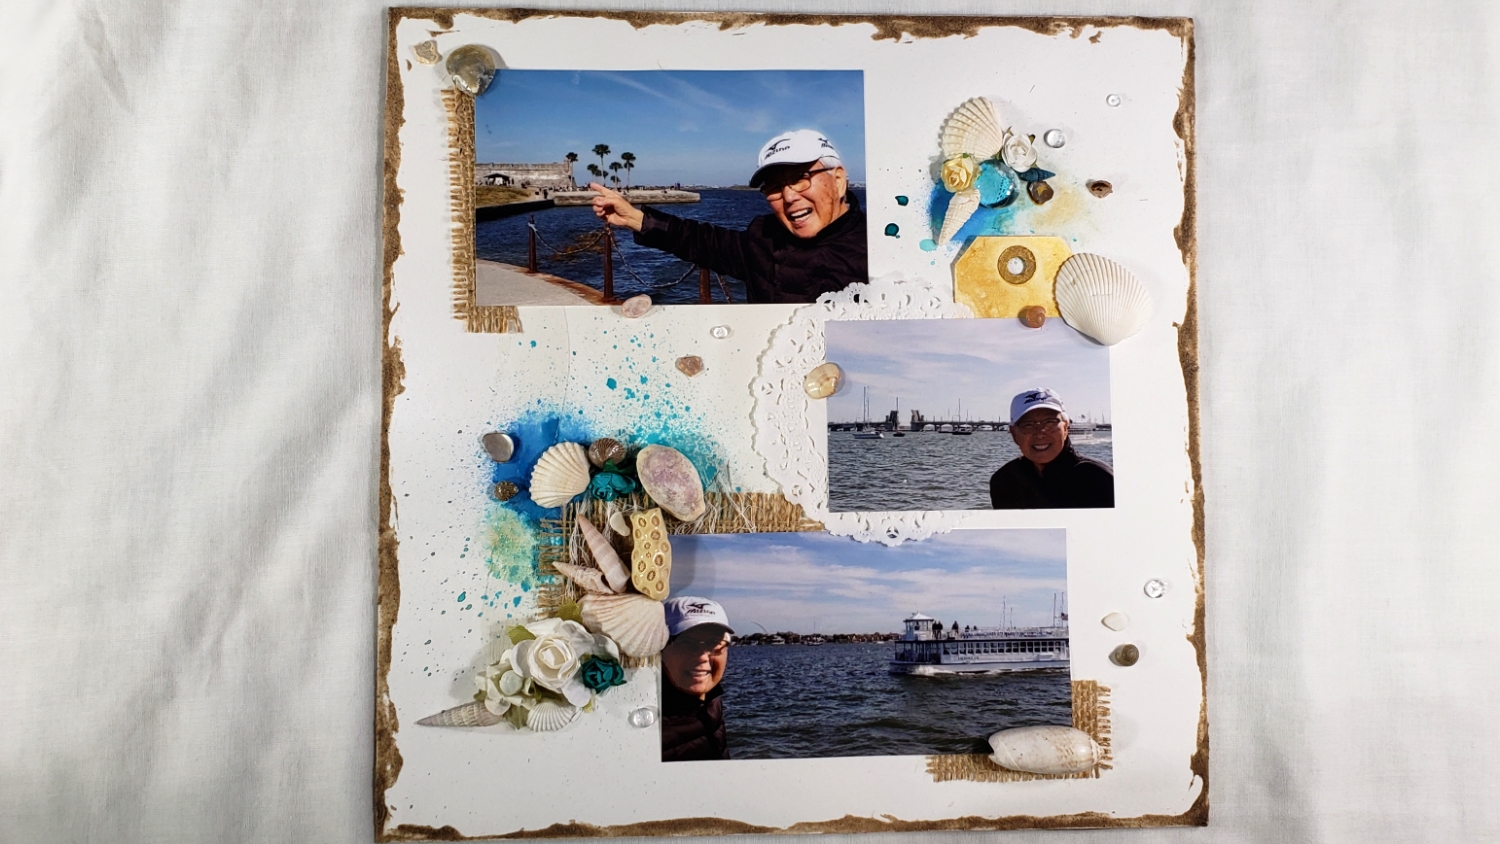
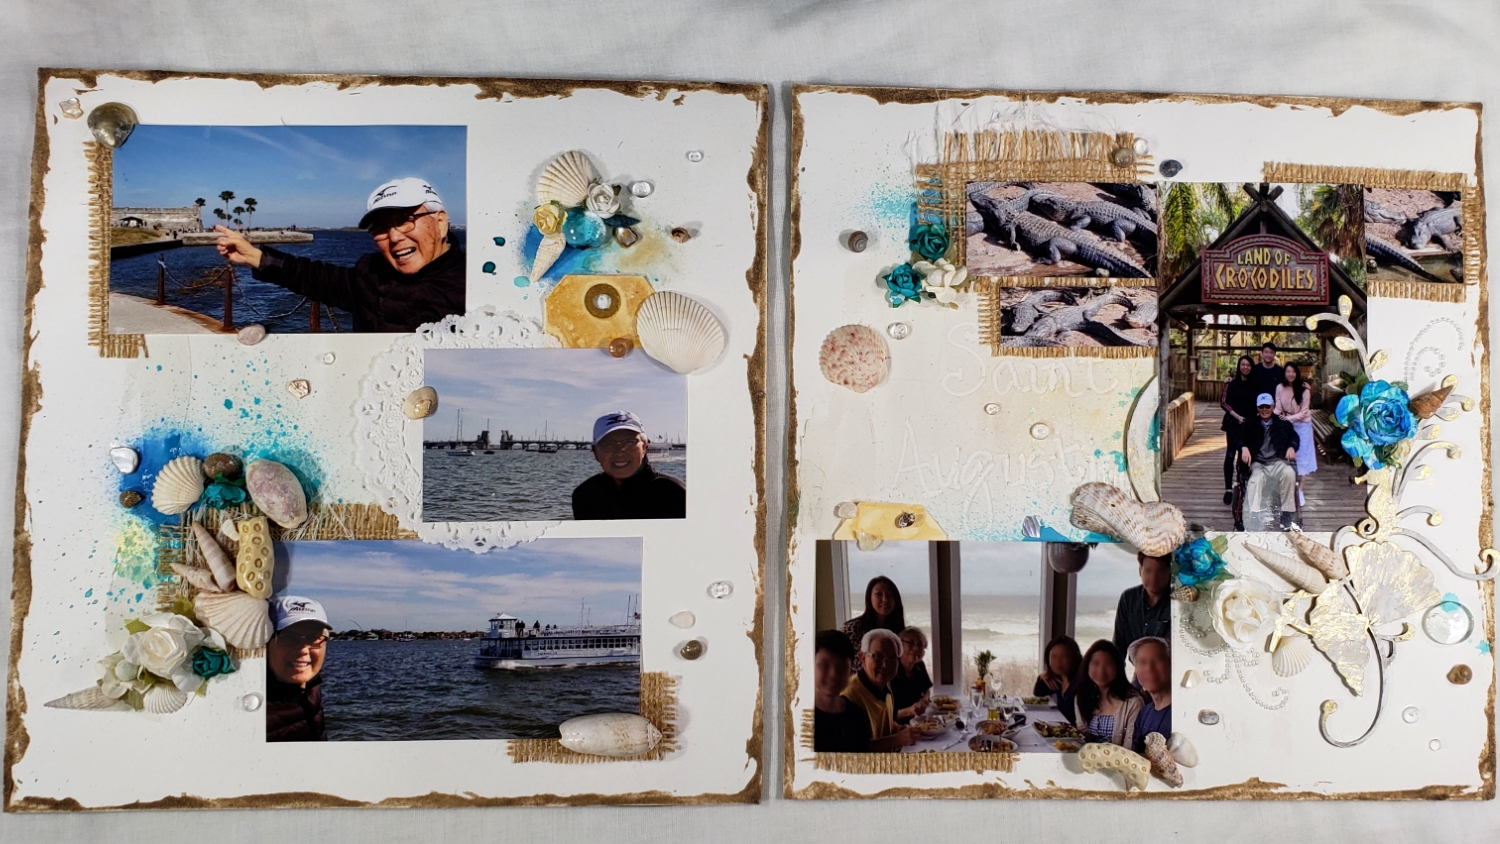
The bases are Canson XL Series Watercolor Textured Paper, which is incredibly robust and perfect for mixed media. The edges were distressed with new-to-me Art Anthology Mud Texture Paste. Then for the background texture, especially visible where I hand wrote “Saint Augustine” with the back end of a paintbrush, I used Art Anthology Sandstone Stone Effects. For the chip board pieces, I used Liquitex Gesso to soften the look and then rubbed on with my fingers some Art Anthology Gold Metal Effects to add a shimmer.
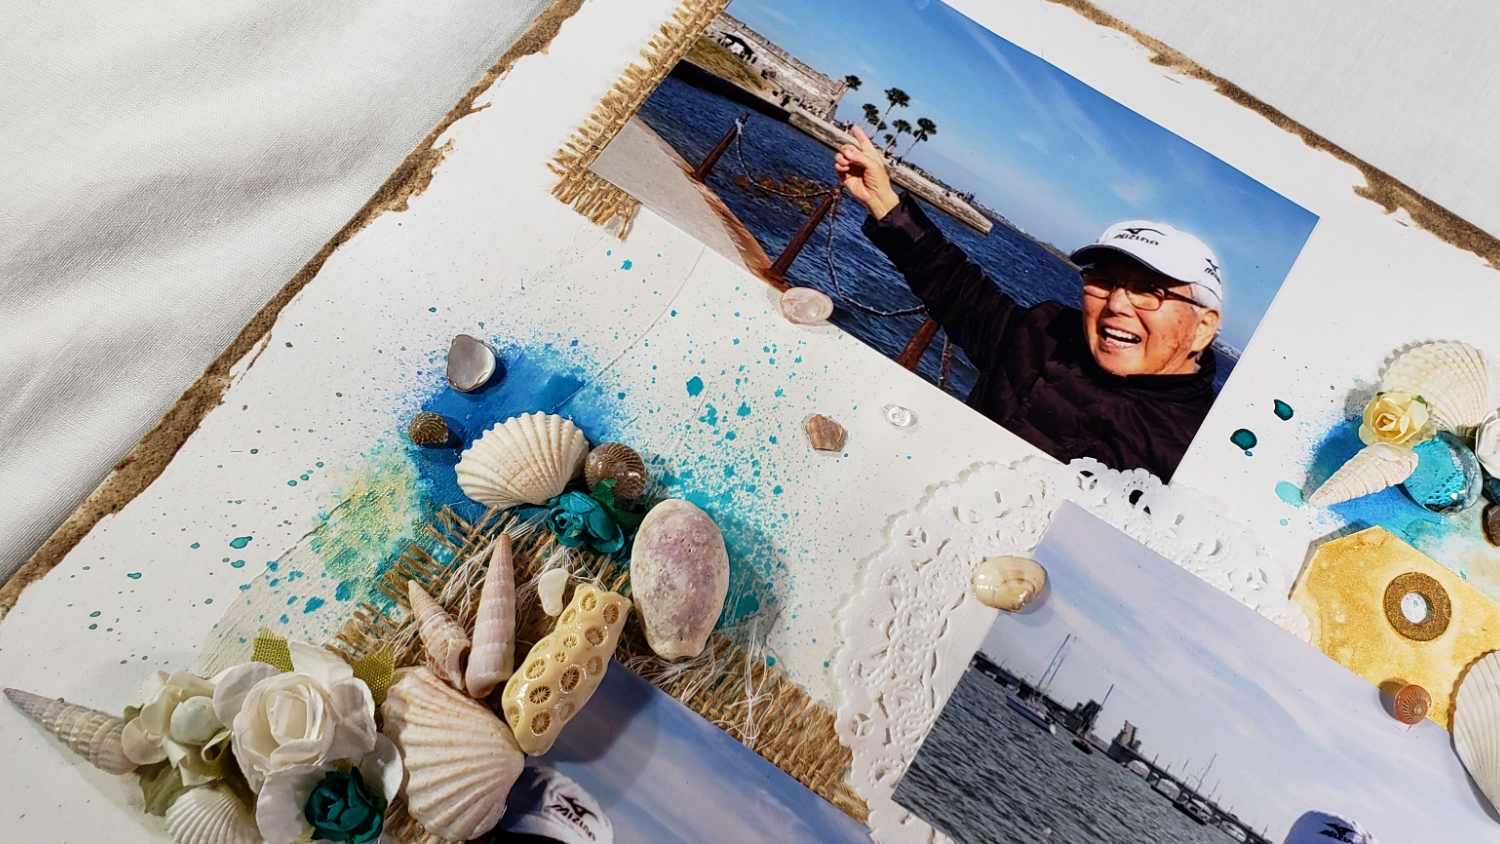
The other background elements to add texture, interest, warmth, and sea-worn look, I used gauze cheesecloth fibers, burlap (with the ends frayed), white flowers sprayed aqua with Art Anthology Siesta Key Spray, seashells, coral, paper doilies, pearl sticker gems, Heidi Swapp Gold Color Shine sprayed manila tags, and clear Pretty Pink Posh 4mm droplets and 6mm droplets.
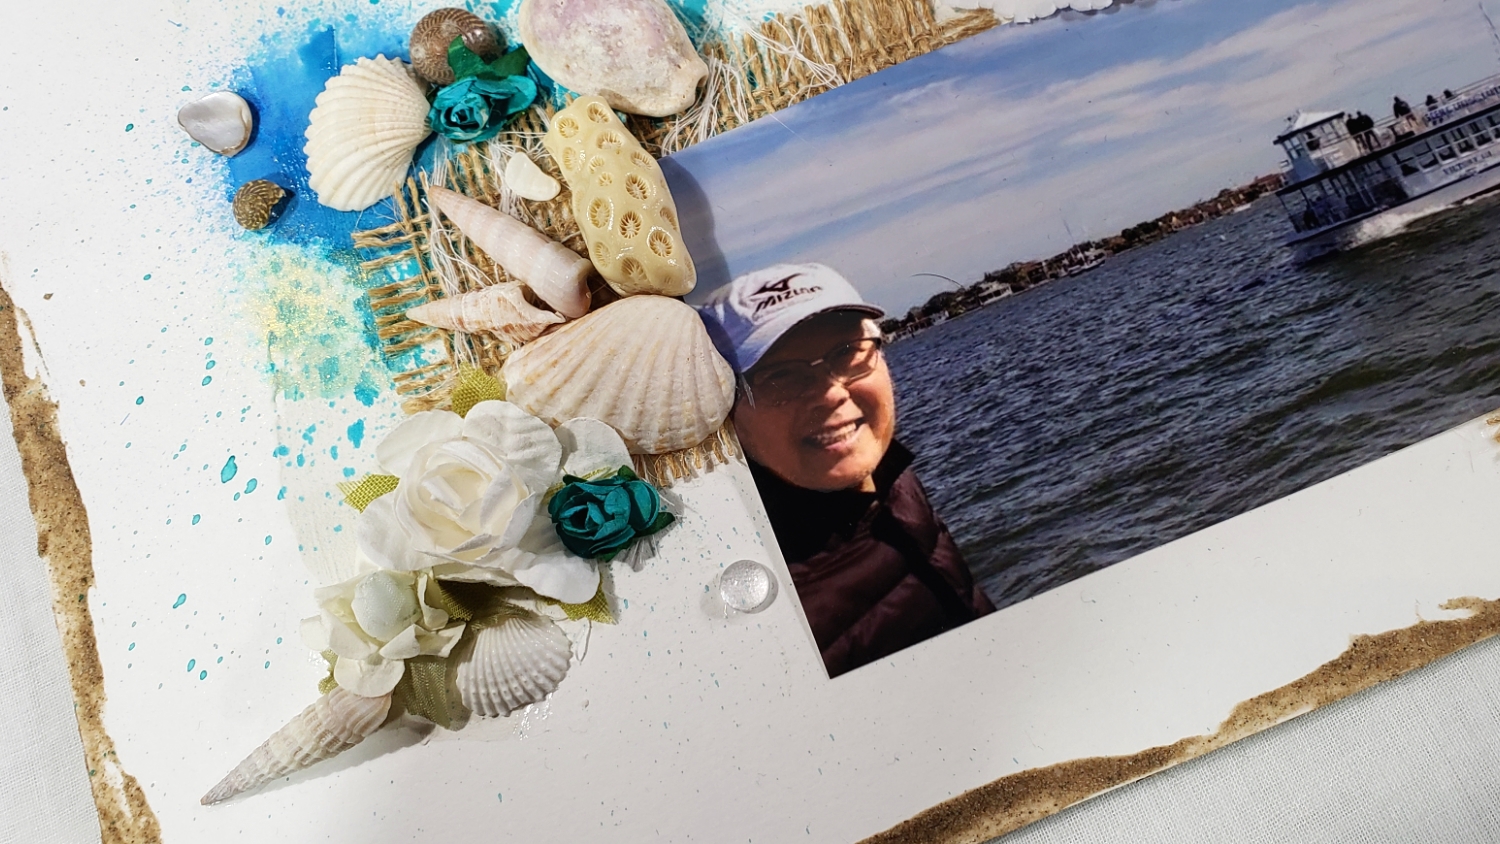
Then it was a matter of finding the pictures from our vacation that I thought would be fun to feature on the layouts. As these are going to be gifts for my dad I used 3 pictures of my dad at the St. Augustine down town area by the water, bridge and Castillo de San Marcos. For the second half of the spread, I used our family Christmas lunch picture (this was the only picture that had our whole family in it! – we were really bad about taking pictures), and a picture of my dad, me and my niece and nephew at the famous St. Augustine Alligator Farm.
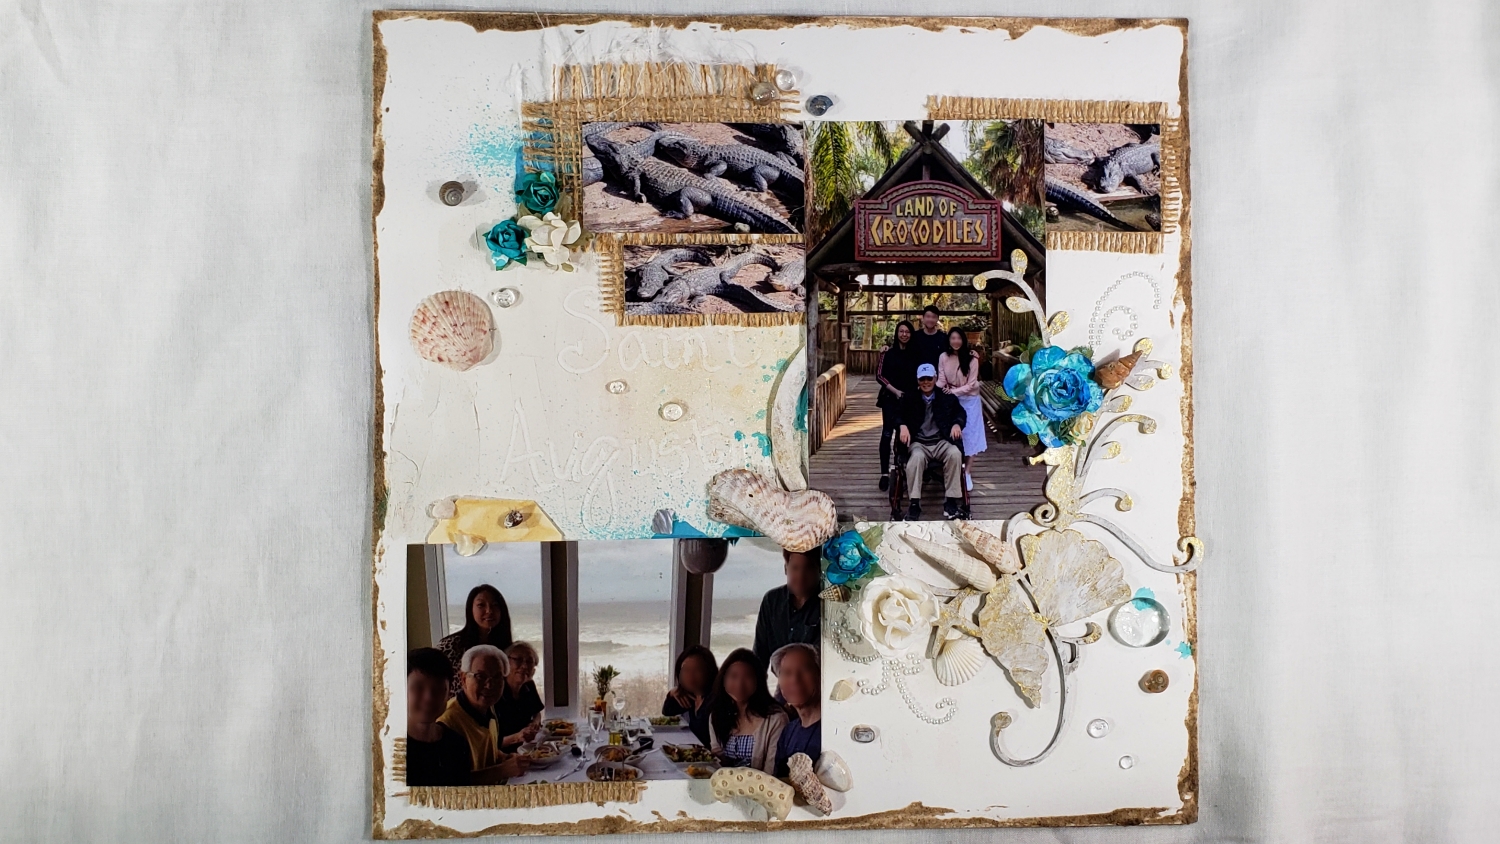
To secure everything in place I used E6000 Glue (for permanent hold) and my Adtech hot glue gun (for quick placement, while the E6000 cures). Due to the very textured nature of many of the embellishments, many other wet glues would be less secure and not suitable. To make the layouts into display pieces, I also backed them with scrap cardboard (watch video for details). All these mixed media techniques are something relatively new to me, but I love the final results, and I think my dad will love these layouts as a keepsake gift!
CLICK on the following picture to watch the quick share and how to make these layouts displayable pieces (there is also a quick share of a shadowbox gift idea that I’ll describe in more detail on my next post):
Disclosure: Many of the supplies I’ve used for today’s project are linked. Some may be affiliate links, which means if you make a purchase I receive a small commission at no extra cost to you. I truly appreciate your support toward the costs of running this blog!
These layouts are being entered into the following challenges:
Simon Says Stamp Wednesday Something New Challenge
Simon Says Stamp Monday Use Something New Challenge
Word Art Wednesday Anything Goes Challenge
Creatalicious Anything Goes with Optional Something New Challenge
Simon Says Stamp Work it Wednesday Try Something New Challenge
Crafter’s Castle Anything Goes with Optional Fun Technique Challenge
613 Avenue Create Anything Goes with Optional Watercoloring Challenge
Crafts Galore Encore Anything Goes Challenge
Through the Craft Room Door Anything Goes Challenge
Lil Patch of Crafty Friends Anything Goes Challenge
]]>
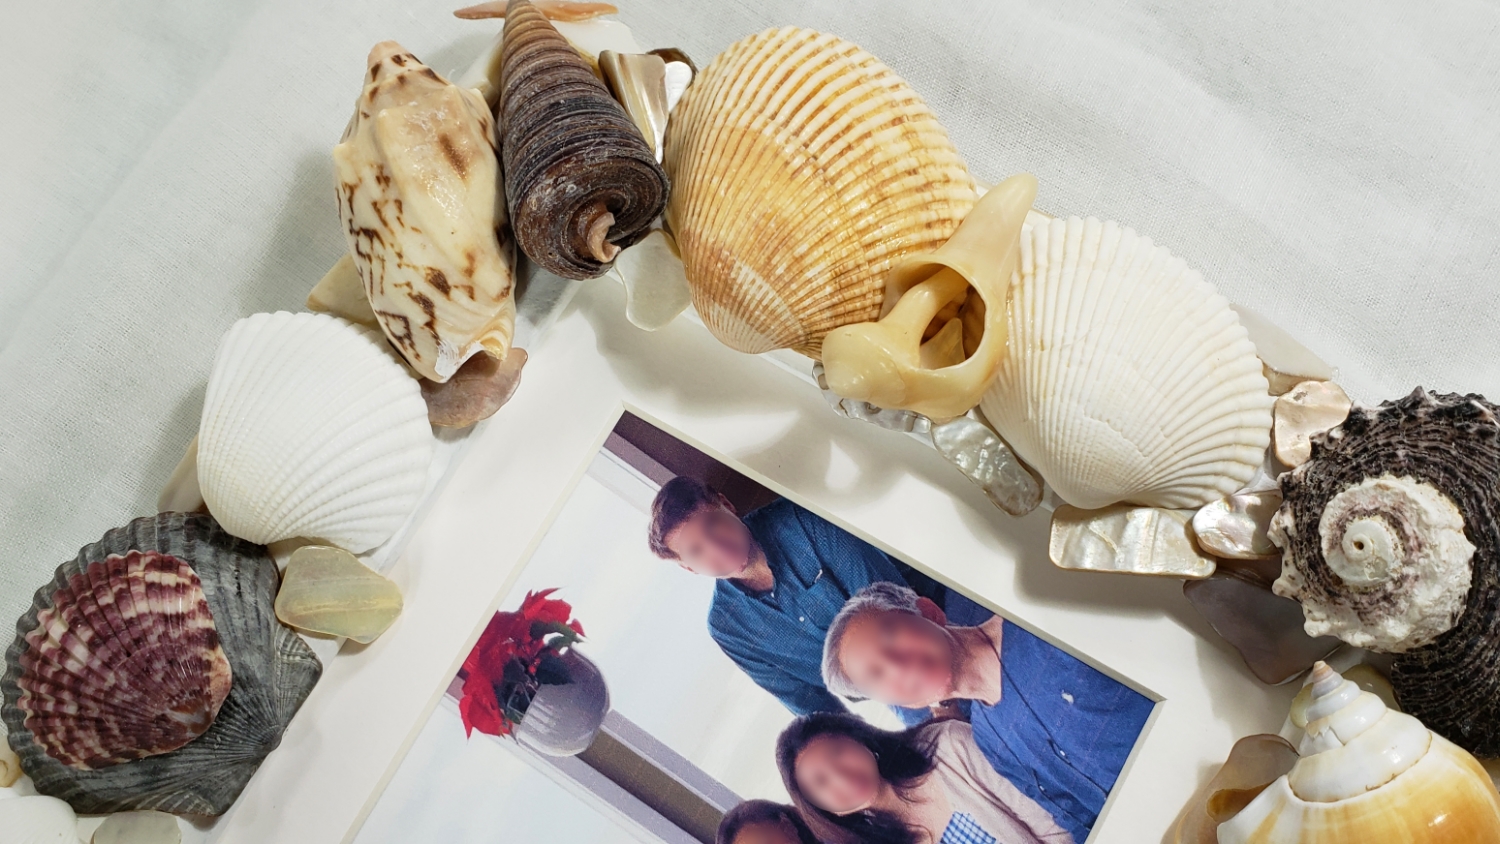
From our many walks along the beach, we picked up lots of beautiful seashells, and when I got home I knew I wanted to try something new and craft a special keepsake frame with them for my parents. Using a spare IKEA frame, I prepped the base with some Liquitex Gesso and white acrylic paint. Then after spending some ridiculously long futzing time with the collected shells (and some supplemental craft shells from the Dollar Tree), I designed what I think turned out to be a wonderful, meaningful gift.
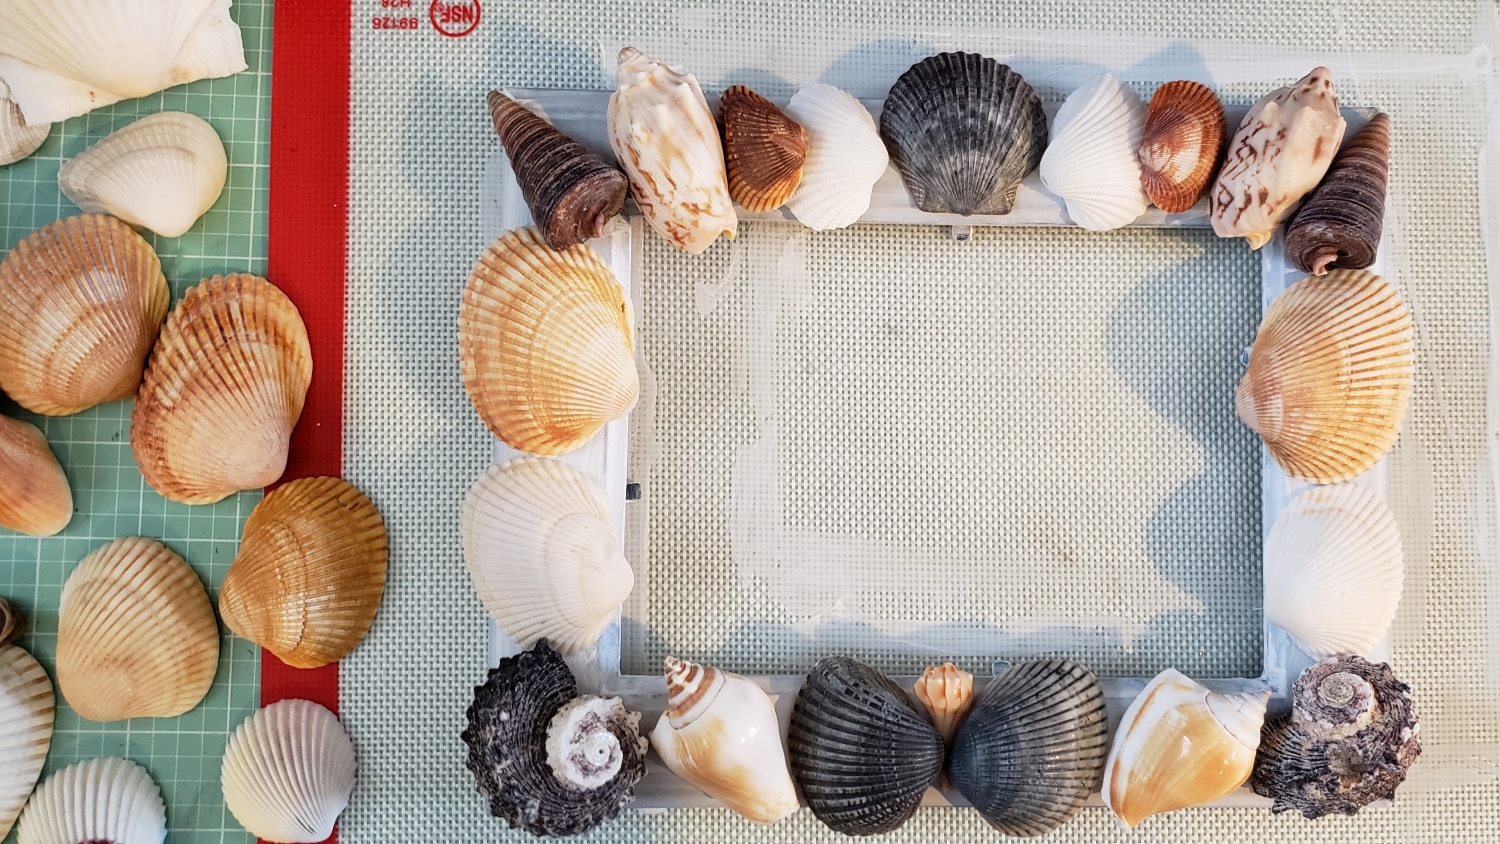
I tried various arrangements for the shells. Mostly I wanted the shells on the left and right sides of the frame to be mirror images of each other. I also wanted the biggest, roughest and dark shells in the four corners, largest on the bottom to visually weight the frame properly. Finally, I added a few unique shells from our beach combing adventures into prominent positions on the frame without regard for symmetry to highlight these special shells (each one has a little discovery story). When I was satisfied with the look, I used E6000 glue (this stuff is super strong but takes 24 hours to fully cure) to secure each piece in place.
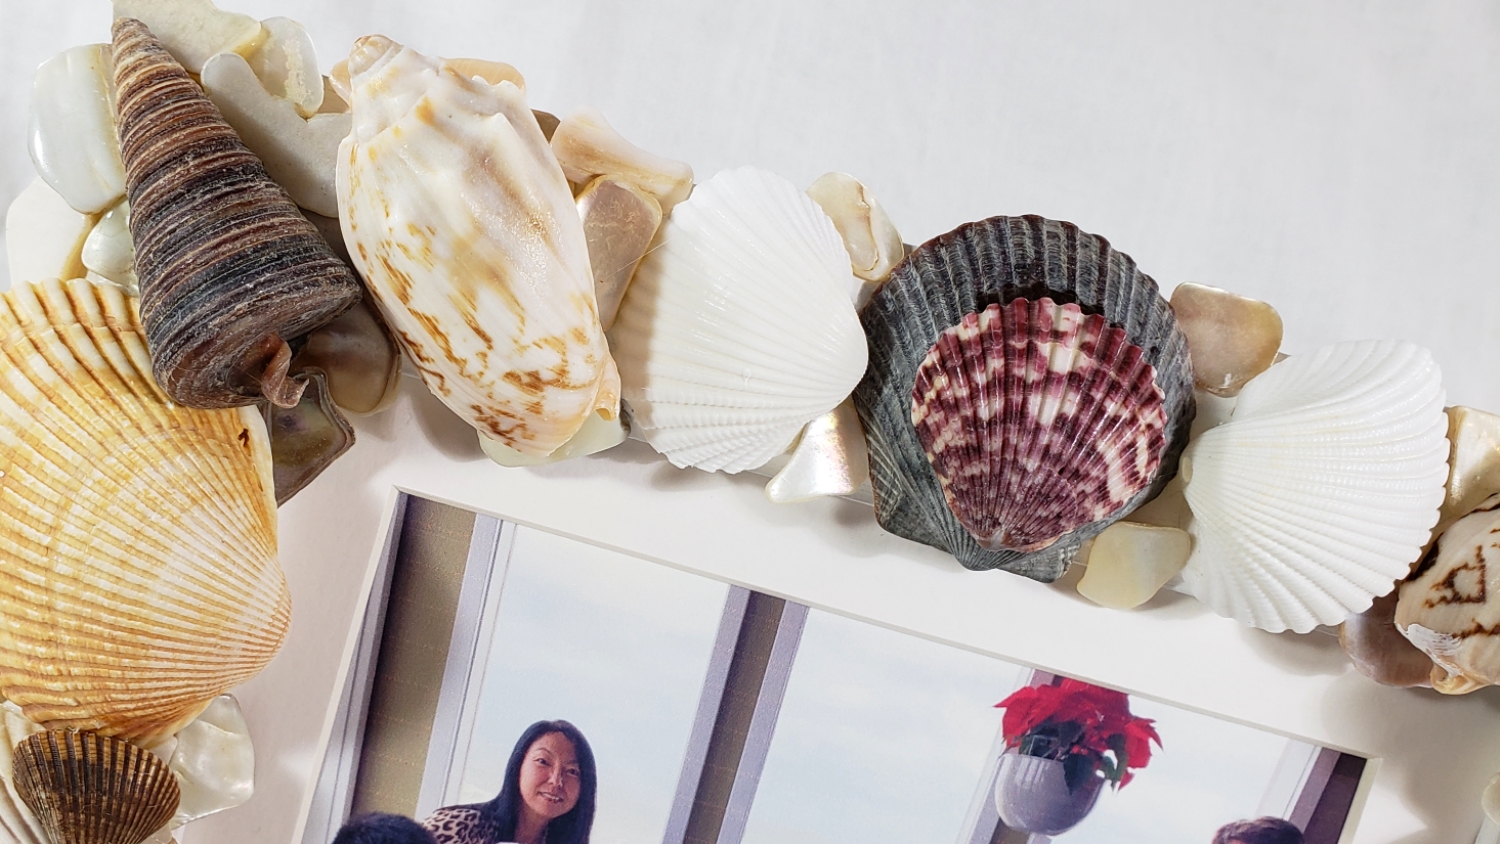
Then to fill in the gaps between the shells, I used crushed pearlized shell pieces that are sold as vase fillers. The resultant very heavy, luxe and naturally elegant frame went perfectly with the family picture we took at our Christmas lunch at The Reef Restaurant. I just gifted this to my parents (today is 3 days after our return home from this vacation), and they both got teary eyed and seemed to really be moved. While this is a small, inexpensive new year’s gift, it truly comes from the heart, and their reaction showed me that it was what they wanted more than any of the extravagant gifts we gave them for Christmas.
The following is a process video of crafting this seashell frame:
This keepsake frame is being entered into the following challenges:
Simon Says Stamp Wednesday Something New Challenge
Word Art Wednesday Anything Goes Challenge
Creatalicious Anything Goes with Optional Something New Challenge
Simon Says Stamp Work it Wednesday Try Something New Challenge
Lil Patch of Crafty Friends Anything Goes Challenge
ABC Christmas Challenge – A is for Anything Christmas Goes
Through the Craft Room Door Anything Goes Challenge
Crafts Galore Encore Anything Goes Challenge
The Corrosive Challenge Anything Goes
]]>
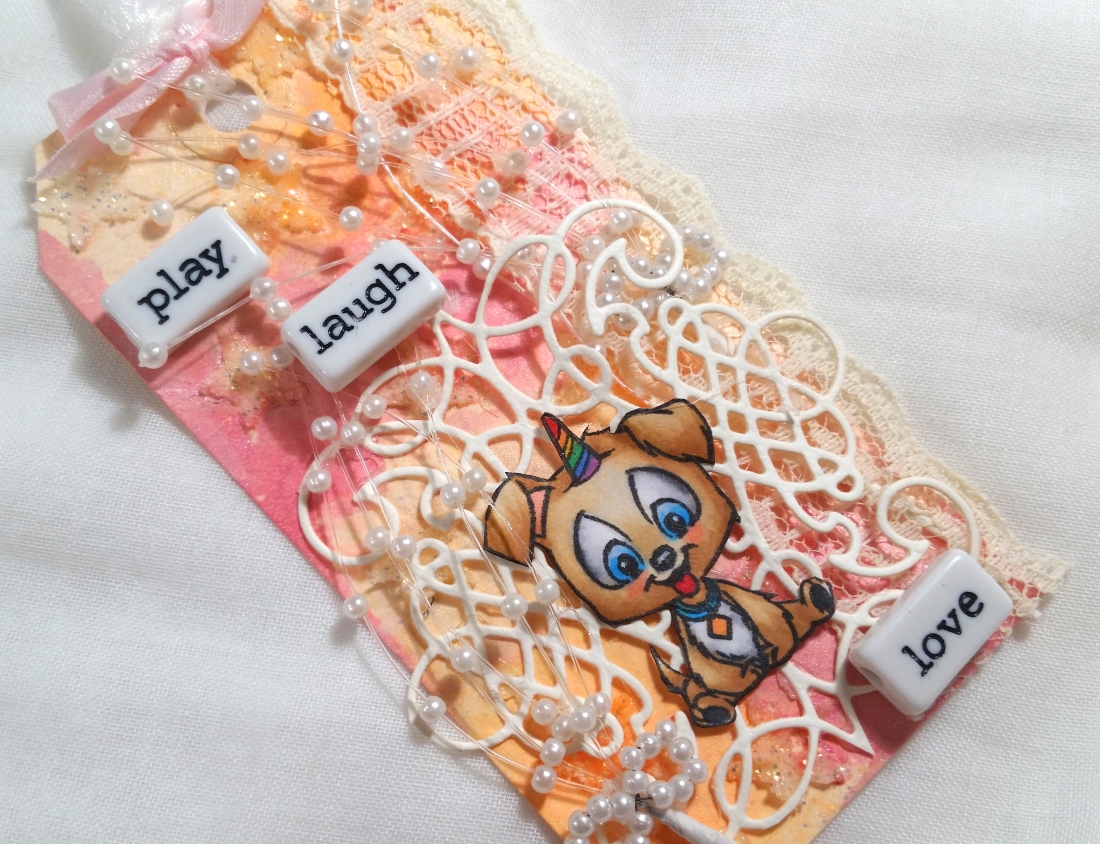
Before stamping out the puppies from the C.C. Designs “Puppy Power” stamp set (my current favorite stamp set), I wiped away a bit of the image at the top of each head so that I could draw in unicorn horns. I doodled in unicorn horns using Copic Multiliner Pens in 0.1 pt and 0.03 pt tips (the ink won’t bleed when you use Copic or other alcohol markers with these pens). Next I Copic colored the images with the following colors:
Rainbow unicorn horns: R27, YR65, Y15, G09, B04, B66 and V06 with Clear Wink of Stella for shimmer
Brown Unipup: E40, E30, E31 and E33; Gray Unipup: N0, N1 and N3
Blue eyes on unipup: B91 and B01; Blush and inside ears: R20; Paw pads: N7
Lastly I fussy cut out all the images with my favorite Fiskars spring loaded scissors and inked the edges with a Momento Tuxedo Black Marker to give them a nice finished look.
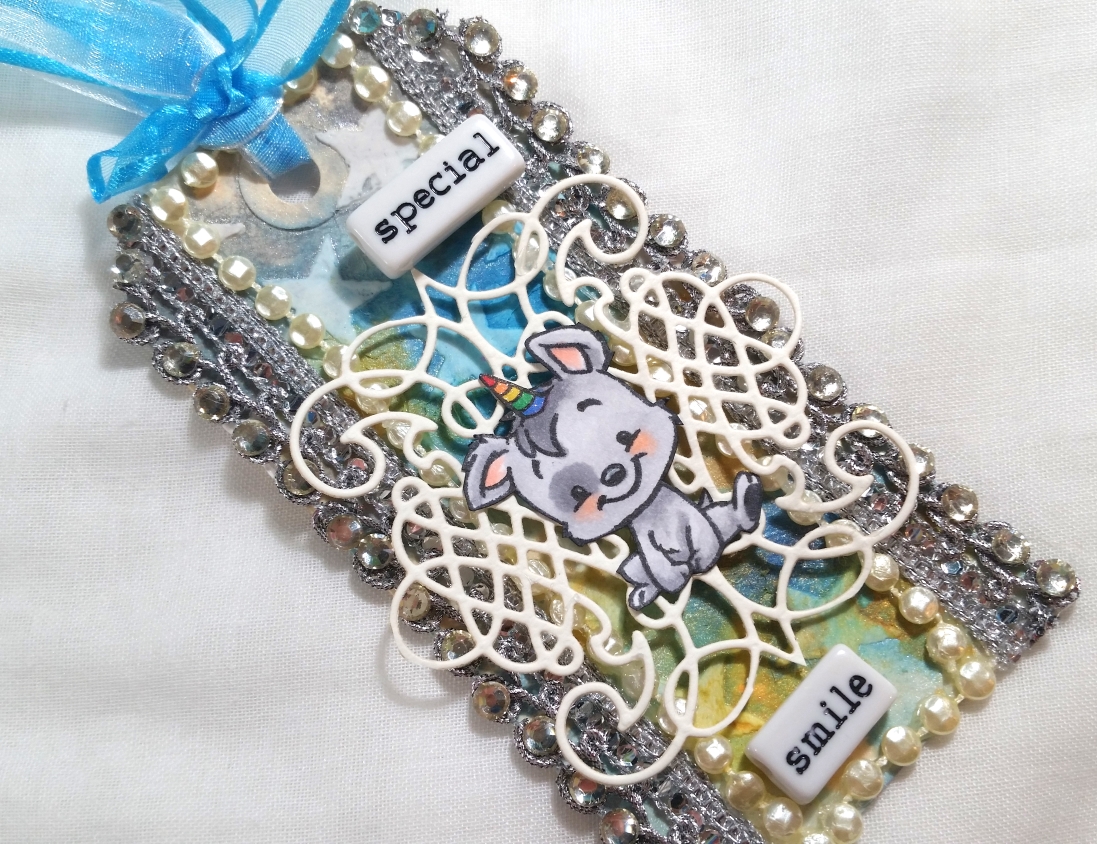
For the tag bases, I used Inkssentials Heavyweight #5 Craft Tags; stencils from Melissa Frances (Hearts Missing) and Visible Image (Stars and Stripes); and modeling pastes to create some textured backgrounds from Liquitex Professional Modeling Paste, and Martha Stewart Sparkle Texture Effect. Once dry, I had some fun with watercoloring, spraying and splattering shimmer sprays and inks from my stash: DecoArt Shimmer Mister in Turquoise; Recollections Simply Pastel in Blue Shimmer; Heidi Swapp Color Shine in Gold, Mustard, Sheer, and Primrose; and Tattered Angels in Blue Icing, Tin Can and Viva Pink. Once all the pastes and sprays were dry, I die cut some backgrounds from thick watercolor paper to add some visual separation between the tag bases and the images using a die from the Spellbinders Calligraphy Flourish Tiles Die Set from the Ooh La La Collection.

Then it was sprinkle in lots of remnant trims of laces, pearl strands, bling trim, satin ribbons, pearl sprays and organza ribbons. I hot glued embellishments in turquoise, pale pink, cream, cotton candy pink, turquoise, and silver. For finishing touches, I also used some Bead Landing Words Craft Beads to add the following phrases to each tag embellishment: “play, laugh, love;” and “special smile.”
Disclosure: Many of the supplies I’ve used for today’s project are linked. Some may be affiliate links, which means if you make a purchase I receive a small commission at no extra cost to you. I truly appreciate your support toward the costs of running this blog!
These tags are being entered into the following challenges:
Simon Says Stamp Sprinkle and Splatter Challenge
Word Art Wednesday Anything Goes Challenge
Creatalicious Anything Goes with Optional No Square or Rectangle Cards Challenge
Simon Says Stamp Work it Wednesday Watercolor Challenge
Lil Patch of Crafty Friends Anything Goes Challenge
613 Avenue Create Anything Goes with Optional Magic/Fantasy Challenge
Penny Black and More Add Something Beginning with B – beads, bling, blue, and bows
Crafty Gals Corner Add a Ribbon or a Bow Challenge
Stamping Sensations Favorite Stamp Challenge
 I admit that to create this Mother’s Day card, I stamped enough layered orchids to fill 3 full cards (there was stamp dropping, smeared stamping, misaligned stamping, etc.), but in the end, I think this final card came out beautifully.
I designed the card with the idea of a full floral garden bouquet with 4 orchid stems visible on the card. I used Altenew Crisp Inks from the “Floral 6 Mini Cube Ink Set” that includes: Ruby, Red Coral Berry, Frosty Pink, Frayed Leaf, Forest Glades and Jet Black (I didn’t use the black). I first stamped the outline of each bloom with the Red Coral Berry, then I stamped the solid bloom with Frosty Pink. Then I went back in with the Red Coral Berry for the flower veins and lastly I stamped the stamens with Ruby.
I next masked the flowers to stamp out the stems to connect them. I also added some additional stem tips so that I could add more buds for an even more lush look. Lastly I added the small and medium buds to the tips of the stems. Adding the buds AFTER stamping the stems was much easier than trying to match the stems to pre-stamped buds (ask me how I know…LOL).
 I heat embossed the sentiments, which translate to “Love You” and “Make Today Another Great Day” with VersaMark Ink and Ranger Black Embossing Powder in the upper left corner. Once the crisp sentiment was embossed, the flowers I had stamped looked a little fuzzy and messy by comparison.
However, rather than discard this card, I took the flowers from another failed card front (where my stamping had been crisper and better aligned but where I had dropped an inked bud stamp) and fussy cut them out with my favorite Fiskars Spring Loaded Scissors to add over top of many of the flowers on the card front with some foam adhesive dots. Oh yes, now the card had dimension and more detail. Sometimes the best ideas come from trying to cover mistakes or use up scraps. 🙂
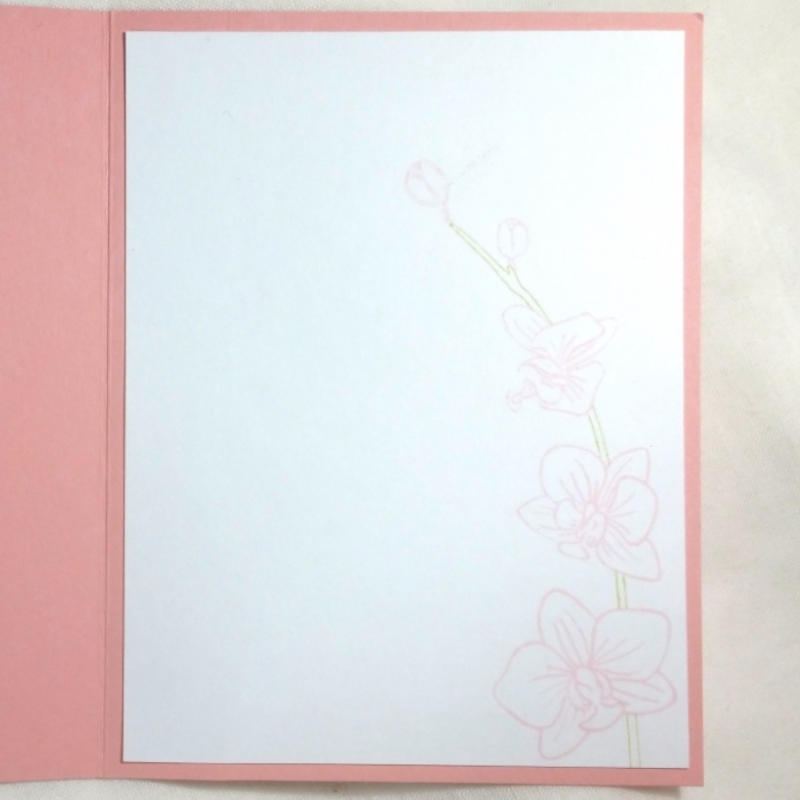
For the inside of the card, I stamped out another orchid stem. But for a lighter look (almost like second generation stamping), I only used the outline stamps for the orchid blooms and stem with the lighter ink colors. As a finishing touch, reminiscent of the Korean signature seals of old, I stamped the “handmade” stamp on the back of the card.
The following is a process video of this card:
This floral card is being entered into the following challenges:
Crafty Gals Corner Add a Flower Challenge
Penny Black and More Anything Goes Challenge
Word Art Wednesday Anything Goes Challenge
Creatalicious Anything Goes with Optional Add a Sentiment Challenge
Simon Says Stamp Work It Wednesday Mothers Challenge
Fab ‘n’ Funky Garden or Outdoors Challenge – WINNER
Lil Patch of Crafty Friends Anything Goes Challenge
Through the Craft Room Door Anything Goes Challenge
Crafts Galore Encore Anything Goes Challenge
Stamping Sensations Close to Nature Challenge
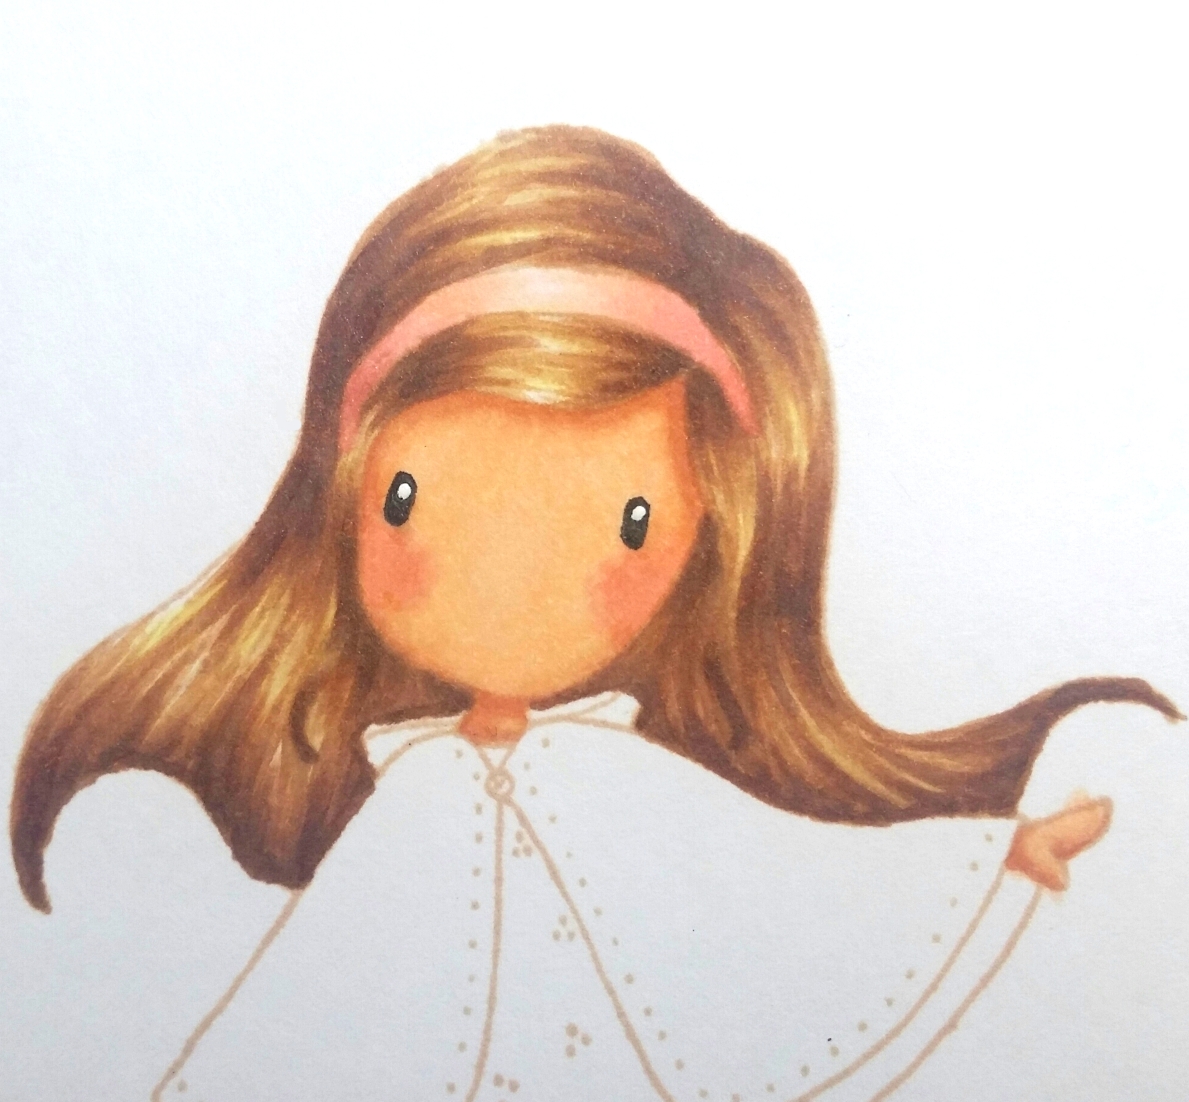 For the card front background I also dug into my stash and used a pretty pattern paper with hearts, flowers and birds from the “Pastels & Whites” paper stack by Craft Sensations (I took my Copic color cues from this paper). Rather than have the little girl just floating on the sea of pattern, I decided to use a Pretty Pink Posh Scallop Frame die with white card stock to create a frame. I wanted to ground the little girl so I found a scrap of patterned note paper in a shabby chic green with cream colored script that I cut with a Lawn Fawn Stitched Hillside die. I was going to just inset that hill into the frame, but I thought it might be nice to soften all of these patterns behind the little girl so she could remain the focal point without a lot of distracting pattern behind her. So I layered a piece of vellum paper behind the frame and over top of the hill and center of the background paper, and this softened the patterns nicely while still keeping them visible.
I stamped the main focal point Gorjuss Girl image with Momento Desert Sand Ink (my favorite ink for no line Copic coloring). Then I colored her up with the following Copic colors:
Skin: E000, E00, E01, E21, E11 and R20
Hair: Y11, E31, E33, E23, E25 and 0.3 pt Copic Multiliner Pen in Warm Gray for fine details (I think this was key to the final look)
Pink of headband, dress and tights: R30 and R32
Cape: YG01, YG13, YG03 and YG25
 Underskirt and gray of tights: W0, W1, W3 and White Prismacolor Colored Pencil
I also emphasized the black of her eyes with a 0.03 pt Copic Multiliner Pen in Black and added highlights to her eyes and dot details to her dress with a Uniball Signo White Gel Pen.
Lastly, I decided the little girl could be traipsing through a meadow to deliver a box of Valentines chocolates so I dug up this cute conversation heart stamp from an old Recollections Valentines set that also had never seen ink. I inked it up with Tim Holtz Distress Oxide Ink in Worn Lipstick for a soft pinky peachy look that I thought matched the colors in the background paper and the colors I’d used to color up the girl’s dress. I tucked the heart into her left hand (notice how her thumb overlaps the front while the rest of her hand is behind) before popping up the entire fussy cut girl on double sided foam adhesive for a little added interest and dimension.
Disclosure: Many of the supplies I’ve used for today’s project are linked. Some may be affiliate links, which means if you make a purchase I receive a small commission at no extra cost to you. I truly appreciate your support toward the costs of running this blog!
The following is a quick card share video:
This card is being entered into the following challenges:
Art Impressions Sweet Treats Challenge – box of chocolates she’s delivering. 🙂
Penny Black and More Love, Hearts and Flowers Challenge
Simon Says Stamp Monday Take Note Challenge
Simon Says Stamp Wednesday It Must Be Love Challenge
Word Art Wednesday Anything Goes Challenge
Creatalicious Anything Goes With Optional Love/Anniversary/Thinking of You Challenge
Through the Craft Room Door Anything Goes Challenge
Lil Patch of Crafty Friends Anything Goes Challenge
613 Avenue Create Anything Goes with Optional Love Challenge
]]>
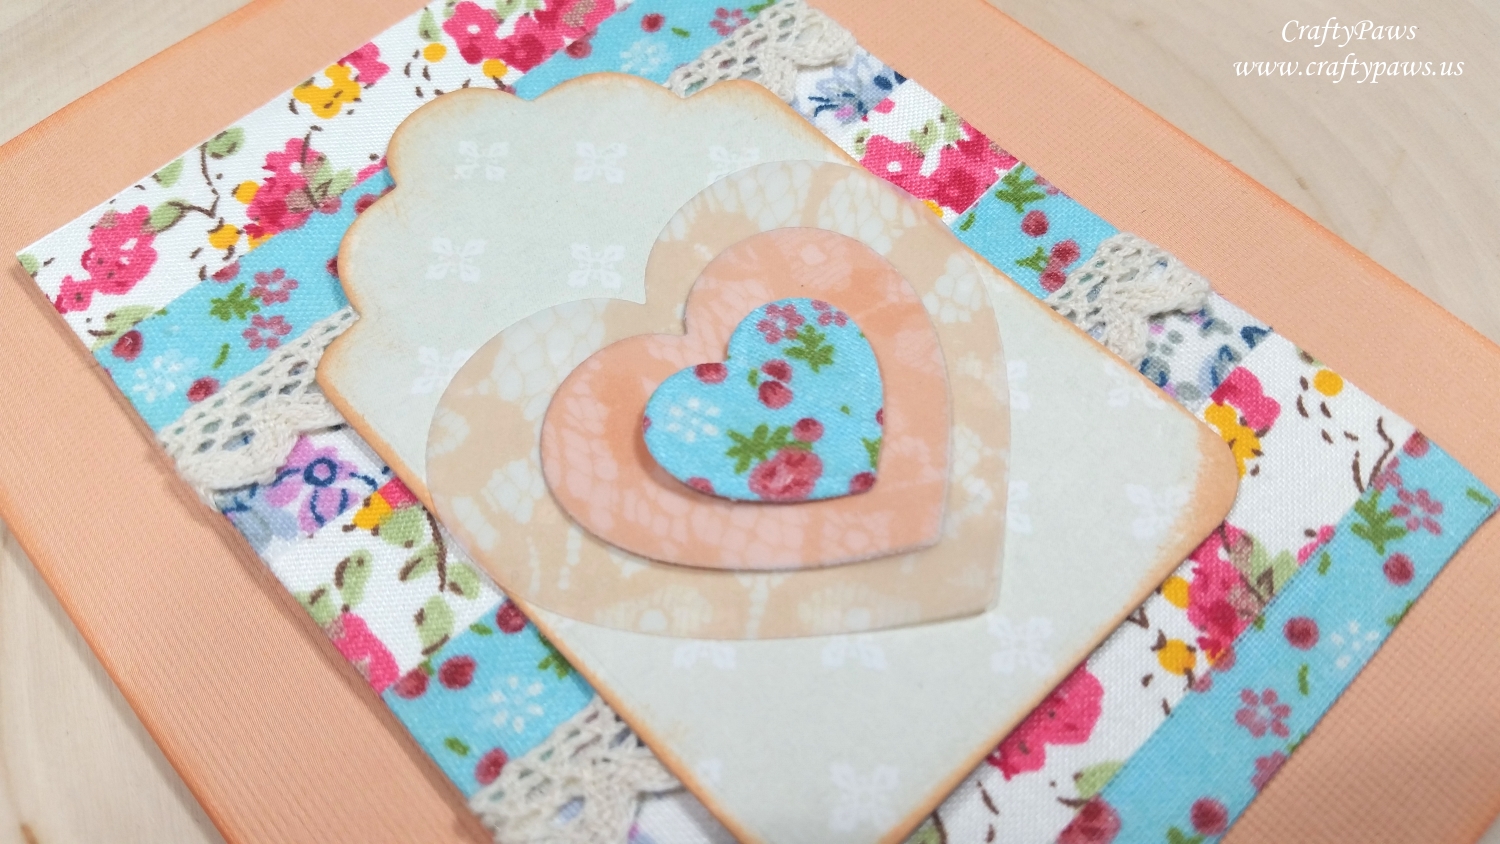
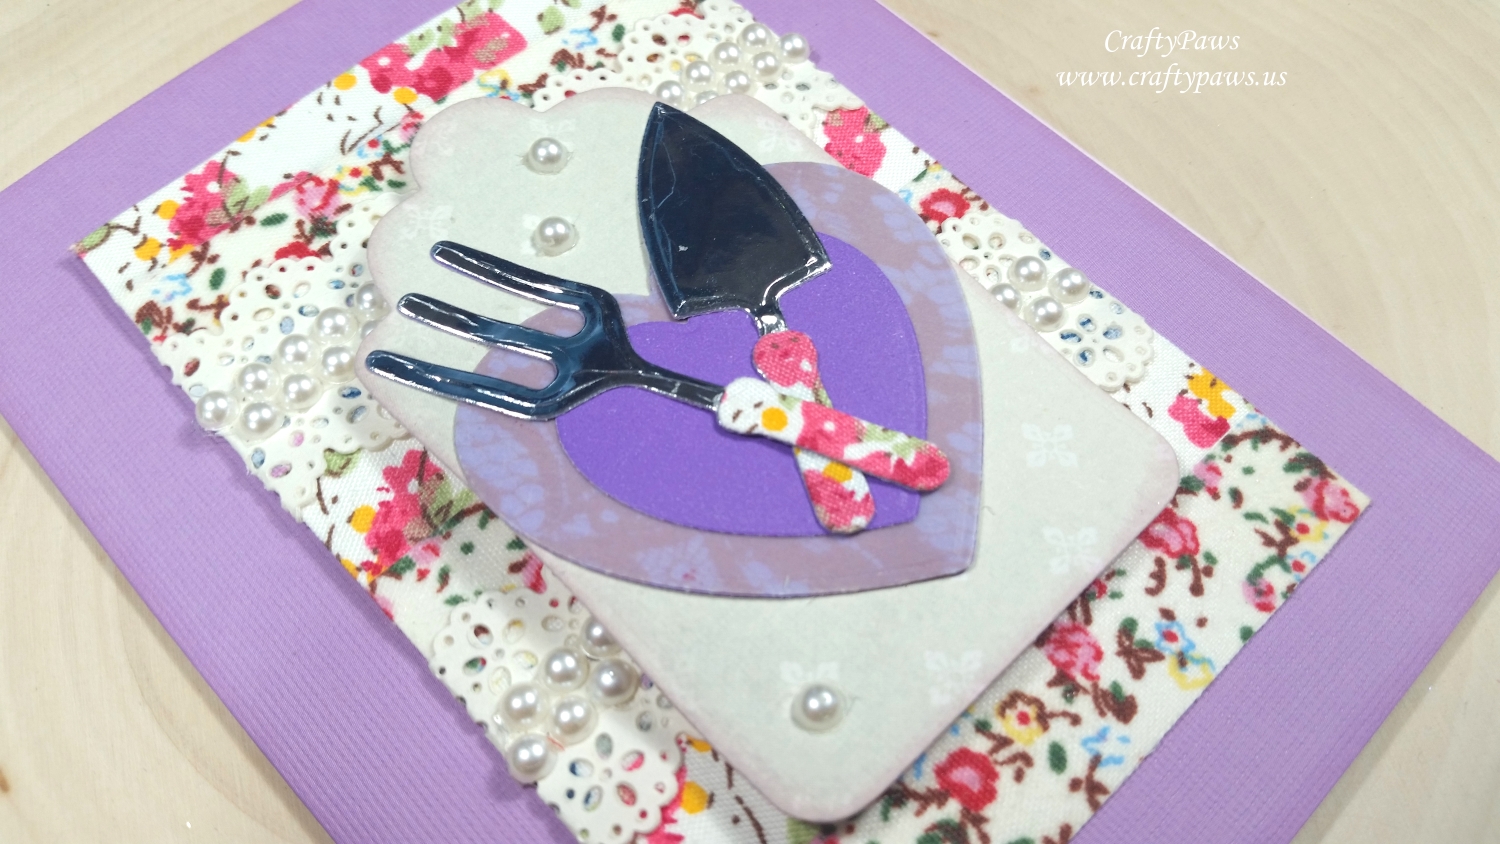
I am normally a very slow crafter, but I put my mind to making a couple sets of handmade note card gift sets that I was actually able to whip up in a day! With very limited supplies — scraps of paper, a few Diemond Dies die sets, and some old fabric washi (I’ve been hoarding these for so long that some of the adhesive has disintegrated!), some Recollections Bling on a Roll (for the purple base card), and handful of Tim Holtz Distress Inks (Dried Marigold, Milled Lavender, Twisted Citron, Squeezed Lemonade, and Broken China), I was able to create these 6 Shabby Chic or Prim style note cards. These are going to be gifted as two sets of 3 cards and mailed to crafty friends who love this style just to let them know I’m thinking of them (the one getting the ones with the garden tools is an avid gardener!).

There is a tutorial/process video below that shows everything in lots of detail, so I’ll just list the items I used here:
Diemond Dies Nesting Heart Die Set
Diemond Dies Nesting Tag Die Set
Diemond Dies Garden Tools Die Set
and you could have used any of the many Diemond Dies flower die sets, the Fluttering Butterfly Die Set, or even the Vintage Buttons Die Set to embellish these sweet cards.
GREAT COUPON!!!: My readers can get 20% off and free worldwide shipping on all Diemond Dies orders of $20 or more by using the coupon code: 30days
The following is a process video of making these card sets:
These cards are being entered into the following challenges:
Word Art Wednesday Anything Goes Challenge
Creatalicious Anything Goes with Optional Add Glitter/Bling
Lil Patch of Crafty Friends Anything Goes Challenge
Fab ‘n’ Funky Anything Goes Challenge
Not Just Cards Anything Goes Challenge
Through the Craft Room Door Anything Goes Challenge
Crafts Galore Encore Anything Goes Challenge
613 Avenue Create Anything Goes with Optional Twist Shabby Chic
CAS-ual Fridays Friendship Challenge
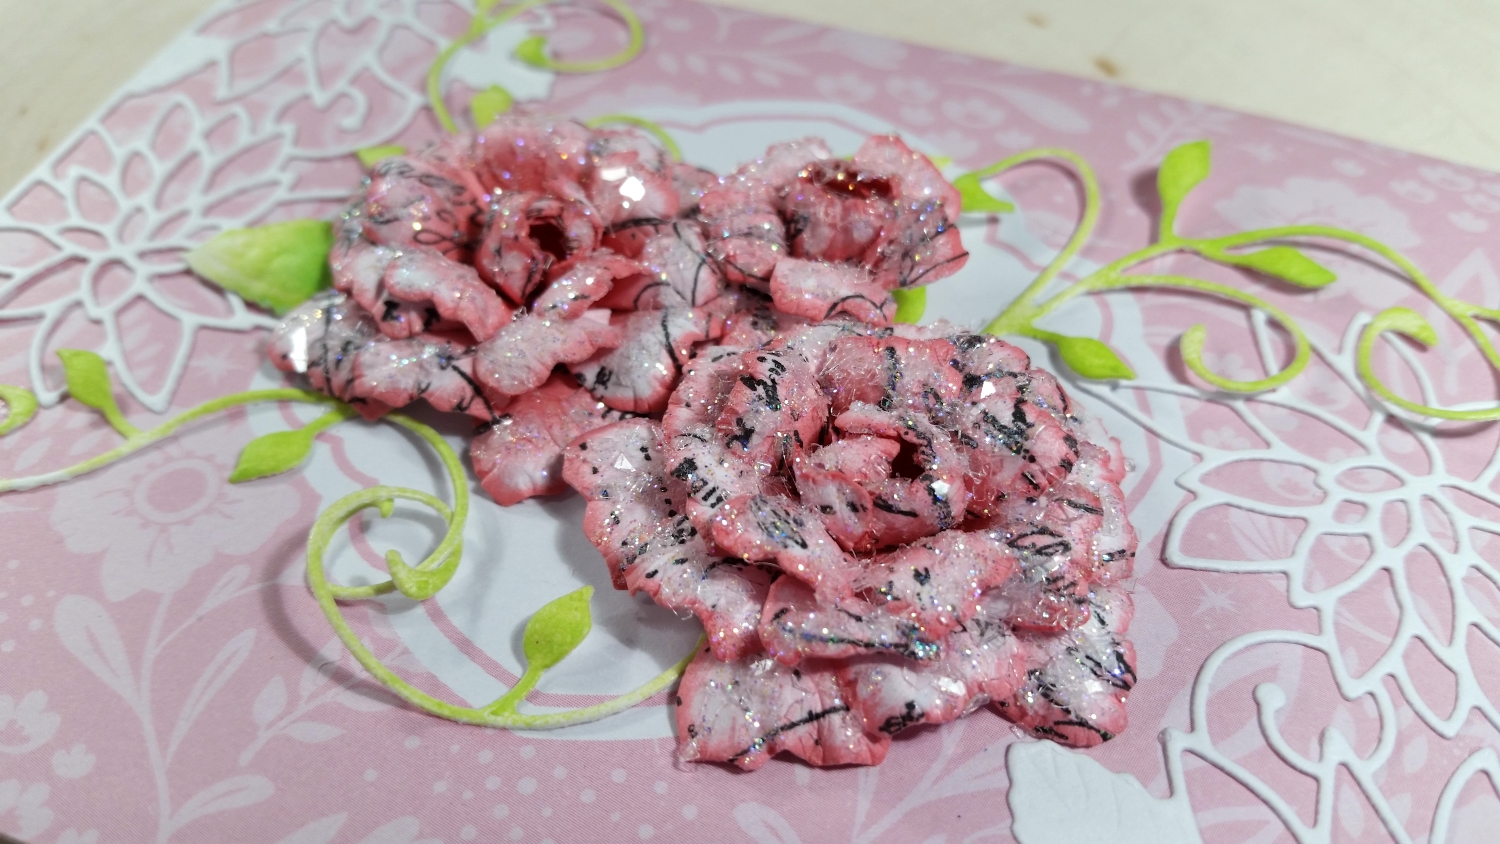
I used the Diemond Dies Sugar Plum Flower Die Set, the Natures Flourish Die, and the Medley of Leaves Die to create a flower cluster for a feminine shabby chic style card. The process of how I stamped, inked/colored, and shaped the roses are in the video linked below, so I’ll just list the products I used and then describe the rest of the card. NOTE: My readers can get 10% off and free worldwide shipping on all orders of $35 or more at Diemond Dies by using the code “thankskristina” at check out.
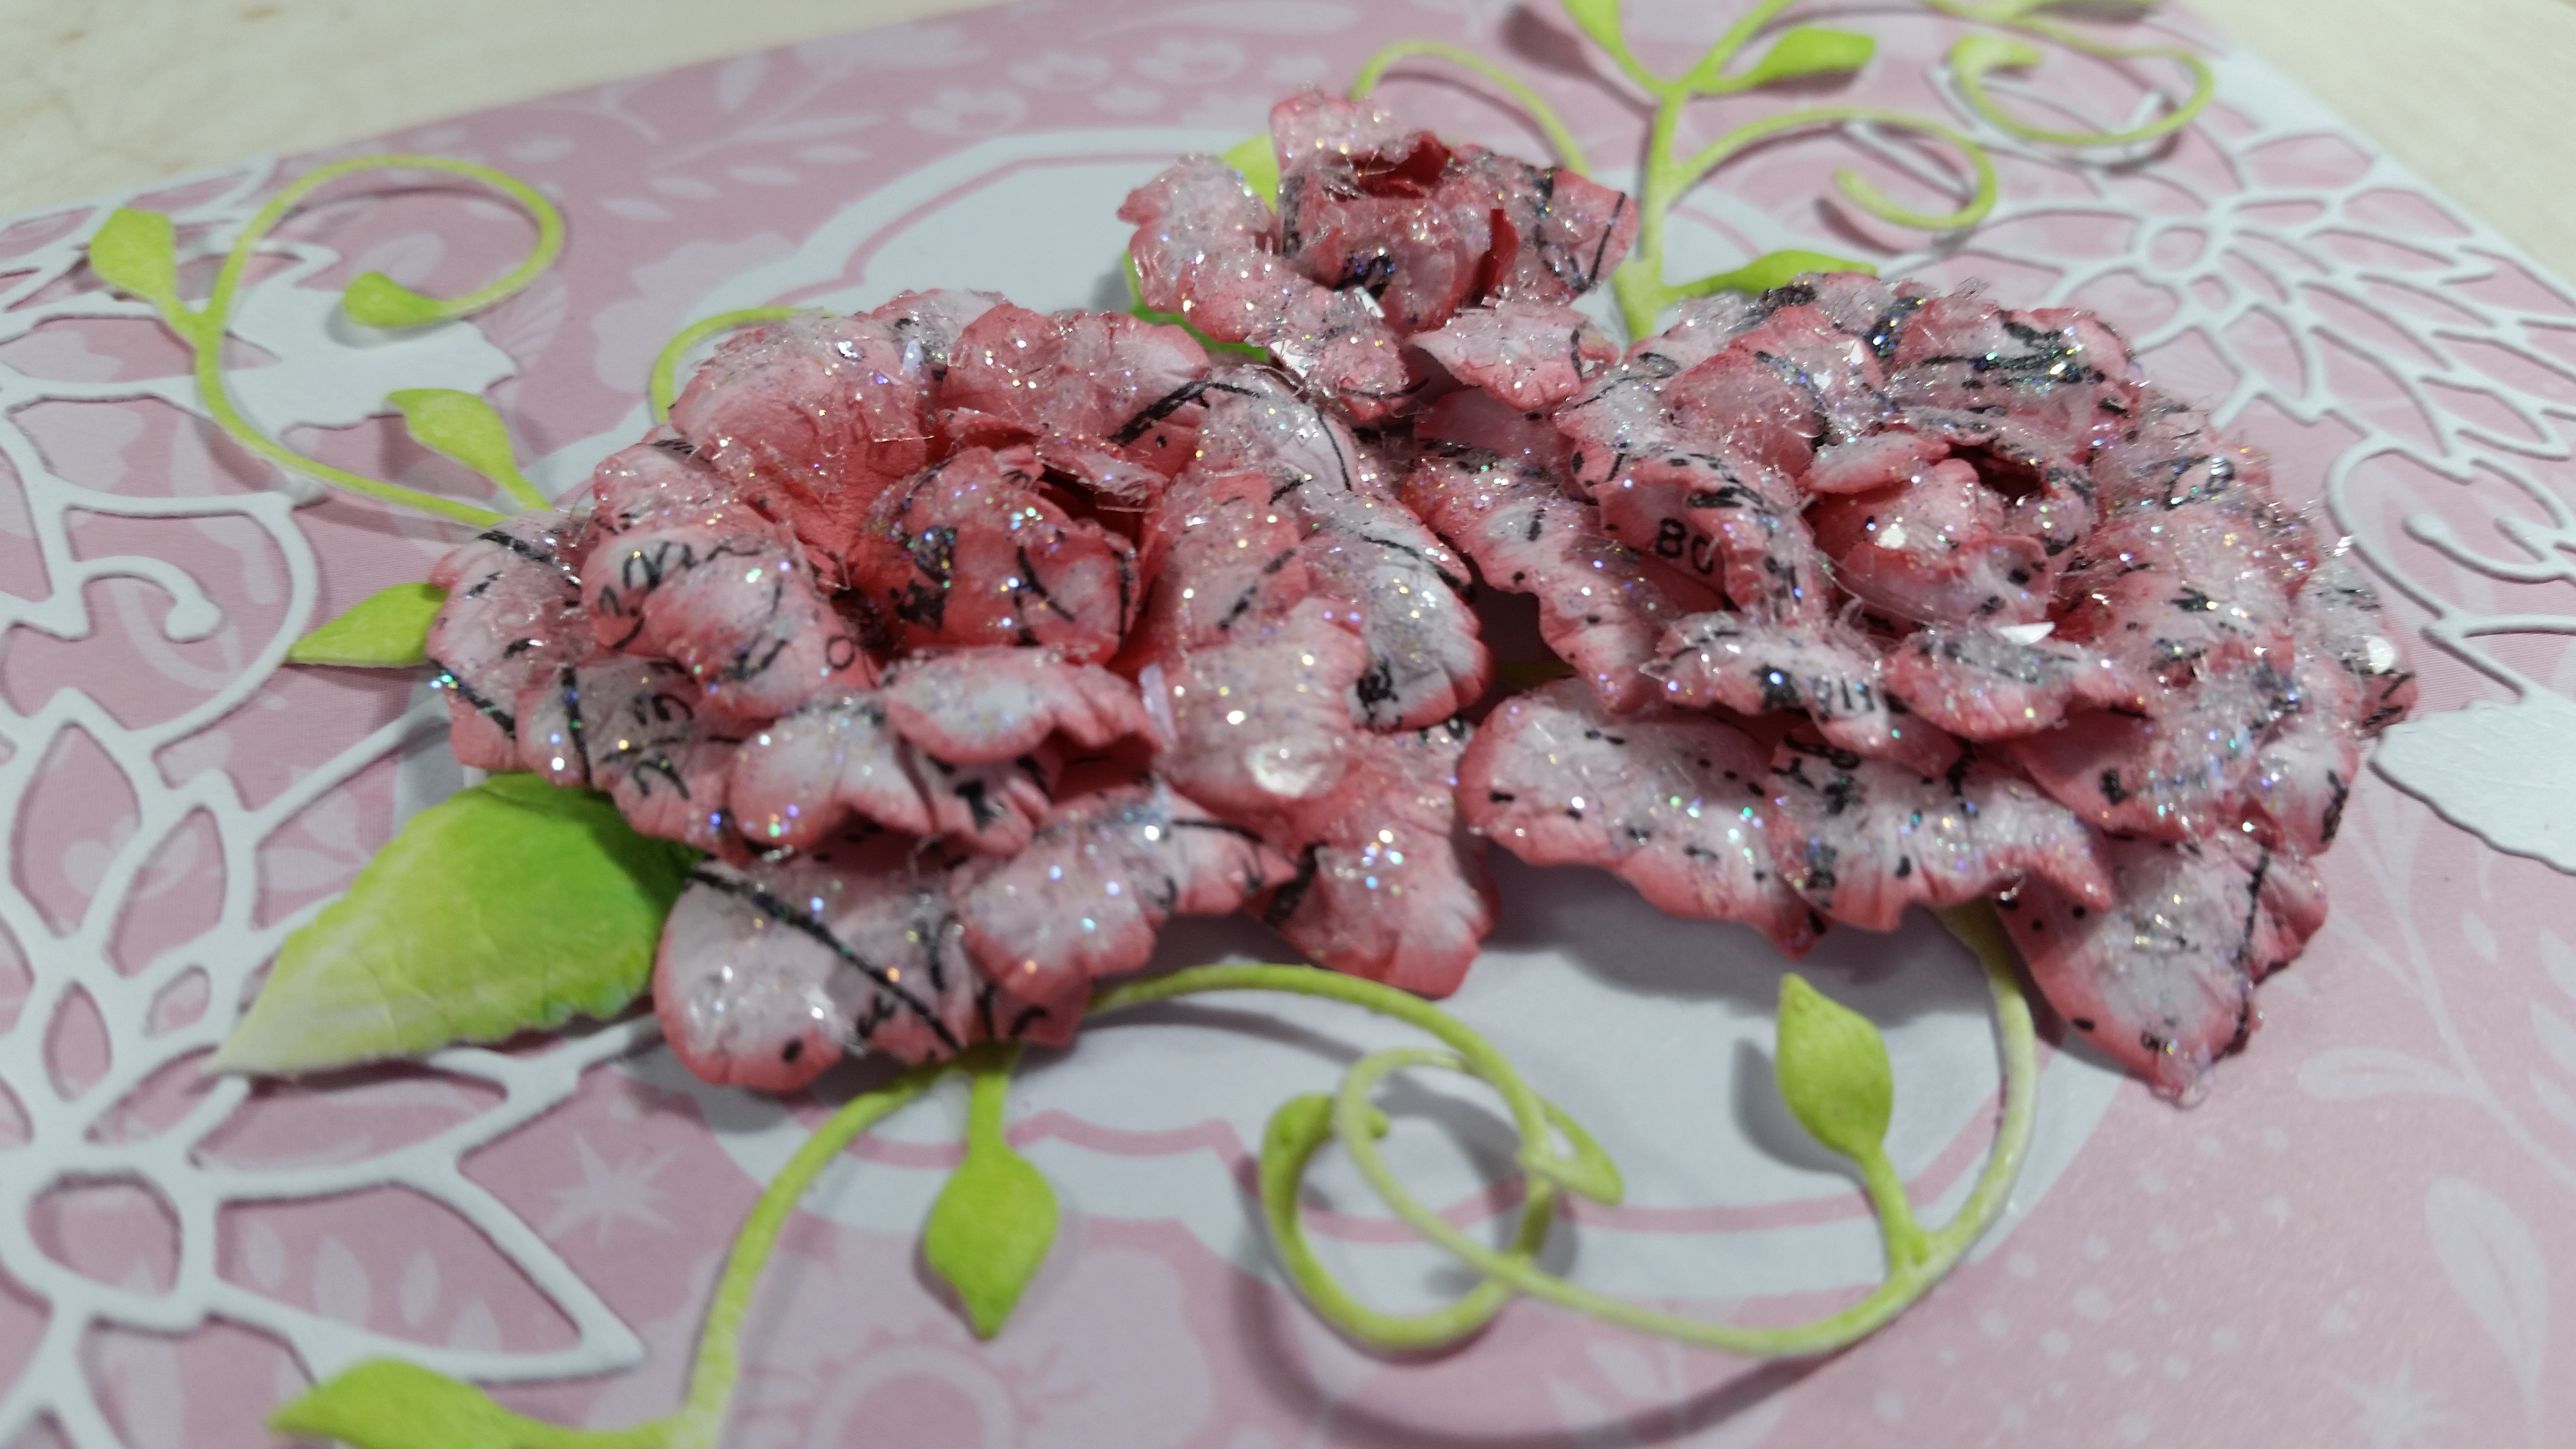
I started by stamping plain white Georgia Pacific Premium card stock with Versafine Black Ink and an old (from 2013) Heidi Swapp Script Background Stamp. Then I used the flower dies to cut out various sizes of flowers. I inked them with Tim Holtz Distress Ink in Spun Sugar and Worn Lipstick and then shaped them using a Spellbinders Tool ‘n One with the Embossing Stylus Tips on top of 2 stacked mouse pads (they have the perfect amount of give and resistance). To add that all-important shimmer and sparkle I sketched on Art Glitter Glue with a fine tip nozzle and sprinkled extra fine iridescent glitter. Then I sketched on another layer of Art Glitter Glue and sprinkled on Diamond Dust (which is actually super thin shards of real glass).
 To add some interest and fullness, I also cut out the flourish and leaves dies from white card stock and inked them with Tim Holtz Twisted Citron and an old American Crafts ink in green. I clustered the flourishes, leaves and roses together in the center of a card base from a Michaels Hot Buy card base and envelopes package called “Uptown Chic” (60 cards and envelopes for $5 – now that’s a deal!).
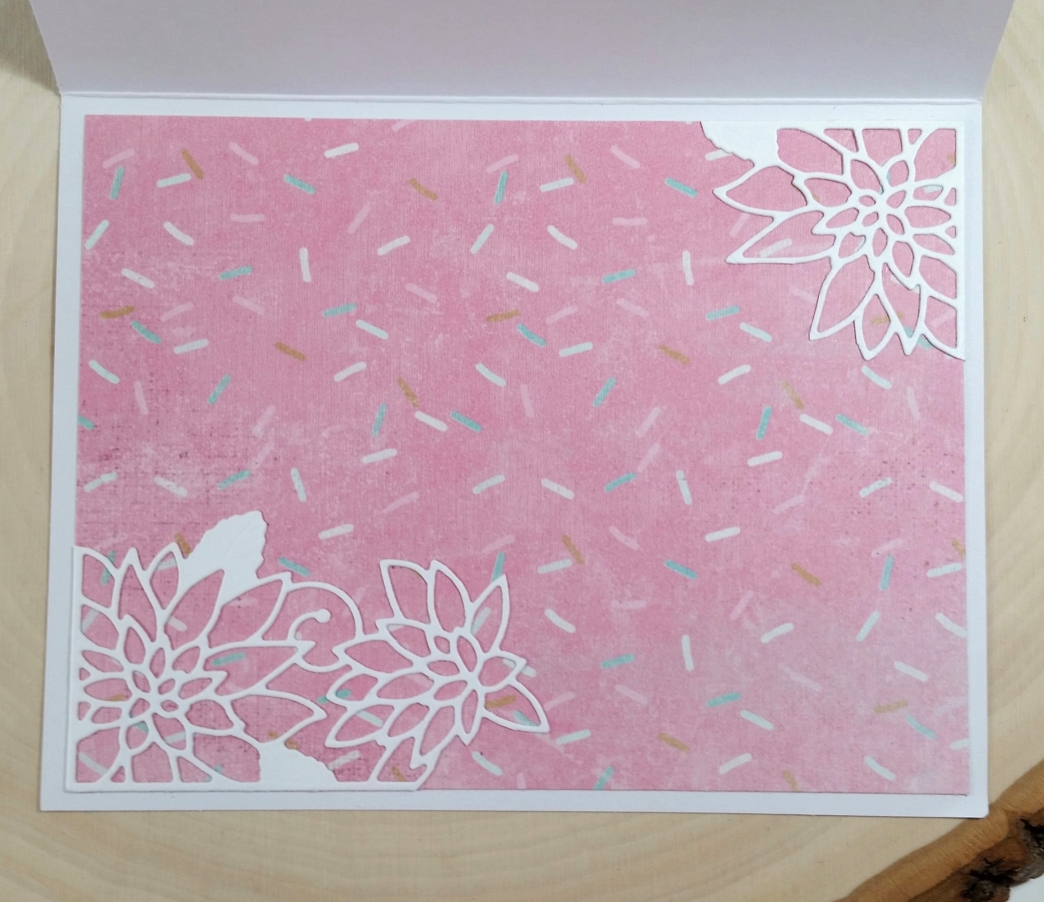
To give a more finished look to the card, I also die cut a couple of Memory Box Chrysanthemum Corner Dies and glued them onto the upper left and lower right corners of the card front. I used an Authentique “Sweetness” collection sprinkles patterned paper scrap to the inside of the card as a card liner and added a couple more of the chrysanthemum corner dies as accents.
The following is a process video of how to make these paper roses:
This card is being entered into the following challenges:
Simon Says Stamp Work It Wednesday Add Sparkle! Challenge
Simon Says Stamp Monday Get In Shape Challenge
Word Art Wednesday Anything Goes Challenge – WINNER
Lil Patch of Crafty Friends Anything Goes Challenge
Fab ‘n’ Funky Patterned Paper Challenge
Through the Craft Room Door Anything Goes Challenge
613 Avenue Create Anything Goes with Optional Monochrome Challenge
Creatalicious Anything Goes with Optional Summer Challenge
Not Just Cards Anything Goes Challenge
]]>
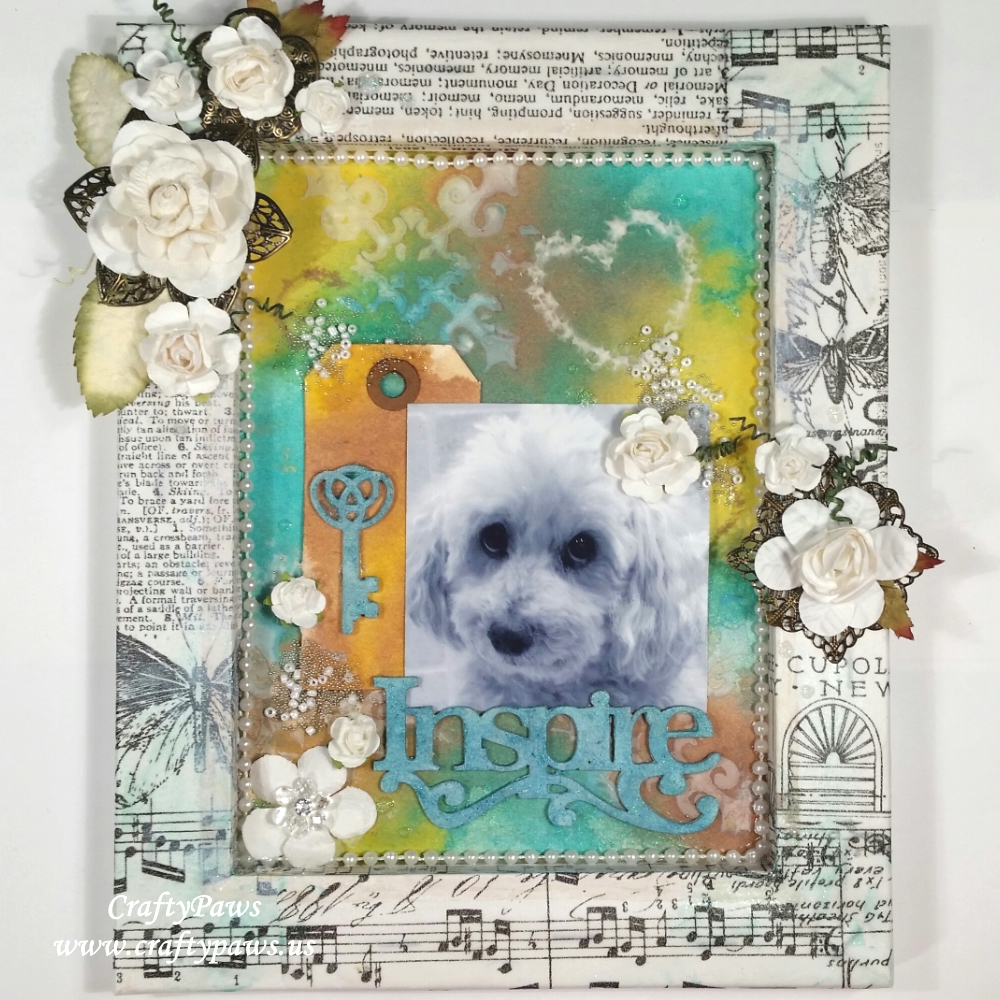 I started with a canvas that I reversed and applied Liquitex Gesso around the exposed wooden edges and over the staples. I next covered the edges with Tim Holtz Tissue Paper, using my new favorite glue, Beacon 3-in-1. I distressed the edges a bit and also smeared on some translucent Art Anthology dimensional medium in Mermaid Sorbet .
While that was drying, I started to work on my background insert, which is made from heavy-weight watercolor paper. I used some mud texture paste and an Art Anthology Gothic Stencil to create some texture and interest to the background. When that was dry to the touch, I used 3 different Art Anthology Colorations Sprays in Glorious (yellow), Sandcastle (tan), and Siesta Key (aqua) to spray the background as well as a little manila tag (I wanted to do a kind of vintage summer country fair color scheme — somehow that seemed fitting for my dear girl who is in her autumn (or winter), but about whom I am hoping and praying this is her summer. Plus I’m taking her in a stroller to a country fair next weekend!). To prep a couple of chipboard pieces (the key and word “Inspire”), I used more gesso to mute down the brown of the chipboard and then used some Art Anthology dimensional medium in Cayman Sorbet and Mermaid Sorbet (the sorbet dimensional mediums are translucent but add a great shimmer/sparkle and rich hint of color) to coordinate with the Siesta Key spray from the background.
Then to add some more interest and texture to the background, I used some Clear Coat Dimensional Medium and dropped in 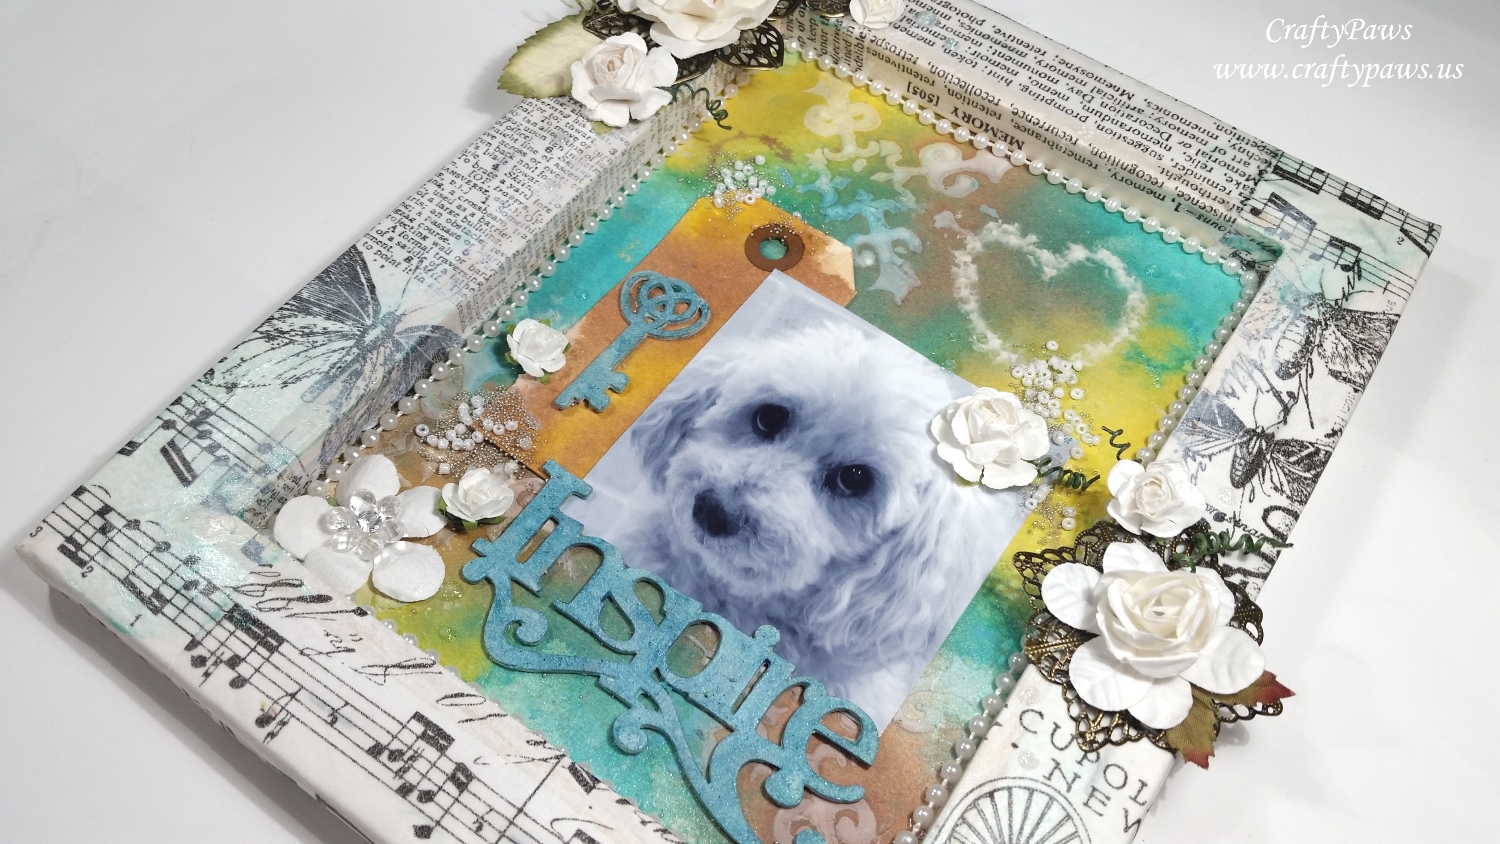 some small white seed beads and micro silver beads. I also used some plain Deco Art Modeling Paste and dabbed on with my finger a Primative little heart.
To cover up the seam where the background watercolor paper didn’t quite reach the edges of the shadowbox frame, I used a strand of pearls (the paper was cut correctly a little larger than the opening, but I was not careful about centering it after inserting and gluing it down – argh!). Lastly, I layered various antique bronze metal flowers/rosettes and white paper flowers and leaves from my stash. I tried to group them into 3 loose clusters in a triangular formation, to follow the rule of 3 and thirds. I especially like the flower on my angelic Biscuit’s hair — doesn’t she look like she’s got the flower tucked behind her ear? 🙂
The following is a process video sharing the 2nd half of creating this canvas shadow box (the first part was done in class so I didn’t video that part):
This altered canvas is being entered into the following challenges
Card Mania Summer Fun Challenge
Simon Says Stamp Monday Distress It Challenge
Not Just Cards Anything Goes Challenge
Word Art Wednesday Anything Goes Challenge
Through the Craft Room Door Anything Goes Challenge
Creatalicious Anything Goes with Optional Summer
Lil Patch of Crafty Friends Anything Goes Challenge
613 Avenue Create Anything Goes with Optional Monochrome
MarkerPOP Summer Fun – We’re Going to the Fair Challenge
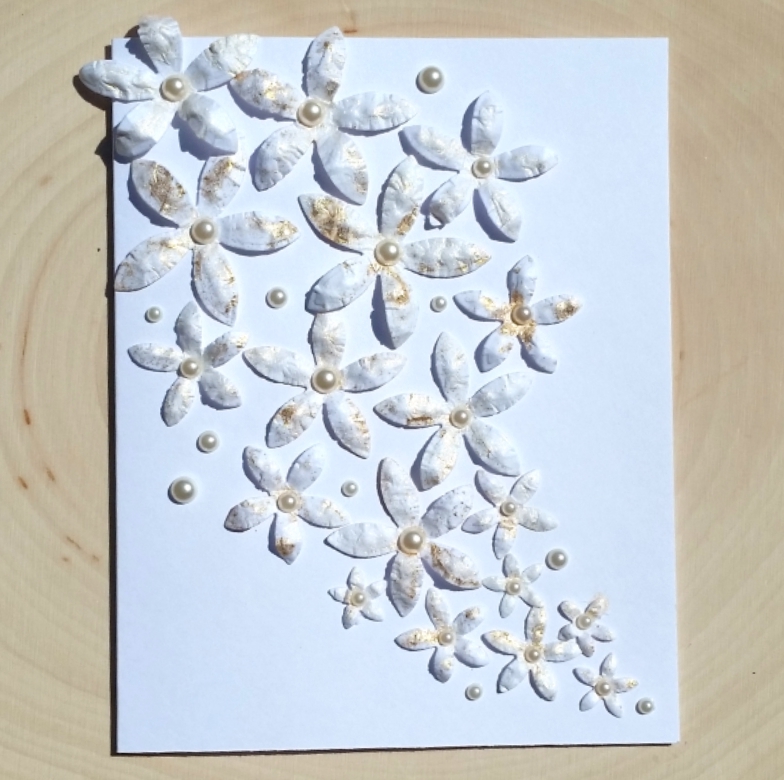 I first gathered all the left over flowers and lightly sprayed them with Heidi Swapp Color Shine in Sheer and Gold. Then I placed a paper towel over my mouse pad (so as not to get spray pigment on my mousepad) and used my Spellbinders Tool ‘n One with the medium sized stylus to hand emboss the flower petals into rounded curves from the back side of the flowers. Then I flipped over the flowers and pushed their centers with the stylus to get a simple shaped flower.
I then played with the placement of the various flower sizes, and decided that a small to large cluster of flowers forming a kind of swoop would look lush and luxe. Lastly I used self-adhesive flat back pearls to dot each flower center, using varying sizes to match the sizes of the flowers. To fill in a few gaps between the flowers I added a few extra flat back pearls to the card front. Easy peasy, clean and simple, super dimensional floral card that can be used for weddings, anniversaries, engagements or any time!
Diemond Dies SALES: My readers can get 15% off and free worldwide shipping at Diemond Dies through June 19, 2017 by using the coupon code spring15 (no minimum purchase required). Additionally, if you are interested in buying the whole May 2017 Bundled New Release, there is a special bundled sale price of just $59 (which is lowered to $50 if you also use the spring15 code — that’s 44% off the individual die prices!), good through June 25, 2017. After June 19, 2017, you can use my coupon code thankskristina for 10% off and free worldwide shipping on all orders of $35 or more.
The following is a Diemond Dies YouTube Hop Video sharing the process of making this card as well as the two cards from the previous post (watch and comment on YouTube for a chance to win a $20 gift certificate!):
These cards are being entered into the following challenges:
Lil Patch of Crafty Friends Anything Goes Challenge
Simon Says Stamp Wednesday Emboss It Challenge
Simon Says Stamp Monday Touchy Feeling Challenge: shaker card
Creatalicious Anything Goes Challenge with Optional Die Cuts or Punches
Word Art Wednesday Anything Goes Challenge
Cards Galore Encore Anything Goes Challenge
Not Just Cards Anything Goes Challenge
613 Avenue Create Anything Goes Challenge
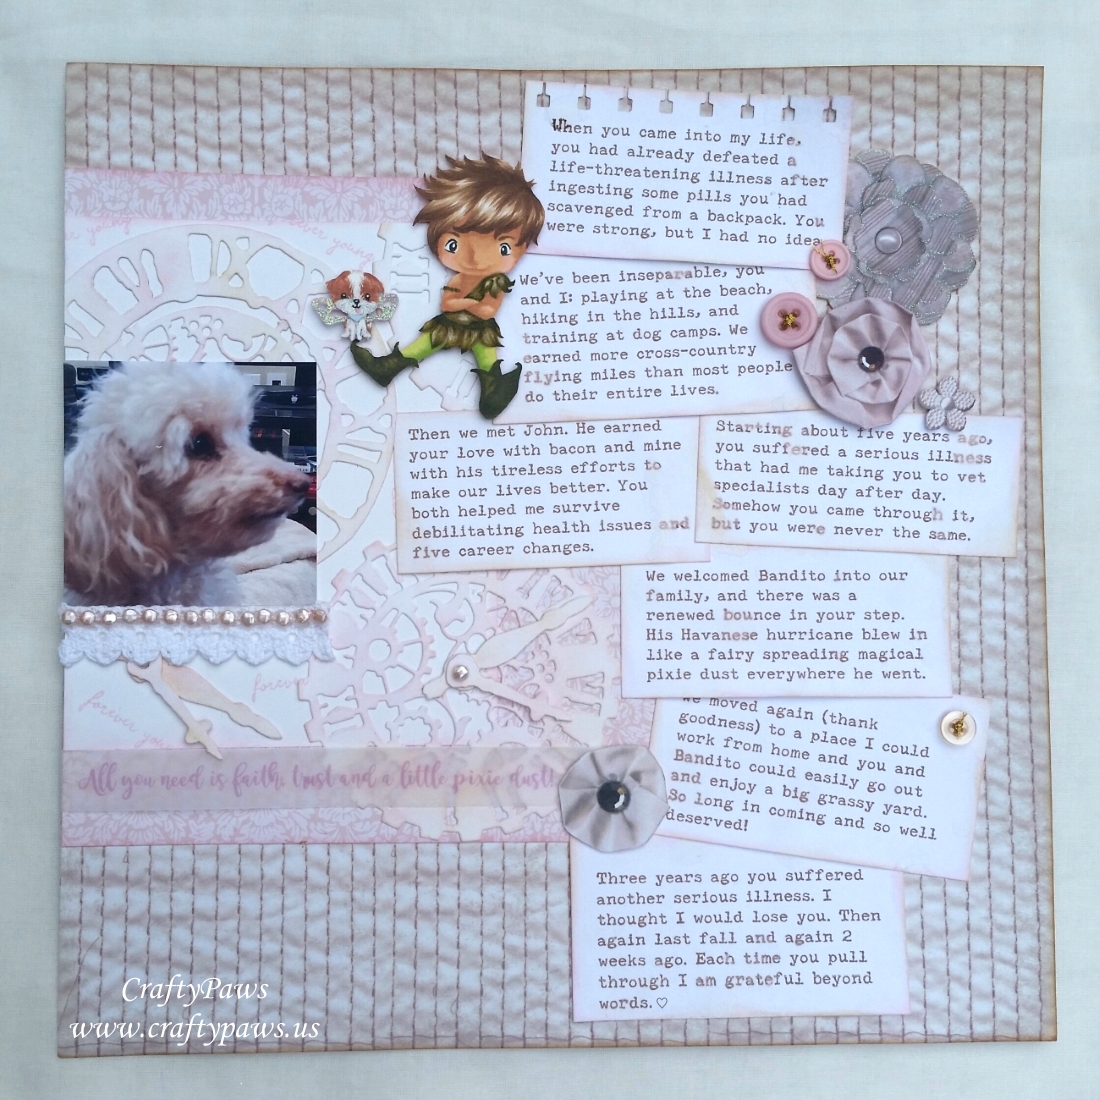
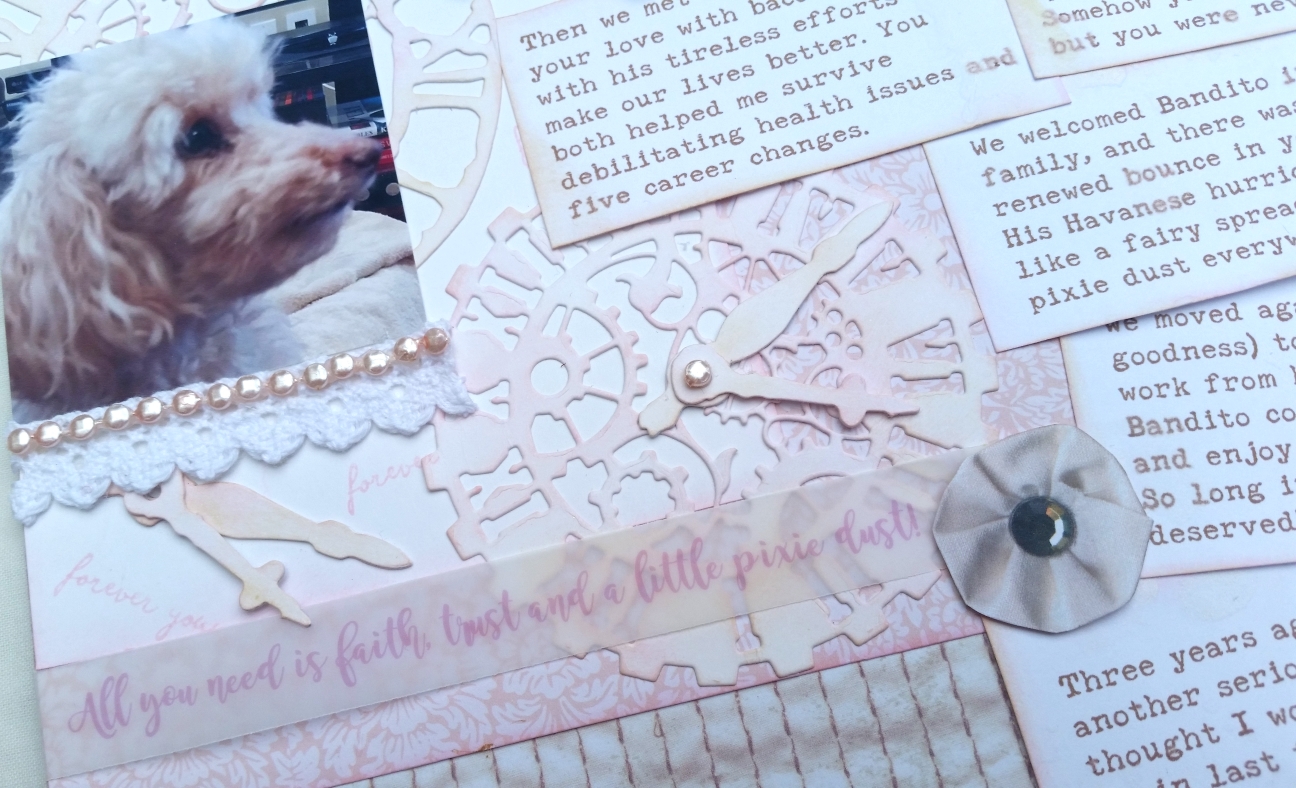
This is a double page shabby chic style layout featuring my sweet, Biscuit as a 1 year old (jumping picture with ears flying) and now at 16. Two weeks ago, we had a terrible health scare, and we agonized as we thought we would lose our sweet girl. Miraculously she pulled through. I wanted to create this special double page LO to memorialize our lives together as I pondered how amazing our lives have been with her and how blessed we are to have her still.
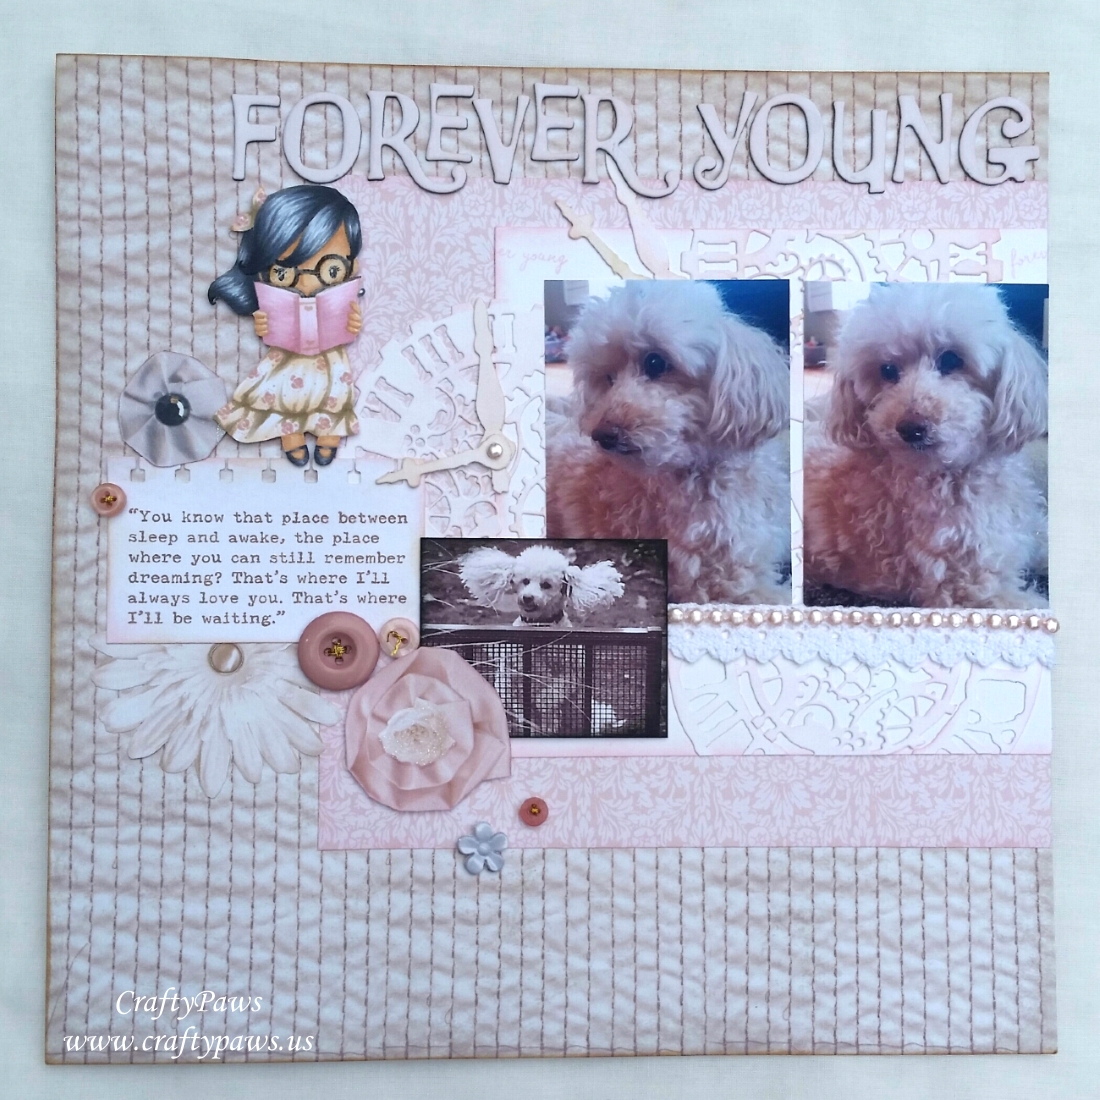 Journaling: The journaling spot on the left LO has a quote from Peter Pan that reads: “You know that place between sleep and awake, the place where you can still remember dreaming? That’s where I’ll always love you. That’s where I’ll be waiting.” The right LO includes a lot of journaling that memorializes snippets of our lives together–through 3 moves, 5 career changes, terrible health scares for me and her, how we met Mr. CraftyPaws, the addition of our 2nd fur baby, Bandito (who stole our hearts with his Havanese hurricanes spreading magical pixie dust like Tinkerbell), and how we got through everything together. I used the free Distress Typewriter Font in brown text for all the journaling, punched the top edge of the first journaling square on each LO with a Stampin’ Up Spiral Border Punch Notebook Trim Border, and inked all the edges with Tim Holtz Distress Ink in Spun Sugar and Antique Linen.
Stamped Images: I used the Wendy girl (representing me), Peter Pan boy (representing Mr. CraftyPaws) and “forever young” sentiment from The Greeting Farm’s Never Ever (retired) stamp set as well as the pup from The Greeting Farm “Mini Remix Happy” stamp set (representing Bandito as a doggy Tinkerbell). They were all stamped out with Momento Desert Sand ink and colored in the no line style with the following Copic colors:
 Skin: E51, E53, R21, E11, and R30
Girl’s hair: C00, C4, C6, C7
Boy’s hair: E55 and E57
Dog’s fur: C00, C2, E11, E13, E15 and white gelly roll gel pen
Girl’s Dress and book: RV000, RV00, RV11, E81, E43, E84
Boy’s Outfit: YG21, YG25, YG95, YG97, and G99 plus some detailing with Distress Markers in Peeled Paint and Crushed Olive
For extra details on the images, I added white gelly roll pen details on the girl’s glasses and coated them with Glossy Accents for shine. I also used the top parts of a punched Martha Stewart Butterfly Punch topped with glitter glue for sparkle as wings for Bandito as Tinkerbell. I hand fussy cut each image out and popped them up on fun foam or double sided foam adhesive for added dimension.
Backgrounds: I used 2 patterned papers from an old DCWV paper stack from my hoard vault called, “The Lace & Linen Stack.” I used a Tim Holtz Alterations Weathered Clock die and Prima Vintage Clock die to create the white/pink/vintage tonal background layer just beneath the pictures. I wanted a lot of texture and detail for this layer, without distracting from the pictures of Biscuit or the stamped and colored images so I layered all these dies and stamped the “forever young” sentiment simply with more Tim Holtz Distress Inks in Spun Sugar and Antique Linen.
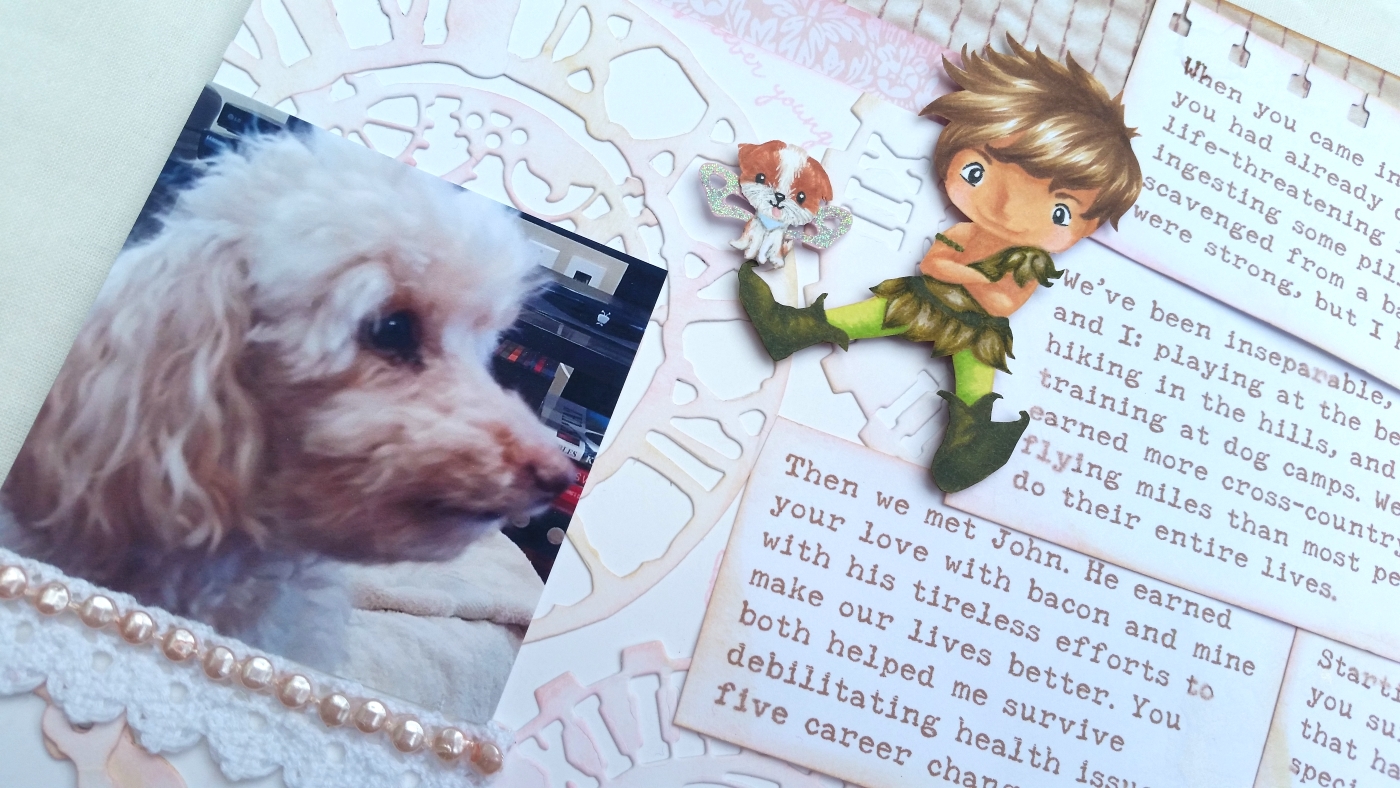
Embellishments/Bling: I used old crocheted lace trim, vintage buttons threaded with metallic gold thread (this isn’t as simple as it sounds – check out the video if you’re interested in the painstaking details), pale pink blingy pearl trim (which I also cut apart to add as clock hand centers), and hand fussy cut paper flower images that look like fabric flowers for embellishments. I also printed out in a free Magnolia Sky Script Font in pink onto vellum another quote from Peter Pan that reads, “All you need is faith, trust and a little pixie dust!”
The following is a video share of these layouts:
These layouts are being entered into the following challenges:
Work it Wednesday May Flowers Challenge
Word Art Wednesday Anything Goes Challenge
Lil Patch of Crafty Friends Anything Goes Challenge – WINNER
Crafty Purple Frog Fabulously Floral Challenge
Crafty Gals Corner Bling Challenge
Through the Craft Room Door Anything Goes Challenge
Crafts Galore Encore Anything Goes Challenge
613 Avenue Create Anything Goes Challenge
Creatalicious Anything Goes Challenge with Optional for the Girls/Mother’s Day
SCT Magazine NSD Sketch Challenge