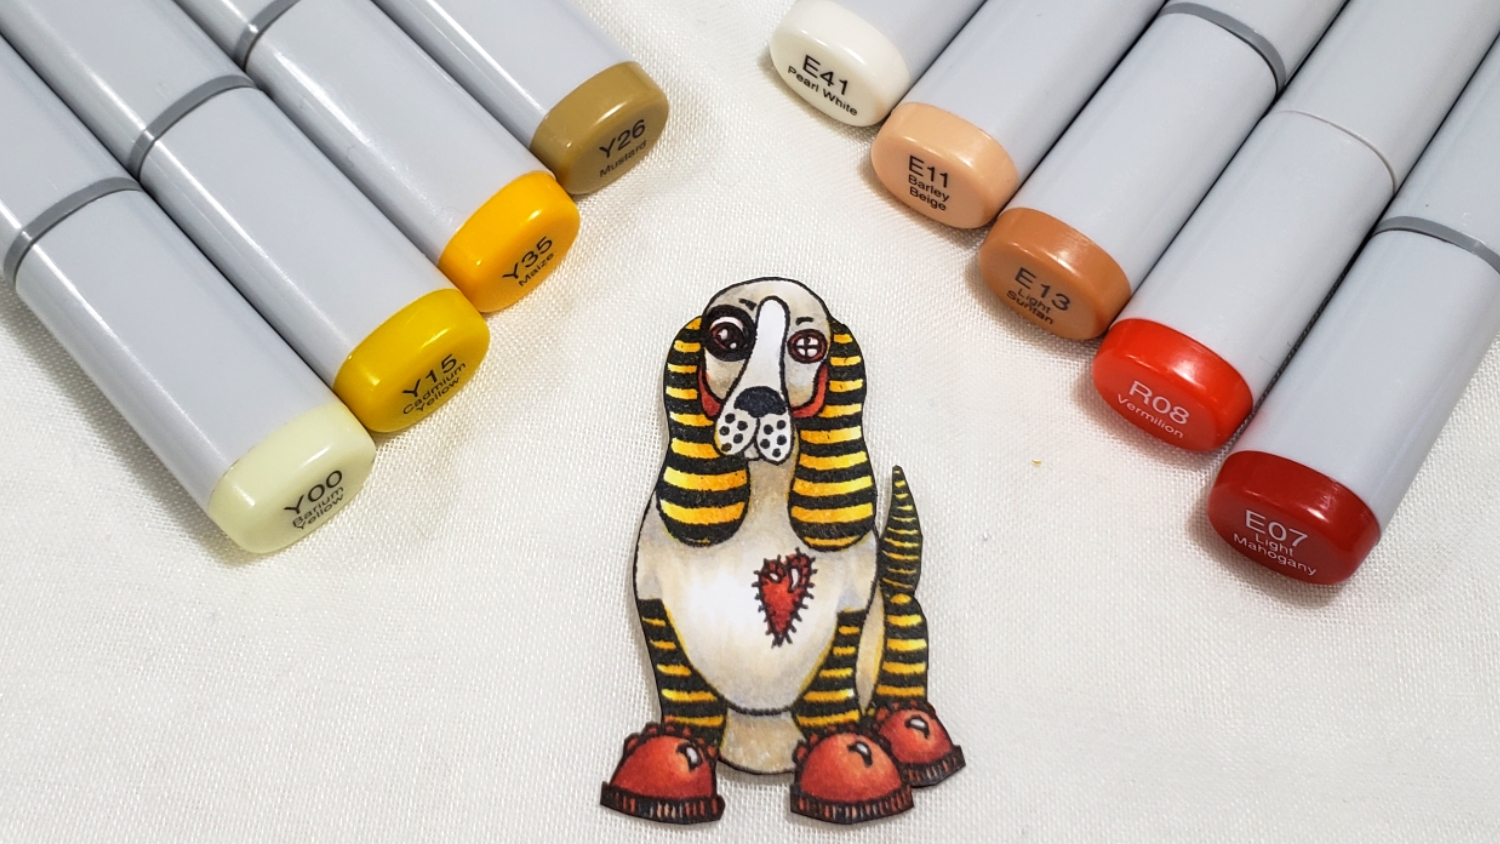
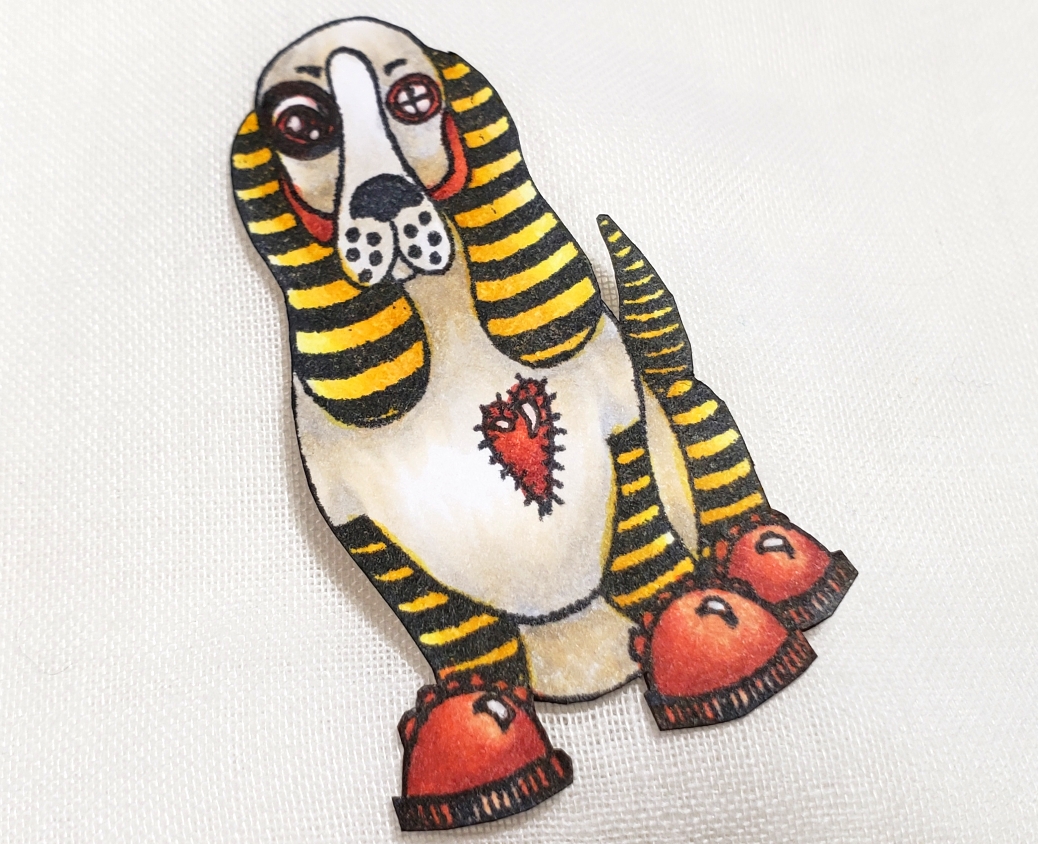
I love how this hound dog came out after Copic coloring it with what I consider a more neutral Steampunk color combination:
Ears, legs and tail: Y00, Y15, Y35 and Y26
Body, N0, N1, N2, E40 and E41
Boots, heart and jowls: E11, E13, E07 and R08
CLICK on the following picture to watch the Copic coloring process video:
Disclosure: Many of the supplies I’ve used for today’s project are linked. Some may be affiliate links, which means if you make a purchase I receive a small commission at no extra cost to you. I truly appreciate your support toward the costs of running this blog!
Thanks again for stopping by. As soon as I figure out what to do with all these funky puppies, I’ll be back to share that with y’all. Till then, I hope you’re having a wonderful crafty day!
]]>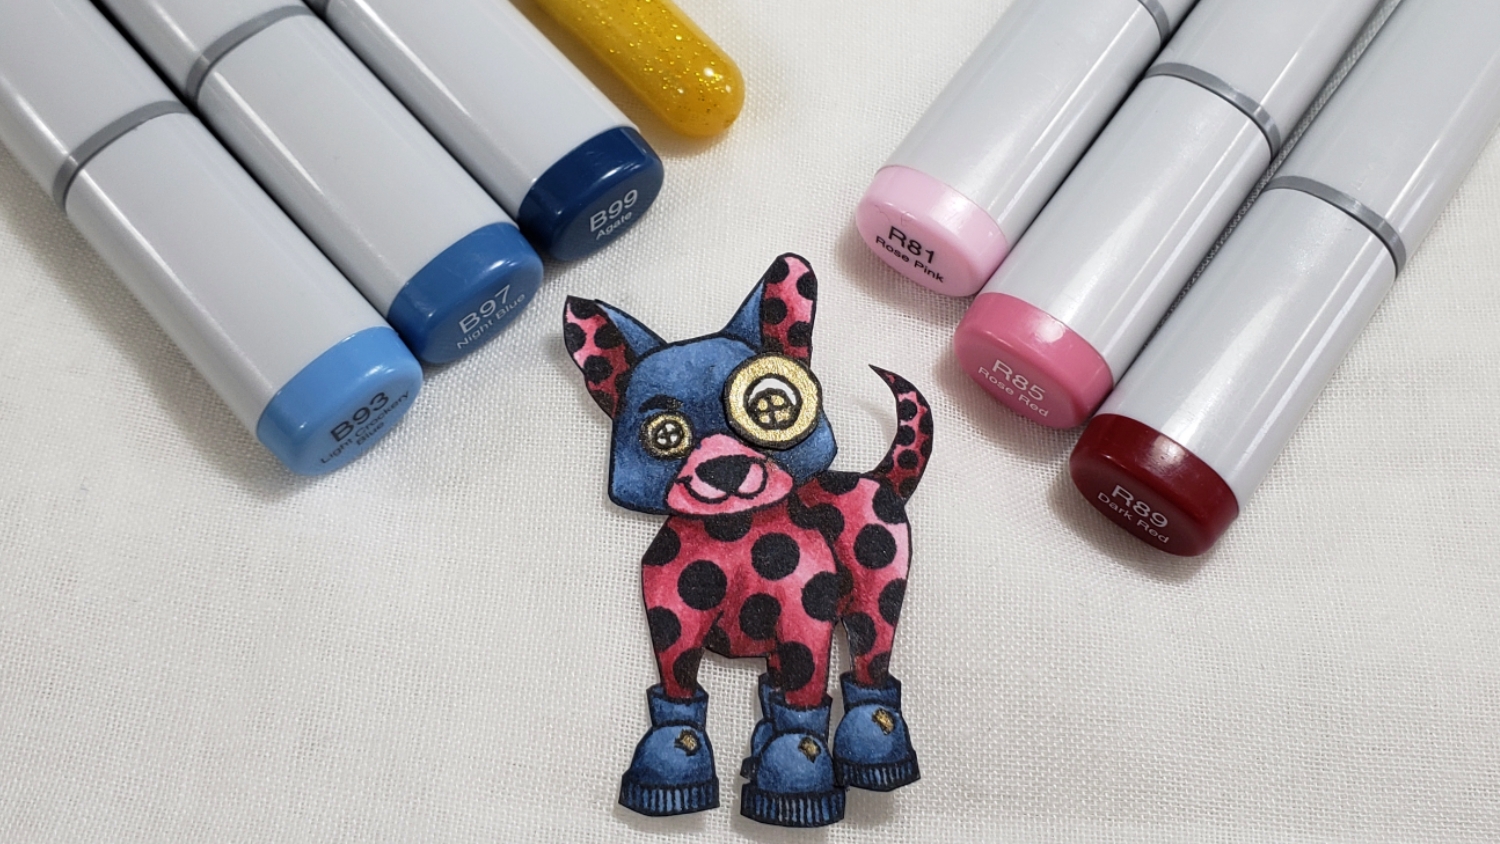
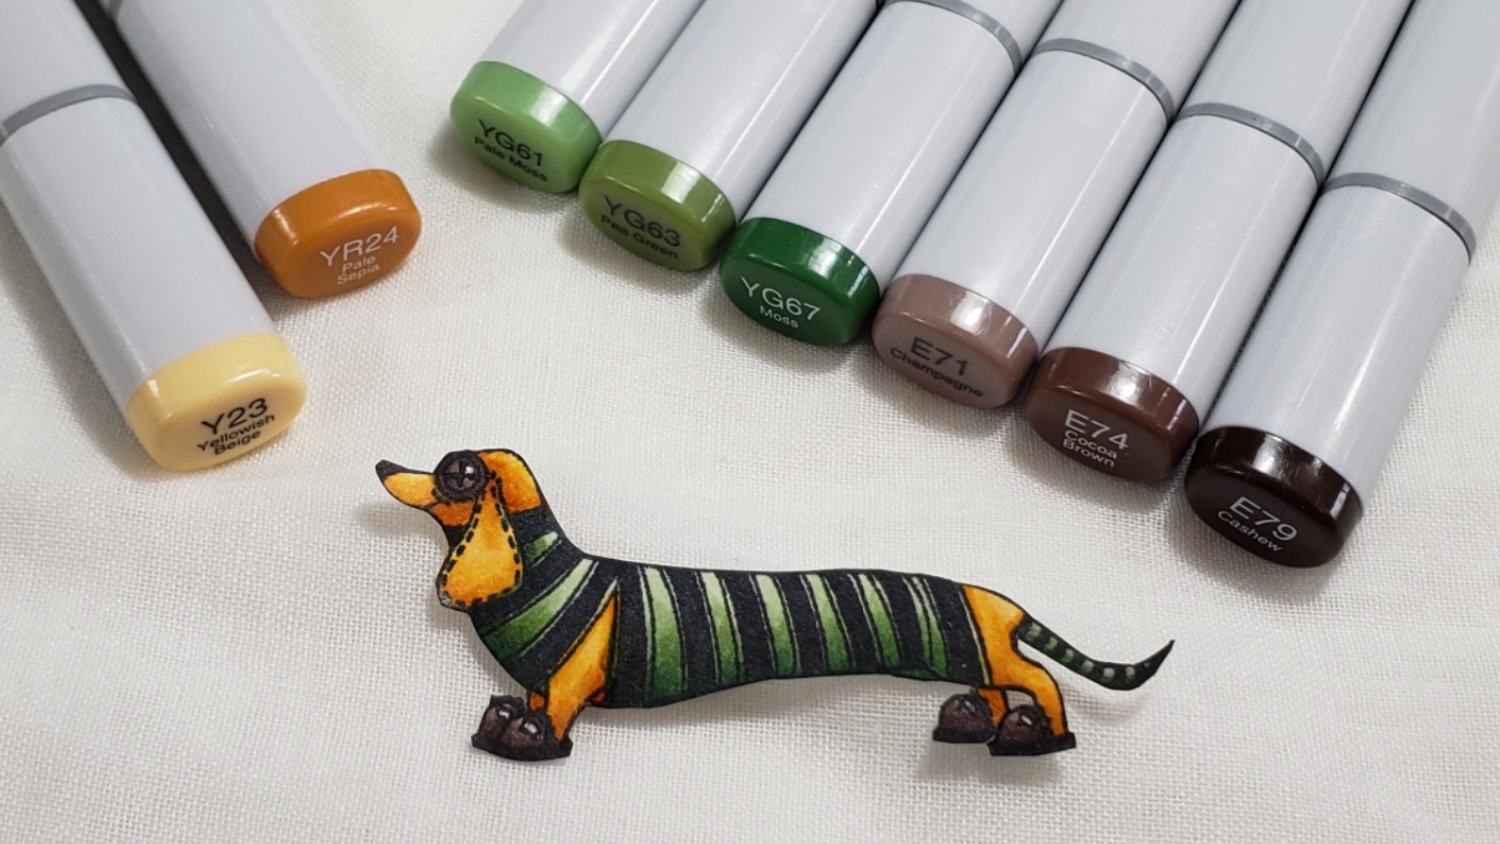
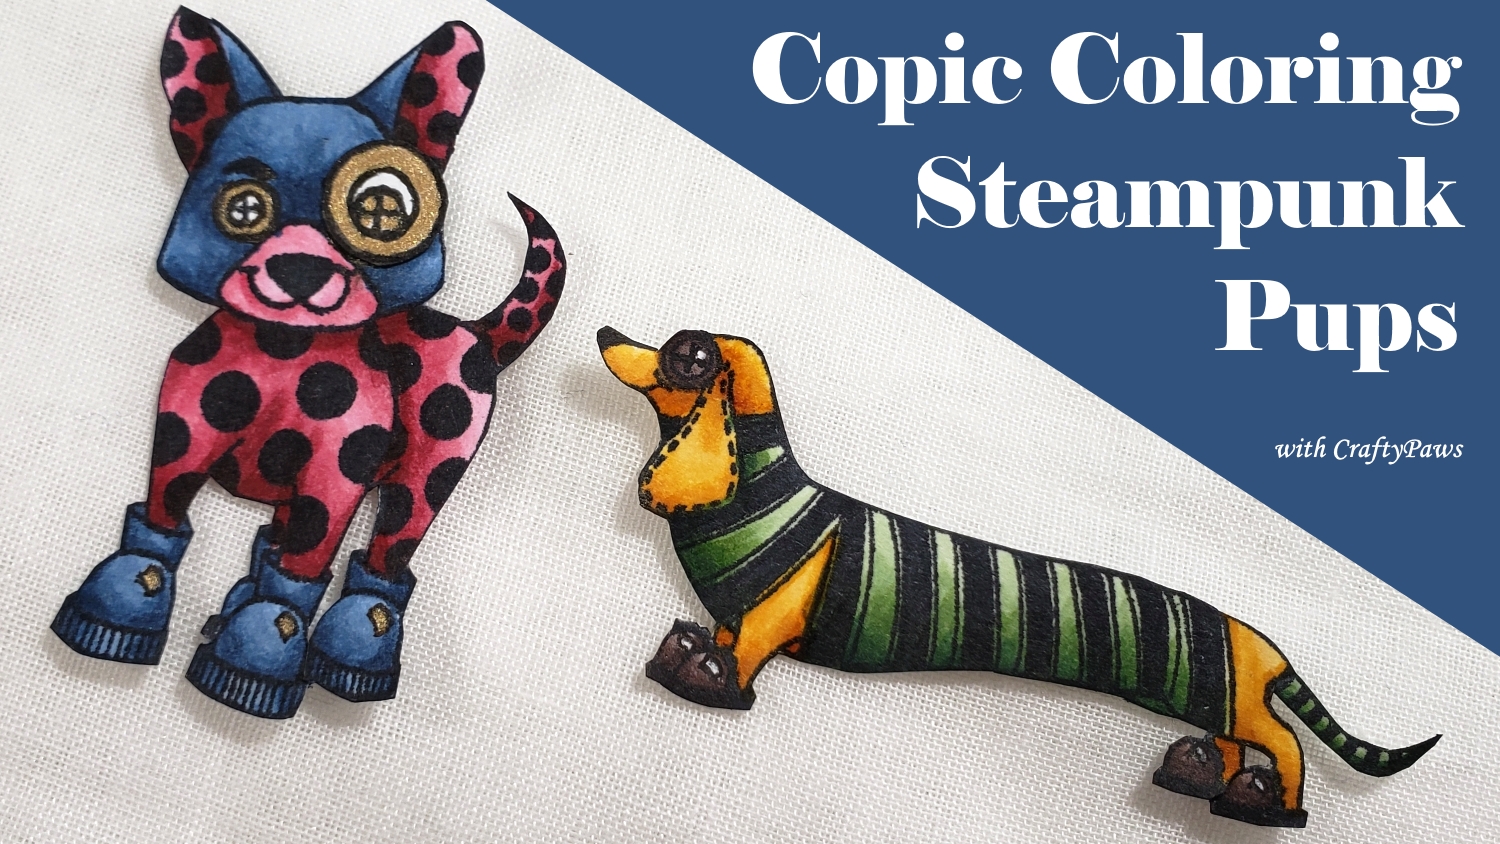
The next two Steampunk pups I colored up are the Terrier and Dachshund, and these are the Copics I used:
Terrier: R81, R85, R89, B93, B95 and B99 with Gold Gelly Roll Pen
Dachshund: YG61, YG63, YG67, G29, Y23, YR24, E71, E74, and E79
CLICK on the following picture to watch a Copic coloring process video:
Disclosure: Many of the supplies I’ve used for today’s project are linked. Some may be affiliate links, which means if you make a purchase I receive a small commission at no extra cost to you. I truly appreciate your support toward the costs of running this blog!
Thanks for stopping by, and please join me when I share what I create with all these Steampunk puppies!
]]>
I’m a bit rusty with crafting, let alone Copic coloring, because I’ve been away from my craft room for almost a month while I have been helping my dad through 2 heart surgeries, fully changing his diet, and just general recovery (if you want to know more, please watch THIS VIDEO and THIS FOLLOW UP VIDEO). Anyway, I’m feeling really thankful and blessed to still have my dad with me and am happy to be back to crafting (if only a little bit at a time for now).
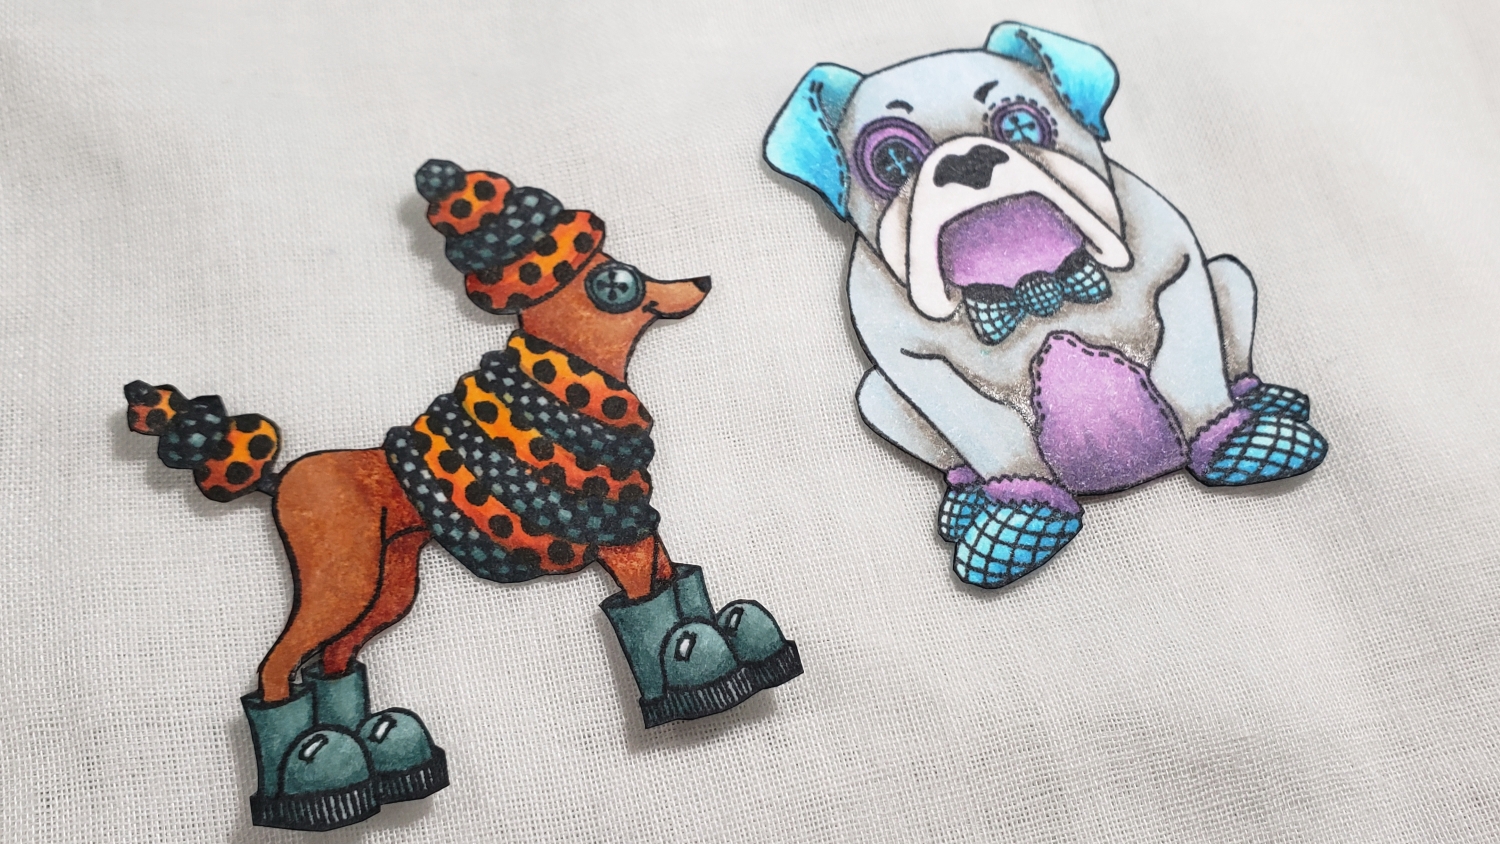
When I figure out what I’m going to do with these colored and fussy cut pups, I’l go into more detail, but in the meantime, here are the Copic colors I used:
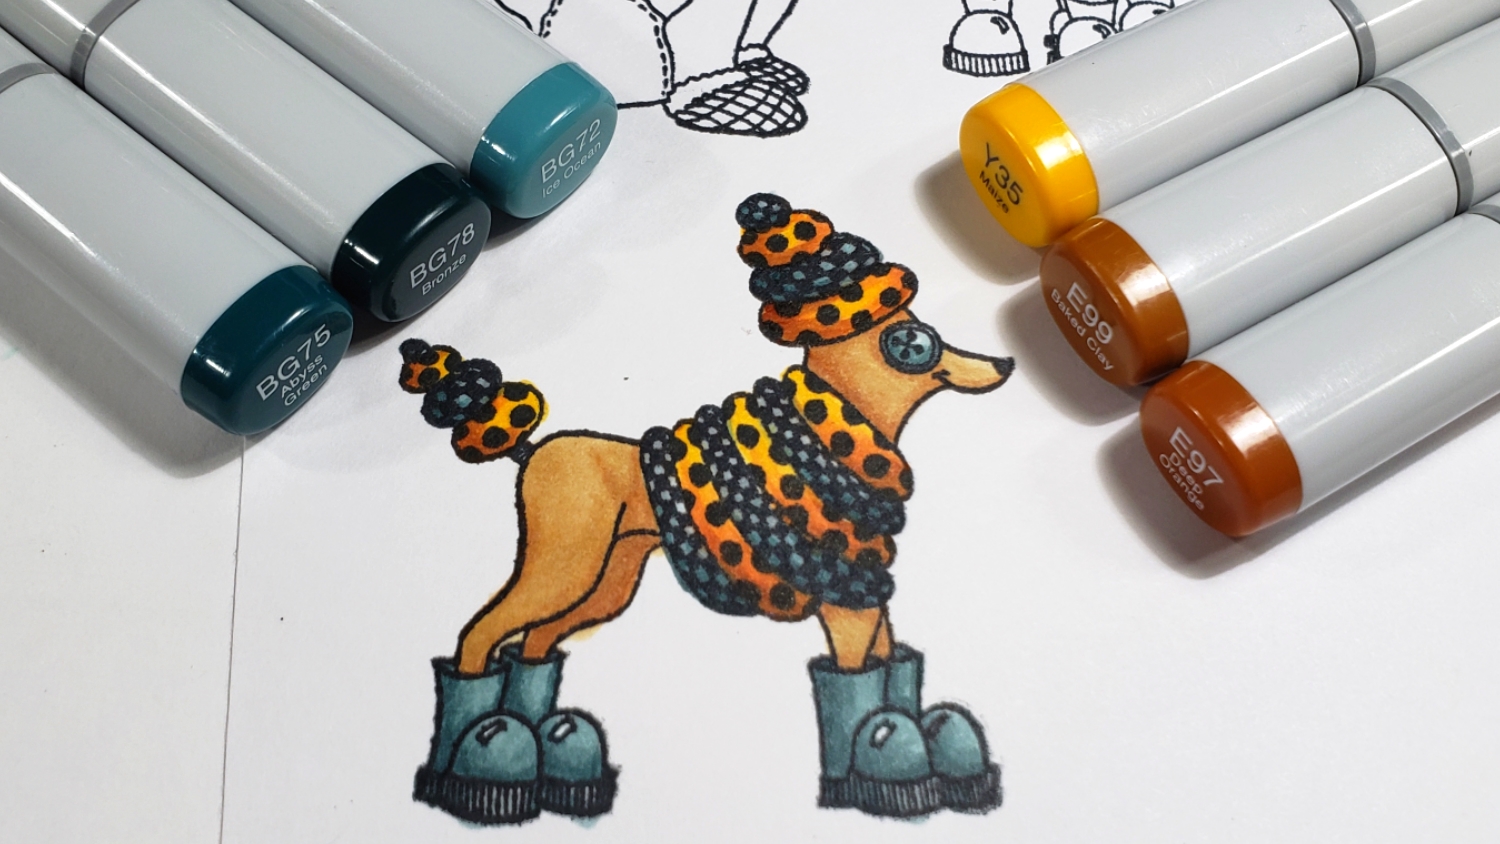
Poodle: Clothes: Y35, E97, E99, BG72, BG75, and BG78; Poodle body: E31 and E33
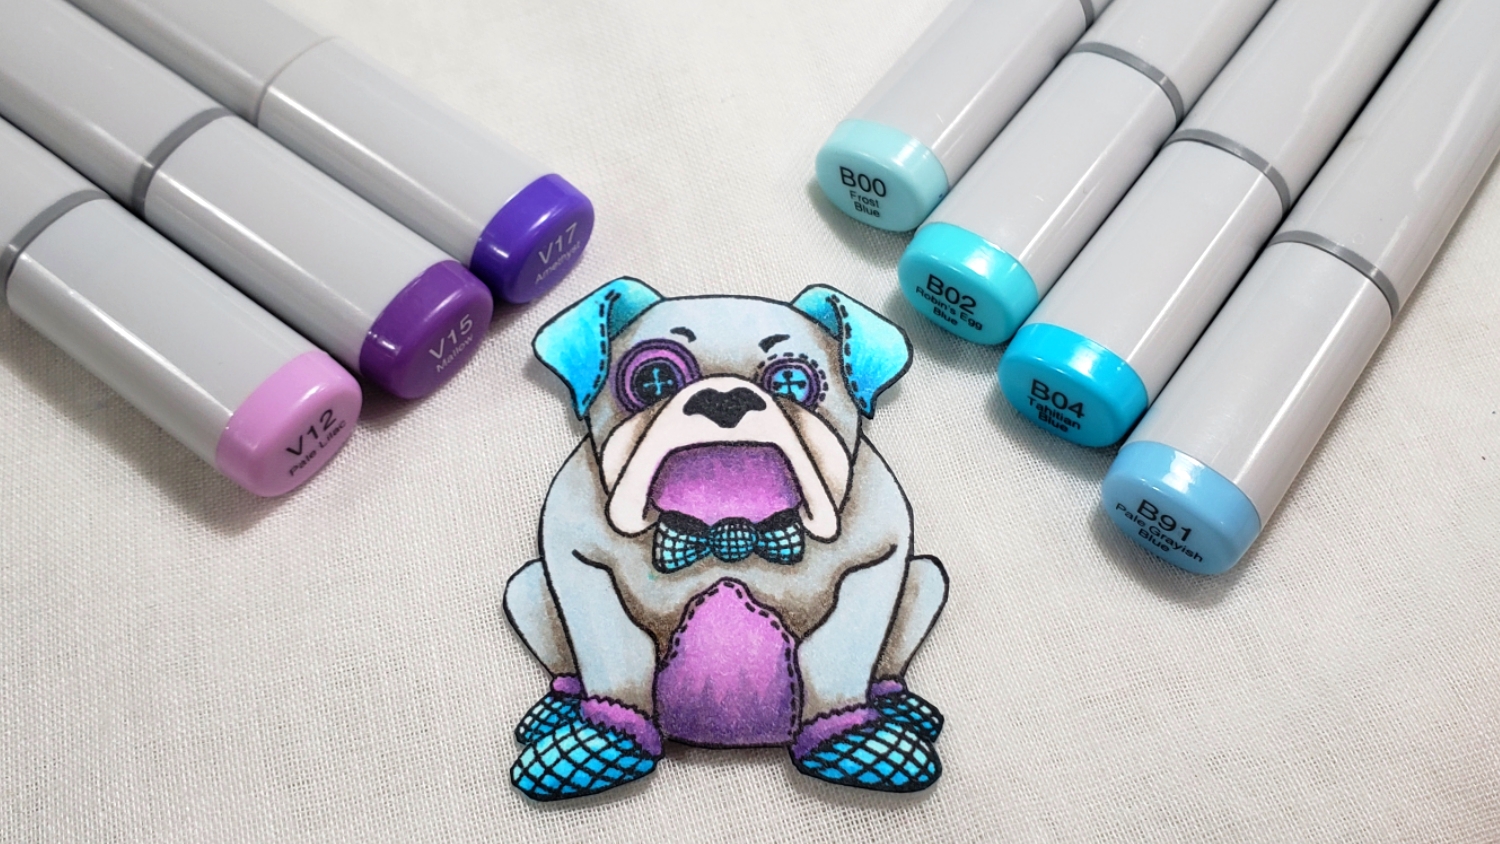
Bulldog: Clothes, ears, and purple patches: W0, W1, W3, V12, V15, V17, B00, B02, B04; Bulldog blue-gray body: W0, W1, W3, and B91
CLICK on the following picture to watch a Copic coloring process video:
Thanks for stopping by and for all your patience as I took a “family leave” break and as I ease back into crafting when I can!
]]>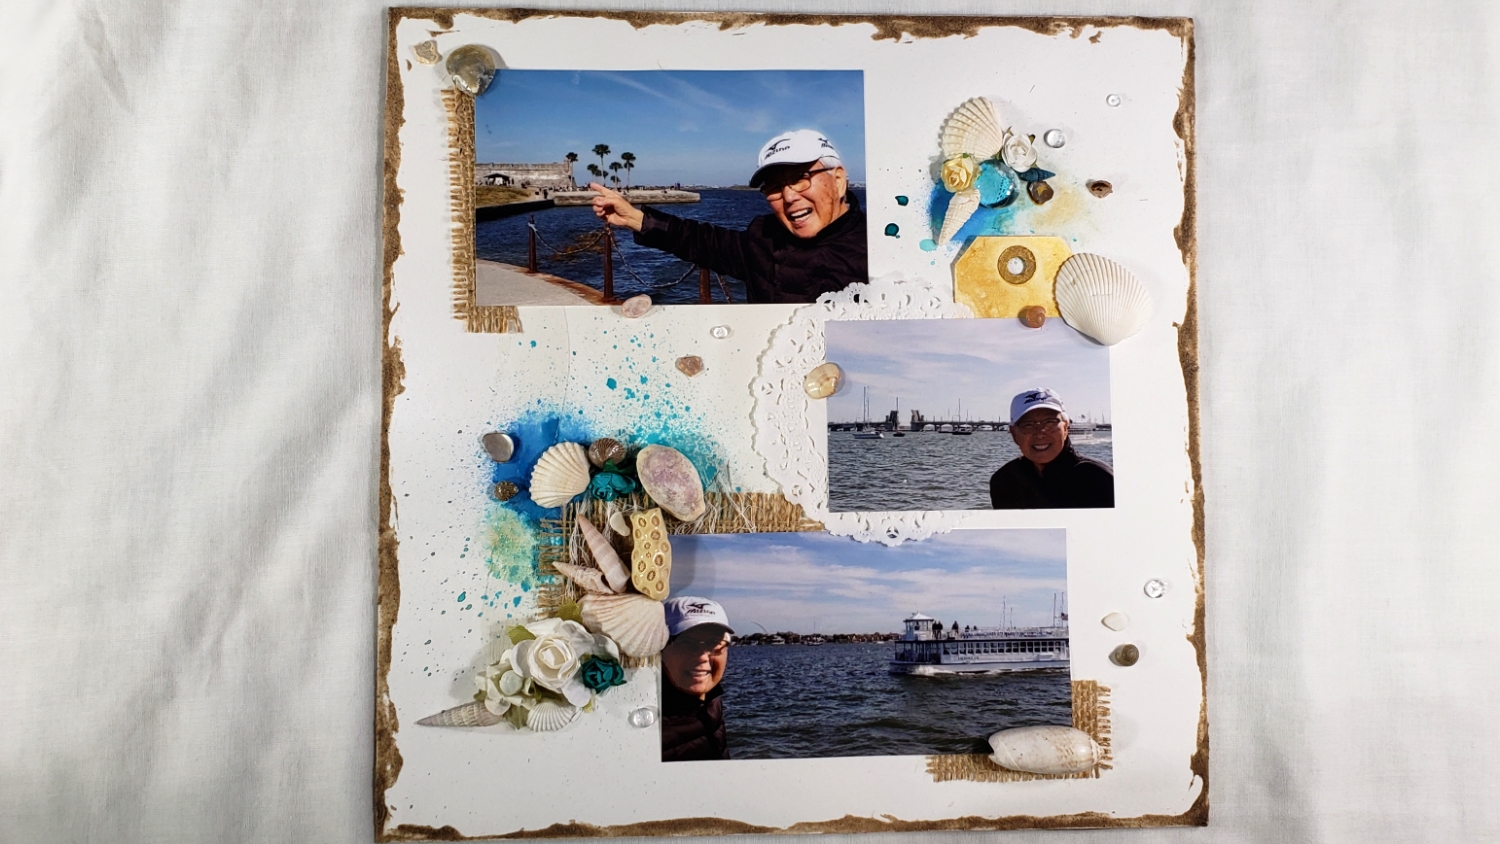
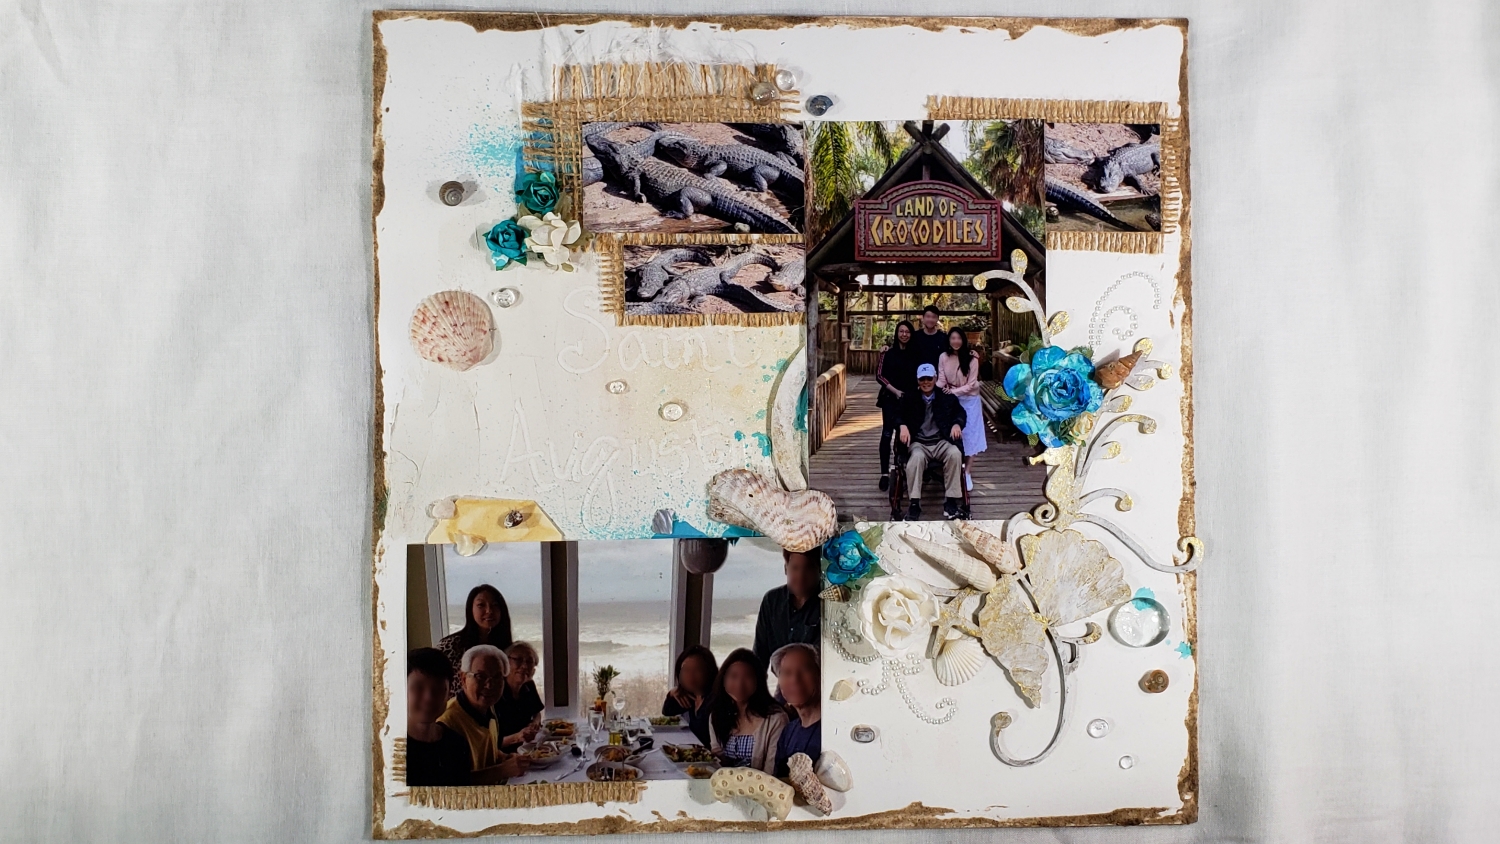
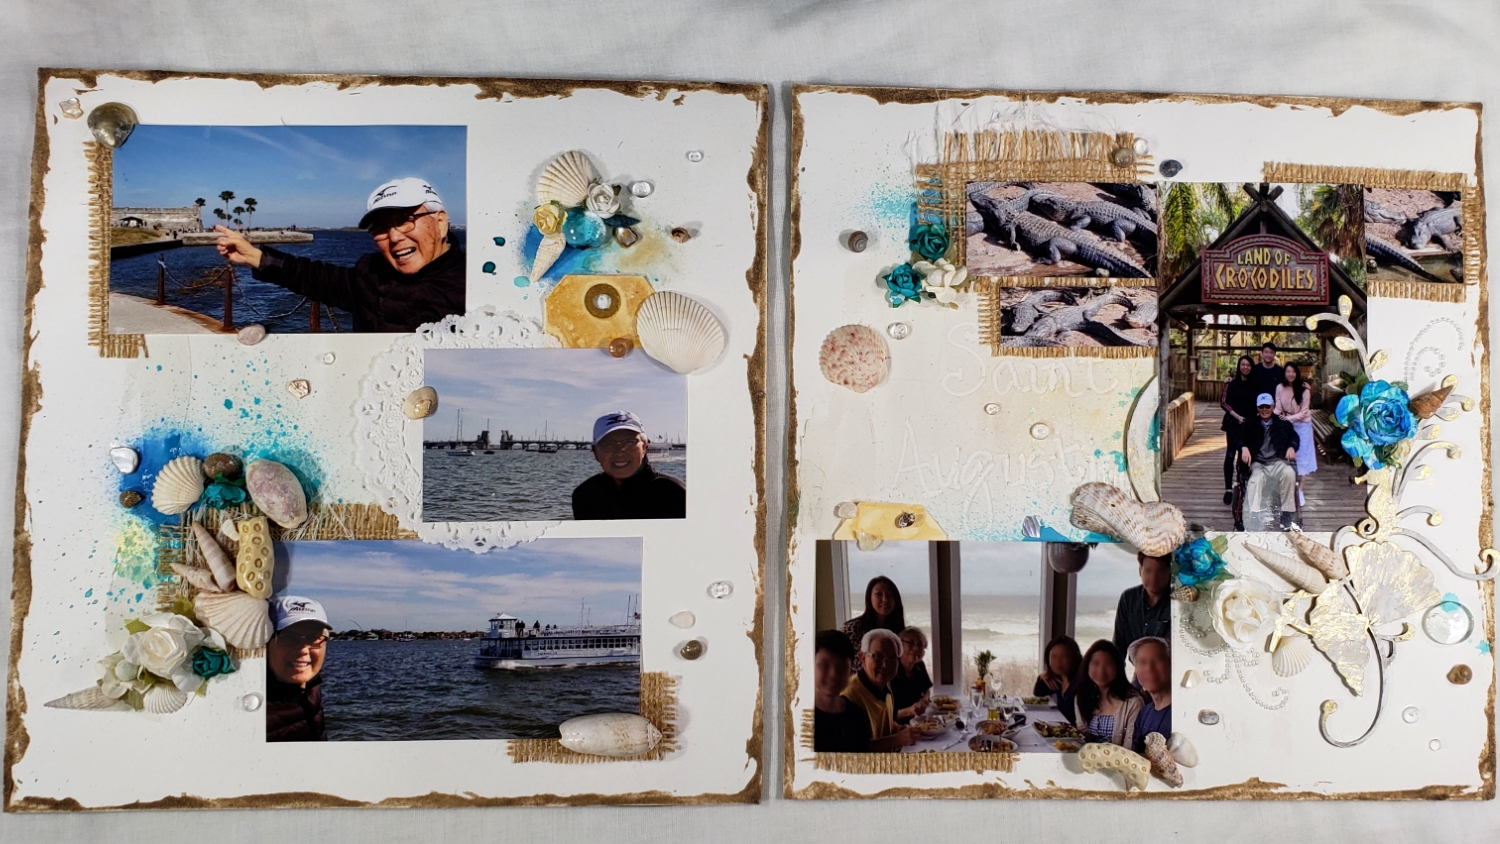
The bases are Canson XL Series Watercolor Textured Paper, which is incredibly robust and perfect for mixed media. The edges were distressed with new-to-me Art Anthology Mud Texture Paste. Then for the background texture, especially visible where I hand wrote “Saint Augustine” with the back end of a paintbrush, I used Art Anthology Sandstone Stone Effects. For the chip board pieces, I used Liquitex Gesso to soften the look and then rubbed on with my fingers some Art Anthology Gold Metal Effects to add a shimmer.
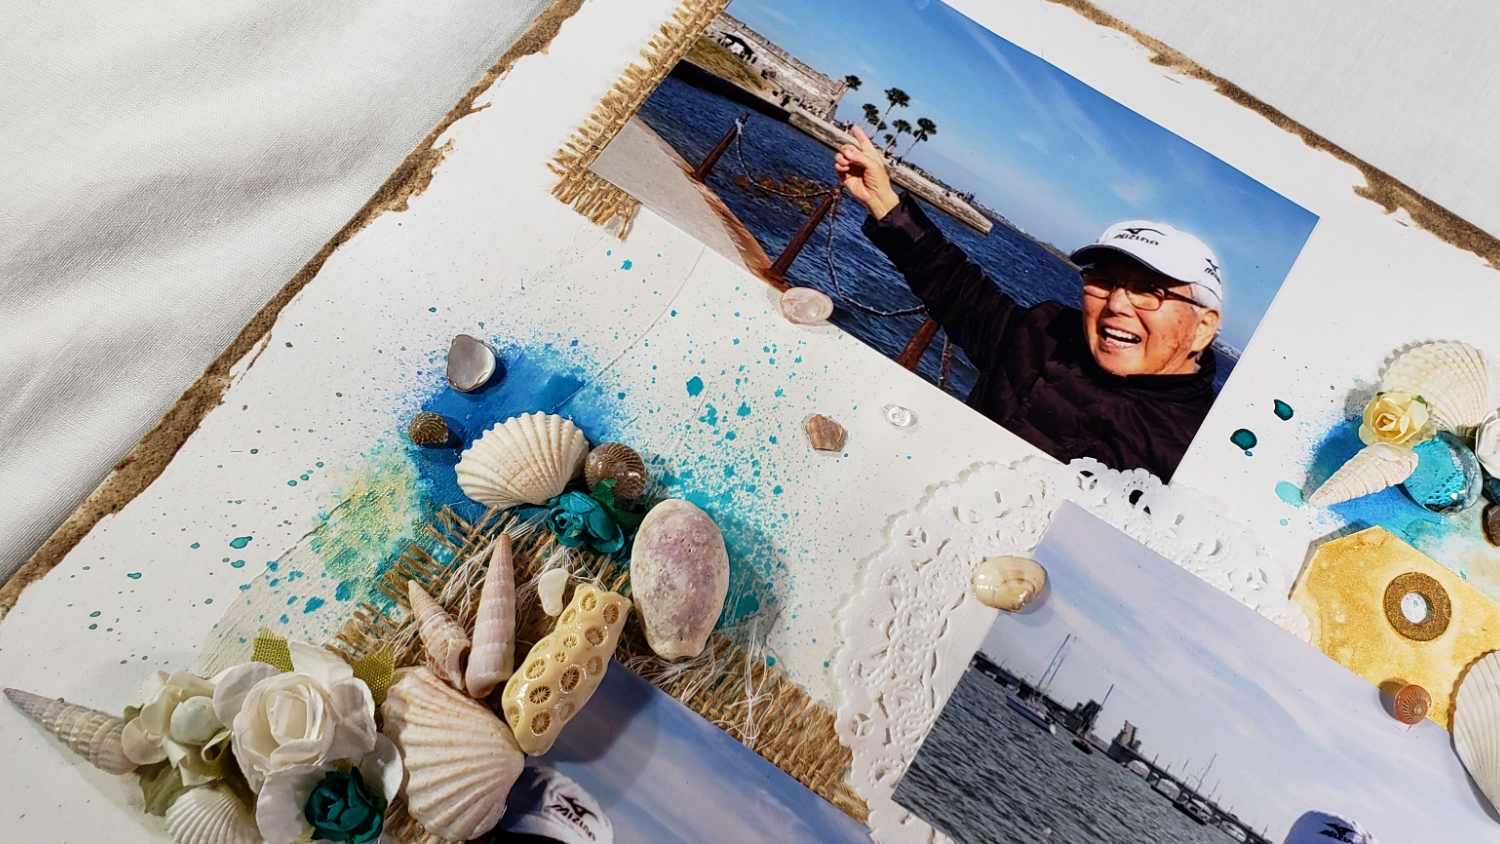
The other background elements to add texture, interest, warmth, and sea-worn look, I used gauze cheesecloth fibers, burlap (with the ends frayed), white flowers sprayed aqua with Art Anthology Siesta Key Spray, seashells, coral, paper doilies, pearl sticker gems, Heidi Swapp Gold Color Shine sprayed manila tags, and clear Pretty Pink Posh 4mm droplets and 6mm droplets.
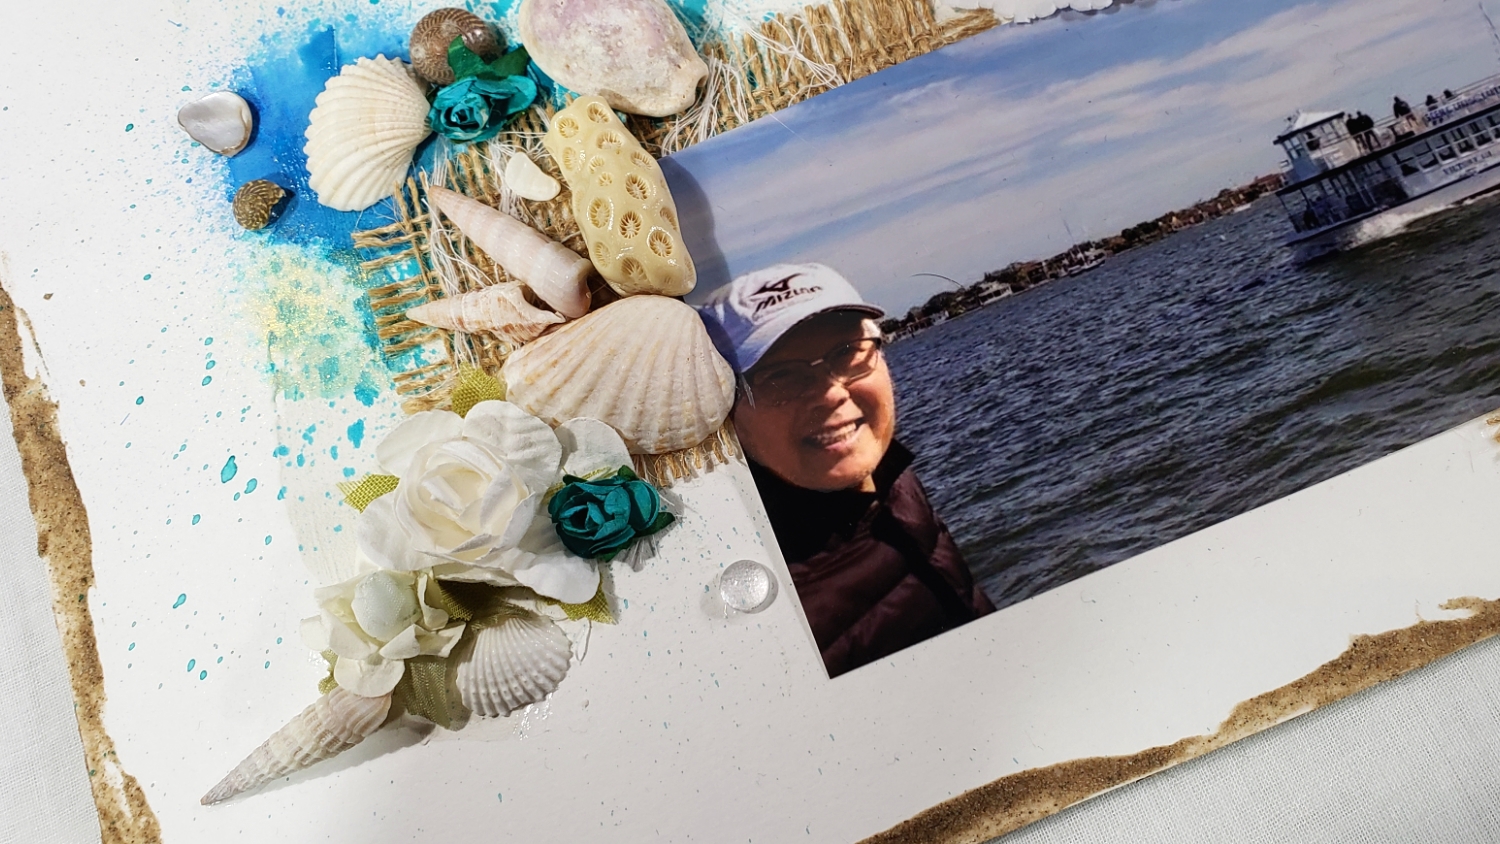
Then it was a matter of finding the pictures from our vacation that I thought would be fun to feature on the layouts. As these are going to be gifts for my dad I used 3 pictures of my dad at the St. Augustine down town area by the water, bridge and Castillo de San Marcos. For the second half of the spread, I used our family Christmas lunch picture (this was the only picture that had our whole family in it! – we were really bad about taking pictures), and a picture of my dad, me and my niece and nephew at the famous St. Augustine Alligator Farm.
To secure everything in place I used E6000 Glue (for permanent hold) and my Adtech hot glue gun (for quick placement, while the E6000 cures). Due to the very textured nature of many of the embellishments, many other wet glues would be less secure and not suitable. To make the layouts into display pieces, I also backed them with scrap cardboard (watch video for details). All these mixed media techniques are something relatively new to me, but I love the final results, and I think my dad will love these layouts as a keepsake gift!
CLICK on the following picture to watch the quick share and how to make these layouts displayable pieces (there is also a quick share of a shadowbox gift idea that I’ll describe in more detail on my next post):
Disclosure: Many of the supplies I’ve used for today’s project are linked. Some may be affiliate links, which means if you make a purchase I receive a small commission at no extra cost to you. I truly appreciate your support toward the costs of running this blog!
These layouts are being entered into the following challenges:
Simon Says Stamp Wednesday Something New Challenge
Simon Says Stamp Monday Use Something New Challenge
Word Art Wednesday Anything Goes Challenge
Creatalicious Anything Goes with Optional Something New Challenge
Simon Says Stamp Work it Wednesday Try Something New Challenge
Crafter’s Castle Anything Goes with Optional Fun Technique Challenge
613 Avenue Create Anything Goes with Optional Watercoloring Challenge
Crafts Galore Encore Anything Goes Challenge
Through the Craft Room Door Anything Goes Challenge
Lil Patch of Crafty Friends Anything Goes Challenge
]]>
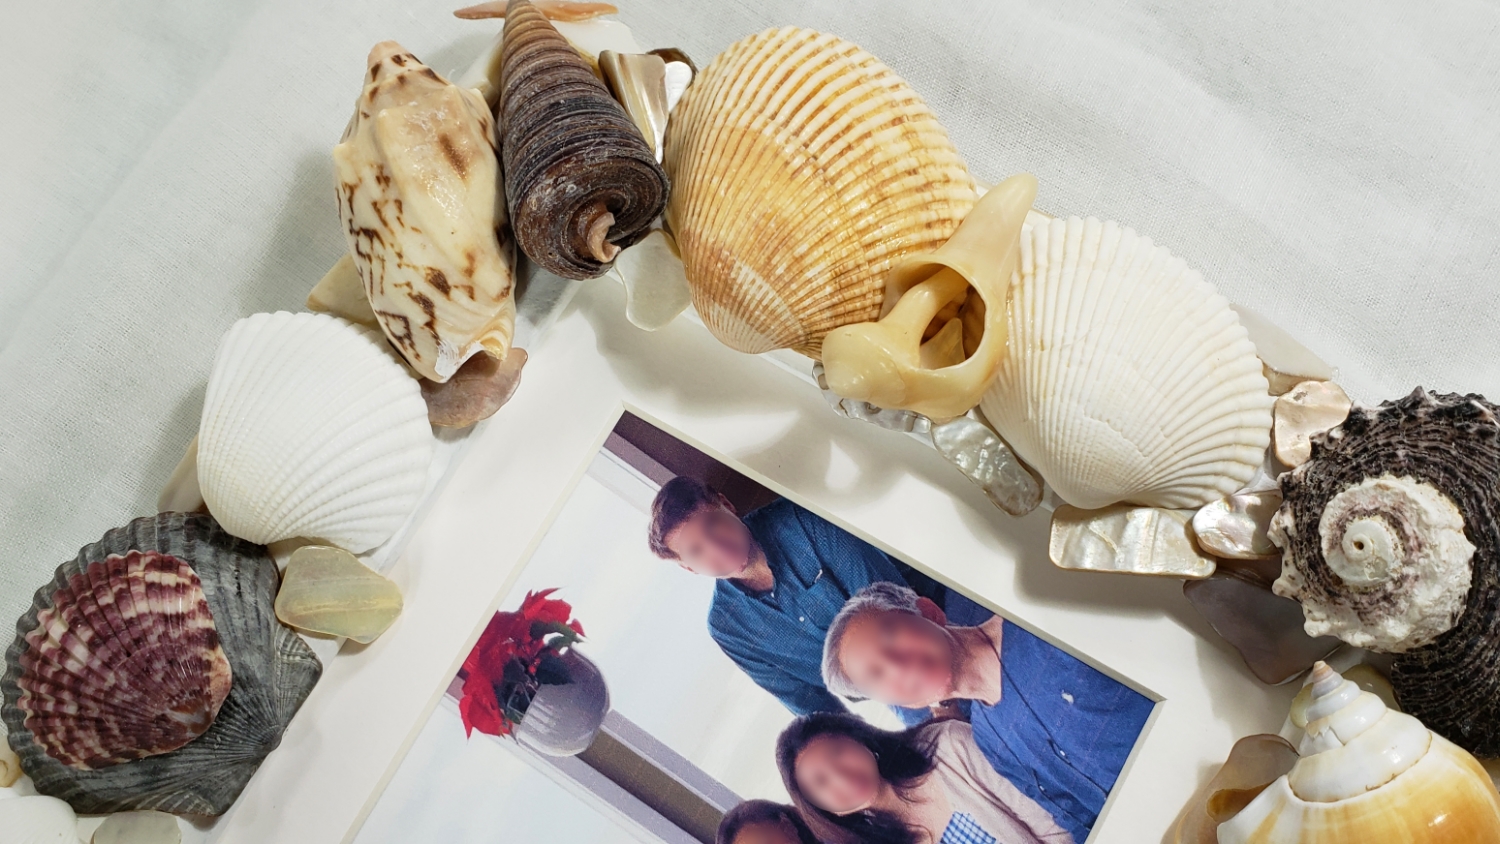
From our many walks along the beach, we picked up lots of beautiful seashells, and when I got home I knew I wanted to try something new and craft a special keepsake frame with them for my parents. Using a spare IKEA frame, I prepped the base with some Liquitex Gesso and white acrylic paint. Then after spending some ridiculously long futzing time with the collected shells (and some supplemental craft shells from the Dollar Tree), I designed what I think turned out to be a wonderful, meaningful gift.
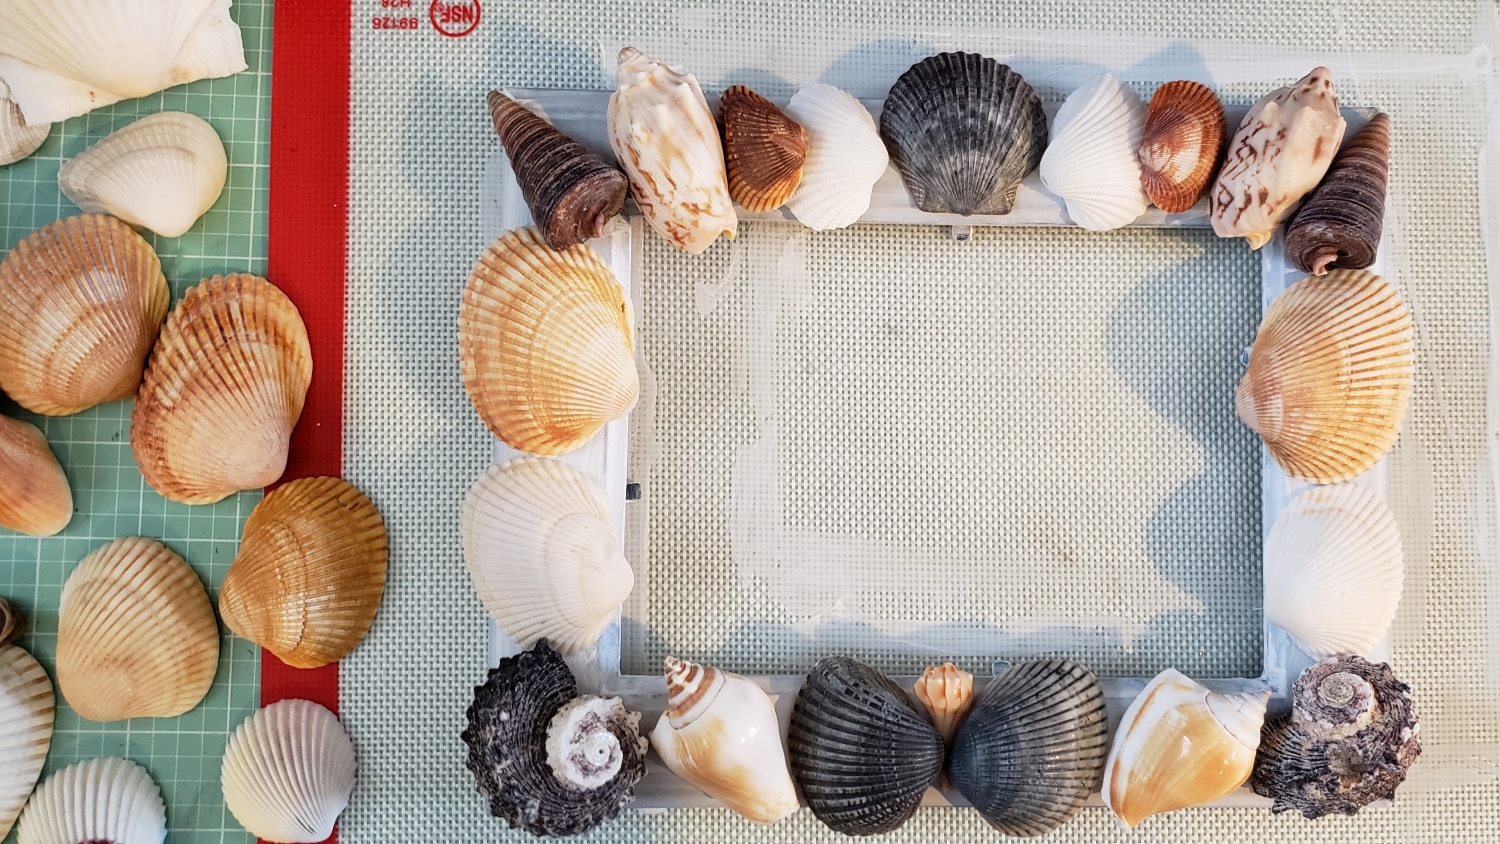
I tried various arrangements for the shells. Mostly I wanted the shells on the left and right sides of the frame to be mirror images of each other. I also wanted the biggest, roughest and dark shells in the four corners, largest on the bottom to visually weight the frame properly. Finally, I added a few unique shells from our beach combing adventures into prominent positions on the frame without regard for symmetry to highlight these special shells (each one has a little discovery story). When I was satisfied with the look, I used E6000 glue (this stuff is super strong but takes 24 hours to fully cure) to secure each piece in place.
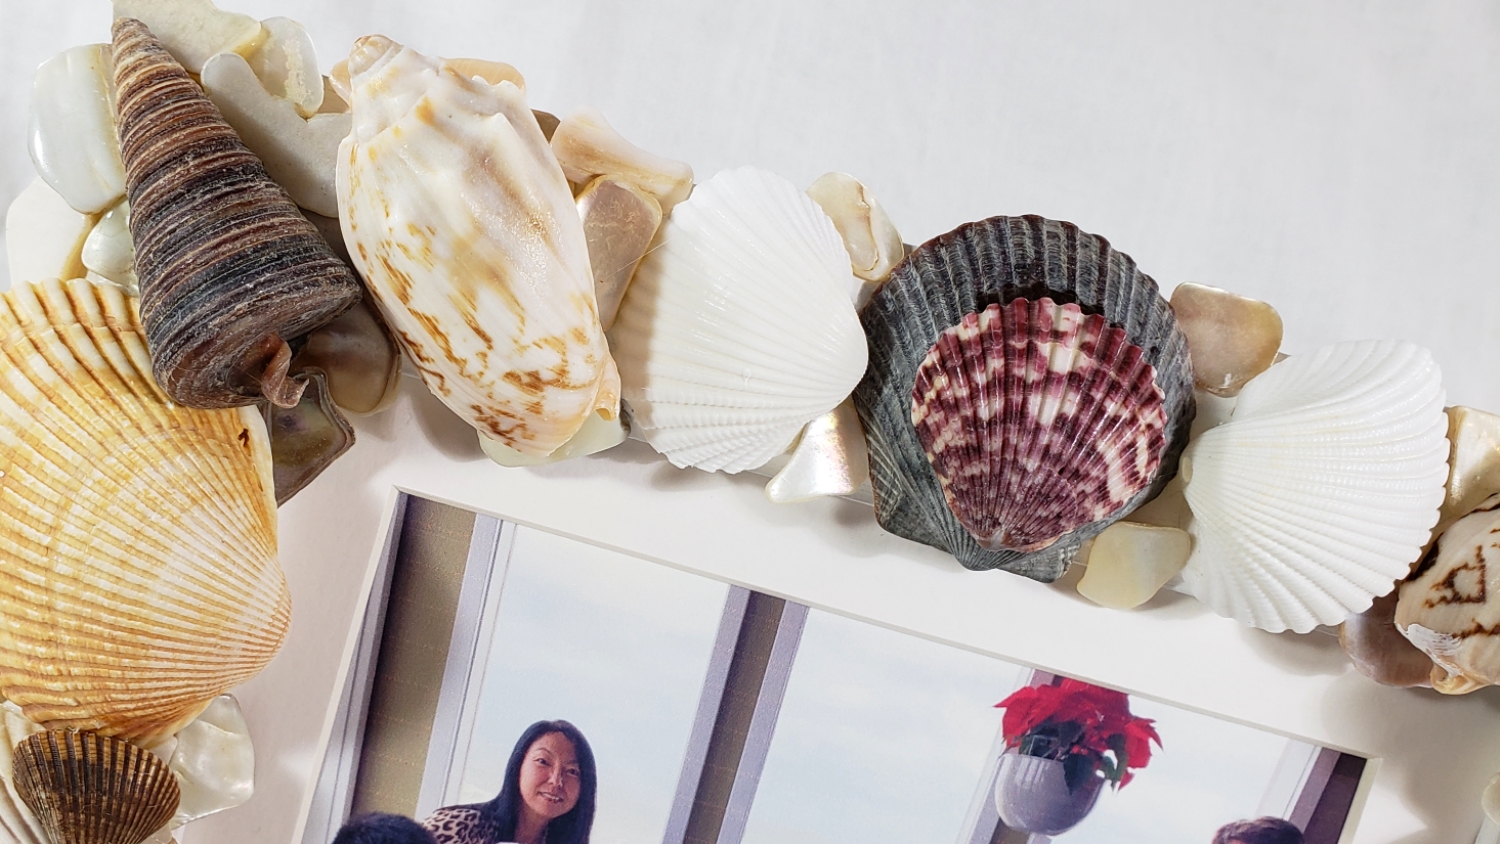
Then to fill in the gaps between the shells, I used crushed pearlized shell pieces that are sold as vase fillers. The resultant very heavy, luxe and naturally elegant frame went perfectly with the family picture we took at our Christmas lunch at The Reef Restaurant. I just gifted this to my parents (today is 3 days after our return home from this vacation), and they both got teary eyed and seemed to really be moved. While this is a small, inexpensive new year’s gift, it truly comes from the heart, and their reaction showed me that it was what they wanted more than any of the extravagant gifts we gave them for Christmas.
The following is a process video of crafting this seashell frame:
This keepsake frame is being entered into the following challenges:
Simon Says Stamp Wednesday Something New Challenge
Word Art Wednesday Anything Goes Challenge
Creatalicious Anything Goes with Optional Something New Challenge
Simon Says Stamp Work it Wednesday Try Something New Challenge
Lil Patch of Crafty Friends Anything Goes Challenge
ABC Christmas Challenge – A is for Anything Christmas Goes
Through the Craft Room Door Anything Goes Challenge
Crafts Galore Encore Anything Goes Challenge
The Corrosive Challenge Anything Goes
]]>
 I just couldn’t face dealing with all those memories so rather than following the tradition of getting our tree after Thanksgiving, Mr. CraftyPaws and I decided that we would keep the holiday decor simple this year and perhaps just hang a couple of wreaths. So I picked up a simple live wreath for $8 at Walmart (this was even cheaper than the $10 live wreaths at Trader Joe’s, but I might go pick one of those up since I think they’re made of Boxwood).
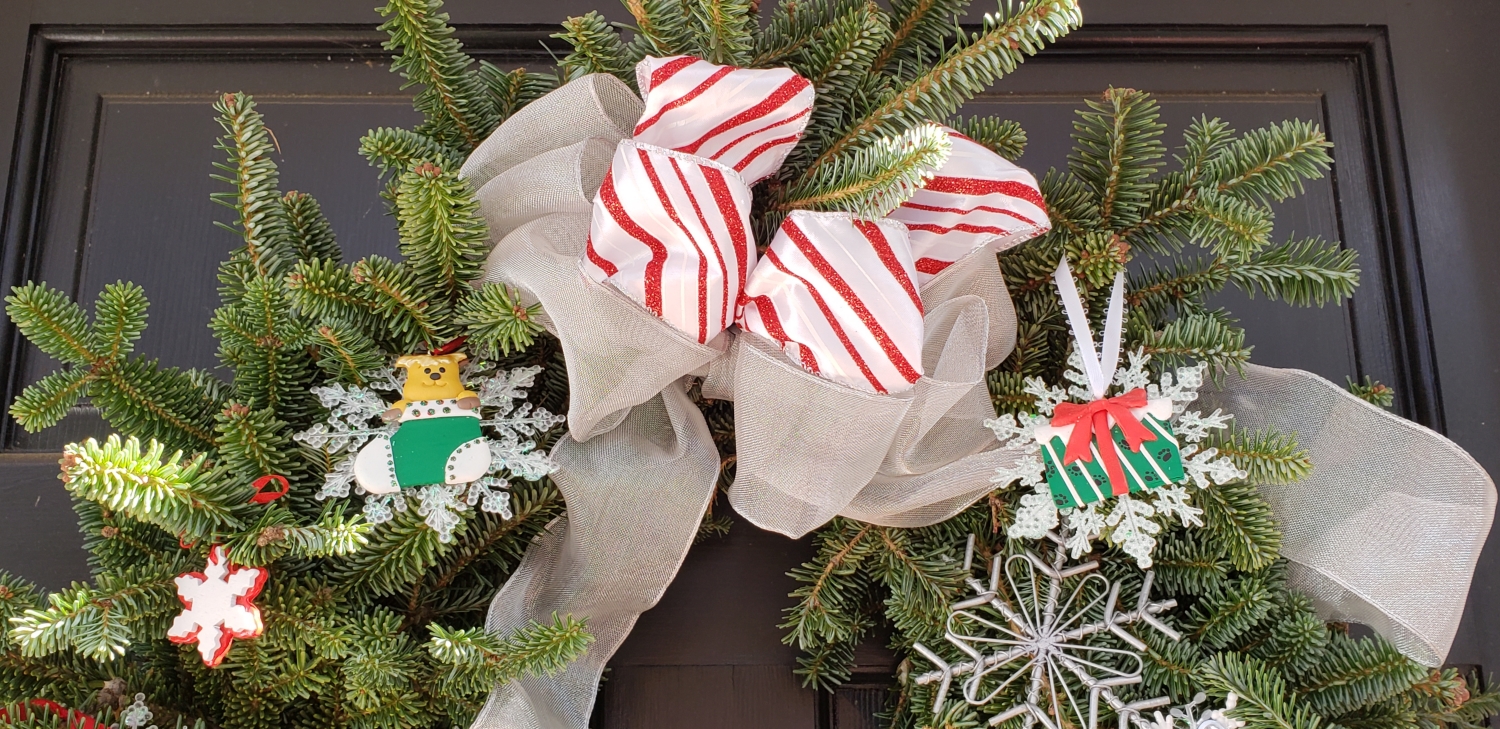
First I had to take off the cheap plastic/faux velvet bow, and made a triple loop bow from silver metal mesh wired ribbon and a double loop red and white sparkly satin wired ribbon that I secured to the top of the wreath with twist ties. Then I dragged out my Rubbermaid container where I had stashed post-holiday clearance buys from Michaels’ $2 grab bags (yes, these are from before they raised the prices to $3 and then $4) and the Dollar Tree years ago.
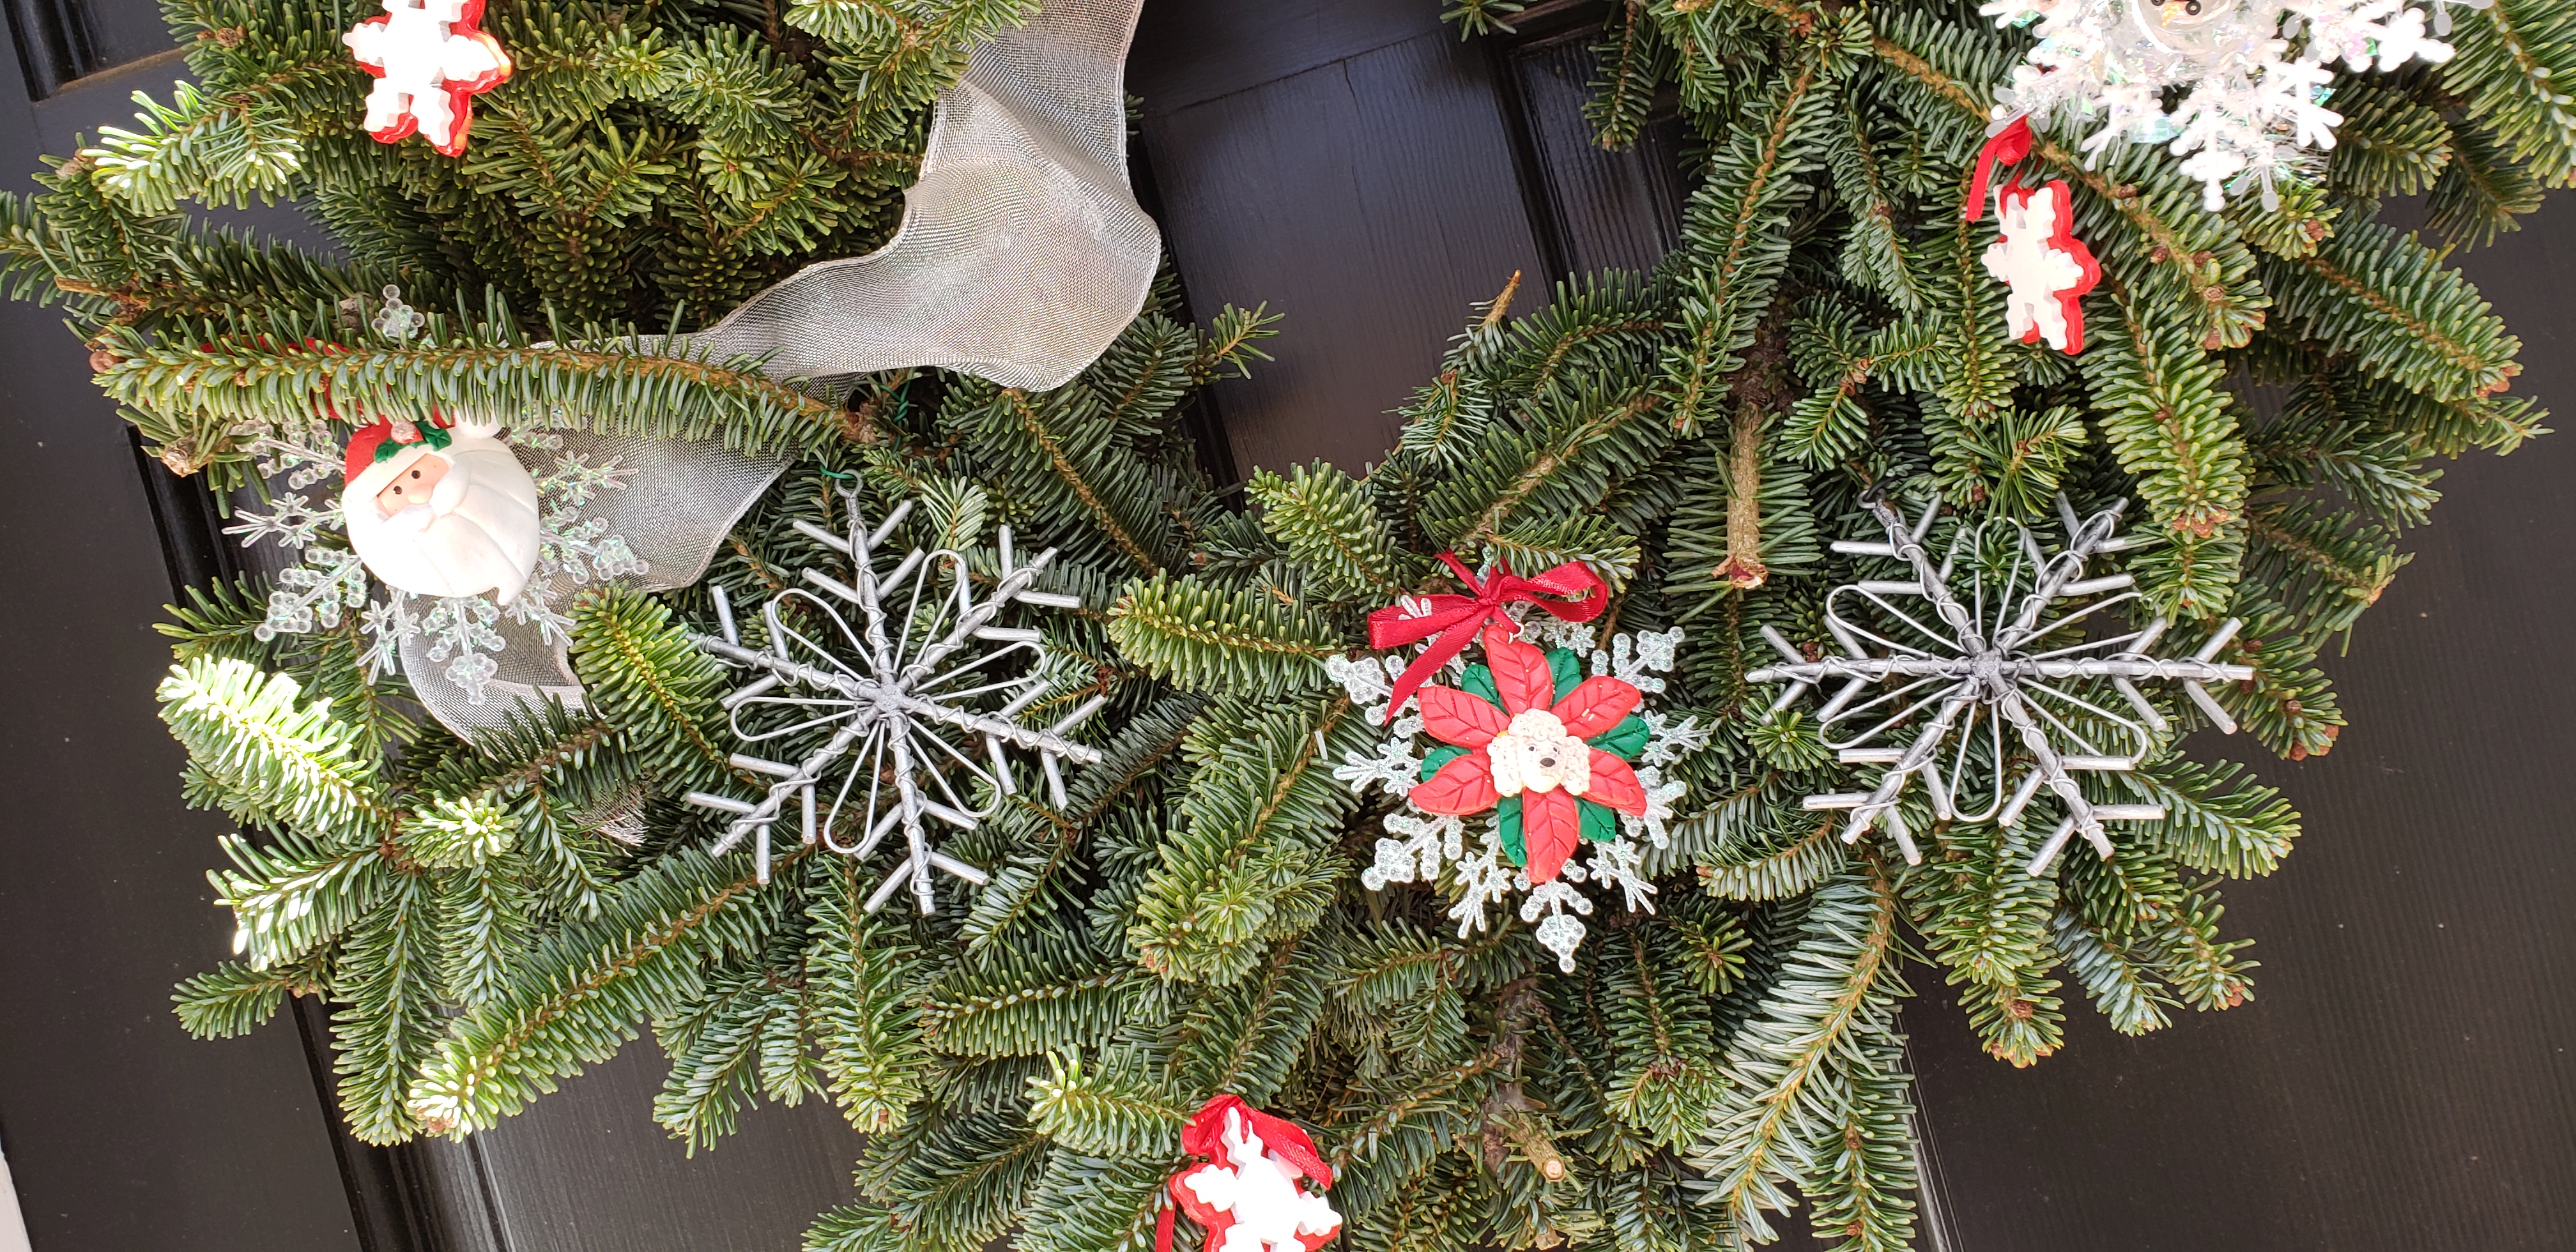
I tried to keep the same types of decorations in odd numbers for a pleasing look and started by tying on 3 small red and white wooden snowflake ornaments and 3 rough metal and wire snowflakes; these were the old Michaels pick-ups. Then I re-discovered some shimmery plastic snowflakes with clay embellishments layered on them that I had put together from the Dollar Tree. One of them had a little apricot poodle head at the center of a poinsettia flower, but somehow it seemed right to have this little reminder of Biscuit front and center on the wreath.
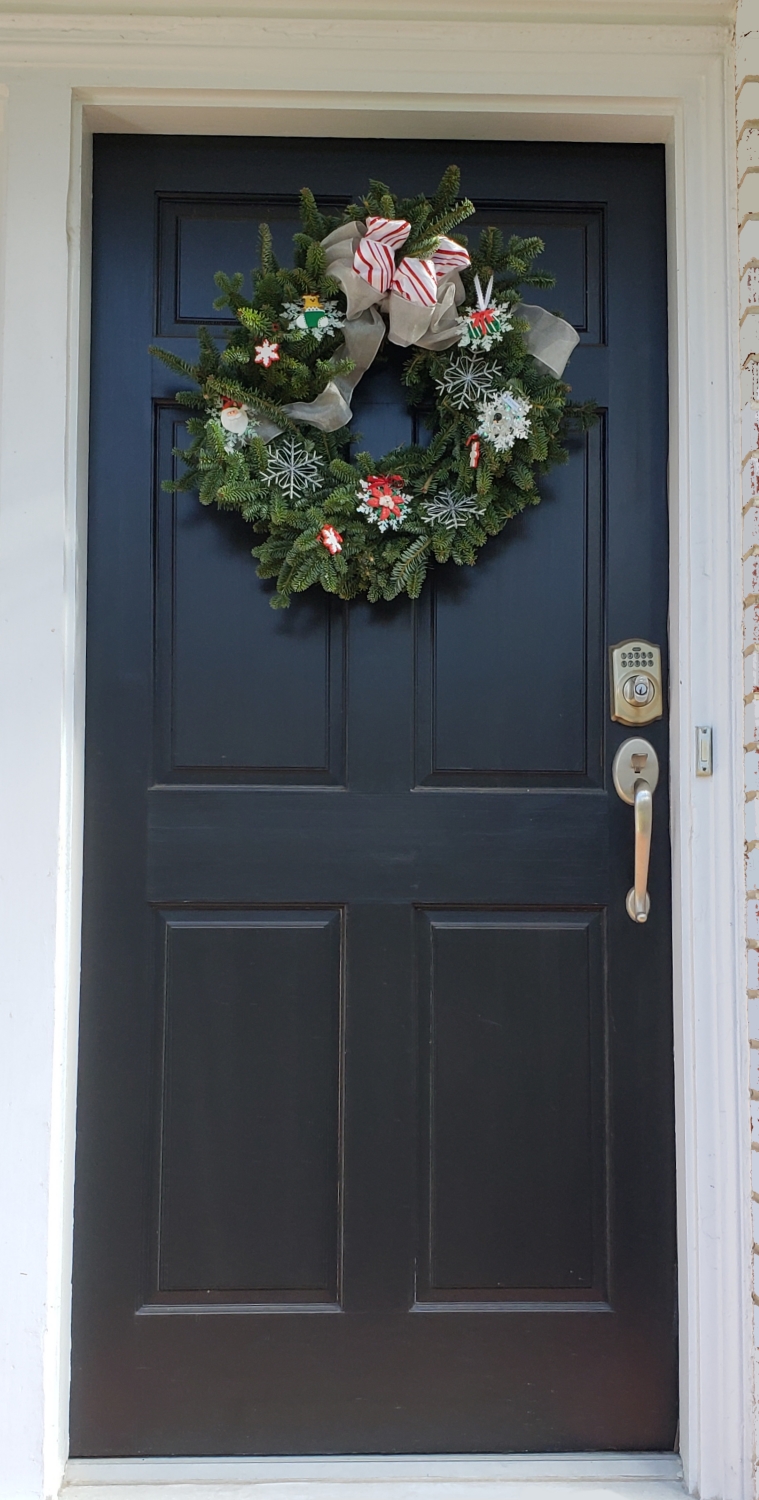
This last picture is how the wreath looks hanging on our front door. I am pleased with the simple, layered homespun look. It’s personal but it wasn’t emotionally taxing for me to craft. In fact, it was enjoyable enough that I am considering doing another one for our side kitchen door! I love how warm and welcoming it looks when folks approach our home from the cold outside.
This wreath is being entered into the following challenges:
Simon Says Stamp Wednesday Baby It’s Cold Outside Challenge
Word Art Wednesday Anything Goes Challenge
Creatalicious Anything Goes with Optional Layer It Up Challenge
Lil Patch of Crafty Friends Anything Goes Challenge
Fab ‘n’ Funky Christmas Challenge
Just Keep On Creating Anything Goes Challenge
613 Avenue Create Anything Goes with Optional Winter/Christmas Challenge
Crafts Galore Encore Anything Goes Challenge
The Corrosive Challenge Anything Goes
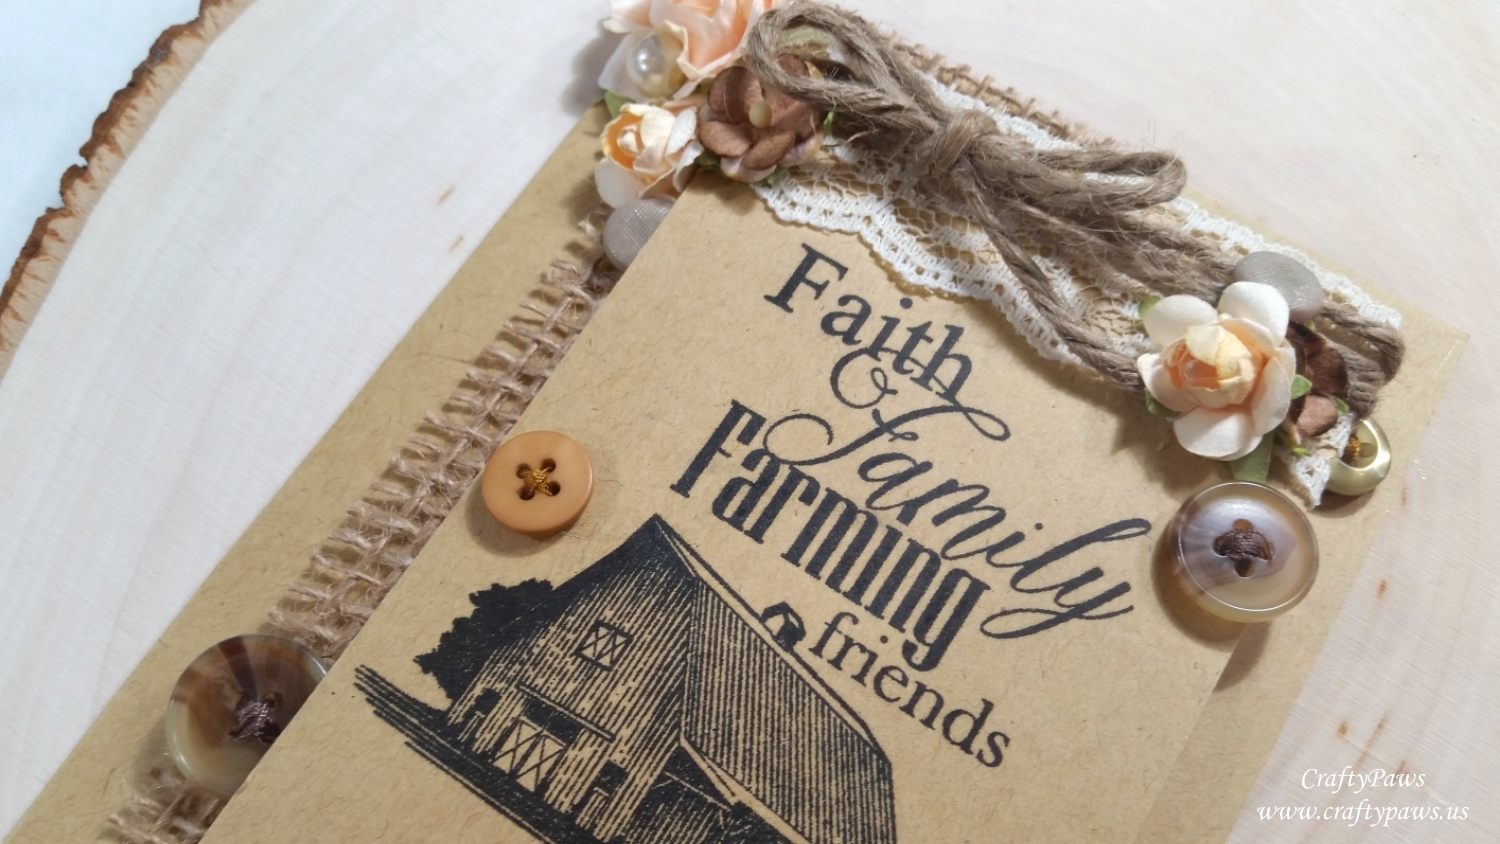
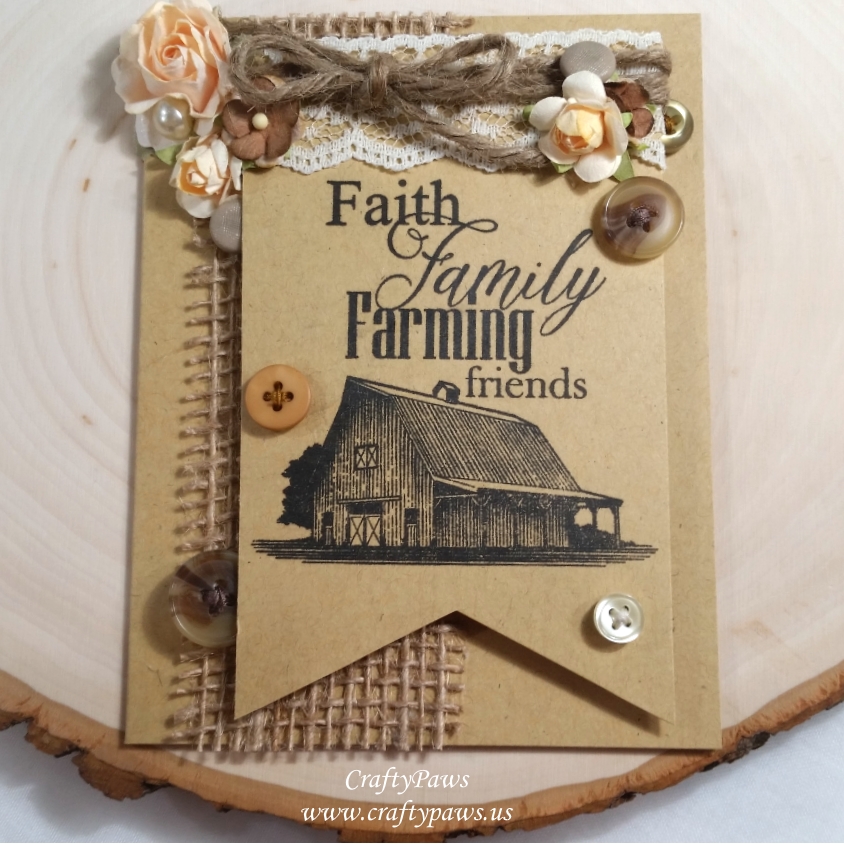 I started with the Kraft cardstock from the kit to make the card base as well as the card front piece onto which I stamped out the beautiful sentiment and barn. The stamp is so beautiful, that I almost could have stopped there, but of course, I didn’t. 🙂
I hand cut the stamped piece into a dove-tail banner shape and wrapped the top of the banner with a scrap of lace and a bit of twine. I added a twine bow to the twine wrappings and then to compensate for the bulk added by the twine, I backed the lower part of the banner with two layers of fun foam sheets.
Then to add more texture, before adhering the banner to the card base, I cut off a segment of the burlap ribbon from the kit. I took the time to cut off the finished edges of the burlap ribbon and fray all the edges in order to unleash the full power of and celebrate the rough form of burlap before I secured it to the card front. Like the twine bow, I adhered this off-center to the card front so reveal more of the ribbon and add interest.
Then I decided to soften the look of the card a bit more by adding three peachy tan paper flowers and two brown flowers. I created small clusters with these at the ends of both ribbon bow tails. I intentionally selected these flower colors because I wanted to keep the whol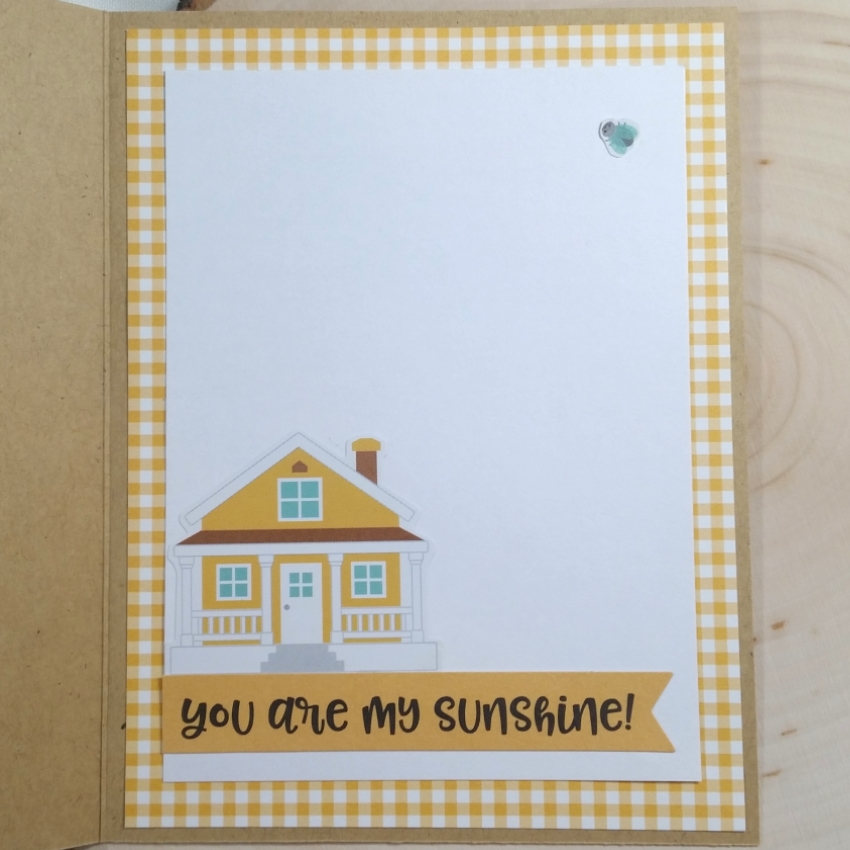 e card monochromatic to up the sophistication level.
Then for a bit of whimsy, I poured through my button stash and grabbed a pearl on, two putty colored linen covered ones, and a handful of mixed faux tortoiseshell, pearly white and tan buttons in different sizes. For those buttons with button holes, I also took the time to put thread through each one in a cross pattern. I didn’t want the buttons to look like they were just buttons from a button jar. Rather, I wanted them to look like they were re-used and upcycled from old clothes, and I think the threading helps give that impression.
True to the Primitive Style, I like the collected-over-time look of these various buttons. I think they add a sense of love and a thoughtfulness to the card. After futzing with each button’s positioning for a ridiculous amount of time, I finally decided to tuck some into the flower clusters, some behind the banner, and some on top of the banner.
For the inside of the card, I shifted the color scheme a bit and went with a country golden yellow gingham from the My Favorite Things “Tiny Checks” collection for the mat. I also added a country farmhouse and beetle sticker and a “you are my sunshine!” banner to decorate the liner; all of these pieces are from the Doodlebug “Down on the Farm” part of the Scrapping For Less May “In the Countryside” Double Dip Kit.
Disclosure: Many of the supplies I’ve used for today’s project are linked. Some may be affiliate links, which means if you make a purchase I receive a small commission at no extra cost to you. I truly appreciate your support toward the costs of running this blog!
The following is a process video of crafting this card:
This card is being entered into the following challenges:
Word Art Wednesday Anything Goes Challenge
Creatalicious Anything Goes Challenge with Optional Flowers
Lil Patch of Crafty Friends Anything Goes Challenge
Fab ‘n’ Funky Monochrome Challenge
613 Avenue Create Anything Goes with Optional Buttons and Bows Challenge – WINNER
Penny Black and More In the Garden Challenge
Crafty Gals Corner Anything Goes Challenge
Stamping Sensations Anything Goes Challenge
The Corrosive Anything Goes Challenge
]]>
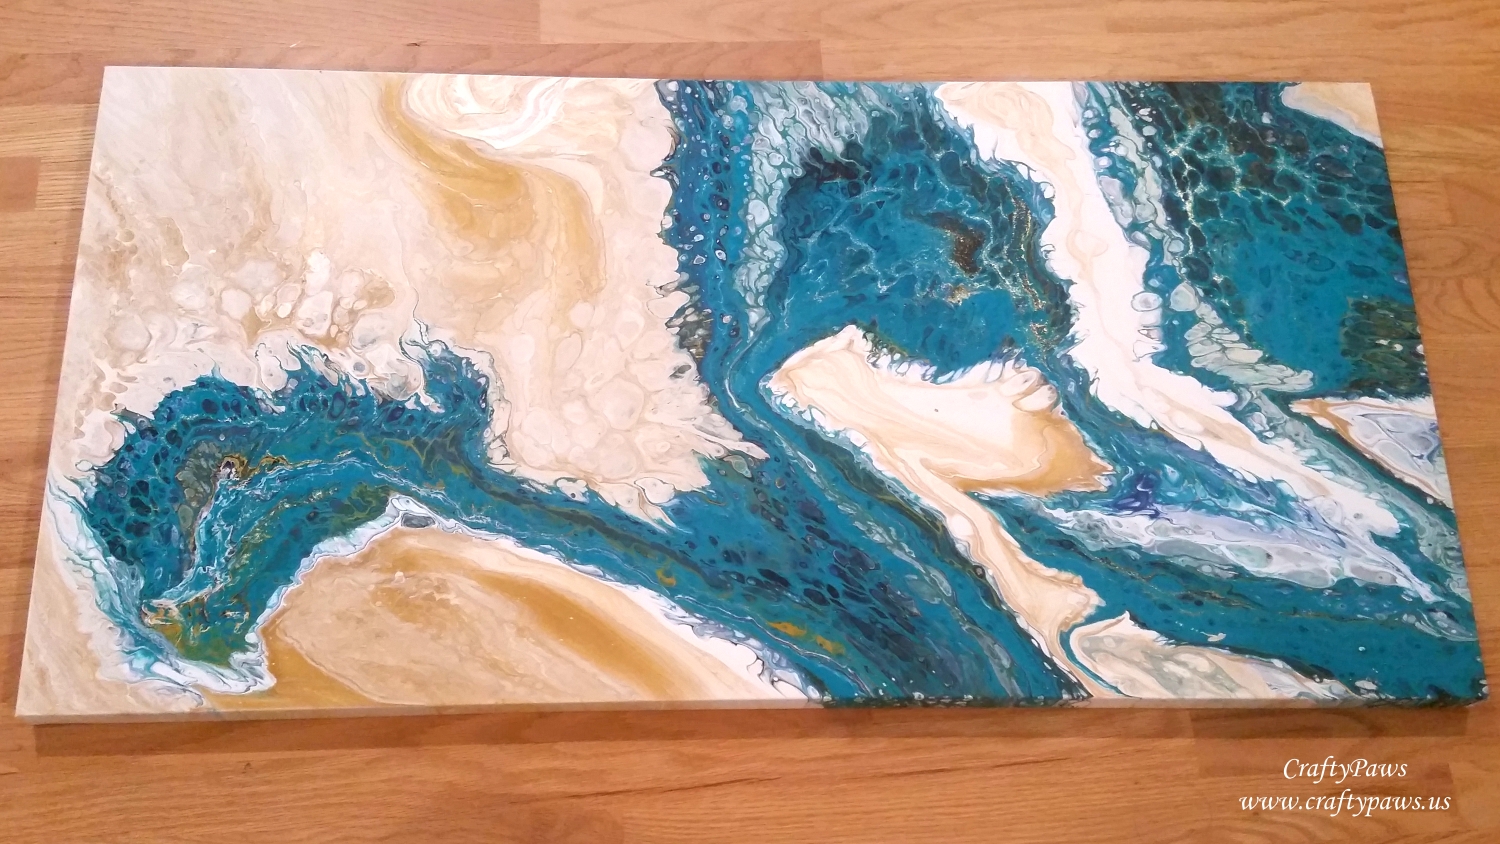
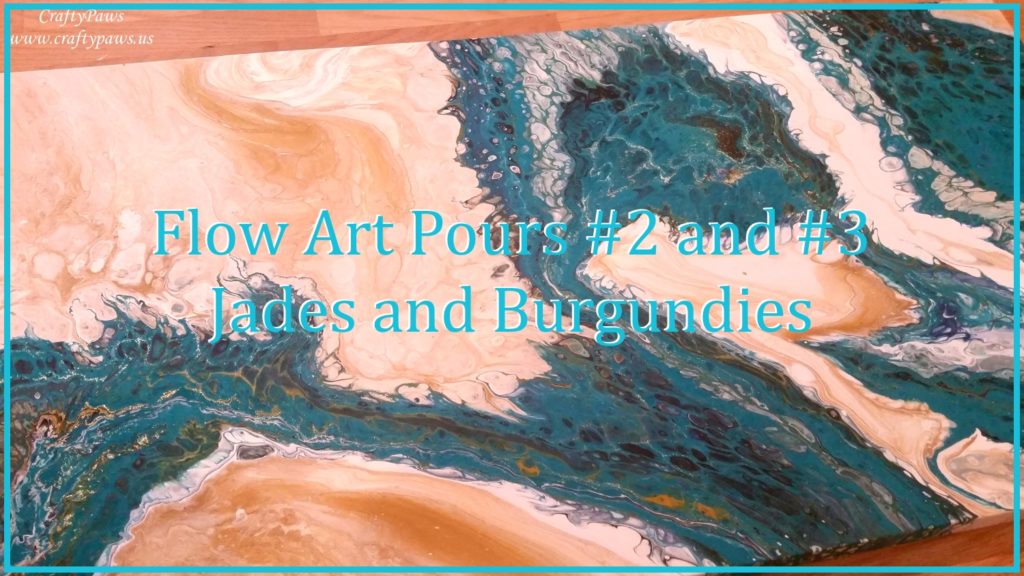
For my second canvas, I wanted to create something fresh with blues and greens while complimenting these brighter hues with golden earthy colors so that the piece would fit in the office lobby space, which is all in browns and creams. So I used the following paints from my stash: Ranger Dylusions Vibrant Turquoise; Apple Barrel Dutch Blue and Black; Craft Smart Bright Blue, Turquoise, Black and White; DecoArt Fluid Acrylic Metallic Gold; Sargent Art Acrylic in White and Black; and Martha Stewart Multi-Surface Glitter Paint in Florentine Gold.
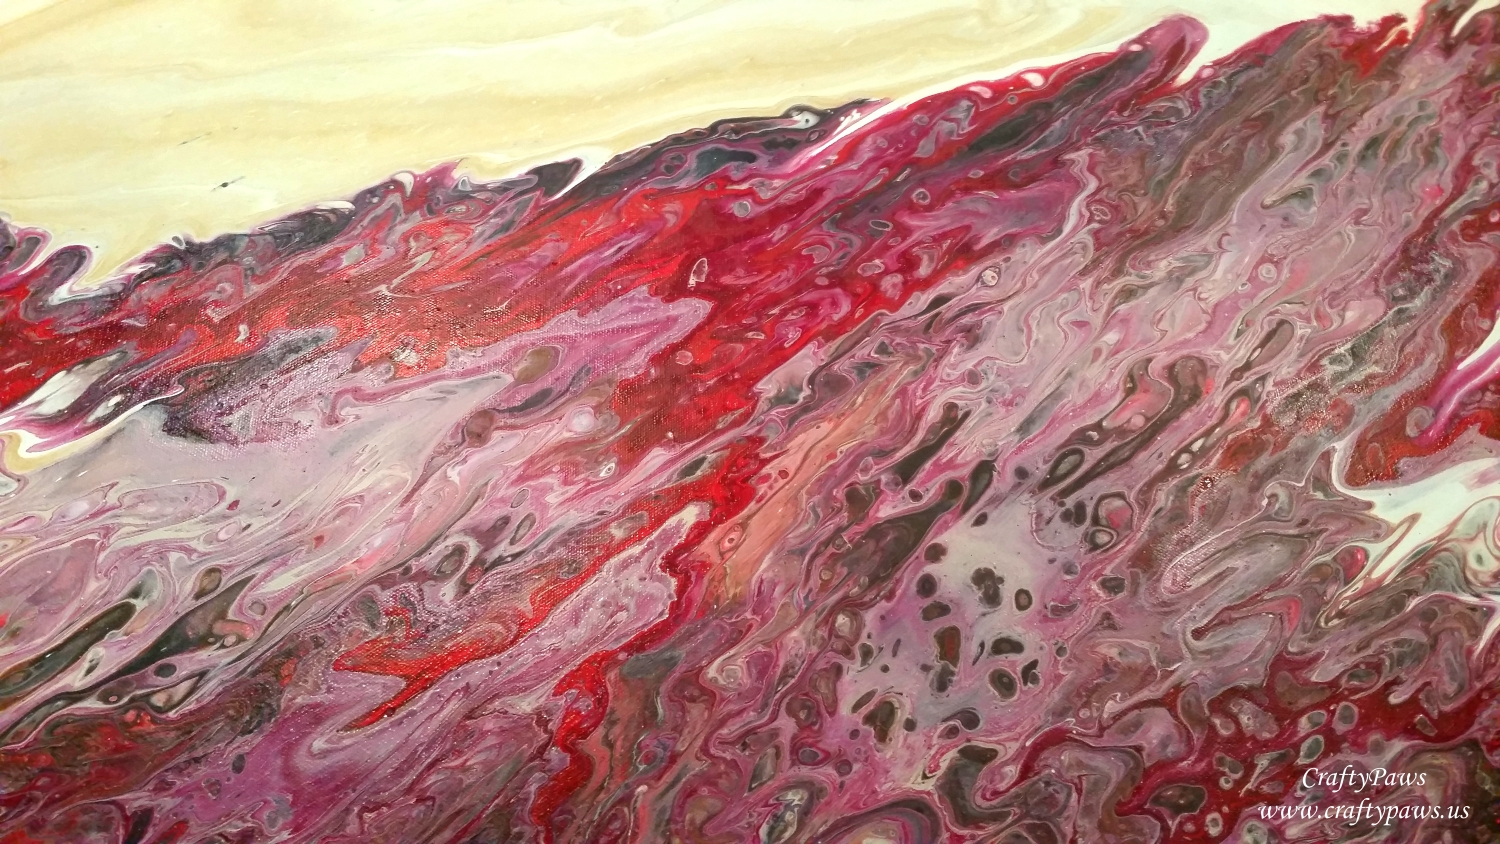
For my third canvas, I wanted something really vibrant with a dominant burgundy color along with some calmer golden creamy tones in the “negative space” part of the canvas so I used these paints from my stash: DecoArt Fluid Acrylics in Quinacridone Violet and Pyrrole Red; Martha Stewart Satin Multi-Surface Putty; Folk Art Metallic Antique Gold; Sargent Art Acrylics in White and Black; and Martha Stewart Multi-Surface Glitter Paint in Florentine Gold.
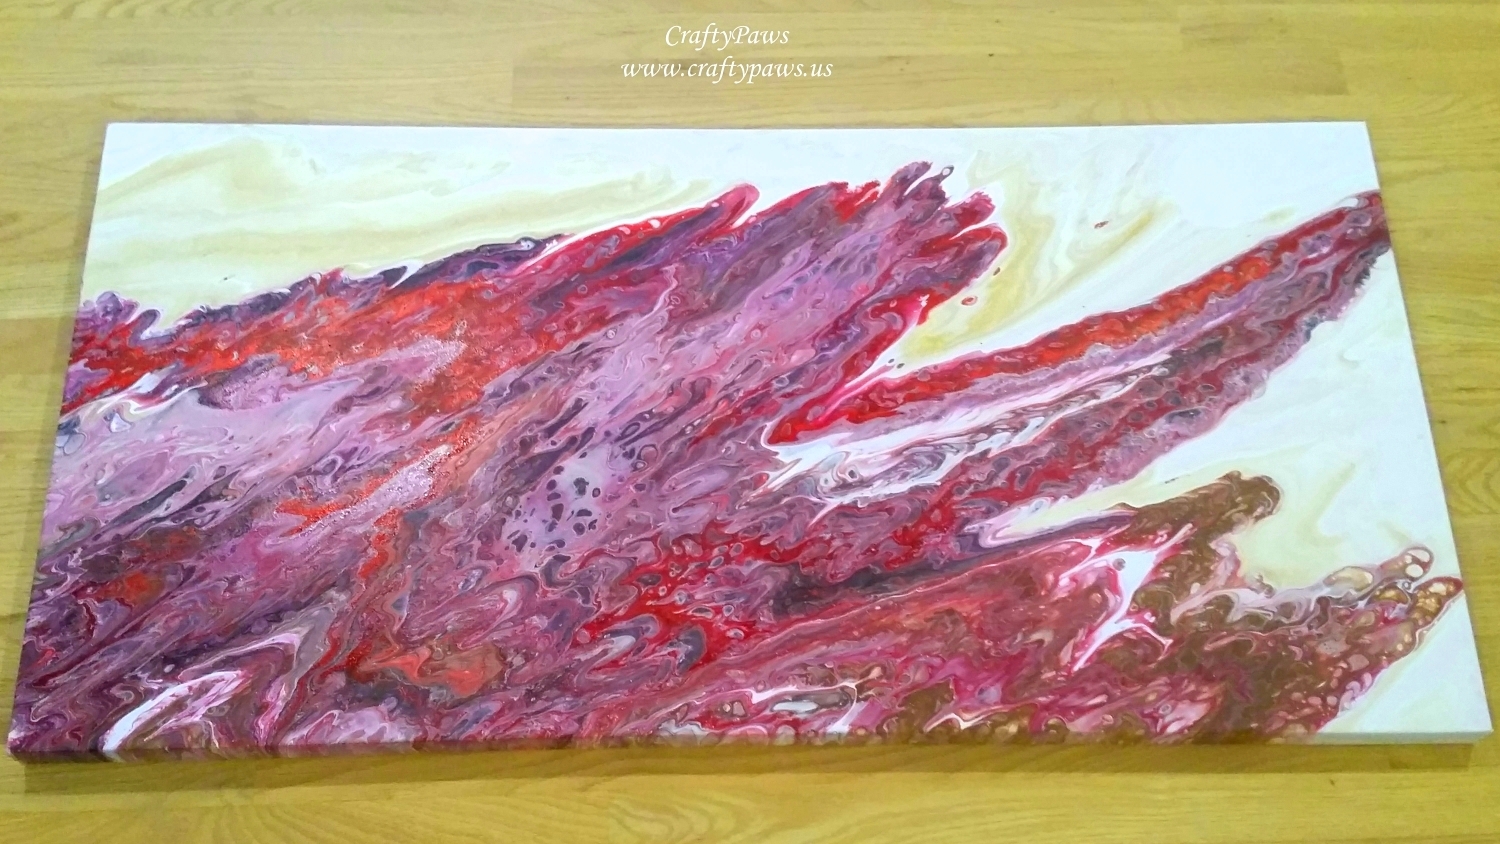
For both of these canvases, I used a double dirty pour and tilting technique. I wanted lots of fluidity, energy and cell formation, and I think by mixing one dirty pour with the dominant colors and a second dirty pour with just the white and metallic gold for the negative spaces, a good balance and harmony emerged. I now have to wait for about a week to 10 days before I can clean the silicone from the canvases so that I can varnish them – stay tuned for the next installment of this series!
The following is a process video of more paint mixing, pouring and tilting:
Disclosure: Many of the supplies I’ve used for today’s project are linked. Some may be affiliate links, which means if you make a purchase I receive a small commission at no extra cost to you. I truly appreciate your support toward the costs of running this blog!
This canvases are is being entered into the following challenges:
Lil Patch of Crafty Friends Anything Goes Challenge
Addicted to CAS Gold Challenge
Card Mania Anything But a Card Challenge
Crafters Castle Anything Goes with Optional Share a Favorite Technique Challenge
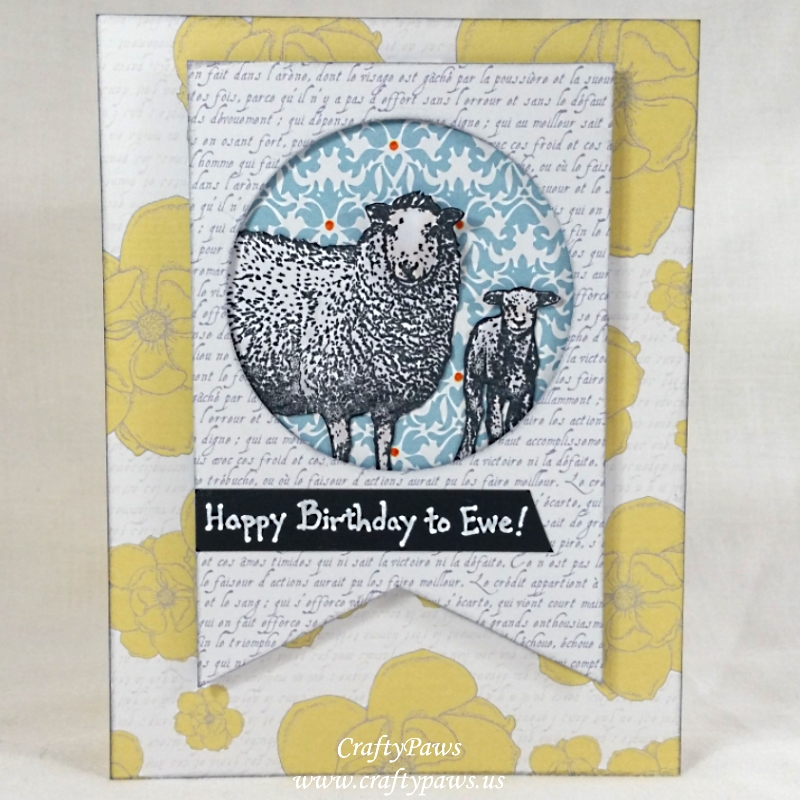
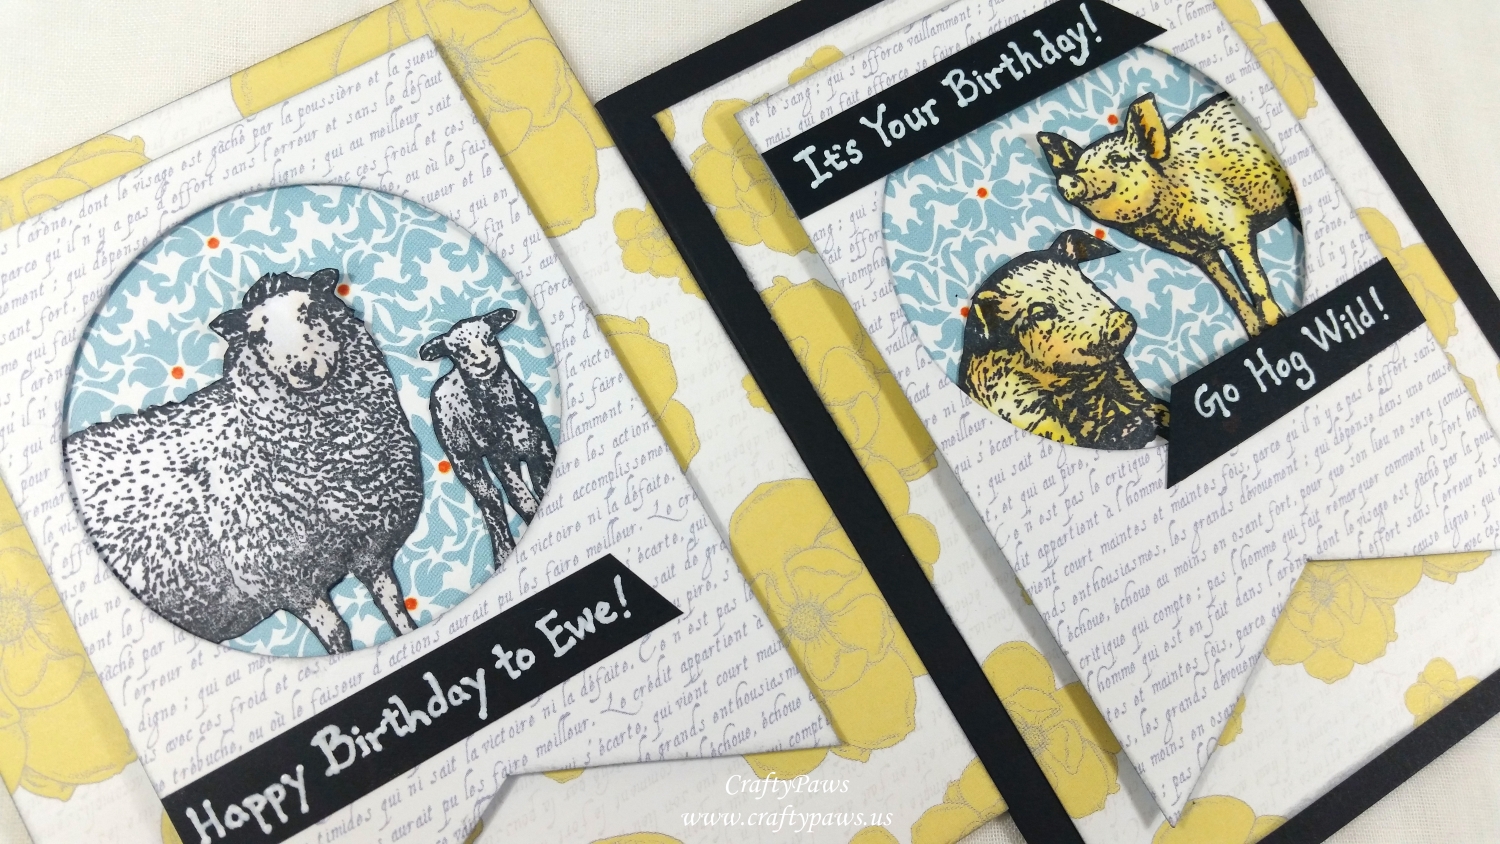
These farm animal stamp images are very realistic so they could certainly stand on their own without any coloring, but I wanted to add a hint of coloring so that they would coordinate with the patterned papers I wanted to use on these cards. So I used the following Copic colors to color up the sheep and pigs:
Sheep: N0, N1 and E000
Pigs: Y000, Y11, Y13, E01, N2
All the patterned papers are from a 6 x 6 My Mind’s Eye “Moments” paper pad (retired). And to give a nice finished look, I lightly inked the edges of all the paper pieces with Tim Holtz Distress Ink in Hickory Smoke.
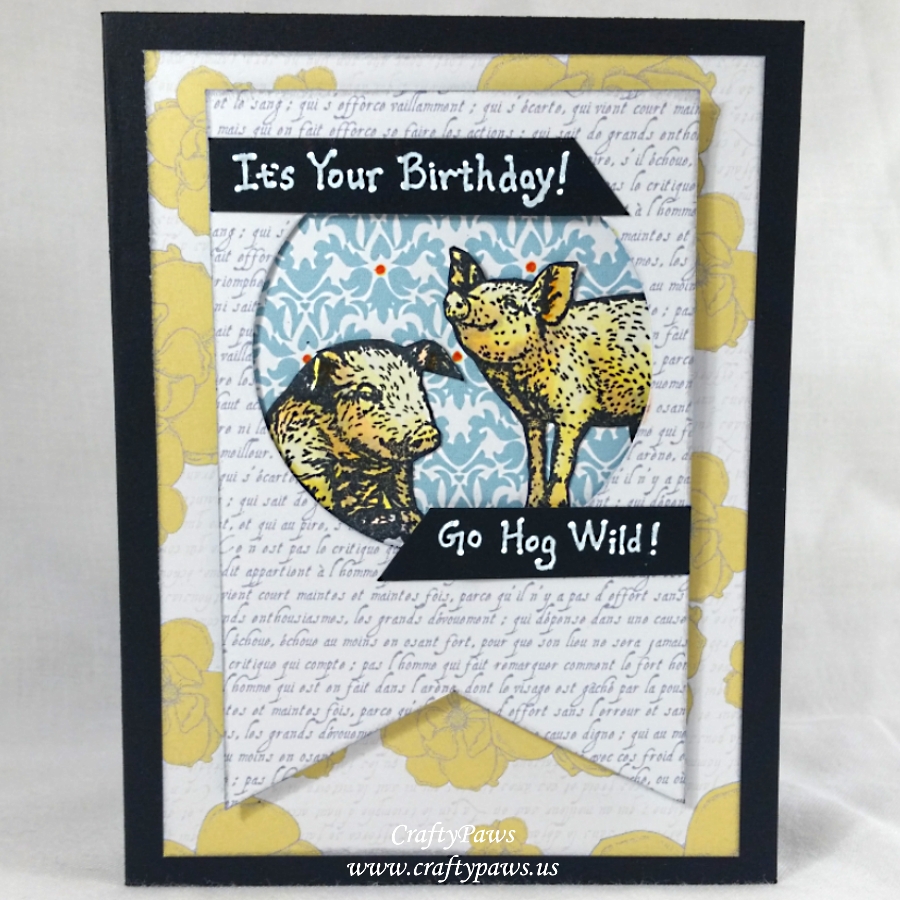
Next I fussy cut all the critters and inked the edges with a Tuxedo Black Momento Marker. This freed me up to position them exactly where I wanted to, which was in round windows die cut from hand cut pennant banners using Lawn Fawn Stitched Circle Stackable Dies. For a little interest and dimension, I layered and popped up the pennants on double sided foam adhesive over a blue damask patterned paper that I customized with small orange dots using a Tim Holtz Distress Marker in Riper Persimmon. Lastly, I added another layer of foam adhesive before I placed the whole assembly on a simple floral card front.
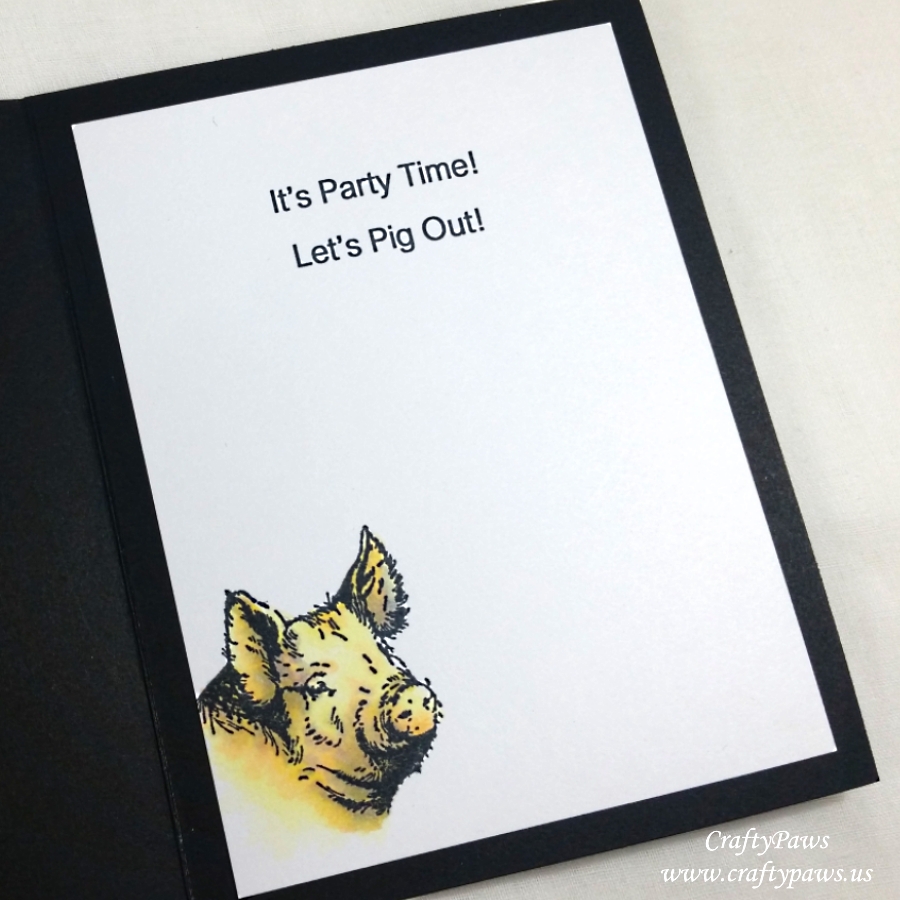 For the silly sentiment banners, I simply used a Uniball Signo White Gel Pen on black card stock. For the pig card, I wrote, “It’s Your Birthday! Go Hog Wild!” and inside the card, I printed out on my computer, ” “It’s Party Time! Let’s Pig Out!” for the card liner. For the sheep card, I wrote, “Happy Birthday to Ewe!”
I’m so glad I got to replenish my birthday card stash with these Joy! Crafts farm animals. I hope you enjoyed this post as much as I enjoyed crafting these punny cards. The following is a process video of crafting these cards:
Disclosure: Many of the supplies I’ve used for today’s project are linked. Some may be affiliate links, which means if you make a purchase I receive a small commission at no extra cost to you. I truly appreciate your support toward the costs of running this blog!
These cards are being entered into the following challenges:
Crafty Gals Corner Anything Goes Challenge
Lil Patch of Crafty Friends Anything Goes Challenge
Through the Craft Room Door Anything Goes Challenge
Crafts Galore Encore Anything Goes Challenge
Simon Says Stamp Monday Time Out Challenge
Simon Says Stamp Wednesday Animal Magic Challenge
Word Art Wednesday Anything Goes Challenge
Creatalicious Anything Goes with Optional Add a Sentiment Challenge
MFT Sketch Challenge #383

]]>
 For the card front background I also dug into my stash and used a pretty pattern paper with hearts, flowers and birds from the “Pastels & Whites” paper stack by Craft Sensations (I took my Copic color cues from this paper). Rather than have the little girl just floating on the sea of pattern, I decided to use a Pretty Pink Posh Scallop Frame die with white card stock to create a frame. I wanted to ground the little girl so I found a scrap of patterned note paper in a shabby chic green with cream colored script that I cut with a Lawn Fawn Stitched Hillside die. I was going to just inset that hill into the frame, but I thought it might be nice to soften all of these patterns behind the little girl so she could remain the focal point without a lot of distracting pattern behind her. So I layered a piece of vellum paper behind the frame and over top of the hill and center of the background paper, and this softened the patterns nicely while still keeping them visible.
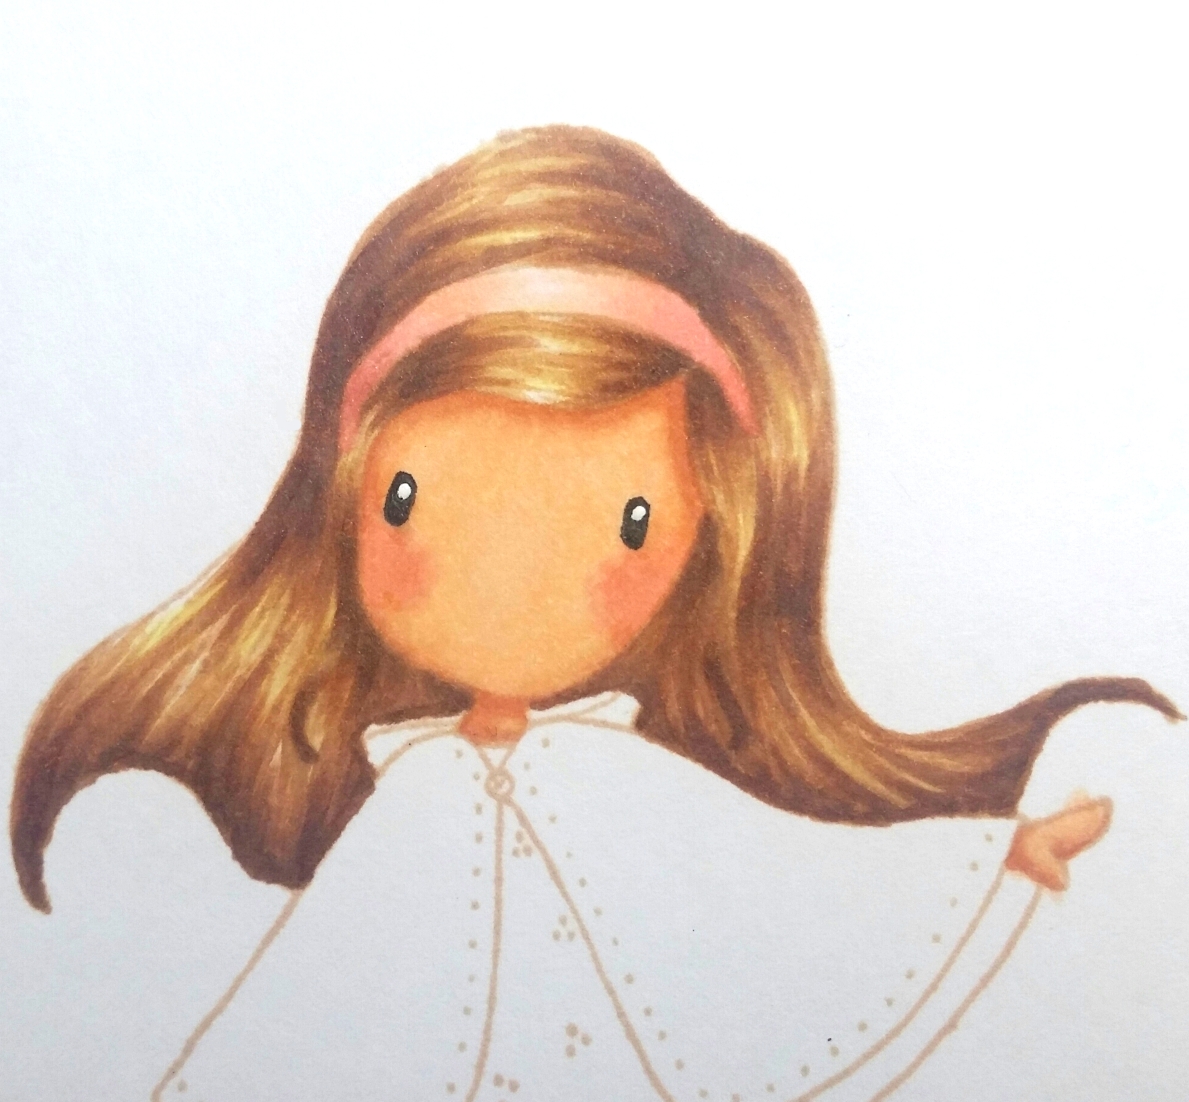
I stamped the main focal point Gorjuss Girl image with Momento Desert Sand Ink (my favorite ink for no line Copic coloring). Then I colored her up with the following Copic colors:
Skin: E000, E00, E01, E21, E11 and R20
Hair: Y11, E31, E33, E23, E25 and 0.3 pt Copic Multiliner Pen in Warm Gray for fine details (I think this was key to the final look)
Pink of headband, dress and tights: R30 and R32
Cape: YG01, YG13, YG03 and YG25
 Underskirt and gray of tights: W0, W1, W3 and White Prismacolor Colored Pencil
I also emphasized the black of her eyes with a 0.03 pt Copic Multiliner Pen in Black and added highlights to her eyes and dot details to her dress with a Uniball Signo White Gel Pen.
Lastly, I decided the little girl could be traipsing through a meadow to deliver a box of Valentines chocolates so I dug up this cute conversation heart stamp from an old Recollections Valentines set that also had never seen ink. I inked it up with Tim Holtz Distress Oxide Ink in Worn Lipstick for a soft pinky peachy look that I thought matched the colors in the background paper and the colors I’d used to color up the girl’s dress. I tucked the heart into her left hand (notice how her thumb overlaps the front while the rest of her hand is behind) before popping up the entire fussy cut girl on double sided foam adhesive for a little added interest and dimension.
Disclosure: Many of the supplies I’ve used for today’s project are linked. Some may be affiliate links, which means if you make a purchase I receive a small commission at no extra cost to you. I truly appreciate your support toward the costs of running this blog!
The following is a quick card share video:
This card is being entered into the following challenges:
Art Impressions Sweet Treats Challenge – box of chocolates she’s delivering. 🙂
Penny Black and More Love, Hearts and Flowers Challenge
Simon Says Stamp Monday Take Note Challenge
Simon Says Stamp Wednesday It Must Be Love Challenge
Word Art Wednesday Anything Goes Challenge
Creatalicious Anything Goes With Optional Love/Anniversary/Thinking of You Challenge
Through the Craft Room Door Anything Goes Challenge
Lil Patch of Crafty Friends Anything Goes Challenge
613 Avenue Create Anything Goes with Optional Love Challenge
]]>