
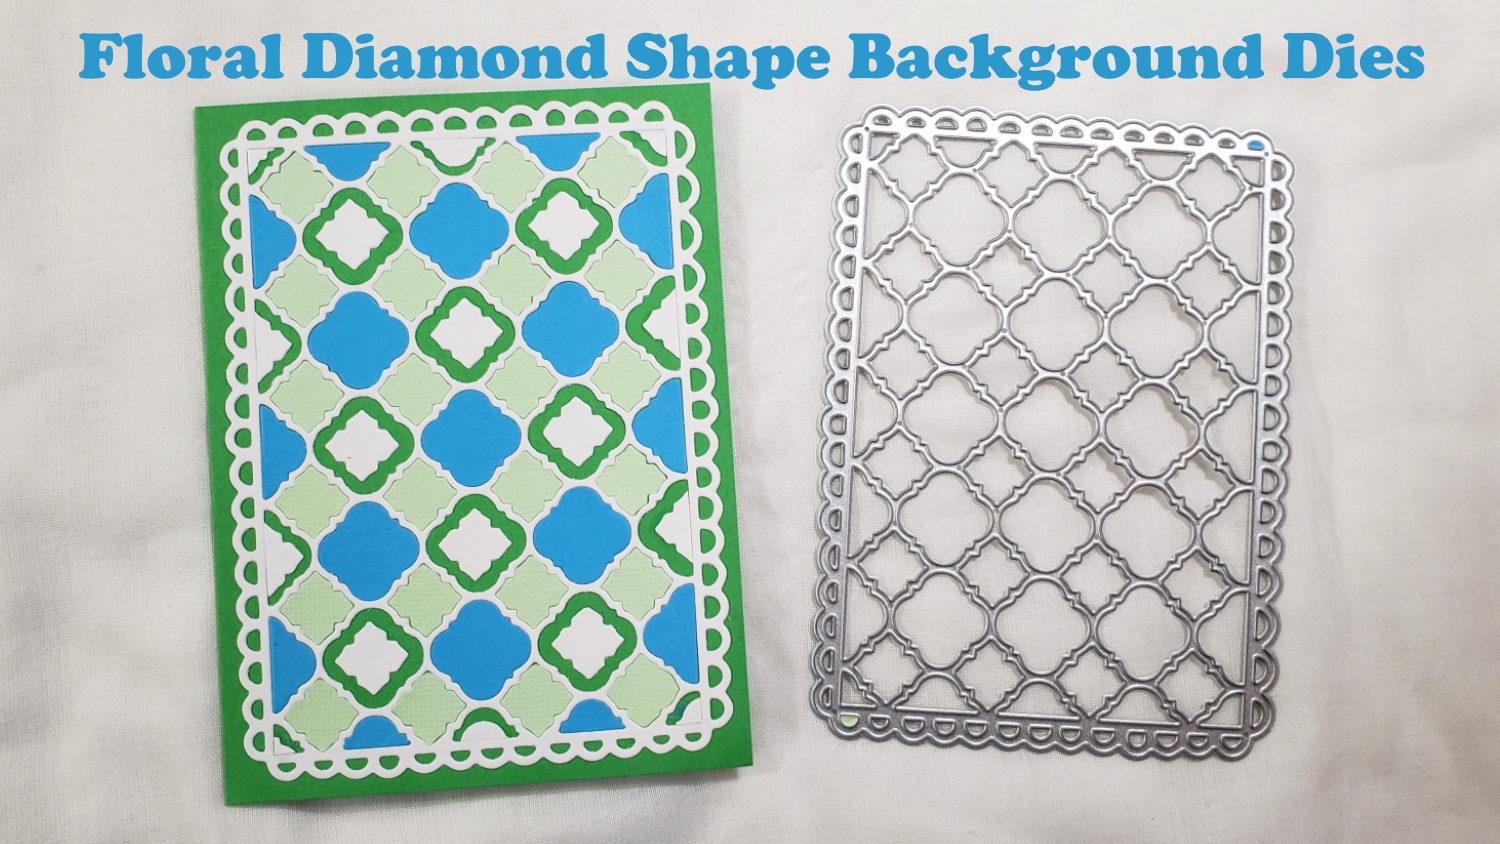
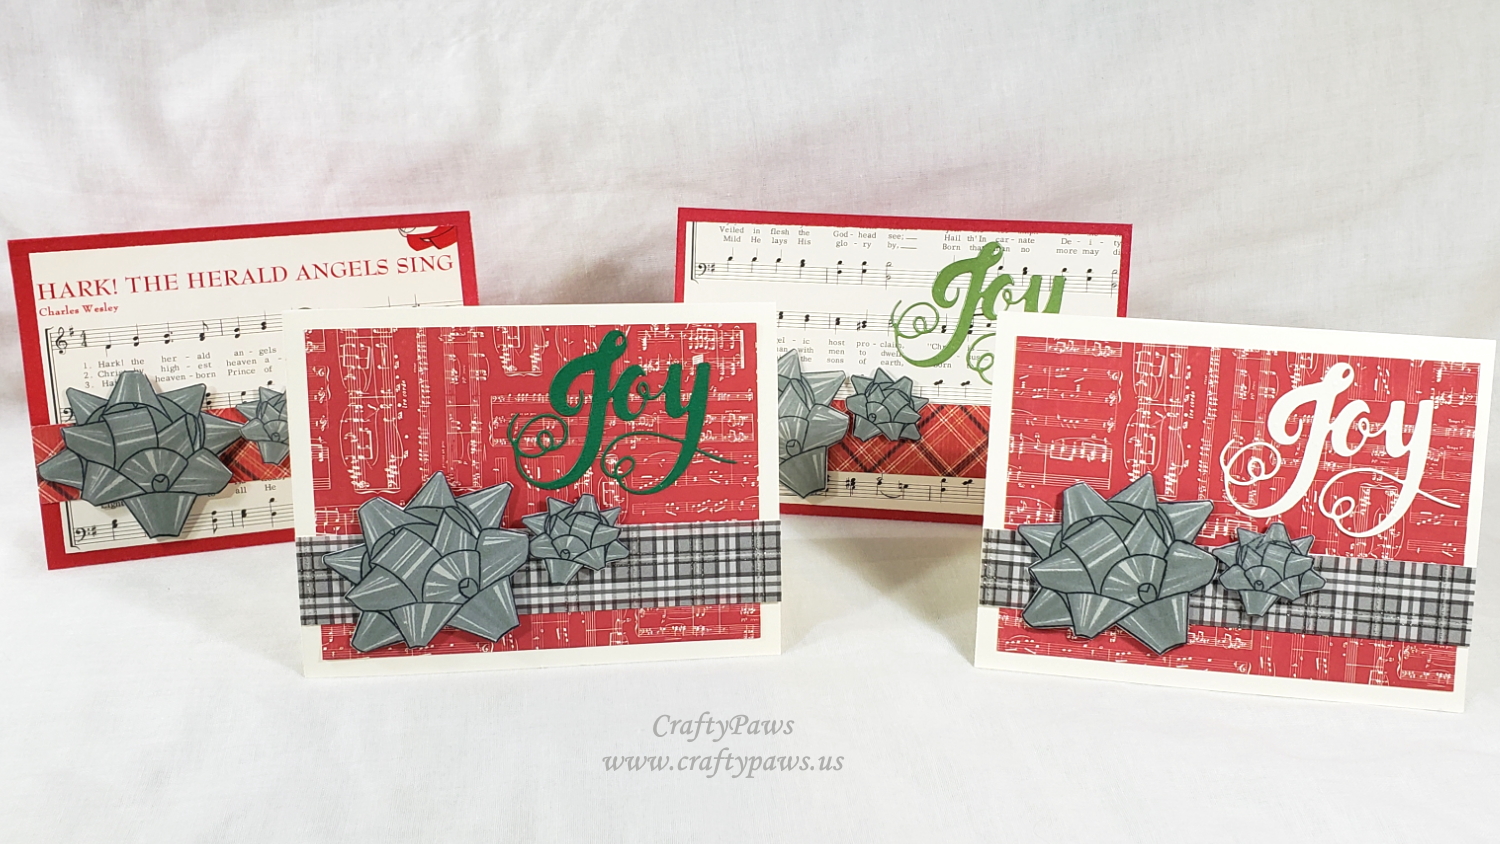
As I looked down the barrel of less than 1 week to Christmas, I started to panic, noting that I only had 1 pre-made handmade holiday card. So I decided to try to make some “mass-make” cards. I used the Altenew Bells and Bows stamp and die set, the JOY from the Diemond Dies Holiday Words Die Set, and a card base I made ages ago with the Floral Diamond Shape Background Dies. NOTE: I’m not sure if these codes still work, but at Diemond Dies you might try “thankskristina” at checkout for 10% off and free shipping on orders of $35 or more AND at inloveartshop.com you might try the code G-36967 for 20% off.
First I stamped out the big and small bows as well as the bell using 3 grey tone Lawn Fawn Fundamentals inks in Manatee, Hippo, Storm Cloud, and my Memento Tuxedo Black. (Watch my video below to get some tips on how to best align the layering stamps for perfect results!) Then I used the accompanying dies to cut them out. Lastly I created card bases with scraps from my patterned paper scrap bin using the rule of thirds to make 4 cards and added the stamped bows with double sided foam adhesive to add special handmade details and dimension:
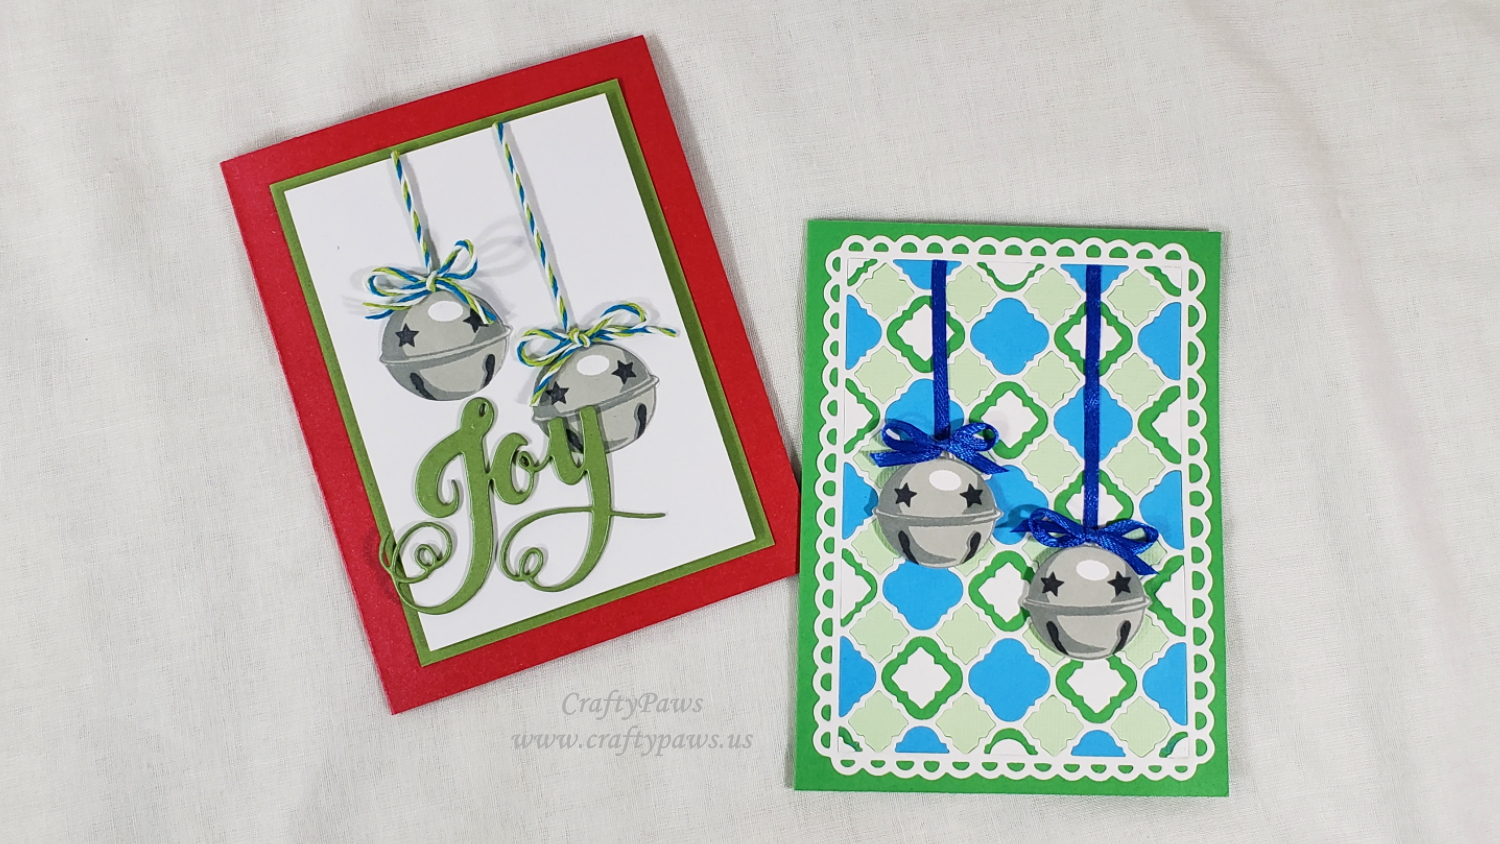
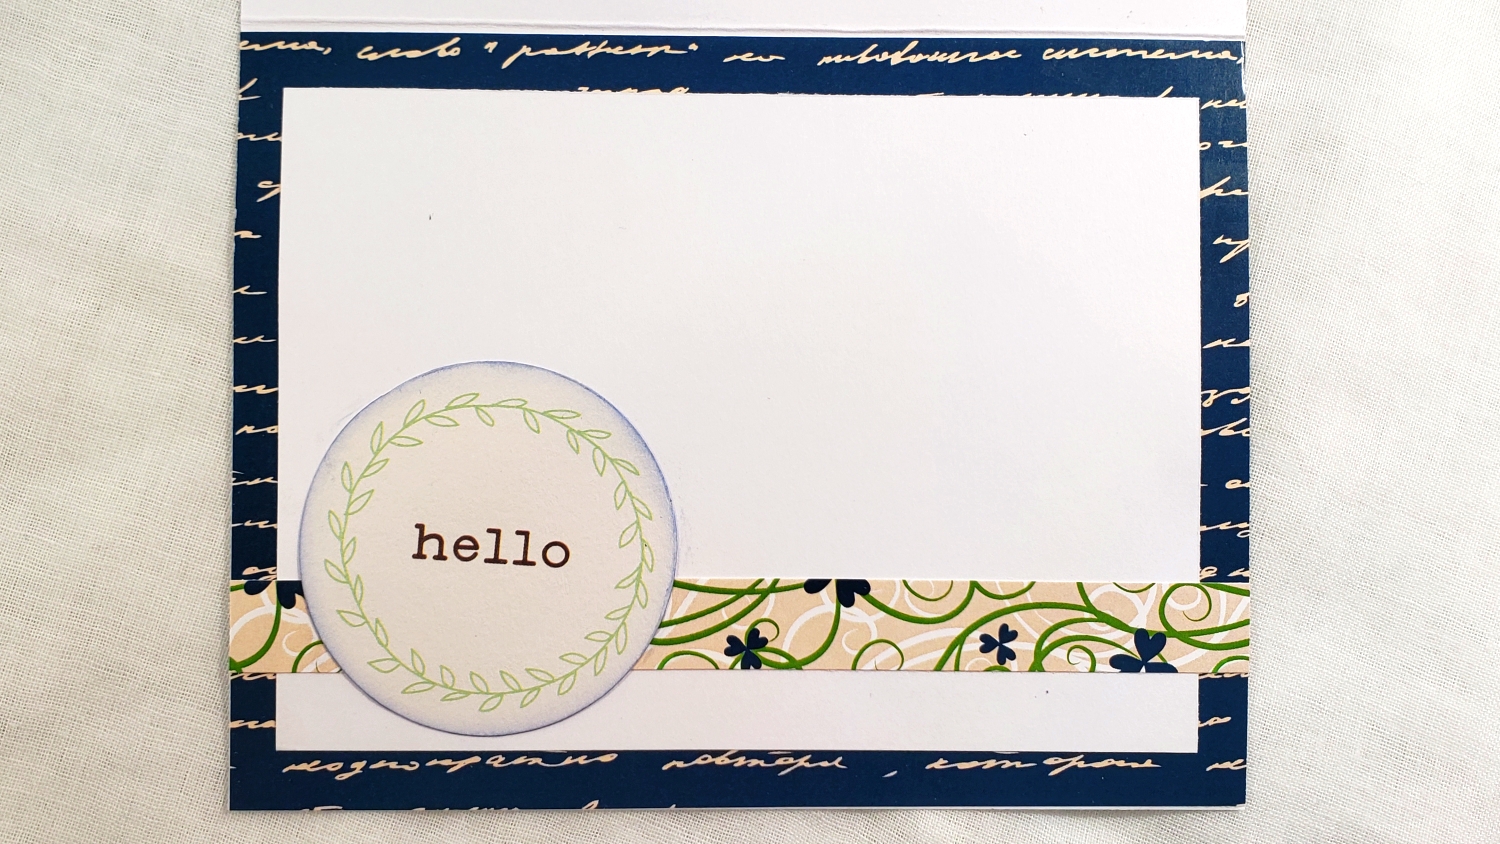
I decided to pair the remaining 4 stamped bells onto 2 cards that I made using an old card base made with the aforementioned inloveartshop floral diamond background die with thin blue satin ribbon and another layered card base using tri-colored bakers twine. I think the key to making quick cards but getting the payoff (and credit) for the unique special feeling of handmade is to add dimension with foam adhesive, interest with ribbons and twine, or bling it on with glittered papers or sequins.
CLICK on the picture below to watch my video tutorial:
Disclosure: Many of the supplies I’ve used for today’s project are linked. Some may be affiliate links, which means if you make a purchase I receive a small commission at no extra cost to you. I truly appreciate your support toward the costs of running this blog!
These cards are being entered into the following challenges:
Stamping Sensations Choose a Theme and Stamp It Challenge
Crafts Galore Encore Anything Goes Challenge
Simon Says Stamp Wednesday Bling It On Challenge – especially the glittered plaid Joy cards
Creatalicious Anything Goes with Optional Traditional Christmas Colors Challenge
Word Art Wednesday Anything Goes Challenge
]]>
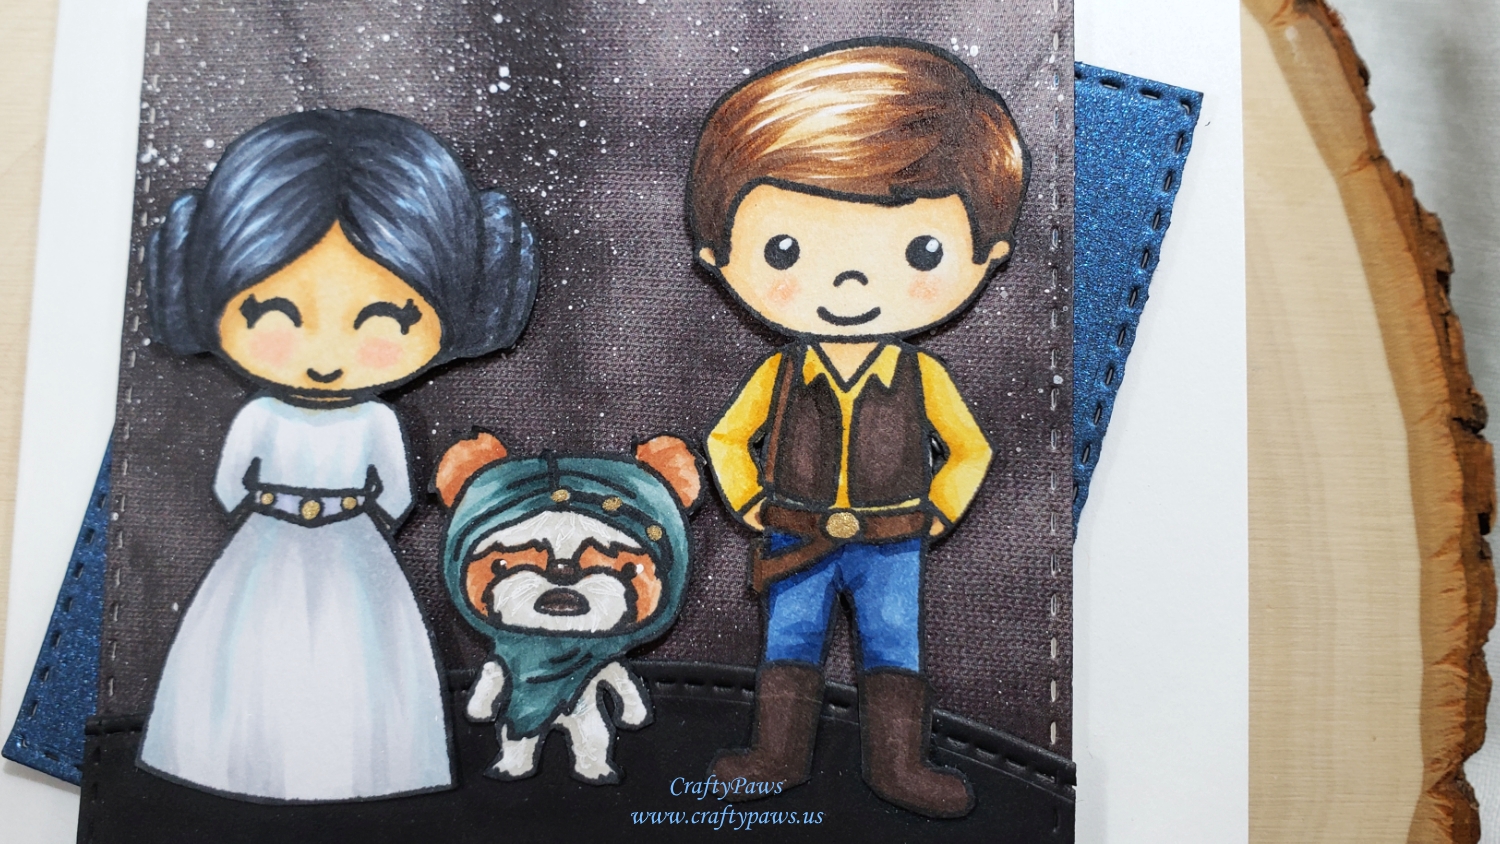
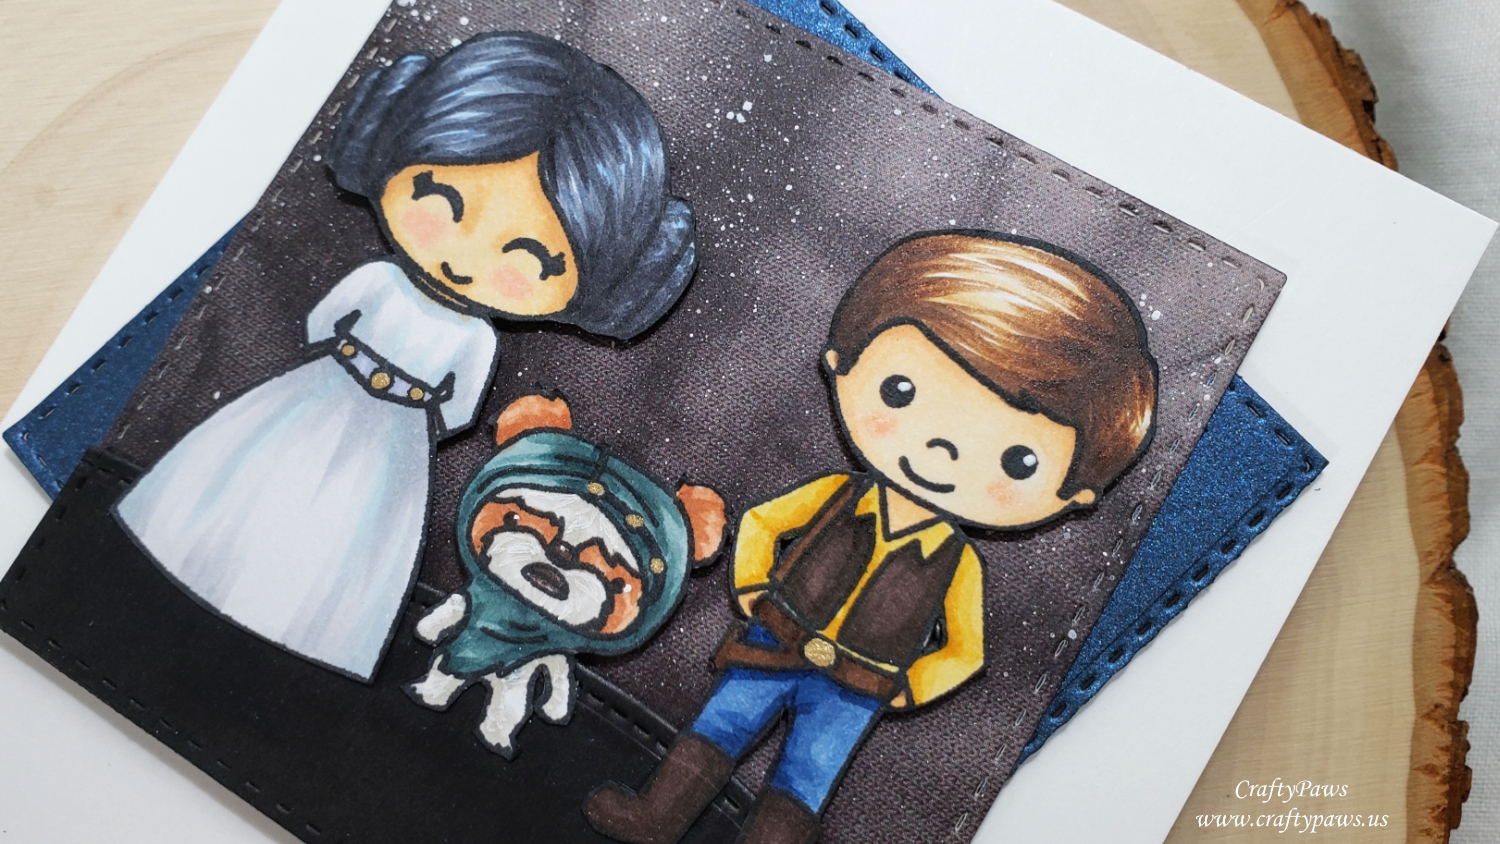
I decided that I could be Princess Leia, Mr. CraftyPaws could be Han Solo, and our Bandito could be (of course) an Ewok and used the following Copic colors:
Princess Leia: Hair: C6, C8, B000; Skin: E50, E51, E53, R21; Dress: C0, C1, C2, B32; Belt; C2 and B60
Han Solo: Hair: E53, E57, E59; Skin: E50, E51, E53, R30; Pants: B34 and B37; Belt: E59 and E79; Vest and Boots: E79 and E49; Shirt: Y21 and YR24
Ewok: Fur: W0, W1, E11, E13, E15; Headpiece: BG72, BG75 and BG78
I also used a Gold Gelly Roll Pen to add shiny details to Leia’s belt, the Ewok’s headpiece, and Han’s belt
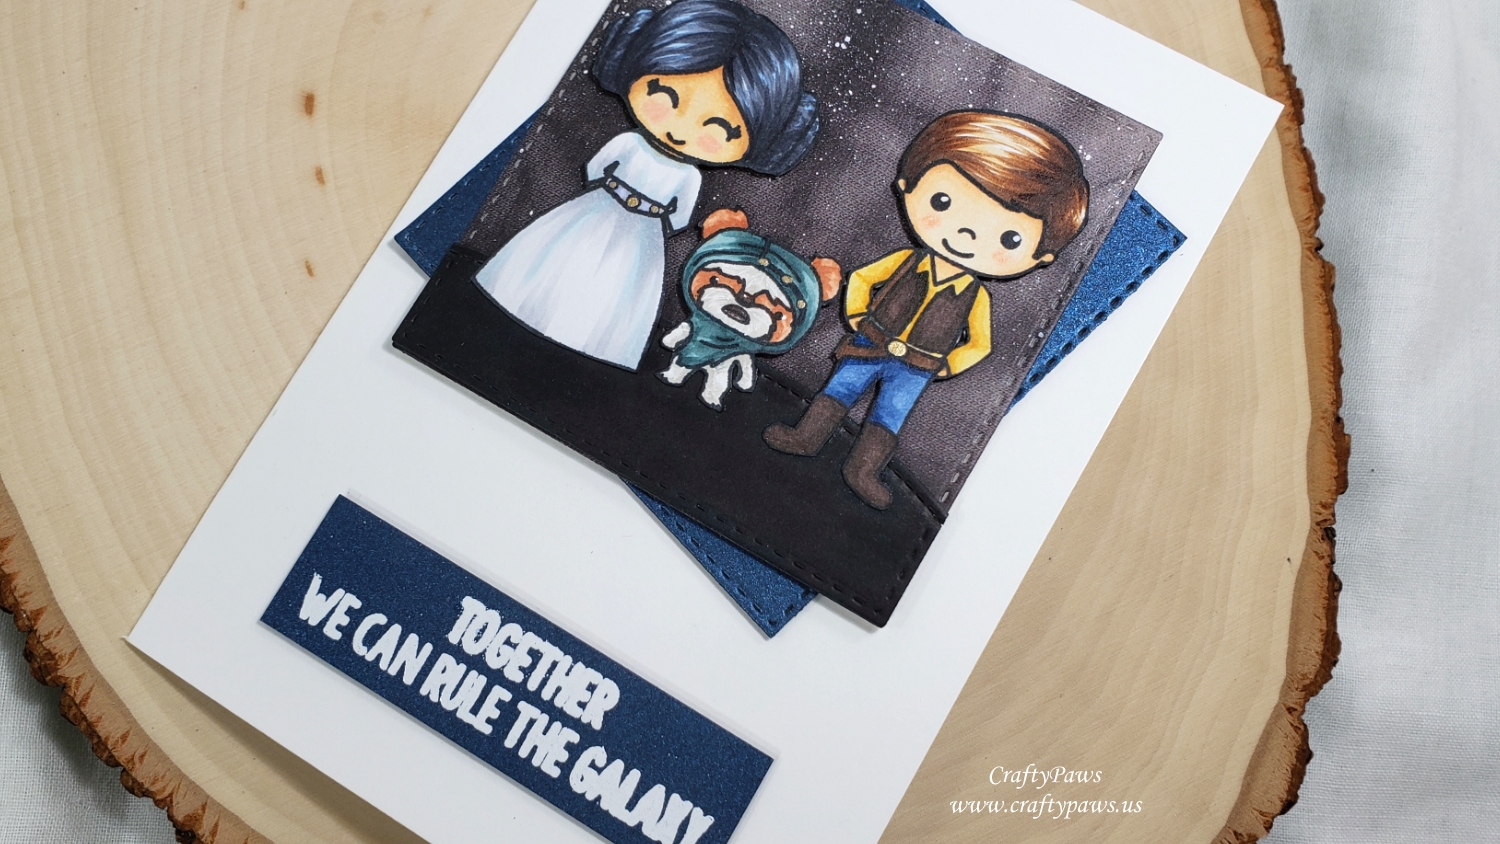
As these images are clearly the “stars” of the card (pun intended), I kept the backgrounds simple. I die cut some black and grey patterned paper from an old DCWV The Tie-Dyed Stack (retired) using a Simon Says Stamp Stitched Squares Die. I splattered some watered down Copic Opaque White to create a galaxy background, and used black card stock and the Simon Says Stamp Stitched Squares Die and a Lawn Fawn Stitched Hillside Die to create a ground for the characters.
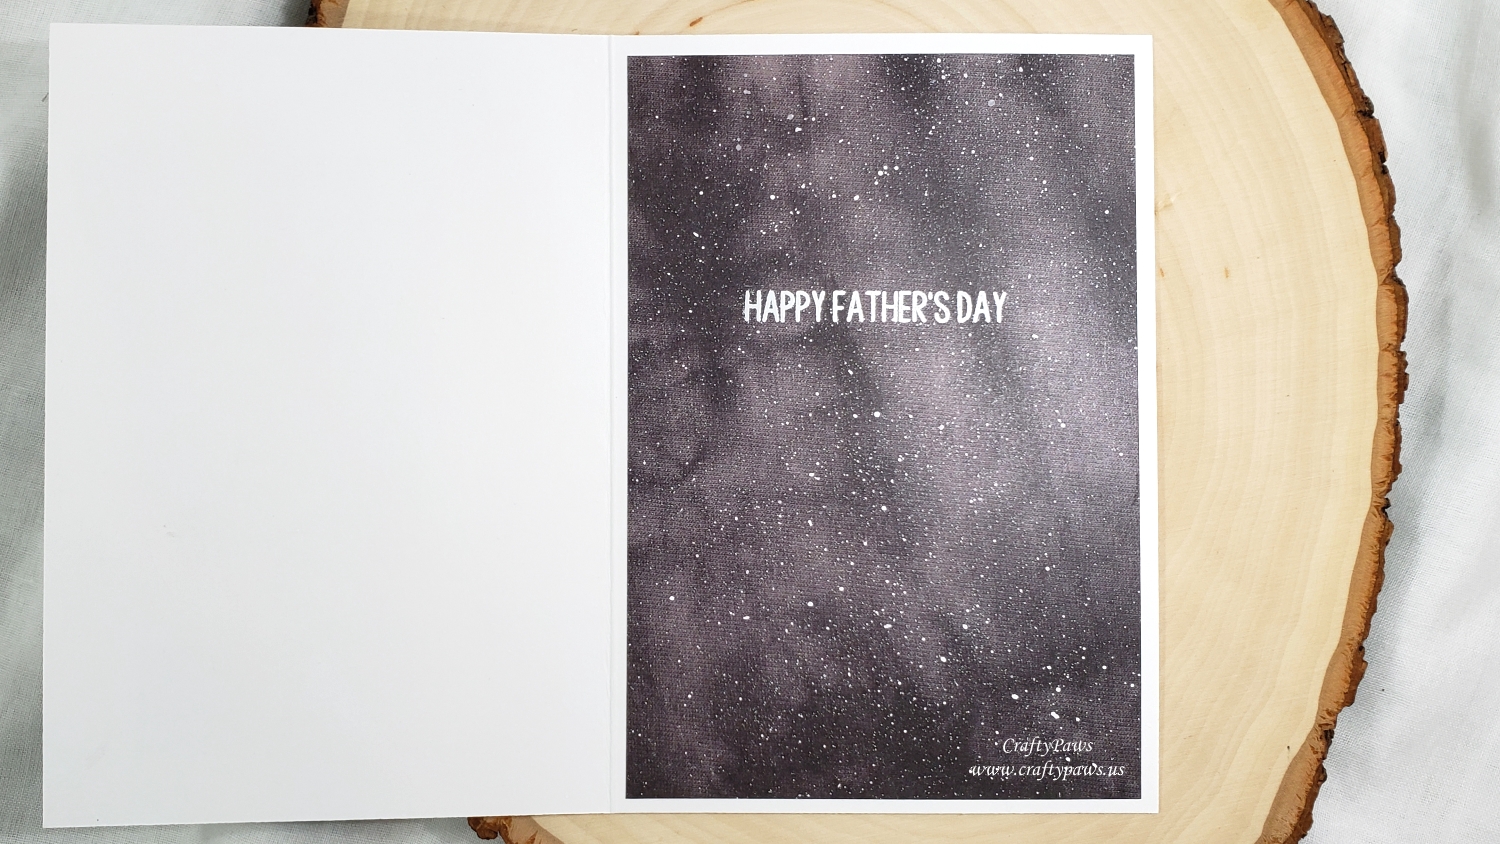
To add some more color, I die cut another stitched square from navy blue shimmer card stock and offset it behind the galaxy background square. Using VersaMark Ink and Ranger Super Fine Detail White Embossing Powder, I also heat embossed the sentiment, “Together We Can Rule the Galaxy” on more navy blue shimmer card stock to repeat the color and give the card a cohesive look. The sentiment, characters, and the squares assemblage are all popped up on double sided foam tape for added dimension and interest. The inside of the card liner was created by using more of the black and grey tie-dyed patterned paper with splattered on “stars.” The sentiment inside is also heat embossed, and simply says, “Happy Father’s Day”.
CLICK on the following picture to watch the process video of crafting this card:
Disclosure: Many of the supplies I’ve used for today’s project are linked. Some may be affiliate links, which means if you make a purchase I receive a small commission at no extra cost to you. I truly appreciate your support toward the costs of running this blog!
This card is being entered into the following challenges:
Word Art Wednesday Anything Goes Challenge
Creatalicious Anything Goes with Optional Blue Challenge
Through the Craft Room Door Anything Goes Challenge
Crafts Galore Encore Anything Goes Challenge
Lil Patch of Crafty Friends Anything Goes Challenge
Crafter’s Castle Anything Goes with Optional Mixed Media Challenge
Craft Gal’s Corner You’re the Man Challenge
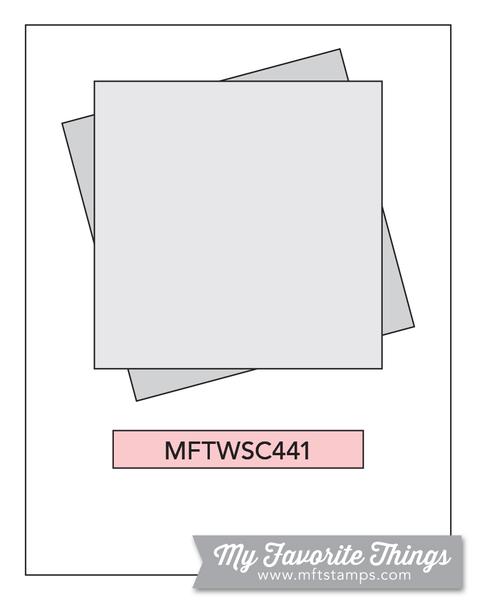
MFT Sketch Challenge 441
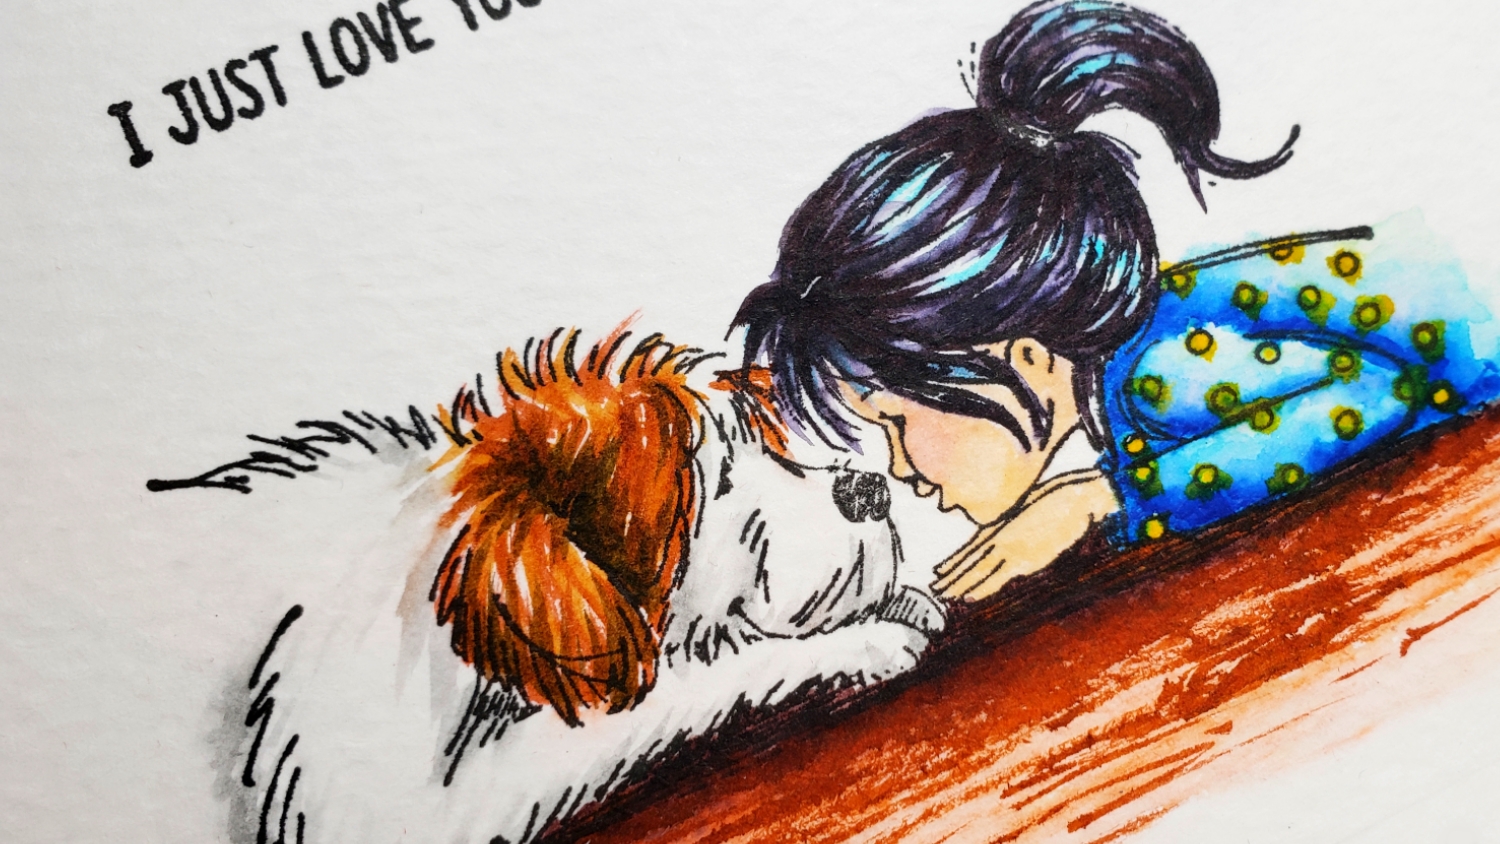
The drawing of the stamp is very artistic, and I thought coloring it up with my Zig Clean Color Real Brush Markers and Pentel water brush would be a great way to dip my toe back into watercoloring. I stamped out the image onto Strathmore Watercolor Paper using VersaFine Onyx Black Ink and used the following Zig colors:
Puppy: Light gray (091); Light Brown (061); Brown (060); Mid Brown (065)
Girl’s hair: Light Blue (036); Black (010)
Girl’s skin: Flesh (071); Pale Pink (028)
Girl’s shirt: Yellow (050); Persian Blue (032)
Floor: Brown (060); Dark Brown (062)
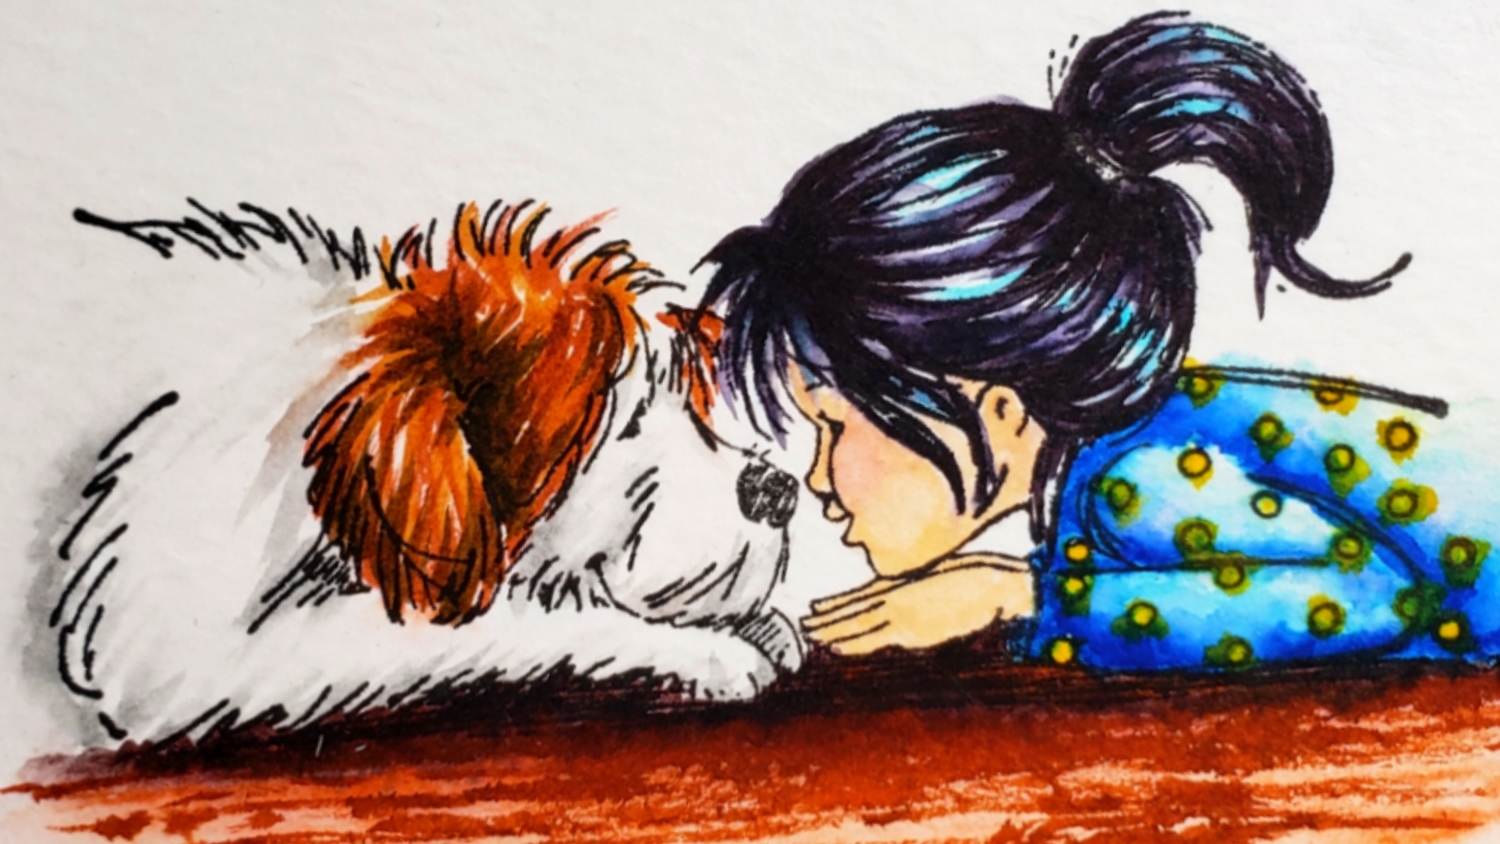
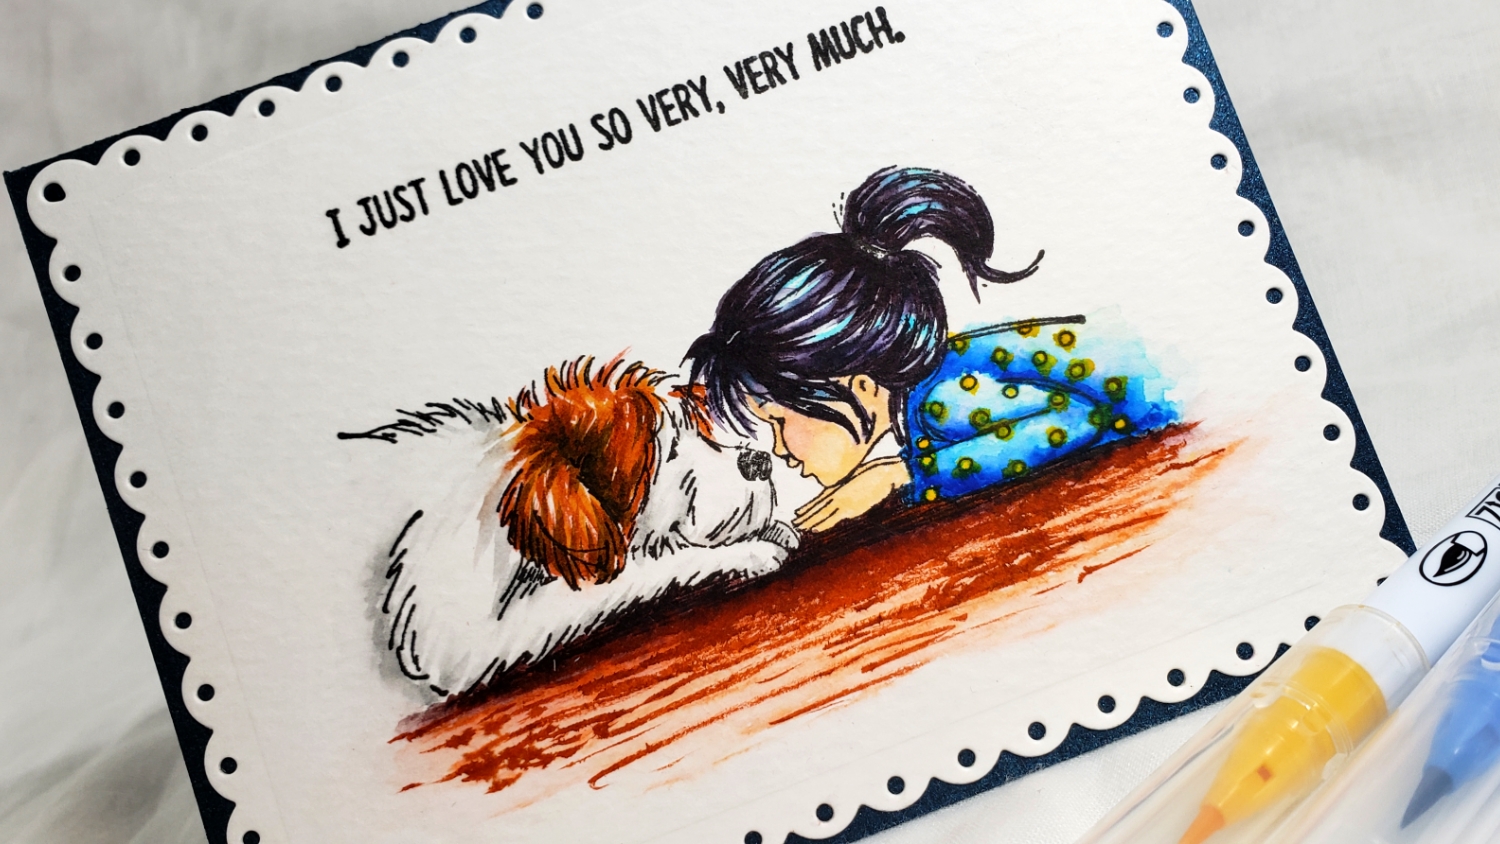
I then stamped the sentiment, “I Just Love You So Very, Very Much.” centered above the image. Then to keep it simple, I used a Lawn Fawn Fancy Scalloped Rectangle Stackables Die to cut out the image and mounted it on a shimmery dark blue card base. I like how the die cut has the tiny cut out circles to let through the blue color and shimmer of the card base.
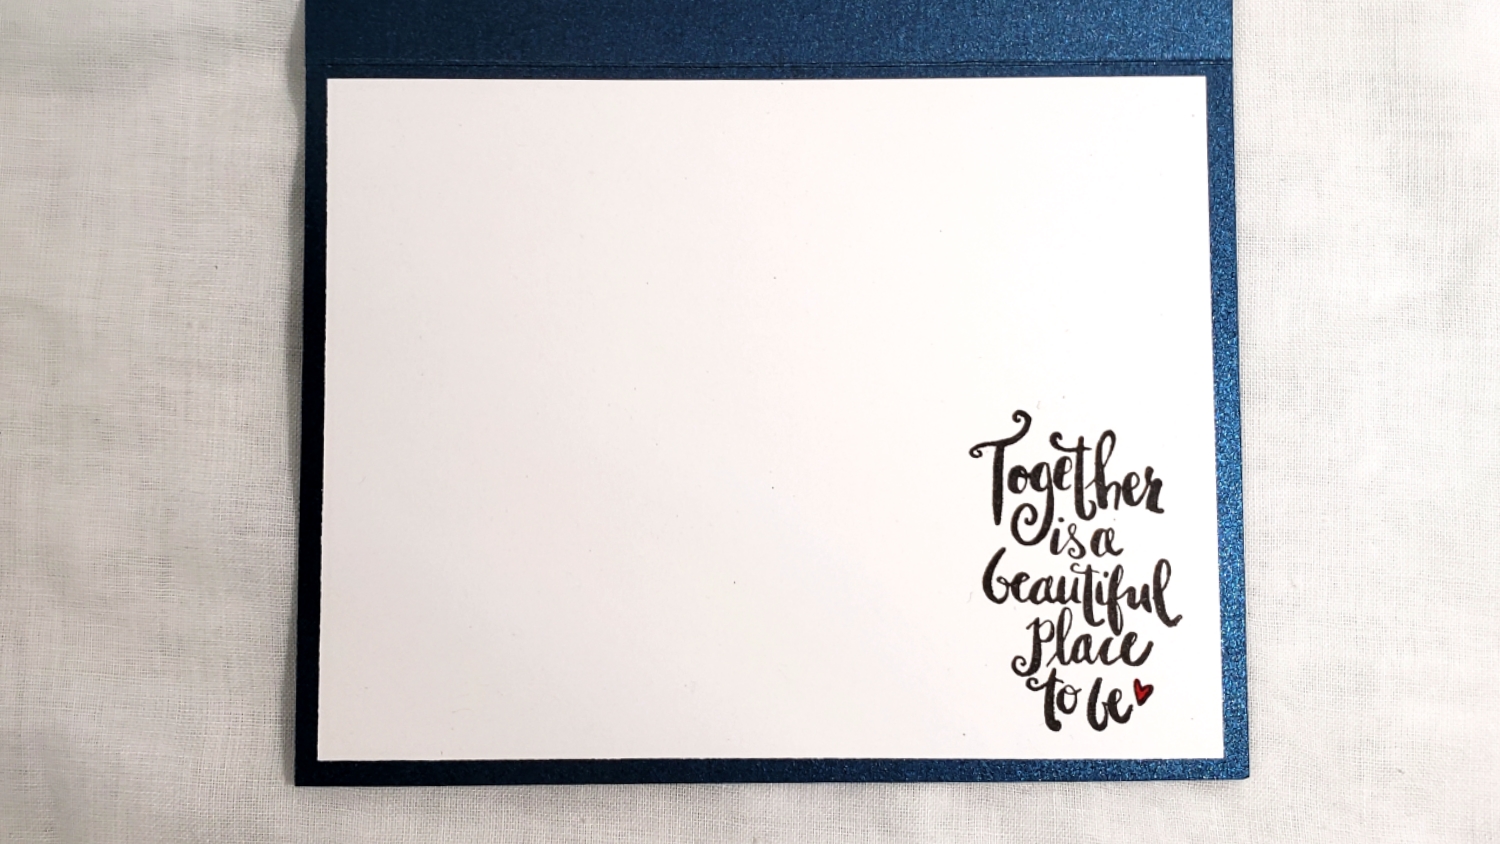
For the inside liner, I used the other sentiment from the stamp set, “Together is a beautiful place to be” in the lower right corner. I really love the font of this sentiment and I liked it off centered like this. To add a delicate finishing touch, I colored in the tiny heart at the end of the sentiment with a Carmine Zig Clean Color Real Brush Marker.
Please CLICK on the following picture to watch the process video of crafting this card:
Disclosure: Many of the supplies I’ve used for today’s project are linked. Some may be affiliate links, which means if you make a purchase I receive a small commission at no extra cost to you. I truly appreciate your support toward the costs of running this blog!
This card is being entered into the following challenges:
Word Art Wednesday Anything Goes Challenge
Creatalicious Anything Goes Challenge with Optional no rectangle or square cards
Simon Says Stamp Work it Wednesday Pet Project Challenge
Crafting by Design Anything Goes Challenge
Penny Black and More All Things Feminine Challenge
Crafts Galore Encore Anything Goes Challenge
Through the Craft Room Door Anything Goes Challenge
Lil Patch of Crafty Friends Anything Goes Challenge
]]>
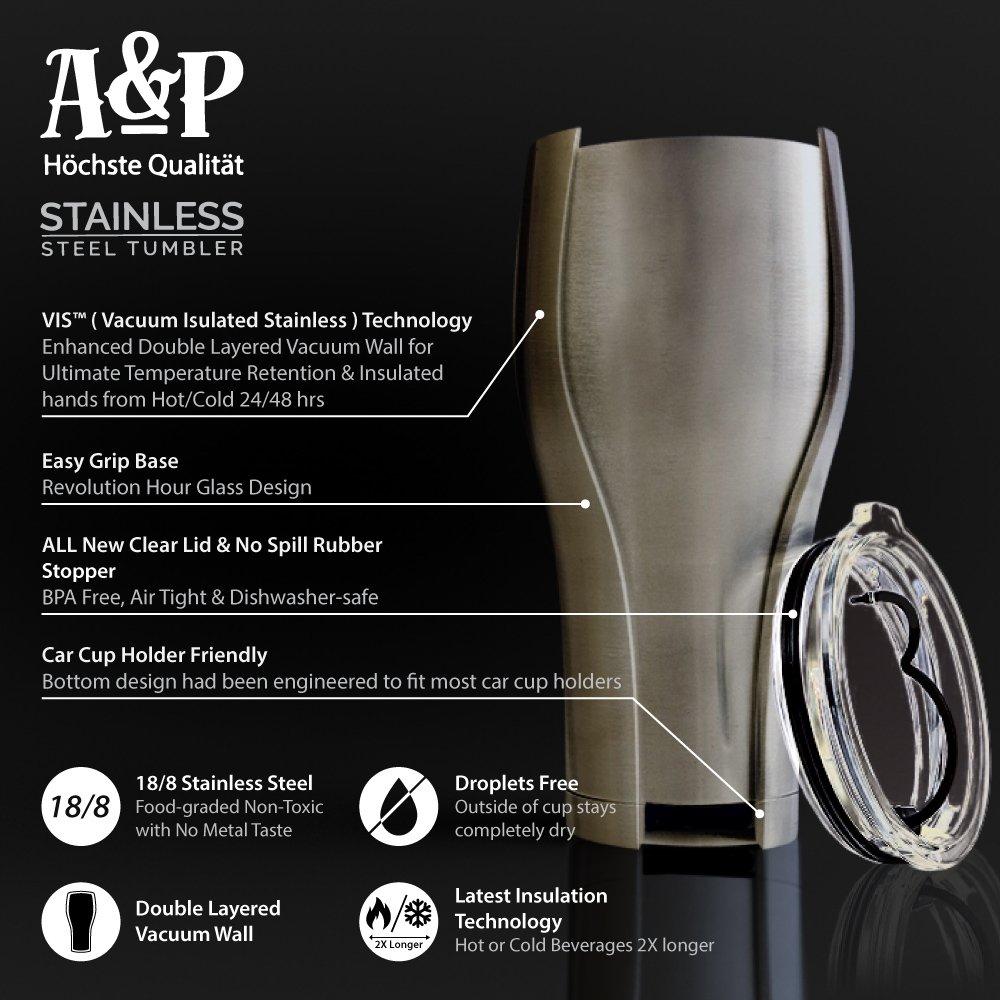
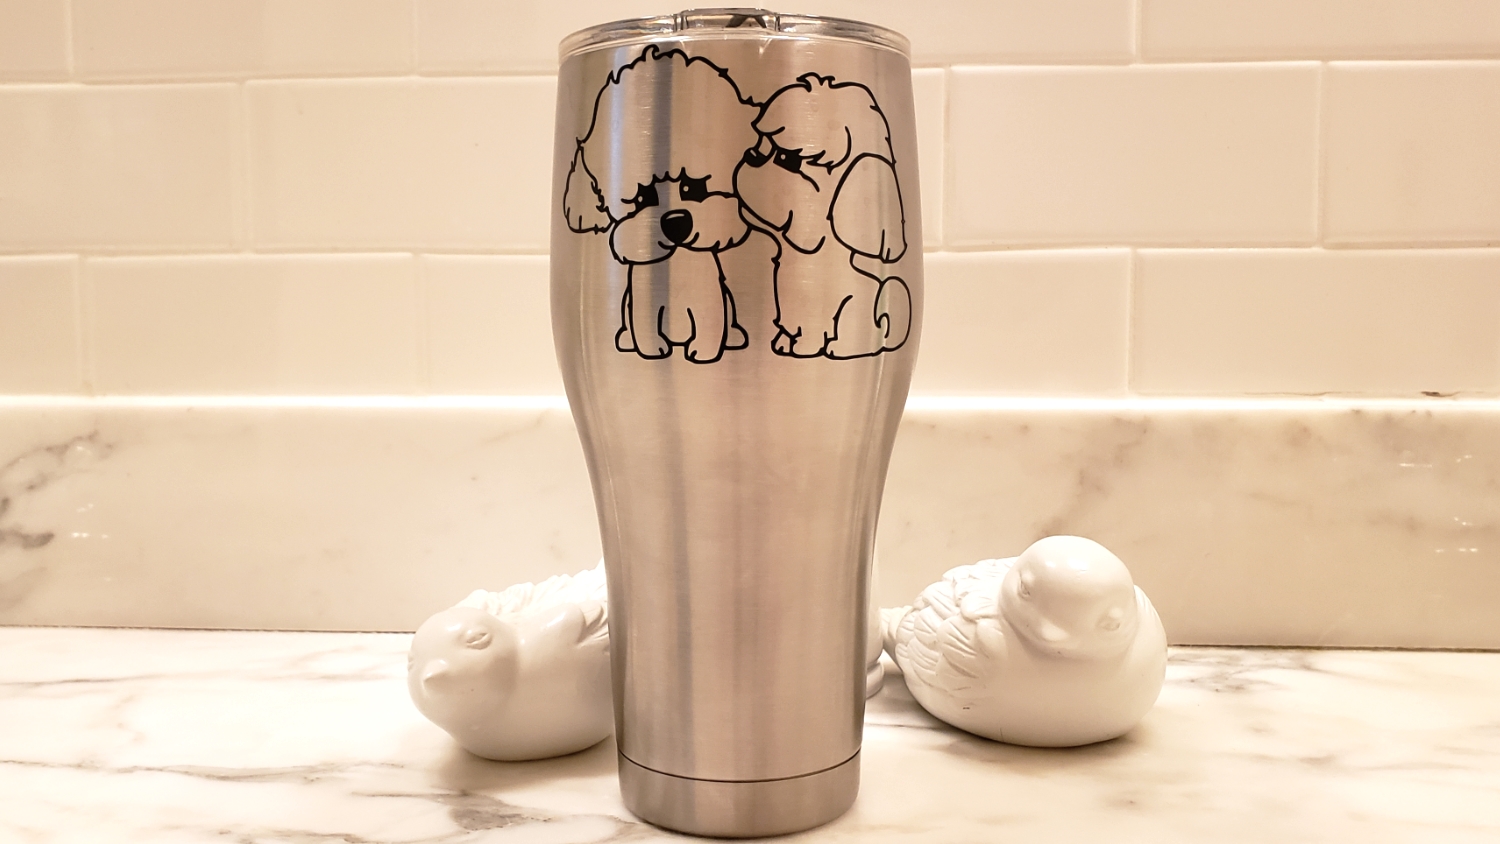
First off, Aric (the A of A&P) told me that their company was a small US based mom and pop company, so I knew I wanted to give their product a try and support them if I thought that they had a good product. Secondly, my hubby has a similar tumbler from a different company that he swears by but it is about $20 more (which I am unwilling to spend when the same funds could be used for crafting supplies – LOL). Third, I confirmed that I was free to provide whatever feedback and review; there were no strings attached to the free mug. Fourth (and lastly), I was able to personalize my tumbler with a vinyl decal of my sweet pups (this is also my CraftyPaws logo) using my Silhouette, and every time I see this I smile.
So long story short I agreed to do the trial and review, and I am so pleased to say that I love it! I use it for my daily morning vitamin drink and it has been wonderful to be able to keep this extra chilly all morning as I concentrate on my work or crafting. I have a couple of minor suggestions for improvement, and if you’re interested in the details of my experience and review please watch the video by CLICKING on the picture below:
Thanks for stopping by, and I hope you’re having a wonderful crafty day!
]]>

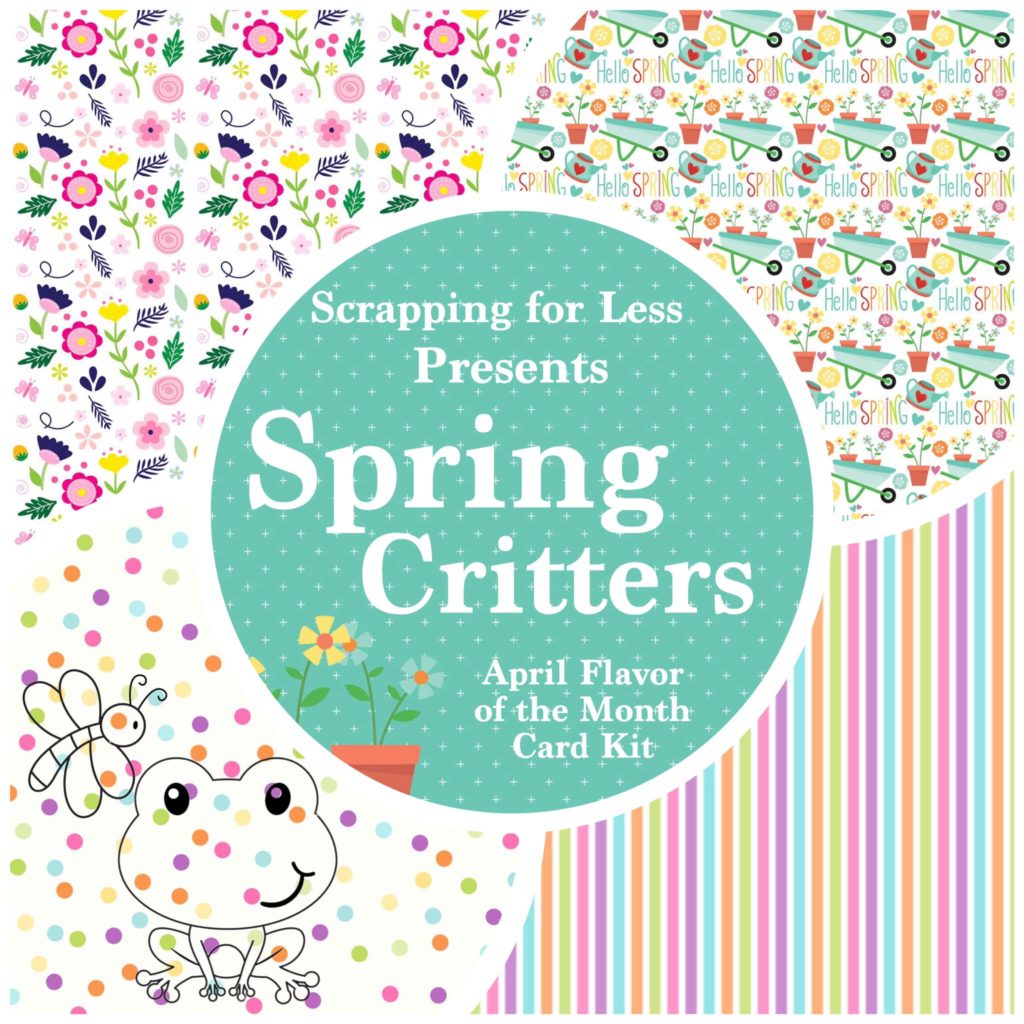
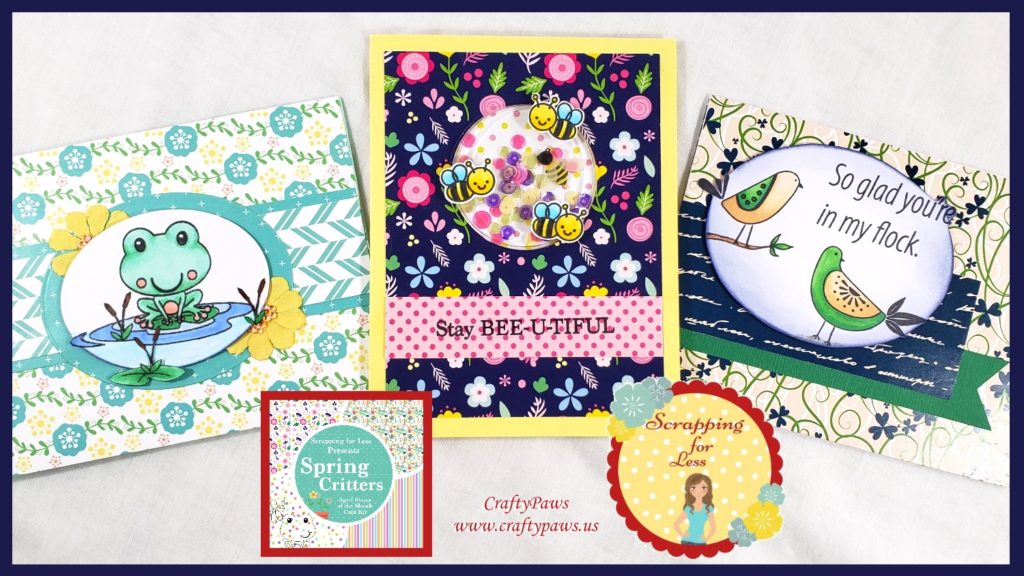
If you’re not familiar with Scrapping for Less Flavor of the Month Card Kits, they are so chock full and a fabulous value! Each basic kit is called a “Double Dip Sundae” and includes 4 collections, some quality card stocks and envelopes. This month’s 4 collections are: Spring Bees, Spring Birds, Spring Frogs and Spring Ducks; and includes a sampling of patterned papers, a stamp set, a sequins mix and a variety of stickers or ephemera to make card making a snap! There is also an add-on collection called the “Banana Split” which also has some fun and useful items that coordinate with the basic kit. This month’s Banana Split includes a fabulous sentiment stamp set that coordinates with all the other stamp sets, Bo Bunny washi, a banner die, and Ranger Multi Matte Medium.
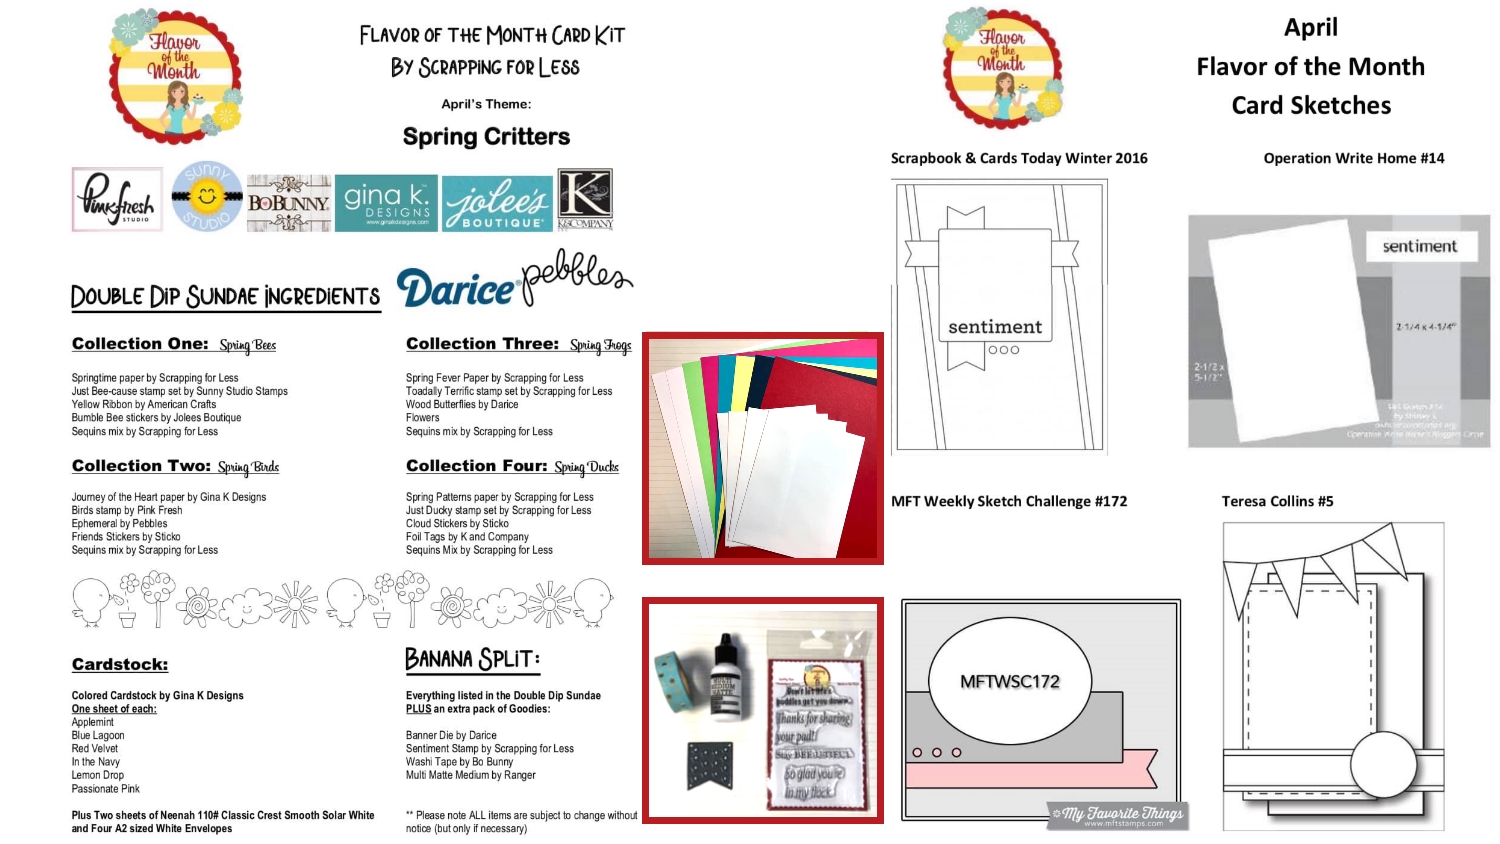
The kit comes with a list of all the items included in the kit as well as a sheet of great sketches to help you create fabulous cards quickly and easily. If you want more inspiration for what can be created with this kit, check out my next post, which will be part of a Scrapping for Less Blog Hop, and of course there is a GIVEWAWAY!
If you’re interested in seeing all that the April 2019 kit includes, please check out the following video:
]]>

Copic Coloring:
The birds and the branch doodled in with a 0.1 pt Copic Multiliner Pen are colored using the following Copics:
Birds: G14, G17, E51 and E53
Branch with leaves and ground: E13, B14 and G17; W3
The cutsie bees were simply colored with these Copics: Y13, Y08, C7, B00 and B01
The scene for the “Hopping by with a Spring hello card is colored with the following Copic markers:
Frog: G00, G02 and G05 with R21 blush and belly
Lilly Pad: G02 and Go5; Reeds: G02, G05, and E57; Water: B00, B01, B21 and B24
For each of the Spring Critter focal point images, I crafted cards to complement around them. The birds were accompanied by the sentiment “So glad you’re in my flock” from the Scrapping for Less Banana Split add-on collection stamp set. I used an oval die (hand fussy cutting around the areas that went beyond the oval) and inked the edges and a soft background with Tim Holtz Distress Ink in Chipped Sapphire. I actually followed one of the sketches included in this month’s kit and used the patterned papers from the Spring Birds collection (along with some green card stock from my scrap box) to quickly pull together the first card. The inside liner is more of the patterned paper scraps along with a “hello” ephemera piece, all from the same collection.
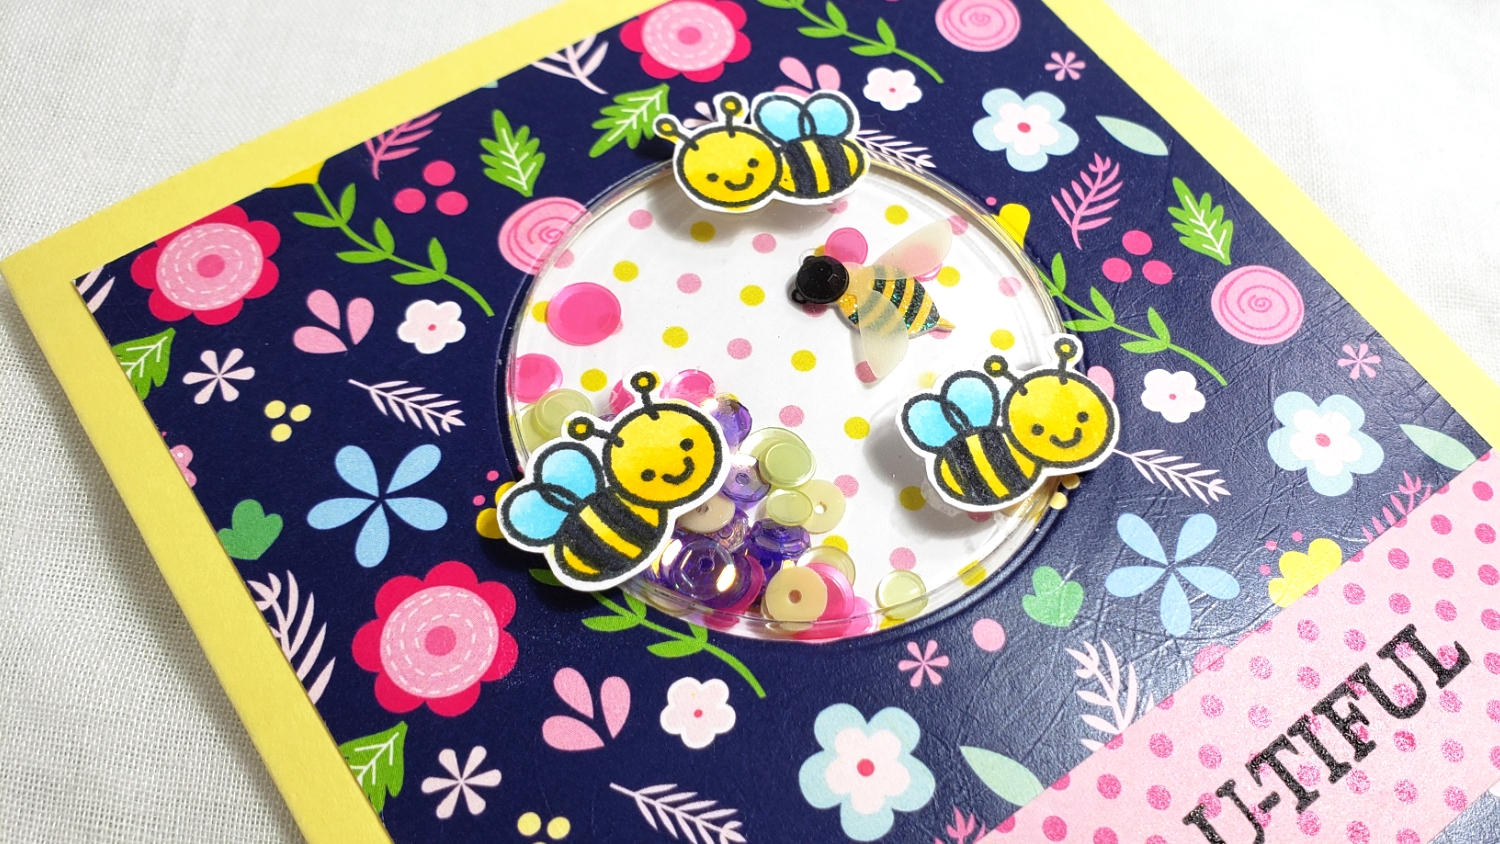
For the adorable bumble bee shaker card, I used the bright and cheerful patterned papers from the Spring Bees collection. I used a circle die to cut out an opening for an Impression Obsession Shake It Shaker Card Pouch (these are discontinued, but these Hampton Arts shaker pouches are similar), a Jolee’s Boutique 3D bee sticker and half of the sequin mix from the collection as fun-filled perfectly coordinated shaker. The sentiment I stamped out 3 times and coated with clear embossing powder to set and pop from the polka dot print paper, which was the reverse side of the springy floral used on the card front.
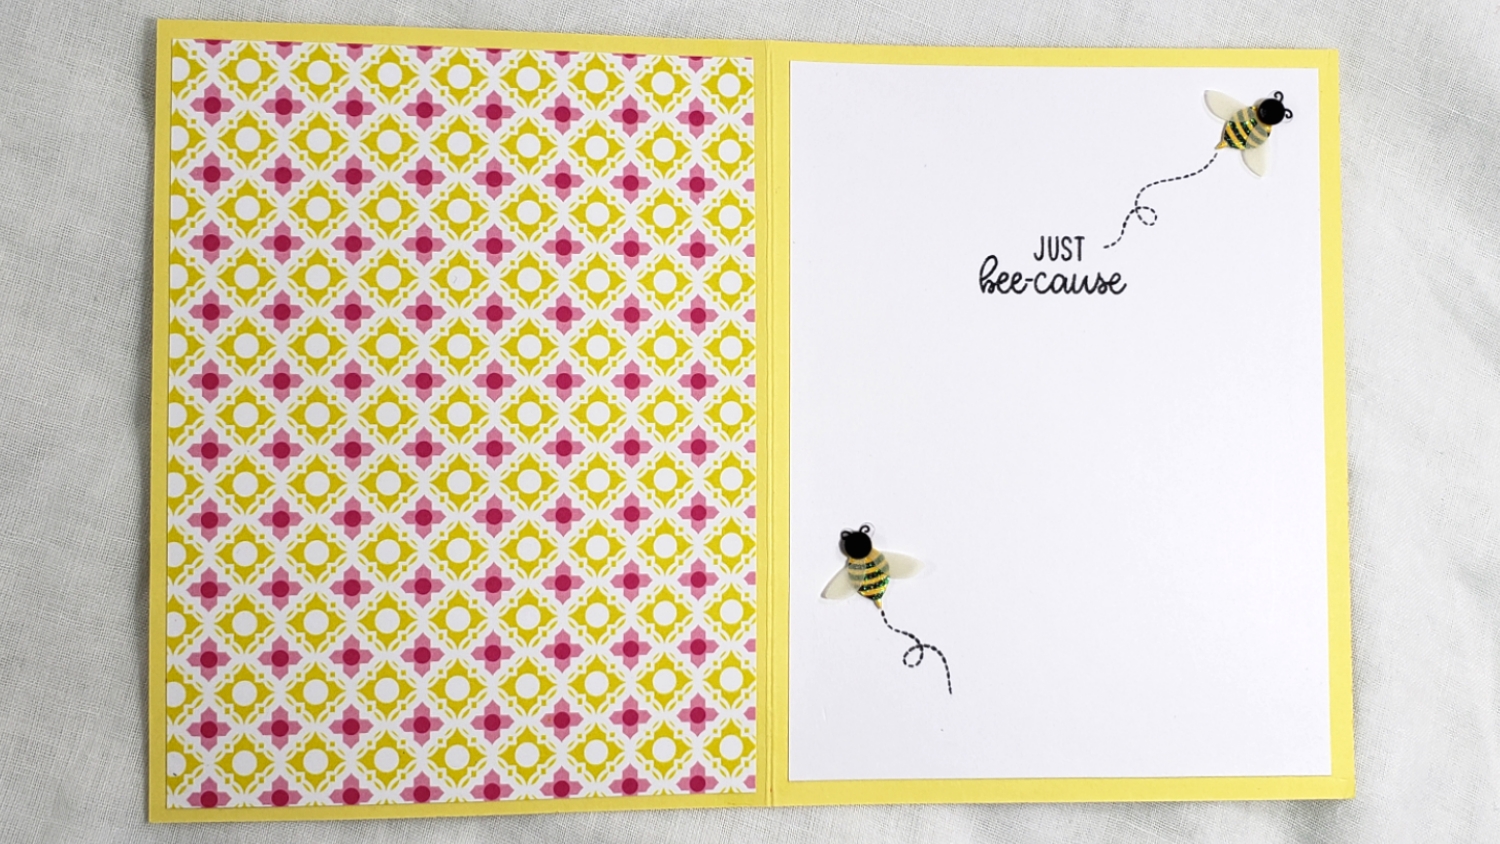
The inside liner was stamped with the “just bee-cause” sentiment and flight lines from the Sunny Studios stamp set and embellished with 2 more Jolee’s Boutique 3D bee stickers. Lastly, the 3 Copic colored bees were easily and permanently adhered onto the plastic shaker pouch using Ranger Multi Medium Matte Adhesive.
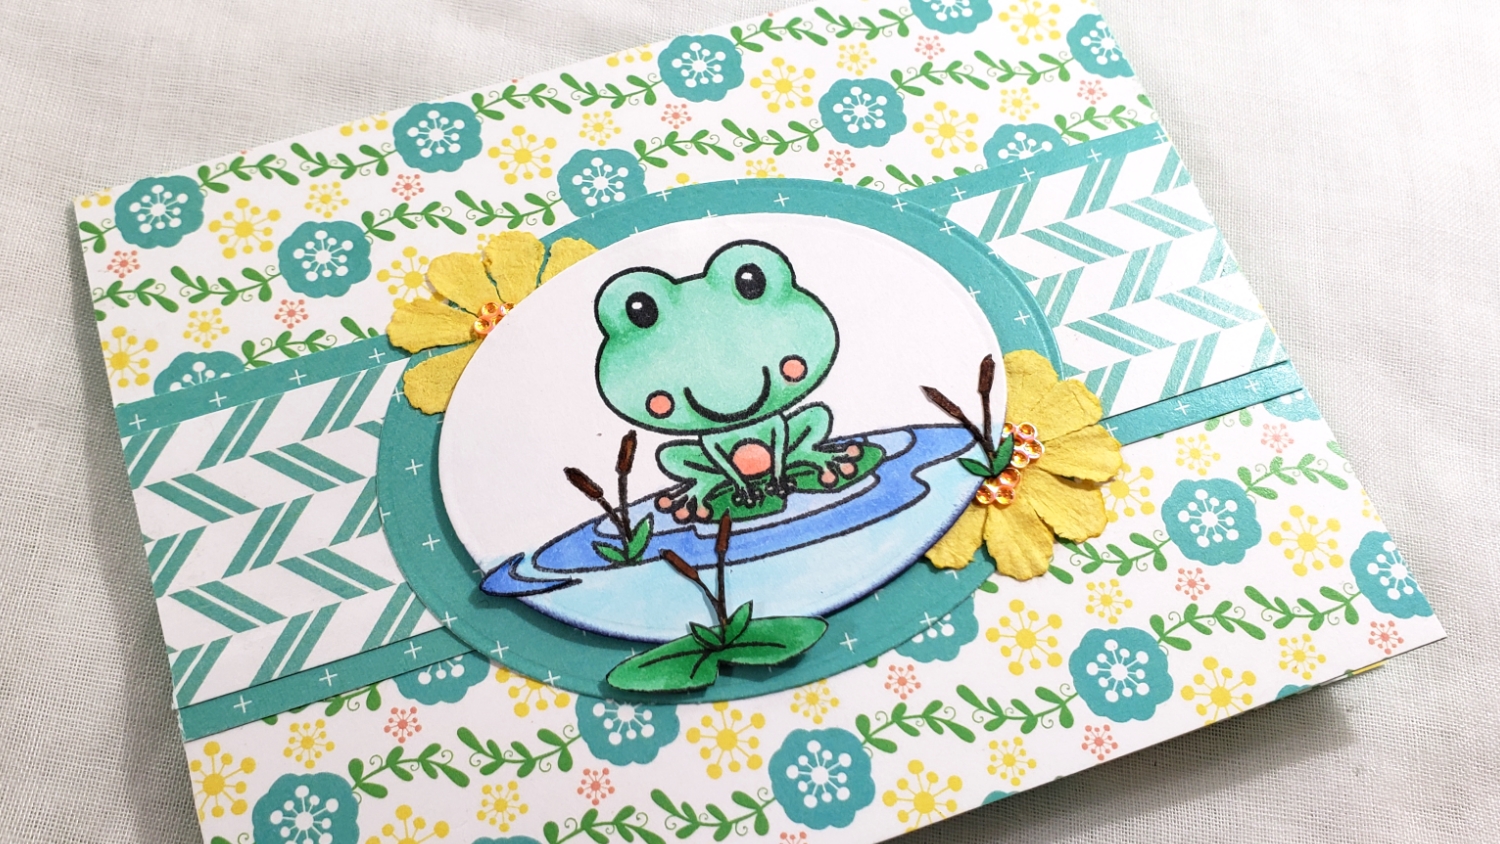
The third and last card was really designed on the fly inspired by the soft minty and sunny “Spring Fever” patterned papers from the Spring Frogs collection. I covered the card front with a graphic floral patterned paper then crafted a belly band look with 2 more patterned papers. I also used one of those smaller print papers to create a mat behind the Copic colored frog scene. To add interest, I die cut out using an oval die, but added an extra lily pad and reed plants to take the scene off the edge of the oval. Softness and a little sparkle were added by cutting one of the paper flowers from the kit in half, adding fancy floral sequin centers from the sequin mix for this collection, and tucking the partial dimensional flowers behind the scene.
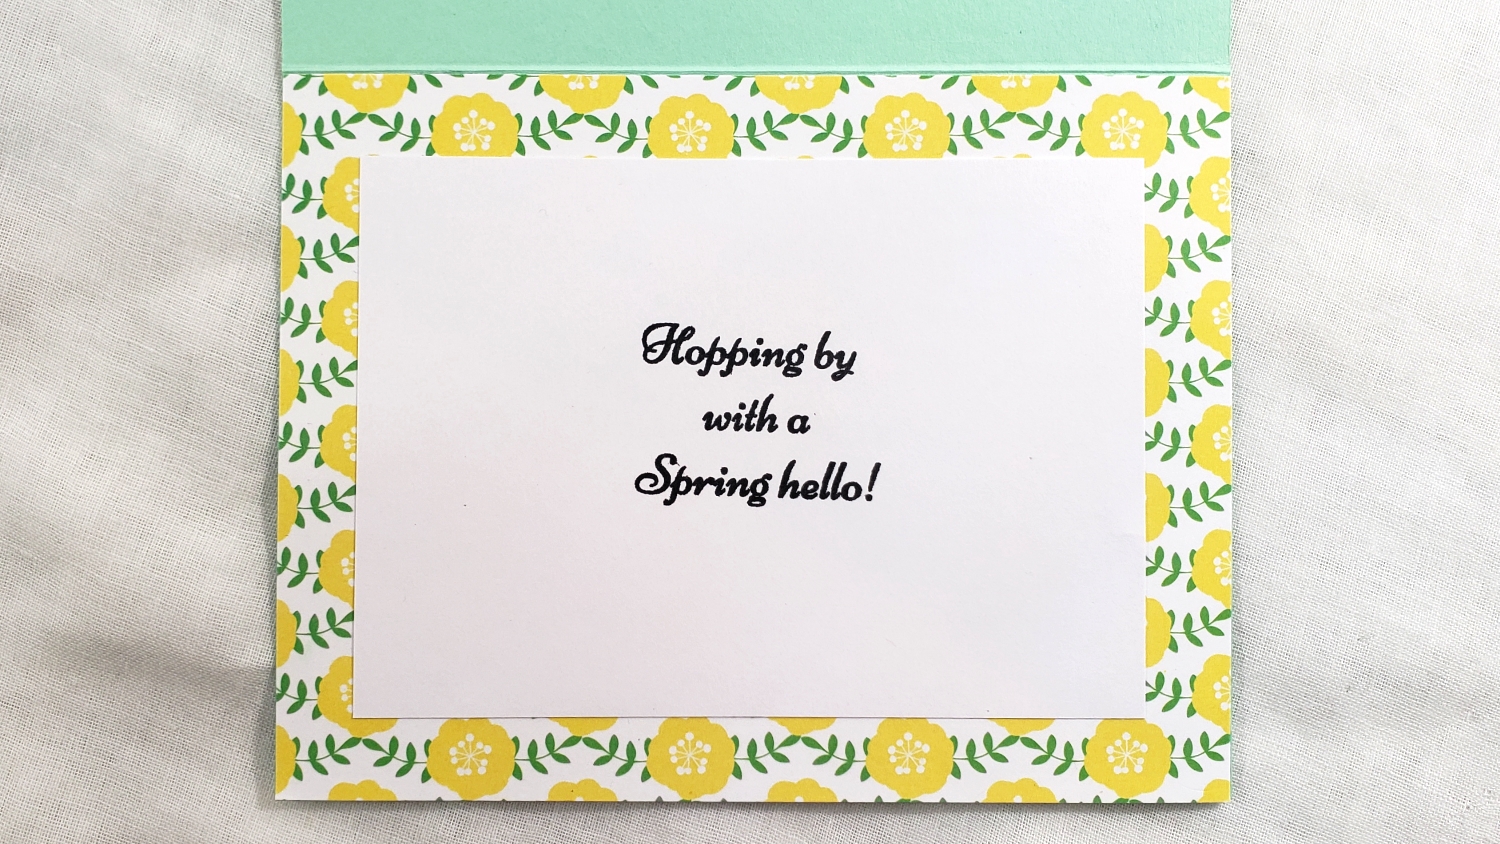
The inside for this card is a brighter lemon yellow floral paper framing a simple white card stock liner sheet. The liner sheet is stamped with the versatile sentiment: “Hopping by with a Spring hello!” so this card can be sent to anyone for any spring time occasion.
CLICK the following picture to watch the detailed process video of crafting these 3 cards:
Make sure you check out the Scrapping for Less BLOG HOP so you can join in our Rafflecopter giveaway. Next on the hop is JACKIE! All winners are announced each month in the Teresa Talks post on the blog on the first of the month.
Disclosure: Many of the supplies I’ve used for today’s project are linked. Some may be affiliate links, which means if you make a purchase I receive a small commission at no extra cost to you. I truly appreciate your support toward the costs of running this blog!
These Spring Cards are being entered into the following challenges:
Penny Black and More Spring in Full Swing Challenge
Simon Says Stamp Work it Wednesday Pets Challenge – Birds Card
Through the Craft Room Door Anything Goes Challenge
613 Avenue Create Anything Goes with Optional Wedding/Anniversary Challenge
The Male Room Challenge Anything Goes with Optional One Layer Challenge
Simon Says Stamp Wednesday Anything Goes Challenge
Word Art Wednesday Anything Goes Challenge
Creatalicious Anything Goes Challenge with Optional Black and White and One Color
NOTE: My readers can use Diemond Dies coupon code: thankskristina on all orders of $35 or more to get 10% off and free worldwide shipping!
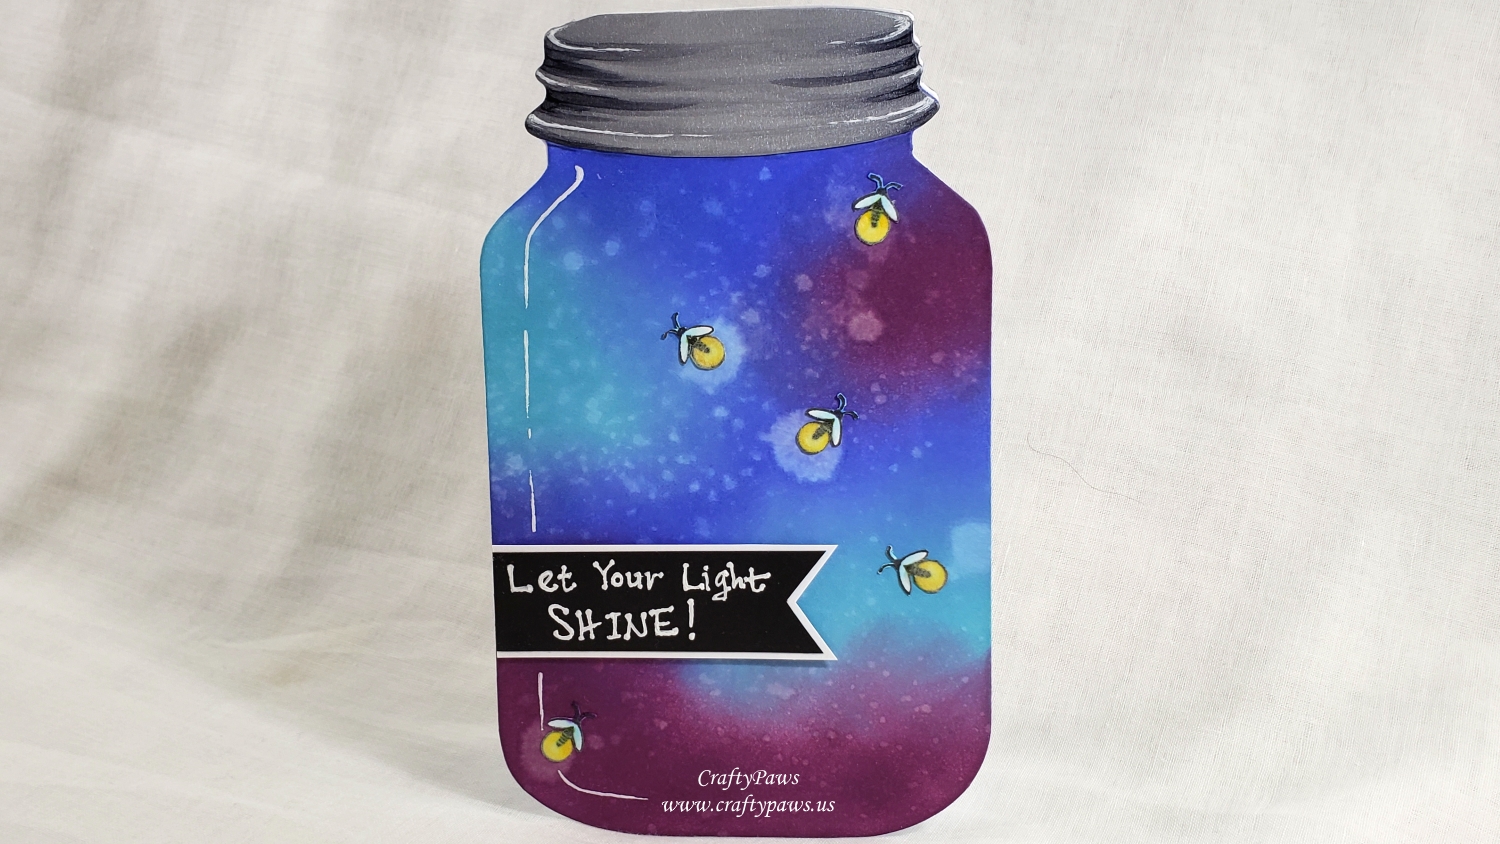
First folded over about an inch from the top of half of a sheet of white cardstock. Then I ran the die through my die cutting machine with just a bit of the top of the die hanging off the edge of the folded cardstock. That creates a front panel for my card with a top tab. I ran the die through my die cutting machine again, this time with just more cardstock with no fold to create the back panel for my card. To connect the panels, I just glued them together at the back of the tab.
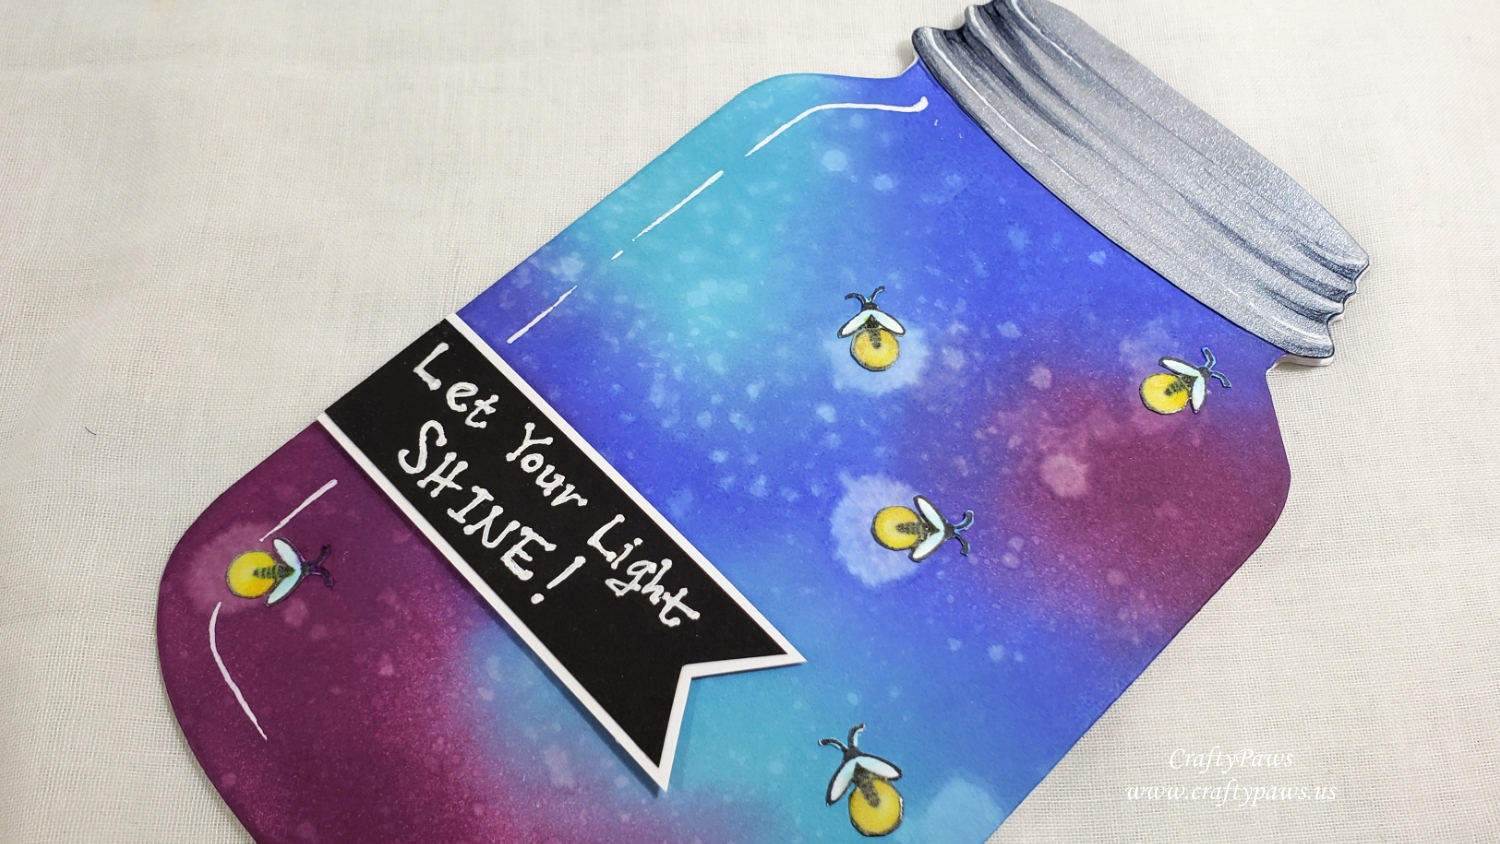
To add some stability and a more finished look, I also cut out an inside liner for the card with pale blue cardstock — getting the general size and shape with the die and then hand fussy cutting around the sides of the liner sheet to create a border all the way around. I also ran the top of the die with some shimmery silver cardstock to create a metallic mason jar lid; I hand fussy cutting just the bottom of the lid and glued that to the top of both the front and back panels. I used Copic markers in C3, C4 and C6 on the lid along with a Uniball Signo White Gel Pen to add some visual dimension to the lid.
To add some much needed color and the look of a warm Spring or Summer night that could be seen through the jar, I blended on Tim Holtz Distress Ink in Tumbled Glass, Seedless Preserves, and Blueprint Sketch onto the card front. To soften my rough blending, I also added some Tim Holtz Distress Oxide Ink in Broken China. I was also able to achieve a magical look of distant lights by splattering on some water with an old toothbrush to “bleach” out the ink for a mottled light appearance.
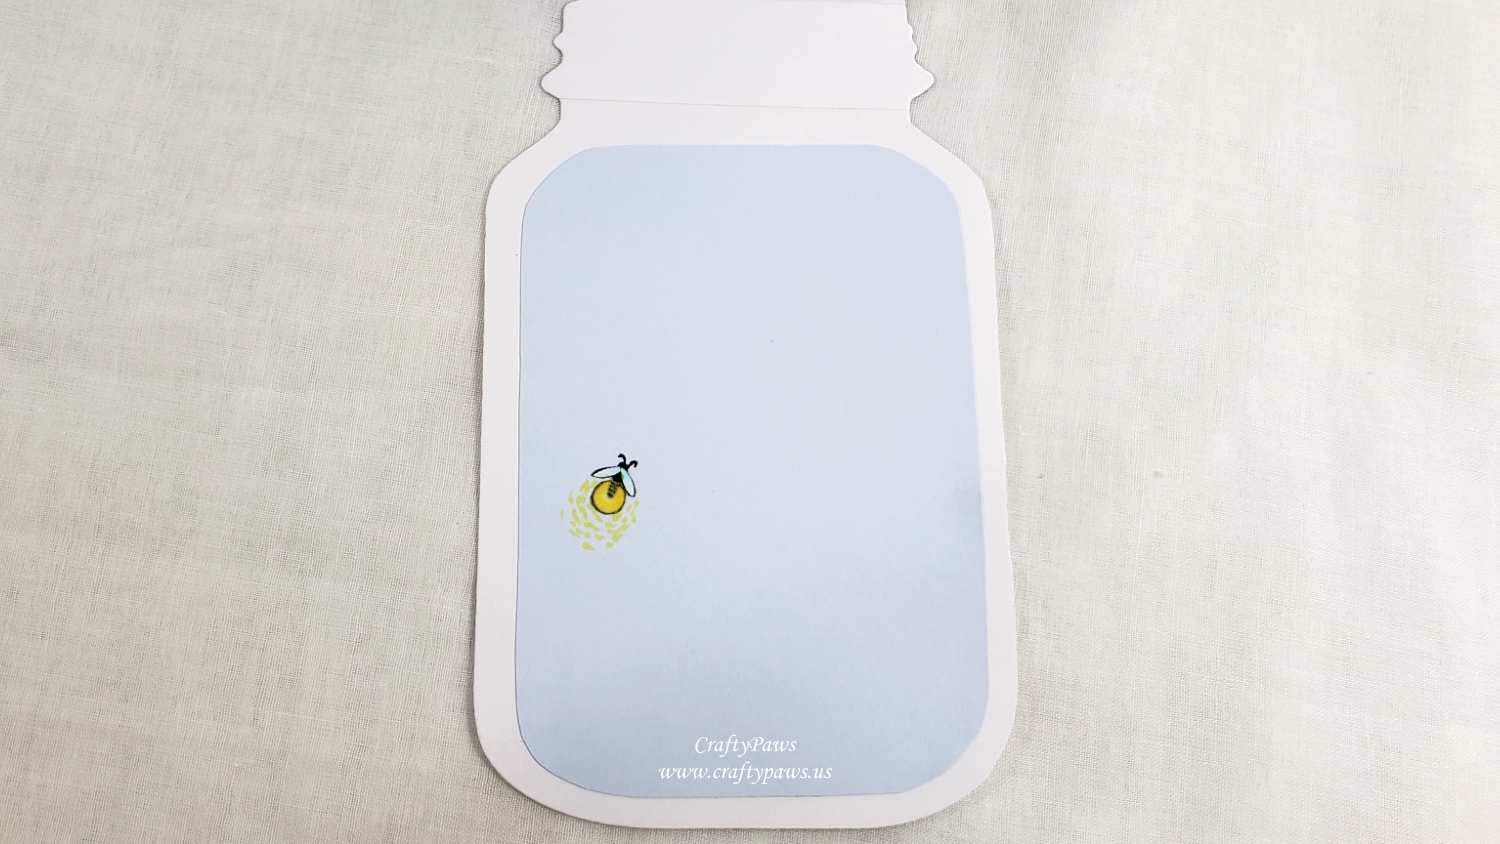
For the featured glow-in-the-dark fireflies, I used an old Recollections clear stamp set called “Mason Jar” that has 3 fireflies. I stamped them and used the following Copic colors to color them: B000, Y13, Y08 and YG25. Then I used a VersaMarker Pen and WOW Glow-in-the-Dark Embossing Powder on the lighted parts of the fireflies to make them glow-in-the dark! I fussy cut out 6 of these fireflies and positioned 5 on the card front and 1 on the inside card liner.
Lastly, I hand wrote out the sentiment: “Let Your Light Shine!” on a scrap of black cardstock using a Uniball Signo White Gel Pen. I matted it with a scrap of white cardstock and cut it into a banner shape to place on the lower left part of the card front. I popped the whole thing up with some thin double sided foam adhesive to add a bit of dimension as well.
The following is a process video of crafting this fun glow-in-the-dark shaped card:
Disclosure: Many of the supplies I’ve used for today’s project are linked. Some may be affiliate links, which means if you make a purchase I receive a small commission at no extra cost to you. I truly appreciate your support toward the costs of running this blog!
This card is being entered into the following challenges:
The Male Room Spring Challenge
Crafts Galore Encore Anything Goes Challenge
Crafter’s Castle Anything Goes Challenge with Optional Spring and/or Distressed
Penny Black and More Springtime Challenge
Through the Craft Room Door Anything Goes Challenge
Simon Says Stamp Wednesday Animal Antics Challenge
Word Art Wednesday Anything Goes Challenge
Creatalicious Anything Goes with Optional Anything But a Card Challenge
Lil Patch of Crafty Friends Anything Goes Challenge
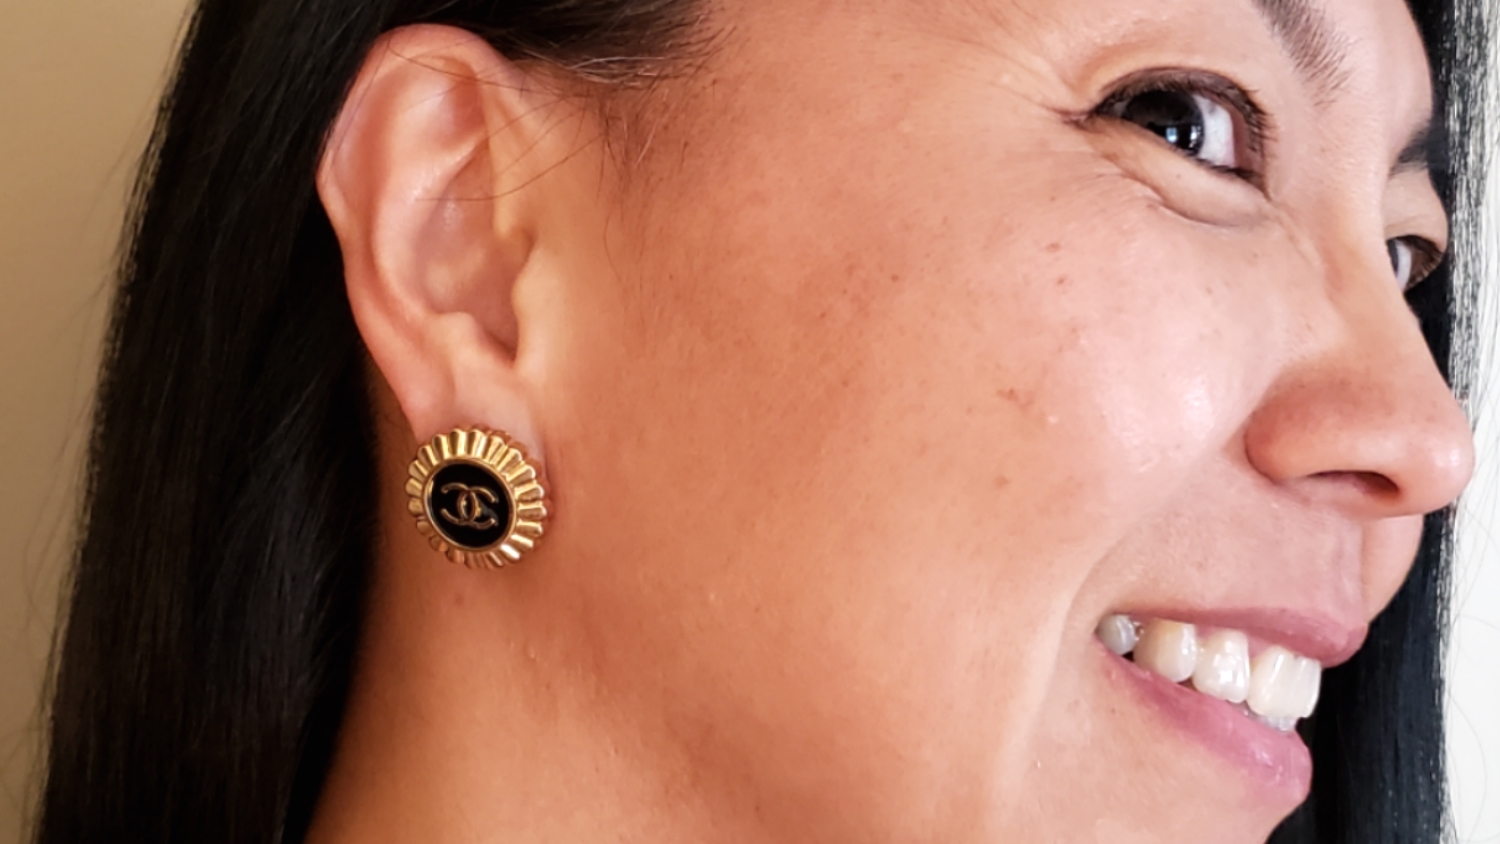
First I bought 2 black and gold sets of vintage buttons and a pair of silver bottle cap style buttons. I used wire cutters to cut off the shanks from the back of the buttons (please use gloves and protective eye wear in case small metal pieces fly), and where I couldn’t get low enough on the shank (the gold button shanks were very thick), I ground them down with a metal file.
Next I used some EnviroTex Jewelry Clay, completely mixing equal small amounts of A clay with B clay. Then I carefully inset the clay into the wells on the backs of the buttons. If your buttons are flat, you could skip this step completely, but mine had deep wells so I had to level the backs to the edges of the buttons. Have patience at this point: to fully cure, you need to leave this jewelry clay for 24 hours.
What I should have done next is paint the clay on the earring backs, but I jumped to attaching the Jewelry Shoppe 18K gold (nickel free) 8mm earring posts with E6000 glue. When that had fully dried after a couple of hours, I painted 2 coats of Artist’s Loft metallic acrylic paint — gold for the gold earrings and a mix of silver and white for the silver earrings.
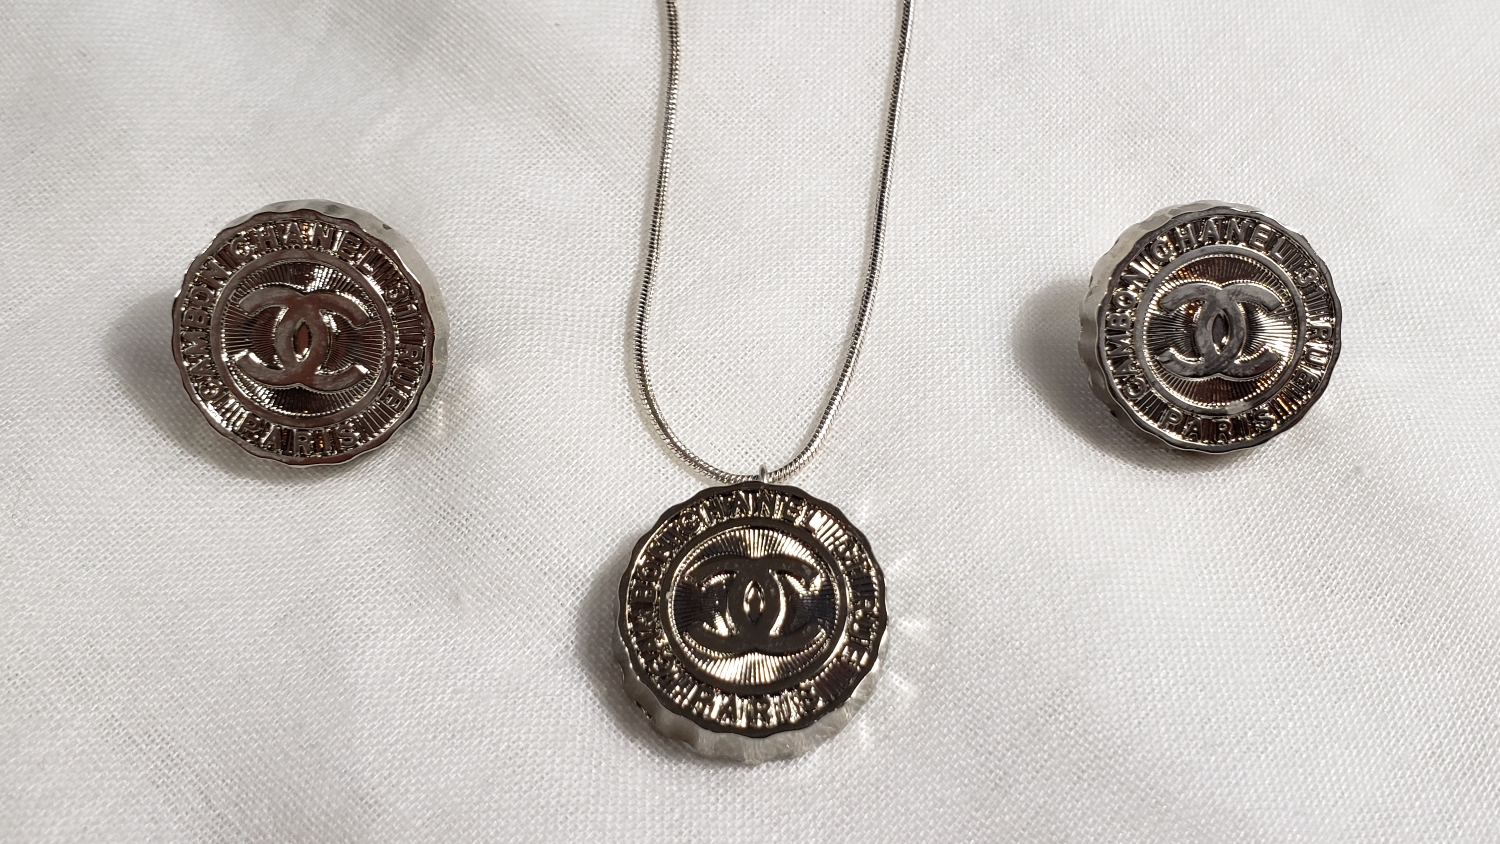
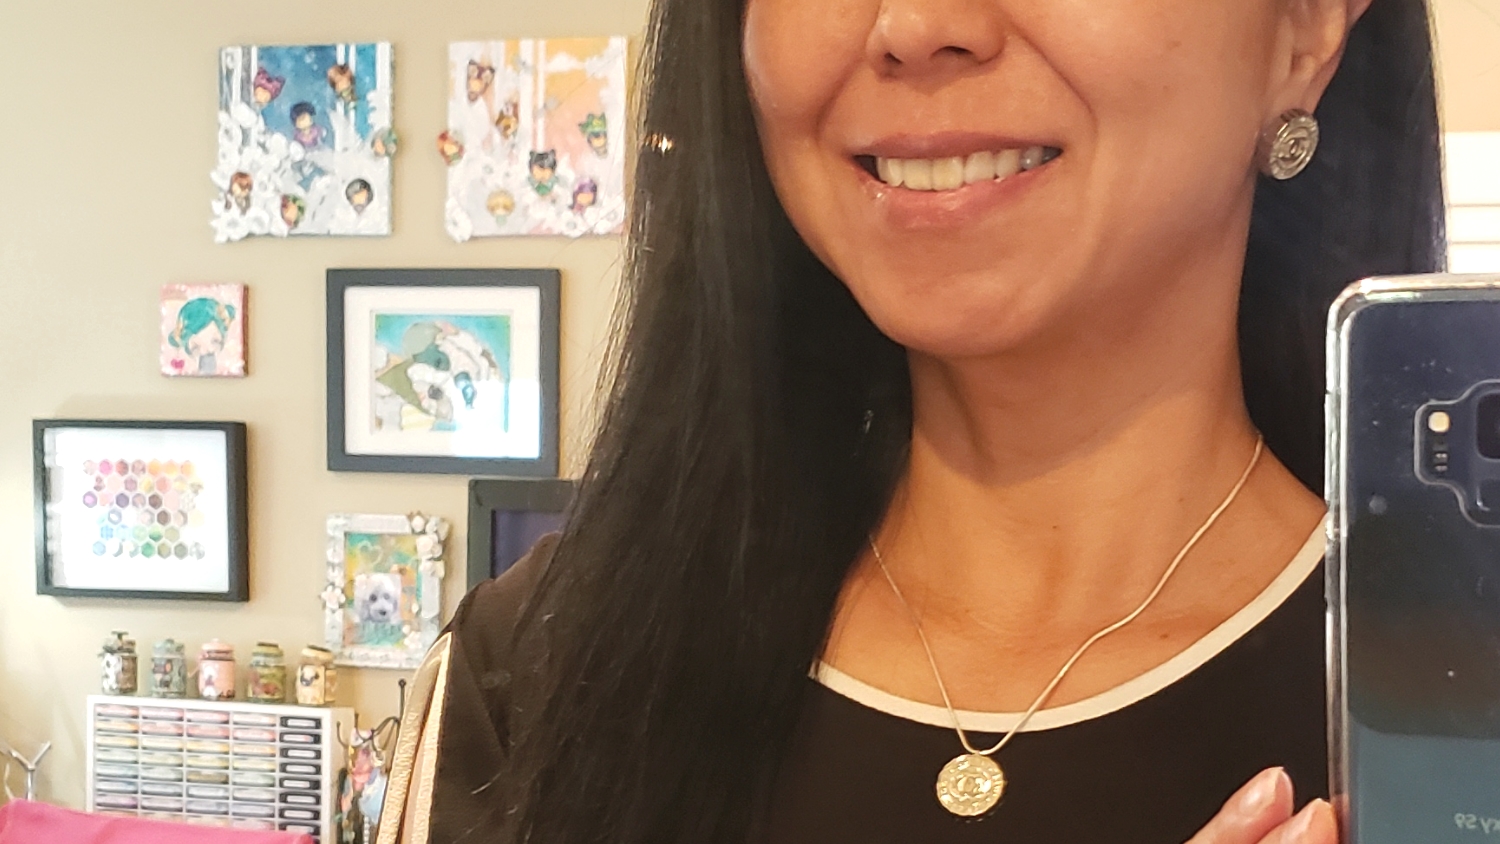
One of the eBay sellers actually sent me a bonus button so I also made a pendant necklace with that extra! To create this necklace pendant, I used flat and round pliers to create a eye loop pin from silver wire. Then, before the jewelry clay could fully dry, I inserted this eye loop pin into the soft clay, making sure it was centered at the top of the button design (the silver bottle cap designed buttons had a top and bottom). Again, after this clay fully cured, I painted the back with Artist’s Loft metallic silver and white acrylic paint and put a thin silver chain through the eye loop.
CLICK the picture below to watch the step by step process video of how I converted these Chanel buttons into authentic Chanel earrings:

Disclosure: Many of the supplies I’ve used for today’s project are linked. Some may be affiliate links, which means if you make a purchase I receive a small commission at no extra cost to you. I truly appreciate your support toward the costs of running this blog!
These Chanel earrings are being entered into the following challenges:
Simon Says Stamp Wednesday Anything Goes Challenge
Word Art Wednesday Anything Goes Challenge
Through the Craft Room Door Anything Goes Challenge
Crafts Galore Encore Anything Goes Challenge
Crafter’s Castle Anything Goes with Optional Use Glitter
]]>
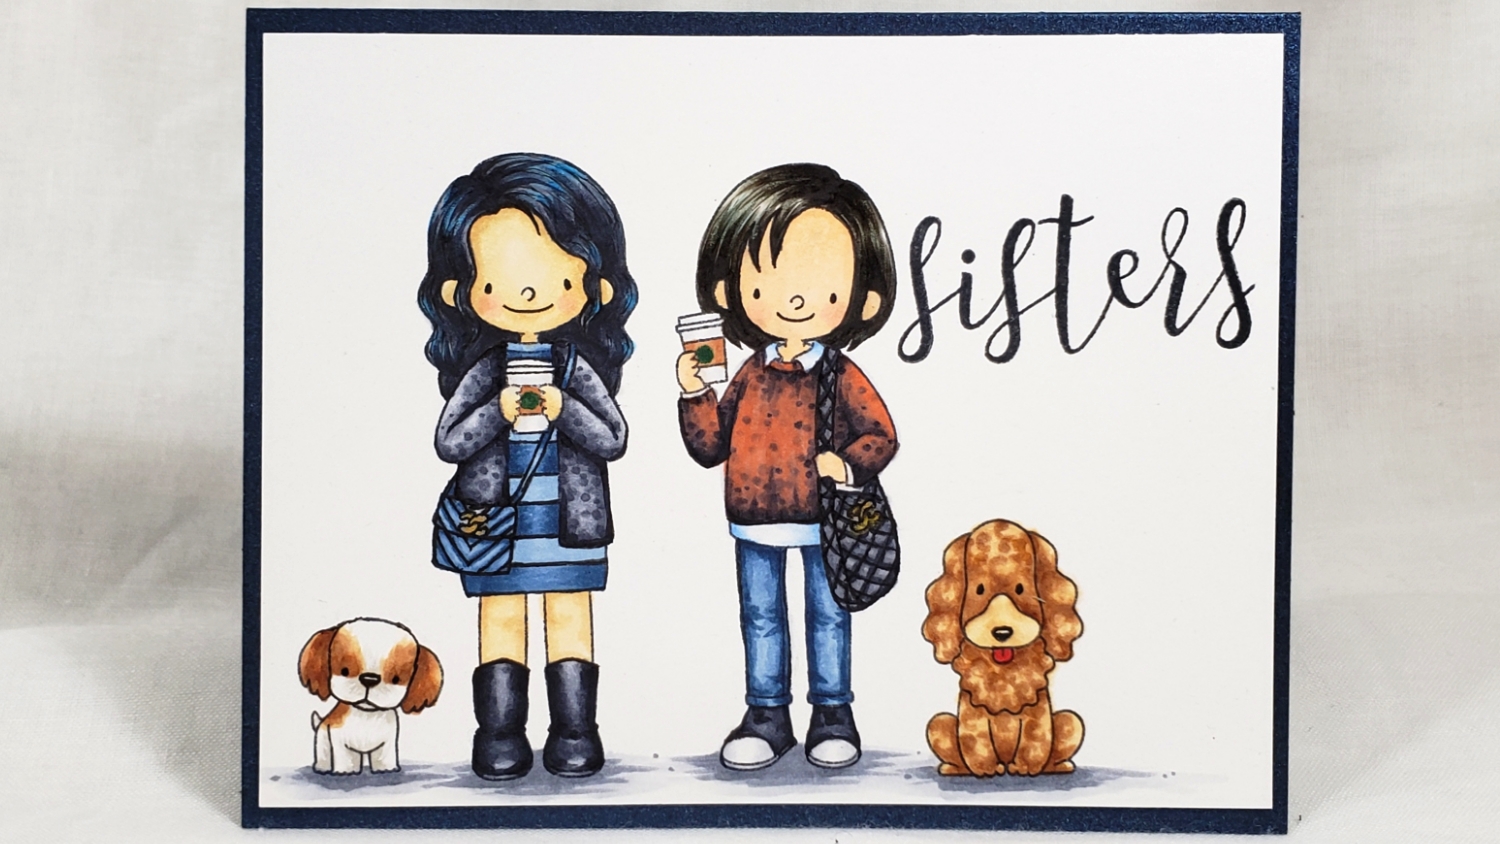
I used the following Copics to color this little scene of me and my sister and our fur babies:
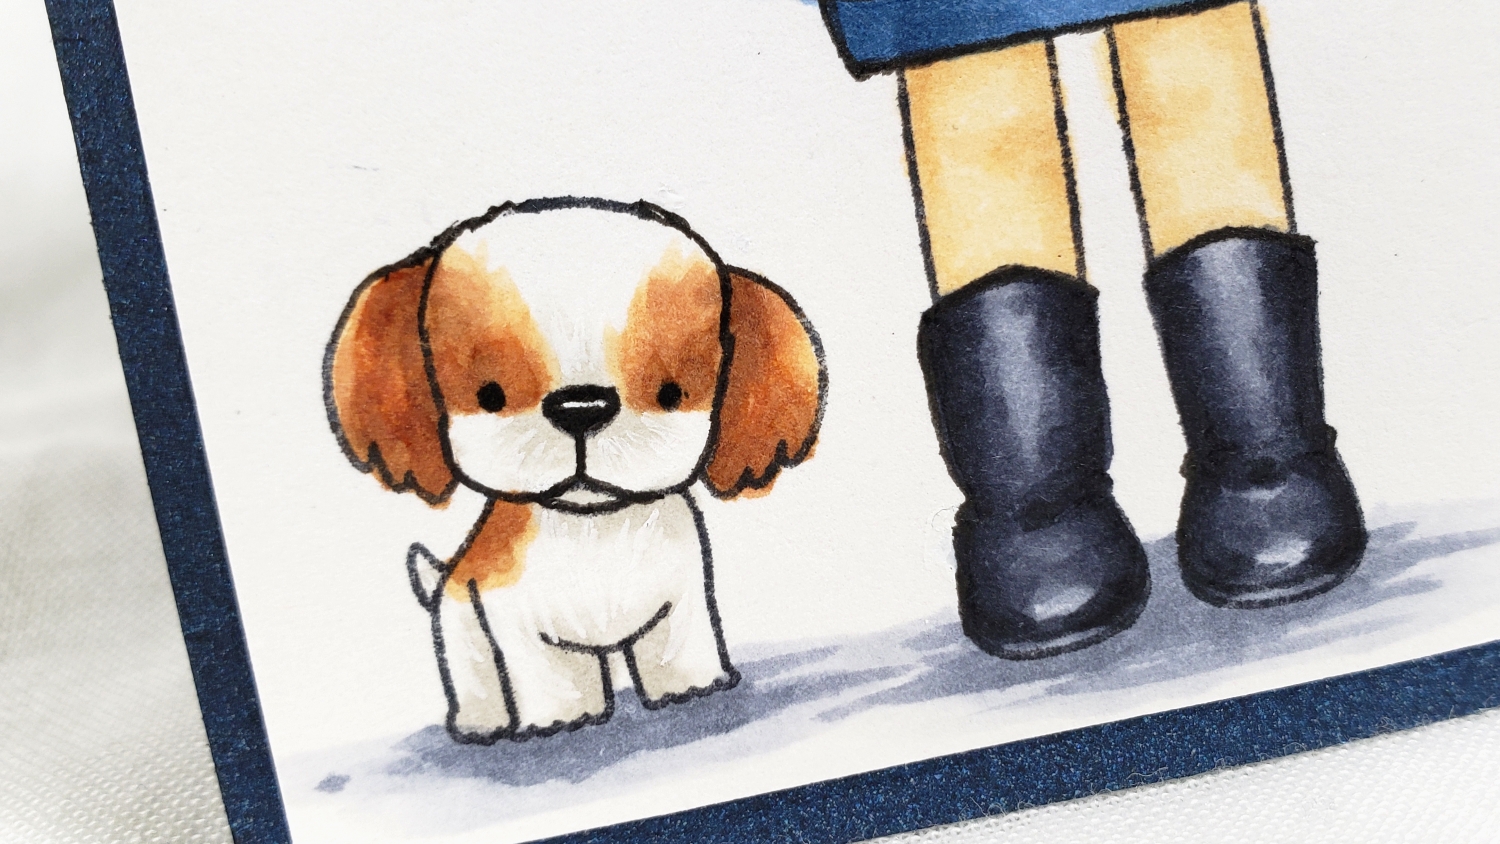
Bandito (my spotted Havanese): W0, E50, E53, E13 with Sakura White Gelly Roll Pen fluffy fur details
Boomer (my sister’s fluffy mini apricot poodle): E21, E33, E23 with R27 tongue
Coffee cups: C0, C1, E13 and G29
Ground shadows: C2 and C4
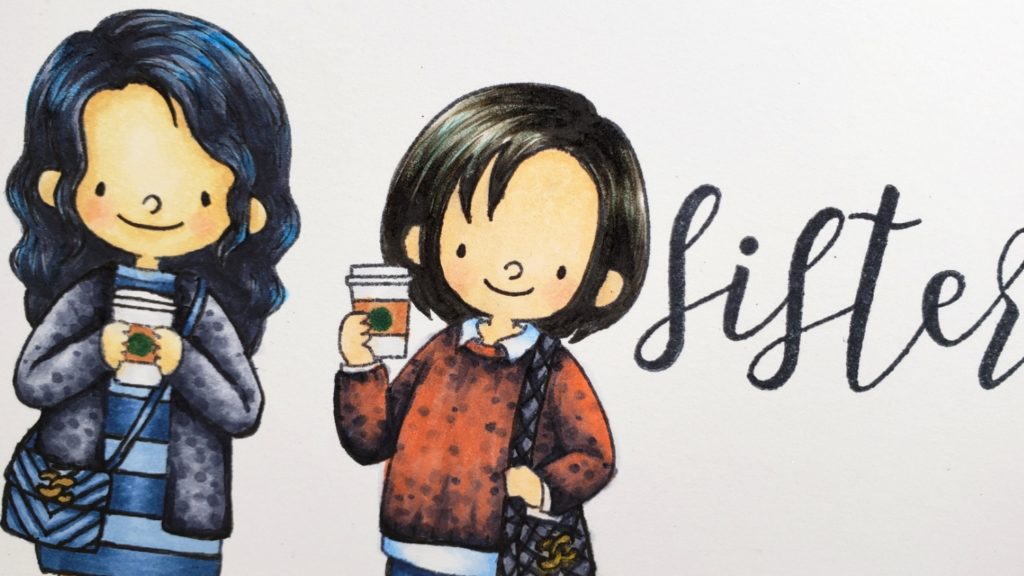
Short haired girl (my sister): Skin: E000, E00, R20; Hair: B01, W3, W5, W7; Jeans: B91, B93, B95, B99; Shirt: B32, 0; Sweater: C2, C4, C6, C8, R05; Purse (with quilting and CC doodled in with a Copic Multiliner 0.03 pt Pen): C2, C4, C6, C8 and the CC logo with a Sakura Metallic Glittery Gold Gelly Roll Pen
Long haired girl (me): Skin: E50, E53, R20, Hair: B02, C4, C6, C8; Cardigan sweater and boots: C1, C2, C4, C6, C8; Purse (with chevron and CC doodled in with a Copic Multiliner 0.03 pt Pen) and striped dress: B91, B93, B95, B97, B99 and the CC logo with a Sakura Metallic Glittery Gold Gelly Roll Pen
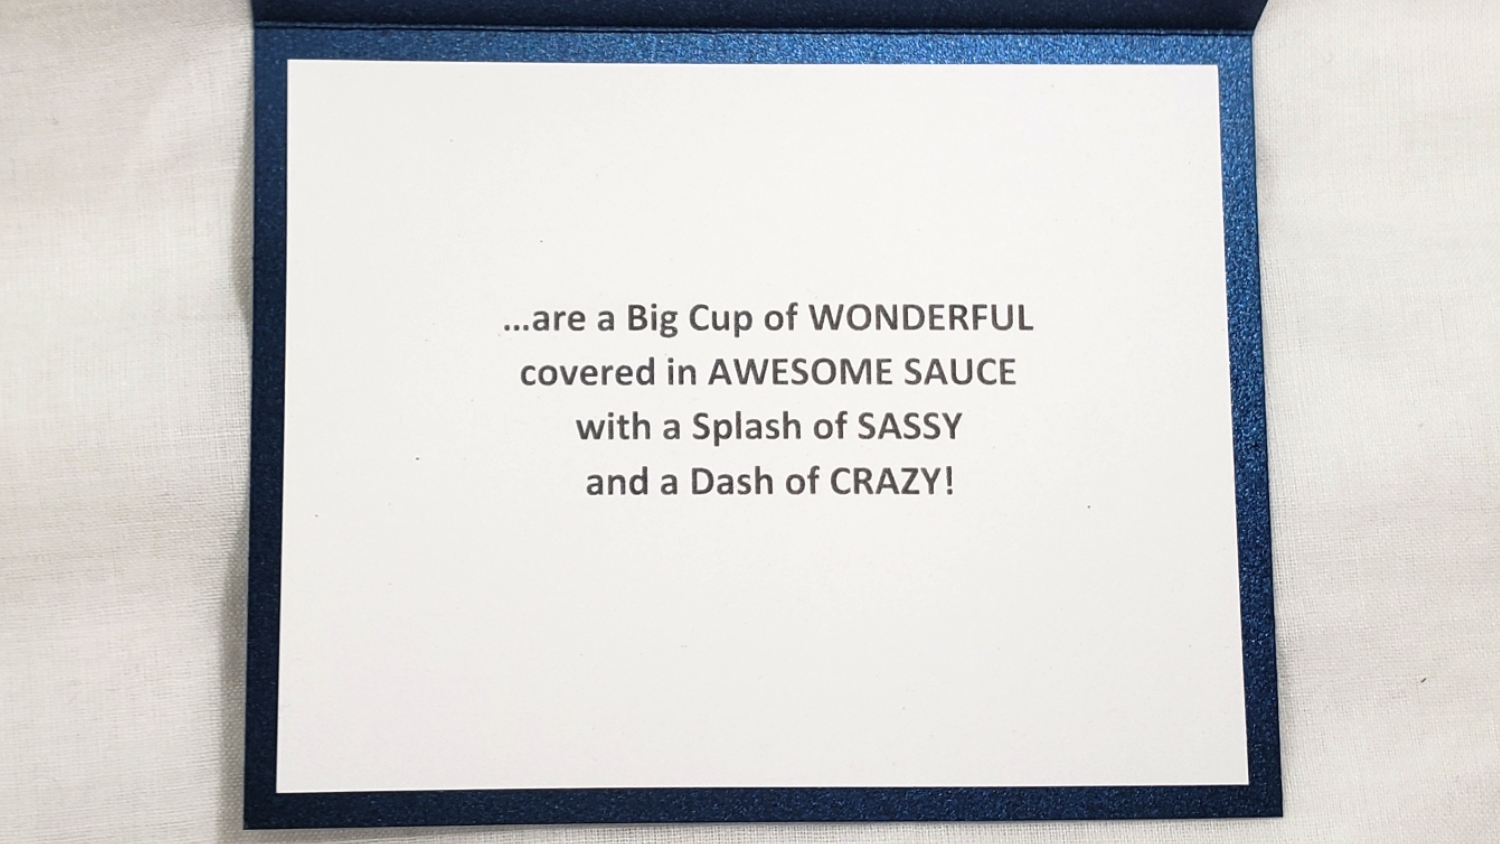
Then I used the Concord & 9th “Sophisticated Script Stamp Set” to stamp out the word “sisters” (using a stamping tool is critical for this step so that repeated stamping and exact positioning is possible). For the inside liner, I printed from my computer, the following: “…are a Big Cup of WONDERFUL covered in AWESOME SAUCE with a Splash of SASSY and a Dash of CRAZY!”
CLICK on the following picture to watch the stamping, doodling (stamp altering), and Copic coloring of the hair and fur:
Disclosure: Many of the supplies I’ve used for today’s project are linked. Some may be affiliate links, which means if you make a purchase I receive a small commission at no extra cost to you. I truly appreciate your support toward the costs of running this blog!
This card is being entered into the following challenges:
Crafting By Design Anything Goes Challenge
Through the Craft Room Door Anything Goes Challenge
Crafts Galore Encore Anything Goes Challenge
Crafter’s Castle Anything Goes with Optional Use Glitter Challenge
Simon Says Stamp Wednesday Scene Challenge
Word Art Wednesday Anything Goes Challenge
Creatalicious Anything Goes with Optional CAS Challenge
Addicted to CAS Fluffy Challenge

We had an amazing time and were blown away by the unique visions the artist shared through various paper and ink, sculpture, and lighting immersive installations.

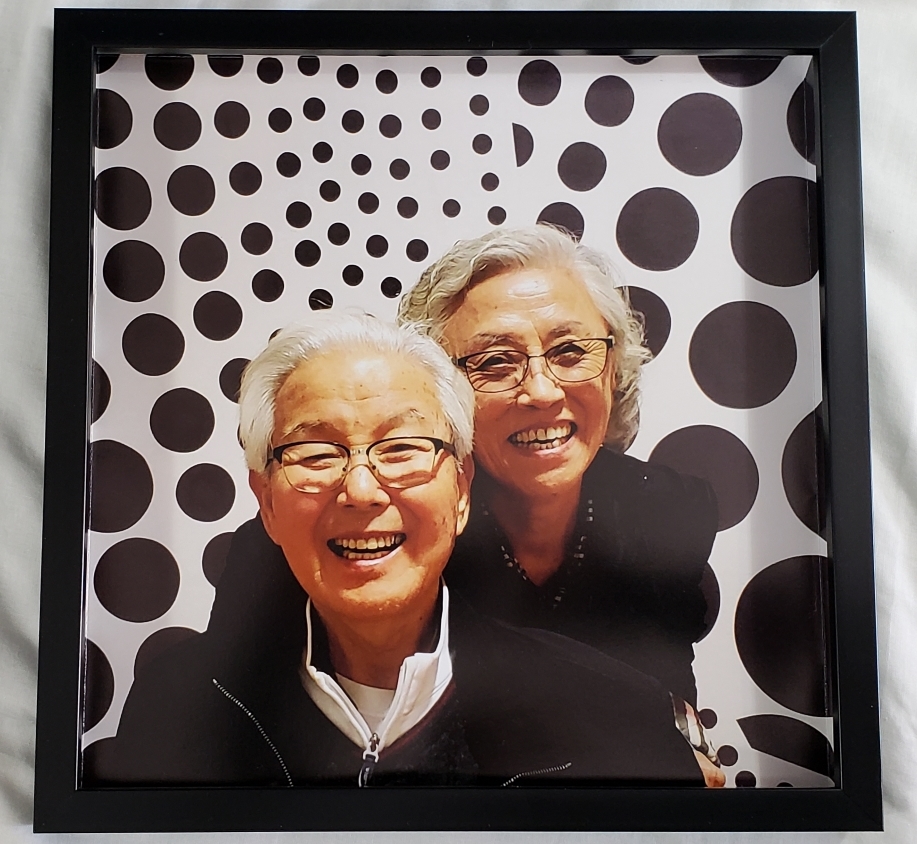
From the numerous pictures we took, one particularly spoke to me. It was an unassuming black and white polka dot wall at the end, and on a whim I asked my parents to pose in front of it. The resultant picture was wonderful and I knew immediately I wanted to frame it for them. I enlarged it to 16″ x 20″ (~$10 with a 40% off coupon at CVS) and then cut it down to about 13.5″ square. I scored and folded up the edges at 0.75″ from each side. Then I cut a triangle from each corner and secured each side together to form a shallow box (how-to the video posted HERE starting at 7:53).
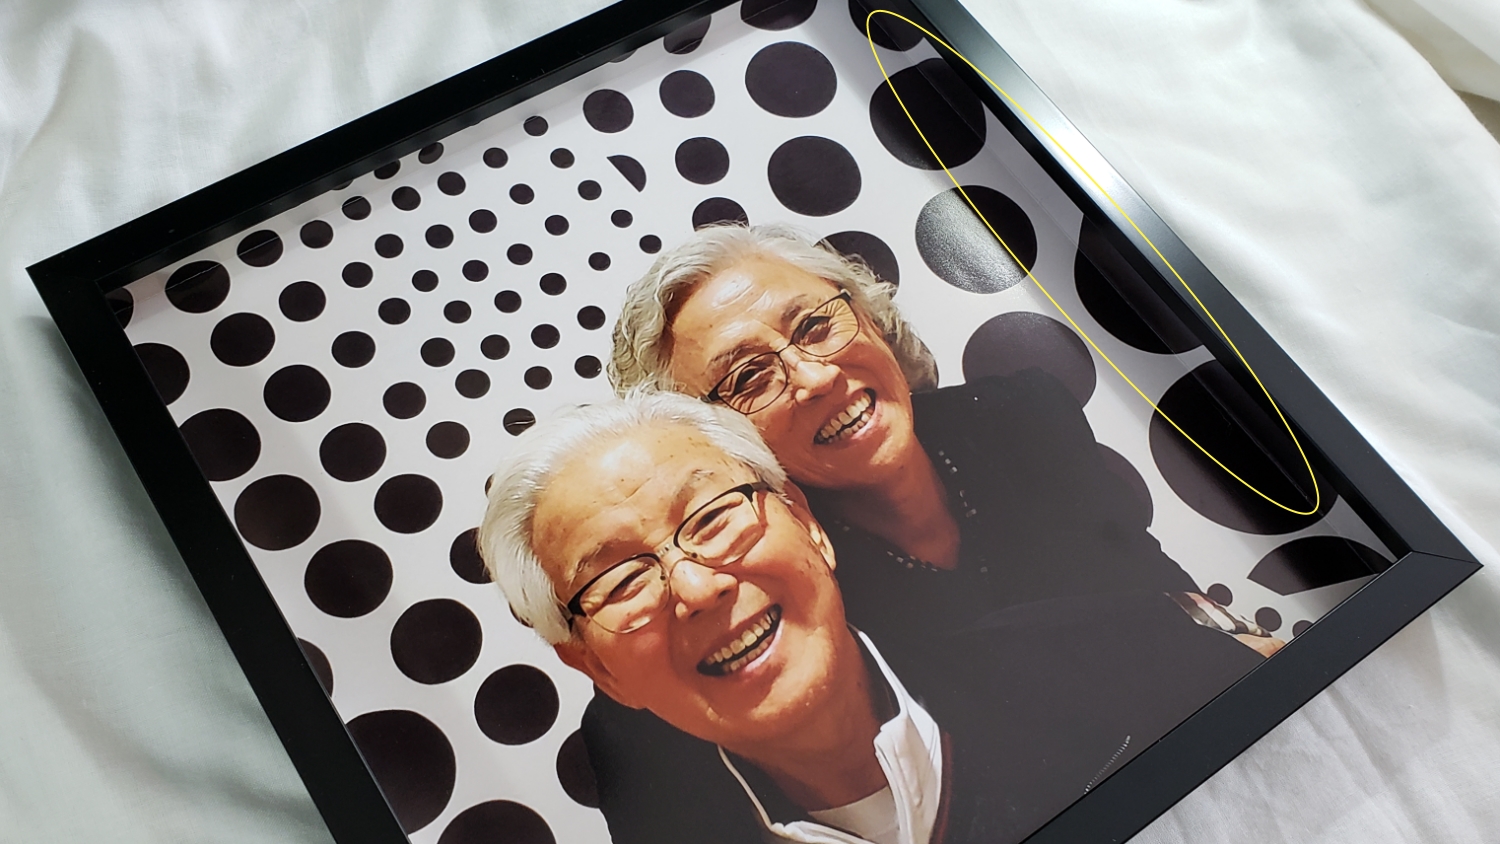
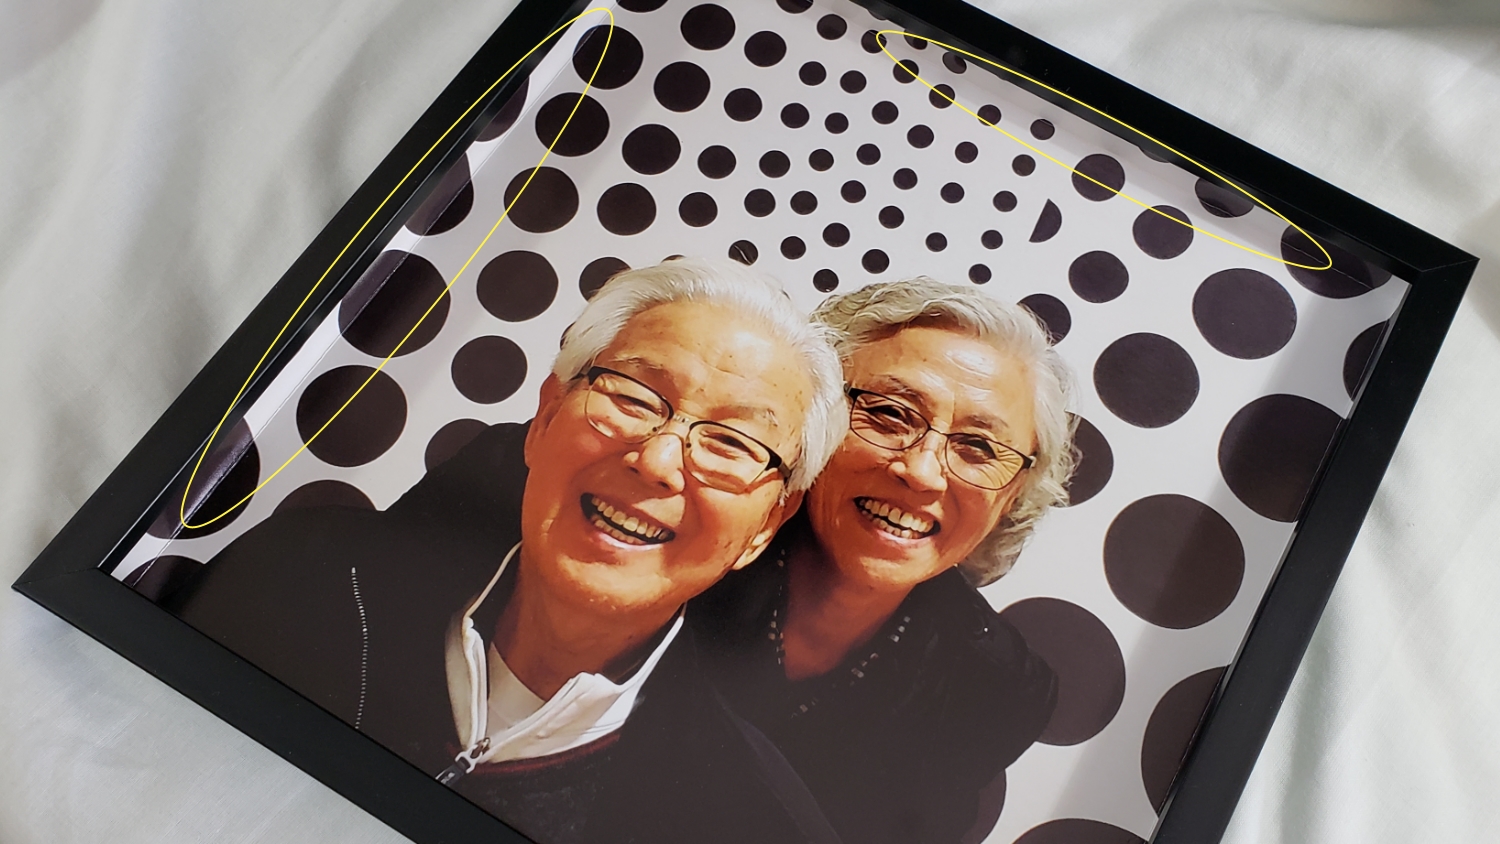
This fit perfectly in the 12″ x 12″ Studio Decor Shadow Box Frame I purchased at Michaels. I love the way this slight bit of paper crafting makes the picture fill the shadow box and makes it look like this project captures a kind of excerpt from the whole room (see images above with circle marking the turned up edges).
I’m having lunch and then doing a virtual reality gaming session with them tomorrow, and I can’t wait to gift this shadowbox picture project as well as the prior mixed media layouts (HERE) to my parents. I hope they love them as much as I loved creating them!
]]>