
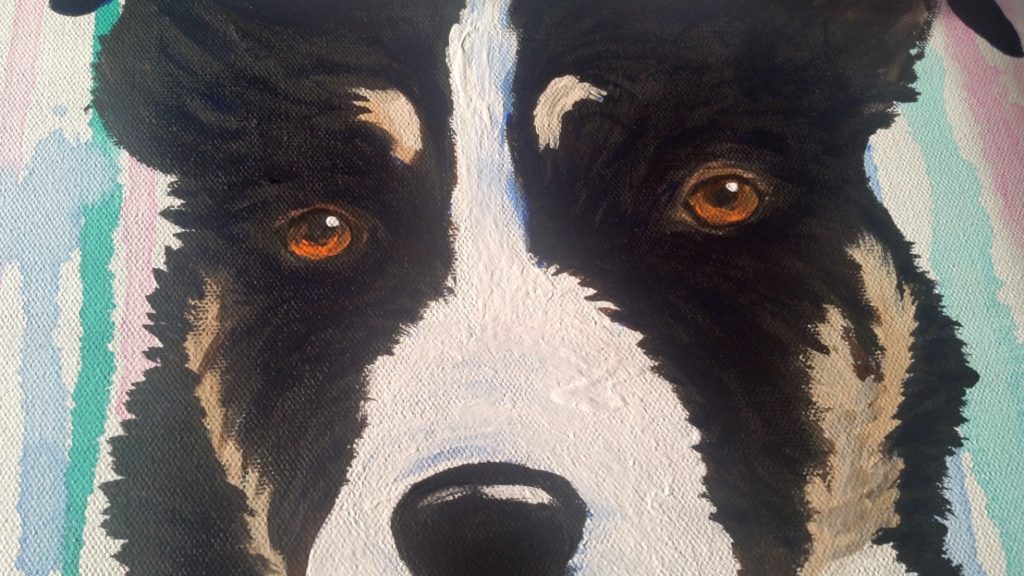
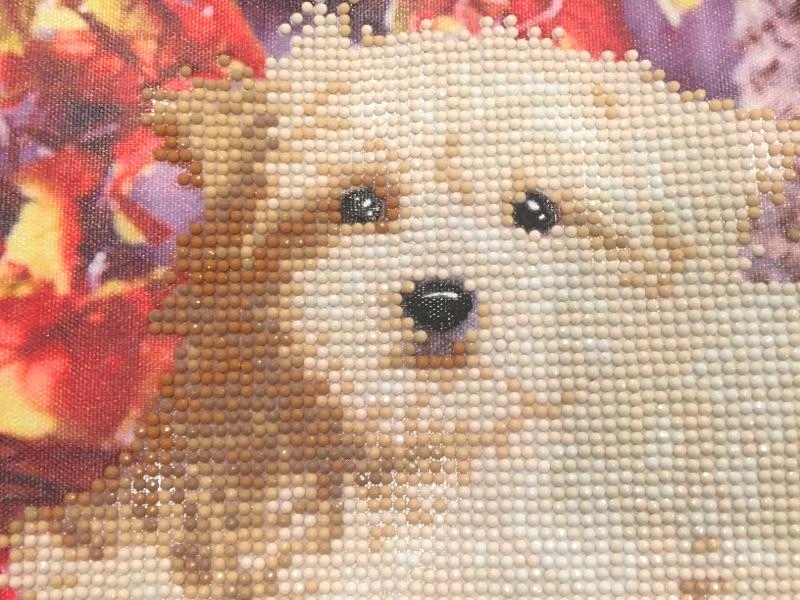
We asked for a a few pictures of Kuzy so that I could work off something tangible (other than sentiments like, “Kuzy ranks at the top of the family hierarchy; it goes: Kuzy, my wife, the kids, and then me.” — that’s a quote from the husband in the family — LOL). I enlarged and focused on Kuzy’s face and head as I drew a grid on the two close-up pictures that I would kind of combine in the portrait painting.
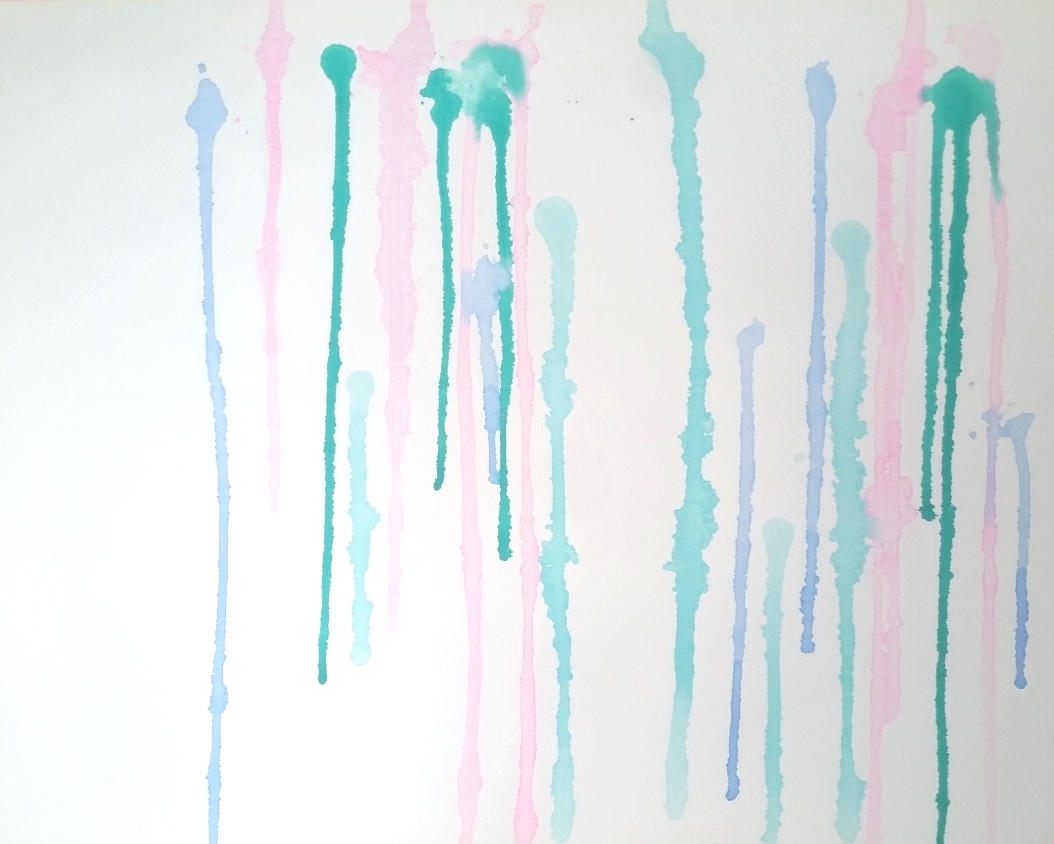
I prepped a 24″ x 30″ professional level canvas with Liquitex Gesso. Then I watered down some craft acrylic paints that I had in my stash from Craft Smart and DecoArt Americana. I dripped some small puddles and then tilted the canvas to create soft drips for the background in bright colors. I used ocean breeze, bright pink, bright blue and bluegrass green.
Then I started mapping out where Kuzy’s eyes, nose and markings would be. I thought about putting in a grid on the canvas, but I wanted to keep the canvas as free from stray marks as possible and just relied on estimating using my thumb as a ballpark guide. It wasn’t perfect, but perfection is not what this painting was about. I was trying to depict Kuzy’s spirit, love and beauty, not create a photographic-like replica (they already had hundreds of pictures of their beloved Kuzy).
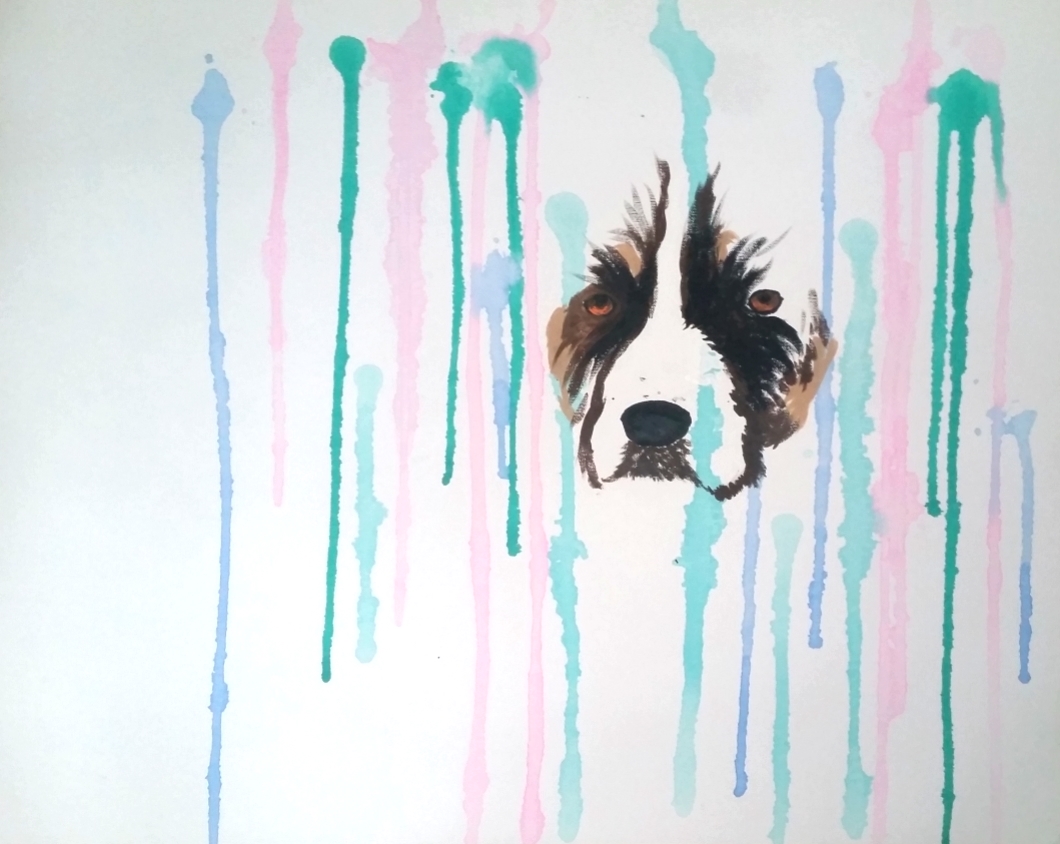
Then I mapped in more of Kuzy’s face, ears and neck. I added more details, texture and shading. I used golden brown, cocoa bean, lamp black, white, mixed a warm gray, and more bright blue to “sketch” out Kuzy’s main facial features.
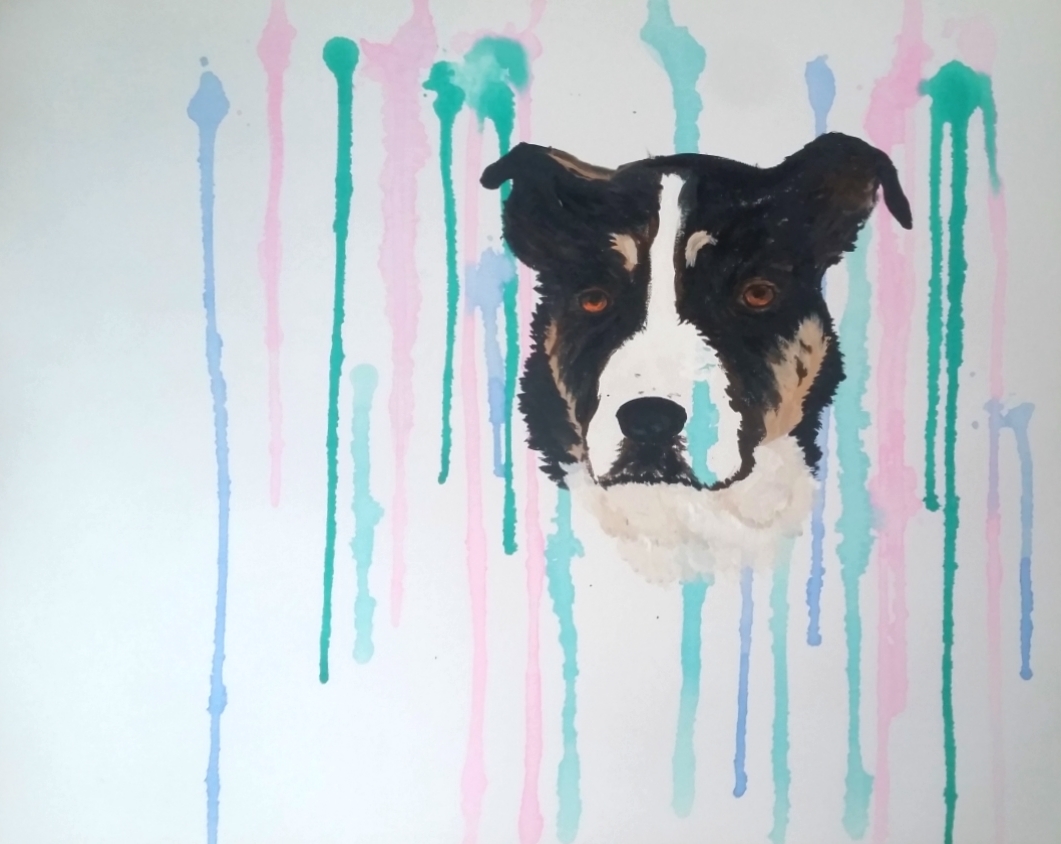
After I was able to lay out the whole face and upper torso, I decided to add more highlights and focus to Kuzy’s face. I left his upper torso textured, but did not add definition to the tops of his legs. I wanted to concentrate those details just around his eyes and facial markings.
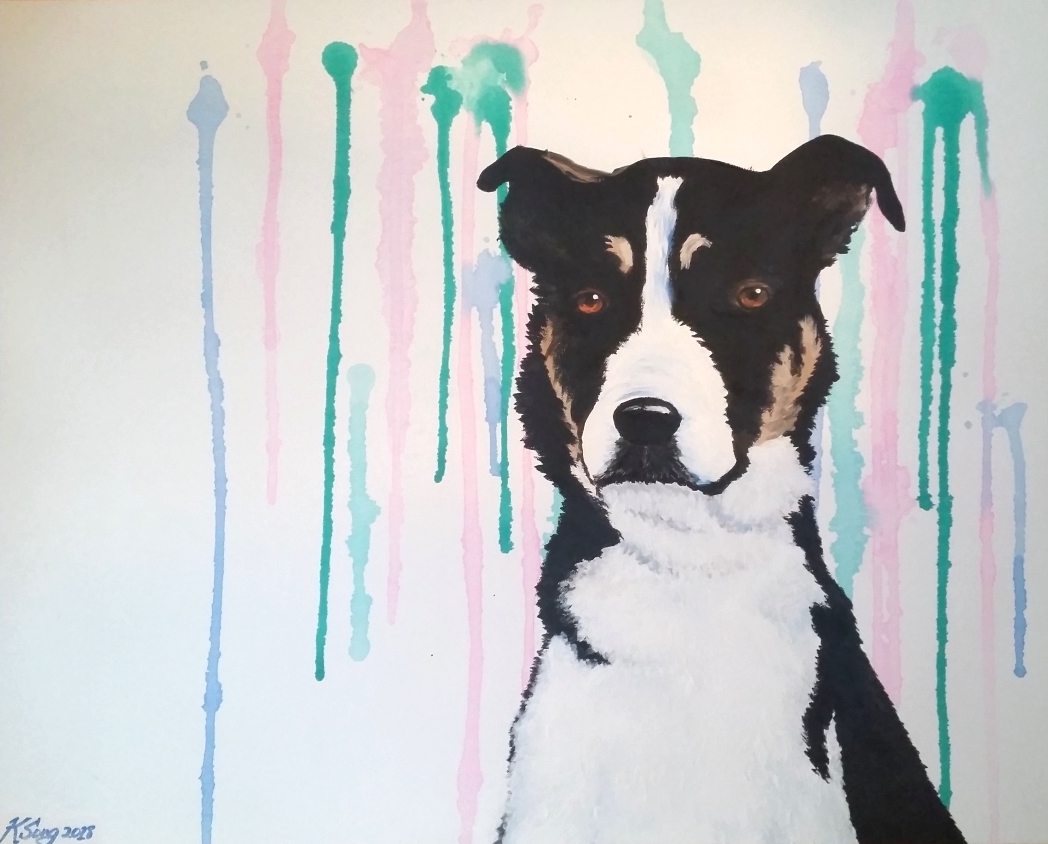
I added highlights to his eyes and nose which I think really brought Kuzy to life. You might be surprised to know that I also used bright blue to add shadows to the white areas of his fur, orange to really make his light eyes shine, and ultramarine blue to the black areas of his fur for depth and texture.
CLICK on the picture below to watch a full share of this doggy portrait painting:
This doggy portrait is being added to the following challenges:
CASology Compliment Challenge
Just Keep on Creating Anything Goes Challenge
Simon Says Stamp Monday Make Your Own Background Challenge
Simon Says Stamp Wednesday Anything Goes Challenge
Word Art Wednesday Anything Goes Challenge
Simon Says Stamp Work It Wednesday Give Thanks Challenge
Crafter’s Castle Anything Goes with Optional Holidays Challenge
Crafts Galore Encore Anything Goes Challenge
Catch the Bug Anything Goes Challenge
]]>
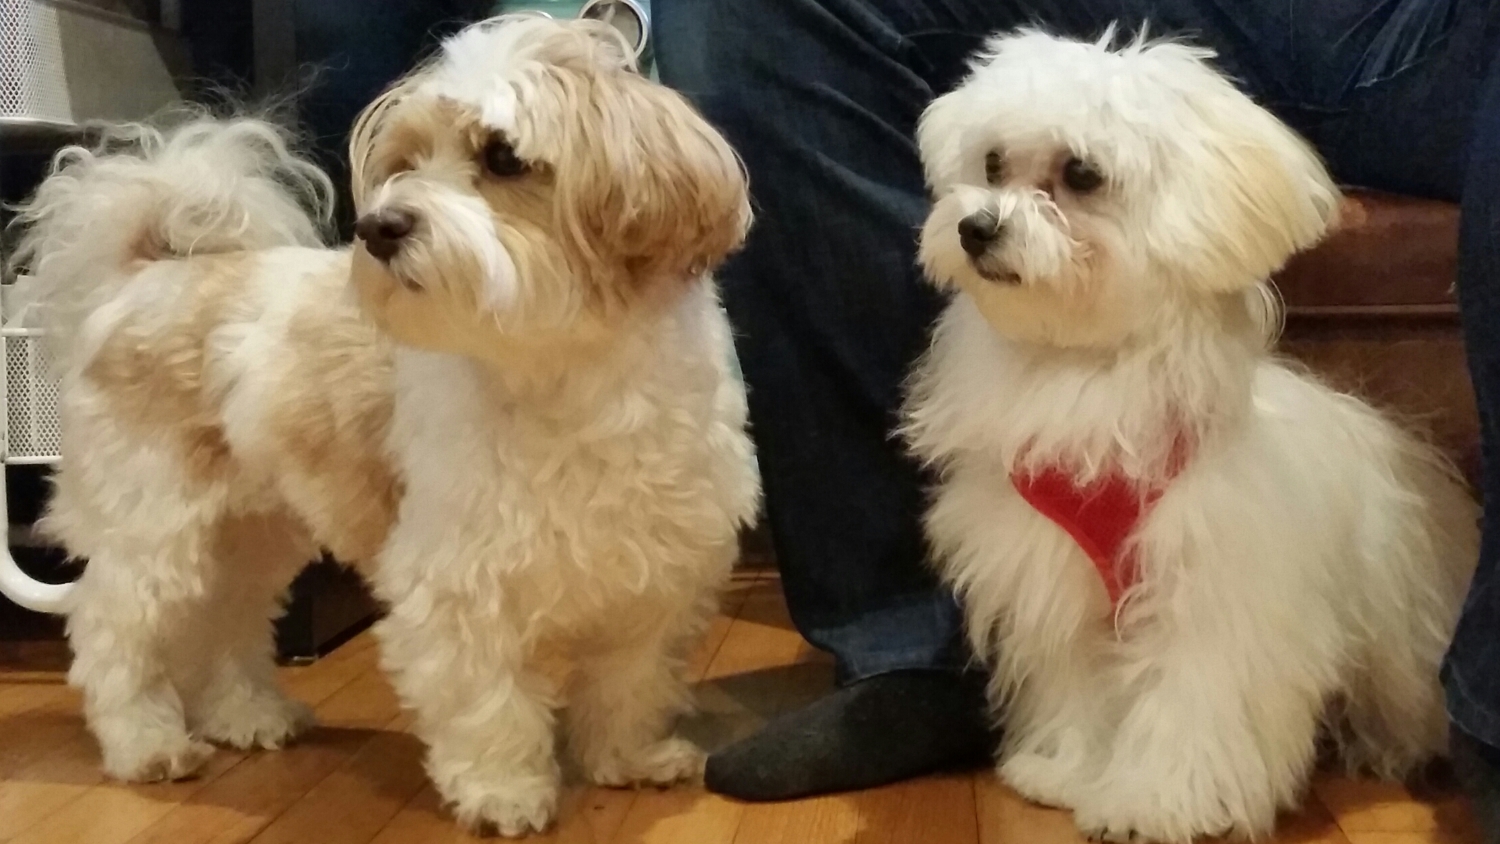
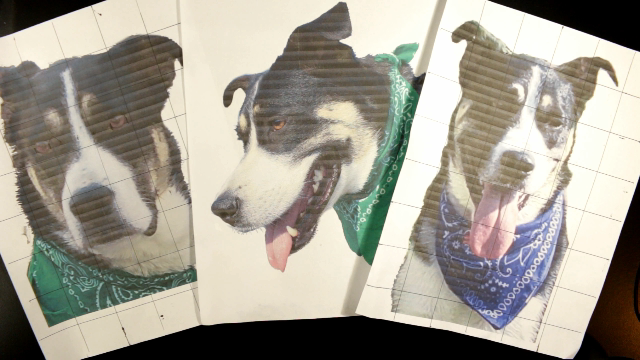
Bandito (left) with cousin Cookie (right)
This is all brand new to me so I thought I’d share some tips and tricks that made this totally enjoyable and pretty fast (I did the whole picture in 1 evening). First, I used blue painters tape to affix it to a portable wooden easel that I had from my drawing class days. Securing it this way, kept it stable while also allowing me to carry it to different spots around the house easily. Second, I used more painters tape to keep each package of drills (that’s what the little “diamond” pieces are called) closed after opening them. Some folks complain that these little plastic baggies are very fragile and can tear making a mess of drills, but I found these from NewFrog fairly strong (some folks transfer them to mini ziplock bags to avoid the possibility of drill spills). I also labeled each using a Sharpie marker on the blue tape to make each baggie easy to distinguish from the next.
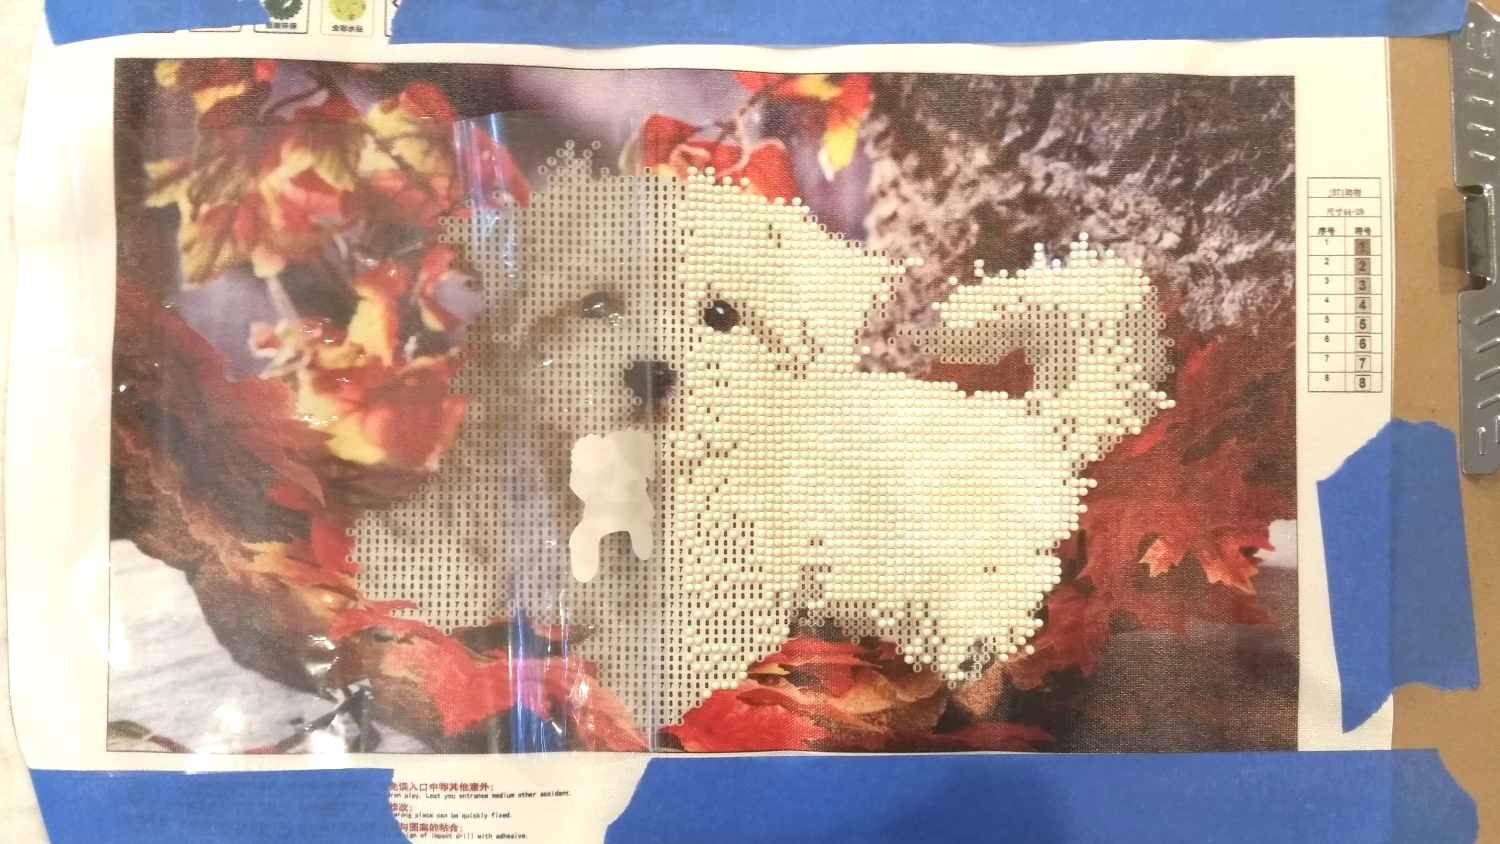
As I also had 2 other diamond painting kits, I used the 2 additional green trays to lay out up to three colors of drills at the same time. Because the color variations on this picture were pretty well segmented to just a few colors in each area, this made working on each area before moving onto the next area easy. Following a tip I learned from Shirley (YT: shirlscraftyworld), I also put a little sticker on top of the release paper so I could tell the front and back of the release paper and keep my canvas free from lint or debris. Lastly, I found that having a little piece of a Swiffer duster sheet or an anti-static bag (used to prep surfaces for heat embossing), was helpful for avoiding drill-to-tray cling.
BTW, because this diamond painting was not an image that was designed to be entirely covered with drills, I found that the flat eyes and nose did not stand up to the drill-covered puppy. To remedy this, I added black glazing with a Sakura Black Glaze Pen and highlights with a Uniball Signo White Gel Pen, and it came out much better. Anyway, I hope you found these diamond painting tips helpful. I had so much fun with this, I can’t wait to start my next one!
Disclosure: Many of the supplies I’ve used for today’s project are linked. Some may be affiliate links, which means if you make a purchase I receive a small commission at no extra cost to you. I truly appreciate your support toward the costs of running this blog!
This diamond painting is being entered into the following challenges:
Simon Says Stamp Wednesday Anything Goes Challenge
Word Art Wednesday Anything Goes Challenge
Just Keep on Creating Anything Goes Challenge
Through the Craft Room Door Anything Goes Challenge
Crafts Galore Encore Anything Goes Challenge
Catch the Bug Anything Goes Challenge
Crafter’s Castle Anything Goes with Optaional The Holidays Challenge
]]>
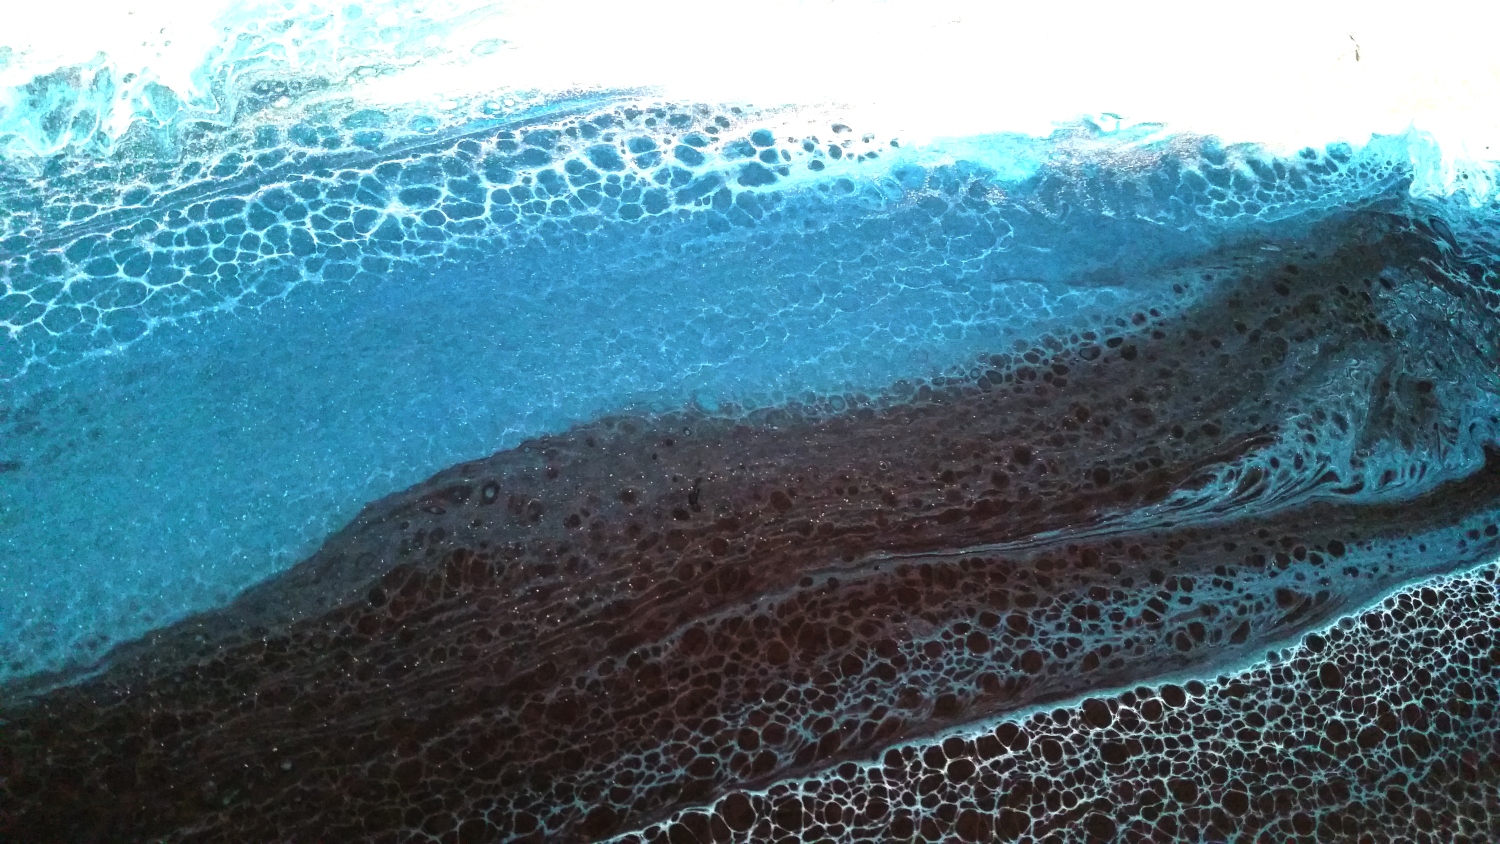
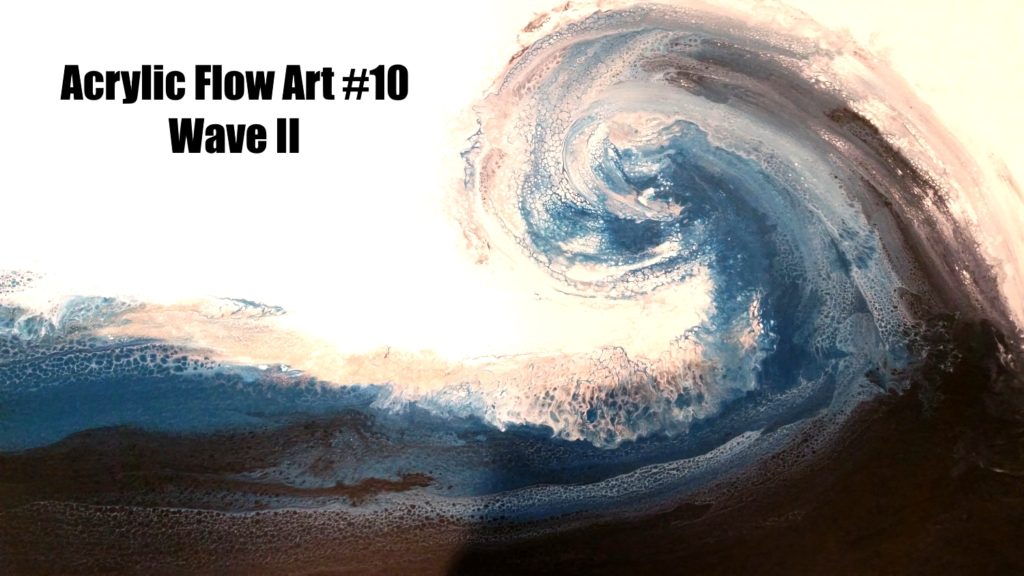
I started first by gessoing the entire canvas with Liquitex Basic White Gesso. After a couple of hours of dry time, I mixed my 4 acrylic pour mixes, 1 part paint to 2 parts Flood Floetrol with a squirt (yes, that’s the technical term – LOL) of Silicone Treadmill Lubricant. To cover about 2/3rds of the background, I mixed up about a quart of white. One of my favorite ocean-y blues is the Artist’s Loft Metallic Cobalt Blue Acrylic Paint so I mixed up about a pint of that. To add a fun sparkle to the piece, I mixed up about a cup of Martha Stewart Silver Glitter Acrylic Paint. Then I had a couple of deep dark blues (sorry I don’t remember the brand) that I mixed with black (about 1:3) to create an almost black pour.

I poured and brushed out the white on the top 2/3rds of the canvas, including the edges. Then I poured out the other paints, going from silver to cobalt and blue-black from top to bottom on the lower 1/3rd of the canvas. Next I did a bunch of swiping with an Ateco offset baking spatula, wiping off the spatula after every swipe so as not to muddy the paints. It is truly magical how the cells form after each swipe.
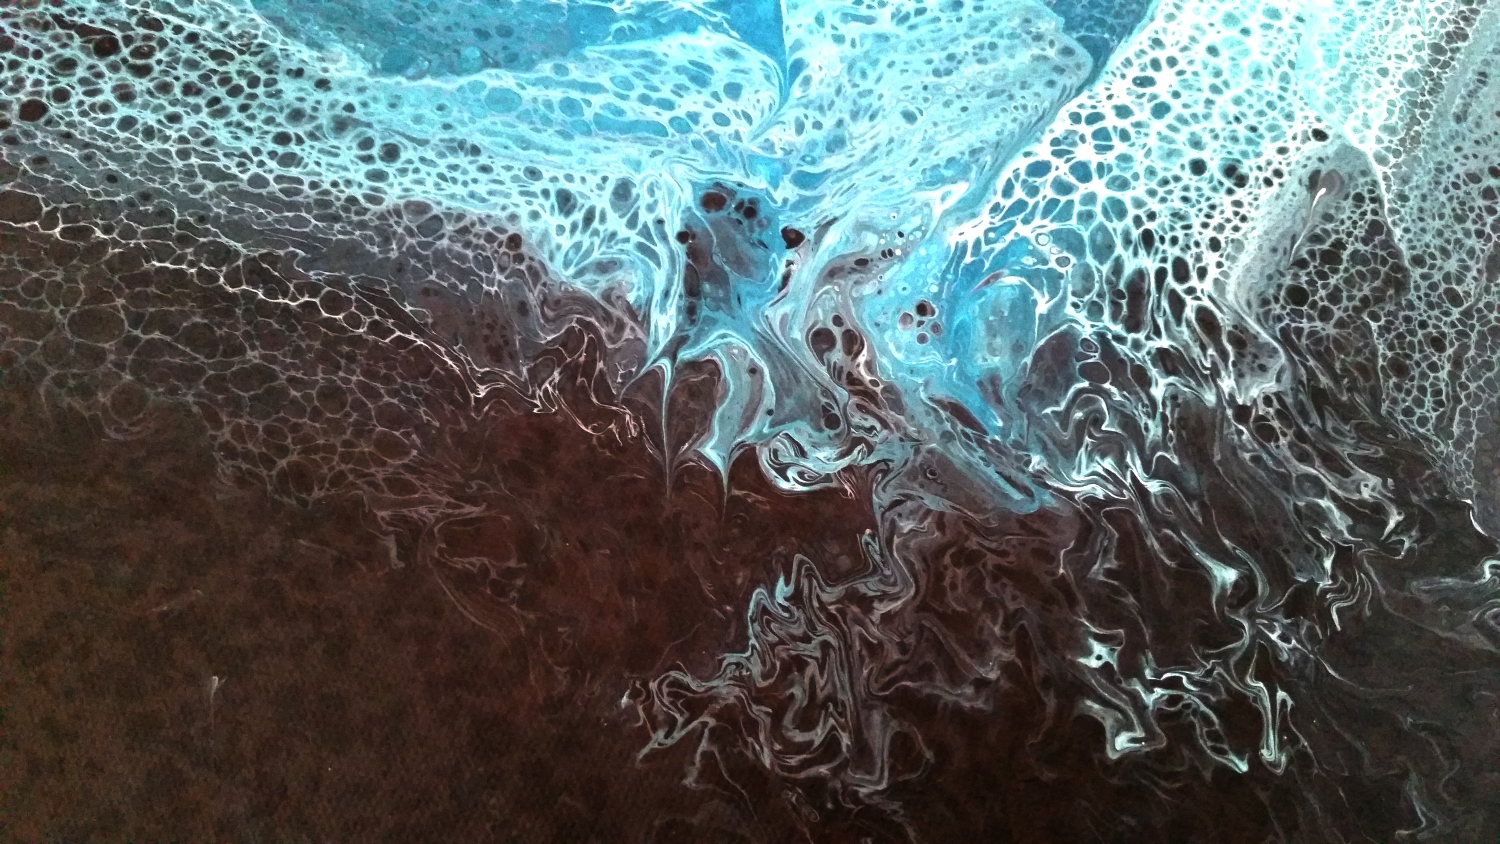
When I was fairly happy with the amount of mixing and separation of the colors, I paused to grab my blow dryer. I set the temperature to cool and turned on the power to high to push the top layers of paint even further. Some folks like more control, and manually blow through straws, but I find that for the large canvases I do, a blow dryer is much more effective. I love being able to move the paint without actually touching it to create softer tendrils of paint. I also push a lot of paint to the edges of the canvas to avoid getting too thick a layer in the middle, which sometimes leads to cracking or crazing as paintings dry.
Please click on the following picture to watch the process video (I apologize for the shakiness; I couldn’t find my portable tripod so I’m doing this hand held):
Disclosure: Many of the supplies I’ve used for today’s project are linked. Some may be affiliate links, which means if you make a purchase I receive a small commission at no extra cost to you. I truly appreciate your support toward the costs of running this blog!
This painting is being entered into the following challenges:
613 Avenue Create Anything Goes with Optional Clean and Simple Challenge
Word Art Wednesday Anything Goes Challenge
Creatalicious Anything Goes with Optional Circles Challenge
Lil Patch of Crafty Friends Anything Goes Challenge
Through the Craft Room Door Anything Goes Challenge
Crafts Galore Encore Anything Goes Challenge
Crafter’s Castle Anything Goes with Optional Fall/Halloween Challenge
The Corrosive Anything Goes Challenge
]]>
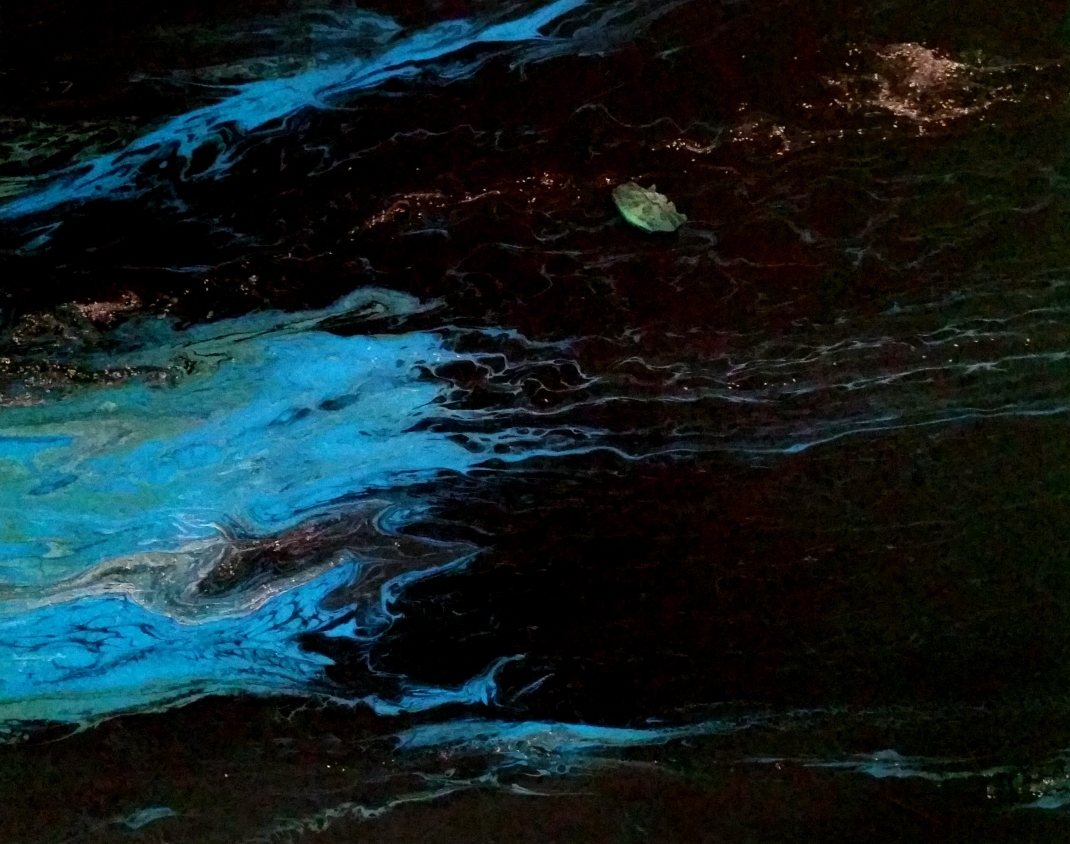
I prepared a 24″ x 30″ canvas that I picked up at Michaels during one of their 70% off sales with white gesso. Then I used various paints salvaged from prior acrylic pours to create a blue-black and a blue-green. I also mixed up some Craftsmart Bright Blue and a Martha Stewart Multi-Surface Antique Silver Glitter Paint with some Flood Floetrol additive (1:2) from Lowes (Home Depot no longer carries this).
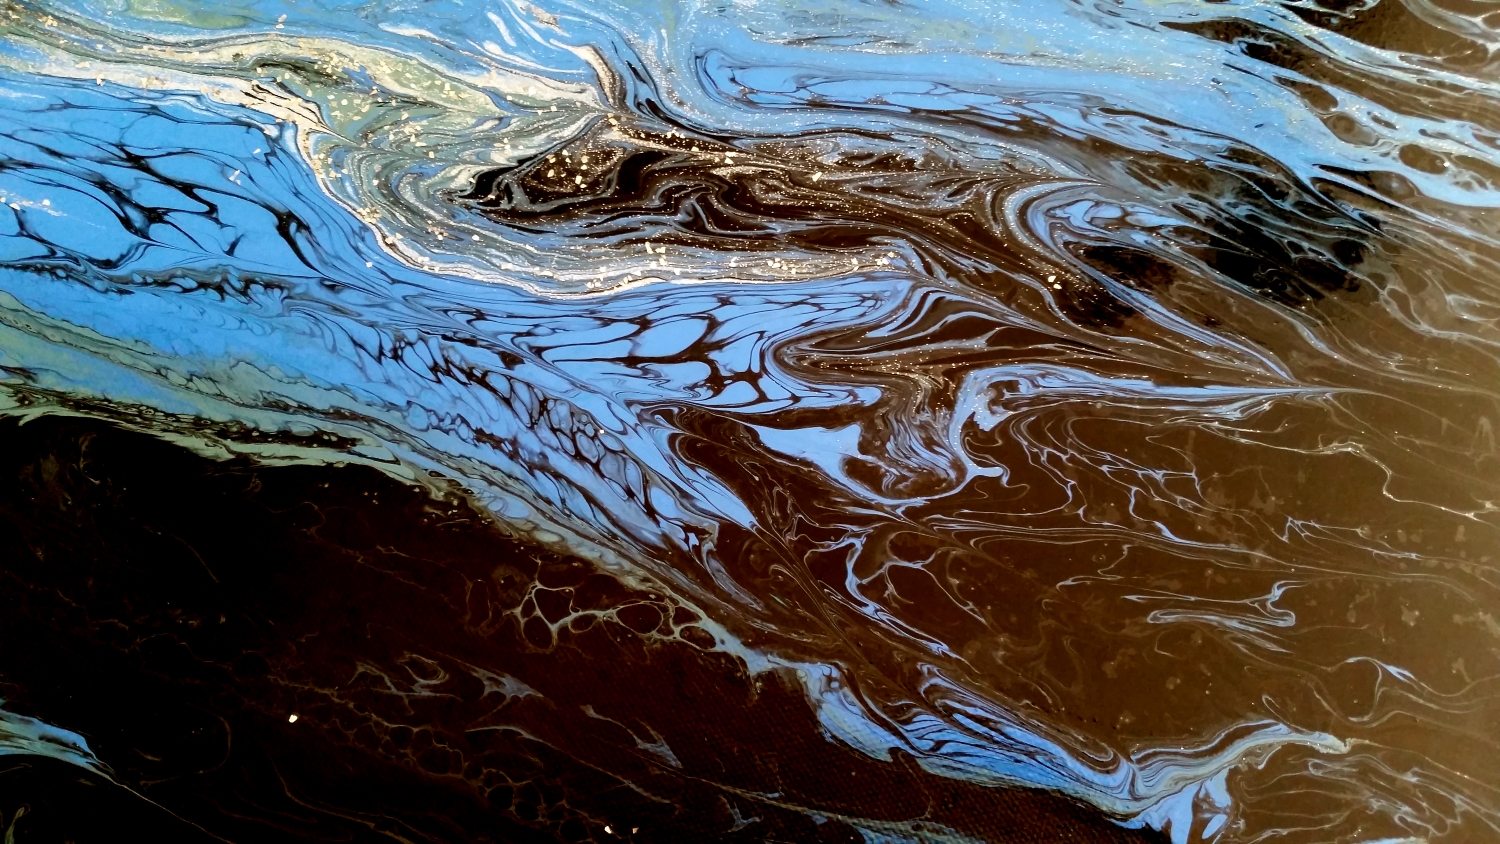
I splattered and poured all the mixed paints individually (rather than combining into a dirty pour) across the canvas, making sure that there was enough paint to flow off all the edges of the canvas for full coverage. Then I took wet paper towels and swiped them across the paints to pull light layers of paint over one another, creating phenomenal cells (which later turned into ribbons for a beautiful gaseous look). I probably used up about 20 paper towels, tossing them after each swipe so as to prevent muddying the colors.
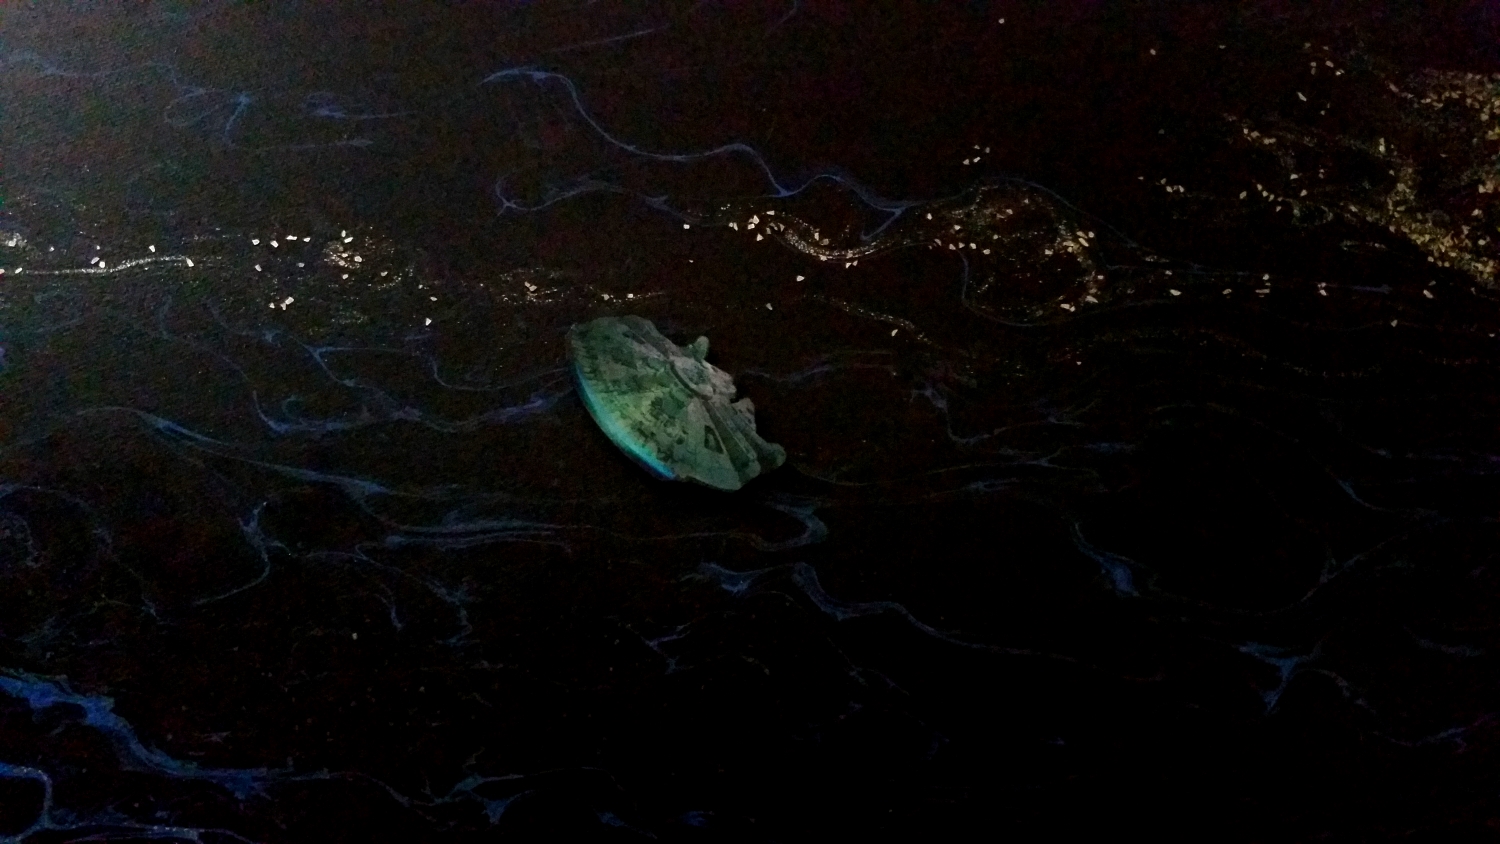
Then I started tipping the canvas to help pull and push the paints even more across the canvas. The results were totally unexpected (which is one of the things I love about acrylic flow art), and I lost a lot of the brighter blue areas. However, letting the paint flow with slight tipping adjustments gave the piece a wonderful galaxy look. To add sparkle and the look of stars, I also sprinkled on some Melissa Francis Glass Glitter in Silver, especially in the areas where I could find thin streams of the Martha Stewart antique glitter paint or where I thought I could emphasize a blue ribbon of paint in a predominantly dark area of the painting.
Then to make this bespoke piece extra special for Mr. CraftyPaws, I added an image of the Millenium Falcon that I found online. I sized it and then printed and fussy cut it out 6 times so that I could create a bit of dimension by adding thin double sided foam adhesive between each layer. Then I coated the top image with a bit of Gloss Mod Podge before finding it a home in this galaxy painting.
Click the following picture to watch the process video of this acrylic pour (sorry I lost the tipping part of the process):

Disclosure: Many of the supplies I’ve used for today’s project are linked. Some may be affiliate links, which means if you make a purchase I receive a small commission at no extra cost to you. I truly appreciate your support toward the costs of running this blog!
This painting is being entered into the following challenges:
Word Art Wednesday Anything Goes Challenge
Creatalicious Anything Goes with Optional No Squares or Rectangle Card Challenge
Card Mania Anniversary Challenge
613 Avenue Create Anything Goes with Optional Magic/Fantasy Challenge
Catch the Bug Anything Goes Challenge
The Corrosive Challenge Anything Goes
Simon Says Stamp Monday Sprinkles and Splatters Challenge
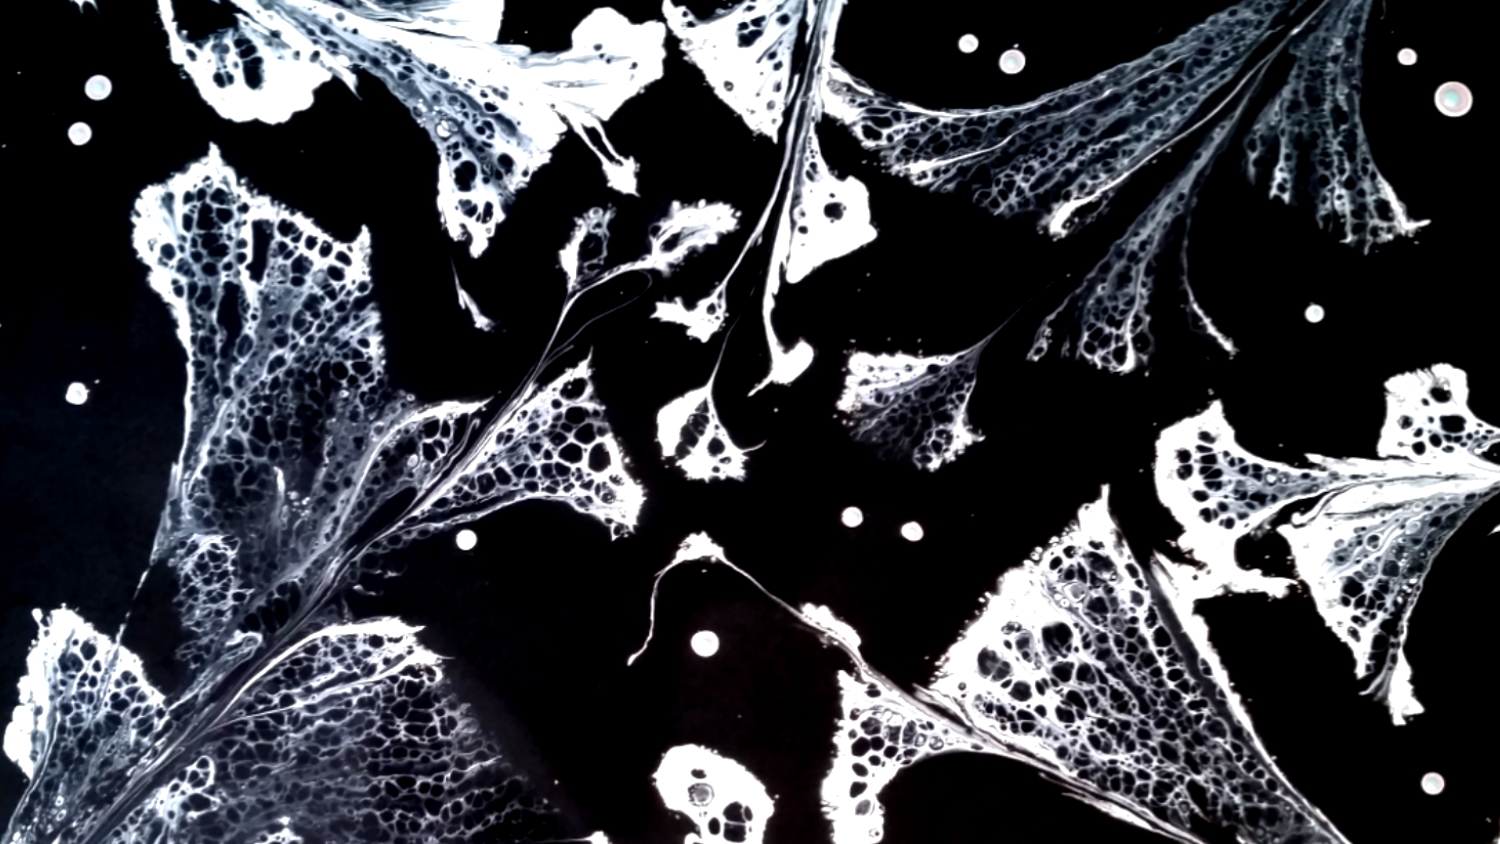
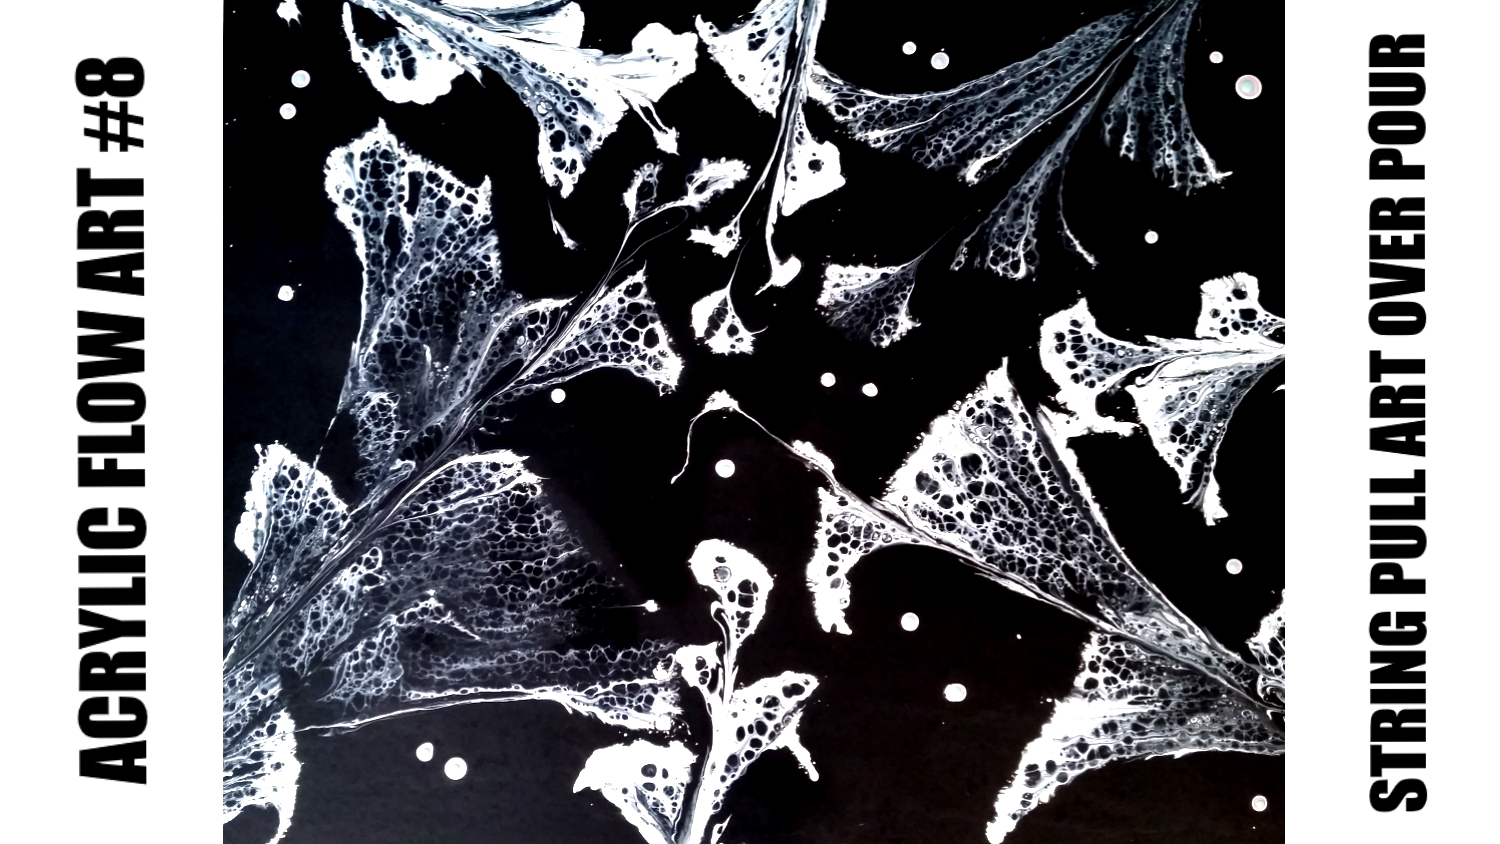
Next I mixed a small container of white acrylic paint (1 part paint to 2 parts Flood Floetrol but no treadmill silicone) in a shallow plastic container (to facilitate easy dipping). Then I took different lengths of an inexpensive white yarn that I had in my stash and dipped them into the white paint. I wanted a fulsome array of foliage coming from all directions so I went about laying down each string in a back-and-forth pattern from the center of the canvas, ending at the edges. As I pulled each strand of yarn toward the edge, beautiful cell-rich branches of leaves formed. The cells appeared like magic and created the look/feel of skeleton leaves.
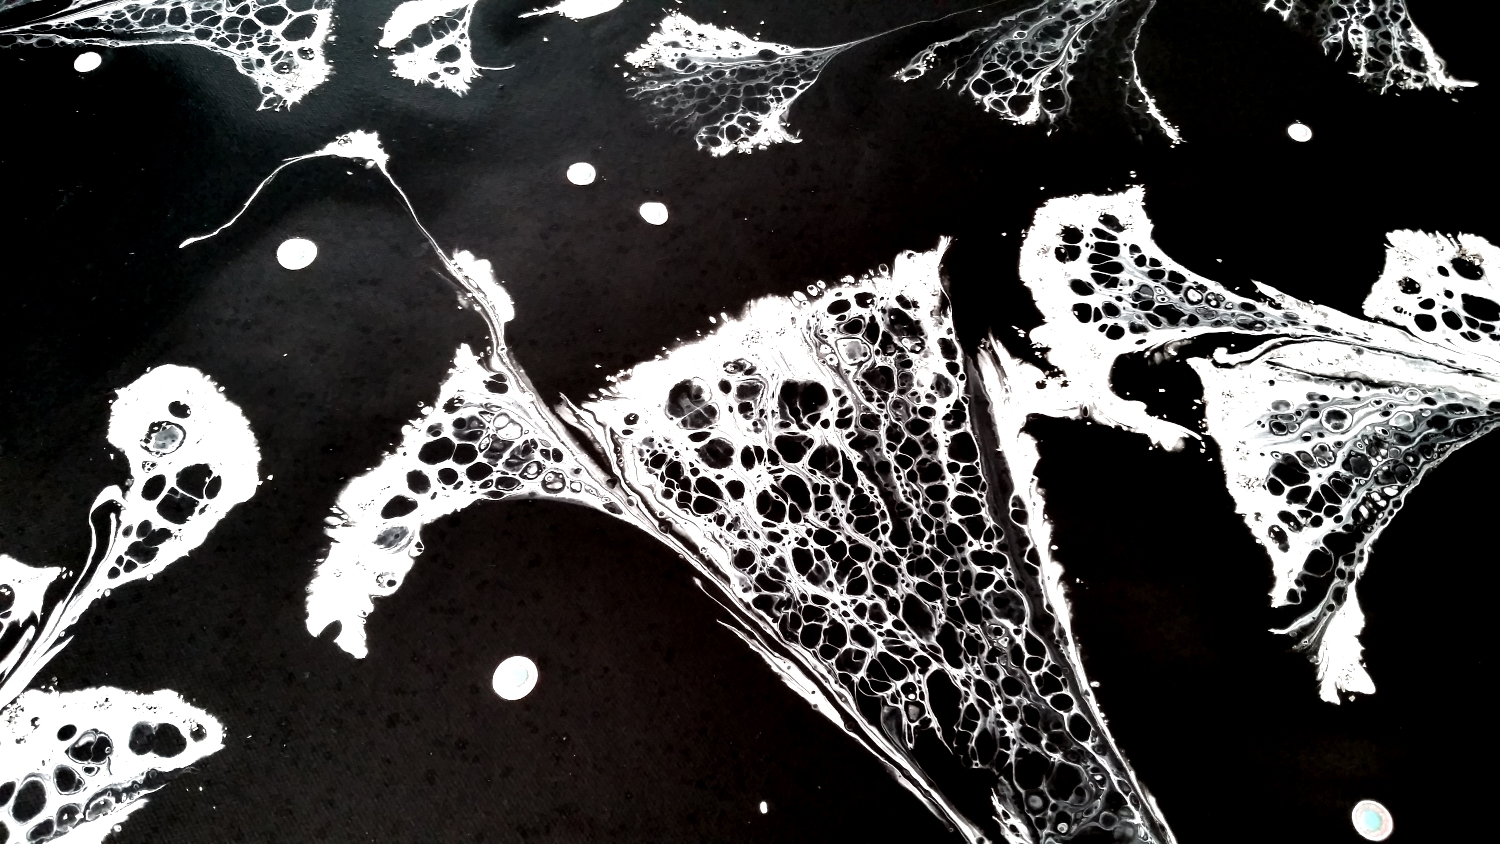
For some finishing touches, I added dots of white paint in some of the empty dark background areas. Then to add just a hint of color I added over top of each white dot, a dab of leftover pink paint, topped again with Martha Stewart Multi-Surface Glitter Acrylic in Antique Silver Paint and then topped again with DecoArt Americana Bahama Blue Acrylic Paint. After seeing the hints of shine that came from the glitter paint, I decided to sprinkle on the whitest parts of the skeleton leaves some Melissa Francis Glass Glitter in Silver. I love the extra bit of drama that comes from these bits of sparkle.
Click the following picture to see the process of creating this canvas titled, “Skeleton Leaves”:
Disclosure: Many of the supplies I’ve used for today’s project are linked. Some may be affiliate links, which means if you make a purchase I receive a small commission at no extra cost to you. I truly appreciate your support toward the costs of running this blog!
This canvas is being entered into the following challenges:
Word Art Wednesday Anything Goes Challenge
Creatalicious Anything Goes with Optional Under the Sea or Fairytales Challenge
Addicted to CAS Masculine Challenge
Lil Patch of Crafty Friends Anything Goes Challenge
Through the Craft Room Door Anything Goes Challenge – WINNER
613 Avenue Create Anything Goes with Optional Magic/Fantasy Challenge
Crafter’s Castle Anything Goes with Optional Elegant/Shabby Chic Challenge
Pause Dream Enjoy Anything Goes Challenge
The Corrosive Challenge Anything Goes
]]>
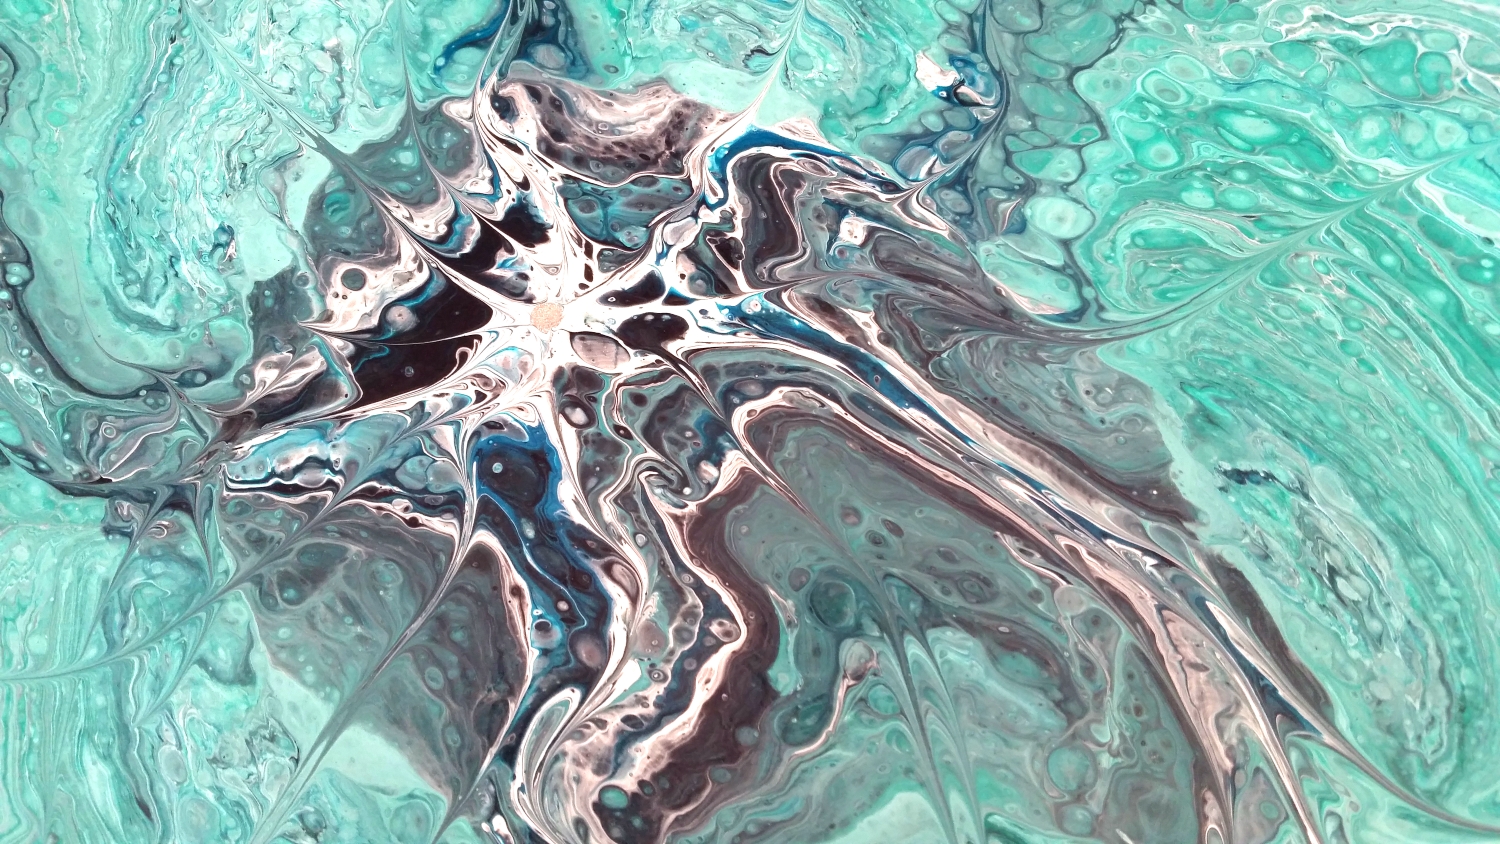
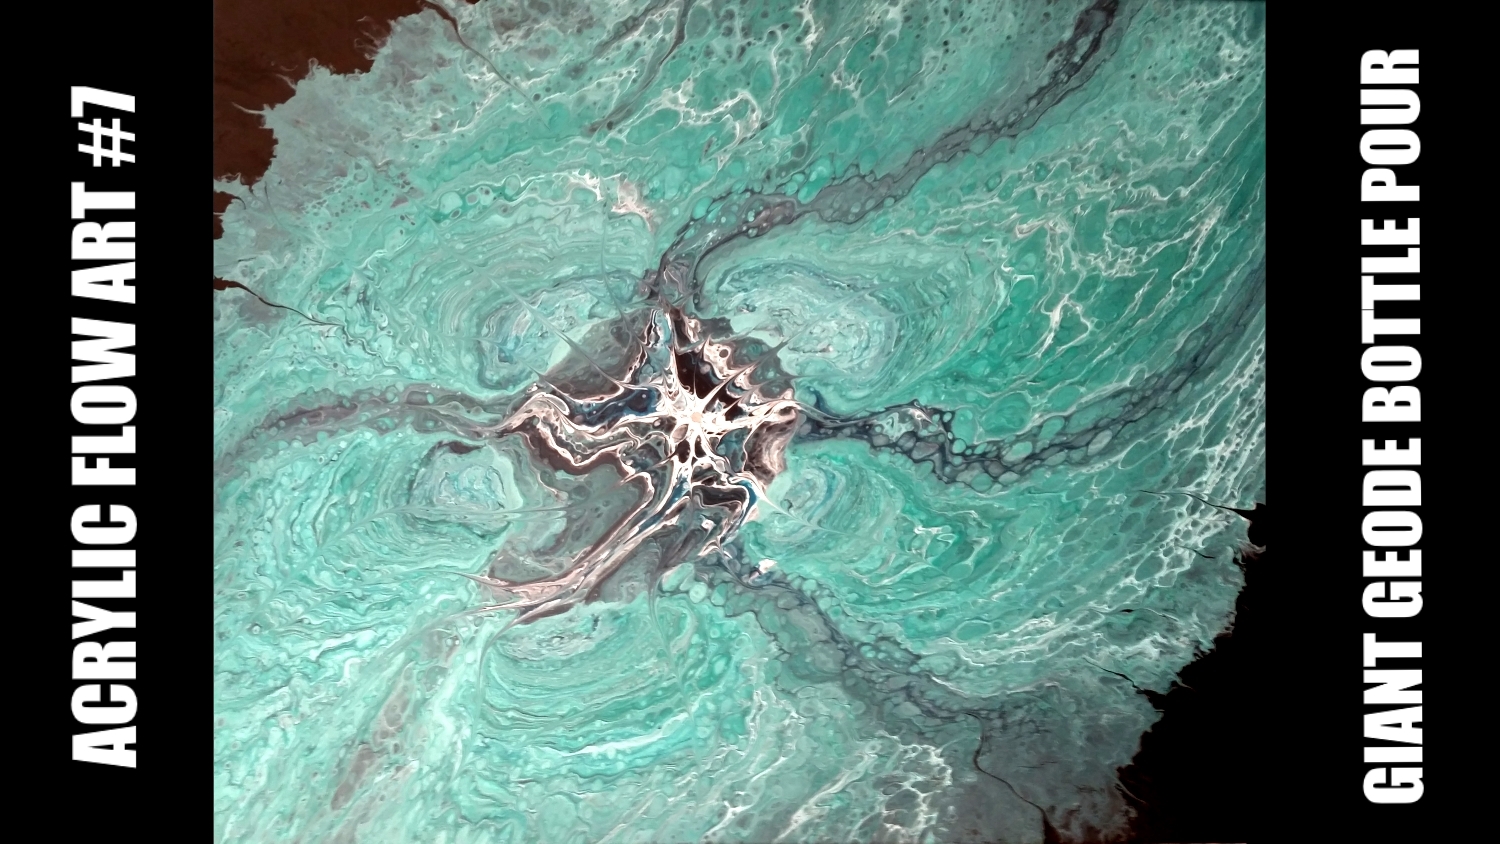
I cut the bottom off of a soda bottle bottom and cut triangular areas at the base of the bottom aligned with the valleys from the bottle bottom (these triangular openings allows the paint to naturally fill in the area under the bottle bottom). I also prepped my 24″ x 30″ canvas with Liquitex White AND Black Gesso. I placed the bottle bottom toward the center of the canvas and started my dirty pour. I was able to insert a bit of white paint in addition to the dirty pour cup paints a couple of times, and I think that helped brighten the center part of the geode. For this size of canvas, about 3/4 of a quart of paint was sufficient to cover the canvas (with a lot of run-off).
I tipped the canvas in a counter-clockwise and then a clockwise direction to let the acrylic paint flow to all the edges that I wanted without losing too much of the veined geode shape I wanted. CLICK the following photo to watch the process video of this acrylic pour that I’ve titled “Living Geode”:
Disclosure: Many of the supplies I’ve used for today’s project are linked. Some may be affiliate links, which means if you make a purchase I receive a small commission at no extra cost to you. I truly appreciate your support toward the costs of running this blog!
This acrylic flow art canvas is being entered into the following challenges:
Crafter’s Castle Blog Anything Goes with Optional Elegant/Shabby Chic Challenge
Addicted To CAS Masculine Challenge
613 Avenue Create Anything Goes with Optional Magical or Fantasy Challenge
Crafts Galore Encore Anything Goes Challenge
Through the Craft Room Door Anything Goes Challenge
Lil Patch of Crafty Friends Anything Goes Challenge
Creatalicious Anything Goes with Optional Under the Sea or Fairytales Challenge
Word Art Wednesday Anything Goes Challenge
Simon Says Stamp Wednesday Make Your Own Background Challenge
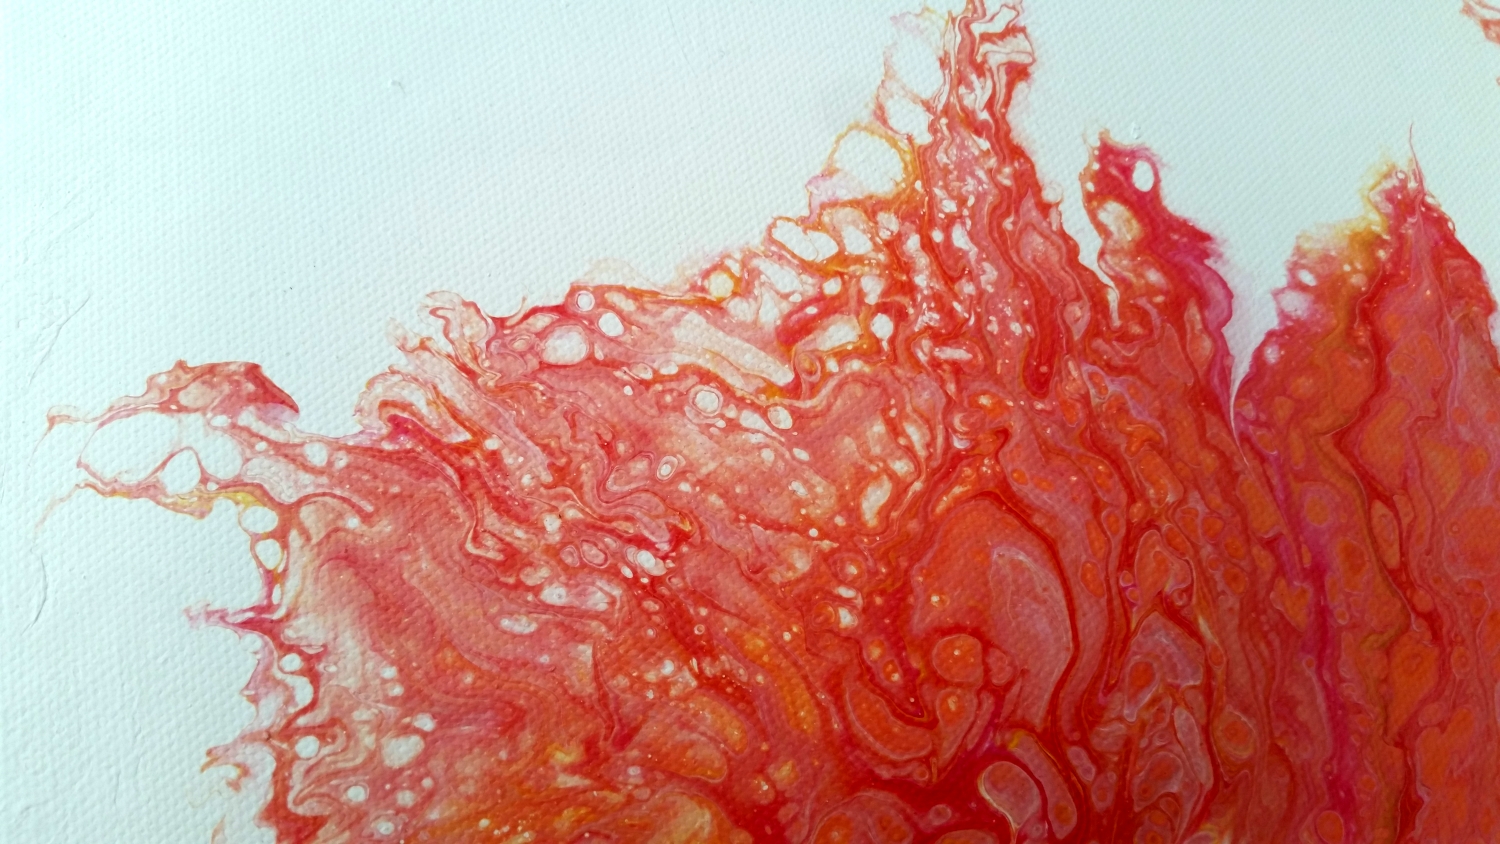
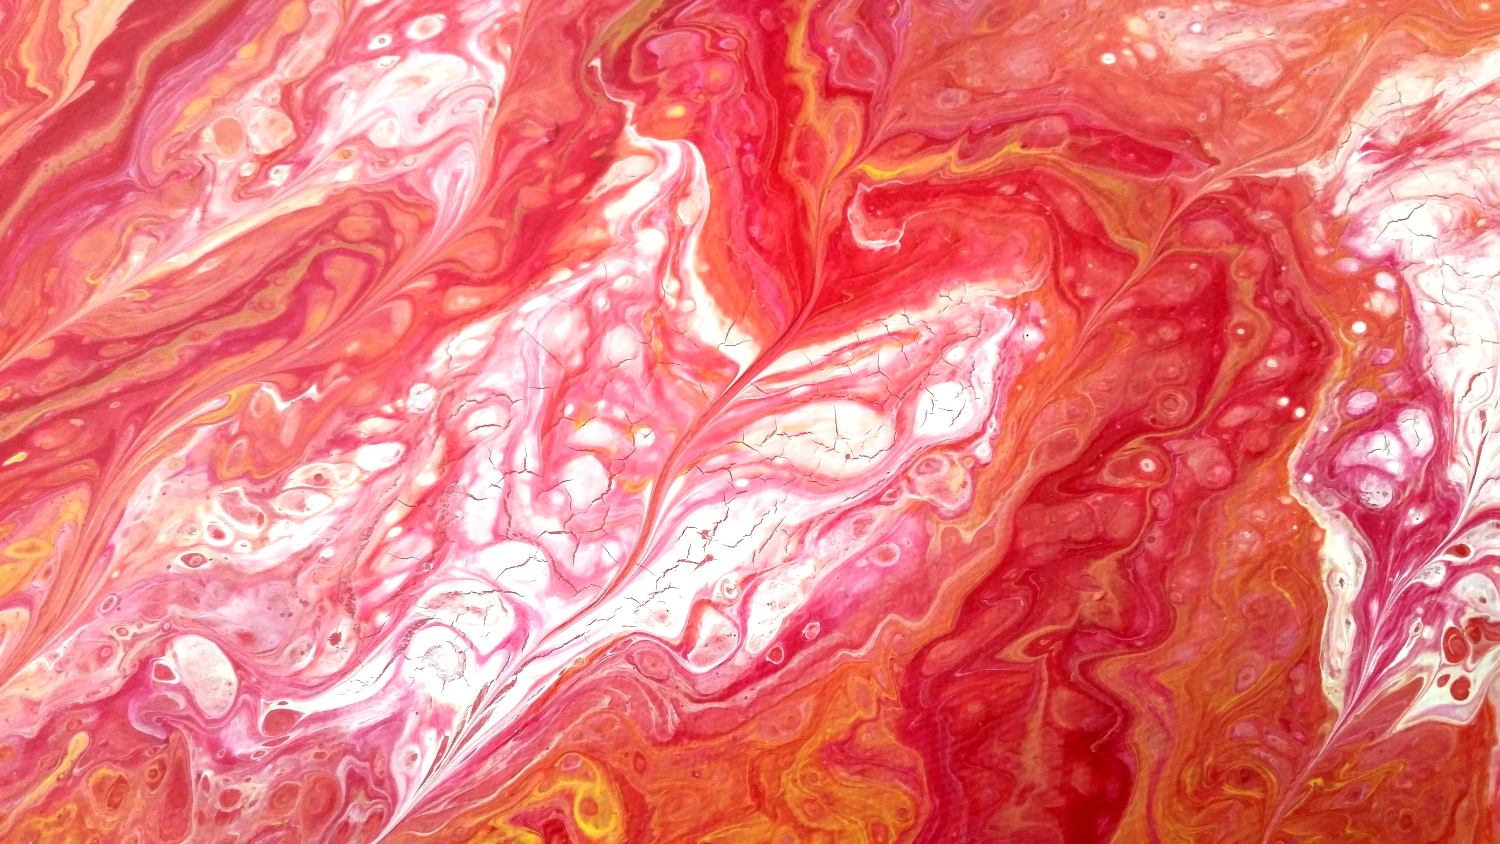
For this first pour, I wanted to use up lots of colors that I had previously mixed up for a little pouring session I had hosted for my mom and her friends (all in their 70s and 80s) a few weeks ago. These ladies had wanted bright tropical colors so this first pour used up all the left overs in cranberry red, red, magenta, citrus orange, lemon yellow, gold and white. I poured all these pre-mixed (1 part paint, 2 parts Floetrol, and a dash of water) colors into a large plastic to-go container for a brightly colored dirty pour. Then I went about cutting off the bottoms of three soda bottles, each with 5 hills and valleys at that bases. I next cut five little triangular openings at the cut off bases, aligning each with a valley; this allows the paint to pool into and underneath the bottle during the pour.
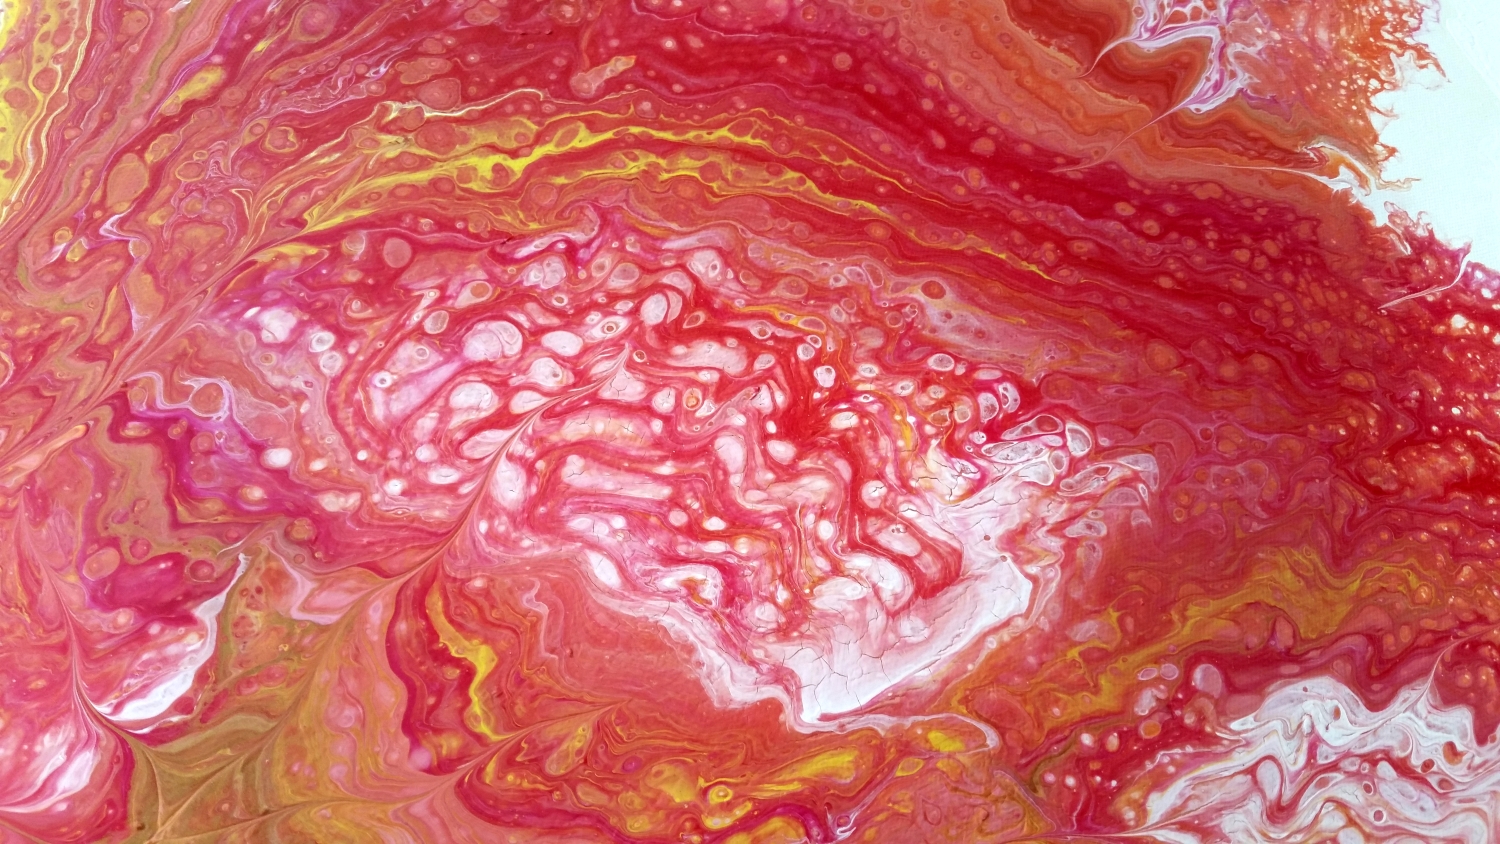
Then it was a matter of placing 3 bottle bottoms on a canvas and pouring over top of each of them. I had hoped to keep the general look of 3 flowers as I then tilted the canvas, but keeping track of 3 pours on one canvas proved to be too much for me. LOL As with most acrylic flow art, one never really knows how something one’s imagined is actually going to turn out, and this one was totally different to what I’d been planning…but that’s part of the fun and magic! To me, the final result looks like a fiery volcanic eruption and reminds me of that fantastical silly movie with Tom Hanks and Meg Ryan called, “Joe Versus the Volcano.”
CLICK on the picture below to watch the process video of how I created this flow art titled, “Eruption”:
Disclosure: Many of the supplies I’ve used for today’s project are linked. Some may be affiliate links, which means if you make a purchase I receive a small commission at no extra cost to you. I truly appreciate your support toward the costs of running this blog!
This acrylic flow art canvas is being entered into the following challenges:
Crafter’s Castle Blog Anything Goes with Optional Elegant/Shabby Chic Challenge
Crafty Gals Corner Tropical Colors Challenge
613 Avenue Create Anything Goes with Optional Magical or Fantasy Challenge
Crafts Galore Encore Anything Goes Challenge
Through the Craft Room Door Anything Goes Challenge
Lil Patch of Crafty Friends Anything Goes Challenge
Creatalicious Anything Goes with Optional Under the Sea or Fairytales Challenge
Word Art Wednesday Anything Goes Challenge
Simon Says Stamp Wednesday Make Your Own Background Challenge
]]>
I have posted 2 videos about my experiences with the Stamp and Scrapbook Expo. In part 1, I share how I prepare and get organized to attend the Expo (get a sense of the booths map, pick my classes (3 classes gets you a free gift, which this year was a 12″ x 12″ paper pad, and you get free admission any day you have a class; my total this year was $122), go through all the special coupons (especially the early bird (time sensitive) specials), and figure out my schedule/plan for each day. The following is Part I of my experience at the Expo:
The following is Part II of my experience at the Expo, and it details the three classes I took (watercoloring hosted by Art Impressions, flower shaping by Heartfelt Creations, and mixed media by Art Anthology) and the great crafty hauls I got for $121.83:
]]>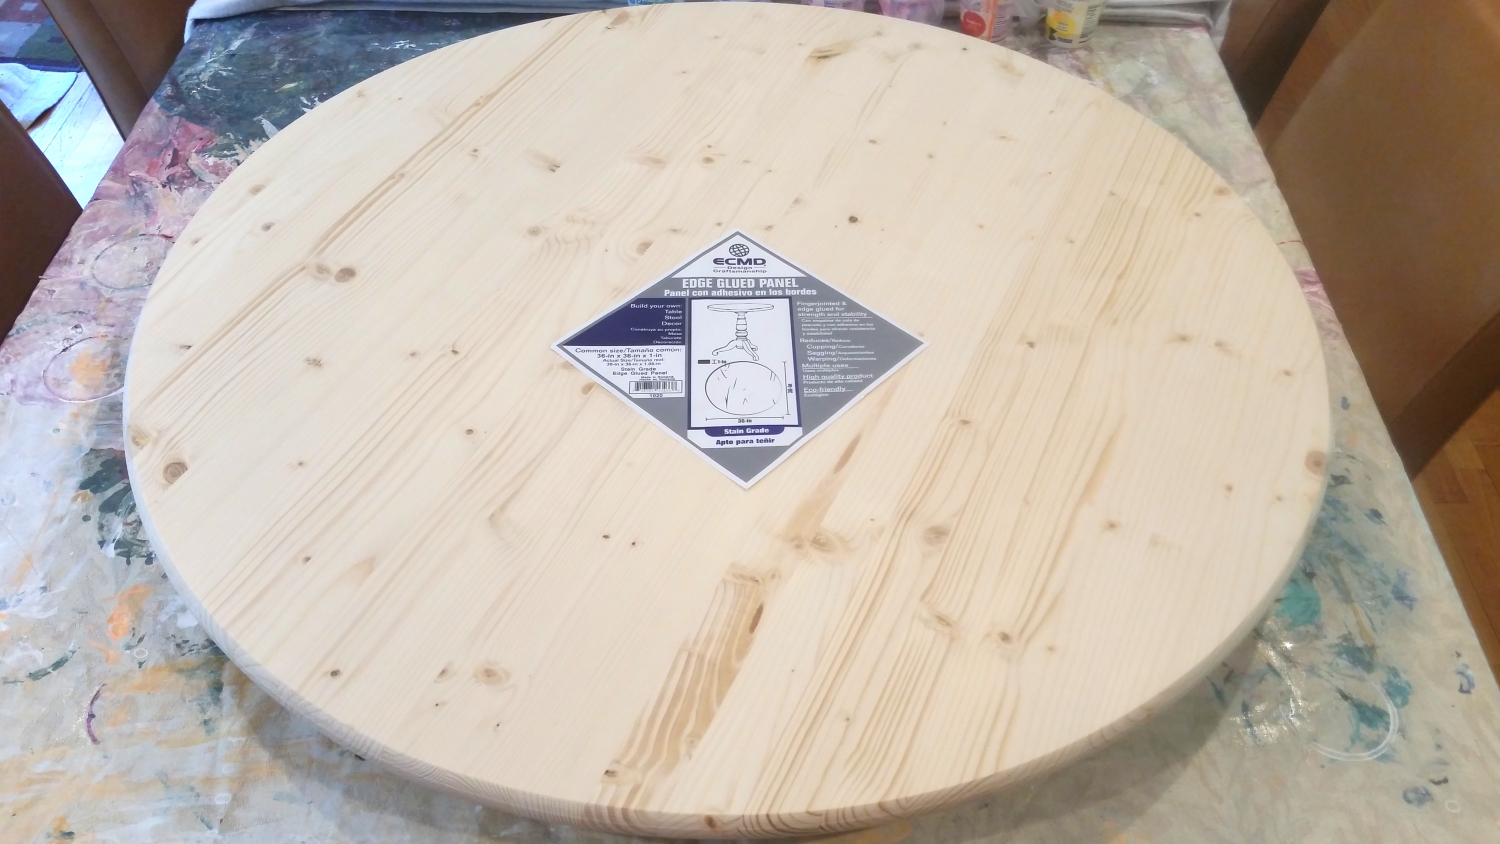
I knew I wanted to create a round piece so I also picked up a 36″ round wooden table top at my local Lowes Home Improvement Store (our local Home Depot only carried 24″ and smaller). I took my time and really picked through the stack in order to try to find one that was not too pock marked, warped or had too many large knots in the wood.
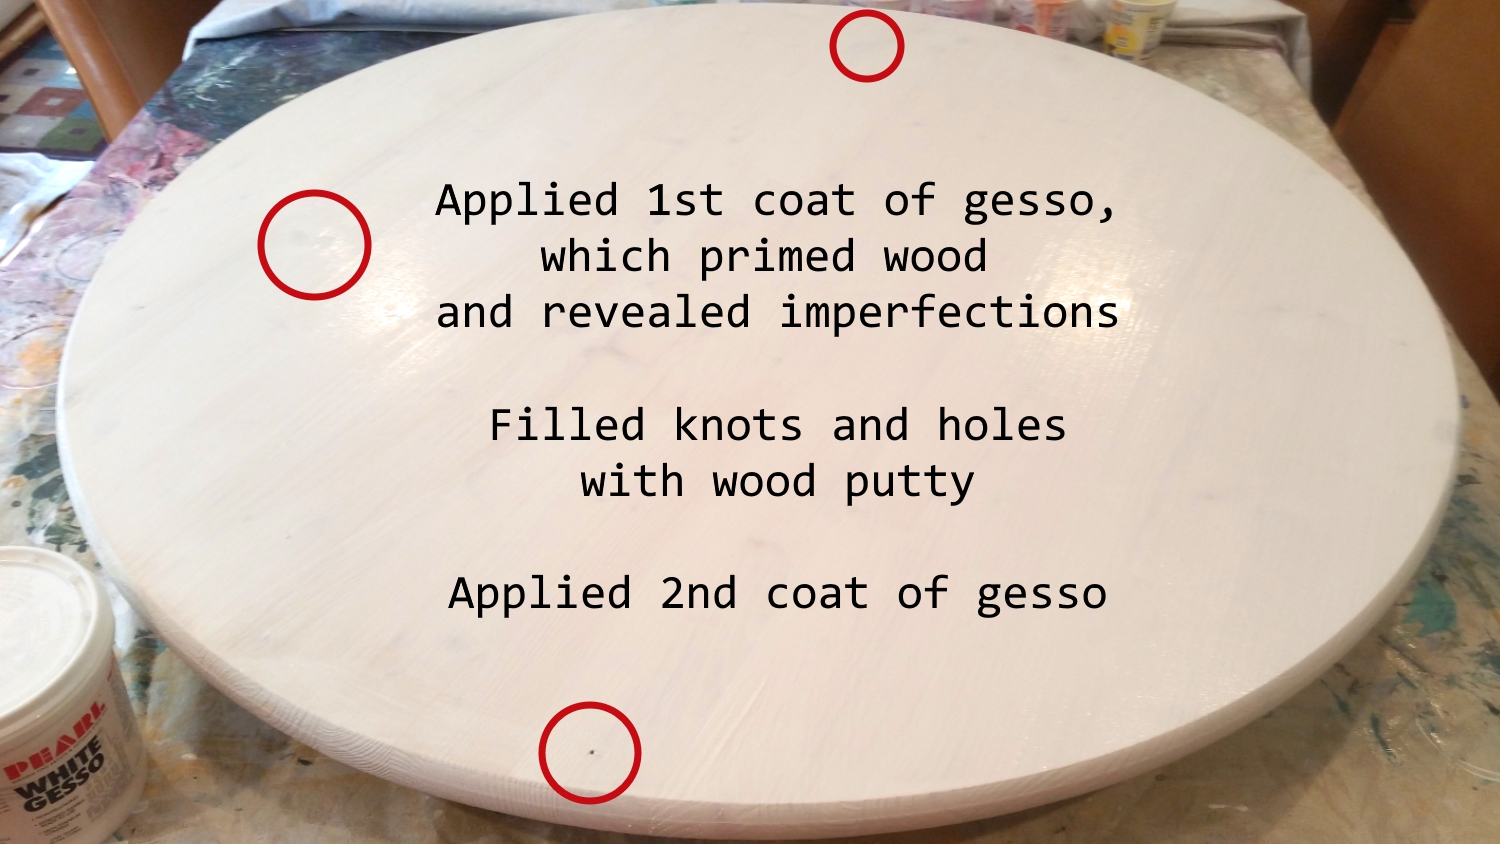
To prepare the wood, I coated it with White Gesso and let it dry for a few hours. This seemed to reveal and highlight the few holes and knots in the wood, so I filled all these imperfections with DAP wood filler putty and let that fully dry too. I put down one more coat of white gesso and after a few more hours dry time, my “canvas” had a clean and smooth finish, ready for the pour.
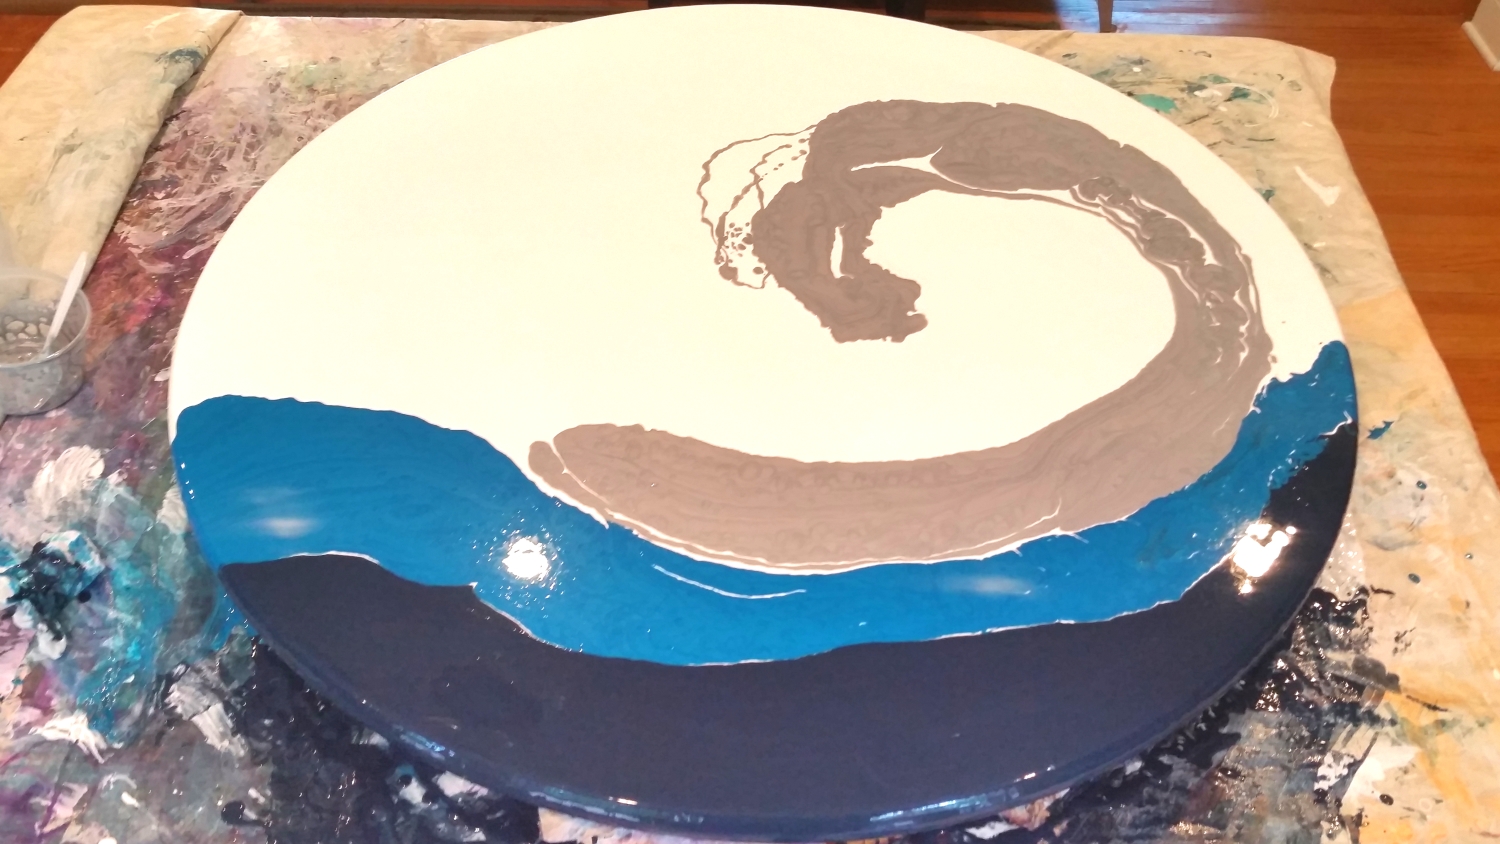
I finally got a chance to try an acrylic pour with a swiping technique (the cell formation created from a light swiping is amazing), and it was so cool! I used left over Craftsmart and Sargent White, mixed a very dark (almost black) blue, a DecoArt Elegant Finish Metallic Shimmering Silver, and an Artist’s Loft Metallic Cobalt Blue. To each cup, I added 2 parts Flood Floetrol to 1 part paint. I added a bit of water if I thought the paint solution needed more thinning, but I was careful not to water them down too much because the binding agents in acrylic paint can be over diluted and I didn’t want flaking or chipping of my finished piece in the long term. Then to each cup (except the white), I also added about 10 drops of treadmill silicone lubricant.
I first flooded the wood round with the white, making sure to get the sides coated too. Next I poured the darkest shade at the bottom, then the cobalt then a swirl toward the upper right with the silver. Then I used a large Wilton Icing Spatula to lightly swipe the paints from the lower left, across toward the upper right and then swirled a bit in the center. I wiped my spatula and did the reverse, starting from the white in the middle and back around and down toward the lower left. With each swipe, more and more incredible cells formed and a real watery look started to evolve.

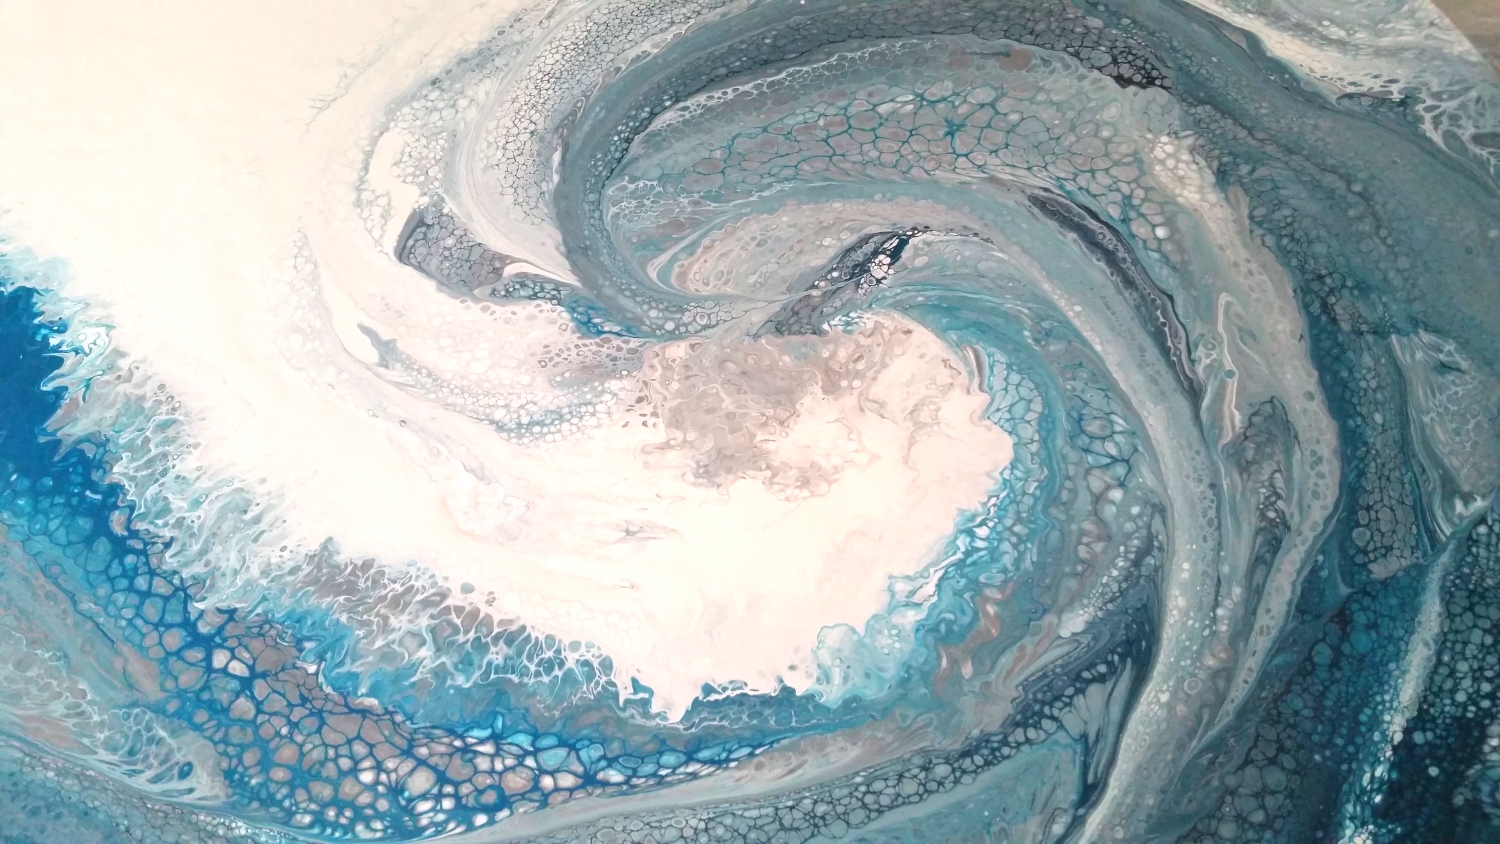
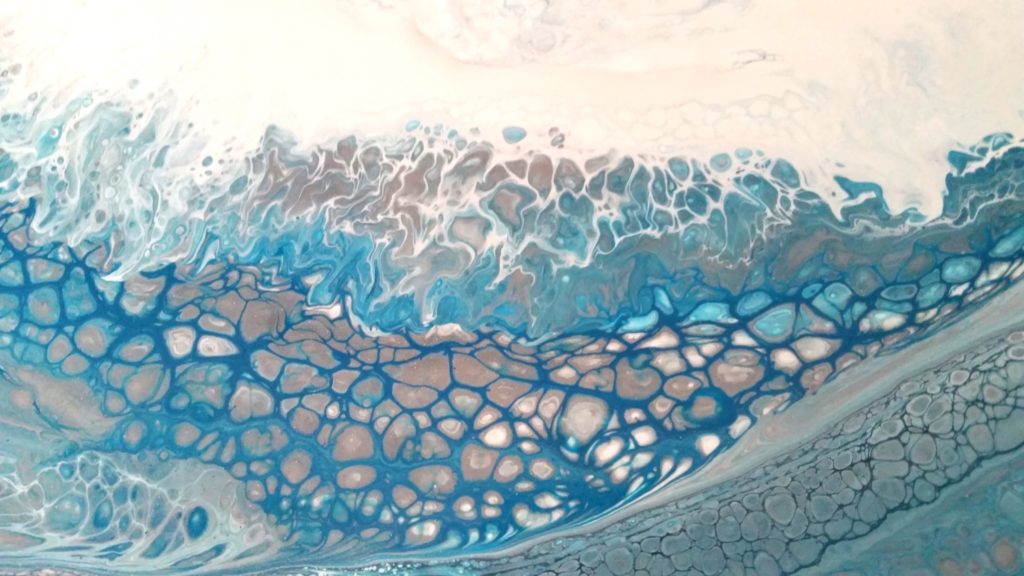
I don’t have a heat torch (folks use these to draw out more cells), so I tried using my heat tool to elicit some more cells in the darkest areas, but that heat must have been too weak. So next I tried my hair dryer on high heat and power to push and thin the paint in certain areas. The feathering that occurred, especially in the middle white areas that I wanted to expand into the silver and cobalt blue areas, was beautiful and the delicate tendrils that emerged matched the thin cells already revealed from the swiping.
Click on the following picture to watch the video share (not a process video) of this acrylic flow art piece:
This acrylic flow art is being entered into the following challenges:
Simon Says Stamp Wednesday Anything Goes Challenge
Word Art Wednesday Anything Goes Challenge
Creatalicious Anything Goes with Optional Hero Challenge – WINNER
Simon Says Stamp Work it Wednesday the Great Outdoors Challenge
Card Mania Anything Goes Challenge
Lil Patch of Crafty Friends Anything Goes Challenge
Crafty Gals Corner Anything Goes Challenge
613 Avenue Create Anything Goes with Optional Create Your Own Paper Challenge
Through the Craft Room Door Anything Goes Challenge
The Corrosive Blog Anything Goes Challenge
]]>
But first, after you’ve let your paintings fully cure (2-3 weeks), you need to clean the canvases of all additives like silicone (which would resist and create pitting if not removed before adding the polycrylic). To do that, I brushed on baby powder (others use flour or talc) all over the canvases and used a soft but firm bristle brush to really try to absorb all the silicone. Next I used microfiber cloths wet with water to fully wipe away all the baby powder and silicone. I rinsed and wrung out the microfiber cloths 4 times for each canvas, just to make sure they were completely clean. I let the canvases dry again for another 24 hours.
For the Minwax Polycrylic, I used a fine finish foam paint roller for the larger canvases and a soft bristle synthetic paint brush (not an expensive one) for the edges of the paintings and the smaller canvas. I put on 3 coats of the polycrylic on each canvas, waiting about 3 hours between coats. While it was not hard to wash my small paint brush, getting all the polycrylic out of the foam paint roller between each use would have been very wasteful and hard to do. So here’s a tip for you: wrap your painting tools in plastic wrap between uses. This keeps the brushes and foam rollers from drying out and getting hard. This worked like a charm for me.
The following is a video sharing the process of cleaning and varnishing my paintings:
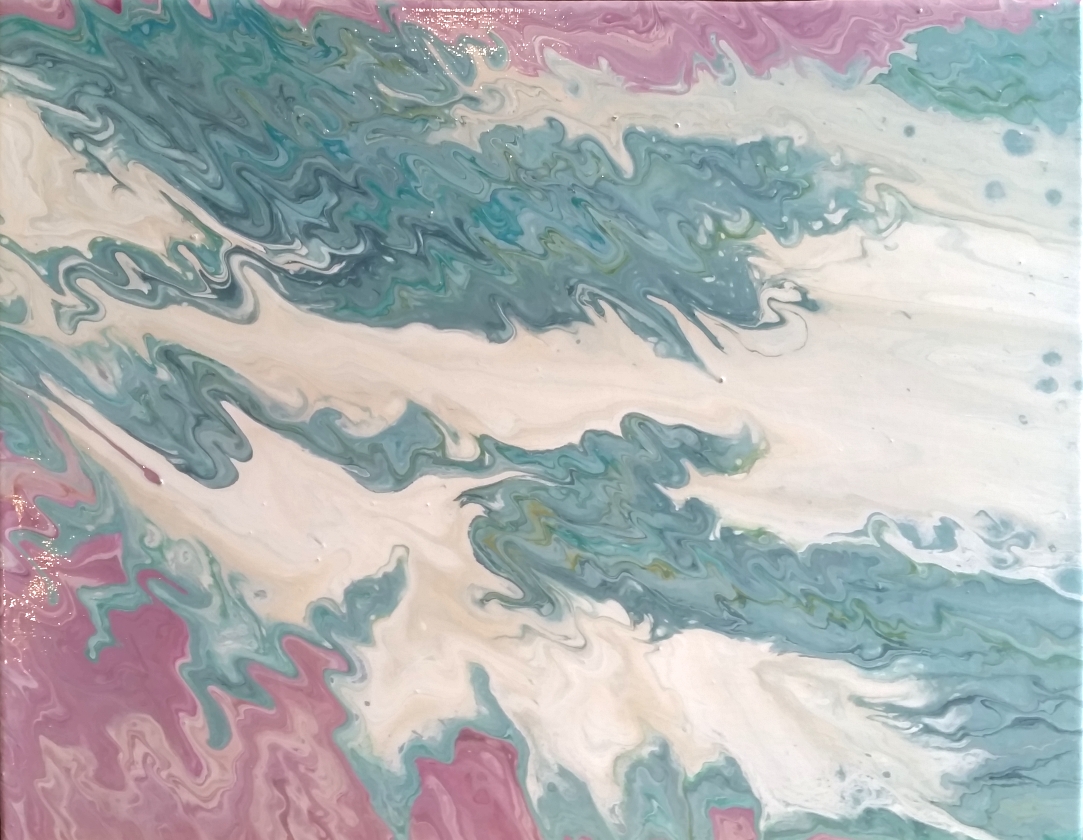
This white, jade and rose colored acrylic pour is being entered into the following challenges:
Word Art Wednesday Anything Goes Challenge
Creatalicious Anything Goes With Optional All that Glitters Challenge
Card Mania Anything But a Card Challenge
Lil Patch of Crafty Friends Anything Goes Challenge
Crafty Gals Corner Anything Goes Challenge
]]>