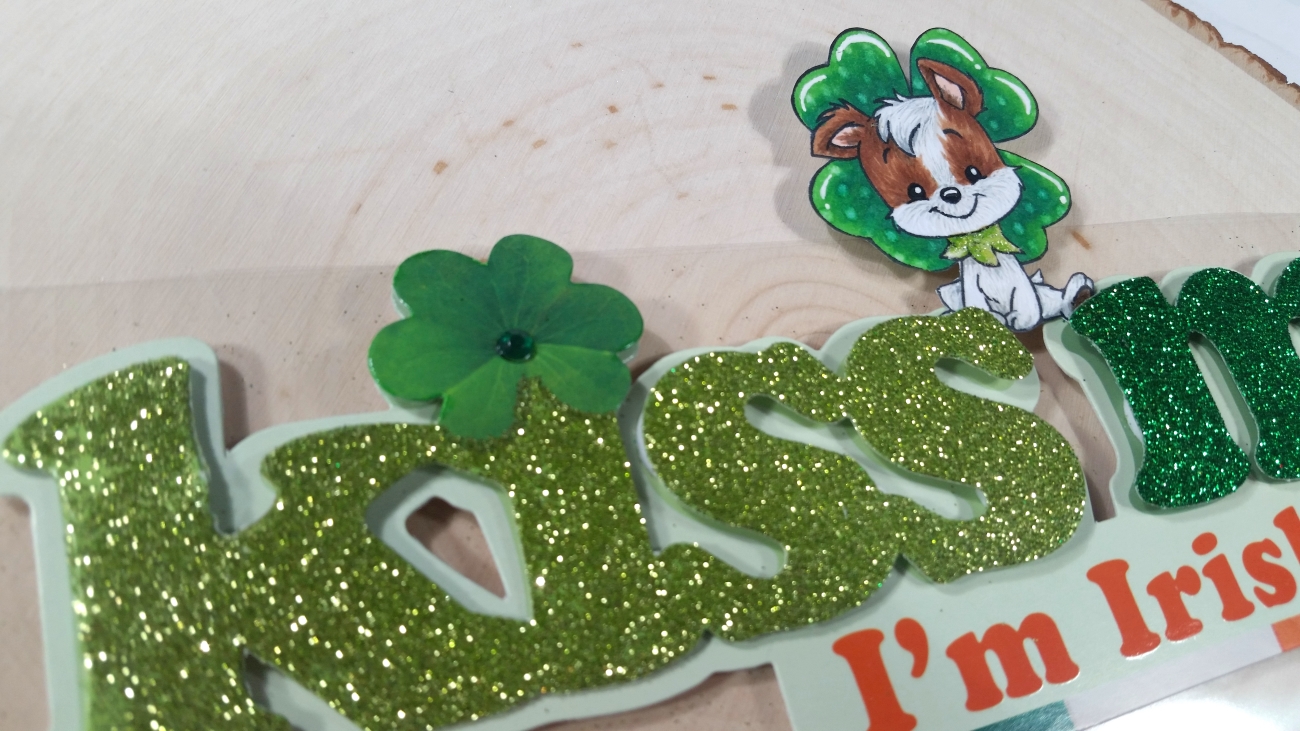
 I found a great glittery 3D title by Paper House Productions at Tuesday Morning for just $0.99 (regular price: $3.49) and I knew I could make it personalized by adding the 4 Leaf Puppy, colored up to look like my pup, Bandito. I used the following Copic colors:
Puppy: E23, E25, R30, W0, W1, 0.3 pt Copic Multiliner in Warm Gray, and White Sakura Gelly Roll Pen
Collar: YG03, YG25 with coating of Recollections Glitz Glitter Glue for sparkle
4 Leaf Clover: G14, G16, BG18, Uni-ball Signo White Gel Pen highlights, and bleached out polka dots with 0 Colorless Blender
I also sharpened the eyes and nose with a 0.03 Copic Multiliner Pen and added Uni-ball Signo White Gel Pen highlights. Then for a little shine, I added dots of Ranger Glossy Accents to the eyes and nose.
I think this title and the adorable Irish pup represents well the partying and fun my sister, niece and I had while traveling together. It’s cute, sitting back relaxing, and full of mischievous sparkly fun!
I have 2 more of these cuties to make, and I’ll be back at some point to share how they all look on the scrapbook layouts, but for now, I’m tickled at how cute this came out!
This Kiss Me I’m Irish Puppy Scrapbook Layout Title is being entered into the following challenges:
Stamping Sensations Anything Goes Challenge
Crafts Galore Encore Anything Goes Challenge
Card Mania Party Challenge
Word Art Wednesday Anything Goes Challenge
Creatalicious Anything Goes with Optional Stars Challenge
Lil Patch of Crafty Friends Anything Goes Challenge
Not Just Cards Anything Goes Challenge
Penny Black and More All Creatures Great and Small Challenge
613 Avenue Create Anything Goes with Optional Twist Shabby Chic
Through the Craft Room Door Anything Goes Challenge
]]>
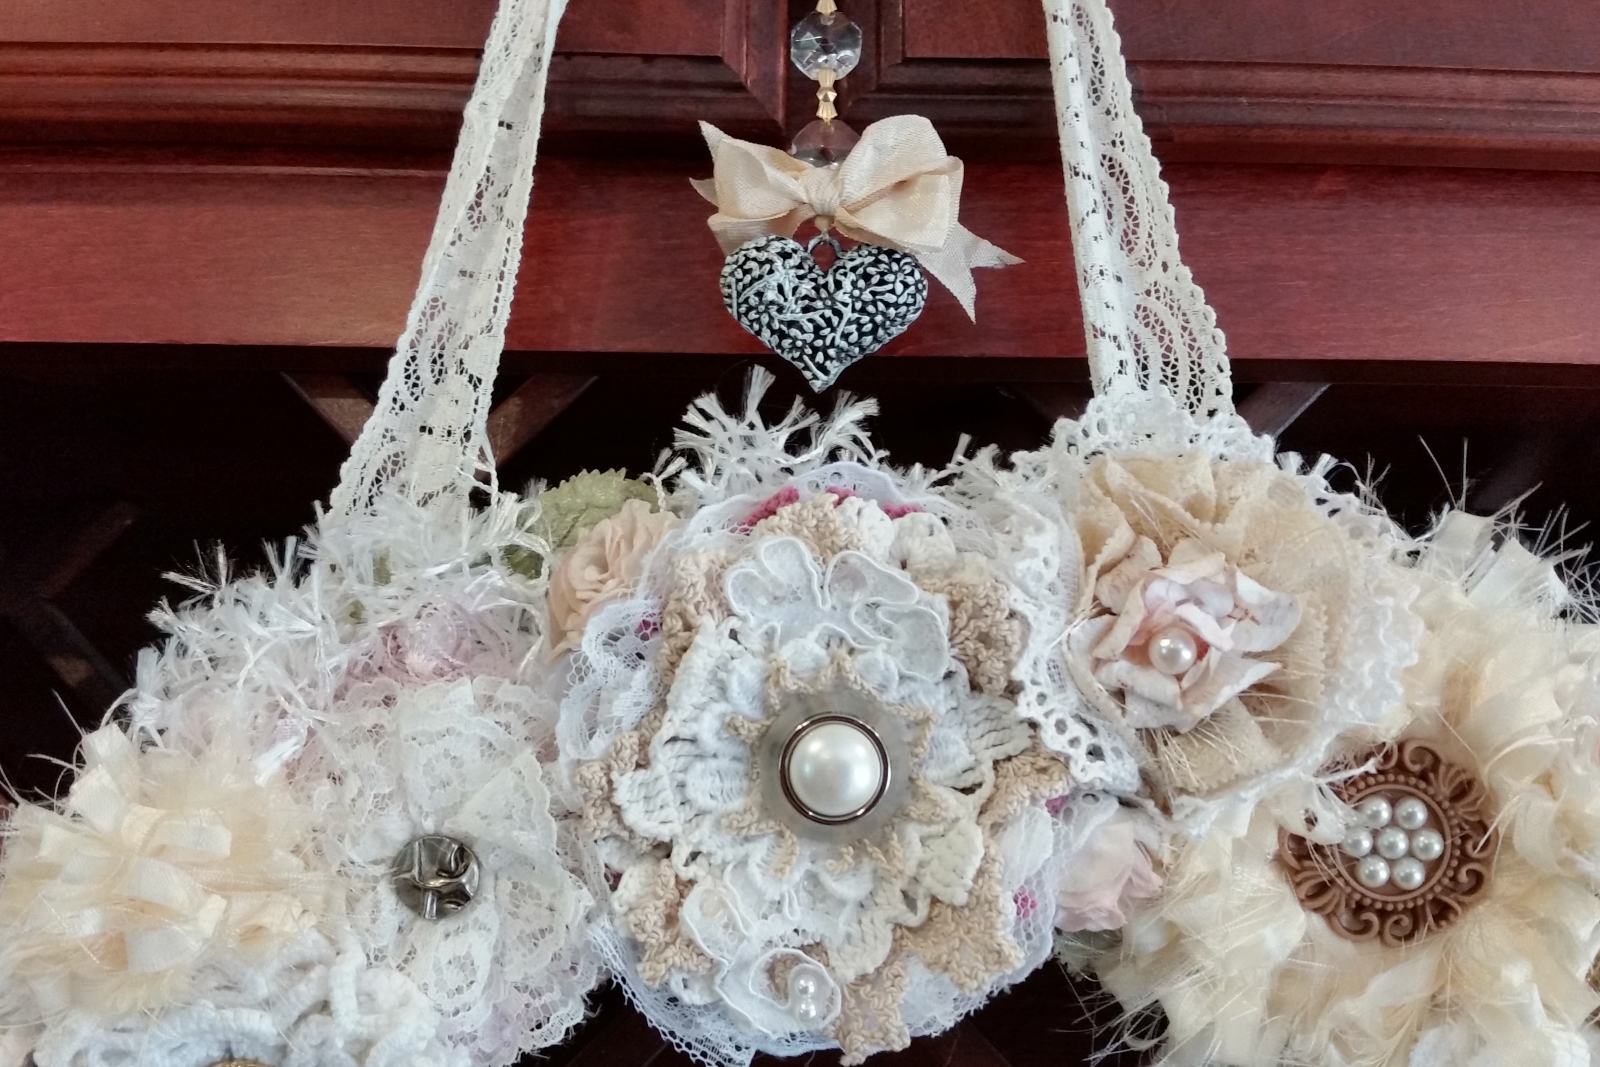
Top with Metal Heart Dangling from Chandelier Crystals
This project hits so many wonderful points for me. First, it is an upcycling project; I use a cardboard box for the base and old book pages to decoupage over it. Second, I got to use my Silhouette (a pricey crafty tool that I have not used nearly enough to justify it’s cost) to create the DIY Thicker-style letters with a free downloaded font called Black Castle. Third, I got to use loads of handmade fabric, lace and doily flowers that were gifted to me by so many crafty friends. All the love they put into these flowers is now incorporated into this special wreath name sign, and every time I look at it I will be reminded of their kindness how blessed I am to be part of this amazing crafty community.
Top Right
I first took the cardboard and used a make-shift compass with a string and a pencil to draw the wreath form. I then cut out the shape with heavy duty scissors. Tearing up old French book pages into small pieces, I decoupaged the wreath form, front and back using Mod Podge. I next used a couple pieces of furry trims that I hot glued around the front to soften the outside edge of the wreath.
Center Bottom
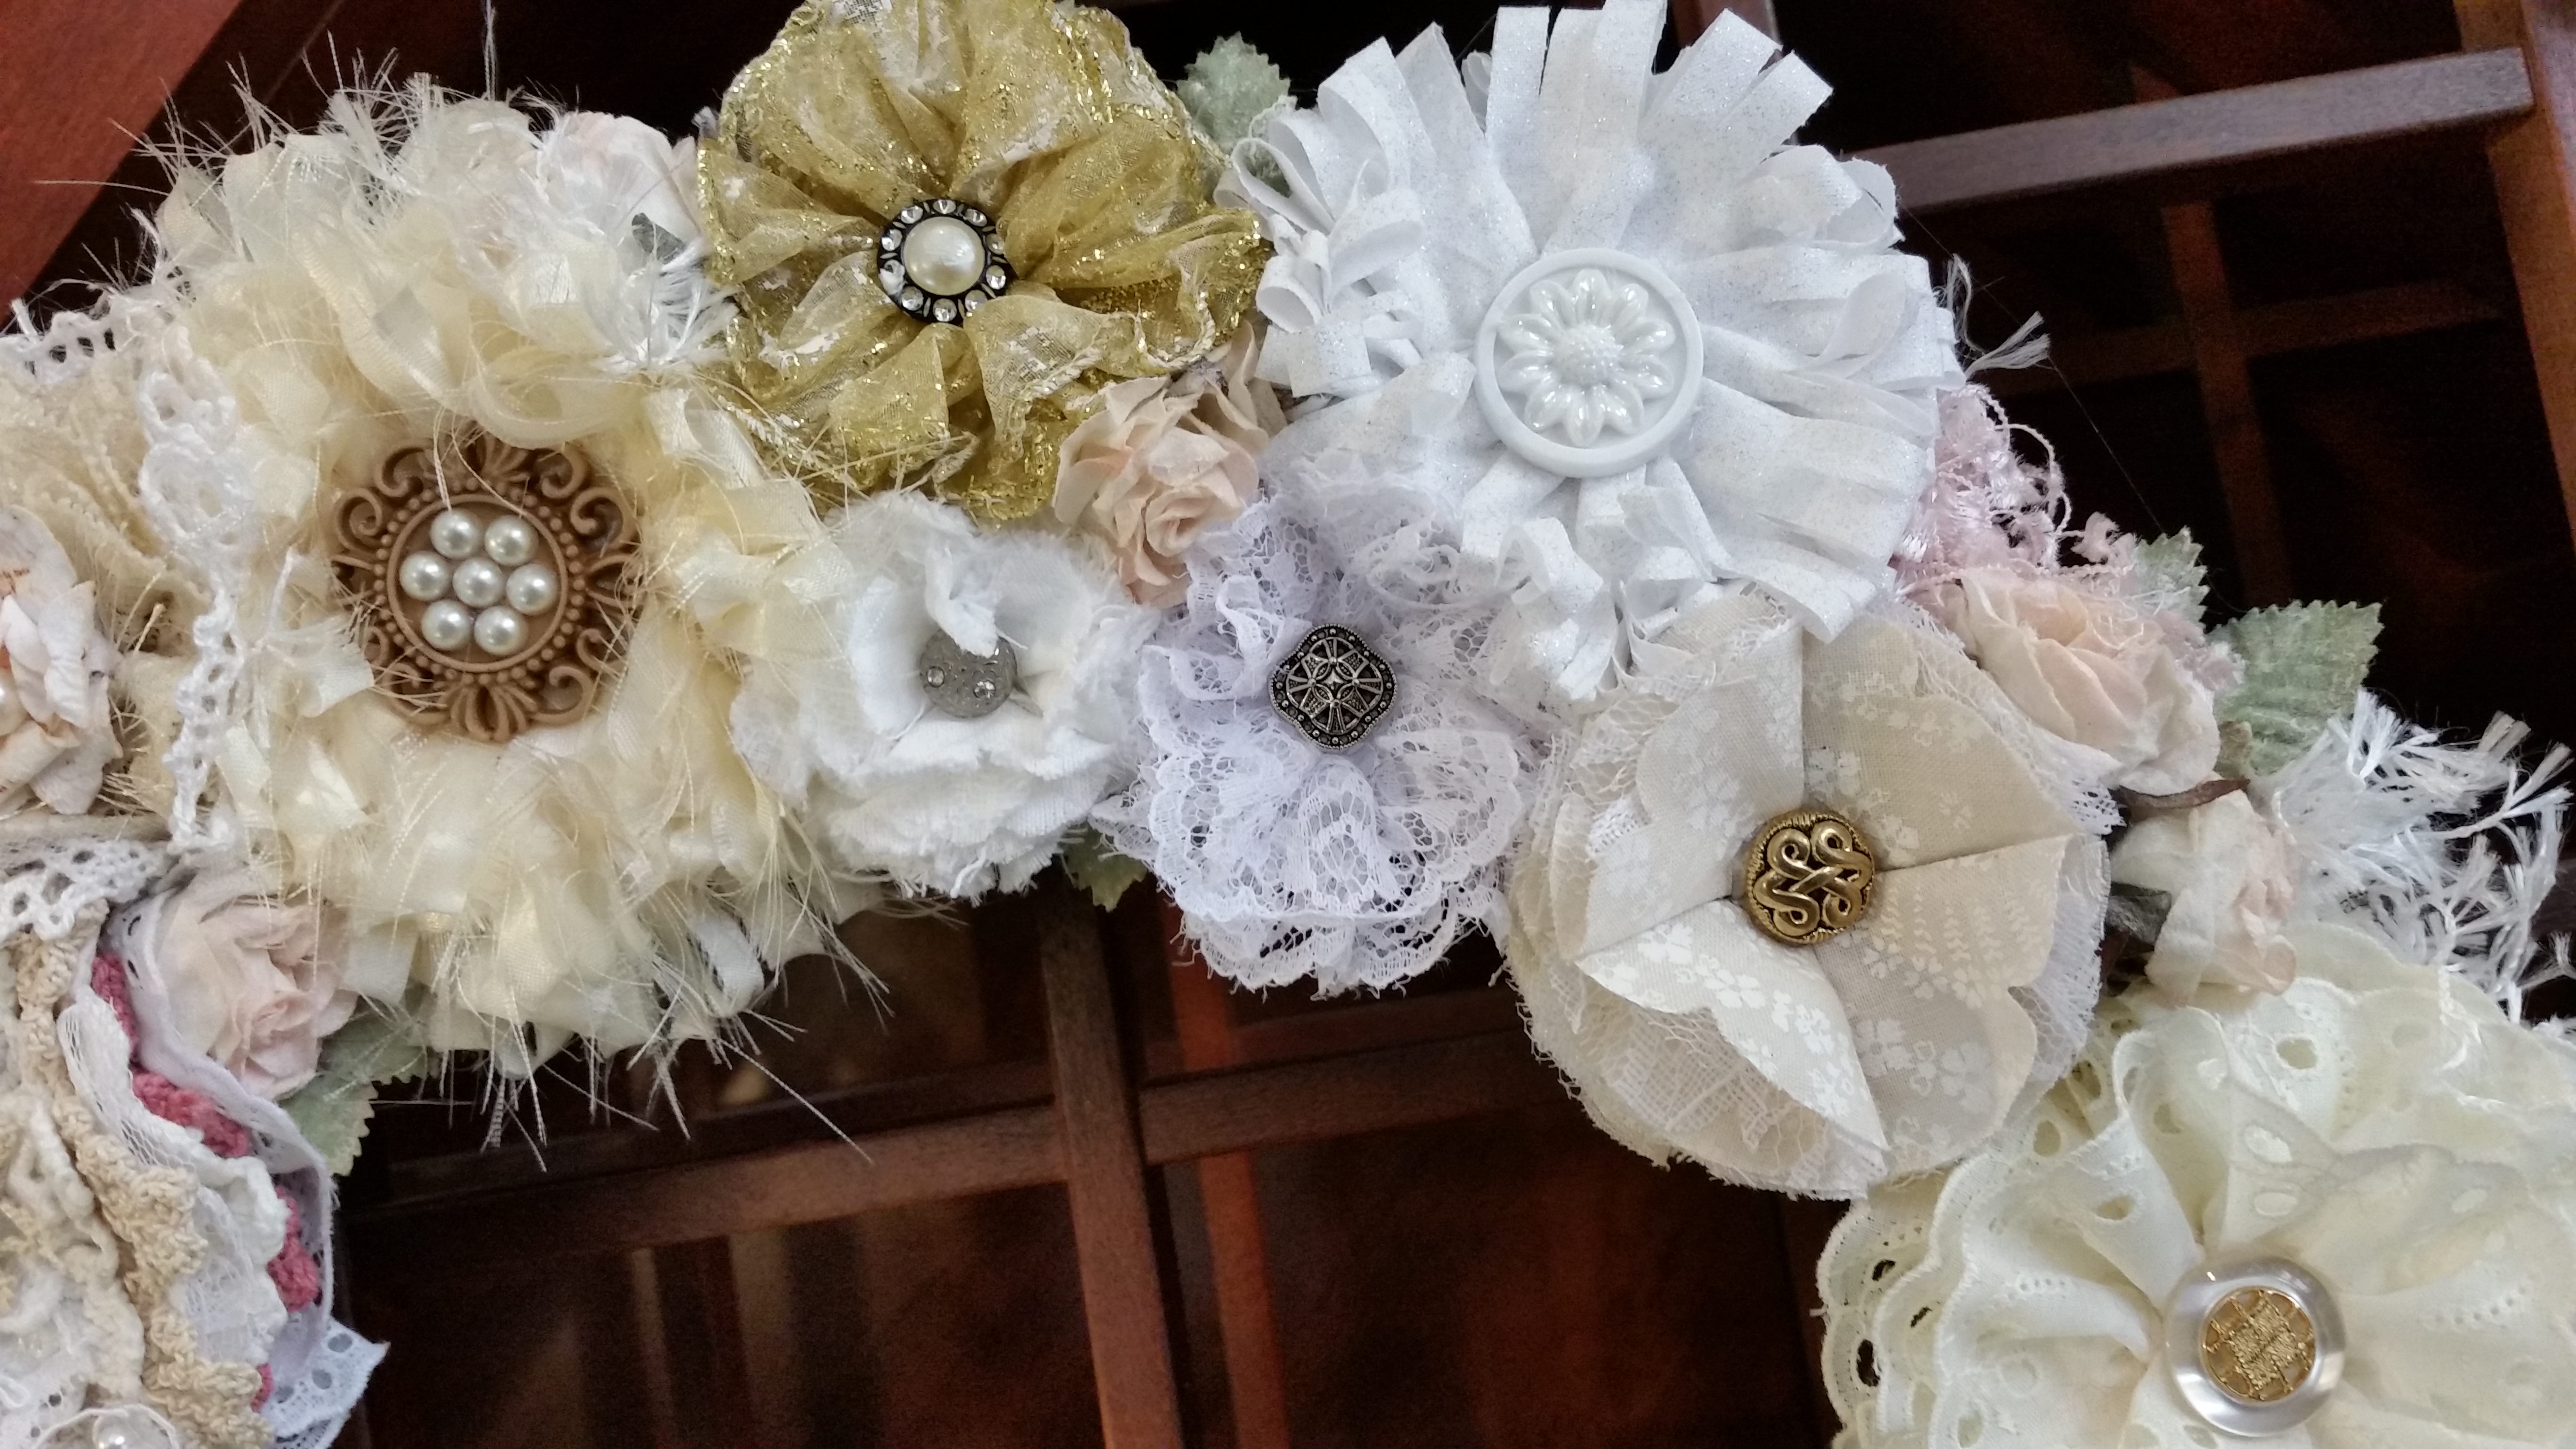
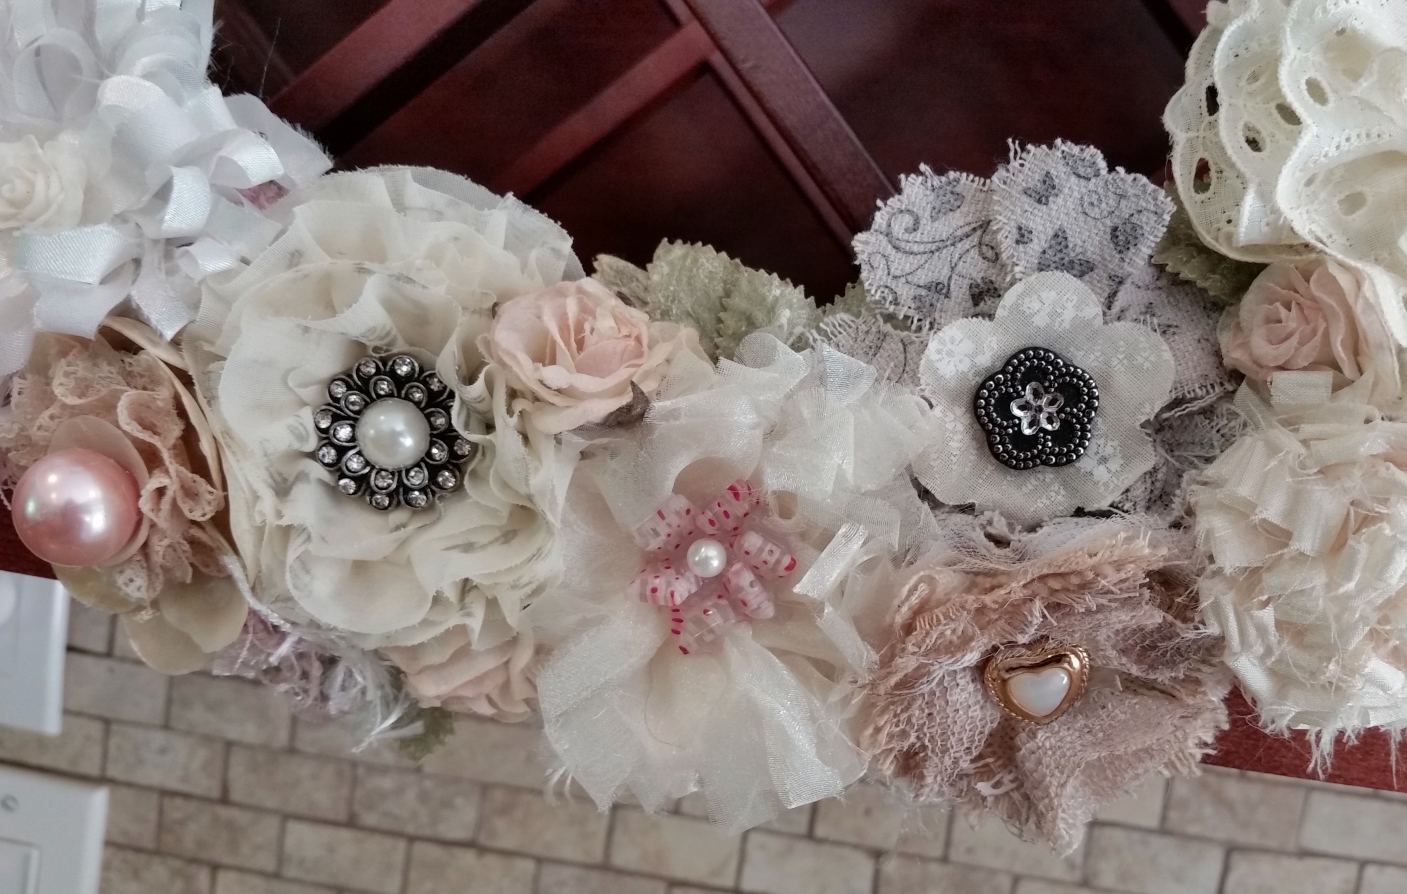
Now for the fun part. I pulled out all the handmade flowers I have received from friends in white, cream or pale tans with occasional hints of pale pink. Originally I had planned to use all the handmade flowers I had been gifted, but there were so many that I decided to divide them up between these neutrals and other brights, which I will save for another project. I futzed with these flowers for a long time, moving them around until I felt like they were well dispersed around the wreath in terms of different sizes, types (can you spot the seashell one?), colors, and textures. When I was finally satisfied with the dry fit, I started to hot glue each one into place. I was surprised to find that when I was all the way around the wreath I had some open spaces; I guess I glued the flowers in closer together than I had mapped out. 🙂 I filled in those gaps with dusty peach paper roses and leaves from my stash; these flowers are much larger those that would work well on most cards or layouts so this was a great way to use them up.
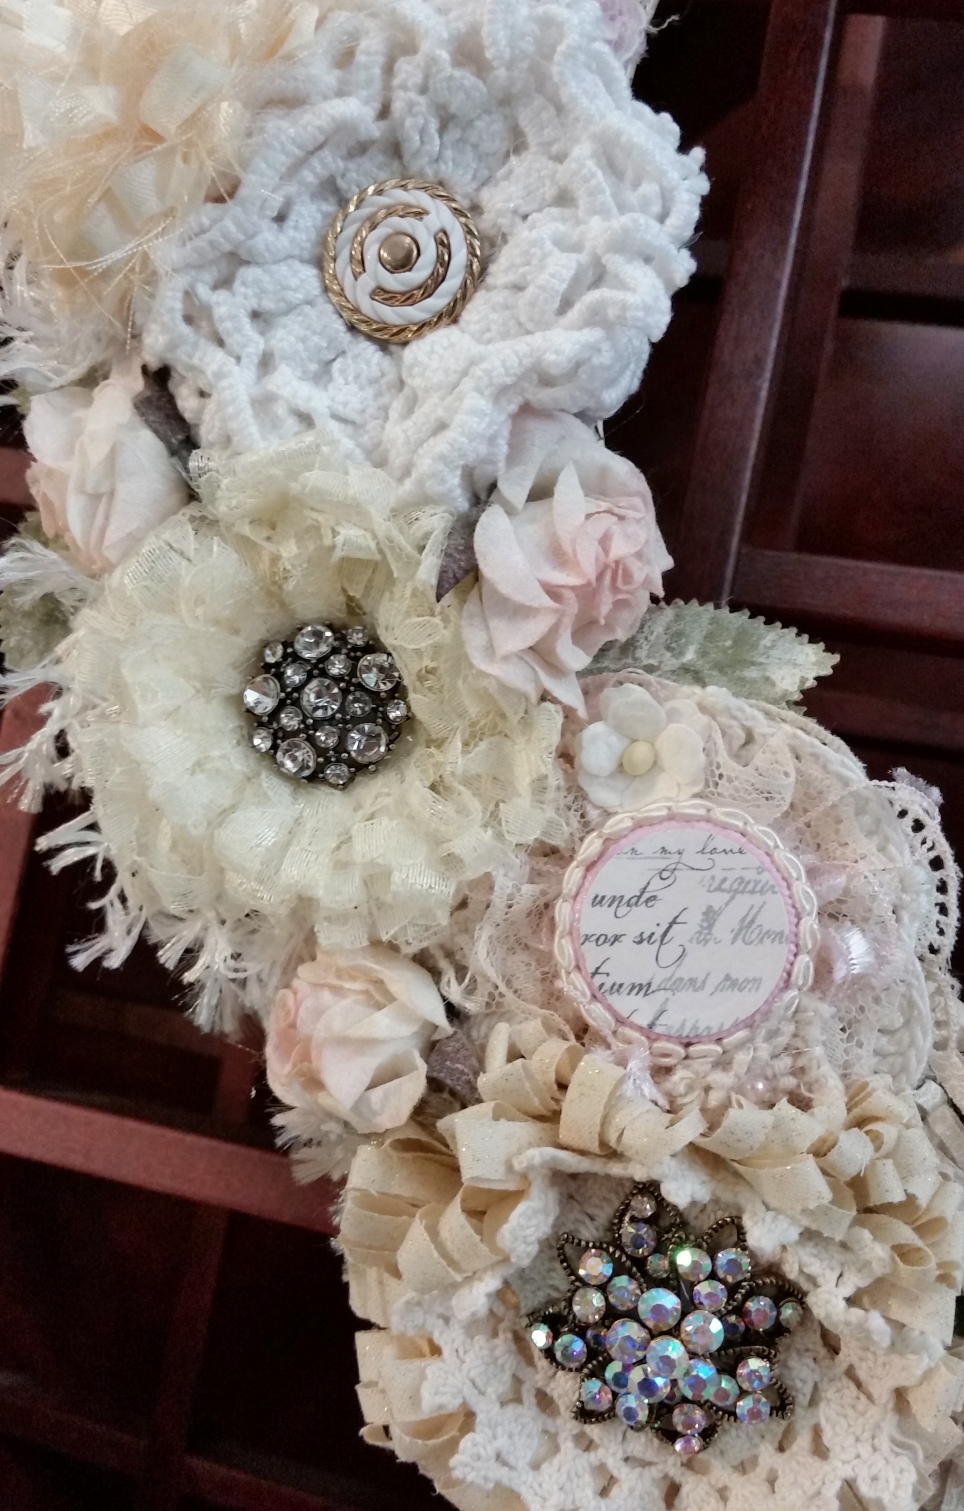
Blingy Left
For the hanger, I used some laces for the hanging strap as well as to tie a triple loop bow, a few doilies and appliques to layer up with a rhinestone bling center for a quick flower topper (this was the only flower I actually made for this project!), some crystal chandelier pieces, and a heavily detailed dimensional metal heart that I lightened with white gesso and topped with a small triple loop seam binding bow.
To create the tags to spell out my YouTube name, I used my Silhouette to cut out letters to spell out CraftyPaws four times so that I could layer up the letters to create Thicker-style pieces. I also used a a Fiskars dog paw print hand punch 8 times to make Thickers-style paw prints for the top two tags. I cut out the tag bases using the second smallest of the Diemond Dies Nesting Tag Die Set. The papers I used to create these alpha banners were from the DCWV Laces and Linen Stack. I inked the edges of the letters with Tim Holtz Distress Ink in Antique Photo and added a little more inking around the tags with Antique Photo and Spun Sugar (this pink helped coordinate the banners with the soft pink touches in some of the flowers and trim). To position the tags just where I wanted them, I glued them in place before I strung through the hand dyed seam binding, which I secured on the back with more hot glue and covered with more vintage book paper scraps. To weigh down the bottom banner a bit and add a little more decoration to the seam binding, I tied two small seam binding bows on either side of the tags that spelled out “Paws”. They were the perfect small finishing touches.
The following is a video share and process video creating this wreath name sign:
This wreath name sign is being entered into the following challenges:
SaCrafters LLC’s Name Sign Challenge (see video for the links to all the super generous Sponsors!)
The Pink Elephant Anything Goes Challenge
Simon Says Stamp Wednesday Anything Goes Challenge
Addicted to Stamps Anything Goes Challenge
Craft-Dee BowZ Anything Goes with a Handmade Bow Challenge
My readers can get 10% off their purchase at Diemond Dies and free worldwide shipping on orders of $35 or more by using the coupon code: thankskristina
Thanks for stopping by. I hope you are having a shabbilicious day! WOOF
]]>
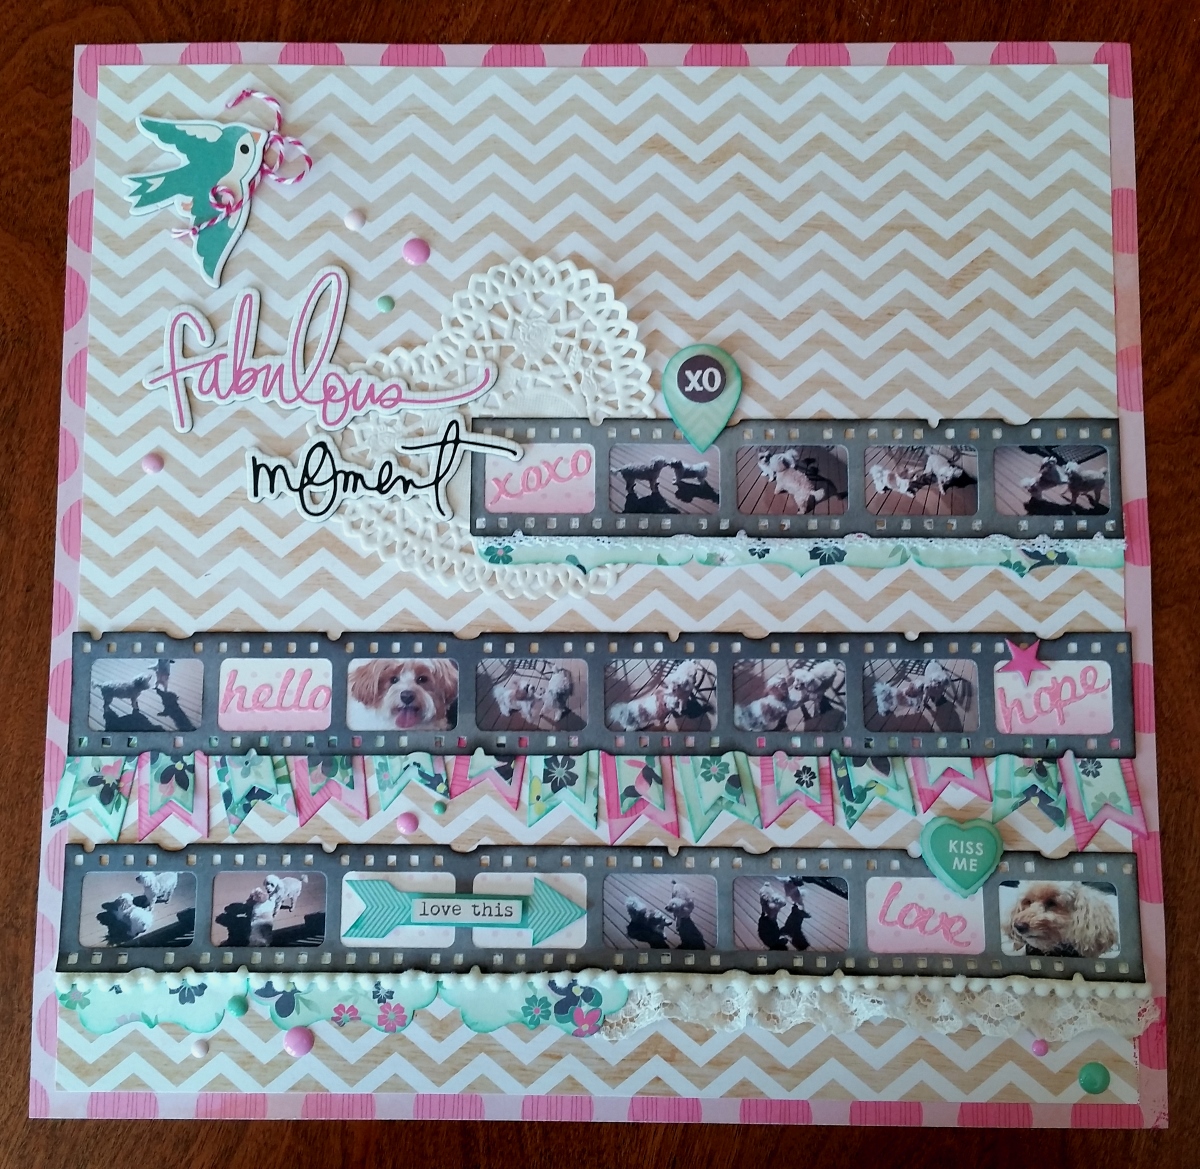 I was able to pull snapshots from that video, so I thought this would be a perfect time use the Tim Holtz Sizzix Sizzlits Decorative Filmstrip Die
 I was recently gifted. I have to admit that cutting down the pictures to fit perfectly into each frame was time consuming (I think it would be much easier to back it first and perhaps stamp inside each frame), but it was well worth it. To give a more finished look, I inked the edges of the grey water colored patterned paper with Ranger Tim Holtz Distress Ink Pad in Black Soot
.
In order to give some places along the film strips to rest ones eyes, I inserted a couple of close up facial shots of my fur babies along with some frames just filled with pearlescent ombre pink polka dot papers and pink die cut words from the Diemond Dies Word Die Set #1. To embellish the LO I used a heart shaped paper doily, script chipboard words by Heidi Swapp, some dimensional stickers from American Crafts, teal and pink enamel dots from My Mind’s Eye and My Style Stamps, and a chipboard bird from the Basic Grey Fresh Cuts collection.
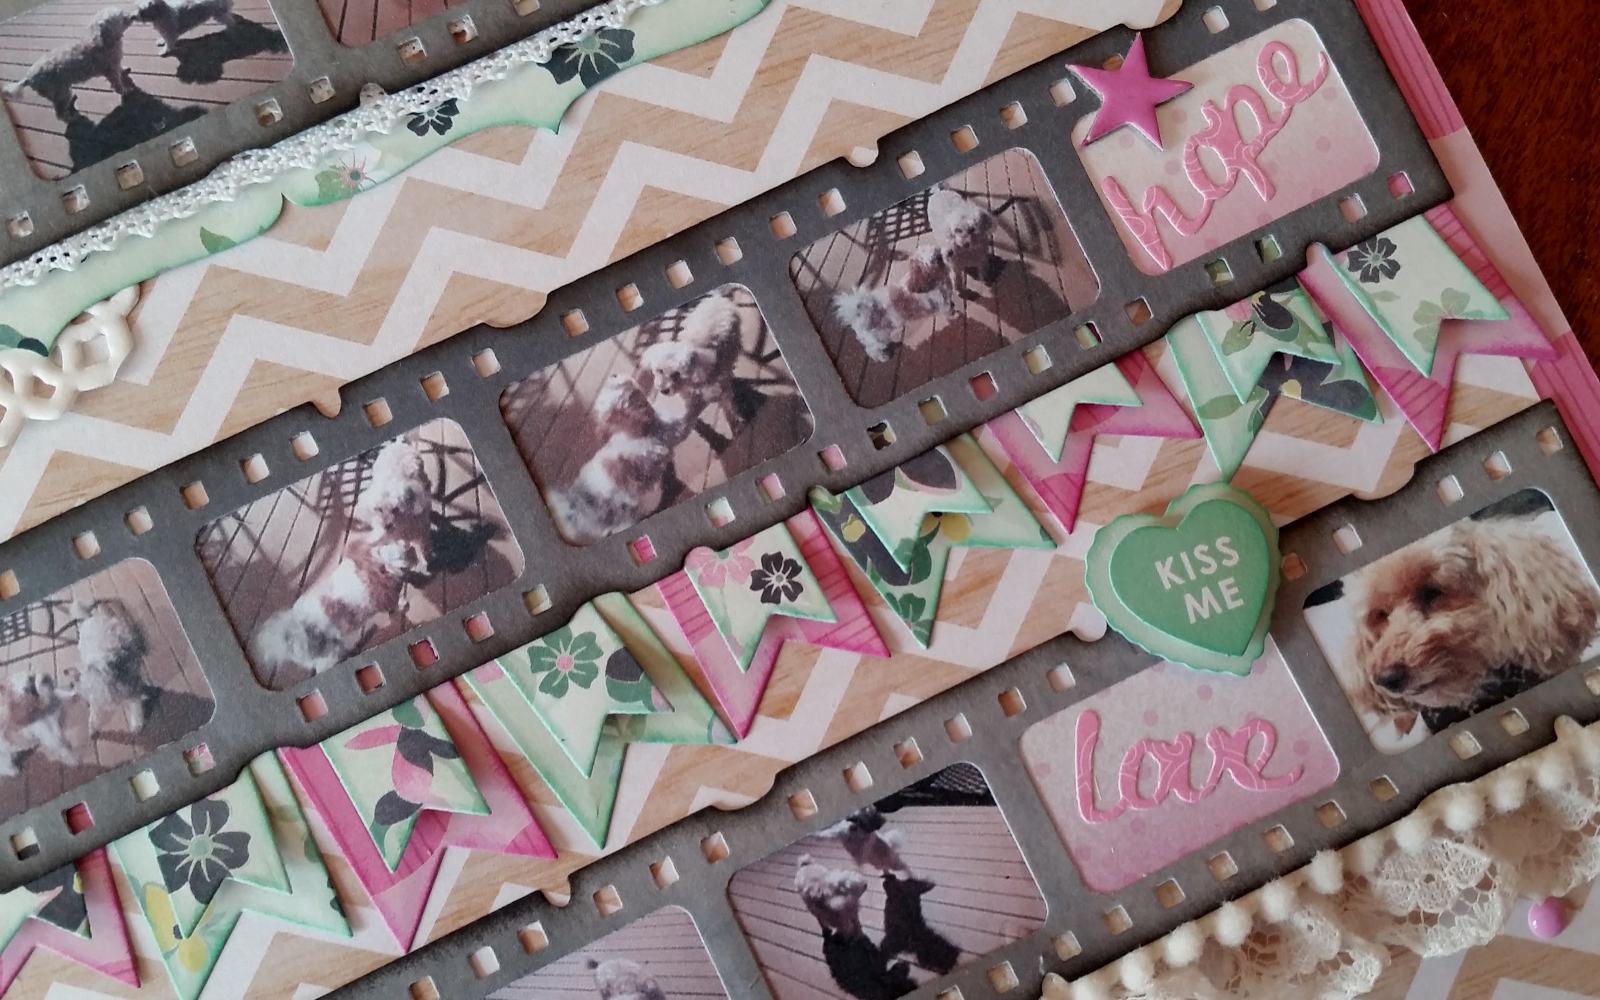 To add softness and texture, I also added bits and bobs of pom pom trim, ruched lace, and crocheted lace, hot gluing them into place under the bottom edge of the film strips here and there. I also added a bit of pink and white bakers twine in the mouth of the chipboard bird’s beak. This may have the appearance of a free and easy snippet, but I am embarrassed to say that I fiddled with this bit of twine for 20 minutes! LOL
To keep up continuity of color throughout the layout, I used papers from the Basic Grey Fresh Cuts collection to make tabs, hand fussy cutting the brackets from the selvage piece of a 12 x 12 piece of paper and punching out one side of my old EK Tools Large Flourish Square punch. Lastly I made some dimensional double layered pennants using the Diemond Dies Mini Pennants Die Set with both sides of a double sided paper of a green base floral and a bold pink polka dot from the same Basic Grey Fresh Cuts collection. I inked all the edges of the green floral paper with green American Crafts ink and the pink polka dot paper with Ranger Tim Holtz Distress Ink Pad in Picked Raspberry
so that they would pop from the background chevron wood grain paper from the Dear Lizzy Neoplitan collection. 🙂 Ok these pennants took a ridiculously long time with all the inking, adding foam adhesive, and wet glue, but the results added a fantastic visual movement and pops of color.
The following is a video share of this layout:
My readers can get 10% off and free worldwide shipping on any orders of $35 or more at Diemond Dies by using the coupon code: thankskristina at check out.
This layout is being entered into the following challenges:
The Friday Mashup 200th Challenge: Combining #29 That’s a Wrap (twine) and #37 Chip Off the Block (chipboard and ink distressing)
MarkerPOP Anything Goes Challenge
The Pink Elephant Green Challenge
Simon Says Stamp Monday Lions and Lambs Challenge (dogs)
Naughty or Nice It Ain’t Easy Being Green
Thanks for stopping by. Please subscribe if you wish, and have a great day! WOOF
]]>
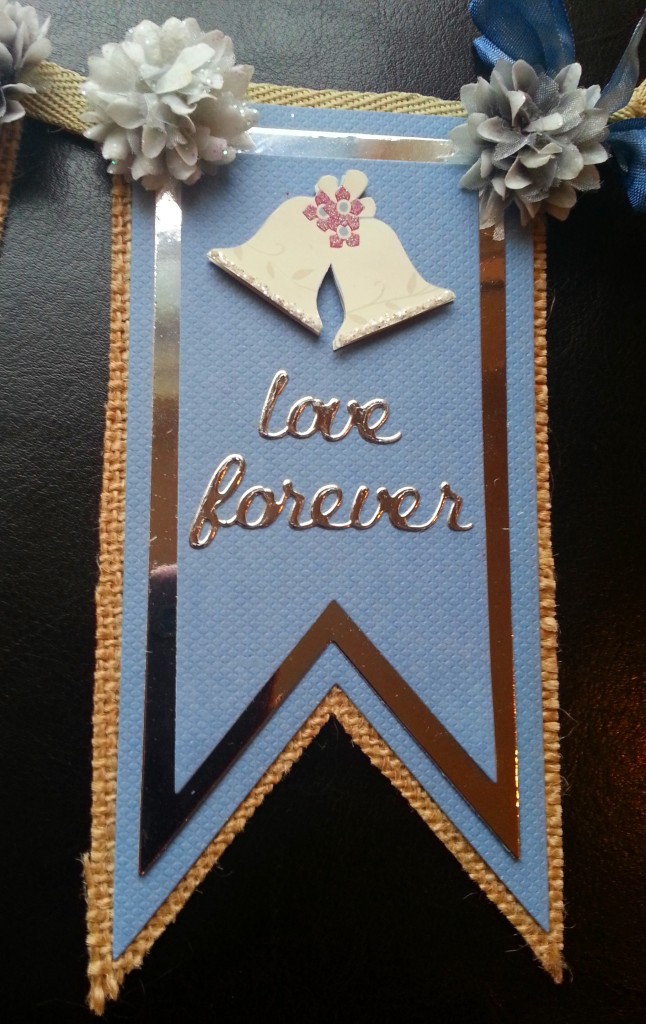
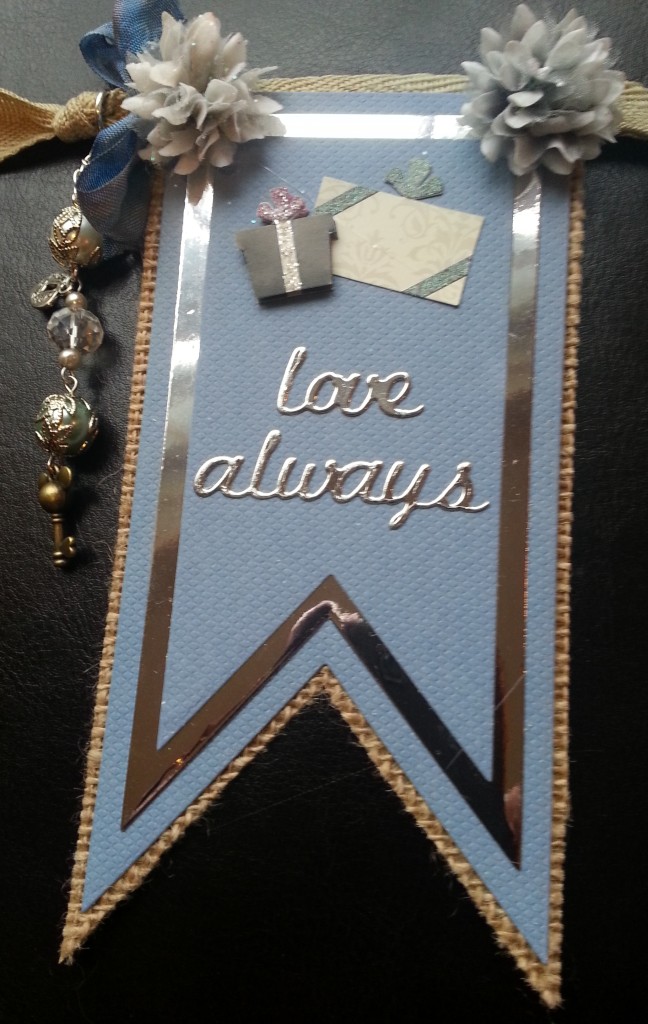 My crafty friend, Kendra (YT: Kendra Nolen) is getting married. Woot woot! She is currently hosting a wedding banner challenge and asked folks to make a pennant or a banner. She listed some of the likes of her fiance and herself as guideposts, so I took it from there. I used the steel blue, silver and burlap colors, my awesome Diemond Dies Fishtail Nesting Banner Set and the new Word Die Set #1 and just had fun!
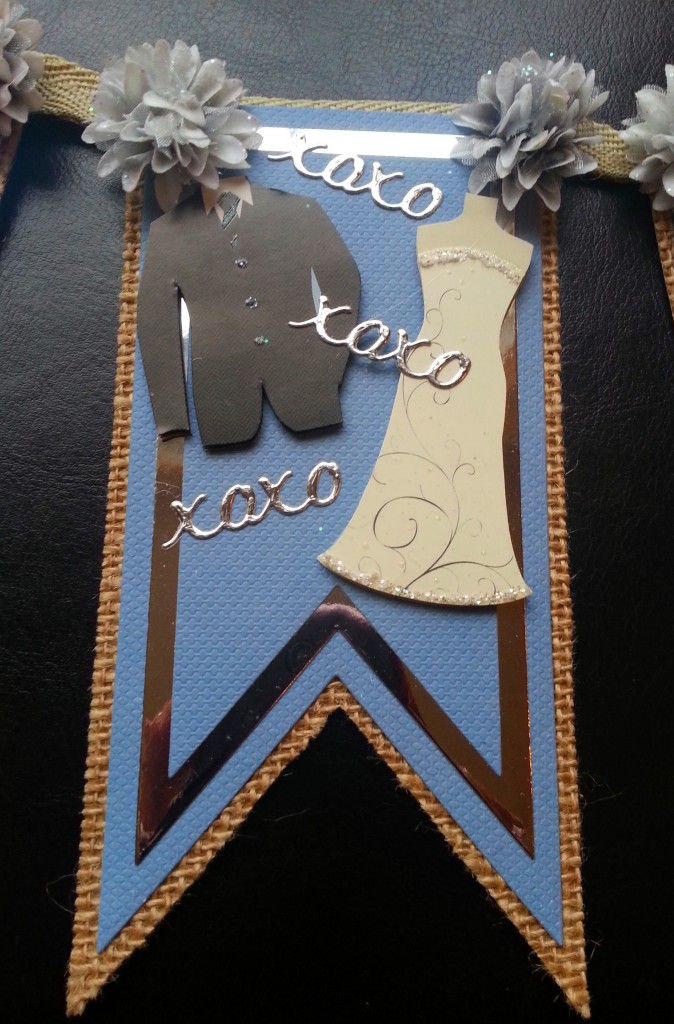 I cut the steel blue Bazzill card stock and silver foil card stock using the largest 3 fishtail banner dies. Then to make the banner a little more substantial, I backed it with some hand cut burlap paper by DCWV. I traced around the outside edge of the largest die to make it slightly larger and I was able to get 2 pennants from each 6″x6″ piece of paper.
I used little scraps of the 1 sheet of foiled silver paper I had to cut out three – “xoxo” die cuts, two – “love” die cuts, one – “forever,” and one – “always”. This word die set has 10 really useful words! There is a Diemond Dies SALE going on through November 2014 and everything (except the latest release) in the store is on sale at least 10% (some 20%). PLUS, if you use the code “thankskristina” you will get an additional 10% off and free worldwide shipping on orders of $35 or more. These words were perfect for this wedding banner.
 I then got out some wedding stickers that I had left over from scrapping my wedding (I made 4 albums for my parents, in-laws, GIL, and us) 6 years ago. I picked out some clean and simple images and fussy cut them out a couple of times so I could avoid the borders and layer them for some dimension and interest on the banners.
What I am most proud of is the upcycling I was able to do with some simple fabric ribbon that I salvaged from some the packaging around some sheets I had purchased at pottery barn a long time ago. This was the same color as the burlap and the rougher texture seemed to complement that nicely. I just used some hot glue to adhere the tops of each pennant to the ribbon folded over the top. This seemed very secure and I didn’t have to trouble with punching holes and using eyelets (bonus, since I had run out of eyelets)!
Lastly, I decided to add some extra trimmings by hot glueing on some steel grey and silver Prima flowers with glitter at the top corners of each pennant. To “finish” off the ends, I also used the last bit of my favorite blue hand dyed seam binding I had purchased from the very talented Candace Scarborough (she sells this gorgeousness at her Etsy store, OnlyOneLifeCreations, for great prices to raise money for mission work).
Well, I thought I was done and posted the following video, but I wanted to add a little somethin’ somethin’ more. 🙂 If you look at the top picture I added a dangle with some beautiful glass and metal framed beads, grey pearl beads, and special charms. Kendra and her fiance are Disney fans so I added two Mickey keys that I had in my stash as well as a little heart with a key hole in it that says “made with love.” I hope they like this banner and that their marriage is made with love and that that love endures always and forever. LOL I’m a sap!
This banner is also being entered into the following challenges:
Challenge Up Your Life Banner Challenge
The Pink Elephant Anything But A Card Challenge
Craft-Dee BowZ Anything with a Bow Challenge
Thanks for stopping by and have a great day! WOOF
]]>
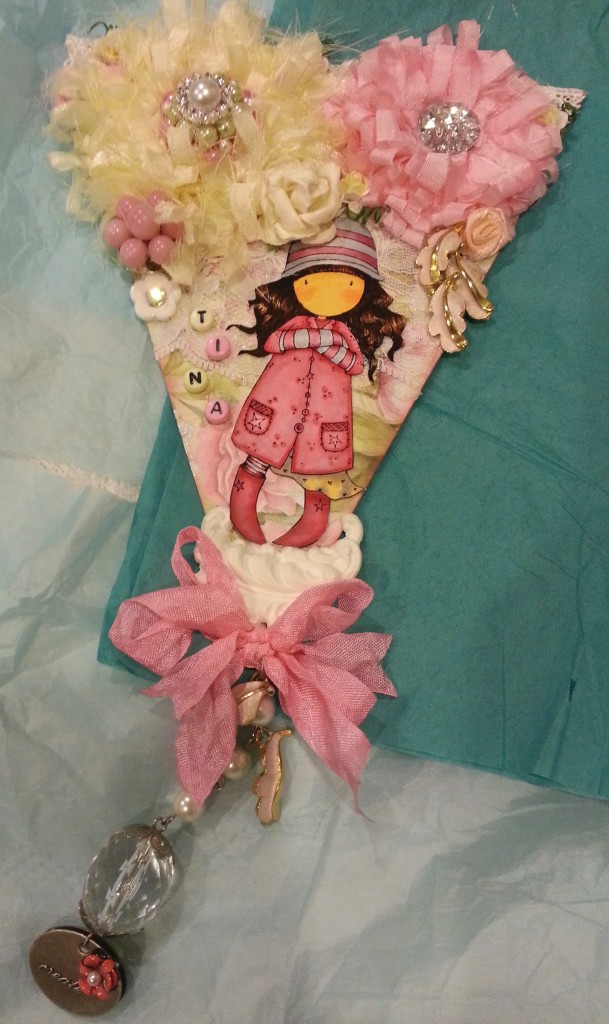 my craft room. However, when my friend Tina Cappa (YT: Tina Cappa) asked folks to make her a pennant to help her celebrate reaching 500+ subbies and so that she could be inspired and surrounded by crafty love in her new craft room, I couldn’t say no.
I started with some really pretty glitter floral paper that I picked up at Tuesday morning. Inked the edges with Tim Holtz Distress Ink in Victorian Velvet, and then started adding bits and bobs of all sorts of beautiful hand made and vintage yummies that had been gifted to me from so many wonderful crafty friends. Lace from Rose (YT: CutsieGirly), vintage jewelry pieces and bobbles from Stephanie (YT: 2muchhurt), gorgeous handmade flowers from Terrie (YT:oneCraftycookie), molded clay from Robin (YT:tngirl224), and flowers from Alice (YT: kintri) and Song (YT: Creations by Song) all add to one big pennant made with love. 🙂
I added an urban Gorjuss Girl stamped image that I colored with my Copic markers: Skin: E000, 00, 11 and R20; Rose colors in hat, arm warmers, socks, and coat: R81, 83, 85; Grey in hat, arm warmers and socks: N0 and 2; Hair: E33, 74 and 29; and Dress hem: E11 and N0 and N2. Eleven markers total. Not too shabby, eh? LOL
The following is a video share of the project:
This banner is being entered into the Simon Says Stamp Wednesday Anything Goes Challenge and
the Kraftin’ Kimmie Stamps Anything Goes Wonderful Wednesday Challenge
Thanks for watching and have a great day! WOOF
]]>
I crafted this pennant in a primative (“prim”) style in autumnal colors, and I really like how it has a lovely, soft vintage look. I used a beautiful hand made flower and hand dyed seam binding that I received from Laura as well as little vintage buttons and paper flowers I received from my friend Rhonda (YT: HeartmusicsoulRJ). The itty bitty bling stars swirling around the officer’s head are also from Rhonda and I thought they added a nice sparkle and a little cartoony humor. 🙂 The piece de resistance is the wooden word “laugh” which I received from my dear friend Marie (YT: Marie Howsie), and I thought the staining and shine from the glossy accent really gave it a rich look.
Prim is not a style that I craft in as often as cutsie, shabby chic or CAS (clean and simple), but it is one that I really love. I am definitely going to do more, as I love the warm and homey feel of it.
Thanks for stopping by and have a great day. WOOF!
]]>The top picture is of a circus themed birthday banner I made for a boy turning 3. I used brightly colored cardstock to hand cut banners (I’m sure this would have been faster to do with a die, if I had one–oh well), found some great free printable “circus-y” letters and circus animal pictures to fussy cut out, and glued on lots of sequins in a rainbow of colors, shapes and sizes. I think it came out super cute, and hopefully it will help add to the birthday party decor in a fun way. I am including the red and white paper straws (which were gifted to me from the lovely Anny (YT: StargrlAnny), from which the banners can be hung and then propped into tumblers filled with colored sand or something else bright and a little weighty. This way, the banner could be hung on a wall, but could even be right on the table with all the food or prezzies. 🙂
Teenagers (in this case a young lady turning 13) are a bit more tricky. They have definite opinions of what they like and don’t like, and hopefully (yes, it’s better if they tell you) they are vocal about it. The card in the video share below is for a young lady named Tati, and she likes purple, One Direction (the band), reading, and basketball. I figured, she would also like sparkle, feathers, and flowers (I mean, who doesn’t?). When someone tells you what they like, it makes creating something for them so much easier. I was able to include all her “likes” (except basketball — I just couldn’t ruin the color story on the card by “tossing in” an orange basketball — LOL). I like how this card looks “sassy” (to quote my friend, Jamilola (YT: Poetspice)), which I hope is just what a 13 year old would want.
Thanks for stopping by! Please subscribe if you wish, and have a great day! WOOF
]]>My first was bit of a let down. I made very flat but colorful fabric flowers, cutting them out by hand and layering them as best I could. Placed one in each corner and put a large poodle applique in the middle. Everything was, well, just ok.
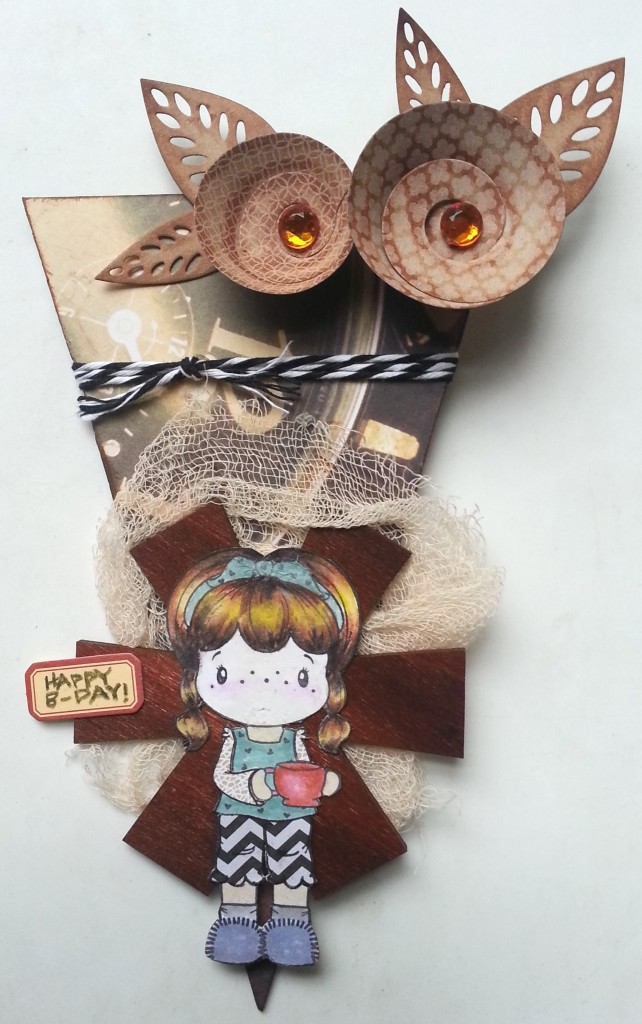 The second one I made I decided I would use a stamped image as my focal point and try layering more. I used tea dyed cheese cloth, a couple craft flowers, a large wood veneer asterisk, and some baker’s twine. I crafted a pretty respectable banner piece (yes, I am still not calling it a banner when it is just one piece of a banner). This time I was fairly happy with the result.
My latest one was super shabby chic. I have gotten the hang of making fabric and lace flowers and just kept adding more and more lace, flowers, and sprays until there was no more room on the triangle banner piece (Oh, by the way, banner pieces can take a variety of forms: rounded bottoms, fish tail banners, and triangles, just to name a few). I think this was the best one yet.
The following is a video of the last banner piece I made.
Please subscribe if you wish, and thanks for stopping by! WOOF
]]>